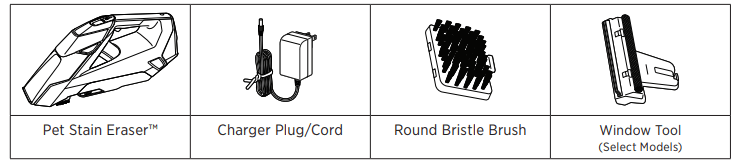
Standard accessories may vary by model. To identify what should be included with your purchase, please refer to the “Carton Contents” list located on the carton top flap.
Charging the Battery
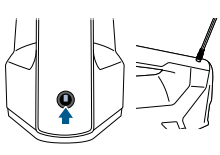
1. Before charging, make sure machine is OFF and the Battery Status Indicator Lights are not illuminated. Insert the charging adapter plug into the charging port on the handle near the base of the machine.
NOTE: There is a door covering the charging port that will automatically slide out of the way when the charging adapter is inserted.
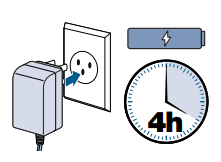
2. Plug the adapter into a wall outlet. For maximum run time, charge the machine 4 hours prior to use.
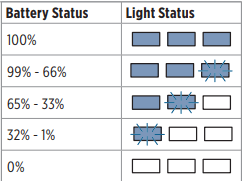
3. The battery status indicator lights will illuminate when charging.
Cleaning Formula
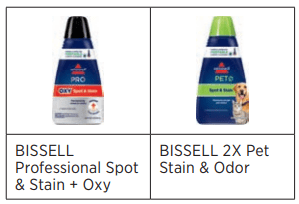
Keep plenty of genuine BISSELL® Spot & Stain Cleaner formula for portable spot cleaning machines on hand so you can clean whenever it fits your schedule.
Note: Always use genuine BISSELL cleaning formulas.
Formula
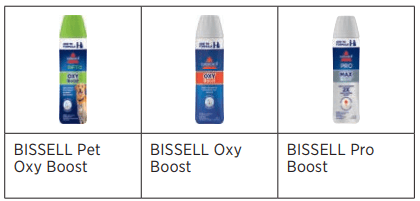
Boost
Filling the Formula Tank
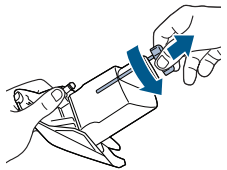
1. Pull the tank away at an angle to remove it from the machine.
2. Twist and remove the tank cap
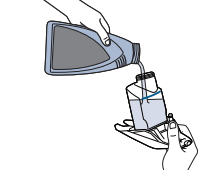
3. Add formula to the indicated fill line on the Formula Tank.
NOTE: No water is needed when using BISSELL Portable Deep Cleaning Formula.
4. If desired, add 1/2 ounce of BISSELL BOOST Formula to 2X Pet Stain & Odor formula.
5. Twist to replace the cap on the tank
6. Return the tank to the machine and make sure it is fully seated.
Spot Cleaning Carpet & Upholstery
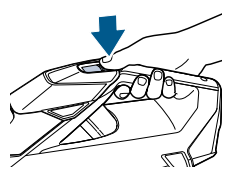
1. Push Power Switch to turn the machine ON. Battery status lights will illuminate to show how much battery remains.
2. Hold the machine above soiled surface and press the trigger to spray formula.
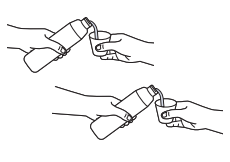
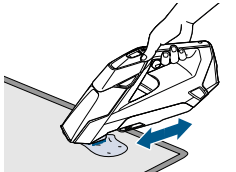
3. For stubborn spots, use brush to gently scrub soiled area while continuing to spray formula.
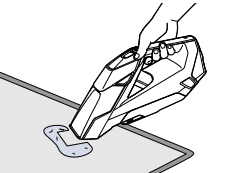
4. For maximum suction performance, tilt machine upward and press nozzle down firmly on cleaning surface.
IMPORTANT: Check the manufacturer’s tag before cleaning upholstery. “W” or “WS” on the tag means you can use your Pet Stain Eraser™. If tag is coded with an “S” (with diagonal strike-through), or says “Dry Clean Only,” do not proceed. If manufacturer’s tag is missing or not coded, check with your furniture dealer.
Window Cleaning (select models)
This machine is safe to use with any off-the-shelf ammonia-based window cleaning solutions. Do not attempt to use any other types of cleaning fluids, such as lemon-based, pine-based or solvent based cleaning fluids, as it may damage your machine and void your warranty.
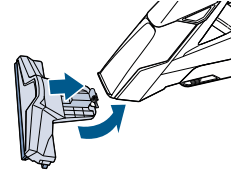
Attach Window Cleaning Tool
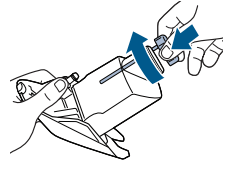
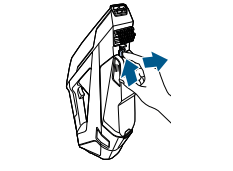
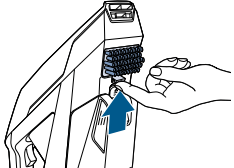
1. Remove scrubbing brush by pushing tab up and pulling gently.
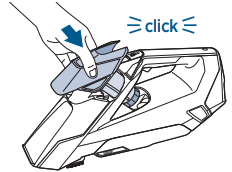
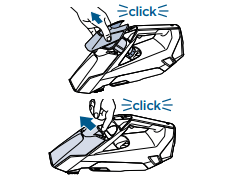
2. Attach Window Cleaning Tool by first securing on the clear nozzle. Then rotate tool until it clicks into place.
Choose Your Cleaning Method
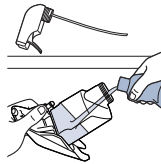
Method 1: Fill Formula Tank with Window Cleaner (not included)
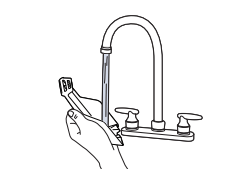
1. Rinse tank to remove any previous contents. Fill with window cleaner (not included).
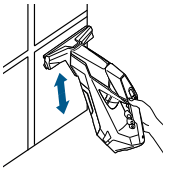
2. Hold machine vertically in front of window. Press Spray Trigger to spray cleaner. Release and use the sponge to gently scrub.
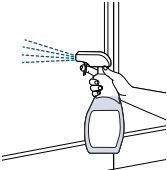
Method 2: Spray Window Cleaner onto Window
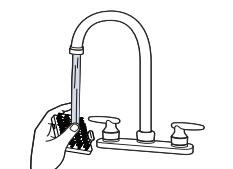
1. Spray window cleaning solution directly on the window.
2. With Spray Trigger released, use the sponge on the tool to gently scrub.
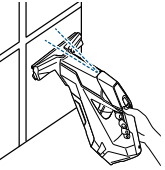
Squeegee the Window
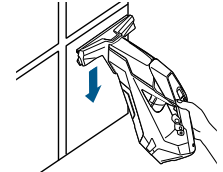
1. With trigger released, tilt machine down to engage the squeegee. Clean with complete vertical strokes and work across entire window.
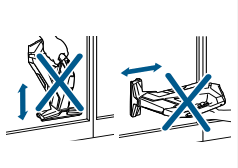
2. When cleaning, ensure squeegee is against window for optimal suction and hold machine in upright position.
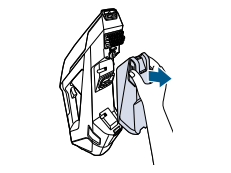
Emptying the Dirty Water Tank
1. Ensure the machine is OFF and set upright on a flat surface. Push up on the release button located on the top of the Dirty Water Tank.
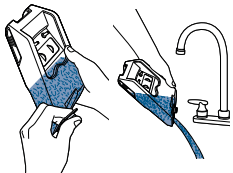
2. Carefully remove the tank from the machine and carry to a sink. To prevent spills, hold tank vertically after removing.
3. To empty, pull tab at the end of the tank and empty to remove the dirty water. Rinse out the tank with clean water after emptying.
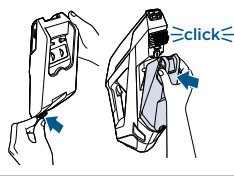
4. Close the tank plug and return tank to the machine. Ensure the tank is secure before use.
Cleaning the Nozzle and Brush
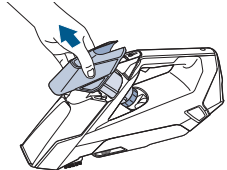
1. The front nozzle of the machine removes for easy cleaning of dirt and debris. Remove the Formula Tank and locate the latch at the top of the nozzle. Pull tab and rotate back to separate from machine.
2. Rinse nozzle with clean water and check spray nozzle for dirt or debris.
3. Replace the front nozzle by hooking lower edge onto machine and snapping into place. Then place the Formula Tank back on the machine.
Note: Ensure nozzle clicks into place and that it’s properly installed prior to replacing Formula Tank. If nozzle does not click, then the seal isn’t made and will significantly reduce suction.
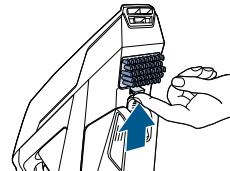
4. Ensure the machine is OFF and set upright on a countertop or flat surface. Remove the Scrubbing Brush by lifting the tab up and pulling gently to release.
5. Rinse brush with clean water and check brush for debris. Once cleaned, insert brush by aligning the top of the brush into the machine and snap into place. Ensure it is secure before using.
Storing Your Machine
Before storing your machine, ensure Dirty Water Tank is empty. Machine should not be left on its side with water in the Dirty Water Tank. Store your machine in a protected, dry area.
NOTICE To reduce the risk of a leaking condition, do not store where freezing may occur. Damage to internal components may result
WARNING To reduce the risk of fire, electric shock or injury, turn power OFF and disconnect from charger before performing maintenance or troubleshooting.
Disposing of the Batteries
Before proceeding, ensure that:
the machine is disconnected from the charger
the Formula Tank, Dirty Water Tank, nozzle and brush have been removed from machine (see removal instructions)
you have a flat-head and Phillips screwdriver, required for disassembly
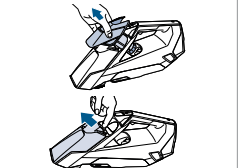
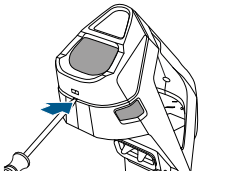
1. Remove the cover on the base of the machine by using a flat-head screw driver.
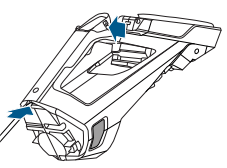
2. Remove the screw near the LED window using a Phillipshead screwdriver. Then, remove entire top handle portion from machine by using a flathead screwdriver.
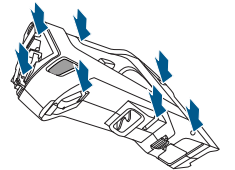
3. Using a Phillips-head screwdriver, remove seven screws in the locations referenced in the image.
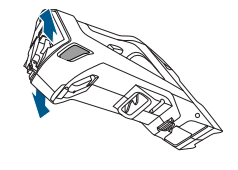
4. Remove product rating label. Pull open the housing on the base of the machine in opposite directions. Disconnect and remove the entire battery assembly. Keep battery assembly together – DO NOT separate individual batteries.
NOTE: Disconnecting the battery will destroy the appliance and invalidate the warranty
Troubleshooting
Remedies
Problem
Possible Cause
Remedies
Machine is leaking
Formula Tank is not properly seated.
Ensure tank is fully seated, see “Filling the Formula Tank” section.
Dirty Water Tank plug is not sealed properly.
Ensure tank plug is sealed properly, see “Spot Cleaning Carpet & Upholstery” section.
Dirty Water Tank is full
Empty tank. Machine should not be left on its side with water in the tank.
Machine is not level
Ensure machine is upright.
Formula Tank cap is not properly threaded. Ensure cap is properly threaded on tank. If issue does not resolve, contact Consumer Care. Machine is not powered or underpowered Charger pl
Ensure cap is properly threaded on tank. If issue does not resolve, contact Consumer Care.
Machine is not powered or underpowered
Charger plug/cord not connected.
Use only the charger that comes with the machine.
Not the correct charger
Use only the charger that comes with the machine.
Reduced spray or no spray
Formula Tank is empty.
Refill tank.
Pump not primed
While the machine is turned ON, press Spray Trigger and gently rock Pet Stain Eraser™ back and forth.
Batteries weak/undercharged.
Recharge according to instructions
Spray tip clogged
Rinse tip with clean water.
Formula Tank not fully inserted
Ensure tank is securely seated by removing and then replacing.