• Features or options may differ depending on the model.
• The items marked as optional may not be provided or may be provided in different locations.
• Since some storage space is reserved for system recovery and operations, the available storage space may be less than the actual capacity.
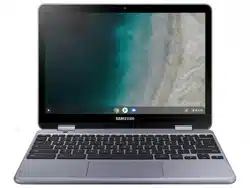
Front view
Number/Name
Description
1. Microphone
• You can use the built-in microphone.
2. Keyboard deck camera
• Using this camera, you can take still pictures and record video of the subjects located in front of the camera.
• Fold the LCD panel behind the keyboard first to use the camera. You can use this camera while holding the computer like a tablet or setting it down on a flat surface.
• Face this camera toward the subjects and check the preview on your LCD screen.
3. Front camera
• Using this camera, you can take still pictures and record video.
4. LCD/ Touch screen
• The screen’s images are displayed here.
• Recognizes touch interactions (only for touch screen models).
5. Keyboard
• Enter text or control computer functions.
6. Touchpad
• Moves the cursor and selects options.
• Functions as a mouse.
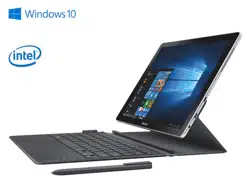
Right view
Number/Name
Description
1. PEN
• Remove the PEN from the slot and perform touch actions on the screen.
2. Volume button
• Adjusts the volume level.
3. Power button / Power LED
• Turns the computer on and off.
• Shows the operating status of the computer.
– Blinks red: Pre-charging
– Red: Charging
– Green: Fully charged
– Blue: Turned on
4. USB 3.0 port
• Connect various peripheral devices, such as a mouse, camera, or keyboard.
Data transfer speeds can vary among different USB devices and system configuration.
Left view
About the chargeable USB port
• It may take longer to charge the battery when charging a USB device.
• The battery power level may be reduced when charging a USB device while the computer is powered by the battery.
• The charging status of the USB device is not displayed on the computer.
• This feature may not be available on some USB devices.
• When the computer is turned off, the device connected to the USB port is not charged.
Number/Name
Description
1. Earpiece/Headset jack
• Connect an earpiece or a headset to the computer to listen to audio.
2. USB-C™port
• The USB-C™ port can be used to connect and charge a USB-C™ device, or connect to an external display device.
Purchase an adapter separately to connect to an external display.
3. Memory card slot
• Insert a memory card into the slot.
Bottom view
Number/Name
Description
1. Internal battery
• Provides power to the computer when not connected to an AC adapter.
• To remove or replace the internal battery, take it to a Samsung Service Center. You will be charged for this service.
2. Speaker
• Sound is emitted from the speakers.
If the bottom of the computer is replaced, the model name, serial number, and some logos will no longer be present. For more information, contact the Samsung Service Center to request assistance.
PEN
Number/Name
Description
1. PEN nib
• Use the PEN to write, draw, or perform touch actions on the screen.
2. Tweezers
• Remove the PEN nib with the tweezers when replacing the nib.
Detaching the PEN
Press the end of the PEN to disengage it. Then, pull the PEN from the slot. To store the PEN, push it back into the slot until you hear it click.
Replacing the PEN nib
If the nib is dull, replace it with a new one.
1. Firmly hold the nib with the tweezers and remove it.
2. Insert a new nib into the PEN.
Basics
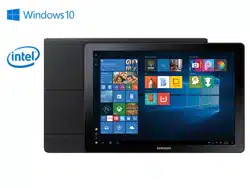
Using the computer as a tablet
You can use the computer as a tablet by folding the LCD panel behind the keyboard.
Open the LCD panel and rotate it away from the keyboard until it touches the bottom side of the computer.
When using the computer as the tablet, tap on the taskbar to view the currently running apps.
• When the LCD panel is tilted past the transition point The keyboard and touchpad will automatically be locked and will not function. The display will rotate automatically depending on the computer’s orientation.
• When the screen is turned off while using the computer as a tablet, press the Volume button to unlock the screen. When the computer is in power saving mode, press the Power button to unlock the screen.
When storing the computer in a bag or carrying it, close the LCD panel to protect the computer.
Using the touch screen
Use your fingers on the touch screen to perform actions.
Touch screen gestures
Tapping
To select menus, options, or applications, tap the touch screen.
Double-tapping
To open files or items, double-tap the touch screen.
Tapping and holding (right-clicking)
To use additional options of an item, tap and hold it on the touch screen.
Dragging
To move an item to another location, tap and hold it, and then drag it on the touch screen to the desired location.
Scrolling
To scroll up, down, left, or right, swipe on the touch screen.
Spreading and pinching
To zoom in, spread two fingers apart on an image or text. Pinch to zoom out.
Using the touchpad
Use the touchpad to move the cursor or select an item. The left and right buttons of the touchpad act the same as the left and right buttons of a mouse.
• Use the touchpad only with fingers. The touchpad will not recognize actions of other objects.
• Images and the touchpad layout may differ depending on the model.
Basic touchpad functions
Moving
To move the cursor, move a finger on the touchpad.
Clicking
Tap the touchpad.
Double-clicking
Double-tap the touchpad.
Right-clicking
To right-click, place two fingers on the touch area and tap once.
Dragging
To move an icon or an app tile to a desired location, press and hold it and then drag it to the target position.
Adjusting your Touchpad Settings
If your touchpad is too sensitive, you can adjust your settings by following these steps:
1. Click the list icon on the top-right corner of your browser.
2. Select Settings.
3. Go to Device → Touchpad → Touchpad speed, and change the settings as appropriate.
Memory card slot
Use a memory card to transfer data to other devices, such as digital cameras or MP3 players. Memory cards are sold separately. Purchase a memory card with the necessary capacity for the requirement.
This computer supports the following types of memory cards.
Some memory cards may not be fully compatible with the computer. Using an incompatible card may damage the computer or the memory card, or corrupt the data stored in it.
Use caution to insert the memory card in the indicated direction.
Store the card separately to prevent losing the card when moving the computer.
Memory card speeds vary
Inserting a memory card
If a dummy card or a memory card adapter is inserted in the memory card slot, remove it.
Insert a memory card into the memory card slot in the indicated direction until it clicks.
3. A new tab opens and the list of files on the card appears.
4. Click on a file to read the data for the file.
Removing a memory card
Push the card gently until it disengages from the memory card slot. Grasp the end of the card and pull it out of the slot.
• Available data formats depend on the current version of the Chrome operating system.
• Data on the card can be saved in the Downloads folder under → Files.
• The maximum file size will vary depending on Chrome OS.
Wireless LAN
Connect the computer to a wireless network to use the Internet.
The descriptions below are for computer models with a Wireless LAN card or device. A Wireless LAN device is optional. The pictures in this manual may differ from the actual product depending on the wireless LAN device model.
About Access Point (AP)
An Access Point (AP) is a network device that bridges wired and wireless LANs and corresponds to a wireless hub in a wired network. Multiple devices can be connected to an AP.
Connecting to a Wi-Fi network
1. Select the account icon on the taskbar.
2. Select No network or No network, and then tap the Wi-Fi switch to activate.
The Wi-Fi list will appear
3. Select a network from the list of detected Wi-Fi list.
4. If the connection is successfully established, the network icon is displayed.
• If the network is not properly connected, it is represented as .
• The icon’s fullness represents the signal strength of the wireless LAN.
Chrome OS
Using applications
• Images and features may differ depending on the model and the application version.
• Some applications may not be supported depending on the model.
• Third-party software related services
For descriptions about and service requests for third-party applications, please contact the relevant manufacturer. Some troubleshooting actions in response to service requests may not work depending on the application manufacturer.
All about Chrome OS
Your Chromebook runs the Chrome operating system that’s built and optimized for the web. Using your Chromebook is as easy as surfing the web.
• Quick access to the web.
Chromebooks boot quickly after start-up and resume instantly from power saving mode. Your favorite websites load quickly and run smoothly, with full support for the latest web standards and Adobe Flash. The best part: Chromebooks not only stay fast, but are designed to get faster over time as updates are released.
• Same experience everywhere.
All your apps, documents, and settings are synced to your account and stored in the cloud. To customize the data that gets synced, select the account icon →→ Sync under People.
• Always connected.
Now, you can stay online at home, outdoors, or on your morning commute because your Chromebook makes it easy to get online anywhere, anytime, via Wi-Fi and, if included, mobile broadband service.
• Built-in security.
Your Chromebook is much safer than a regular computer. Each webpage and application you visit runs in a restricted environment. So if you visit an infected page, it can’t affect the other tabs, apps, or anything else on your computer.
• Less updating. More surfing.
When you turn your Chromebook on, it updates itself. Automatically. All of your apps stay up-to-date, and you get the latest and greatest version of the operating system without having to think about it. Starting now, say goodbye to annoying update prompts.
Get on the web
Logging in with your Google account
You can use your Chromebook when it is connected to the internet. To login, you need a Google account.
If you don’t have a Google account, create an account.
The setup process may be different depending on the OS version being used.
1. Activating the computer.
1-1. Select a network. Detected networks are automatically listed in the Select a network menu.
1-2. Connect to a network.
1-3. Enter your Google ID and password, then click NEXT
If you do not have a Google Account, you can login as a “Guest” by clicking Browse as Guest. Note that there are some restrictions in place while using Chrome OS as “Guest”.
2. Get started with your Chromebook.
When your Chromebook starts for the first time, updates may be performed for up to 5 minutes during the activation step.
Desktop
When you have completed the login, the Desktop appears. Select the icons on the taskbar to launch various apps and use Stylus tools. You can also check your notifications and personalize your computer even more by configuring various settings.
Launcher
You can search for and launch various apps on the Launcher.
On the Desktop, select to run the Launcher. Select to display icons for all your apps, including newly installed apps.
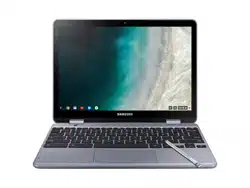
Stylus tools
Use the Stylus tools to use additional touchscreen functions.
On the taskbar, select .
To change Stylus tools, select and select one of the following: will be changed to a different icon depending on the tool you select.
• Capture region () : Select and capture an area of the screen. You can view the captured image and use it with other apps, such as Google Keep or Google Docs.
• Capture screen () : Capture the current screen. You can view the full screen captured image and use it with other apps, such as Google Keep or Google Docs.
• Create note () : Open Google Keep and create a memo. You can share the memo with other people and set the date and time to remind you of the contents in the memo. For more information on Google Keep, select → Help.
• Laser pointer () : Use the PEN as a laser pointer for the screen.
• Magnifying glass () : Expand an area of the screen to zoom in on items.
The browsing interface
Once you’re signed in, you’re instantly on the web. Here’s a quick overview of the interface you’ll see:
Discover web apps
Want to edit a photo, listen to music, or play games in your browsers? The Chrome Web Store offers a wide range of apps, games, extensions, and themes that you can use to customize your browser.
• Extensions are custom features and functionality that you can add to the browser.
• Themes change the skin of the browser, to give it a bit more style and flair.
• Apps can offer powerful functionality that you’d expect from desktop programs.
• Games lets you enjoy various games.
Items you installed are automatically synced to your account, so you always have access to your apps and extensions.
To open the Chrome Web Store, launch the Chrome browser, click the new tab button, and then click Chrome Web Store on the frequently used websites list.
• To use the Web Store, you must have the latest version of the Chrome browser installed.
• Some items purchased from the Chrome Web Store may not work depending on your computer specifications.
• The Chrome Web Store items may or may not be freeof-charge. Confirm that an item is free-of-charge or not before you select or purchase it.
• You have to install an app or extension that is supported by the Chrome OS to use it. Before downloading it, check if it is supported by the operating system.
Using Play Store
You can purchase and install various Android apps with your Chromebook just as you would with other Android devices. Download useful apps from Play Store to use your Chromebook more effectively.
Installing apps
1. Select → Play Store.
If you cannot find Play Store on the Launcher, select the account icon →→ TURN ON under Google Play Store.
2. Browse apps by category or search for apps by keyword.
3. Select an app to view information about it.
4. Select INSTALL to download free apps. To purchase and download apps where charges apply, select the price and follow the instructions.
• Some apps may not be compatible with your Chromebook.
• If you want to use apps that you have previously purchased through the Play Store, download them again. Your Chromebook does not automatically download your apps from the Play Store.
5. The downloaded apps will be installed on the Launcher. If you cannot find the apps, select on the Launcher.
FAQ
How can I print on a Chromebook?
Chromebook supports the Google Cloud Print service for printing.
If the printer supports cloud printing, you can print without connecting the Chromebook and the printer. Also, you don’t need to install the printer driver on the Chromebook.
If you are using the standard printer, add the printer on the Chromebook Settings screen.
Select the account icon → → Advanced → Printers → ADD PRINTER, enter the printer’s information, and then follow the onscreen instructions to proceed with printer set up.
Settings & Upgrade
LCD brightness
Adjust the LCD brightness to reduce eye strain and save power.
• Adjust the LCD brightness by pressing the key to decrease brightness or the key to increase brightness.
• Whenever you press the key, the LCD brightness increases by one level.
LCD bad pixels principle of computer
Samsung observes the specifications regarding strict quality and reliability of LCD. But in spite of that, it is inevitable that there might be a small number of bad pixels. A large number of bad pixels can cause problems in appearance, but a small number of pixels doesn’t affect the computer performance.
Therefore Samsung observes and manages the following dot principles:
• Bright dot: 2 or less
• Black dot: 4 or less
• Combination of Bright and Dark: 4 or less
Instructions for Cleaning the LCD
Clean the LCD panel with a soft cloth lightly moistened with computer cleansing detergent moving in one direction.
Cleaning the LCD panel with excessive force can damage the LCD.
Volume
Adjust the system volume or sound volume when playing music or video.
Controlling volume using the keyboard
Press the Volume button on the right side of the computer to adjust the volume.
Controlling volume using the taskbar
1. Select the account icon on the taskbar.
2. Drag the adjustment bar to the desired volume.
Battery
Fully charge the battery using the AC adapter before using the computer for the first time.
Use only Samsung-approved AC adapters, batteries, and cables. If you use unapproved adapters, the battery cannot be charged or it may explode or damage the computer.
Incorrectly connecting the charger may cause serious damage to the computer.
This computer is equipped with an internal battery. The battery is not user-serviceable or user-replaceable.
To safely remove or replace the battery, take the device to a Samsung Service Center. You will be charged for this service.
You can use the computer while it is charging, but the battery charging time may increase. If the battery temperature rises too much, the charging may stop as a safety measure.
To restore the battery power after cutting it, connect the AC adapter.
Charging the battery
Fully charge the battery using the AC adapter before using the computer for the first time, or when the computer is completely discharged.
1. Connect the AC adapter to the USB-C™ port of the computer. You can use the USB-C™ ports on either side of the computer.
2. Plug the power cable into an electric socket.
If the battery is fully discharged, the computer will not turn on immediately with the AC adapter. A minimum level of battery power will be charged slowly for safety while the Power LED blinks red. You can turn on the computer after the Power LED stops blinking.
3. When the battery is fully charged, the power LED turns green. Disconnect the AC adapter from the computer.
4. Unplug it from the electric socket.
Battery status
Select the account icon on the taskbar to view the current battery charge.
Battery usage time
Batteries are replaceable items and over time the battery’s capacity to hold a charge and its power level is reduced. If a battery can only hold its charge for half of the time that it could when new, it is recommended to purchase a new, replacement battery.


 on the taskbar to view the currently running apps.
 When storing the computer in a bag or carrying it, close the LCD panel to protect the computer.


 on the top-right corner of your browser.


 → Files.
 No network or
  No network, and then tap the Wi-Fi switch to activate.
 displayed.
 → Sync under People.
 to run the Launcher. Select
  to display icons for all your apps, including newly installed apps.
 .
.
 ) : Select and capture an area of the screen. You can view the captured image and use it with other apps, such as Google Keep or Google Docs.
  ) : Capture the current screen. You can view the full screen captured image and use it with other apps, such as Google Keep or Google Docs.
  ) : Open Google Keep and create a memo. You can share the memo with other people and set the date and time to remind you of the contents in the memo. For more information on Google Keep, select
  → Help.
  ) : Use the PEN as a laser pointer for the screen.
  ) : Expand an area of the screen to zoom in on items.

 on the Launcher.
 → Advanced → Printers → ADD PRINTER, enter the printer’s information, and then follow the onscreen instructions to proceed with printer set up.
 key to decrease brightness or the
  key to increase brightness.