User Manual for Samsung XE521QAB-K02US
Table of Contents
- Getting started
- About this manual
- Layout
- Turning the computer on and off
- Basics
- Using the computer as a tablet
- Using the touch screen
- Using the keyboard
- Using the touchpad
- Memory card slot
- Wireless LAN
- Chrome OS
- Using applications
- All about Chrome OS
- Get on the web
- Discover web apps
- Using Play Store
- FAQ
- Recovery (optional)
- Settings & Upgrade
- LCD brightness
- Volume
- Battery
- Appendix
- Product specifications
- Ergonomic tips
- Safety precautions
- Important safety information
- Replacement parts and accessories
- Regulatory compliance statements
- WEEE symbol information
- Samsung package TakeBack program
Getting started
Turning the computer on and off
Fully charge the battery using the AC adapter before using the computer for the first time.
Turning the computer on
1 Before turning on the computer, check that the battery is charged and charge it if necessary.
2 Open the LCD panel.
3 The computer turns on automatically when the LCD panel is opened. If the computer does not turn on automatically, press the Power button.
Turning the computer off
Using screen buttons
1 Select the account icon on the taskbar.
2 Select Power button ( ).
• Save all data before turning off the computer.
• If the screen is locked in power saving mode Press any key to unlock the screen.
Using the Power button
Press and hold the Power button for about 8 seconds to shut down the Chromebook.
Press and hold the Power button for about 2 seconds to enter power saving mode.
In this lock state, press and hold the Power button for about 2 seconds to shut down the Chromebook.
To shut down the Chromebook when the system has frozen unexpectedly, press and hold the Power button for at least 8 seconds.
Basics
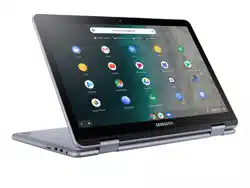
Using the computer as a tablet
You can use the computer as a tablet by folding the LCD panel behind the keyboard. Open the LCD panel and rotate it away from the keyboard until it touches the bottom side of the computer. When using the computer as the tablet, tap on the taskbar to view the currently running apps.
• When the LCD panel is tilted past the transition point The keyboard and touchpad will automatically be locked and will not function. The display will rotate automatically depending on the computer’s orientation.
• When the screen is turned off while using the computer as a tablet, press the Volume button to unlock the screen. When the computer is in power saving mode, press the Power button to unlock the screen.
When storing the computer in a bag or carrying it, close the LCD panel to protect the computer.
Using the touch screen
Use your fingers on the touch screen to perform actions.
Touch screen gestures
Tapping
To select menus, options, or applications, tap the touch screen.
Double-tapping
To open files or items, double-tap the touch screen.
Tapping and holding (right-clicking)
To use additional options of an item, tap and hold it on the touch screen.
Dragging
To move an item to another location, tap and hold it, and then drag it on the touch screen to the desired location.
Scrolling
To scroll up, down, left, or right, swipe on the touch screen. or
Spreading and pinching
To zoom in, spread two fingers apart on an image or text. Pinch to zoom out.
WARNING
• Do not subject the touch screen to severe impacts or press it with sharp objects. Doing so may damage the touch screen.
• Do not allow the touch screen to come into contact with other electrical devices. Electrostatic discharges can cause the touch screen to malfunction.
• Do not expose the touch screen to water. The touch screen may malfunction in humid conditions or when exposed to water.
• Do not spray liquid cleansing solutions directly onto the touch screen. The solution may enter the touch screen or cause undesired operation. To clean the screen, dampen a cloth with solution and gently wipe the screen. Do not use solutions or cloths that contain abrasive materials, as they may damage the touch screen.
• Do not damage the edges of the touch screen. Doing so may damage the touch screen
• Leaving the touch screen idle for extended periods may result in afterimages (screen burn-in) or ghosting. Turn off the touch screen when you are not using the computer.
• Make sure your hands are clean and dry before using the touch screen. Remove any moisture from your hands before using the touch screen.
• Do not expose the computer to foreign substances. Doing so may cause the touch screen to malfunction.
NOTE
• Very light touches on the touch screen may not be recognized.
• Precisely tap items on the touch screen for the best results.
• The touch screen sensors are located on the edges of the touch screen. Therefore, do not cover the edges of the touch screen with protective covers or accessories.
• Touch screen gestures are available for touch screen models running Windows and work only with some applications.
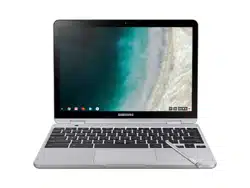
Using the keyboard
Shortcut key functions and procedures are discussed in the following sections.
• The keyboard image may differ from the actual keyboard.
• The keyboard may differ depending on your country. The following mainly describes the shortcut keys.
Shift key
Hold the Shift key down to enter upper case letters.
Hot key function
Press the following keys at the same time.
You can check the hot keys in Chrome OS.
Search key
Where you’d find the Caps Lock key on a traditional keyboard, we’ve put the Search key.
Press the Search key to run the Launcher.
If you really need Caps Lock, go to the Settings page to make the Search key behave like a Caps Lock key.
System Reset
If computer is frozen and unresponsive, press the following keys at the same time.
Using the touchpad
Use the touchpad to move the cursor or select an item. The left and right buttons of the touchpad act the same as the left and right buttons of a mouse.
• Use the touchpad only with fingers. The touchpad will not recognize actions of other objects.
• Images and the touchpad layout may differ depending on the model.
Basic touchpad functions
- Moving To move the cursor, move a finger on the touchpad.
- Clicking Tap the touchpad.
- Double-clicking Double-tap the touchpad.
- Right-clicking To right-click, place two fingers on the touch area and tap once.
- Dragging To move an icon or an app tile to a desired location, press and hold it and then drag it to the target position.
Adjusting your Touchpad Settings
If your touchpad is too sensitive, you can adjust your settings by following these steps:
1 Click the list icon on the top-right corner of your browser.
2 Select Settings.
3 Go to Device → Touchpad → Touchpad speed, and change the settings as appropriate.
Memory card slot
Use a memory card to transfer data to other devices, such as digital cameras or MP3 players. Memory cards are sold separately. Purchase a memory card with the necessary capacity for the requirement. This computer supports the following types of memory cards.
WARNING
• Some memory cards may not be fully compatible with the computer. Using an incompatible card may damage the computer or the memory card, or corrupt the data stored in it.
• Use caution to insert the memory card in the indicated direction.
• Store the card separately to prevent losing the card when moving the computer.
• Memory card speeds vary.
Inserting a memory card
1 If a dummy card or a memory card adapter is inserted in the memory card slot, remove it.
2 Insert a memory card into the memory card slot in the indicated direction until it clicks
3 A new tab opens and the list of files on the card appears.
4 Click on a file to read the data for the file.
Removing a memory card
Push the card gently until it disengages from the memory card slot. Grasp the end of the card and pull it out of the slot.
• Available data formats depend on the current version of the Chrome operating system.
• Data on the card can be saved in the Downloads folder under → Files.
• The maximum file size will vary depending on Chrome OS.