Features or options may differ depending on the model.
The items marked as optional may not be provided or may be provided in different locations.
Since some storage space is reserved for system recovery and operations, the available storage space may be less than the actual capacity.
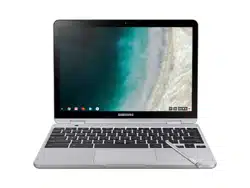
Front view
Number/Name
Description
Microphone
You can use the built-in microphone.
Keyboard deck camera
Using this camera, you can take still pictures and record video of the subjects located in front of the camera.
Fold the LCD panel behind the keyboard first to use the camera. You can use this camera while holding the computer like a tablet or setting it down on a flat surface.
Face this camera toward the subjects and check the preview on your LCD screen.
Front camera
Using this camera, you can take still pictures and record video.
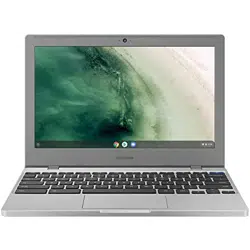
Number/Name
Description
LCD/ Touch screen
The screen’s images are displayed here.
Recognizes touch interactions (only for touch screen models).
Keyboard
Enter text or control computer functions.
Touchpad
Moves the cursor and selects options.
Functions as a mouse.
Right view
Left view
About the chargeable USB port
It may take longer to charge the battery when charging a USB device.
The battery power level may be reduced when charging a USB device while the computer is powered by the battery.
The charging status of the USB device is not displayed on the computer.
This feature may not be available on some USB devices.
When the computer is turned off, the device connected to the USB port is not charged.
Bottom view
If the bottom of the computer is replaced, the model name, serial number, and some logos will no longer be present. For more information, contact the Samsung Service Center to request assistance.
PEN
Detaching the PEN
Press the end of the PEN to disengage it. Then, pull the PEN from the slot. To store the PEN, push it back into the slot until you hear it click.
Replacing the PEN nib
If the nib is dull, replace it with a new one.
1. Firmly hold the nib with the tweezers and remove it.
2. Insert a new nib into the PEN.
Be careful not to pinch your fingers with the tweezers.
Do not reuse old nibs. Doing so may cause the PEN to malfunction.
Do not press the nib excessively when inserting the nib into the PEN.
Do not insert the round end of the nib into the PEN.
Doing so may cause damage to the PEN or your device.
Do not bend or apply excessive pressure with the PEN while using it. The PEN may be damaged or the nib may be deformed.
If you use the PEN at sharp angles on the screen, the device may not recognise the PEN actions.
For more information about the PEN, visit the Samsung website.
If the PEN is not working properly, take it to a Samsung Service Center.
Turning the computer on and off
Fully charge the battery using the AC adapter before using the computer for the first time.
Turning the computer on
Before turning on the computer, check that the battery is charged and charge it if necessary.
Open the LCD panel.
3. The computer turns on automatically when the LCD panel is opened. If the computer does not turn on automatically, press the Power button.
Turning the computer off
Using screen buttons
Select the account icon on the taskbar.
Select Power button.
Save all data before turning off the computer.
If the screen is locked in power saving mode Press any key to unlock the screen.
Using the Power button
Press and hold the Power button for about 8 seconds to shut down the Chromebook.
Press and hold the Power button for about 2 seconds to enter power saving mode.
In this lock state, press and hold the Power button for about 2 seconds to shut down the Chromebook.
To shut down the Chromebook when the system has frozen unexpectedly, press and hold the Power button for at least 8 seconds.
Controlling the power of the Chromebook
Press any key to unlock the screen.
Basics
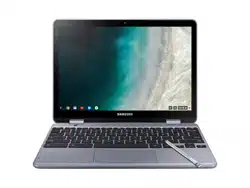
Using the computer as a tablet
You can use the computer as a tablet by folding the LCD panel behind the keyboard.
Open the LCD panel and rotate it away from the keyboard until it touches the bottom side of the computer.
When using the computer as the tablet, tap on the taskbar to view the currently running apps.
When the LCD panel is tilted past the transition point The keyboard and touchpad will automatically be locked and will not function. The display will rotate automatically depending on the computer’s orientation.
When the screen is turned off while using the computer as a tablet, press the Volume button to unlock the screen. When the computer is in power saving mode, press the Power button to unlock the screen.
When storing the computer in a bag or carrying it, close the LCD panel to protect the computer.
Using the touch screen
Use your fingers on the touch screen to perform actions.
Touch screen gestures
Tapping
To select menus, options, or applications, tap the touch screen.
Double-tapping
To open files or items, double-tap the touch screen.
Tapping and holding (right-clicking)
To use additional options of an item, tap and hold it on the touch screen.
Dragging
To move an item to another location, tap and hold it, and then drag it on the touch screen to the desired location.
Scrolling
To scroll up, down, left, or right, swipe on the touch screen.
Spreading and pinching
To zoom in, spread two fingers apart on an image or text. Pinch to zoom out.
Do not subject the touch screen to severe impacts or press it with sharp objects. Doing so may damage the touch screen.
Do not allow the touch screen to come into contact with other electrical devices. Electrostatic discharges can cause the touch screen to malfunction.
Do not expose the touch screen to water. The touch screen may malfunction in humid conditions or when exposed to water.
Do not spray liquid cleansing solutions directly onto the touch screen. The solution may enter the touch screen or cause undesired operation. To clean the screen, dampen a cloth with solution and gently wipe the screen. Do not use solutions or cloths that contain abrasive materials, as they may damage the touch screen.
Do not damage the edges of the touch screen. Doing so may damage the touch screen.
Leaving the touch screen idle for extended periods may result in afterimages (screen burn-in) or ghosting. Turn off the touch screen when you are not using the computer.
Make sure your hands are clean and dry before using the touch screen. Remove any moisture from your hands before using the touch screen.
Do not expose the computer to foreign substances. Doing so may cause the touch screen to malfunction.
Very light touches on the touch screen may not be recognized.
Precisely tap items on the touch screen for the best results.
The touch screen sensors are located on the edges of the touch screen. Therefore, do not cover the edges of the touch screen with protective covers or accessories.
Touch screen gestures are available for touch screen models running Windows and work only with some applications.
Using the keyboard
Shortcut key functions and procedures are discussed in the following sections.
The keyboard image may differ from the actual keyboard.
The keyboard may differ depending on your country. The following mainly describes the shortcut keys.
Shortcut Keys
Here is an overview of the shortcut keys on the top row of the keyboard.
Shift key
Hold the Shift key down to enter upper case letters.
Hot key function
Press the following keys at the same time.
You can check the hot keys in Chrome OS.
Search key
Where you’d find the Caps Lock key on a traditional keyboard, we’ve put the Search key.
Press the Search key to run the Launcher.
If you really need Caps Lock, go to the Settings page to make the Search key behave like a Caps Lock key.
System Reset
If computer is frozen and unresponsive, press the following keys at the same time.
Using the touchpad
Use the touchpad to move the cursor or select an item. The left and right buttons of the touchpad act the same as the left and right buttons of a mouse.
Use the touchpad only with fingers. The touchpad will not recognize actions of other objects.
Images and the touchpad layout may differ depending on the model.
Basic touchpad functions
Moving
To move the cursor, move a finger on the touchpad.
Clicking
Tap the touchpad
Double-clicking
Double-tap the touchpad
Right-clicking
To right-click, place two fingers on the touch area and tap once.
Dragging
To move an icon or an app tile to a desired location, press and hold it and then drag it to the target position.
Adjusting your Touchpad Settings
If your touchpad is too sensitive, you can adjust your settings by following these steps:
1. Click the list icon on the top-right corner of your browser.
2. Select Settings.
3. Go to Device → Touchpad → Touchpad speed, and change the settings as appropriate.
Inserting a memory card
If a dummy card or a memory card adapter is inserted in the memory card slot, remove it.
Insert a memory card into the memory card slot in the indicated direction until it clicks.
3. A new tab opens and the list of files on the card appears.
4. Click on a file to read the data for the file.
Removing a memory card
Push the card gently until it disengages from the memory card slot. Grasp the end of the card and pull it out of the slot.
Available data formats depend on the current version of the Chrome operating system.
Data on the card can be saved in the Downloads folder under → Files.
The maximum file size will vary depending on Chrome OS.
Settings & Upgrade
LCD brightness
Adjust the LCD brightness to reduce eye strain and save power.
Adjust the LCD brightness by pressing the key to decrease brightness or the key to increase brightness.
Whenever you press the key, the LCD brightness increases by one level.
LCD bad pixels principle of computer
Samsung observes the specifications regarding strict quality and reliability of LCD. But in spite of that, it is inevitable that there might be a small number of bad pixels. A large number of bad pixels can cause problems in appearance, but a small number of pixels doesn’t affect the computer performance.
Therefore Samsung observes and manages the following dot principles:
Bright dot: 2 or less
Black dot: 4 or less
Combination of Bright and Dark: 4 or less
Instructions for Cleaning the LCD
Clean the LCD panel with a soft cloth lightly moistened with computer cleansing detergent moving in one direction.
Cleaning the LCD panel with excessive force can damage the LCD.
Volume
Adjust the system volume or sound volume when playing music or video.
Controlling volume using the keyboard
Press the Volume button on the right side of the computer to adjust the volume.
Controlling volume using the taskbar
Select the account icon on the taskbar.
Drag the adjustment bar to the desired volume.
Battery
Fully charge the battery using the AC adapter before using the computer for the first time.
Use only Samsung-approved AC adapters, batteries, and cables. If you use unapproved adapters, the battery cannot be charged or it may explode or damage the computer.
Incorrectly connecting the charger may cause serious damage to the computer.
This computer is equipped with an internal battery. The battery is not user-serviceable or user-replaceable.
To safely remove or replace the battery, take the device to a Samsung Service Center. You will be charged for this service.
You can use the computer while it is charging, but the battery charging time may increase. If the battery temperature rises too much, the charging may stop as a safety measure.
To restore the battery power after cutting it, connect the AC adapter.
Charging the battery
Fully charge the battery using the AC adapter before using the computer for the first time, or when the computer is completely discharged.
Connect the AC adapter to the USB-C™ port of the computer. You can use the USB-C™ ports on either side of the computer.
Plug the power cable into an electric socket.
If the battery is fully discharged, the computer will not turn on immediately with the AC adapter. A minimum level of battery power will be charged slowly for safety while the Power LED blinks red. You can turn on the computer after the Power LED stops blinking.
3. When the battery is fully charged, the power LED turns green. Disconnect the AC adapter from the computer.
4. Unplug it from the electric socket.
Battery status
Select the account icon on the taskbar to view the current battery charge.
Battery usage time
Batteries are replaceable items and over time the battery’s capacity to hold a charge and its power level is reduced. If a battery can only hold its charge for half of the time that it could when new, it is recommended to purchase a new, replacement battery.
Appendix
Ergonomic tips
Maintaining the proper posture during computer use is very important to prevent physical injury. Improper or prolonged keyboard use may result in repetitive strain injury. Viewing the monitor screen for extended periods of time may result in eye strain. Therefore, please follow these guidelines carefully when setting up and using the computer.
Back and neck
Use an adjustable chair with firm, comfortable support.
Adjust the height of your chair so that thighs are horizontal to the floor and feet are flat on the floor.
The back of the chair should support the lower back. Adjust the backrest to fit your body properly.
Sit back fully in your chair and straighten the back and neck. Avoid leaning forward or craning your neck toward the computer screen.
Avoid using the computer while lying down or on your lap. If the computer’s temperature increases, there is a danger of burn injury.
The instructions in this manual have been prepared so that they can be applied to the range of needs of general users. If the user is not included in the range, the recommendations should be applied according to the user’s needs.
Images may differ from actual products.
Arms and hands
When using the keyboard and touchpad, the shoulders should be relaxed. The upper arm and forearm should form an angle that is slightly greater than a right angle, with the wrist and hand in almost a straight line.
Use a light touch when typing or using the touchpad and keep the hands and fingers relaxed. Avoid rolling the thumbs under your palms or supporting the wrists on the desk while typing.
Use an external keyboard and mouse when using the computer for long periods. When using an external keyboard and mouse, position the devices at the same height as the computer and within comfortable reach.
Eye position and display illumination
Position the screen at least 50 cm away from your eyes.
Adjust the height of the screen so that its top edge is equal to or just below the level of your eyes.
Avoid setting the screen’s brightness settings excessively high.
Keep the screen clean.
If wearing glasses, clean them before using the computer.
When referring to printed content while typing, use a static paper holder to hold the paper at about the same height as the monitor.
Hearing and volume control
Ensure that the volume is not too loud before using the headset or earpiece. Excessive exposure to loud sounds can cause hearing damage.
Always turn the volume down before plugging the earphones into an audio source and use only the minimum volume setting necessary to hear your conversation or music.
Avoid using headphones for long periods of time.
Default audio settings can be changed by software and driver updates without your knowledge. Always recheck equalizer and volume settings before listening to audio.
To prevent possible hearing damage, do not listen at high volume levels for long periods.
Operating conditions
Take at least a 10 minute break every hour.
Avoid using the computer in dark locations. Use the computer with as much ambient light as you would when reading a book.
Indirect illumination is recommended. Use a curtain to prevent reflections and glare on the screen.
While operating a computer and talking on the phone, use a headset. Using the computer while holding a phone on your shoulder or with your neck may lead to muscle strain or injury.
Keep frequently used items within reach.
Only use the computer within the temperature and humidity ranges specified in this manual.
Use caution when exposed to flashing lights.
While using your computer, leave some lights on in the room and do not hold the screen too close to your eyes.
Seizures or blackouts can occur when you are exposed to flashing lights while watching videos or playing Flash-based games for extended periods. If you feel any discomfort, stop using the computer immediately.
If anyone related to you has experienced seizures or blackouts while using a similar product, consult a physician before using the computer.
If you feel discomfort, such as a muscle spasm, or disoriented, stop using the computer immediately and consult a physician.
To prevent eye strain, take frequent breaks while using the computer.
Reduce the risk of repetitive motion injuries.
When you repetitively perform actions, such as pressing keys, drawing characters on a touch screen with your fingers, or playing games, you may experience occasional discomfort in your hands, neck, shoulders, or other parts of your body. When using your computer for extended periods, hold the computer with a relaxed grip, press the keys lightly, and take frequent breaks. If you continue to have discomfort during or after such use, stop using the computer and consult a physician.


 Microphone
 Keyboard deck camera
 Front camera
 LCD/ Touch screen
 Keyboard
 Touchpad


 Be careful not to pinch your fingers with the tweezers.


 .
.

 on the taskbar to view the currently running apps.


 on the top-right corner of your browser.

 → Files.
 key to decrease brightness or the