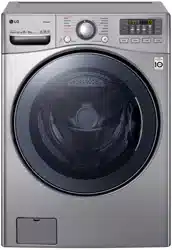
Documents: Go to download!
User Manual
- User Manual - (English, Korean)
- WDC1215HSVE - LG - Specifications Sheet - (English)
- OPERATION
- SMART FUNCTIONS
- MAINTENANCE
- TROUBLESHOOTING
Table of contents
USER MANUAL Washer Dryer Combo
OPERATION
Using the Washing Machine
Before the first wash, select a washing programme, allow the washing machine to wash without clothing.
This will remove residue and water from the drum that may have been left during manufacturing.
- Sort laundry and load items.
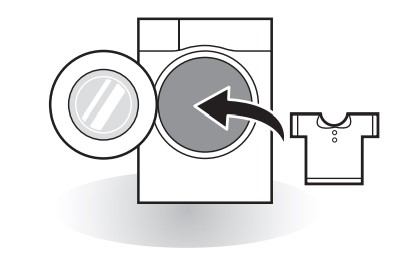
- Sort laundry by fabric type, soil level, colour and load size as needed. Open the door and load items into the washing machine
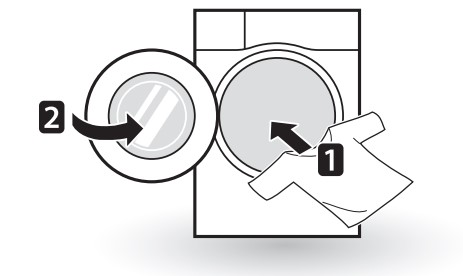
- Sort laundry by fabric type, soil level, colour and load size as needed. Open the door and load items into the washing machine
- Add cleaning products and/or detergent and softener.
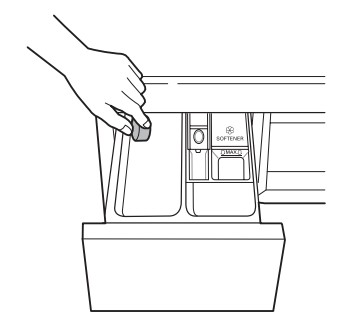
- Add the proper amount of detergent to the detergent dispenser drawer. If desired, add bleach or fabric softener to the appropriate areas of the dispenser.
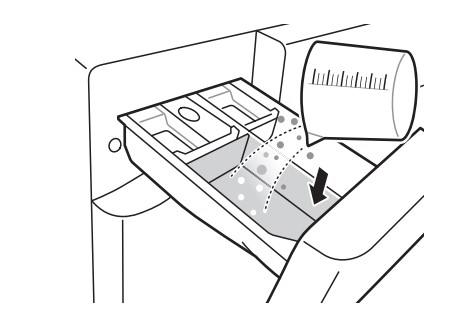
- Add the proper amount of detergent to the detergent dispenser drawer. If desired, add bleach or fabric softener to the appropriate areas of the dispenser.
- Turn on the washing machine.
- Press the
 button to turn on the washing machine.
- Press the
- Choose the desired washing cycle.
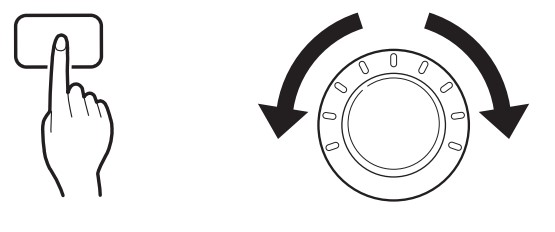
- Press the programme button repeatedly or turn the cycle selector knob until the desired cycle is selected.

- Press the programme button repeatedly or turn the cycle selector knob until the desired cycle is selected.
- Begin cycle.
- Press the Start/Pause button to begin the cycle. The washing machine will agitate briefly without water to measure the weight of the load. If the Start/Pause button is not pressed within 60 minutes, the washing machine will shut off and all settings will be lost.
- Press the Start/Pause button to begin the cycle. The washing machine will agitate briefly without water to measure the weight of the load. If the Start/Pause button is not pressed within 60 minutes, the washing machine will shut off and all settings will be lost.
- End of cycle.
- When the cycle is finished, a melody will sound. Immediately remove your clothing from the washing machine to reduce wrinkling. Check around the door seal when removing the load for small items that may be caught in the seal.
Sorting Laundry
- Look for a care label on your clothes.
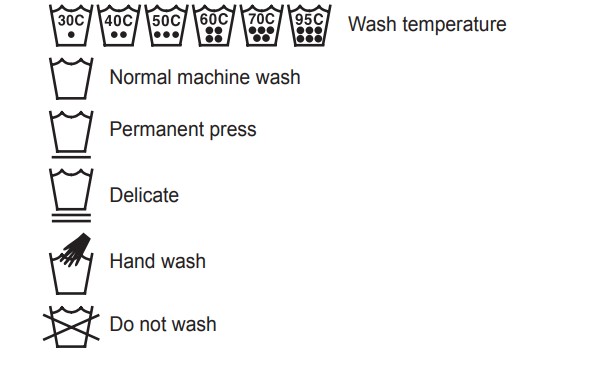
- This will tell you about the fabric content of your garment and how it should be
- This will tell you about the fabric content of your garment and how it should be
- Sorting laundry.
- To get the best results, sort clothes into loads that can be washed with the same wash cycle.
- Different fabrics need to be washed at varying temperatures and spin speeds.
- Always sort dark colours from pale colours and whites. Wash separately as dye and lint transfer can occur causing discolouration of white and pale garments. If possible, do not wash heavily soiled items with lightly soiled ones.
- Soil (Heavy, Normal, Light) :
Separate clothes according to amount of soil. - Colour (White, Lights, Darks):
Separate white fabrics from coloured fabrics. - Lint (Lint producers, Collectors):
Wash lint producers and lint collectors separately.
- Soil (Heavy, Normal, Light) :
- Caring before loading.
- Combine large and small items in a load. Load large items first.
- Large items should not be more than half the total wash load. Do not wash single items. This may cause an unbalanced load. Add one or two similar items.
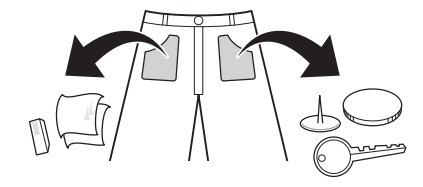
- Check all pockets to make sure that they are empty. Items such as nails, hair clips, matches, pens, coins and keys can damage both your washing machine and your clothes.
- Close zippers, hooks and strings to make sure that these items don’t snag on other clothes.
- Pre-treat dirt and stains by brushing a small amount of detergent dissolved water onto stains to help lift dirt.
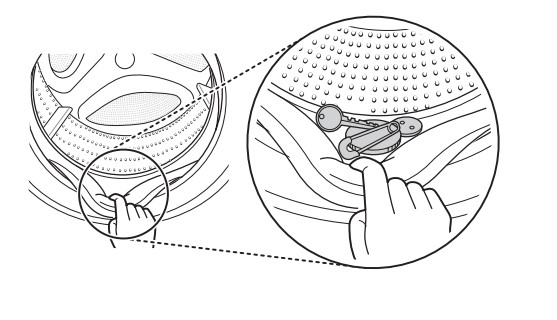
- Check the folds of the flexible gasket (gray) and remove any small articles.
CAUTION
- Check inside the drum and remove any items from a previous wash.
- Remove any clothing or items from the flexible gasket to prevent clothing and gasket damage.
Adding Cleaning Products
Detergent Dosage
- Detergent should be used according to the instruction of the detergent manufacturer and selected according to type, colour, soiling of the fabric and washing temperature.
- If too much detergent is used, too many suds can occur and this will result in poor washing results or cause heavy load to the motor and cause a malfunction.
- If you wish to use liquid detergent, follow the guidelines provided by the detergent manufacturer.
- You can pour liquid detergent directly into the main detergent drawer if you are starting the cycle immediately.
- Do not use liquid detergent if you are using Delay End, or if you have selected Pre Wash, as the liquid may harden.
- If too many suds occur, reduce the detergent amount.
Drum type detergent must only be used in Front loaders. excessive suds can be caused by using the wrong type of detergent. - Detergent usage may need to be adjusted for water temperature, water hardness, size and soil level of the load. For best results, avoid oversudsing.
- Refer to the label of the clothes, before choosing the detergent and water temperature.
- When using the washing machine, use designated detergent for each type of clothing only:
- General powdered detergents for all types of fabric
- Powdered detergents for delicate fabric
- Liquid detergents for all types of fabric or designated detergents only for wool
- For better washing performance and whitening, use detergent with the general powdered bleach.
- Detergent is flushed from the dispenser at the beginning of the cycle.
NOTE
- Do not let the detergent harden. Doing so may lead to blockages, poor rinse performance or bad odours.
- Full load : According to manufacturer’s recommendation.
- Part load : 3/4 of the normal amount
- Minimum load : 1/2 of full load
Adding Detergent and Fabric Softener
Adding Detergent
- Main wash only →

- Pre wash+Main wash →

NOTE
- Too much detergent, bleach or softener may cause an overflow of that liquid and cause damage or staining to the clothes.
- Be sure to use the appropriate amount of detergent.
Adding Fabric Softener
- Do not exceed the maximum fill line. Overfilling can cause early dispensing of the fabric softener, which may stain clothes. Close the dispenser drawer slowly.
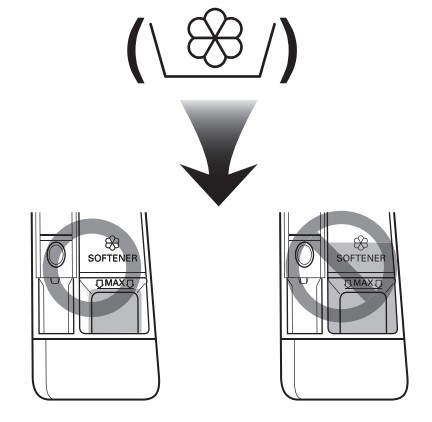
- Do not leave the fabric softener in the detergent drawer for more than 2 days (Fabric softener may harden).
- Softener will automatically be added during the last rinse cycle.
- Do not open the drawer when water is being supplied.
- Solvents (benzene, etc.) must not be used.
NOTE
- Do not pour fabric softener directly on the clothes.
Adding Water Softener
- A water softener, such as anti-limescale (e.g. Calgon) can be used to cut down on the use of detergent in extremely hard water areas. Dispense according to the amount specified on the packaging. First add detergent and then the water softener.
- Use the quantity of detergent required for soft water.
Using tablet
- Open the door and put tablets into the drum.
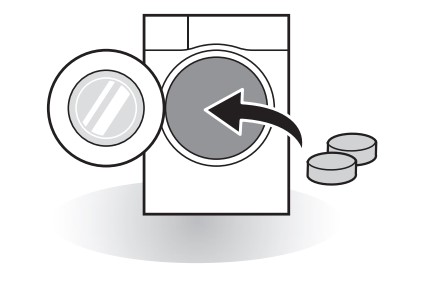
- Load the laundry into the drum and close the door
Control Panel
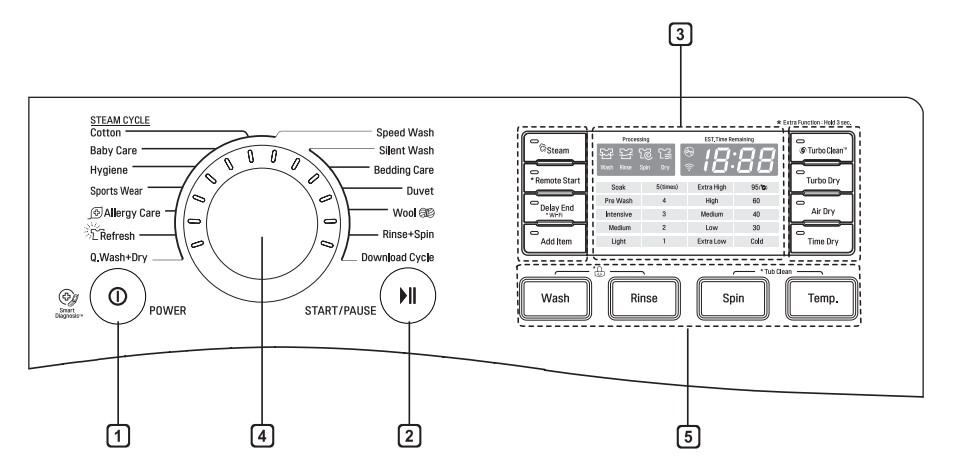
- Power button
- Press the Power button to turn the washing machine on.
- To cancel the Delay End function, the Power button should be pressed.
- Start/Pause button
- This Start/Pause button is used to start the wash cycle or pause the wash cycle.
- If a temporary stop of the wash cycle is needed, press the Start/Pause button.
- Display
- The display shows the settings, estimated time remaining, options, and status messages. When the product is turned on, the default settings in the display will illuminate.
- The display shows estimate time remaining. While the size of the load is being calculated automatically, blinking ‘
 ’ or ‘Detecting’ appears.
- Programme dial
- Programmes are available according to laundry type.
- Lamp will light up to indicate the selected programme.
- Options
- This allows you to select an additional programme and will light when selected.
- Use these buttons to select the desired programme options for the selected cycle.
Programme Table
Washing Programme
| Programme | Description | Fabric Type | Proper Temp. | Maximum Load Weight |
| Cotton | Provides better performance by combining various drum motions. | Coloured fast garments (shirts, nightdresses, pajamas, etc) and normally soiled cotton load (underwear). | 40 °C (Cold to 60 °C) | Rated Capacity |
| Allergy Care . | Removes pet hair and allergens such as house mite and pollen | Cotton, underwear, pillow covers, bed sheets, baby wear. | No choice | 3.0 kg |
| Hygiene | Washes laundry in a hot cycle | Cotton, underwear, pillow covers, bed sheets, baby wear. | 95 °C | 3.0 kg |
| Refresh | Helps to remove wrinkles within 25 mins with steam | Cotton mixed, Polyester mixed Dress shirts, blouses. | No choice | 3 items |
| Baby Care | Removes solid and protein stains, provides better rinse performance. | Lightly soiled baby wear. | No choice | 5.0 kg |
| Duvet | This cycle is for large items such as bed cover, pillows, sofa covers, etc. | Cotton bedding except special garments (delicates, wool, silk, etc.) with filling: duvets, pillows, blankets, sofa covers with light filling. | Cold (Cold to 40 °C) | 1 king size |
| Sports Wear | This cycle is suitable for sports wear such as jogging clothes and sports wear. | Coolmax, Gore-tex, Fleece and Sympatex. | *30 °C (Cold to 30 °C) | 3.0 kg |
| Wool | Enables to wash wool fabrics. (Please use detergent for machinewashable woolens). | Machine washable woolens with pure wool and new wool only. | 40 °C (Cold to 40 °C) | 3.0 kg |
| Silent Wash | Provides less noise and vibration and saves money by using overnight electricity | Coloured fast garments (shirts, nightdresses, pajamas, etc) and normally soiled cotton load (underwear) | 40 °C (Cold to 40 °C) | 3.0 kg |
| Speed Wash | This cycle provides a fast washing time for small loads and lightly soiled clothes. | Coloured laundry which is lightly soiled for fast wash. CAUTION : Use less than 20 g of detergent (for 2.0 kg load) otherwise detergent may remain on the clothes. | *40 °C (Cold to 40 °C) | 3.0 kg |
| Q.Wash+Dry | Speed Wash and Dry | A small amount of laundry which can be dried in an hour. | 40 °C | 1.0 kg |
| Rinse+Spin | Use for laundry that need rinsing only of to add rinse-added fabric softener to laundry | Normal fabrics which can be washable. | No choice | Rating |
| Bedding Care | Duvets, blankets, pillowcases, shams, and other bedding. CAUTION : Check fabric care labels on blankets or duvets before using the Bedding care programme. The heated air of the programme may shrink or damage some items | No choice | 1 item | |
| Download Cycle | For downloadable cycles. If you did not download any cycles, the default is Cold Wash. | |||
- *Proper temperature can be selected after deleting the steam option, automatically-included in the cycle.
- Water Temperature: Select the appropriate water temperature for chosen wash programme. Always follow garment manufacturer’s care label or instructions when washing.
- If you select the Hygiene cycle and change the spin mode to No Spin, the drum may still spin very slowly. This is normal and will not affect performance.
- Set program at “Cotton, Intensive Wash, Rinse 3, Extra High Spin, 40 °C, Turbo Clean” option for a normally soiled cotton load and test in accordance or in conformity with AS/NZS 2040.1.
- Set program at “Air Dry, Extra High Spin" option for test in accordance or in conformity with AS/NZS 2442.1.
NOTE
- Neutral detergent is recommended.
Drying Programme
| Programme | Description | Fabric Type |
| Turbo Dry | Select this cycle to reduce the cycle time during the drying cycle. | Cotton or linen fabrics such as cotton towels, t-shirts, and linen garments. |
| Air Dry | Select this cycle to reduce water and energy usage during the drying cycle. | |
| You can change the drying time according to the maximum load. Cotton, towel | Cotton, towel |
NOTE
- Select maximum selectable spin speed of washing programme to improve the drying results.
- Where the amount of laundry to be washed and dried in one programme does not exceed the maximum weight permitted for the drying programme, washing and drying in one continuous sequence is recommended.
Extra Options
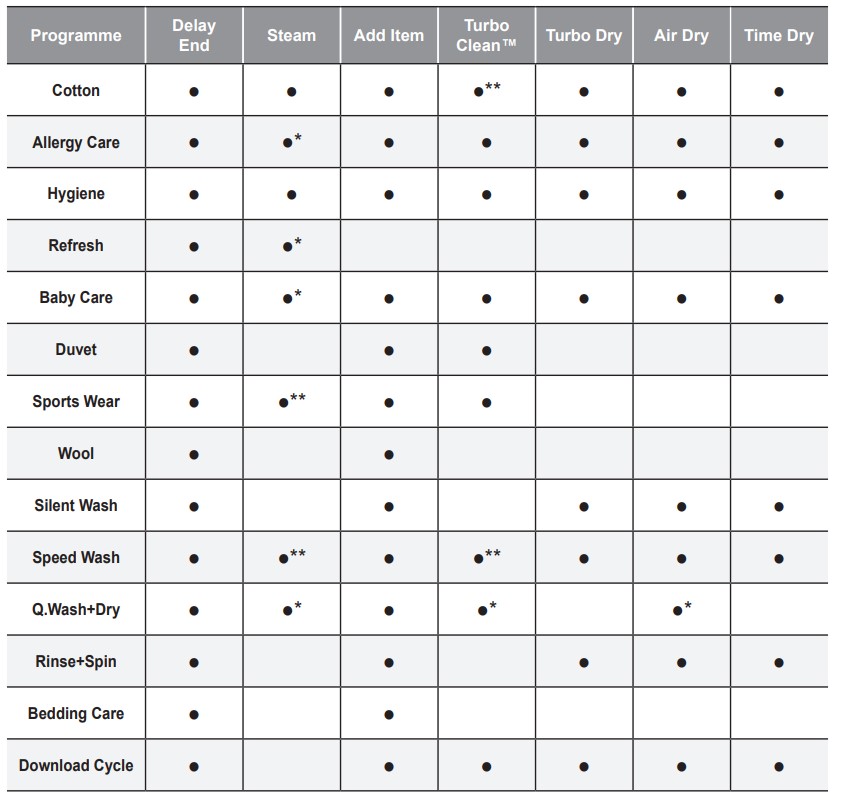
* : This option is automatically included in the cycle and can not be deleted.
** : This option is automatically included in the cycle and can be deleted.
Option Programme
Delay End
You can set a time delay so that the washing machine will start automatically and finish after a specified time interval.
- Press the Power button.
- Select a washing programme.
- Press the Delay End button and set time required.
- Press the Start/Pause button.
NOTE
- The delay time is the time to the end of the programme, not the start. The actual running time may vary due to water temperature, wash load and other factors. Do not use Liquid detergent for this operation.
Turbo Clean™
Adding the Turbo Clean™ option reduces cycle time and provides good performance in normal cycle. Using Turbo Clean™ saves time without sacrificing performance.
- Press the Power button.
- Select a washing programme.
- Press the Turbo Clean™ button..
- Press the Start/Pause button.
NOTE
- Turbo Clean™ function of Some courses is selected automatically.
Add Item
Use this function to add loads or remove the foreign material.
- Press the Add Item button.
- Close the door after add loads or remove the foreign material (e.g. coin or pin etc.)
- Press the Start/Pause button.
- Results when choosing Add Item during cycles.
- When the tub is spinning : Tub stops and Door Lock is off.
- When water temperature in the tub is higher than 45°C : Add Item is not available with short warning sound for safety.
- When lots of water is in the tub : Door Lock is off after draining by safe water level.
NOTE
- Open the door when Door Lock is off after checking the safety.
- Add Item doesn't work when Tub Cleaning course is in progress for safety.
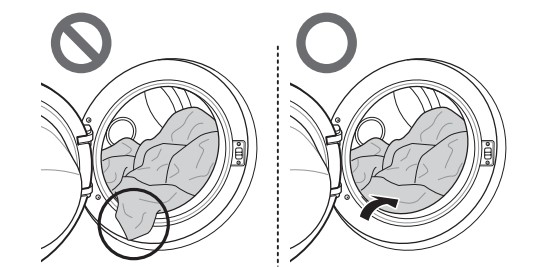
- Put the laundry into the tub completely. Laundry caught in between door closing part can damage door packing (rubber part) and might cause failure
Steam
Steam Wash features enhance washing performance with low energy consumption.
- Press the Power button.
- Select steam course.
- Press the Steam button.
- Press the Start/Pause button.
Steam Wash
- For heavily stained clothes, underwear, or baby clothes.
- Do not use Steam Wash for delicates such as wool, silk, and easily discoloured clothes.
Wash
Soak
Use this mode to wash normal clothes or thick and heavy clothes which are excessively dirty.
Pre Wash
If the laundry is heavily soiled, the Pre Wash cycle is recommended.
Intensive
If the load is normal and heavily soiled, the Intensive option is effective.
Medium
This option is automatically selected in every course except for Rinse+Spin, Baby Care.
Light
This cycle is suitable for lightly soiled clothing.
NOTE
- Selectable options will differ depending on selected course.
Rinse
By pressing the Rinse button the Rinse times can be selected. times)
- 1 / 2 / 3 / 4 / 5 (times)
Spin
- Spin speed level can be selected by pressing the Spin button repeatedly.
- Extra High / High / Medium / Low / Extra Low
- Spin Only
- Press the Power button.
- Press the Spin button to select spin speed.
- Press the Start/Pause button.
Temp.
The Temp. button selects the wash temperature for the selected cycle. Press this button until the desired setting is lit. All rinses use the water from the cold water hose connection.
- Select the water temperature suitable for the type of load you are washing. Follow the garment fabric care labels for best results.
Child Lock ( )
)
Select this function to lock the buttons on the control assembly to prevent tampering.
Locking the control panel
- Press and hold the Wash and Rinse button for 3 seconds.
- A beep will sound, and ‘
 ’ will appear on the display.
When the child lock is set, all buttons are locked except the Power button.
NOTE
- Turning off the power will not reset the child lock function. You must deactivate child lock before you can access any other functions.
Unlocking the control panel
Press and hold the Wash and Rinse button for 3 seconds.
- A beep will sound and the remaining time for the current programme will reappear on the display.
Wi-Fi ( )
)
Press and hold the Wi-Fi button for 3 seconds. When Wi-Fi is turned on, the Wi-Fi icon (  ) on the control panel is lit.
Remote Start
Use a smart phone to control your appliance remotely.
You can also monitor your cycle operation so you know how much time is left in the cycle.
NOTE
- You must first connect to a gateway and register your appliance in order to use the Remote Start function.
To use Remote Start:
- Press the Power button.
- Put the laundry in the drum.
- Press and hold Remote Start button for 3 seconds to enable Remote Start function.
- Start a cycle from the LG SmartThinQ application on your smart phone.
NOTE
- The appliance cannot be used manually if the Remote Start function is turned on. The Remote Start function must be turned off from the app or by disabling it directly from the unit itself before using the machine manually.
- When Remote Start is turned on, the door is automatically locked.
To disable Remote Start:
When the Remote Start is activated, press and hold Remote Start button for 3 seconds.
Download Cycle
The Download Cycle features of this appliance allow you to download new and special cycles that are not included in the appliance's basic cycles.
Appliances that have been successfully registered can download a variety of specialty cycles specific to the appliance. Only one cycle can be stored on the appliance at a time.
Once Cycle Download is completed in the washer, the product keeps the downloaded cycle until you change it to a new downloaded cycle.
NOTE
- You can download cycles after registering the product and configuring the Wi-Fi connection.
- You can download a desired cycle through the 'LG
- SmartThinQ' app. For more information on each cycle, refer to the 'LG SmartThinQ' app.
- Depending on the type of washer purchased, different cycles will be available.
- The downloaded cycles may be different depending on the updated version of the 'LG SmartThinQ' app
Dry
Use the Automatic cycles to dry most loads. Electronic sensors measure the temperature of the exhaust to increase or decrease drying temperatures for faster reaction time and tighter temperature control.
- Cold water tap must be left on during drying cycles.
- This washing machine’s automatic process from washing to drying can be selected easily.
- For most even drying, make sure all articles in the clothes load are similar in material and thickness.
- Do not overload the washing machine by stuffing too many articles into the drum. Items must be able to tumble freely.
- If you open the door and remove the load before the washing machine has finished its cycle, remember to press the Start/Pause button.
- After the end of the dry cycle, ‘
 ’ is displayed.
  means crease reduction. The drying cycle is already done. Press any button to terminate the
  function and unlock the door. If you do not press any button, the '
 ' function will end after about 4 hours.
NOTE
- When you turn the washing machine off of the drying cycle, the drying fan motor can be operated to save itself for 1 minute.
- Be careful when removing your clothing from the washing machine, as the clothing or washing machine may be hot.
Woolen Articles
- Do not tumble dry woolen articles. Pull them to their original shape and dry them flat.
Woven and Loopknit Materials
- Some woven and loopknit materials may shrink, by varying amounts, depending on their quality.
- Always stretch these materials out immediately after drying.
Permanent Press and Synthetics
- Do not overload your washing machine
- Take out permanent press articles as soon as the washing machine stops to reduce wrinkles.
Baby clothes and Night Gowns
- Always check the manufacturer’s instructions.
Rubber and Plastics
- Do not dry any items made from or containing rubber or plastics, such as:
- aprons, bibs, chair covers
- curtains and table cloths
- bathmats
Fiber glass
- Do not dry fiberglass articles in your washing machine.
Glass particles left in the washing machine may be picked up by your clothes the next time you use the washing machine and cause skin irritation.
Drying Time Guide
- The drying time can be selected by pressing the Time Dry button.
- These drying times are given as a guide to help you set your washing machine for manual drying.
NOTE
- The estimated drying time varies from the actual drying time during the Automatic cycle. The type of fabric, size of the load, and the dryness selected affect drying time.
- When you select drying only, spinning runs automatically for energy efficiency
SMART FUNCTIONS
Using SmartThinQ Application Things to check before using LG SmartThinQ
- For appliances with the
 or
or  logo
logo
- Check the distance between the appliance and the wireless router (Wi-Fi network).
- If the distance between the appliance and the wireless router is too far, the signal strength becomes weak. It may take a long time to register or installation may fail.
- Turn off the Mobile data or Cellular Data on your smartphone.
- For iPhones, turn data off by going to Settings → Cellular → Cellular Data.
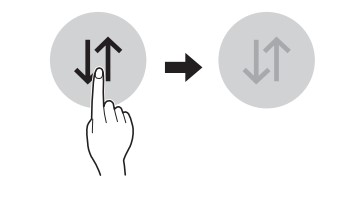
- For iPhones, turn data off by going to Settings → Cellular → Cellular Data.
- Connect your smartphone to the wireless router.
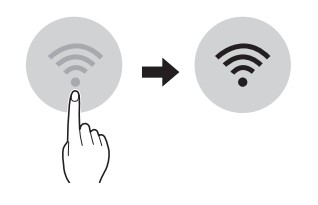
NOTE
- To verify the Wi-Fi connection, check the Wi-Fi
 icon on the control panel is lit.
 - The appliance supports 2.4 GHz Wi-Fi networks only. To check your network frequency, contact your
- Internet service provider or refer to your wireless router manual.
- LG SmartThinQ is not responsible for any network connection problems or any faults, malfunctions, or errors caused by network connection.
- If the appliance is having trouble connecting to the WiFi network, it may be too far from the router.Purchase a Wi-Fi repeater (range extender) to improve the Wi-Fi signal strength.
- The Wi-Fi connection may not connect or may be interrupted because of the home network environment.
- The network connection may not work properly depending on the Internet service provider.
- The surrounding wireless environment can make the wireless network service run slowly.
- The appliance cannot be registered due to problems with the wireless signal transmission. Unplug the appliance and wait about a minute before trying again.
- If the firewall on your wireless router is enabled, disable the firewall or add an exception to it.
- The wireless network name (SSID) should be a combination of English letters and numbers. (Do not use special characters.)
Installing SmartThinQ
Search for the LG SmartThinQ application from the Google Play Store or Apple App Store on a smart phone. Follow instructions to download and install the application.
NOTE
If you choose the simple login to access the LG SmartThinQ application, you must go through the appliance registration process each time you change your smartphone or reinstall the application.
Wi-Fi Function
- For appliances with the
 or
or  logo Communicate with the appliance from a smart phone using the convenient smart features.
Washer Cycle
Set or download any perferred cycle and operate by remote control.
Tub Clean Coach
Check the appropriate Tub Clean period based on the washing frequency.
Energy Monitoring
Check the energy consumption of the recently used cycles and monthly average.
Smart Diagnosis
If you use the Smart Diagnosis function, you will be provided with the useful information such as a correct way of using the appliance based on the pattern of use.
Settings
Allows you to set various options on the appliance and in the application.
Push Alert
Turn on the Push Alerts to receive appliance status notifications. The notifications are triggered even if the LG SmartThinQ application is off.
NOTE
- If you change your wireless router, your Internet service provider or your password after registering the appliance, please delete it from the LG SmartThinQ Settings → Edit Product and register again.
- The application is subject to change for appliance improvement purposes without notice to users.
- Functions may vary by model.
Open Source Software Notice Information
To obtain the source code under GPL, LGPL, MPL, and other open source licenses, that is contained in this product, please visit http://opensource.lge.com.
In addition to the source code, all referred license terms, warranty disclaimers and copyright notices are available for download.
LG Electronics will also provide open source code to you on CD-ROM for a charge covering the cost of performing such distribution (such as the cost of media, shipping, and handling) upon email request to opensource@lge. com. This offer is valid for three (3) years from the date on which you purchased the product.
RF Radiation Exposure Statement
This equipment should be installed and operated with minimum distance of 20 cm between the radiator and your body
Smart Diagnosis™ Using a Smart Phone
- For appliances with the
 or
or  logo
logo
Use this function if you need an accurate diagnosis by an LG Electronics customer information centre when the appliance malfunctions or fails.
Smart Diagnosis™ can not be activated unless the appliance is connected to power. If the appliance is unable to turn on, then troubleshooting must be done without using Smart Diagnosis™.
Using Smart Diagnosis™
Smart Diagnosis™ Through the Customer Information Centre
Use this function if you need an accurate diagnosis by an LG Electronics customer information center when the appliance malfunctions or fails. Use this function only to contact the service representative, not during normal operation.
- Press the Power button to turn on the washing machine. Do not press any other buttons or turn the cycle selector knob.
- When instructed to do so by the call centre, place the mouthpiece of your phone close to the Power button.
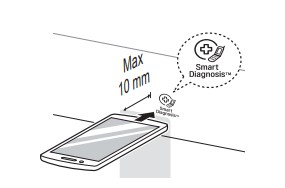
- Press and hold the Temp. button for 3 seconds, while holding the phone mouthpiece to the icon or Power button.
- Keep the phone in place until the tone transmission has finished. Time remaining for data transfer is displayed.
- For best results, do not move the phone while the tones are being transmitted.
- If the call centre agent is not able to get an accurate recording of the data, you may be asked to try again.
- Once the countdown is over and the tones have stopped, resume your conversation with the call centre agent, who will then be able to assist you using the information transmitted for analysis.
NOTE
- The Smart Diagnosis™ function depends on the local call quality.
- The communication performance will improve and you can receive better service if you use the home phone.
- If the Smart Diagnosis™ data transfer is poor due to poor call quality, you may not receive the best Smart Diagnosis™ service.
MAINTENANCE
WARNING
- Unplug the washing machine before cleaning to avoid the risk of electric shock. Failure to follow this warning may result in serious injury, fire, electric shock, or death.
- Never use harsh chemicals, abrasive cleaners, or solvents to clean the washing machine. They may damage the finish.
Cleaning Your Washing Machine Care After Wash
- After the cycle is finished, wipe the door and the inside of the door seal to remove any moisture.
- Leave the door open if it is safe to do so to dry the drum interior.
- Wipe the body of the washing machine with a dry cloth to remove any moisture.
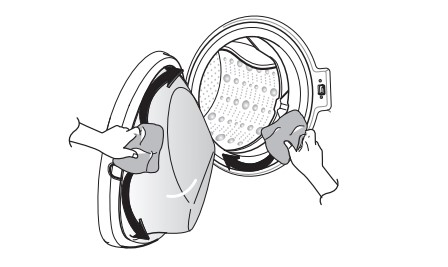
Cleaning the Exterior
Proper care of your washing machine can extend its life.
Door:
- Wash with a damp cloth on the outside and inside and then dry with a soft cloth.
Exterior:
- Immediately wipe off any spills.
- Wipe with a damp cloth.
- Do not press the surface or the display with sharp objects.
Cleaning the Interior
- Use a towel or soft cloth to wipe around the washing machine door opening and door glass.
- Always remove items from the washing machine as soon as the cycle is complete. Leaving damp items in the washing machine can cause wrinkling, colour transfer, and odour.
- Run the Tub Clean programme once a month (or more often if needed) to remove detergent buildup and other residue.
Cleaning the Water Inlet Filter
- Turn off the supply taps to the machine if the washing machine is to be left for any length of time (e.g. holiday), especially if there is no floor drain (gully) in the immediate vicinity.
 icon will be displayed on the control panel when water is not entering the detergent drawer.
- If water is very hard or contains traces of lime deposit, the water inlet filter may become clogged. It is therefore a good idea to clean it occasionally.
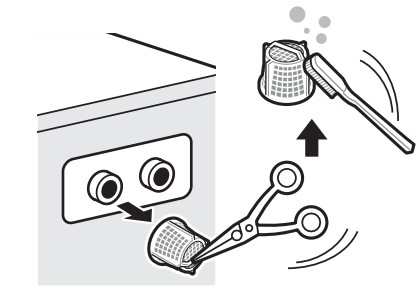
- Turn off the water tap and unscrew the water supply hose.
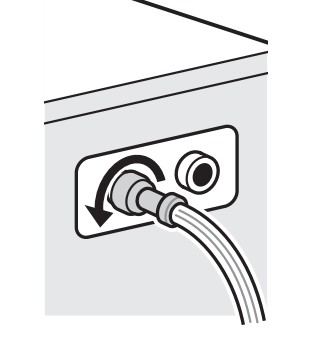
- Remove the filter with pincers or long nose pliers. Clean the filter using a hard bristle brush.
Cleaning the Drain Pump Filter
- The drain filter collects threads and small objects left in the laundry. Check regularly that the filter is clean to ensure smooth running of your washing machine.
- Allow the water to cool down before cleaning the drain pump, carrying out emergency emptying, or opening the door in an emergency.
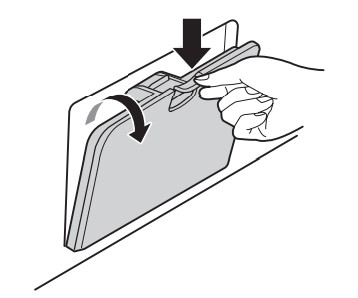
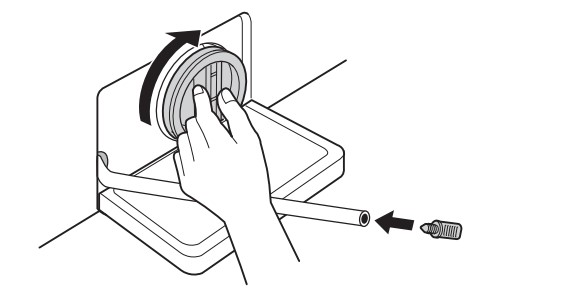
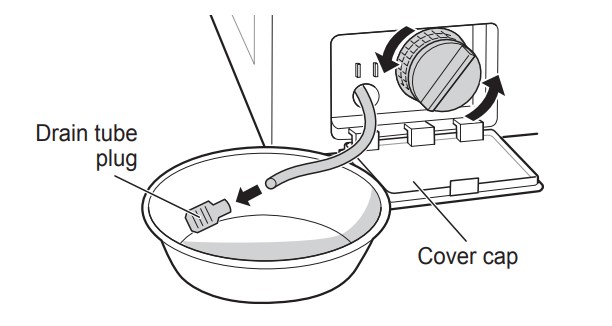
- Open the cover cap and pull out the hose.
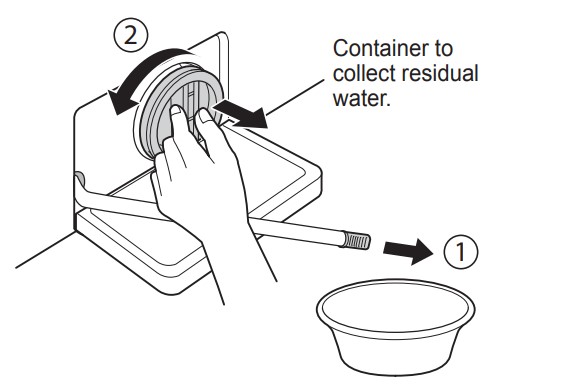
- Unplug the drain plug and allow all the excess water to drain into a vessel before opening the filter by turning it to the left.
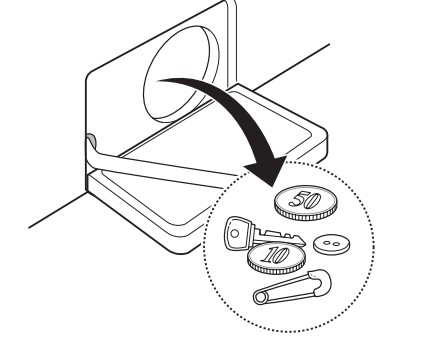
- Remove any extraneous matter, foreign debris and lint from the pump filter trap.
- After cleaning, refit the pump filter cap by turning it to the right and insert the drain plug back onto the drain tube.
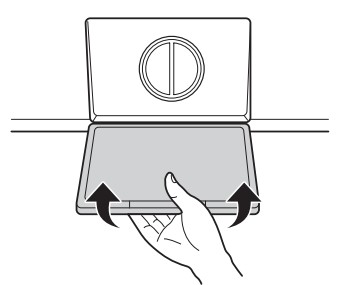
- Close the cover cap.
CAUTION
- First drain using the drain tube and then open the pump filter cap to remove any threads or objects.
- Be careful when draining, as the water may be hot.
Cleaning the Dispenser Drawer
Detergent and fabric softener may build up in the dispenser drawer. Remove the drawer and inserts and check for buildup once or twice a month.
- Remove the detergent dispenser drawer by pulling it straight out until it stops.
- Press down hard on the disengage button and remove the drawer.
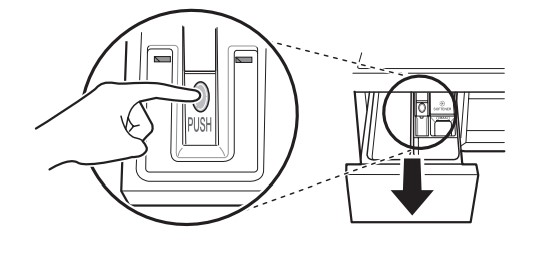
- Press down hard on the disengage button and remove the drawer.
- Remove the inserts from the drawer.
- Rinse the inserts and the drawer with warm water to remove buildup from laundry products. Use only water to clean the dispenser drawer. Dry the inserts and drawer with a soft cloth or towel.
- To clean the drawer opening, use a cloth or small, non-metal brush to clean the recess.
- Remove all residue from the upper and lower parts of the recess.
- Wipe any moisture off the recess with a soft cloth or towel.
- Return the inserts to the proper compartments and replace the drawer.
Tub Clean
Tub Clean is a special cycle to clean the inside of the washing machine.
A higher water level is used in this cycle at higher spin speed. Perform this cycle regularly.
- Remove any clothing or items from the washing machine and close the door.
- Open the dispenser drawer and add Anti limescale (e.g. Calgon) to the main wash compartment.
- Cleaning tablets can be placed directly into the drum.
- Close the dispenser drawer slowly.
- Power On and then press and hold the Spin and Temp. button for 3 seconds.
Then ‘ ’ will be displayed on the display.
 - Press the Start/Pause button to start.
- After the cycle is complete, leave the door open to allow the washing machine and the flexible door gasket and door glass to dry.
CAUTION
- If there is a child present, be careful not to leave the door open unless it is supervised by an adult
NOTE
- Do not add any detergent to the detergent compartments. Excessive suds may generate and leak from the washing machine.
Caution on Freezing During Winter
- When frozen, the product does not operate normally. Install the product where it will not freeze during winter.
- Do not install the washer in any outdoor or sheltered outdoor location as this will contribute water freezing within the unit.
How to Keep the Product from Freezing
- After washing, remove any water remaining inside the pump by opening the drain tube plug that's used for removal of residual water. When the water is removed completely, refit the drain tube and filter cap and then close the filter cover cap.
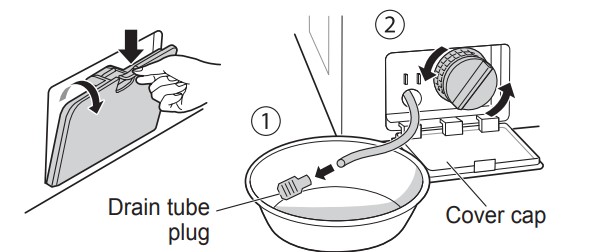
- Lower the Drain tube so that any residual water remaining in the tub can be drained into a low profile vessel.
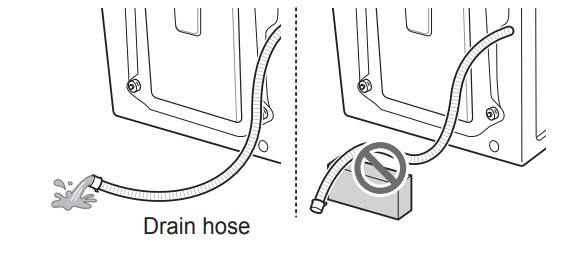
CAUTION
- When the drain hose is installed in a curved shape, the water within the curve of the hose may freeze.
- After closing the tap, disconnect the cold supply hose from the tap, and remove water while keeping the hose facing downwards.
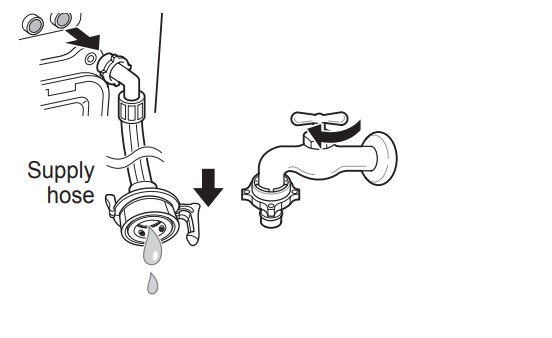
Check for Freezing
- If water does not drain when opening the drain tube plug, check the drain pump body for ice by removing the drain filter cap.
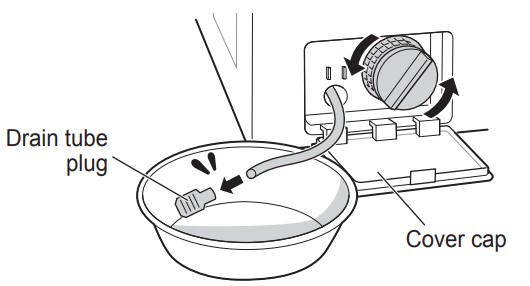
- Turn the power on, choose a washing programme, and press the Start/Pause button.
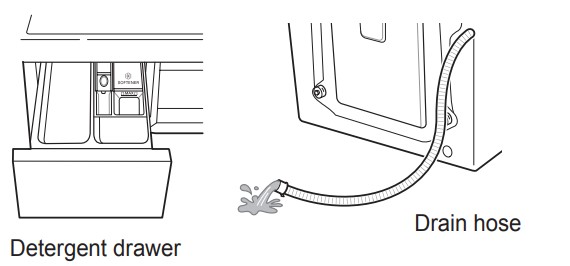
- If
 is shown in the display window while the product is in operation, check water supply taps, and all hoses for ice build up (Some models do not have an
  alarm function that indicates freezing).
NOTE
- Check that water is coming into the detergent drawer while rinsing, and water is draining through the drain hose while spinning
How to Handle Freezing
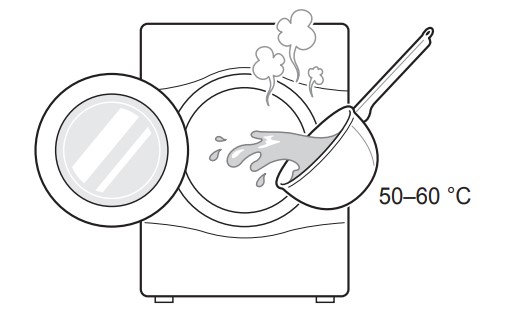
- Make sure to empty the drum, pour warm water of 50–60 °C up to the rubber part inside the drum, close the door, and wait for 1–2 hours.
CAUTION
- When the drain hose is installed in a curved shape, the inner hose may freeze.
- Open the cover cap and drain tube plug used for removal of residual water to extract water completely
NOTE
- If water does not drain, this means the ice is not melted completely, or lint may be trapped inside.
- When water is removed completely from the drum, close the drain tube plug used for removal of residual water, choose a washing programme, and press the Start/Pause button.
NOTE
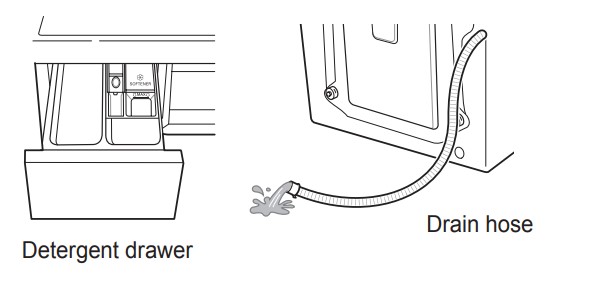
- Check that water is coming into the detergent drawer while rinsing, and water is draining through the drain hose while spinning.
- When water supply problems occur, take the following measures.
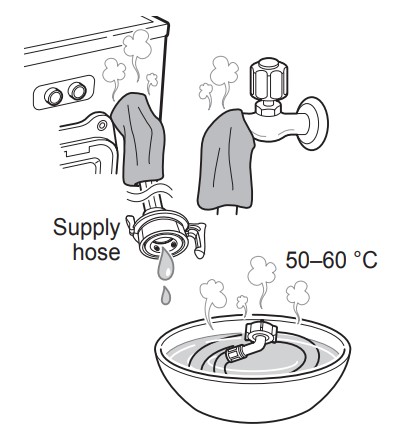
- Turn off the tap, and thaw out the tap and both connection areas of supply hose of the product using a hot water cloth.
- Take out supply hose and immerse in warm water below 50–60 °C.
TROUBLESHOOTING
The appliance is equipped with an automatic error-monitoring system to detect and diagnose problems at an early stage. If the appliance does not function properly or does not function at all, check the following before you call for service:
Diagnosing Problems
| Symptoms | Reason | Solution |
| Rattling and clanking noise |
|
|
| Thumping sound |
|
|
| Vibrating noise |
|
|
| Water leaks |
|
|
| Oversudsing |
| |
|
| |
| Water in the washing machine does not drain or drains slowly |
|
|
| Washing machine does not start |
|
|
| Washing machine will not spin |
|
|
| Door does not open |
| |
| Wash cycle time delayed |
| |
| Fabric softener overflow |
|
|
| Softeners dispensed too early |
|
|
| Dry problem |
|
|
| Odor |
|
|
| Your home appliance and smartphone is not connected to the Wi-Fi network. |
|
|
Error Messages
| Symptoms | Reason | Solution | |
 |  | Water supply pressure is not adequate in area. Water supply taps are not completely open. Water supply hose(s) are kinked. The filter of the supply hose(s) are clogged. If water leakage occurred in the supply hose (aqua stop hose), indicator [A] will become red.
|
|
 |  | Drain hose may not be installed as per installation instructions. The drain filter is clogged. |
|
 |  | Load is too small Feet are not adjusted correctly The appliance has an imbalance detection and correction system. If individual heavy articles are loaded (e.g. bath mat, bath robe, etc.) this system may stop spinning or even interrupt the spin cycle altogether. If the laundry is still too wet at the end of the cycle, add smaller articles of laundry to balance the load and repeat the spin cycle. |
|
 |  | Door is not closed properly. |
|
 | Door sensor has malfunctioned | ||
 |  | Thermistor control error |
|
 |  | Water overfills due to a malfunction or excessively high water pressures. |
|
 |  | Malfunction of water level sensor |
|
 |  | Over load in motor. |
|
 |  | Water leaks. |
|
 |  | The washer experienced a power failure. |
|
 |  | Does not dry (only on combo dryer models) |
|
 |  | Is Inlet/outlet hose or drainage pump frozen? |
|
See other models: GS-B680PL GGC-H20N WD14130FD6 LRE3021ST GF-L708PL

 ’ is not released, call for service.