
OWNER’S MANUAL & COOKING GUIDE
MICROWAVE OVEN
LSMC3086ST
LSMC3086SS
LSMC3089BD
www.lg.com
MFL68927903_06
Copyright © 2016 - 2020 LG Electronics Inc. All Rights Reserved.
Read this owner's manual thoroughly before operating the
appliance and keep it handy for reference at all times.

- 2 -
Thank you for purchasing an LG microwave oven.
PRECAUTIONS TO AVOID POSSIBLE
EXPOSURE TO EXCESSIVE
MICROWAVE ENERGY...
Please record the model number and serial
number of this unit for future reference. We
also suggest you record the details of your
contact with LG (LG Electronics U.S.A., Inc.)
concerning this unit.
Staple your receipt here to prove your
retail purchase.
(a) Do not attempt to operate this oven
with the door open since open-door
operation can result in harmful exposure
to microwave energy. It is important
not to defeat or tamper with the safety
interlocks.
(b) Do not place any object between the
oven front face and the door or allow
soil or cleaner residue to accumulate on
sealing surfaces.
(c) Do not operate the oven if it is damaged.
It is particularly important that the oven
door closes properly and that there is no
damage to the:
(1) door (bent),
(2) hinges and latches (broken or
loosened),
(3) door seals and sealing surfaces.
(d) The oven should not be adjusted or
repaired by anyone except properly
qualied service personnel.
Model No:
Serial No:
Dealer:
Dealer Phone No:
Customer Relations
LG Electronics U.S.A., Inc.
Service Division Bldg. #3
201 James Record Rd.
Huntsville, AL 35824-0126

- 3 -
PRECAUTIONS TO AVOID POSSIBLE
EXPOSURE TO EXCESSIVE MICROWAVE
ENERGY ...............................................................2
SAFETY ...............................................................4
Important Safety Instructions .............................4
PRODUCT OVERVIEW
....................................... 6
Location of Model Number .................................6
Oven Specications ...........................................6
Electrical Requirements .....................................6
Grounding Instructions .....................................6
Microwave Oven Features .................................7
Control Panel Features ......................................8
MICROWA
VE COOKING TIPS ..........................10
OPERATION ......................................................15
Learn About Your Microwave Oven ..................15
Clock ................................................................15
Child Lock ........................................................15
Timer ................................................................16
Custom Cook ...................................................16
Vent Fan ..........................................................16
Vent Fan Auto Time Set ...................................16
Turntable On/Off ..............................................17
Light On/Off ......................................................17
Cooking at High Power Level ..........................17
Custom Set.......................................................17
Cooking at Lower Power Levels ......................18
Cooking With More Than One Cook Cycle ......18
Cooking Guide for Lower Power Levels ...........19
Sensor Operating Instructions ..........................20
Sensor Cooking Guide ....................................20
Sensor Reheat ................................................20
Sensor Cook ....................................................20
Sensor Popcorn ...............................................20
Sensor Reheat Table .......................................21
Sensor Cook Table ..........................................21
Tips for Convection Cooking ...........................22
Convection ......................................................23
Tips for Combination Cooking ..........................24
Helpful Hints for Combination Cooking ...........24
Combination Roast ...........................................24
Auto Cook ........................................................25
Auto Cook Table
..............................................
25
Soften
..............................................................26
Soften T
able
....................................................26
Melt ..................................................................26
Melt Table ........................................................26
Speed Auto
Combination .................................27
Speed Auto Combination Chart
.......................27
Auto Defrost ....................................................28
Weight
Conversion Table
................................28
Operating T
ips
.................................................28
Auto
Defrost Table
...........................................29
Defrosting T
ips
................................................31
COOKING GUIDE
...............................................32
Convection Baking Guidelines ........................32
Meat Roasting Guidelines for Convection
Cooking ...........................................................34
Combination Roast Cooking Guide ..................35
Combination Bake Cooking Guide ..................36
Heating/Reheating Guide .................................37
Fresh Vegetable Guide ....................................38
SMART FEATURES
............................................
39
Before Using Tag On
.......................................39
Using the
Tag On Function
..............................39
Using T
ag On with Apps
..................................40
MAINTENANCE
..................................................41
Caring for Your Microwave Oven .....................41
Cleaning the Grease Filters .............................42
Charcoal Filter Replacement ............................42
Oven Light Replacement ..................................43
Cooktop/Countertop Light Replacement .........43
Microwave Utensil Guide .................................44
TROUBLESHOOTING
........................................45
Before Callin
g for Service ................................45
Frequently Asked Questions
...........................45
SMART DIAGNOSIS
...........................................46
WARRANTY ........................... Inside Back Cover
TABLE OF CONTENTS

- 4 -
SAFETY
IMPORTANT SAFETY INSTRUCTIONS
The safety instructions below will tell you how to use your oven and avoid harm to yourself or
damage to your oven.
WARNING - To reduce the risk of burns,
electric shock, re, injury to persons, or exposure to
excessive microwave energy:
•
Read all the instructions before using your oven.
•
Do not allow children to use this oven without
close supervision.
• Read and follow the specic PRECAUTIONS TO
AVOID POSSIBLE EXPOSURE TO EXCESSIVE
MICROWAVE ENERGY found on page 2.
• Do not use corrosive chemicals or vapors, such as
sulde and chloride, in this appliance. This type of
oven is specically designed to heat, cook, or dry
food. It is not designed for industrial or laboratory
use.
• Do not store this appliance outdoors. Do not
use this product near water - for example, near a
kitchen sink, in a wet basement, near a swimming
pool, or similar location.
• Do not use the cavity for storage purposes. Do not
leave paper products, cooking utensils, or food in
the cavity when not in use.
• Clean the ventilating hood frequently. Do not
allow grease to accumulate on the hood or the
lters.
• Use care when cleaning the vent hood lters.
Corrosive cleaning agents, such as lye-based oven
cleaners, may damage the lters.
• Do not tamper with the built-in safety switches
on the oven door. The oven has several built-in
safety switches to make sure the power is off when
the door is open.
• When food ames under the hood, turn the fan on.
• Suitable for use above both gas and electric
cooking equipment 36 inches wide or less.
• Do not use this oven for commercial purposes.
It is made for household use only.
• When cleaning the door and the surfaces that
touch the door, use only mild, non-abrasive
soaps or detergents and a sponge or soft cloth.
• If your oven is dropped or damaged, have
it thoroughly checked by a qualied service
technician before using it again.
• To avoid a re hazard:
- Do not severely overcook food. Severely
overcooked foods can start a re in the oven.
Watch the oven carefully, especially if you have
paper, plastic, or other combustibles in the oven.
-
Do not store combustible items (bread, cookies,
etc.) in the oven, because if lightning strikes the
power lines it may cause the oven to turn on.
- Do not use wire twist-ties in the oven. Be sure
to inspect purchased items for wire twist-ties and
remove them before placing the item in the oven.
• If a re should start:
- Keep oven door closed
- Turn the oven off
- Disconnect the power cord or shut off power
at the fuse or circuit breaker panel
• To avoid electric shock:
- This appliance must be grounded. Connect only
to a properly grounded outlet. See the electrical
GROUNDING INSTRUCTIONS on page 6.
- Do not operate this appliance if it has a
damaged cord or plug, if it is not working
properly or if it has been damaged or dropped.
- Do not immerse the electrical cord or plug in
water.
- Keep cord away from heated surfaces.
- Do not let cord hang over edge of table or
counter.
• Take care when The Door is opened.
There is a possibility of being injured.
• When range or cooktop, located below the
microwave, is in operation, PLEASE USE
CAUTION IN OPERATING THE MICROWAVE AS
ITS COMPONENTS SUCH AS DOOR HANDLE
MAY BE OVERHEATED CAUSING BURNS AND/
OR INJURY.
SAFETY
- 5 -
SAVE THESE INSTRUCTIONS
FEDERAL COMMUNICATIONS COMMISSION RADIO FREQUENCY
INTERFERENCE STATEMENT ( U.S.A. ONLY)
• To avoid improperly cooking some foods.
- Do not heat any types of baby bottles or baby
food. Uneven heating may occur and possibly
cause personal injury.
- Do not heat small-necked containers, such as
syrup bottles.
- Do not deep-fat fry in your microwave oven.
- Do not attempt home canning in your microwave
oven.
- Do not heat the following items in the microwave
oven: whole eggs in the shell, water with oil or fat,
sealed containers, or closed glass jars. These items
may explode.
• Do not cover or block any openings in the oven.
• Use your oven only for its intended use as described
in the manual.
• Do not run the oven empty.
• Secure the cord in the cabinet above the oven.
- Do not
package on a microwavable dish.
- Do not
turntable. Use a microwavable dish.
- Keep a browning dish at least
3
/
16
Carefully read and follow the instructions for the
browning dish. If you use a browning dish incorrectly,
• Install or locate this appliance only in accordance with
the provided installation instructions.
•
service personnel. Contact the nearest authorized
service facility for examination, repair, or adjustment.
• Liquids, such as water, coffee, or tea can be
overheated beyond the boiling point without appearing
to be boiling due to surface tension of the liquid. Visible
bubbling or boiling when the container is removed from
the microwave oven is not always present.
THIS COULD RESULT IN VERY HOT LIQUIDS
SUDDENLY BOILING OVER WHEN THE CONTAINER
IS DISTURBED OR A SPOON OR OTHER UTENSIL
IS INSERTED INTO THE LIQUID.
To reduce the risk of injury to persons;
- Do not overheat the liquid.
- Stir the liquid both before and halfway through heating it.
- Do not use straight-sided containers with narrow necks.
-
After heating, allow the container to stand in the microwave
oven for a short time before removing the container.
- Use extreme care when inserting a spoon or other
utensil into the container.
WARNING:
This equipment generates and uses ISM frequency
energy and if not installed and used properly, that is in
strict accordance with the manufacturer's instructions,
may cause interference to radio and television
reception. It has been type tested and found to comply
with limits for ISM Equipment pursuant to part 18 of
FCC Rules, which are designed to provide reasonable
protection against such interference in a residential
installation.
However, there is no guarantee that interference will
not occur in a particular installation. If this equipment
does cause interference to radio or television reception,
which can be determined by turning the equipment
off and on, the user is encouraged to try to correct the
interference by one or more of the following:
• Reorient the receiving antenna of the radio or
television.
• Relocate the Microwave Oven with respect to the
receiver.
• Move the microwave oven away from the receiver.
• Plug the microwave oven into a different outlet so that
the microwave oven and the receiver are on different
branch circuits.
The manufacturer is not responsible for any radio or
to this microwave oven. It is the responsibility of the
user to correct such interference.
WARNING:
Your microwave oven must be installed following the guide of
installation manual,otherwise there could be injury to persons or other objects!
- 6 -
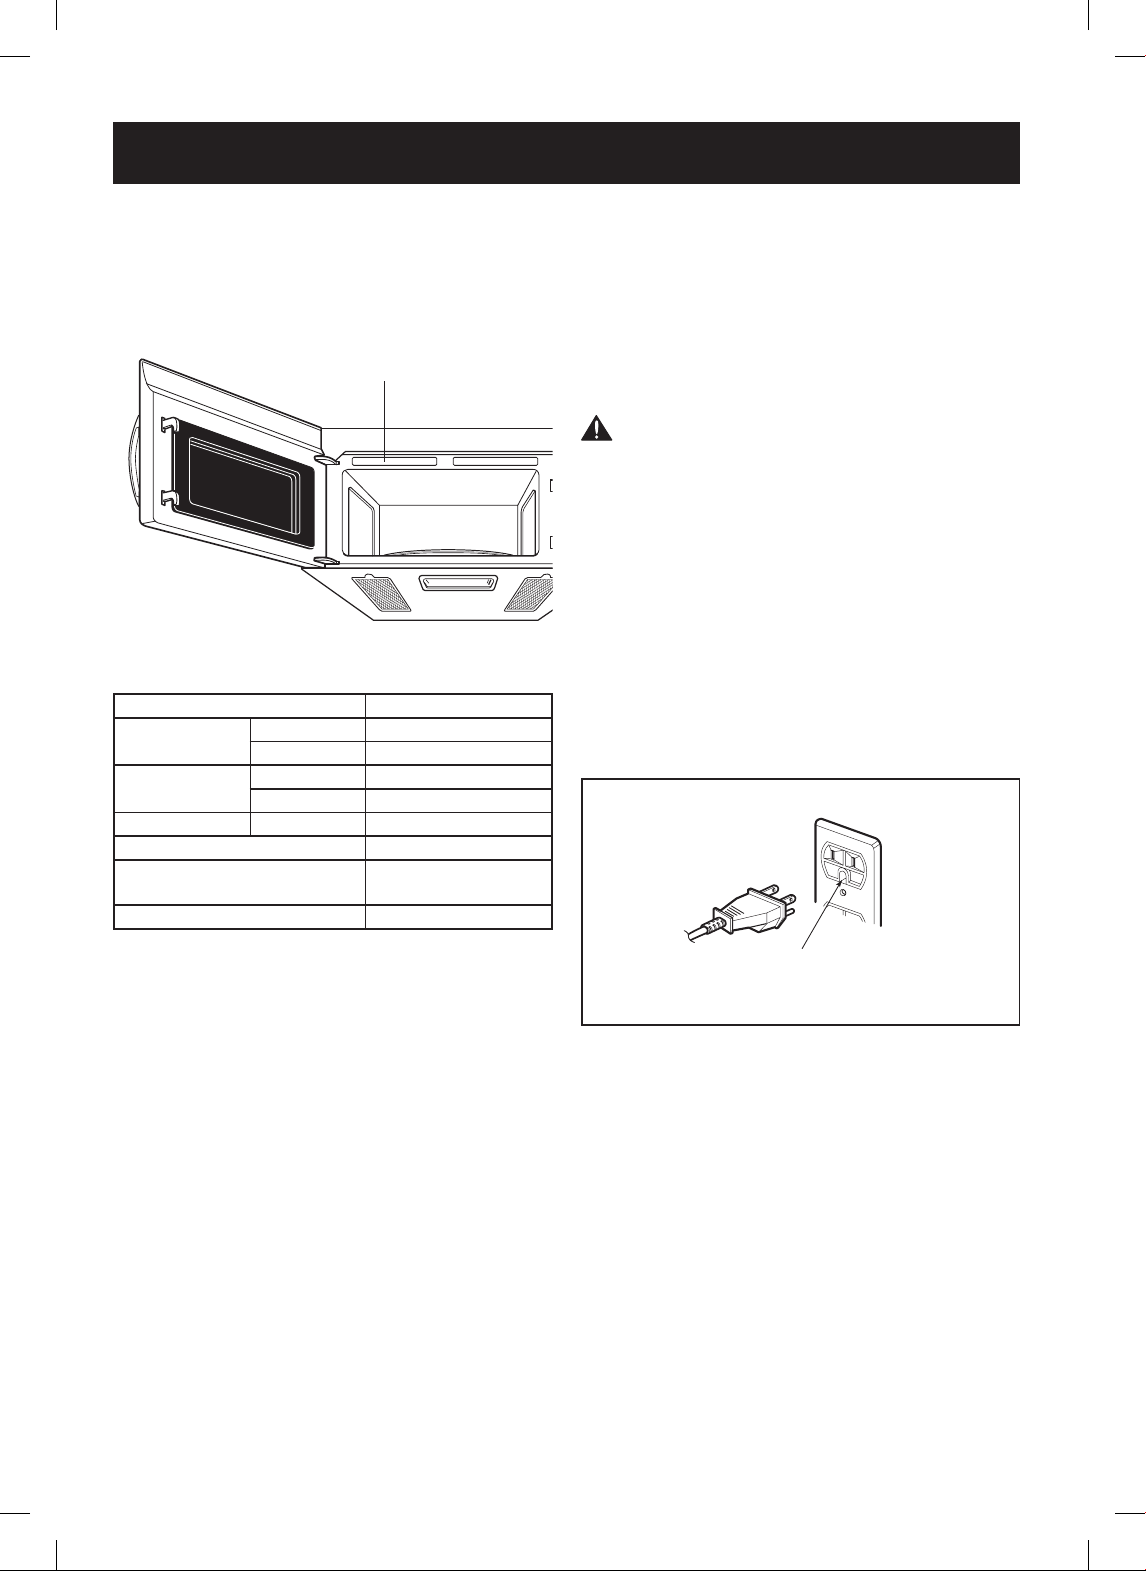
LOCATION OF MODEL NUMBER
To request service information or replacement parts,
the service center requires the complete model number
of your microwave oven. The model number is on the
oven front as shown in the illustration below.
OVEN SPECIFICATIONS
Power Supply 120 V AC, 60 Hz
Rated Current Microwave 14.0 A
Convection 14.0 A
Rated Power
Input
Microwave 1650 W
Convection 1650 W
Power Output Microwave 950 W
Overall Dimensions(WxHxD)
29
15
/
16
" x 16
7
/
16
" x 15
3
/
8
"
Oven Cavity Dimensions
(WxHxD)
21
1
/
4
" x 9
9
/
16
" x 14
3
/
16
"
Capacity of Oven Cavity 1.7 cu.ft
ELECTRICAL REQUIREMENTS
The oven is designed to operate on a Standard
120 V/60 Hz household outlet. Be sure the circuit is at
least 15 A or 20 A and the microwave oven is the only
appliance on the circuit. It is not designed for 50 Hz or
any circuit other than a 120 V/60 Hz circuit.
GROUNDING INSTRUCTIONS
This appliance must be grounded. In the event of an
electrical short circuit, grounding reduces the risk of
electric shock by providing an escape wire for the
electric current. This appliance is equipped with a cord
having a grounding wire with a grounding plug. The
plug must be plugged into an outlet that is properly
installed and grounded.
WARNING
- Improper use of the
grounding can result in a risk of electric shock.
Consult a qualied electrician or service person if the
grounding instructions are not completely understood,
or if doubt exists as to whether the appliance is
properly grounded.
Because this appliance ts under the cabinet, it has a
short power-supply cord. Do not use an extension cord.
If the power supply cord is too short, have a qualied
electrician or service person install an outlet near the
appliance. A short power supply cord is provided to
reduce the risks resulting from becoming entangled in
or tripping over a longer cord.
See the separate Installation Instructions for directions
on placing the cord properly.
Keep the electrical power cord dry and do not pinch or
crush it in any way.
PRODUCT OVERVIEW
MODEL NUMBER LABEL
Ensure proper ground
exists before use
- 7 -
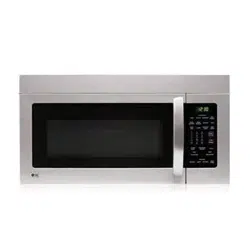
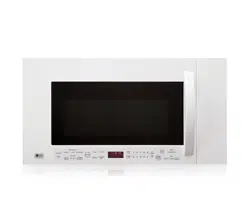
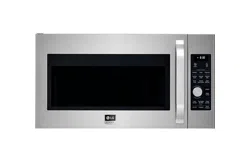
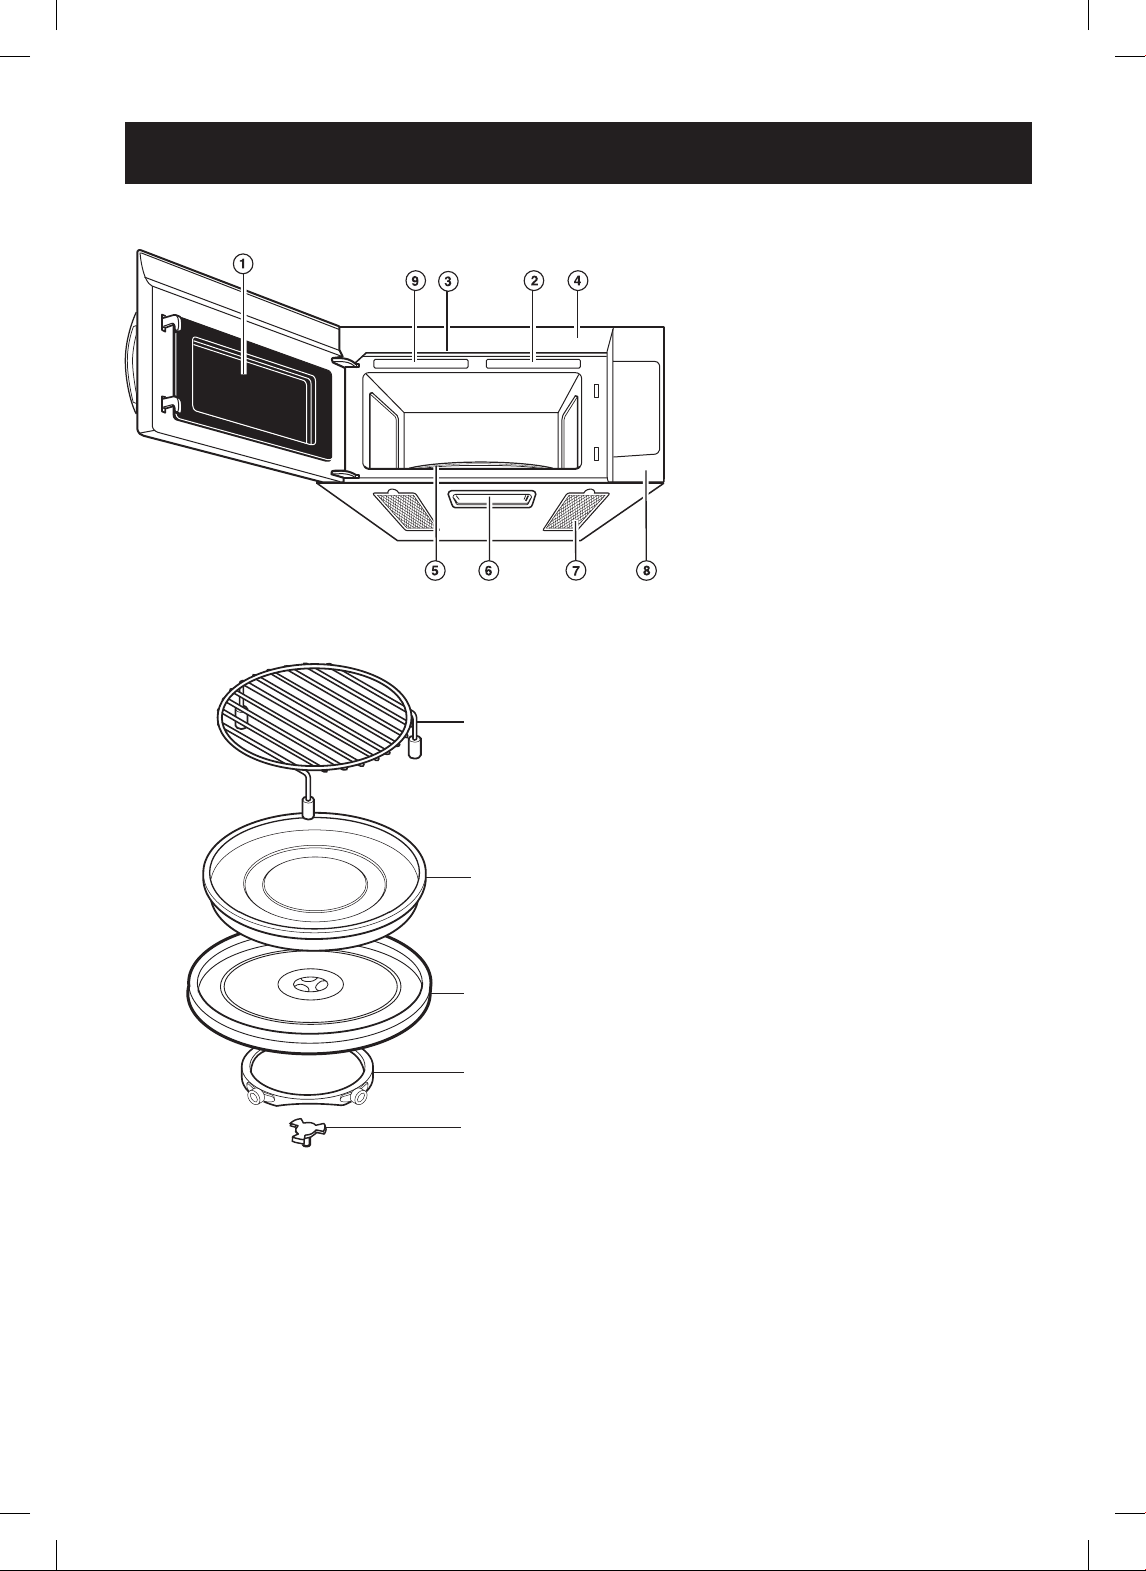
MICROWAVE OVEN FEATURES
1. Convection Rack
2. Metal Tray/Drip Pan
3. Glass Tray
4. Rotating Ring
5. Shaft
PRODUCT OVERVIEW
1. Metal Shielded Window
The shield
prevents microwaves from escaping.
It is designed as a screen to allow
you to view food as it cooks.
2. Cooking Guide Label
3. Charcoal Filter
(Behind Vent Grille)
4. Vent Grille
5. Glass Tray
The glass tray moves
food as it cooks for more even
cooking. It must be in the oven
during operation.
6. Cooktop Light
7. Grease Filter
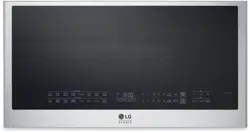
8. Control Panel
Touch the buttons on
this panel to perform all functions.
9. Model and Serial Number Plate
1
2
3
4
5
The turntable rotates in both direction to help
food cook more evenly. Do not operate the
microwave oven without the glass tray in place.
- 8 -
CONTROL PANEL FEATURES
Use the control panel to select the desired cooking function quickly and easily. Simply touch a command
key to select the desired function.
For more information on these features, see the
OPERATION
section.
PRODUCT OVERVIEW
1
2
4
6
3
9
12
14
15
18
21
7
10
13
16
19
17
20
11
8
5

- 9 -
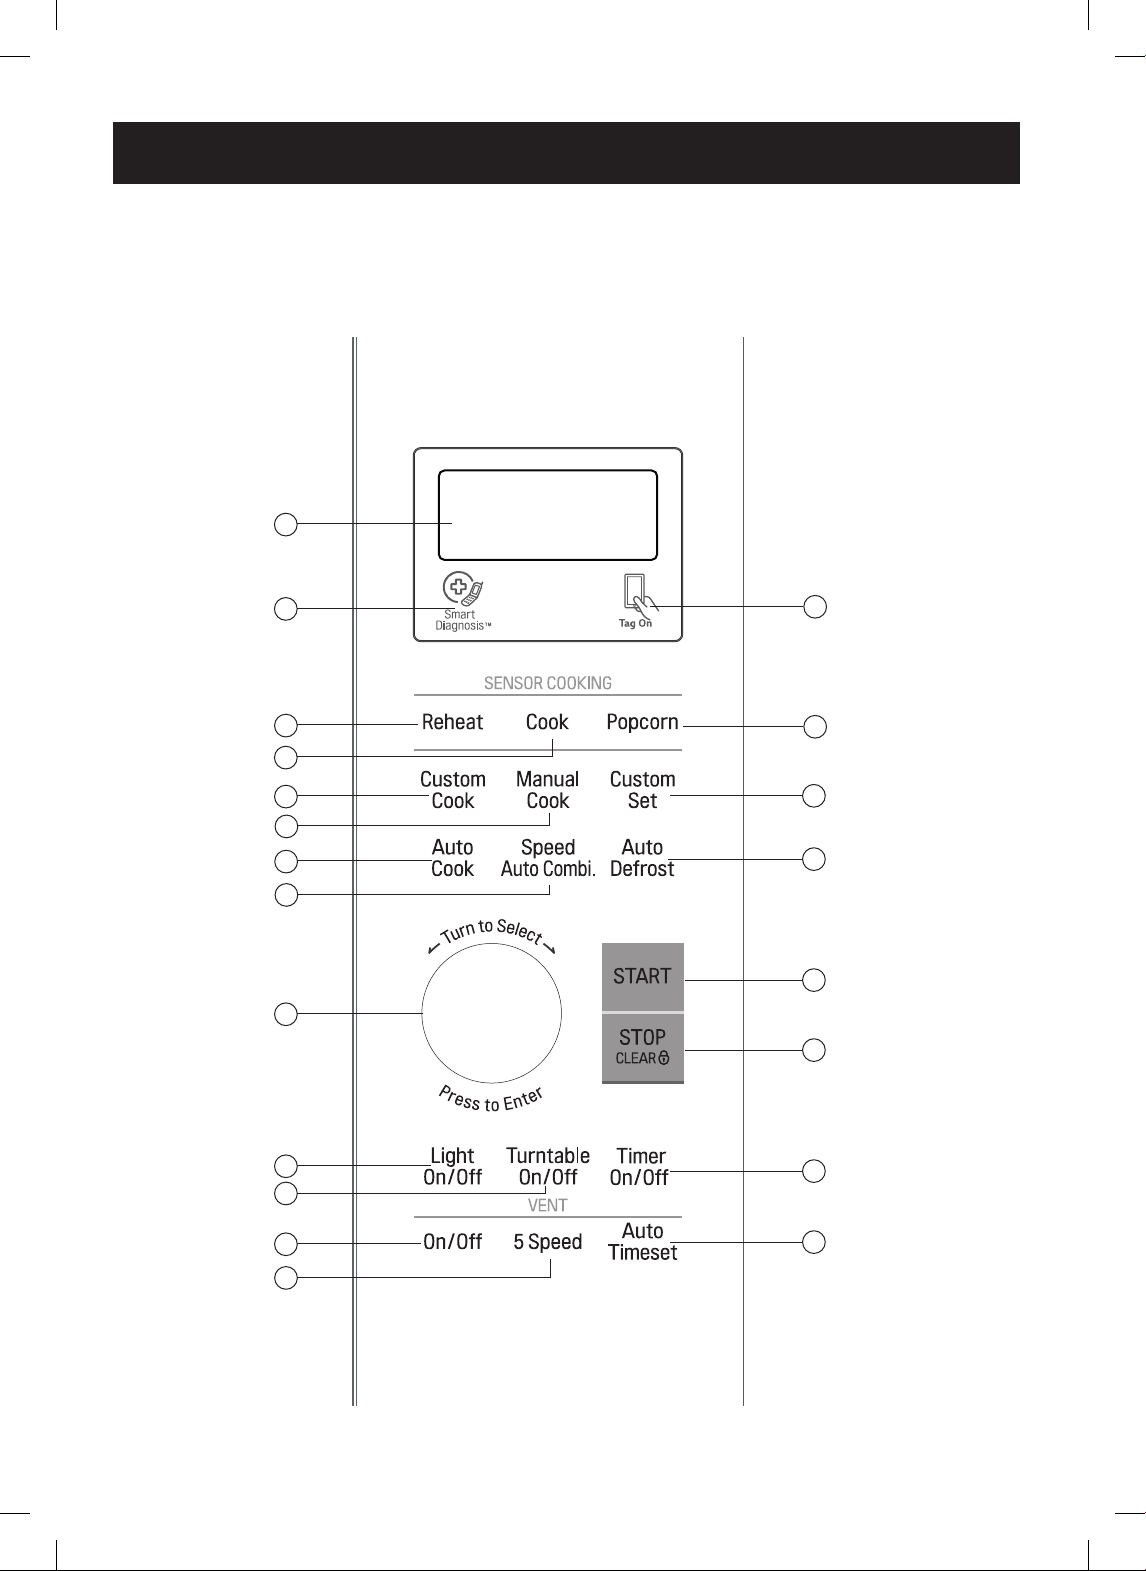
1. DISPLAY:
The Display includes a clock and
indicators to tell you time of day, cooking time
settings, and cooking functions selected.
ICONS
2. SMART DIAGNOSIS:
Hold the mouthpiece
of a phone up to this icon when directed to
by service center personnel, to help diagnose
problems with the oven when calling for service.
3. TAG ON:
Hold a smart phone over this icon to
activate the NFC function.
COMMAND KEYS
4. SENSOR REHEAT:
Touch this key to reheat
casseroles, dinner plates, pizza slices, and
soups/sauces. The oven’s sensor tells the oven
how long to cook depending on the amount of
humidity coming from the food.
5. SENSOR COOK:
Touch this key to cook baked
potatoes, frozen vegetables, fresh vegetables,
canned vegetables, frozen entrées, and rice.
The oven’s sensor tells the oven how long to
cook depending on the amount of humidity
coming from the food.
6. SENSOR POPCORN:
Touch this to pop
popcorn. The oven’s sensor tells the oven
how long to cook depending on the amount of
humidity it detects from the popcorn.
7. CUSTOM COOK:
Touch this key to recall one
cooking instruction previously programmed into
memory.
8. MANUAL COOK:
Select the functions to
operate MICROWAVE and CONVECTION,
COMBI.
9. CUSTOM SET:
Touch this key to change the
oven’s default settings for sound, clock, display
speed, and defrost weight.
10. AUTO COOK:
Touch this key to cook bacon,
fresh rolls and mufns, frozen rolls and
mufns, beverages, chicken pieces, and hot
cereal.
- SOFTEN: butter, ice cream, cream cheese,
or frozen juice.
- MELT: butter, chocolate, cheese, or
marshmallows.
11. SPEED AUTO COMBI:
Touch this key when
setting weight combination cooking.
12. AUTO DEFROST:
Touch this key to select
food type and defrost food by weight.
CONTROLS
13. CONTROL DIAL:
Set cooking time,
temperature, weight and cooking categories.
Lengthen or shorten the cooking time at any
point by turning the dial(except in defrost
mode). Press on the dial to start a function or
enter all entries.
14. START:
Touch the key to start a function,
accept selections, or restart after opening.
15. STOP/CLEAR:
Touch this key to stop the
oven or to clear all entries.
16. LIGHT ON/OFF:
Touch this key to turn the
cooktop/countertop light on or off.
17. TURNTABLE ON/OFF:
Touch this key to turn
off the turntable. OFF appears in the display.
Note:
This option is not available in sensor
cook and defrost modes.
18. TIMER ON/OFF:
Touch this key to set the
timer.
19. VENT ON/OFF:
Touch this key to turn the fan
on/off.
20. VENT 5-SPEED:
Touch this key to choose
one of 5 fan speeds.
21. VENT AUTO TIMESET:
Touch this key when
setting the ventilation time. (1, 3, 5, 10, and 30
minutes.)
PRODUCT OVERVIEW

- 10 -
Amount of Food
• If you increase or decrease
the amount of food you
prepare, the time it takes to cook that food will also
change. For example, if you double a recipe, add a
little more than half the original cooking time. Check
for doneness and, if necessary, add more time in small
increments.
Starting Temperature of Food
• The lower the temperature
of the food being put into
the microwave oven, the longer it takes to cook. Food
at room temperature reheats more quickly than food
at refrigerator temperature.
Composition of Food
• Food with a lot of fat and sugar
heats faster than
food containing a lot of water. Fat and sugar also
reach a higher temperature than water during the
cooking process.
• The more dense the food,
the longer it takes to
heat. Very dense food like meat takes longer to heat
than lighter, more porous food like sponge cakes.
Size and Shape
• Smaller pieces of food
cook faster than larger
pieces. Also, same-shaped pieces cook more evenly
than different-shaped pieces.
• With foods that have different thicknesses,
the
thinner parts cook faster than the thicker parts Place
the thinner parts of chicken wings and legs in the
center of the dish.
Stirring and Turning Foods
• Stirring and turning foods
spreads heat quickly to
the center of the dish and avoids overcooking at the
outer edges of the food.
Covering Food
Cover food to:
• reduce
splattering
• shorten
cooking times
• keep
food moist
Releasing Pressure in Foods
• Several foods
(for example: baked potatoes,
sausages, egg yolks, and some fruits) are tightly
covered by a skin or membrane. Steam can build up
under the membrane during cooking, causing the
food to burst. To relieve the pressure and to prevent
bursting, pierce these foods before cooking with a
fork, cocktail pick, or toothpick.
Using Standing Time
• Always allow food to stand
either in or out of
the oven after cooking power stops. Standing time
after defrosting and cooking allows the temperature
to evenly spread throughout the food, improving
the cooking results. For inside oven standing time,
program a 0 power second stage of the cooking cycle.
See Cooking with More than One Cook Cycle.
• The length of the standing time
depends on how
much food you are cooking and how dense it is.
Sometimes it can be as short as the time it takes you
to remove the food from the oven and take it to the
serving table. However, with larger, denser food items,
the standing time may be as long as 10 minutes.
Arranging Food
For best results, place food evenly on the plate. You
can do this in several ways:
• If you are cooking several items of the same food,
such as baked potatoes, place them in a ring pattern
for uniform cooking.
• When cooking foods of uneven shapes or
thickness, such as chicken breasts,
place the
smaller or thinner area of the food towards the center
of the dish where it will be heated last.
• Layer thin slices of meat
on top of each other.
• When you cook or reheat whole sh, score
the
skin to prevent cracking.
• Do not
let food or a container touch the top or sides
of the oven. This will prevent possible arcing.
MICROWAVE COOKING TIPS
- 11 -
MICROWAVE COOKING TIPS
Using Aluminum Foil
Metal containers should not be used in a microwave
oven. However, if you have purchased food which is
prepackaged in an aluminum foil container, refer to the
instructions on the package. When using aluminum
foil containers, cooking times may be longer because
microwaves will only penetrate the exposed top of the
food and not the bottom or the sides. If using aluminum
containers without package instructions, follow these
guidelines:
• Place
the
aluminum foil container in a glass bowl and
add water so that it covers the bottom of the container,
but not more than ¼ in. (.64 cm) deep. This ensures
even heating of the container bottom.
• Always remove
the container lid to avoid damage to
the oven.
• Use only
undamaged containers.
• Do not use
containers taller than ¾ in. (1.9 cm).
• Container must be
at least half lled.
• To avoid arcing,
there must be a minimum ¼ in.(.64
cm) between the aluminum container and the walls of
the oven and also between two aluminum containers.
• Always place
the container on the turntable.
• Shield
parts of food that may cook quickly, such as
wing tips and leg ends of poultry, with small pieces of
aluminum foil.
• Heating food
in aluminum foil containers usually
takes up to double the time compared to reheating in
plastic, glass, china, or paper containers.
The cooking time will vary depending upon the type of
container you use.
• Let food stand
for 2 to 3 minutes after heating so
that heat is spread evenly throughout the container.
Do Not Can or Sterilize in Oven
• Do not
try to can food in the oven. Closed glass jars
may explode, resulting in damage to the oven.
• Do not
use the microwave oven to sterilize objects
(baby bottles, etc.). It is difcult to keep the oven at
the high temperature needed for sterilization.
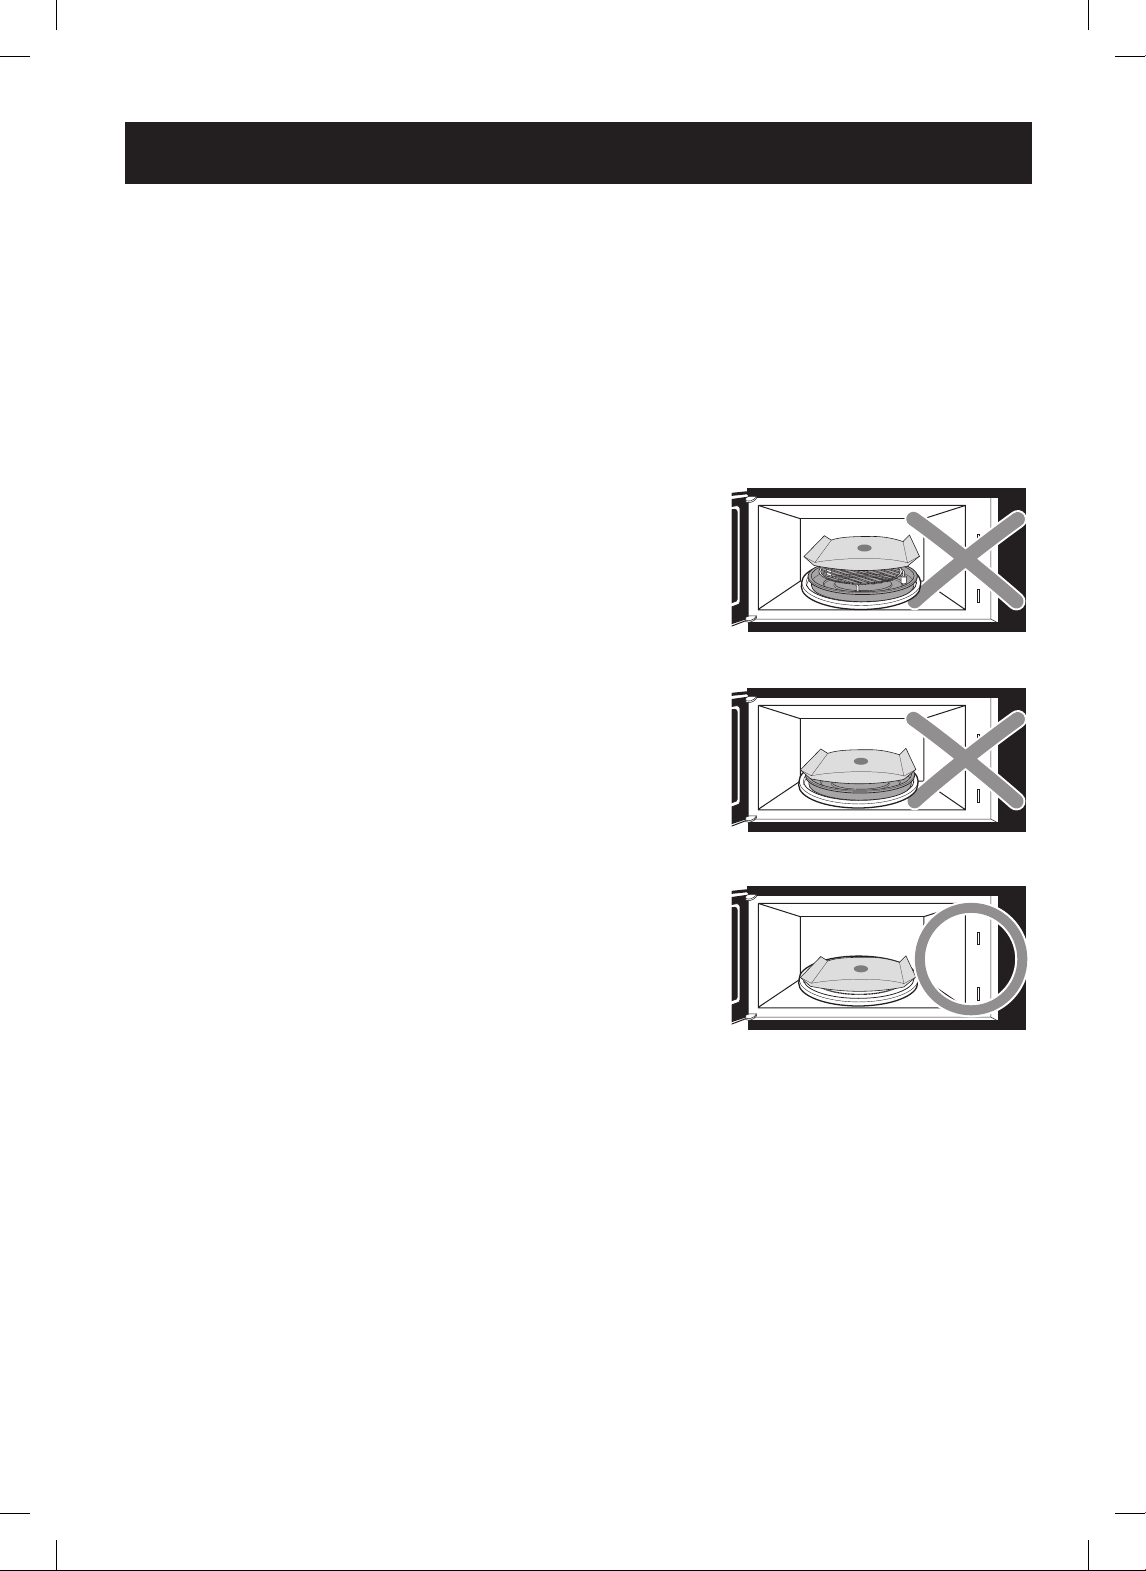
Removing the Rack
• When popping commercially packaged popcorn,
remove the rack and drip pan from the oven.
Do not place the bag of microwave popcorn on the
rack or under the rack. Leave the glass tray in place at
all times.
CAUTION
:
Popping microwave popcorn with rack
and drip pan in place can cause re or
damage to the microwave oven.
- 12 -
Cooking Comparison Guide
Cooking with your new oven offers a wide variety
of food preparation options: microwave cooking,
convection cooking, and combination cooking.
Microwave cooking
uses very short, high-frequency
radio waves. The movement of the microwaves
through the food generates heat and cooks most
foods faster than regular methods, while retaining their
natural texture and moisture. Microwave cooking heats
food directly, not the cookware or the interior of the
oven. Reheating is easy and defrosting is particularly
convenient because less time is spent in food
preparation.
Convection cooking
constantly circulates heated air
around the food, creating even browning and sealed-in
avor by the constant motion of hot air over the food
surfaces.
Combination cooking
combines microwave energy
with convection to cook with speed and accuracy, while
browning and crisping to perfection.
Timed cooking can be set with microwave cooking,
convection cooking, and combination cooking. Preset
the desired length of cooking time and the oven turns
off automatically.
MICROWAVE COOKING TIPS
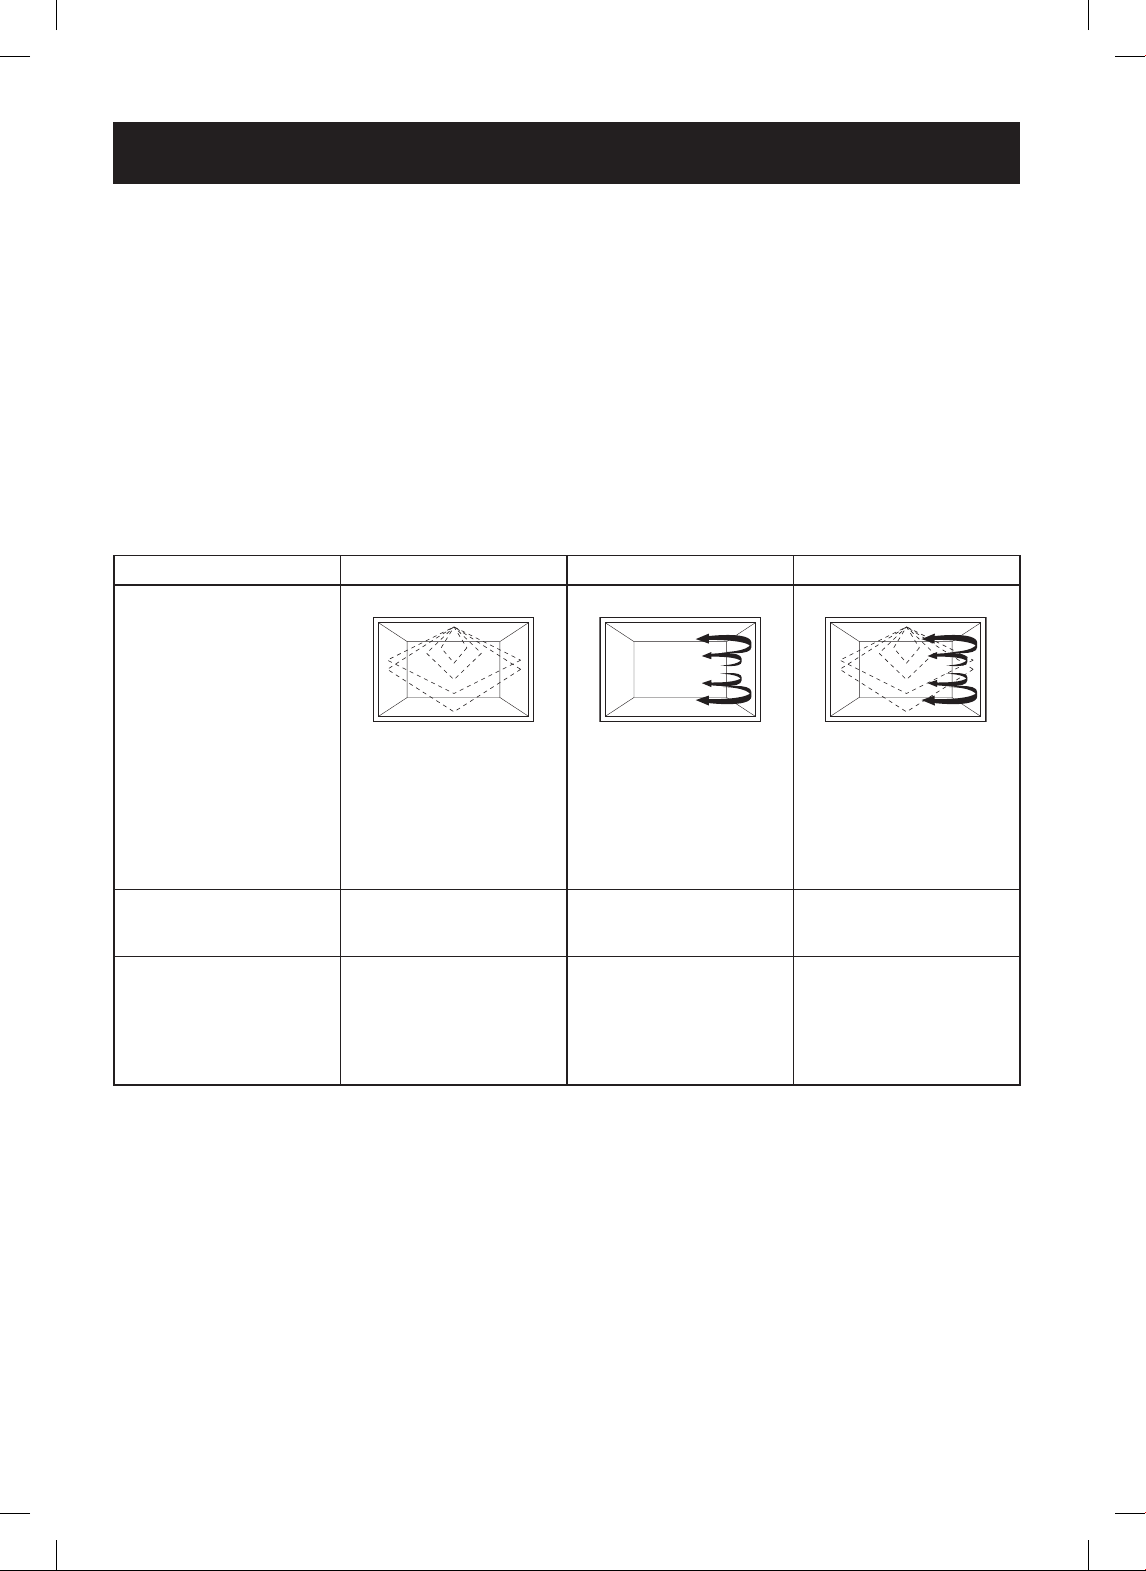
MICROWAVE CONVECTION COMBINATION
COOKING
METHOD
Microwave energy is
distributed evenly
throughout the oven for
fast, thorough cooking of
food.
Hot air circulates around
food to produce browned
exteriors and sealed-in
juices.
Microwave energy and
convection heat combine
to shorten the cooking
time of regular ovens,
while browning and
sealing in juices.
HEAT SOURCE
Microwave energy. Circulating heated air. Microwave energy and
circulating heated air.
BENEFITS
• Fast, high efciency
cooking.
• Oven and surroundings
do not get hot.
• Easy clean-up
• Aids in browning and
seals in avor.
• Cooks some foods faster
than regular ovens.
• Shortened cooking time
from microwave energy.
• Browning and crisping
from convection heat.

- 13 -
MICROWAVE COOKING TIPS
COOKWARE MICROWAVE CONVECTION COMBINATION
Heat-Resistant Glass, Ceramic Glass
Yes Yes Yes
Ceramics, China
Yes
(Do not use china
with gold or silver
trim.)
Yes Yes
Metal Cookware
No Yes No
Non Heat-Resistant Glass
No No No
Microwave-Safe Plastic
Yes No Yes*
Plastic Wrap, Wax Paper
Yes No No
Paper Products
Yes No No
Straw, Wicker, and Wood
Yes No No
* Use only microwave cookware that is safe to 450°F
COOKWARE GUIDE
Microwave Cooking
Most heat-resistant, non-metallic cookware is safe for
use in the microwave oven.
Testing Cookware Before Using
1. Place the empty cookware in the microwave oven.
2. Measure 1 cup of water in a glass measuring cup
and place it in the oven beside the cookware.
3. Microwave on 100% power for 1 minute. If the dish is
warm, it should not be used for microwave cooking.
Convection Cooking
• Metal pans are recommended for all types of baked
products, but especially where browning or crusting is
important.
• Dark or dull nish metal pans are best for breads and
pies because they absorb heat and produce a crisper
crust.
• Shiny aluminum pans are better for cakes, cookies,
or mufns because these pans reect heat and help
produce a light, tender crust.
• Glass or glass-ceramic casserole or baking dishes
are best suited for egg and cheese recipes to provide
easy cleanup.
Combination Cooking
• Glass or glass-ceramic baking containers are
recommended. Do not use items with metal trim as
they may cause arcing (sparking) with oven wall or
oven shelf, damaging the cookware, the shelf, or the
oven.
• Heat-resistant plastic microwave cookware (safe to
450°F) may be used, but is not recommended for
foods that require crusting or all-around browning,
because plastic is a poor conductor of heat.
- 14 -
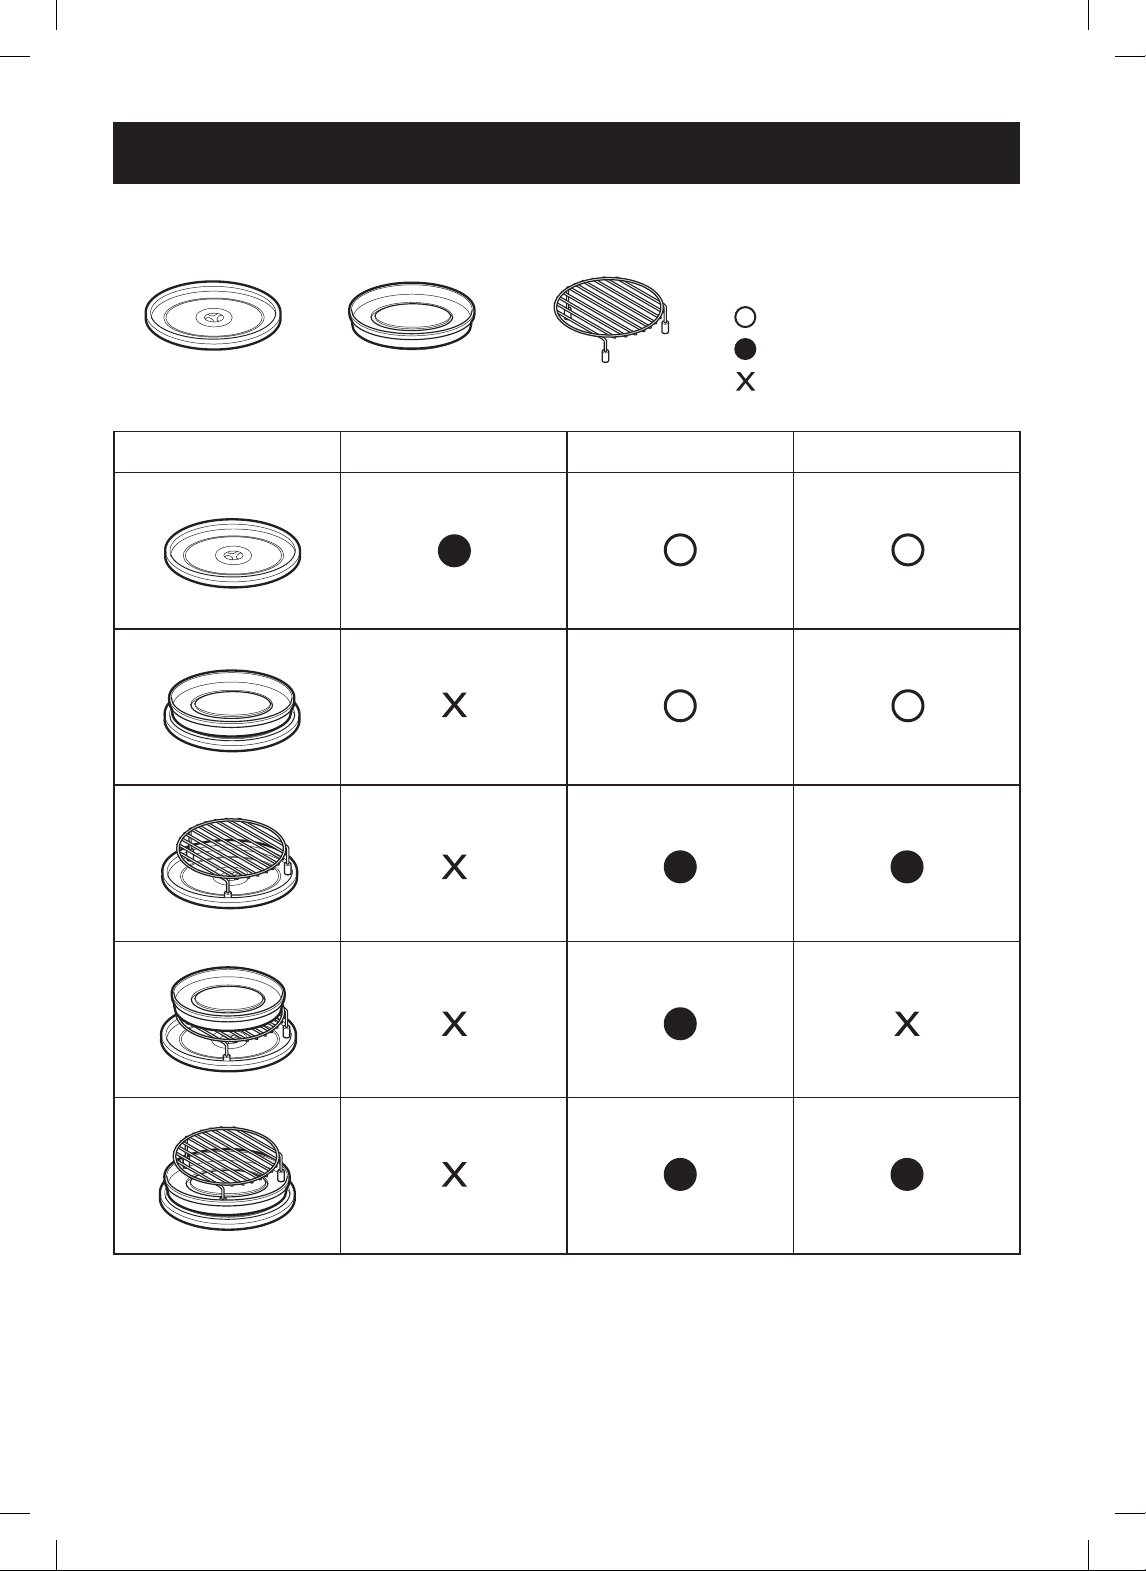
HOW TO USE ACCESSORIES
MICROWAVE CONVECTION COMBINATION
Notes:
• Never operate the oven while empty except to preheat in convection mode.
• NEVER operate the microwave mode while the oven is empty.
MICROWAVE COOKING TIPS
Glass Tray
: Possible to use
: Recommended method
: Do not use
Metal Tray Metal Rack
- 15 -
LEARN ABOUT YOUR MICROWAVE OVEN
This section discusses the concepts behind microwave cooking and introduces you to the basics you need to
know to operate your microwave oven. Please read this information before using your oven.
OPERATION
AUDIBLE SIGNALS
Audible signals are available to guide you when setting
and using your oven:
• A tone will sound each time you touch a key.
• A melody signals the end of a Timer countdown.
• A melody signals the end of a cooking cycle.
CLOCK
When your microwave oven is rst plugged in or after
a power failure, the display shows PLEASE SET TIME
OF DAY. If a time of day is not set, a colon (:) shows on
the display until CUSTOM SET is touched.
Note:
• If you touch
STOP/CLEAR
while setting the clock, the
display shows the last time of day set or a colon (:) if
no time of day has been set.
INTERRUPTING COOKING
Stop the oven during a cycle by opening the door. The
oven stops heating and the fan stops, but the light
stays on. To restart cooking, close the door and touch
START.
To stop cooking, open the door and touch STOP/
CLEAR.
CHILD LOCK
Use this safety feature to lock the control panel when
cleaning the oven, or so children cannot use the oven
unsupervised.
To avoid risk of personal injury or property
damage, do not use stoneware, metal utensils, or
metal trimmed utensils in the oven.
CAUTION
To avoid risk of personal injury
or property damage, do not run oven empty.
CAUTION
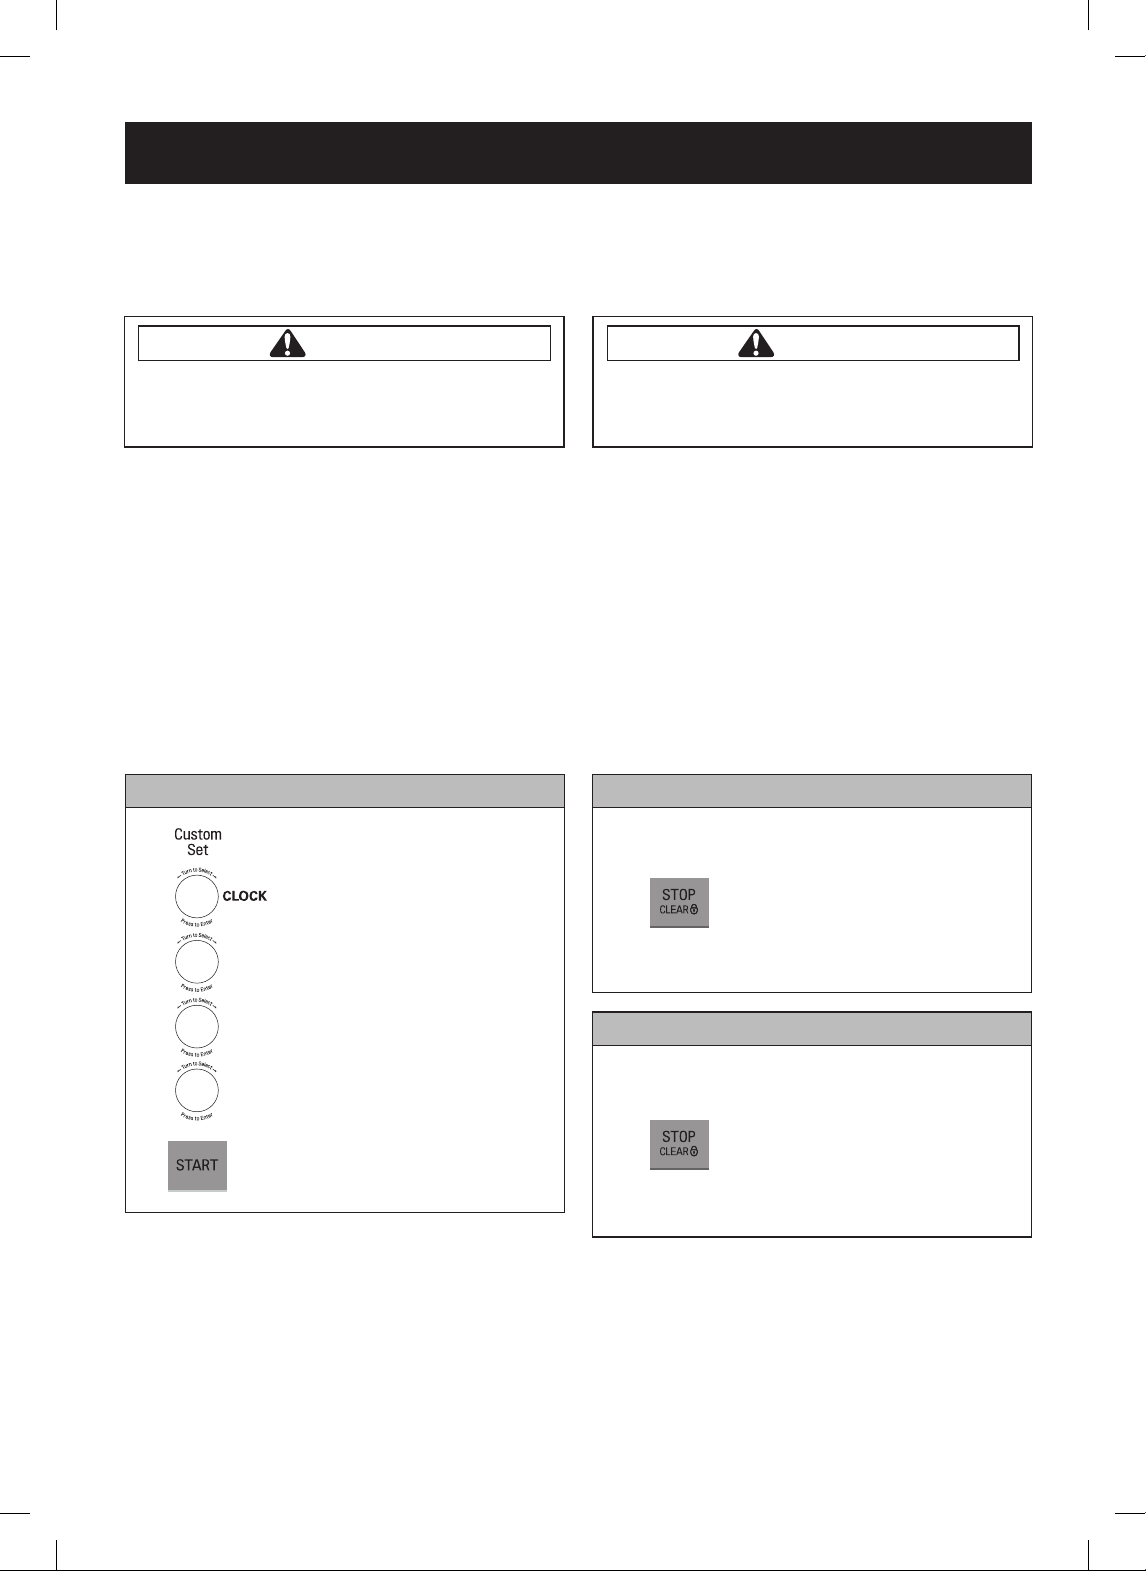
Example: To set the clock for 10:30(AM).
1. Touch
CUSTOM SET.
2. Turn the dial to select the
CLOCK SET.
Touch
START
or
press dial to enter.
3. Turn the dial to set the hour 10.
Touch
START
or press the dial to
enter.
4. Turn the dial to set the minute 30.
Touch
START
or press the dial to
enter.
5. Turn the dial to select AM or
PM.(AM)
6. Touch
START
or press the dial
to enter.
Example: To set the child lock.
1. Touch and hold
ST
OP/CLEAR
until
LOCKED
appears in the display and a
melody sounds.
(approximately 3 seconds)
Example: To cancel the child lock.
1. Touch and hold
ST
OP/CLEAR
until
LOCKED
disappears and a
melody sounds.
(approximately 3 seconds)
10
SET
30
AM
- 16 -
OPERATION
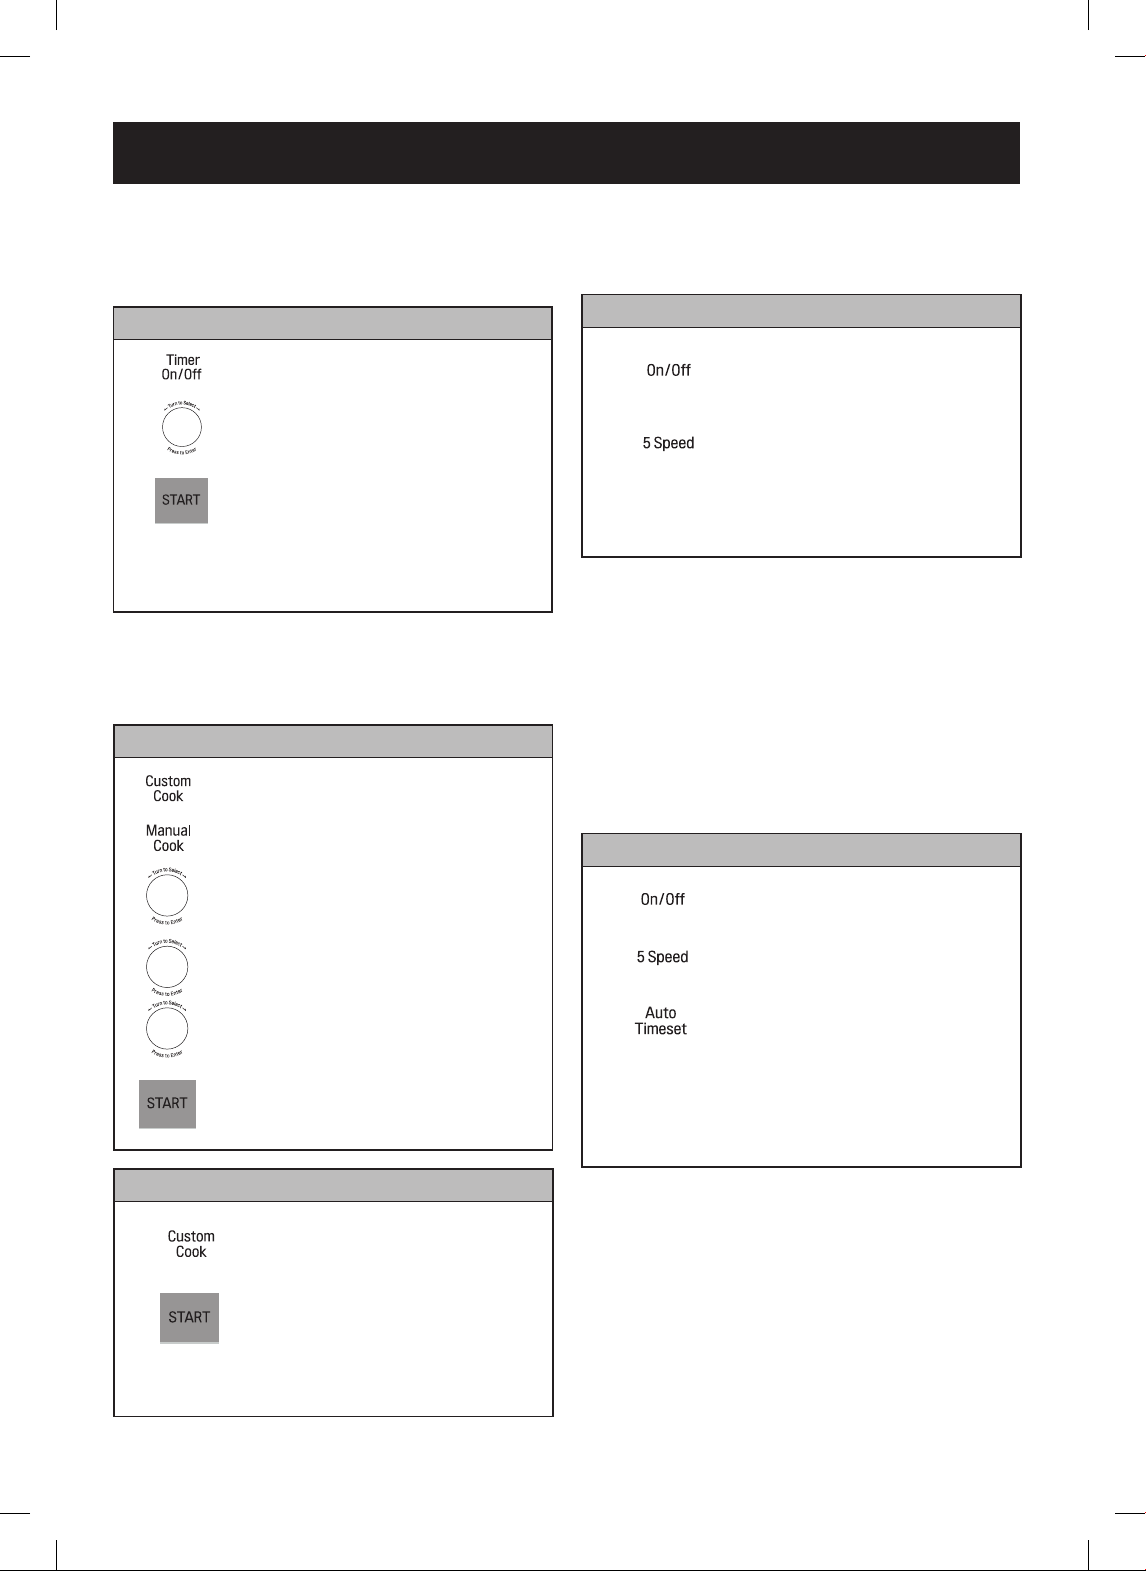
TIMER
Use this feature for a a general purpose timer. It can be
used while cooking in the oven. The timer can be set
for up to 99 minutes and 59 seconds.
CUSTOM COOK
CUSTOM COOK allows one cooking instruction to be
placed in memory and then recalled quickly.
VENT FAN
The bottom of the control panel controls the 5-speed
vent fan.
Note:
• If the temperature from the range or cooktop below
the oven gets too hot, the vent fan in the vent hood
automatically turns on at the 4-Speed setting to
protect the oven. It may stay on up to an hour to cool
the oven. When this occurs, the VENT
ON/OFF
key
does not turn the fan off. The vent fan cannot be
turned off during microwave cooking.
VENT FAN AUTO TIME SET
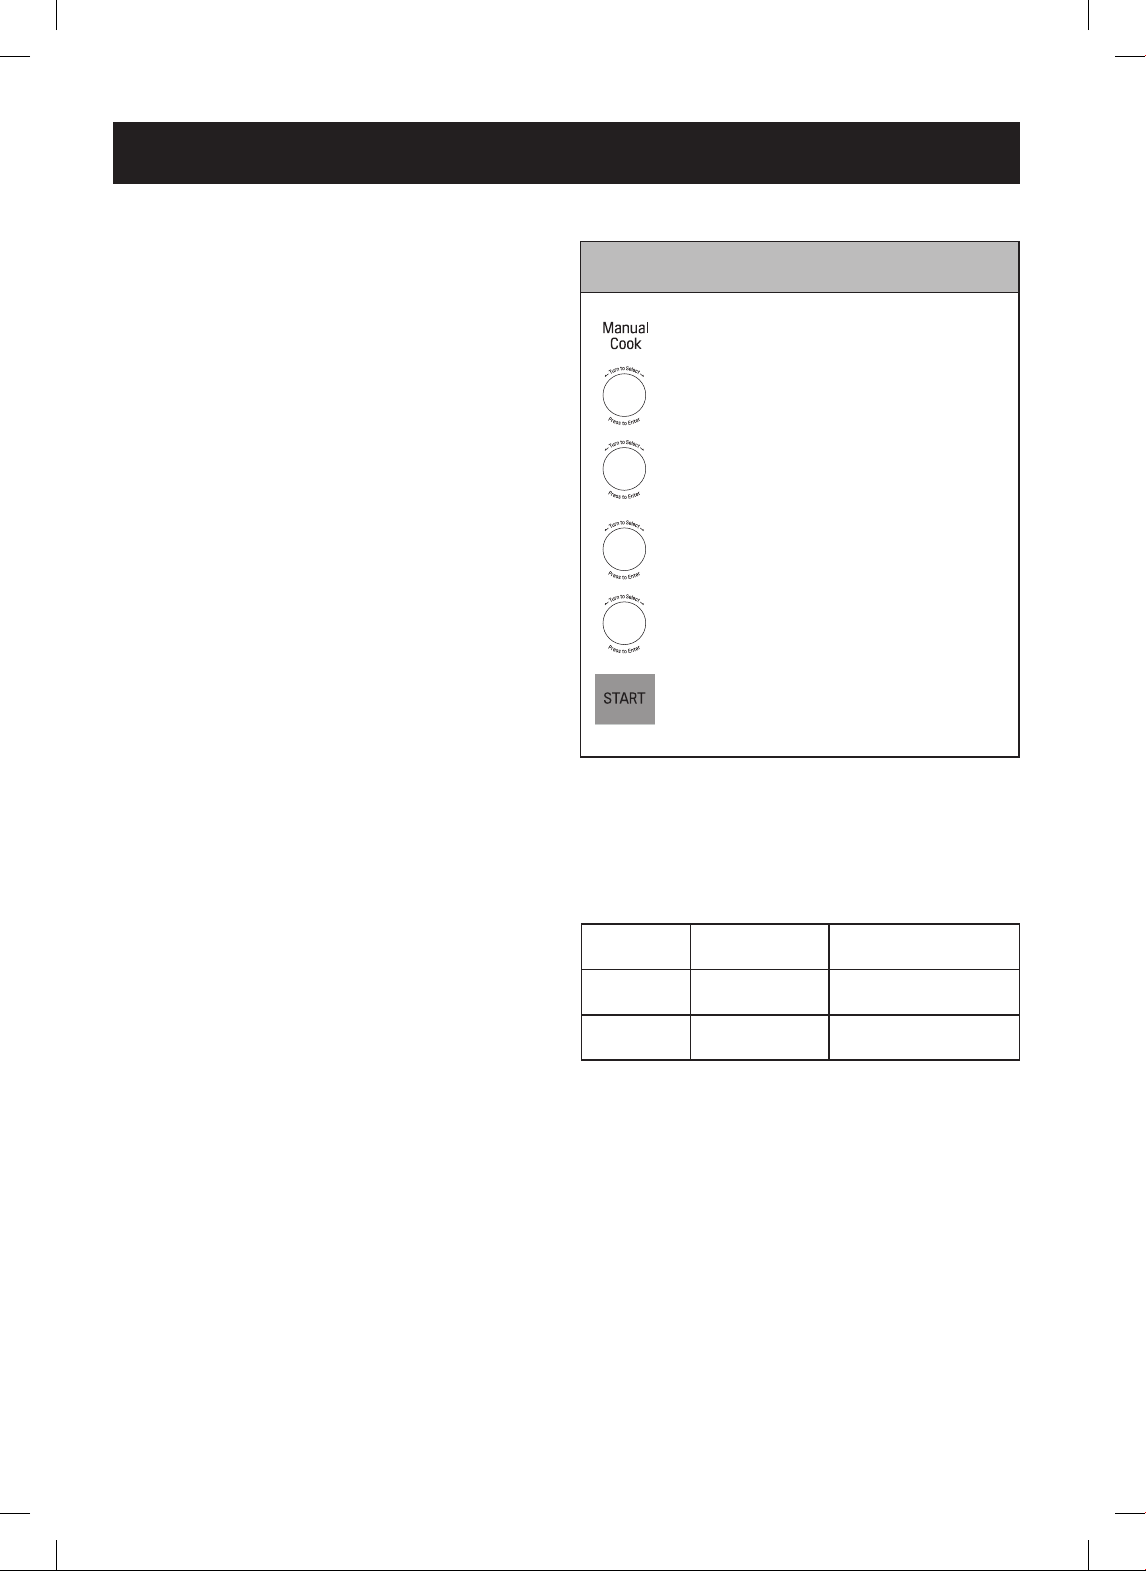
Example: To memorize a 2-minute microwave cook.
1. Touch
CUSTOM COOK.
2. Touch
MANUAL COOK.
3. Turn the dial to select the
cooking type (MICROWAVE).
Touch
START
or press the dial to
enter.
4. Turn the dial to set the power
level (POWER 100). Touch
ST
ART
or press the dial to enter.
5. Turn the dial to set the time.
(2:00)
6. Touch
START
or press the dial
to enter.
Example: To set 3 minutes.
1. Touch
TIMER ON/OFF.
2. Turn the dial to set the time. (3:00)
3. Touch
START
or
TIMER ON/OFF
or press the dial to enter.
When the time is over a melody
sounds and
END
displays. Press
ST
OP/CLEAR.
To cancel, press
TIMER ON/OFF.
Example: To turn off fan after 30 minutes at level 4.
1. Touch
ON/OFF.
2. Touch
5 SPEED
until Level 4
appears in the display.
3. Touch
AUTO TIMESET
ve
times.
1 time - 1 minute
2 times - 3 minutes
3 times - 5 minutes
4 times - 10 minutes
5 times - 30 minutes
Example: To set Level 4.
1. Touch
ON/OFF.
The display defaults to the last
level selected.
2.
Touch
5 SPEED
until
LEVEL 4
appears in the display.
Turn off fan when desired.
Example: To recall the memory.
1. Touch
CUSTOM COOK.
2. Touch
START
or press the dial to
enter.
When the cook time is over a
melody sounds and
COOK END
displays.
3:00
MICROWAVE
POWER 100
2:00
- 17 -
OPERATION
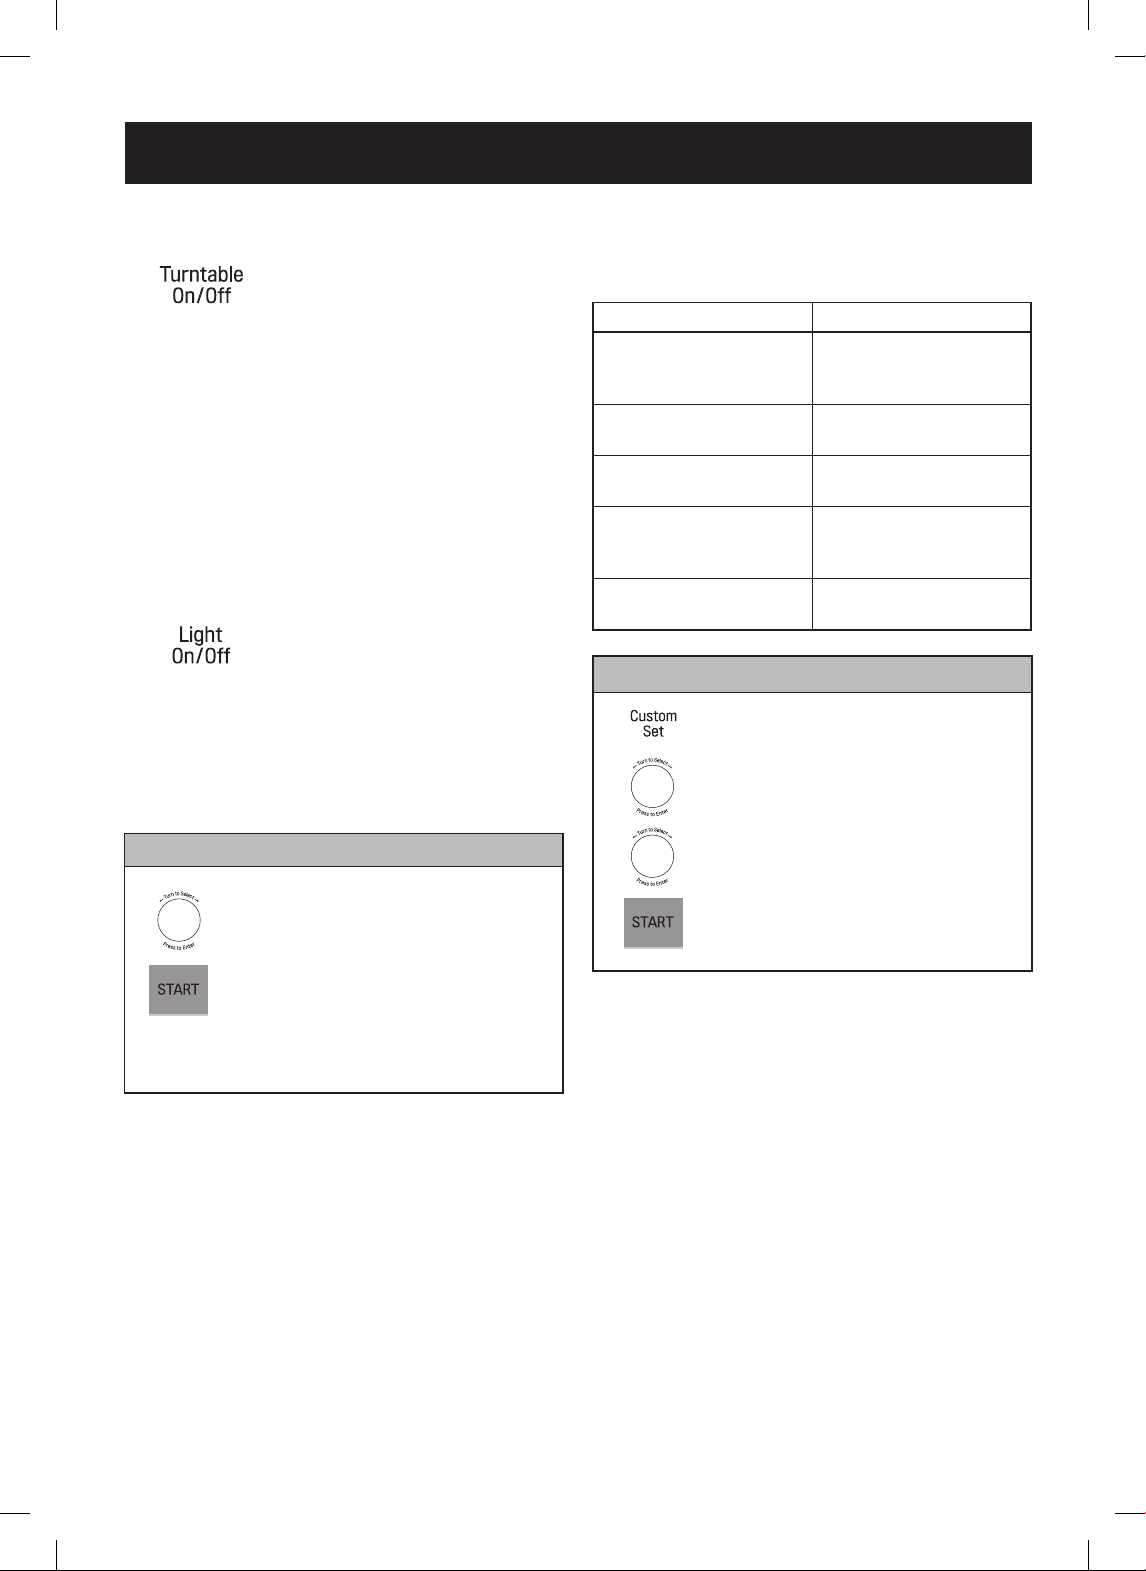
TURNTABLE ON/OFF
For best cooking results, leave
the turntable on. It can be turned
off for large dishes. Touch
TURNTABLE ON/OFF
to turn the
turntable on or off.
Notes:
• This option is not available in sensor cook and defrost
modes.
•
Sometimes the turntable can become hot to
touch.
Be careful when touching the turntable during
and after cooking.
• Do not run the oven empty.
LIGHT ON/OFF
To turn the hood light on, touch
LIGHT ON/OFF
once.
To turn the hood light off, touch
LIGHT ON/OFF
again.
COOKING AT HIGH POWER
LEVEL
CUSTOM SET
Use this key to change settings for the clock, beep
sound, display speed, and defrost weight.
See the following chart for more information.
CATEGORY SELECTION
Clock set
Hours
Minutes
AM/PM
Sound ON/OFF
Sound ON
Sound OFF
Clock ON/OFF
Clock ON
Clock OFF
Scroll speed
Slow speed
Normal speed
Fast speed
Defrost weight mode
Lbs.
Kg.
Example: To cook food for 8 minutes 30 seconds.
1. Turn the dial to select the time.
(8:30)
2. Touch
START
or press the dial
to enter.
When the cook time is over a
melody sounds and
COOK END
displays.
Example: To change defrost weight mode.(from Lbs. to Kg.)
1. Touch
CUSTOM SET.
2. Turn the dial to select
Lbs/Kg
T
ouch
START
or press
the dial to enter.
3.
Turn the selector dial to select
Kg
.
4.
Touch
START
or press the dial
to enter.
Lbs/Kg
Kg
8:30
- 18 -
OPERATION
COOKING AT LOWER POWER
LEVELS
HIGH power cooking does not always give the best
results with foods that need slower cooking, such as
roasts, baked goods, or custards. The oven has 10
power settings in addition to HIGH.
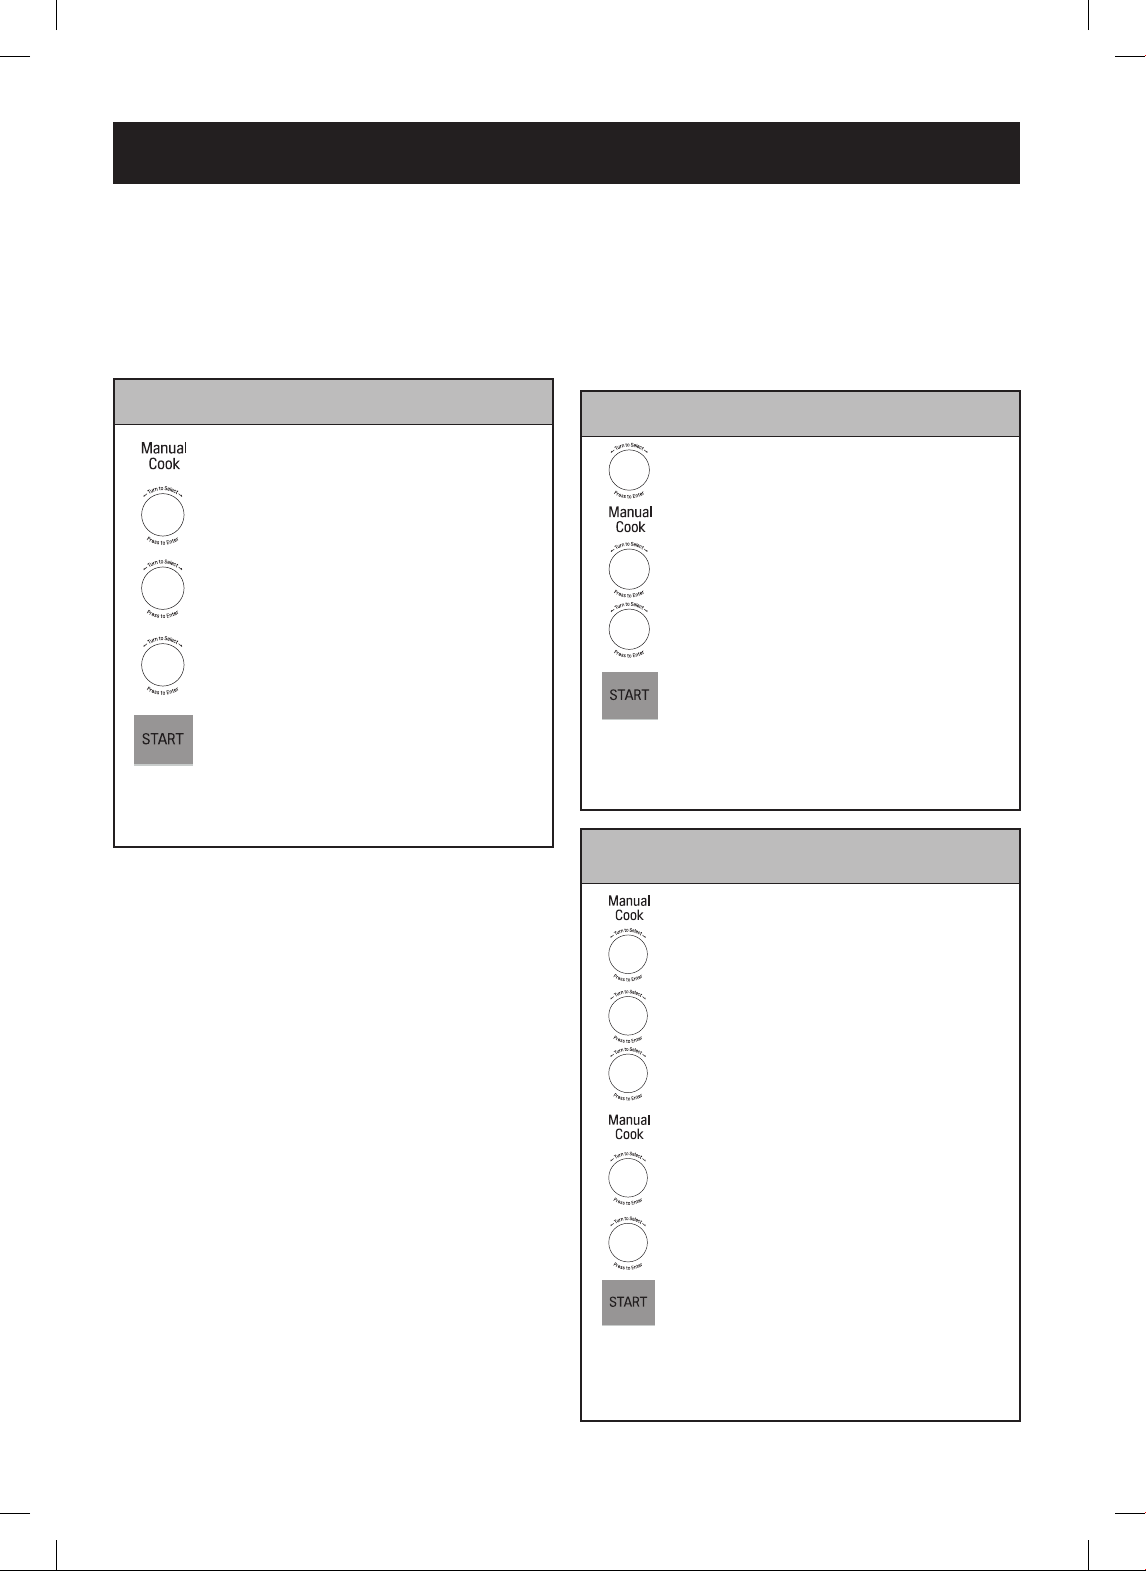
COOKING WITH MORE THAN
ONE COOK CYCLE
For best results, some recipes call for one power level
for a certain length of time, and another power level for
another length of time. The oven can be set to change
from one power level to another automatically, for up to
three cycles if the rst heating cycle is defrost.
Example: To cook food for 7 minutes 30 seconds
at 70% power.
1. Touch
MANUAL COOK
.
2. Turn the dial to select
MICROW
AVE
. Touch
START
or
press the dial to enter.
3.
Turn the dial to set the power
level (POWER 70). Touch
ST
ART
or press the dial to enter.
4.
Turn the dial to set the time.(7:30)
5. Touch
START
or press the dial to
enter.
When the cook time is over a
melody sounds and
COOK END
displays.
Example: To cook food for 3 minutes at 100% power
and then 70% power for 7 minutes 30 seconds.
1. Turn the dial to select the time.
(3:00)
2. Touch
MANUAL COOK
.
3. Turn the dial to set the power
level (POWER 70). Touch
START
or press the dial to enter.
4. Turn the dial to set the time.(7:30)
5. Touch
START
or press the dial to
enter.
When the cook time is over a
melody sounds and
COOK END
displays.
MICROWAV
E
POWER 70
7:30
3:00
POWER 70
7:30
When the rst stage is over a melody sounds as the oven
begins the second cook stage.
Example: To cook at 70% for 3 minutes and then at
50% for 10 minutes.
1. Touch
MANUAL COOK
.
2. Turn the dial to select
MICROWAVE
. Touch
START
or
press the dial to enter.
3. Turn the dial to set the power
level (POWER 70). Touch
START
or press the dial to enter.
4. Turn the dial to set the time (3:00).
5. Touch
MANUAL COOK
.
6. Turn the dial to set the power
level (POWER 50). Touch
START
or press the dial to enter.
7.
Turn the dial to set the time (10:00).
8. Touch
START
or press the dial to
enter.
When the cook time is over, a
melody sounds and
COOK END
displays.
POWER 70
POWER 50
3:00
10:00
MICROWAVE
When the rst stage is over, a melody sounds as the oven
begins the second cook stage.
- 19 -
COOKING GUIDE FOR LOWER POWER LEVELS
POWER LEVEL MICROWAVE OUTPUT USE
100
HIGH
100% • Quick heating many convenience foods and
foods with high water content, such as soups
and beverages.
• Cooking tender cuts of meat, ground meat
90 90% • Heating cream soups
80 80% • Heating rice, pasta, or casseroles
70 70% • Cooking and heating foods that need a cook
power lower than high (for example, whole sh
and meat loaf) or when food is cooking too fast
• Reheating a single serving of food
60 60% • Cooking requiring special care, such as cheese
and egg dishes, pudding, and custards
• Finishing cooking casseroles
50 50% • Cooking ham, whole poultry, and pot roasts
• Simmering stews
40 40% • Melting chocolate
• Heating pastries
30 30% • Manually defrosting foods, such as bread, sh,
meats, poultry, and precooked foods
20 20% • Softening butter, cheese, and ice cream
10 10% • Keeping food warm
• Taking the chill out of fruit
00 0% • Standing time in oven
OPERATION
The nine power levels in addition to HIGH provide a
choice of the best level for the food being cooked.
Below are listed all the power levels,
examples of foods best cooked at each level, and the
amount of microwave power being used.

- 20 -
OPERATION
SENSOR OPERATING
INSTRUCTIONS
Sensor Cook cooks favorite foods without selecting
cooking times and power levels.
The oven automatically determines required cooking
time for each food item. When the internal sensor
detects a certain amount of humidity coming from
the food, it tells the oven how much longer to heat.
The display shows the remaining heating time. For
best results when sensor cooking, follow these
recommendations.
1. Food cooked with the sensor system should be at
normal storage temperature.
2. The glass tray and the outside of the container
should be dry to assure best cooking results.
3. Foods should always be covered loosely with
microwavable plastic wrap, waxed paper, or a lid.
4. Do not open the door or touch
STOP/CLEAR
during
the sensing time. When sensing time is over, the
oven beeps and the remaining cooking time will
appear in the display window.
At this time you can open the door to stir, turn, or
rearrange the food.
SENSOR COOKING GUIDE
Appropriate containers and coverings help assure good
sensor cooking results.
1. Always use microwavable containers and cover
them with lids or vented plastic wrap.
2. Never use tight-sealing plastic covers. They can
prevent steam from escaping and cause food to
overcook.
3. Match the amount to the size of the container.
Fill containers at least half full for best results.
4. Be sure the outside of the cooking container and the
inside of the microwave oven are dry before placing
food in the oven. Beads of moisture turning into
steam can mislead the sensor.
SENSOR REHEAT
Use SENSOR REHEAT to reheat common microwave-
prepared foods without selecting cooking times and
power levels.
SENSOR COOK
Use SENSOR COOK to heat common microwave-
prepared foods without needing to program times and
power levels. SENSOR COOK has preset programs for
6 food categories.
SENSOR POPCORN
POPCORN lets you pop commercially packaged
microwave popcorn. Pop only one package at a time.
For best results, use fresh bags of popcorn.
Example: To cook rice.
1. Touch
COOK.
2. Turn the dial to select
RICE
.
3. Touch
START
or press the dial to
enter. After a slight delay, cooking
begins.
When the cook time is over a
melody sounds and
COOK END
displays.
Example: To reheat slices of pizza.
1. Touch
REHEAT.
2. Turn the dial to select
PIZZA
SLICE
.
3. Touch
START
or press the dial to
enter.
When the cook time is over a
melody sounds and
COOK END
displays.
Example: To pop popcorn.
1. Touch
POPCORN.
When the cook time is over a
melody sounds and
COOK END
displays.
RICE
PIZZA
SLICE

- 21 -
OPERATION
SENSOR REHEAT TABLE
CATEGORY
DIRECTION AMOUNT
Dinner Plate
Place on a low plate. Cover with vented plastic wrap.
Let stand 3 minutes after cooking.
1 to 2 servings
Soup/Sauce
Place in shallow microwavable casserole. Cover with vented
plastic wrap. After cooking, stir and let stand 3 minutes.
1 - 4 cups
Casserole
Place in a microwavable bowl or casserole. Cover with
vented plastic wrap. After cooking, stir and let stand 3
minutes.
1 - 4 cups
Pizza Slice
This function is for re-heating pizza that was cooked
previously. It is NOT for raw, ready-to-bake, or frozen pizza.
Place the pizza slice(s) on a paper towel or microwave safe
plate.
1 - 4 slices
SENSOR COOK TABLE
CATEGORY
DIRECTION AMOUNT
Baked
Potato
Pierce each potato with a fork and place on the oven tray
around the edge, at least one inch apart.
After cooking, allow to stand for 5 minutes.
1 - 4 medium
(approx. 8 to 10 oz.
each)
Frozen
Vegetable
Remove from package, rinse off frost under running water.
Place in an appropriately sized microwave container. Add
amount of water according to the quantity (1 - 2 cups: 2
tablespoons, 3 - 4 cups: 4 tablespoons). Cover with plastic
wrap and vent. After cooking, stir and allow to stand for 3
minutes.
1 - 4 cups
Fresh
Vegetable
Prepare as desired, wash, and leave residual water on
the vegetables. Place in an appropriately sized microwave
container. Add amount of water according to the quantity (1 -
2 cups: 2 tablespoons, 3 - 4 cups: 4 tablespoons). Cover with
plastic wrap and vent. After cooking, stir and allow to stand for
3 minutes.
1 - 4 cups
Canned
Vegetable
Remove from the can. Place in an appropriately sized
microwave container, cover with plastic wrap, and vent. After
cooking, stir and allow to stand for 3 minutes.
1 - 4 cups
Frozen
Entrée
Remove from outer package. Slit cover. If not in microwave-safe
container, place on a plate. Cover with plastic wrap and vent the
plastic lm by piercing with a fork (3 times). After cooking, allow
to stand for 3 minutes.
10 to 21 oz.
Rice
Place rice and twice as much liquid (water, chicken or
vegetable stock) in a 2-quart microwave dish. Cover with
plastic wrap and vent. After cooking, allow to stand for 10
minutes. Stir for ufer rice.
½ - 2 cups
Use medium or long
grain rice.
Cook instant rice
according to directions
on the package.

- 22 -
OPERATION
TIPS FOR CONVECTION
COOKING
This section provides cooking instructions and
procedures for each convection function.
Convection cooking circulates hot air through the
oven cavity with a fan. The constantly moving air
surrounds the food to heat the outer portion quickly,
creating even browning and sealed-in avor through
the constant motion of hot air over the food surfaces.
To use convection cooking, turn the dial to select the
Convection or Combination modes.
DO NOT USE THE
OVEN WITHOUT THE TURNTABLE IN PLACE.
1.
Always use the metal rack
on the turntable when
convection cooking.
2.
Do not cover
the turntable or metal rack with
aluminum foil. It interferes with the ow of a
4.
Use convection cooking
for items like soufés,
breads, cookies, angel food cakes, pizza, and for
some meat and sh.
5.
The oven comes
equipped with a metal tray which
can be used for cooking in convection mode or
combination mode.
6.
No special techniques are necessary
to adapt
favorite oven recipes to convection cooking; but
reduce the oven temperature by 25°F from the
recommended temperature when cooking packaged
foods in convection mode.
7.
When baking
cakes, cookies, breads, rolls, or
other baked foods, most recipes call for preheating.
Preheat the empty oven just as with a regular oven.
You can start heavier dense foods such as meats,
casseroles, and poultry without preheating.
8.
All heatproof
cookware or metal utensils can be
used in convection cooking.
9.
As in conventional cooking,
the distance of the
food from the heat source affects cooking results.
Refer to the charts in this owner's manual.
10.
Use metal utensils
only for convection cooking.
Never use for microwave or combination cooking
since arcing and damage to the oven may occur.
11.
After preheating,
if the door remains closed,
the oven automatically holds at the preheated
temperature for 30 minutes.
PRECAUTIONS
• The oven cavity, door, turntable, roller rest, metal tray,
metal rack, and cooking utensils become very hot.
USE THICK OVEN GLOVES when removing the food,
cooking utensils, metal rack, metal tray, and turntable
from the oven after convection cooking.
• Do not use lightweight plastic containers, plastic
wraps, or paper products during any convection cycle.

- 23 -
OPERATION
CONVECTION
During convection cooking, a heating element is used
to raise the temperature of the air inside the oven.
Convection cooking temperature ranges from 100°F to
450°F.
It is best to preheat the oven when convection cooking.
Note: Reduce oven temperature by 25°F from the
temperature recommended on packaged foods.
The baking time may vary according to the food
condition or individual preference.
Notes:
• When the oven reaches the set preheat temperature,
a melody will sound and the display scrolls the
message
PREHEAT END
. The oven automatically
holds that temperature for 30 minutes.
• The oven temperature drops very quickly when the
door is opened; however, this should not prevent food
from being fully cooked during normal cooking time.
• During convection cooking, the vent fan in the vent
hood automatically turns on at the 1-speed (lowest
speed) setting to protect the oven.
Note:
The temperature range has 10 steps from 100°F
to 450°F.
Example: To set for convection cooking at 325°F for
45 minutes with preheating.
1. Touch
MANUAL COOK.
2. Turn the dial to select
CONVECTION
. Touch
START
or
press the dial to enter.
3. Turn the dial to set the
temperature (325°F). Touch
ST
ART
or press the dial to enter.
4. Touch
START
or press the dial to
begin preheating.(Do not enter
the time.)
5.
When the melody sounds, Place
the food in the oven.
6. Turn the dial to set the time.
(45:00)
7. Touch
START
or press the dial to
enter.
Example: To set for convection cooking at 375°F for
30 minutes without preheating.
1. Touch
MANUAL COOK.
2. Turn the dial to select
CONVECTION
. Touch
START
or
press the dial to enter.
3. Turn the dial to set the
temperature (375°F). Touch
START
or press the dial to enter.
4. Turn the dial to set the time.
(30:00)
5. Touch
START
or press the dial
to enter.
CONVECTION
325℉
45:00
DISPLA
Y SCROLLS
PREHEA
T END
CONVECTION
375℉
30:00
- 24 -
OPERATION
TIPS FOR COMBINATION
COOKING
This section provides instructions for each combination
cooking function. Combination microwave-convection
cooking shortens the cooking time for foods that
normally need a long time to cook. It also leaves
meat juicy on the inside and crispy on the outside.
In combination cooking, the convection heat and
microwave energy alternate automatically. The oven
has three preprogrammed settings that make it easy to
use combination cooking.
HELPFUL HINTS FOR
COMBINATION COOKING
1.
Meats
can be roasted directly on the metal rack or
in a shallow roasting pan placed on the rack. When
using the metal rack, check the cooking guide for
information on proper use.
2.
Less tender
cuts of beef can be roasted and
tenderized using oven cooking bags.
3.
When baking,
check for doneness after cooking
time is up. If not completely done, let stand in oven
for a few minutes to complete cooking.
PRECAUTIONS
1. All cookware used for combination cooking must be
BOTH microwave-safe and oven-safe.
2. During combination baking, some baking cookware
may cause arcing when it comes in contact with the
oven walls or metal accessory racks. Arcing is a
discharge of electricity that occurs when microwaves
come in contact with metal.
- If arcing occurs, immediately stop the cooking cycle
and place a heat resistant dish between the pan and
the metal rack.
- Use the metal tray supplied with the oven. It has
rubber feet that help prevent arcing.
- If arcing occurs with other baking cookware, do not
use them for combination cooking.
COMBINATION ROAST
Notes:
• The temperature range has 9 steps from 250°F to
450°F.
• During combination cooking, the exhaust fan in the
vent hood automatically turns on at the 1-speed
(lowest) setting to protect the oven.
COMBI CATEGORY DEFAULT
TEMPERATURE
Co-1 Combination
ROAST
Convection
375°F
Co-2 Combination
BAKE
Convection
325°F
Example: To roast with combination cooking for
45 minutes at 400°F.
1. Touch
MANUAL COOK.
2. Turn the dial to select
COMBI
.
Touch
START
or press the dial to
enter.
3. Turn the dial to select
Co-1
.
4. Turn the dial to set the
temperature. (400℉)
5. Turn the dial to set the time.
(45:00)
6. Touch
START
or press the dial to
enter.
COMBI
Co-1
400 ℉
45:00
- 25 -
OPERATION
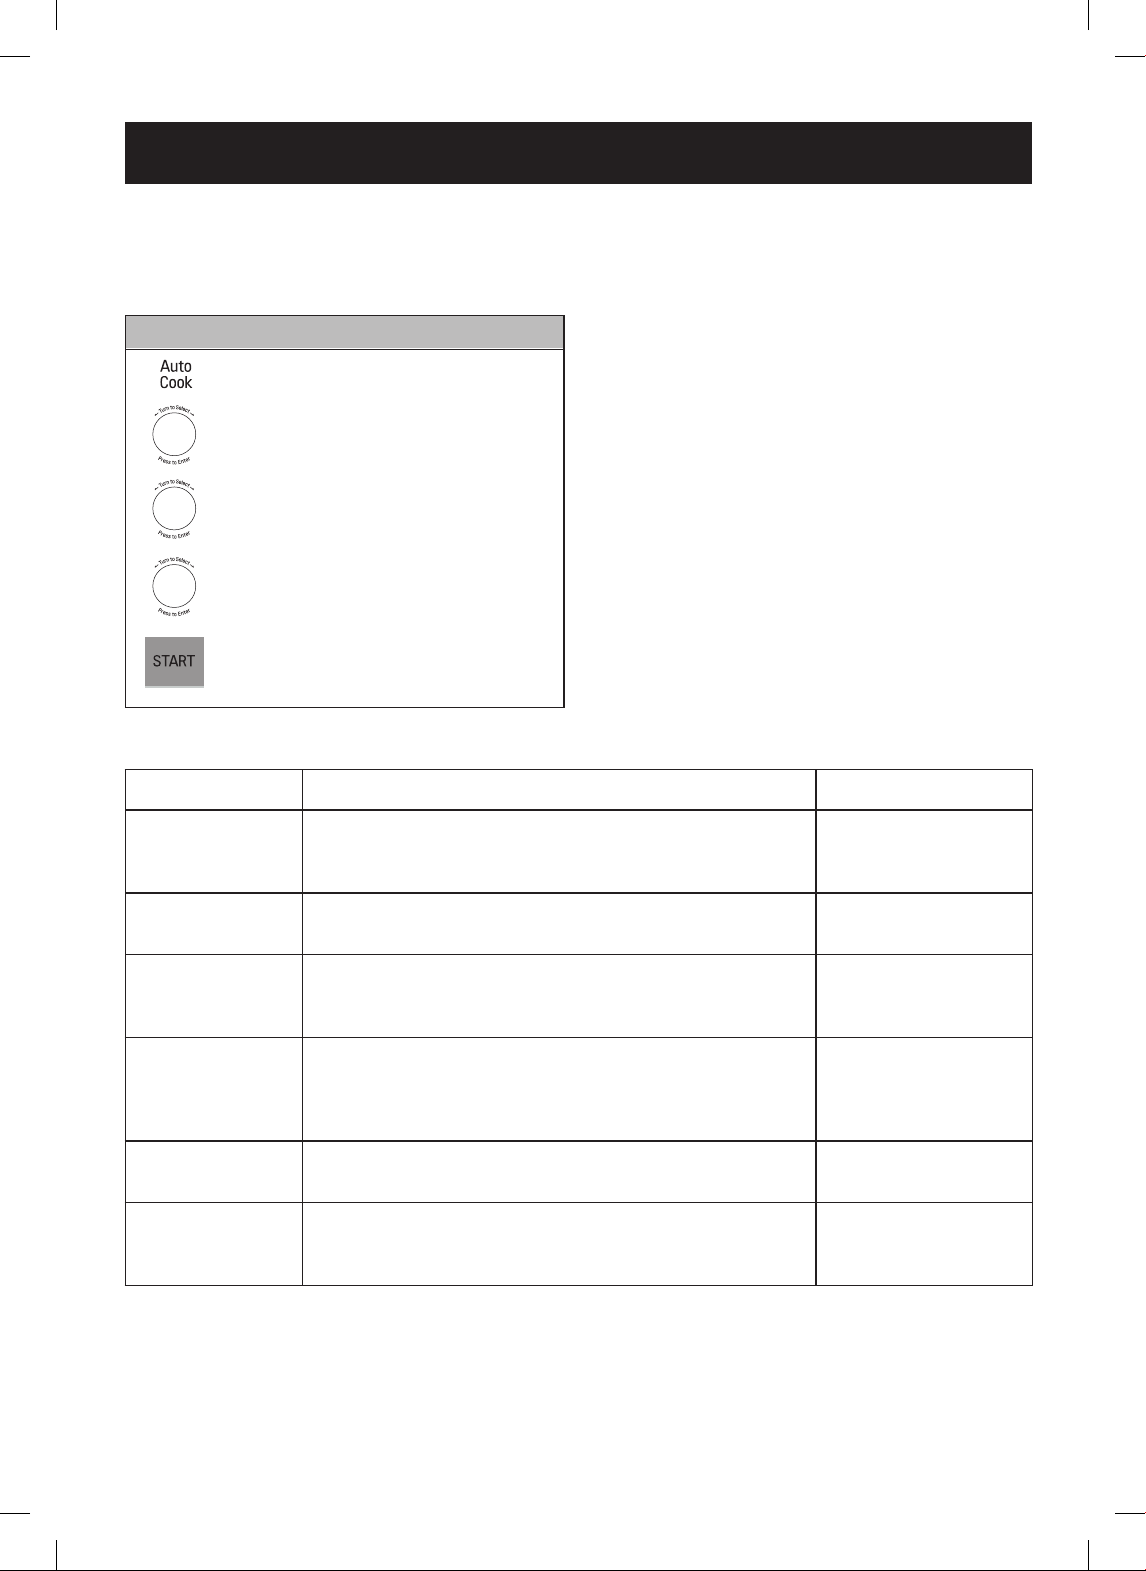
AUTO COOK
Use Auto Cook to heat common microwave-prepared
foods without selecting cooking times and power levels.
Auto Cook has preset programs for 6 food functions.
AUTO COOK TABLE
CATEGORY
DIRECTION AMOUNT
Bacon
Place bacon strips on a microwave bacon rack for best
results. (Use dinner plate lined with paper towels if rack is not
available).
2 - 6 slices
Fresh
Roll/Mufn
Remove from package and place on plate. (If mufns are
over 3 oz. each, count each as two when entering quantity).
1 - 6 pieces
(2 - 3 oz. each)
Frozen
Roll/Mufn
Remove from display package and place on plate. (If mufns
are over 3 oz. each, count each as two when entering
quantity).
1 - 6 pieces
(2 - 3 oz. each)
Beverage
Use a wide-mouth mug. Do not cover.
(Be careful. The beverage will be very hot! Sometimes liquids
heated in cylindrical containers will splash out when the cup
is moved).
1 - 2 cups
Chicken
Pieces
Place the chicken pieces in an appropriately sized
microwavable container, cover with plastic wrap, and vent.
0.5 - 2 lbs.
(0.2 - 0.9 kg)
Hot Cereal
Prepare as directed on package and cook.
Stir well before eating.
Use only instant hot cereal.
1 - 6 servings
Note:
Do not use recycled paper products in the microwave oven.
They sometimes contain impurities that cause arcing and sparking.
NEVER
use paper products in the convection oven.
Example: To cook bacon 2 slices.
1. Touch
AUTO COOK.
2. Turn the dial to select
AUTO COOK
. T
ouch
START
or
press the dial to enter.
3. Turn the dial to select
BACON
.
Touch
START
or press the dial to
enter.
4. Turn the dial to select
2 SLICES
.
5.
Touch
START
or press the dial to
enter.
AUTO
COOK
BACON
2 SLICES
- 26 -
OPERATION
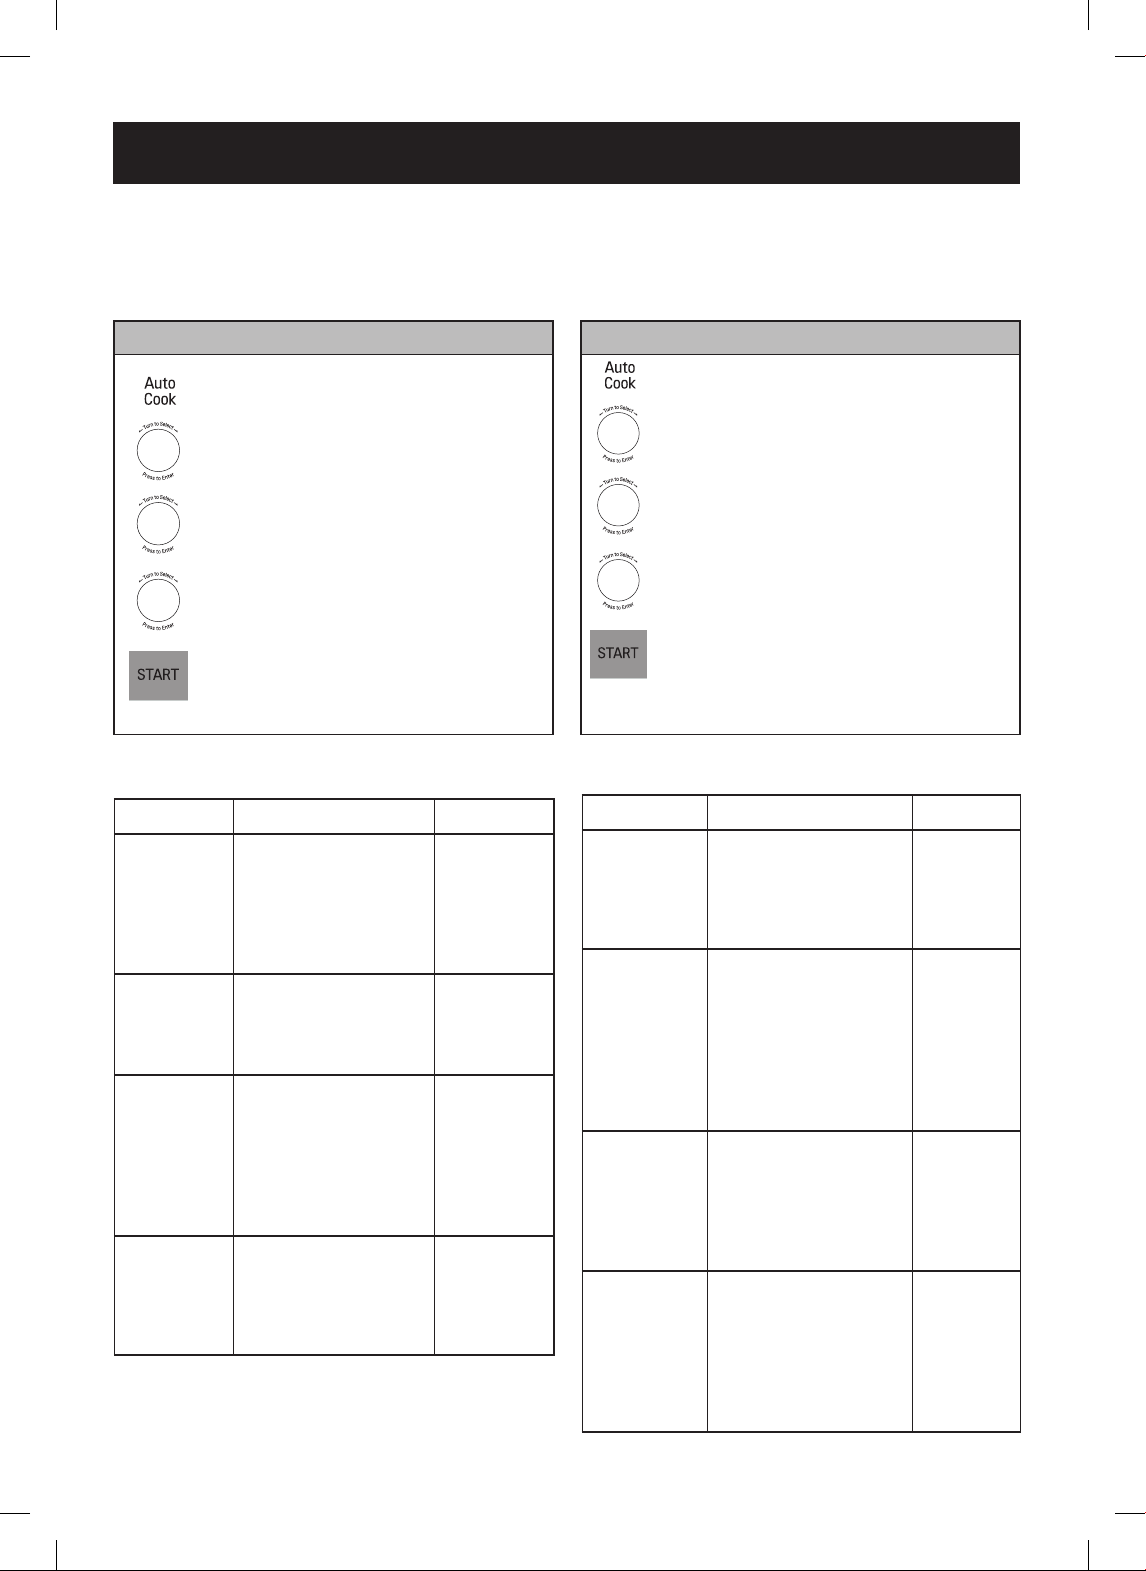
SOFTEN
The oven uses low power to soften foods (butter, ice
cream, cream cheese, and frozen juice).
See the following table.
SOFTEN TABLE
CATEGORY DIRECTION AMOUNT
Butter
Unwrap and place
in microwavable
container.
Butter will be at room
temperature and ready
for use in recipe.
1, 2 or 3
sticks
Ice
Cream
Place container in
oven. Ice cream will be
soft enough to make
scooping easier.
Pint,
Quart,
Half
gallon
Cream
Cheese
Unwrap and place
in microwavable
Container.
Cream cheese will be
at room temperature
and ready for use in
recipe.
3 or 8 oz.
Frozen
Juice
Remove top.
Place in oven.
Frozen juice will be
soft enough to mix
easily with water.
6, 12 or
16 oz.
MELT
The oven uses low power to melt foods (butter,
chocolate, processed cheese food, or marshmallows).
See the following table.
MELT TABLE
CATEGORY DIRECTION AMOUNT
Butter
Unwrap and place in
microwavable container.
No need to cover butter.
Stir at the end of cooking
to complete melting.
1, 2 or 3
sticks
Chocolate
Chocolate chips or
squares of baking
chocolate may be used.
Unwrap squares and
place in microwavable
container. Stir at the
end of cycle to complete
melting.
4 or 8 oz.
Cheese
Use processed cheese
food only. Cut into cubes.
Place in a single layer in
microwavable container.
Stir at the end of cooking
to complete melting.
8 or 16
oz.
Marshmallows
Large or miniature
marshmallows may be
used.
Place in microwavable
container. Stir at the
end of cycle to complete
melting.
5 or 10
oz.
Example for quart of ice cream.
1. Touch
AUTO COOK
.
2. Turn the dial to select
SOFTEN
.
Touch
START
or press the dial to
enter.
3. Turn the dial to select
ICE
CREAM
. Touch
START
or press
the dial to enter.
4. Turn the dial to select
QUART
.
5. Touch
START
or press the dial to
enter.
When the cook time is over a
melody sounds and
COOK END
displays.
Example for 8 oz. of chocolate.
1. Touch
AUTO COOK
.
2. Turn the dial to select
MELT
.
Touch
ST
ART
or press the dial to
enter.
3. Turn the dial to select
CHOCOLATE
. Touch
START
or
press the dial to enter.
4. Turn the dial to select
8 Oz
.
5. Touch
START
or press the dial to
enter.
When the cook time is over a
melody sounds and
COOK END
displays.
SOFTEN
ICE CREAM
QUART
MELT
CHOCOLATE
8 Oz
- 27 -
OPERATION
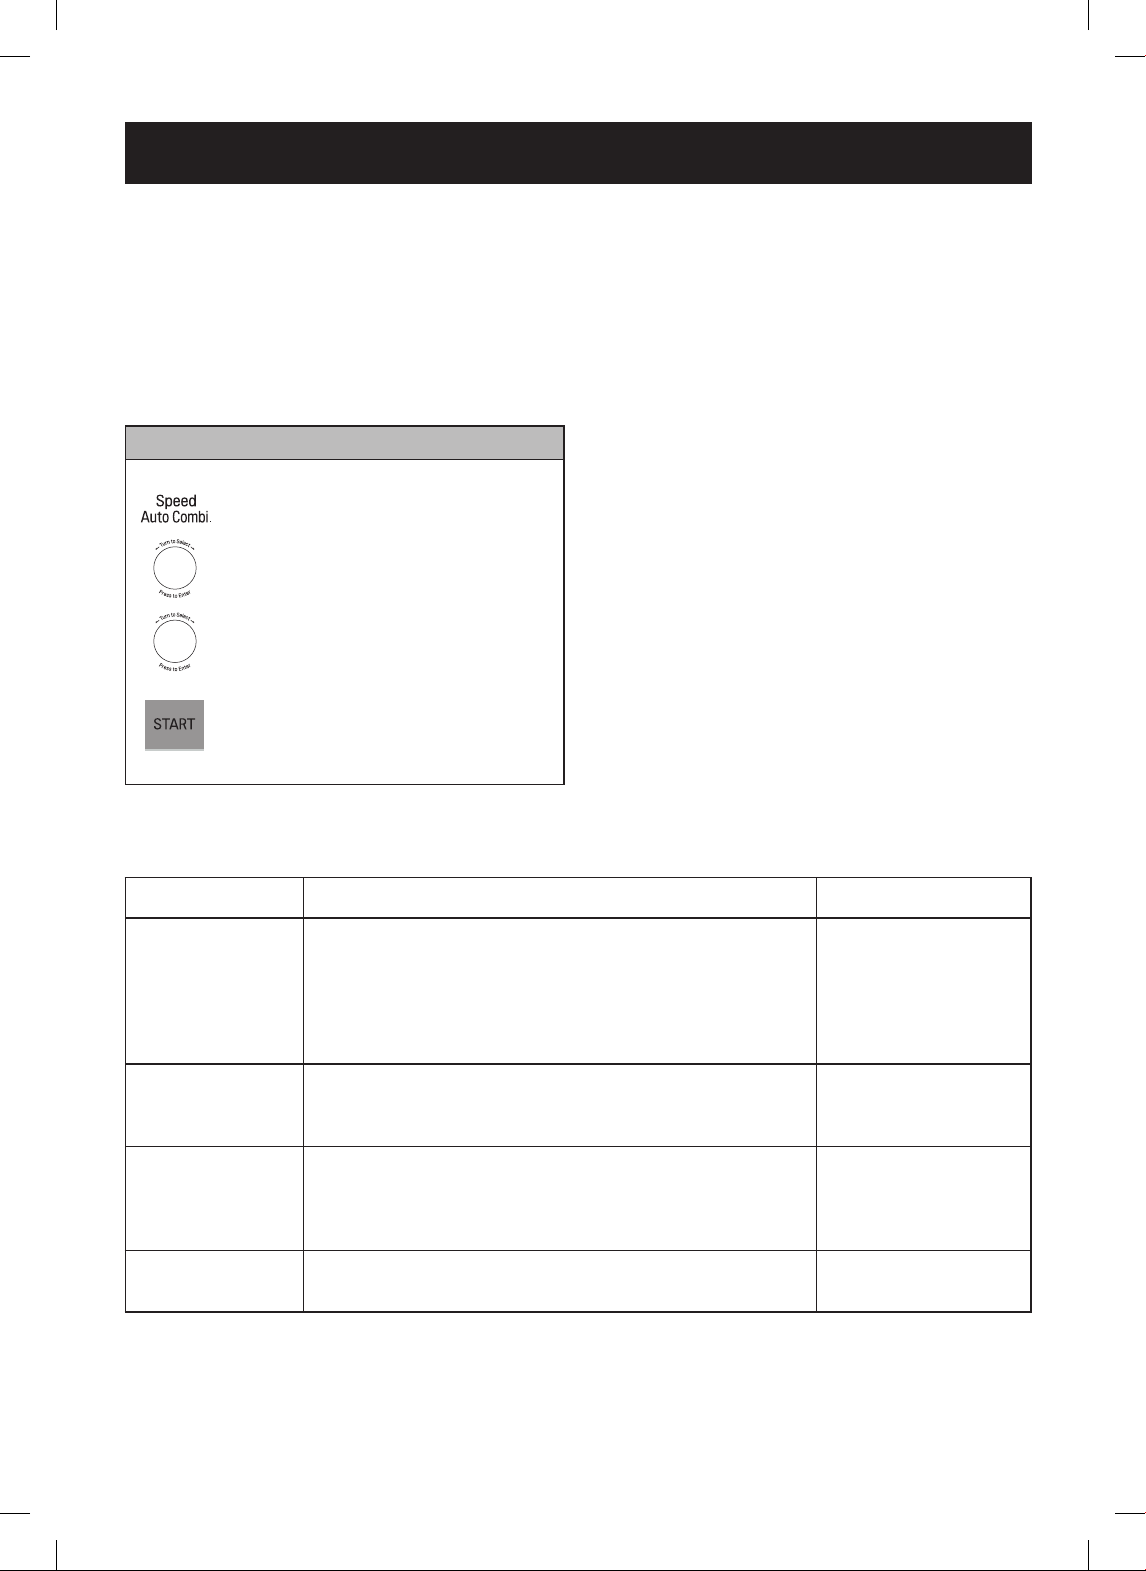
SPEED AUTO COMBINATION
Use to cook food without entering cooking time
or power level on combination mode. SPEED AUTO
COMBINATION has 4 food categories.
See the SPEED AUTO COMBINATION CHART on this
page for the settings available.
For best results, place food on the rack. When
cooking meats, use the metal tray/drip pan to catch
drippings.
SPEED AUTO COMBINATION CHART
CATEGORY
DIRECTION AMOUNT
Whole
Chicken
Thoroughly wash inside and outside of chicken with cold
water. Pat chicken dry with paper towels, secure the legs with
kitchen twine. Brush outside of chicken with melted butter or
margarine. Place chicken breast side down on metal rack on
metal tray. After cooking, loosely tent chicken with aluminum
foil. Let stand for 10 minutes after cooking.
2.0 - 4.0 lbs.
(0.9 - 1.8 kg)
Roast Pork
Pat dry with paper towels. Place roast on metal rack on metal
tray. After cooking, loosely tent roast with aluminum foil and
let stand 5 to 10 minutes.
2.0 - 4.0 lbs.
(0.9 - 1.8 kg)
Frozen
Lasagna
Remove from outer package. Remove lm cover. If lasagna is
not in an ovenproof container, place it on an ovenproof dish.
Place on metal rack on metal tray. Let stand for 5 minutes
after cooking.
10 or 21 oz.
Baked Potatoes
Pierce each potato several times with a fork and place on
metal rack on metal tray.
1 - 4 ea
Example: To cook 2 lb. roast pork.
1. Touch
SPEED AUTO COMBI.
2. Turn the dial to select
ROAST
PORK
. Touch
START
or press the
dial to enter.
3. Turn the dial to select
2.0 Lbs
.
4. Touch
START
or press the dial to
enter.
ROAST
PORK
2.0 Lbs
- 28 -
OPERATION
AUTO DEFROST
Five defrost sequences are preset in the oven.
The auto defrost feature provides the best defrosting
method for frozen foods. The Auto Defrost
Table shows which defrost sequence is recommended.
For added convenience, Auto Defrost includes a built-
in beep mechanism as a reminder to check, turn over,
separate, or rearrange food to get the best defrost
results. Five different defrost settings are provided.
1 MEAT
2 POULTRY
3 FISH
4 BREAD
5 QUICK DEFROST
WEIGHT CONVERSION TABLE
Most food weights are given in pounds and ounces.
If using pounds, food weights must be entered into Auto
Defrost in pounds and tenths of pounds (decimals).
Use the following table if necessary to convert food
weights to decimals.
Equivalent Weight
OUNCES
1.6
3.2
4.8
6.4
8.0
9.6
11.2
12.8
14.4
16.0
DECIMAL WEIGHT
.10
.20
.30
.40
.50 One-Half Pound
.60
.70
.80
.90
1.00 One Pound
OPERATING TIPS
• For best results, remove sh, shellsh, meat, and
poultry from its original closed paper or plastic
package (wrapper). Otherwise, the wrap will hold
steam and juice close to the foods, which can cause
the outer surface of the foods to cook.
• For best results, shape the ground meat into the
form of a doughnut before freezing. When defrosting,
scrape off thawed meat when the beep sounds and
continue defrosting.
• Place foods in a shallow container or on a microwave
roasting rack to catch drippings.
• For more defrost help, read Defrosting Tips following
the Auto Defrost Table.
For best results, loosen or remove coverings on food.
FOOD
WEIGHTS YOU CAN SET
(tenths of a pound)
Meat 0.1 to 6.0 (0.1 - 4 kg)
Poultry 0.1 to 6.0 (0.1 - 4 kg)
Fish 0.1 to 6.0 (0.1 - 4 kg)
Bread 0.1 to 1.0 (0.1 - 0.5 kg)
Quick Defrost Only 1 lb (0.5 kg only)
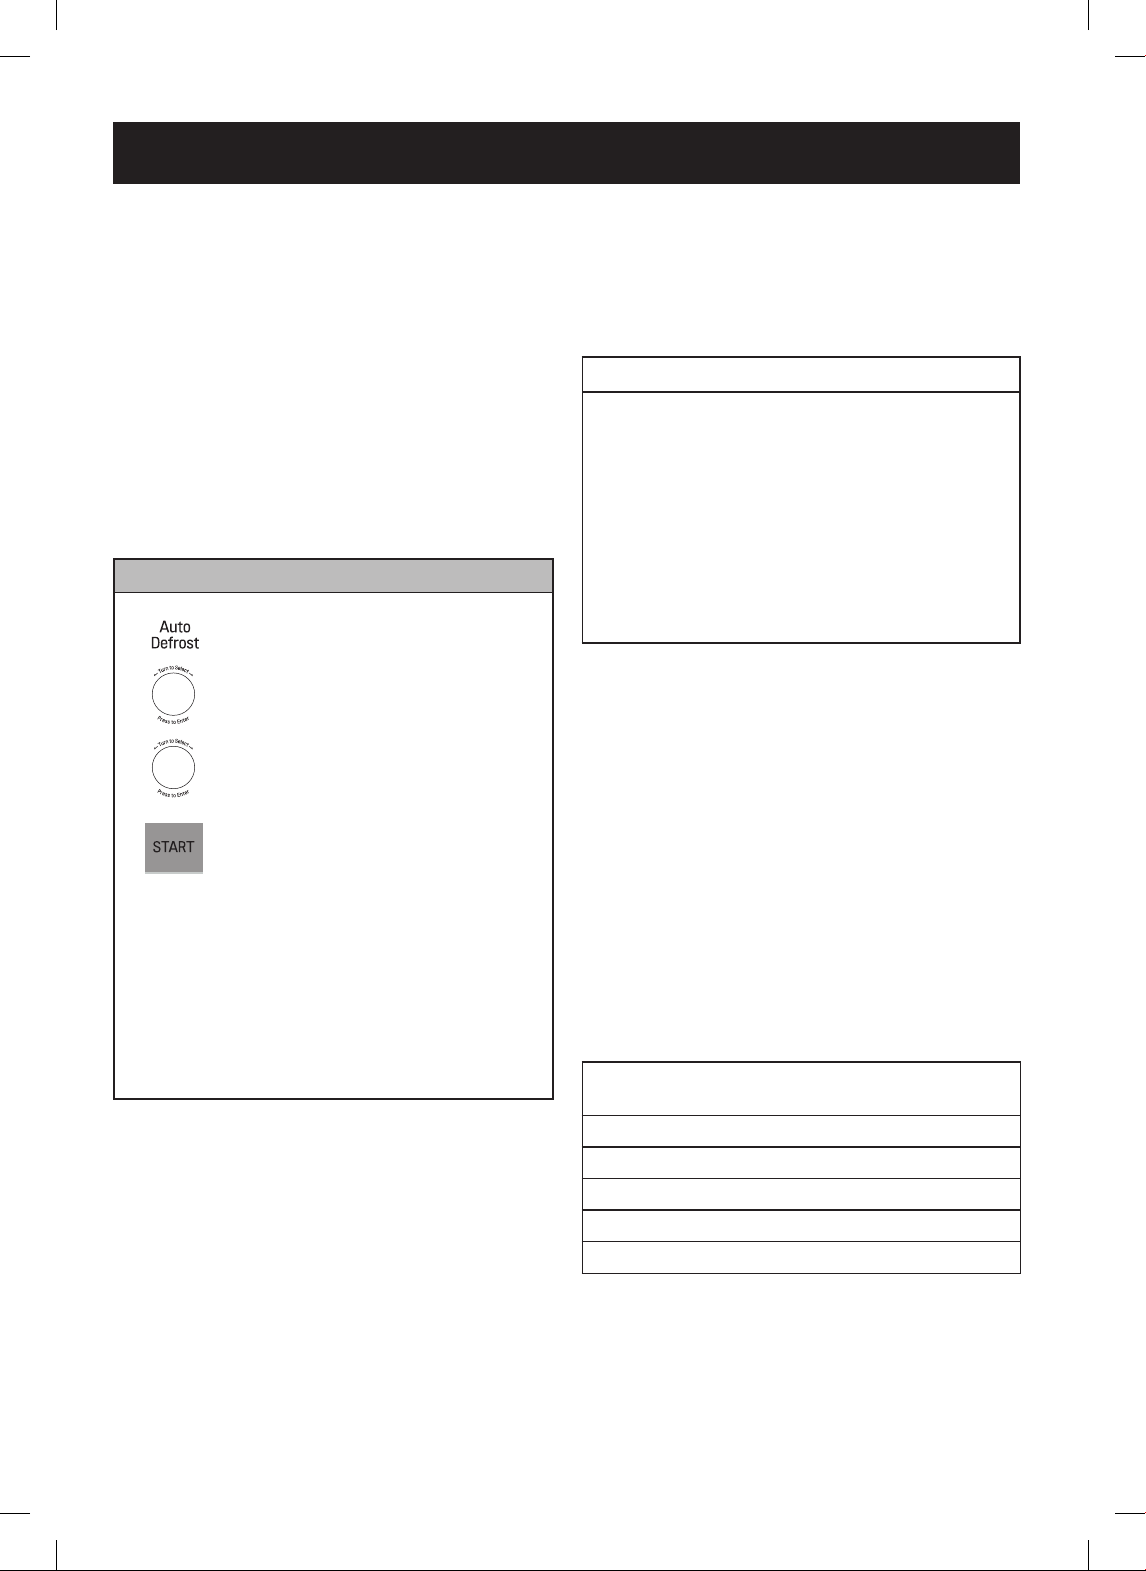
Example: To defrost 1.2 lbs. of meat.
1. Touch
AUTO DEFROST
.
2. Turn the selector dial to select
the food category. (Meat)
※ Category: Meat, Poultry, Fish,
Bread, Quick
3. Turn the dial to select the
weight. (1.2 Lbs)
4. Touch
START
or press the dial
to enter.
Note:
When you touch the START or press the
dial, the display changes to the defrost time
count down. When the oven beeps during
the DEFROST cycle, open the door and turn,
separate, or rearrange the food. Remove
any portions that have thawed. Return frozen
portions to the oven and touch START to
resume the defrost cycle.
MEAT
1.2 Lbs

- 29 -
OPERATION
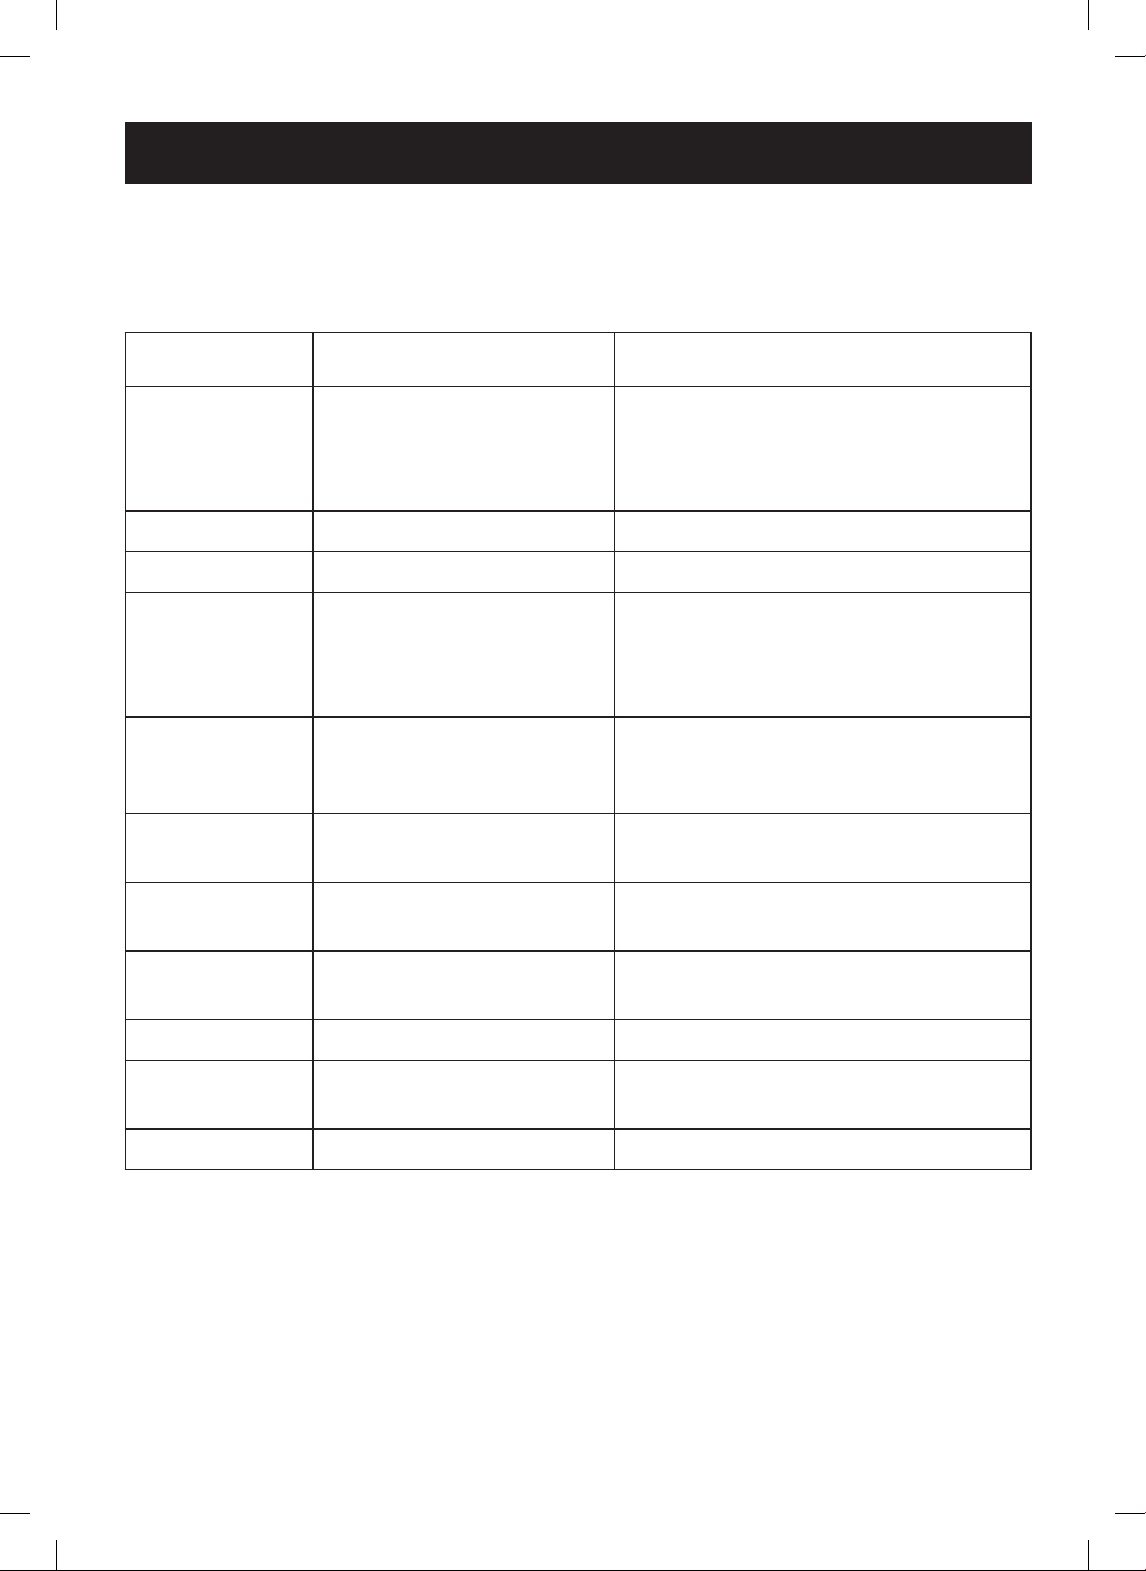
AUTO DEFROST TABLE
Meat setting
FOOD SETTING AT BEEP SPECIAL INSTRUCTIONS
BEEF
Meat of irregular shape and large, fatty
cuts of meat should have the narrow
or fatty areas shielded with foil at the
beginning of a defrost sequence.
Ground Beef,
Bulk
MEAT Remove thawed portions with fork
Turn over. Return remainder to
oven.
Do not defrost less than ¼ lb.
Freeze in doughnut shape.
Ground Beef,
Patties
MEAT Separate and rearrange. Do not defrost less than 2 oz. patties.
Depress center when freezing.
Round Steak MEAT Turn over. Cover warm areas with
aluminum foil.
Place on a microwavable roasting rack.
Tenderloin
Steak
MEAT Turn over. Cover warm areas with
aluminum foil.
Place on a microwavable roasting rack.
Stew Beef MEAT Remove thawed portions with fork.
Separate remainder.
Return remainder to oven.
Place in a microwavable baking dish.
Pot Roast,
Chuck Roast
MEAT Turn over. Cover warm areas with
aluminum foil.
Place on a microwavable roasting rack.
Rib Roast MEAT Turn over. Cover warm areas with
aluminum foil.
Place on a microwavable roasting rack.
Rolled Rump
Roast
MEAT Turn over. Cover warm areas with
aluminum foil.
Place on a microwavable roasting rack.
LAMB
Cubes for
Stew
MEAT Remove thawed portions with fork.
Return remainder to oven.
Place in a microwavable baking dish.
Chops
(1 inch thick)
MEAT Separate and rearrange. Place on a microwavable roasting rack.
PORK
Chops
(½ inch thick)
MEAT Separate and rearrange. Place on a microwavable roasting rack.
Hot Dogs MEAT Separate and rearrange. Place on a microwavable roasting rack.
Spareribs
Country-style
Ribs
MEAT Turn over. Cover warm areas with
aluminum foil.
Place on a microwavable roasting rack.
Sausage,
Links
MEAT Separate and rearrange. Place on a microwavable roasting rack.
Sausage,
Bulk
MEAT Remove thawed portions with fork.
Turn over. Return remainder to
oven.
Place in a microwavable baking dish.
Loin Roast,
Boneless
MEAT Turn over. Cover warm areas with
aluminum foil.
Place on a microwavable roasting rack.

- 30 -
OPERATION
AUTO DEFROST TABLE (CONT.)
Poultry setting
FOOD SETTING AT BEEP SPECIAL INSTRUCTIONS
CHICKEN
Whole
(up to 6 lbs.)
POULTRY Turn over (nish defrosting
breastside down). Cover warm
areas with aluminum foil.
Place chicken breast-side up on a
microwavable roasting rack. Finish
defrosting by immersing in cold water.
Remove giblets when chicken is partially
defrosted.
Cut-up Separate pieces and rearrange. Place on a microwavable roasting rack.
Turn over. Cover warm areas with
aluminum foil.
Finish defrosting by immersing in cold
water.
CORNISH
HENS
Whole
POULTRY Turn over. Cover warm areas with
aluminum foil.
Place on a microwavable roasting rack.
Finish defrosting by immersing in cold
water.
TURKEY
Breast
(up to 6 lbs.)
POULTRY Turn over. Cover warm areas with
aluminum foil.
Place on a microwavable roasting rack.
Finish defrosting by immersing in cold
water.
Fish setting
FOOD SETTING AT BEEP SPECIAL INSTRUCTIONS
FISH
Fillets
FISH Turn over. Separate llets when
partially thawed if possible.
Place in a microwavable baking dish.
Carefully separate llets under cold
water.
Steaks FISH Separate and rearrange. Place in a microwavable baking dish.
Run cold water over to nish defrosting.
Whole FISH Turn over. Place in a microwavable baking dish.
Cover head and tail with foil; do not let
foil touch sides of microwave. Finish
defrosting by immersing in cold water.
SHELLFISH
Crabmeat
Lobster tails
Shrimp
Scallops
FISH
FISH
FISH
FISH
Break apart. Turn over.
Turn over and rearrange.
Separate and rearrange.
Separate and rearrange.
Place in a microwavable baking dish.
Place in a microwavable baking dish.
Place in a microwavable baking dish.
Place in a microwavable baking dish.

- 31 -
OPERATION
AUTO DEFROST TABLE (CONT.)
Bread setting
FOOD SETTING AT BEEP SPECIAL INSTRUCTIONS
BREAD
Turn over and rearrange. Place on 3 sheets of paper towel.
Bagel
Dinner Roll
BREAD
BREAD
Note:
Do not
use recycled paper products in
the microwave oven. They sometimes
contain impurities that cause arcing and
sparking.
NEVER
use paper products in the
convection oven.
DEFROSTING TIPS
• When using
Auto Defrost, the weight to be entered
is the net weight in pounds and tenths of pounds (the
weight of the food minus the container).
• Before starting,
remove the metal twist-ties which
often come with frozen food bags, and replace them
with strings or elastic bands.
• Open containers
such as cartons before they are
placed in the oven.
• Always slit
or pierce plastic pouches or packaging.
• If food is foil wrapped,
remove foil and place the
food in a suitable container.
• Slit
the skins, if any, of frozen food such as sausage.
• Bend
plastic pouches of food to ensure even
defrosting.
• Always underestimate
defrosting time. If defrosted
food is still icy in the center, return it to the microwave
oven for more defrosting.
• The length
of defrosting time varies according to how
solidly the food is frozen.
• The shape of the package
affects how quickly
food will defrost. Shallow packages will defrost more
quickly than a deep block.
• As food begins to defrost,
separate the pieces
Separated pieces defrost more easily.
• Use small pieces of aluminum foil
to shield parts
of food such as chicken wings, leg tips, sh tails, or
areas that start to get warm. Make sure the foil does
not touch the sides, top, or bottom of the oven. The
foil can damage the oven lining.
• For better results,
let food stand after defrosting.
(For more information on standing time, see the
Microwave Cooking Tips
section.)
• Turn over
food during defrosting or standing time
Break apart and remove food as required.

- 32 -
1. Always use the metal rack when convection baking.
Place food directly on rack or place in metal tray and
then place tray on rack.
2. Aluminum pans conduct heat quickly. For most
convection baking, light, shiny nishes give best
results because they prevent overbrowning in the
time it takes to cook the center areas. Pans with dull
(satin-nish) bottoms are recommended for cake
pans and pie pans for best bottom browning.
3. Dark or non-shiny nishes, glass, and pyroceramic
absorb heat which may result in dry, crisp crusts.
4. Preheating the oven is recommended when baking
foods by convection.
5. To prevent uneven heating and save energy, open
the oven door to check food as seldom as possible.
FOOD OVEN TEMP. TIME, MIN. COMMENTS
Breads
Refrigerated Biscuits
Corn Bread
Mufns
Popovers
Nut Bread or Fruit
Bread
Yeast Bread
Plain or Sweet Rolls
375°F
350°F
425°F
325°F
325°F
375°F
350°F
11 to 14
35 to 40
18 to 22
45 to 55
60 to 70
16 to 23
13 to 16
Allow additional time for large biscuits.
Remove from pans immediately and cool
slightly on wire rack.
Pierce each popover with a fork after removing
from oven to allow steam to escape.
Interiors will be moist and tender.
Lightly grease baking sheet.
Cakes
Devil’s Food
Fudge brownies
Coffee Cake
Cup Cakes
Fruit Cake (loaf)
Gingerbread
Butter Cakes, Cake
Mixes
9 x 13 inch
Tube Cake
Pound Cake
350°F
350°F
325°F
325°F
275°F
300°F
325°F
325°F
325°F
325°F
35 to 40
26 to 30
30 to 35
20 to 25
90 to 100
25 to 30
35 to 45
35 to 45
30 to 40
45 to 55
Place cake pan on rack.
Bake 2 layers of brownies at a time.
Interior will be moist and tender.
Turn end for end half way through baking.
Grease and our pan.
Cool in pan 10 minutes before inverting on
wire rack.
Cookies
Chocolate Chip
Sugar
350°F
350°F
11 to 14
11 to 14
Place metal tray on rack. Allow extra time for
frozen cookie dough.
Place metal tray on rack.
Fruits,
Other
Desserts
Baked Apples or Pears
Bread Pudding
Cream Puffs
Meringue Shells
350°F
300°F
400°F
300°F
35 to 40
35 to 40
30 to 35
30 to 35
Bake in cookware with shallow sides.
Pudding is done when knife inserted near
center comes out clean.
Puncture puffs twice with toothpick to release
steam after 25 minutes of baking time.
When done, turn oven off and let shells stand
in oven 1 hour to dry.
Notes:
• The oven temperature indicated in the chart above is recommended over the package instruction temperature.
• The baking time in the chart above is only a guideline for reference. Adjust time according to the food condition
or your preference. Check doneness at the minimum time.
COOKING GUIDE
CONVECTION BAKING GUIDELINES

- 33 -
CONVECTION BAKING GUIDELINES (CONT'D)
FOOD OVEN TEMP. TIME, MIN. COMMENTS
Pies,
Pastries
Frozen Pie
Meringue-Topped
Two-Crust
Quiche
Pastry Shell
400°F
450°F
400°F
350°F
400°F
50 to 60
9 to 11
50 to 55
30 to 35
10 to 16
Place metal tray on rack and place in cold
oven. Preheat oven, tray and rack to 400°F.
When preheated, place frozen pie on metal
tray and bake according to package time or
until crust is browned and lling is hot.
Follow package directions for preparation.
Follow package directions for preparation.
Let stand 5 minutes before cutting.
Pierce pastry with fork to prevent shrinkage.
Casseroles
Meat, Chicken,
Seafood Combinations
Pasta
Potatoes, scalloped
Vegetable
350°F
350°F
350°F
350°F
20 to 40
25 to 45
55 to 60
25 to 35
Cook times vary with casserole size and
ingredients.
Cook times vary with casserole size and
ingredients.
Let stand 5 minutes before serving.
Cook times vary with casserole size and
ingredients.
Convenience
Foods
Frozen Bread Dough
Frozen Entrée
Frozen Pizza Rising
Crust
Frozen Pizza
French Fries Crinkle
Cut
Frozen Wafe
Frozen Cheese Sticks
Frozen Turnovers
350°F
325°F
400°F
400°F
450°F
400°F
450°F
450°F
30 to 35
70 to 80
25 to 35
17 to 21
15 to 19
5 to 7
6 to 8
18 to 22
Follow package directions for preparation.
Follow package directions for preparation.
Follow package directions for preparation.
Pizza should not extend over the rack.
Follow package directions for preparation.
Pizza should not extend over the rack.
Follow package directions for preparation.
Follow package directions for preparation.
Follow package directions for preparation.
Follow package directions for preparation.
Main Dishes
Meat Loaf
Oven-Baked Stew
Swiss Steak
Stuffed Peppers
400°F
325°F
350°F
350°F
30 to 40
80 to 90
60 to 70
40 to 45
Let stand 5 minutes after cooking.
Brown meat before combining with liquid
and vegetables.
Let stand 2 minutes after cooking.
Use green, red, or yellow peppers.
Vegetables
Acorn Squash Halves
Baked Potatoes
Twice-Baked Potatoes
375°F
425°F
400°F
55 to 60
50 to 60
25 to 30
Pierce skin in several places. Add ½ cup
water to dish. Turn squash halves cut side
up after 30 minutes of cook time and cover.
Pierce skin with fork before baking.
Pierce skin with fork before baking.
Notes:
• The oven temperature indicated in the chart above is recommended over the package instruction temperature.
• The baking time in the chart above is only a guideline for reference. Adjust time according to the food condition
or your preference. Check doneness at the minimum time.
COOKING GUIDE

- 34 -
MEAT ROASTING GUIDELINES FOR CONVECTION COOKING
FOOD OVEN TEMP. TIME, MIN./LB.
Beef
Ribs (2 to 4 lbs.)
Rare
Medium
Well
Boneless Ribs, Top Sirloin
Rare
Medium
Well
Beef Tenderloin
Rare
Medium
Pot Roast (2½ to 3 lbs.)
Chuck, Rump
Meat Loaf (2 lbs.)
300°F
300°F
300°F
300°F
300°F
300°F
300°F
300°F
300°F
400°F
45 to 50
50 to 55
55 to 60
53 to 58
58 to 63
63 to 68
28 to 32
32 to 36
83 to 88
65 to 75
Ham
Canned (3-lb. fully cooked)
Butt (5-lb. fully cooked)
Shank (5-lb. fully cooked)
325°F
325°F
325°F
20 to 25
20 to 25
17 to 20
Lamb
Bone-in (2 to 4 lbs.)
Medium
Well
Boneless (2 to 4 lbs.)
Medium
Well
300°F
300°F
300°F
300°F
42 to 47
47 to 52
50 to 55
55 to 60
Pork
Bone-in (2 to 4 lbs.)
Boneless (2 to 4 lbs.)
Pork Chops (½ to 1-inch thick)
2 chops
4 chops
6 chops
300°F
300°F
325°F
325°F
325°F
48 to 52
56 to 61
42 to 45
45 to 48
48 to 55
Poultry
Whole Chicken (2½ to 3½ lbs.)
Chicken Pieces (2½ to 3½ lbs.)
Duckling (4 to 5 lbs.)
Turkey Breast (4 to 6 lbs.)
375°F
425°F
375°F
325°F
25 to 35
10 to 12
19 to 21
21 to 25
Seafood
Fish, whole (3 to 5 lbs.)
Lobster Tails (6 to 8-oz. each)
400°F
350°F
13 to 18
12 to 17
Note:
• The roasting time in the chart above is only a guideline for reference. Adjust time according to the food condition
or your preference. Check doneness at the minimum time.
COOKING GUIDE

- 35 -
COMBINATION ROAST COOKING GUIDE
FOOD OVEN TEMP. TIME, MIN./LB.
Beef Turn over after half of cooking time.
Ribs (2 to 4 lbs.)
Rare
Medium
Well
Boneless Ribs, Top Sirloin
Rare
Medium
Well
Beef Tenderloin
Rare
Medium
Chuck, Rump or Pot Roast (2½ to 3 lbs.)
(Use cooking bag for best results.)
375°F
375°F
375°F
375°F
375°F
375°F
375°F
375°F
300°F
9 to 13
11 to 15
13 to 17
9 to 13
11 to 15
13 to 17
16 to 18
18 to 20
18 to 20
Ham Turn over after half of cooking time.
Canned (3-lb. fully cooked)
Butt (5-lb. fully cooked)
Shank (5-lb. fully cooked)
300°F
300°F
300°F
15 to 18
15 to 18
15 to 18
Lamb Turn over after half of cooking time.
Bone-in (2 to 4 lbs.)
Medium
Well
Boneless (2 to 4 lbs.)
Medium
Well
300°F
300°F
300°F
300°F
13 to 18
18 to 23
14 to 19
19 to 24
Pork Turn over after half of cooking time.
Bone-in (2 to 4 lbs.)
Boneless (2 to 4 lbs.)
Pork Chops (¾ to 1-inch thick)
2 chops
4 chops
6 chops
300°F
300°F
350°F
305°F
305°F
17 to 20
19 to 22
10 to 13
13 to 16
16 to 19
Poultry Turn over after half of cooking time.
Whole Chicken (2½ to 6 lbs.)
Chicken Pieces (2½ to 6 lbs.)
Cornish Hens (untied)
Unstuffed
Stuffed
Duckling
Turkey Breast (4 to 6 lbs.)
375°F
375°F
425°F
375°F
375°F
300°F
15 to 17
15 to 18
15 to 18
22 to 25
15 to 18
11 to 15
Seafood
Fish
1-lb. llets
Lobster Tails (6 to 8-oz. each)
Shrimp (1 to 2 lbs.)
Scallops (1 to 2 lbs.)
350°F
350°F
350°F
350°F
7 to 10
10 to 15
9 to 14
8 to 13
Note:
• The roasting time in the chart above is only a guideline for reference. Adjust time according to the food condition
or your preference. Check doneness at the minimum time.
COOKING GUIDE

- 36 -
COMBINATION BAKE COOKING GUIDE
FOOD OVEN TEMP. TIME, MIN. COMMENTS
Pies,
Pastries
Quiche 425°F 15 to 17
Let stand 5 minutes before cutting.
Convenience
Foods
Frozen Entrée
Frozen Pizza
Rolls, Egg Rolls
Pizza
375°F
450°F
450°F
39 to 43
4 to 6
23 to 26
Follow package directions for preparation.
Follow package directions for preparation.
Follow package directions for preparation.
Vegetables
Baked Potatoes 450°F 36 to 40
Pierce skin with a fork before baking.
Place on rack.
COOKING GUIDE

- 37 -
HEATING/REHEATING GUIDE
To heat or reheat successfully in a microwave oven, follow these guidelines: Measure the amount of food in order
to determine the time needed to reheat. Arrange the food in a circular pattern for best results. Room temperature
food will heat faster than refrigerated food. Canned foods should be taken out of the can and placed in a
microwave-safe container. The food will heat more evenly if covered with a microwave-safe lid or vented plastic
wrap. Remove the cover carefully to prevent steam burns. Use the following chart as a guide for reheating cooked
food.
ITEMS COOK TIME (AT HIGH) SPECIAL INSTRUCTIONS
Sliced meat
3 slices (¼ -inch thick)
1 - 2 minutes Place sliced meat on microwavable plate.
Cover with plastic wrap and vent.
Note:
Gravy or sauce helps to keep meat juicy.
Chicken pieces
1 breast
1 leg and thigh
2 - 3½ minutes
1½ - 3 minutes
Place chicken pieces on microwavable plate.
Cover with plastic wrap and vent.
Fish llet
(6 - 8 oz.)
2 - 4 minutes Place sh on microwavable plate.
Cover with plastic wrap and vent.
Lasagna
1 serving (10½ oz.)
4 - 6 minutes Place lasagna on microwavable plate.
Cover with plastic wrap and vent.
Casserole
1 cup
4 cups
1 - 3½ minutes
5 - 8 minutes
COOK covered in microwavable casserole.
Stir once halfway through cooking.
Casserole – cream or
cheese
1 cup
4 cups
1½ - 3 minutes
3½ - 5½ minutes
COOK covered in microwavable casserole.
Stir once halfway through cooking.
Sloppy Joe or
Barbecued Beef
1 sandwich (½ cup
meat lling)without bun
1 - 2½ minutes
Reheat lling and bun separately.
Cook lling covered in microwavable casserole.
Stir once.
Heat bun as directed in chart below.
Mashed potatoes
1 cup
4 cups
1 - 3 minutes
5 - 8 minutes
COOK covered in microwavable casserole.
Stir once halfway through cooking.
Baked beans
1 cup 1½ - 3 minutes
COOK covered in microwavable casserole.
Stir once halfway through cooking.
Ravioli or pasta in sauce
1 cup
4 cups
2½ - 4 minutes
7½ - 11 minutes
COOK covered in microwavable casserole.
Stir once halfway through cooking.
Rice
1 cup
4 cups
1½ - 3½ minutes
4 - 6½ minutes
COOK covered in microwavable casserole.
Stir once halfway through cooking.
Sandwich roll or bun
1 roll 15 - 30 seconds
Wrap in paper towel and place on glass microwavable
rack.
Vegetables
1 cup
4 cups
1½ - 2½ minutes
4 - 6 minutes
COOK covered in microwavable casserole.
Stir once halfway through cooking.
Soup
1 serving (8 oz.) 1½ - 2½ minutes
COOK covered in microwavable casserole.
Stir once
COOKING GUIDE
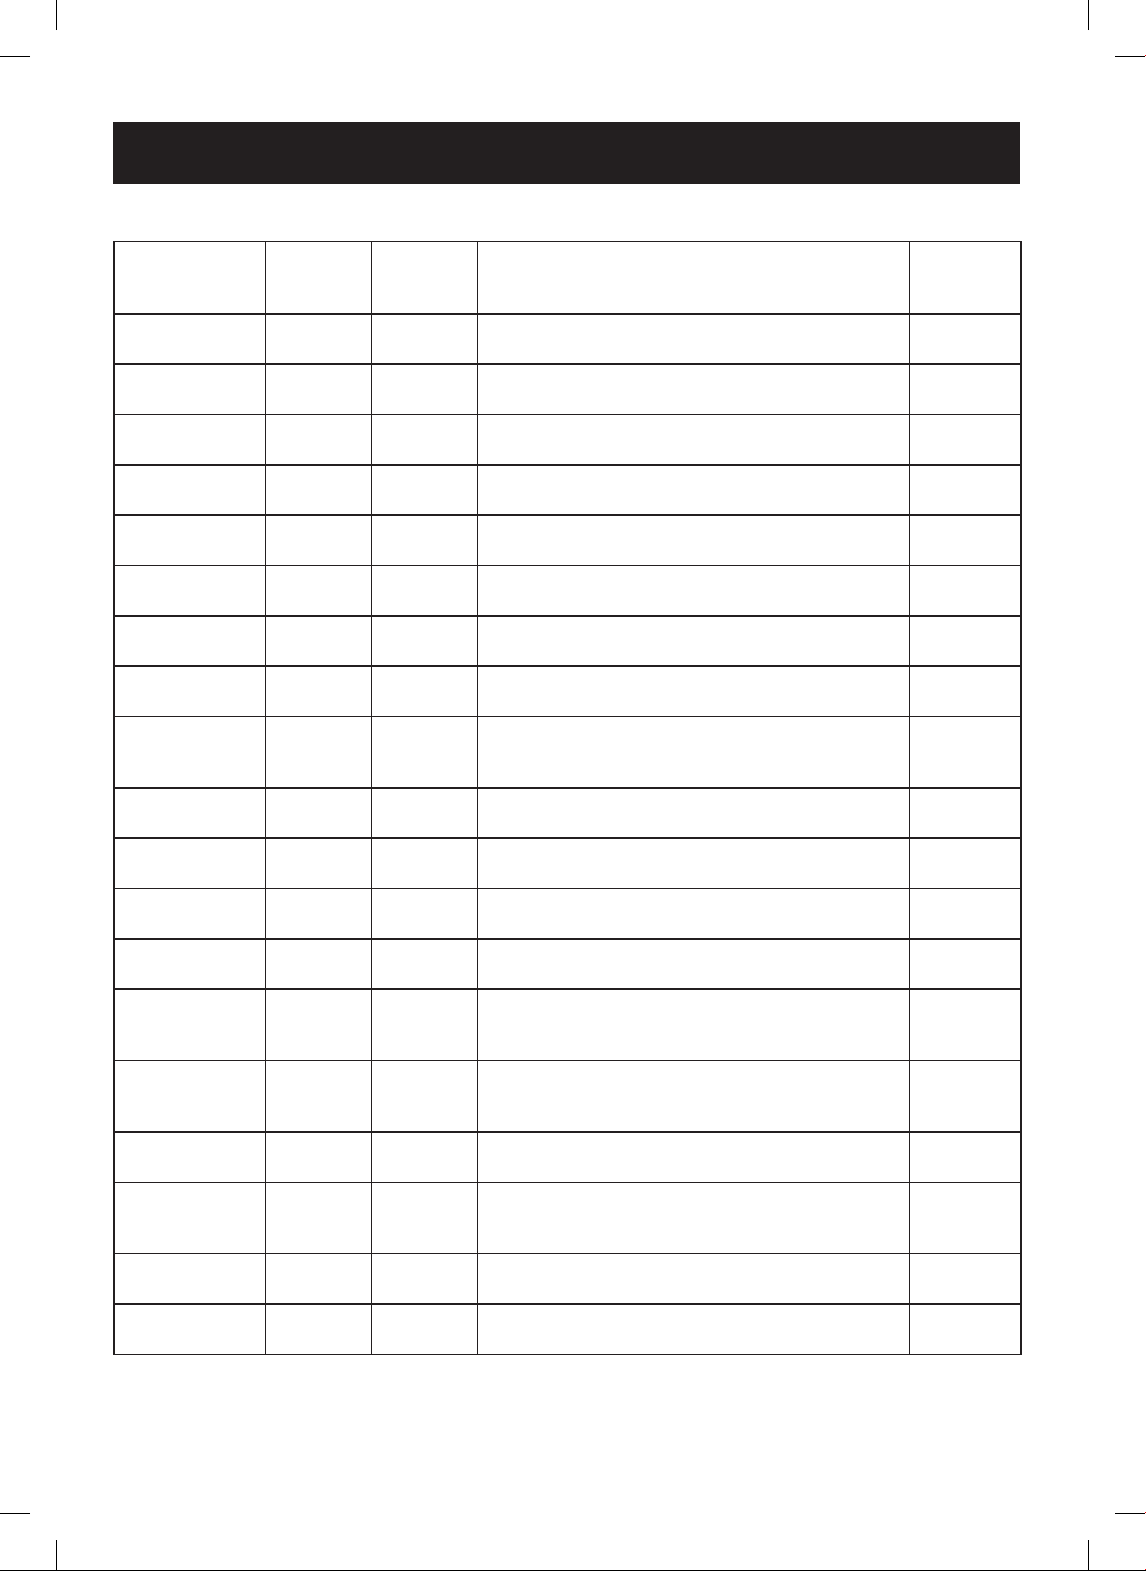
- 38 -
FRESH VEGETABLE GUIDE
VEGETABLE AMOUNT
COOK TIME
AT HIGH
(MINUTE)
INSTRUCTIONS
STANDING
TIME
Artichokes
(8 oz.each)
2 medium
4 medium
5 - 8
10 - 13
Trim. Add 2 tsp water and 2 tsp juice. Cover.
2 - 3 minutes
Asparagus,
Fresh, Spears
1 Ib. 3 - 6 Add ½ cup water. Cover.
2 - 3 minutes
Beans, Green
and Wax
1 Ib. 7 - 11 Add ½ cup water in 1½ qt. casserole. Stir halfway
through cooking.
2 - 3 minutes
Beets, Fresh 1 Ib. 12 - 16 Add ½ cup water in 1½ qt. covered casserole.
Rearrange halfway through cooking.
2 - 3 minutes
Broccoli, Fresh,
Spears
1 Ib. 4 - 8 Place broccoli in baking dish. Add ½ cup water.
2 - 3 minutes
Cabbage,
Fresh, Chopped
1 Ib. 4 - 7 Add ½ cup water in 1½ qt. covered casserole.
Stir halfway through cooking.
2 - 3 minutes
Carrots, Fresh,
Sliced
2 cups 2 - 4 Add ¼ cup water in 1 qt. covered casserole. Stir
halfway through cooking.
2 - 3 minutes
Cauliower,
Fresh, Whole
1 lb. 7 - 11 Trim and add ¼ cup water in 1 qt. covered casserole.
Stir halfway through cooking.
2 - 3 minutes
Flowerettes,
Fresh Celery,
Fresh, Sliced
2 cups
4 cups
2½ - 4½
6 - 8
Slice and add ½ cup water in 1½ qt. covered
casserole. Stir halfway through cooking.
2 - 3 minutes
Corn, Fresh 2 ears 5 - 9 Husk and add 2 tbsp water in 1½ qt. baking dish.
Cover.
2 - 3 minutes
Mushrooms,
Fresh, Sliced
½ Ib. 2 - 3½ Place mushrooms in 1½ qt. covered casserole.
Stir halfway through cooking.
2 - 3 minutes
Parsnips,
Fresh, Sliced
1 Ib. 4 - 8 Add ½ cup water in 1½ qt. covered casserole.
Stir halfway through cooking.
2 - 3 minutes
Peas, Green,
Fresh
4 cups 7 - 10 Add ½ cup water in 1½ qt. covered casserole.
Stir halfway through cooking.
2 - 3 minutes
Sweet Potatoes
Whole Baking
(6-8 oz.each)
2 medium
4 medium
5 - 10
7 - 13
Pierce potatoes several times with fork.
Place on 2 paper towels.
Turn over halfway through cooking.
2 - 3 minutes
2 - 3 minutes
White Potatoes,
Whole Baking
(6-8 oz.each)
2 potatoes
4 potatoes
5 - 8
10 - 14
Pierce potatoes several times with fork.
Place on 2 paper towels.
Turn over halfway through cooking.
2 - 3 minutes
2 - 3 minutes
Spinach, Fresh,
Leaf
1 Ib. 4 - 7 Add ½ cup water in 2 qt. covered casserole.
2 - 3 minutes
Squash, Acorn
or Butternut,
Fresh
1 medium 6 - 8 Cut squash in half. Remove seeds.
Place in 8 x 8-inch baking dish. Cover.
2 - 3 minutes
Zucchini, Fresh,
Sliced
1 Ib. 4½ - 7½ Add ½ cup water in 1½ qt. covered casserole.
Stir halfway through cooking.
2 - 3 minutes
Zucchini, Fresh,
Whole
1 Ib. 6 - 9 Pierce. Place on 2 paper towels. Turn over and
rearrange halfway through cooking.
2 - 3 minutes
COOKING GUIDE
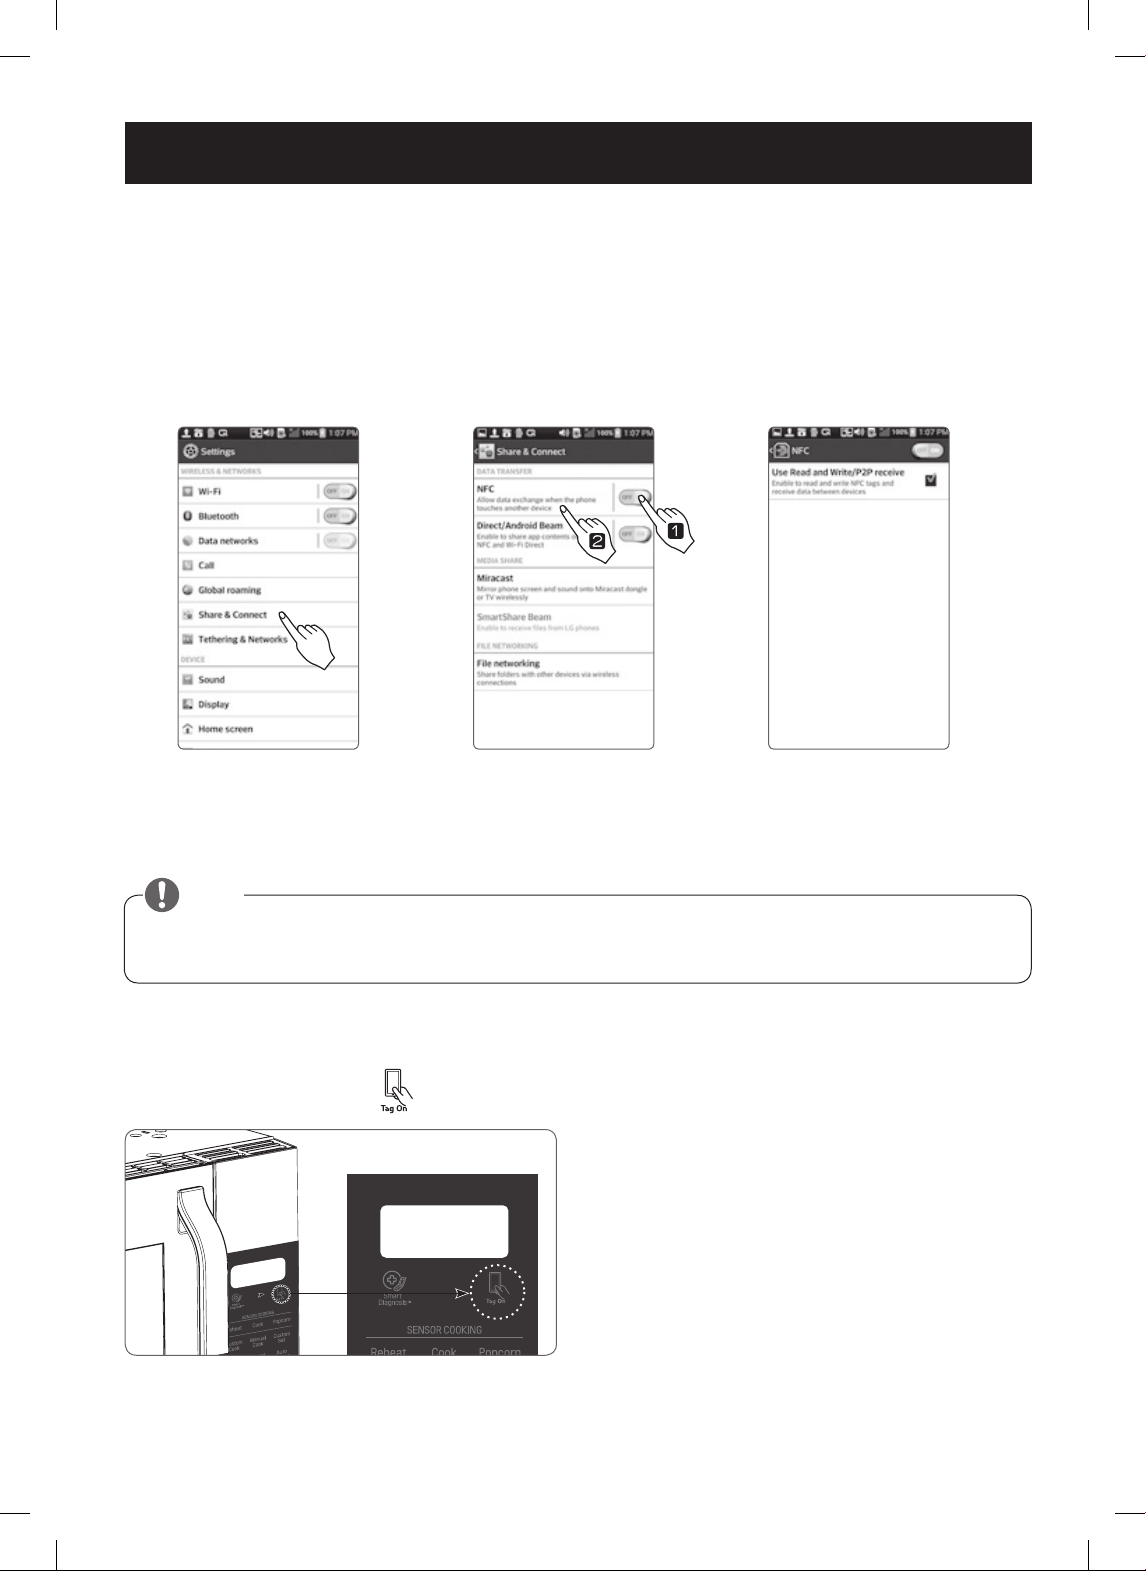
- 39 -
SMART FEATURES
BEFORE USING TAG ON
The Tag On function allows you to conveniently use LG Smart Diagnosis™, set the cook mode and communicate
with the appliance using a smart phone. To use the Tag On function:
1. Download the SmartThinQ application to a smart phone.
2. Turn on the NFC (Near Field Communication) function in the smart phone.- The Tag On function can only be
used with smart phones equipped with the NFC function and based on the Android operating system (OS).
TURNING ON THE SMART PHONE’S NFC FUNCTION
USING THE TAG ON FUNCTION
THE TAG ON ICON
Look for the Tag On icon next to the display on the
control panel. Position the smart phone next to the
icon when using the Tag On function with the LG Smart
Diagnosis™, cook mode setting of the SmartThinQ
application.
1. Enter the
Settings
menu of the
smart phone and select
Share
& Connect
under WIRELESS &
NETWORKS.
2. Set
NFC
and
Direct/Android
Beam
to ON and select NFC.
3. Check Use Read and
Write/P2P receive.
NOTE
Depending on the smart phone manufacturer and Android OS version, the NFC activation process may differ.
Refer to the manual of the smart phone for details.

- 40 -
SMART FEATURES
THE NFC ANTENNA POSITION
When using the Tag On function, position the smart
phone so that the NFC antenna inside the back of the
smart phone matches the position of the Tag On icon
on the appliance. (The position of the antenna cannot
be seen, so the SmartThinQ app will attempt to nd it
and display a target range for the antenna on the smart
phone's screen.)
If the app is not able to show a target range, position
the center back of the smart phone over the Tag On
icon on the appliance. If the connection is not made
immediately, move the smart phone very slightly in a
widening circular motion until the application veries the
connection.
Because of the characteristics of NFC, if the
transmission distance is too far, or if there is a metal
sticker or a thick case on the phone, transmission will
not be good.
Press [
] in the SmartThinQ app for a more detailed
guide on how to use the Tag On function.
USING TAG ON WITH APPS
Touch an LG appliance's Tag On logo with an NFC-equipped smart phone, and the SmartThinQ apps use the Tag
On function.
Smart Diagnosis™
Allows you to diagnose and troubleshoot problems with
your microwave oven.
Cook Mode Setting
Allows you to set repeatedly and conveniently the cook
mode, temperature, and cook time of your favorite
dishes.
IMPORTANT:
Features could be added or deleted when the SmartThinQ application is updated. Data saved on
the SmartThinQ application could be deleted when the application is updated or your smart phone is changed.
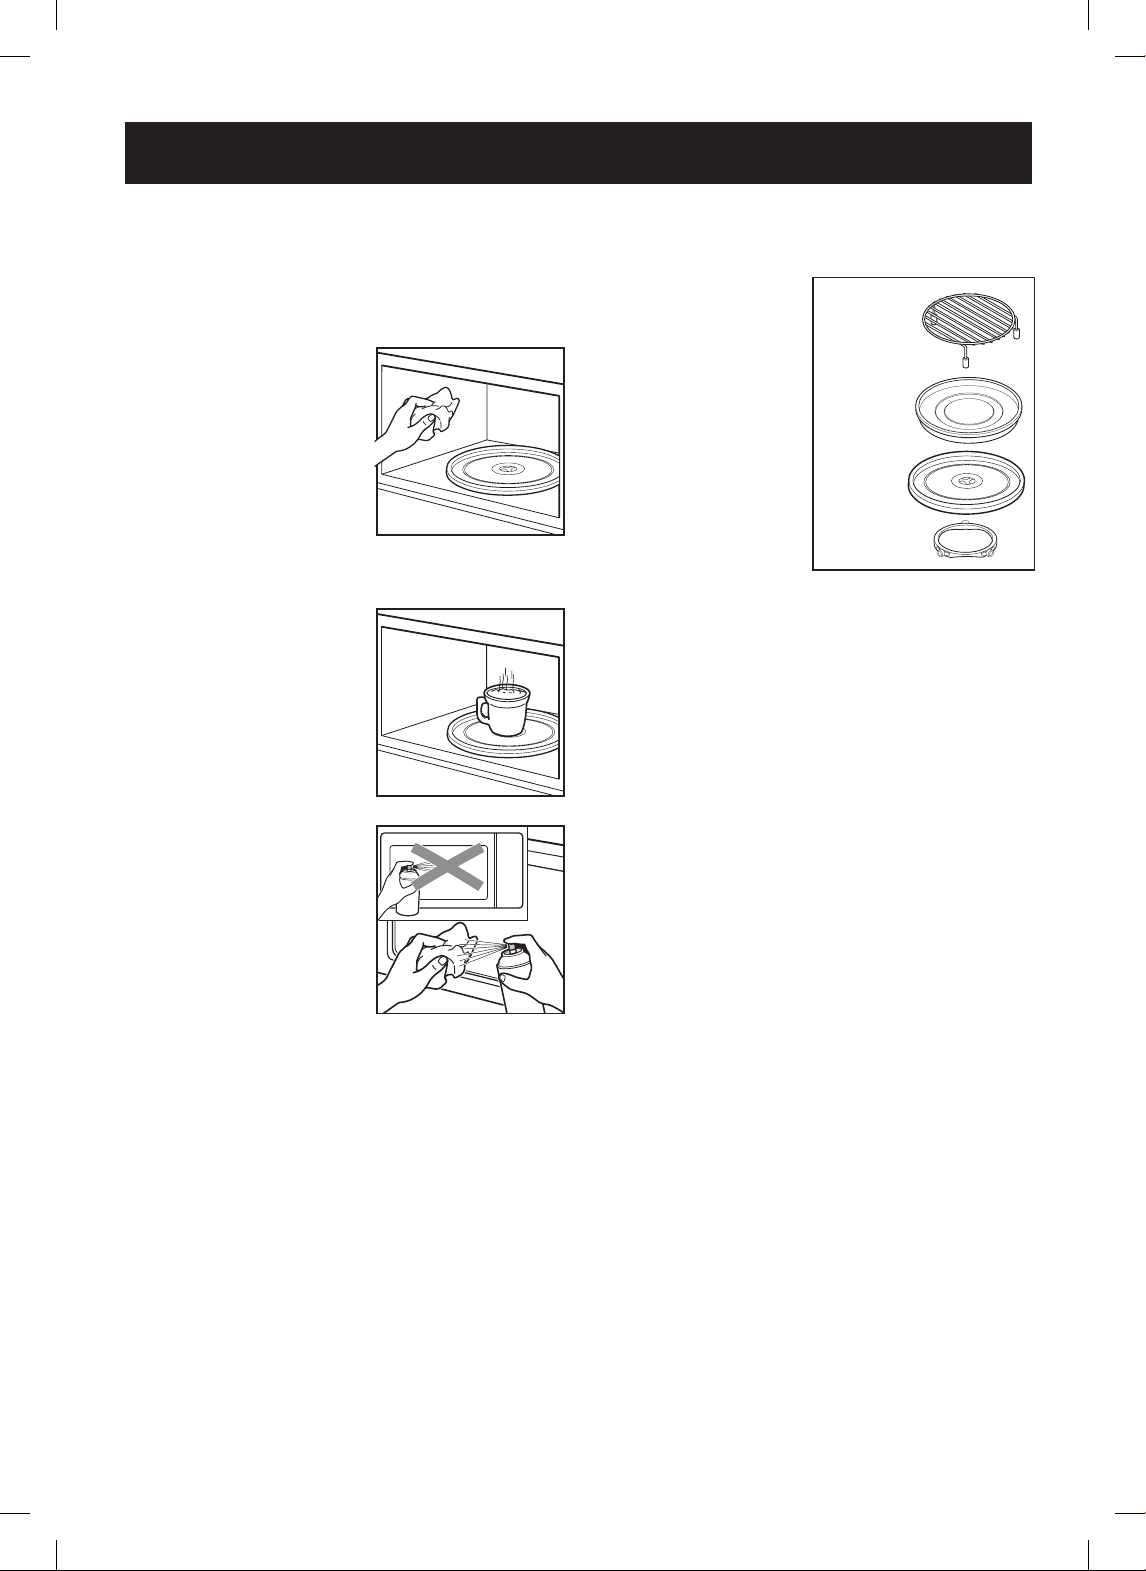
- 41 -
MAINTENANCE
CARING FOR YOUR
MICROWAVE OVEN
To make sure the microwave oven looks good and
works well for a long time, maintain it properly. For
proper care, follow these instructions carefully.
For interior surfaces: Wash
often with warm, sudsy water
and a sponge or soft cloth. Use
only mild, nonabrasive soaps
or a mild detergent.
Keep the
areas clean where the door
and oven frame touch when
closed.
Wipe well with a clean cloth.
Over time, stains can occur on the surfaces as the
result of food particles spattering during cooking.
This is normal.
For stubborn soil, boil a cup of
water in the oven for 2 to 3
minutes. Steam will soften the
soil. To get rid of odors inside
the oven, boil a cup of water
with some lemon juice or
vinegar in it.
For exterior surfaces and
control panel:
Use a soft cloth
sprayed with glass cleaner.
Apply the glass cleaner to the
soft cloth; do not spray directly
on the oven.
Note: Abrasive cleansers,
steel wool pads, gritty wash
cloths, some paper towels,
etc., can damage the control panel and the interior and
exterior oven surfaces.
To clean the glass tray
and rotating ring,
wash in
mild, sudsy water.
For heavily soiled areas
use a mild cleanser and
scouring sponge.
The glass tray and rotating
ring are dishwasher safe.
Metal
Rack
Metal
Tray
Glass
Tray
Rotating
Ring
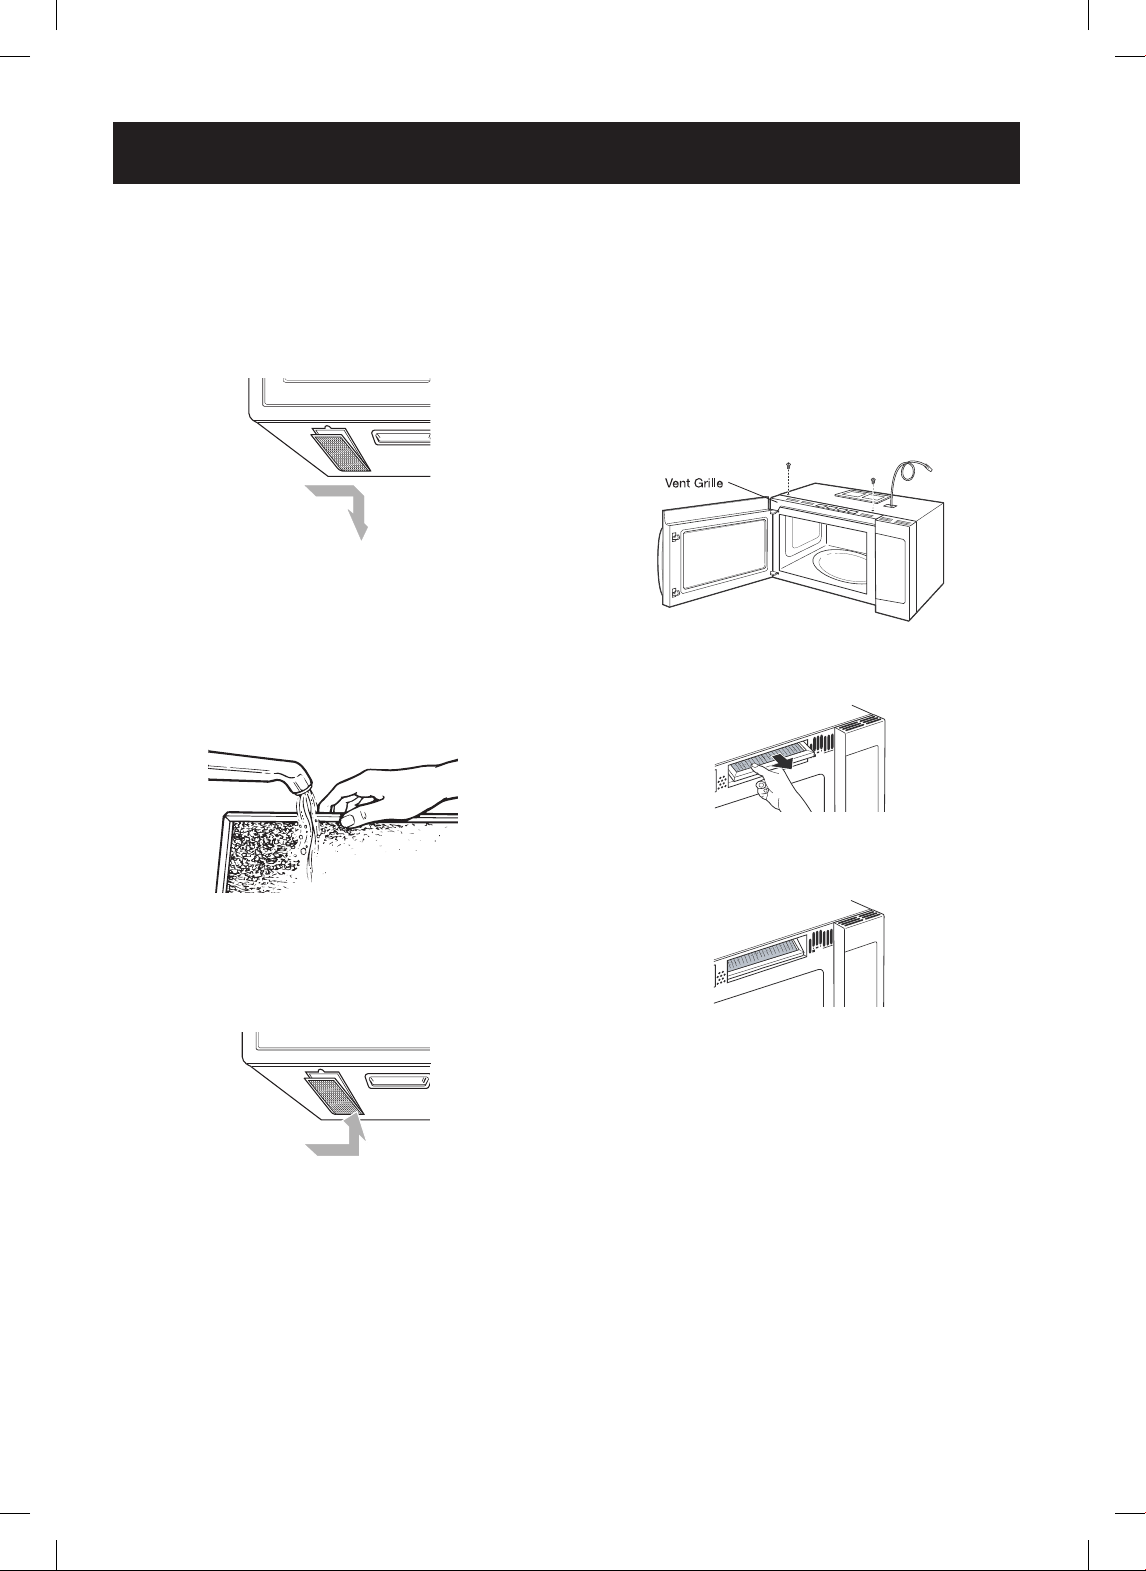
- 42 -
CLEANING THE GREASE
FILTERS
1.
Unplug
the microwave oven.
2.
To remove
grease lters, slide each lter to the side.
Pull lters downward and push to the other side. The
lter will drop out.
3.
Soak
grease lters in hot water and a mild detergent.
Scrub and swish
to remove embedded dirt and
grease.
Rinse well and shake
to dry.
Do not clean
lters with ammonia, corrosive cleaning agents
such as lye-based oven cleaners, or place them
in a dishwasher. The lters will turn black or
could be damaged.
4.
To replace
grease lters, slide lter in the frame slot
on one side of the opening. Push lter upward and
push to the other side to lock into place.
5.
Plug in
the microwave oven.
CHARCOAL FILTER
REPLACEMENT
If the oven is vented inside, the charcoal lter should
be replaced every 6 to 12 months, and more often
if necessary. The charcoal lter cannot be cleaned.
To order a new charcoal lter, contact the Parts
Department at your nearest Authorized Service Center.
1.
Unplug
the microwave oven.
2.
Remove
the vent grille mounting screws.
3.
Tip
the grille forward, then
lift out
to remove.
4.
Remove
the charcoal lter
5.
Slide
a new charcoal lter into place.
The lter should rest at the angle shown.
6.
Slide
the bottom of the vent grille into place.
Push
the top until it snaps into place.
Replac
e the mounting screws.
7.
Plug in
the microwave oven.
MAINTENANCE
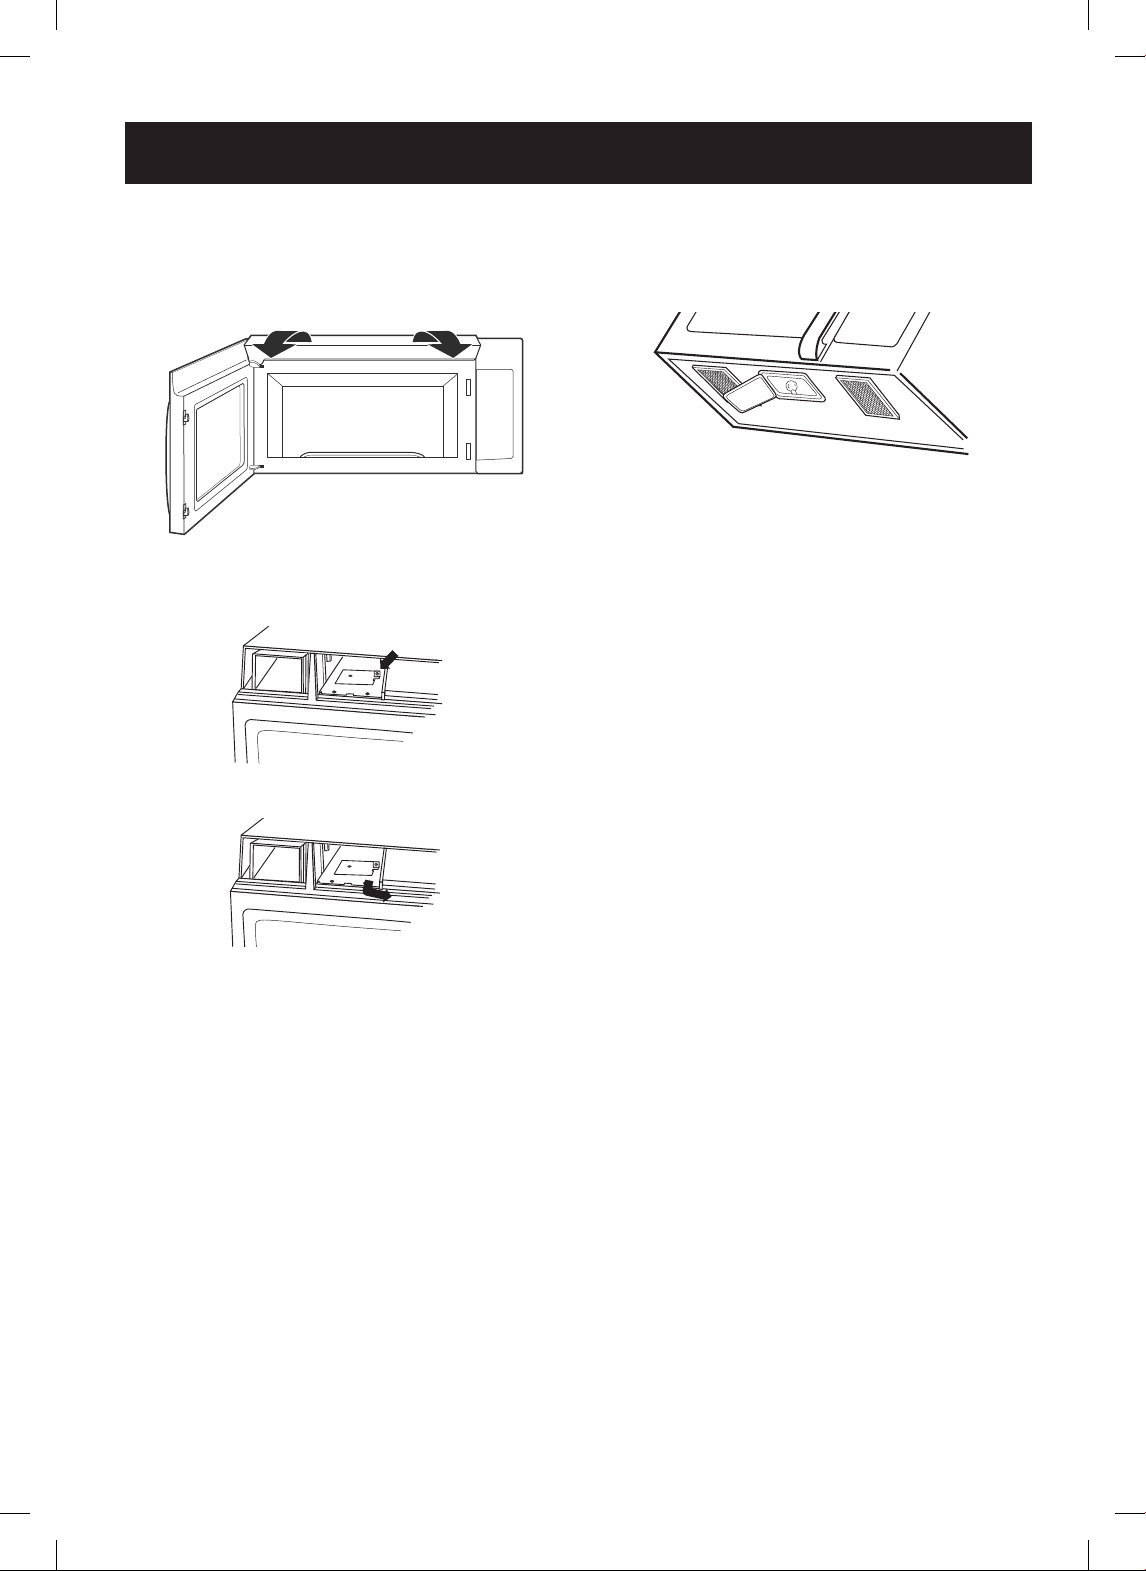
- 43 -
MAINTENANCE
OVEN LIGHT REPLACEMENT
1.
Unplug
the microwave oven.
2.
Remove
the vent grille mounting screws.
3.
Tip
the grille forward, then
lift out
to remove.
4.
Remove
charcoal lter.
5.
Remove
the screw holding the lamp shield in place.
6.
Pull
the lamp shield out.
7.
Replace
the bulb with a candelabra-base 50 watt
bulb.
8.
Return
the lamp and lamp shield to original position
and replace screw and charcoal lter.
9.
Replace
the mounting screws.
10.
Plug in
the microwave oven.
COOKTOP/COUNTERTOP LIGHT
REPLACEMENT
1.
Unplug
the microwave oven.
2.
Remove
the bulb cover mounting screws.
3.
Replace
bulb(s) with candelabra-base 50 watt bulb.
4.
Replace
bulb cover and mounting screw.
5.
Plug in
the microwave oven.

- 44 -
MICROWAVE UTENSIL GUIDE
USE DO NOT USE
OVENPROOF GLASS
(treated for high intensity heat):
utility dishes, loaf dishes, pie plates, cake
plates, liquid measuring cups, casseroles
and bowls without metallic trim.
CHINA:
bowls, cups, serving plates, and platters
without metallic trim.
PLASTIC:
Plastic wrap (as a cover)- lay the plastic
wrap loosely over the dish and press it to
the sides.
Vent plastic wrap by turning back one
edge slightly to allow excess steam to
escape. The dish should be deep enough
so that the plastic wrap will not touch the
food. As the food heats it may melt the
plastic wrap wherever the wrap touches
the food.
Use plastic dishes, cups, semi-rigid freezer
containers and plastic bags
only for
short cooking time. Use these with care
because the plastic may soften from
the heat of the food.
PAPER:
Paper towels, waxed paper, paper
napkins, and paper plates with no metallic
trim or design. Look for the manufacturer's
label for use in the microwave oven.
Note:
Do not use recycled paper products in the
microwave oven. They sometimes contain
impurities that cause arcing and sparking.
NEVER use paper products in the
convection oven.
METAL UTENSILS:
Metal shields the food from microwave energy and produces
uneven cooking. Also avoid metal skewers, thermometers, or foil
trays. Metal utensils can cause arcing, which can damage the
microwave oven.
METAL DECORATION:
Metal-trimmed or metal-banded dinnerware, casserole dishes,
etc. The metal trim interferes with normal cooking and may
damage the oven.
ALUMINUM FOIL:
Avoid large sheets of aluminum foil because they hinder cooking
and may cause harmful arcing. Use small pieces of foil to shield
poultry legs and wings. Keep ALL aluminum foil at least 1 inch
from the side walls and door of the oven.
WOOD:
Wooden bowls and boards will dry out and may split or crack
when you use them in the microwave oven. Baskets react in the
same way.
TIGHTLY COVERED UTENSILS:
Be sure to leave openings for steam to escape from covered
utensils. Pierce plastic pouches of vegetables or other food items
before cooking. Tightly closed pouches could explode.
BROWN PAPER:
Avoid using brown paper bags.
They absorb too much heat and could burn.
FLAWED OR CHIPPED UTENSILS:
Any utensil that is cracked, awed, or chipped may break in the
oven.
METAL TWIST TIES:
Remove metal twist ties from plastic or paper bags.
They become hot and could cause a re.
MAINTENANCE

- 45 -
BEFORE CALLING FOR SERVICE
Check the following list to be sure a service call is
really necessary. A quick reference of this manual as
well as reviewing additional information on items to
check may prevent an unneeded service call.
If nothing on the oven operates:
• check for a blown circuit fuse or a tripped main circuit
breaker.
• check if oven is properly connected to electric circuit
in house.
• check that controls are set properly.
If the oven interior light does not work
• the light bulb is loose or defective.
If oven will not cook:
• check that control panel was programmed correctly.
• check that door is rmly closed.
• check that Start was pressed.
•
check that timer wasn’t started instead of a cook function.
If oven takes longer than normal to cook or cooks
too rapidly:
• be sure the Power Level is programmed properly.
If the time of day clock does not always keep
correct time:
• check that the power cord is fully inserted into the
outlet receptacle.
• be sure the oven is the only appliance on the
electrical circuit.
If food cooks unevenly:
• be sure food is evenly shaped.
• be sure food is completely defrosted before cooking.
• check placement of aluminum foil strips used to
prevent overcooking.
If food is undercooked:
• check recipe to be sure all directions (amount, time,
and power levels) were correctly followed.
• be sure microwave oven is on a separate circuit.
• be sure food is completely defrosted before cooking.
If food is overcooked:
• check recipe to be sure all directions (amount, power
level, time, size of dish) were followed.
If arcing (sparks) occur:
• be sure microwavable dishes were used.
• be sure wire twist ties weren’t used.
• be sure oven wasn’t operated when empty.
• make sure metal rack (if used) is properly installed on
4 supports.
If the display shows a time counting down but the
oven is not cooking:
• check that door is rmly closed.
• check that timer wasn’t started instead of a cooking
function.
FREQUENTLY ASKED QUESTIONS
Q. Can I use a rack in my microwave oven to reheat
or cook on two levels at once?
A. Only use the rack that is supplied with your
microwave oven. Use of any other rack can result
in poor cooking performance and/or arcing and may
damage your oven.
Q. Can I use either metal or aluminum pans in my
microwave oven?
A. Usable metal includes aluminum foil for shielding
(use small, at pieces), and shallow foil trays (if
tray is ¾ inch deep and lled with food to absorb
microwave energy). Never allow metal to touch walls
or door.
Q. Sometimes the door of my microwave oven
appears wavy. Is this normal?
A. This appearance is normal and does not affect the
operation of your oven.
Q. The glass tray does not move.
A. The glass tray is not correctly in place. It should be
correct-side up and sitting rmly on the center hub.
The support is not operating correctly. Remove the
glass tray and restart the oven. Cooking without
the glass tray can give you poor results.
Q. Why does the dish become hot when I
microwave food in it? I thought that this should
not happen.
A. As the food becomes hot it will conduct the heat to
the dish. Use hot pads to remove food after cooking.
Q. What does standing time mean?
A. Standing time means that food should be taken
out of the oven and covered for additional time after
cooking. This process allows the cooking to nish,
saves energy, and frees the oven for other purposes.
Q. Can I pop popcorn in my microwave oven?
How do I get the best results?
A. Yes. Pop packaged microwave popcorn following
manufacturer’s guidelines or use the preprogrammed
Popcorn key.
Do not use regular paper bags. Use the listening test
by stopping the oven as soon as the popping slows
to a pop every one or two seconds. Do not try to
repop unpopped kernels. You can also use special
microwave poppers. When using a popper, be sure
to follow manufacturer’s directions. Do not pop
popcorn in glass utensils.
Q. Why does steam come out of the air exhaust
vent?
A. Steam is normally produced during cooking. The
microwave oven has been designed to vent steam
out of the top vent.
TROUBLESHOOTING
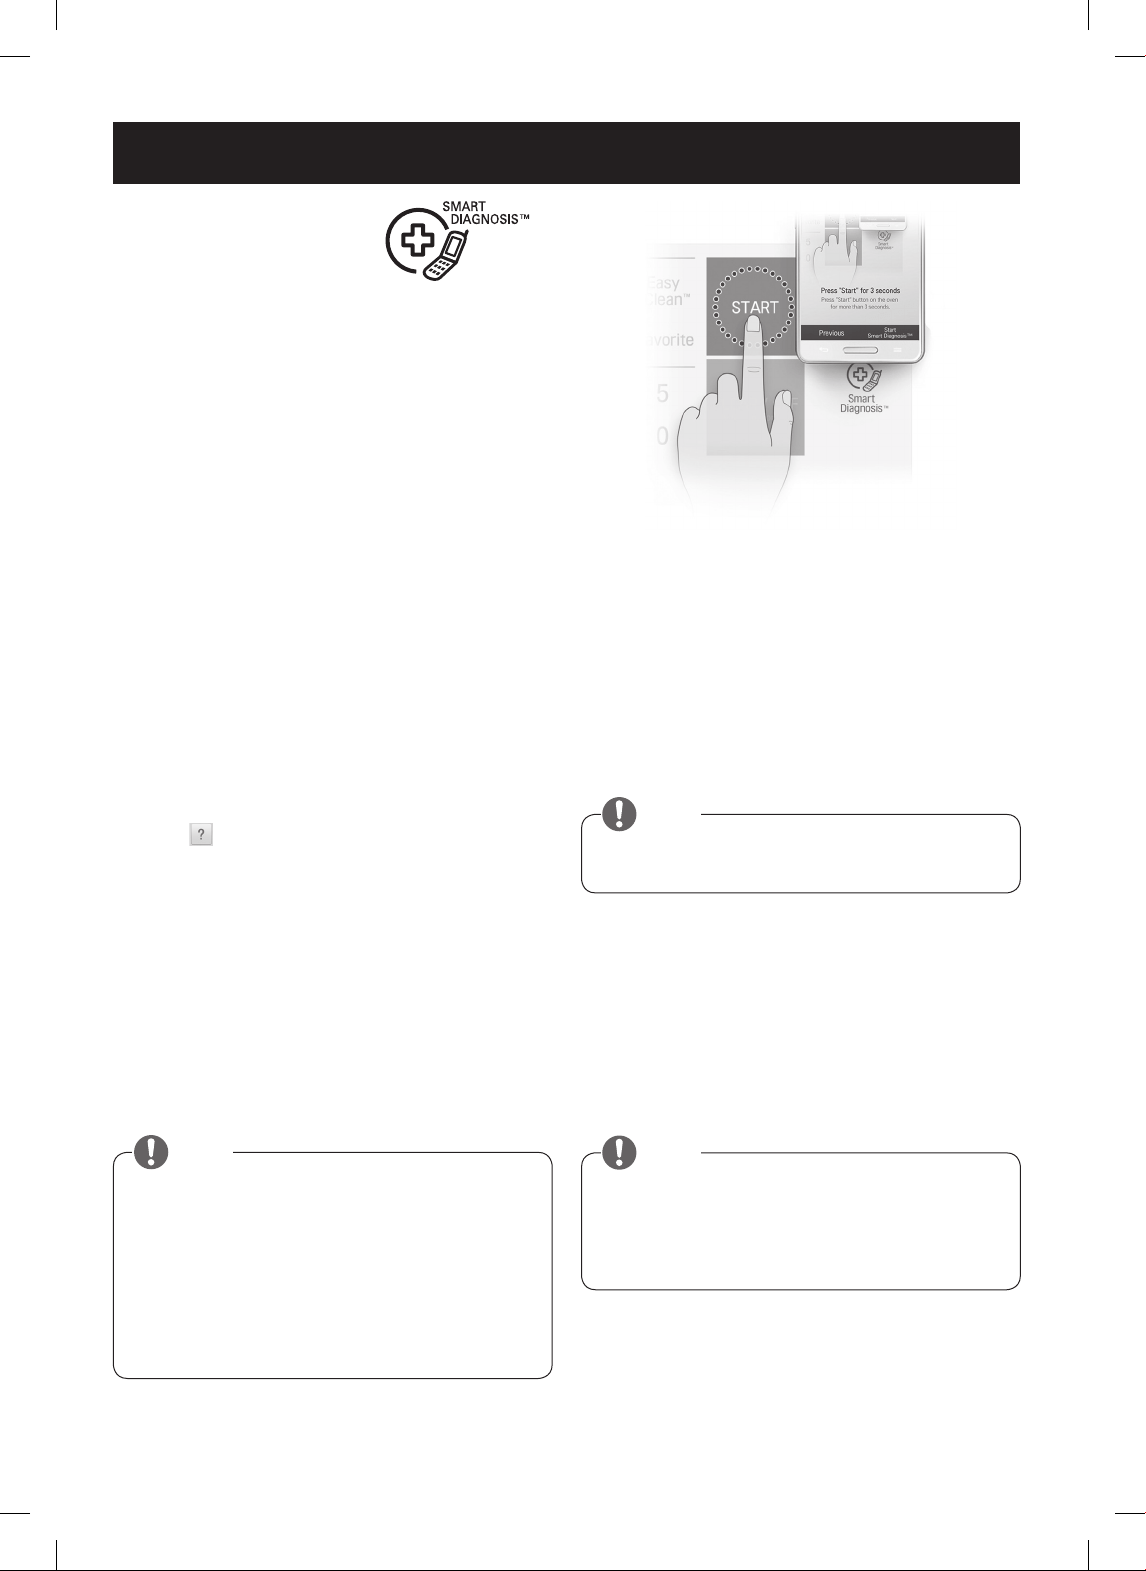
- 46 -
SMART DIAGNOSIS
Should you experience any problems with your
microwave oven, it has the capability of transmitting
data to your smart phone using the SmartThinQ
Application or via your telephone to the LG call center.
Smart Diagnosis™ cannot be activated unless your
microwave oven is turned on. If your microwave oven
is unable to turn on, then troubleshooting must be done
without using Smart Diagnosis™.
USING SMART DIAGNOSIS™
SMART DIAGNOSIS™ USING YOUR
SMART PHONE
1. Download the SmartThinQ application on your smart
phone.
2. Open the SmartThinQ application on your smart
phone. Press the Smart Diagnosis™ button to
advance to the next screen.
3. Follow the directions in the application.
Using ‘Tag on’ is recommended but, if it does not
work well, the application will show how to use
Audible Diagnosis.
4. Press [
] in the SmartThinQ app for a more
detailed guide on how to use the Tag On function.
SMART DIAGNOSIS™ THROUGH THE
CALL CENTER
1. Call the LG call center at: (LG U.S.) 1-800-243-0000
(LG Canada) 1-888-542-2623.
2. When instructed to do so by the call center agent,
hold the mouthpiece of your phone over the Smart
Diagnosis™ logo on the machine.
Hold the phone no more than one inch from (but not
touching) the machine.
3. Press and hold the Start button for three seconds.
4. Keep the phone in place until the tone transmission
has nished. The display will count down the time.
5. Once the countdown is over and the tones have
stopped, resume your conversation with the call
center agent, who will then be able to assist you in
using the information transmitted for analysis.
SMART DIAGNOSIS
NOTE
NOTE
NOTE
• Call quality differences by region may affect the
function.
• Use the home telephone for better
communication performance, resulting in better
service.
• Bad call quality may result in poor data
transmission from your phone to the machine,
which could cause Smart Diagnosis™ to
malfunction.
Do not touch any other buttons or icons on the
display screen.
• For best results, do not move the phone while
the tones are being transmitted.
• If the call center agent is not able to get an
accurate recording of the data, you may be
asked to try again.

MEMO

MEMO

LIMITED WARRANTY (USA)
ARBITRATION NOTICE: THIS LIMITED WARRANTY CONTAINS AN ARBITRATION PROVISION THAT
REQUIRES YOU AND LG TO RESOLVE DISPUTES BY BINDING ARBITRATION INSTEAD OF IN COURT,
UNLESS YOU CHOOSE TO OPT OUT. IN ARBITRATION, CLASS ACTIONS AND JURY TRIALS ARE NOT
PERMITTED. PLEASE SEE THE SECTION TITLED “PROCEDURE FOR RESOLVING DISPUTES” BELOW.
Should your LG Microwave (“Product”) fail due to a defect in materials or workmanship under normal and proper
use, during the warranty period set forth below, LG Electronics (“LG”) will, at its option, repair or replace the
Product. This limited warranty is valid only to the original retail purchaser of the Product and applies only when
purchased and used within the United States including U.S. Territories.
WARRANTY PERIOD:
LABOR: Two Years from the Date of Purchase*.
PAR TS(except as listed below): Two Years from the
Date of Purchase*.
MAG NETRON: Ten Years from the Date of
Purchase*.
Replacement Units and Repair Parts are warranted
for the remaining portion of the original unit's warranty
period.
* Retain your Sales Receipt to prove the date of
purchase. A copy of your Sales Receipt must be
submitted at the time warranty service is provided.
HOW SERVICE IS HANDLED:
Please call 1-800-243-0000 and choose the
appropriate option. (Phones are answered 24 hours
a day, 365 days per year.) Please have the product
type (Microwave) and your ZIP code ready.
Or visit our website at: www.lg.com
•
Replacement products and parts are warranted for the remaining portion of the original warranty period or ninety
(90) days, whichever is greater.
•
Replacement products and parts may be new, reconditioned, refurbished, or otherwise factory remanufactured.
•
Proof of original retail purchase specifying the Product model and date of purchase is required to obtain
warranty service under this limited warranty.
EXCEPT TO THE EXTENT PROHIBTED BY APPLICABLE LAW, ANY IMPLIED WARRANTY OF
MERCHANTABILITY OR FITNESS FOR A PARTICULAR PURPOSE ON THE PRODUCT IS LIMITED IN
DURATION TO THE DURATION OF THE ABOVE LIMITED WARRANTY. UNDER NO CIRCUMSTANCES
SHALL LG OR ITS U.S. DISTRIBUTORS/DEALERS BE LIABLE FOR ANY INDIRECT, INCIDENTAL,
CONSEQUENTIAL, SPECIAL, OR PUNITIVE DAMAGES, INCLUDING, WITHOUT LIMITATION, LOST
GOODWILL, LOST REVENUES OR PROFITS, WORK STOPPAGE, IMPAIRMENT OF OTHER GOODS, COST
OF REMOVAL AND REINSTALLATION OF THE PRODUCT, LOSS OF USE, OR ANY OTHER DAMAGES
WHETHER BASED IN CONTRACT, TORT, OR OTHERWISE. LG’S TOTAL LIABILITY, IF ANY, SHALL NOT
EXCEED THE PURCHASE PRICE PAID BY YOU FOR THE PRODUCT.
Some states do not allow the exclusion or limitation of incidental or consequential damages or limitations on how
long an implied warranty lasts, so the above exclusions or limitations may not apply to you. This limited warranty
gives you specific legal rights and you may also have other rights that vary from state to state.
THIS LIMITED WARRANTY DOES NOT COVER:
•
Service trips to deliver, pick up, or install, educate how to operate, correct wiring, or correct unauthorized repairs.
•
Damage or failure of the Product to perform during power failures and interrupted or inadequate electrical service.
•
Damage or failure resulting from operating the Product in a corrosive atmosphere or contrary to the Product
owner’s manual.
•
Damage or failure to the Product caused by accidents, pests and vermin, lightning, wind, fire, floods, acts of God,
or any other causes beyond the control of LG.
•
Damage or failure caused by unauthorized modification or alteration, or if used for other than the intended purpose.
•
Damage or failure resulting from misuse, abuse, improper installation, repair, or maintenance. Improper
repair includes use of parts not authorized by LG. Improper installation or maintenance includes installation or
maintenance contrary to the Product owner’s manual.
Model LSMC3086ST / LSMC3089BD / LSMC3086SS
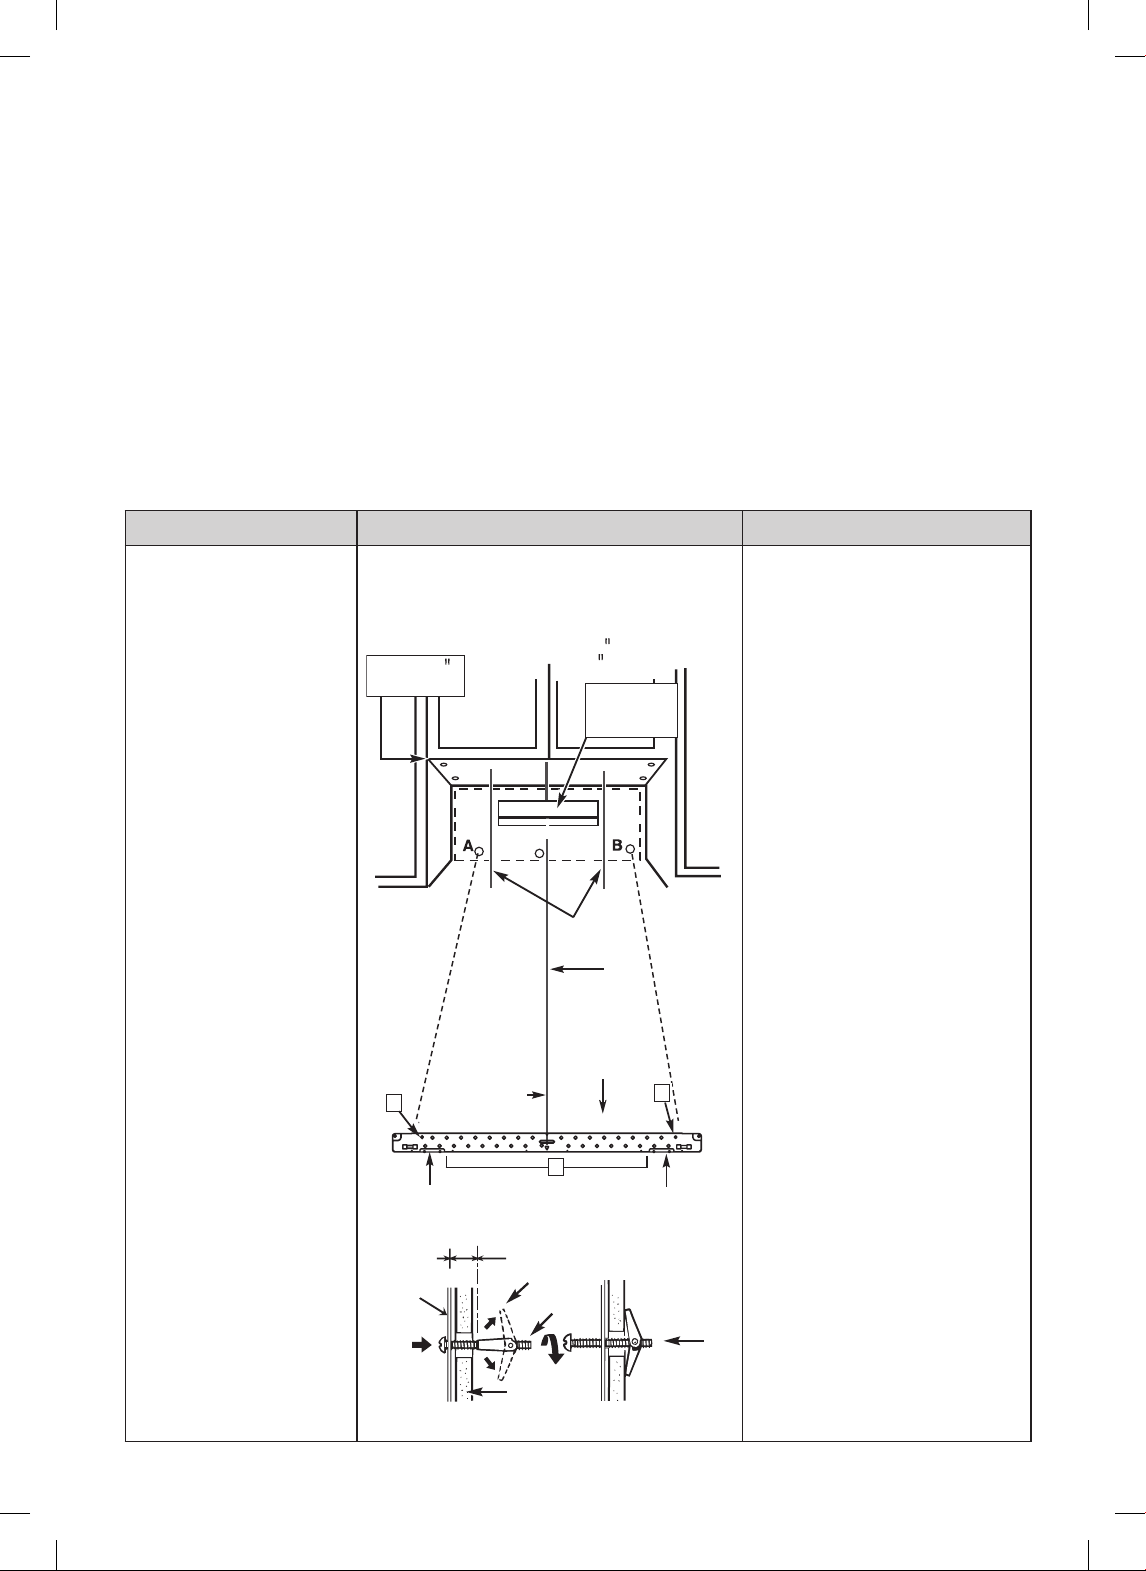
•
Damage or failure caused by incorrect electrical current, voltage, or ventilation/plumbing codes.
•
Damage or failure caused by transportation and handling, including scratches, dents, chips, and/or other damage
to the finish of the Product, unless such damage is reported within one (1) week of delivery.
•
Damage or missing items to any display, open box, or discounted Product.
•
Refurbished Product or any Product sold “As Is”, “Where Is”, “With all Faults”, or similar disclaimer.
•
Products with original serial numbers that have been removed, altered, or cannot be readily determined.
•
Increases in utility costs and additional utility expenses.
•
Any noises associated with normal operation.
•
Use of accessories, components, or consumable cleaning products that are not authorized by LG.
•
Replacement of light bulbs, filters, fuses or any other consumable parts.
•
When Product is used for other than normal and proper household use (e.g. commercial or industrial use, offices,
and recreational facilities or vehicles) or contrary to the Product’s owner’s manual.
•
Costs associated with removal and reinstallation of your Product for repairs.
•
Shelves, drawers and accessories, except for internal/functional parts covered under this limited warranty.
Problem Cause Solution
Microwave oven
Installation issue
- Vibration noise
- Unit is not level
- Installation damage
1. Mounting bracket screw not xed
completely
2. Mounting plate not aligned
Check with installer rst
C
B
A
Wall
Mounting
Plate
Space More Than Wall Thickness
Bolt
En
d
Toggle Bolt
Toggle Wings1
3/16 Hole on Studs
5/8 Hole on Drywall Only
Minimum 66
From the Floor
For Wall -
Venting Only
Draw Lines
on Studs
Draw
Center Line
Center Line
Mounting Plate
Support Tab
Support Tab
3. Product carried/installed improperly
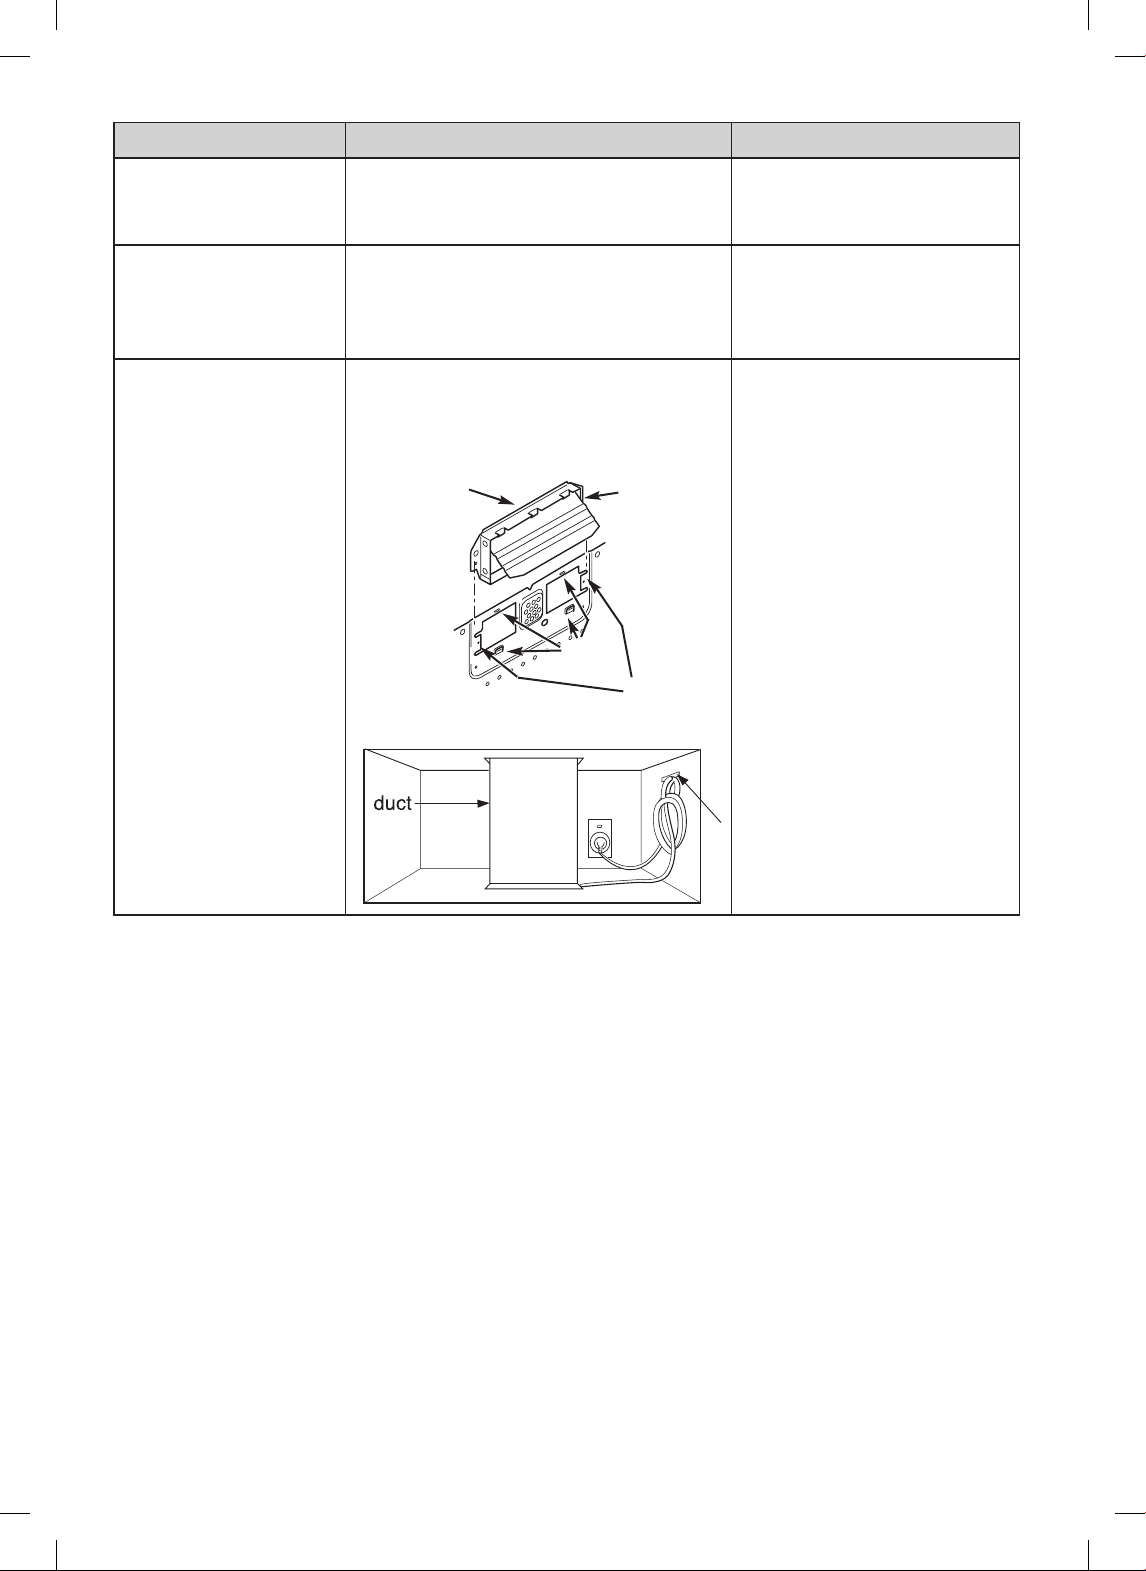
Problem Cause Solution
Spark / Arcing Aluminum foil or metal utensil used in
microwave mode
DO NOT use aluminum foil or
metal utensils in microwave mode
- Check user instructions
Unit has no power 1. House power turned off (power supply)
2. Tripped breaker
3. The power cord is not installed properly
1. Check house power supply
2. Check proper power cord
connection
3. Check extension cord
Vent is not working
- Weak or no ventilation
- Abnormal noise during
operation
- Product overheating
1. Improper blower unit direction or installation
2. Improper ductwork or damper connection
1. Check blower unit direction and
reinstall if necessary.
2. Properly align the exhaust
ports and blower plate opening.
Slide exhaust
adapter into
guides on
rear panel.
Exhaust
Adapter
Damper
(hinge side up)
Locking
Tabs
Guides
3. Blower unit exhaust ports
should be completely exposed
to the outside
4. After installation, check the air
ventilation path
The cost of repair or replacement under the above excluded circumstances shall be borne by the
consumer.
TO OBTAIN WARRANTY SERVICE AND ADDITIONAL INFORMATION
Call 1-800-243-0000 and select the appropriate option from the menu.
Or visit our website at http://www.lg.com
Or by mail: LG Electronics Customer Service P.O. Box 240007 Huntsville, AL 35813 ATTN: CIC
PROCEDURE FOR RESOLVING DISPUTES:
ALL DISPUTES BETWEEN YOU AND LG ARISING OUT OF OR RELATING IN ANY WAY TO THIS LIMITED
WARRANTY OR THE PRODUCT SHALL BE RESOLVED EXCLUSIVELY THROUGH BINDING ARBITRATION, AND
NOT IN A COURT OF GENERAL JURISDICTION. BINDING ARBITRATION MEANS THAT YOU AND LG ARE EACH
WAIVING THE RIGHT TO A JURY TRIAL AND TO BRING OR PARTICIPATE IN A CLASS ACTION.
Definitions. For the purposes of this section, references to “LG” mean LG Electronics U.S.A., Inc., its parents,
subsidiaries and affiliates, and each of their officers, directors, employees, agents, beneficiaries, predecessors
in interest, successors, assigns and suppliers; references to “dispute” or “claim” shall include any dispute, claim
or controversy of any kind whatsoever (whether based in contract, tort, statute, regulation, ordinance, fraud,
misrepresentation or any other legal or equitable theory) arising out of or relating in any way to the sale, condition or
performance of the product or this Limited Warranty.

Notice of Dispute. In the event you intend to commence an arbitration proceeding, you must first notify LG in writing
at least 30 days in advance of initiating the arbitration by sending a letter to LG at LG Electronics, USA, Inc. Attn:
Legal Department- Arbitration 1000 Sylvan Ave, Englewood Cliffs 07632. You and LG agree to engage in good faith
discussions in an attempt to amicably resolve your claim. The notice must provide your name, address, and telephone
number; identify the product that is the subject of the claim; and describe the nature of the claim and the relief being
sought. If you and LG are unable to resolve the dispute within 30 days, either party may proceed to file a claim for
arbitration.
Agreement to Binding Arbitration and Class Action Waiver. Upon failure to resolve the dispute during the 30 day
period after sending written notice to LG, you and LG agree to resolve any claims between us only by binding arbitration
on an individual basis, unless you opt out as provided below. Any dispute between you and LG shall not be combined or
consolidated with a dispute involving any other person’s or entity’s product or claim. More specifically, without limitation
of the foregoing, any dispute between you and LG shall not under any circumstances proceed as part of a class or
representative action. Instead of arbitration, either party may bring an individual action in small claims court, but that
small claims court action may not be brought on a class or representative basis.
Arbitration Rules and Procedures. To begin arbitration of a claim, either you or LG must make a written demand for
arbitration. The arbitration will be administered by the American Arbitration Association (“AAA”) and will be conducted
before a single arbitrator under the AAA’s Consumer Arbitration Rules that are in effect at the time the arbitration is
initiated (referred to as the “AAA Rules”) and under the procedures set forth in this section. The AAA Rules are available
online at www.adr.org/consumer. Send a copy of your written demand for arbitration, as well as a copy of this provision,
to the AAA in the manner described in the AAA Rules. You must also send a copy of your written demand to LG at LG
Electronics, USA, Inc. Attn: Legal Department- Arbitration 1000 Sylvan Avenue Englewood Cliffs, NJ 07632. If there is a
conflict between the AAA Rules and the rules set forth in this section, the rules set forth in this section will govern. This
arbitration provision is governed by the Federal Arbitration Act. Judgment may be entered on the arbitrator’s award in
any court of competent jurisdiction. All issues are for the arbitrator to decide, except that issues relating to the scope and
enforceability of the arbitration provision and to the arbitrability of the dispute are for the court to decide. The arbitrator is
bound by the terms of this provision.
Governing Law. The law of the state of your residence shall govern this Limited Warranty and any disputes between us
except to the extent that such law is preempted by or inconsistent with applicable federal law.
Fees/Costs. You do not need to pay any fee to begin an arbitration. Upon receipt of your written demand for arbitration,
LG will promptly pay all arbitration filing fees to the AAA unless you seek more than $25,000 in damages, in which case
the payment of these fees will be governed by the AAA Rules. Except as otherwise provided for herein, LG will pay
all AAA filing, administration and arbitrator fees for any arbitration initiated in accordance with the AAA Rules and this
arbitration provision. If you prevail in the arbitration, LG will pay your attorneys’ fees and expenses as long as they are
reasonable, by considering factors including, but not limited to, the purchase amount and claim amount. Notwithstanding
the foregoing, if applicable law allows for an award of reasonable attorneys’ fees and expenses, an arbitrator can award
them to the same extent that a court would. If the arbitrator finds either the substance of your claim or the relief sought
in the demand is frivolous or brought for an improper purpose (as measured by the standards set forth in Federal Rule
of Civil Procedure 11(b)), then the payment of all arbitration fees will be governed by the AAA Rules. In such a situation,
you agree to reimburse LG for all monies previously disbursed by it that are otherwise your obligation to pay under the
AAA Rules. Except as otherwise provided for, LG waives any rights it may have to seek attorneys’ fees and expenses
from you if LG prevails in the arbitration.
Hearings and Location. If your claim is for $25,000 or less, you may choose to have the arbitration conducted solely on
the basis of (1) documents submitted to the arbitrator, (2) through a telephonic hearing, or (3) by an in-person hearing
as established by the AAA Rules. If your claim exceeds $25,000, the right to a hearing will be determined by the AAA
Rules. Any in-person arbitration hearings will be held at a location within the federal judicial district in which you reside
unless we both agree to another location or we agree to a telephonic arbitration.
Opt Out. You may opt out of this dispute resolution procedure. If you opt out, neither you nor LG can require the other to
participate in an arbitration proceeding. To opt out, you must send notice to LG no later than 30 calendar days from the
date of the first consumer purchaser’s purchase of the product by either: (i) sending an e-mail to [email protected], with
the subject line: “Arbitration Opt Out” or (ii) calling 1-800-980-2973. You must include in the opt out e-mail or provide by
telephone: (a) your name and address; (b) the date on which the product was purchased; (c) the product model name or
model number; and (d) the serial number (the serial number can be found (i) on the product; or (ii) online by accessing
https://www.lg.com/us/support/repair-service/schedule-repair-continued and clicking on “Find My Model & Serial
Number”).
You may only opt out of the dispute resolution procedure in the manner described above (that is, by e-mail or
telephone); no other form of notice will be effective to opt out of this dispute resolution procedure. Opting out of this
dispute resolution procedure will not affect the coverage of the Limited Warranty in any way, and you will continue to
enjoy the full benefits of the Limited Warranty. If you keep this product and do not opt out, then you accept all terms and
conditions of the arbitration provision described above.

Printed in China
LG Customer Information Center
Register your product Online!
www.lg.com
1-800-243-0000
USA