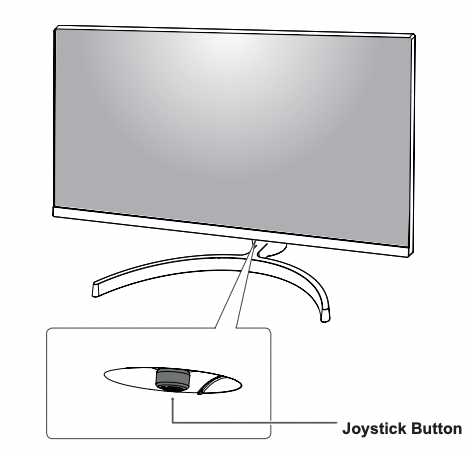
You can easily control the functions of the monitor by pressing the joystick button or moving it left/right with your finger.
Basic Functions
Power on
Press the joystick button once with your finger to turn on the monitor.
Power on
Press and hold the joystick button once with your finger to turn off the monitor.
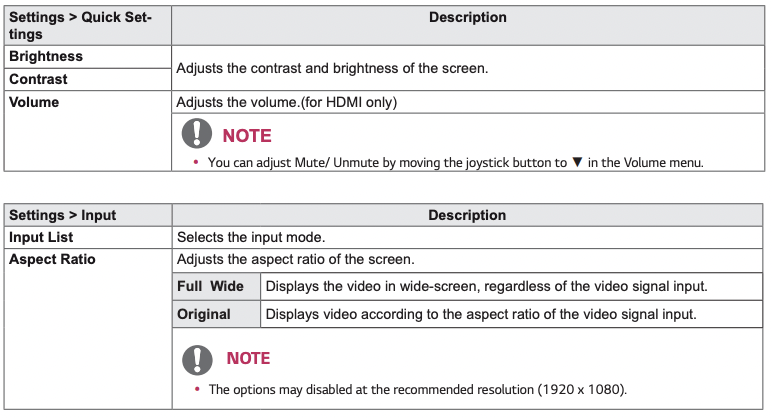
Volume Control
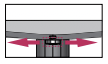
You can control the volume by moving the joystick button left/right. (for HDMI only)
NOTE The joystick button is located at the bottom of the monitor.
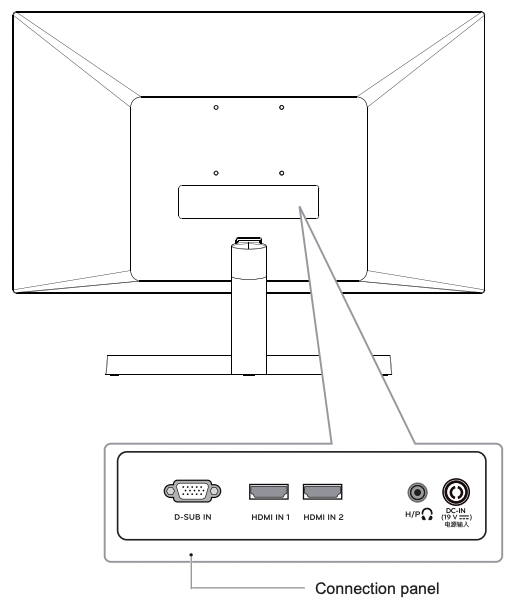
Input Connector
Moving and Lifting the Monitor
When moving or lifting the monitor, follow these instructions to prevent the monitor from being scratched or damaged and to ensure safe transportation regardless of its shape or size.
It is advisable to place the monitor in the original box or packing material before attempting to move it.
Before moving or lifting the monitor, disconnect the power cord and all cables.
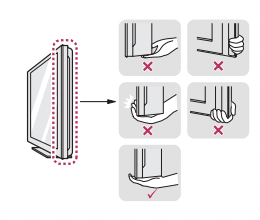
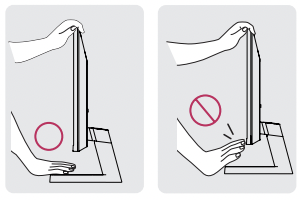
Hold the top and bottom of the monitor frame firmly. Do not hold the panel itself.
When holding the monitor, the screen should face away from you to prevent it being scratched.
When moving the monitor, avoid any strong shock or vibrations to the product.
When moving the monitor, keep it upright, never turn the monitor on its side or tilt it sideways.
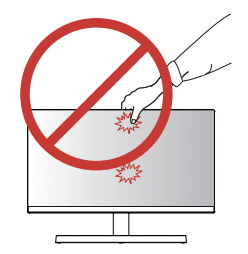
CAUTION
As far as possible, avoid touching the monitor screen. This may result in damage to the screen or some of the pixels used to create images.
If you use the monitor panel without the stand base, its joystick button may cause the monitor to become unstable and fall, resulting in damage to the monitor or human injury. In addition, this may cause the joystick button to malfunction.
Setting up the Monitor set
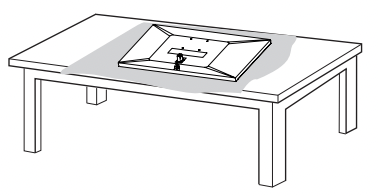
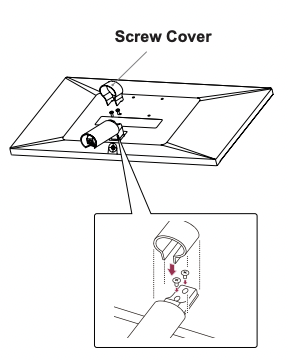
Assembling the Stand
1
CAUTION To protect the screen from scratches, cover the surface with a soft cloth.
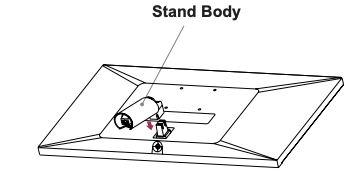
2
3
4
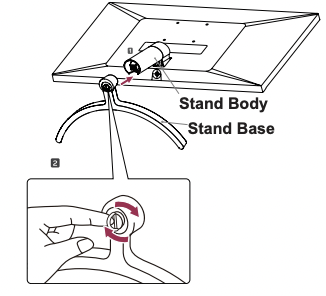
WARNING
To avoid injury to the fingers and foot when Assembling the Stand Body and Base, you should hold the Base for better stability.
CAUTION
Illustrations in this document represent typical procedures, so they may look different from the actual product.
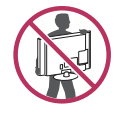
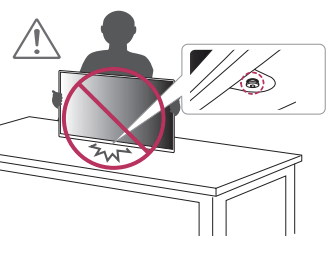
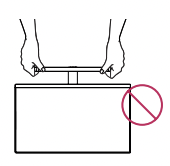
Do not carry the monitor upside down by just holding the stand base. This may cause the monitor to fall off the stand and could result in personal injury.
When lifting or moving the monitor, do not touch the monitor screen. The force applied to the monitor screen may cause damage to it.
Do not apply foreign substances (oils, lubricants, etc.) to the screw parts when assembling the product. (Doing so may damage the product.)
Applying excessive force when tightening screws may cause damage to the monitor. Damage caused in this way will not be covered by the product warranty
NOTE
You can disassemble the stand in the reverse order of the assembly.
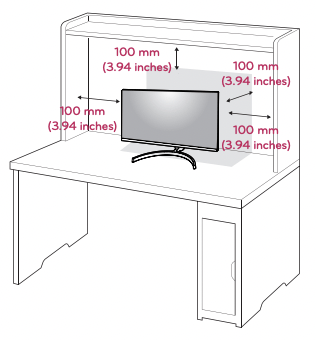
Mounting on a table
Lift and tilt the Monitor set into its upright position on a table. Leave a 100 mm (3.94 inches) (minimum) space from the wall for proper ventilation.
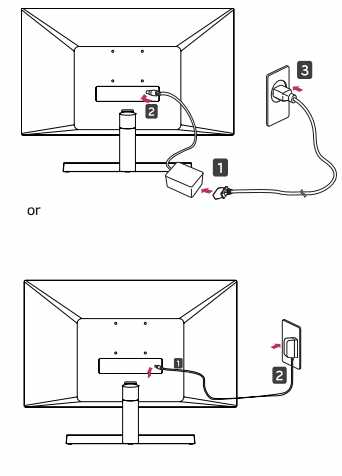
2. Connect the AC-DC Adapter and Power Cord to a wall outlet.
3. Press the joystick button on the bottom of the monitor to turn on the monitor.
CAUTION
Unplug the power cord prior to moving or installing the monitor. There is risk of electric shock.
WARNING
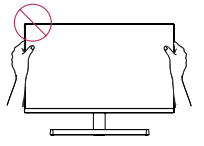
When you adjust the angle, do not hold the bottom of the Monitor set frame as shown on the following illustration, as may injure your fingers.
Do not touch or press the screen when adjusting the angle of the monitor.
Do not hold this set like below picture.Monitor screen can detach from stand base and injure your body.
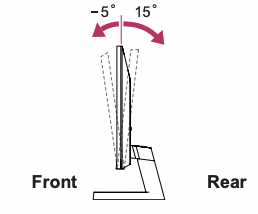
The angle of the screen can be adjusted forward or backward from -5° to 15° for a comfortable viewing experience.
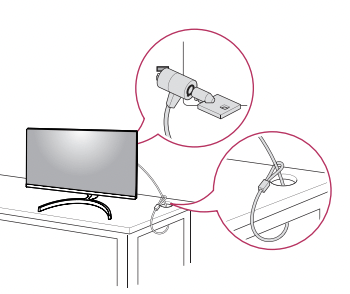
Using the Kensington security system
The Kensington security system connector is located at the back of the Monitor set. For more information of installation and using, refer to the manual supplied with the Kensington security system or visit kensington.
Connect the Kensington security system cable between the Monitor set and a table.
NOTE The Kensington security system is optional. You can obtain it from most electronics stores.
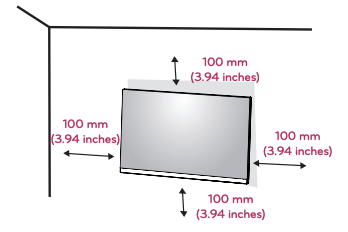
Mounting on a wall
For proper ventilation, allow a clearance of 100 mm (3.94 inches) on each side and from the wall. Detailed instructions are available from your dealer, see the optional Tilt Wall Mounting Bracket Installation and Setup Guide.
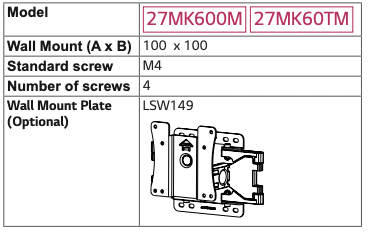
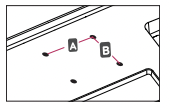
If you intend to mount the Monitor set to a wall, attach Wall mounting interface (optional parts) to the back of the set. When you install the Monitor set using a wall mounting interface (optional parts), attach it carefully so it will not drop.
1 If you use screw longer than standard, the monitor might be damaged internally.
2 If you use improper screw, the product might be damaged and drop from mounted position. In this case, LG Electronics is not responsible for it.
Wall Mount (A x B)
CAUTION
Disconnect the power cord first, and then move or install the Monitor set. Otherwise electric shock may occur.
If you install the Monitor set on a ceiling or slanted wall, it may fall and result in severe injury.
Use only an authorized LG wall mount and contact the local dealer or qualified personnel.
Do not over tighten the screws as this may cause damage to the Monitor set and void your warranty.
Use only screws and wall mounts that meet the VESA standard. Any damages or injuries by misuse or using an improper accessory are not covered by the warranty.
Screw length from outer surface of back cover should be under 8mm.
NOTE
Use the screws that are listed on the VESA standard screw specifications.
The wall mount kit will include an installation manual and necessary parts.
The wall mount bracket is optional. You can obtain additional accessories from your local dealer.
The length of screws may differ depending on the wall mount. Be sure to use the proper length.
For more information, refer to the instructions supplied with the wall mount.
USING THE MONITOR SET
Connecting to a PC
Your Monitor set supports Plug & Play*. *Plug & Play: A PC recognizes a connected device that users connect to a PC and turn on, without device configuration or user intervention.
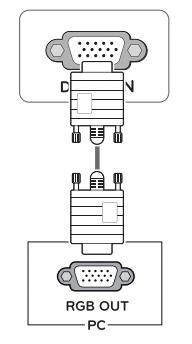
D-SUB connection
Transmits analog video from your PC to the Monitor set. Connect the PC and the Monitor set with the supplied D-sub 15 pin signal cable as shown in the following illustrations.
NOTE
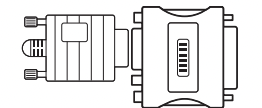
When using a D-Sub signal input cable connector for Macintosh
Mac adapter
For Apple Macintosh use, a separate plug adapter is needed to change the 15 pin high density (3 row) D-SUB VGA connector on the supplied cable to a 15 pin 2 row connector.
HDMI connection
Transmits the digital video and audio signals from your PC to the Monitor set. Connect the PC and the Monitor set with the HDMI cable as shown in the following illustrations.
NOTE
If you use HDMI PC, it can cause compatibility problem.
Use a certified cable with the HDMI logo attached. If you do not use a certified HDMI cable, the screen may not display or a connection error may occur.
Recommended HDMI cable types
- High-Speed HDMI® / TMM Cable
- High-Speed HDMI® / TM Cable with Ethernet
NOTE
When you want to use two PC in our Monitor, please connect the signal cable(D-SUB/ DVI-D/HDMI) respectively in Monitor set.
If you turn the Monitor set on while it is cold, the screen may flicker. This is normal.
Some red, green, or blue spots may appear on the screen. This is normal.
Connecting to AV Devices
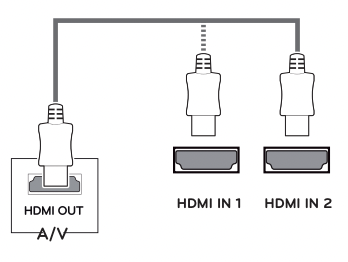
HDMI connection
Transmits the digital video and audio signals from your AV devices to the monitor. Connect your AV device to the monitor with the HDMI cable as illustrated below.
NOTE
If you use HDMI PC, it can cause compatibility problem.
Use a certified cable with the HDMI logo attached. If you do not use a certified HDMI cable, the screen may not display or a connection error may occur.
Recommended HDMI cable types
- High-Speed HDMI® / TM Cable
- High-Speed HDMI® / TM Cable with Ethernet
Connecting Peripherals
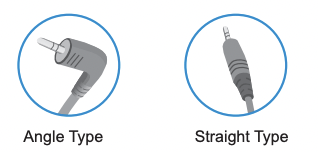
Connecting Headphones
Connect peripherals to the monitor via the headphones port. Connect as illustrated.
NOTE
Peripheral devices are sold separately.
If you use angled headphones, it may cause a problem with connecting another external device to the monitor. Therefore, it is recommended to use straight headphones.
Depending on the audio settings of the PC and external device, headphones and speaker functions may be limited.
CUSTOMIZING SETTINGS
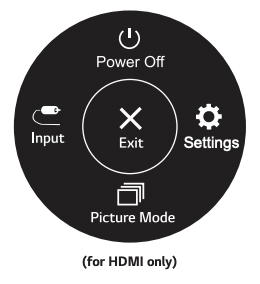
Activating the Main Menu
1 Press the joystick button on the bottom of the monitor.
2 Move the joystick up/down (▲/▼) and left/right(◄/►) to set the options.
3 Press the joystick button once more to close the main menu.
Button
Menu Status
Description
Main menu disabled
Enables the main menu
Main menu enabled
Close the main menu. (Long press the button to turn off the monitor)
◄
Main menu disabled
Adjusts the monitor volume level. (for HDMI only)
Main menu enabled
Enters the input features
►
Main menu disabled
Adjusts the monitor volume level. (for HDMI only)
Main menu enabled
Enters the Settings feature
▲
Main menu disabled
Displays the information on the current input.
Main menu enabled
Turns off the monitor.
▼
Main menu disabled
Displays the information on the current input.
Main menu enabled
Enters the picture mode feature. (for HDMI only)
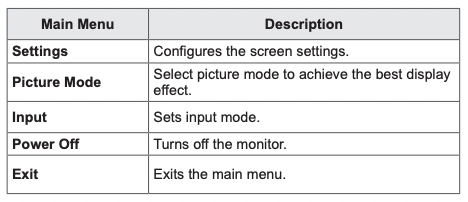
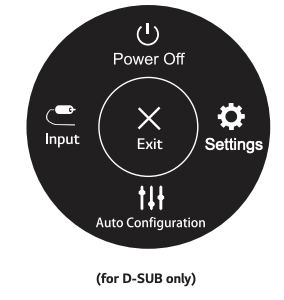
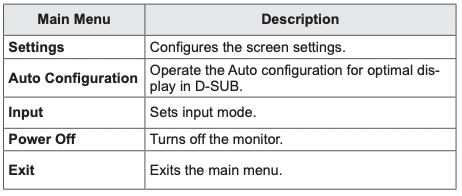
Main Menu Features
Customizing settings
NOTE
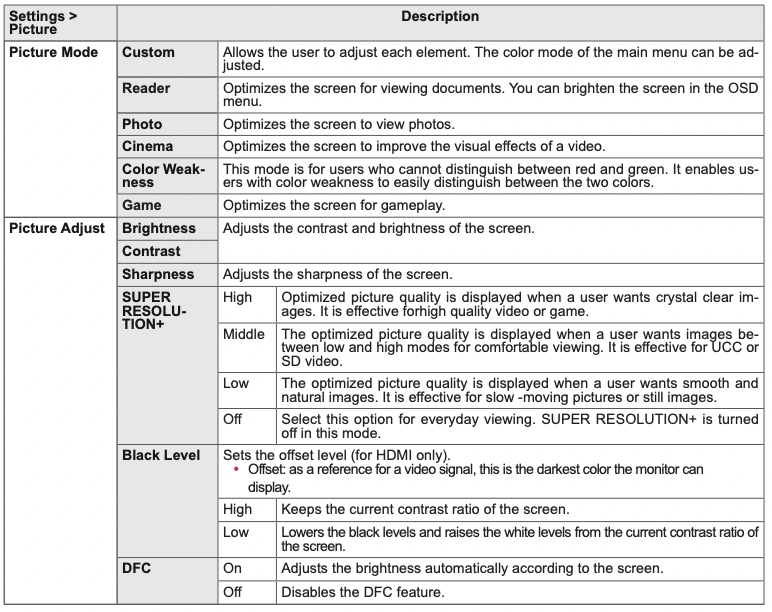
This is subsidiary for color weakness user. Therefore if you feel uncomfortable with the screen, please turn off this function.
This function can’t distinguish some colors in some images.
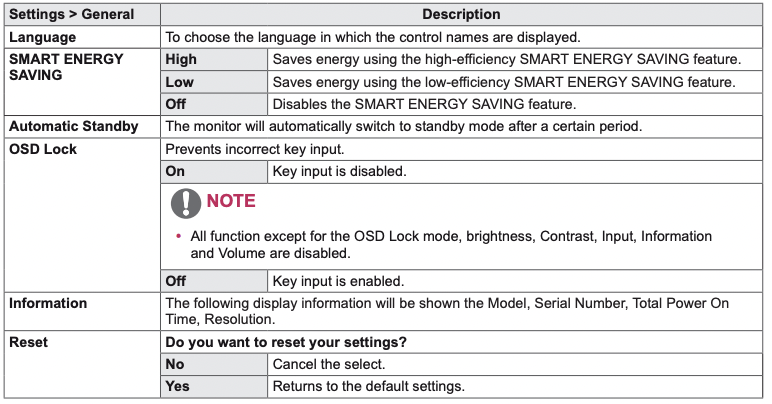
NOTE Saving Data depends on the Panel. So, those values should be different between each panel and panel vendor. If the SMART ENERGY SAVING option is High or Low, monitor luminance becomes higher or lower depending on the source.
TROUBLESHOOTING
Check the following before calling for service.
No image appears
Is the power cord of the display connected?
Check and see if the power cord is connected properly to the power outlet.
Do you see an "Out of Range" message on the screen?
This message appears when the signal from the PC (video card) is out of horizontal or vertical frequency range of the display. See the 'Specifications' section of this manual and configure your display again.
Do you see a "NO SIGNAL" message on the screen or black screen?
After the monitor is on "NO SIGNAL", the monitor goes to DPM mode.
This is displayed when the signal cable between the PC and the monitor is missing or disconnected. Check the cable and reconnect it.
Check PC status.
Can't control some functions in OSD?
You can't select some menu items in OSD?
You can unlock the OSD controls at any time by entering the OSD lock menu and changing items to off.
CAUTION
Check Control Panel ► Display ► Settings and see if the frequency or the resolution were changed. If yes, readjust the video card to the recommend resolution. y If the recommended resolution (optimal resolution) is not selected, letters may be blurred and the screen may be dimmed, truncated or biased. Make sure to select the recommend resolution.
The setting method can differ by computer and O/S (Operation System), and resolution mentioned above may not be supported by the video card performance. In this case, please ask to the computer or the video card manufacturer.
Keep proper posture when using the monitor, otherwise the screen may not be optimized.
Display image is incorrect
The screen color is mono or abnormal.
Check if the signal cable is properly connected and use a screwdriver to fasten if necessary.
Make sure the video card is properly inserted in the slot
Set the color setting higher than 24 bits (true color) at Control Panel ► Settings.
The screen blinks.
Check if the screen is set to interlace mode and if yes, change it to the recommend resolution.
Do you see an "Unrecognized monitor, Plug&Play (VESA DDC) monitor found" message?
Have you installed the display driver?
Be sure to install the display driver from our web site: lg
Make sure to check if the video card supports Plug&Play function.
The screen is flickering.
Did you select the recommended resolution?
If the selected resolution is HDMI 1080i 60/50 Hz, the screen may be flickering. Change the resolution to the recommended resolution 1080P.
#1 How to use Airplay & what LG TV's support Airplay 2
You can share screen directly from an iPhone to an Apple TV using Airplay. Airplay is the official screen sharing technology from Apple. Supports: iPhone 4 or later iPad or iPad mini iPod touch (4th generation or later) You can stream content to these devices: For photos and videos: Apple TV (2nd or 3rd generation) For music: Apple TV (2nd or 3rd generation), AirPort Express, or AirPlay-enabled speakers How to stream: Connect your iOS device and Apple TV or AirPort Express to the same Wi-Fi network. On your iOS device, swipe up from the bottom of your screen to access Control Center. Tap AirPlay. Tap the name of the device you want to stream content to. You'll see icons of a TV screen or speaker next to each device so you know what type of content you can stream. On iPad, you might need to scroll to see all of the available devices in the device list. When you use AirPlay Mirroring, your TV uses the orientation and aspect ratio of your device. If you want the image from your device to fill your TV screen, you might need to to adjust your TV's aspect ratio or zoom settings.
LG TVs are equipped with innovative features that make it easy to share screen and display content between your external devices like your PC, tablet, smartphone and more. There are multiple ways to connect and they all depend on your network connectivity and the type of device you wish to share.
LG Smart Share is the tool that lets you connect your compatible smartphone, tablet, PC, camera, or USB device to your TV and showcases all of the device's audio, video, and photo content in simple menus on your screen.
In the case you are using a Mac device to share your information, AirPlay will only allow you to stream to a Mac device, however LG supports AirPlay 2 in its 2019 models.