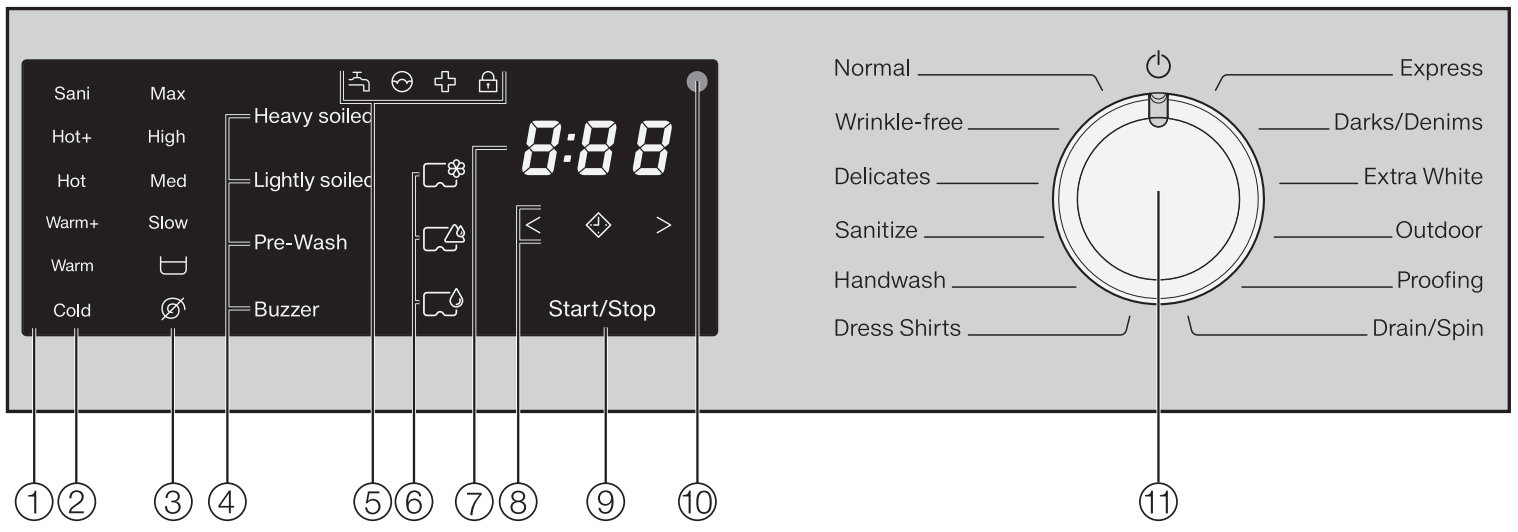
Temperature sensor buttons for selecting the temperature.
Spin Speed sensor buttons for selecting the spin speed.
Extra Options sensor buttons for the various extra options that can be added to the wash programs.
Indicator lights light up when necessary
CapDosing sensor buttons
Time display for the program duration
Sensor buttons for the Delay Start function
Start/Stop sensor button for program start/cancellation
Optical interface for service technicians
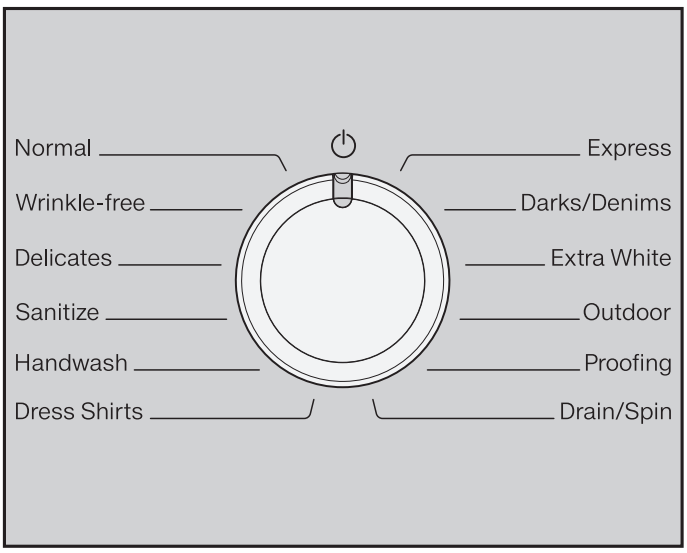
Program selector for selecting programs and for switching off. The washing machine is switched on when you select a program, and switched off by turning the program selector to the position.
How the control field works
The 1, 3, 4, 6, 8 and 9 sensor buttons react to fingertip contact. Selection is possible as long as the respective sensor button is lit.
If a sensor button is brightly lit, this means it is currently selected
If a sensor button is dimly lit, this means it can be selected
(2) and (3) sensor buttons for temperature and spin speed
After a wash program has been selected with the program selector, the recommended temperature (in °F) and spin speed (in rpm) light up brightly.
Selectable temperatures and spin speeds light up dimly.
(4) Sensor buttons for extra options
You can supplement the wash programs with extra options.
If a wash program has been selected, the sensor buttons for the available extra options light up dimly
(5) Indicator lights
lights up if there are faults affecting the water intake and drainage
lights up if excess detergent was used
lights up as a reminder about hygiene information
flashes for as long as it is possible to add laundry lights up when the door of the washing machine is locked
(6) CapDosing
The CapDosing sensor buttons are used for activating cap dosing.
Fabric care (e.g., fabric softener, proofing agent)
Additives (e.g., detergent enhancers)
Detergent (for the main wash only)
(7) Time display
After the program has started, the program duration will appear on the display in hours and minutes.
When Delay Start is being used, the program duration will appear after the Delay Start time has elapsed.
(8) Sensor buttons
After touching the sensor button, a later start time for the program (Delay Start) can be selected. Once selected, lights up brightly
The duration of the Delay Start period is selected by touching the < or > sensor button.
(9) Start/Stop sensor button
Touching the Start/Stop sensor button starts the selected program or cancels a program that has already been started. The sensor button flashes slowly as soon as it is possible for a program to be started and then lights up constantly after the program has started.
Environmentally friendly washing
Energy and water consumption
Make use of the maximum load that the wash program can accommodate.
This will keep the energy and water consumption to a minimum in relation to the size of the load.
When smaller amounts of laundry are washed, the washing machine’s automatic load control system will reduce the amount of water and energy used.
Use the Express program for small, lightly soiled loads.
Modern detergents make it possible to wash at lower temperatures (e.g., 70°F/20°C). Using the corresponding temperature settings will save energy.
To maintain the hygiene of the machine, carry out a hot wash (above 60°C) at regular intervals. The indicator will come on to remind you to carry out a hot wash.
Detergent consumption
Do not exceed the amounts of detergent recommended on the packaging.
Adjust the dosage to the level of soiling of the laundry.
Reduce the amount of detergent with smaller loads (approx. ⅓ less than the amount recommended can be used when washing a half load).
When drying with a tumble dryer
Select the highest possible spin speed for the wash program to save energy in the subsequent tumble dryer cycle.
Start washing step-by-step
1. Preparing the laundry
Empty all pockets.
Damage due to foreign objects. Nails, coins, paper clips, and so on can cause damage to garments and components in the machine.
Check the laundry before washing and remove any such foreign objects.
Sorting the laundry
Only wash items that are labeled machine washable by the manufacturer. Most garments have a fabric care label in the collar or side seam.
Sort the laundry by care label and color.
Tip: Dark fabrics often bleed the first few times they are washed. They should be washed separately several times before being included in a mixed load.
Pre-treating stains
Badly soiled areas and stains should be cleaned as soon as possible, preferably while still fresh. Stains should be carefully dabbed off using a soft, colorfast cloth. Do not rub!
Tip: Stains (such as blood, egg, coffee, and tea) can be pre-treated using some handy tricks which can be found in the Miele guide to laundry care. Please contact Miele directly or submit a request via Internet page to obtain or view a copy of this manual.
WARNING
Damage due to solvent-based cleaning agents Cleaning agents containing benzine, stain remover, etc., can damage plastic parts. When pre-treating a stain, make sure that plastic parts do not come into contact with cleaning agents
Risk of explosion due to solventbased cleaning agents. When using solvent-based cleaning agents, an explosive mixture may develop. Never use solvent-based cleaning agents in the washing machine.
General tips
Curtains: Remove lead weights first or place in a laundry bag.
Loose bra underwires should be removed or sewn in place before washing.
Close zippers, hooks and eyelets before washing.
Comforter covers and pillowcases should be fastened to prevent small items from rolling inside of them.
Do not wash items with the symbol on the fabric care label.
2. Load the laundry
Opening the door
Take hold of the door and pull it open.
Check the drum for pets or foreign objects before loading it with laundry.
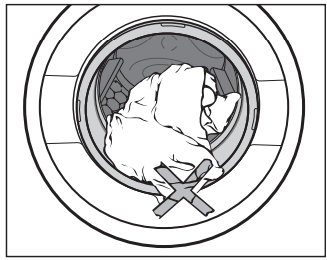
The most efficient use of energy and water is achieved when a full load is washed. However, do not overload as this reduces cleaning efficiency and causes creasing.
Unfold the laundry and load loosely in the drum.
Mixing both large and small items gives better wash results and also helps distribute the load evenly during spinning.
Tip: Please note the maximum load for different wash programs.
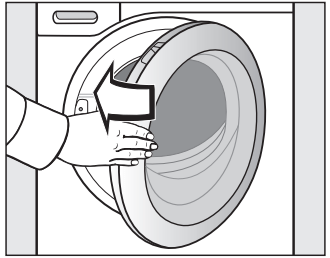
Closing the door
Make sure that no items are caught between the door and the seal.
Shut the door with a gentle swing.
3. Selecting a programme
Program selection
The washing machine is switched on by turning the program selector to a wash program.
Turn the programme selector to a required programme.
The estimated wash time is shown on the time display and the pre-set temperature and spin speed light up in the control field.
Selecting a temperature and spin speed
The wash program’s pre-set temperature and spin speed light up brightly. The choice of temperatures and spin speeds selectable for the wash program light up dimly
Touch the sensor button for the temperature desired. It will then light up brightly.
Touch the sensor button for the spin speed desired. It will then light up brightly.
Selecting extra options
The selection of extra options available for the wash program lights up dimly
Touch the sensor button for the required extra option. It will then light up brightly.
Tip: You can select multiple extra options for a wash program.
Please refer to “Extra options” for more information.
4. Adding detergent
This washing machine requires high efficiency detergent. Adhere strictly to the dispensing amounts supplied by the detergent manufacturer. The detergents must be marked with the following label
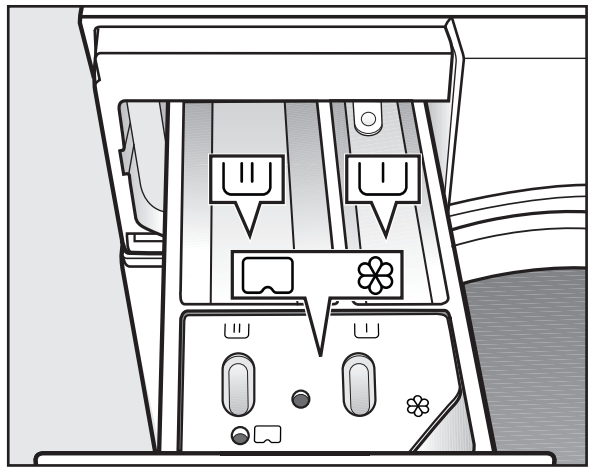
Filling with detergent
Pull out the detergent drawer and add detergents to the compartments.
Chlorine bleach for removing stains or liquid detergent for the pre-wash
Detergent for the main wash and soaking
Fabric softener, liquid starch, or capsules
Tips for dispensing
Adjust the detergent dosage to the level of soiling of the laundry and the maximum load. Reduce the amount of detergent with smaller loads (e.g., reduce the amount of detergent by ⅓ when washing a half load).
Too little detergent:
The laundry is not cleaned properly and may become gray and hard to the touch over time.
Can lead to a build-up of mould in the washing machine.
Grease is not completely removed from the laundry.
Can lead to limescale deposits on the heater elements.
Too much detergent
Poor wash, rinse, and spin results.
Causes higher water consumption as an extra rinse cycle is automatically activated.
A greater burden on the environment.
Dispensing aids
Use dispensing aids (e.g., balls) if these are supplied with the detergent, particularly when using liquid detergent.
Using chlorine bleach
WARNING Damage due to chlorine bleach.
Textiles may be discolored or their fibers damaged.
Only use chlorine bleach on suitable textiles.
Chlorination must be activated in the programmable functions before chlorine bleach is first used.
Chlorine bleach may be used in the following programs:
Normal
Wrinkle-free
Sanitize
Dress Shirts
Extra White
Dispensing chlorine bleach
Follow the manufacturer's instructions on the packaging.
The extra option pre-wash must not be selected.
Pour max. ¼ cup (60 ml) of chlorine bleach into the chamber.
The chlorine bleach is added automatically 10 minutes before the end of the main wash.
Using powder detergent
The detergent dispenser drawer contains an insert for liquid detergent in the compartment. This insert must be removed to use powder detergent.
It is not possible to use powder detergent in the compartment.
A pre-wash cannot be carried out when using powder detergent.
Remove the detergent dispenser drawer.
Remove the insert for liquid detergents from the compartment.
Tip: Reinsert the insert into the detergent dispenser drawer before next using liquid detergent.
Using detergent tablets or pods
Always put detergent tablets or pods directly in the drum with the laundry.
They cannot be added via the detergent dispenser drawer.
Using fabric softener and liquid starch
Fabric softeners make garments soft to handle and help prevent static cling when tumble drying.
Liquid starch is synthetic and provides good stiffness to fabric.
Natural starch stiffens and gives body to fabric.
Adding fabric softener
Add fabric softener or liquid starch to the compartment. Do not exceed the maximum level mark.
It will be automatically dispensed in the final rinse cycle. At the end of the program, a small amount of water remains in the compartment.
If starching frequently, clean the dispenser compartment, especially the siphon, regularly.
CapDosing
Three different types of capsule are available:
Fabric care (e.g. fabric softener, proofing agent)
Additives (e.g. detergent enhancers)
Detergent (for the main wash only)
Each capsule contains the correct amount for one wash cycle.
Capsules are available to order from Miele’s online store, Miele customer service, or your Miele dealer.
WARNING
Capsules pose a health risk. The ingredients of capsules can be hazardous to health if they are swallowed or come into contact with skin. Keep capsules out of the reach of children.
Switching on CapDosing
Touch the sensor button for the capsule you want to use.
Sensor button
Capsule
for
for
for
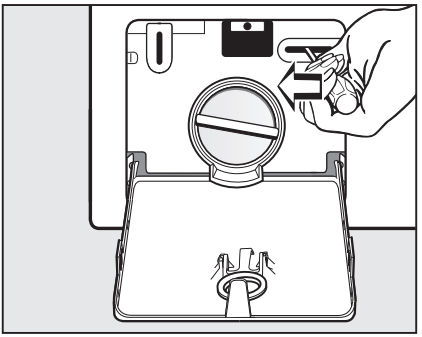
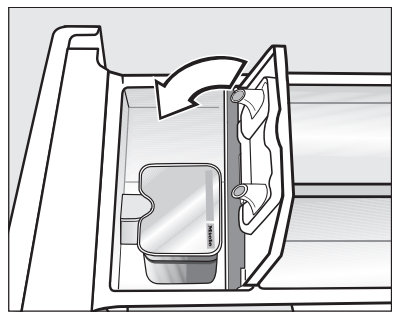
Inserting a capsule
Open the detergent dispenser drawer.
Open the lid of the compartment.
Press the capsule in firmly
Close the lid and press it firmly shut.
Close the detergent dispenser drawer.
The capsule is opened by the act of inserting it in the detergent dispenser drawer. The contents can run out of the capsule if you then remove it from the drawer before it is used. Dispose of opened capsules.
The contents of the capsule will be added to the wash program at the correct time.
During CapDosing, water intake to the takes place solely via the capsule. Do not add any additional fabric softener to the compartment.
Remove the empty capsule at the end of the programme.
For technical reasons a small amount of water will remain in the capsule.
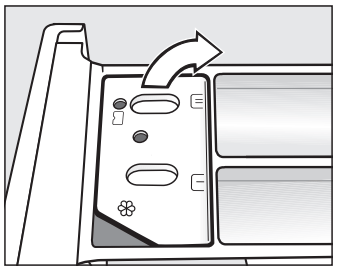
Switching off/Changing CapDosing
In order to switch off CapDosing, touch the brightly lit sensor button.
In order to change CapDosing, touch one of the other capsule sensor buttons.
Color run and dye removers
WARNING
Damage due to color run/dye removers.
Color run and dye removers can cause corrosion in the washing machine.
Do not use color run or dye removers in the washing machine
Dyes suitable for use in domestic washing machines can be used. However, please note that the salt used in the dyeing process can cause corrosion to stainless steel components in the machine if you use dye frequently. Always observe the dye manufacturer’s instructions carefully
5. Starting a program
Starting a program
Touch the flashing Start/Stop sensor button.
The door will lock and the program will start.
As long as the symbol is flashing on the control field, you can add laundry.
When the symbol lights up constantly, the door is locked until the end of the program.
If a Delay Start time has been selected, this will count down on the time display. At the end of the Delay Start time or immediately after the program has started (if no Delay Start time has been selected), the program duration will appear on the time display
Energy savings
After 10 minutes, the indicators dim. The Start/Stop sensor button will flash slowly.
You can reactivate the indicators:
Touch the Start/Stop sensor button (this does not have any effect on a running program).
Program end
The time display shows 0:00. The symbol will remain lit up on the control field. The door is locked in the Anticrease phase.
Touch the Start/Stop sensor.
The door will be unlocked. The door unlocks and the symbol on the control field goes out.
Pull open the door.
Remove the laundry
Energy savings
10 minutes after the beginning of the Anti-crease phase, the indicators dim and the Start/Stop sensor button starts flashing. minutes after completion of the
Anti-crease phase, the washing machine switches off completely and the door lock is released.
Items left in the drum could discolor other items in the next wash or become discolored themselves. Remove all items from the drum
Check the folds in the door seal for any foreign objects.
Tip: Leave the door slightly open to allow the drum to dry.
Turn the programme selector to the position. This switches the washing machine off.
If applicable, remove the used capsule from the detergent dispenser drawer.
Tip: Leave the detergent dispenser drawer slightly open to allow it to dry.
Spin cycle
Final spin speed
Final spin speed in the wash program
When a program is selected, the sensor button for the optimum spin speed for that program will be brightly lit up on the control field.
A faster spin speed can be selected for certain wash programs.
The highest selectable spin speed is indicated in the table.
Omitting the final spin (Rinse hold)
Touch the sensor button (Rinse hold).
The laundry is not spun after the final rinse and remains in the rinse water. This helps prevent creasing if the laundry is not going to be removed from the drum immediately after the end of the program.
After the end of a program
The sensor button for the optimum spin speed lights up on the control field. You can change the spin speed. The Start/Stop sensor button will flash slowly.
To start the final spin:
Touch the flashing Start/Stop sensor button once.
The final spin is carried out.
To end the program:
Touch the flashing Start/Stop sensor button twice.
The water will be pumped away.
Deselecting the rinse-spin and final spin
Touch the sensor button.
After the last rinse cycle, the water will be pumped away and the Anti-crease phase will switch on.
An Extra Rinse cycle is carried out with this setting for certain wash programs.
Rinse-spin
There is a spin cycle after the main wash and between the rinse cycles. A reduction in the final spin speed will also reduce the interim spin speed as appropriate. If a spin speed of less than rpm is selected for the Normal program, an Extra Rinse phase is carried out.
Delay Start
With Delay Start, you can delay the start of a program from 30 minutes up to a maximum of 24 hours. This allows you to make use of night-time economy electricity rates, for example.
Selecting Delay Start
Delay Start cannot be selected in the Drain / Spin or Proofing programs.
Select the program required.
Touch the sensor button.
The sensor button lights up brightly.
Touch the < or > sensor button repeatedly until the required Delay Start time appears on the time display.
In the case of settings below 10 hours, the Delay Start time changes in increments of 30 minutes
In the case of settings above 10 hours, the Delay Start time changes in increments of 1 hour
Starting Delay Start
Touch the flashing Start/Stop sensor button.
The Delay Start process starts and counts down on the time display.
Altering Delay Start
Touch the Start/Stop sensor button.
The Delay Start process stops and the symbol on the control field goes out.
Touch the < or > sensor button repeatedly until the required Delay Start time appears on the time display.
Touch the flashing Start/Stop sensor button.
Canceling Delay Start
Touch the Start/Stop sensor button.
The Delay Start process stops and the symbol on the control field goes out.
Touch the brightly lit sensor button.
Delay Start is canceled and the sensor button goes out. The program duration appears on the time display.
Touch the flashing Start/Stop sensor button in order to start the wash program.
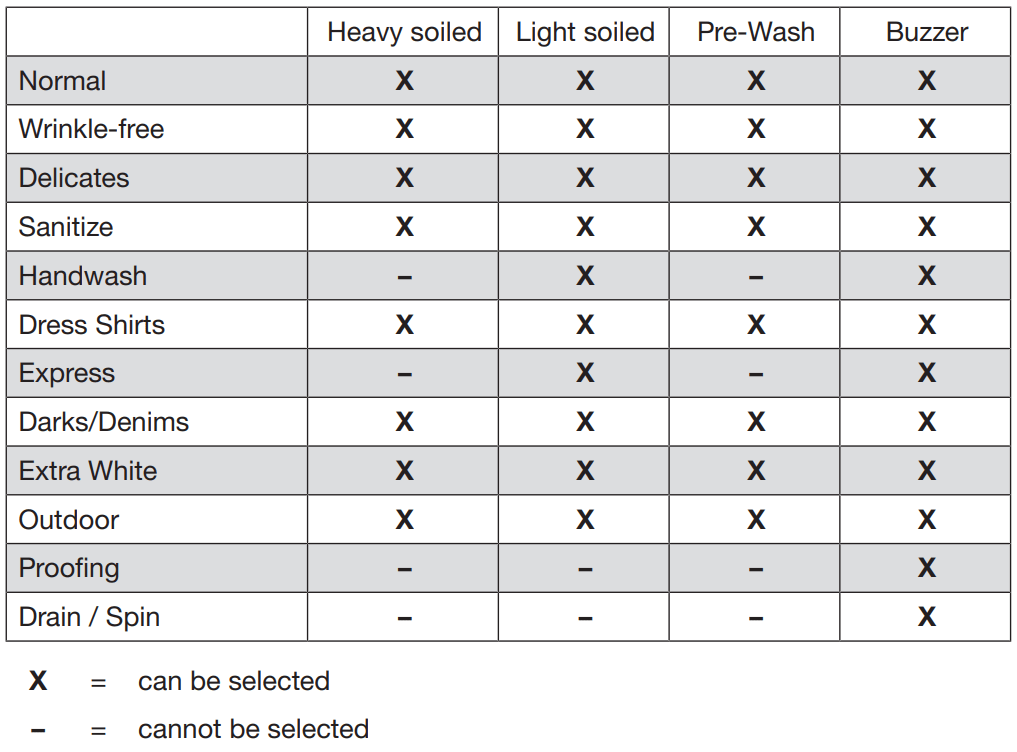
Extras options
You can supplement the wash programs with extra options.
Extra options are selected and deselected using the relevant sensor buttons on the control field.
Touch the sensor button for the extra option you require.
The relevant button will light up brightly.
Not all the extra options can be used with every program.
An extra option that is not permitted for the wash program is not lit dimly and cannot be activated by touch.
Heavy soiled
For laundry that is very heavily soiled.
The extended wash duration enhances the stain-removing effect.
Light soiled
For slightly soiled textiles that are not stained. The wash duration is reduced.
Pre-wash
For laundry with large amounts of dirt, e.g., dust and sand.
Buzzer
A buzzer sounds at the end of the program. The buzzer sounds until the washing machine is switched off. The volume of the buzzer can be changed, see “Settings – Buzzer”.
The following extra options can be selected in addition to the programs
Changing the programme sequence
Changing the program
After a program has started, it is no longer possible to select a different program.
If you would like to change the program, you have to cancel the program.
Canceling a program
You can cancel a wash program at any time after it has started.
Touch and hold the Start/Stop sensor button until the time display switches to
The water will be pumped away. As soon as the symbol on the control field goes out, the program has been canceled.
Open the door.
Selecting a different program after canceling the program
Close the door.
Check that there is still detergent in the dispenser drawer. Add more detergent if necessary.
Turn the program selector to the program you want and start it by touching the Start/Stop sensor button.
Removing laundry after canceling the program
If you want to remove the laundry when it is dripping wet:
Open the door.
Remove the laundry.
If you want to remove the laundry after it has been spun (damp):
Open the door.
Close the door.
Turn the program selector to Drain/ Spin.
Tip: Select an appropriate spin speed.
Interrupting a program
Turn the program selector to the position.
The washing machine switches off.
To continue, turn the program selector to the position of the wash program that was started.
Tip: If appears on the time display, the program selector is in the incorrect position.
Adding or removing laundry
You can add or remove laundry at the start of a wash program as long as the symbol is flashing on the control field.
Briefly touch the Start/Stop button.
The program will stop and the door will unlock.
Pull open the door.
Add or remove items.
Close the door.
Touch the Start/Stop sensor button.
The wash program will continue.
Detergent
Miele recommended detergents
The Miele detergents have been developed by Miele especially for the Miele washing machine. You can order the Miele detergents from Miele's online store or you can purchase them from Miele's customer service, or your Miele dealer.
General detergent recommendations
The wash programs that are not listed do not have a detergent recommendation
Cleaning and care
Cleaning the drum (Hygiene info)
Washing at low temperatures and/or using liquid detergent can cause bacteria and unpleasant odors to build up in the washing machine. Use the Sanitize program to clean the machine. This should be done at the latest when the indicator light comes on.
Cleaning the housing and control panel
WARNING Risk of electric shock.
Mains voltage is present when the washing machine is switched off
Disconnect the machine from the electricity supply before cleaning or maintenance.
WARNING Risk of damage due to ingress of water.
The pressure of a water jet can cause water to get into the washing machine, resulting in damage to components.
Do not spray the washing machine with a water jet when hosing down.
Clean the housing and control panel with a mild cleaning agent or soap and water and dry both with a soft cloth.
The drum can be cleaned using a suitable stainless steel cleaning agent following the manufacturer’s instructions on the packaging.
WARNING Damage due to cleaning agents.
Do not use solvents, abrasive cleaners, glass cleaners or all-purpose cleaning agents. These might damage plastic surfaces and other components because of the chemicals they contain. Do not use any of these cleaning agents.
Cleaning the detergent dispenser drawer
Washing at low temperatures and the use of liquid detergent can lead to a build-up of bacteria in the detergent dispenser drawer.
For hygiene reasons, clean the entire drawer at regular intervals.
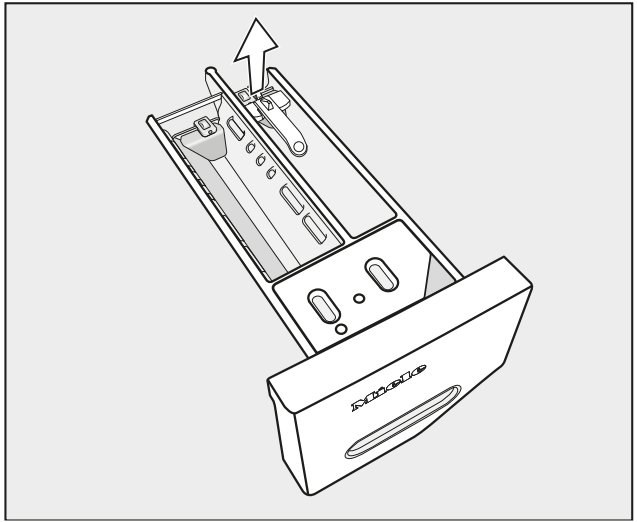
Removing the detergent dispenser drawer
Pull out the detergent dispenser drawer until a resistance is felt. Press down the release button and at the same time pull the drawer right out of the machine.
Removing and cleaning the insert for liquid detergents
An insert for liquid detergents is located in the compartment of the detergent dispenser drawer.
Remove the insert. Clean the insert thoroughly with warm water.
Cleaning the compartment
Compartment 1 has a siphon for better dispensing of the chlorine bleach.
Remove the release catch.
Remove and clean the siphon.
Clean the and compartments with warm water
Cleaning the siphon and the compartment channel
Liquid starch results in clogging. The siphon in the compartment no longer works and the compartment can overflow. Clean the siphon particularly thoroughly after using liquid starch a few times.
1. Remove the siphon from compartment and clean under warm running water. Clean the siphon tube in the same way.
2. Refit the siphon.
Clean the fabric softener channel with a brush and warm water.
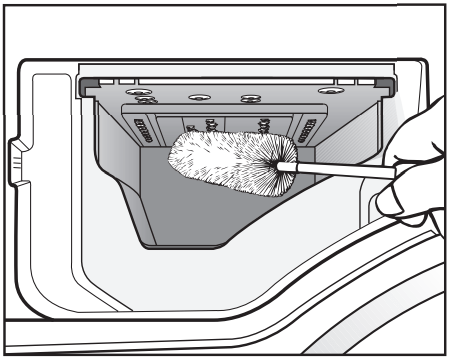
Cleaning the detergent dispenser drawer housing
Use a bottle brush to remove detergent residues and limescale from the jets inside the detergent dispenser drawer housing.
Cleaning the water inlet filter
The washing machine has two filters to protect the inlet valve. You should inspect the filters approximately every six months, or more often if there are frequent interruptions to the external water supply
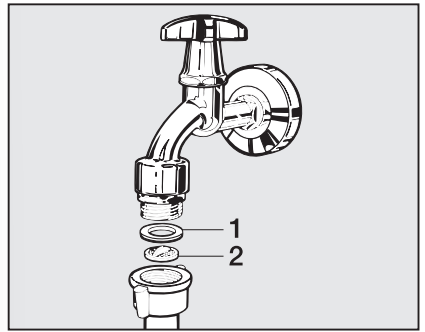
Cleaning the filter in the inlet hose
First turn off the faucet.
Unscrew the inlet hose from the faucet.
Remove the rubber seal 1 from the connector.
Using needle nose pliers, take hold of the plastic filter bar 2 and remove it.
Clean the filter.
Reassemble the appliance in reverse order.
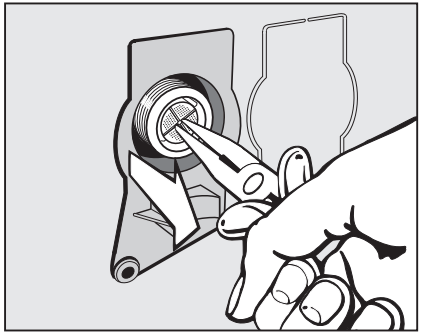
Cleaning the filter in the water inlet valve
Using pliers, carefully loosen the ribbed plastic nut on the inlet valve and unscrew.
Use needle nose pliers to withdraw the filter by the bar.
Clean the filter.
Reassemble the appliance in reverse order.
After cleaning, turn the faucet slowly and make sure the screw connections are watertight. If water leaks, tighten the screw connections.
The filters must be put back in place after cleaning.
Troubleshooting
Frequently asked questions
Problem solving guide
With the help of the following guide, minor faults in the performance of the appliance, some of which may result from incorrect operation, can be put right without contacting Miele Service. This will save time and money.
The following guide may help you to find the reason for a fault, and to correct it. You should, however, note the following:
WARNING Repairs and other work by unqualified persons could be dangerous. The manufacturer cannot be held responsible for unauthorized work.
Repair work to electrical appliances must only be carried out by a suitably qualified and competent person in strict accordance with current local and national safety codes.
A wash program cannot be started
Problem
Possible cause and solution
The control field remains dark.
There is no power to the machine.
■ Check whether the plug is plugged in.
■ Check whether the fuse has tripped.
The washing machine has switched off automatically to save energy.
■ Switch the washing machine on again by turning the program selector.
Fand 3H appear alternately on the time display.
The door is not closed properly. The door lock could not engage.
■ Close the door again.
■ Start the program again.
If the fault message appears again, contact Technical Service.
The program is canceled and a fault indicator light lights up on the control field
Problem
Possible cause and solution
The fault indicator light lights up, Fand 10appear alternately on the time display, and the buzzer sounds.
The water intake is blocked or restricted.
■ Check whether the water supply is turned on properly.
■ Check whether the intake hose is kinked.
■ Check whether there is sufficient water pressure.
The filter in the water intake is blocked.
■ Clean the filter.
The fault indicator light lights up, Fand appear alternately on the time display, and the buzzer sounds.
The drain is blocked or restricted.
The drain hose has been fixed too high.
■ Clean the filter and the pump.
■ The maximum drain height is 1 m.
The fault indicator light lights up, Fand 138appear alternately on the time display, and the buzzer sounds.
The water protection system has reacted.
■ Close the water supply.
■ Contact Technical Service.
Fand XXXappear alternately on the time display and the buzzer sounds.
There is a fault.
■ Disconnect the washing machine from the power supply, either by unplugging the machine or by disconnecting it at the fuse.
■ Wait at least 2 minutes before reconnecting the washing machine to the electricity supply.
■ Then switch the washing machine on again.
■ Restart the program.
If the fault message appears again, contact Technical Service.
During the program, a symbol appears on the time display
Message
Possible cause and solution
-0-lights up.
The program selector was moved to a different position after the program had started.
■ Turn the program selector back to the original position.
The program has been interrupted.
■ Open the door.
■ Close the door.
At the end of the program, an indicator light lights up on the control field
Problem
Possible cause and solution
The indicator light lights up.
Excessive foam has built up during washing.
■ Use less detergent next time and follow the manufacturer’s instructions on dosage given on the packaging.
The indicator light lights up.
A wash program using a temperature above 140°F (60°C) has not been run for a long period of time.
■ In order to prevent bacteria and unpleasant odors building up in the machine, run the Sanitize program using Miele washing machine cleaner or universal powder detergent.
General problems with the washer
Problem
Possible cause and solution
The washing machine is emitting an odor.
The indicator light was ignored. A wash program using a temperature above 140°F (60°C) has not been run for a long period of time.
■ In order to prevent bacteria and unpleasant odors building up in the machine, run the Sanitize program using Miele washing machine cleaner or universal powder detergent.
The door and detergent dispenser drawer were closed after washing.
■ Leave the door and the detergent dispenser drawer slightly open to allow them to dry.
The washer shakes during the spin cycle.
The four feet are not resting evenly on the floor.
■ Level the machine (see “Leveling the washer”).
The laundry has not been spun properly and the laundry is still wet.
The machine detected an imbalance during the final spin and reduced the spin speed automatically.
■ Wash large and small items together in order to achieve a more even load distribution.
There are unusual sounds coming from the drain pump.
There is no fault!
Lapping sounds at the beginning and end of the drain process are normal.
Large amounts of detergent residue remain in the detergent dispensing drawer.
The water pressure is too low.
■ Clean the filter in the water intake.
■ Please note that the water pressure must be at least 14.5 psi (100 kPa).
Powder detergent used in conjunction with water softeners tends to become sticky.
■ Clean the detergent dispenser drawer and in future, add detergent first and then the water softener.
The fabric softener is not completely dispensed or too much water remains in the compartment.
The siphon tube is either positioned incorrectly or clogged.
■ Clean the siphon tube, see “Cleaning and care -Cleaning the detergent drawer”.
At the end of the program there is still liquid in the capsule.
The small pipe in the detergent dispenser drawer onto which the capsule is placed is blocked.
■ Clean the small pipe.
Not a fault.
For technical reasons, a small amount of water will remain in the capsule.
There is water next to the capsule in the fabric softener compartment.
The Cap sensor button was not activated or an empty capsule was not removed at the end of the last wash cycle.
■ Make sure that you remember to activate the Cap sensor button the next time you insert a capsule.
■ Remove and then dispose of the empty capsule at the end of each wash cycle.
The small pipe in the detergent dispenser drawer onto which the capsule is placed is blocked.
■ Clean the small pipe.
Poor wash results
Problem
Possible cause and solution
Liquid detergent is not achieving the required results.
Liquid detergents do not usually contain bleaching agents. Consequently, fruit, coffee, and tea stains cannot always be removed.
■ Use powder detergent containing a bleaching agent.
■ Use the appropriate capsule or add stain removers to the compartment.
■ Never put stain removers and liquid detergent together in the detergent dispenser drawer.
Gray, greasy particles cling to washed laundry.
Insufficient amounts of detergent were used. The laundry was heavily soiled with grease (oils, ointments).
■ Use more detergent or use liquid detergent with this type of soiled laundry.
■ Before washing the next load, run a Normal 60°C program with liquid detergent but without a load.
White residues which look like powder detergent are seen on dark textiles after washing.
The detergent contained compounds (zeolites) to aid water softening which are not soluble in water. These have ended up on the laundry.
■ Try and brush off the residues with a soft brush once the laundry is dry.
■ In the future, wash dark textiles using a detergent which contains no zeolites. Liquid detergents do not usually contain zeolites.
■ Use the Darks/Denim program to wash the textiles.
The drum door cannot be opened
Problem
Possible cause and solution
The door cannot be pulled open during a program.
The drum is locked during a program.
■ Touch the Start/Stop sensor button to cancel the program.
The program is canceled, the door will unlock, and you will be able to pull it open.
There is still water in the drum and the machine is unable to drain.
■ Clean the drain filter and the drain pump as described in “Opening the door in the event of a blocked drain outlet and/or power outage”.
After the program is canceled, flashing bars appear on the time display.
To protect the user against scalding, the door cannot be opened if the suds temperature is higher than 130°F (55°C).
■ Wait until the temperature in the drum has decreased and the bars have stopped flashing on the time display.
Fand 35appear alternately on the time display.
The door lock has jammed.
■ Contact Technical Service.
Opening the door in the event of a blocked drain outlet and/ or power outage
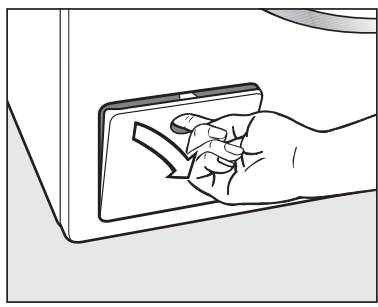
Turn off the washing machine.
Open the drain pump flap.
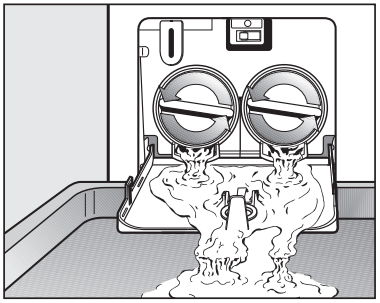
Blocked drain outlet
If the drain outlet is blocked, a larger quantity of water can remain in the washing machine.
WARNING Risk of scalding due to hot suds.
Escaping suds will be hot if laundry has been washed at high temperatures. Carefully allow all suds to drain off.
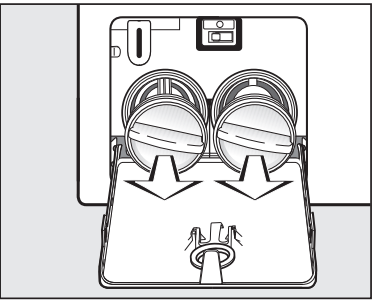
Procedure for draining the machine
Draining the washing machine
Remove the drain filter, though not completely.
Place a suitable container under the flap, e.g., a bowl or dish.
Slowly unscrew the drain filter to let the water out.
Tighten the drain filter back up again if you need to interrupt the flow of water.
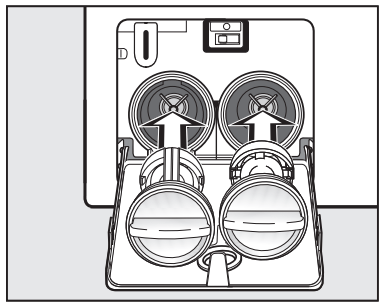
Once the flow of water stops:
Remove the drain ffilters completely
Clean the drain filter thoroughly.
Remove any foreign objects (e.g., buttons, coins, etc.) and clean the interior. Turn the impellers by hand to check that they rotate freely.
Replace the drain filter correctly and tighten it securely.
Close the drain pump flap
Replace the filters correctly (on the right and left) and tighten them.
Close the drain pump access panel.
Risk of water damage.
Make sure the drain filters are securely tightened. Otherwise there is a risk of water leakage during use.
Replace the drain filters correctly and tighten them securely.
Opening the door
WARNIING Danger of injury due to rotating drum!
Reaching into a moving drum is extremely dangerous. Danger of injury!
Always make sure that the drum is stationary before reaching in to remove laundry.
Use a screwdriver to unlock the door.
Pull open the door.
Contact in case of fault
In the event of a fault which you cannot remedy yourself, please contact your Miele dealer or Miele Technical Service.
Contact information for Miele Technical Service can be found at the end of this document.
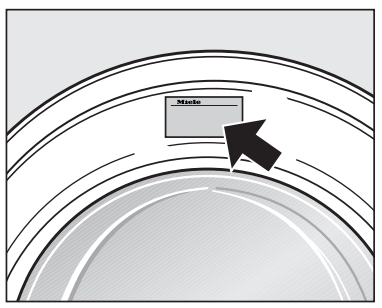
Please quote the model and serial number of your appliance when contacting Miele. Both pieces of information can be found on the data plate.
The data plate is found above the porthole glass when the door is opened.
 light up when necessary
 for the Delay Start function
 position.
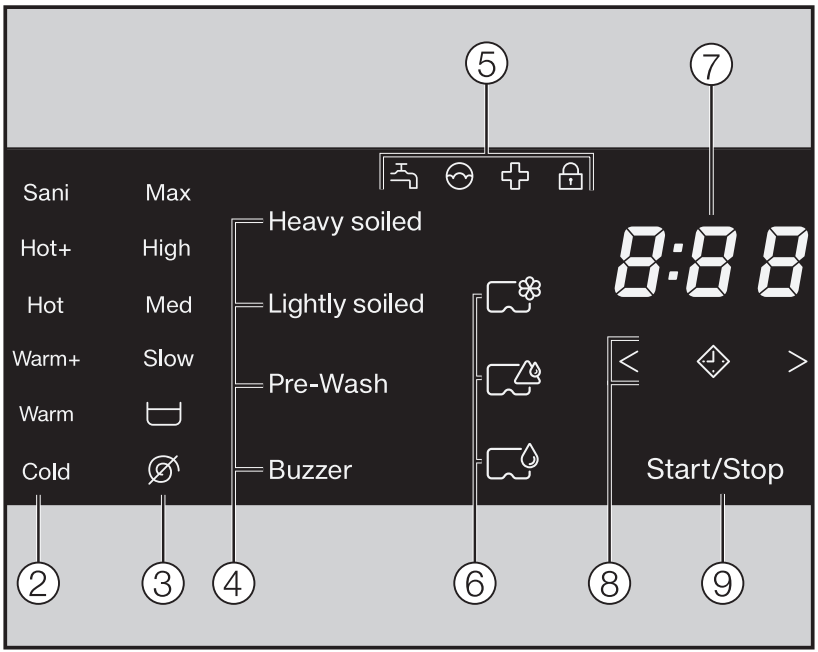


 indicator will come on to remind you to carry out a hot wash.
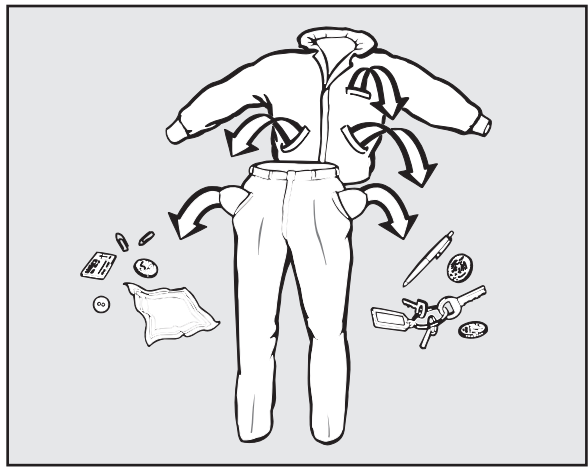
 symbol on the fabric care label.
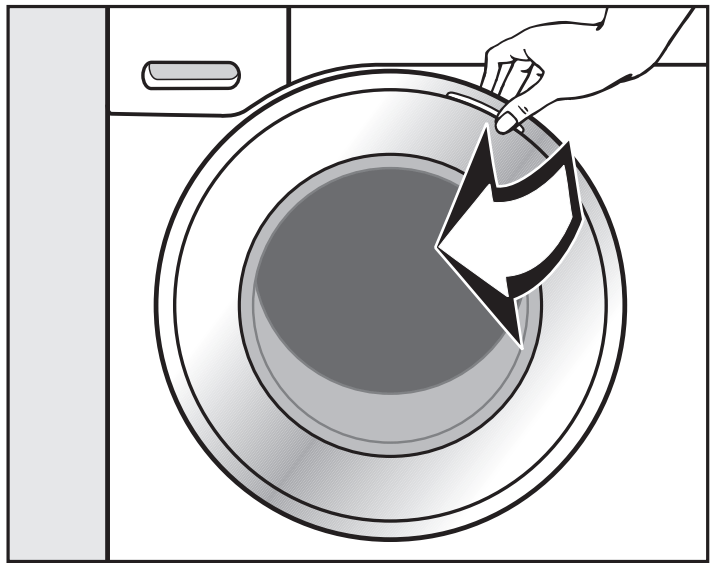


 chamber.
 compartment. This insert must be removed to use powder detergent.
 compartment.
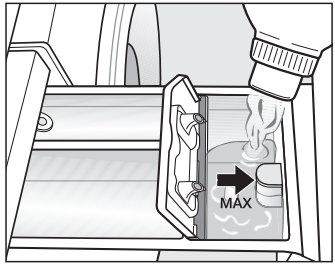
 compartment. Do not exceed the maximum level mark.
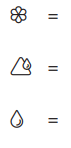


 compartment.
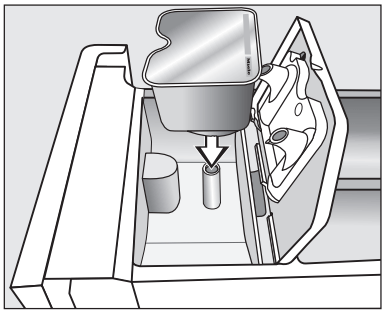
 takes place solely via the capsule. Do not add any additional fabric softener to the
  symbol is flashing on the control field, you can add laundry.
 position. This switches the washing machine off.
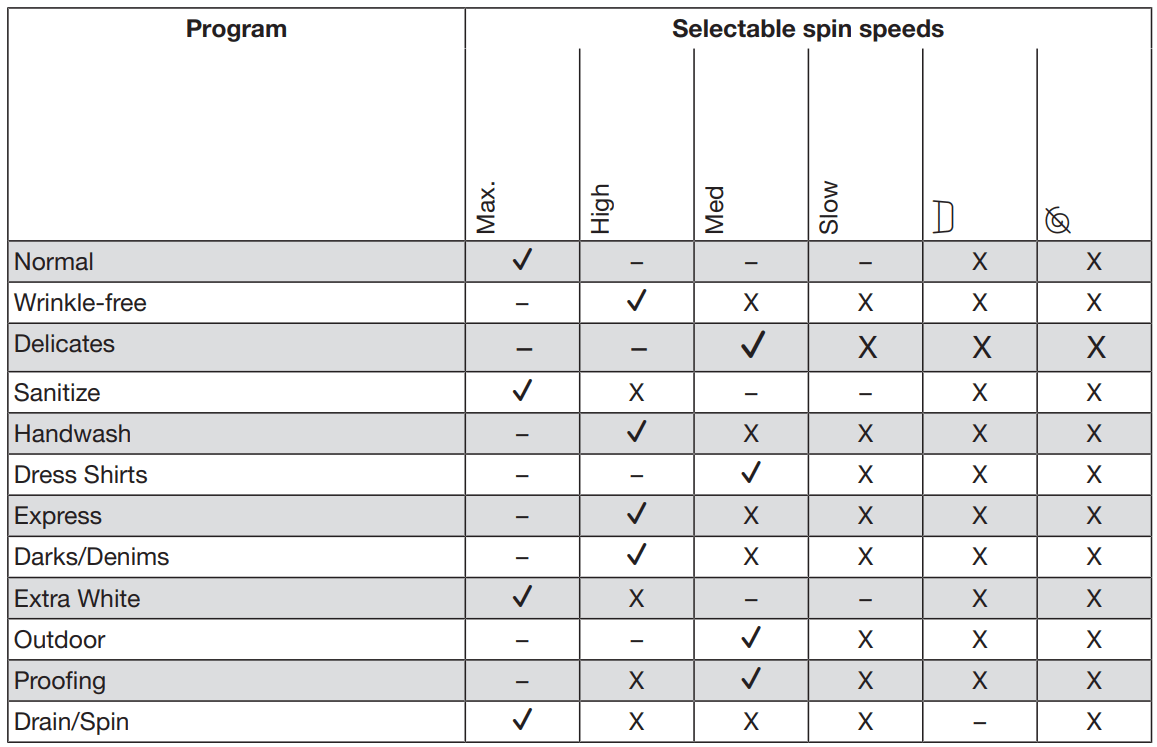

 sensor button (Rinse hold).
 sensor button.
 symbol on the control field goes out.
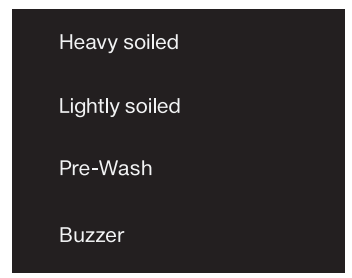

 symbol on the control field goes out, the program has been canceled.
 position.
 appears on the time display, the program selector is in the incorrect position.
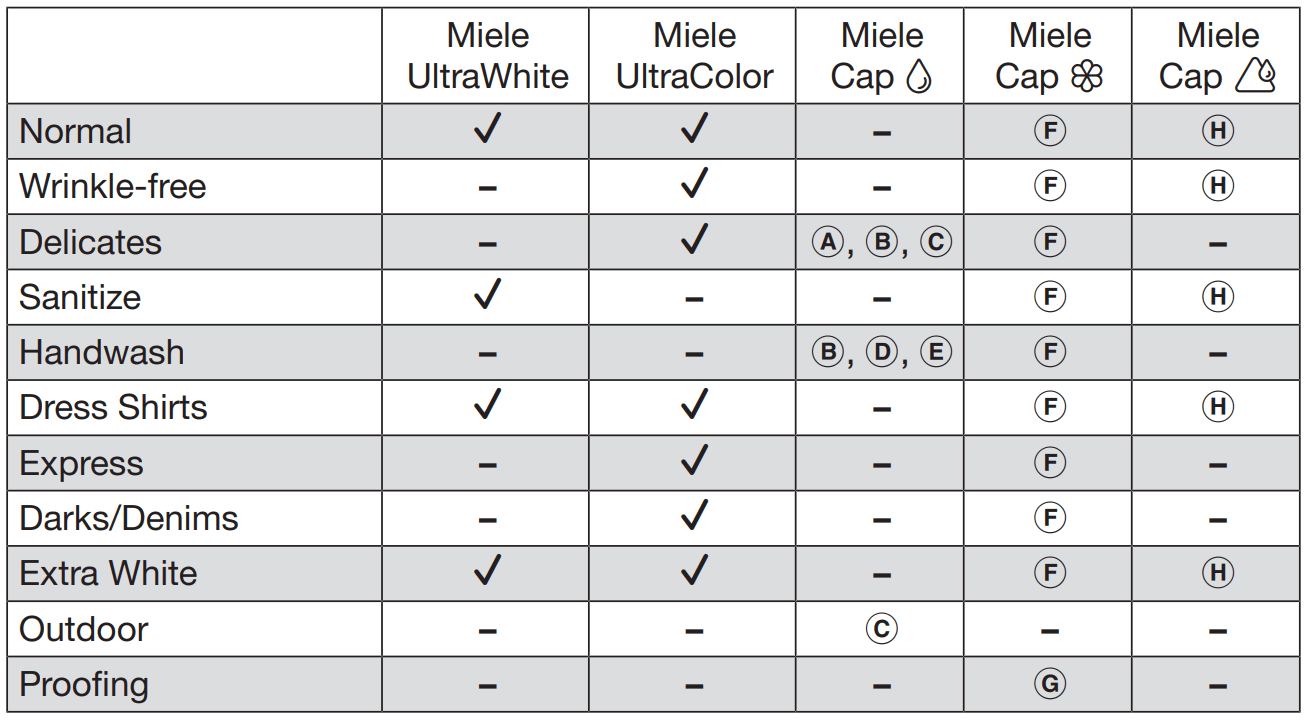


 comes on.
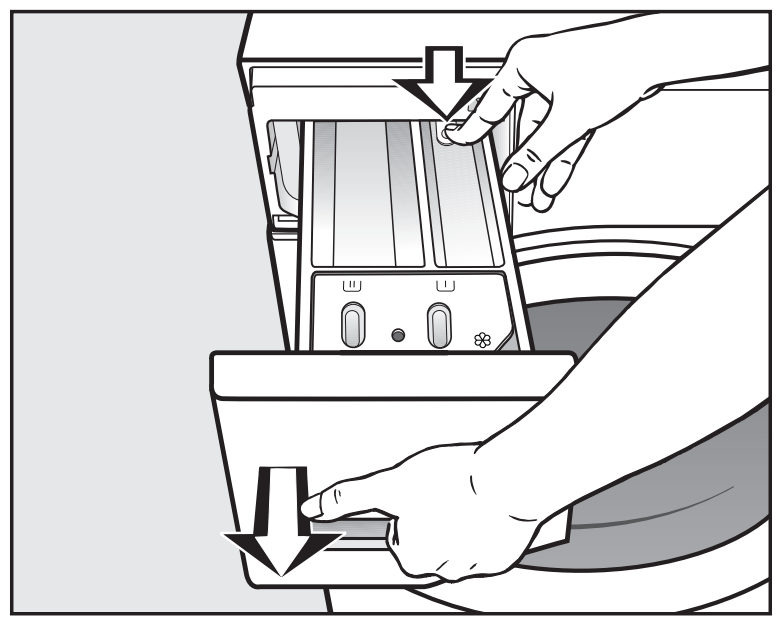
 compartment of the detergent dispenser drawer.
 compartment
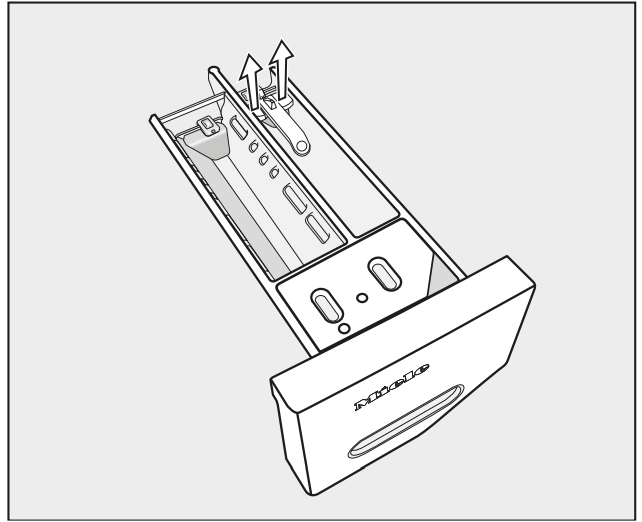
 compartment channel
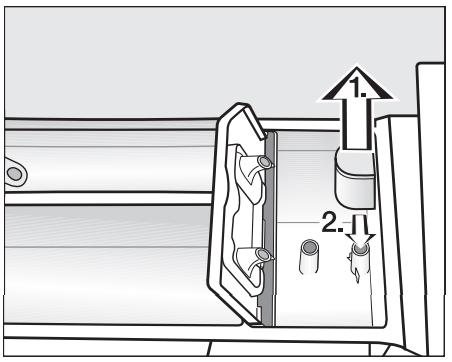
 compartment and clean under warm running water. Clean the siphon tube in the same way.
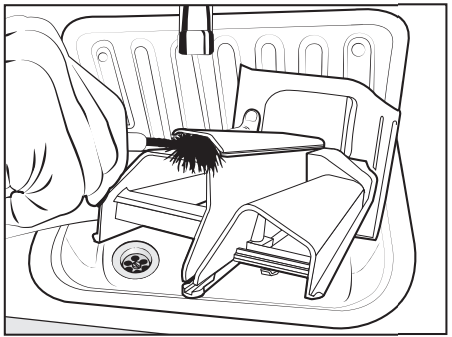
 lights up, F and 10 appear alternately on the time display, and the buzzer sounds.
 appear alternately on the time display, and the buzzer sounds.
 lights up.
 lights up.
 was ignored. A wash program using a temperature above 140°F (60°C) has not been run for a long period of time.
 compartment.
 was not activated or an empty capsule was not removed at the end of the last wash cycle.
 compartment.
 appear on the time display.