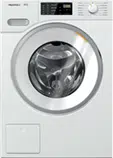
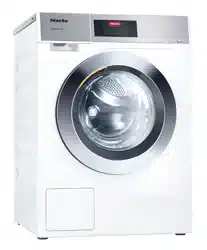
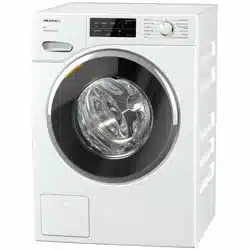
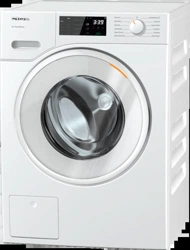
User manual Washing Machine
Guide to the washer
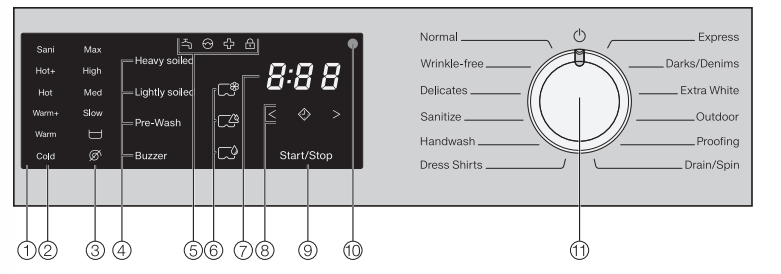
1 Control field
2 Temperature sensor buttons for selecting the temperature.
3 Spin Speed sensor buttons for selecting the spin speed.
4 Extra Options sensor buttons for the various extra options that can be added to the wash programs.
5 Indicator lights light up when necessary
6 CapDosing sensor buttons
7 Time display for the program duration
8 Sensor buttons  for the Delay Start function
9 Start/Stop sensor button for program start/cancellation
10 Optical interface for service technicians
11 Program selector for selecting programs and for switching off. The washing machine is switched on when you select a program, and switched off by turning the program selector to the  position.
How the control field works
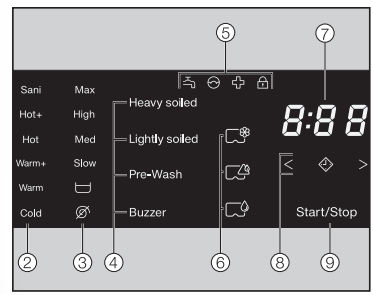
The 1-2-3-4-6-8 and 9 sensor buttons react to fingertip contact. Selection is possible as long as the respective sensor button is lit.
If a sensor button is brightly lit, this means it is currently selected If a sensor button is dimly lit, this means it can be selected
2 and 3 sensor buttons for temperature and spin speed
After a wash program has been selected with the program selector, the recommended temperature (in °F) and spin speed (in rpm) light up brightly. Selectable temperatures and spin speeds light up diml
4 Sensor buttons for extra options
You can supplement the wash programs with extra options.
If a wash program has been selected, the sensor buttons for the available ex�tra options light up dimly
5 Indicator lights
 lights up if there are faults affecting the water intake and drainage
 lights up if excess detergent was used
 lights up as a reminder about hygiene information
 flashes for as long as it is possible to add laundry lights up when the door of the washing machine is locked
6 CapDosing
The CapDosing sensor buttons are used for activating cap dosing.
 Fabric care (e.g., fabric softener, proofing agent)
 Additives (e.g., detergent enhancers)
 Detergent (for the main wash only)
7 Time display
After the program has started, the program duration will appear on the display in hours and minutes.
When Delay Start is being used, the program duration will appear after the Delay Start time has elapsed
8 Sensor buttons 
 \
\
After touching the sensor button, a later start time for the program (Delay Start) can be selected. Once selected,
  lights up brightly.
<>
The duration of the Delay Start period is selected by touching the < or > sensor button.
The Delay Start time selected will appear on the time display. After the program has started, the Delay Start time will begin to count down.
Once the Delay Start time has elapsed, the program begins and the estimated program duration appears on the time display
9 Start/Stop sensor button
Touching the Start/Stop sensor button starts the selected program or cancels a program that has already been started. The sensor button flashes slowly as soon as it is possible for a program to be started and then lights up constantly after the program has started.
Starting a program
Starting a program
Touch the flashing Start/Stop sensor button.
The door will lock and the program will start.
– As long as the symbol is flashing on the control field, you can add laundry.
– When the symbol lights up constantly, the door is locked until the end of the program.
If a Delay Start time has been selected, this will count down on the time display. At the end of the Delay Start time or immediately after the program has started (if no Delay Start time has been selected), the program duration will appear on the time display.
Energy savings
After 10 minutes, the indicators dim. The Start/Stop sensor button will flash slowly.
You can reactivate the indicators:
Touch the Start/Stop sensor button (this does not have any effect on a running program)
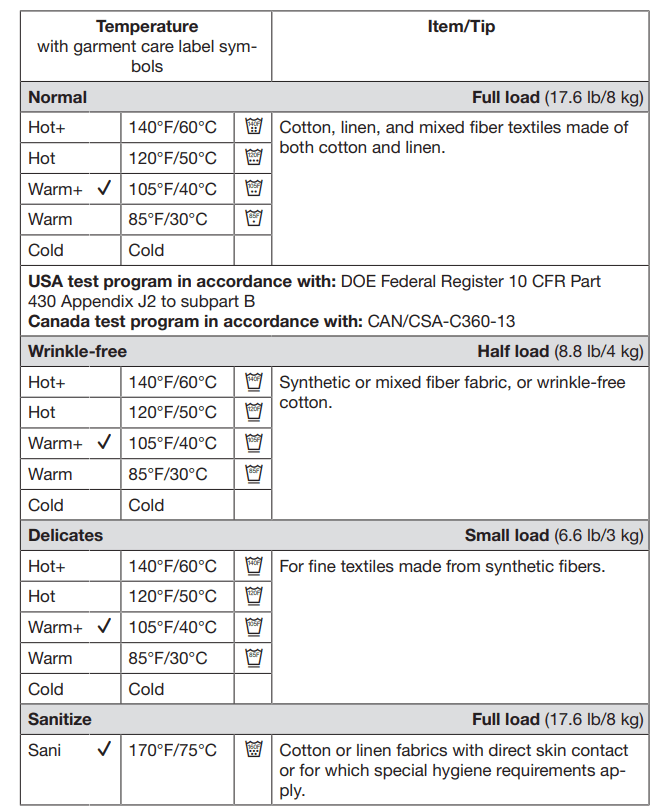
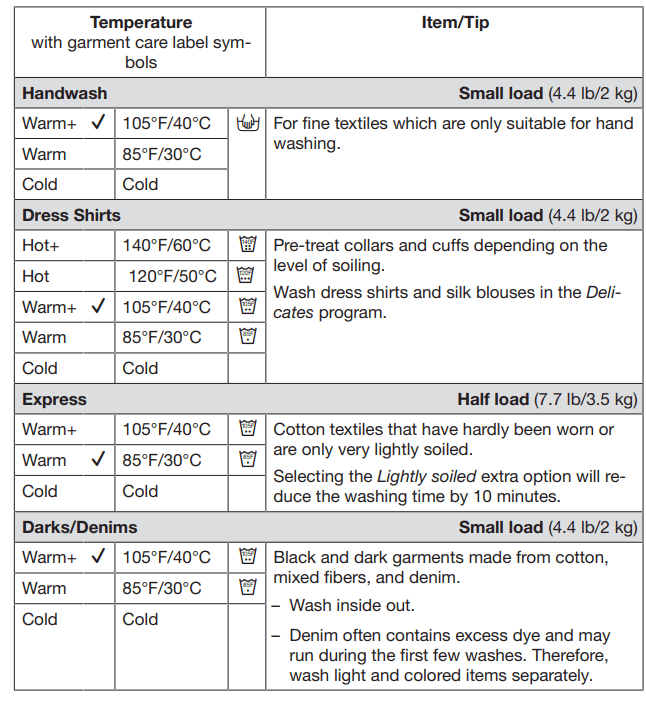
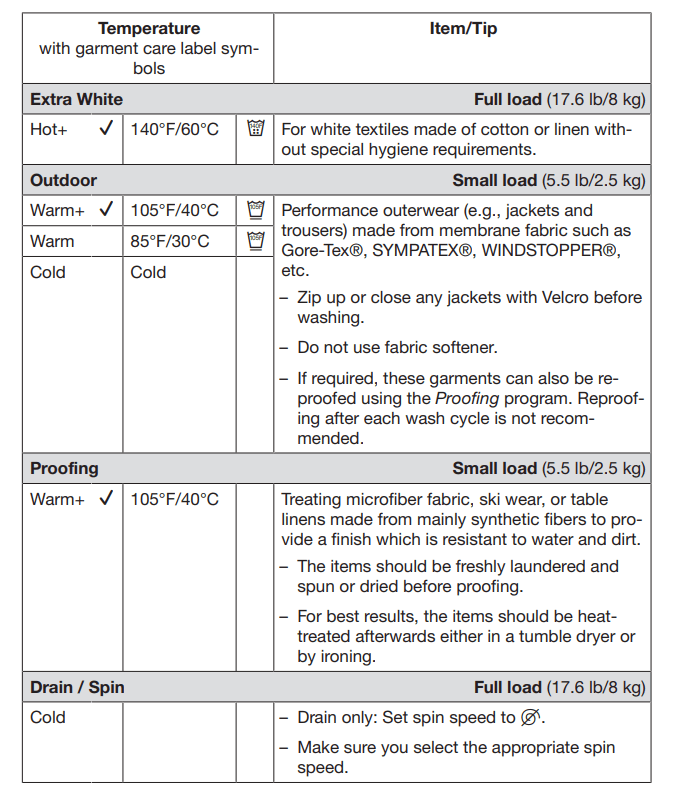
Program guide
Cleaning and care
Cleaning the drum (hygiene info)
Washing at low temperatures and/or using liquid detergent can cause bacteria and unpleasant odors to build up in the washing machine. Use the Sanitize program to clean the machine. This should be done at the latest when the indicator light comes on.
Cleaning the housing and control panel
WARNING! Mains voltage is present when the washing machine is switched off Disconnect the machine from the electricity supply before cleaning or maintenance. The pressure of a water jet can cause water to get into the washing machine, resulting in damage to components. Do not spray the washing machine with a water jet when hosing down.
- Clean the housing and control panel with a mild cleaning agent or soap and water and dry both with a soft cloth.
- The drum can be cleaned using a suitable stainless steel cleaning agent following the manufacturer’s instructions on the packaging
WARNING! Do not use solvents, abrasive cleaners, glass cleaners or all-purpose cleaning agents. These might damage plastic surfaces and other components because of the chemicals they contain. Do not use any of these cleaning agents.
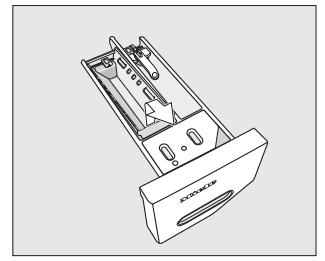
Cleaning the detergent dispensing drawer
For hygiene reasons, clean the entire drawer at regular intervals.
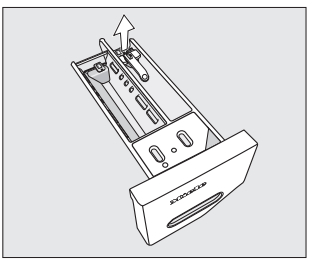
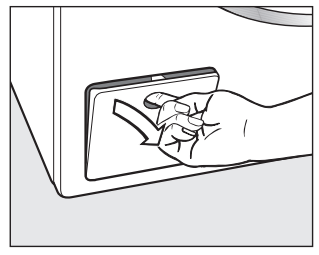
Removing the detergent dispenser drawer
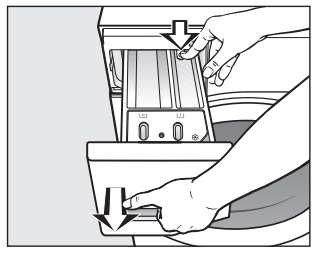
- Pull out the detergent dispenser drawer until a resistance is felt. Press down the release button and at the same time pull the drawer right out of the machine.
Removing and cleaning the insert for liquid detergents
An insert for liquid detergents is located in the  compartment of the detergent dispenser drawer
- Remove the insert. Clean the insert thoroughly with warm water
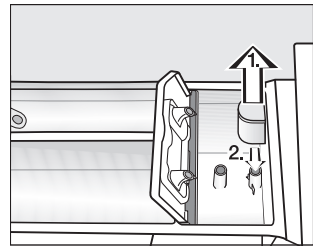
Cleaning the  compartment
Compartment 1 has a siphon for better dispensing of the chlorine bleach

- Remove the release catch.
- Remove and clean the siphon
- .Clean the
 and
and  compartments with warm water
Cleaning the siphon and the  compartment channel
1. Remove the siphon from the  compartment and clean under warm running water. Clean the siphon tube in the same way.
2. Refit the siphon.
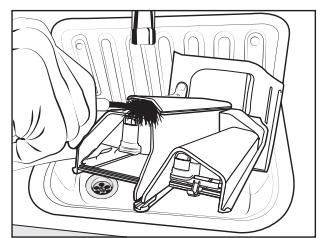
- Clean the fabric softener channel with a brush and warm water.
Cleaning the detergent dispenser drawer housing
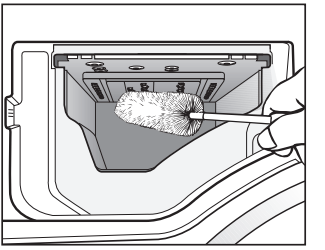
- Use a bottle brush to remove detergent residues and limescale from the jets inside the detergent dispenser drawer housing.
Cleaning the water inlet filter
The washing machine has two filters to protect the inlet valve. You should inspect the filters approximately every six months, or more often if there are frequent interruptions to the external water supply.
Cleaning the filter in the inlet hose
- First turn off the faucet.
- Unscrew the inlet hose from the faucet
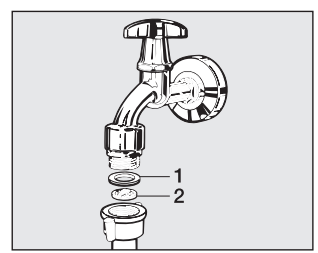
- Remove the rubber seal 1 from the connector
- Using needle nose pliers, take hold of the plastic filter bar 2 and remove it.
- Clean the filter.
- Reassemble the appliance in reverse order.
Cleaning the filter in the inlet valve
- Using pliers, carefully loosen the ribbed plastic nut on the inlet valve and unscrew
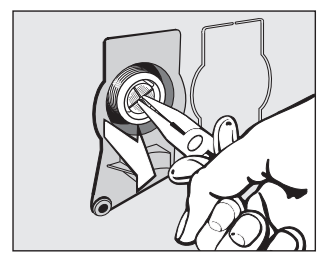
- Use needle nose pliers to withdraw the filter by the bar.
- Clean the filter.
- Reassemble the appliance in reverse order.
After cleaning, turn the faucet slowly and make sure the screw connections are watertight. If water leaks, tighten the screw connections. The filters must be put back in place after cleaning.
Troubleshooting
With the help of the following guide, minor faults in the performance of the appliance, some of which may result from incorrect operation, can be put right without contacting Miele Service. This will save time and money.
A wash program cannot be started
| Problem |
Possible cause and solution |
| The control field remains dark. |
There is no power to the machine.
- Check whether the plug is plugged in.
- Check whether the fuse has tripped.
The washing machine has switched off automatically to save energy.
- Switch the washing machine on again by turning the program selector.
|
| F and 34 appear alternately on the time display. |
The door is not closed properly. The door lock could not engage.
- Close the door again.
- Start the program again. If the fault message appears again, contact Technical Service.
|
The program is canceled and a fault indicator light lights up on the control field
| Problem |
Possible cause and solution |
The fault indicator light  lights up, F and 10 appear alternately on the time display, and the buzzer sounds. lights up, F and 10 appear alternately on the time display, and the buzzer sounds. |
The water intake is blocked or restricted.
- Check whether the water supply is turned on properly.
- Check whether the intake hose is kinked
- Check whether there is sufficient water pressure.
The filter in the water intake is blocked.
|
The fault indicator light lights up, F and 11 appear alternately on the time display, and the buzzer sounds. lights up, F and 11 appear alternately on the time display, and the buzzer sounds. |
The drain is blocked or restricted.
The drain hose has been fixed too high.
- Clean the filter and the pump.
- The maximum drain height is 1 m.
|
The fault indicator light  lights up, F and 138 appear alternately on the time display, and the buzzer sounds. lights up, F and 138 appear alternately on the time display, and the buzzer sounds. |
The water protection system has reacted.
- Close the water supply.
- Contact Technical Service.
|
| F and XXx appear alternately on the time display and the buzzer sounds. |
There is a fault.
- Disconnect the washing machine from the power supply, either by unplugging the machine or by disconnecting it at the fuse.
- Wait at least 2 minutes before reconnecting the washing machine to the electricity supply.
- Then switch the washing machine on again.
- Restart the program.
If the fault message appears again, contact Technical Service.
|
During the program, a symbol appears on the time display
| Message |
Possible cause and solution |
| -0- lights up. |
The program selector was moved to a different position after the program had started.
- Turn the program selector back to the original position.
The program has been interrupted.
- Open the door.
- Close the door.
|
At the end of the program, an indicator light lights up on the control field
| Problem |
Possible cause and solution |
The indicator light lights up lights up |
Excessive foam has built up during washing.
- Use less detergent next time and follow the manufacturer’s instructions on dosage given on the packaging.
|
The indicator light lights up lights up |
A wash program using a temperature above 140°F (60°C) has not been run for a long period of time.
- In order to prevent bacteria and unpleasant odors building up in the machine, run the Sanitize program using Miele washing machine cleaner or universal powder detergent
|
General problems with the washer
| Problem |
Possible cause and solution |
| The washing machine is emitting an odor. |
The indicator light  was ignored. A wash program using a temperature above 140°F (60°C) has not been run for a long period of time. was ignored. A wash program using a temperature above 140°F (60°C) has not been run for a long period of time.
- In order to prevent bacteria and unpleasant odors building up in the machine, run the Sanitize program using Miele washing machine cleaner or universal powder detergent. The door and detergent dispenser drawer were closed after washing.
- Leave the door and the detergent dispenser drawer slightly open to allow them to dry.
|
| The washer shakes during the spin cycle. |
The four feet are not resting evenly on the floor.
- Level the machine (see “Leveling the washer”)
|
| The laundry has not been spun properly and the laundry is still wet |
The machine detected an imbalance during the final spin and reduced the spin speed automatically.
- Wash large and small items together in order to achieve a more even load distribution.
|
| There are unusual sounds coming from the drain pump |
There is no fault! Lapping sounds at the beginning and end of the drain process are normal |
| Large amounts of detergent residue remain in the detergent dispensing drawer. |
The water pressure is too low.
- Clean the filter in the water intake.
- Please note that the water pressure must be at least 14.5 psi (100 kPa).
Powder detergent used in conjunction with water softeners tends to become sticky.
- Clean the detergent dispenser drawer and in future, add detergent first and then the water softener.
|
General problems with the washing machine
| Problem |
Possible cause and solution |
The fabric softener is not completely dispensed or too much water remains in the  compartment. compartment. |
The siphon tube is either positioned incorrectly or clogged.
- Clean the siphon tube, see “Cleaning and care - Cleaning the detergent drawer”.
|
| At the end of the program there is still liquid in the capsule. |
The small pipe in the detergent dispenser drawer onto which the capsule is placed is blocked.
Not a fault
- For technical reasons, a small amount of water will remain in the capsule.
|
| There is water next to the capsule in the fabric softener compartment. |
The Cap sensor button was not activated or an empty capsule was not removed at the end of the last wash cycle. was not activated or an empty capsule was not removed at the end of the last wash cycle.
- Make sure that you remember to activate the Cap
 sensor button the next time you insert a capsule. sensor button the next time you insert a capsule.
- Remove and then dispose of the empty capsule at the end of each wash cycle.
The small pipe in the detergent dispenser drawer onto which the capsule is placed is blocked.
|
Poor wash results
| Problem |
Possible cause and solution |
| Liquid detergent is not achieving the required results. |
Liquid detergents do not usually contain bleaching agents. Consequently, fruit, coffee, and tea stains cannot always be removed.
- Use powder detergent containing a bleaching agent.
- Use the appropriate capsule or add stain removers to the
 compartment. compartment.
- Never put stain removers and liquid detergent together in the detergent dispenser drawer
|
| Gray, greasy particles cling to washed laundry |
Insufficient amounts of detergent were used. The laundry was heavily soiled with grease (oils, ointments).
- Use more detergent or use liquid detergent with this type of soiled laundry.
- Before washing the next load, run a Normal 60°C program with liquid detergent but without a load
|
| White residues which look like powder detergent are seen on dark textiles after washing. |
The detergent contained compounds (zeolites) to aid water softening which are not soluble in water. These have ended up on the laundry.
- Try and brush off the residues with a soft brush once the laundry is dry.
- In the future, wash dark textiles using a detergent which contains no zeolites. Liquid detergents do not usually contain zeolites.
- Use the Darks/Denim program to wash the textiles.
|
The drum door cannot be opened
| Problem |
Possible cause and solution |
| The door cannot be pulled open during a program. |
The drum is locked during a program.
- Touch the Start/Stop sensor button to cancel the program.
The program is canceled, the door will unlock, and you will be able to pull it open.
There is still water in the drum and the machine is unable to drain.
- Clean the drain filter and the drain pump as described in “Opening the door in the event of a blocked drain outlet and/or power outage”.
|
After the program is canceled, flashing bars .appear on the time display .appear on the time display |
To protect the user against scalding, the door cannot be opened if the suds temperature is higher than 130°F (55°C).
- Wait until the temperature in the drum has decreased and the bars have stopped flashing on the time display.
|
| F and 35 appear alternately on the time display. |
The door lock has jammed.
- Contact Technical Service.
|
Opening the door in the event of a blocked drain outlet and/ or power outage
- Turn off the washing machine
Blocked drain outlet
If the drain outlet is blocked, a larger quantity of water can remain in the washing machine.
Draining the washing machine
- Place a suitable container under the flap, e.g., a bowl or dish.
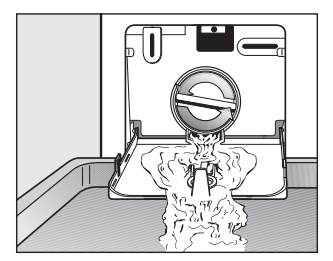
- Slowly unscrew the drain filter to let the water out
- Tighten the drain filter back up again if you need to interrupt the flow of water.
Once the flow of water stops:
- Remove the drain filter completely.
- Clean the drain filter thoroughly.
- Remove any foreign objects (e.g., buttons, coins, etc.) and clean the interior. Turn the impellers by hand to check that they rotate freely.
- Replace the drain filter correctly and tighten it securely.
- Close the drain pump flap
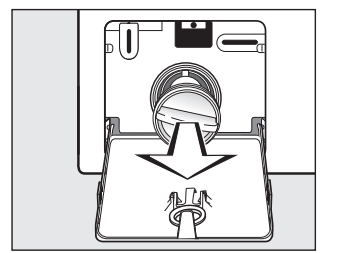
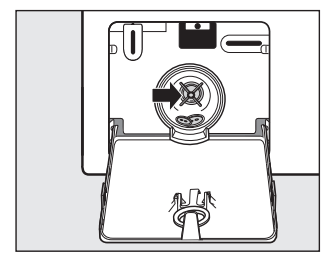
Opening the door
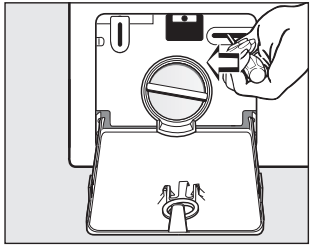
- Use a screwdriver to unlock the door.
- Pull open the door
Installation
Front view
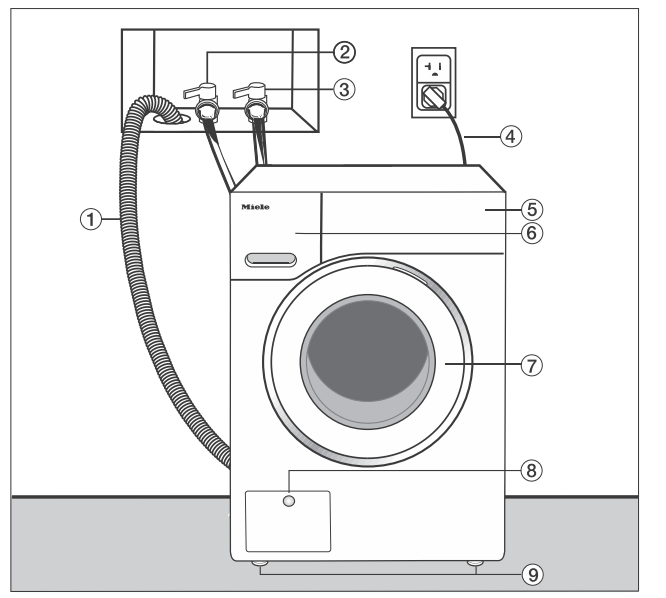
1 Drain hose
2 Hot-water inlet hose (pressure-proof to 1,015 psi/7,000 kPa)
3 Cold-water inlet hose (pressure�proof to 1,015 psi/7,000 kPa)
4 Electrical connection
5 Control panel
6 Detergent dispenser drawer
7 Door
8 Flap for drain filters, drain pump, and emergency release
9 Four height-adjustable feet
Rear view
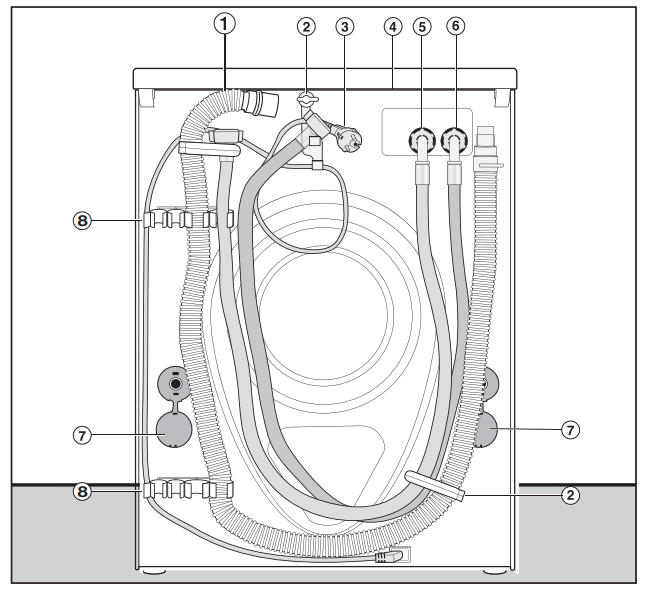
1 Drain hose
2 Transport clips for inlet and drain hoses and power cord
3 Electrical connection
4 Protruding lid for holding when moving the machine
5 Cold-water inlet hose (pressureproof to 1,015 psi/7,000 kPa)
6 Hot-water inlet hose (pressure-proof to 1,015 psi/7,000 kPa)
7 Safety caps for shipping struts
8 Transport clips for inlet and drain hoses and for storing shipping struts when not in use