Loading ...
Loading ...
Loading ...
— The equalizer curve switches to Flat.
(Refer to Recalling equalizer curves on
page 33.)
— The front, center and rear speakers will
automatically be adjusted to a high pass
filter setting.
! Previous settings for auto EQ will be overwrit-
ten.
! If using an AVH-X3500BHS, AVH-X2500BT, or
AVH-X1500DVD, connect a microphone ex-
tension cable (sold separately) to the AUX
input in advance.
Performing auto EQ
1 Stop the car in a place that is quiet, close
all the doors, windows and sun roof, and
then turn the engine off.
If the engine is left running, engine noise may
prevent correct auto EQ.
2 Fix the optional microphone in the center
of the headrest of the driver’s seat, facing
forward.
The auto EQ may differ depending on where you
place the microphone. If desired, place the mi-
crophone on the front passenger seat to carry
out auto EQ.
3 Turn the ignition switch to ON or ACC.
If the car’s air conditioner or heater is turned on,
turn it off. Noise from the fan in the air condi-
tioner or heater may prevent correct auto EQ.
4 Press the home button to switch to the
home display.
5 Touch the system key to open the system
menu.
6 Touch Auto EQ Measurement to enter
auto EQ measurement mode.
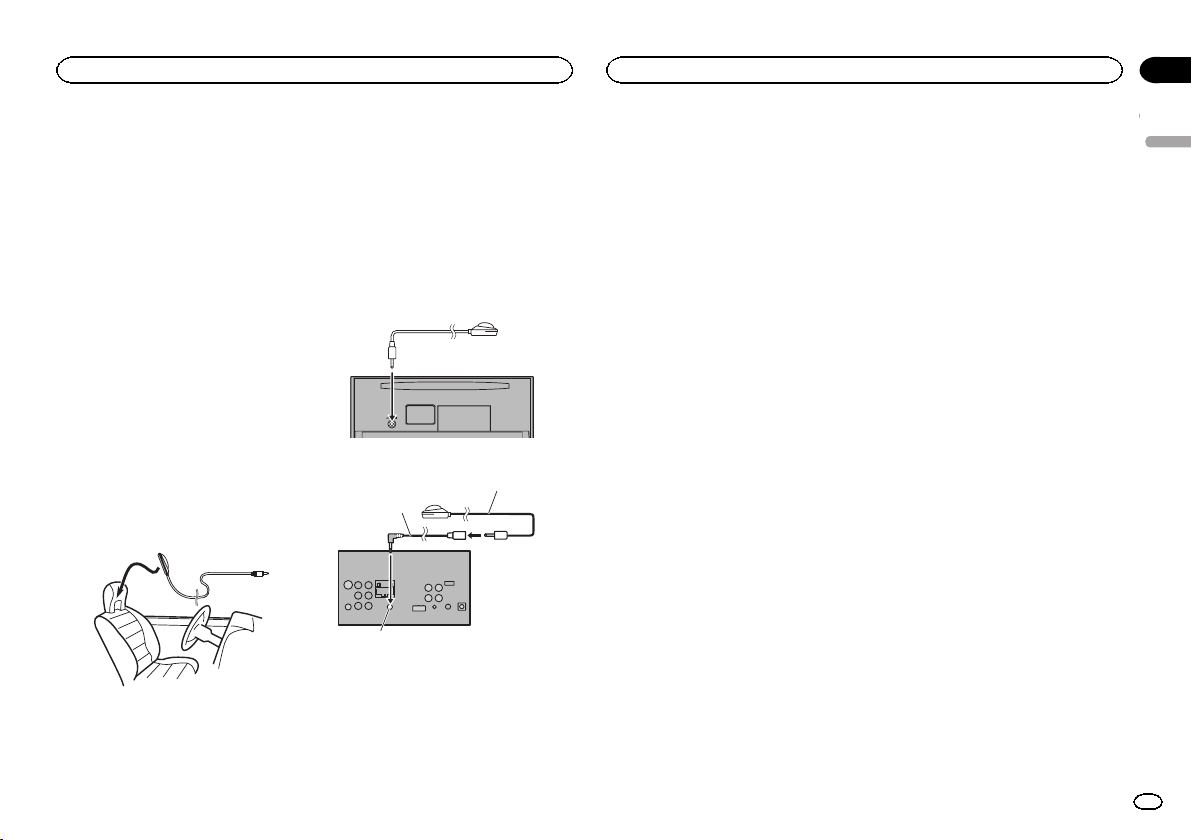
7 Plug the microphone into the micro-
phone input jack on this unit.
AVH-X5500BHS and AVH-X4500BT
AVH-X3500BHS, AVH-X2500BTand AVH-
X1500DVD
AUX input
(AUX)
Extension Cable
(Sold separately)
Microphone
8 Touch Start to start auto EQ.
9 When the 10-second countdown starts,
get out of the car and close the door within
10 seconds.
A measurement tone (noise) is emitted from the
speakers, and auto EQ measurement begins.
When auto EQ is completed, The measurement
has finished. Please disconnect the micro-
phone and then push HOME key. is displayed.
When the car’s interior acoustic characteristics
cannot be measured correctly, an error message
will be displayed. (Refer to Understanding auto
EQ error messages on page 56.)
# It takes about nine minutes for auto EQ measure-
ment to be completed when all the speakers are con-
nected.
# To stop auto EQ, touch Stop.
10 Store the microphone carefully in the
glove compartment or another safe place.
If the microphone is subjected to direct sunlight
for an extended period, high temperatures may
cause distortion, color change or malfunction.
Setting the video signal
When you connect this unit to an AV equipment
to this unit, select the suitable video signal set-
ting.
! As this function is initially set to Auto, the
unit will automatically adjust the video signal
setting.
! You can operate this function only for the
video signal input into the AV input.
1 Press the home button to switch to the
home display.
2 Touch the system key to open the system
menu.
3 Touch Video Signal Setting on the func-
tion menu.
Video Signal Setting items are displayed.
! AV – Adjusts the AV video signal
! AUX – Adjusts the AUX video signal
! Camera – Adjusts the rear view camera video
signal
4 Touch c or d to select the desired video
signal appears.
Auto—PAL—NTSC—PAL-M—PAL-N—SECAM
English
System settings
41
Section
System settings
En
20
<CRD4703-B/N>41
Loading ...
Loading ...
Loading ...