www.beko.com
Mcrowave Oven
User Manual
MGB 25332 BG MGB 25333 BG
MGB 25333 WG MGB 25333 X
01M-8847913200-4016-13
EN DE FR IT ES PT
NL PL CZ HR SL LT
ET BG TR
Please read this manual first!
Dear Customer,
Thank you for purchasng a Beko product. We hope that you get the best results from
your product whch has been manufactured wth hgh qualty and state-of-the-art
technology. Therefore, please read ths entre user manual and all other accompanyng
documents carefully before usng the product and keep t as a reference for future
use. If you handover the product to someone else, gve the user manual as well. Follow
all warnngs and nformaton n the user manual.
Meanings of the symbols
Followng symbols are used n the varous secton of ths user manual:
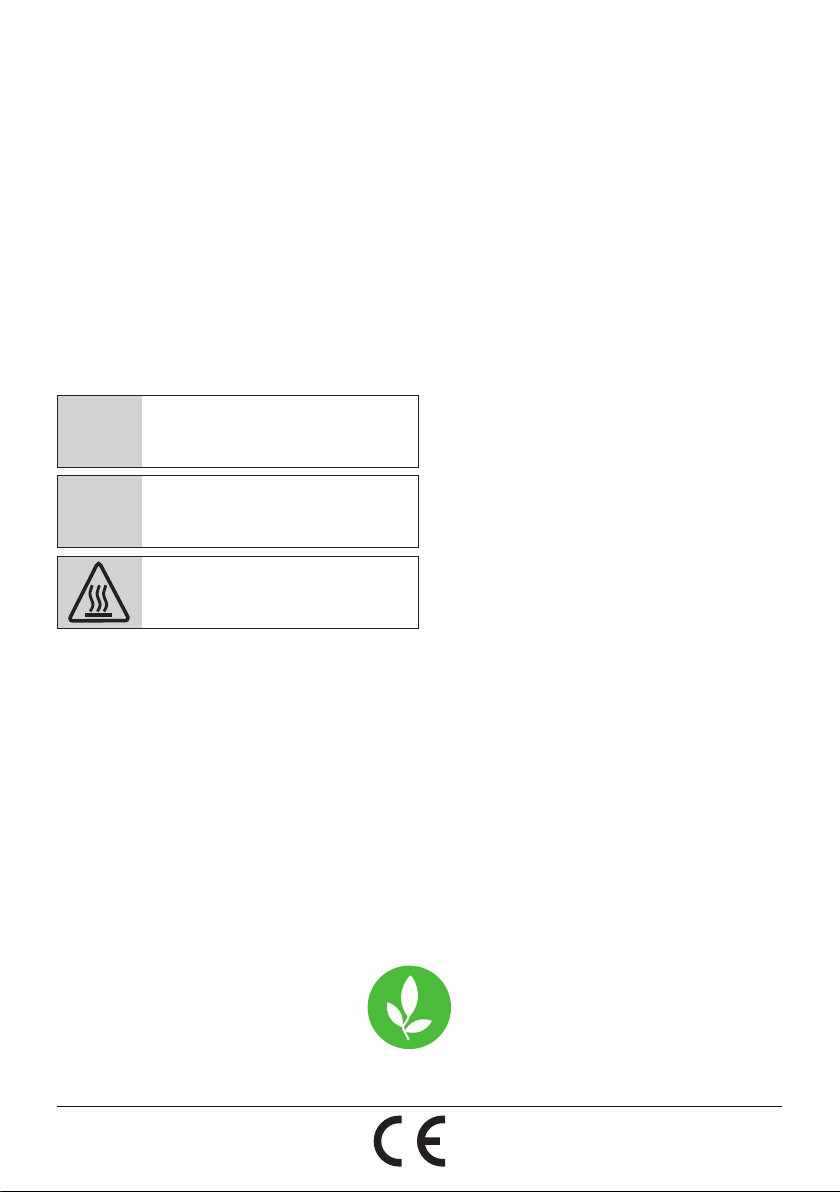
C
Important nformaton and useful
hnts about usage.
A
Warnngs for dangerous stuatons
concernng the safety of lfe and pro-
perty.
Warnng for hot surfaces.
Ths product has been manufactured n envronmental frendly modern plants wthout gvng any
harm to the nature.
Ths applance conforms to the WEEE
regulaton.
It does not contan PCB.

Microwave Oven / User Manual
3 / 371 EN
CONTENTS
01M-8847893200-4016-13
01M-8853783200-4016-13
01M-8849973200-4016-13
1 Important safety and
environmental instructions 4
1.1 General safety ..........................................................4
1.2 Intended use ............................................................8
1.3 Children’s safety......................................................9
1.4 Compliance with the WEEE Directive and
disposal of waste products ......................................10
1.5 Package information ............................................10
2 Your microwave oven 11
2.1 Overview ....................................................................11
2.1.1. Controls and parts .............................................11
2.1.2. Technical data .....................................................11
2.1.3 Installing the turntable ....................................12
3 Installation and connection 13
3.1 Installation and connection ...............................13
3.2 Built-in installation ................................................14
3.2.1 Furniture dimensions for built-in
installation .......................................................................14
3.2.2 Preparing the cabinet .......................................15
3.2.3 Fixing the oven....................................................16
3.3 Radio interference .................................................17
3.4 Microwave cooking principles ...........................17
3.5 Grounding instructions........................................17
3.6 Utensil test ...............................................................17
4 Operation 19
4.1 Control panel ............................................................19
4.2 Operating instructions ........................................19
4.2.1 Setting the time ..................................................19
4.2.2 Cooking with microwave oven ......................19
4.2.3 Microwave keypad instructions ...................20
4. 3 Cooking with grill or combination mode ......20
4.3.1 (Grill/Combination) Keypad instructions ..21
4.4 Quick start ................................................................21
4.5 Defrost by weight ..................................................21
4.6 Defrost by time .......................................................21
4.7 Kitchen timer (counter) .......................................21
4.8 Auto menu ................................................................22
4.8.1 Auto cooking menu ...........................................23
4.9 Multi-step cooking ................................................24
4.10 Query function .....................................................24
4.11 Child lock ..................................................................24
4.12 Opening the oven door .....................................24
5 Cleaning and maintenance 25
5.1 Cleaning ......................................................................25
5.2 Storage .......................................................................25
5.3 Handling and transportation ............................25
6 Troubleshooting 26

Microwave Oven / User Manual
4 / 371 EN
1
Important safety and envronmental
nstructons
Important Safety
Instructons Read
Carefully And Keep
For Future Reference
Ths secton contans safety ns-
tructons that wll help protect from
rsk of fre, electrc shock, exposure
to leak mcrowave energy, personal
njury or property damage. Falure
to follow these nstructons shall
vod any warranty.
1.1 General safety
• The microwave oven is intended
for heating food and beverages.
Drying of food or clothing and
heating of warming pads, slippers,
sponges, damp cloth and similar
may lead to risk of injury, ignition
or fire.
Ths applance s ntended to be
used n household and smlar app-
lcatons such as:
• Staff kitchen areas in shops, of-
fices and other working environ-
ments;
• Farm houses
• By clients in hotels, motels and
other residential type environ-
ments;
• Bed and Breakfast type environ-
ments.
• Do not attempt to start the oven
when its door is open; otherwise
you may be exposed to harmful
microwave energy. Safety locks
should not be disabled or tam-
pered with.
• Do not place any object between
the front side and the door of the
oven. Do not allow dirt or cleaning
agent remnants built-up on the
closure surfaces.
• Any service works involving re-
moval of the cover that provides
protection against exposure to
microwave energy must be per-
formed by authorized persons/
service. Any other approach is
dangerous.
• Your product is intended for
cooking, heating and defrost
food at home. It must not be
used for commercial purposes.
Manufacturer shall not be held li-
able for damages that have arisen
from misuse.
• Do not use this appliance out-
doors, bathrooms, humid environ-
ments or in places where the it
can get wet.

Microwave Oven / User Manual
5 / 371 EN
1
Important safety and envronmental
nstructons
• No responsibility or warranty claim
shall be assumed for damages
arising from misuse or improper
handling of the appliance.
• Never attempt to dismantle the
appliance. No warranty claims are
accepted for damage caused by
improper handling.
• Only use the original parts or parts
recommended by the manufac-
turer.
• Do not leave this appliance unat-
tended while it is in use.
• Always use the appliance on a
stable, flat, clean dry, and non-slip
surface.
• The appliance should not be oper-
ated with an external clock timer
or separate remote control sys-
tem.
• Before using the appliance for the
first time, clean all parts. Please
see the details given in the "Clean-
ing and Maintenance" section.
• Operate the appliance for its in-
tended purpose only as described
in this manual. Do not use abrasive
chemicals or steam on this appli-
ance. This oven is particularly in-
tended for heating and cooking
the food.
It is not intended for industrial or
laboratory use.
• Do not use your appliance to dry
clothes or kitchen towels.
• Appliance becomes very hot while
it is in use. Pay attention not to
touch the hot parts inside the
oven.
• Your oven is not designed to dry
any living being.
• Do not operate the oven empty.
• Only use utensils that are suitable
for use in microwave ovens.
• Cooking utensil may get hot due
to the heat transferred from the
heated food to the utensil. You
may need oven gloves to hold the
utensil.
• Utensils shall be checked to en-
sure that they are suitable for use
in microwave ovens.
• Do not place the oven on stoves or
other heat generating appliances.
Otherwise, it may be damaged
and the warranty becomes void.
• Microwave oven must not be
placed in a cabinet that is not in
compliance with the installation
instructions.

Microwave Oven / User Manual
6 / 371 EN
• Steam may come out while open-
ing the covers or the foil after
cooking the food.
• Use gloves while taking any kind
of heated food out.
• The appliance and its accessible
surfaces may be very hot when
the appliance is in use.
• Door and outer glass may be very
hot when the appliance is in use.
1.1.1 Electrcal safety
• If the supply cord is damaged, it
must be replaced by the manu-
facturer or its service agent or a
similarly qualified person in order
to avoid a hazard.
• Beko Microwave Ovens comply
with the applicable safety stan-
dards; therefore, in case of any
damage on the appliance or power
cable, it should be repaired or re-
placed by the dealer, service cen-
ter or a specialist and authorized
service alike to avoid any danger.
Faulty or unqualified repair work
may be dangerous and cause risk
to the user.
• Make sure that your mains power
supply complies with the informa-
tion supplied on the rating plate of
the appliance.
The only way to disconnect the
appliance from the power supply
is to remove the power plug from
the power outlet.
• Use the appliance with a grounded
outlet only.
• Never use the appliance if the
power cable or the appliance itself
is damaged.
• Do not use this appliance with an
extension cord.
• Never touch the appliance or its
plug with damp or wet hands.
• Place the appliance in a way so
that the plug is always accessible.
• Prevent damage to the power
cable by not squeezing, bending,
or rubbing it on sharp edges. Keep
the power cable away from hot
surfaces and naked flame.
• Make sure that there is no danger
that the power cable could be ac-
cidentally pulled or that someone
could trip over it when the appli-
ance is in use.
• Unplug the appliance before each
cleaning and when the appliance
is not in use.
1
Important safety and envronmental
nstructons

Microwave Oven / User Manual
7 / 371 EN
• Do not pull the power cable of the
appliance to disconnect it from its
power supply and never wrap its
power cable around the appliance.
• Do not immerse the appliance,
power cable, or power plug in
water or any other liquids. Do not
hold it under running water.
• When heating food in plastic or
paper containers, keep an eye on
the oven due to the possibility of
ignition.
• Remove the wire strings and/or
metal handles of paper or plastic
bags before placing bags suitable
for use in microwave oven to the
oven.
• If smoke is observed, switch off
or unplug the appliance and keep
the door closed in order to stifle
any flames.
• Do not use inside of the oven to
store something. Do not leave
paper items, cooking material or
food inside the oven when it is not
being used.
• The contents of feeding bottles
and baby food jars shall be stirred
or shaken and the temperature
shall be checked before consump-
tion, in order to avoid burns.
• This appliance is a Group 2 Class B
ISM equipment. Group 2 contains
all ISM (Industrial, Scientific and
Medical) equipment in which ra-
dio-frequency energy is intention-
ally generated and/or used in the
form of electromagnetic radiation
for the treatment of material, and
spark erosion equipment.
• Class B equipment is suitable for
use in domestic establishments
and establishments directly con-
nected to a low voltage power
supply network.
• Door or outer surface of the appli-
ance may become hot when it is in
use.
1.1.2 Product safety
• Heating the beverages with mi-
crowave may cause them to boil
by splashing around after they
have been taken out of the oven;
so be careful when you are hold-
ing the containers.
• Do not roast anything in the oven.
Hot oil may damage the compo-
nents and materials of the oven,
and it may even cause skin burns.
• Pierce food with thick crust such
as potatoes, zucchinis, apples and
chestnuts.
1
Important safety and envronmental
nstructons

Microwave Oven / User Manual
8 / 371 EN
• Appliance must be placed so that
the rear side is facing the wall.
• Before moving the appliance,
please secure the turntable to
prevent damage to it.
• Eggs in their shell and whole hard-
boiled eggs must not be heated in
microwave ovens since they may
explode, even after microwave
heating has ended.
• Never remove the parts at the rear
and sides of the appliance, which
protect the minimum distances
between the cabinet walls and
the appliance in order to allow for
the required air circulation.
1.2 Intended use
• The oven should be cleaned reg-
ularly and any food deposits re-
moved.
• Failure to maintain the oven in a
clean condition could lead to dete-
rioration of the surface that could
adversely affect the life of the
appliance and possibly result in a
hazardous situation.
• Cleaning the door seals and adja-
cent parts: Use hot soapy water.
Clean with a dish cloth, do not
scour. Do not use a metal or glass
scraper for cleaning.
•
WARNING:
If the door or door
seals are damaged, the oven must
not be operated until it has been
repaired by a competent person.
•
WARNING:
It is hazardous for
anyone other than a competent
person to carry out any service or
repair operation which involves
the removal of a cover which gives
protection against exposure to
microwave energy.
•
WARNING:
Liquids and other
foods must not be heated in
sealed containers since they are
liable to explode.
• Microwave oven is intended for
built-in use only.
• Do not use the appliance for any-
thing other than its intended use.
• Do not use the appliance as a heat
source.
• Microwave oven is intended to
thaw, cook and stew food only.
• Do not over-cook foods; other-
wise, you may cause a fire.
• Do not use steam assisted clean-
ers to clean the appliance.
1
Important safety and envronmental
nstructons

Microwave Oven / User Manual
9 / 371 EN
1.3 Chldren’s safety
• Extreme caution is advised when
being used near children and per-
sons who are restricted in their
physical, sensory or mental abili-
ties.
• This appliance can be used by the
children who are at the age of 8 or
over and by the people who have
limited physical, sensory or men-
tal capacity or who do not have
knowledge and experience, as
long as they are supervised with
regard to safe use of the product
or they are instructed accordingly
or understand the risks of using
the product. Children should not
play with the appliance. Cleaning
and user maintenance procedures
should not be performed by chil-
dren unless they are controlled by
their elders.
• Danger of choking! Keep all the
packaging materials away from
children.
• Only allow children to use the
oven without supervision when
adequate instructions have been
given so that the child is able to
use the microwave oven in a safe
way and understands the hazards
of improper use.
• Due to excessive heat that arises
in grill and combination modes,
children should only be allowed to
use these modes under supervi-
sion of an adult.
• Keep the product and its power
cable so that they are inaccessible
by children under 8 years old.
• The appliance and its accessible
surfaces may be very hot when
the appliance is in use. Keep chil-
dren away.
• The appliance is not intended for
use by persons (including children)
with reduced physical, sensory or
mental capabilities, or lack of ex-
perience and knowledge, unless
they have been given supervised
or instruction concerning use of
the appliance by a responsible
person for their safely.
• Young children should be super-
vised to ensure that they do not
play with the appliance.
•
WARNING:
Only allow children
to use the oven without supervi-
sion when adequate instructions
have been given so that the child
is able to use the oven in a safe
way and understands the hazards
of improper use.
1
Important safety and envronmental
nstructons
Microwave Oven / User Manual
10 / 371 EN
1
Important safety and envronmental
nstructons
1.4 Complance wth the WEEE
Drectve and dsposal of
waste products
Ths product does not nclude harmful
and prohbted materals specfed n
the “Regulaton for Supervson of the
Waste Electrc and Electronc
Applances” ssued by the Mnstry of
Envronment and Urban Plannng. Comples wth
the WEEE Drectve. Ths product has been manu-
factured wth hgh qualty parts and materals
whch can be reused and are sutable for recy-
clng.
Therefore, do not dspose the product wth nor-
mal domestc waste at the end of ts servce lfe.
Take t to a collecton pont for the recyclng of
electrcal and electronc equpment. Ask the local
authorty n your area for these collecton ponts.
Help protect the envronment and natural resour-
ces by recyclng used products.
1.5 Package nformaton
Package of the product s made of
recyclable materals n accordance
wth our Natonal Legslaton. Do not
dspose of the packagng materals to-
gether wth the domestc or other wastes. Take
them to the packagng materal collecton ponts
desgnated by the local authortes.
Microwave Oven / User Manual
11 / 371 EN
Markngs on the product or the values stated n other documents suppled wth the product are values obtaned under laboratory
condtons as per relevant standards. These values may vary accordng to the usage of the applance and ambent condtons.
Power values are tested at 230V.
2 Your mcrowave oven
2.1 Overvew
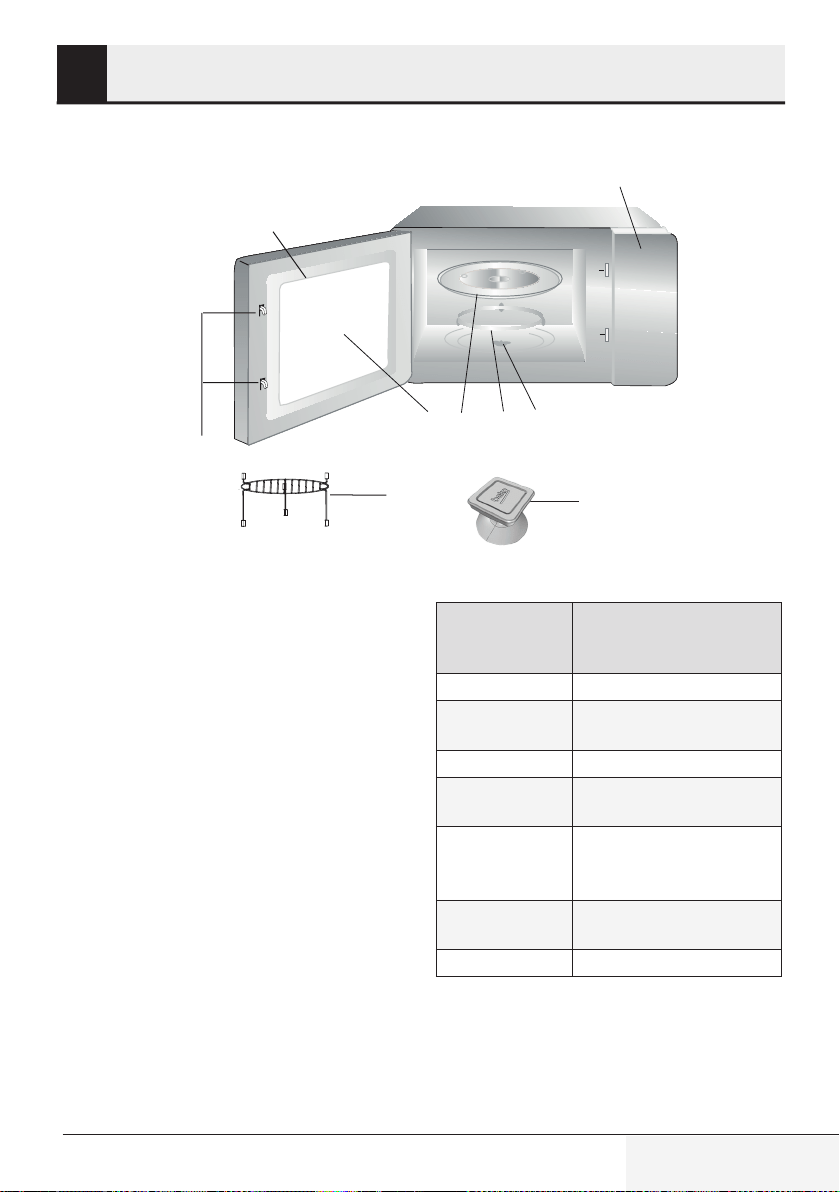
2.1.1. Controls and parts
1. Control panel
2. Turntable shaft
3. Turntable support
4. Glass tray
5. Oven wndow
6. Door group
7. Door safety nterlock system
8. Grll rack (only to be used n grll functon and
placed on the glass tray)
9. Vacuum lfter for manual door openng (appl-
es for model MGB 25333 BG.)
2.1.2. Techncal data
Power con-
sumption
230 V~50 Hz,
1450 W (Mcrowave)
1000 W (Grll)
Output
900 W
Operating
frequency
2450 MHz
Ampere value
6.4 A
External
dimensions
388 mm (H) / 595 mm (W) /
400 mm (D)
Internal
dimensions of
the oven
206 mm (H) / 328 mm
(G) / 368 mm (D)
Oven
Capacity
25 ltres
Net weight
18.5 kg
6
7
1
235 4
8
9

Microwave Oven / User Manual
12 / 371 EN
2.1.3 Installng the turntable
Göbek (alt kısım)
Cam tabla
Döner tabla desteği
Döner tabla mili
• Never place the glass tray upsde down. The
glass tray should never be restrcted.
• Both glass tray and turntable support must al-
ways be used durng cookng.
• All food and contaners of food must always
place on the glass tray for cookng.
• If glass tray or turntable support crack or break,
contact your nearest authorzed servce center.
2 Your mcrowave oven
Hub (underside)
Glass tray
Turntable shaft
Turntable support
Microwave Oven / User Manual
13 / 371 EN
3 Installation and connection
3.1 Installaton and
connecton
• Remove all packng materal and accessores.
Examne the oven for any damage such as dents
or broken door. Do not nstall f oven s damaged.
• Remove any protectve flm found on the mcro-
wave oven cabnet surface.
• Do not remove the lght brown Mca cover that
s attached to the oven cavty to protect the
magnetron.
• Ths applance has been desgned for domestc
use only.
• Ths oven s ntended for bult-n use only. It s
not ntended for counter-top use or for use n-
sde a cabnet.
• Please observe the specal nstallaton nstruc-
tons.
• The applance can be nstalled n a 60cm wde
wall-mounted cabnet (at least 55 cm deep and
85 cm off the floor).
• The applance s ftted wth a plug and must only
be connected to a properly nstalled grounded
socket.
• The mans voltage must correspond to the vol-
tage specfed on the ratng plate.
• If the plug s no longer accessble after nstal-
laton, an all-pole solatng swtch must be pre-
sent on the nstallaton sde wth a contact gap
of at least 3 mm.
• Adapters, mult-way sockets and extenson
cords must not be used. Overloadng can result
wth a rsk of fre.
The accessble surface may be hot
durng operaton.
C
Do not trap or bend the power cable.
Microwave Oven / User Manual
14 / 371 EN
3.2 Bult-n nstallaton
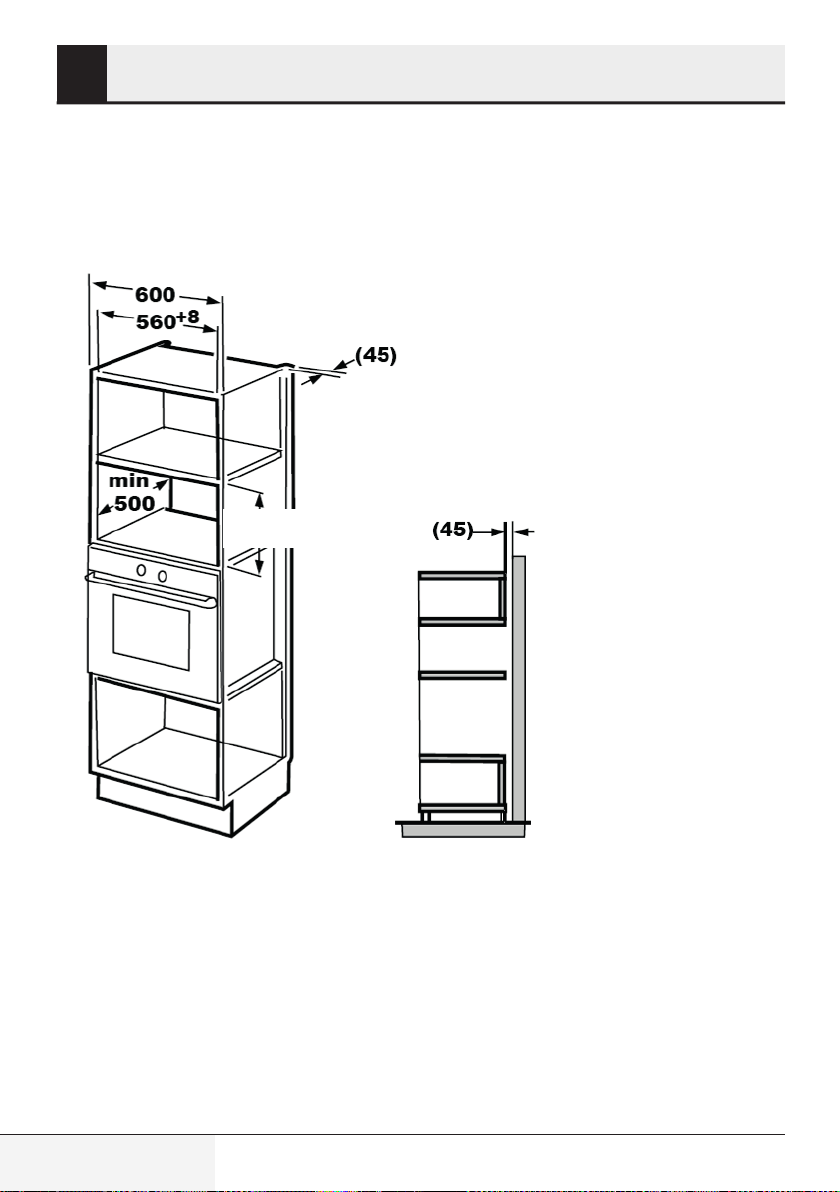
3.2.1 Furnture dmensons for bult-n nstallaton
The Mcrowave oven frame should stand out of the cabnet
380+2
3 Installaton and connecton
Microwave Oven / User Manual
15 / 371 EN
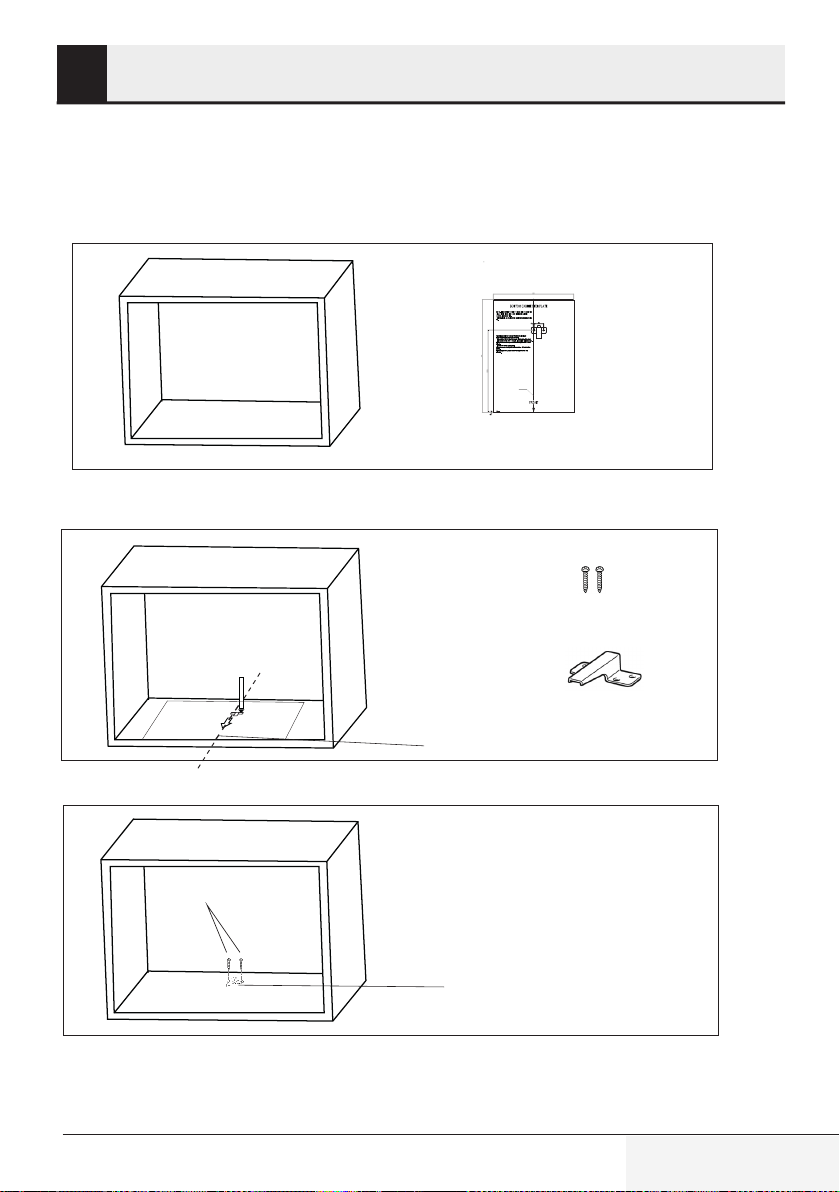
3.2.2 Preparng the cabnet
1. Read the nstructon on the bottom cabnet template and put the template on the bottom plane of
cabnet.
a
a
CENTER LINE
FRONT EDGE
LEFT EDGE
T EDGE RIGH
2. Make the marks on the bottom plane of cabnet accordng to marks "a" of the template.
a
a
Vida A
Braket
Merkez çizgi
Screw A
Centre line
Bracket
3. Remove the bottom cabnet template and fx the bracket wth screw A.
Braket
Vida A
Screw A
Bracket
3 Installaton and connecton
Microwave Oven / User Manual
16 / 371 EN
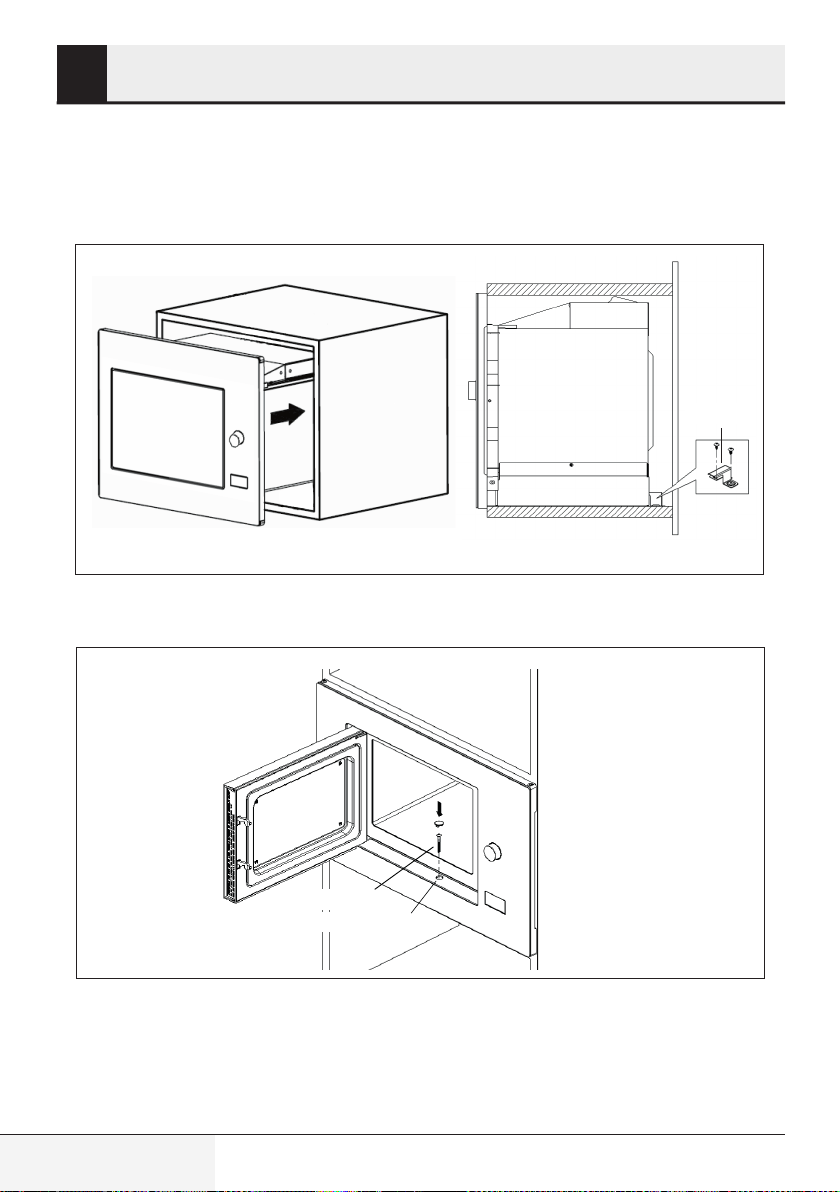
3.2.3 Fxng the oven
1. Install the oven nto the cabnet.
- Make sure the back of the oven s locked by bracket.
- Do not trap or bend the power cable.
braket
bracket
2. Open the door, fx the oven to the cabnet wth Screw B through the nstallaton hole. Then fx the
trm-kt plastc cover to the nstallaton hole.
Montaj deliği
Vida B
Screw B
Installation hole
3 Installaton and connecton

Microwave Oven / User Manual
17 / 371 EN
3.3 Rado nterference
C
Operaton of the mcrowave oven
may cause nterference on rados,
TVs and smlar applances.
• Place the oven as far away from rados and
TVs as possble. Operaton of mcrowave oven
may cause nterference to your rado or TV
recepton. 2. Plug your oven nto a standard
household outlet. Be sure the voltage and the
frequency s the same as the voltage and the
frequency on the ratng plate.
• In case of nterference, t may be reduced or el-
mnated by takng the precautons gven below:
• Clean the door and sealng surface of the oven.
• Set the antenna drecton of the rado or TV
agan.
• Reposton the oven based on the locaton of
the recever.
• Place mcrowave oven away from the recever.
• Plug the mcrowave oven to another outlet,
thus mcrowave oven and recever shall be on
dfferent lnes.
3.4 Mcrowave cookng
prncples
• Prepare the food carefully. Place the remanng
parts to the outsde of the dsh.
• Pay attenton to the cookng tme. Cook n the
shortest tme specfed and add some more tme
f requred. Overcooked food may cause smoke
or may be burnt.
• Cover the food whle cookng. Coverng the food
prevents any splashng and helps to ensure that
food s cooked evenly.
• Turn over food such as poultry and hambur-
gers whle cookng them n a mcrowave oven n
order to accelerate cookng of ths knd of food.
Larger food such as roast must be turned over
at least once.
• Turn food such as meatballs upsde down n the
mddle of the cookng and replace them wth
each other from the center of the dsh to the
outsde.
3.5 Groundng nstructons
Ths applance must be grounded. Ths oven has a
groundng cable wth a grounded plug. Applance
must be plugged to a wall outlet nstalled and gro-
unded correctly. Groundng system allows a leak
wre for the electrcal current n case of a short
crcut and reduces the rsk of electrc shock. We
recommend usng an electrcal crcut dedcated
to the oven. Operatng wth hgh voltage s dan-
gerous and may cause fre or other accdents that
would cause damage to the oven.
A
WARNING:
Msuse of groundng
plug may cause electrc shock.
C
If you have any questons on gro-
undng and electrcal nstructons,
please consult a qualfed electrc
techncan or servce personnel.
C
Manufacturer and/or dealer would
not accept any responsblty for n-
jures or damages on the oven that
may occur when electrcal connec-
ton procedures are not followed.
3.6 Utensl test
Never operate the mcrowave oven empty. The
only excepton s the utensl test descrbed n the
followng secton. Some certan non-metal uten-
sls may not be sutable for usng n mcrowave. If
you are not sure whether your utensl s sutab-
le for mcrowave, you can perform the followng
test.
3 Installaton and connecton
Microwave Oven / User Manual
18 / 371 EN
1. Place the empty utensl to be tested nto the
mcrowave oven together wth a mcrowave-
compatble glass flled wth 250 ml water.
2. Operate the mcrowave oven at max power for
1 mnute.
3. Check carefully the temperature of the utensl
beng tested. If t s warmed up, t s not sutable
for use n mcrowave.
4. Never exceed the operatng tme lmt of 1 m-
nute. If you notce arcng durng 1 mnute of
operaton, stop the mcrowave. Utensls cau-
sng arcng are not sutable for use n mcrowa-
ve.
Followng lst s a general gude that would help
you n selectng the rght utensl.
Cooking utensil Microwave Grill Combination
Heat-resistant glass Yes Yes Yes
Non-heat-resistant glass No No No
Heat-resistant ceramics Yes Yes Yes
Plastic dish suitable for microwave oven Yes No No
Paper kitchenware Yes No No
Metal tray No Yes No
Metal rack No Yes No
Aluminum foil and foil covers No Yes No
Foam materials No No No
3 Installaton and connecton
Microwave Oven / User Manual
19 / 371 EN
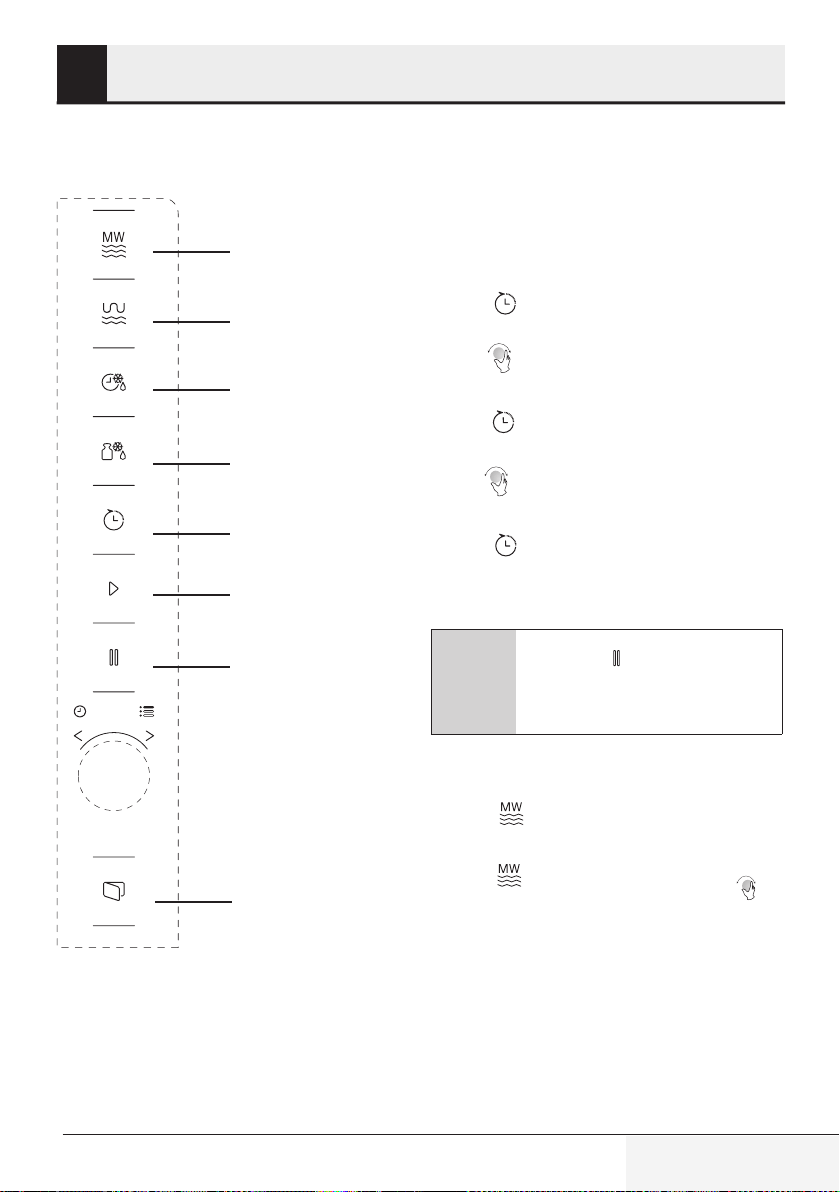
4.2 Operatng nstructons
4.2.1 Settng the tme
When the mcrowave oven s energzed, "0:00”
wll be dsplayed n LED screen and buzzer wll rng
once.
1. Press (Kitchen Timer/Clock) twice and the
figures for hours will start flashing.
2. Turn to adjust the hour; the input value
should be between 0 and 23.
3. Press (Kitchen Timer/Clock) and the figures
for minutes will start flashing.
4. Turn to adjust the minutes; the input value
should be between 0 and 59.
5. Press (Kitchen Timer/Clock) to finish time
setting. ":" symbol will flash, and the time will
light.
C
If you press (Stop/Cancel) durng
tme settng, oven wll automatcally
return back to prevous mode.
4.2.2 Cookng wth mcrowave
oven
1. Press (Microwave) and “P100” will be
displayed in LED screen.
2. Press (Microwave) again or turn to
select the desired power. Each time you press
the key, “P100”, “P80”, ”P50”, “P30” or “P10” will
be displayed respectively.
Mcrowave
Grll/Combnaton
Defrost
by tme
Defrost
by weght
Ktchen Tmer/Clock
Start/+30 sec./Confrm
Stop/Cancel
Door Open Key
4 Operation
4.1 Control panel
Microwave Oven / User Manual
20 / 371 EN
3. Press (Start/+30 Sec./Confirm) to confirm
and turn to set the cooking time to a value
between 0:05 and 95:00.
4. Press (Start/+30 Sec./Confirm) again to
start cooking.
5. Press (Microwave) once and “P100” will be
displayed in the screen.
6. Press (Microwave) once again or turn to
set 80% microwave power.
7. Press (Start/+30Sec./Confirm) to confirm
and "P 80” will be displayed in the screen.
8. Turn to adjust the cooking time until the
oven displays "20:00".
9. Press (Start/+30 Sec./Confirm) to start
cooking.
The steps for adjustng the tme n codng button
are as below:
Setting the
duration
Increment
amount
0-1 minute 5 seconds
1-5 minutes 10 seconds
5-10 minutes 30 seconds
10-30 minutes 1 minute
30-95 minutes 5 minutes
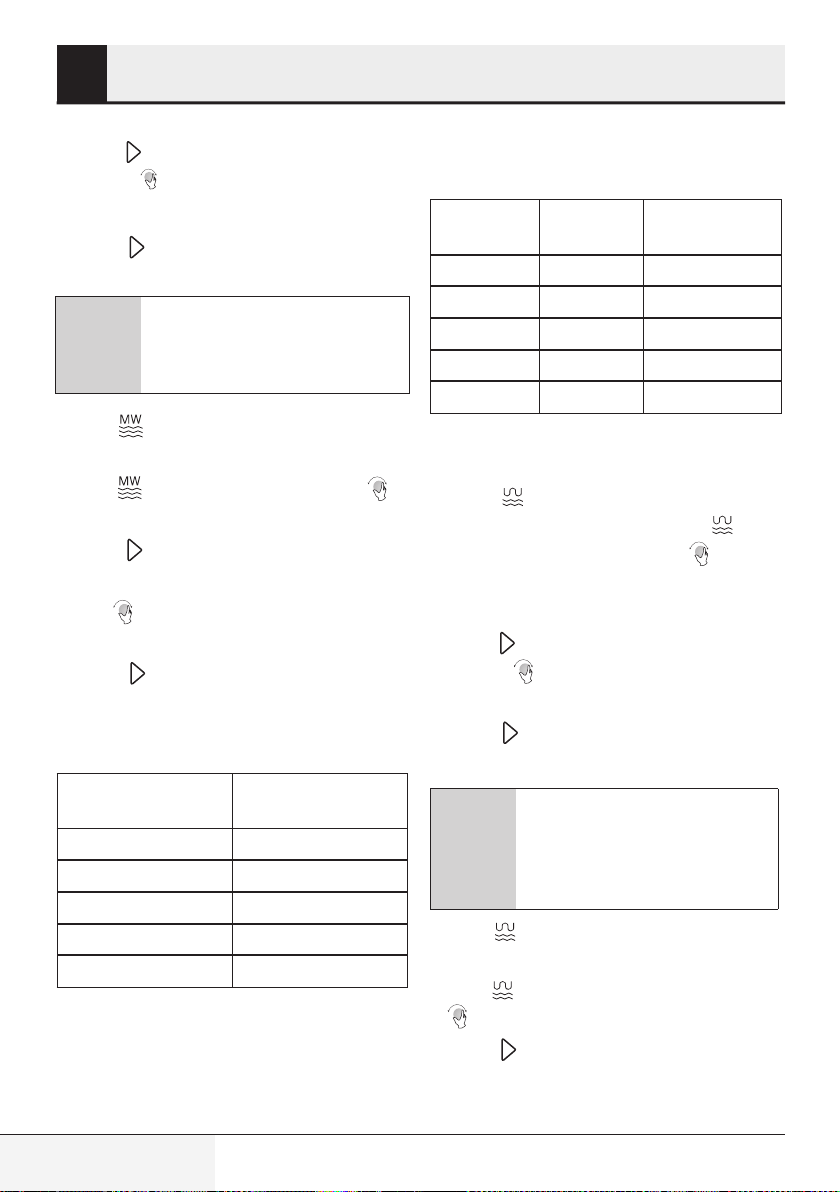
4.2.3 Mcrowave keypad
nstructons
Order Screen Microwave
Power
1 P100 100%
2 P80 80%
3 P50 50%
4 P30 30%
5 P10 10%
4. 3 Cookng wth grll or
combnaton mode
1. Press (Grill/Combination) and "G” will
be displayed in LED screen. Press (Grill/
Combination) repeatedly or turn to select
the desired power. Each time you press the key,
“G”, ”C-1” or “C-2” will be displayed respectively.
2. Press (Start/+30 Sec./Confirm) to confirm
and turn to set the cooking time to a value
between 0:05 and 95:00.
3. Press (Start/+30 Sec./Confirm) again to
start cooking.
C
Example:
If you want to use
55% mcrowave power and 45%
grll power (C-1) to cook for 10 m-
nutes, you can operate the oven
wth the followng steps.
1. Press (Grll/Combnaton) once and "G” wll
be dsplayed n the screen.
2. Press (Grill/Combination) once again or turn
to select the Combination 1 mode.
3. Press (Start/+30Sec./Confirm) to confirm
and “C-1” will be displayed in the screen.
C
Example:
If you want to use 80%
mcrowave power to cook for 20 m-
nutes, you can operate the oven
wth the followng steps.
4 Operaton
Microwave Oven / User Manual
21 / 371 EN
4. Turn to adjust the cooking time until the
oven displays "10:00".
5. Press (Start/+30 Sec./Confirm) to start
cooking.
4.3.1 (Grll/Combnaton) Keypad
nstructons
Order Screen Micro-
wave
Power
Grill
Power
1 G 0% 100%
2 C-1 55% 45%
3 C-2 36% 64%
C
When half the grll tme passes,
the oven sounds twce, and ths s
normal. In order to have a better
grllng effect, you should turn the
food over, close the door, and then
press (Start/+30Sec./Confrm) to
contnue cookng. If no operaton s
performed, the oven wll contnue
cookng.
4.4 Quck start
1. In standby mode, press (Start/+30Sec./
Confirm) to start cooking with 100% microwave
power. Each time you press the key, cooking
time will increase until 95 minutes with steps of
30 seconds.
2. In microwave oven cooking, grill and combina-
tion cooking or defrost by time modes, the
cooking time will increase by 30 seconds each
time you press (Start/+30 Sec/Confirm).
3. In standby mode, turn counterclockwise to
set the cooking time in order to start cooking
with 100% microwave power and press
(Start/+30Sec./Confirm) to start cooking.
C
In auto menu and defrost by
weght modes, pressng
(Start/+30Sec/Confrm) wll not
ncrease the cookng tme.
4.5 Defrost by weght
1. Press (Defrost by weight) for once.
2. Turn to select the weight of food from 100
to 2000 g.
3. Press (Start/+30 Sec./Confirm) to start
defrost.
4.6 Defrost by tme
1. Press (Defrost by time) for once.
2. Turn to select the defrost time. The
maximum time is 95 minutes.
3. Press (Start/+30 Sec./Confirm) to start
defrost. Defrost power is P30 and cannot be
changed.
4.7 Ktchen tmer (counter)
Your oven s equpped wth an automatc counter
whch s not lnked wth the oven functons and
can be used separately at the ktchen ( t can be
set to max. 95 mnutes.)
1. Press (Kitchen Timer/Clock) for once and
00:00 will be displayed in LED screen.
2. Turn to enter the correct time.
3. Press (Start/+30Sec./Confirm) to confirm
the setting.
4 Operaton
Microwave Oven / User Manual
22 / 371 EN
4. When the countdown from the entered time
reaches to 00:00, the buzzer will ring for 5
times. If the time is set (24-hour system),
current time will be displayed in LED screen.
Press (Stop/Cancel) to abort the tmer at any-
tme.
C
Ktchen tmer functons dfferent
than 24-hours system. Ktchen
tmer s just a tmer.
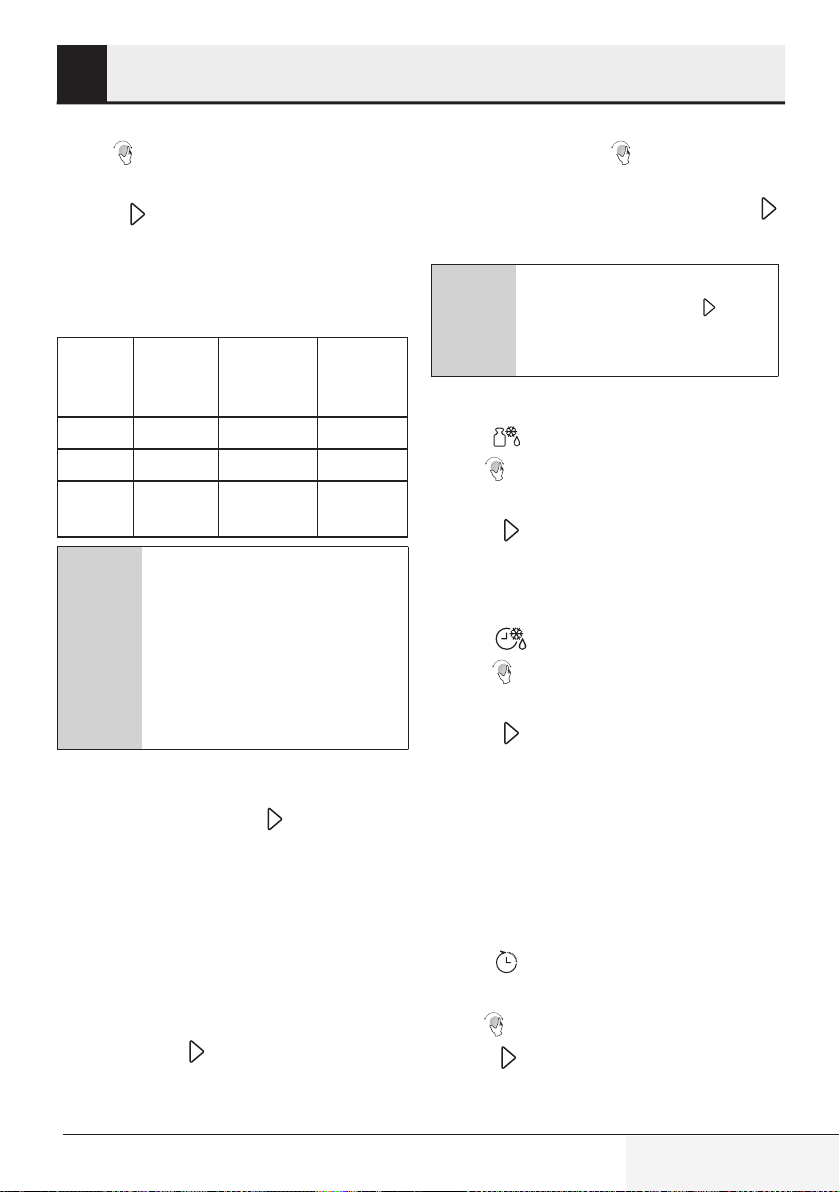
4.8 Auto menu
1. Turn clockwise to select the desired menu.
Menus between “A-1” and “A-8”, namely pizza,
meat, vegetable, pasta, potato, fish, beverage
and popcorn, will be displayed.
2. Press (Start/+30Sec./Confirm) to confirm.
3. Turn to choose the default weight in
accordance with the menu chart.
4. Press (Start/+30 Sec./Confirm) to start
cooking.
C
Example:
If you want to use
“Auto Menu" to cook 350 g fsh:
1. Turn clockwise until "A-6" is displayed in the
screen.
2. Press (Start/+30Sec./Confirm) to confirm.
3. Turn to select the weight of fish until "350"
is displayed in the screen.
4. Press (Start/+30 Sec./Confirm) to start
cooking.
4 Operaton
Microwave Oven / User Manual
23 / 371 EN
4.8.1 Auto cookng menu
Menu Weight Screen
A-1
Pizza
200 g 200
400 g 400
A-2
Meat
250 g 250
350 g 350
450 g 450
A-3
Vegetable
200 g 200
300 g 300
400 g 400
A-4
Pasta
50 g (with 450 ml cold water) 50
100 g (with 800 ml cold water) 100
A-5
Potato
200 g 200
400 g 400
600 g 600
A-6
Fish
250 g 250
350 g 350
450 g 450
A-7
Beverage
1 glass (120 ml) 1
2 glasses (240 ml) 2
3 glasses (360 ml) 3
A-8
Popcorn
50 g 50
100 g 100
4 Operaton
Microwave Oven / User Manual
24 / 371 EN
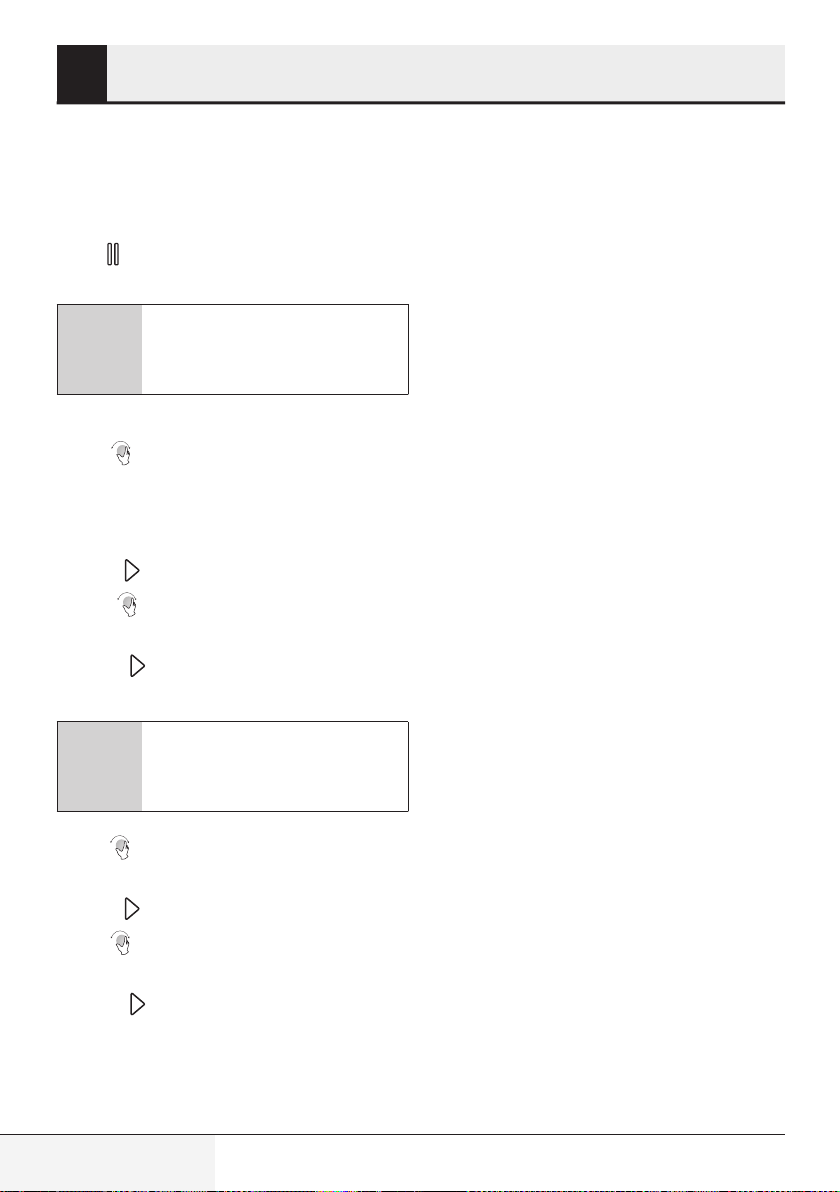
4.9 Mult-step cookng
At most 2 steps can be set for cookng. In mult-
step cookng, f one step s defrostng, then def-
rostng must be placed n the frst step.
C
If you want to thaw food for 5 m-
nutes and then cook wth 80%
mcrowave power for 7 mnutes,
perform the followng steps:
1. Press (Defrost by time) for once.
2. Turn to select the defrost time until "5:00" is
displayed in the screen.
3. Press (Microwave) once and “P100” will be
displayed in the screen.
4. Press (Microwave) once again or turn to
set 80% microwave power.
5. Press (Start/+30Sec./Confirm) to confirm
and "P 80” will be displayed in the screen.
6. Turn to adjust the cooking time until the
oven displays "7:00".
7. Press (Start/+30Sec./Confirm) to start
cooking. Buzzer will sound once for the first
step and defrost time countdown will start.
Buzzer will sound once again when entering
the second cooking step. Buzzer will sound for
5 times at the end of cooking.
4.10 Query functon
1. In microwave, grill and combination modes, press
(Microwave) or (Grill/Combination) and
the current power level will be displayed for 3
seconds. After 3 seconds, the oven will return
to the previous mode.
2. While cooking, press (Kitchen Timer/Clock)
and the current time will be displayed for 3
seconds.
4.11 Chld lock
1.
Locking:
In standby mode, press (Stop/
Cancel) for 3 seconds and a buzzer will sound
indicating that the child lock is activated. If the
time is already set, current time will also be
displayed; otherwise will be displayed in the
LED screen.
2.
Unlocking:
To disable the child lock, press
(Stop/Cancel) for 3 seconds and a long
”beep” will sound indicating that the child lock
is disabled.
4.12 Openng the oven door
Press (Open door) and the oven door wll be
opened.
C
If the door cannot be opened
wth “open door” key n model
MGB 25333 BG (e.g., due to power
falure), you can open the door wth
vacuum lfter for openng the door
manually.
4 Operaton

Microwave Oven / User Manual
25 / 371 EN
5.1 Cleanng
A
WARNING:
Never use gaso-
lne, solvent, abrasve cleanng
agents, metal objects or hard
brushes to clean the applance.
A
WARNING:
Never mmerse
the applance or ts power cable
n water or n any other lqud.
1. Turn the applance off and dsconnect t from
wall socket.
2. Wat for the applance to completely cool down.
3. Keep the nsde of the oven clean. Wpe wth a
damp cloth when splashed food or splled lqu-
ds stck on the walls of the oven. A mld deter-
gent may be used f the oven gets very drty.
Avod usng sprays and other harsh cleanng
agents as they may cause stans, marks, and
opaqueness on the door surface.
4. Outer surfaces of the oven must be cleaned
wth a damp cloth. Do not allow water ngress
from ventlaton openngs to prevent damage
to the operatng parts n the oven.
5. Wpe both sdes of the door and the glass, door
gaskets and parts near the gaskets frequently
wth a damp cloth n order to remove the overf-
lowng and splashng stans. Do not use abras-
ve cleanng agents.
6. Do not allow control panel to get wet. Clean
wth a soft damp cloth. Leave the door of the
oven open to prevent nadvertent operaton
whle cleanng the control panel.
7. If steam accumulates nsde or around the oven
door, wpe wth a soft cloth. Ths may occur
when the mcrowave oven s operated under
hgh humdty condtons. It s normal.
8. In some cases, you may need to remove the
glass tray for cleanng. Wash the tray n warm
soapy water or n a dshwasher.
9. The roller rng and oven floor should be cleaned
regularly to avod excessve nose.
5 Cleanng and mantenance
It would be sufficient to wipe the lower
surface of the oven with a mild detergent.
Roller ring may be washed in warm soapy
water or in a dishwasher. When you remove
the roller ring from oven internal floor for
cleaning, ensure that you install it in the
correct position while replacing it.
10. In order to remove bad odors in your oven, put
a glass of water and juice and peel of a lemon
to a deep bowl suitable for use in microwave
and operate the oven for 5 minutes in
microwave mode. Wipe thoroughly and dry
with a soft cloth.
11. Please contact the authorized service when
the oven lamp needs to be replaced.
12. The oven should be cleaned regularly and
any food deposits should be removed. If the
oven is not kept clean, this may cause surface
defects that would affect the lifecycle of the
appliance negatively and that would possibly
cause risks.
13. Please do not dispose this appliance with
household waste; old ovens shall be disposed
to special waste centers provided by the
municipalities.
14. When the microwave oven is used in grill
function, a small amount of smoke and odor
may occur which will disappear after a certain
time of usage.
5.2 Storage
• If you do not ntend to use the applance for a
long tme, please store t carefully.
• Please make sure that the applance s unplug-
ged, cooled down and totally dry.
• Store the applance n a cool and dry place.
• Keep the applance out of the reach of chldren
5.3 Handlng and transportaton
• Durng handlng and transportaton, carry the
applance n ts orgnal packagng. The packa-
gng of the applance protects t aganst phys-
cal damages.