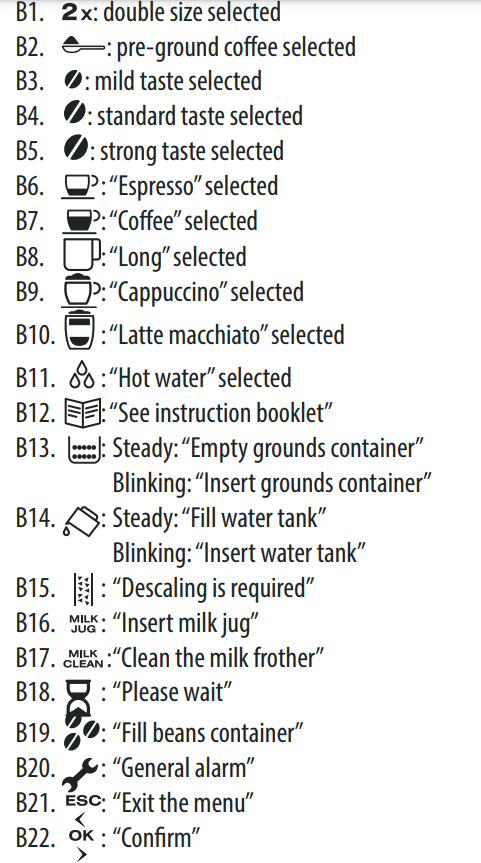
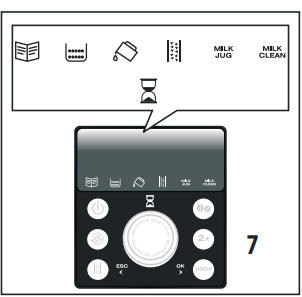
(for the meaning of the pilot lights, refer to “Explanation of lights”
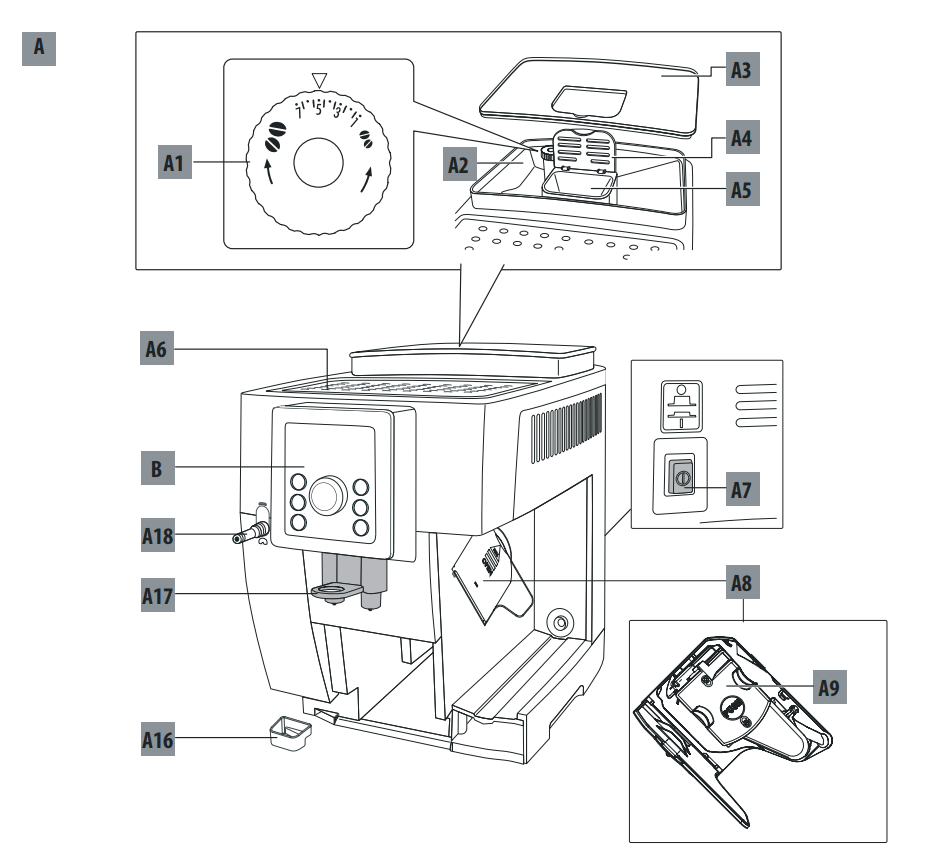
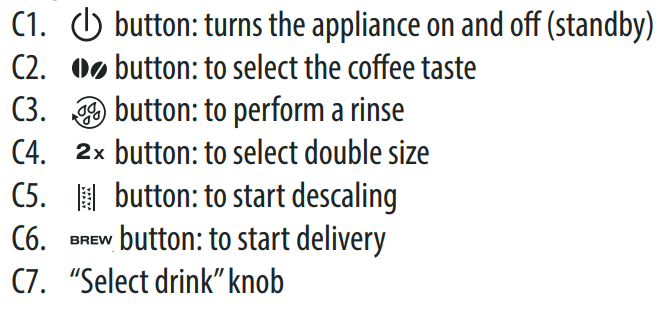
Description of the control panel
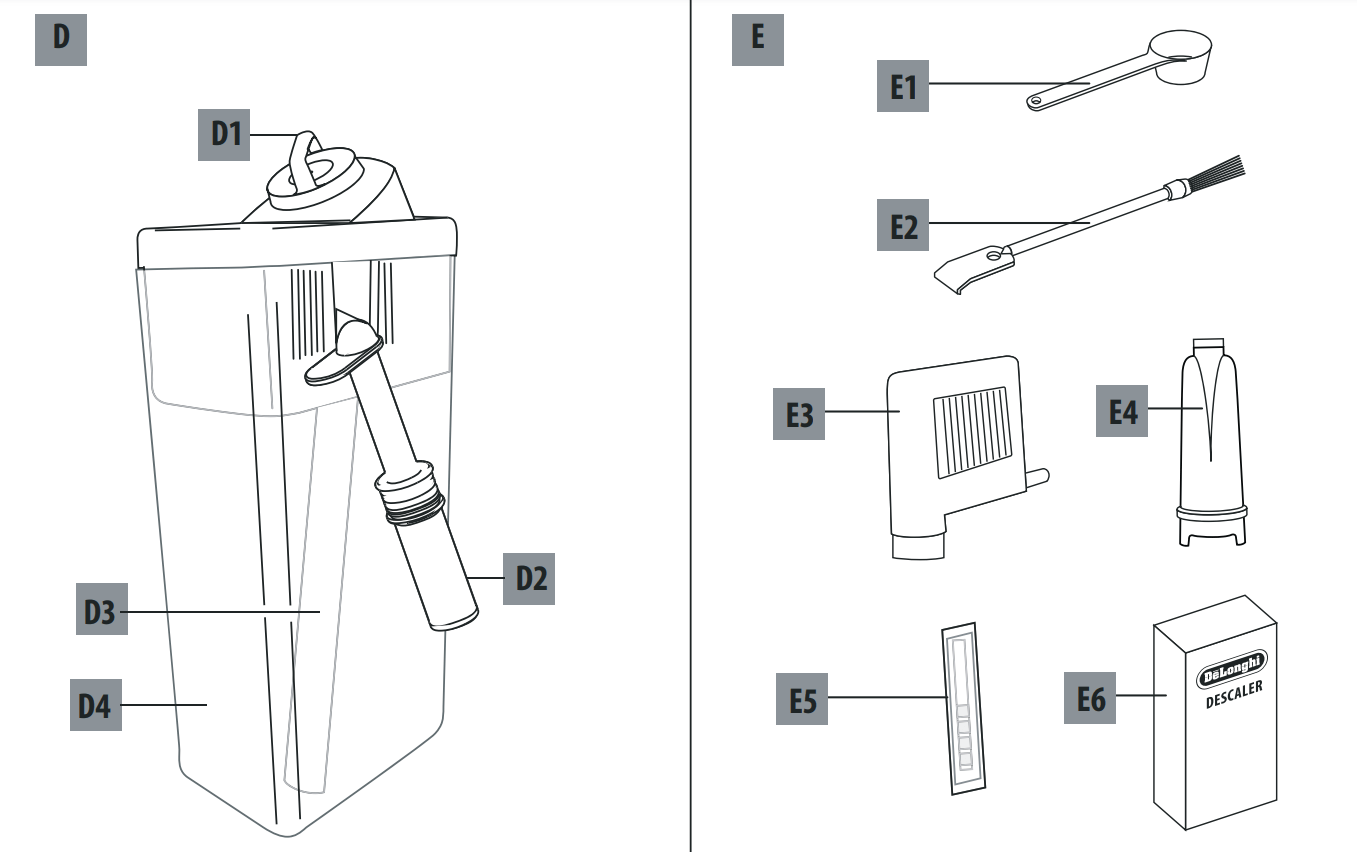
Description of the milk jug
D1. Froth and CLEAN dial
D2. Frothed milk spout (adjustable)
D3. Milk intake tube
D4. Milk container
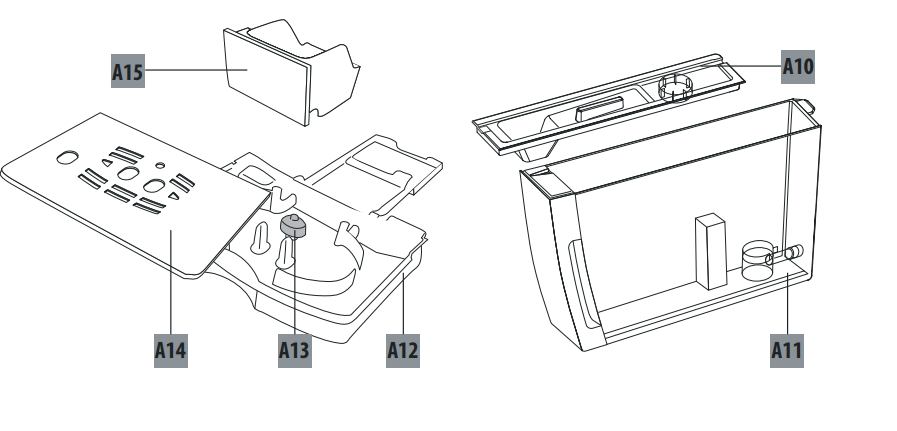
Description of the accessories
E1. Pre-ground coffee measure
E2. Cleaning brush
E3. Hot water spout
E4. Water softener filter (*certain models only)
E5. “Total Hardness Test” indicator paper
E6. Descaler
PRELIMINARY CHECKS
Checking the appliance
After removing the packaging, make sure the product is complete and undamaged and that all accessories are present. Do not use the appliance if it is visibly damaged. Contact De’Longhi Customer Experience.
Installing the appliance
Important! When installing the appliance, respect the following safety warnings:
The appliance gives off heat. After positioning the appliance on the worktop, leave a space of at least 1.18 in / 3 cm between the surfaces of the appliance and the side and rear walls and at least 5.9 in/ 15 cm above the coffee maker.
Water penetrating the coffee maker could cause damage. Do not place the appliance near taps or sinks.
The appliance could be damaged if the water it contains freezes. Do not install the appliance in a room where the temperature could drop below freezing point.
Arrange the power cable in such a way that it cannot be damaged by sharp edges or contact with hot surfaces (e.g. electric hot plates).
Connecting the appliance
Important! Check that the mains power supply voltage corresponds to the value indicated on the rating plate on the bottom of the appliance.
If the power socket does not match the plug on the appliance, have the socket replaced with a suitable type by a qualified professional.
Using the appliance for the first time
Please note!
Coffee has been used to factory test the appliance and it is therefore completely normal for there to be traces of coffee in the mill. The machine is, however, guaranteed to be new.
You should customise water hardness as soon as possible following the instructions in the section “Setting water hardness” (page 10).
ollow the instructions:
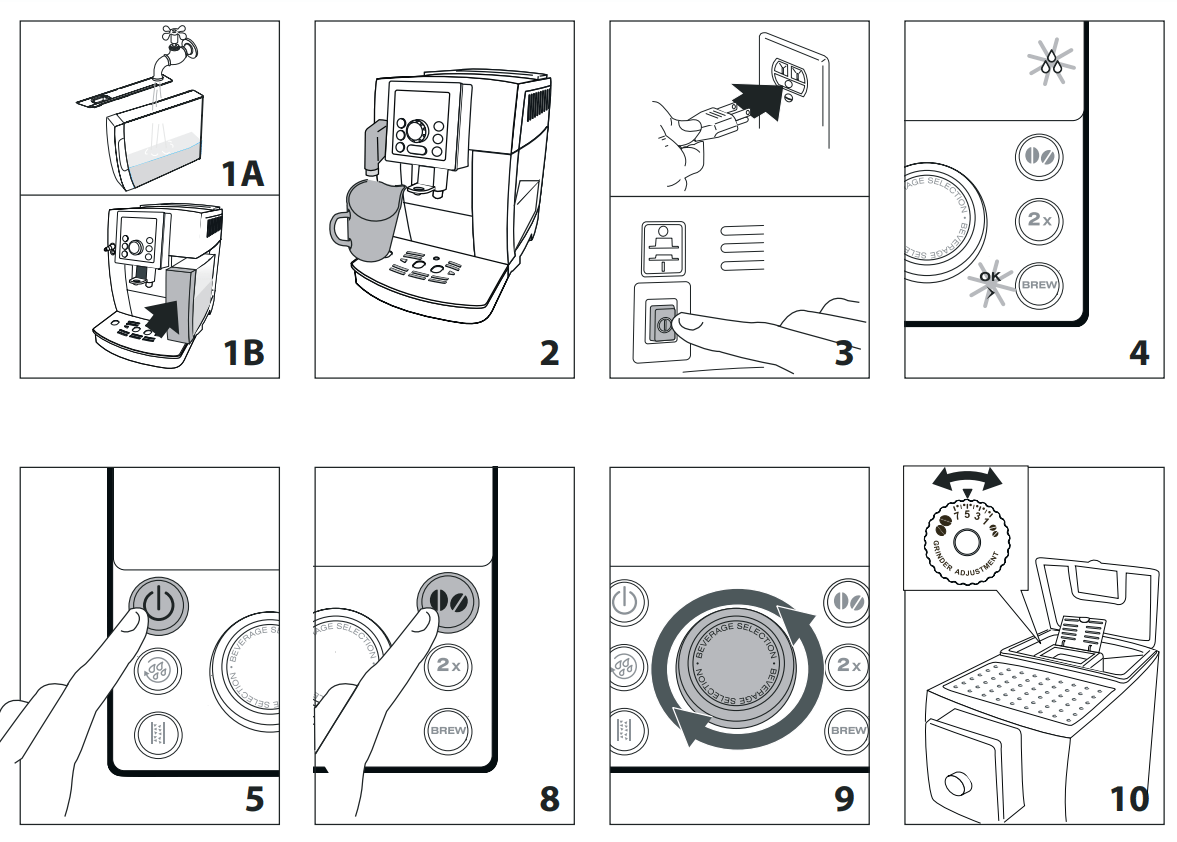
Remove the water tank, fill to the MAX line with fresh water (fig. 1A) then put back in the appliance (fig. 1B).
Check that the hot water spout is inserted on the nozzle and place a container (fig. 2) with a minimum capacity of 100 ml underneath.
Plug the appliance into the mains socket and press the main switch (fig. 3).
The and the lights turn on (fig. 4).
Press the button: the appliance delivers water from the hot water spout then goes off.
The appliance automatically switches off. The coffee maker is now ready for normal use.
Please note!
When using the appliance for the first time, you need to make 4-5 cups of coffee or 4-5 cappuccinos before the appliance starts to give satisfactory results.
To enjoy your coffee even more and improve the performance of your appliance, we recommend installing a water softener filter as described in the section “ WATER SOFTENER FILTER “ (page 15). If your model is not provided with a filter, you can request one from De’Longhi Customer Services.
TURNING THE APPLIANCE ON
Please note!
Before turning the appliance on, make sure the main switch is pressed (fig. 3).
Each time the appliance is turned on, it performs an automatic preheat and rinse cycle which cannot be interrupted. The appliance is ready for use only after completion of this cycle.
Danger of burns! During rinsing, a little hot water comes out of the coffee spouts and is collected in the drip tray underneath. Avoid contact with splashes of water.
To turn the appliance on, press the button (fig. 5). flashes to indicated that the appliance is heating up and performing an automatic rinse cycle (by circulating hot water, the appliance heats both the boiler and the internal circuits).
The appliance is at temperature when the light goes off and the lights corresponding to the coffee taste and beverages come on.
TURNING THE APPLIANCE OFF
Whenever the coffee machine is turned off after being used to make coffee, it performs an automatic rinse cycle.
Danger of burns! During rinsing, a little hot water flows from the coffee spouts. Avoid contact with splashes of water. To turn the appliance off (standby), press the button (fig. 5). The appliance performs a rinse cycle, then goes off.
Please note! If the appliance is not used for an extended period, switch off the machine at the main switch.
first turn the appliance off by pressing the button (fig. 5);
release the main switch at the side of the appliance (fig. 3).
Important! Never press the main switch while the appliance is on.
SETTING WATER HARDNESS
The (descaling) light turns on after a period of time according to water hardness.
The machine is factory set for a hardness value of 4.
The machine can also be programmed according to the hardness of the mains water in the various regions so that the machine needs to be descaled less often.
Measuring water hardness
Remove the “total hardness test” indicator paper attached to this manual from its pack.
Immerse the paper completely in a glass of water for one second.
Remove the paper from the water and shake lightly. After about a minute, 1, 2, 3, or 4 red squares form, depending on the hardness of the water. each square corresponds to one level.
Setting water hardness
With the machine on, keep pressed the button for about six seconds until lights on: and flash.
Turn the knob until the required level is selected:
Press the button to confirm: the light turns on to indicate that the appliance is saving the new setting. (If you want to abort the new setting, press the button, corresponding to ).
The machine is now reprogrammed with the new water hardness setting
Default values (reset)
This resets the water hardness level back to the default values. To reset the default values, proceed as follows:
With the machine on, keep pressed the button for about six second.
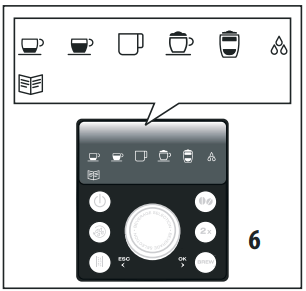
Press again button until the lights shown in fig. 6 come on: and flash.
Press the button to confirm: the lights shown in fig. 7 flash to indicate that the appliance is resetting the default values. (If you want to abort the operation, press the button, corresponding to ).
MAKING COFFEE
Selecting the coffee taste
The appliance is set by default to make coffee with a standard taste.
You can also choose one of these tastes:
To change the taste, press the button (fig. 8) repeatedly until the required taste is displayed.
Selecting the coffee
To select the coffee, turn the selection knob (fig. 9) until the light corresponding to the required quantity of coffee comes on:
If you want to deliver 2 cups of coffee or a double size of coffee, press the button: the corresponding light comes on.
Adjusting the coffee mill
The coffee mill is preset in the factory to make coffee correctly and should not require adjusting initially.
However, if after making the first few coffees you find that the coffee is too thin and not creamy enough or that delivery is too slow (a drop at a time), this can be corrected by adjusting the grinding adjustment dial (fig. 10).
Please note! The grinding adjustment dial must only be turned when the coffee mill is in operation.
If the coffee is delivered too slowly or not at all, turn one click clockwise towards “7”.
For fuller bodied creamier coffee on the other hand, turn one click anticlockwise towards “1” (do not turn more than one click at a time otherwise the coffee could be delivered a drop at a time).
These adjustments will only be evident after at least 2 cups of coffee have been delivered.
If this adjustment does not obtain the desired result, turn the dial another click.
Tips for a hotter coffee
For a hotter coffee, before delivery you are recommended to:
rinse the appliance through by pressing the button. Hot water flows out of the coffee spouts and heats the internal circuit of the machine so that the coffee delivered will be hotter. Danger of burns! If inserted, hot water will flow out from the hot water spout.
warm the cups with hot water (using the hot water function).
Making coffee using coffee beans
Important! Do not use caramelised or candied coffee beans as they could stick to the coffee mill and make it unusable.
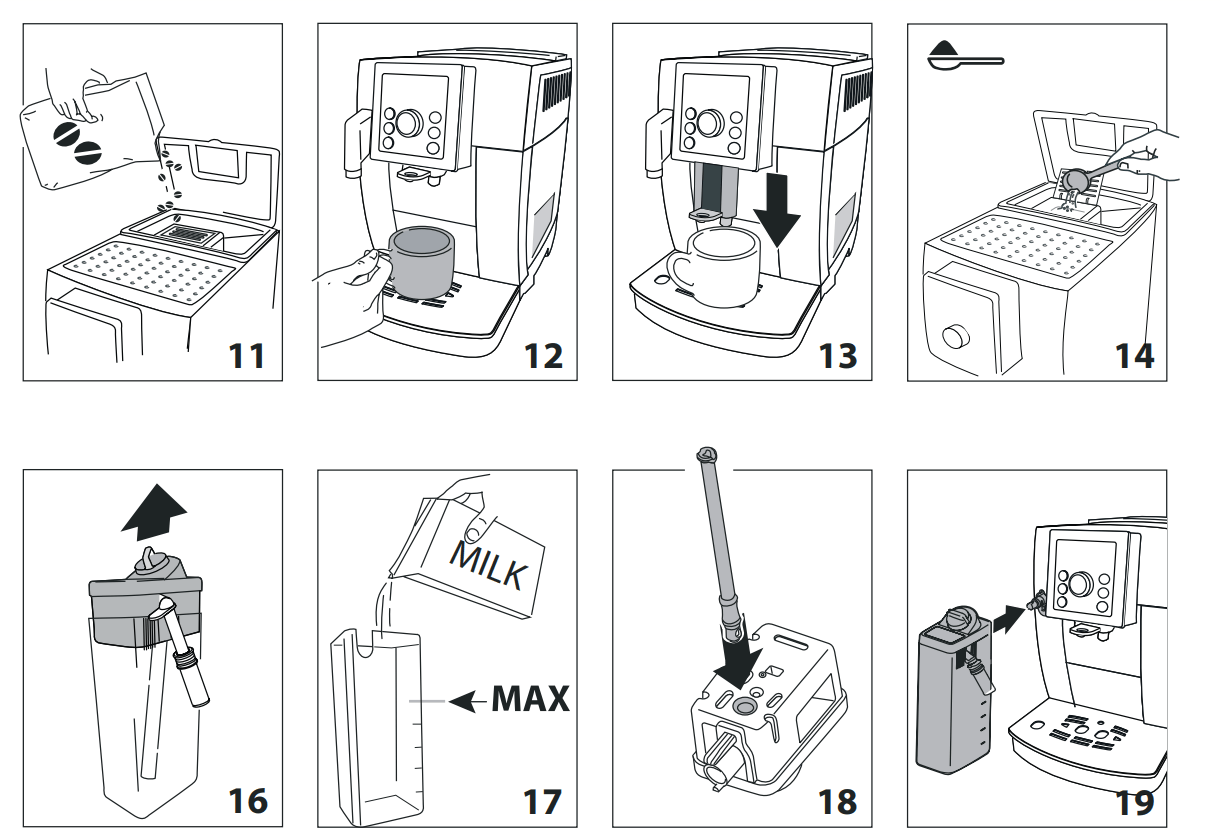
Place coffee beans in the coffee bean container (fig. 11).
Place under the coffee dispensing spouts, either: - 1 cup if you want one coffee (fig. 12); - 2 cups if you want 2 coffees.
Lower the spouts as near as possible to the cup. This makes a creamier coffee (fig. 13).
Press the button.
Preparation begins and automatically stops.
Pease note:
While the machine is making coffee, delivery can be interrupted at any moment by pressing the button.
At the end of delivery, to increase the quantity of coffee in the cup, just press and hold (within 3 seconds) the button. Once the coffee has been made, the appliance is ready to make the next drink.
Please note!
Lights may be displayed on the control panel during use. Their meaning is given in the section “Explanation of the lights” on page 16.
For hotter coffee, see the section “Tips for a hotter coffee” (page 11).
If the coffee is delivered a drop at a time, too weak and not creamy enough or too cold, read the tips in the “Troubleshooting” section on page 19.
DELIVERING HOT WATER
Important! Danger of burns. Never leave the machine unsupervised while delivering hot water or steam. The spout becomes hot during delivery. Hold by the handle only.
Delivering hot water
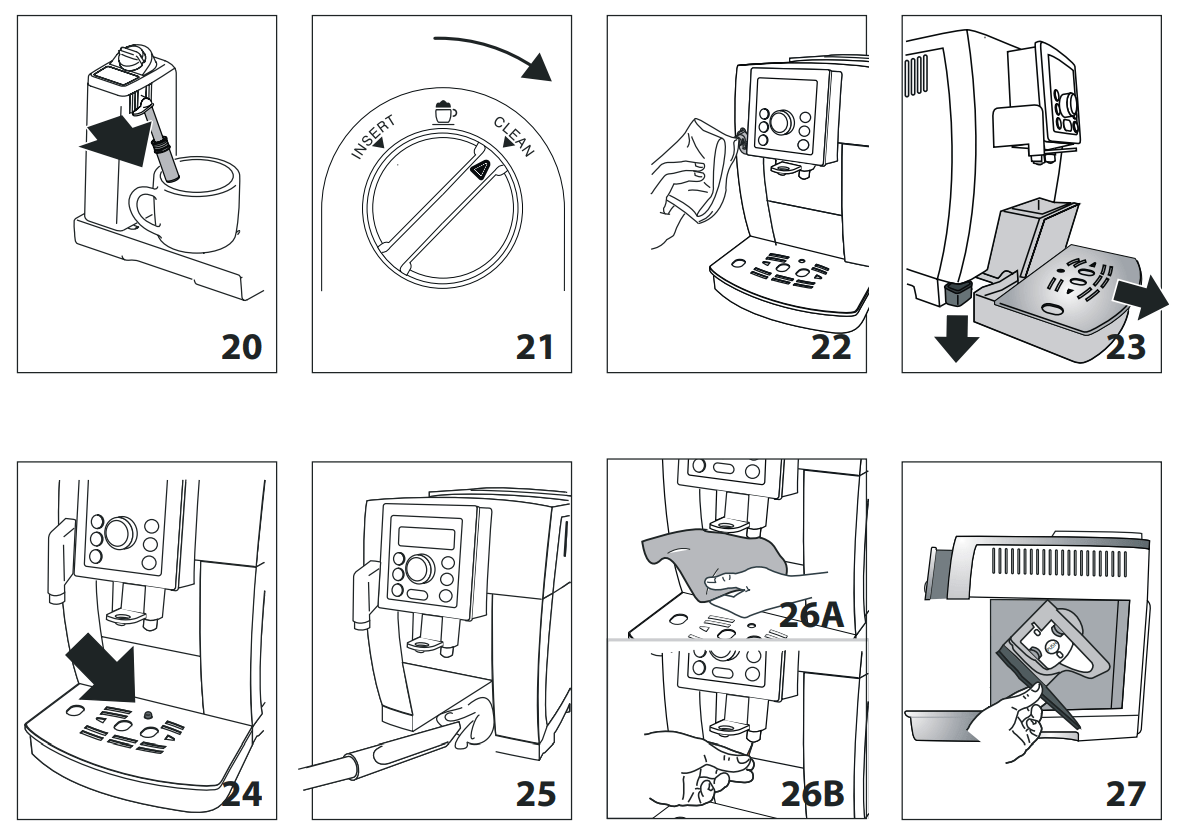
Make sure the hot water spout is attached correctly (fig. 2).
Place a container under the spout (as close as possible to avoid splashes).
Turn the selection knob (fig. 9) until the light comes on.
If you want to deliver a double size, press the button: the corresponding light comes on.
Press the button.
The machine delivers hot water, then stops automatically. To interrupt delivery of hot water manually, press the button again.
CLEANING
Important!
Do not use solvents, abrasive detergents or alcohol to clean the coffee maker. With De’Longhi bean to cup coffee makers, you need not use chemical products to clean the machine.
None of the components can be washed in a dishwasher apart from the milk container (D).
Do not use metal objects to remove encrustations or coffee deposits as they could scratch metal or plastic surfaces.
Cleaning the coffee grounds container
When comes on, the grounds container must be emptied and cleaned. Until the grounds container has been cleaned, the appliance continues to display the message and coffee cannot be made.
Important! Danger of burns If you make a number of cappuccinos one after the other, the metal cup tray becomes hot. Wait for it to cool down before touching it and handle it from the front only
To clean (with the machine on):
Remove the drip tray (fig. 23), empty and clean.
Empty the grounds container and clean thoroughly to remove all residues left on the bottom. This can be done with the spatula on the brush provided.
Check the condensate tray (red) and empty if necessary.
Important! When removing the drip tray, the grounds container must be emptied, even if it contains few grounds. If this is not done, when you make the next coffees, the grounds container may fill up more than expected and clog the machine.
Cleaning the drip tray and condensate tray
Important! The drip tray is fitted with a level indicator (red) showing the level of water it contains (fig. 24).
Before the indicator protrudes from the cup tray, the drip tray must be emptied and cleaned, otherwise the water may overflow the edge and damage the appliance, the surface it rests on or the surrounding area.
To remove the drip tray:
Remove the drip tray and the grounds container (fig. 23);
Empty the drip tray and grounds container and wash them;
Check the red condensate tray and empty if necessary.
Replace the drip tray and grounds container.
Cleaning the inside of the coffee maker
Danger of electric shock! Before cleaning internal parts, the machine must be turned off (see “Turning off”) and unplugged from the mains power supply.
Never immerse the coffee maker in water.
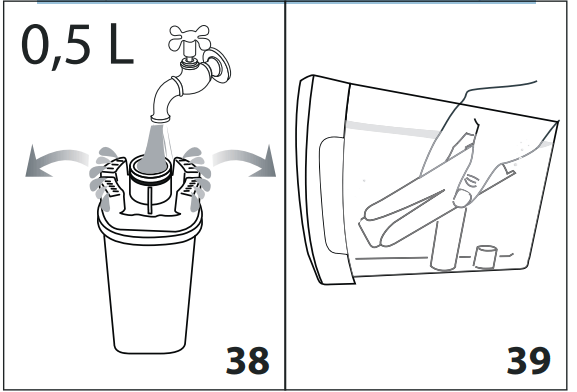
Check regularly (about once a month) that the inside of the appliance (accessible after removing the drip tray) is not dirty. If necessary, remove coffee deposits with the brush provided or a sponge.
Remove the residues with a vacuum cleaner (fig. 25).
Cleaning the water tank
Clean the water tank (A11) regularly (about once a month and whenever you replace the water softener filter (if provided) with a damp cloth and a little mild washing up liquid.
Remove the filter (if present) and rinse with running water.
Replace the filter (if provided), fill the tank with fresh water and replace the tank.
Cleaning the coffee spouts
Regularly clean the coffee spouts with a sponge or cloth (fig. 26A).
Check the holes in the coffee spout are not blocked. If necessary, remove coffee deposits with a toothpick (fig. 26B).
Cleaning the pre-ground coffee funnel
Check regularly (about once a month) that the pre-ground coffee funnel (A5) is not blocked. If necessary, remove coffee deposits with the brush (E2) supplied.
Cleaning the infuser
The infuser (A9) must be cleaned at least once a month.
Important! The infuser may not be extracted when the machine is on.
Make sure the machine is correctly turned off (see “Turning the appliance off” on page 10).
Remove the water tank.
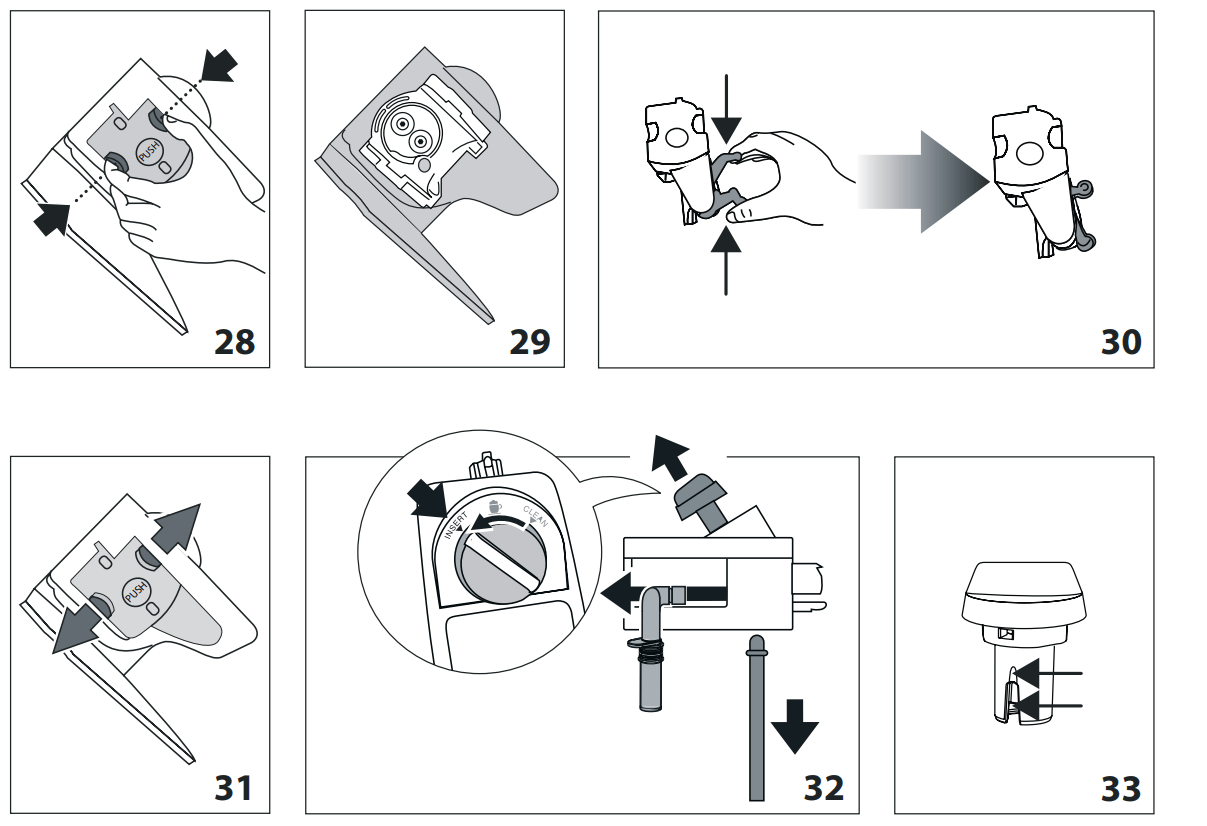
Open the infuser door (fig. 27) on the right side.
Press the two red release buttons inwards and at the same time pull the infuser outwards (fig. 28).
Soak the infuser in water for about 5 minutes, then rinse under the tap. Important! RINSE WITH WATER ONLY NO WASHING UP LIQUID - NO DISH WASHER Clean the infuser without using washing up liquid as it could be damaged.
Use the brush (E2) to remove any coffee residues left in the infuser housing, visible through the infuser door.
After cleaning, replace the infuser by sliding it onto the internal support; then push the PUSH symbol fully in until it clicks into place (fig. 29). Please note! If the infuser is difficult to insert, before insertion, adapt it to the right size by pressing the two levers shown in fig. 30 .
Once inserted, make sure the two red buttons have snapped out (fig. 31).
Close the infuser door.
Replace the water tank.
Cleaning the milk container
Clean the milk container every two days as described below:
Remove the lid.
2. Remove the milk spout and intake tube.
3. Turn the froth adjustment dial clockwise to the “INSERT” position (fig. 32) and pull off upwards.
4. Wash all the components thoroughly with hot water and mild washing-up liquid. All components are dishwasher safe, placing them in the top basket of the dishwasher. Make sure there are no milk residues on the hollow and groove under the dial (see fig. 33). If necessary, scrape the groove with a toothpick
5. Rinse inside the froth adjustment dial seat with running water (fig. 34).
6. Check that the intake tube and spout are not clogged with milk residues.
7. Replace the dial (in correspondence to the word “INSERT”), spout and milk intake tube.
8. Place the lid back on the milk container.
Cleaning the hot water/steam nozzle
Each time you prepare milk, clean the nozzle with a sponge to remove milk residues from the gaskets (see fig. 22).
DESCALE
Descale the machine when appears on the display.
Important!
Descaler contains acids which may irritate the skin and eyes. It is vital to respect the manufacturer’s safety warnings given on the descaler pack and the warnings relating to the procedure to follow in the event of contact with the skin and eyes.
You should use De’Longhi descaler only. Using unsuitable descaler and/or performing descaling incorrectly may result in faults not covered by the manufacturer’s guarantee
1. Turn the machine on.
2. Empty the water tank (A11) and remove the softener filter, if present.
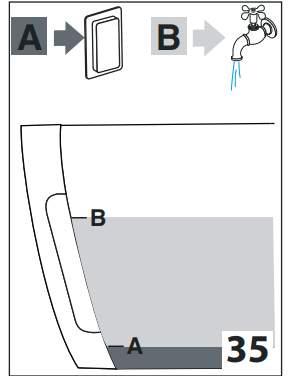
3. Pour the descaler into the tank up to the level A (corresponding to a 3.4oz/ 100ml pack) marked on the back of the tank (fig. 35A), then add water (1liter) up to level B (fig. 35B). Place an empty container with a minimum capacity of 50 oz./ 1.5 liters under the water spout.
4. Wait until the appliance is ready for use.
Important! Danger of burns Hot water containing acid flows from the spout. Avoid contact with splashes of water.
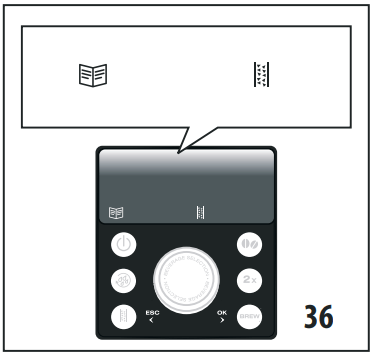
5. Press the button: the lights shown in fig. 36 come on: and flash.
6. Press the button to confirm. (If you want to abort the operation, press the button, corresponding to ).
7. Press the button to confirm. The descaling programme starts and the descaler liquid comes out of the cappuccino maker. The descale programme automatically performs a series of rinses and pauses to remove limescale deposits from inside the machine.The descale programme starts and the descaler liquid comes out of the water spout.
After about 20 minutes, the , and lights come on.
8. The appliance is now ready for rinsing through with clean water. Extract the water tank, empty, rinse under running water, fill with clean water up to the MAX level, insert the filter (if removed previously) and put the water tank back in the machine. The light comes on.
9. Empty the container used to collect the descaler solution and replace it empty under the water spout.
10. Press the button to start the first rinsing. Hot water flows out of the spout.
11. When the water tank is completely empty, the , and lights come on.
12. Extract the water tank, empty, rinse under running water, fill with clean water up to the MAX level, and put the water tank back in the machine. The ight comes on.
13. Press the button to start the second rinsing. Hot water flows out of the spout and coffee outlet.
14. Press Ok and fill the water tank: the appliance is ready for use.
Please note! If the descaling cycle is not completed correctly (e.g. lack of electricity) we recommend repeating the cycle.
WATER SOFTENER FILTER (IF FITTED)
Certain models are fitted with a water softener filter. If this is not the case with your model, you are recommended to purchase one from De’Longhi Customer Services.
To use the filter correctly, follow the instructions below.
Installing the filter
Remove the filter from the packaging.
2. Turn the date indicator disk (fig. 37) until the next two months of use are displayed. .
Please note The filter lasts about two months if the appliance is used normally. If the coffee machine is left unused with the filter installed, it will last a maximum of three weeks.
3. To activate the filter, run tap water through the hole in the filter as shown in the figure until water comes out of the openings at the side for more than a minute (fig. 38).
4. Extract the tank from the appliance and fill with water.
5. Insert the filter in the water tank and immerse it completely for about ten minutes, sloping it to enable the air bubbles to escape (fig. 39).
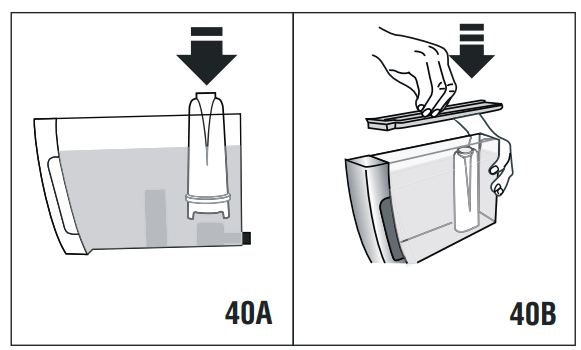
6. Insert the filter in the filter housing and press as far as it will go (fig. 40A)
7. Close the tank with the lid, then put the tank back in the machine (fig. 40B).
When you install the filter, it must be activated delivering hot water until it flows regularly
Important! After two months (see date indicator) or when the appliance has not been used for 3 weeks, you should replace the filter with a new one, repeating the procedure for the installation.
TECHNICAL SPECIFICATION
Voltage: 120 V~ 60 Hz max. 10A
Absorbed power: 1250W
Pressure: 15 bar
Water tank capacity: 50 oz./1.5 litres max.
Size Lxhxd: 238x350x445 mm
Cable length: 1.80 m
Weight: 11.8 kg
Beans container capacity: 250 g max.
EXPLANATION OF LIGHTS
LIGHT
POSSIBLE CAUSE
REMEDY
The appliance is heating up
Wait
The grounds container (A15) is full
Empty the grounds container and drip tray, clean and replace. Important: when removing the drip tray, the grounds container MUST be emptied, even if it contains few grounds. If this is not done, when you make the next coffees, the grounds container may fill up more than expected and clog the machine
After cleaning, the grounds container has not been replaced (A15)
Remove the drip tray and insert the grounds container
The grounds container is not correctly inserted
Check that the grounds container is correctly inserted
Insufficient water in the tank (A11)
Fill the tank with water and/or insert it correctly, pushing it as far as it will go until it clicks into place
The water tank is not inserted
Insert the water tank
The coffee beans have run out
Fill the beans container
The machine must be descaled.
The descaling procedure described in the section “Descale” needs to be performed as soon as possible
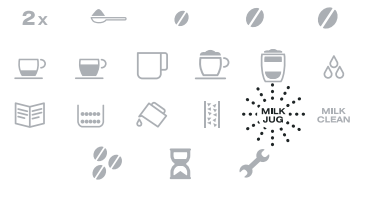
The milk jug is not inserted correctly or it is not inserted at all
Insert the milk container as far as it will go
Milk has been delivered recently and the tubes inside the milk container must be cleaned
Turn the froth adjustment dial to CLEAN (fig. 21)
The milk frother knob (D1) is on wrong position after CLEAN
Turn the knob on position
The water spout is not inserted or is inserted incorrectly
Insert the water spout (E3) as far as it will go
Water spout is required instead of milk container
Insert water spout
General alarm
Contact a service center.
The infuser has not been replaced after cleaning
Insert the infuser as described in the section “Cleaning the infuser”
The grinding is too fine and the coffee is delivered too slowly or not at all
Repeat coffee delivery and turn the grinding adjustment knob (fig. 10) one click clockwise towards “7” while the coffee mill is in operation.
If after making at least 2 coffees delivery is still too slow, repeat the correction procedure, turning the grinding adjustment knob another click until delivery is correct (see the section: Adjusting the coffee mill on page 11).
If the problem persists, turn the steam knob to the I position and deliver water from the cappuccino maker.
Pre-ground function was selected but no pre-ground coffee was poured
Pour pre-ground coffee in the coffee funnel.
Pre-ground coffee is blocked in the funnel
Clean the preground coffee funnel (see page 14)
Too much coffee has been used
Select a milder taste or reduce the quantity of pre-ground coffee then make the coffee again.
The water circuit is empty: it is necessary to insert the water spout
Insert the water spout and deliver hot water
The water circuit is empty
Press OK to deliver water from the spout (E3) until it flows out normally. If the problem persists, make sure the water tank is fully inserted.
TROUBLESHOOTING
Below is a list of some of the possible malfunctions.
If the problem cannot be resolved as described, contact Customer Services
PROBLEM
POSSIBLE CAUSE
SOLUTION
The coffee is not hot
The cups were not preheated
Warm the cups by rinsing them with hot water (N.B.
you can use the hot water function)
The infuser has cooled down because 2/3 minutes have elapsed since the last coffee was made
Before making the coffee, warm the infuser by performing a rinse (see “Tips for a hotter coffee”, page 11)
The coffee is thin or not creamy enough
The coffee is ground too coarsely
Turn the grinding adjustment dial one click anticlockwise towards “1” while the coffee mill is in operation (fig. 10). Continue one click at a time until coffee delivery is satisfactory. The effect is only visible after delivering 2 coffees (see the section: “adjusting the coffee mill” on page 11)
The coffee is unsuitable
Use pre-ground coffee for espresso coffee makers
The coffee is delivered too slowly or a drop at a time
The coffee is ground too finely
Turn the grinding adjustment dial one click clockwise towards “7” while the coffee mill is in operation (fig. 10). Continue one click at a time until coffee delivery is satisfactory. The effect is only visible after delivering two coffees. (see the section “adjusting the coffee mill” on page 11)
Coffee does not come out of one of the spouts
The spouts are blocked.
Clean the spouts with a toothpick (fig. 26B)
The milk does not come out of the milk spout
The milk container lid is dirty.
Clean the milk container lid as described in the section “Cleaning the milk container”
The milk contains large bubbles and squirts out of the milk spout or there is little froth
The milk container lid is dirty
Clean the milk container lid as described in the section “cleaning the milk container”
The milk is not cold enough or is not semi-skimmed
Use skimmed or semi-skimmed milk at refrigerator temperature (about 5°C). If the result is not as you wished, try changing brand of milk
The froth adjustment dial is incorrectly adjusted.
Adjust following the instructions in the section “making drinks with milk”
The milk container lid or froth adjustment dial is dirty
Clean the milk container lid and dial as described in the section “cleaning the milk container”
The appliance does not come on
It is not plugged into the mains socket
Plug into the mains socket
The main switch (A7) is not turned on
Push the main switch (fig. 3)
The infuser cannot be extracted
The appliance has not been turned off correctly
Turn the appliance off by pressing the button (pag. 10)


 and
and  the lights turn on (fig. 4).
 button: the appliance delivers water from the hot water spout then goes off.
 button (fig. 5).
  flashes to indicated that the appliance is heating up and performing an automatic rinse cycle (by circulating hot water, the appliance heats both the boiler and the internal circuits).
 (descaling) light turns on after a period of time according to water hardness.
 button for about six seconds until
  and
and  flash.
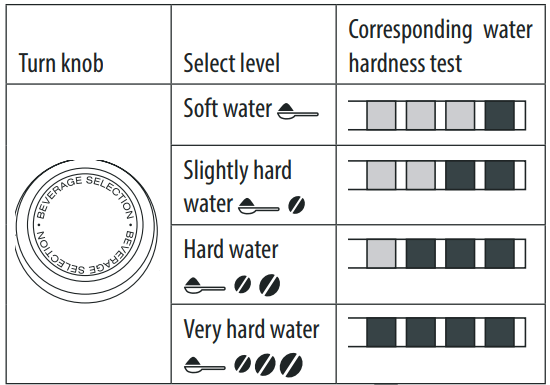

 button (fig. 8) repeatedly until the required taste is displayed.
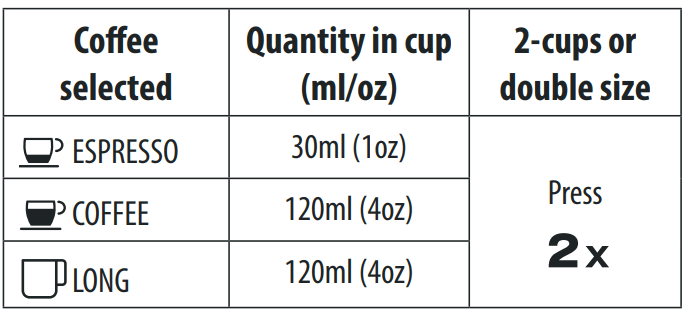
 button: the corresponding light comes on.
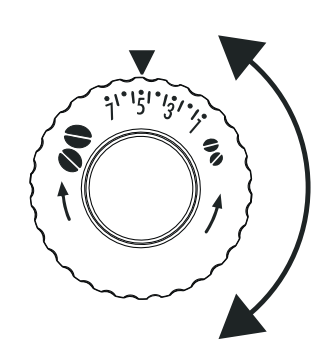
 comes on, the grounds container must be emptied and cleaned. Until the grounds container has been cleaned, the appliance continues to display the message and coffee cannot be made.
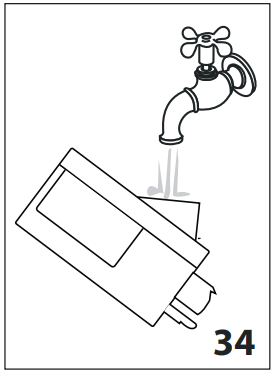
 ,
,  lights come on.
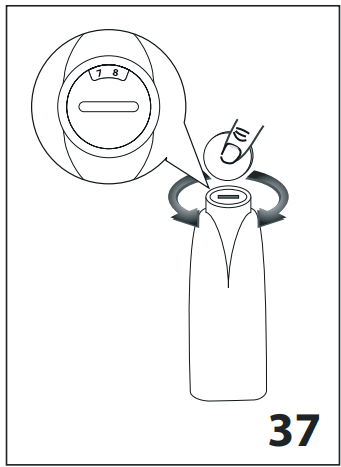 .
.


 button (pag. 10)