
ECAM29X.2Y - 29X.3Y - 29X.4Y
MACCHINA DA CAFFÈ
Istruzioni per l’uso
BEAN TO CUP ESPRESSO AND
CAPPUCCINO MACHINE
Instruction for use
2
IT
EN
pag. 3 page 16
MAX
MAX
MAX
50°C
✕ ✕ ✕
✓ ✓
✓ ✓ ✓ ✓ ✓
3
1. INTRODUZIONE
Le operazioni principali della macchina sono illustrate passo a
passo nella Quick Guide.
Prendetevi un paio di minuti per leggere le presenti istruzioni
per l’uso. Eviterete così di incorrere in pericoli o di danneggiare
la macchina.
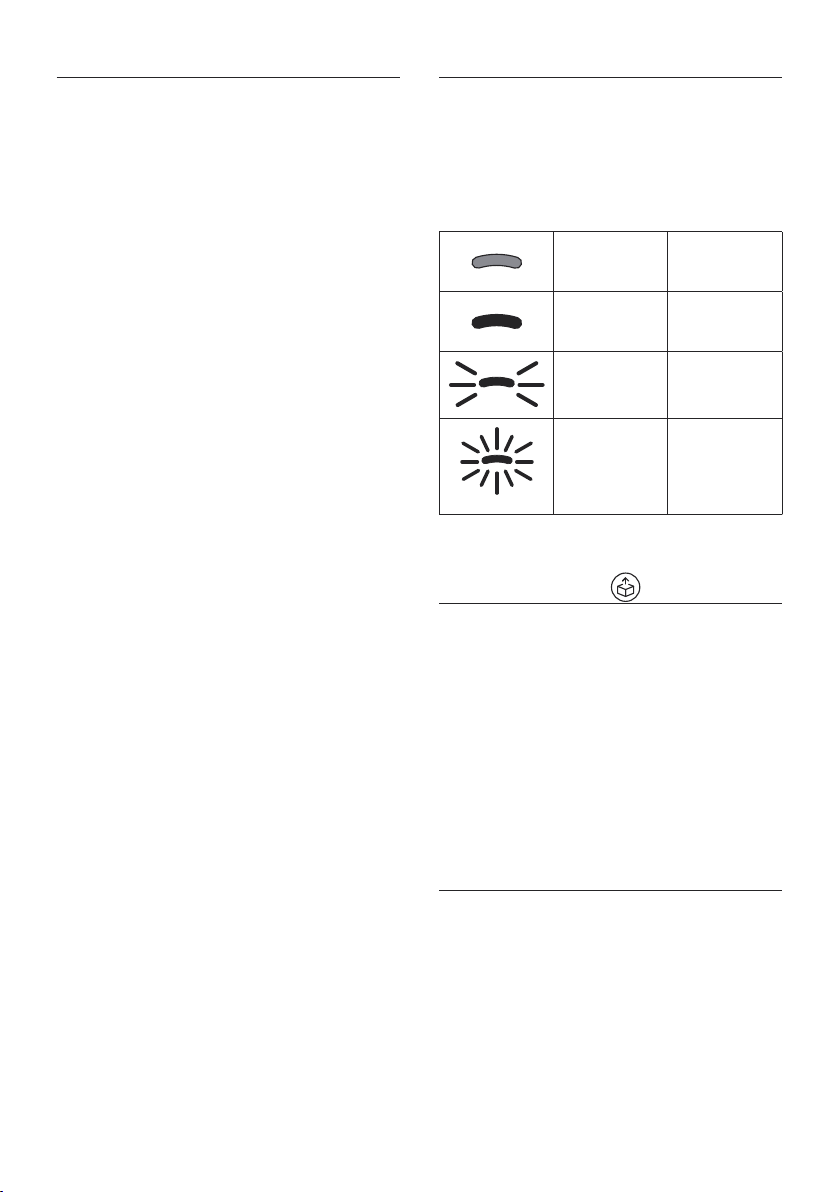
I led e le spie sul pannello della vostra macchina vi aiuteranno
ad interagire correttamente con la macchina:
Spento --
Acceso
Funzione
disponibile
Lampeggiante Funzione in corso
Lampeggiante
veloce
L’apparecchio
richiede l’inter-
vento da parte
dell’utente
Questa simbologia è utilizzata anche nella quick guide allegata
al prodotto.
2. AL PRIMO UTILIZZO
• Le istruzioni per la prima messa in funzione della macchi-
na sono riportate nella QUICK GUIDE.
• Al primo utilizzo è necessario fare 4-5 erogazioni prima
che la macchina cominci a dare un risultato soddisfacente
in tazza.
• Al primo utilizzo il circuito acqua è vuoto, per questo la
macchina potrebbe essere molto rumorosa: il rumore si
attenuerà man mano che il circuito si riempirà.
• Eventuali tracce di caè nel macinino sono dovute alle
prove di settaggio della macchina prima di metterla in
commercio e sono prova della cura meticolosa che abbia-
mo per il prodotto.
3. ACCENSIONE E SPEGNIMENTO
• Ad ogni accensione, l’apparecchio esegue automatica-
mente un ciclo di preriscaldamento e di risciacquo che
non può essere interrotto. L’apparecchio è pronto all’uso
solo dopo l’esecuzione di questo ciclo.
• Ad ogni spegnimento, l’apparecchio esegue un risciacquo
automatico, qualora sia stato preparato un caè.
Pericolo scottature!
Durante il risciacquo, dai beccucci dell’erogatore del caè fuo-
riesce un po’ di acqua calda. Prestare attenzione a non venire in
contatto con spruzzi d’acqua.
SOMMARIO
1. INTRODUZIONE ....................................... 3
2. AL PRIMO UTILIZZO ................................ 3
3. ACCENSIONE E SPEGNIMENTO ................. 3
4. EROGAZIONE BEVANDE CAFFÈ ................. 4
4.1 Preparazione del
caè utilizzan
do il caè in
chicchi ...................................................... 4
4.2 Preparazione del caè utilizzando il caè
pre-macinato ..........................................4
4.3 Variazione dell’aroma del caè ...............4
4.4 Risciacquo ..............................................4
4.5 Consigli per il caè più caldo ...................4
4.6 Regolazione del macinacaè ...................4
4.7 Personalizzare la quan
tità in ta
zza ........... 5
5. PREPARAZIONE DEL CAPPUCCINO ........... 5
6. MISURAZIONE DELLA DUREZZA DELL’ACQUA
.............................................................. 5
7. FILTRO ADDOLCITORE .............................. 5
7.1 Sostituzione del ltro ..............................6
7.2 Rimozione del ltro .................................6
8. CONSIGLI PER IL RISPARMIO ENERGETICO 6
9. MENÙ IMPOSTAZIONI .............................. 7
9.1 Reset ai valori di fabbrica ........................9
10. PULIZIA DELL‘APPARECCHIO ................... 9
11. PULIZIA DELL’INFUSORE .........................10
12. DECALCIFICAZIONE ................................11
13. SIGNIFICATO DELLE SPIE ........................12
14. RISOLUZIONE DEI PROBLEMI .................14
4
• Per accendere o spegnere l’apparecchio, premere il tasto
.
Se l’apparecchio non viene utilizzato per periodi prolungati,
disconnettere l’apparecchio dalla rete elettrica:
4. EROGAZIONE BEVANDE CAFFÈ
4.1 Preparazione del
caè utilizzan
do il caè in
chicchi
• Non utilizzare chicchi di caè verdi, caramellati o candi-
ti perché possono incollarsi sul macinacaè e renderlo
inutilizzabile.
• Se la modalità “Risparmio energetico” è attivata, l’eroga-
zione del primo caè potrebbe richiedere alcuni secondi
di attesa.
4.2 Preparazione del caè utilizzando il caè
pre-macinato
• Non introdurre mai il caè pre-macinato a macchina
spenta, per evitare che si disperda all’interno della mac-
china, sporcandola. In questo caso la macchina potrebbe
danneggiarsi.
• Non inserire mai più di 1 misurino raso, altrimenti l’in-
terno della macchina potrebbe sporcarsi oppure l’imbuto
potrebbe otturarsi.
• Preparando il caè Long: a metà della prepa-
razione, quando si accendono le spie +
, inserire un altro misurino raso di caè pre-macinato e
ripremere il tasto Long.
• Non è possibile preparare il caè Doppio+ utiliz-
zando il pre-macinato.
4.3 Variazione dell’aroma del caè
1. Premere il tasto relativo all’aroma desiderato:
Leggero
Medio
Forte
2. Procedere selezionando la bevanda caè desiderata.
Nota bene:
• Alla successiva preparazione, la macchina propone l’ulti-
mo aroma selezionato.
• Nel caso di interruzione dell’alimentazione elettrica, la
macchina ritorna al livello medio di default.
4.4 Risciacquo
Con questa funzione è possibile far uscire acqua calda dall’e-
rogatore caè in modo da pulire e riscaldare il circuito interno
della macchina.
Per avviare il risciacquo, è suciente mantenere premuto il
tasto per circa 5 secondi: l’erogazione si interrompe au-
tomaticamente (se si desidera interrompere prima, ripremere
lo stesso tasto).
x 5 sec
4.5 Consigli per il caè più caldo
Per ottenere un caè più caldo, si consiglia di:
• eettuare un risciacquo(vedi paragrafo “Risciacquo”;
• scaldare con dell’acqua calda le tazze utilizzando la fun-
zione acqua calda;
• aumentare la temperatura caè (vedi capitolo “9. Menù
impostazioni”).
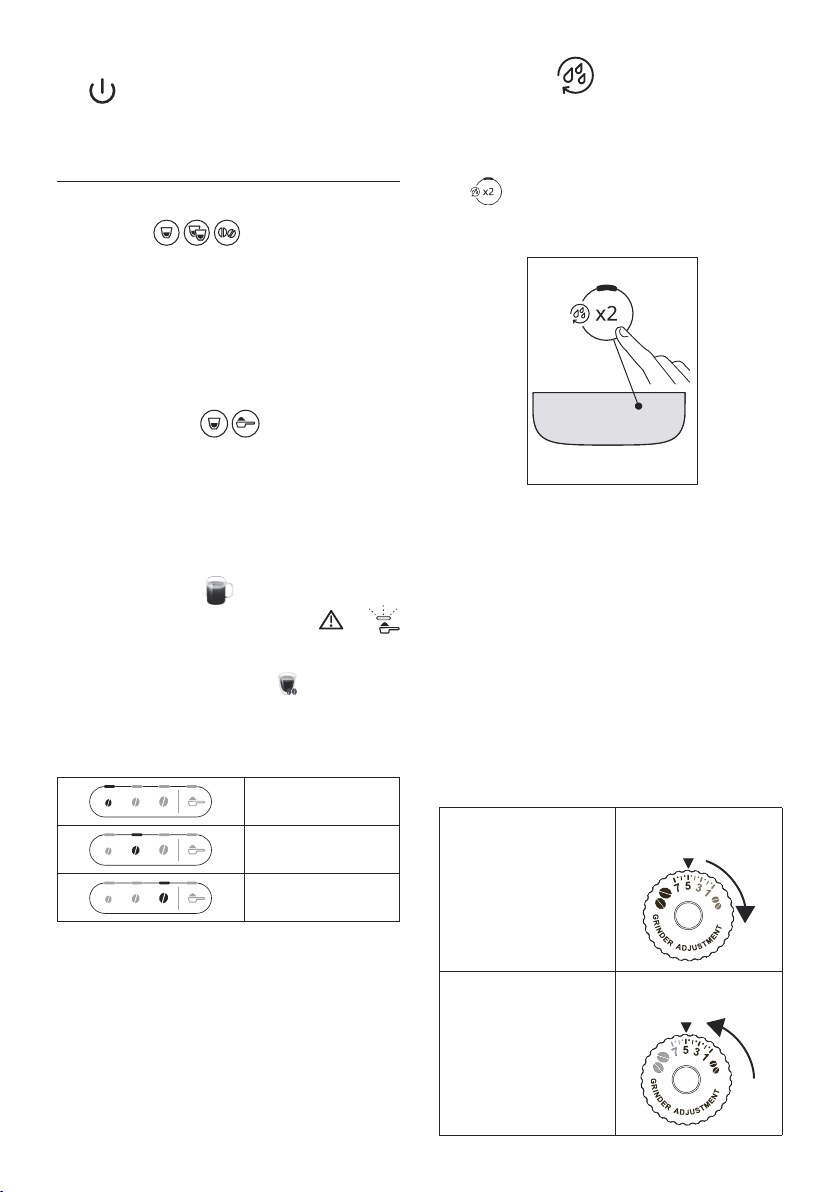
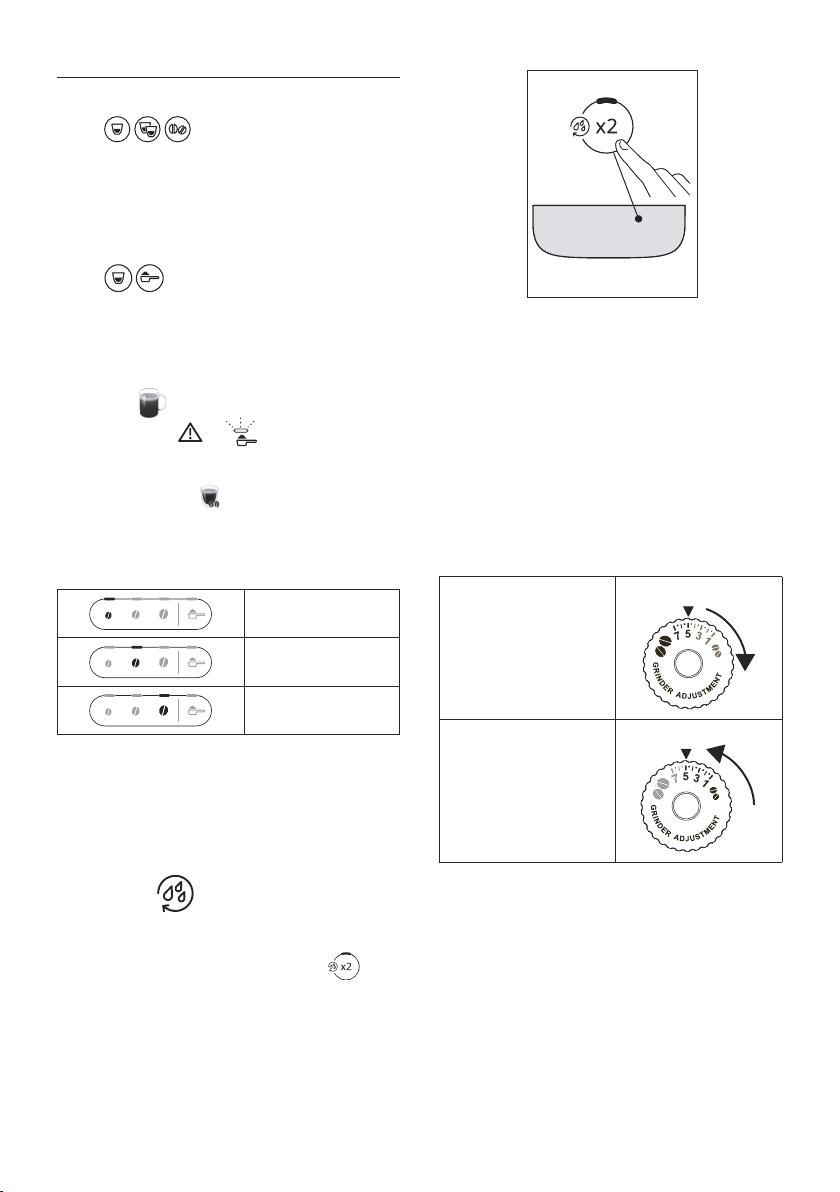
4.6 Regolazione del macinacaè
Il macinacaè non deve essere regolato, almeno inizialmente,
perché è già stato preimpostato in fabbrica in modo da ottene-
re una corretta erogazione del caè.
Per eettuare una correzione, durante il funzionamento del
macinacaè, regolare la manopola come segue:
Se il caè esce troppo
lentamente o non esce
aatto.
L’eetto di questa correzione si
avverte solo dopo l’erogazione di
almeno 2 caè successivi.
Girare di uno scatto verso il
numero 7
Per un’erogazione del caè
più corposa e migliorare
l’aspetto della crema
L’eetto di questa correzione si
avverte solo dopo l’erogazione di
almeno 2 caè successivi.
Girare di uno scatto verso il
numero 1
5
Nota Bene:
La manopola di regolazione deve essere ruotata solo mentre
il macinacaè è in funzione nella fase iniziale di preparazione
delle bevande caè.
4.7 Personalizzare la quan
tità in ta
zza
1. Mantenere premuto per alcuni secondi il tasto relativo alla
bevanda da programmare: si è nel menù programmazio-
ne quando la spia lampeggia velocemente. L’erogazione
inizia;
2. Al raggiungimento della quantità in tazza desiderata, ri-
premere il tasto della bevanda: l’erogazione si interrompe
e la quantità è memorizzata.
Bevanda* Default
(ml)
Programmabile (ml)
Espresso 40
da ≃ 20 a ≃ 180
Coee 180
da ≃ 100 a ≃ 240
Long 160
da ≃ 115 a ≃ 250
Doppio+ 120
da ≃ 80 a ≃ 180
Americano Espresso:
40
Acqua:
110
Espresso:
da ≃ 20 a ≃ 180
Acqua:
da ≃ 50 a ≃ 300
Long Black Acqua:
120
Espresso:
80
Acqua:
da ≃ 50 a ≃ 300
Espresso:
da ≃ 40 a ≃ 360
Over ice 100
da ≃ 40 a ≃ 240
(*)
Bevande diverse per tipo e numero a seconda del modello.
Nota Bene !
Per annullare la programmazione in corso, premere un tasto relati
-
vo ad un’altra bevanda
5. PREPARAZIONE DEL CAPPUCCINO
• Riempire un contenitore con circa 100 grammi di latte per
ogni cappuccino che si vuole preparare. Nella scelta delle
dimensioni del contenitore, tenere conto che il volume
aumenterà di 2 o 3 volte.
• Per ottenere una schiuma più densa e ricca, utilizzare
latte scremato o parzialmente scremato ed a temperatura
di frigorifero (circa 5° C). Per evitare di ottenere un latte
poco schiumato, oppure con bolle grosse, pulire sempre il
cappuccinatore dopo ogni uso.
• La qualità della schiuma può variare in base a:
• tipo di latte o bevanda vegetale;
• marca utilizzata;
• ingredienti e valori nutrizionali.
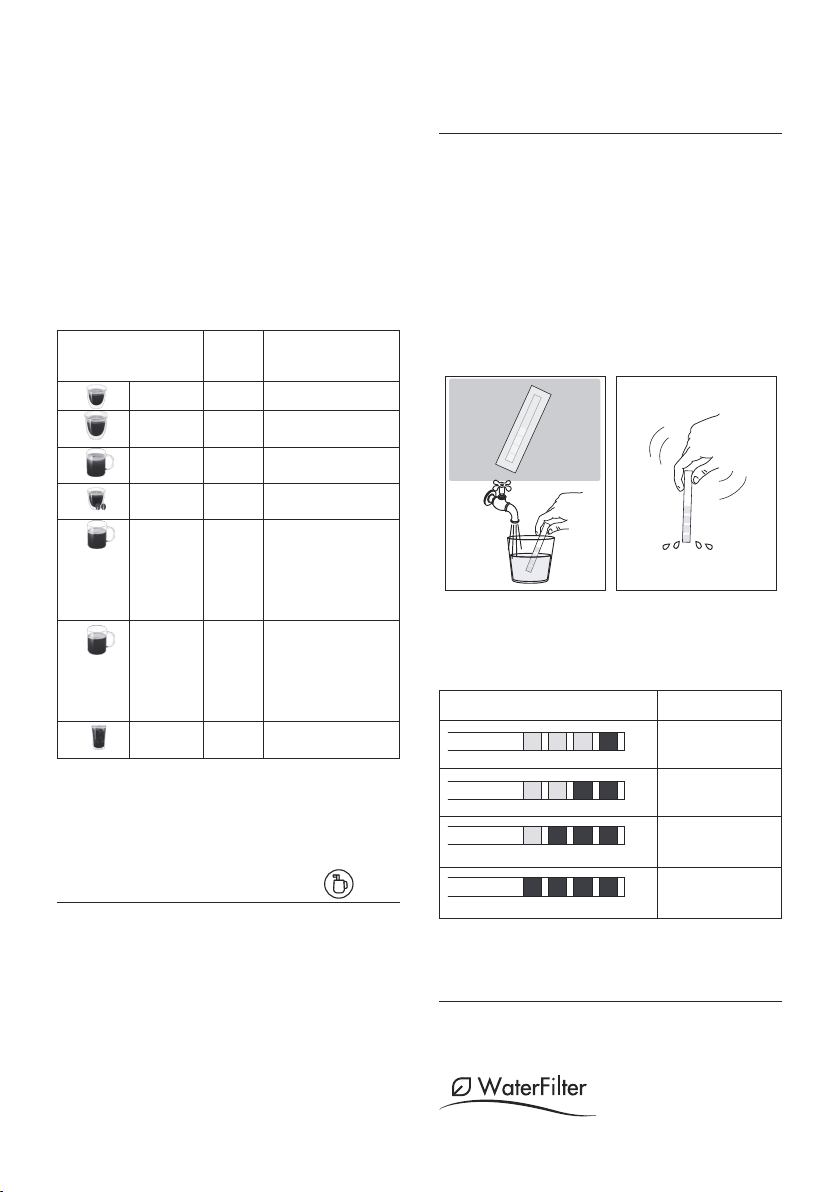
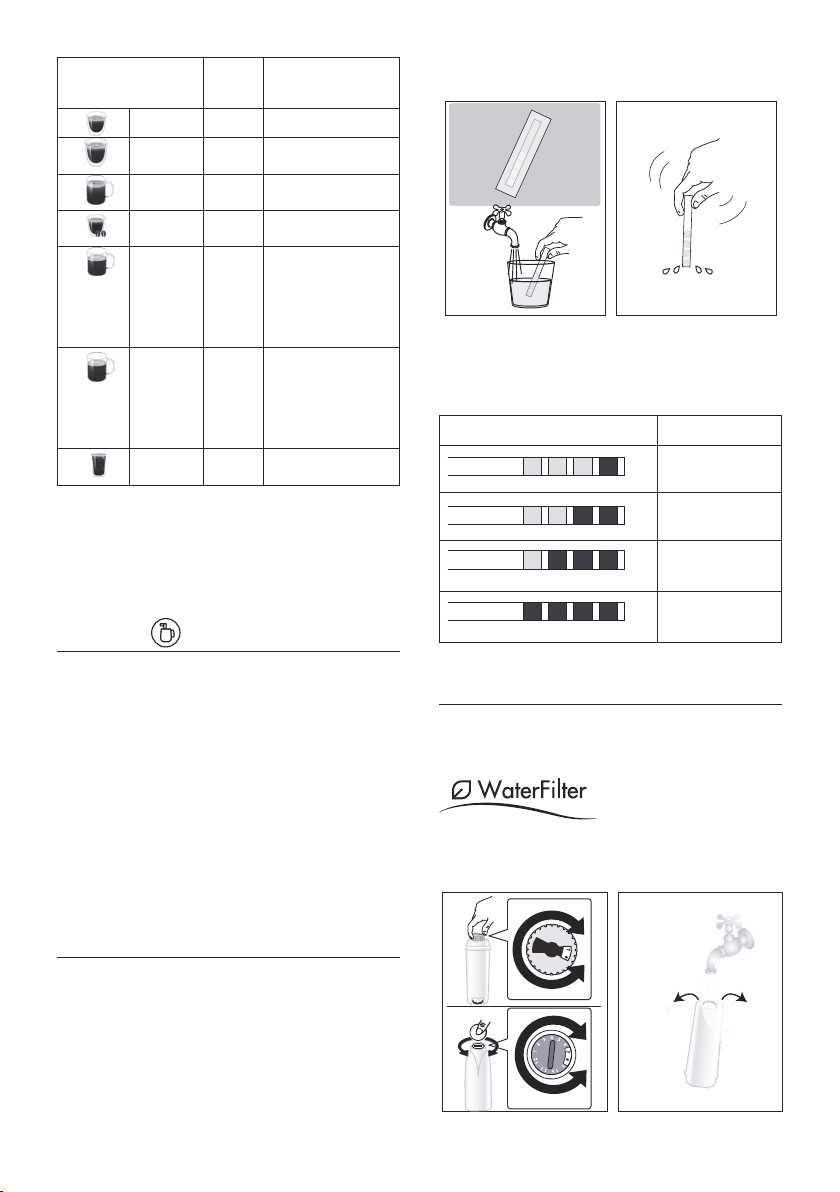
6. MISURAZIONE DELLA DUREZZA DELL’ACQUA
L’allarme decalcicazione viene visualizzato dopo un periodo
di funzionamento predeterminato che dipende dalla durezza
dell’acqua. La macchina è preimpostata in fabbrica sul “Livello
4” di durezza. Volendo è possibile programmare la macchina in
base alla reale durezza dell’acqua in utenza nelle varie regioni,
rendendo così meno frequente l’operazione di decalcicazione.
1. Togliere dalla sua confezione la striscia reattiva: se è in
dotazione al vostro modello, la trovate allegata alla quick
guide.
2. Immergere completamente la striscia in un bicchiere d’ac-
qua per circa un secondo.
3. Estrarre la striscia dall’acqua e scuoterla leggermente.
Dopo circa un minuto si formano 1, 2, 3 oppure 4 qua-
dratini di colore rosso, a seconda della durezza dell’acqua
ogni quadratino corrisponde a 1 livello.
Total Hardness Test Livello durezza
1
Bassa
2
Media
3
Media/Alta
4
Alta
Vedi istruzioni al capitolo “9. Menù impostazioni” per impostare
la macchina.
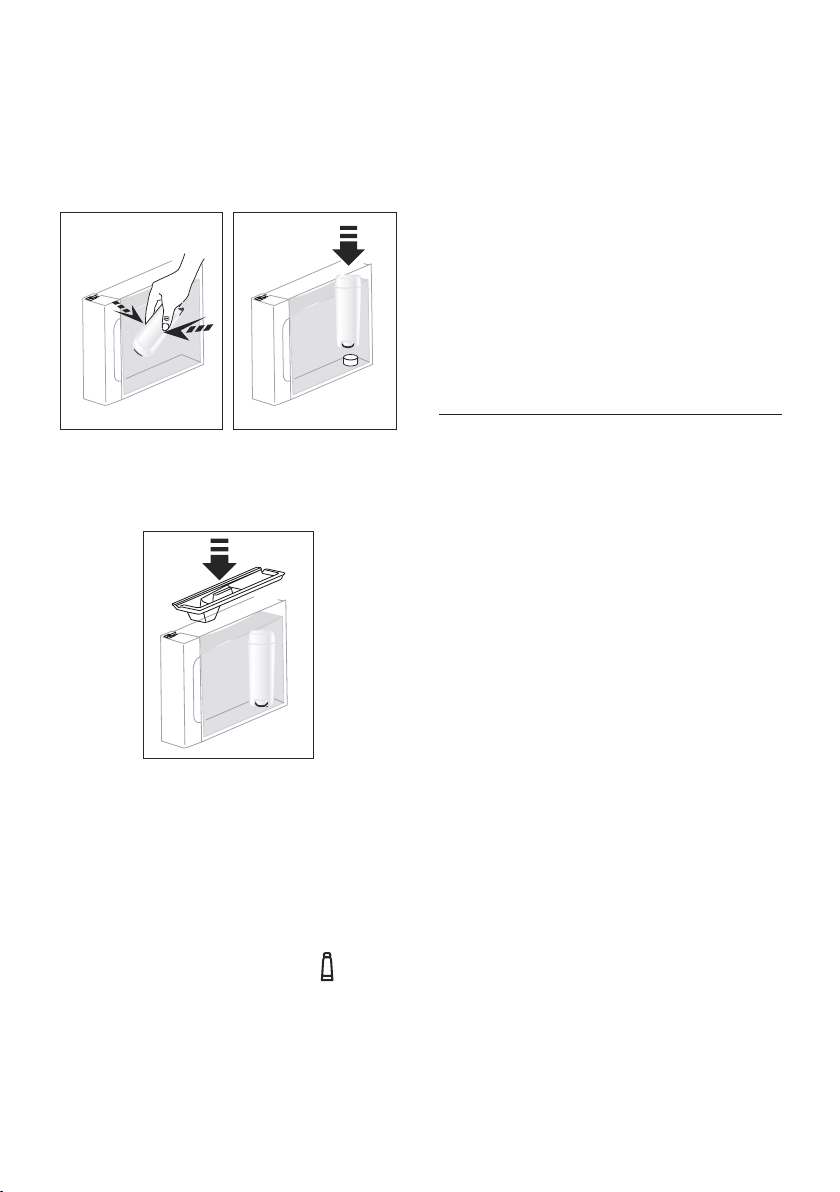
7. FILTRO ADDOLCITORE
Per mantenere costanti nel tempo le prestazioni della macchi-
na, vi consigliato di utilizzare il ltro addolcitore De’Longhi.
Maggiori informazioni nel sito www.delonghi.com.
EAN: 8004399327252
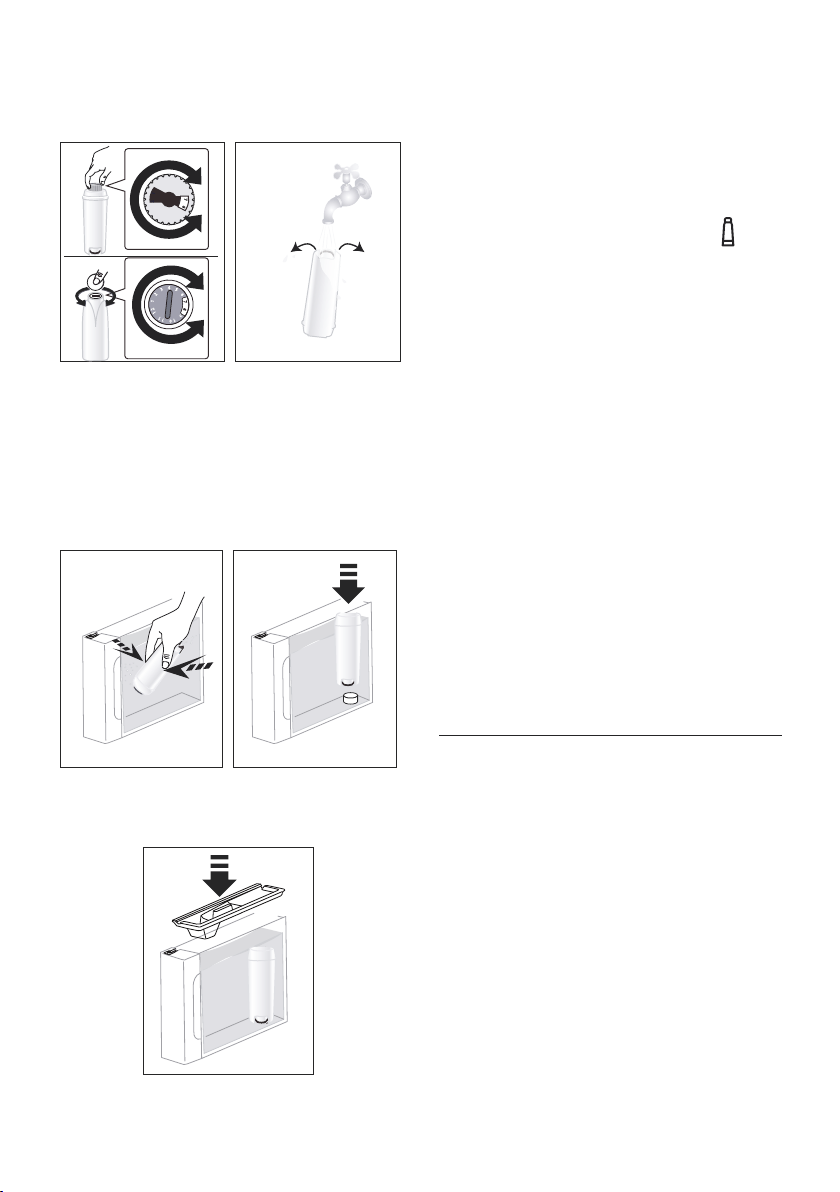
6
Per un utilizzo corretto del ltro, seguire le istruzioni di seguito
riportate.
1. Togliere il filtro dalla confezione e ruotare il datario no a
visualizzare i prossimi 2 mesi ;
0,5 L
2. Per attivare il ltro, far scorrere dell’acqua di rubinetto nel
foro centrale del ltro ntantoché l’acqua fuoriesce dalle
aperture laterali per oltre un minuto;
3. Estrarre il s
erbatoio acqua dalla macchina e riempirlo di
acqua; inserire il ltro nel serbatoio acqua immergendolo
completamente per una decina di secondi, inclinandolo e
premendolo leggermente per permettere alle bolle d’aria
di uscire ;
4. Inserire il ltro nella sede apposi
ta e premerlo a fondo;
5. R
ichiudere il serbatoio con il coperchio , quindi reinserire il
serbatoio in macchina;
6. Posizionare sotto l’erogatore vapore/acqua calda un con-
tenitore vuoto con capacità minima pari a 0,5 litri.
7. Vedi istruzioni al capitolo “9. Menù impostazioni” per in-
stallare il ltro.
8. L’apparecchio eroga acqua calda e si interrompe
automaticamente;
9. Ora il ltro è attivo e si può procedere all’uso della
macchina.
7.1 Sostituzione del ltro
Sostituire il ltro quando si accende la relativa spia .
1. Estrarre il serbatoio acqua ed il ltro esaurito;
2. Procedere seguendo le operazioni illustrate al paragrafo
precedente per attivare il ltro;
3. Vedi istruzioni al capitolo “9. Menù impostazioni” per im-
postare la macchina.
Nota Bene:
Quando sono trascorsi i due mesi di durata (vedi datario),
oppure se non viene utilizzato l’apparecchio per 3 settimane,
procedere alla sostituzione del ltro anche se la macchina non
lo richiede ancora.
7.2 Rimozione del ltro
Se si desidera continuare ad utilizzare l’apparecchio senza il
ltro, è necessario rimuoverlo e segnalare la rimozione.
1. Estrarre il serbatoio acqua ed il ltro esaurito;
2. Vedi istruzioni al capitolo “9. Menù impostazioni” per im-
postare la macchina.
Nota Bene !
Quando sono trascorsi i due mesi di durata (vedi datario), oppure se
non viene utilizzato l’apparecchio per 3 settimane, procedere alla
rimozione del ltro anche se la macchina non lo richiede ancora.
8. CONSIGLI PER IL RISPARMIO ENERGETICO
• Impostare l’autospegnimento a 15 minuti (vedi “9. Menù
impostazioni”);
• Attivare il Risparmio Energetico (vedi “9. Menù
impostazioni”);
• Quando la macchina lo richiede, eettuare il ciclo di
decalcicazione.

7
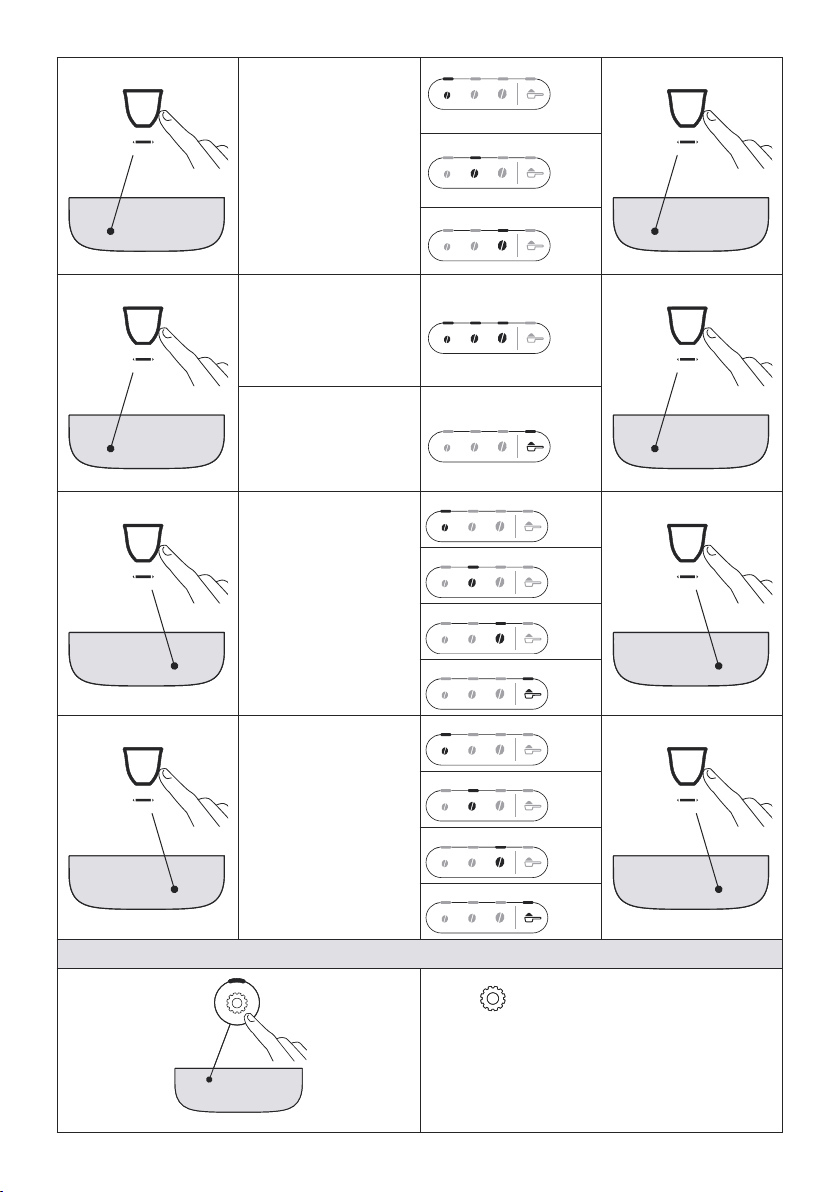
9. MENÙ IMPOSTAZIONI
Una volta entrati nel menù, i tasti che rimangono attivi permettono di selezionare le corrispondenti funzioni:
1 2 3 4 5
6
(*)
(*)
Bevande diverse a seconda del modello
1. Entrare nel menù:
x 5 sec
Mantenere premuto il tasto per alcuni secondi:
si accendonoi tasti relativi alle impostazioni.
Procedere premendo il tasto relativo all’impostazione da
regolare.
2. Regolare le impostazioni della macchina:
Filtro addolcitore
Premere uno dei chicchi
per installare o sostituire
il ltro addolcitore
INSERITO
Confermare la selezione
Premere il simbolo pre-
macinato per rimuovere il
ltro addolcitore
RIMOSSO
Avviso acustico
Premere uno dei chicchi
per attivare l’avviso
acustico
ON
Confermare la selezione
Premere il simbolo pre-
macinato per disattivare
l’avviso acustico
OFF
→
Filtro addolcitore
Temperatura caè Autospegnimento
Risparmio energetico
Durezza acqua
Accesso al
menù impostazioni
Selezione
impostazioni
Avviso acustico
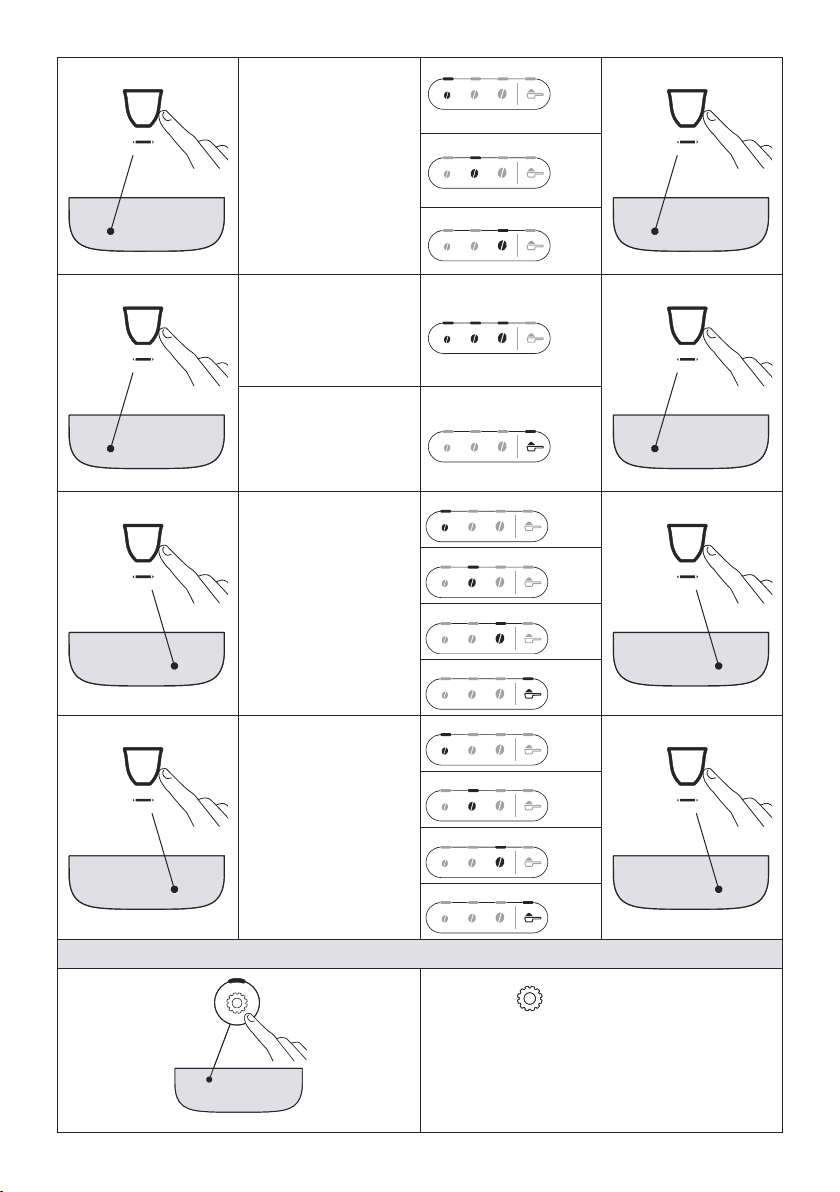
8
Temperatura caè
1
Premere il chicco
dorrispondente alla
temperatura desiderata
BASSA
Confermare la selezione
1
MEDIA
ALTA
Risparmio energetico
2
Premere uno dei chicchi
per attivare il risparmio
energetico
ON
Confermare la selezione
2
Premere il simbolo pre-
macinato per disattivare
il risparmio energetico
OFF
Durezza acqua
3
Premere il simbolo
corrispondente al livello
da impostare
LIVELLO 1
Confermare la selezione
3
LIVELLO 2
LIVELLO 3
LIVELLO 4
Autospegnimento
4
Premere il simbolo
corrispondente al tempo
da impostare
15 MINUTI
Confermare la selezione
4
30 MINUTI
1 ORA
3 ORE
3. Uscire dal menù:
Premere il tasto :
La macchina ritorna in pronto all’uso.
Nota Bene !
La macchina esce automaticamente dal menù impostazioni dopo 30
secondi di inutilizzo.

9
9.1 Reset ai valori di fabbrica
Vericare che la macchina sia in stand-by (spenta, ma collegata
alla rete elettrica).
Mantenere premuti per 5 secondi i tasti relativi alle bevande 1,
2 e : ritornano ai valori di fabbrica tutte le impostazioni e
anche le quantità delle bevande.
1 2
x 5 sec
La macchina emette un beep prolungato e tutte le spie lampeg-
giano a conferma del reset
BEEP
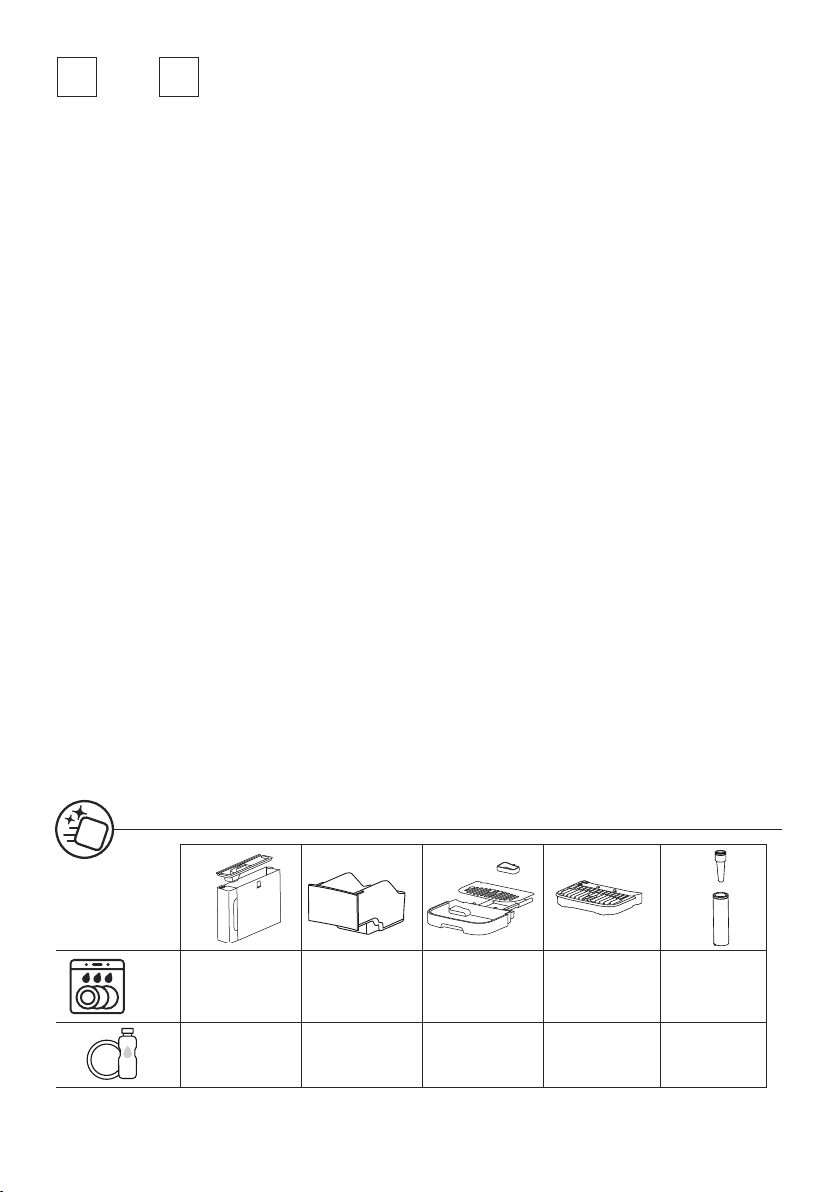
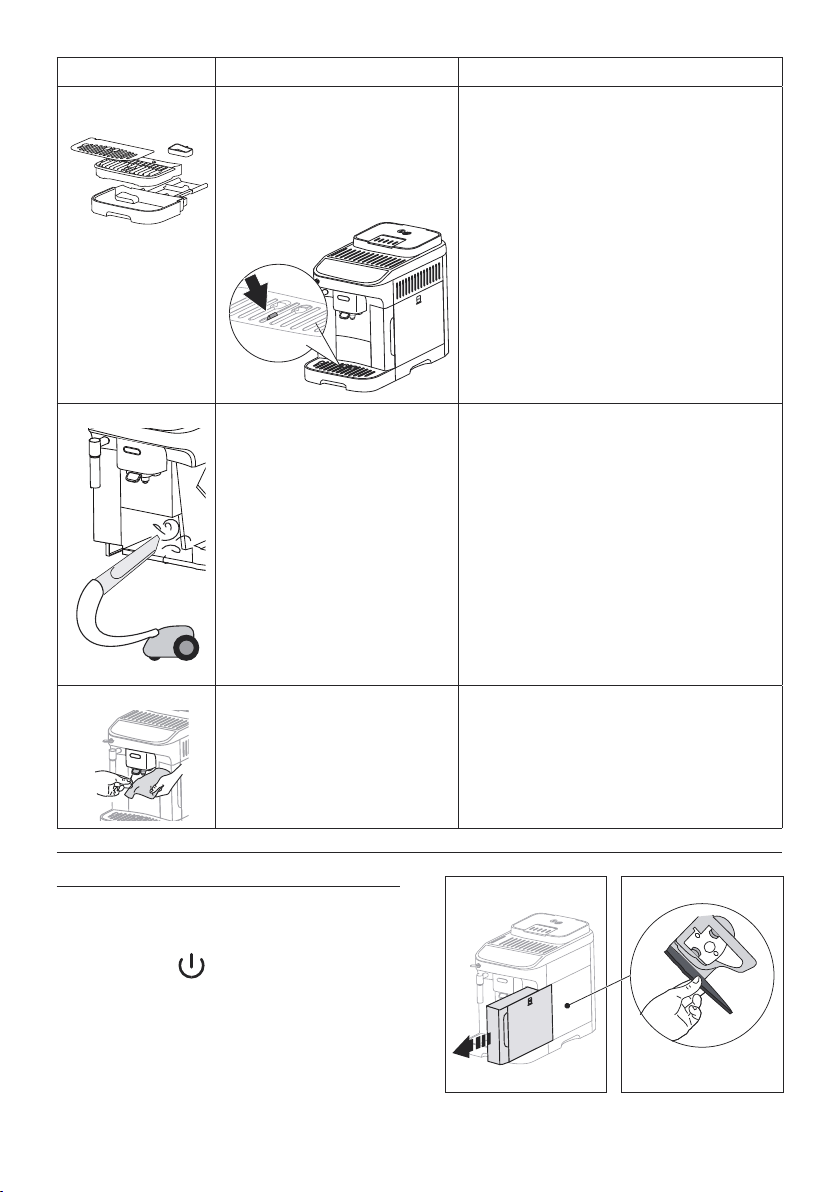
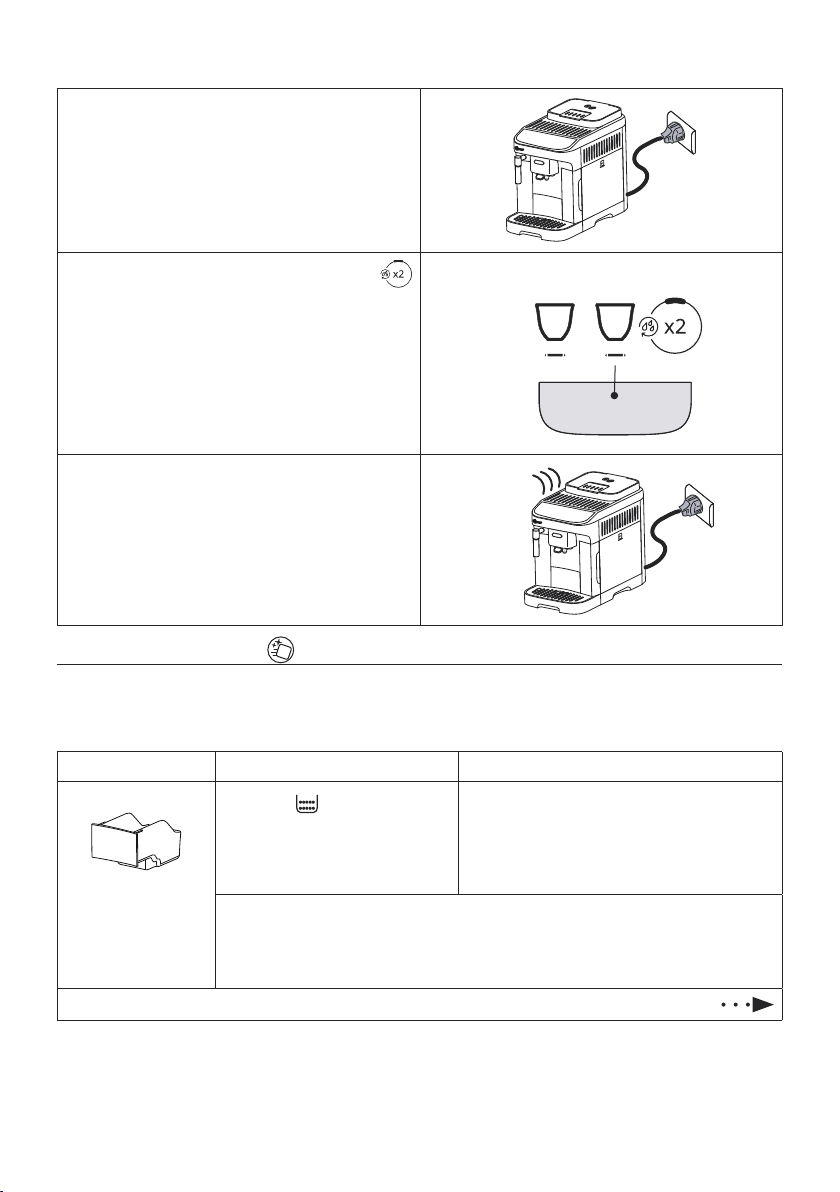
10. PULIZIA DELL‘APPARECCHIO
Attenzione!
• Per la pulizia della macchina non usare solventi, detergenti abrasivi o alcool. Con le superautomatiche De’Longhi non è necessa-
rio utilizzare additivi chimici per la pulizia della macchina.
• Non utilizzare oggetti metallici per togliere le incrostazioni o i depositi di caè, perché potrebbe graare le superci in metallo
o in plastica.
Componente Frequenza Procedura
Contenitore fondi
Quando si accende la spia è ne-
cessario svuotare il contenitore fondi: la
macchina non può fare il caè.
• Estrarre la vaschetta raccogligocce, svuotarla e
pulirla.
• Svuotare e pulire accuratamente il contenitore dei
fondi avendo cura di rimuovere tutti i residui che
possono essere depositati sul fondo.
• Controllare la vaschetta raccogli-condensa (di colo-
re rosso) e, se è piena, svuotarla.
Finchè non si pulisce il contenitore dei fondi la macchina non può fare il caè. L’apparecchio segnala
la necessità di svuotare il contenitore anche se non è pieno, qualora siano trascorse 72 ore dalla prima
preparazione eseguita (perchè il conteggio delle 72 ore sia eseguito correttamente, la macchina non
deve essere mai scollegata dall’alimentazione).
10
Componente Frequenza Procedura
Componenti vaschetta
raccogligocce
La vaschetta raccogligocce è provvista
di un indicatore galleggiante di colore
rosso) del livello dell’acqua contenuta.
Prima che questo indicatore cominci a
sporgere dal vassoio poggiatazze, è ne-
cessario svuotare la vaschetta e pulirla
• Estrarre la vaschetta raccogli gocce ed il contenitore
dei fondi di caè;
• Rimuovere il vassoio poggiatazze, la griglia va-
schetta, quindi svuotare la vaschetta raccogli gocce
ed il contenitore fondi e lavare tutti i componenti;
• Controllare la vaschetta raccogli-condensa di colore
rosso e, se è piena, svuotarla;
• Reinserire la vaschetta raccogli gocce completa di
griglia ed il contenitore dei fondi di caè.
Quando si estrae la vaschetta raccogligocce è obbligato-
rio svuotare sempre il contenitore fondi caè anche se è
riempito poco.
Interno della macchina Controllare periodicamente (circa una
volta al mese) che l’interno della mac-
china (accessibile una volta estratta la
vaschetta raccogli-gocce) non sia sporco.
Spegnere e scollegare dalla rete elettrica la macchina.
Non immergere mai la macchina nell’acqua.
• Rimuovere i depositi di caè con un pennello e una
spugna;
• Aspirare tutti i residui con un aspirapolvere
Beccucci erogatore caè Pulire periodicamente (una volta al mese)
i beccucci erogatore caè
• Pulire periodicamente i beccucci erogatore caè
servendosi di una spugna o di un panno;
• Controllare che i fori dell’erogatore caè non siano
otturati. Se necessario rimuovere i depositi di caè
con uno stuzzicadenti.
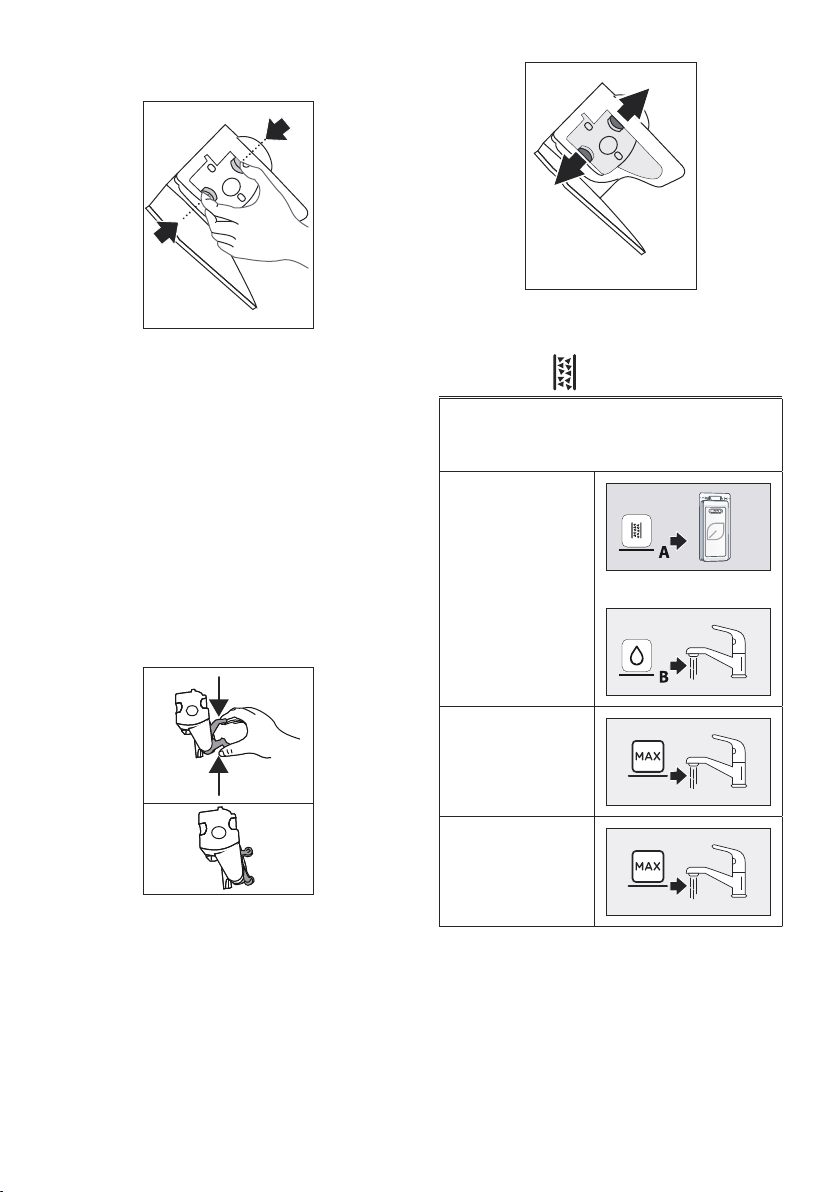
11. PULIZIA DELL’INFUSORE
Attenzione!
L’infusore non può essere estratto quando la macchina è accesa.
1. Premere il tasto per spegnere la macchina;
2. Estrarre il serbatoio acqua;
3. Aprire lo sportello infusore posizionato sul anco destro;
PUSH
11
4.
Premere verso l’interno i due tasti di sgancio colorati e con-
temporaneamente estrarre l’infusore verso l’esterno;
PUSH
5. Immergere per circa 5 minuti l’infusore in acqua e poi ri-
sciacquarlo sotto il rubinetto;
Attenzione!
SCIACQUARE SOLO CON ACQUA
NO DETERSIVI NO LAVASTOVIGLIE
6. Pulire l’infusore senza usare detersivi perché potrebbero
danneggiarlo.
7. Utilizzando un pennello, pulire eventuali residui di caè
sulla sede dell’infusore, visibili dallo sportello infusore;
8. Dopo la pulizia, reinserire l’infusore inlandolo nel sup-
porto; quindi premere sulla scritta PUSH no a sentire il
clic di aggancio;
Nota Bene:
Se l’infusore è dicile da inserire, è necessario (prima dell’inse-
rimento) portarlo alla giusta posizione premendo le due leve.
9. Una volta inserito, assicurarsi che i due tasti colorati siano
scattati verso l’esterno;
PUSH
10. Chiudere lo sportello infusore;
11. Reinserire il serbatoio acqua.
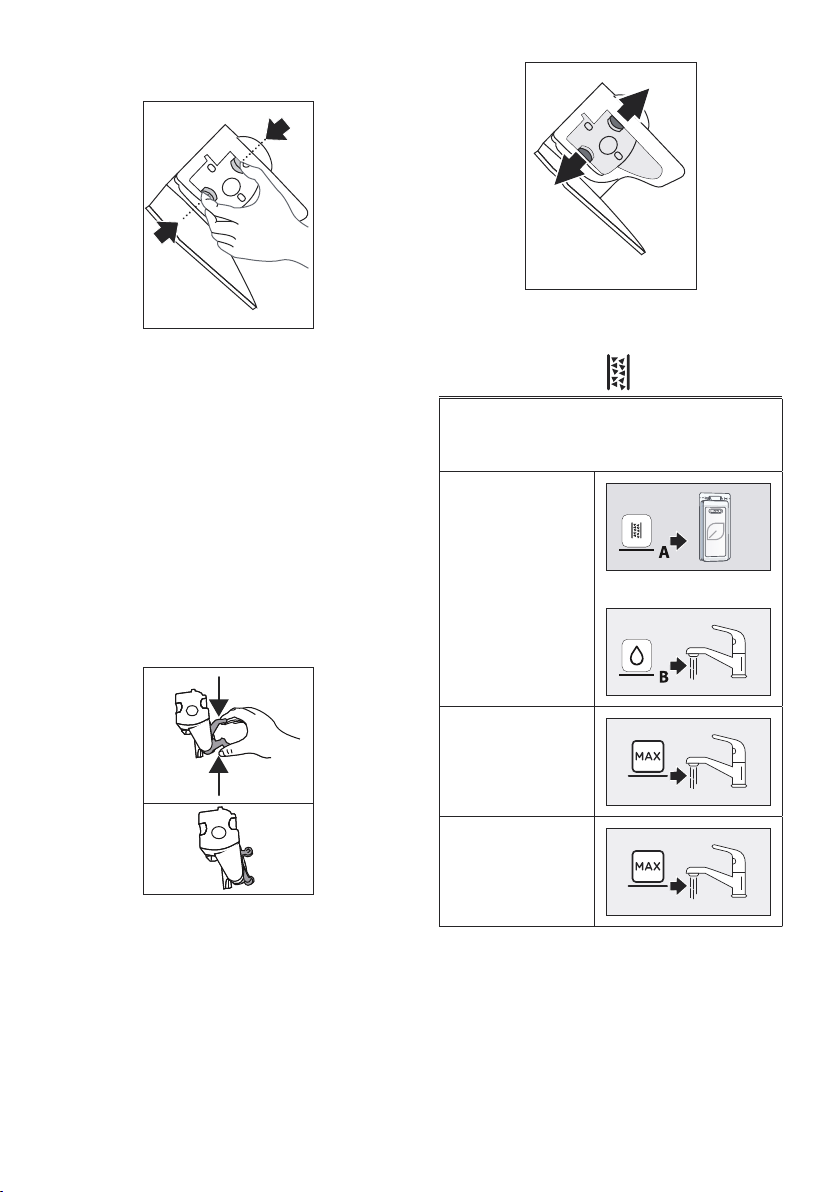
12. DECALCIFICAZIONE
Per completare correttamente il ciclo di decalcicazione fare
molta attenzione alle quantità richieste nel serbatoio acqua
per ogni fase:
Fase 1: Azione
decalcicante
+
Fase 2: Primo
risciacquo
Fase 3: Secondo
risciacquo
• Prima dell’uso, leggere le istruzioni e l’etichettatura del
decalcicante, riportate sulla confezione del decalcican-
te stesso.
• Si raccomanda di utilizzare esclusivamente decalcicante
De’Longhi. L’utilizzo di decalcicanti non idonei, come
pure la decalcicazione non regolarmente eseguita, può
comportare l’insorgenza di difetti non coperti dalla garan-
zia del produttore.
12
• Il decalcicante può danneggiare le superci delicate. Se
il prodotto viene rovesciato accidentalmente, asciugare
immediatamente.
Per eettuare la decalcicazione
Decalcicante Decalcicante De’Longhi
Contenitore Capacità consigliata: 2 l
Tempo ~45min
Attenzione:
Se è installato il ltro addolcitore, è necessario rimuo-
verlo prima di inserire la soluzione decalcicante.
Successivamente, reinserire il ltro al termine del
primo serbatoio di risciacquo.
La procedura per la decalcicazione è illustrata nella “Quick
Guide”.
Nota Bene:
• Una volta iniziato il ciclo di decalcicazione, non è pos-
sibile interromperlo e va completato con l’intero ciclo di
risciacquo.
• E’ normale che, dopo aver eseguito il ciclo di decalcica-
zione, ci sia dell’acqua nel contenitore dei fondi di caè.
• L’apparecchio richiede un terzo risciacquo, nel caso in cui il
serbatoio acqua non sia stato riempito no al livello MAX:
questo per garantire non ci sia soluzione decalcicante nei
circuiti interni dell’apparecchio. Prima di avviare il risciac-
quo, ricordarsi di svuotare la vaschetta raccogligocce.
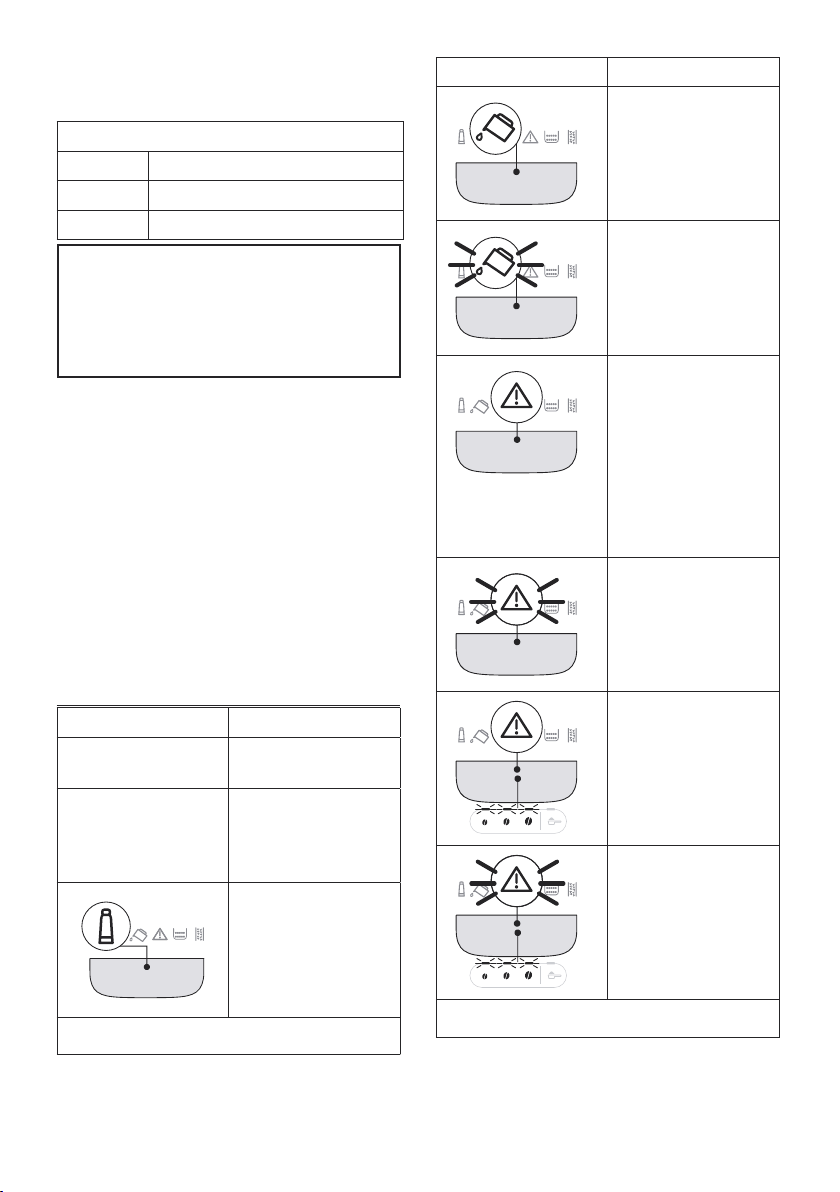
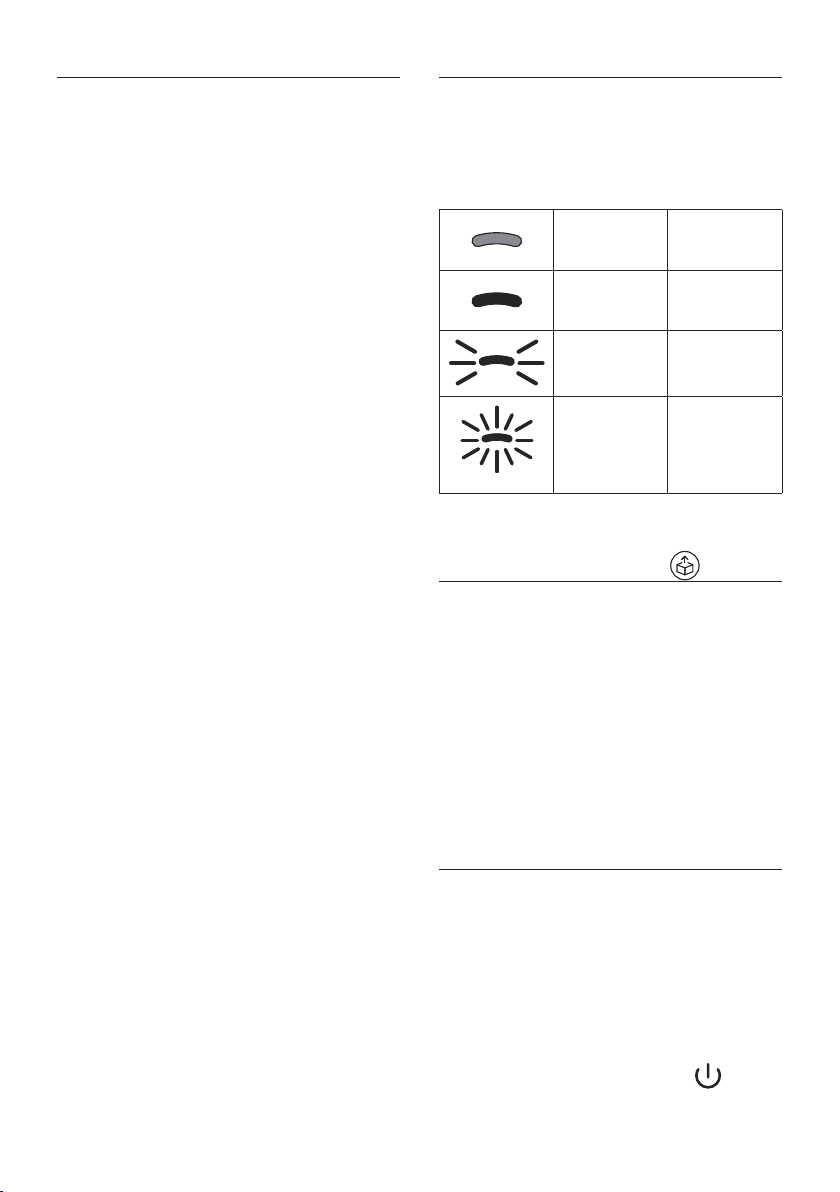
13. SIGNIFICATO DELLE SPIE
Spia Signicato
Le spie relative alle bevande
lampeggiano
La macchina si sta riscaldan-
do: attendere
Le spie relative alle bevande
e ai relativi settaggi sono
accese sse
La macchina è pronta all’u-
so: procedere selezionando
la bevanda da erogare e le
relative opzioni
Sostituire il ltro (vedi capi-
tolo “7. Filtro addolcitore”)
→
Spia Signicato
L’acqua nel serbatoio non
è suciente: riempire il
serbatoio
Il serbatoio acqua non è
inserito in macchina o non
è inserito correttamente:
inserire correttamente il
serbatoio
Allarme generico: l’interno
della macchina è molto
sporco. Pulire accuratamen-
te la macchina. Se dopo la
pulizia, la macchina visua-
lizza ancora il messaggio,
contattare il servizio clienti
e\o un Centro Assistenza
autorizzato
Dopo la pulizia non è stato
inserito l’infusore: inserire
l’infusore come indicato
nel capitolo “11. Pulizia
dell’infusore”
Mancanza chicchi: riempire
il contenitore chicchi, quindi
premere un tasto qualsiasi
per uscire dall’allarme.
La macinatura è troppo ne
e quindi il caè fuoriesce
troppo lentamente o non
esce del tutto. Regolare il
macinacaè (par. “4.6 Re-
golazione del macinacaè”)
→
13
Spia Signicato
È stato utilizzato troppo
caè. Selezionare un gusto
più leggero o ridurre la
quantità pre-macinato
È stata selezionata la prepa-
razione con caè pre-ma-
cinato ma non è stato ver-
sato il caè pre-macinato
nell’imbuto. Assicurarsi che
l’imbuto non sia otturato,
quindi inserire un misurino
raso di caè pre-macinato e
ripetere l’erogazione
Il circuito idraulico è vuoto.
Erogare acqua calda ruotan-
do la manopola su o
premere il tasto “Steam”
È necessario svuotare il con-
tenitore fondi
Il contenitore dei fondi non
è inserito o non è inserito
correttamente: inserire la
vaschetta raccogligocce
completa di contenitore dei
fondi premendo a fondo
→
Spia Signicato
È necessario procedere con
la decalcicazione (“12. De-
calcicazione” e la sezione
dedicata della quick guide)
La decalcicazione è stata
interrotta. Per ritornare in
pronto all’uso:
1. Premere il tasto ;
2. Se la manopola
erogazione vapore è
in pos. O, ruotarla in
pos. : la macchina
comincerà ad erogare
e la decalcicazione
riprenderà da g. 14
di pag. 10 della quick
guide.

14
14. RISOLUZIONE DEI PROBLEMI
In basso sono elencati alcuni possibili malfunzionamenti.
Se il problema non può essere risolto nel modo descritto, si deve contattare l’Assistenza Tecnica.
PROBLEMA POSSIBILE CAUSA RIMEDIO
L’apparecchio non si accende. La spina non è collegata alla presa. Collegare la spina alla presa.
Il caè non è caldo. Le tazze non sono state pre-riscaldate. Riscaldare le tazze risciacquandole con
dell’acqua calda (N.B: si può utilizzare la
funzione acqua calda).
I circuiti interni dell’apparecchio si sono
ra reddati perché sono trascorsi 2-3 mi-
nuti dall’ultimo caè.
Prima di fare il caè riscaldare i circuiti
interni con un risciacquo, mantenendo
premuto il tasto per alcuni secondi.
La temperatura caè impostata è bassa.
Impostare una temperatura caè più alta
nel menù impostazioni (vedi “9. Menù
impostazioni”).
È necessario decalcicare la macchina
Eseguire la decalcicazione. Successi-
vamente vericare il grado di durezza
dell’acqua (“6. Misurazione della durezza
dell’acqua”) e vericare che l’apparecchio
sia impostato secondo la durezza reale (“9.
Menù impostazioni”).
Il caè è poco corposo o ha poca crema. Il caè è macinato troppo grosso. Regolare la macinatura (“4.6 Regolazione
del macinacaè”). L’eetto è visibile solo
dopo l’erogazione di almeno 2 caè .
Il caè non è adatto. Utilizzare caè per macchine da caè
espresso.
Il caè non è fresco. La confezione del caè è aperta da troppo
tempo e ha perso il gusto.
Il caè fuoriesce troppo lentamente op-
pure a gocce.
Il caè è macinato troppo ne. Regolare la macinatura (“4.6 Regolazione
del macinacaè”). L’eetto è visibile solo
dopo l’erogazione di almeno 2 caè .
La macchina non eroga il caè La macchina rileva delle impurità al suo
interno
Attendere che la macchina ritorni pronta
all’uso e selezionare la bevanda deside-
rata. Se il problema persiste, rivolgersi al
Centro Assistenza Autorizzato.
Il caè non esce da uno oppure entrambi
i beccucci dell’erogatore.
Gli ugelli dell’erogatore caè sono
otturati.
Pulire gli ugelli con un panno. Se neces-
sario, utilizzare uno stuzzicadenti per
rimuoere eventuali incrostazioni.
Il caè erogato è annacquato. L’imbuto per il caè pre-macinato si è
intasato.
Aprire lo sportello, pulire l’imbuto con
l’aiuto di un pennello.
L’infusore non si può estrarre. Non è stato eseguito lo spegnimento.
Eseguire lo spegnimento premendo il tasto
.
→

15
PROBLEMA POSSIBILE CAUSA RIMEDIO
Al termine della decalcicazione, l’appa-
recchio richiede un terzo risciacquo
Durante i due cicli di risciacquo, il serba-
toio acqua non è stato riempito no al
livello MAX
Svuotare la vaschetta raccogligocce, riempire
il serbatoio no al livello MAX e eettuare il
terzo risciacquo.
Il latte ha bolle grandi Il latte non è sucientemente freddo o
non è parzialmente scremato o scremato.
Utilizzare latte o totalmente scremato,
oppure parzialmente scremato, a tem-
peratura di frigorifero (circa 5°C). Se il
risultato non è ancora quello desiderato,
provare a cambiare marca di latte.
Il cappuccinatore è sporco. Smontare i componenti e pulirli
accuratamente.
Si utilizzano bevande vegetali. Il risultato varia molto in base alle carat-
teristiche nutrizionali delle bevande.
Il ripiano poggiatazze sopra la macchina
è caldo
Sono state preparate diverse bevande in
rapida successione
La macchina non è in uso ed emette dei
rumori o dei piccoli sbu di vapore
La macchina è pronta all’uso o è stata
spenta da poco e alcune gocce di conden-
sa cadono all’interno del vaporizzatore
ancora caldo.
Questo fenomeno fa parte del normale
funzionamento dell’apparecchio; per li-
mitare il fenomeno, svuotare la vaschetta
raccogligocce.
L’apparecchio emette degli sbu di va-
pore dalla vaschetta raccogligocce e/o c’è
acqua sul piano sul quale l’apparecchio è
posto .
Dopo la pulizia, non è stata reinserita la
griglia vaschetta.
Reinserire nella vaschetta raccogligocce
la griglia vaschetta.
16
1. INTRODUCTION
The principal functions of the machine are illustrated step by
step in the Quick Guide.
Take a few minutes to read this Instruction for Use. This will
avoid all risks and damage to the appliance.
The LEDs and indicator lights on the panel will help you interact
with the machine and use the various functions correctly:
O --
On steadily
Function
available
Flashing
Function in
progress
Fast blink
Attention
required on the
part of the user
The same symbols are also used in the Quick Guide provided
with the product.
2. SETTING UP THE APPLIANCE
• The instructions for setting up the appliance are given in
the QUICK GUIDE.
• When using the machine for the rst time, 4-5 coees
will need to be made before it starts giving satisfactory
results.
• The rst time you use the machine, the water circuit is
empty and the appliance could be very noisy.The noise
becomes less as the circuit lls.
• Possible traces of coee in the mill are the result of set-
tings tests performed on the appliance before sale, proof
of the meticulous care and attention we invest in our
products.
3. TURNING THE MACHINE ON AND OFF
• Each time the appliance is turned on, it performs an auto-
matic preheat and rinse cycle which cannot be interrupt-
ed. The appliance is not ready for use until the cycle has
been completed.
• Whenever the machine is turned o after being used to
make coee, it performs an automatic rinse cycle.
Danger of scalding!
During rinsing, a little hot water ows from the coee spouts.
Take care to avoid contact with splashes of water.
• To turn the appliance on or o, press the button.
If you will not be using the appliance for some time, unplug it
from the mains socket:
CONTENTS
1. INTRODUCTION ......................................16
2. SETTING UP THE APPLIANCE ..................16
3. TURNING THE MACHINE ON AND OFF ......16
4. MAKING COFFEE BEVERAGES ..................17
4.1 Making
coee using
coee beans .........17
4.2 Making coee using pre-ground coee 17
4.3 Varying the coee aroma ......................17
4.4 Rinsing ................................................17
4.5 Tips for a hotter coee...........................17
4.6 Adjusting the coee mill .......................17
4.7 Customising the quantity in the cup......17
5. MAKING CAPPUCCINO ............................18
6. MEASURING WATER HARDNESS ..............18
7. WATER SOFTENER FILTER .......................18
7.1 Replacing the lter ................................ 19
7.2 Removing the lter ...............................19
8. TIPS FOR ENERGY SAVING .......................19
9. SETTINGS MENU ....................................20
9.1 Reset default values ..............................22
10. CLEANING THE MACHINE ........................22
11. CLEANING THE INFUSER .........................23
12. DESCALING ...........................................24
13. EXPLANATION OF INDICATOR LIGHTS.......25
14. TROUBLESHOOTING ..............................26
17
4. MAKING COFFEE BEVERAGES
4.1 Making
coee using
coee beans
• Do not use green, caramelised or candied coee beans as
they could stick to the coee mill and make it unusable.
• If “Energy Saving” mode is activated, there may be a few
seconds delay before the rst coee is delivered.
4.2 Making coee using pre-ground coee
• Never add pre-ground coee when the machine is o or it
could spread through the inside of the machine and dirty
it. This could damage the machine.
• Never use more than one level measure as it could dirty
the inside of the machine or block the funnel.
• Making LONG coee: halfway through prepara-
tion, when the + lights come on, add one
level measure of pre-ground coee and press the Long
button again.
• You cannot make Doppio+ coee using pre-
ground coee.
4.3 Varying the coee aroma
1. Press the button corresponding to the preferred aroma:
Mild
Medium
Strong
2. Select the desired coee beverage.
Please note:
• When the next coee is made, the machine will propose
the last aroma selected.
• In the event of power failure, the machine will revert to
the medium default setting.
4.4 Rinsing
Use this function to deliver hot water from the coee spouts to
clean and heat the appliance’s internal circuit.
To perform the rinse cycle, just press and hold the button
for about 5 seconds. Delivery stops automatically (to interrupt
delivery earlier, press the same button again).
x 5 sec
4.5 Tips for a hotter coee
To make a hotter coee, proceed as follows:
• perform a rinse cycle (see paragraph “Rinsing”);
• warm the cups by rinsing them rst using the hot water
function;
• increase the coee temperature (see section “9. Settings
menu”).
4.6 Adjusting the coee mill
The coee mill is set by default to prepare coee correctly and
should not require regulating initially. To adjust, while the cof-
fee mill is in operation, turn the dial as follows:
If the coee is delivered too
slowly, or not at all.
This adjustment will not take ef-
fect until at least 2 cups of coee
have been delivered.
Turn one click towards “7”
For a fuller bodied creamier
coee
This adjustment will not take ef-
fect until at least 2 cups of coee
have been delivered.
Turn one click towards “1”
Please note:
The grinding adjustment dial must only be turned when the
coee mill is in operation during the initial phase of coee
preparation.
4.7 Customising the quantity in the cup
1. Press the button relative to the beverage being pro-
grammed and hold for a few seconds: the programming
menu is accessed when the indicator switches to fast
blink. Delivery begins;
2. Once the cup is lled to the desired level, press the bev-
erage button again. Delivery ceases and the quantity is
stored in the memory.
18
Beverage* Default
(ml)
Programmable (ml)
Espresso 40
from ≃ 20 to ≃ 180
Coee 180
from ≃ 100 to ≃ 240
Long 160
from ≃ 115 to ≃ 250
Doppio+ 120
from ≃ 80 to ≃ 180
Americano Espresso:
40
Water:
110
Espresso:
da ≃ 20 a ≃ 180
Water:
da ≃ 50 a ≃ 300
Long Black Water:
120
Espresso:
80
Water:
da ≃ 50 a ≃ 300
Espresso:
da ≃ 40 a ≃ 360
Over ice 100
from ≃ 40 to ≃ 240
(*)
The numbers and types of beverages dier according to
model.
Please note!
To cancel the current programme, press a button corresponding to
another beverage
5. MAKING CAPPUCCINO
• Fill a container with about 100 grams of milk for each
cappuccino to be made. When choosing the size of the
container, bear in mind that the milk doubles or triples in
volume.
• For a richer, denser froth, use skimmed or partially
skimmed milk at refrigerator temperature (about 5°C).
To ensure the heated milk does not end up with meagre
froth or large bubbles, clean the cappuccino maker every
time after use.
• The quality of the froth may vary depending on:
• the type of milk or vegetable beverage;
• the brand used;
• the ingredients and nutritional values.
6. MEASURING WATER HARDNESS
The descaling alarm is displayed after a period of time es-
tablished according to water hardness. The machine is set by
default for a hardness value of “4“. The machine can also be
programmed according to the hardness of the water supply
in the various regions, so that descaling is required less often.
1. Remove the indicator paper from its packaging. If provid-
ed with your model, you will nd it attached to the Quick
Guide.
2. Immerse the paper completely in a glass of water for
about one second.
3. Remove the strip from the water and shake lightly. After
about a minute, 1, 2, 3, or 4 red squares appear, depend-
ing on the hardness of the water. Each square corresponds
to one level.
Total Hardness Test Hardness
1
Low
2
Medium
3
Medium/High
4
High
See instructions in section “9. Settings menu” to set the machine.
7. WATER SOFTENER FILTER
To ensure constant performance of the machine over time, we
recommend using a De’Longhi water softener lter.
For more information, visit the www.delonghi.com website.
EAN: 8004399327252
To use the lter correctly, follow the instructions below.
1. Remove the lter from the packaging and turn the date
indicator to view the next two months;
0,5 L
19
2. To activate the lter, run tap water through the hole in the
centre of the lter until water comes out of the openings
at the side for more than a minute;
3. Extract the water tank
and ll with water; insert the lter
in the water tank and immerse it completely for about ten
seconds, sloping it and pressing it lightly to enable the air
bubbles to escape;
4. Insert the lter in the lter housing and press as far as
it will go;
5. Close the tank with the lid, then put the tank back in the
machine;
6. Place an empty container with a minimum capacity of 0.5
litres under the steam/hot water spout.
7. See instructions in section “9. Settings menu” to install the
lter.
8. The appliance delivers hot water, then stops automatically;
9. The lter is now active and you can use the coee
machine.
7.1 Replacing the lter
Replace the lter when the corresponding light comes on.
1. Extract the water tank and exhausted lter;
2. Follow the operations described in the previous section to
activate the lter;
3. See instructions in section “9. Settings menu” to set the
machine.
Please note:
After two months (see date indicator) or when the appliance
has not been used for 3 weeks, you should replace the lter
even if the message has not yet been displayed.
7.2 Removing the lter
If you want to use the appliance without the lter, you must
remove it and notify the appliance of its removal.
1. Extract the water tank and exhausted lter;
2. See instructions in section “9. Settings menu” to set the
machine.
Please note!
After two months (see date indicator) or when the appliance has
not been used for 3 weeks, you should replace the lter even if the
message has not yet been displayed.
8. TIPS FOR ENERGY SAVING
• Set auto-o to 15 minutes (see “9. Settings menu”);
• Enable Energy Saving (see “9. Settings menu”);
• Always carry out the descaling cycle when prompted by
the machine.

20
9. SETTINGS MENU
When in the menu, use the active buttons to select the corresponding functions:
1 2 3 4 5
6
(*)
(*)
Beverages dier according to model
1. Access the menu:
x 5 sec
Press and hold the button for a few seconds:
the settings buttons light up.
Proceed by pressing the button corresponding to the setting to
be adjusted.
2. Adjust the machine settings:
Water softener lter
Press one of the bean
symbols to install or
replace the water softener
lter
INSERTED
Conrm selection
Press the pre-ground
symbol to remove the
water softener lter
REMOVED
Beep
Press one of the bean
symbols to enable the
beep
ON
Conrm selection
Press the pre-ground sym-
bol to disable the beep
OFF
→
Water softener
lter
Coee
temperature
Auto-o
Energy saving
Water hardness
Access to
settings menu
Selection of
settings
Beep
21
Coee temperature
1
Press the bean symbol
corresponding to the
required temperature
LOW
Conrm selection
1
MEDIUM
HIGH
Energy saving
2
Press one of the bean
symbols to enable energy
saving
ON
Conrm selection
2
Press the pre-ground
symbol to disable energy
saving
OFF
Water hardness
3
Press the symbol
corresponding to the level
to set
LEVEL 1
Conrm selection
3
LEVEL 2
LEVEL 3
LEVEL 4
Auto-o
4
Press the symbol
corresponding to the time
to set
15 MINUTES
Conrm selection
4
30 MINUTES
1 HOUR
3 HOURS
3. Exit the menu:
Press the button:
The machine is ready for use again.
Please note!
The machine exits the settings menu automatically if there is no
activity for 30 seconds.
22
9.1 Reset default values
Make sure the machine is in stand-by (o, but connected to the
mains power supply).
Press the buttons corresponding to beverages 1, 2 and
and hold for 5 seconds. All the settings and beverage quantities
are reset to the default values.
1 2
x 5 sec
The machine emits a long beep and all the lights ash to con-
rm the reset
BEEP
10. CLEANING THE MACHINE
Important!
• Do not use solvents, abrasive detergents or alcohol to clean the coee machine. With De’Longhi superautomatic coee machines,
no chemical products are required for cleaning purposes.
• Do not use metal objects to remove encrustations or coee deposits as they could scratch metal or plastic surfaces.
Component Frequency Procedure
Grounds container
When the light comes on, the
grounds container must be emptied and
the machine can no longer make coee.
• Remove the drip tray, empty and clean.
• Empty the grounds container and clean thoroughly
to remove all residues left on the bottom.
• Check the red condensate tray and empty if
necessary.
The appliance cannot be used to make coee until you have cleaned the grounds container. Even if
not full, the empty grounds container message is displayed 72 hours after the rst coee has been
prepared. For the 72 hours to be calculated correctly, the machine must never be disconnected from
the mains power supply.

23
Component Frequency Procedure
Drip tray components The drip tray is tted with a level indi-
cator (red) showing the level of water it
contains.
Before the indicator protrudes from the
cup tray, the drip tray must be emptied
and cleaned
• Remove the drip tray and grounds container;
• Remove the cup tray and drip tray grille, then
empty the drip tray and grounds container and
wash all the components;
• Check the red condensate tray and empty if
necessary;
• Replace the drip tray complete with grille and the
grounds container.
When removing the drip tray, the grounds container
must be emptied, even if it contains only a few grounds.
Inside of the machine Check periodically (about once a month)
that the inside of the appliance (accessi-
ble by removing the drip tray) is not dirty.
Switch the machine o and disconnect from the power
supply. Never immerse the machine in water.
• Remove coee deposits with a brush or sponge;
• Remove all residues with a vacuum cleaner
Coee spouts Clean the coee spouts regularly (once a
month)
• Clean the coee spouts regularly with a sponge or
cloth;
• Check the holes in the coee spout are not
blocked. If necessary, remove coee deposits with
a toothpick.
11. CLEANING THE INFUSER
Important!
The infuser cannot be extracted while the machine is on.
1. Press the button to turn the machine o;
2. Remove the water tank;
3. Open the infuser door on the right side of the machine;
PUSH
24
4. Press the two coloured release buttons inwards, at the same
time pulling the infuser outwards;
PUSH
5. Soak the infuser in water for about 5 minutes, then rinse
under the tap;
Important!
RINSE WITH WATER ONLY
NO DETERGENTS NO DISHWASHER
6. Do not use detergents when cleaning the infuser, as they
could damage it.
7. Use the brush to remove any coee residues left in the
infuser housing, visible through the infuser door;
8. After cleaning, replace the infuser by sliding it onto the
internal support, then push the PUSH symbol fully in until
it clicks into place;
Please note:
If the infuser is dicult to insert, before insertion, position it
correctly by pressing the two levers.
9. Once inserted, make sure the two coloured buttons have
snapped out;
PUSH
10. Close the infuser door;
11. Put the water tank back.
12. DESCALING
To complete the descaling cycle correctly, pay close atten-
tion to the quantities required in the water tank for each
step:
Step 1: Descaling
action
+
Step 2: First rinse
Step 3: Second rinse
• Before use, read the instructions and the labelling on the
descaler pack.
• Use De’Longhi descaler only. Using unsuitable descaler
and/or performing descaling incorrectly may result in
faults not covered by the manufacturer’s guarantee.
• Descaler can cause damage to delicate surfaces. If the
product is accidentally spilt, dry immediately.
25
To descale
Descaler De’Longhi descaler
Container Recommended capacity: 2 l
Time ~45min
Important:
If the water softener lter is installed, it must be re-
moved before adding the descaler solution.
Put the lter back in the machine after the rst tank of
rinsing has been completed.
The descaling procedure is described in the Quick Guide.
Please note:
• Once the descaling cycle has begun, it cannot be inter-
rupted and must be completed with the entire rinse cycle.
• After descaling, it is normal for the grounds container to
contain water.
• If the water tank has not been lled to the MAX level after
descaling, the appliance prompts for a third rinse to en-
sure that the descaler solution has been completely elimi-
nated from the machine’s internal circuits. Before starting
rinsing, remember to empty the drip tray.
13. EXPLANATION OF INDICATOR LIGHTS
Light Meaning
The beverage lights ash The machine is warming up:
wait
The beverage and settings
lights are on steadily
The machine is ready for
use: select the desired bev-
erage and relative options
Replace the lter (see
section “7. Water softener
lter”)
Insucient water in tank:
ll the tank
→
Light Meaning
The water tank is missing, or
is not positioned correctly:
insert the tank correctly
General alarm: the inside of
the machine is very dirty.
Clean the machine thor-
oughly. If the message is
still displayed after cleaning,
contact De’Longhi Customer
Services and/or an approved
Service Centre
The infuser has not been re-
placed after cleaning: insert
the infuser as described in
section “11. Cleaning the
infuser”
No coee beans: ll the
beans container, then press
any button to reset the
alarm.
The grinding is too ne and
the coee is delivered too
slowly or not at all. Adjust
the coee mill (section “4.6
Adjusting the coee mill”)
Too much coee has been
used. Select a milder taste
or reduce the quantity of
pre-ground coee
→
26
Light Meaning
Preparation with pre-
ground coee has been
selected without placing
any pre-ground coee in the
funnel. Make sure the funnel
is not blocked, then add one
level measure of pre-ground
coee and repeat delivery.
The water circuit is empty.
Deliver hot water by turning
the dial to the posi-
tion or pressing the “Steam”
button
The grounds container
needs emptying
→
Light Meaning
The grounds container is
missing, or not inserted
correctly: insert the drip
tray complete with grounds
container and press as far as
it will go
Descaling is required (“12.
Descaling” and the dedi-
cated section of the Quick
Guide)
Descaling has been inter-
rupted. To use the machine
again:
1. Press the button;
2. If the steam dial is in
the O position, turn it
to the position;
delivery will begin and
descaling will resume
from Fig. 14, page 10.
14. TROUBLESHOOTING
Below is a list of some of the possible malfunctions. If the problem cannot be resolved as described, contact customer services.
PROBLEM POSSIBLE CAUSE REMEDY
The appliance does not come on. It is not plugged into the mains socket. Plug into the mains socket.
The coee is not hot. The cups were not preheated. Warm the cups by rinsing them with hot
water (Please note: you can use the hot
water function).
The internal circuits of the appliance have
cooled down because 2-3 minutes have
elapsed since the last coee was made.
Before making coee, press and hold the
button for a few seconds to perform a
rinse cycle and warm the internal circuits.
Coee temperature setting too low.
Set a hotter coee temperature in the set-
tings menu (see “9. Settings menu”).
The machine must be descaled Carry out the descale procedure. Next,
check the water hardness (“6. Measuring
water hardness”) and make certain the
machine setting matches the local water
supply hardness (“9. Settings menu”).
→
27
PROBLEM POSSIBLE CAUSE REMEDY
The coee is weak or not creamy enough. The coee is ground too coarsely. Adjust the grinding level (“4.6 Adjusting
the coee mill”). The eect is not visible
until at least 2 coees have been made.
The coee is unsuitable. Use coee for espresso machines.
Coee not fresh. The coee pack has been opened for too
long and has lost its taste.
The coee is delivered too slowly or drop
by drop.
The coee is ground too nely. Adjust the grinding level (“4.6 Adjusting
the coee mill”). The eect is not visible
until at least 2 coees have been made.
The machine does not make coee Impurities have been detected in the in-
ternal circuits
Wait until the machine is ready for use
again, and proceed to select the required
beverage. Contact customer services if
the problem persists.
Coee does not come out of one or both
spouts.
The coee nozzles are blocked. Clean the nozzles with a cloth. Any en-
crusted deposits can be removed with a
toothpick, if necessary.
The coee delivered is watery. The pre-ground coee funnel is clogged. Open the door and clean the funnel with
the help of a brush.
The infuser cannot be extracted. The machine has not been turned o.
Turn the machine o by pressing the
button.
At the end of descaling, the appliance
requests a third rinse
Water tank not lled to the MAX level
during the course of the two rinse cycles
Empty the drip tray, ll the tank up to the
MAX level and run the third rinse cycle.
The milk has big bubbles The milk is not cold enough, or is not
semi-skimmed or skimmed.
Use skimmed or semi-skimmed milk at
refrigerator temperature (about 5° C). If
the result is not as you wished, try chang-
ing brand of milk.
Cappuccino maker dirty. Remove the components and clean them
thoroughly.
Vegetable beverages have been used. The eect varies widely depending on the
nutritional properties of the beverages.
The cup tray on top of the machine is hot A number of beverages have been pre-
pared in rapid succession
The machine emits noises or small pus
of steam while not in use
The machine is ready for use, or has re-
cently been turned o, and condensate is
dripping into the hot vaporiser.
This is part of normal operation. To limit
the phenomenon, empty the drip tray.
The appliance emits pus of steam from
the drip tray and/or there is water on the
surface the appliance rests on.
The drip tray grille has not been replaced
after cleaning.
Put the drip tray grille back in the drip
tray.

De’Longhi Appliances via Seitz, 47 31100 Treviso Italia www.delonghi.com
5713250274_00_0421