

July, 2019
QSG2_A
Reolink E1 Series
Operational Instruction
EN/DE/FR/IT/ES

• Meaning of the Status LED
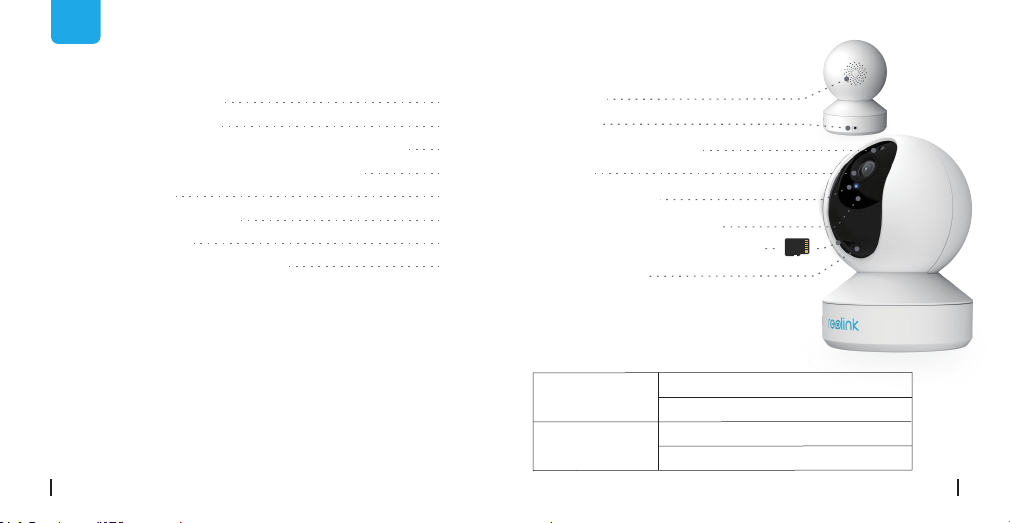
Speaker
Micro SD Card Slot
Daylight Sensor
WiFi connection failed
WiFi is not configured
Camera is starting up
WiFi connection succeeded
On
Blinking
General Introduction
EN
Contents
What’s in the Box
What’s in the Box
General Introduction
Set up Camera on Reolink App
(For Smartphones)
Add the Camera to Reolink Client (For PC)
How to Mount the Camera
Troubleshooting
Specifications
Notification of Compliance
1
2
3
7
9
11
13
14
Camera ×1
Mounting Plate ×1
Power Adapter ×1
Quick Start Guide ×1
Surveillance Sign ×1
Mounting Hole
Template ×1
Pack of Screws ×1
DC 5V
Built-in Mic
Status LED
Lens
Reset Button
(Rotate the camera's lens to find the
reset button and the SD card slot.)
2English1 English

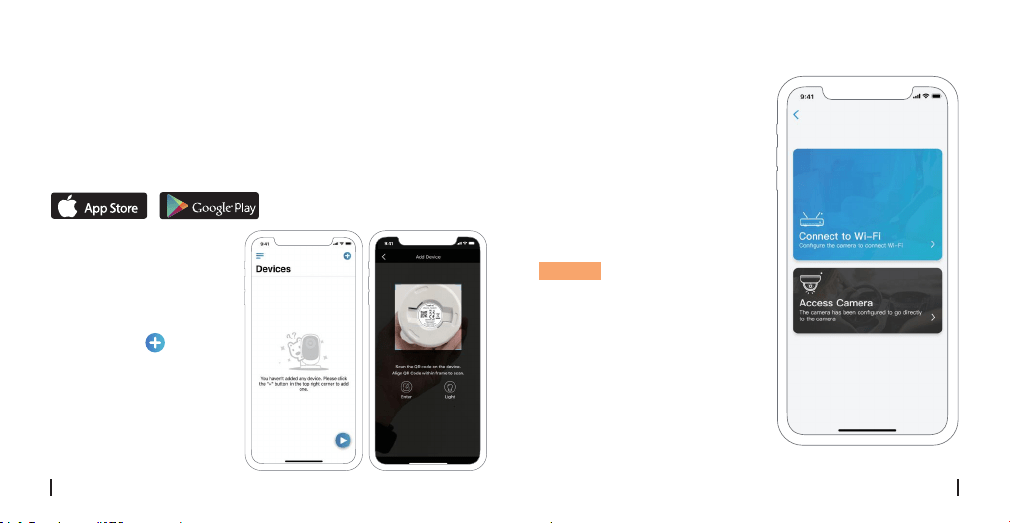
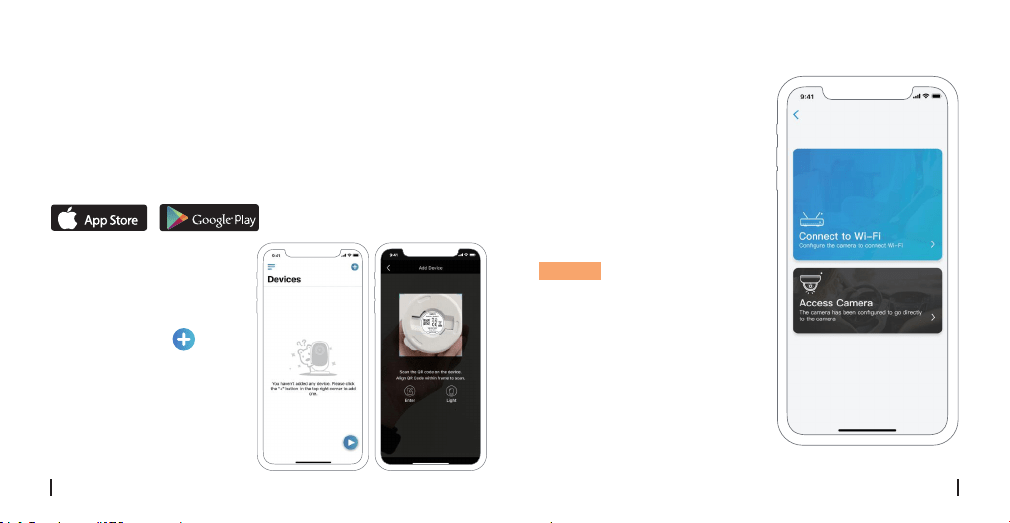
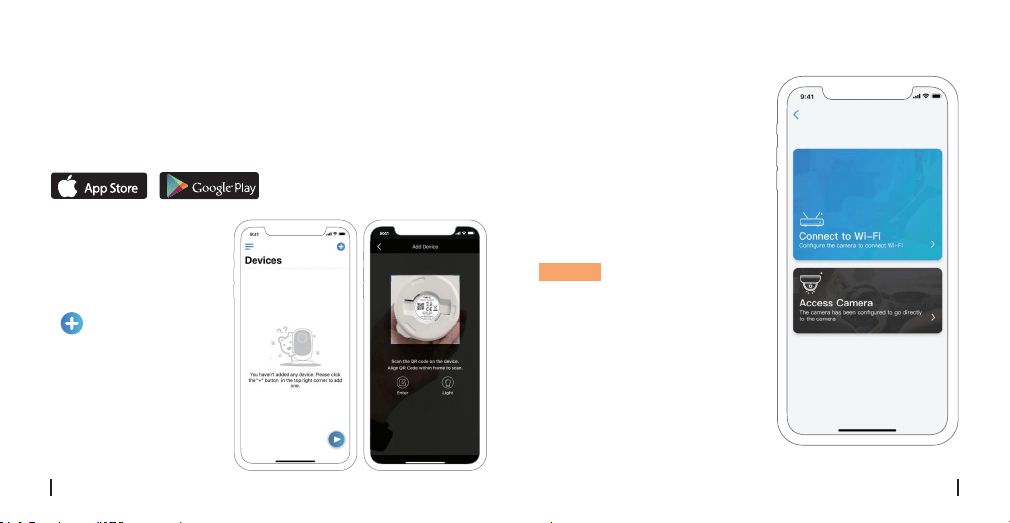
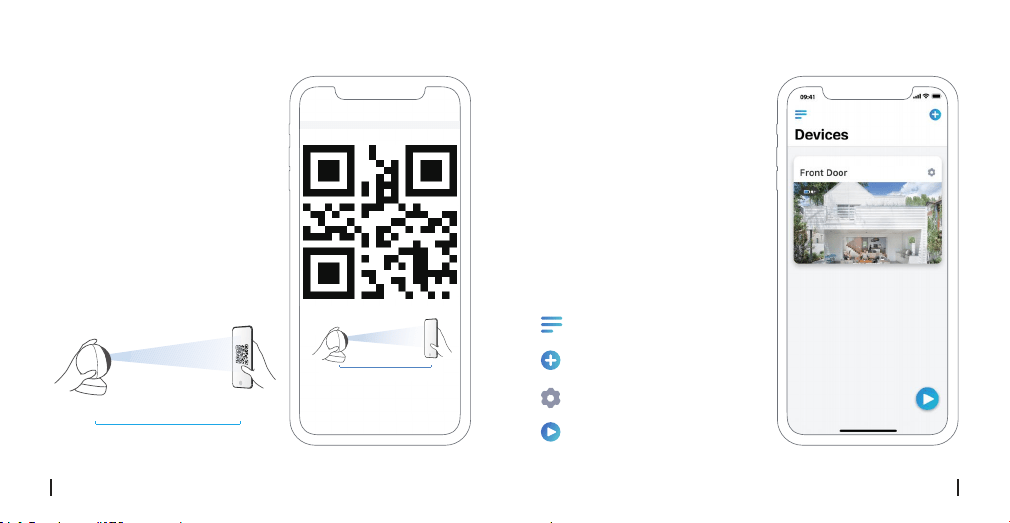
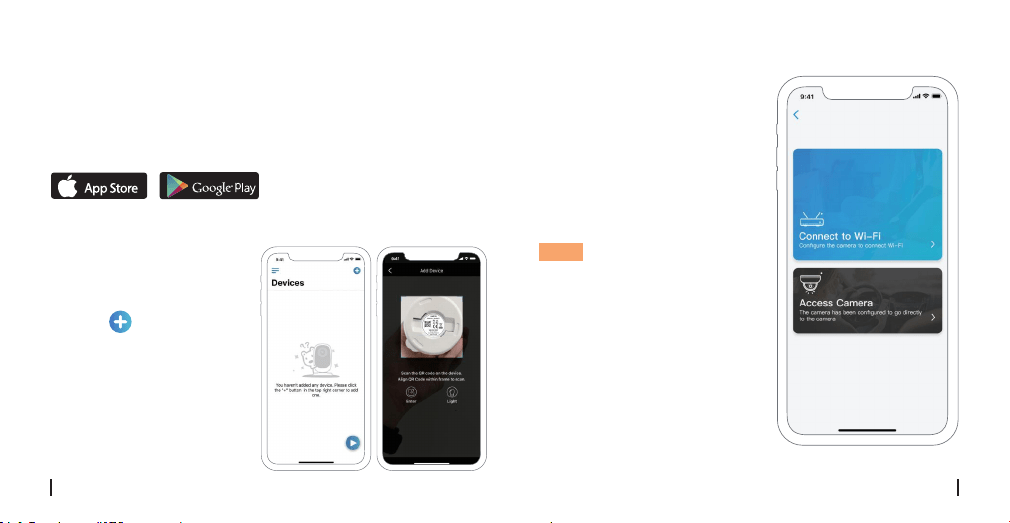
Set up Camera on Reolink App
(For Smartphones)
Download and install the Reolink App on APP Store (for
iOS) and Google Play (for Android).
Please follow the
prompt tones to
configure the camera.
1. Please click the “ ”
button in the top right
corner to add the
camera.
2. Scan the QR code on
the bottom of the
camera.
Available on the
Get it on
3. Click “Connect to Wi-Fi” to
configure the WiFi settings.
NOTICE:
Your family can click
"Access Camera" for live
view after the initial setup.
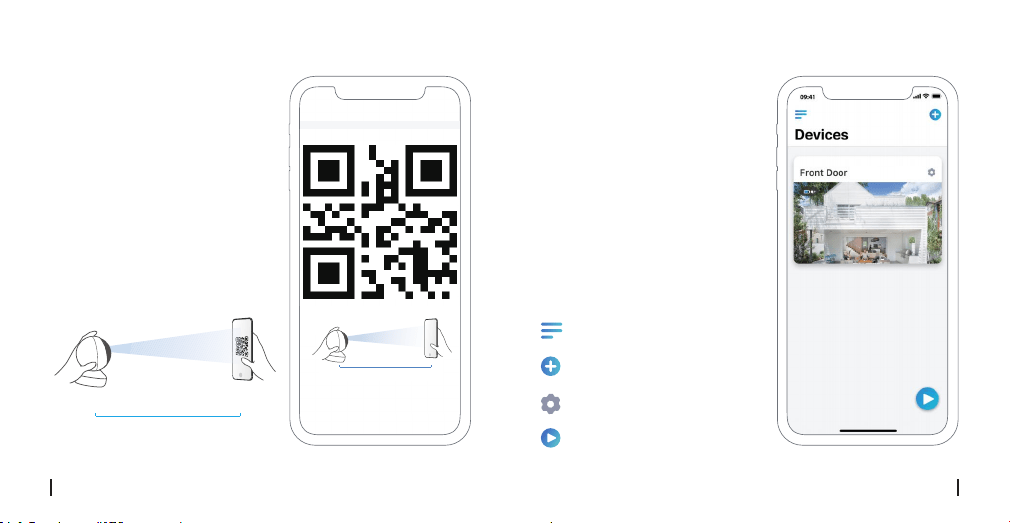
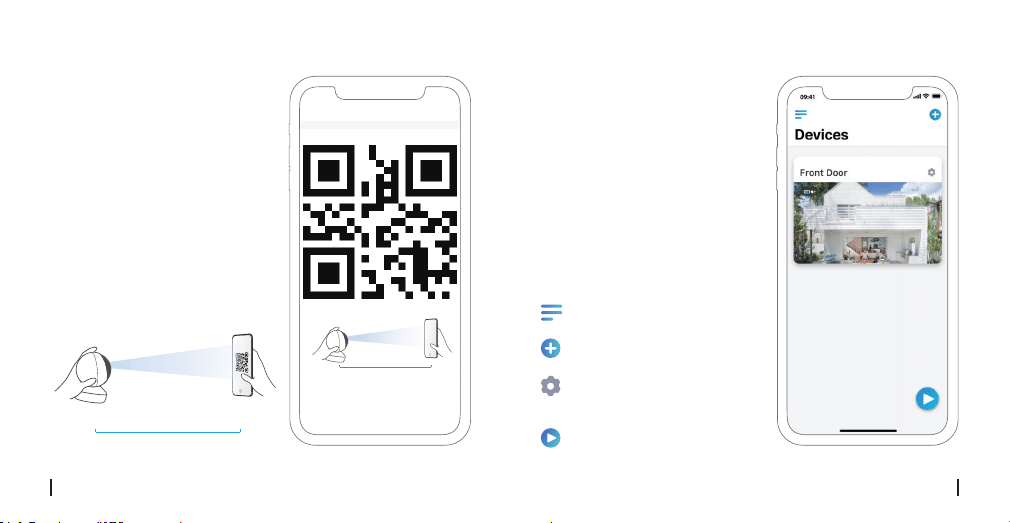
4English3 English

4. Then a QR code will be
generated and displayed on
your phone. Please place the
QR code on your phone in
front of the camera’s lens at
a distance of about 30 cm
(12 inches) and let the
camera scan the QR code.
≈30cm(12 inch)
5. Follow the steps to finish
the Wi-Fi settings.
6. After you created a
password for your camera,
please follow the steps to
sync the time, and then start
live view or go to “Device
Settings”.
Menu
Add New Device
Device Settings
Access the Live View
≈30cm(12 inch)
6English
5 English
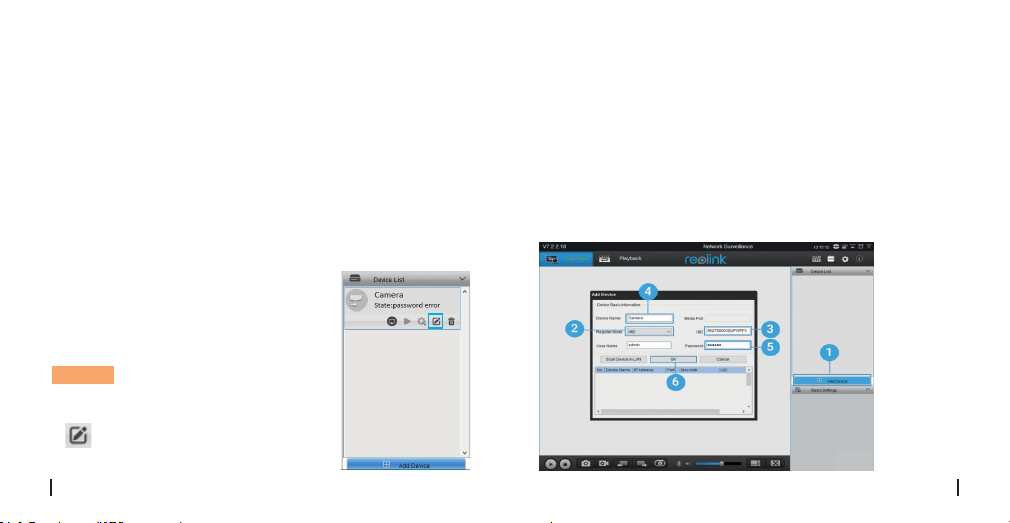
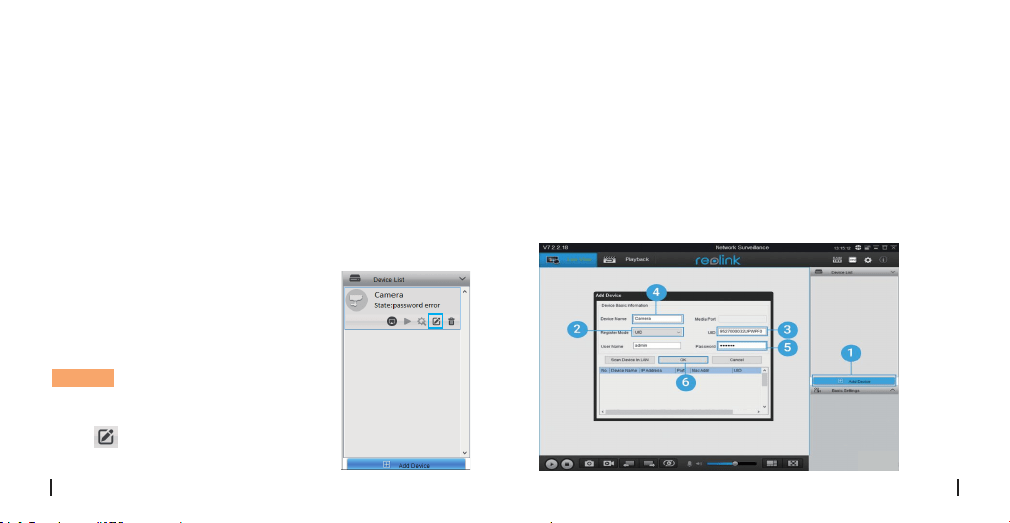
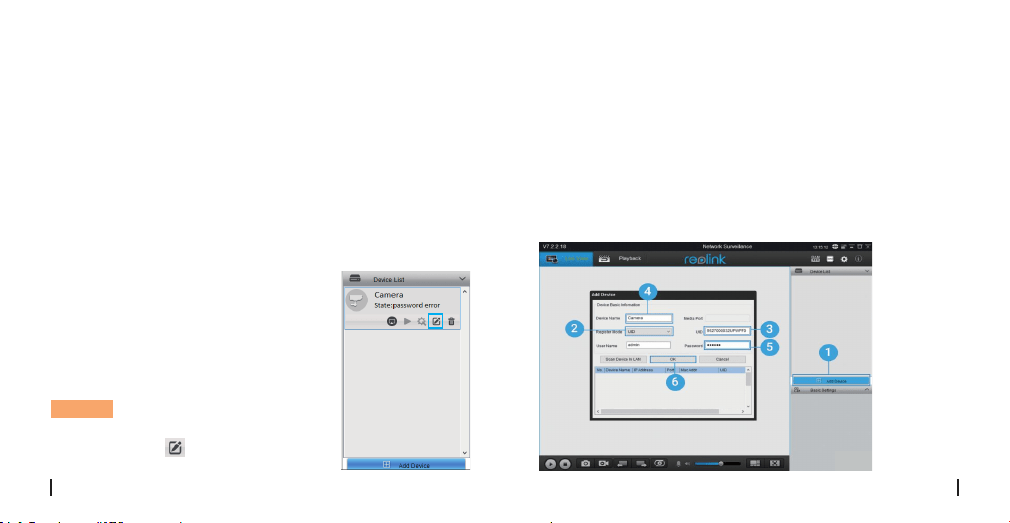
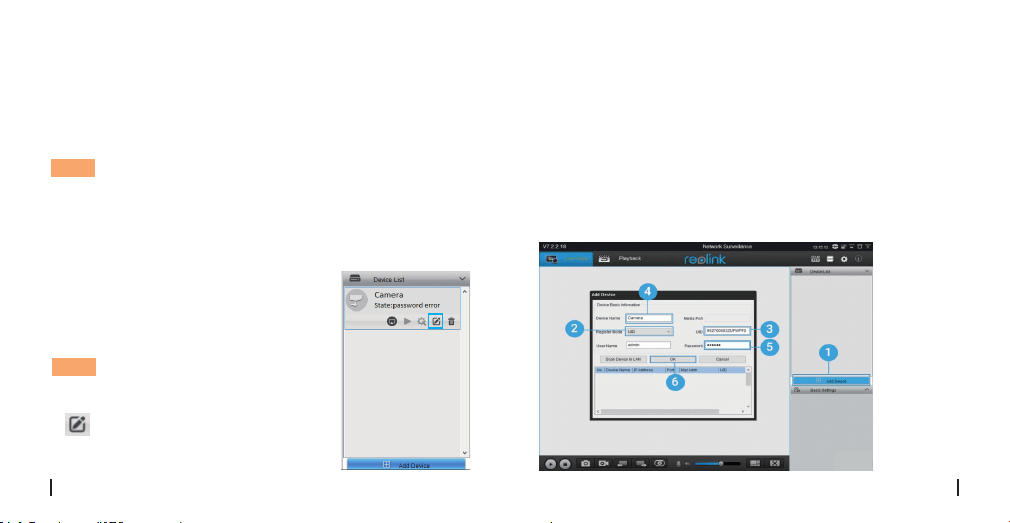
• In WAN
1. Click “Add Device” on the right-side menu.
2. Choose “UID” as the Register Mode.
3. Type in the UID of your camera.
4. Create a display name for the camera.
5. Input the login password created on Reolink App.
6. Click “OK” to log in.
Please download and install the Reolink Client software:
https://reolink.com/software-and-manual/ and install it.
Please configure the camera using the Reolink App first.
Launch the Reolink Client software and follow the steps
below toadd the camera.
1. Connect your computer to the
WiFi network of your router.
2. Launch Reolink Client. The
camera will automatically display
in the device list in LAN.
NOTICE: If you’ve created the
password for your camera on
Reolink App, please click the
“ ” button to enter the correct
password to log in.
• In Same Network (In LAN)
Add the Camera to Reolink
Client (For PC)
8English7 English
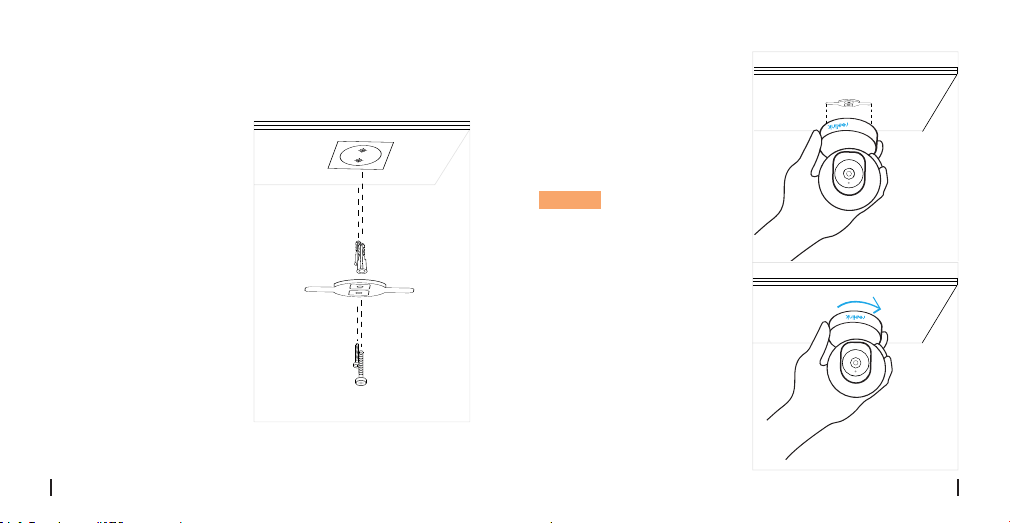
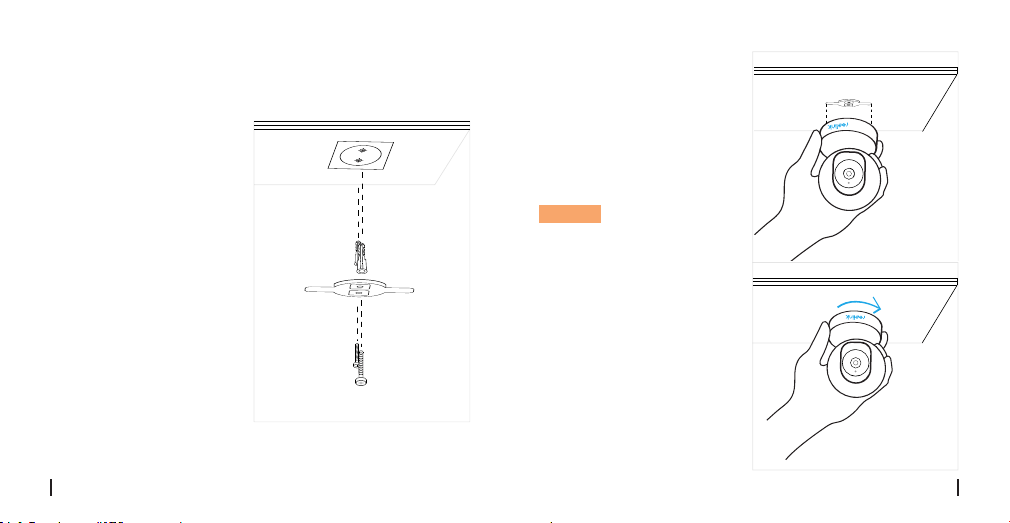
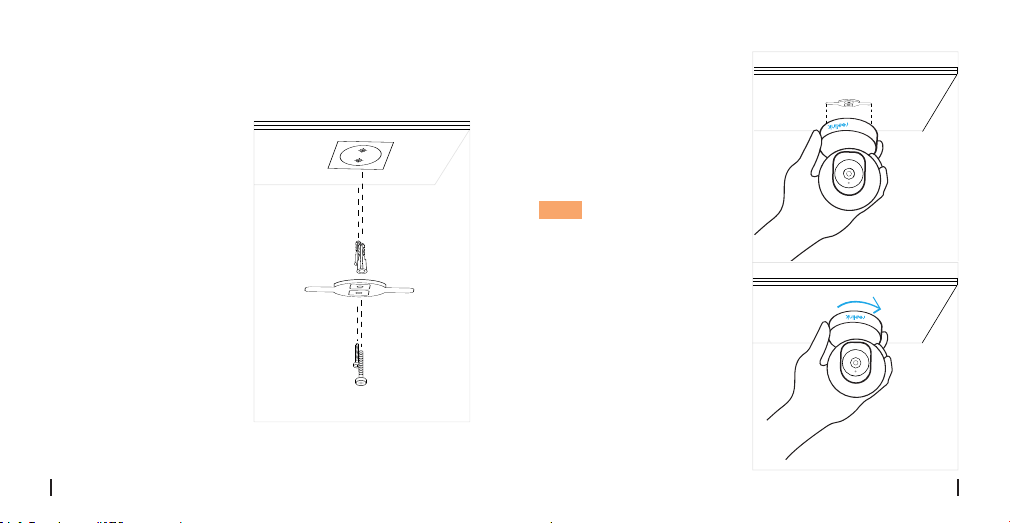
How to Mount the Camera
Step 1
Drilling two screw holes
on the wall according to
the mounting hole
template.
Step 2
Insert the two plastic
anchors into the holes on
the wall.
Step 3
Secure the base unit in
place by tightening the
screws into the plastic
anchors.
Step 4
Align the camera with the
bracket, then turn the
camera unit clockwise
to lock it in position.
NOTICE:
1. Turn the camera
anticlockwise to remove
it from the wall.
2. In case your camera is
mounted upside down,
the picture will need to be
rotated as well. Please go
to Device Settings->
Display interface , then
click Rotation to adjust
the image.
10English
9 English
If you find your camera is not powering on, please try
the following:
• Please check whether the outlet is working properly or
not. Try to plug the camera into a dierent outlet and
see whether it will work.
• Please check whether the DC adapter is working or not.
If you have another 5V/1A power adapter which is
working, please try with another power adapter and see
whether it will work.
• If it still won’t work, please contact Reolink support.
set the mode to Auto to activate the IR lights.
• Upgrade your camera's firmware to the latest version.
• Restore it to factory settings, and check the IR light
settings again.
• If the problem goes on, contact Reolink Support.
If you fail to upgrade the firmware for the camera, try
the following:
• Confirm the current firmware version of the camera.
• Make sure the firmware you download in the download
center is the correct one.
• Make sure the network of your computer is smooth.
If it still won’t work, please contact Reolink support.
• Fail to upgrade the firmware
If you find the IR LEDs of your camera stop working, try
the following:
• Go to Device Settings and check whether you have
enabled Infrared Lights, if it’s disabled, please turn it on.
• Please go to Live View and check the Day/Light mode,
• IR LEDs Stop Working
Troubleshooting
• IP cameras is not powering on
12English
11 English
Specifications
Notification of Compliance
Simplified EU Declaration of
Conformity
Reolink Communications declares that this device is in
compliance with the essential requirements and other
relevant provisions of Directive 2014/53/EU.
FCC Compliance Statement
This device complies with Part 15 of FCC Rules. Operation
is subject to the following two conditions: (1) this device
may not cause harmful interference, and (2) this device
must accept any interference received, including
interference that may cause undesired operation. For
more information, visit:
https://reolink.com/fcc-compliance-notice/
This marking indicates that this product should not be
disposed with other household wastes throughout the
Operating Frequency: 2.4 GHz(E1)/Dual Band (E1 Pro/E1
Zoom)
Operating Temperature: -10° to 55° C (14° to 131° F)
Size: Φ76 x 106mm
Weight: 200g (11.2 oz)
Frame Rate: 15fps (in default)
Audio: Two-Way Audio
IR Cut Filter: Yes
Display Resolution: 5MP (E1 Zoom)/4MP(E1 Pro)/3MP(E1)
IR Distance: 12 Meters (40ft)
Pan/Tilt Angle: Horizontal: 355°/Vertical: 50°
Power: DC 5V/1A
Hardware Features
Software Features
General
Correct Disposal of this product
14English13 English

EU. To prevent possible harm to the environment or
human health from uncontrolled waste disposal, recycle
it responsibly to promote the sustainable reuse of
material resources. To return your used device, please
use the return and collection systems or contact the
retailer where the product was purchased. They can take
this product for environment safe recycling.
Use of the product is subject to your agreement to the
Terms of Service and Privacy Policy at reolink.com. Keep
out of reach of children.
By using the Product Software that is embedded on the
Reolink product, you agree to the terms of this End User
License Agreement (“EULA”) between you and Reolink.
Learn more:
https://reolink.com/eula/.
This product comes with a 2-year limited warranty that
is valid only if purchased from Reolink Ocial Store or a
Reolink authorized reseller. Learn more:
https://reolink.com/warranty-and-return/.
Limited warranty
Terms and Privacy
End User License Agreement
This equipment complies with RSS-102 radiation
exposure limits set forth for an uncontrolled
environment. This equipment should be installed and
operated with minimum distance 20cm between the
radiator & your body.
ISED Radiation Exposure Statement
This equipment
16English15 English
OPERATING FREQUENCY (the maximum transmitted
power)
2412MHz—2472MHz (19dBm)
5180 MHz -5320 MHz(18dBm)
5745 MHz -5825 MHz (18dBm)

• Bedeutung des Status der LED
Lautsprecher
Micro-SD-Kartenslot
Tageslichtsensor
WLAN-Verbindung fehlgeschlagen
Kamera startet jetzt
WLAN-Verbindung erfolgreich
Ein
Blinkt
Allgemeine Einführung
DE
Überblick
Lieferumfang
Lieferumfang
Allgemeine Einführung
Richten Sie die Kamera auf der Reolink App ein
Fügen Sie die Kamera zum dem Reolink Client ein
Installation
Fehlerbehebung
Technische Daten
Konformitätserklärung
17
18
19
23
25
27
29
30
Kamera ×1
Montageplatte ×1
Netzteil ×1
Kurzanleitung ×1
Überwachungszeichen ×1
Montage-Lochschablone ×1
Schrauben (im Paket) ×1
DC 5V
Internes Mikrofon
Status LED
Linse
Reset Knopf
(Drehen Sie das Kameraobjektiv für
den Zugri auf Reset-Loch und SD-
Kartensteckplatz.)
18Deutsc17 Deutsc
WLAN ist nicht eingerichtet
Richten Sie die Kamera auf der
Reolink App ein
Suchen Sie im App Store (für iOS) oder in Google Play
(für Android) nach „Reolink“, führen Sie den Download
durch und installieren Sie die App.
Befolgen Sie bitte die
Ansage,um die Kamera
zu konfigurieren.
1. Klicken Sie bitte auf
den Knopf “ ” oben
rechts,um die Kamera
hinzuzufügen.
2. Scannen Sie den
QR-Code auf der
Unterseite der Kamera.
Available on the
Get it on
3. Klicken Sie auf „
WLANVerbindung“,um
fortzufahren.
Hinweis:
Ihre Familie kann nach der
Erstkonfiguration über „Auf
Kamera zugreifen“ zur
Live-Ansicht gelangen.
20Deutsc19 Deutsc

4. Auf dem Handy erscheint
ein QR-Code. Bitte halten Sie
den QR-Code auf Ihrem
Handy in einer Entfernung
von etwa 30 cm vor die Linse
der Kamera, damit die
Kamera den QR-Code
scannen kann. Bitte
vergewissern Sie sich, dass
Sie den Schutzfilm auf der
Kamera-linse entfernt haben.
≈30cm(12 inch)
5. Befolgen Sie die Schritte,
um die WLAN-Einstellungen
zu schaen.
6. Nachdem Sie ein Passwort
für Ihre Kamera erstellt
haben, folgen Sie bitte den
Schritten, um die Uhrzeit zu
synchronisieren. Starten
Sie dann die Live-Ansicht
oder gehen Sie zu „
Geräteeinstellungen"
für weitere Konfiguration.
Menü
Neues Gerät hinzufügen
Geräteeinstellungen
Live-View
≈30cm(12 Fuß)
22Deutsc
21 Deutsc
• In WAN
1. Klicken Sie oben rechts auf „Gerät hinzufügen“.
2. Wählen Sie „UID“ als Registermodus.
3. Tragen Sie die UID Ihrer Kamera ein.
4. Erstellen Sie einen Anzeigenamen für die Kamera.
5. Geben Sie das erstellte Passwort ein.
6. Klicken Sie auf „OK“, um sich einzuloggen.
Bitte laden Sie die Client-Software auf der folgenden
Website herunter und installieren Sie die Software:
https://reolink.com/de/software-and-manual/ Vor der
Verbindung mit der Reolink Client Software muss die
Kamera zuerst auf der Reolink App eingerichtet werden.
1. Verbinden Sie Ihren Computer mit
dem gleichen Router, mit dem auch
die Kamera verbunden ist.
2. Starten Sie den Reolink Client. Die
Kamera wird nun automatisch in der
Geräteliste im LAN angezeigt.
Hinweis: Wenn Sie das Passwort für
Ihre Kamera in der Reolink App
erstellt haben, klicken Sie bitte auf
den“ ” Knopf, um das korrekte
Passwort einzugeben.
• In LAN
Fügen Sie die Kamera zum dem
Reolink Client ein
24Deutsc23 Deutsc
lnstal lαtion
Schritt 1
Bohren Sie gemäb der
Montogelochschoblone
zwel SChraubenlöchern
In die Wond.
Schritt 2
Setzen Sie die belden
Kunststodübel In die
Löcher eln.
Schritt 3
Befestlgen Sie die
Baslsstatlon am
gewünschten Platz.
lndem Sle die Schrouben
In den Kunststodübeln
anzlehen.
Schritt 4
Rlchten Sie die Komera
mlt der Halterung ous
Drehen Sie die
Kameroelnhelt dann
Im Uhrzelgerslnn, um sie
In lhrer Position zu fixleren.
Hinweis:
1. Drehen Sie die Komera
gegen den Uhrzeigersinn.
um sie von der wand zu
entfernen
2. Wenn lhre Kamero auf
dem Kopf stehend
montiert ist. müssen Sie
dos Bild ebenfalIs drehen.
Bitte önen Sie
Gerāteeinstellungen->
Anzelgeoberfläche. kllcken
Sie dann auf Drehen. um
dos Bild anzupassen.
26Deutsc
25 Deutsc

Wenn Ihre Kamera sich nicht einschaltet, versuchen Sie
solche Lösungen:
• Prüfen Sie, ob die Steckdose funktioniert oder nicht. Sie
können die Kamera mit einer anderen Steckdose
verbinden und überprüfen, ob die Kamera nun
funktioniert.
• Prüfen Sie, ob der DC-Adapter funktioniert oder nicht.
• Wenn Sie ein anderes 12V DC-Netzteil besitzen,
verwenden Sie dieses und prüfen, ob die Kamera
funktioniert. Wenn dies das Problem nicht behebt,
wenden Sie sich bitte an das Reolink Support-Team.
ob die Infrarot-LEDs aktiviert sind. Sind die LEDs
deaktiviert, aktivieren Sie diese bitte.
• Bitte önen Sie die Live-Ansicht und aktivieren Sie den
Tag/Nacht-Modus, setzen Sie den Modus auf Auto, um
die IR-Lampen zu aktivieren.
• Aktualisieren Sie Ihre Kamera-Firmware auf die neueste
Version.
• Setzen Sie sie auf die Werkseinstellungen zurück und
aktiveren Sie die IR-Lichteinstellungen.
• Wenn dies das Problem nicht behebt, wenden Sie sich
bitte an das Reolink Support-Team.
Wenn Sie die Firmware nicht aktualisieren können,
versuchen Sie die Lösungen:
• Bestätigen Sie die aktuelle Firmware-Version der Kamera.
• Stellen Sie sicher, dass die im Download-Center
heruntergeladene Firmware die richtige ist.
• Vergewissern Sie sich, dass das Netzwerk Ihres Compu-
ters problemfrei arbeitet.
• Firmware kann nicht aktualisiert
werden
Wenn die IR-LEDs nicht funktionieren, versuchent Sie
Lösungen:
• Önen Sie die Geräteeinstellungen und überprüfen Sie,
• Die IR-LEDs funktionieren nicht
mehr
Fehlerbehebung
• IP-Kamera schaltet sich nicht ein
28Deutsc
27 Deutsc
Spezifikationen
Konformitätserklärung
Vereinfachte
EU-Konformitätserklärung
Reolink erklärt, dass dieses Gerät den grundlegenden
Anforderungen und anderen relevanten Bestimmungen
der Richtlinie 2014/53/EU entspricht.
FCC-Konformitätserklärung
Dieses Gerät entspricht Abschnitt 15 der
FCC-Bestimmungen. Der Betrieb unterliegt den
folgenden beiden Bedingungen:
(1) Dieses Gerät darf keine schädlichen Interferenzen
verursachen und (2) dieses Gerät muss alle
empfangenen Interferenzen akzeptieren, einschließlich
Interferenzen, die zu einem unerwünschten Betrieb
führen können. Weitere Informationen finden Sie unter:
https://reolink.com/fcc-compliance-notice/.
Betriebsfrequenz: 2.4 GHz(E1)/Dualband-WLAN (E1
Pro/E1 Zoom)
Betriebstemperatur: -10° to 55° C
Größe: Φ76 x 106mm
Gewicht: 200g (11.2 oz)
Bildfrequenz: 15 fps (Standard)
Audio: Zwei-Wege-Audio
IR-Sperrfilter: Ja
Display-Auflösung: 5MP(E1 Zoom)/4MP(E1 Pro)/3MP(E1)
Nachtsichtdistanz: 12 Meter (40 Fuß)
Schwenk/Neige winkel: Horizontal: 355°/Vertikal: 50°
Stromeingang: DC 5,0 V/1 A
Hardware-Merkmale
Software-Merkmale
Allgemeines
30Deutsc29 Deutsc

Diese Kennzeichnung weist darauf hin, dass dieses
Produkt in der gesamten EU nicht über den Hausmüll
entsorgt werden darf. Um mögliche Umwelt-oder
Gesundheitsschäden durch unkontrollierte Entsorgung
von Abfällen zu vermeiden, recyceln Sie diese
verantwortungsbewusst, um die nachhaltige
Wiederverwendung von Ressourcen zu unterstützen. Um
ein gebrauchtes Gerät zurückzugeben, nutzen Sie bitte
das Rückgabe-und Sammelsystem oder kontaktieren Sie
den Händler, bei welchem Sie das Produkt gekauft
haben. Ihr Händler kann das Produkt dem
umweltverträglichen Recycling zuführen.
UsDie Nutzung des Produkts unterliegt Ihrer
Durch die Verwendung der in das
Reolink-Produkt integrierten Produktsoftware stimmen
Sie den Bestimmungen dieses Endbenutzer-
Lizenzvertrags (“EULA”) zwischen Ihnen und Reolink zu.
Weitere Informationen:
https://reolink.com/eula/.
Zustimmung zu AGB und Datenschutzrichtlinien auf
https://reolink.com/de/.
2-Jahre eingeschränkte Garantie ist für dieses Produkt
verfügbar. Mehr Infos:
https://reolink.com/de/warranty-and-return/.
Korrekte Entsorgung dieses Produkts
Garantiebestimmun
AGB & Datenschutz
Endbenutzer-Lizenzvereinbarung
Dieses Gerät entspricht den Strahlenbelastungsgrenzen
nach RSS-102, die für eine unkontrollierte Umgebung
festgelegt wurden. Bei der Installation und Verwendung
dieses Gerätes sollte ein Abstand von mindestens 20 cm
zwischen der Strahlungsquelle und Ihrem Körper
eingehalten werden.
Erklärung zur Strahlenexposition nach ISED
32Deutsc31 Deutsc
BETRIEBSFREQUENZ (maximale Sendeleistung)
2412MHz—2472MHz (19dBm)
5180 MHz -5320 MHz(18dBm)
5745 MHz -5825 MHz (18dBm)

• Signification de la LED d'état
Haut-parleur
Fente pour carte Micro SD
Capteur de lumière du jour
la connexion WiFi a échoué
WiFi ne peut pas être configuré
La caméra est en train de démarrer
connexion WiFi réussie
Allumé
Clignotant
Introduction générale
FR
Contenu
Contenu de la boîte
Contenu de la boîte
Introduction générale
Configurer la caméra sur l'application Reolink
(pour Smartphone)
Ajouter la caméra sur Reolink client (pour PC)
Guides d'installation
Dépannage
Caractéristiques techniques
Avis de conformité
33
34
35
39
42
44
45
46
Caméra ×1
Support de montage ×1
Adaptateur secteur ×1
Guide de démarrage ×1
Signe de surveillance ×1
Plaque de trous de
montage ×1
Lot de vis ×1
DC 5V
Micro intégré
Voyant LED
Lentille
Bouton de réinitialisation
Pivotez l'objectif de la caméra pour
trouver le trou de réinitialisation et la
fente pour carte SD.
34French33 French
Configurer la caméra sur
l'applicationReolink (pour
Smartphone)
Téléchargez et installez l'application Reolink sur l'APP
Store (pour iOS) et Google Play (pour Android).
Veuillez suivre les
tonalités d'invite pour
configurer la caméra.
1. cliquez sur le “ ”
bouton dans le coin
supérieur droit pour
ajouter l'option caméra.
2. Scannez le code QR
au verso de la caméra.
Available on the
Get it on
3. Cliquez sur " Se connecter
au Wi-Fi " pour configurer
les paramètres WiFi.
NOTICE:
Votre famille peut cliquer
sur "Accès Caméra" pour
l'achage en direct après
l'achage de la
configuration initiale.
36French35 French
4. Un code QR sera généré
sur le téléphone. Veuillez
placer le code QR sur votre
téléphone vers la caméra à
une distance d'environ 30 cm
(12 pouces) pour laisser la
caméra scannez le code QR.
Assurez-vous d'avoir déchiré
le film de protection de
l'objectif de la caméra.
≈30cm(12 inch)
5. Suivez les étapes pour
terminer la configuration
WiFi.
6. Après avoir créé un mot
de passe pour votre la
caméra, veuillez suivre les
étapes suivantes pour
synchroniser l'heure, et puis
lancez l'achage en direct
ou allez dans "Réglages de
l'appareil".
Menu
Ajouter un nouvel appareil
Réglages de l'appareil
Accéder à la vue en direct
≈30cm(12 pouces)
38French
37 French

• En Réseau étendu
1. Cliquez sur "Ajouter un appareil" dans le menu de droite.
2. Choisissez "UID" comme mode d’enregistrement.
3. Saisissez l'UID de votre caméra.
4. Créez un nom d'achage pour la caméra
5. Entrez le mot de passe créé sur Reolink App.
6. Cliquez sur "OK" pour vous connecter.
Veuillez télécharger le logiciel Reolink Client sur notre site
ociel: https://reolink.com/software-and-manual/ et
installez-le.
Veuillez configurer la caméra sur l'application Reolink.
1. Connectez votre ordinateur au
même routeur que celui auquel la
caméra est connecté.
2. Lancez Reolink Client. la caméra
s'ache automatiquement dans la
liste des périphériques du réseau local.
NOTICE: Si vous avez créé le mot
de passe de votre la caméra sur
l'application Reolink, cliquer sur le
“ ” bouton pour entrer le mot de
passe correct pour vous connecter.
• En Réseau local
Ajouter la caméra sur Reolink
Client
40French39 French

Guides d'installation
Etape 1
Percage de deux trous de
vis Sur le mur selon le
gabarit du rou de
montage.
Etape 2
lnserez les deux
ancrages en plastique
dans les trous du mur.
Etape 3
Fixez l'unite de base en
place en serrant les vis
dans les ancrages en
plastique.
Etape 4
Alignez la camera sur le
support, puis tournez unite
camera dans le sens
horaire pour la verrouiller
en position.
NOTICE:
1. Tournez Ia camera dons
le sens lnverse des
aiguilles d'une montre pour
la retirer du mur.
2. Si votre camera est
monteeo l'envers, I ’mage
devra egalement etre
tournee. Allez dans
Parametres de rappareil->
Acher l ’ lnterface, puis
cliquez sur Rotation pour
ajuster l ’ image.
42French
41 French

Si votre la caméra ne s'allume pas, essayez les solutions
suivantes:
• Veuillez vérifier si la prise de courant fonctionne
correctement ou non. Essayez de brancher la caméra
sur une prise diérente pour voir si l'appareil fonctionne.
• Veuillez vérifier si l'adaptateur DC fonctionne ou non. Si
vous avez un autre adaptateur d'alimentation 5V/1A qui
fonctionne, veuillez utiliser un autre adaptateur
d'alimentation et voir s'il fonctionne.
• Si le problème n'est pas résolu, veuillez contacter
l'équipe d'assistanceReolink.
• Allez dans Paramètres du périphérique et vérifiez si
vous avez activé les LED infrarouges. Si les LED sont
désactivées, veuillez les activer.
• Passez en mode Achage en direct et vérifiez le mode
Jour/Nuit, réglez le mode sur Auto pour activer les
lumières infrarouges-Mettez à jour le firmware de votre
caméra avec la dernière version.
• Restaurez les réglages d'usine et vérifiez à nouveau les
réglages de l'éclairage infrarouge.
• Si le problème n'est toujours pas résolu, veuillez
contacter l'équiped'assistance Reolink.
Si vous ne parvenez pas à mettre à niveau le micrologiciel
de la caméra, essayez les solutions suivantes:
• Confirmez la version actuelle du micrologiciel de la
caméra.
• Assurez-vous que le micrologiciel que vous téléchargez
dans lecentre de téléchargement est le bon.
• Échec de la mise à niveau du
micrologiciel
Si vous constatez que les LED IR de votre caméra ne
fonctionnent plus, essayez les solutions suivantes:
• Les LED IR s'arrêtent de
fonctionnert
Dépannage
• Les caméras IP ne s'allument pas
44French
43 French
Caractéristiques techniques
Notification of Compliance
Déclaration de conformité UE
simplifiée
Reolink déclare que cet appareil est conforme aux
exigences essentielles et autres dispositions pertinentes
de la Directive 2014/53/EU.
FCC Compliance Statement
This device complies with Part 15 of FCC Rules. Operation
is subject to the following two conditions: (1) this device
may not cause harmful interference, and (2) this device
must accept any interference received, including
interference that may cause undesired operation. For
more information, visit:
https://reolink.com/fcc-compliance-notice/.
Fréquence Wi-Fi: 2.4 GH (E1)/Bi-Bande (E1 Pro/E1 Zoom)
Température de fonctionnement: -10° to 55° C
Dimensions: Φ76 x 106mm
fréquence d'images: 15fps (dé fault)
Audio: Audio Bidirectionnel
Filtre infrarouge: Oui
Résolution vidéo: 5MP(E1 Zoom)/4MP(E1 Pro)/3MP(E1)
Distance de vision nocturne: 12 m (40 pieds)
Pan et Tilt Angle: horizontale: 355°/verticale: 50°
Alimentation: DC 5V/1A
Caractéristiques du matériel
Caractéristiques du logiciel
Général
46French45 French
• Assurez-vous que le réseau de votre ordinateur est en
bon état.
Poids: 200g (11.2 oz)

Ce marquage indique que ce produit ne doit pas
êtreéliminé avec d'autres déchets ménagers dans l'UE.
Afin d'éviter que l'élimination incontrôlée des déchets ne
nuise à l'environnement ou à la santé humaine,
recyclezles de manière responsable afin de promouvoir
la réutilisation durable des ressources matérielles. Pour
retourner votre appareil usagé, veuillez utiliser les
systèmes de retour et de collecte ou contacter le
détaillant où le produit a été acheté. Ils peuvent prendre
ce produit pour un recyclage sans danger pour
l'environnement.
L'utilisation du produit est soumise à votre acceptation
des Conditions d'utilisation et de la Politique de
confidentialité de https://reolink.com. Veuillez laisser ce
produit dans un endroit que les enfants ne peuvent pas
atteindre.
En utilisant le logiciel produit intégré au produit Reolink,
vous acceptez les termes du présent contrat de licence
utilisateur final (“CLUF”) entre vous et Reolink. Pour en
savoir plus: https://reolink.com/eula/.
Ce produit est livré avec une garantie limitée de 2 ans.
En savoir plus:
https://reolink.com/warranty-and-return/.
Élimination correcte de ce produit
Garantie limitée
Conditions et Confidentialité
Contrat de licence d'utilisateur final
Cet équipement est conforme aux limites d'exposition au
rayonnement RSS-102 établies pour un environnement
non contrôlé. Cet équipement doit être installé et utilisé à
une distance minimale de 20 cm entre le radiateur et
votre corps.
ISED Déclaration d'exposition aux
rayonnements
48French47 French
FREQUENCE DE FONCTIONNEMENT (puissance
maximale transmise)
2412MHz—2472MHz (19dBm)
5180 MHz -5320 MHz(18dBm)
5745 MHz -5825 MHz (18dBm)

• Il significato del LED di stato
Altoparlante
Slot Scheda Micro SD
Sensore Luce Diurna
connessione Wi-Fi fallita
Il WiFi non è configurato
La telecamera si sta avviando
connessione Wi-Fi avvenuta con successo
Fisso
Lampeggiante
Introduzione Generale
IT
Contenuti
Cosa c’è nella Confezione
Cosa c’è nella Confezione
Introduzione Generale
Impostare la Telecamera sulla App Reolink (per
Smartphone)
Aggiungere la Telecamera al Client Reolink (per PC)
Guide all’Installazione
Risoluzioni dei Problemi
Specifiche
Avviso di Idoneità
49
50
51
55
57
59
61
62
Telecamara ×1
Supporto di Montaggio ×1
Adaptador de Corriente ×1
Guida Rapida ×1
Cartello di Sorveglianza ×1
Modello per Foro di
Installazione ×1
Viti ×1
DC 5V
Microfono incorporato
LED di Stato
Lente
Foro di Reset
Ruotare l'obiettivo della telecamera per
trovare l'interruttore di reset e lo slot
della scheda SD.
50Italian49 Italian
Impostare la Telecamera sulla
App Reolink (per Smartphone)
Scaricare e installare l'App Reolink da App Store (per iOS)
e Google Play (per Android).
Seguire le tonalità di
avviso per configurare
la telecamera.
1. Fare clic sul pulsante
“ ” nell'angolo in
alto a destra per
aggiungere la
telecamera.
2. Scannerizzare il
codice QR sul retro
della telecamera.
Available on the
Get it on
3. Fare clic su “connetti al
Wi-Fi” per configurare le
impostazioni Wi-Fi.
AVVISO:
La vostra famiglia può fare
clic su “Accedi a Telecamera”
per la visualizzazione dal
vivo dopo il setup iniziale.
52Italian51 Italian
4. Verrà generato un codice
QR sul telefono. Posizionare il
codice QR sul vostro telefono
verso la lente della
telecamera ad una distanza di
circa 30 cm (12 pollici) per
permettere alla telecamera di
scannerizzare il codice
QR. Assicurarsi di aver
rimosso la pellicola protettiva
della lente della telecamera.
≈30cm(12 inch)
5. Seguire i passaggi per
completare le impostazioni
Wi-Fi.
6. Dopo aver creato una
password per la vostra
telecamera, seguire i
passaggi per sincronizzare
l’ora, poi avviare la visualiz-
zazione dal vivo o andare su
“Impostazioni Dispositivo”.
Menu
Aggiungi nuovo dispositivo
Impostazioni Dispositivo
Accedi a Visuale dal Vivo
≈30cm(12 pollici)
54Italian
53 Italian
• In Una Rete Diversa (In WAN)
1. Fare clic su "Aggiungi dispositivo" a destra.
2. Scegliere "UID" come modalità.
3. Scrivere l'UID.
4. Creare un nome della telecamera.
5. Inserire la password di accesso.
6. Fare clic su "OK" per il login.
Scaricare il software Reolink Client dal nostro sito web
uciale: https://reolink.com/software-and-manual/ e
installarlo.
Impostare la telecamera sulla App Reolink prima di
aggiungere la telecamera al Reolink Client.
1. Connettere il computer allo
stesso router al quale è connessa
la telecamera.
2. Lanciare Reolink Client. La
telecamera verrà visualizzata
automaticamente nella lista
dispositivi in LAN.
AVVISO: Se hai creato la password
per la telecamera a sulla Reolink
App clicca su “ ” per inserire la
password corretta e accedere.
• Nella Stessa Rete (In LAN)
Aggiungere la Telecamera al
Client Reolink (per PC)
56Italian55 Italian

Guide all ’ Installaizione
Posso 1
Proticore sullo parete
due fori per le viti
secondo lo sogomo
del foro di montoggio.
Posso 2
lnseri i due tosselli di
plostico nei fori sullo
porete.
Posso 3
Flssore l'unlta base ln
poslzlone stringendo le
vltl negll oncoroggl In
plostlco.
Posso 4
Alllneore lo vldeocomera
con lo stoa, qulndl
ruotare lo vldeocomero In
senso arorlo per bloccorla
In poslzlone.
AVVISO:
1. Girare lo fotocomero In
senso ontlororlo per
rlmuoverlo dol muro.
2. Nel coso ln cul lo
vldeocomero slo montotα
copovolta soro necessorlo
ruotare onche l'lmmoglne.
Vol o lmpostozlonl
dlsposltlvo-> lnterfocclo
display, qulndl faI cllc su
Rotozlone per regolore
l’Immaglne.
58Italian
57 Italian

Se la vostra telecamera sembra non funzionare, provate
le soluzioni seguenti:
• Assicurarsi che la presa funzioni adeguatamente.
Provate ad inserire la telecamera in una presa di
corrente diversa per vedere se la telecamera funziona.
• Controllare se l’adattatore DC funziona o no. Se avete
un altro adattatore 5V/1A DC funzionante, usate un altro
adattatore per vedere se funziona.
• Se il problema non si risolve, contattare il team di
supporto Reolink.
• Andate sulla visione dal vivo e controllate la modalità
Giorno/Notte, impostate la modalità su Auto per attivare
i LED IR.
• Aggiornate firmware della telecamera alla versione più
recente.
• Ripristinate sulle impostazioni di fabbrica, e controllate
nuovamente le impostazioni delle luci IR.
• Se il problema non si risolve, contattare il team di
supporto Reolink.
Se non riuscite ad aggiornare il film della telecamera,
provate le soluzioni seguenti:
• confermate nella versione firma attuale della telecamera.
• Assicuratevi che il firmware scaricato dal centro
download sia quello corretto.
• Assicuratevi che la rete del computer non abbia problemi.
• Impossibile Agigornare il Firmware
Se i LED IR della vostra telecamera smettono di
funzionare, provate le soluzioni seguenti:
• Andate su Impostazioni Dispositivo e controllate se
avete abilitato i LED ad infrarosso. Se i LED sono
disattivati, si prega di abilitarli.
• I LED IR Smettono di Funzionare
Risoluzione Problemi
• Le Telecamere IP Non si Accendono
60Italian
59 Italian
Specifiche
Avviso di Idoneità
Dichiarazione Semplificata di
Conformità UE
Reolink dichiara che questo dispositivo è in conformità
con i requisiti essenziali e altre rilevanti disposizioni della
Direttiva 2014/53/EU.
Dichiarazione di Idoneità FCC
Questo dispositivo rispetta la Parte 15 delle Regole FCC.
L’operazione è soggetta alle seguenti due condizioni: (1)
questo dispositivo non può causare interferenze nocive,
e (2) questo dispositivo deve accettare qualsiasi
interferenza ricevuta, incluse interferenze che possono
causare operazioni indesiderate. Per maggiori
informazioni, visitare:
https://reolink.com/fcc-compliancenotice/.
Frequenza Wi-Fi: 2.4 GHz (E1)/Dual-Band (E1 Pro/E1 Zoom)
Temperatura in operatività: -10° to 55° C
Dimensione: Φ76 x 106mm
Peso: 200g (11.2 oz)
frequenza dei fotogrammi: 15fps (didefault)
Audio: Audio a 2 vie
Filtro taglio IR: Sì
Risoluzione video: 5MP (E1 Zoom)/4MP(E1 Pro)/3MP(E1)
Distanza visione notturna: 12 m (40 piedi))
Angolo di Pan/Tilt: Pan: 355°/Tilt: 50°
Alimentazione di esercizio: DC 5V/1A
Caratteristiche Hardware
Caratteristiche Software
Generale
62Italian61 Italian

Questo marchio indica che questo prodotto non deve
essere rottamato insieme ad altri rifiuti domestici
attraverso l’UE. Per prevenire possibili danni all’ambiente
o alla salute umana da un incontrollato scarico di rifiuti,
riciclalo responsabilmente per promuovere il riuso
sostenibile delle materie prime. Per restituire il dispositivo
usato, per favore usa il sistema di resi e raccolta o
contatta il punto vendita dove il prodotto è stato
acquistato. Possono rilevare questo prodotto per un
riciclo sicuro per l’ambiente.
L'utilizzo del prodotto è soggetto all'accettazione dei
Termini di servizio e dell'Informativa sulla privacy su
https://reolink.com. Tenere fuori dalla portata dei bambini.
Utilizzando il software prodotto incorporato al prodotto
Reolink, voi accettate i termini di questo accordo di
licenza per l’utente finale (“EULA”) fra voi e Reolink.
Scopri di più:
https://reolink.com/eula/.
Questo prodotto viene fornito con una garanzia
limitata di 2 anni. Ulteriori informazioni:
https://reolink.com/warranty-and-return/.
Corretta rottamazione di questo prodotto
Garanzia limitata
Termini e privacy
Contratto di Licenza per l’utente Finale
Questa è attrezzatura è conforme ai limiti di esposizione
alle radiazioni RSS-102 impostati per un ambiente non
controllato. Questa attrezzatura deve essere installata e
operata con una distanza minima di 20 cm fra l’oggetto
radiante e il vostro corpo.
Dichiarazione sulla Esposizione alle Radiazioni
ISED
64Italian63 Italian
FREQUENZA OPERATIVA (la potenza massima
trasmessa)
2412MHz—2472MHz (19dBm)
5180 MHz -5320 MHz(18dBm)
5745 MHz -5825 MHz (18dBm)
• Significado del LED de estado
Altavoz
Ranura para tarjeta micro SD
Sensor de luz diurna
falla la conexión WiFi
WiFi no está configurado
La cámara se está iniciando
conexión WiFi exitosa
Encendido
Parpadeo
Introducción general
ES
Contenido
¿Qué hay en la caja?
¿Qué hay en la caja?
Introducción general
Configure la cámara en la aplicación Reolink
Agregue la cámara en el cliente Reolink
Cómo instalar
Solución de problemas
Especificaciones
Notificación de Cumplimiento
65
66
67
71
73
75
76
77
Cámara ×1
Plantilla de montaje ×1
Adaptador de corriente ×1
Guía de inicio rápido ×1
Señal de vigilancia ×1
Plantilla de orificio de
montaje ×1
Tornillos ×1
DC 5V
Micrófono incorporado
LED de estado
Lente
Reset Button
Ruotare l'obiettivo della telecamera per
trovare l'interruttore di reset e lo slot
della scheda SD.
66Spanish65 Spanish
Configure la Cámara en el App
Reolink
Busque “Reolink” en la App Store (para IOS), o google
play (para Android), descargue e instale la App.
Por favor siga el tono
para configurar la
cámara.
1. Por favor haga clic al
botón “ ” en la
esquina derecha
superior para añadir la
cámara
2. Escanee el código QR
en la parte posterior de
la cámara.
Available on the
Get it on
3. Haga clic en “conectar al
WiFi” para continuar.
Nota:
Su familia puede hacer clic
en “Acceder a la Cámara”
para ver la Vista en Vivo
después de la configuración
inicial.
68Spanish67 Spanish
4. Un código QR será
generado en el teléfono. Por
favor coloque el código QR
en su teléfono hacia el lente
de la cámara a una distancia
de unos 30 cm para dejar
que la cámara escanee el
código QR. Por favor
asegúrese que haya retirado
la cubierta de protección del
lente de la cámara.
≈30cm(12 inch)
5. Sigue los pasos para
finalizar la configuración de
Wifi.
6. Después de crear una
contraseña para su cámara,
siga los pasos para
sincronizar la hora, y luego
inicie la vista en vivo o vaya
a "Configuración del
dispositivo".
Menú
Añadir Nuevo Dispositivo
Configuración de
Dispositivo
Acceder a la Vista en Vivo
≈30cm(12 piest)
70Spanish
69 Spanish
• en WAN
1. Haga clic "Agregar dispositivo" en el menú.
2. Elija "UID" como el modo de registro.
3. Escriba el UID de su cámara.
4. Cree un nombre para mostrar para la cámara.
5. Ingrese el clave de inicio sesión creada en Reolink App.
6. Haga clic en "Aceptar" para iniciar sesión.
Descargue e instale el software Reolink Client desde nuestro
sitio web oficial: https://reolink.com/software-and-manual
Nota: Por favor configurarse primero en Reolink App.
1. Conecte su computadora al
mismo enrutador al cual la cámara
esta conectada.
2. Inicie Reolink Client. La Cámara
se mostrará automáticamente en
la lista de dispositivos en LAN.
Nota: Si ha creado la contraseña
para su cámara en la aplicación
Reolink, por favor haga clic en el
“ ” botón para ingresar la
contraseña correcta para iniciar
sesión.
• en LAN
Agregue la cámara al Reolink
client (para PC)
72Spanish71 Spanish
C6mo instalar
Paso 1
Hago dos orificios para
tornillos en lo pored de
acuerdo con Ia plantilla
de montaje de orificios.
Paso 2
lnserte los dos anclajes
de pl6stico en los orificios
de la pàred.
Paso 3
Fije la base de la unidad
en su lugar asegurando
los ornillos en los
anclojes de pl6stico.
Paso 4
Allnee la càmarc con el
soporte. luego glre Ia
unldad de la càmara hacla
la derecha para que que
de segurc en su poslclón.
Nota:
1. GIre la comaraen sentl
do contrario a las manlllas
del rel oj para retlrarla de
la pared .
2. En caso de que Ia
camara este montada al
reves , I a Imagen tamblen
debera gl rarse. Vaya
aConflguracion del
dlsposltlvo-> lnterfaz de po
ntolla, luego hogo die en
Rotaclon po re oju stor lo
Imogen.
74Spanish
73 Spanish

Si encuentra que su cámara no se enciende, intente las
siguientes soluciones:
• Compruebe si la toma de corriente funciona
correctamente o no. Intente conectar la cámara a una
salida diferente y ver si la cámara trabaja.
• Compruebe si el adaptador de DC esta trabajando o
no. Si tiene otro adaptador 5V/1A DC de corriente que
funciona, por favor use otro adaptador y vea si funciona.
• Si el problema no se soluciona, comuníquese con el
equipo de apoyo de Reolink.
habilitado los LEDs infrarrojos. Si los LED están
deshabilitados, habilítelos.
• Actualice el firmware de su cámara a la ultima versión.
• Restaure la configuración de fábrica y verifique la
configuración de la luz IR nuevamente.
• Si el problema aún no se soluciona, comuníquese con el
equipo de soporte de Reolink.
Si no puede actualizar el firmware para cámara, pruebe
las siguientes soluciones:
• Confirme la versión actual del firmware de la cámara.
• Asegúrese de que el firmware que descargue en el
centro de descargas es el correcto.
• Asegúrese de que la red de su computadora esté
funcionando.
• No se puede actualizar el firmware
Si los LED IR de su cámara, dejan de trabajar, pruebe las
siguientes soluciones:
• Vaya a Configuración del dispositivo y verifique si ha
• Los LED IR dejan de funcionar
Solución de problemas
• Las cámaras IP no están
encendiendo
Especificaciones
Resolución de video: 5MP (E1 Zoom)/4MP(E1 Pro)/3MP(E1)
Características de hardware
76Spanish
75 Spanish
Notificación de Cumplimiento
Declaración de conformidad
de la UE simplificada
Reolink declara que este dispositivo cumple con los
requisitos esenciales y otras disposiciones relevantes de
la Directiva 2014/53/UE.
Declaración de cumplimiento de la FCC
Este dispositivo cumple con la Parte 15 de las Reglas de
la FCC. El funcionamiento está sujeto a las siguientes dos
condiciones: (1) este dispositivo no puede causar i
nterferencias perjudiciales y (2) este dispositivo debe
aceptar cualquier interferencia recibida, incluidas las
interferencias que puedan causar un funcionamiento no
deseado. Para obtener más información, visite:
https://reolink.com/fcccompliance-notice/.
Frecuencia WiFi: 2.4 GHz (E1)/Doble Banda(E1 Pro/E1
Zoom)
Temperatura de funcionamiento: -10° to 55° C
Tamaño: Φ76 x 106mm
Peso: 200g (11.2 oz)
Frecuencia de fotogramas: 15fps (por defecto)
A u dio: Audio de 2 Vías
Filtro de corte IR: Sí
Distancia de la visión nocturna: 12 m (40 pies)
Pan/Tilt Ángulo: Horizontal: 355°/Vertical: 50°
Características de Software
General
78Spanish77 Spanish
Esta marca indica que este producto no debe
desecharse con otros desechos domésticos en toda la
UE. Para evitar posibles daños al medio ambiente o la
salud humana derivados de la eliminación no controlada
de residuos, recíclelo de manera responsable para
promover la reutilización sostenible de los recursos
materiales. Para devolver su dispositivo usado, utilice los
Deshecho correcto de este producto.

sistemas de devolución y recolección o póngase en
contacto con el distribuidor donde adquirió el producto.
Ellos pueden aceptar este producto para reciclarlo de
manera segura para el medio ambiente.
El uso del producto está sujeto a su aceptaciónde los
Términos de servicio y la Política de privacidad en
https://reolink.com. Mantenga fuera del alcance de los
niños.
Al utilizar el Software del producto que está incorporado
en el producto Reolink, usted acepta los términos de
este Acuerdo de licencia de usuario final ("EULA") entre
usted y Reolink.Obtenga más información:
https://reolink.com/eula/.
Este producto viene con una garantía limitada de 2
años. Aprenda más:
https://reolink.com/warranty-and-return/.
Garantía limitada
Términos y privacidad
Acuerdo de licencia de usuario final
Este equipo cumple con los límites de exposición a la
radiación RSS-102 establecidos para un entorno no
controlado. Este equipo debe instalarse y operarse con
una distancia mínima de 20cm entre el dispositivo y su
cuerpo.
Technical Support
If you need help, please contact Reolink before returning
your product. Most questions can be answered through
our online support center at https://support.reolink.com.
Declaración de exposición a la radiación ISED
80Spanish79 Spanish
FREQUENZA OPERATIVA (la potenza massima
trasmessa)
2412MHz—2472MHz (19dBm)
5180 MHz -5320 MHz(18dBm)
5745 MHz -5825 MHz (18dBm)
Technische Unterstützung
Wenn Sie Hilfe brauchen, kontaktieren Sie bitte Reolink
Support Team zuerst, bevor Sie Ihre Bestellung
zurücksenden.Meiste Fragen oder Probleme können von
Shenzhen Reo-link Digital Technology Co, Ltd.
11th floor, Building C, Unisplendour Information Harbour,
North High-Tech Zone, Nanshan District, Shenzhen,
China, 518057
https://reolink.com
https://support.reolink.com
unserem Online Support Center beantwortet und gelöst
werden: https://support.reolink.com.
Support technique
Si vous avez besoin d’aide, veuillez contacter Reolink
avant de retourner votre produit. La plupart des questions
peuvent être répondues via notre centre de support en
ligne à l'adresse https://support.reolink.com.
Supporto Tecnico
Se avete bisogno di aiuto, le chiediamo gentilmente di
contattare Reolink prima di restituire il prodotto.La
maggior parte delle domande può essere risolta tramite
il nostro centro di assistenza online all'indirizzo
https://support.reolink.com.
Soporte técnico
Si necesita ayuda, comuníquese con Reolink antes
de devolver su producto. La mayoría de las preguntas
se pueden responder a través de nuestro centro de
soporte en línea en
https://support.reolink.com.
Pettenkoferstraße 18,10247,Berlin,Germany
BellaCocool GmbH
REP
82Spanish
81 Spanish
