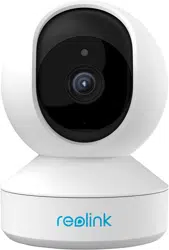
User Manual for Camera
General Introduction
• Meaning of the Status LED
Blinking
|
WiFi connection failed |
| WiFi is not configured |
On
|
Camera is starting up |
| WiFi connection succeeded |
Set up Camera on Reolink App (For Smartphones)
Download and install the Reolink App on APP Store (for iOS) and Google Play (for Android).

Please follow the prompt tones to configure the camera.
- 1. Please click the “
 ” button in the top right corner to add the camera.
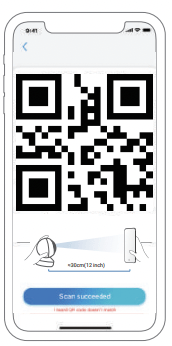
- 2. Scan the QR code on the bottom of the camera.
- 3. Click “Connect to Wi-Fi” to configure the WiFi settings.
NOTICE: Your family can click "Access Camera" for live view after the initial setup.
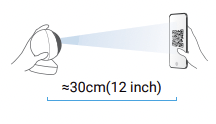
- 4. Then a QR code will be generated and displayed on your phone. Please place the QR code on your phone in front of the camera’s lens at a distance of about 30 cm (12 inches) and let the camera scan the QR code.
- 5. Follow the steps to finish the Wi-Fi settings.
- 6. After you created a password for your camera, please follow the steps to sync the time, and then start live view or go to “Device Settings”.
 Menu
Menu
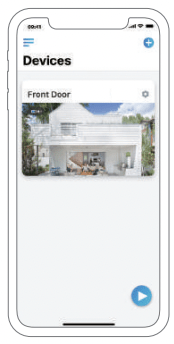
 Add New Device
 Device Settings
 Access the Live View
Add the Camera to Reolink Client (For PC)
Please download and install the Reolink Client software: reolinksoftware-and-manual and install it. Please configure the camera using the Reolink App first. Launch the Reolink Client software and follow the steps below toadd the camera.
• In Same Network (In LAN)
1. Connect your computer to the WiFi network of your router.
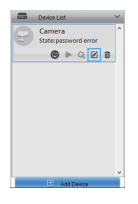
2. Launch Reolink Client. The camera will automatically display in the device list in LAN.
NOTICE: If you’ve created the password for your camera on Reolink App, please click the “  ” button to enter the correct password to log in
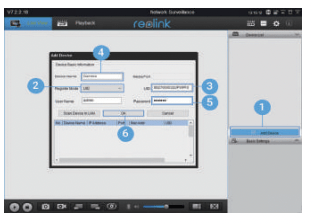
• In WAN
1. Click “Add Device” on the right-side menu.
2. Choose “UID” as the Register Mode.
3. Type in the UID of your camera.
4. Create a display name for the camera.
5. Input the login password created on Reolink App.
6. Click “OK” to log in.
How to Mount the Camera
|
Step 1
Drilling two screw holes on the wall according to the mounting hole template.
Step 2
Insert the two plastic anchors into the holes on the wall.
Step 3
Secure the base unit in place by tightening the screws into the plastic anchors.
|
|
 |
|
Step 4
Align the camera with the bracket, then turn the camera unit clockwise to lock it in position.
NOTICE:
1. Turn the camera anticlockwise to remove it from the wall.
2. In case your camera is mounted upside down, the picture will need to be rotated as well. Please go to Device Settings-> Display interface , then click Rotation to adjust the image.
|
|
 |
Troubleshooting
• IP cameras is not powering on
If you find your camera is not powering on, please try the following:
• Please check whether the outlet is working properly or not. Try to plug the camera into a different outlet and see whether it will work.
• Please check whether the DC adapter is working or not. If you have another 5V/1A power adapter which is working, please try with another power adapter and see whether it will work.
• If it still won’t work, please contact Reolink support.
• IR LEDs Stop Working
If you find the IR LEDs of your camera stop working, try the following:
• Go to Device Settings and check whether you have enabled Infrared Lights, if it’s disabled, please turn it on.
• Please go to Live View and check the Day/Light mode,set the mode to Auto to activate the IR lights.
• Upgrade your camera's firmware to the latest version.
• Restore it to factory settings, and check the IR light settings again. • If the problem goes on, contact Reolink Support.
• Fail to upgrade the firmware
If you fail to upgrade the firmware for the camera, try the following:
• Confirm the current firmware version of the camera.
• Make sure the firmware you download in the download center is the correct one.
• Make sure the network of your computer is smooth. If it still won’t work, please contact Reolink support.
Specifications
Hardware Features
Display Resolution: 5MP (E1 Zoom)/4MP(E1 Pro)/3MP(E1)
IR Distance: 12 Meters (40ft)
Pan/Tilt Angle: Horizontal: 355°/Vertical: 50°
Power: DC 5V/1A
Software Features
Frame Rate: 15fps (in default)
Audio: Two-Way Audio
IR Cut Filter: Yes
General
Operating Frequency: 2.4 GHz(E1)/Dual Band (E1 Pro/E1 Zoom)
Operating Temperature: -10° to 55° C (14° to 131° F)
Size: Φ76 x 106mm
Weight: 200g (11.2 oz)
Notification of Compliance
FCC Compliance Statement
This device complies with Part 15 of FCC Rules. Operation is subject to the following two conditions: (1) this device may not cause harmful interference, and (2) this device must accept any interference received, including interference that may cause undesired operation
Simplified EU Declaration of Conformity
Reolink Communications declares that this device is in compliance with the essential requirements and other relevant provisions of Directive 2014/53/EU.
Correct Disposal of this product
This marking indicates that this product should not be disposed with other household wastes throughout the EU. To prevent possible harm to the environment or human health from uncontrolled waste disposal, recycle it responsibly to promote the sustainable reuse of material resources. To return your used device, please use the return and collection systems or contact the retailer where the product was purchased. They can take this product for environment safe recycling.
Limited warranty
This product comes with a 2-year limited warranty that is valid only if purchased from Reolink Official Store or a Reolink authorized reseller
Terms and Privacy
Use of the product is subject to your agreement to the Terms of Service and Privacy Policy at reolink.com. Keep out of reach of children.
End User License Agreement
By using the Product Software that is embedded on the Reolink product, you agree to the terms of this End User License Agreement (“EULA”) between you and Reolink.
ISED Radiation Exposure Statement This equipment
This equipment complies with RSS-102 radiation exposure limits set forth for an uncontrolled environment. This equipment should be installed and operated with minimum distance 20cm between the radiator & your body.