
August 2023
QSG1_A_EN
Quick Start Guide
Apply to: Reolink Lumus
@ReolinkTech https://reolink.com
58.03.001.0348A
English English1 2
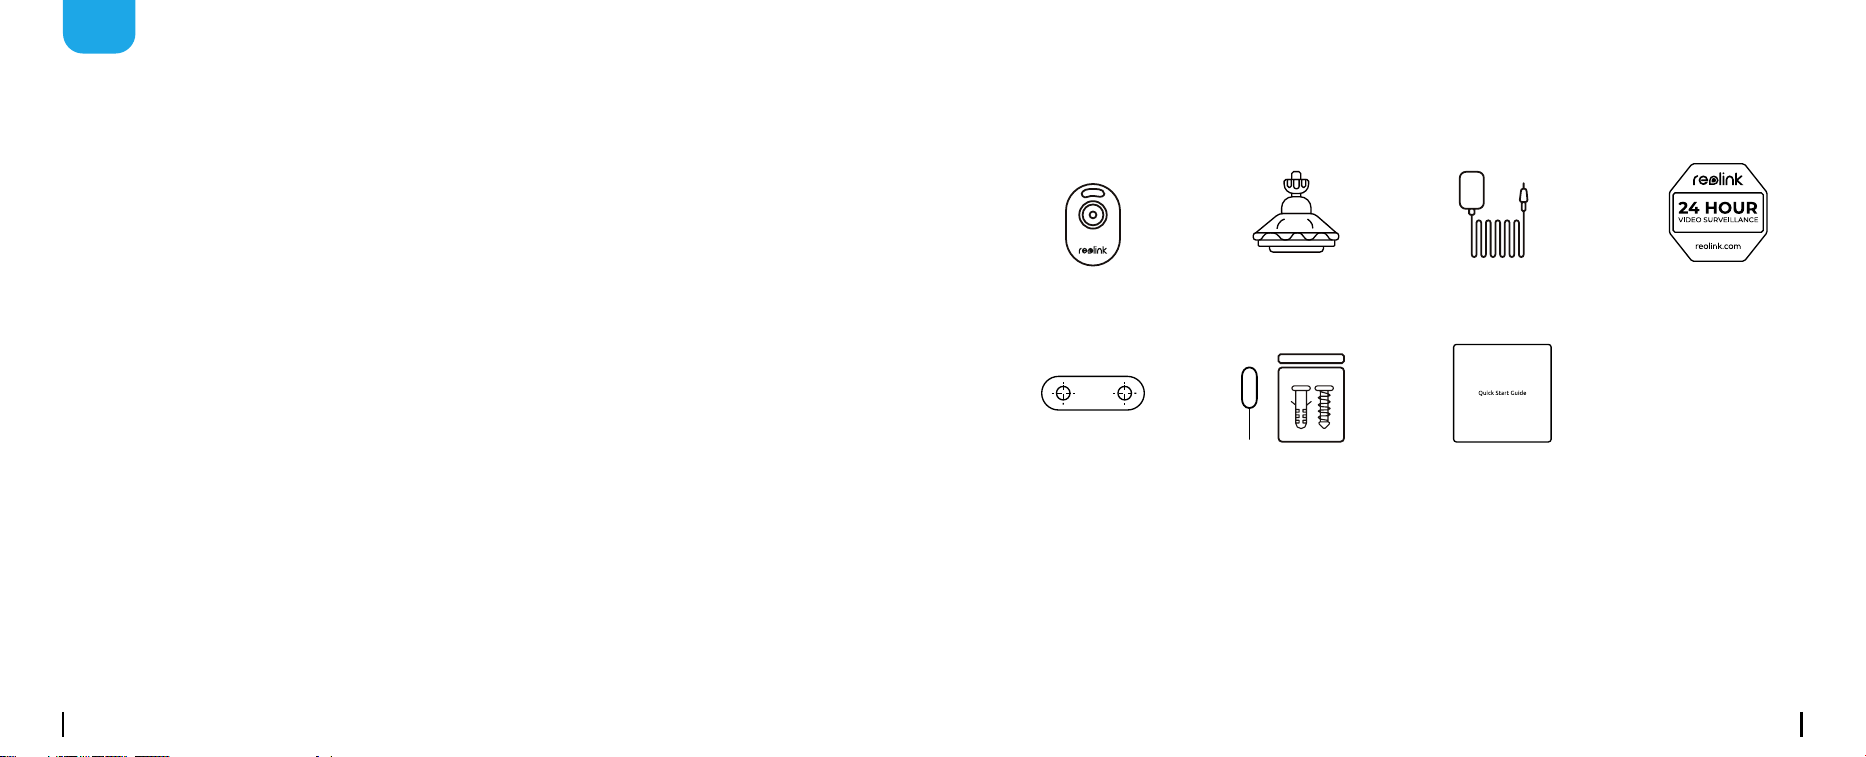
What's in the Box
Camera
Quick Start Guide
Surveillance Sign
Pack of ScrewsMounting Hole
Template
Security Bracket Power Adapter
EN
Content
What’s in the Box ············································································2
Camera Introduction ········································································3
Set up the Camera ··········································································4
Mount the Camera ··········································································5
Troubleshooting ·············································································8
Notication of Compliance ··································································9
English English3 4
RST
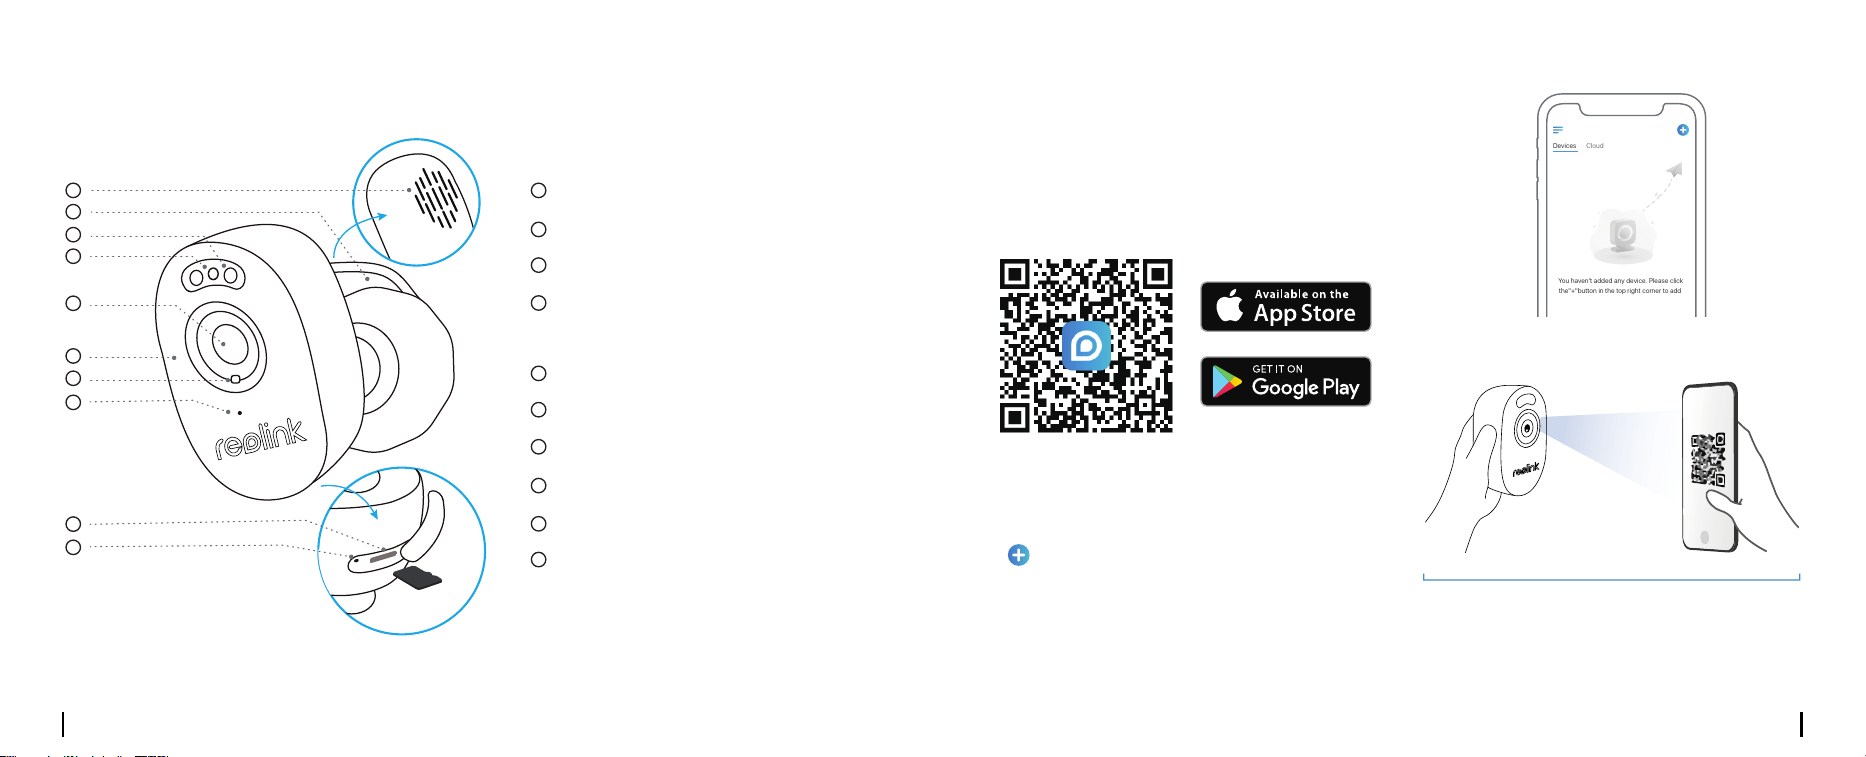
Camera Introduction Set up the Camera
≈30cm
Set up the Camera on Phone
Step 1 Scan to download the Reolink App from
the App Store or Google Play Store.
Speaker
Status LED
Blinking: WiFi connection failed
On: Camera is starting up/WiFi connection succeeded
Built-in Mic
Power Cable
Lens
microSD Card Slot
Spotlight
Daylight Sensor
IR LEDs
Reset Button
* Press for more than ve seconds to restore the device
to default settings.
* Always keep the rubber plug closed rmly.
Step 2 Power on the camera.
Step 3 Launch the Reolink App, click the
“ ” button in the top right corner to add the
camera.
Step 4 Follow the onscreen instructions to
nish the initial setup.
1 1
2
2
3
3
4
4
5
5
6
6
7
7
8
8
9
9
10
10
Devices
Cloud
You haven't added any device. Please click
the"+"button in the top right corner to add
The working environment of the adapter is 5V/1A or 5V/2A.
If the adapter is not working, please check your power supply
conditions first. If the power supply is compatible with the adapter,
please contact us for further support.
English English5 6
Step 1 Download and install the Reolink Client. Go to https://reolink.com> Support > App & Client
Step 2 Power on the camera.
Step 3 Launch the Reolink Client. Click the “ ” button and input the UID number of the camera to
add it.
Step 4 Follow the onscreen instructions to nish the initial setup.
Set up the Camera on PC (Optional)
Mount the Camera
• Do not face the camera towards any light sources.
• Do not point the camera towards a glass window. Or, it may result in poor image quality
because of the window glare by infrared LEDs, ambient lights or status lights.
• Do not place the camera in a shaded area and point it towards a well-lit area. Or, it may result in
poor image quality. To ensure best image quality, the lighting condition for both the camera and
the capture object shall be the same.
• To ensure better image quality, it’s recommended to clean the lens with a soft cloth from time to
time.
• Make sure the power ports are not directly exposed to water or moisture and not blocked by dirt
or other elements.
• Do not install the camera at places where rain and snow can hit the lens directly.
Installation Tips
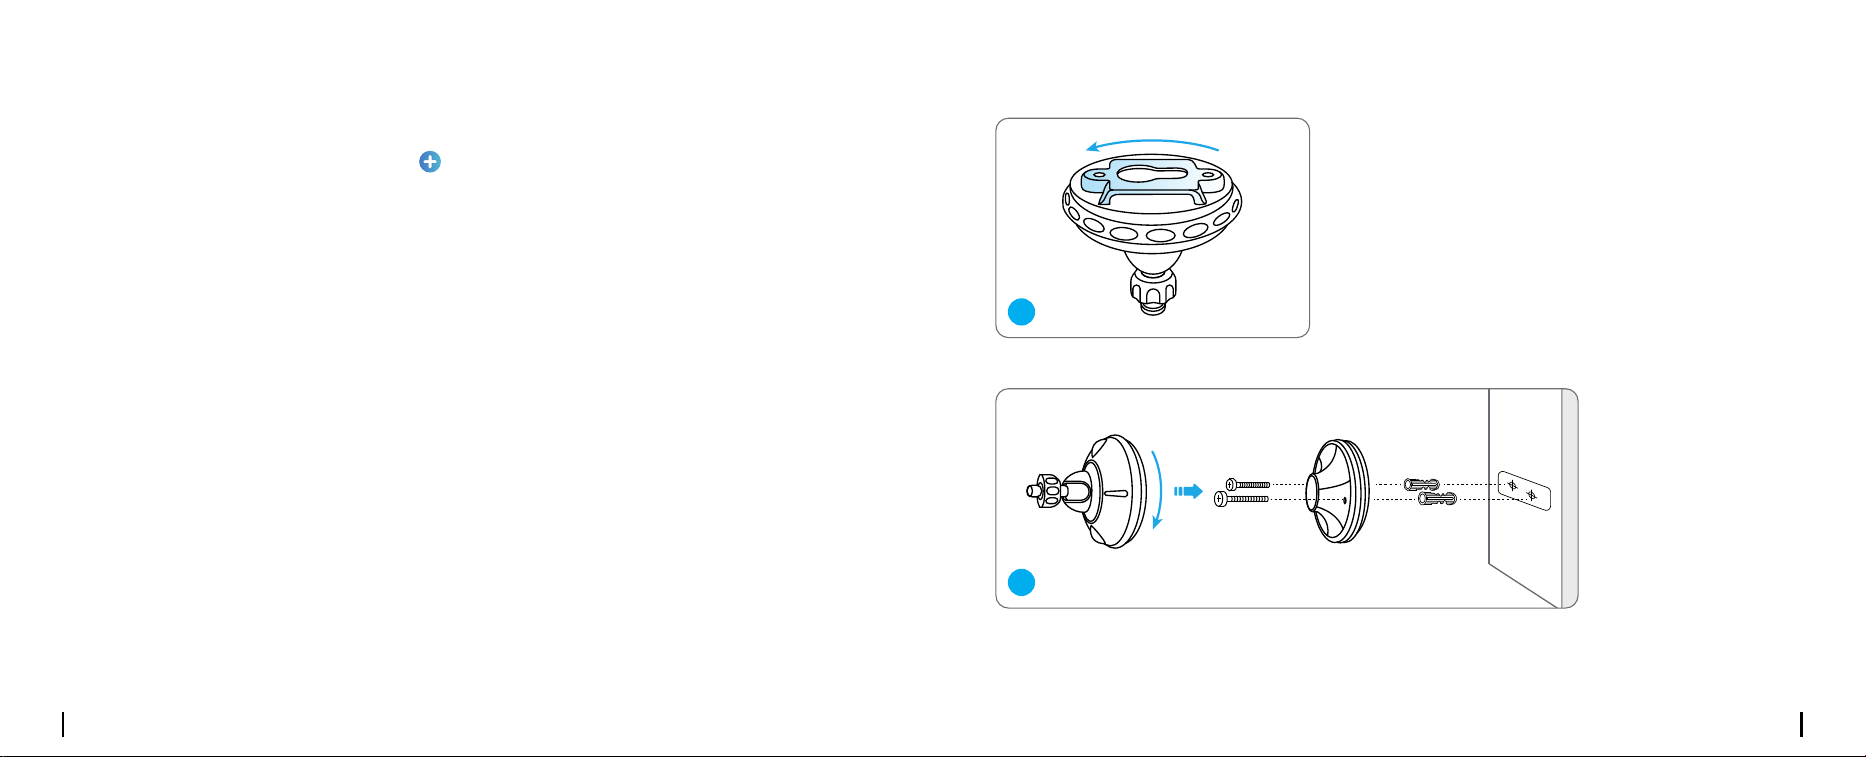
Mount the Camera
Rotate to separate parts from
the bracket.
Drill holes in accordance with the mounting hole template and screw the base of the bracket onto
the wall. Next, attach the other part of the bracket onto the base.
1
2
English English7 8
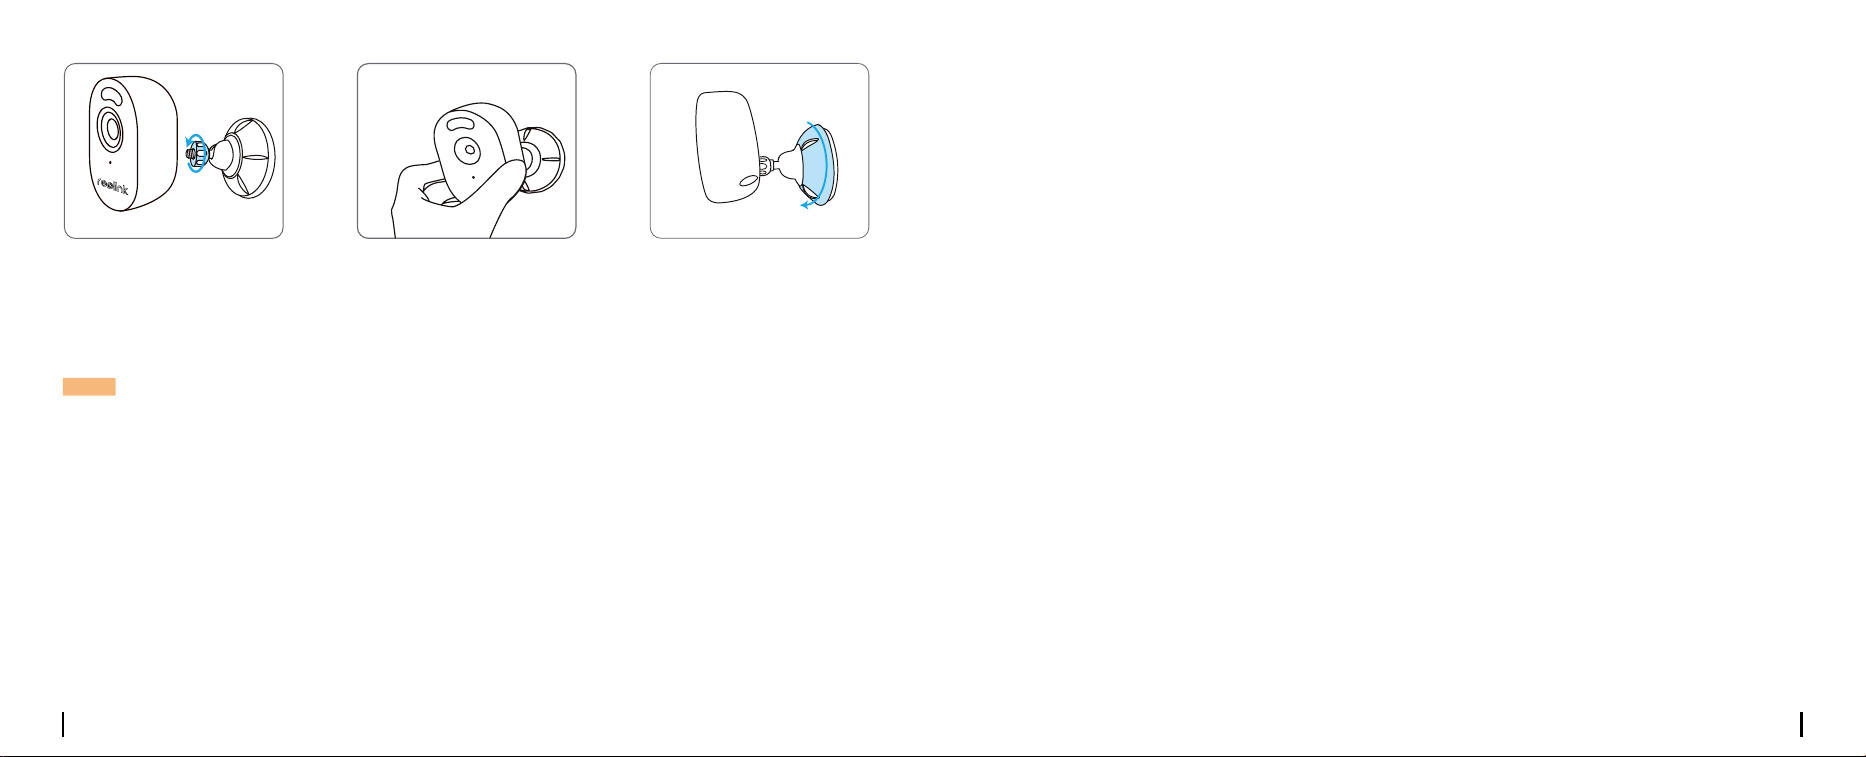
Fasten the camera to the
bracket by turning the
screw identied in the chart
anticlockwise.
Adjust the camera angle to
get the best eld of view.
Secure the camera by
turning the part on the
bracket identied in the
chart clockwise.
NOTE: To adjust the camera angle, please loosen the bracket by turning the upper part anticlockwise.
Troubleshooting
If the Infrared LEDs of your camera stop
working, please try the following solutions:
• Enable infrared lights on Device Settings
page via Reolink App/Client.
• Check if the Day/Night mode is enabled and
set up auto infrared lights at night on Live
View page via Reolink App/Client.
• Upgrade the rmware of your camera to the
latest version.
• Restore the camera to factory settings and
check out the infrared light settings again.
If these won’t work, contact Reolink Support
https://support.reolink.com/.
If you fail to scan the QR code on your smart-
phone, please try the following solutions:
• Check if the protective lm on the camera
has been removed.
• Face the camera towards the QR code and
keep a scan distance of about 20-30 cm.
• Make sure the QR code is well-lit.
Infrared LEDs Stop Working
Failed to Scan the QR code on the
Smartphone
If you fail to upgrade the rmware for the
camera, try the following solutions:
Failed to Upgrade the Firmware
• Check out the current camera rmware and
see if it is the latest one.
• Make sure that you download the correct
rmware from Download Center.
• Make sure that your PC is working on a sta-
ble network.
If these won’t work, contact Reolink Support
https://support.reolink.com/.

English English9 10
Notication of Compliance
This device complies with Part 15 of the FCC Rules. Operation is subject to the following two con-
ditions: (1) this device may not cause harmful interference, and (2) this device must accept any
interference received, including interference that may cause undesired operation.
Note: This equipment has been tested and found to comply with the limits for a Class B digital de-
vice, pursuant to Part 15 of the FCC Rules. These limits are designed to provide reasonable protec-
tion against harmful interference in a residential installation. This equipment generates, uses and
can radiate radio frequency energy and, if not installed and used in accordance with the instruc-
tions, may cause harmful interference to radio communications. However, there is no guarantee
that interference will not occur in a particular installation. If this equipment does cause harmful
interference to radio or television reception, which can be determined by turning the equipment o
and on, the user is encouraged to try to correct the interference by one or more of the following
measures:
• Reorient or relocate the receiving antenna.
• Increase the separation between the equipment and receiver.
• Connect the equipment into an outlet on a circuit dierent from that to which the receiver is con-
nected.
• Consult the dealer or an experienced radio/TV technician for help.
Caution: Changes or modications not expressly approved by the party responsible for compliance
could void the user’s authority to operate the equipment.
FCC Compliance Statement
This equipment complies with FCC radiation exposure limits set forth for an uncontrolled environ-
This device contains licence-exempt transmitter(s)/receiver(s) that comply with Innovation, Science
and Economic Development Canada’s licence-exempt RSS(s). Operation is subject to the following
two conditions:
(1) This device may not cause interference.
(2) This device must accept any interference, including interference that may cause undesired
operation of the device.
L’ émetteur/récepteur exempt de licence contenu dans le présent appareil est conforme aux CNR
d’Innovation, Sciences et Développement économique Canada applicables aux appareils radio
exempts de licence. L’ exploitation est autorisée aux deux conditions suivantes :
(1) L’ appareil ne doit pas produire de brouillage;
(2) L’ appareil doit accepter tout brouillage radioélectrique subi, même si le brouillage est suscepti-
ble d’en compromettre le fonctionnement.
This equipment complies with IC RSS-102 radiation exposure limits set forth for an uncontrolled
environment. This equipment should be installed and operated with minimum distance 20 cm be-
tween the radiator and your body.
Cet équipement est conforme aux limites d’exposition aux radiations IC CNR-102 établies pour un
environnement non contrôlé. Cet équipement doit être installé et utilisé avec une distance minimale
de 20 cm entre le radiateur et votre corps. Cet émetteur ne doit pas être colocalisé ou fonctionner
en conjonction avec une autre antenne ou un autre émetteur.
FCC Radiation Exposure statement
ISED Compliance Statements
ISED Radiation Exposure statement
ment. This equipment should be installed and operated with minimum distance 20cm between the
radiator and your body.

English English11 12
Simplied EU Declaration of Conformity
Reolink declares that this device is in compliance with the essential requirements and other rele-
vant provisions of Directive 2014/53/EU and Directive 2014/30/EU.
WiFi Operating Frequency
OPERATING FREQUENCY :
2.4 GHzEIRP< 20dBm
5 GHzEIRP< 20dBm
5.8GHz EIRP< 14dBm
The functions of Wireless Access Systems including Radio Local Area Networks(WAS/
RLANs) within the band 5150-5350 MHz for this device are restricted to indoor use only
within all European Union countries (BE/BG/CZ/DK/DE/EE/IE/EL/ES/FR/HR/ IT/CY/LV/
LT/LU/HU/MT/NL/AT/PL/PT/RO/SI/SK/FI/SE/TR/N O/CH/IS/LI/UK(NI)
This marking indicates that this product should not be disposed with other household wastes.
throughout the EU. To prevent possible harm to the environment or human health from
uncontrolled waste disposal, recycle it responsibly to promote the sustainable reuse of material
resources. To return your used device, please use the return and collection systems or contact the
retailer where the product was purchased. They can take this product for environmentally safe
recycling.
This product comes with a 2-year limited warranty that is valid only if purchased from Reolink
Ocial Store or a Reolink authorized reseller. Learn more:
https://reolink.com/warranty-and-return/.
Use of the product is subject to your agreement to the Terms of Service and Privacy Policy at
reolink.com. Keep out of reach of children.
Limited Warranty
Terms and Privacy
Correct Disposal of This Product