PoE IP Camera
Operational Instruction
EN/DE/FR/IT/ES
Pettenkoferstraße 18,10247,Berlin,Germany
BellaCocool GmbH
REP
Issued in July 2019
QG4_B
Technical Support
If you need help, please contact Reolink before returning your product. Most questions can be
answered through our online support center at https://support.reolink.com.
Technische Unterstützung
Wenn Sie Hilfe brauchen, kontaktieren Sie bitte Reolink Support Team zuerst, bevor Sie Ihre
Bestellung zurücksenden.Meiste Fragen oder Probleme können von unserem Online Support
Center beantwortet und gelöst werden: https://support.reolink.com.
Support technique
Si vous avez besoin d’aide, veuillez contacter Reolink avant de retourner votre produit. La
plupart des questions peuvent être répondues via notre centre de support en ligne à l'adresse
https://support.reolink.com.
Supporto Tecnico
Se avete bisogno di aiuto, le chiediamo gentilmente di contattare Reolink prima di restituire il
prodotto.La maggior parte delle domande può essere risolta tramite il nostro centro di
assistenza online all'indirizzo https://support.reolink.com.
Soporte técnico
Si necesita ayuda, comuníquese con Reolink antes de devolver su producto. La mayoría de las
preguntas se pueden responder a través de nuestro centro de soporte en línea en
https://support.reolink.com.
Shenzhen Reo-link Digital Technology Co, Ltd.
11th floor, Building C, Unisplendour Information Harbour, North High-Tech Zone, Nanshan
District, Shenzhen, China, 518057
https://reolink.com
https://support.reolink.com

Contents
What’s in the Box
What’s in the Box
How to Power the Camera
Camera Connection Diagram
Set up the Camera on Reolink App (For Smartphone)
Set up the Camera on Reolink Client (For PC)
How to Adjust the Camera’s Direction
Troubleshooting
Specifications
Notification of Compliance
1
2
3
4
5
8
9
9
10
EN
2English
1 English
How to Power the Camera
PoE Camera ×1
Waterproof Lid ×1
1m Network Cable ×1
Surveillance Sign ×1
Quick Start Guide ×1
Mounting Hole Template ×1
Pack of Screws ×1
Power Adapter ×1 (For RLC-423 only)
Connect your IP camera to the Reolink PoE NVR with a single network cable, and then the PoE
camera will get power from the PoE NVR.
• Powered by the Reolink PoE NVR
• For Reolink RLC-423 & RLC-423S, the ratings of the power adapter should be DC 12V 2A.
• For other Reolink PoE camera models, the ratings of the power adapter should be DC 12V 2/1A.
• For Reolink RLC-423 & RLC-423S, you need to make sure that the PoE injector/switch is 802.3at
compliant (48V) and supports the active mode.
• For other Reolink PoE camera models, please make sure that the PoE injector/switch is 802.3af
compliant (48V) and supports the active mode.
• Powered by the Power Adapter
• Powered by the PoE Injector/Switch
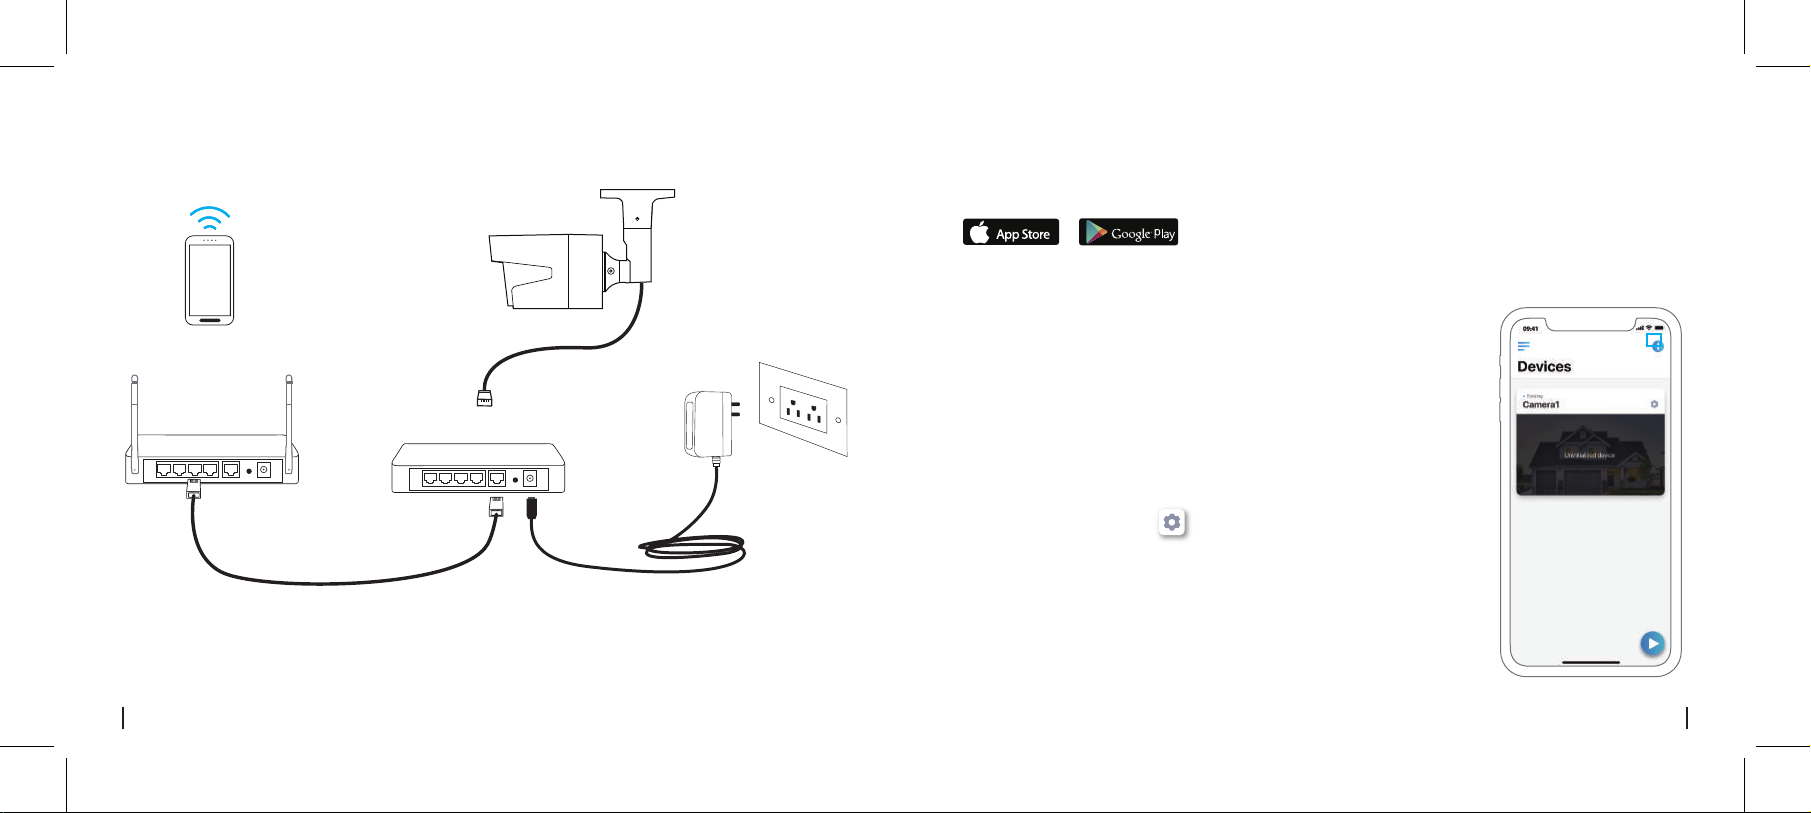
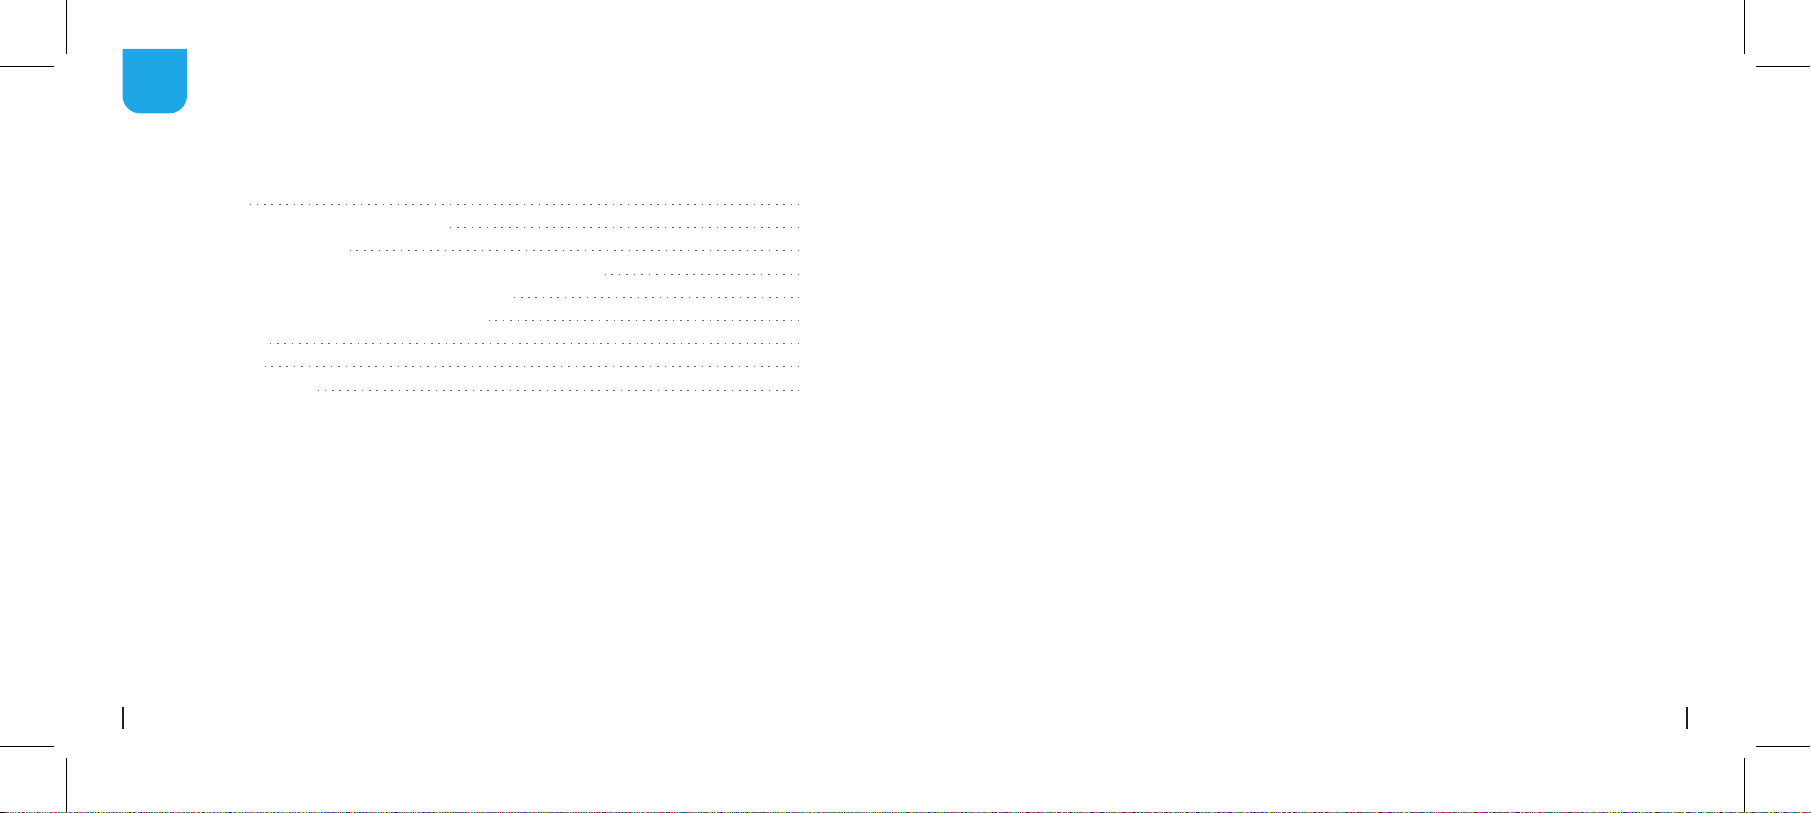
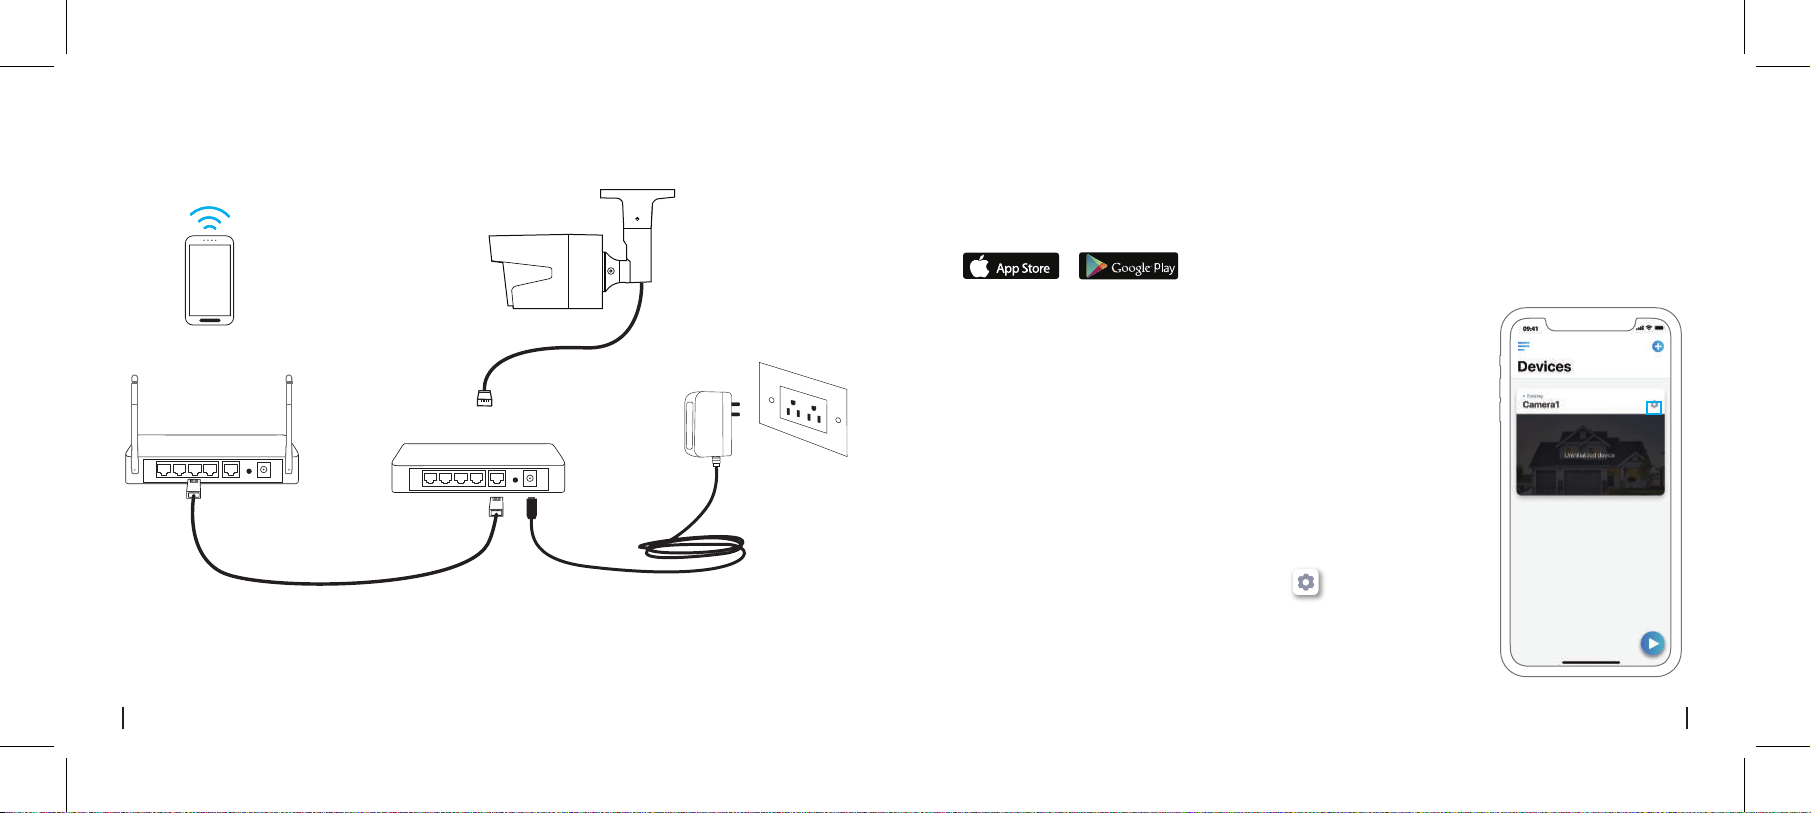
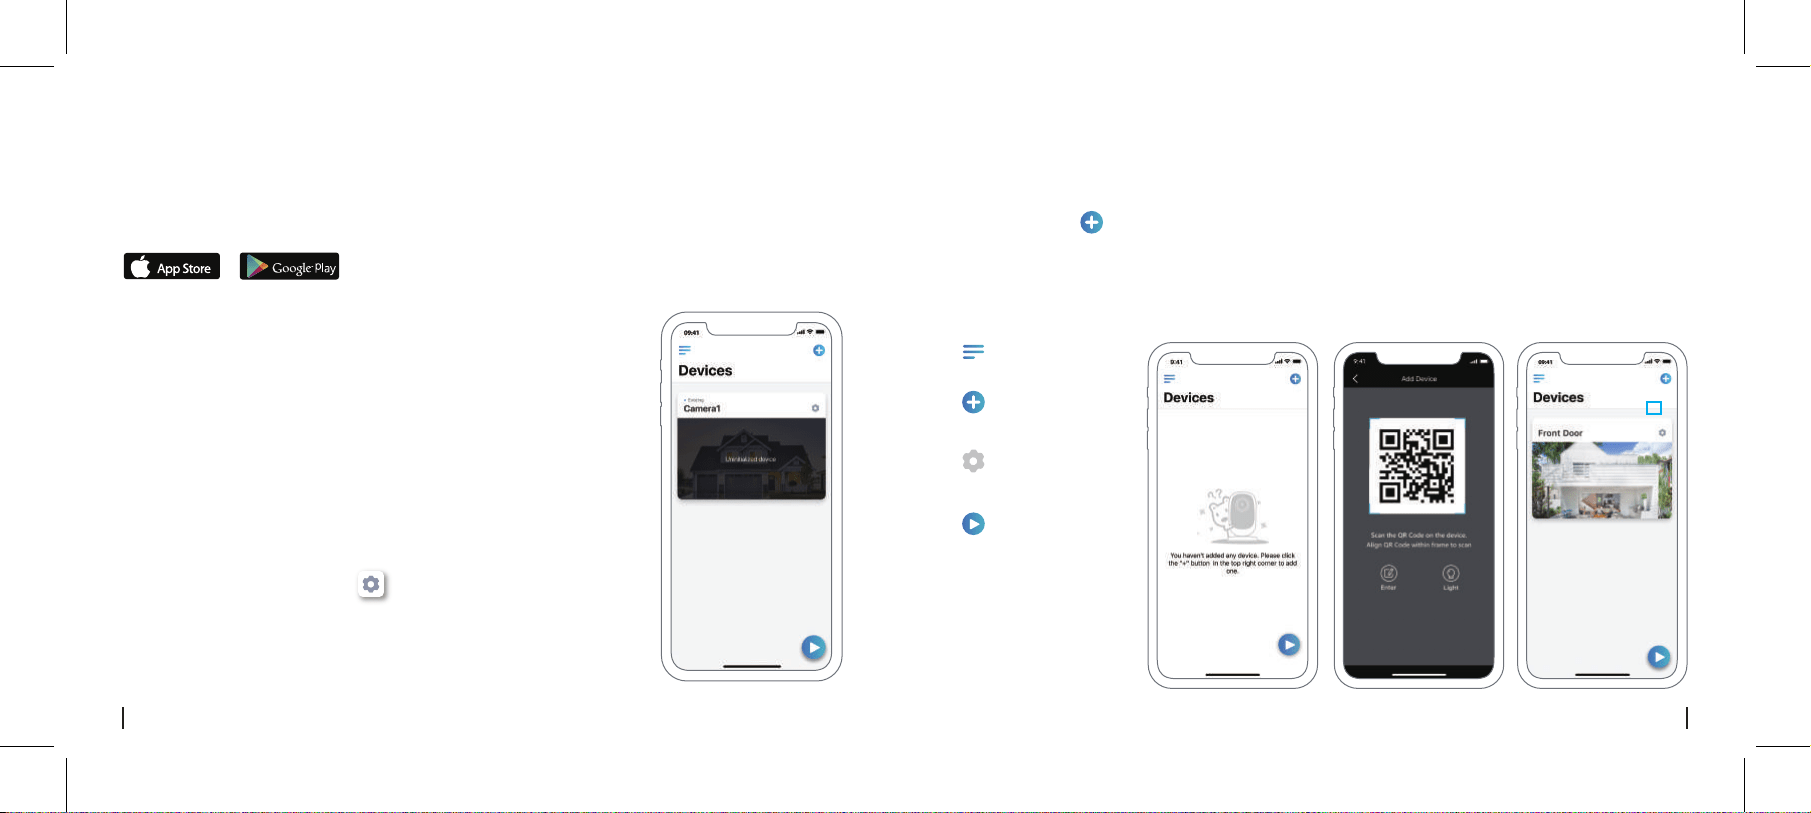
Download and install the Reolink App on App Store (for iOS) or Google Play (for Android).
Available on the
Get it on
Set up the Camera on Reolink App (For Smartphone)
4English3 English
Camera Connection Diagram
1. Connect your smartphone to the Wi-Fi network of your router.
2. Launch Reolink App. The camera will automatically display in the
camera list in LAN.
3. Tap screen to create a login password and name your camera.
4. Start live view or go to “ ” for more configurations.
• Add the Camera in the Same Network
(In LAN)
Network Cable
Network Cable
PoE IP Camera
Power Adapter
Router
PoE Switch/Injector
Your Smart
Device

Please download and install the Reolink Client software from our ocial website:
https://reolink.com/software-and-manual/.
Set up the Camera on Reolink Client (For PC)
6English5 English
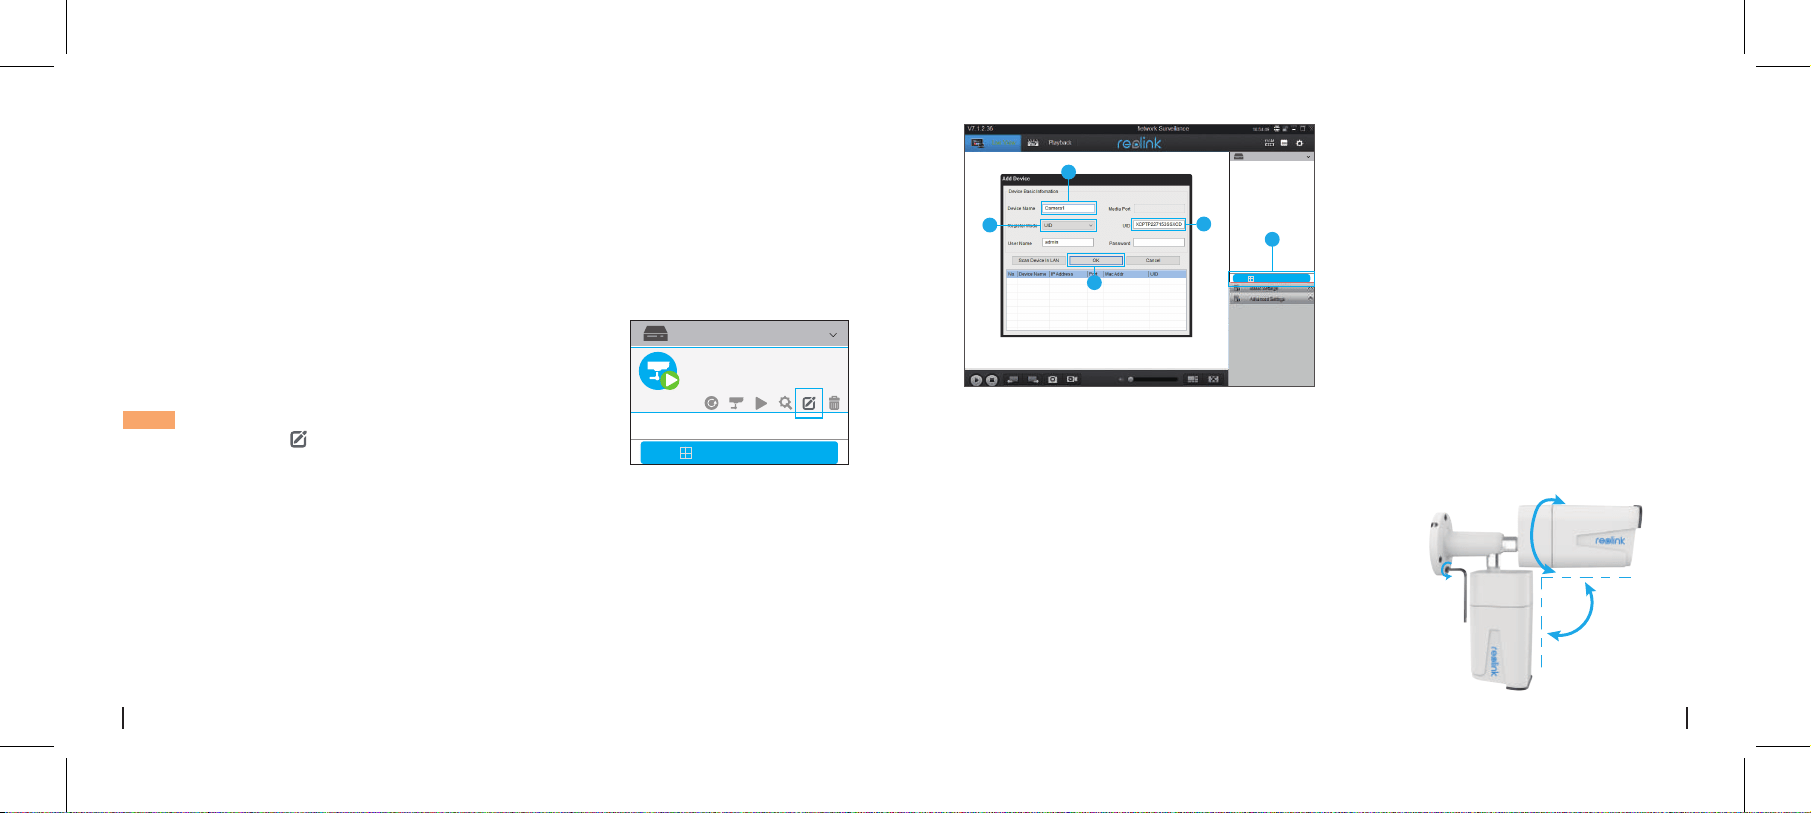
Add New Device
Device Settings
Menu
Access the
Live View
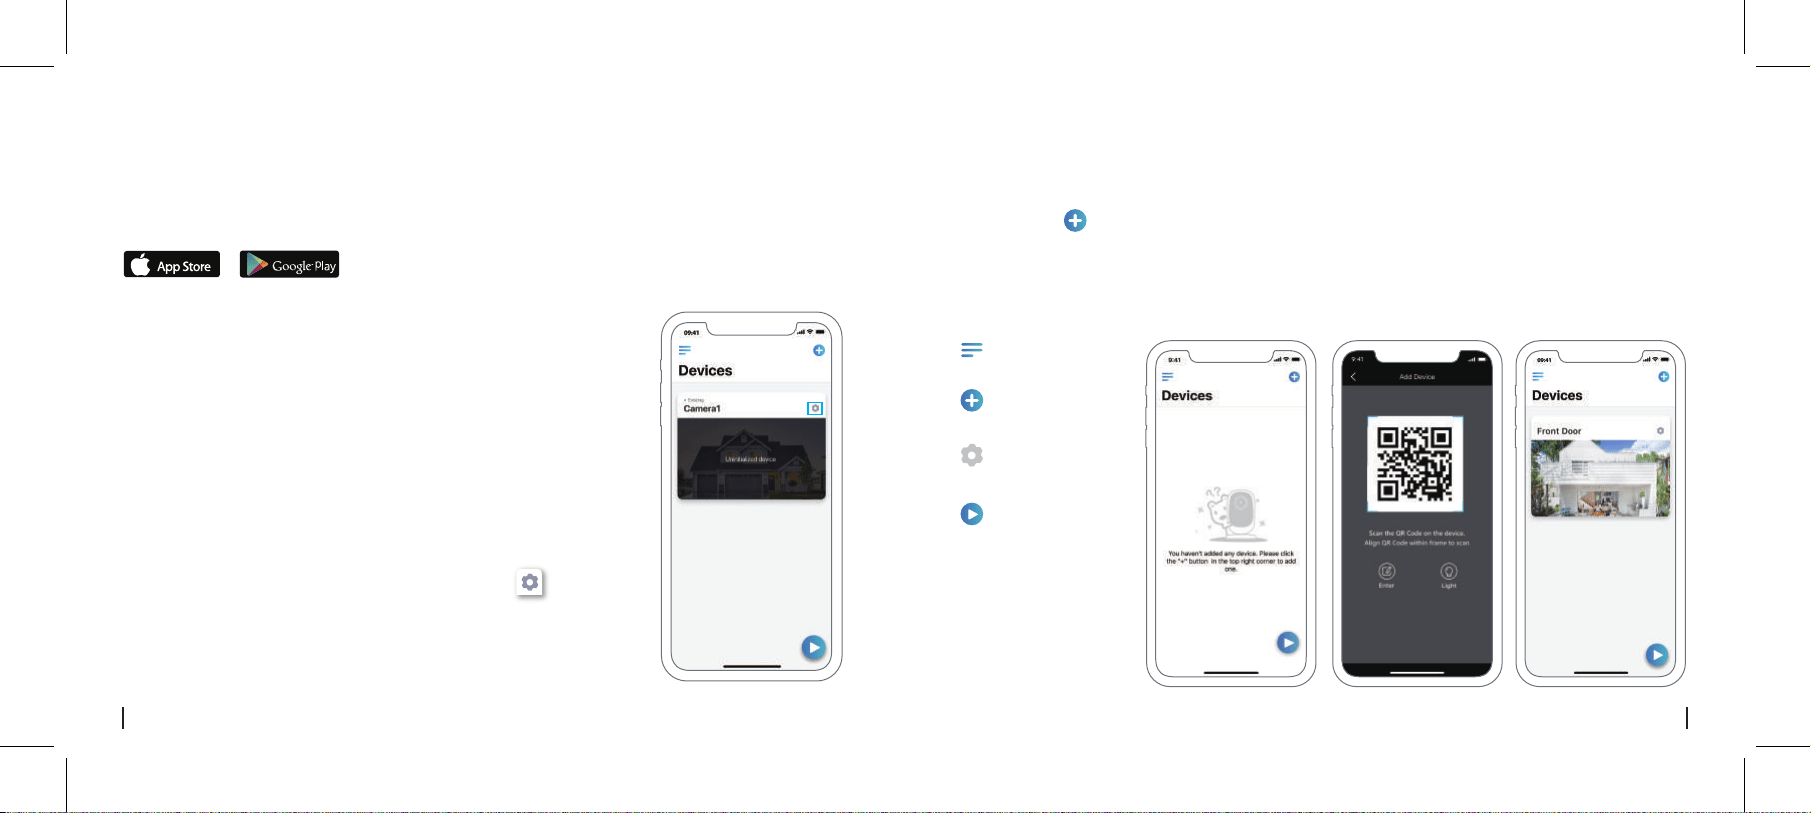
• Add the Camera in Dierent Network (In WAN)
1. Click “ ” on the upright corner.
2. Scan the QR code on the camera, and then start to initialize the device.
3. Create a login password, name your camera, and then start live view.
• Add the Camera in Dierent Network or Using Cellular Data
(In WAN)
1. Connect your computer to the same router which the camera
is connected to.
2. Launch Reolink Client. The camera will automatically display
in the device list in LAN.
NOTICE: If you’ve created the password for your camera on
Reolink App, please click the “ ” button to enter the correct
password to log in.
• Add the Camera in the Same Network (In LAN)
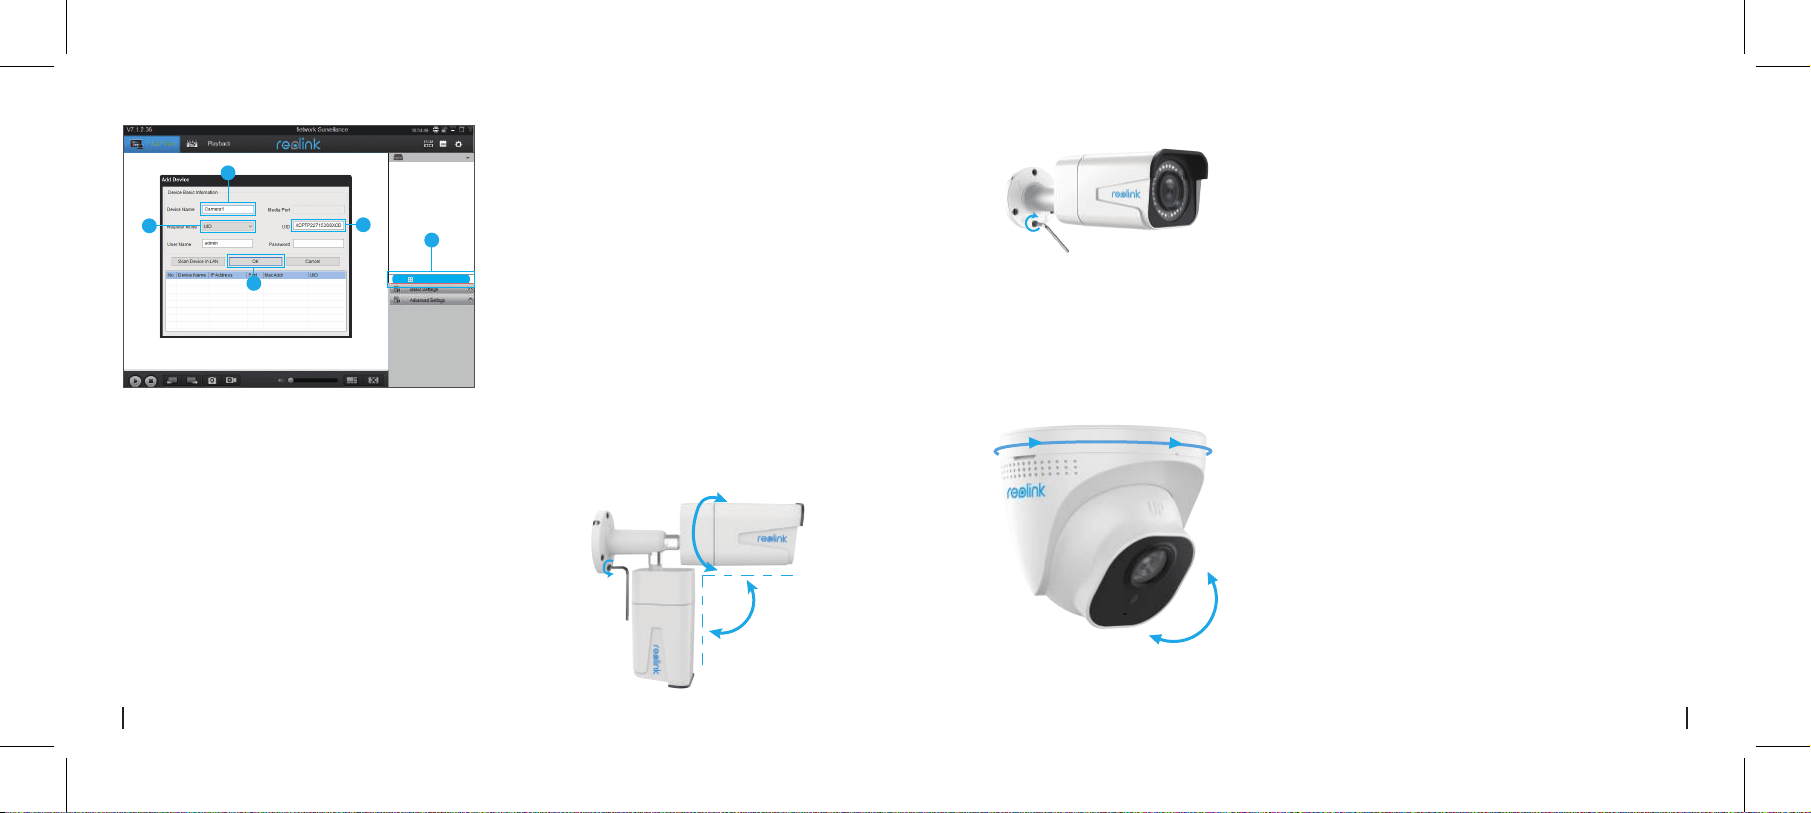
Add Device
Device list
Camera
State: password error
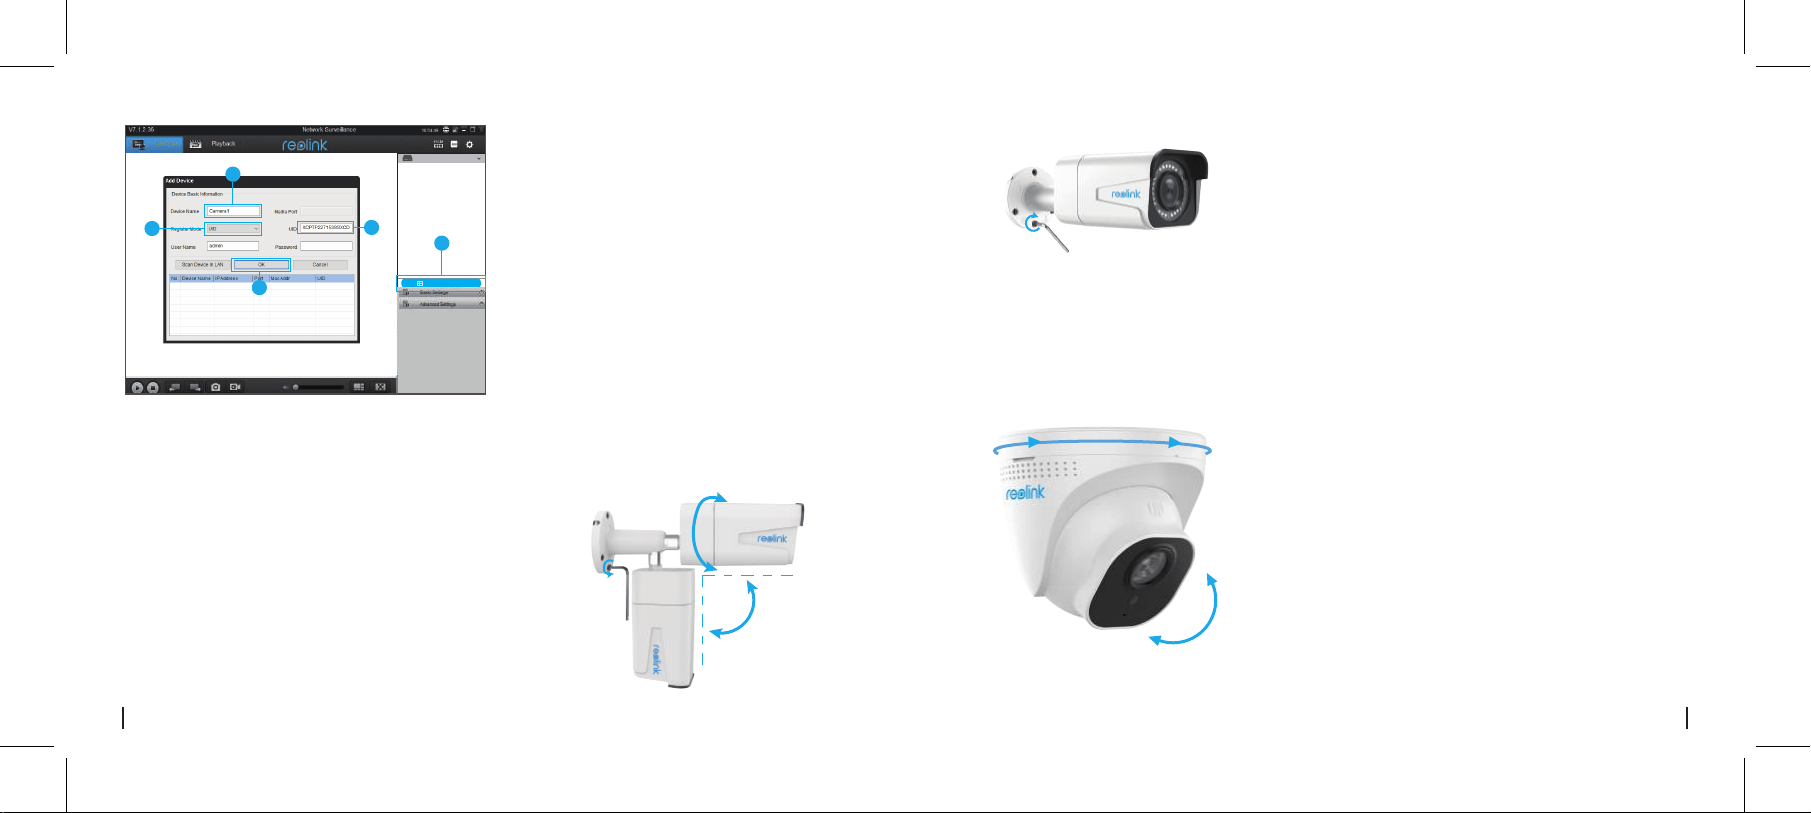
1. Click “Add Device” on the right-side menu.
2. Choose “UID” as the Register Mode.
3. Type in the UID of your camera.
4. Create a name for the camera displayed on Reolink Client.
5. Input the password created on Reolink App to log in.
6. Click “OK” to log in.
8English7 English
Add Device
Device list
1
4
2
5
3
******
• For PoE Bullet Cameras
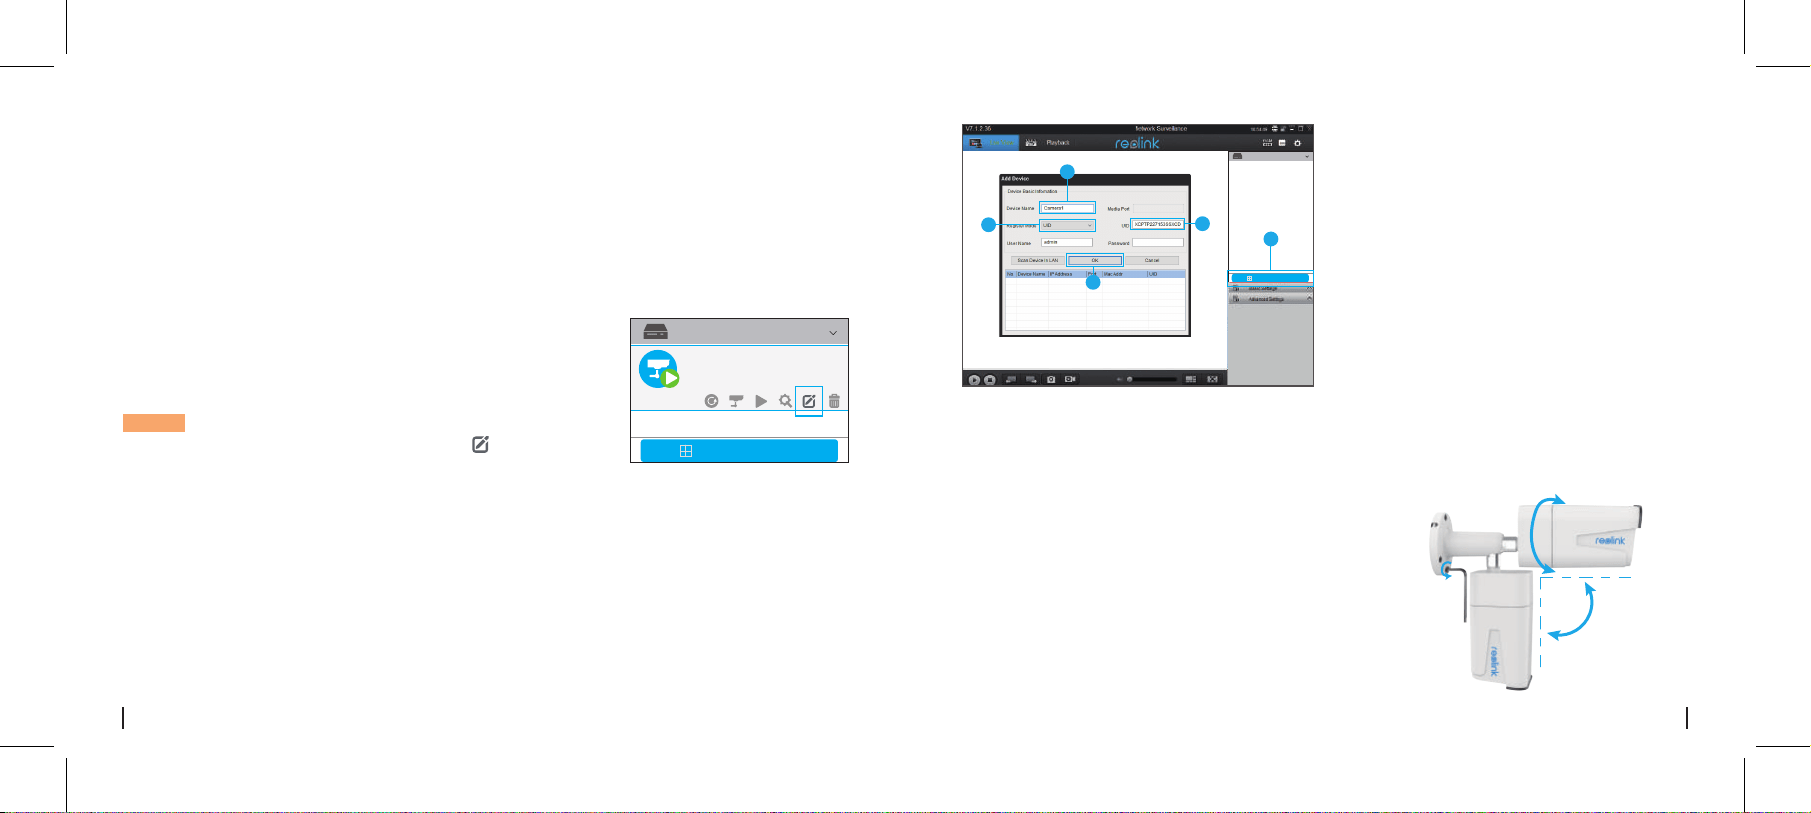
How to Adjust the Camera’s Direction
• For PoE Dome Cameras
1. Twist the screws with the wrench, and then adjust the
camera in any direction.
Manually rotate the camera body to adjust the
surveillance angle.
90°
360°
1
2
2. After adjustment, twist the screws back to mount
the camera firmly.
70°
360°
10English
9 English
Notification of
Compliance
FCC Compliance Statement
This device complies with Part 15 of FCC Rules.
Operation is subject to the following two
conditions: (1) this device may not cause
harmful interference, and (2) this device must
accept any interference received, including
interference that may cause undesired
operation. For more information,visit:
https://reolink.com/fcc-compliance-notice/.
Reolink Communications declares that this
device is in compliance with the essential
requirements and other relevant provisions of
Directive 2014/53/EU.
Simplified EU Declaration of
Conformity
This marking indicates that this product
should not be disposed with other household
wastes throughout the EU. To prevent possible
harm to the environment or human health
from uncontrolled waste disposal, recycle it
responsibly to promote the sustainable reuse of
material resources. To return your used device,
please use the return and collection systems or
contact the retailer where the product was
purchased. They can take this product for
environmentally safe recycling.
Correct Disposal of this product
Specifications
Operating Temperature: -10° to 55° C (14° to 131° F)
Operating Humidity: 10%-90%
Ingress Protection: IP66
IR Distance: 30 Meters (100ft) (60 Meters only for
RLC-423)
Day/Night Mode: Auto Switchover
Hardware Features
General
Use of the product is subject to your
agreement to the Terms of Service and Privacy
Policy at reolink.com. Keep out of reach of
children.
By using the Product Software that is
embedded on the Reolink product, you agree
to the terms of this End User License
Agreement (“EULA”) between you and Reolink.
Learn more: https://reolink.com/eula/.
This product comes with a 2-year limited
warranty that is valid only if purchased from
Reolink Ocial Store or a Reolink authorized
reseller. Learn more:
https://reolink.com/warranty-and-return/.
Limited warranty
Terms and Privacy
End User License Agreement
IP Cameras Are Not
Powering On
If you find your camera is not powering on,
try the following solutions:
• Please make sure your camera is powered
properly. The camera should be powered by
a PoE switch/injector, the Reolink NVR or a
12V power adapter.
• If the camera is connected to a PoE device
such as a switch/injector/Reolink NVR,
please plug the camera to another PoE port
and see whether the camera will power on.
• Try another Ethernet cable.
• If the issue isn’t fixed, please contact Reolink
support team.
Troubleshooting
IR LEDs Stop Working
If you find the IR LEDs of your camera stop
working, try the following solutions:
• Go to Device Settings and check whether
you have enabled Infrared lights. If the LEDs
are disabled, please enable them.
• Please go to Live View and check the
Day/Night mode, set the mode to Auto to
activate the IR lights.
• Upgrade your camera's firmware to the latest
version.
• Restore the camera to the factory settings, and
check the IR light settings again.
• If the issue is still not fixed, please contact
Reolink support team.
Fail to Upgrade the Firmware
If you fail to upgrade the firmware for the
camera, try the following solutions:
• Confirm the current firmware version of the
camera.
• Make sure the firmware you downloaded in the
download center is the correct one.
• Make sure the network of your computer is
smooth.
Inhalt
Lieferumfang
Lieferumfang
Wie Sie die Kamera mit Strom versorgen
Kamera-Verbindungssplan
Einrichtung der Kamera in der Reolink App (für Smartphones)
Einrichtung der Kamera im Reolink Client (für PC)
Wie Sie die Ausrichtung der Kamera einstellen
Fehlerbehebung
Spezifikationen
Konformitätserklärung
11
12
13
14
16
17
19
20
20
DE
12Deutsch
11 Deutsch
Wie Sie die Kamera mit Strom versorgen
PoE Kamera ×1
Wasserdichte Abdeckung ×1
1m Netzwerkkabel ×1
Überwachungszeichen ×1
Kurzanleitung ×1
Montage-Lochschablone ×1
Paket Schrauben ×1
Netzteil ×1 (Nur für RLC-423)
Verbinden Sie Ihre IP-Kamera mithilfe eines einzelnen Netzwerkkabels mit dem Reolink PoE NVR.
Nun erhält die PoE-Kamera Strom vom PoE NVR.
• Stromversorgung per Reolink PoE NVR
• Für Reolink RLC-423 & RLC-423S sollte die Nennleistung des Netzteils DC 12V 2A betragen.
• Für andere Reolink PoE-Kameramodelle sollte die Nennleistung des Netzteils DC 12V 2/1A betragen.
• Bei der Reolink RLC-423 & RLC-423S müssen Sie sicherstellen, dass der PoE-Injector/Switch
802.3at-konform (48V) ist und den aktiven Modus unterstützt.
• Für andere Reolink PoE-Kameramodelle müssen Sie sicherstellen, dass der PoE-Injector/Switch
802.3af-konform (48V) ist und den aktiven Modus unterstützt.
• Stromversorgung per Netzteil
• Stromversorgung per PoE Injector/Switch
Laden Sie die Reolink App herunter und installieren Sie sie im App Store (für iOS) oder Google
Play (für Android).
Available on the
Get it on
Einrichtung der Kamera in der Reolink App (für
Smartphones)
14Deutsch13 Deutsch
Kamera-Verbindungsplan
1. Verbinden Sie Ihr Smartphone mit dem WLAN-Netzwerk Ihres Routers.
2. Starten Sie die Reolink App. Die Kamera erscheint nun automatisch in
der Kameraliste im LAN.
3. Tippen Sie auf den Bildschirm, um ein Anmeldekennwort zu erstellen
und Ihre Kamera zu benennen.
4. Starten Sie die Live-Ansicht oder gehen Sie für die erweiterte
Konfiguration auf “ ”
• Hinzufügen der Kamera zum gleichen
Netzwerk (im LAN)
Netzwerkkabel
Netzwerkkabel
PoE IP Kamera
Netzteil
Router
PoE-Schalter/Injector
Ihr Smart
Device
Für die Erstinstallation führen Sie bitte die folgenden Schritte aus, um Ihre Kamera zu verbinden.
1. Verbinden Sie die Kamera über das Ethernet-Kabel mit Ihrem PoE-Switch/Injector.
2. Verbinden Sie den PoE-Switch/Injector mit Ihrem Router und schalten Sie dann den
PoE-Switch/Injector ein.

Bitte laden Sie die Reolink Client Software von unserer oziellen Website herunter und installieren
Sie sie: https://reolink.com/de/software-and-manual/.
Einrichtung der Kamera im Reolink Client (für PC)
16Deutsch15 Deutsch
Neues Gerät
hinzufügen
Geräteeinstellungen
Menü
Zugri auf die
Live-Ansicht
• Hinzufügen der Kamera in einem anderen Netzwerk (im WAN)
1. Klicken Sie auf “ ” in der oberen rechten Ecke.
2. Scannen Sie den QR-Code auf der Kamera und starten Sie nun die Initialisierung des Geräts.
3. Erstellen Sie ein Anmeldekennwort, benennen Sie Ihre Kamera und starten Sie dann die Live-Ansicht.
• Hinzufügen der Kamera in einem anderen Netzwerk oder
unter Verwendung von Mobilfunk (Im WAN)
• Hinzufügen der Kamera zum gleichen Netzwerk (im LAN)
Add Device
Device list
Camera
State: password error
1. Klicken Sie im rechten Menü auf „Gerät hinzufügen“.
2. Wählen Sie „UID“ als Registrierungsmodus.
3. Geben Sie die UID Ihrer Kamera ein.
4. Geben Sie der Kamera einen im Reolink Client angezeigten Namen.
5. Geben Sie für die Anmeldung das in der Reolink App erstellte Passwort ein.
6. Klicken Sie zum Anmelden auf „OK“.
1. Verbinden Sie Ihren Computer mit dem gleichen Router, mit dem
auch die Kamera verbunden ist.
2. Starten Sie den Reolink Client. Die Kamera wird nun automatisch
in der Geräteliste im LAN angezeigtt.
HINWEIS: Wenn Sie ein Passwort für Ihre Kamera in der Reolink
App erstellt haben, klicken Sie bitte auf den “ ” Knopf, um das
korrekte Passwort für die Anmeldung einzugeben.

18Deutsch17 Deutsch
Add Device
Device list
1
4
2
5
3
******
• Für PoE-Stiftkameras
Wie Sie die Ausrichtung der Kamera einstellen
• Für PoE Dome-Kameras
1. Drehen Sie die Schrauben mit dem Schraubenschlüssel
und richten Sie die Kamera in die gewünschte Richtung.
Drehen Sie die Kamera manuell, um den
Überwachungswinkel anzupassen.
90°
360°
1
2
2. Ziehen Sie nach dem Einstellen die Schrauben
wieder an, um die Kamera festzustellen.
70°
360°

Betriebstemperatur: -10° bis 55° C
Betriebsfeuchtigkeit: 10%–90%
Witterungsbeständigkeit: IP66-zertifiziert
wetterfest
Allgemeines
20Deutsch
19 Deutsch
Konformitätserklärung
FCC-Konformitätserklärung
Dieses Gerät entspricht Abschnitt 15 der FCC-
Bestimmungen. Der Betrieb unterliegt den
folgenden beiden Bedingungen: (1) Dieses
Gerät darf keine schädlichen Interferenzen
verursachen und (2) dieses Gerät muss alle
empfangenen Interferenzen akzeptieren,
einschließlich Interferenzen, die zu einem
unerwünschten Betrieb führen können.
Weitere Informationen finden Sie unter:
https://reolink.com/fcc-compliance-notice/.
Reolink erklärt, dass dieses Gerät den
grundlegenden Anforderungen und anderen
relevanten Bestimmungen der Richtlinie
2014/53/EU entspricht.
Vereinfachte
EU-Konformitätserklärung
Diese Kennzeichnung weist darauf hin, dass
dieses Produkt in der gesamten EU nicht über den
Hausmüll entsorgt werden darf.
Um mögliche Umwelt- oder Gesundheitsschäden
durch unkontrollierte Entsorgung von Abfällen zu
vermeiden, recyceln Sie diese
verantwortungsbewusst, um die nachhaltige
Wiederverwendung von Ressourcen zu
unterstützen. Um ein gebrauchtes Gerät
zurückzugeben, nutzen Sie bitte das Rückgabe-
und Sammelsystem oder kontaktieren Sie den
Händler, bei welchem Sie das Produkt gekauft
haben. Ihr Händler kann das Produkt dem
umweltverträglichen Recycling zuführen.
Korrekte Entsorgung dieses Produkts
Spezifikationen
IR-Entfernung: 30 Meter (100 Fuß) (60 Meter
nur für RLC-423)
Tag/Nacht-Modus: Automatische
Umschaltung
Hardware-Merkmale
2-Jahre eingeschränkte Garantie ist für dieses
Produkt verfügbar. Mehr Infos:
https://reolink.com/de/warranty-and-return/.
Garantiebestimmun
IP-Kamera schaltet sich
nicht ein
Wenn Ihre Kamera sich nicht einschaltet,
versuchen Sie die folgenden Lösungen:
• Bitte stellen Sie sicher, dass Ihre Kamera
ordnungsgemäß mit Strom versorgt wird. Die
Kamera sollte über einen PoE-Switch/Injector,
den Reolink NVR oder ein 12V-Netzteil mit
Strom versorgt werden.
• Wenn die Kamera mit einem PoE-Gerät wie
z.B. einen Switch/Injector/Reolink NVR
verbunden ist, verbinden Sie die Kamera mit
einem anderen PoEAnschluss und prüfen Sie,
ob sich die Kamera einschaltet.
• Versuchen Sie es mit einem anderen
Ethernet-Kabel.
• Wenn dies das Problem nicht behebt,
wenden Sie sich bitte an das Reolink
Support-Team.
Fehlerbehebung
Die IR-LEDs funktionieren
nicht mehr
Wenn die IR-LEDs Ihrer Kamera nicht mehr
funktionieren, versuchen Sie die folgenden
Lösungen:
• Önen Sie die Geräteeinstellungen und
überprüfen Sie, ob die Infrarot-LEDs aktiviert sind.
Sind die LEDs deaktiviert, aktivieren Sie diese bitte.
• Bitte önen Sie die Live-Ansicht und aktivieren
Sie den Tag/Nacht-Modus, setzen Sie den Modus
auf Auto, um die IR-Lampen zu aktivieren.
• Aktualisieren Sie Ihre Kamera-Firmware auf die
neueste Version.
• Setzen Sie sie auf die Werkseinstellungen zurück
und aktiveren Sie die IR-Lichteinstellungen.
• Wenn dies das Problem nicht behebt, wenden Sie
sich bitte an das Reolink Support-Team.
Firmware kann nicht aktualisiert
werden
Wenn Sie die Firmware der Kamera nicht
aktualisieren können, versuchen Sie die folgenden
Lösungen:
• Bestätigen Sie die aktuelle Firmware-Version der
Kamera.
• Stellen Sie sicher, dass die im Download-Center
heruntergeladene Firmware die richtige ist.
• Vergewissern Sie sich, dass das Netzwerk Ihres
Computers problemfrei arbeitet.

Contenu
Contenu de la boîte
Contenu de la boîte
Comment alimenter la Caméra
Diagramme de connexion de la caméra
Configurer la Caméra sur l'application Reolink (pour Smartphone)
Configurer la Caméra sur Reolink client (pour PC)
Comment régler la direction de la caméra
Dépannage
Spécifications
Avis de conformité
22
23
24
25
27
28
30
31
31
FR
PoE Caméra ×1
Couvercle étanche ×1
Câble réseau 1m ×1
Signe de surveillance ×1
Guide de démarrage rapide ×1
Gabarit de perçage de montage ×1
Pack de vis ×1
Adaptateur secteur ×1 (Pour RLC-423 uniquement)
22French
21 Deutsch
Die Nutzung des Produkts unterliegt Ihrer
Zustimmung zu AGB und Datenschutzrichtlinien
auf https://reolink.com/de/terms-conditions/.
Durch die Verwendung der in das
Reolink-Produkt integrierten Produktsoftware
stimmen Sie den Bestimmungen dieses
Endbenutzer-Lizenzvertrags (“EULA”) zwischen
Ihnen und Reolink zu. Weitere Informationen:
https://reolink.com/eula/.
AGB & Datenschutz
Endbenutzer-Lizenzvereinbarung

24French
23 French
Diagramme de raccordement de la caméra
Comment alimenter la Caméra
câble Ethernet
câble Ethernet
PoE IP Caméra
Adaptateur secteur
Routeur
Switch POE / injecteur PoE
Votre dispositif
intelligent
Connectez votre caméra IP au PoE NVR de Reolink à l'aide d'un seul câble réseau, puis la caméra
PoE sera alimentée par le NVR PoE.
• Alimenté par le PoE NVR de Reolink
• Pour Reolink RLC-423 & RLC-423S, la puissance nominale de l'adaptateur secteur doit être de
12V2A DC.
• Pour les autres modèles de PoE caméra Reolink, la puissance nominale de l'adaptateur secteur
doit être de 12V2/1A DC.
• Pour Reolink RLC-423 & RLC-423S, vous devez vous assurer que le commutateur/l'injecteur PoE
est compatible 802.3at (48V) et supporte le mode actif. • Pour les autres modèles de PoE caméra
Reolink, assurez-vous que le commutateur/injecteur PoE est compatible 802.3af (48V) et supporte
le mode actif.
• Alimenté par l'adaptateur secteur
• Alimenté par le commutateur/injecteur PoE
Pour la configuration initiale, veuillez suivre les étapes ci-dessous pour connecter votre la caméra.
1. Connectez la caméra à votre Switch/injecteur PoE par le câble Ethernet.
2. Connectez le switch/injecteur PoEs à votre routeur, puis mettez le switch/injecteur PoE sous tension.
Téléchargez et installez l'application Reolink sur l'APP Store (pour iOS) et Google Play (pour Android).
Available on the
Get it on
Configurer la Caméra sur l'application Reolink
(pour Smartphone)
26French25 French
1. Connectez votre smartphone au réseau Wi-Fi de votre routeur.
2. Lancez l'application Reolink. La Caméra s'ache
automatiquement dans la liste des appareils photo du réseau local.
3. Appuyez sur l'écran pour créer un mot de passe de connexion et
donnez un nom à votre caméra.
4. Commencez la visualisation en direct ou allez sur “ ” pour plus
de configurations.
• Ajouter la caméra dans le même réseau
(En LAN)
Ajouter un nouvel
appareil
Réglages de
l'appareil
Menu
Accéder à la vue
en direct
1.Cliquez sur “ ” dans le coin droit.
2. Scannez le code QR sur l'appareil photo, puis commencez à initialiser l'appareil.
3. Créez un mot de passe de connexion, donnez un nom à votre caméra, puis commencez la
vue en direct.
• Ajouter la caméra dans un réseau diérent ou en utilisant
des données cellulaires (En WAN)
Veuillez télécharger le logiciel Reolink Client sur notre site o iciel:
https://reolink.com/software-and-manual/ et installez-le.
Configurer la caméra sur Reolink Client (Pour PC)
28French27 French
Add Device
Device list
1
4
2
5
3
******
• Ajouter la caméra dans un autre réseau (En WAN)
1. Connectez votre ordinateur au même routeur que celui auquel
l'appareil photo est connecté.
2. Lancez Reolink Client, la caméra s'ache automatiquement dans
la liste des périphériques en LAN.
NOTICE: Si vous avez créé le mot de passe pour votre appareil photo
sur l'application Reolink, veuillez cliquer sur le “ ” bouton pour
entrer le mot de passe correct pour vous connecter.
• Ajouter la caméra dans le même réseau (En LAN)
Add Device
Device list
Camera
State: password error
• Pour caméras Bullet PoE
Comment régler la direction de la caméra
1. Cliquez sur " Ajouter un appareil " dans le menu de droite.
2. Choisissez "UID" comme mode d'enregistrement.
3. Tapez l'UID de votre caméra.
4. Créez un nom pour la caméra achée sur le Reolink Client.
5. Entrez le mot de passe créé sur l'application Reolink pour vous connecter.
6. Cliquez sur "OK" pour vous connecter.
1. Tournez la vis à l'aide de la clé, puis réglez la caméra
dans n'importe quelle direction.
90°
360°
1

30French29 French
Les caméras IP ne
s'allument pas
Si vous constatez que votre appareil photo ne
s'allume pas, essayez les solutions suivantes:
• Veuillez vous assurer que votre appareil
photo est alimenté correctement. La caméra
doit être alimentée par un commutateur/
injecteur PoE, l'adaptateur secteur Reolink
NVR ora 12V.
• Si la caméra est connectée à un
périphérique PoE tel qu'un commutateur/
injecteur/RéolinkNVR, veuillez brancher la
caméra sur un autre port PoE et voir si la
caméra s'allume.
• Essayez un autre câble Ethernet.
• Si le problème n'est pas résolu, veuillez
contacter l'équipe d'assistance Reolink.
Dépannage
Les LED IR s'arrêtent de
fonctionner
Si vous constatez que les LED IR de votre
caméra ne fonctionnent plus, essayez les
solutions suivantes:
• Allez dans Paramètres du périphérique et
vérifiez si vous avez activé les LED
sont désactivées, veuillez les activer.
• Passez en mode Achage en direct et vérifiez le
mode Jour/Nuit, réglez le mode sur Auto pour
activer les lumières infrarouges - Mettez à jour le
firmware de votre caméra avec la dernière version.
• Restaurez les réglages d'usine et vérifiez à nouveau
les réglages de l'éclairage infrarouge.
• Si le problème n'est toujours pas résolu, veuillez
contacter l'équipe d'assistance Reolink.
Échec de la mise à niveau du
micrologiciel
Si vous ne parvenez pas à mettre à niveau le
micrologiciel de la caméra, essayez les solutions
suivantes:
• Confirmez la version actuelle du micrologiciel de
la caméra.
• Assurez-vous que le micrologiciel que vous
téléchargez dans le centre de téléchargement est
le bon.
• Assurez-vous que le réseau de votre ordinateur
est en bon état.
• Pour les caméras dôme PoE
Pivotez manuellement le boîtier de la caméra pour
régler l'angle de surveillance.
2
2. Après le réglage, tournez les vis vers l'arrière pour
monter l'appareil photo bien en place.
70°
360°
32French
31 French
Température de fonctionnement: -10° à 55° C
Operating Humidity: 10%-90%
Résistance aux intempéries: IP66 certified
Général
Avis de conformité
Déclaration de conformité FCC
Cet appareil est conforme à l'article 15 de la
réglementation FCC. L'utilisation est soumise
aux deux conditions suivantes: (1) cet appareil
ne doit pas causer d'interférences nuisibles, et
(2) cet appareil doit accepter toute interférence
reçue, y compris les interférences qui peuvent
causer un fonctionnement non désiré. Pour plus
d'informations, visitez:
https://reolink.com/fcc-compliance-notice/.
Reolink déclare que cet appareil est conforme
aux exigences essentielles et autres
dispositions pertinentes de la Directive
2014/53/EU.
Déclaration de conformité
UE simplifiée
Ce marquage indique que ce produit ne doit
pas êtreéliminé avec d'autres déchets
ménagers dans l'UE. Afin d'éviter que
l'élimination incontrôlée des déchets ne nuise à
l'environnement ou à la santé humaine,
recyclez-les de manière responsable afin de
promouvoir la réutilisation durable des
ressources matérielles. Pour retourner votre
appareil usagé, veuillez utiliser les systèmes de
retour et de collecte ou contacter le détaillant
où le produit a été acheté. Ils peuvent prendre
ce produit pour un recyclage sans danger pour
l'environnement.
Élimination correcte de ce produit
Spécifications
Distance IR: 30 mètres (100 pieds) (60 mètres
seulement pour RLC-423)
Mode Jour/Nuit: Commutation automatique
Caractéristiques du matériel
Ce produit est livré avec une garantie limitée de
2 ans. En savoir plus:
https://reolink.com/warranty-and-return/.
Garantie limitée
L'utilisation du produit est soumise à votre
acceptation des Conditions d'utilisation et de la
Politique de confidentialité de
https://reolink.com/terms-conditions/.
Veuillez laisser ce produit dans un endroit que
les enfants ne peuvent pas atteindre.
Conditions et Confidentialité
En utilisant le logiciel produit intégré au
produit Reolink, vous acceptez les termes du
présent contrat de licence utilisateur final
(“CLUF”) entre vous et Reolink. Pour en savoir
plus: https://reolink.com/eual/.
Contrat de licence d'utilisateur final
Contenuti
Contenuto della Confezione
Contenuto della Confezione
Come Accendere la Telecamera
Diagramma Connessione Telecamera
Impostare la Telecamera su Reolink App (Per Smartphone)
Impostare la Telecamera sul Client Reolink (per PC)
Regolare la direzione Telecamera
Risoluzione Problemi
Specifiche
Avviso di Idoneità
33
34
35
36
38
39
41
42
42
IT
34Italian33 Italian
Come Accendere la Telecamera
PoE Telecamera ×1
Coperchio Impermeabile ×1
Cavo di Rete 1m ×1
Cartello Sorveglianza ×1
Guida di Avvio Rapido ×1
Modello Fori di Montaggio ×1
Confezione Viti ×1
Adattatore ×1 (Solo per RLC-423)
Connetti la tua Telecamera IP a Reolink PoE NVR con un singolo cavo di rete, e poi la telecamera
PoE riceverà correnate dal PoE NVR.
• Alimentata da Reolink PoE NVR
• Per Reolink RLC-423 & RLC-423S, la valutazione dell’adattatore dovrebbe essere DC 12V 2A.
• Per altri modelli di telecamere Reolink PoE, la valutazione dell’adattatore dovrebbe essere DC 12V 2/1A.
• Per Reolink RLC-423 & RLC-423S, bisogna accertarsi che il PoE injector/switch sia idoneo con
802.3at (48V) e supporti la modalità attiva.
• Per altri modelli di PoE telecamere Reolink, assicurarsi che il PoE injector/switch sia idoneo con
802.3at (48V) e supporti la modalità attiva.
• Alimentata da Adattatore
• Alimentata da PoE Injector/Switch
Scaricare ed installare la App Reolink da App Store (per iOS) e Google Play (per Android).
Available on the
Get it on
Impostare la Telecamera su Reolink App (Per
Smartphone)
36Italian35 Italian
Diagramma Connessione Telecamera
1. Connetti lo smartphone alla rete Wi-Fi del tuo router.
2. Lancia Reolink App. La telecamera verrà visualizzata
automaticamente nella lista di telecamere in LAN.
3. Tocca lo schermo per creare una password di accesso e un nome
per la tua telecamera.
4. Inizia la visualizzazione live oppure vai su“ ” per maggiori
configurazioni.
• Aggiungere la Telecamera alla Stessa
Rete (In LAN)
Cavo di Rete
Cavo di Rete
PoE IP Camera
Adattatore
Router
PoE Switch/Injector
Il Tuo Dispositivo
Smart
Per il setup iniziale, segui passaggi sotto per connettere la telecamera.
1. Connetti la telecamera al tuo PoE switch/injector tramite il cavo Ethernet.
2. Connettilo PoE switch/injector al tuo router, e poi accendi lo PoE switch/injector.

Scaricare il software Reolink Client dal nostro sito web uciale:
https://reolink.com/software-and-manual/.
Impostare la Telecamera sul Client Reolink (per PC)
38Italian37 Italian
Aggiungi Nuovo
Dispositivo
Impostazioni
Dispositivo
Menu
Access the
Live View
• Aggiungere la Telecamera ad una Rete Diversa (In WAN)
1. Clicca “ ” nell’angolo in alto a destra.
2. Scannerizzare il codice QR sulla telecamera e poi inizializzare il dispositivo.
3. Creare una password di accesso, il nome telecamera e iniziare la visione dal vivo.
• Aggiungere la Telecamera ad una Rete Diversa o Usando i
Dati Cellulare (In WAN)
1. Connettere il computer allo stesso router al quale è connessa
la telecamera.
2. Lanciare Reolink Client. La telecamera verrà visualizzata
automaticamente nella lista dispositivi in LAN.
AVVISO: Se hai crteato la password per la tua telecmaera sulla
Reolink Appclicca sul pulsante“ ”per inserire la password
corretta per accedere.
• Aggiungere la Telecamera alla Stessa Rete (In LAN)
Add Device
Device list
Camera
State: password error
1. Clicca “Aggiungi Dispositivo” sul men a destra.
2. Scegli “UID” come Modalità di Registrazione.
3. Scrivi l’UID della tua telecamera.
4. Crea un nome per la telecamera visualizzato sul Reolink Client.
5. Inserisci la password create sulla Reolink App per accedere.
6. Clicca “OK” per accedere.
40Italian39 Italian
Add Device
Device list
1
4
2
5
3
******
• Per PoE Bullet Camera
Regolare la direzione Telecamera
• Per PoE Dome Camera
1. Girare le viti con la brugola, e regolare la telecamera
su ogni direzione.
Ruotare manualmente il corpo della telecamera per
regolare l'angolo di visualizzazione.
90°
360°
1
2
2. Dopo la regolazione, avvitare nuovamente le viti
per fissare la telecamera.
70°
360°
Betriebstemperatur: -10° bis 55° C (14° bis 131° F)
Betriebsfeuchtigkeit: 10%–90%.
Eindringschutz: IP66
Allgemeines
42Italian
41 Italian
Avviso di Idoneità
Dichiarazione di Idoneità
Questo dispositivo rispetta la Parte 15 delle
Regole FCC. L’operazione è soggetta alle
seguenti due condizioni: (1) questo dispositivo
non può causare interferenze nocive, e (2)
questo dispositivo deve accettare qualsiasi
interferenza ricevuta, incluse interferenze che
possono causare operazioni indesiderate. Per
maggiori informazioni, visitare:
https://reolink.com/fcc-compliancenotice/.
Reolink dichiara che questo dispositivo è in
conformità con i requisiti essenziali e altre
rilevanti disposizioni della Direttiva 2014/53/EU.
Dichiarazione Semplificata di
Conformità UE
Questo marchio indica che questo prodotto
non deve essere rottamato insieme ad altri
rifiuti domestici attraverso l’UE. Per prevenire
possibili danni all’ambiente o alla salute umana
da un incontrollato scarico di rifiuti, riciclalo
responsabilmente per promuovere il riuso
sostenibile delle materie prime. Per restituire il
dispositivo usato, per favore usa il sistema di
resi e raccolta o contatta il punto vendita dove
il prodotto è stato acquistato. Possono rilevare
questo prodotto per un riciclo sicuro per
l’ambiente.
Corretta rottamazione di questo
prodotto
Specifiche
Distanza IR: 30 Metri (100ft) (60 Metri solo per
RLC-423)
Modalità Giorno/Notte: Cambio automatic
Caratteristiche Hardwaree
Questo prodotto viene fornito con una garanzia
limitata di 2 anni. Ulteriori informazioni:
https://reolink.com/de/warranty-and-return/.
Garanzia limitata
Le Telecamere IP Non si
Accendono
Se la vostra telecamera sembra non
funzionare, provate le soluzioni seguenti:
• Assicurarsi che la telecamera sia collegata
adeguatamente. La telecamera deve essere
alimentata da un PoE switch/injector,
Reolink NVR o da un adattatore a 12V.
• Se la telecamera è connessa ad un
dispositivo a PoE come un switch/injector/
Reolink NVR, si prega di scollegare la
telecamera inserendola in un’altra porta
PoE e vedere se la telecamera si accende
• Provare un altro cavo Ethernet.
• Se il problema non si risolve, contattare il
team di supporto Reolink.
Risoluzione Problemi
Die IR-LEDs funktionieren
nicht mehr
Wenn die IR-LEDs Ihrer Kamera nicht mehr
funktionieren, versuchen Sie die folgenden
Lösungen:
• Önen Sie die Geräteeinstellungen und
überprüfen Sie, ob die Infrarot-LEDs aktiviert
sind. Sind die LEDs deaktiviert, aktivieren Sie
die folgenden Lösungen:
• Önen Sie die Geräteeinstellungen und
überprüfen Sie, ob die Infrarot-LEDs aktiviert sind.
Sind die LEDs deaktiviert, aktivieren Sie diese bitte.
• Bitte önen Sie die Live-Ansicht und aktivieren Sie
den Tag/Nacht-Modus, setzen Sie den Modus auf
Auto, um die IR-Lampen zu aktivieren.
• Aktualisieren Sie Ihre Kamera-Firmware auf die
neueste Version.
• Setzen Sie sie auf die Werkseinstellungen zurück
und aktiveren Sie die IR-Lichteinstellungen.
• Wenn dies das Problem nicht behebt, wenden Sie
sich bitte an das Reolink Support-Team.
Firmware kann nicht aktualisiert
werden
Wenn Sie die Firmware der Kamera nicht
aktualisieren können, versuchen Sie die
folgenden Lösungen:
• Bestätigen Sie die aktuelle Firmware-Version
der Kamera.
• Stellen Sie sicher, dass die im Download-Center
heruntergeladene Firmware die richtige ist.
• Vergewissern Sie sich, dass das Netzwerk Ihres
Computers problemfrei arbeitet.
Contenido
Qué hay en la caja
Qué hay en la caja
Cómo dar energía a la cámara
Diagrama de conexión de la cámara
Configure la cámara en la aplicación Reolink (para teléfonos inteligentes)
Configurar la cámara en Reolink Client (para PC)
Cómo ajustar la dirección de la cámara
Solución de problemas
Especificaciones
Notificación de Cumplimiento
44
45
46
47
49
50
52
52
53
ES
Cámara PoE ×1
Tapa impermeable ×1
Cable de red de 1m ×1
Señal de vigilancia ×1
Guía de inicio rápido ×1
Plantilla de orificio de montaje ×1
Paquete de tornillos ×1
Adaptador de corriente ×1 (solo para RLC-423)
44Spanish
43 Italian
L'utilizzo del prodotto è soggetto
all'accettazione dei Termini di servizio e
dell'Informativa sulla privacy su
https://reolink.com/terms-conditions/.
Tenere fuori dalla portata dei bambini.
Termini e privacy
Utilizzando il software prodotto
incorporato al prodotto Reolink, voi
accettate i termini di questo accordo di
licenza per l’utente finale (“EULA”) fra voi
e Reolink. Scopri di più:
https://reolink.com/com/eula/.
Contratto di Licenza per l’utente Finale

46Spanish45 Spanish
Diagrama de Conexión de la Cámara
Cómo dar energía a la Cámara
Network Cable
Network Cable
PoE IP Camera
Power Adapter
Router
PoE Switch/Injector
Your Smart
Device
Conecte su cámara IP al Reolink PoE NVR con un solo cable de red, y luego la cámara PoE
obtendrá energía del PoE NVR.
• Alimentado por Reolink PoE NVR
• Para Reolink RLC-423 y RLC-423S, las clasificaciones del adaptador de corriente deben ser DC 12V
2A.
• Para otros modelos de cámara Reolink PoE, las clasificaciones del adaptador de corriente deben
ser DC 12V.
• Para Reolink RLC-423 y RLC-423S, debe asegurarse de que el inyector/interruptor PoE sea
compatible con 802.3at (48V) y admita el modo activo.
• Para otros modelos de cámara Reolink PoE, asegúrese de que el inyector/interruptor PoE sea
compatible con 802.3af (48V) y permita el modo activo.
• Alimentado por el adaptador de corriente
• Alimentado por el inyector/switch PoE
Para la configuración inicial, siga los pasos a continuación para conectar su cámara.
1. Conecte la cámara a su interruptor/inyector PoE a través del cable Ethernet.
2. Conecte el interruptor/inyector PoE a su enrutador y luego encienda el interruptor/inyector PoE.
Descargue e instale la aplicación Reolink en App Store (para iOS) o Google Play (para Android).
Available on the
Get it on
Configure la Cámara en el APP Reolink (Para Teléfonos
Inteligentes)
48Spanish47 Spanish
1. Conecte su teléfono inteligente a la red Wi-Fi de su enrutador.
2. Inicie la aplicación Reolink. La cámara aparecerá automáticamente
en la lista de cámaras en LAN.
3. Toque la pantalla para crear una contraseña de inicio de sesión y
asigne un nombre a su cámara.
4. Inicie vista en vivo o vaya a “ ” para más configuraciones.
• Agregue la cámara en la misma red (LAN)
Añadir Nuevo
Dispositivo
Configuración de
Dispositivo
Menú
Acceder a la Vista
en Vivo
1. Haga clic en “ ” la esquina vertical.
2. Scan the QR code on the camera, and then start to initialize the device.
3. Create a login password, name your camera, and then start live view.
• Agregue la cámara en una red diferente o con datos celu-
lares (WAN)
Descargue e instale el software Reolink Client desde nuestro sitio web oficial:
https://reolink.com/software-and-manual/.
Configure la cámara en Reolink Client (para PC)
50Spanish49 Spanish
Add Device
Device list
1
4
2
5
3
******
• Agregue la cámara en una red diferente (WAN)
1. Conecte su computadora al mismo enrutador al que está
conectada la cámara.
2. Inicie Reolink Client. La cámara se mostrará automáticamente
en la lista de dispositivos en LAN.
AVISO: si ha creado la contraseña de su cámara en la aplicación
Reolink, haga clic en “ ” el botón para ingresar la contraseña
correcta para iniciar sesión.
• Agregue la cámara en la misma red (LAN)
Add Device
Device list
Camera
State: password error
• Para cámaras Bullet PoE
Cómo ajustar la dirección de la cámara
1. Haga clic en "Agregar dispositivo" en el menú del lado derecho.
2. Elija "UID" como el modo de registro.
3. Escriba el UID de su cámara.
4. Cree un nombre para la cámara que se muestra en Reolink Client.
5. Ingrese la contraseña creada en la aplicación Reolink para iniciar sesión.
6. Haga clic en "Aceptar" para iniciar sesión.
1. Gire los tornillos con la llave y luego ajuste la cámara
en cualquier dirección.
90°
360°
1
52Spanish51 Spanish
Especificaciones
Distancia IR: 30 metros (100 pies) (60 metros
solo para RLC-423)
Modo día/noche: Cambio automático
Características de hardware
La cámara no enciende
Si encuentra que su cámara no se enciende,
pruebe las siguientes soluciones:
• Asegúrese de que su cámara esté
alimentada correctamente. La cámara debe
ser alimentada por un interruptor/inyector
PoE, el NVR Reolink o un adaptador de
corriente de 12V.
• Si la cámara está conectada a un
dispositivo PoE, como un interruptor/inyector
/NVR Reolink, conecte la cámara a otro
puerto PoE y vea si la cámara se enciende.
• Pruebe con otro cable Ethernet.
• Si el problema no se soluciona,
comuníquese con el equipo de soporte de
Reolink.
Solución de problemas
Los LED IR dejan de
funcionar
Si los LED IR de su cámara, dejan de
trabajar, pruebe las siguientes soluciones:
• Vaya a Configuración del dispositivo y
verifique si ha habilitado los LEDs infrarrojos.
Si los LED están deshabilitados, habilítelos.
• Vaya a Live View y verifique Modo día/noche,
configure el modo en Auto para activar las luces
IR.
• Actualice el firmware de su cámara a la ultima
versión.
• Restaure la configuración de fábrica y verifique
la configuración de la luz IR nuevamente.
• Si el problema aún no se soluciona, comuníquese
con el equipo de soporte de Reolink.
No se puede actualizar el
firmware
Si no puede actualizar el firmware para
cámara, pruebe las siguientes soluciones:
• Confirme la versión actual del firmware de la
cámara.
• Asegúrese de que el firmware que descargue
en el centro de descargas es el correcto.
• Asegúrese de que la red de su computadora
estéfuncionando.
• Para cámaras Dome PoE
Gire manualmente el cuerpo de la cámara para
ajustar el ángulo de vigilancia.
2
2. Después del ajuste, gire los tornillos hacia atrás
para montar la cámara firmemente.
70°
360°
54Spanish
53 Spanish
Notificación de
Cumplimiento
Declaración de cumplimiento de la FCC
Este dispositivo cumple con la Parte 15 de
las Reglas de la FCC. El funcionamiento está
sujeto a las siguientes dos condiciones: (1)
este dispositivo no puede causar interferencias
perjudiciales y (2) este dispositivo debe
aceptar cualquier interferencia recibida,
incluidas las interferencias que puedan causar
un funcionamiento no deseado. Para obtener
más información, visite:
https://reolink.com/fcccompliance-notice/.
Reolink declara que este dispositivo cumple
con los requisitos esenciales y otras
disposiciones relevantes de la Directiva
2014/53/UE.
Declaración de conformidad
de la UE simplificada
Esta marca indica que este producto no debe
desecharse con otros desechos domésticos
en toda la UE. Para evitar posibles daños al
medio ambiente o la salud humana derivados
de la eliminación no controlada de residuos,
recíclelo de manera responsable para
promover la reutilización sostenible de los
recursos materiales. Para devolver su
dispositivo usado, utilice los sistemas de
devolución y recolección o póngase en
contacto con el distribuidor donde adquirió el
producto. Ellos pueden aceptar este producto
para reciclarlo de manera segura para el
medio ambiente.
Deshecho correcto de este
producto.
Temperatura de funcionamiento: -10° a 55° C
Humedad de funcionamiento: 10% -90%
Protección de entrada: IP66
General
El uso del producto está sujeto a su
aceptaciónde los Términos de servicio y la
Política de privacidad en
https://reolink.com/terms-conditions/.
Mantenga fuera del alcance de los niños.
Al utilizar el Software del producto que
está incorporado en el producto Reolink,
usted acepta los términos de este Acuerdo
de licencia de usuario final (“EULA”) entre
usted y Reolink. Obtenga más información:
https://reolink.com/eula/.
Este producto viene con una garantía limitada
de 2 años. Aprenda más:
https://reolink.com/warranty-and-return/.
Garantía limitada
Términos y privacidad
Acuerdo de licencia de usuario final