CRUNCH
AIR FRYER OVEN
FREIDORA DE AIRE
FRITEUSE À AIR
Scan here to download a free
recipe book with more than 20
delicious recipes to use in your
Crunch Air Fryer Oven.
User’s Manual
Manual del Usuario
Manuel d’utilisation

1
ENGLISH
ENGLISH
Contents
Introduction .............................................................................................................. 2
Important Safeguards .............................................................................................. 3
Features and Functions ............................................................................................6
Parts and Accessories ..............................................................................................8
Getting Started: Before First Use ............................................................................. 9
Operating Functions ............................................................................................... 10
How to Use the Air Fryer ........................................................................................ 12
Air Fryer Cooking Charts ........................................................................................ 13
Fresh Food Air Fryer Cooking Chart ...................................................................... 13
Frozen Food Air Fryer Cooking Chart .................................................................... 14
How to Use the Preset Functions ........................................................................... 15
How to Dehydrate ................................................................................................... 16
Air Fryer Dehydrating Chart ................................................................................... 17
Rotisserie: Before First Use.................................................................................... 18
How to Prepare the Rotisserie Spit ...................................................................... 18
How to Use the Rotisserie Spit ............................................................................. 19
How to Use the Rotisserie Basket ........................................................................ 19
How to Use the Rotisserie Retrieval Tool .............................................................. 20
Air Frying Tips ........................................................................................................ 21
Cleaning and Maintenance .................................................................................... 22
Troubleshooting ...................................................................................................... 23
Español.................................................................................................................... 25
Français .................................................................................................................. 49
Limited Warranty .................................................................................................... 72

3
2
ENGLISH
ENGLISH
Introduction
Thank you for purchasing this state of the art Zavor Crunch Air
Fryer Oven! The Zavor Crunch Air Fryer Oven can be used as an air
fryer, rotisserie, dehydrator, and more! The user-friendly electronic
controls are simple and straightforward, allowing you to set recipe
times with ease.
The Zavor Air Fryer user’s manual contains information on the
use and care of this product. Please read this manual carefully
before operating the Zavor Air Fryer to ensure proper usage and
maintenance of the unit. Carefully following the directions in this
manual enables you to optimize the performance and lifespan of
the unit.
IMPORTANT SAFEGUARDS
The product you have purchased is a state of the art appliance. It adheres to
all of the latest safety and technology standards; however, as with any electric
appliance, there are some potential risks. Only operate this cooker following the
instructions provided and only for its intended household use.
PLEASE READ THE INSTRUCTIONS BELOW BEFORE USING THE
APPLIANCE FOR THE FIRST TIME.
• Read all of the instructions contained in this manual before using the appliance.
• This product is not intended for commercial or outdoor use; it is only for
household and indoor use.
• Do not operate the unit if the electric cord or plug is damaged. If the appliance
is not working correctly, has been dropped or damaged, left outdoors or
submerged in water, discontinue use immediately and contact our customer
service department at 1-855-928-6748.
• This appliance should only be used by persons who are capable of
understanding the user guide or are supervised by those who have an adequate
understanding of the appliance’s features, use, and operating instructions.
Children must be supervised and should not be left alone with any appliance
during operation.
• Using accessories or replacement parts that are not recommended or sold by
the manufacturer may cause damage to the air fryer or personal injury. Using
unauthorized components will void the manufacturer’s warranty.
• Place the air fryer on a flat, sturdy, heat resistant surface. Do not place the air
fryer near or on any type of heat source, such as a gas or electric burner, stove,
or oven. Do not use near an open flame or flammable materials.
• Never operate the air fryer on a gas or electric stovetop, even if the stovetop is
off and completely cool.
• Always use the air fryer in a well-ventilated area. Do not block the vents.
• Before using the air fryer, inspect the plug and cord line for any damage. Do
not use the air fryer if it is damaged in any way. In such cases, contact Zavor
Customer Service for assistance at 1-855-928-6748.
• Insert the plug by grasping it firmly and guiding it into your home’s grounded
electrical outlet. Disconnect by grasping the plug, not the cord, and removing it
from your home’s grounded electrical outlet.
• Never wrap the cord around the appliance during use or storage; this may
cause the cord to fray and break.
• This appliance is not intended for use by persons (including children) with
reduced physical, sensory or mental capabilities, or lack of experience and
knowledge unless they have been given supervision or instruction concerning
use of the appliance by a person responsible for their safety.

5
4
ENGLISH
ENGLISH
• If using an extension cord, please note that a damaged extension cord can
cause the unit to malfunction. Always check your extension cord for damage
and be sure it is compliant with the required voltage. Do not let the electric cord
hang over the edge of the table or counter. Do not let the electric cord touch
hot surfaces.
• To reduce the risk of an electric shock, never immerse the plug, power cable
or housing in water or any other liquid. Only the removable accessories can be
placed in the dishwasher.
• Only qualified experts may repair and perform maintenance work on the air
fryer using authentic Zavor replacement and accessory parts. Never attempt to
disassemble and repair the air fryer yourself.
• This product is not a deep fryer. It is NOT meant to be filled with oil. Never fill
any parts of the air fryer with oil. If you choose to use oil, toss food with oil in a
separate bowl and then transfer food to the removable trays.
• Do not leave uncooked ingredients in the air fryer for more than a short period
of time before cooking; raw meat, poultry, fish, fruits, and vegetables can spoil.
• Do not move the air fryer while it is in use. During initial use, you may notice
some smoke and/or a slight odor. This is normal and should quickly dissipate.
It should not reoccur after the appliance has been used a few more times.
• Do not leave the air fryer unattended during use.
• The exterior of the air fryer is designed to be cool to the touch. Some areas do
get HOT during use. Do not touch the heating elements. Do not place hands or
other body parts near the air vents while air fryer is in use as burns may result.
Take caution when handling the hot trays and all removable parts.
• Use protective mitts and/or tongs to remove hot food from the air fryer.
• NEVER use air fryer outside.
• NEVER use the air fryer door as a place to rest any food. This could damage
the air fryer door or cause the unit to tip over and cause injury.
• Unplug the air fryer when you are done cooking.
• When the cooking time is done, the heating element will turn off but the fan
WILL CONTINUE RUNNING for 20 seconds to help cool the unit down.
• If the air fryer is used improperly or for professional or semi-professional
purposes or if it is not used according to the instructions in the user manual,
the warranty becomes invalid, and the manufacturer will not be held liable for
damages.
• Should the inner temperature control system fail, the overheating protection
system will be activated, and the unit will not function. Should this happen,
unplug the power cord. Allow time for the unit to cool completely before
restarting or storing.
• The appliance has a built-in “shut-off” device that will automatically shut down
the unit when the timer reaches zero. You can manually switch off the appliance
by pressing the Start/Stop button. The fan will continue running for 20 seconds
to cool the unit down.
• Before cleaning, make sure that the air fryer is off, unplugged, and cooled to
room temperature.
• Do not immerse the air fryer housing in water or place it in the dishwasher for
cleaning. It is NOT dishwasher safe.
• All removable parts may be washed with a sponge and warm, soapy water. All
removable parts are dishwasher safe.
• Do not use scouring pads to clean any component of this air fryer.
• Store the air fryer oven in a cool, dry place.
• In case of any electric emergency, such as a fire, call 911.
SAVE THESE INSTRUCTIONS
7
6
ENGLISH
ENGLISH
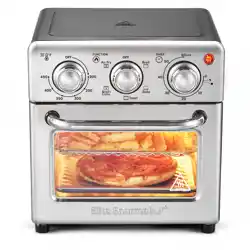
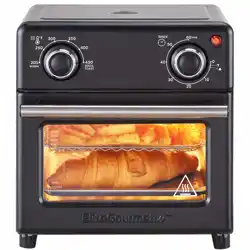
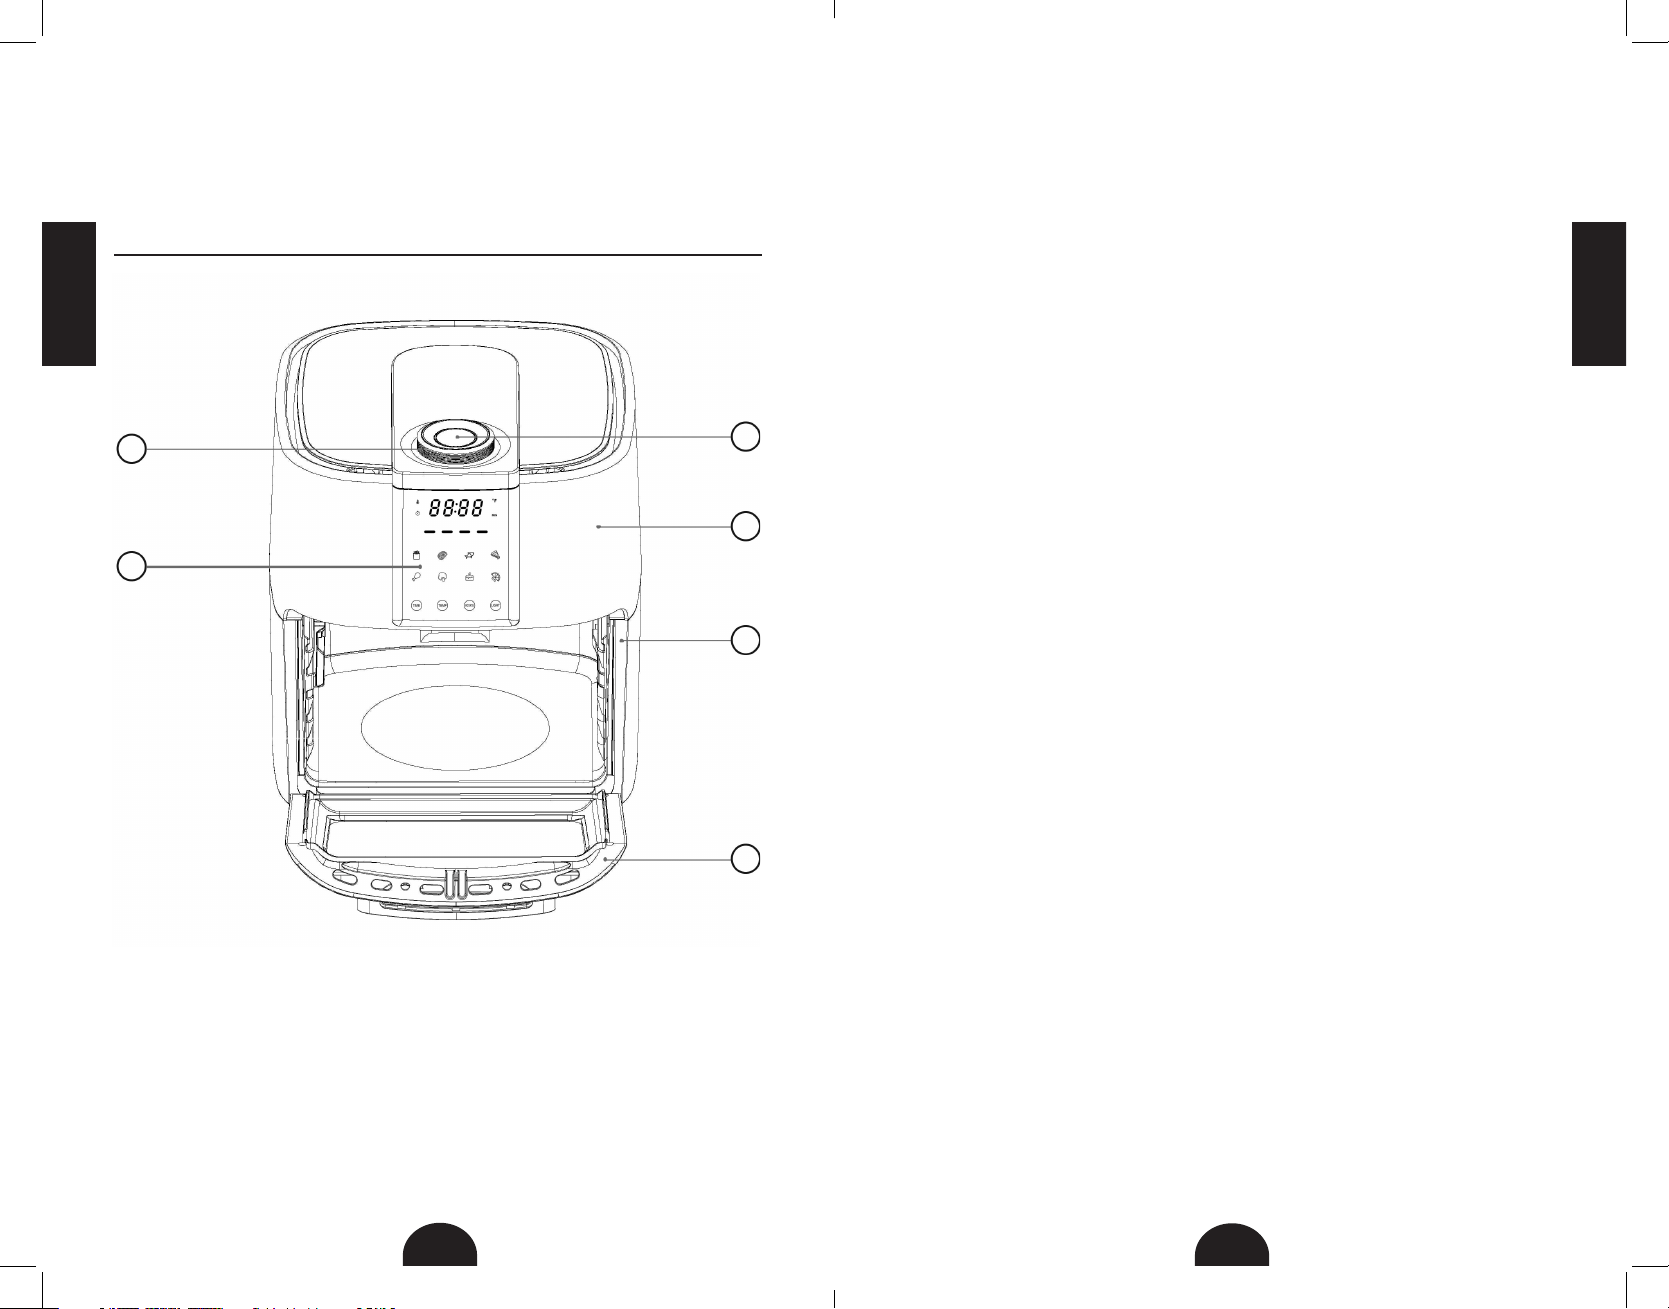
1. Start/Stop Button: Pressing the Start/Stop Button once will cause the full
panel to illuminate. Pressing the Start/Stop Button a second time (while
the panel is illuminated) will activate the cooking process at the default
temperature of 370°F and time of 15 minutes. Pressing the Start/Stop Button
at any time during the cooking process will cancel the cooking program.
Mute Feature: Pressing and holding the Start/Stop button for 3 seconds will
activate the mute feature which silences all unit beeps and alerts. To unmute,
press and hold the Start/Stop button for 3 seconds until the unit beeps.
2. Time & Temperature Dial: The outer part of the Start/Stop button functions
as a dial to help you scroll through times and temperatures when programming
the air fryer. Either can be programmed after pressing the corresponding
button on the control panel.
3. Air Fryer Housing: The body of the air fryer where all the electrical components
and heating elements are housed. The housing also holds the air fryer cavity
which measures approximately 6.5” high x 10” wide x 9.5” deep.
4. Control Panel: The interactive panel allows you to select different programs
such as French fries, chicken, seafood, and even dehydrate. In addition, it has
the time and temperature programs where you can set your own times and
temperatures as well as the rotate button to use the rotisserie feature.
5. Cooking Tray Positions: The Zavor air fryer has 5 different cooking tray
positions, including a rotisserie support to use the rotisserie accessories.
6. Air Fryer Door: Much like an oven door, the air fryer door drops down to allow
access to the inside of the fryer. It must be firmly pushed and will click into
place to ensure a proper close. The air fryer will not operate if the door is not
properly closed.
Features and Functions
2
1
3
5
6
4
7
6
ENGLISH
ENGLISH
1. Start/Stop Button: Pressing the Start/Stop Button once will cause the full
panel to illuminate. Pressing the Start/Stop Button a second time (while
the panel is illuminated) will activate the cooking process at the default
temperature of 370°F and time of 15 minutes. Pressing the Start/Stop Button
at any time during the cooking process will cancel the cooking program.
Mute Feature: Pressing and holding the Start/Stop button for 3 seconds will
activate the mute feature which silences all unit beeps and alerts. To unmute,
press and hold the Start/Stop button for 3 seconds until the unit beeps.
2. Time & Temperature Dial: The outer part of the Start/Stop button functions
as a dial to help you scroll through times and temperatures when programming
the air fryer. Either can be programmed after pressing the corresponding
button on the control panel.
3. Air Fryer Housing: The body of the air fryer where all the electrical components
and heating elements are housed. The housing also holds the air fryer cavity
which measures approximately 6.5” high x 10” wide x 9.5” deep.
4. Control Panel: The interactive panel allows you to select different programs
such as French fries, chicken, seafood, and even dehydrate. In addition, it has
the time and temperature programs where you can set your own times and
temperatures as well as the rotate button to use the rotisserie feature.
5. Cooking Tray Positions: The Zavor air fryer has 5 different cooking tray
positions, including a rotisserie support to use the rotisserie accessories.
6. Air Fryer Door: Much like an oven door, the air fryer door drops down to allow
access to the inside of the fryer. It must be firmly pushed and will click into
place to ensure a proper close. The air fryer will not operate if the door is not
properly closed.
Features and Functions
2
1
3
5
6
4
9
8
ENGLISH
ENGLISH
Parts and Accessories
1. Removable Non-stick Trays (2): Ceramic coated mesh trays for a more
convenient, nonstick cooking experience.
2. Rotisserie Basket: Stainless steel rotisserie basket is the perfect accessory
for air frying French fries, tater tots, onion rings, and more.
3. Rotisserie Retrieval Tool: Allows users to safely remove the rotisserie basket
or rotisserie forks from the air fryer.
4. Removable Drip Tray: Placed at the very bottom of the air fryer cavity to
catch any liquid, oil, crumbs, food particles, etc. that may fall during cooking.
5. Rotisserie Spit: The rod that food will be suspended on while rotisserie
cooking.
6. Rotisserie Forks with Removable Screws: Used to secure the food onto the
rotisserie spit.
Getting Started: Before First Use
Read the safety instructions found in this manual before plugging in and operating
the unit. Before using the air fryer for the first time, follow these steps:
1. Remove all packing materials and stickers from the inside and outside of the
air fryer, but don’t throw away the packing materials just yet! The rotisserie
spit and 2 rotisserie forks are packaged outside the air fryer in Styrofoam.
2. The rotisserie retrieval tool is packaged vertically next to the air fryer in
cardboard.
3. The rest of the tools (the rotisserie basket, 2 removable trays and 1 drip tray)
are packaged inside the air fryer.
4. Once everything is removed, gently wipe down the exterior with a damp cloth
or paper towel. Never immerse the air fryer or its plug in water or any other
liquid. The air fryer’s housing is NOT dishwasher safe.
5. Wash all removable parts with a sponge and warm, soapy water. Trays and
rotisserie basket may be washed with a soft bristled brush. Do NOT use
abrasive cleaning agents or scouring pads. All removable parts are dishwasher
safe.
6. Dry thoroughly.
1 2
3
6
4
5

11
10
ENGLISH
ENGLISH
Operating Functions:
Control Panel and Functions
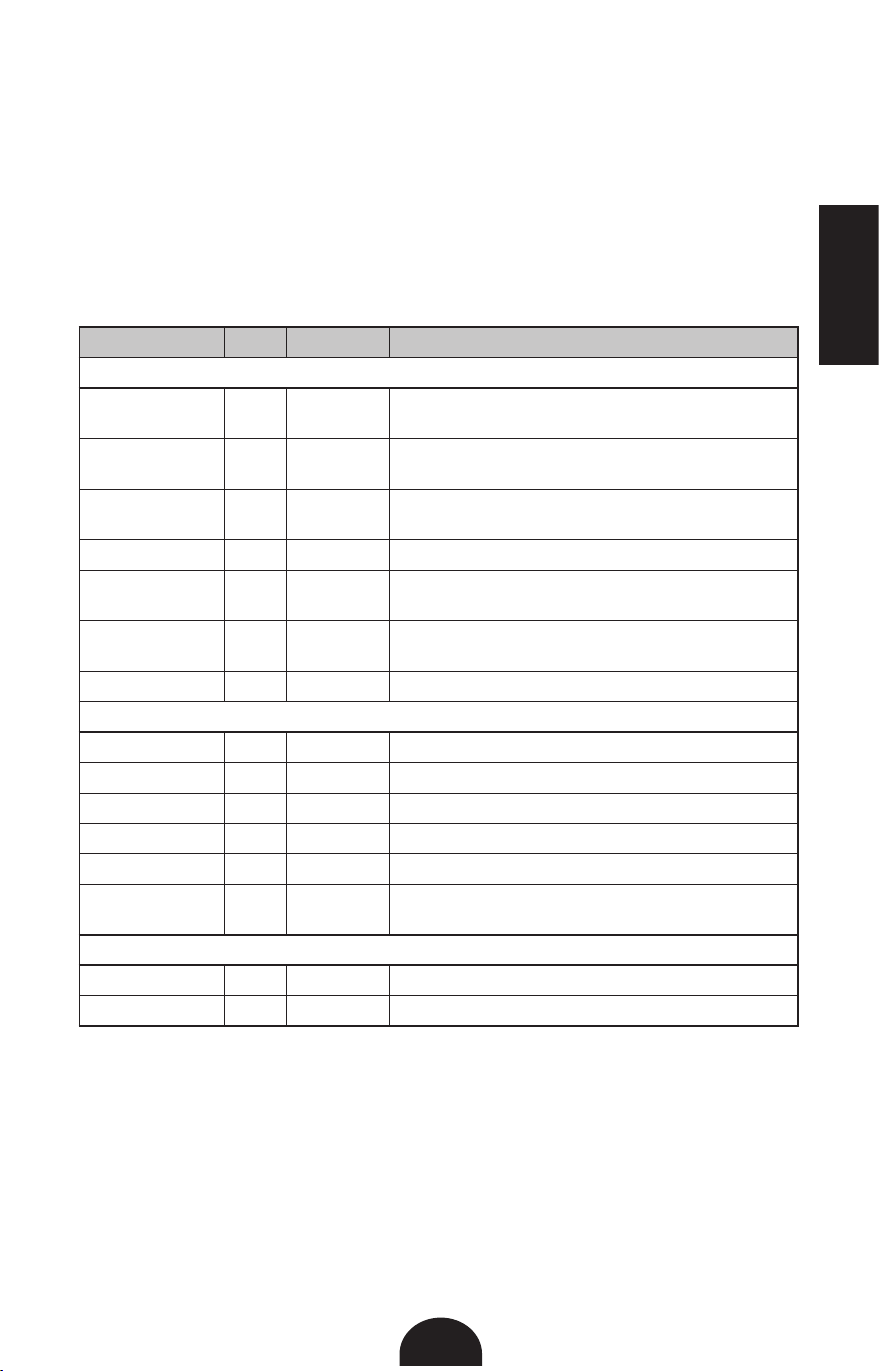
Preset Functions Time & Temperature Chart
Cooking Function: Preset Temp: Preset Time: Timer:
Fries 400°F 20 minutes
1-60 minutes,
1-minute increments
Meat 400°F 18 minutes
1-60 minutes,
1-minute increments
Seafood 390°F 12 minutes
1-60 minutes,
1-minute increments
Pizza 350°F 15 minutes
1-60 minutes,
1-minute increments
Chicken 380°F 18 minutes
1-60 minutes,
1-minute increments
Vegetables 350°F 20 minutes
1-60 minutes,
1-minute increments
Bake 350°F 30 minutes
1-60 minutes,
1-minute increments
Dehydrate 180°F 1 hour (60 minutes)
1 - 24 hours,
30-minute increments
1. LED Screen: Will show cooking temperature and cooking time.
2. Fahrenheit Indicator: Will illuminate when programming the temperature to
let users know the degrees are presented in Fahrenheit. It will also illuminate
while the unit is running and the cooking temperature is displayed on the
screen.
3. Minutes Indicator: Will illuminate when programming the cooking time. It will
also illuminate while the unit is running and the cooking time is displayed on
the screen.
4. Temperature Indicator: Illuminates when the unit is cooking and the
temperature is displayed on the screen.
5. Time Indicator: Illuminates when the unit is cooking and the cooking time is
displayed on the screen.
6. Running Lights: 4 lights beneath the LED screen will blink in sequence while
cooking to alert you that the unit is running.
7. Preset Functions: 8 functions come with preprogrammed times and
temperatures. You may over-ride these presets with the Time and Temperature
buttons. For the preset times and temperatures, please refer to the Time &
Temperature Chart. The icon will blink while in use.
8. Time Button: This button allows you to select your own cooking time from 1
minute to 60 minutes in all modes except when dehydrating, which uses 30-
minute intervals and an operating time from 1 to 24 hours.
9. Temp. Button: This button allows you to program the cooking temperature.
It is adjustable in 5°F intervals; the programmable temperature ranges from
150°F to 400°F. Dehydration temperature range is from 90°F to 180°F.
10. Rotate Button: Select this button when cooking anything using the rotisserie
accessories. The rotisserie accessories and rotation feature can be used with
any of the preset functions. The button will blink while in use.
11. Light Button: Turns the interior light on and off while cooking to easily check
your food.
NOTE: Whenever any button on the panel is pushed, it will beep and start to blink
to confirm it was selected.

11
10
ENGLISH
ENGLISH
Operating Functions:
Control Panel and Functions
Preset Functions Time & Temperature Chart
Cooking Function: Preset Temp: Preset Time: Timer:
Fries 400°F 20 minutes
1-60 minutes,
1-minute increments
Meat 400°F 18 minutes
1-60 minutes,
1-minute increments
Seafood 390°F 12 minutes
1-60 minutes,
1-minute increments
Pizza 350°F 15 minutes
1-60 minutes,
1-minute increments
Chicken 380°F 18 minutes
1-60 minutes,
1-minute increments
Vegetables 350°F 20 minutes
1-60 minutes,
1-minute increments
Bake 350°F 30 minutes
1-60 minutes,
1-minute increments
Dehydrate 180°F 1 hour (60 minutes)
1 - 24 hours,
30-minute increments
1. LED Screen: Will show cooking temperature and cooking time.
2. Fahrenheit Indicator: Will illuminate when programming the temperature to
let users know the degrees are presented in Fahrenheit. It will also illuminate
while the unit is running and the cooking temperature is displayed on the
screen.
3. Minutes Indicator: Will illuminate when programming the cooking time. It will
also illuminate while the unit is running and the cooking time is displayed on
the screen.
4. Temperature Indicator: Illuminates when the unit is cooking and the
temperature is displayed on the screen.
5. Time Indicator: Illuminates when the unit is cooking and the cooking time is
displayed on the screen.
6. Running Lights: 4 lights beneath the LED screen will blink in sequence while
cooking to alert you that the unit is running.
7. Preset Functions: 8 functions come with preprogrammed times and
temperatures. You may over-ride these presets with the Time and Temperature
buttons. For the preset times and temperatures, please refer to the Time &
Temperature Chart. The icon will blink while in use.
8. Time Button: This button allows you to select your own cooking time from 1
minute to 60 minutes in all modes except when dehydrating, which uses 30-
minute intervals and an operating time from 1 to 24 hours.
9. Temp. Button: This button allows you to program the cooking temperature.
It is adjustable in 5°F intervals; the programmable temperature ranges from
150°F to 400°F. Dehydration temperature range is from 90°F to 180°F.
10. Rotate Button: Select this button when cooking anything using the rotisserie
accessories. The rotisserie accessories and rotation feature can be used with
any of the preset functions. The button will blink while in use.
11. Light Button: Turns the interior light on and off while cooking to easily check
your food.
NOTE: Whenever any button on the panel is pushed, it will beep and start to blink
to confirm it was selected.

13
12
ENGLISH
ENGLISH
How to Use the Air Fryer
This section of the manual will instruct you on how to use the air fryer and the
preset functions. For rotisserie instructions, see the ROTISSERIE section of the
manual on page 18.
1. Place the air fryer on a flat, steady surface away from all sources of heat and
water and plug it in.
2. Ensure the drip tray is in place on the bottom of the air fryer.
NOTE: The door of the air fryer will not close if the drip tray is not placed in the
unit properly.
3. Place seasoned food on cooking trays and place cooking trays on the
appropriate rack position. Close the door, making sure it clicks into place.
NOTE: If the door is opened at any point while the air fryer is running, it will
pause the cooking time.
4. Press the TEMP button and turn the Time & Temp dial on top of the air fryer
until the display reads your desired temperature.
5. Once the desired temperature is displayed on the screen, press the TIME
button to program your cooking time. Turn the Time & Temp dial on the top of
the air fryer until the display reads your desired cooking time.
6. Press the START/STOP button located on the top of the air fryer to begin the
cooking process.
NOTE: For the best and most even results, rotate the trays from the top
positions to the bottom positions, and vice versa, halfway through cooking.
7. While the air fryer is running, the display will toggle between the set
temperature and the remaining time. The Fahrenheit Indicator and Minutes
Indicator will confirm whether the screen is showing the cooking temperature
or cooking time.
NOTE: Press START/STOP at any time to stop the cooking process. The time
and temperature will disappear from the screen and only the running lights will
remain. The fan will stay on for about 20 seconds before the unit completely
shuts off.
8. Once the cooking time is done, the unit will beep 3 times and will automatically
shut off.
9. Use oven mitts to remove hot trays from air fryer and tongs to handle hot
food.
Air Fryer Cooking Charts
Air fryer cooking times are approximate times. Use these cooking times as a
general guideline. Size and variety of food will most likely alter cooking times.
Fresh Food Air Fryer Cooking Chart
Fresh Food Item Amount Temperature Time Extra Info
Thin Fries 16 oz 400°F 36 minutes
On two trays, switch tray
positions at halfway mark
Baby Potatoes 16 oz 375°F 16-20 minutes
Potatoes should be quartered,
on one tray on the second rack
position from the top
Onion Rings 4 oz 400°F 14 minutes
On two trays, switch tray
positions at halfway mark
Chicken Breasts 2 pcs- 4 oz each 375°F 30 minutes
On one tray on the second rack
position from the top
Meatballs 4 pcs- 2 oz each 360°F 15 minutes
On one tray on the second rack
position from the top
Chicken Wings/
Drumsticks
4-5 pcs 375°F 28-30 minutes
On one tray on the second rack
position from the top
Fish Fillet 4 oz 390°F 12 minutes
On one tray on the second rack
position from the top
Jumbo Shrimp 13-14 oz 390°F 14 minutes
On two trays, switch tray
positions at halfway mark
Broccoli 8 oz 350°F 15 minutes
On one tray on the second rack
position from the top
Mushrooms 8 oz 400°F 18 minutes
Sliced, on one tray on the second
rack position from the top
Corn on the Cob 2 ears 400°F 12-14 minutes
On one tray on the second rack
position from the top
Zucchini 1 pc 400°F 22 minutes
Sliced, on one tray on the second
rack position from the top
Mini Fruit Hand
Pies
3 pcs- 3 oz each 350°F 15 minutes
On one tray on the second rack
position from the top
White Toast 2 pcs 400°F 4-6 minutes
Flip the slices halfway through
the time, adjust time for desired
darkness
Whole Wheat
Toast
2 pcs 400°F 3-5 minutes
Flip the slices halfway through
the time, adjust time for desired
darkness
Bagel 1, sliced 400°F 5 minutes Adjust time for desired darkness.
Personal Pizza 7 oz 325°F 24-26 minutes
On one tray on the second rack
position from the top

15
14
ENGLISH
ENGLISH
Frozen Food Air Fryer Cooking Chart
Frozen Food Item Amount Temperature Time Extra Info
Thin Fries 8 oz 400°F 20 minutes In the mesh basket on rotate
Thick Fries 8 oz 400°F 24 minutes In the mesh basket on rotate
Onion Rings 8 oz 400°F 12-15 minutes In the mesh basket on rotate
Chicken Nuggets 8 oz 400°F 12 minutes
On two trays, switch position at
the halfway mark
Chicken Wings 7 oz 380°F 18 minutes
On one tray on the second rack
position from the top
Fish Sticks 8 oz 390°F 12- 14 minutes
On one tray on the second rack
position from the bottom
Breaded Fish Fillet 2 pcs- 5 oz each 400°F 18-20 minutes
On one tray on the second rack
position from the bottom
Popcorn Shrimp 8 oz 360°F 12-14 minutes
On one tray on the second rack
position from the top
Breakfast Sausage 8 oz 400°F 18 minutes
On one tray on the second rack
position from the bottom
Mini Hand Pies 2 pcs- 3 oz each 350°F 30 minutes
On one tray on the second rack
position from the bottom
Personal Pizza 1 pc- 5 oz 350°F 15 minutes
On one tray on the second rack
position from the bottom
Hamburger Patty 1 pc 380°F 20 minutes
On one tray, flip at the halfway
mark
Chicken Fingers 8 oz 400°F 12-15 minutes
On one tray, flip at the halfway
mark
How to Use the Preset Functions
1. Place the air fryer on a flat, steady surface away from all sources of heat and
water and plug it in.
2. Ensure the drip tray is in place on the bottom of the air fryer.
NOTE: The door of the air fryer will not close if the drip tray is not placed in the
unit properly.
3. Place seasoned food on cooking trays and place cooking trays on the
appropriate rack position. Close the door, making sure it clicks into place.
NOTE: If the door is opened at any point while the air fryer is running, it will
pause the cooking time.
4. Select the desired setting by pressing the correct button on the control panel.
5. If desired, you can adjust the preset time and temperature by pressing the
TIME and/or TEMP buttons and rotating the Time & Temp dial to adjust
accordingly.
6. Press the START/STOP button located on the top of the air fryer to begin the
cooking process.
NOTE: For the best and most even results, rotate the trays from the top
positions to the bottom positions, and vice versa, halfway through cooking.
7. While the air fryer is running, the display will toggle between the set
temperature and remaining time. The Fahrenheit Indicator and Minutes
Indicator will confirm whether the screen is showing the cooking temperature
or cooking time.
NOTE: Press START/STOP at any time to stop the cooking process. The time
and temperature will disappear from the screen and only the running lights will
remain. The fan will stay on for about 20 seconds before the unit completely
shuts off.
8. Once the cooking time is done, the unit will beep 3 times and will automatically
shut off.
9. Use oven mitts to remove hot trays from air fryer and tongs to handle hot
food.

17
16
ENGLISH
ENGLISH
How to Dehydrate
Dehydrating foods such as vegetables, fruits, meats, and more is perfect for
cooking, traveling, camping, and snacking. Dehydrating fresh, ripe foods will
preserve nutrients and intensify the flavor. Using bruised fruits or vegetables
are acceptable for dehydrating and helps create less food waste. Trim off any
bruises with a knife. The Crunch Air Fryer Oven’s automated drying makes home
dehydration both rewarding and simple.
1. Place the air fryer on a flat, steady surface away from all sources of heat and
water and plug it in.
2. Ensure the drip tray is in place on the bottom of the air fryer.
NOTE: The door of the air fryer will not close if the drip tray is not placed in the
unit properly.
3. Place food on cooking trays and place cooking trays on the appropriate rack
position. Close the door, making sure it clicks into place.
NOTE: If the door is opened at any point while the air fryer is running, it will
pause the cooking time.
4. Select the Dehydrate setting on the control panel.
5. Adjust the preset time and temperature by pressing the TIME and/or TEMP
buttons and rotating the Time & Temp dial to adjust accordingly.
6. Press the START/STOP button located on the top of the air fryer to begin the
dehydrating process.
NOTE: For the best and most even results, rotate the trays from the top
positions to the bottom positions, and vice versa, halfway through cooking.
7. While the air fryer is running, the display will toggle between the set
temperature and remaining time.
NOTE: Press START/STOP at any time to stop the cooking process. The time
and temperature will disappear from the screen and only the running lights will
remain. The fan will stay on for about 20 seconds before the unit completely
shuts off.
8. Once the cooking time is done, the unit will beep 3 times and will automatically
shut off.
9. Use oven mitts to remove hot trays from air fryer and tongs to handle hot
food.
Air Fryer Dehydrating Chart
Follow the chart for common foods that can be dehydrated using the suggested
time, temperature, and instructions.
FOOD ITEM TEMP TIME INSTRUCTIONS
Fruit
Apples 135°F 8-10 hours Core/slice into 1/4-in. rounds,Soak in acidulated water. Switch
tray positions halfway through.
Apricots 135°F 10 hours Peel/slice into 1/4-in. pieces. Switch tray positions halfway
through.
Mango/Papaya 135°F 10 hours Peel/slice into 1/4-in. pieces. Switch tray positions halfway
through.
Kiwi 135°F 6 hours 1/4-in. rounds. Switch tray positions halfway through.
Orange Slices 135°F 10 hours Citrus is crisp when fully dried. Switch tray positions halfway
through.
Strawberries 135°F 6 hours Core/slice into 1/4-in. rounds or slices. Switch tray positions
halfway through.
Bananas 135°F 5- 6 hours 1/4-in. rounds. Switch tray positions halfway through.
Vegetables
Carrots 145°F 10- 11 hours Peel, cut 1/8 thickness. Switch tray positions halfway through.
Garlic 145°F 6-7 hours Chop and peel well. Switch tray positions halfway through.
Tomatoes 145°F 10- 11 hours Skin-side down. Switch tray positions halfway through.
Mushrooms 145°F 3-5 hours Skin-side down. Switch tray positions halfway through.
Peppers 145°F 4-8 hours Skin-side down. Switch tray positions halfway through.
Zucchini 145°F 7-9 hours Chop and Skin-side down. Switch tray positions halfway
through.
Jerky
Meat Jerky 145°F 5-6 hours Flip and Switch tray positions halfway through.
Fish Jerky 145°F 8-12 hours Flip and Switch tray positions halfway through.

19
18
ENGLISH
ENGLISH
How to Use the Rotisserie Spit
The rotisserie spit accessory must be used with the rotisserie forks. The rotisserie
spit accessory allows you to cook a whole chicken, large cuts of meat, fruits, and
more to perfection. The maximum weight the rotisserie spit allows is 4 lbs.
1. Place the air fryer on a flat, steady surface away from all sources of heat and
water and plug it in.
2. Ensure the drip tray is in place on the bottom of the air fryer.
NOTE: The door of the air fryer will not close if the drip tray is not placed in the
unit properly.
3. Hold the left side of the rotisserie spit in your left hand and the right side in
your right.
4. Guide the prepared rotisserie spit into the air fryer in the rotisserie rack
position. Place the left side of the rotisserie spit into the round rotisserie gear
located on the left interior wall. Once it is in place, lift the right side of the
rotisserie spit and place it on the rotisserie holder on the right interior wall.
Slide it until it reaches the rotisserie support and is in line with the left side.
Close the air fryer the door, making sure it clicks into place.
NOTE: If the door is opened at any point while the air fryer is running, it will
pause the cooking time.
5. Select your desired preset button by pressing the desired icon.
6. If desired, press the TIME button to adjust the time by rotating the time and
temperature dial on the top of the air fryer.
7. If desired, press the TEMP button to adjust the temperature by rotating the
time and temperature dial on the top of the air fryer.
8. Press the START/STOP button located on the top of the air fryer to begin the
cooking process.
9. Once the air fryer is running, press the ROTATE button to begin the rotisserie
rotation. While the air fryer is running, the display will toggle between the set
temperature and the remaining time.
NOTE: Press START/STOP at any time to stop the cooking process. The time
and temperature will disappear from the screen and only the running lights will
remain. The fan will stay on for about 20 seconds before the unit completely
shuts off.
10. Once the cooking time is done, the unit will beep 3 times and will automatically
shut off.
11. Use oven mitts with the rotisserie retrieval tool to remove the hot spit with the
hot food from the air fryer. Spit and forks will be HOT, use extreme caution
when unscrewing the forks.
How to Use the Rotisserie Basket
The rotisserie basket accessory is perfect for making evenly air fried foods such
as French fries, tater tots, chicken nuggets, and more. The maximum weight the
rotisserie basket allows is 4 lbs.
Rotisserie: Before First Use
• Read all material and warning stickers and labels.
• Wash all parts and accessories used in the cooking process with warm soapy
water.
NOTE: Only the accessories are dishwasher safe.
• Wipe the inside and outside of the air fryer with a clean moist cloth.
• Place the air fryer on a stable, level, horizontal, and heat resistant surface.
• Select the appropriate cooking accessory for your recipe.
How to Prepare the Rotisserie Spit
Chicken: If cooking a chicken on the rotisserie spit, ensure that all the innards
have been removed, that it is seasoned, and properly trussed.
1. Insert the rotisserie spit into the chicken’s cavity so that the chicken can hang
securely on the rod. Place the chicken with the rod on a cutting board and
clean any food bits off the ends of the spit.
2. Hold the rod in one hand, and one of the rotisserie forks with the prongs
pointed toward the chicken in the other hand. Insert the rod into the square
notches on the rotisserie fork.
CAUTION: Forks are sharp. Handle with care.
3. Poke the chicken with the fork and insert the prongs completely. Secure the
fork by tightening the screw. Repeat on the other side.
NOTE: Once the screws are tightened, there should be at least 1 inch of free
space on both ends of the rod. The chicken should also be secure; it should
not be able to slide back and forth on the rod.
Boneless meat (beef, pork, etc.) or fruit (pineapple, etc.)
1. Insert the rotisserie spit, lengthwise, into the center of the meat or fruit. Place
the meat, or fruit, with the rod onto a cutting board and clean any food bits off
the ends of the spit.
NOTE: If the spit doesn’t pierce your food well enough to insert, carefully
make an incision with a sharp kitchen knife to assist the initial puncture.
2. Hold the rod in one hand, and the rotisserie fork, with the prongs pointed
toward the food, in the other hand. Insert the rod into the square notches on
the rotisserie fork. Use forks only if needed to hold foods larger than the width
of the forks.
CAUTION: Forks are sharp. Handle with care.
3. Stick the meat or fruit with the fork and insert the prongs completely. Secure
the fork by tightening the screw. Repeat on the other side.
NOTE: Once the screws are tightened, there should be at least 1 inch of free
space on both ends of the rod. The food should also be secure; it should not
be able to slide back and forth on the rod.

21
20
ENGLISH
ENGLISH
1. Place the air fryer on a flat, steady surface away from all sources of heat and
water and plug it in.
2. Remove all trays except for the drip tray. Ensure the drip tray is properly in
place on the bottom of the air fryer.
NOTE: The door of the air fryer will not close if the drip tray is not placed in the
unit properly.
3. Place seasoned food inside the rotisserie basket and close it.
4. Hold the sealed rotisserie basket in your hands so that the side with the door
is in your right hand.
5. Guide the basket into the rotisserie rack position in the air fryer. Place the left
side of the basket into the round rotisserie gear located on the left interior
wall. Once it’s in place, lift the right side of the basket and place the protruding
pin on the rotisserie rail on the right interior wall. Slide it until it reaches the
rotisserie support and is in line with the left side. Close the air fryer the door,
making sure it clicks into place.
NOTE: If the door is opened at any point while the air fryer is running, it will
pause the cooking time.
6. Select your desired preset button by pressing the desired icon.
7. Press the TIME button to adjust the time by rotating the time and temperature
dial on the top of the air fryer.
8. Press the TEMP button to adjust the temperature by rotating the time and
temperature dial on the top of the air fryer.
9. Press the START/STOP button located on the top of the air fryer to begin the
cooking process.
10. Once the air fryer is running, press the ROTATE button to begin the rotisserie
rotation. While the air fryer is running, the display will toggle between the set
temperature and remaining time.
NOTE: Press START/STOP at any time to stop the cooking process. The time
and temperature will disappear from the screen and only the running lights will
remain. The fan will stay on for about 20 seconds before the unit completely
shuts off.
11. Once the cooking time is done, the unit will beep 3 times and will automatically
shut off.
12. Use oven mitts with the rotisserie retrieval tool to remove the hot basket from
the air fryer. Use oven mitts or a kitchen towel to open the basket door.
How to Use the Rotisserie Retrieval Tool
1. Hold the retrieval tool by its handle.
2. Guide the retrieval tool into the air fryer. Position it below the rotisserie spit or
basket.
3. Use the retrieval tool to lift the right side of the rotisserie spit. Once it is free,
lift the left side.
4. Carefully remove the hot rotisserie spit or basket and food from the air fryer.
Air Frying Tips
• Almost any food you cook in the oven can be air fried.
• Foods cook best and most evenly when they are of similar size and thickness.
Smaller pieces of food require less cooking time than larger items.
• Smaller pieces of food may be cooked at higher temperatures than larger items
because they generally require less time to cook.
• For best results in the shortest amount of time, air fry food in single layers.
• Most prepared foods do not need to be tossed in oil before air frying. Most
already contain oil and other ingredients that enhance browning and crispiness.
• Frozen appetizers and hors d’oeuvres air fry very well.
• Rotate trays halfway through the cooking cycle to ensure the most even results.
• Toss foods you are preparing from scratch, such as French fries, with oil, in a
separate bowl, to improve browning and crispiness. Fresh foods do not contain
the same oils, fats, and other ingredients that prepared foods contain, which
promote browning and crispiness.
• When making French fries using fresh potatoes, ensure they are completely
dry before cooking in the air fryer. Even the smallest droplets of moisture will
prevent them from getting crispy.
• When air frying battered food, stick to thick, pasty batters. Thin batters, such
as the batters used to make tempura, will run and not set fast enough like they
do in a deep fryer.
• Coating battered foods in panko breadcrumbs or puffed rice, and then spraying
them with oil, can help create crispy, healthier versions of your favorite fried
foods.
• Cook chicken until it reaches an internal temperature of 165°F.
• The air fryer is great for reheating food. To reheat your food, set the temperature
to 300°F for up to 10 minutes. Use a thermometer to ensure food reaches an
internal temperature of 165°F, the recommended food-safe temperature for
reheating food.
• Do not use any paper or plastic plates/containers in the air fryer.
• Aluminum foil and parchment paper can be used in the air fryer on the cooking
trays only. Do not place aluminum foil or parchment paper in the rotating
basket.
• It is not recommended to use any of the fryer’s tools for anything other than
their intended use with the air fryer as this may damage the components.
• Do not use the drip tray as a baking pan.

23
22
ENGLISH
ENGLISH
Cleaning and Maintenance
Do not wash any parts of the air fryer in the dishwasher except for the removable
accessories. Always wash the cooking trays, rotisserie tools, and drip tray
thoroughly after every use.
1. When the air fryer is unplugged and completely cool, gently wipe down the
exterior with a damp cloth or paper towel. Never immerse the air fryer or its
plug in water or any other liquid. The air fryer housing is NOT dishwasher safe.
2. Wash all removable parts with a sponge and warm, soapy water. Trays and
rotisserie basket may be washed with a soft bristled brush. Do not use abrasive
cleaning agents or scouring pads. All removable parts are dishwasher safe.
NOTE: If crumbs or food particles become lodged in the air fryer door hinges
or crevices, use a small brush to clean them out. Do not attempt to remove
the door for cleaning.
3. Dry thoroughly and store in a cool, dry place.
Troubleshooting
If you experience any issues while using your air fryer, here is a list of simple
solutions to assist you. If the issue persists, please call our customer service
department for assistance at 1-855-928-6748.
Problem The air fryer door won’t close after I put the cooking trays inside.
Solution Make sure the trays are inserted with the curved side in rst.
If the trays have been inserted backwards, the door will not
close.
Problem The air fryer won’t turn on.
Solution Make sure the unit is properly plugged in and that the air fryer
door is properly shut. Make sure you set a cooking time before
pressing the Start/Stop button.
Problem The rotisserie basket/spit isn’t rotating.
Solution Make sure you press the ROTATE button in order to use the
rotisserie feature. Make sure you don’t exceed the 4 lb. weight
limit when loading the food.
Problem I feel a little bit of air escape around the door when using the
air fryer.
Solution This is normal. The door is not sealed airtight. There are a few
spots around where air circulates for ventilation purposes.
Problem There is white smoke coming out of the air fryer.
Solution White smoke is often caused when cooking greasy foods or if
there is leftover grease residue from previous use. Make sure the
vents are not blocked and that you properly clean your air fryer
and accessories after every use.

ESPAÑOL
25
Contenidos
Introducción ............................................................................................................ 26
Precauciones Importantes ..................................................................................... 27
Características y Funciones ................................................................................... 30
Partes y Accesorios ................................................................................................32
Antes del Primer Uso .............................................................................................. 33
Funciones de Operación ......................................................................................... 34
Tabla de Tiempo y Temperatura de Funciones Preestablecidas .......................... 34
Cómo usar la Freidora de Aire ............................................................................... 36
Tablas de Cocción de la Freidora de Aire .............................................................. 37
Tabla de Cocción de Freidora de Aire para Alimentos Frescos ........................... 37
Tabla de Cocción de Freidora de Aire para Alimentos Congelados ..................... 38
Cómo Usar las Funciones Preestablecidas ........................................................... 39
Cómo Deshidratar ................................................................................................... 40
Tabla de Deshidratación de la Freidora de Aire .................................................... 41
Rostizador: Antes Del Primer Uso .......................................................................... 42
Cómo Preparar la Barra de Rostizador ................................................................ 42
Cómo Usar la Barra del Rostizador ...................................................................... 43
Cómo Usar la Cesta del Rostizador ....................................................................... 44
Como Usar la Herramienta de Manejo del Rostizador .......................................... 45
Consejos Para Freír al Aire ....................................................................................45
Limpieza y Mantenimiento ..................................................................................... 46
Solución de Problemas .......................................................................................... 47

ESPAÑOL
ESPAÑOL
27
26
Introducción
¡Gracias por comprar la Freidora de Aire Crunch de ZAVOR!
La freidora de aire Crunch se puede usar como freidora de aire,
rostizador, deshidratador y más! Los controles electrónicos fáciles
de usar son simples y directos, lo que le permite establecer tiempos
de recetas con facilidad.
El manual de uso contiene información vital para la utilización y
cuidado de este producto. Lea por favor este manual detenidamente
antes de poner en funcionamiento la freidora de aire de ZAVOR para
asegurar un uso y mantenimiento adecuado. Siga cuidadosamente
las siguientes instrucciones de este folleto para optimizar el
resultado y el período de vida útil de su electrodoméstico.
PRECAUCIONES IMPORTANTES
El producto que usted ha comprado es un electrodoméstico de tecnología punta.
Cumple todas las últimas medidas de seguridad y estándares tecnológicos; sin
embargo, al igual que con cualquier electrodoméstico, existen algunos riesgos
potenciales. Sólo opere esta freidora de aire de acuerdo con las instrucciones
facilitadas y sólo para su uso previsto en el hogar.
LEA POR FAVOR LAS SIGUIENTES INSTRUCCIONES ANTES DE PONER EN
FUNCIONAMIENTO EL ELECTRODOMÉSTICO POR PRIMERA VEZ.
• Lea todas las instrucciones contenidas en este manual antes de usar el
electrodoméstico.
• Este producto no está concebido para uso industrial o al aire libre; es sólo para
uso interior y en el hogar.
• No ponga a funcionar esta unidad si el cable o el enchufe están dañados.
Si el electrodoméstico no está funcionando correctamente, se ha caído o se
ha dañado, se ha dejado al aire libre o sumergido en agua, deje de usarlo
inmediatamente y contacte con nuestro servicio de asistencia al cliente en el
número de teléfono (800) 207 0806.
• La freidora de aire utiliza un enchufe doméstico tipo A estándar y un cable de
49 pulgadas.
• Este aparato solo debe ser utilizado por personas que sean capaces
de comprender la guía del usuario o que estén supervisadas por aquellos
que tengan un conocimiento adecuado de las características, el uso y las
instrucciones de funcionamiento del aparato. Los niños deben ser supervisados
y no deben dejarse solos con ningún electrodoméstico durante la operación.
• El uso de accesorios o piezas de repuesto que el fabricante no recomienda o
vende puede causar daños a la freidora o lesiones personales.
• Coloque la freidora sobre una superficie plana y resistente al calor. No coloque
la freidora de aire cerca o sobre ningún tipo de fuente de calor, como una
estufa u horno. No lo use cerca de una llama abierta o materiales inflamables.
• Nunca opere la freidora de aire en una estufa de gas o eléctrica, incluso si la
estufa está apagada y completamente fría.
• Utilice siempre la freidora de aire en un área bien ventilada. No bloquee las
rejillas de ventilación.
• Antes de usar la freidora de aire, inspeccione el enchufe y la línea del cable en
busca de daños. No use la freidora si está dañada de alguna manera. En tales
casos, comuníquese con el Servicio al Cliente de Zavor para obtener ayuda al
1-855-928-6748.
• Inserte el enchufe agarrándolo firmemente y guiándolo hacia el tomacorriente
de su hogar. Desconecte agarrando el enchufe, no el cable, y retirándolo del
tomacorriente de su hogar.
ESPAÑOL
ESPAÑOL
27
26
Introducción
¡Gracias por comprar la Freidora de Aire Crunch de ZAVOR!
La freidora de aire Crunch se puede usar como freidora de aire,
rostizador, deshidratador y más! Los controles electrónicos fáciles
de usar son simples y directos, lo que le permite establecer tiempos
de recetas con facilidad.
El manual de uso contiene información vital para la utilización y
cuidado de este producto. Lea por favor este manual detenidamente
antes de poner en funcionamiento la freidora de aire de ZAVOR para
asegurar un uso y mantenimiento adecuado. Siga cuidadosamente
las siguientes instrucciones de este folleto para optimizar el
resultado y el período de vida útil de su electrodoméstico.
PRECAUCIONES IMPORTANTES
El producto que usted ha comprado es un electrodoméstico de tecnología punta.
Cumple todas las últimas medidas de seguridad y estándares tecnológicos; sin
embargo, al igual que con cualquier electrodoméstico, existen algunos riesgos
potenciales. Sólo opere esta freidora de aire de acuerdo con las instrucciones
facilitadas y sólo para su uso previsto en el hogar.
LEA POR FAVOR LAS SIGUIENTES INSTRUCCIONES ANTES DE PONER EN
FUNCIONAMIENTO EL ELECTRODOMÉSTICO POR PRIMERA VEZ.
• Lea todas las instrucciones contenidas en este manual antes de usar el
electrodoméstico.
• Este producto no está concebido para uso industrial o al aire libre; es sólo para
uso interior y en el hogar.
• No ponga a funcionar esta unidad si el cable o el enchufe están dañados.
Si el electrodoméstico no está funcionando correctamente, se ha caído o se
ha dañado, se ha dejado al aire libre o sumergido en agua, deje de usarlo
inmediatamente y contacte con nuestro servicio de asistencia al cliente en el
número de teléfono (800) 207 0806.
• La freidora de aire utiliza un enchufe doméstico tipo A estándar y un cable de
49 pulgadas.
• Este aparato solo debe ser utilizado por personas que sean capaces
de comprender la guía del usuario o que estén supervisadas por aquellos
que tengan un conocimiento adecuado de las características, el uso y las
instrucciones de funcionamiento del aparato. Los niños deben ser supervisados
y no deben dejarse solos con ningún electrodoméstico durante la operación.
• El uso de accesorios o piezas de repuesto que el fabricante no recomienda o
vende puede causar daños a la freidora o lesiones personales.
• Coloque la freidora sobre una superficie plana y resistente al calor. No coloque
la freidora de aire cerca o sobre ningún tipo de fuente de calor, como una
estufa u horno. No lo use cerca de una llama abierta o materiales inflamables.
• Nunca opere la freidora de aire en una estufa de gas o eléctrica, incluso si la
estufa está apagada y completamente fría.
• Utilice siempre la freidora de aire en un área bien ventilada. No bloquee las
rejillas de ventilación.
• Antes de usar la freidora de aire, inspeccione el enchufe y la línea del cable en
busca de daños. No use la freidora si está dañada de alguna manera. En tales
casos, comuníquese con el Servicio al Cliente de Zavor para obtener ayuda al
1-855-928-6748.
• Inserte el enchufe agarrándolo firmemente y guiándolo hacia el tomacorriente
de su hogar. Desconecte agarrando el enchufe, no el cable, y retirándolo del
tomacorriente de su hogar.
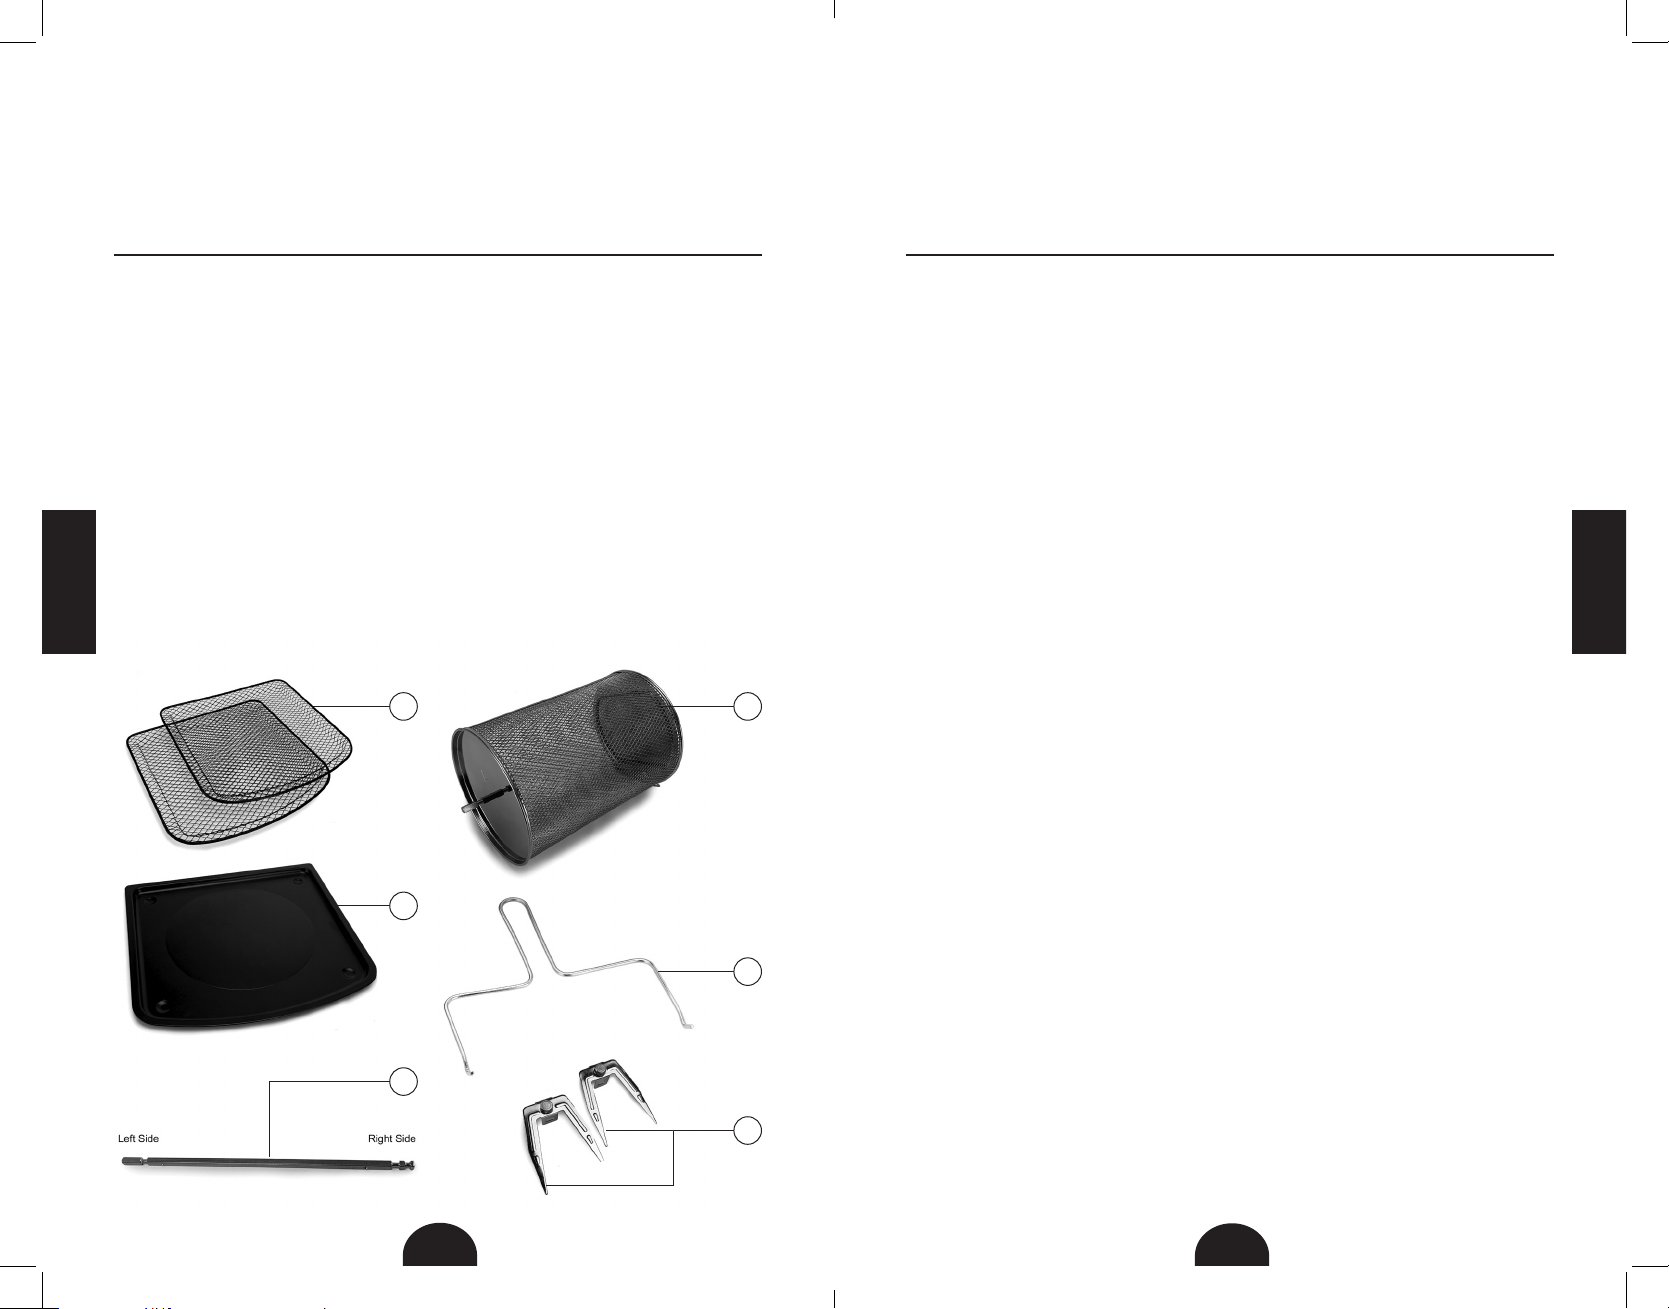
ESPAÑOL
ESPAÑOL
29
28
• Nunca enrolle el cable alrededor del aparato durante su uso o almacenamiento;
esto puede hacer que el cable se deshilache y se rompa.
• Este producto no debe ser utilizado por personas (niños incluidos) con
capacidades físicas, sensoriales o mentales reducidas, así como por personas
con falta de experiencia o conocimiento, a no ser que la persona responsable
de su seguridad supervise o dé las instrucciones necesarias sobre el uso del
producto.
• Si usa un cable de extensión, tenga en cuenta que un cable de extensión
dañado puede causar un mal funcionamiento de la unidad. Siempre revise
su cable de extensión por daños y asegúrese de que cumpla con el voltaje
requerido. No permita que el cable eléctrico cuelgue del borde de la mesa o
mostrador. No permita que el cable eléctrico toque superficies calientes.
• Para reducir el riesgo de una descarga eléctrica, nunca sumerja el enchufe,
el cable o la unidad en agua u otro líquido. Solo los accesorios extraíbles se
pueden colocar en el lavavajillas.
• Solo expertos calificados pueden reparar y realizar trabajos de mantenimiento
en la freidora de aire utilizando piezas de repuesto y accesorios auténticos de
Zavor. Nunca intente desmontar y reparar la freidora usted mismo.
• Este producto no es una freidora tradicional. NO está destinado a ser llenado
con aceite. Nunca llene ninguna parte de la freidora con aceite. Si elige
usar aceite, mezcle los alimentos con aceite en un recipiente aparte y luego
transfiera los alimentos a las bandejas de cocción.
• No deje ingredientes crudos en la freidora por más de un corto período de
tiempo antes de cocinar; carne cruda, aves, pescado, frutas y verduras pueden
echarse a perder.
• No mueva la freidora mientras está en uso. Durante el uso inicial, puede notar
algo de humo y/o un ligero olor. Esto es normal y debe disiparse rápidamente.
No debe volver a ocurrir después de que el aparato se haya usado varias veces
más.
• No deje la freidora desatendida durante el uso.
• El exterior de la freidora de aire está diseñado para ser frío al tacto. Algunas
áreas se CALIENTAN durante el uso. No toque los elementos calefactores. No
coloque las manos u otras partes del cuerpo cerca de las rejillas de ventilación
mientras la freidora esté en uso, ya que pueden producirse quemaduras. Tenga
cuidado al manipular las bandejas calientes y todas las piezas extraíbles.
• Use guantes y/o pinzas protectoras para tomar alimentos calientes de la
freidora.
• NUNCA use la freidora de aire afuera.
• NUNCA use la puerta de la freidora como lugar para colocar comida. Esto
podría dañar la puerta de la freidora de aire o hacer que la unidad se voltee y
cause lesiones.
• Desenchufe la freidora cuando termine de cocinar.
• Cuando termine el tiempo de cocción, el elemento calefactor se apagará pero
el ventilador CONTINUARÁ EN FUNCIONAMIENTO durante 20 segundos para
ayudar a enfriar la unidad.
• Si la freidora de aire se usa incorrectamente, o con fines profesionales o
semiprofesionales, o si no se usa de acuerdo con las instrucciones del manual
del usuario, la garantía se invalida y el fabricante no será responsable por
daños.
• Si falla el sistema de control de temperatura interior, se activará el sistema
de protección contra sobrecalentamiento y la unidad no funcionará. Si esto
sucediera, desenchufe el cable. Permita que la unidad se enfríe por completo
antes de reiniciar o almacenar.
• El aparato tiene un dispositivo de “apagado” incorporado que apagará
automáticamente la unidad cuando el temporizador llegue a cero. Puede
apagar el aparato manualmente presionando el botón de Start/Stop. El
ventilador continuará funcionando durante 20 segundos para enfriar la unidad.
• Antes de limpiar, asegúrese de que la freidora esté apagada, desenchufada y
enfriada a temperatura ambiente.
• No sumerja la freidora de aire en agua ni la coloque en el lavavajillas para
limpiarla. NO es apto para lavavajillas.
• Todas las partes removibles se pueden lavar con una esponja y agua tibia y
jabón. Todas las piezas extraíbles son aptas para lavavajillas.
• No use estropajos para limpiar ningún componente de esta freidora.
• Almacene la freidora en un lugar fresco y seco.
• En caso de cualquier emergencia eléctrica, como un incendio, llame al 911.
GUARDE ESTAS INSTRUCCIONES

ESPAÑOL
ESPAÑOL
29
28
• Nunca enrolle el cable alrededor del aparato durante su uso o almacenamiento;
esto puede hacer que el cable se deshilache y se rompa.
• Este producto no debe ser utilizado por personas (niños incluidos) con
capacidades físicas, sensoriales o mentales reducidas, así como por personas
con falta de experiencia o conocimiento, a no ser que la persona responsable
de su seguridad supervise o dé las instrucciones necesarias sobre el uso del
producto.
• Si usa un cable de extensión, tenga en cuenta que un cable de extensión
dañado puede causar un mal funcionamiento de la unidad. Siempre revise
su cable de extensión por daños y asegúrese de que cumpla con el voltaje
requerido. No permita que el cable eléctrico cuelgue del borde de la mesa o
mostrador. No permita que el cable eléctrico toque superficies calientes.
• Para reducir el riesgo de una descarga eléctrica, nunca sumerja el enchufe,
el cable o la unidad en agua u otro líquido. Solo los accesorios extraíbles se
pueden colocar en el lavavajillas.
• Solo expertos calificados pueden reparar y realizar trabajos de mantenimiento
en la freidora de aire utilizando piezas de repuesto y accesorios auténticos de
Zavor. Nunca intente desmontar y reparar la freidora usted mismo.
• Este producto no es una freidora tradicional. NO está destinado a ser llenado
con aceite. Nunca llene ninguna parte de la freidora con aceite. Si elige
usar aceite, mezcle los alimentos con aceite en un recipiente aparte y luego
transfiera los alimentos a las bandejas de cocción.
• No deje ingredientes crudos en la freidora por más de un corto período de
tiempo antes de cocinar; carne cruda, aves, pescado, frutas y verduras pueden
echarse a perder.
• No mueva la freidora mientras está en uso. Durante el uso inicial, puede notar
algo de humo y/o un ligero olor. Esto es normal y debe disiparse rápidamente.
No debe volver a ocurrir después de que el aparato se haya usado varias veces
más.
• No deje la freidora desatendida durante el uso.
• El exterior de la freidora de aire está diseñado para ser frío al tacto. Algunas
áreas se CALIENTAN durante el uso. No toque los elementos calefactores. No
coloque las manos u otras partes del cuerpo cerca de las rejillas de ventilación
mientras la freidora esté en uso, ya que pueden producirse quemaduras. Tenga
cuidado al manipular las bandejas calientes y todas las piezas extraíbles.
• Use guantes y/o pinzas protectoras para tomar alimentos calientes de la
freidora.
• NUNCA use la freidora de aire afuera.
• NUNCA use la puerta de la freidora como lugar para colocar comida. Esto
podría dañar la puerta de la freidora de aire o hacer que la unidad se voltee y
cause lesiones.
• Desenchufe la freidora cuando termine de cocinar.
• Cuando termine el tiempo de cocción, el elemento calefactor se apagará pero
el ventilador CONTINUARÁ EN FUNCIONAMIENTO durante 20 segundos para
ayudar a enfriar la unidad.
• Si la freidora de aire se usa incorrectamente, o con fines profesionales o
semiprofesionales, o si no se usa de acuerdo con las instrucciones del manual
del usuario, la garantía se invalida y el fabricante no será responsable por
daños.
• Si falla el sistema de control de temperatura interior, se activará el sistema
de protección contra sobrecalentamiento y la unidad no funcionará. Si esto
sucediera, desenchufe el cable. Permita que la unidad se enfríe por completo
antes de reiniciar o almacenar.
• El aparato tiene un dispositivo de “apagado” incorporado que apagará
automáticamente la unidad cuando el temporizador llegue a cero. Puede
apagar el aparato manualmente presionando el botón de Start/Stop. El
ventilador continuará funcionando durante 20 segundos para enfriar la unidad.
• Antes de limpiar, asegúrese de que la freidora esté apagada, desenchufada y
enfriada a temperatura ambiente.
• No sumerja la freidora de aire en agua ni la coloque en el lavavajillas para
limpiarla. NO es apto para lavavajillas.
• Todas las partes removibles se pueden lavar con una esponja y agua tibia y
jabón. Todas las piezas extraíbles son aptas para lavavajillas.
• No use estropajos para limpiar ningún componente de esta freidora.
• Almacene la freidora en un lugar fresco y seco.
• En caso de cualquier emergencia eléctrica, como un incendio, llame al 911.
GUARDE ESTAS INSTRUCCIONES
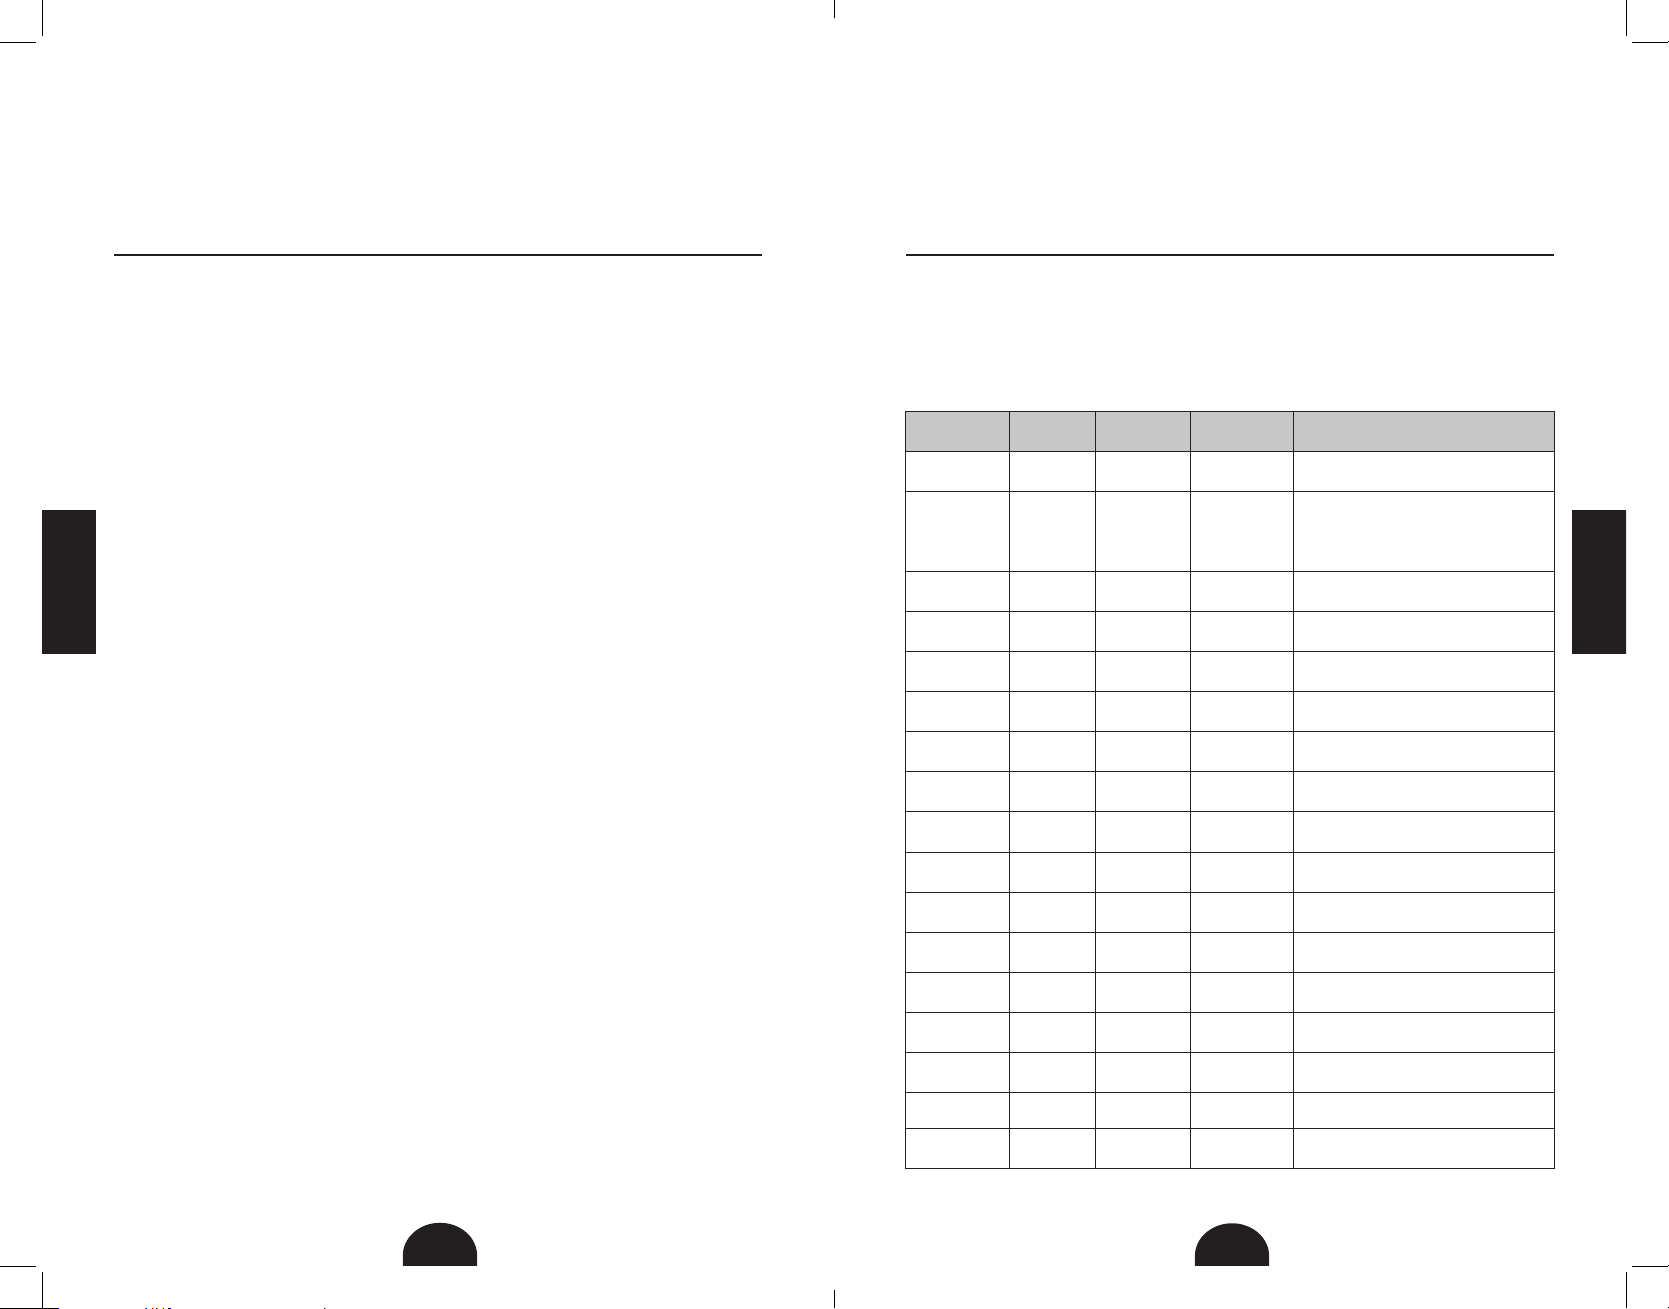
ESPAÑOL
ESPAÑOL
31
30
Características y Funciones
2
1
3
5
6
4
1. Inicio/Parar (START/STOP): Al presionar el botón Start/Stop una vez, se
iluminará el panel completo. Al presionar el botón de Start/Stop por segunda
vez (mientras el panel está iluminado) se activará el proceso de cocción a la
temperatura predeterminada de 370°F y el tiempo de 15 minutos. Al presionar
el botón Start/Stop en cualquier momento durante el proceso de cocción
cancelará el programa de cocción.
Función de Silencio: Al presionar y mantener presionado el botón Start/Stop
durante 3 segundos, se activará la función de silencio que silencia todos los
pitidos y alertas de la unidad. Para cancelar la función de silencio, presione
y mantenga presionado el botón Start/Stop durante 3 segundos hasta que la
unidad emita un pitido.
2. Selector de Tiempo y Temperatura: la parte externa del botón Start/Stop
funciona como un dial para ayudarlo a programar tiempos y temperaturas
cuando usa la freidora de aire. Cualquiera de los dos se puede programar
después de presionar el botón correspondiente en el panel de control.
3. Cuerpo de la Freidora: El cuerpo de la freidora de aire donde se encuentran
todos los componentes eléctricos y elementos calefactores. El cuerpo
también sostiene la cavidad de la freidora de aire que mide aproximadamente
6.5 “de alto x 10” de ancho x 9.5 “de profundidad.
4. Panel de Control: el panel interactivo le permite seleccionar diferentes
programas como papas fritas, pollo, mariscos e incluso deshidratar. Además,
tiene los programas de tiempo y temperatura donde puede configurar sus
propios tiempos y temperaturas, así como el botón de rotación para usar la
función del rostizador.
5. Posiciones de Bandejas de Cocción: La freidora de aire Zavor tiene 5
posiciones diferentes para las bandejas de cocción, incluida una con soporte
de asador para usar los accesorios del rostizador.
6. Puerta de la Freidora de Aire: Igual que la puerta de un horno, la puerta
de la freidora de aire se abre hacia abajo para permitir el acceso al interior
de la freidora. Debe presionarse firmemente hasta que escuche un clic para
asegurar un cierre adecuado. La freidora de aire no funcionará si la puerta no
está bien cerrada.

ESPAÑOL
ESPAÑOL
31
30
Características y Funciones
2
1
3
5
6
4
1. Inicio/Parar (START/STOP): Al presionar el botón Start/Stop una vez, se
iluminará el panel completo. Al presionar el botón de Start/Stop por segunda
vez (mientras el panel está iluminado) se activará el proceso de cocción a la
temperatura predeterminada de 370°F y el tiempo de 15 minutos. Al presionar
el botón Start/Stop en cualquier momento durante el proceso de cocción
cancelará el programa de cocción.
Función de Silencio: Al presionar y mantener presionado el botón Start/Stop
durante 3 segundos, se activará la función de silencio que silencia todos los
pitidos y alertas de la unidad. Para cancelar la función de silencio, presione
y mantenga presionado el botón Start/Stop durante 3 segundos hasta que la
unidad emita un pitido.
2. Selector de Tiempo y Temperatura: la parte externa del botón Start/Stop
funciona como un dial para ayudarlo a programar tiempos y temperaturas
cuando usa la freidora de aire. Cualquiera de los dos se puede programar
después de presionar el botón correspondiente en el panel de control.
3. Cuerpo de la Freidora: El cuerpo de la freidora de aire donde se encuentran
todos los componentes eléctricos y elementos calefactores. El cuerpo
también sostiene la cavidad de la freidora de aire que mide aproximadamente
6.5 “de alto x 10” de ancho x 9.5 “de profundidad.
4. Panel de Control: el panel interactivo le permite seleccionar diferentes
programas como papas fritas, pollo, mariscos e incluso deshidratar. Además,
tiene los programas de tiempo y temperatura donde puede configurar sus
propios tiempos y temperaturas, así como el botón de rotación para usar la
función del rostizador.
5. Posiciones de Bandejas de Cocción: La freidora de aire Zavor tiene 5
posiciones diferentes para las bandejas de cocción, incluida una con soporte
de asador para usar los accesorios del rostizador.
6. Puerta de la Freidora de Aire: Igual que la puerta de un horno, la puerta
de la freidora de aire se abre hacia abajo para permitir el acceso al interior
de la freidora. Debe presionarse firmemente hasta que escuche un clic para
asegurar un cierre adecuado. La freidora de aire no funcionará si la puerta no
está bien cerrada.
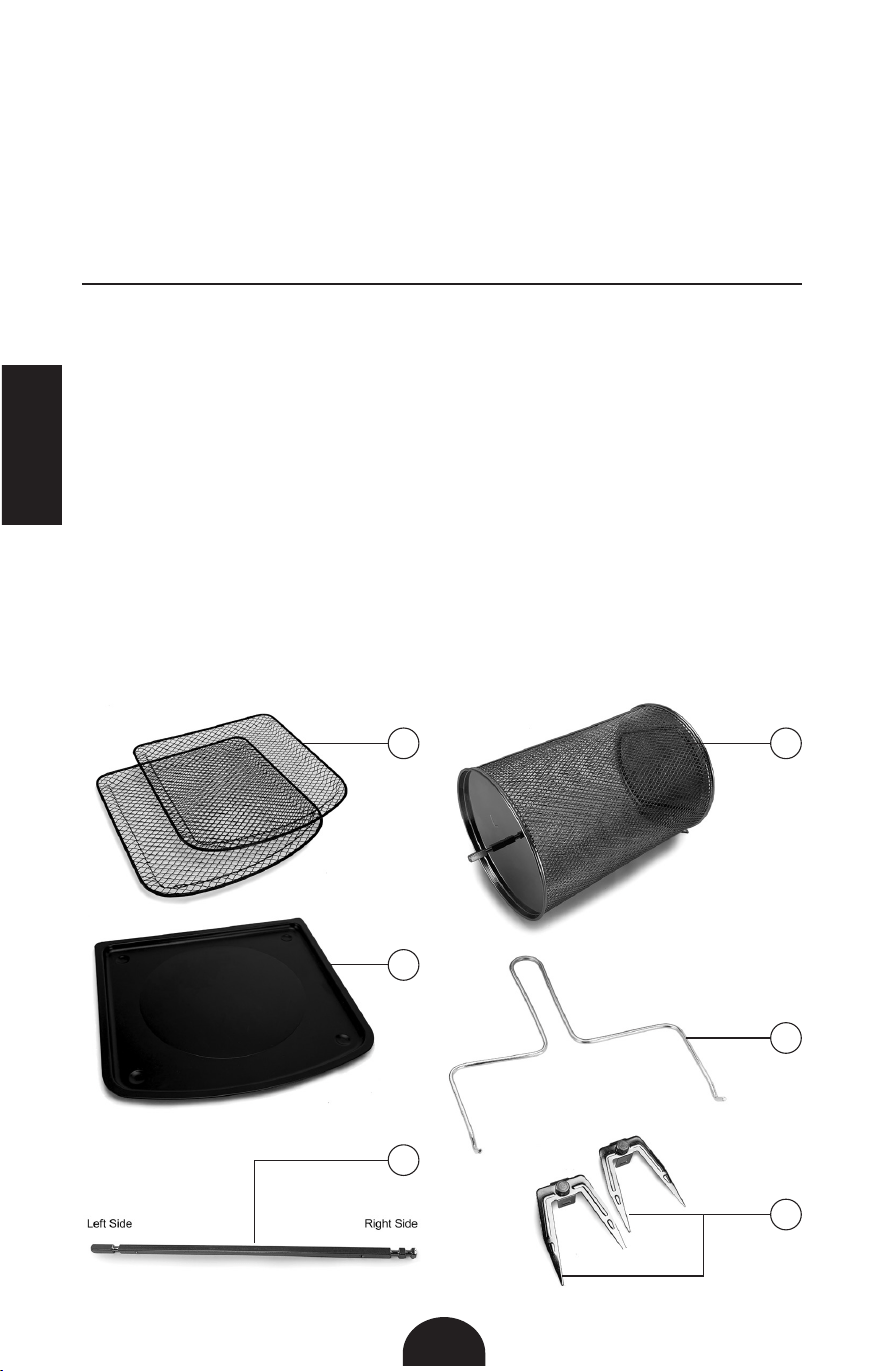
ESPAÑOL
ESPAÑOL
33
32
Partes y Accesorios
1. Bandeja Antiadherente Extraíble (2): Bandejas de malla recubiertas de
cerámica para una experiencia de cocción antiadherente más conveniente.
2. Cesta del Rostizador: La cesta del rostizador de acero inoxidable es el
accesorio perfecto para freír al aire papas fritas, verduras y más.
3. Herramienta de Manejo del Rostizador: Esta herramienta permite a los
usuarios retirar de forma segura la cesta del rostizador o la barra del rostizador
de la freidora.
4. Bandeja de Goteo Extraíble: Colocada en la parte inferior de la cavidad de la
freidora para atrapar líquidos, aceite, migas, partículas de alimentos, etc. que
pueden caerse durante la cocción.
5. Barra del Rostizador: La barra en la que se suspenderán los alimentos
mientras se cocina con el rostizador.
6. Tenedores del Rostizador con Tornillos Extraíbles: Se utilizan para
asegurar los alimentos en la barra del rostizador.
Antes del Primer Uso
Lea las instrucciones de seguridad que encontrará en este manual antes de
enchufar y poner en funcionamiento su freidora de aire. Antes de usar la freidora
de aire por primera vez, siga estos pasos:
1. Retire todos los materiales de embalaje del interior y exterior de la freidora,
¡pero no tire los materiales de embalaje todavía! La barra del rostizador y 2
tenedores del rostizador están empacados fuera de la freidora en espuma de
poliestireno.
2. La herramienta de manejo del rostizador se empaqueta verticalmente al lado
de la freidora de aire en cartón.
3. El resto de las herramientas (la cesta del rostizador, 2 bandejas extraíbles y 1
bandeja de goteo) están empaquetadas dentro de la freidora de aire.
4. Una vez que haya quitado todo, limpie suavemente el exterior con un paño
húmedo o una toalla de papel. Nunca sumerja la freidora de aire o su enchufe
en agua u otro líquido. El cuerpo de la freidora NO es apta para lavavajillas.
5. Lave todas las partes removibles con una esponja y agua jabonosa tibia. Las
bandejas y la cesta del rostizador se pueden lavar con un cepillo suave. NO
use productos de limpieza abrasivos ni estropajos. Todas las piezas extraíbles
son aptas para lavavajillas.
6. Secar bien.
1 2
3
6
4
5

ESPAÑOL
ESPAÑOL
35
34
Funciones de Operación:
Funciones del Panel de Control
Tabla de Tiempo y Temperatura de Funciones Preestablecidas
Función de Cocina: Temperatura: Tiempo: Temporizador:
Papas Fritas 400°F 20 minutos
1-60 minutos,
incrementos de 1 minuto
Carne 400°F 18 minutos
1-60 minutos,
incrementos de 1 minuto
Mariscos 390°F 12 minutos
1-60 minutos,
incrementos de 1 minuto
Pizza 350°F 15 minutos
1-60 minutos,
incrementos de 1 minuto
Pollo 380°F 18 minutos
1-60 minutos,
incrementos de 1 minuto
Vegetales 350°F 20 minutos
1-60 minutos,
incrementos de 1 minuto
Hornear 350°F 30 minutos
1 minuto - 6 horas, incrementos
de 1 minuto
Deshidratar 180°F 1 hora (60 minutos)
1 - 24 horas,
incrementos de 30 minutos
1. Pantalla LED: Mostrará la temperatura y el tiempo de cocción.
2. Indicador de Fahrenheit: Se iluminará al programar la temperatura para
que los usuarios sepan los grados se presentan en Fahrenheit. También se
iluminará mientras la unidad está funcionando y la temperatura de cocción se
muestra en la pantalla.
3. Indicador de Minutos: Se iluminará al programar el tiempo de cocción.
También se iluminará mientras la unidad está funcionando y el tiempo de
cocción se muestra en la pantalla.
4. Indicador de Temperatura: Se ilumina cuando la unidad está cocinando y la
temperatura se muestra en la pantalla.
5. Indicador de Tiempo: Se ilumina cuando la unidad está cocinando y el
tiempo de cocción se muestra en la pantalla.
6. Luces de Funcionamiento: 4 luces debajo de la pantalla LED parpadearán en
secuencia mientras cocina para alertarlo de que la unidad está funcionando.
7. Funciones Preestablecidas: Al seleccionar cualquiera de ellas, se mostrarán
el tiempo y la temperatura predeterminados para esa configuración. Puede
anular estos preajustes con los botones de tiempo y temperatura. Para los
tiempos y la temperatura predeterminados, consulte la tabla de tiempo y
temperatura. El icono parpadeará mientras esté en uso.
8. Botón de Tiempo: Este botón le permite seleccionar su propio tiempo de
cocción de 1 minuto a 60 minutos en todos los modos, excepto cuando se
deshidrata, que utiliza intervalos de 30 minutos y un tiempo de funcionamiento
de 1 a 24 horas.
9. Botón de Temperatura: Este botón le permite programar la temperatura de
cocción. Es ajustable en intervalos de 5°F, la temperatura programable varía
de 150°F a 400°F. La temperatura de deshidratación es de 90°F a 180°F.
10. Botón de Rotación: Seleccione este botón cuando cocine con los accesorios
del rostizador. Los accesorios del rostizador y la función de rotación se pueden
usar con cualquiera de las funciones preestablecidas. El botón parpadeará
mientras esté en uso.
11. Botón de Luz: Enciende y apaga la luz interior mientras cocina para verificar
fácilmente su comida.
NOTA: Cada vez que se presiona cualquier botón del panel, sonará un pitido y
comenzará a parpadear para confirmar que se seleccionó.

ESPAÑOL
ESPAÑOL
37
36
Cómo usar la Freidora de Aire
Esta sección del manual le indicará cómo usar la freidora de aire y las funciones
preestablecidas. Para obtener instrucciones sobre el rostizador, consulte la
sección del Rostizador del manual en la página 42.
1. Coloque la freidora de aire sobre una superficie plana y estable, lejos de
todas las fuentes de calor y agua y enchúfela.
2. Asegúrese de que la bandeja de goteo esté en su lugar en la parte inferior de
la freidora.
NOTA: La puerta de la freidora de aire no se cerrará si la bandeja de goteo no
se coloca correctamente en la unidad.
3. Coloque los alimentos sazonados en bandejas de cocción y coloque las
bandejas de cocción en la posición adecuada. Cierra la puerta, asegurándose
de que haga clic.
NOTA: Si la puerta se abre en cualquier momento mientras la freidora está
funcionando, detendrá el tiempo de cocción.
4. Presione el botón TEMP y gire el selector de tiempo y temperatura en la parte
superior de la freidora de aire hasta que la pantalla muestre la temperatura
deseada.
5. Una vez que se muestre la temperatura deseada en la pantalla, presione el
botón TIME para programar su tiempo de cocción. Gire el selector de tiempo
y temperatura en la parte superior de la freidora de aire hasta que la pantalla
muestre el tiempo de cocción deseado.
6. Presione el botón START/STOP ubicado en la parte superior de la freidora
para comenzar el proceso de cocción.
NOTA: Para obtener los mejores y más uniformes resultados, gire las bandejas
desde las posiciones superiores a las inferiores, y viceversa, a mitad de la
cocción.
7. Mientras la freidora de aire esté funcionando, la pantalla alternará entre la
temperatura establecida y el tiempo restante. El indicador Fahrenheit y el
indicador de minutos confirmarán si la pantalla muestra la temperatura de
cocción o el tiempo de cocción.
NOTA: Presione START/STOP en cualquier momento para detener el proceso
de cocción. El tiempo y la temperatura desaparecerán de la pantalla y solo
quedarán las luces de funcionamento. El ventilador permanecerá encendido
durante unos 20 segundos antes de que la unidad se apague por completo.
8. Cuando termina el tiempo de cocción, la unidad emitirá un pitido 3 veces y se
apagará automáticamente.
9. Use guantes de cocina para quitar las bandejas calientes de la freidora de aire
y las pinzas para manipular alimentos calientes.
Tablas de Cocción de la Freidora de Aire
Los tiempos de cocción de la freidora son tiempos aproximados. Use estos
tiempos de cocción como una guía general. El tamaño y la variedad de los
alimentos probablemente alterarán los tiempos de cocción.
Tabla de Cocción de Freidora de Aire
para Alimentos Frescos
Comida Fresca Cantidad Temperatura Tiempo Información Extra
Papas Finas 16 oz 400°F 36 minutos
En dos bandejas, cambie la posición a la
mitad
Patatas
Pequeñas
16 oz 375°F 16-20 minutos
Las papas deben estar en cuartos, en
una bandeja en la segunda posición del
estante desde arriba
Aros de Cebolla 4 oz 400°F 14 minutos
En dos bandejas, cambie la posición a la
mitad
Pechugas de
Pollo
2 pcs- 4 oz
cada uno
375°F 30 minutos
En una bandeja en la segunda posición del
estante desde arriba
Albóndigas
4 pcs- 2 oz
cada uno
360°F 15 minutos
En una bandeja en la segunda posición del
estante desde arriba
Alitas de Pollo 4-5 pcs 375°F 28-30 minutos
En una bandeja en la segunda posición del
estante desde arriba
Filete de
Pescado
4 oz 390°F 12 minutos
En una bandeja en la segunda posición del
estante desde arriba
Camaron
Jumbo
13-14 oz 390°F 14 minutos
En dos bandejas, cambie la posición a la
mitad
Brócoli 8 oz 350°F 15 minutos
En una bandeja en la segunda posición del
estante desde arriba
Champiñones 8 oz 400°F 18 minutos
En rodajas, en una bandeja en la segunda
posición del estante desde arriba
Maíz en la
Mazorca
2 mazorcas 400°F 12-14 minutos
En una bandeja en la segunda posición del
estante desde arriba
Calabacín 1 pc 400°F 22 minutos
En rodajas, en una bandeja en la segunda
posición del estante desde arriba
Empanadas de
Frutas
3 pcs- 3 oz
cada uno
350°F 15 minutos
En una bandeja en la segunda posición del
estante desde arriba
Pan Tostado
(blanco)
2 pcs 400°F 4-6 minutos
Voltear a la mitad del tiempo, ajustar el
tiempo para la oscuridad deseada
Pan Tostado
(integral)
2 pcs 400°F 3-5 minutos
Voltear a la mitad del tiempo, ajustar el
tiempo para la oscuridad deseada
Bagel 1, rebanado 400°F 5 minutos
Ajustar el tiempo para la oscuridad
deseada
Pizza Personal 7 oz 325°F 24-26 minutos
En una bandeja en la segunda posición del
estante desde arriba

ESPAÑOL
ESPAÑOL
37
36
Cómo usar la Freidora de Aire
Esta sección del manual le indicará cómo usar la freidora de aire y las funciones
preestablecidas. Para obtener instrucciones sobre el rostizador, consulte la
sección del Rostizador del manual en la página 42.
1. Coloque la freidora de aire sobre una superficie plana y estable, lejos de
todas las fuentes de calor y agua y enchúfela.
2. Asegúrese de que la bandeja de goteo esté en su lugar en la parte inferior de
la freidora.
NOTA: La puerta de la freidora de aire no se cerrará si la bandeja de goteo no
se coloca correctamente en la unidad.
3. Coloque los alimentos sazonados en bandejas de cocción y coloque las
bandejas de cocción en la posición adecuada. Cierra la puerta, asegurándose
de que haga clic.
NOTA: Si la puerta se abre en cualquier momento mientras la freidora está
funcionando, detendrá el tiempo de cocción.
4. Presione el botón TEMP y gire el selector de tiempo y temperatura en la parte
superior de la freidora de aire hasta que la pantalla muestre la temperatura
deseada.
5. Una vez que se muestre la temperatura deseada en la pantalla, presione el
botón TIME para programar su tiempo de cocción. Gire el selector de tiempo
y temperatura en la parte superior de la freidora de aire hasta que la pantalla
muestre el tiempo de cocción deseado.
6. Presione el botón START/STOP ubicado en la parte superior de la freidora
para comenzar el proceso de cocción.
NOTA: Para obtener los mejores y más uniformes resultados, gire las bandejas
desde las posiciones superiores a las inferiores, y viceversa, a mitad de la
cocción.
7. Mientras la freidora de aire esté funcionando, la pantalla alternará entre la
temperatura establecida y el tiempo restante. El indicador Fahrenheit y el
indicador de minutos confirmarán si la pantalla muestra la temperatura de
cocción o el tiempo de cocción.
NOTA: Presione START/STOP en cualquier momento para detener el proceso
de cocción. El tiempo y la temperatura desaparecerán de la pantalla y solo
quedarán las luces de funcionamento. El ventilador permanecerá encendido
durante unos 20 segundos antes de que la unidad se apague por completo.
8. Cuando termina el tiempo de cocción, la unidad emitirá un pitido 3 veces y se
apagará automáticamente.
9. Use guantes de cocina para quitar las bandejas calientes de la freidora de aire
y las pinzas para manipular alimentos calientes.
Tablas de Cocción de la Freidora de Aire
Los tiempos de cocción de la freidora son tiempos aproximados. Use estos
tiempos de cocción como una guía general. El tamaño y la variedad de los
alimentos probablemente alterarán los tiempos de cocción.
Tabla de Cocción de Freidora de Aire
para Alimentos Frescos
Comida Fresca Cantidad Temperatura Tiempo Información Extra
Papas Finas 16 oz 400°F 36 minutos
En dos bandejas, cambie la posición a la
mitad
Patatas
Pequeñas
16 oz 375°F 16-20 minutos
Las papas deben estar en cuartos, en
una bandeja en la segunda posición del
estante desde arriba
Aros de Cebolla 4 oz 400°F 14 minutos
En dos bandejas, cambie la posición a la
mitad
Pechugas de
Pollo
2 pcs- 4 oz
cada uno
375°F 30 minutos
En una bandeja en la segunda posición del
estante desde arriba
Albóndigas
4 pcs- 2 oz
cada uno
360°F 15 minutos
En una bandeja en la segunda posición del
estante desde arriba
Alitas de Pollo 4-5 pcs 375°F 28-30 minutos
En una bandeja en la segunda posición del
estante desde arriba
Filete de
Pescado
4 oz 390°F 12 minutos
En una bandeja en la segunda posición del
estante desde arriba
Camaron
Jumbo
13-14 oz 390°F 14 minutos
En dos bandejas, cambie la posición a la
mitad
Brócoli 8 oz 350°F 15 minutos
En una bandeja en la segunda posición del
estante desde arriba
Champiñones 8 oz 400°F 18 minutos
En rodajas, en una bandeja en la segunda
posición del estante desde arriba
Maíz en la
Mazorca
2 mazorcas 400°F 12-14 minutos
En una bandeja en la segunda posición del
estante desde arriba
Calabacín 1 pc 400°F 22 minutos
En rodajas, en una bandeja en la segunda
posición del estante desde arriba
Empanadas de
Frutas
3 pcs- 3 oz
cada uno
350°F 15 minutos
En una bandeja en la segunda posición del
estante desde arriba
Pan Tostado
(blanco)
2 pcs 400°F 4-6 minutos
Voltear a la mitad del tiempo, ajustar el
tiempo para la oscuridad deseada
Pan Tostado
(integral)
2 pcs 400°F 3-5 minutos
Voltear a la mitad del tiempo, ajustar el
tiempo para la oscuridad deseada
Bagel 1, rebanado 400°F 5 minutos
Ajustar el tiempo para la oscuridad
deseada
Pizza Personal 7 oz 325°F 24-26 minutos
En una bandeja en la segunda posición del
estante desde arriba
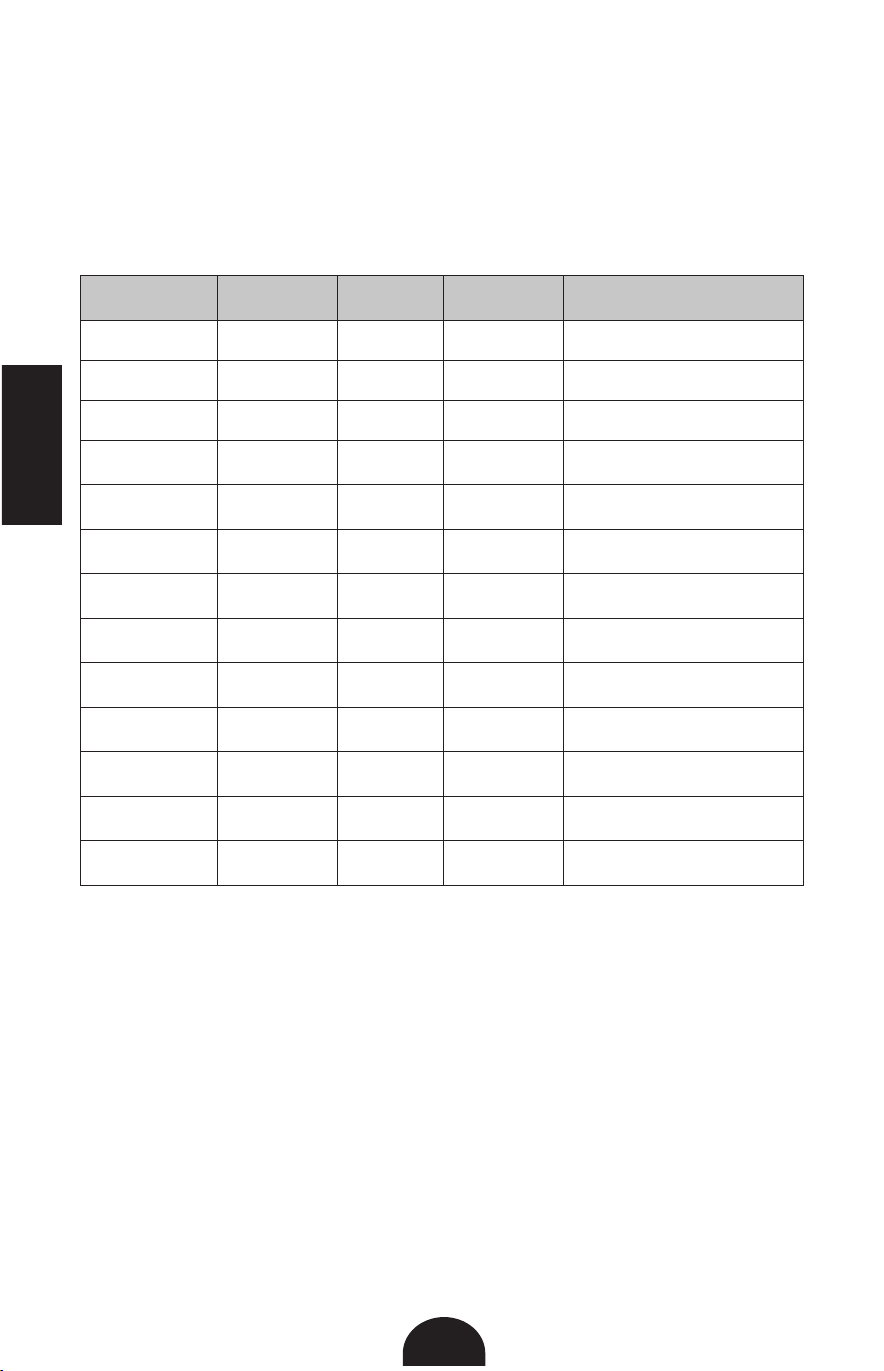
ESPAÑOL
ESPAÑOL
39
38
Tabla de Cocción de Freidora de Aire
para Alimentos Congelados
Comida
Congelada
Cantidad Temperatura Tiempo Información Extra
Papas Finas 8 oz 400°F 20 minutos En la canasta de malla, girando
Papas Gruesas 8 oz 400°F 24 minutos En la canasta de malla, girando
Aros de Cebolla 8 oz 400°F 12-15 minutos En la canasta de malla, girando
Nuggets de Pollo 8 oz 400°F 12 minutos
En dos bandejas, cambie la
posición a la mitad
Alitas de Pollo 7 oz 380°F 18 minutos
En una bandeja en la segunda
posición del estante desde arriba
Palitos de Pescado 8 oz 390°F 12- 14 minutos
En una bandeja en la segunda
posición del estante desde abajo
Filete de Pescado
Empanizado
2 pcs- 5 oz cada
uno
400°F 18-20 minutos
En una bandeja en la segunda
posición del estante desde abajo
Palomitas de
Camarón
8 oz 360°F 12-14 minutos
En una bandeja en la segunda
posición del estante desde arriba
Salchicha de
Desayuno
8 oz 400°F 18 minutos
En una bandeja en la segunda
posición del estante desde abajo
Empanadas
2 pcs- 3 oz cada
uno
350°F 30 minutos
En una bandeja en la segunda
posición del estante desde abajo
Pizza Personal 1 pc- 5 oz 350°F 15 minutos
En una bandeja en la segunda
posición del estante desde abajo
Hamburguesa 1 pc 380°F 20 minutos
En una bandeja, voltear a la mitad
del tiempo
Tiras de Pollo 8 oz 400°F 12-15 minutos
En una bandeja, voltear a la mitad
del tiempo
Cómo Usar las Funciones Preestablecidas
1. Coloque la freidora de aire sobre una superficie plana y estable, lejos de
todas las fuentes de calor y agua y enchúfela.
2. Asegúrese de que la bandeja de goteo esté en su lugar en la parte inferior de
la freidora.
NOTA: La puerta de la freidora de aire no se cerrará si la bandeja de goteo no
se coloca correctamente en la unidad.
3. Coloque los alimentos sazonados en bandejas de cocción y coloque las
bandejas de cocción en la posición adecuada. Cierra la puerta, asegurándose
de que haga clic.
NOTA: Si la puerta se abre en cualquier momento mientras la freidora está
funcionando, detendrá el tiempo de cocción.
4. Seleccione la función deseada presionando el botón correcto en el panel de
control.
5. Si lo desea, puede ajustar el tiempo y la temperatura preestablecidos
presionando los botones TIME y/o TEMP y girando el selector de tiempo y
temperatura para ajustar.
6. Presione el botón START/STOP ubicado en la parte superior de la freidora
para comenzar el proceso de cocción.
NOTA: Para obtener los mejores y más uniformes resultados, gire las bandejas
desde las posiciones superiores a las inferiores, y viceversa, a mitad de la
cocción.
7. Mientras la freidora de aire esté funcionando, la pantalla alternará entre la
temperatura establecida y el tiempo restante. El indicador Fahrenheit y el
indicador de minutos confirmarán si la pantalla muestra la temperatura de
cocción o el tiempo de cocción.
NOTA: Presione START/STOP en cualquier momento para detener el proceso
de cocción. El tiempo y la temperatura desaparecerán de la pantalla y solo
quedarán las luces de funcionamento. El ventilador permanecerá encendido
durante unos 20 segundos antes de que la unidad se apague por completo.
8. Cuando termina el tiempo de cocción, la unidad emitirá un pitido 3 veces y se
apagará automáticamente.
9. Use guantes de cocina para quitar las bandejas calientes de la freidora de aire
y las pinzas para manipular alimentos calientes.

ESPAÑOL
ESPAÑOL
41
40
Cómo Deshidratar
Dehydrating foods such as vegetables, fruits, meats, and more is perfect for La
deshidratación de alimentos como verduras, frutas, carnes y más es perfecta
para cocinar, viajar, acampar y comer bocadillos. La deshidratación de alimentos
frescos y maduros preservará los nutrientes e intensificará el sabor. El uso de
frutas o vegetales magullados es aceptable para la deshidratación y ayuda a crear
menos desperdicio de alimentos. Recorte cualquier contusión con un cuchillo. El
secado automático del Crunch Air Fryer Oven hace que la deshidratación en el
hogar sea gratificante y simplista.
1. Coloque la freidora de aire sobre una superficie plana y estable, lejos de
todas las fuentes de calor y agua y enchúfela.
2. Asegúrese de que la bandeja de goteo esté en su lugar en la parte inferior de
la freidora.
NOTA: La puerta de la freidora de aire no se cerrará si la bandeja de goteo no
se coloca correctamente en la unidad.
3. Coloque los alimentos en bandejas de cocción y coloque las bandejas de
cocción en la posición adecuada. Cierra la puerta, asegurándose de que
haga clic.
NOTA: Si la puerta se abre en cualquier momento mientras la freidora está
funcionando, detendrá el tiempo de cocción.
4. Seleccione la función de deshidratación presionando el botón correcto en el
panel de control.
5. Ajuste el tiempo y la temperatura preestablecidos presionando los botones
TIME y/o TEMP y girando el selector de tiempo y temperatura para ajustar.
6. Presione el botón START/STOP ubicado en la parte superior de la freidora
para comenzar el proceso de deshidratación.
NOTA: Para obtener los mejores y más uniformes resultados, gire las bandejas
desde las posiciones superiores a las inferiores, y viceversa, a mitad de la
cocción.
7. Mientras la freidora de aire esté funcionando, la pantalla alternará entre la
temperatura establecida y el tiempo restante
NOTA: Presione START/STOP en cualquier momento para detener el proceso
de cocción. El tiempo y la temperatura desaparecerán de la pantalla y solo
quedarán las luces de funcionamento. El ventilador permanecerá encendido
durante unos 20 segundos antes de que la unidad se apague por completo.
8. Cuando termina el tiempo de cocción, la unidad emitirá un pitido 3 veces y se
apagará automáticamente.
9. Use guantes de cocina para quitar las bandejas calientes de la freidora de aire
y las pinzas para manipular alimentos calientes.
Tabla de Deshidratación de la Freidora de Aire
Siga la tabla de alimentos comunes que se pueden deshidratar utilizando el
tiempo, la temperatura y las instrucciones sugeridos.
ALIMENTO TEMP TIEMPO INSTRUCCIONES
Fruta
Manzanas 135°F 8-10 horas Núcleo y corte en discos de 1/4 de pulgada. Remojar en agua
acidulada. Cambie las posiciones de la bandeja a la mitad.
Albaricoques 135°F 10 horas Pelar y cortar en trozos de 1/4 de pulgada. Cambie las
posiciones de la bandeja a la mitad.
Mango/Papaya 135°F 10 horas Pelar y cortar en trozos de 1/4 de pulgada. Cambie las
posiciones de la bandeja a la mitad.
Kiwi 135°F 6 horas Pelar y cortar en trozos de 1/4 de pulgada. Cambie las
posiciones de la bandeja a la mitad.
Rodajas de Naranja 135°F 10 horas Cambie las posiciones de la bandeja a la mitad.
Fresas 135°F 6 horas Cortar en trozos de 1/4 de pulgada. Cambie las posiciones de
la bandeja a la mitad.
Plátanos 135°F 5-6 horas Pelar y cortar en trozos de 1/4 de pulgada. Cambie las
posiciones de la bandeja a la mitad.
Vegetales
Zanahorias 145°F 10-11 horas Pelar y cortar en trozos de 1/8 de pulgada. Cambie las
posiciones de la bandeja a la mitad.
Ajo 145°F 6-7 horas Pelar y picar. Cambie las posiciones de la bandeja a la mitad.
Tomates 145°F 10-11 horas Colocar con la piel hacia abajo. Cambie las posiciones de la
bandeja a la mitad.
Champiñones 145°F 3-5 horas Colocar con la piel hacia abajo. Cambie las posiciones de la
bandeja a la mitad.
Pimientos 145°F 4-8 horas Colocar con la piel hacia abajo. Cambie las posiciones de la
bandeja a la mitad.
Calabacín 145°F 7-9 horas Picar y colocar con la piel hacia abajo. Cambie las posiciones
de la bandeja a la mitad.
Carne Seca
Carne Seca 145°F 5-6 horas Voltear y cambiar las posiciones de la bandeja a mitad de
camino
Cecina de Pescado 145°F 8-12 horas Voltear y cambiar las posiciones de la bandeja a mitad de
camino

ESPAÑOL
ESPAÑOL
43
42
Rostizador: Antes Del Primer Uso
• Lea todo el material y las etiquetas de advertencia.
• Lave todas las partes y accesorios utilizados en el proceso de cocción con
agua jabonosa tibia.
NOTA: Solo los accesorios son aptos para lavavajillas.
• Limpie el interior y el exterior de la unidad de cocción con un paño limpio y
húmedo.
• Coloque el aparato sobre una superficie estable, nivelada, horizontal y
resistente al calor.
• Seleccione el accesorio de cocina apropiado para su receta.
Cómo Preparar la Barra de Rostizador
Pollo: Si cocina un pollo en el rostizador, asegúrese de que se hayan quitado
todas las vísceras, que estén sazonadas y debidamente atadas.
1. Inserte la barra del rostizador en la cavidad del pollo para que el pollo pueda
colgar de forma segura en la barra. Coloque el pollo con la barra sobre una
tabla de cortar y limpie los extremos de la barra.
2. Sostenga la varilla con una mano, y una de los tenedores del rostizador con
las puntas apuntando hacia el pollo en la otra mano. Inserte la varilla en las
muescas cuadradas en el tenedor del rostizador.
PRECAUCIÓN: Los tenedores están afilados. Tratar con cuidado.
3. Pincha el pollo con el tenedor e inserta las puntas por completo. Asegure el
tenedor apretando el tornillo. Repita en el otro lado.
NOTA: Una vez que los tornillos estén apretados, debe haber al menos 1
pulgada de espacio libre en ambos extremos de la varilla. El pollo también
debe estar seguro; no debe poder deslizarse hacia adelante y hacia atrás en
la barra.
Carne Deshuesada (carne de res, cerdo, etc.) o Fruta (piña, etc.)
1. Inserte la barra del rostizador, longitudinalmente, en el centro de la carne
o fruta. Coloque la carne o fruta con la varilla sobre una tabla para cortar y
limpie los extremos de la barra.
NOTA: Si la barra no perfora su comida lo suficiente como para insertarla,
haga una incisión con cuidado con un cuchillo de cocina afilado para ayudar
a la perforación inicial.
2. Sostenga la barra con una mano, y una de los tenedores del rostizador con
las puntas apuntando hacia la comida en la otra mano. Inserte la varilla en
las muescas cuadradas en el tenedor del rostizador. Use tenedores solo
si es necesario para sostener alimentos más grandes que el ancho de los
tenedores.
PRECAUCIÓN: Los tenedores están afilados. Tratar con cuidado.
3. Pincha la carne o la fruta con el tenedor e inserta las puntas por completo.
Asegure el tenedor apretando el tornillo. Repita en el otro lado.
NOTA: Una vez que los tornillos estén apretados, debe haber al menos 1
pulgada de espacio libre en ambos extremos de la varilla. La comida también
debe estar segura; no debe poder deslizarse hacia adelante y hacia atrás en
la barra.
Cómo Usar la Barra del Rostizador
La barra del rostizador debe usarse con los tenedores del rostizador. La barra del
rostizador le permite cocinar pollo entero, grandes cortes de carne, frutas y más.
El peso máximo que permite la barra del rostizador es de 4 libras.
1. Coloque la freidora de aire sobre una superficie plana y estable, lejos de
todas las fuentes de calor y agua y enchúfela.
2. Asegúrese de que la bandeja de goteo esté en su lugar en la parte inferior de
la freidora.
NOTA: La puerta de la freidora de aire no se cerrará si la bandeja de goteo no
se coloca correctamente en la unidad.
3. Sostenga el lado izquierdo de la barra del rostizador con la mano izquierda y
el lado derecho con la derecha.
4. Guíe la barra del rostizador preparada dentro de la freidora de aire en la
posición del rostizador. Coloque el lado izquierdo del rostizador en el
engranaje redondo ubicado en la pared interior izquierda. Una vez que esté
en su lugar, levante el lado derecho de la barra del rostizador y colóquela en
el soporte del rostizador en la pared interior derecha. Deslícelo hasta que
llegue al soporte del rostizador y esté alineado con el lado izquierdo. Cierre la
puerta, asegurándose de que haga clic.
NOTA: Si la puerta se abre en cualquier momento mientras la freidora está
funcionando, detendrá el tiempo de cocción.
5. Seleccione la función preestablecida deseada presionando el botón
apropiado.
6. Si lo desea, presione el botón TEMP para ajustar la temperatura girando el
selector de tiempo y temperatura en la parte superior de la freidora de aire.
7. Si lo desea, presione el botón TIME para ajustar el tiempo de cocción girando
el selector de tiempo y temperatura en la parte superior de la freidora de aire.
8. Presione el botón START/STOP ubicado en la parte superior de la freidora
para comenzar el proceso de cocción. Cuando termina el tiempo de cocción,
la unidad emitirá un pitido 3 veces y se apagará automáticamente.
9. Una vez que la freidora esté funcionando, presione el botón ROTATE para
comenzar la rotación de la barra. Mientras la freidora de aire esté funcionando,
la pantalla alternará entre la temperatura establecida y el tiempo restante.
NOTA: Presione START/STOP en cualquier momento para detener el proceso
de cocción. El tiempo y la temperatura desaparecerán de la pantalla y solo
quedarán las luces de funcionamento. El ventilador permanecerá encendido
durante unos 20 segundos antes de que la unidad se apague por completo.
10. Cuando termina el tiempo de cocción, la unidad emitirá un pitido 3 veces y se
apagará automáticamente.

ESPAÑOL
ESPAÑOL
45
44
11. Use guantes de cocina con la herramienta de manejo del rostizador para
quitar la barra caliente con la comida de la freidora. La barra y los tenedores
estarán CALIENTES, tenga mucho cuidado desatornillado los tenedores.
Cómo Usar la Cesta del Rostizador
La cesta de rostizador es perfecta para preparar alimentos fritos de manera
uniforme, como papas fritas, alitas de pollo y más. El peso máximo que permite
la cesta del rostizador es de 4 libras.
1. Coloque la freidora de aire sobre una superficie plana y estable, lejos de
todas las fuentes de calor y agua y enchúfela.
2. Retire todas las bandejas, excepto la bandeja de goteo. Asegúrese de que la
bandeja de goteo esté en su lugar en la parte inferior de la freidora.
NOTA: La puerta de la freidora de aire no se cerrará si la bandeja de goteo no
se coloca correctamente en la unidad.
3. Coloque la comida sazonada dentro de la cesta de rostizador y ciérrela.
4. Sostenga la cesta de rostizador sellada en sus manos con el lado con la tapa
en su mano derecha.
5. Guíe la cesta del rostizador dentro de la freidora de aire en la posición del
rostizador. Coloque el lado izquierdo de la cesta en el engranaje redondo
ubicado en la pared interior izquierda. Una vez que esté en su lugar,
levante el lado derecho de la cesta de rostizador y colóquela en el soporte
del rostizador en la pared interior derecha. Deslícelo hasta que llegue al
soporte del rostizador y esté alineado con el lado izquierdo. Cierre la puerta,
asegurándose de que haga clic.
NOTA: Si la puerta se abre en cualquier momento mientras la freidora está
funcionando, detendrá el tiempo de cocción.
6. Seleccione la función preestablecida deseada presionando el botón
apropiado.
7. Si lo desea, presione el botón TEMP para ajustar la temperatura girando el
selector de tiempo y temperatura en la parte superior de la freidora de aire.
8. Si lo desea, presione el botón TIME para ajustar el tiempo de cocción girando
el selector de tiempo y temperatura en la parte superior de la freidora de aire.
Cuando termina el tiempo de cocción, la unidad emitirá un pitido 3 veces y se
apagará automáticamente.
9. Presione el botón START/STOP ubicado en la parte superior de la freidora
para comenzar el proceso de cocción.
10. Una vez que la freidora esté funcionando, presione el botón ROTATE para
comenzar la rotación de la cesta. Mientras la freidora de aire esté funcionando,
la pantalla alternará entre la temperatura establecida y el tiempo restante.
NOTA: Presione START/STOP en cualquier momento para detener el proceso
de cocción. El tiempo y la temperatura desaparecerán de la pantalla y solo
quedarán las luces de funcionamento. El ventilador permanecerá encendido
durante unos 20 segundos antes de que la unidad se apague por completo.
11. Cuando termina el tiempo de cocción, la unidad emitirá un pitido 3 veces y se
apagará automáticamente.
12. Use guantes de cocina con la herramienta de manejo del rostizador para
quitar la cesta caliente con la comida de la freidora. Use guantes de cocina o
una toalla de cocina para abrir la puerta de la cesta.
Como Usar la Herramienta de Manejo del Rostizador
1. Sostenga la herramienta de manejo por su mango.
2. Guíe la herramienta de manejo hacia la freidora. Colóquela debajo de la barra
del rostizador o la cesta.
3. Use la herramienta de manejo para levantar el lado derecho del rostizador.
Una vez que esté libre, levante el lado izquierdo.
4. Retire con cuidado la barra o a cesta del rostizador y la comida de la freidora.
Consejos Para Freír al Aire
• Casi cualquier comida que cocines en el horno puede ser frita al aire.
• Los alimentos se cocinan mejor y de manera más uniforme cuando son de
tamaño y grosor similares. Los alimentos más pequeños requieren menos
tiempo de cocción que los artículos más grandes.
• Los alimentos más pequeños se pueden cocinar a temperaturas más altas que
los artículos más grandes porque generalmente requieren menos tiempo para
cocinarse.
• Para obtener mejores resultados en el menor tiempo posible, fríe los alimentos
en capas individuales.
• No es necesario arrojar la mayoría de los alimentos preparados en aceite
antes de freírlos al aire. La mayoría ya contiene aceite y otros ingredientes que
mejoran el dorado y la textura crujiente.
• Los aperitivos y entremeses congelados se fríen muy bien al aire.
• Gire las bandejas a la mitad del ciclo de cocción para garantizar los resultados
más uniformes.
• Mezcle los alimentos que está preparando desde cero, como las papas
fritas, con aceite, en un recipiente aparte, para mejorar el dorado y la textura
crujiente. Los alimentos frescos no contienen los mismos aceites, grasas y
otros ingredientes que contienen los alimentos preparados que promueven el
dorado y la textura crujiente.
• Cuando prepare papas fritas con papas frescas, asegúrese de que estén
completamente secas antes de cocinarlas en la freidora. Hasta las gotas de
humedad más pequeñas evitarán que se vuelvan crujientes.
• Al freír al aire alimentos rebozados, use rebozados espesos y pastosos. Las
masas finas, como las que se usan para hacer tempura, correrán y no se
fraguarán lo suficientemente rápido como en una freidora tradicional.
• Cubrir los alimentos rebozados con migas de pan o arroz inflado, y luego
rociarlos con aceite, puede ayudar a crear versiones crujientes y más

ESPAÑOL
ESPAÑOL
47
46
saludables de sus alimentos fritos favoritos.
• Cocine el pollo hasta que alcance una temperatura interna de 165°F.
• La freidora de aire es ideal para recalentar alimentos. Para recalentar su comida,
ajuste la temperatura a 300°F por hasta 10 minutos. Use un termómetro para
asegurarse de que los alimentos alcancen una temperatura interna de 165°F, la
temperatura segura para alimentos.
• No utilice ningún plato o recipiente de papel o plástico en la freidora.
• El papel de aluminio y el papel pergamino solo se pueden usar en la freidora
de aire en las parrillas de cocción. No coloque papel de aluminio o papel
pergamino en la cesta del rostizador.
• No se recomienda usar ninguna de las herramientas de la freidora para otra
cosa que no sea su uso previsto con la freidora de aire, ya que esto puede
dañar los componentes.
• No use la bandeja de goteo como bandeja para hornear.
Limpieza y Mantenimiento
No lave ninguna parte de la freidora en el lavavajillas, excepto los accesorios
extraíbles. Siempre lave bien las bandejas de cocción, las herramientas del
rostizador y la bandeja de goteo después de cada uso.
1. Cuando la freidora esté desenchufada y completamente fría, limpie
suavemente el exterior con un paño húmedo o una toalla de papel. Nunca
sumerja la freidora de aire o su enchufe en agua u otro líquido. La freidora de
aire NO es apta para lavavajillas.
2. Lave todas las partes removibles con una esponja y agua jabonosa tibia. La
barra y la cesta del rostizador se pueden lavar con un cepillo de limpieza
suave. No utilice productos de limpieza abrasivos ni estropajos. Todas las
piezas extraíbles son aptas para lavavajillas.
NOTA: Si quedan migajas o partículas de comida en las bisagras o grietas
de la puerta de la freidora, use un cepillo pequeño para limpiarlas. No intente
quitar la puerta para limpiarla.
3. Seque bien y almacene en un lugar fresco y seco.
Solución de Problemas
Si se producen problemas durante el uso de la freidora de aire, aquí hay una lista
de soluciones simples para ayudarle. Si el problema persiste, llame a nuestro
departamento de servicio al cliente para obtener ayuda al 1-855-928-6748.
Problema La puerta de la freidora no se cerrará después de que coloque
las bandejas de cocina adentro.
Solución Asegúrese de insertar las bandejas con el lado curvo primero.
Si las bandejas se han insertado al revés, la puerta no se
cerrará.
Problema La freidora no se enciende.
Solución Asegúrese de que la unidad esté correctamente conectada y que
la puerta de la freidora esté correctamente cerrada. Asegúrese
de establecer un tiempo de cocción antes de presionar el botón
Start/Stop
Problema La cesta/barra del rostizador no gira.
Solución Asegúrese de presionar el botón ROTATE para usar la función
del rostizador. Asegúrese de no exceder el límite de peso de 4
lb. al cargar la comida.
Problema Siento que sale un poco de aire por la puerta cuando uso la
freidora.
Solución Esto es normal. La puerta no está sellada herméticamente.
Hay algunos puntos por donde circula el aire para facilitar la
ventilación.
Problema Sale humo blanco de la freidora.
Solución El humo blanco a menudo se produce cuando se cocinan
alimentos grasosos o si quedan restos de grasa del uso anterior.
Asegúrese de que las rejillas de ventilación no estén bloqueadas
y de que limpie adecuadamente la freidora y los accesorios
después de cada uso.

ESPAÑOL
ESPAÑOL
47
46
saludables de sus alimentos fritos favoritos.
• Cocine el pollo hasta que alcance una temperatura interna de 165°F.
• La freidora de aire es ideal para recalentar alimentos. Para recalentar su comida,
ajuste la temperatura a 300°F por hasta 10 minutos. Use un termómetro para
asegurarse de que los alimentos alcancen una temperatura interna de 165°F, la
temperatura segura para alimentos.
• No utilice ningún plato o recipiente de papel o plástico en la freidora.
• El papel de aluminio y el papel pergamino solo se pueden usar en la freidora
de aire en las parrillas de cocción. No coloque papel de aluminio o papel
pergamino en la cesta del rostizador.
• No se recomienda usar ninguna de las herramientas de la freidora para otra
cosa que no sea su uso previsto con la freidora de aire, ya que esto puede
dañar los componentes.
• No use la bandeja de goteo como bandeja para hornear.
Limpieza y Mantenimiento
No lave ninguna parte de la freidora en el lavavajillas, excepto los accesorios
extraíbles. Siempre lave bien las bandejas de cocción, las herramientas del
rostizador y la bandeja de goteo después de cada uso.
1. Cuando la freidora esté desenchufada y completamente fría, limpie
suavemente el exterior con un paño húmedo o una toalla de papel. Nunca
sumerja la freidora de aire o su enchufe en agua u otro líquido. La freidora de
aire NO es apta para lavavajillas.
2. Lave todas las partes removibles con una esponja y agua jabonosa tibia. La
barra y la cesta del rostizador se pueden lavar con un cepillo de limpieza
suave. No utilice productos de limpieza abrasivos ni estropajos. Todas las
piezas extraíbles son aptas para lavavajillas.
NOTA: Si quedan migajas o partículas de comida en las bisagras o grietas
de la puerta de la freidora, use un cepillo pequeño para limpiarlas. No intente
quitar la puerta para limpiarla.
3. Seque bien y almacene en un lugar fresco y seco.
Solución de Problemas
Si se producen problemas durante el uso de la freidora de aire, aquí hay una lista
de soluciones simples para ayudarle. Si el problema persiste, llame a nuestro
departamento de servicio al cliente para obtener ayuda al 1-855-928-6748.
Problema La puerta de la freidora no se cerrará después de que coloque
las bandejas de cocina adentro.
Solución Asegúrese de insertar las bandejas con el lado curvo primero.
Si las bandejas se han insertado al revés, la puerta no se
cerrará.
Problema La freidora no se enciende.
Solución Asegúrese de que la unidad esté correctamente conectada y que
la puerta de la freidora esté correctamente cerrada. Asegúrese
de establecer un tiempo de cocción antes de presionar el botón
Start/Stop
Problema La cesta/barra del rostizador no gira.
Solución Asegúrese de presionar el botón ROTATE para usar la función
del rostizador. Asegúrese de no exceder el límite de peso de 4
lb. al cargar la comida.
Problema Siento que sale un poco de aire por la puerta cuando uso la
freidora.
Solución Esto es normal. La puerta no está sellada herméticamente.
Hay algunos puntos por donde circula el aire para facilitar la
ventilación.
Problema Sale humo blanco de la freidora.
Solución El humo blanco a menudo se produce cuando se cocinan
alimentos grasosos o si quedan restos de grasa del uso anterior.
Asegúrese de que las rejillas de ventilación no estén bloqueadas
y de que limpie adecuadamente la freidora y los accesorios
después de cada uso.

FRANÇAIS
49
Table des Matières
Introduction ............................................................................................................ 50
Importantes Mesures De Protection ...................................................................... 51
Caractéristiques et Fonctions ................................................................................ 54
Pièces et Accessoires ............................................................................................ 56
Préparation ............................................................................................................. 57
Fonctions de Fonctionnement ................................................................................ 58
Comment Utiliser la Friteuse à Air ......................................................................... 60
Tableaux de Cuisson de la Friteuse à Air .............................................................. 61
Tableau de Cuisson de Friteuse à Air pour Aliments Frais .................................. 61
Tableau de Cuisson de Friteuse à Air pour Aliments Surgelés ............................ 62
Comment Utiliser les Fonctions Prédéfinies ......................................................... 63
Comment Déshydrater............................................................................................ 64
Tableau de Déshydratation de la Friteuse à Air .................................................... 65
Rôtissoire: Avant la Première Utilisation ............................................................... 66
Comment Préparer la barre de Rôtisserie ............................................................ 66
Comment Utiliser la Barre de Rôtisserie .............................................................. 67
Comment Utiliser le Panier de Rôtisserie ..............................................................68
Comment Utiliser l’outil de Gestion de la Rôtisserie ............................................ 69
Conseils de Friture à l’air ....................................................................................... 69
Nettoyage et Entretien ............................................................................................ 70
Dépannage .............................................................................................................. 71

FRANÇAIS
FRANÇAIS
51
50
Introduction
Merci d’avoir acheté cette friteuse à air. La Friteuse à Air Crunch
peut être utilisée comme friteuse à air, rôtissoire, déshydrateur et
plus encore! Les commandes électroniques faciles à utiliser sont
simples et directes, vous permettant de définir facilement les temps
de recette.
Ce manuel d’utilisation contient des informations essentielles pour
l’utilisation et l’entretien de ce produit. Veuillez lire attentivement ce
manuel avant d’utiliser la friteuse à air pour garantir une utilisation
et un entretien corrects. Suivez attentivement les instructions de
cette brochure pour optimiser le résultat et la durée de vie de votre
appareil.
IMPORTANTES MESURES DE
PROTECTION
Le produit que vous avez acheté est un appareil de pointe. Il répond à toutes les
dernières mesures de sécurité et normes technologiques; Cependant, comme
pour tout appareil, il existe des risques potentiels. N’utilisez cette friteuse à air
qu’avec les instructions fournies et uniquement pour son usage prévu à la maison.
VEUILLEZ LIRE LES INSTRUCTIONS CI-DESSOUS AVANT D’UTILISER
L’APPAREIL POUR LA PREMIÈRE FOIS.
• Lire toutes les instructions contenues dans ce manuel avant d’utiliser l’appareil.
• Ce produit n’est pas prévu pour une utilisation commerciale ou en plein air ; il
est uniquement prévu pour une utilisation domestique et à l’intérieur.
• Ne pas faire fonctionner l’appareil si le cordon électrique ou la fiche est
endommagé. Si l’appareil ne fonctionne pas correctement, est tombé, ou
a été endommagé, laissé à l’extérieur ou immergé dans l’eau, cessez-en
immédiatement l’utilisation et contactez notre service clientèle au 1-855-928-
6748.
• La friteuse à air utilise une prise domestique standard de type A et un câble de
49 pouces.
• Cet appareil ne doit être utilisé que par des personnes capables de
comprendre le guide de l’utilisateur ou supervisées par des personnes ayant
une connaissance adéquate des fonctionnalités, de l’utilisation et du mode
d’emploi de l’appareil. Les enfants doivent être surveillés et ne doivent pas être
laissés seuls avec un appareil pendant le fonctionnement.
• L’utilisation d’accessoires ou de pièces de rechange que le fabricant ne
recommande pas ou ne vend pas peut endommager la friteuse ou blesser
quelqu’un.
• Placez la friteuse sur une surface plane et résistante à la chaleur. Ne placez
pas la friteuse à air près ou au-dessus d’une source de chaleur, telle qu’une
cuisinière ou un four. Ne pas utiliser à proximité d’une flamme nue ou de
matériaux inflammables.
• Ne jamais faire fonctionner la friteuse à air dans une cuisinière à gaz ou
électrique, même si le poêle est éteint et complètement froid.
• Utilisez toujours la friteuse à air dans un endroit bien ventilé. Ne bloquez pas
les évents.
• Avant d’utiliser la friteuse à air, inspectez la prise et la ligne de câble pour tout
dommage. Ne pas utiliser la friteuse est endommagée d’une certaine façon.
Dans de tels cas, contactez le service client de Zavor pour obtenir de l’aide au
1-855-928-6748.
• Insérez la fiche en la tenant fermement et en la guidant vers la sortie de votre
maison. Débranchez en saisissant la fiche, pas le cordon, et en le retirant de la
prise de courant de votre maison.

FRANÇAIS
FRANÇAIS
53
52
• N’enroulez jamais le câble autour de l’appareil pendant l’utilisation ou le
stockage. Cela peut provoquer l’effilochage et la rupture du câble.
• Cet appareil n’est pas prévu pour une utilisation par des personnes (y compris
des enfants) ayant des capacités réduites physiques, sensorielles ou mentales,
ou qui manquent d’expérience et de connaissances, à moins qu’elles ne
soient surveillées ou instruites sur l’utilisation de l’appareil par une personne
responsable pour leur sécurité.
• Si vous utilisez une rallonge, sachez qu’une rallonge endommagée peut
entraîner un dysfonctionnement de l’appareil. Vérifiez toujours que votre
rallonge n’est pas endommagée et assurez-vous qu’elle respecte la tension
requise. Ne laissez pas le cordon d’alimentation pendre du bord de la table
ou du comptoir. Ne laissez pas le cordon d’alimentation toucher des surfaces
chaudes.
• Pour réduire le risque de choc électrique, ne plongez jamais la fiche, le câble
ou l’unité dans l’eau ou tout autre liquide. Seuls les accessoires amovibles
peuvent être placés dans le lave-vaisselle.
• Seuls des experts qualifiés peuvent réparer et effectuer des travaux de
maintenance sur la friteuse à air en utilisant des pièces de rechange et des
accessoires d’origine Zavor. N’essayez jamais de démonter et de réparer la
friteuse vous-même.
• Ce produit n’est pas une friteuse traditionnelle. Il n’est PAS destiné à être
rempli d’huile. Ne remplissez jamais aucune partie de la friteuse avec de l’huile.
Si vous choisissez d’utiliser de l’huile, mélangez les aliments avec de l’huile
dans un récipient séparé, puis transférez les aliments dans les plateaux de
cuisson.
• Ne laissez pas les ingrédients crus dans la friteuse pendant plus d’une courte
période avant la cuisson. La viande, la volaille, le poisson, les fruits et les
légumes crus peuvent se gâter.
• Ne déplacez pas la friteuse pendant son utilisation. Lors de la première
utilisation, vous pouvez remarquer de la fumée et / ou une légère odeur. Ceci
est normal et devrait se dissiper rapidement. Cela ne doit pas se reproduire
après plusieurs utilisations de l’appareil.
• Ne laissez pas la friteuse sans surveillance pendant son utilisation.
• L’extérieur de la friteuse à air est conçu pour être frais au toucher. Certaines
zones deviennent CHAUDES pendant l’utilisation. Ne touchez pas les éléments
chauffants. Ne placez pas vos mains ou d’autres parties du corps près des
évents lorsque la friteuse est en cours d’utilisation, car des brûlures peuvent
survenir. Soyez prudent lorsque vous manipulez des plateaux chauds et toutes
les pièces amovibles.
• Utilisez des gants et/ou des pinces pour retirer les aliments chauds de la
friteuse.
• NE JAMAIS utiliser de friteuse à air à l’extérieur.
• N’utilisez JAMAIS la porte de la friteuse comme endroit pour placer des
aliments. Cela pourrait endommager la porte de la friteuse à air ou faire tourner
l’appareil et provoquer des blessures.
• Débranchez la friteuse une fois la cuisson terminée.
• Lorsque le temps de cuisson est terminé, l’élément chauffant s’éteint mais le
ventilateur CONTINUE DE FONCTIONNER pendant 20 secondes pour aider à
refroidir l’appareil.
• Si la friteuse à air est utilisée de manière incorrecte, à des fins professionnelles
ou semi-professionnelles, ou si elle n’est pas utilisée conformément aux
instructions du manuel d’utilisation, la garantie est annulée et le fabricant ne
sera pas responsable des dommages.
• Si le système de contrôle de la température intérieure tombe en panne, le
système de protection contre la surchauffe sera activé et l’appareil ne
fonctionnera pas. Dans ce cas, débranchez le câble. Laissez l’appareil refroidir
complètement avant de redémarrer ou de ranger.
• L’appareil dispose d’un dispositif «éteint» intégré qui éteint automatiquement
l’appareil lorsque la minuterie atteint zéro. Vous pouvez éteindre l’appareil
manuellement en appuyant sur le bouton Start/Stop. Le ventilateur continuera
de fonctionner pendant 20 secondes pour refroidir l’unité.
• Avant le nettoyage, assurez-vous que la friteuse est éteinte, débranchée et
refroidie à température ambiante.
• Ne plongez pas la friteuse à air dans l’eau et ne la placez pas dans le lave-
vaisselle pour la nettoyer. Il n’est PAS lavable au lave-vaisselle.
• Toutes les pièces amovibles peuvent être lavées avec une éponge et de l’eau
chaude et du savon. Toutes les pièces amovibles vont au lave-vaisselle.
• N’utilisez pas de tampons à récurer pour nettoyer les composants de cette
friteuse.
• Conservez la friteuse dans un endroit frais et sec.
• En cas d’urgence électrique, comme un incendie, appelez le 911.
GARDEZ CES INSTRUCTIONS

FRANÇAIS
FRANÇAIS
53
52
• N’enroulez jamais le câble autour de l’appareil pendant l’utilisation ou le
stockage. Cela peut provoquer l’effilochage et la rupture du câble.
• Cet appareil n’est pas prévu pour une utilisation par des personnes (y compris
des enfants) ayant des capacités réduites physiques, sensorielles ou mentales,
ou qui manquent d’expérience et de connaissances, à moins qu’elles ne
soient surveillées ou instruites sur l’utilisation de l’appareil par une personne
responsable pour leur sécurité.
• Si vous utilisez une rallonge, sachez qu’une rallonge endommagée peut
entraîner un dysfonctionnement de l’appareil. Vérifiez toujours que votre
rallonge n’est pas endommagée et assurez-vous qu’elle respecte la tension
requise. Ne laissez pas le cordon d’alimentation pendre du bord de la table
ou du comptoir. Ne laissez pas le cordon d’alimentation toucher des surfaces
chaudes.
• Pour réduire le risque de choc électrique, ne plongez jamais la fiche, le câble
ou l’unité dans l’eau ou tout autre liquide. Seuls les accessoires amovibles
peuvent être placés dans le lave-vaisselle.
• Seuls des experts qualifiés peuvent réparer et effectuer des travaux de
maintenance sur la friteuse à air en utilisant des pièces de rechange et des
accessoires d’origine Zavor. N’essayez jamais de démonter et de réparer la
friteuse vous-même.
• Ce produit n’est pas une friteuse traditionnelle. Il n’est PAS destiné à être
rempli d’huile. Ne remplissez jamais aucune partie de la friteuse avec de l’huile.
Si vous choisissez d’utiliser de l’huile, mélangez les aliments avec de l’huile
dans un récipient séparé, puis transférez les aliments dans les plateaux de
cuisson.
• Ne laissez pas les ingrédients crus dans la friteuse pendant plus d’une courte
période avant la cuisson. La viande, la volaille, le poisson, les fruits et les
légumes crus peuvent se gâter.
• Ne déplacez pas la friteuse pendant son utilisation. Lors de la première
utilisation, vous pouvez remarquer de la fumée et / ou une légère odeur. Ceci
est normal et devrait se dissiper rapidement. Cela ne doit pas se reproduire
après plusieurs utilisations de l’appareil.
• Ne laissez pas la friteuse sans surveillance pendant son utilisation.
• L’extérieur de la friteuse à air est conçu pour être frais au toucher. Certaines
zones deviennent CHAUDES pendant l’utilisation. Ne touchez pas les éléments
chauffants. Ne placez pas vos mains ou d’autres parties du corps près des
évents lorsque la friteuse est en cours d’utilisation, car des brûlures peuvent
survenir. Soyez prudent lorsque vous manipulez des plateaux chauds et toutes
les pièces amovibles.
• Utilisez des gants et/ou des pinces pour retirer les aliments chauds de la
friteuse.
• NE JAMAIS utiliser de friteuse à air à l’extérieur.
• N’utilisez JAMAIS la porte de la friteuse comme endroit pour placer des
aliments. Cela pourrait endommager la porte de la friteuse à air ou faire tourner
l’appareil et provoquer des blessures.
• Débranchez la friteuse une fois la cuisson terminée.
• Lorsque le temps de cuisson est terminé, l’élément chauffant s’éteint mais le
ventilateur CONTINUE DE FONCTIONNER pendant 20 secondes pour aider à
refroidir l’appareil.
• Si la friteuse à air est utilisée de manière incorrecte, à des fins professionnelles
ou semi-professionnelles, ou si elle n’est pas utilisée conformément aux
instructions du manuel d’utilisation, la garantie est annulée et le fabricant ne
sera pas responsable des dommages.
• Si le système de contrôle de la température intérieure tombe en panne, le
système de protection contre la surchauffe sera activé et l’appareil ne
fonctionnera pas. Dans ce cas, débranchez le câble. Laissez l’appareil refroidir
complètement avant de redémarrer ou de ranger.
• L’appareil dispose d’un dispositif «éteint» intégré qui éteint automatiquement
l’appareil lorsque la minuterie atteint zéro. Vous pouvez éteindre l’appareil
manuellement en appuyant sur le bouton Start/Stop. Le ventilateur continuera
de fonctionner pendant 20 secondes pour refroidir l’unité.
• Avant le nettoyage, assurez-vous que la friteuse est éteinte, débranchée et
refroidie à température ambiante.
• Ne plongez pas la friteuse à air dans l’eau et ne la placez pas dans le lave-
vaisselle pour la nettoyer. Il n’est PAS lavable au lave-vaisselle.
• Toutes les pièces amovibles peuvent être lavées avec une éponge et de l’eau
chaude et du savon. Toutes les pièces amovibles vont au lave-vaisselle.
• N’utilisez pas de tampons à récurer pour nettoyer les composants de cette
friteuse.
• Conservez la friteuse dans un endroit frais et sec.
• En cas d’urgence électrique, comme un incendie, appelez le 911.
GARDEZ CES INSTRUCTIONS
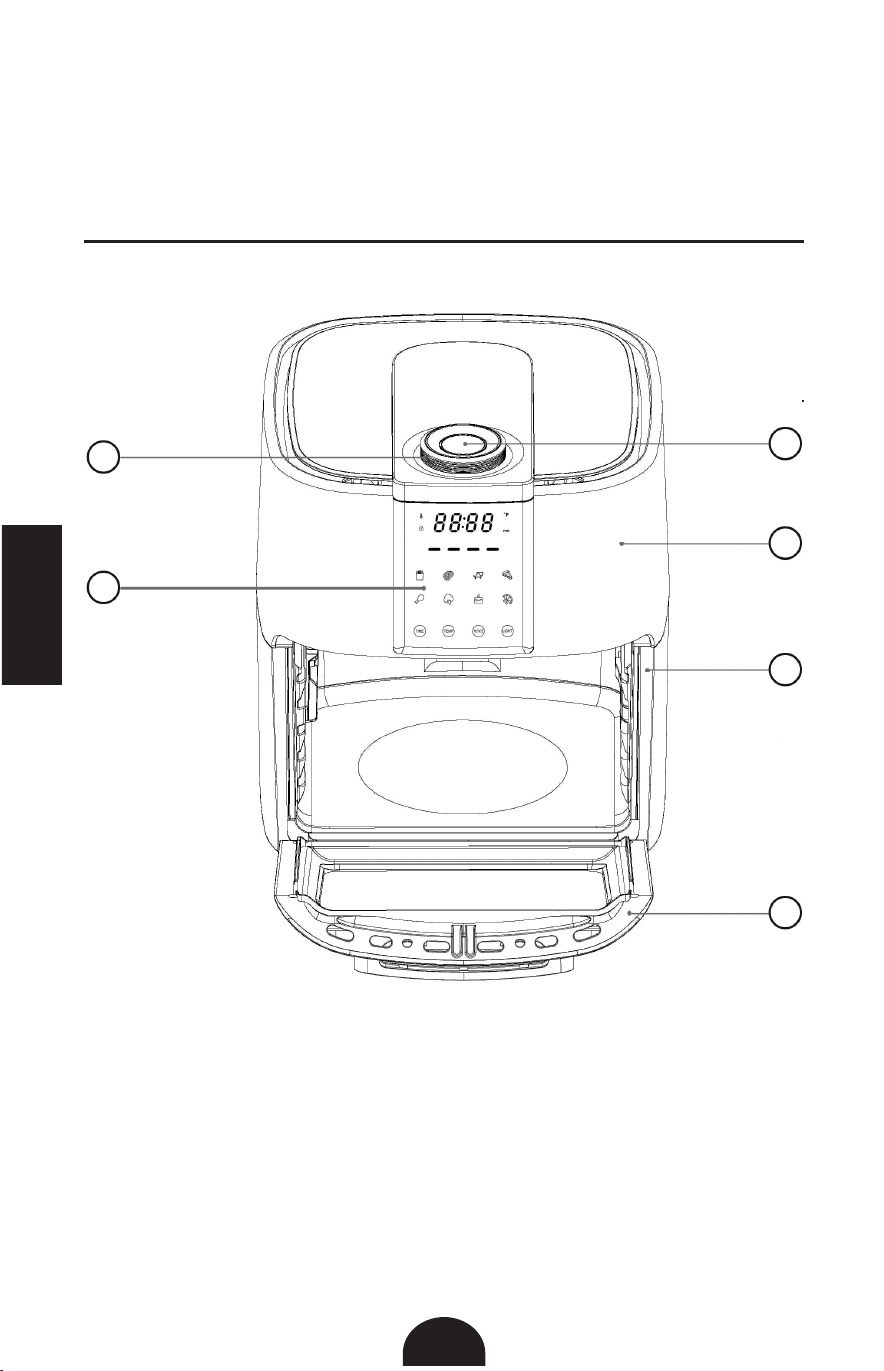
FRANÇAIS
FRANÇAIS
55
54
Caractéristiques et Fonctions
2
1
3
5
6
4
1. Bouton Marche/Arrêt (START/STOP): Une pression sur le bouton Start/Stop
éclairera tout le panneau. Appuyez une deuxième fois sur le bouton Start/
Stop (alors que le panneau est allumé) pour activer le processus de cuisson à
la température par défaut de 370°F et au temps de 15 minutes. Appuyez sur
le bouton Start/Stop à tout moment pendant le processus de cuisson pour
annuler le programme de cuisson.
Fonction Muet: Appuyez et maintenez le bouton Start/Stop pendant 3
secondes pour activer la fonction de sourdine qui coupe tous les bips et
alertes de l’unité. Pour réactiver le son, appuyez sur le bouton Start/Stop et
maintenez-le enfoncé pendant 3 secondes jusqu’à ce que l’appareil émette
un bip.
2. Sélecteur de Temps et de Température: l’extérieur du bouton Start/Stop
fonctionne comme un cadran pour vous aider à programmer les heures et les
températures lorsque vous utilisez la friteuse à air. L’un ou l’autre peut être
programmé après avoir appuyé sur le bouton correspondant du panneau de
commande.
3. Corps de la Friteuse: Le corps de la friteuse à air où se trouvent tous
les composants électriques et les éléments chauffants. Le corps contient
également la cavité de la friteuse à air qui mesure environ 6,5 “de haut x 10”
de large x 9,5 “de profondeur.
4. Panneau de Contrôle: Le panneau interactif vous permet de sélectionner
différents programmes tels que des frites, du poulet, des fruits de mer et même
des déshydrater. De plus, il a les programmes de temps et de température où
vous pouvez régler vos propres temps et températures, ainsi que le bouton de
rotation pour utiliser la fonction rôtissoire.
5. Positions des Plateaux de Cuisson: La friteuse à air Zavor a 5 positions
différentes pour les plateaux de cuisson, dont une avec support de rôtissoire
pour utiliser la fonction de rôtissoire.
6. Porte de la Friteuse à Air: Comme la porte du four, la porte de la friteuse à
air s’ouvre pour permettre l’accès à l’intérieur de la friteuse. La porte doit être
fermement enfoncée et s’encliquetera pour assurer une fermeture correcte.
La friteuse à air ne fonctionnera pas si la porte n’est pas correctement fermée.

FRANÇAIS
FRANÇAIS
55
54
Caractéristiques et Fonctions
2
1
3
5
6
4
1. Bouton Marche/Arrêt (START/STOP): Une pression sur le bouton Start/Stop
éclairera tout le panneau. Appuyez une deuxième fois sur le bouton Start/
Stop (alors que le panneau est allumé) pour activer le processus de cuisson à
la température par défaut de 370°F et au temps de 15 minutes. Appuyez sur
le bouton Start/Stop à tout moment pendant le processus de cuisson pour
annuler le programme de cuisson.
Fonction Muet: Appuyez et maintenez le bouton Start/Stop pendant 3
secondes pour activer la fonction de sourdine qui coupe tous les bips et
alertes de l’unité. Pour réactiver le son, appuyez sur le bouton Start/Stop et
maintenez-le enfoncé pendant 3 secondes jusqu’à ce que l’appareil émette
un bip.
2. Sélecteur de Temps et de Température: l’extérieur du bouton Start/Stop
fonctionne comme un cadran pour vous aider à programmer les heures et les
températures lorsque vous utilisez la friteuse à air. L’un ou l’autre peut être
programmé après avoir appuyé sur le bouton correspondant du panneau de
commande.
3. Corps de la Friteuse: Le corps de la friteuse à air où se trouvent tous
les composants électriques et les éléments chauffants. Le corps contient
également la cavité de la friteuse à air qui mesure environ 6,5 “de haut x 10”
de large x 9,5 “de profondeur.
4. Panneau de Contrôle: Le panneau interactif vous permet de sélectionner
différents programmes tels que des frites, du poulet, des fruits de mer et même
des déshydrater. De plus, il a les programmes de temps et de température où
vous pouvez régler vos propres temps et températures, ainsi que le bouton de
rotation pour utiliser la fonction rôtissoire.
5. Positions des Plateaux de Cuisson: La friteuse à air Zavor a 5 positions
différentes pour les plateaux de cuisson, dont une avec support de rôtissoire
pour utiliser la fonction de rôtissoire.
6. Porte de la Friteuse à Air: Comme la porte du four, la porte de la friteuse à
air s’ouvre pour permettre l’accès à l’intérieur de la friteuse. La porte doit être
fermement enfoncée et s’encliquetera pour assurer une fermeture correcte.
La friteuse à air ne fonctionnera pas si la porte n’est pas correctement fermée.
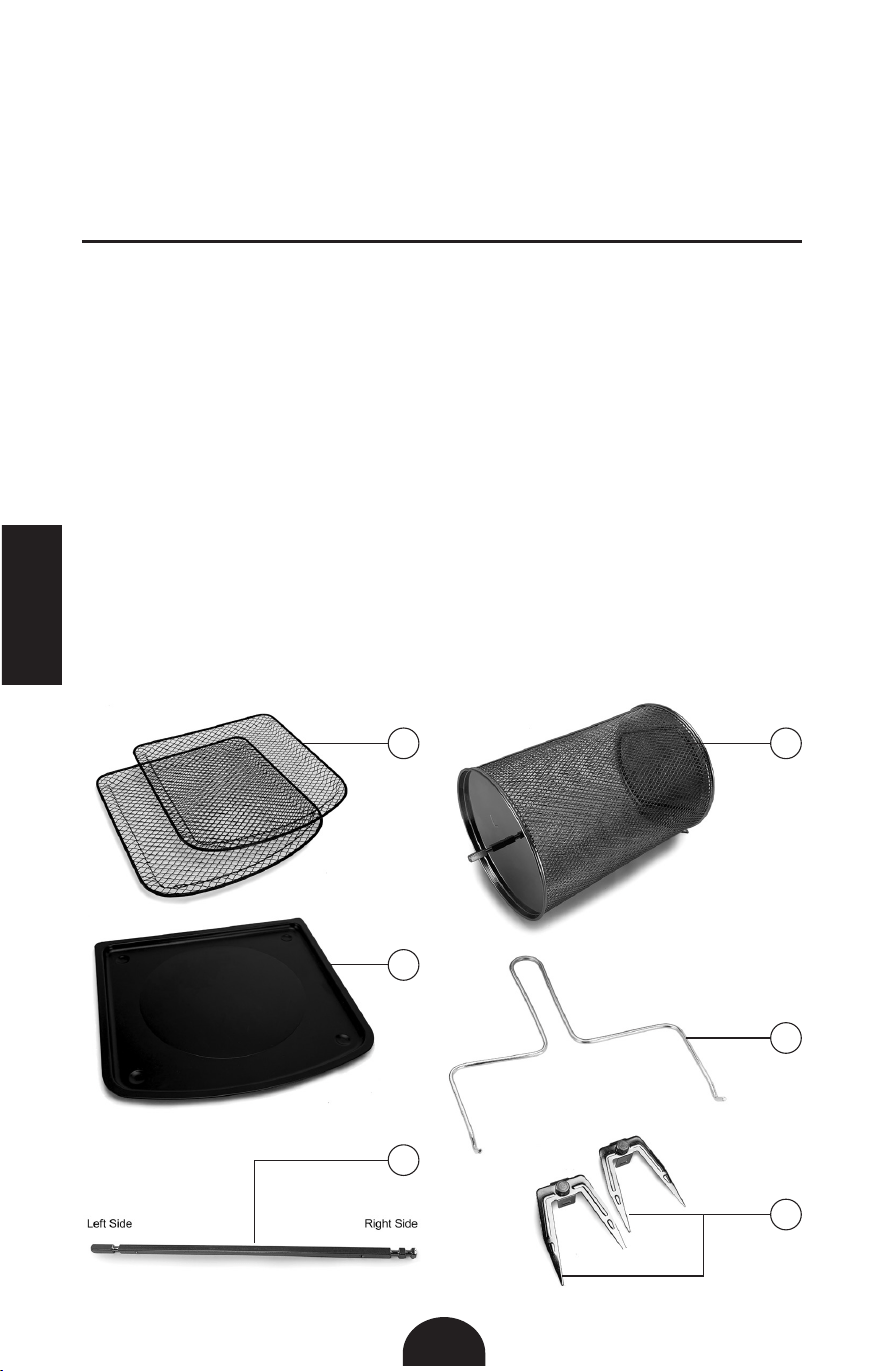
FRANÇAIS
FRANÇAIS
57
56
Pièces et Accessoires
1. Plateau Antiadhésif Amovible (2): Plateaux grillagés revêtus de céramique
pour une expérience de cuisson antiadhésive plus pratique.
2. Panier de Rôtisserie: Le panier de rôtisserie en acier inoxydable est
l’accessoire parfait pour faire frire des frites, des légumes et plus encore.
3. Outil de Manipulation de la Rôtissoire: Cet outil permet aux utilisateurs de
retirer en toute sécurité le panier ou la barre de la rôtissoire de la friteuse.
4. Plateau d’égouttement Amovible: Placé au bas de la cavité de la friteuse
pour piéger les liquides, l’huile, les miettes, les particules de nourriture, etc. Ils
peuvent tomber pendant la cuisson.
5. Barre de Rôtisserie: Barre dans laquelle les aliments seront suspendus
pendant la cuisson avec la rôtissoire.
6. Supports de Rôtissoire avec Vis Amovibles: Ils sont utilisés pour fixer les
aliments dans la barre du rôtissoire.
Préparation: Avant la première utilisation
Lire les instructions de sécurité contenues dans ce manuel avant l’emploi. Avant
d’utiliser cet appareil pour la première fois, suivez les étapes suivantes:
1. Retirez tous les matériaux d’emballage de l’intérieur et de l’extérieur de la
friteuse, mais ne jetez pas encore les matériaux d’emballage! La barre de
rôtisserie et 2 supports de rôtissoire sont emballées à l’extérieur de la friteuse
à air en polystyrène.
2. L’outil de manipulation de la rôtissoire est emballé verticalement à côté de la
friteuse à air en carton.
3. Le reste des outils (le panier de la rôtissoire, 2 plateaux amovibles et 1 bac
d’égouttement) sont emballés à l’intérieur de la friteuse à air.
4. Une fois que vous avez tout retiré, essuyez délicatement l’extérieur avec un
chiffon humide ou une serviette en papier. Ne plongez jamais la friteuse à air
ou son bouchon dans l’eau ou tout autre liquide. Le corps de la friteuse n’est
PAS lavable au lave-vaisselle.
5. Lavez toutes les pièces amovibles avec une éponge et de l’eau chaude
savonneuse. Les plateaux et le panier de rôtissoire peuvent être lavés avec
une brosse douce. N’UTILISEZ PAS d’agents de nettoyage abrasifs ou de
tampons à récurer. Toutes les pièces amovibles vont au lave-vaisselle.
6. Bien sécher.
1 2
3
6
4
5

FRANÇAIS
FRANÇAIS
57
56
Pièces et Accessoires
1. Plateau Antiadhésif Amovible (2): Plateaux grillagés revêtus de céramique
pour une expérience de cuisson antiadhésive plus pratique.
2. Panier de Rôtisserie: Le panier de rôtisserie en acier inoxydable est
l’accessoire parfait pour faire frire des frites, des légumes et plus encore.
3. Outil de Manipulation de la Rôtissoire: Cet outil permet aux utilisateurs de
retirer en toute sécurité le panier ou la barre de la rôtissoire de la friteuse.
4. Plateau d’égouttement Amovible: Placé au bas de la cavité de la friteuse
pour piéger les liquides, l’huile, les miettes, les particules de nourriture, etc. Ils
peuvent tomber pendant la cuisson.
5. Barre de Rôtisserie: Barre dans laquelle les aliments seront suspendus
pendant la cuisson avec la rôtissoire.
6. Supports de Rôtissoire avec Vis Amovibles: Ils sont utilisés pour fixer les
aliments dans la barre du rôtissoire.
Préparation: Avant la première utilisation
Lire les instructions de sécurité contenues dans ce manuel avant l’emploi. Avant
d’utiliser cet appareil pour la première fois, suivez les étapes suivantes:
1. Retirez tous les matériaux d’emballage de l’intérieur et de l’extérieur de la
friteuse, mais ne jetez pas encore les matériaux d’emballage! La barre de
rôtisserie et 2 supports de rôtissoire sont emballées à l’extérieur de la friteuse
à air en polystyrène.
2. L’outil de manipulation de la rôtissoire est emballé verticalement à côté de la
friteuse à air en carton.
3. Le reste des outils (le panier de la rôtissoire, 2 plateaux amovibles et 1 bac
d’égouttement) sont emballés à l’intérieur de la friteuse à air.
4. Une fois que vous avez tout retiré, essuyez délicatement l’extérieur avec un
chiffon humide ou une serviette en papier. Ne plongez jamais la friteuse à air
ou son bouchon dans l’eau ou tout autre liquide. Le corps de la friteuse n’est
PAS lavable au lave-vaisselle.
5. Lavez toutes les pièces amovibles avec une éponge et de l’eau chaude
savonneuse. Les plateaux et le panier de rôtissoire peuvent être lavés avec
une brosse douce. N’UTILISEZ PAS d’agents de nettoyage abrasifs ou de
tampons à récurer. Toutes les pièces amovibles vont au lave-vaisselle.
6. Bien sécher.
1 2
3
6
4
5
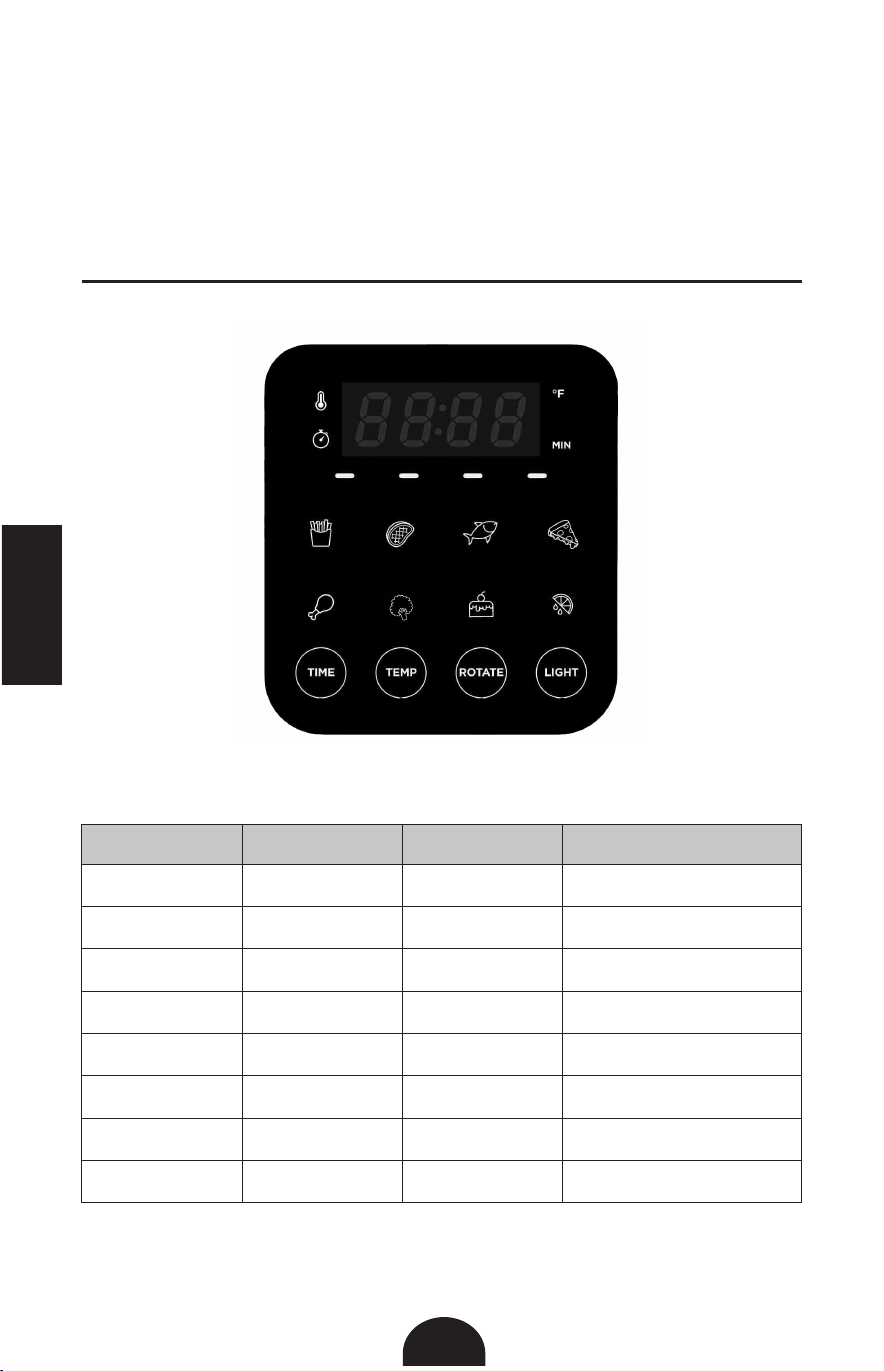
FRANÇAIS
FRANÇAIS
59
58
Fonctions de Fonctionnement:
Fonctions du Panneau
Tableau de Temps et de Température des Fonctions Prédéfinies
Fonction de cuisson: Température: Temps: Minuterie:
Frites 400°F 20 minutes
1-60 minutes,
par paliers de 1 minute
Viande 400°F 18 minutes
1-60 minutes,
par paliers de 1 minute
Fruit de Mer 390°F 12 minutes
1-60 minutes,
par paliers de 1 minute
Pizza 350°F 15 minutes
1-60 minutes,
par paliers de 1 minute
Poulet 380°F 18 minutes
1-60 minutes,
par paliers de 1 minute
Légumes 350°F 20 minutes
1-60 minutes,
par paliers de 1 minute
Cuire 350°F 30 minutes
1-60 minutes,
par paliers de 1 minute
Déshydrater 180°F 1 heure (60 minutes)
1 - 24 heures,
en 30 min d’intervalle
1. Affichage LED: Il affichera la température et le temps de cuisson.
2. Indicateur Fahrenheit: Il s’allumera lors de la programmation de la
température afin que les utilisateurs sachent que les degrés sont présentés
en Fahrenheit. Il s’allumera également lorsque l’unité est en marche et que la
température de cuisson est affichée à l’écran.
3. Indicateur des Minutes: Il s’allume lors de la programmation du temps de
cuisson. Il s’allumera également lorsque l’unité est en marche et que le temps
de cuisson est affiché à l’écran.
4. Indicateur de Température: S’allume lorsque l’unité cuit et que la température
est affichée à l’écran.
5. Indicateur de Temps: S’allume lorsque l’appareil cuit et que le temps de
cuisson est affiché à l’écran.
6. Voyants de Fonctionnement: 4 voyants sous l’affichage LED clignotent en
séquence pendant la cuisson pour vous avertir que l’unité fonctionne.
7. Fonctions Prédéfinies: Lorsque vous sélectionnez l’une d’entre elles,
l’heure et la température par défaut de ce paramètre s’affichent. Vous pouvez
remplacer ces préréglages avec les boutons de temps et de température.
Pour les heures et températures par défaut, consultez le tableau des heures et
températures. L’icône clignote pendant l’utilisation.
8. Bouton Temps: Ce bouton vous permet de sélectionner votre propre temps
de cuisson de 1 minute à 60 minutes dans tous les modes, sauf lorsqu’il
est déshydraté, qui utilise des intervalles de 30 minutes et un temps de
fonctionnement de 1 à 24 heures.
9. Bouton de Température: Ce bouton vous permet de régler la température de
cuisson. Il est réglable par intervalles de 5°F, la température programmable
varie de 150°F à 400°F. La température de déshydratation est de 90°F à 180°F.
10. Bouton de Rotation: Sélectionnez ce bouton lorsque vous cuisinez avec
des accessoires de rôtissoire. Les accessoires de rôtissoire et la fonction de
rotation peuvent être utilisés avec n’importe laquelle des fonctions prédéfinies.
Le bouton clignote pendant l’utilisation.
11. Bouton d’éclairage: Allume et éteint l’éclairage intérieur pendant la cuisson
pour vérifier facilement vos aliments.
REMARQUE: Chaque fois qu’un bouton du panneau est enfoncé, il émet un bip
et commence à clignoter pour confirmer qu’il a été sélectionné.

FRANÇAIS
FRANÇAIS
61
60
Comment Utiliser la Friteuse à Air
Cette section du manuel vous expliquera comment utiliser la friteuse à air et les
fonctions prédéfinies. Pour obtenir des instructions sur le torréfacteur, reportez-
vous à la section Rôtisserie du manuel à la page 66.
1. Placez la friteuse à air sur une surface plane et stable, loin de toute source de
chaleur et d’eau et branchez-la.
2. Assurez-vous que le bac d’égouttement est en place au bas de la friteuse.
REMARQUE: La porte de la friteuse à air ne se fermera pas si le bac
d’égouttement n’est pas correctement placé dans l’appareil.
3. Placez les aliments assaisonnés sur les plateaux de cuisson et placez les
plateaux de cuisson dans la bonne position. Ferme la porte en vous assurant
qu’elle clique.
REMARQUE: Si la porte est ouverte à un moment quelconque pendant que la
friteuse à air fonctionne, le temps de cuisson sera interrompu.
4. Appuyez sur le bouton TEMP et tournez le sélecteur de temps et de
température sur le dessus de la friteuse à air jusqu’à ce que l’écran affiche la
température souhaitée.
5. Une fois la température désirée affichée à l’écran, appuyez sur la touche TIME
pour programmer votre temps de cuisson. Tournez le sélecteur de temps et
de température en haut de la friteuse à air jusqu’à ce que l’écran affiche le
temps de cuisson souhaité.
6. Appuyez sur le bouton START/STOP situé sur le dessus de la friteuse pour
commencer le processus de cuisson.
REMARQUE: Pour obtenir les meilleurs résultats et les plus uniformes, faites
pivoter les plateaux de la position supérieure à la position inférieure, et vice
versa, au milieu de la cuisson.
7. Pendant que la friteuse à air fonctionne, l’affichage alterne entre la température
réglée et le temps restant. L’indicateur Fahrenheit et l’indicateur des minutes
confirmeront si l’affichage indique la température de cuisson ou le temps de
cuisson.
REMARQUE: Appuyez sur START/STOP à tout moment pour arrêter le
processus de cuisson. L’heure et la température disparaîtront de l’écran et
seuls les voyants de fonctionnement resteront. Le ventilateur restera allumé
pendant environ 20 secondes avant que l’unité ne s’éteigne complètement.
8. Une fois le temps de cuisson terminé, l’appareil émet 3 bips et s’éteint
automatiquement.
9. Portez des gants de cuisine pour retirer les plateaux chauds de la friteuse à air
et des pinces pour manipuler les aliments chauds.
Tableaux de Cuisson de la Friteuse à Air
Les temps de cuisson de la friteuse à air sont des temps approximatifs. Utilisez
ces temps de cuisson comme ligne directrice générale. La taille et la variété des
aliments modifieront très probablement les temps de cuisson.
Tableau de Cuisson de Friteuse à Air pour Aliments Frais
Nourriture
Fraîche
Quantité Température Temps Informations Supplémentaires
Frites Fines 16 oz 400°F 36 minutes
Sur deux plateaux, changez de position à
mi-chemin
Petites Patates 16 oz 375°F 16-20 minutes
Les pommes de terre doivent être
coupées en quartiers, sur un plateau sur
la deuxième position de grille à partir du
haut
Rondelles
d'Oignon
4 oz 400°F 14 minutes
Sur deux plateaux, changez de position à
mi-chemin
Poitrines de
Poulet
2 pcs- 4 oz
chacun
375°F 30 minutes
Sur un plateau, sur la deuxième position
de rack à partir du haut
Boulettes de
Viande
4 pcs- 2 oz
chacun
360°F 15 minutes
Sur un plateau, sur la deuxième position
de rack à partir du haut
Ailes de Poulet 4-5 pcs 375°F 28-30 minutes
Sur un plateau, sur la deuxième position
de rack à partir du haut
Filet de Poisson 4 oz 390°F 12 minutes
Sur un plateau, sur la deuxième position
de rack à partir du haut
Crevettes
Géantes
13-14 oz 390°F 14 minutes
Sur deux plateaux, changez de position à
mi-chemin
Brocoli 8 oz 350°F 15 minutes
Sur un plateau, sur la deuxième position
de rack à partir du haut
Champignons 8 oz 400°F 18 minutes
En tranches, sur un plateau, sur la
deuxième position de rack à partir du haut
Maïs en Épi 2 Épis 400°F 12-14 minutes
Sur un plateau, sur la deuxième position
de rack à partir du haut
Zucchini 1 pc 400°F 22 minutes
En tranches, sur un plateau, sur la
deuxième position de rack à partir du haut
Empanadas aux
Fruits
3 pcs- 3 oz
chacun
350°F 15 minutes
Sur un plateau, sur la deuxième position
de rack à partir du haut
Pain Grillé
(blanc)
2 pcs 400°F 4-6 minutes
Retournez à mi-chemin dans le temps,
ajuster le temps pour l'obscurité souhaitée
Pain Grillé (de
blé entier)
2 pcs 400°F 3-5 minutes
Retournez à mi-chemin dans le temps,
ajuster le temps pour l'obscurité souhaitée
Bagel 1, tranché 400°F 5 minutes Ajuster le temps pour l'obscurité souhaitée
Pizza
Personnelle
7 oz 325°F 24-26 minutes
Sur un plateau, sur la deuxième position
de rack à partir du haut
FRANÇAIS
FRANÇAIS
63
62
Comment Utiliser les Fonctions Prédéfinies
1. Placez la friteuse à air sur une surface plane et stable, loin de toute source de
chaleur et d’eau et branchez-la.
2. Assurez-vous que le bac d’égouttement est en place au bas de la friteuse.
REMARQUE: La porte de la friteuse à air ne se fermera pas si le bac
d’égouttement n’est pas placé correctement dans l’appareil.
3. Placer les aliments assaisonnés sur les plateaux de cuisson et placer les
plateaux de cuisson dans la bonne position. Ferme la porte en vous assurant
qu’elle clique.
REMARQUE: Si la porte est ouverte à un moment quelconque pendant que la
friteuse à air fonctionne, le temps de cuisson sera interrompu.
4. Sélectionnez la fonction souhaitée en appuyant sur le bon bouton du panneau
de commande.
5. Si vous le souhaitez, vous pouvez régler l’heure et la température préréglées
en appuyant sur les boutons TIME et/ou TEMP et en tournant le sélecteur
d’heure et de température pour régler.
6. Appuyez sur le bouton START/STOP situé sur le dessus de la friteuse pour
commencer le processus de cuisson.
REMARQUE: Pour obtenir les meilleurs résultats et les plus uniformes, faites
pivoter les plateaux de la position supérieure à la position inférieure, et vice
versa, au milieu de la cuisson.
7. Pendant que la friteuse à air fonctionne, l’affichage alterne entre la température
réglée et le temps restant. L’indicateur Fahrenheit et l’indicateur des minutes
confirmeront si l’affichage indique la température de cuisson ou le temps de
cuisson.
REMARQUE: Appuyez sur START/STOP à tout moment pour arrêter le
processus de cuisson. L’heure et la température disparaîtront de l’écran et
seuls les voyants de fonctionnement resteront. Le ventilateur restera allumé
pendant environ 20 secondes avant que l’unité ne s’éteigne complètement.
8. Une fois le temps de cuisson terminé, l’appareil émet 3 bips et s’éteint
automatiquement.
9. Portez des gants de cuisine pour retirer les plateaux chauds de la friteuse et
les pinces pour manipuler les aliments chauds.
Tableau de Cuisson de Friteuse à Air
pour Aliments Surgelés
Nourriture
Congelée
Quantité Température Temps Informations Supplémentaires
Frites Fines 8 oz 400°F 20 minutes Dans le panier, tournant
Frites Épaisses 8 oz 400°F 24 minutes Dans le panier, tournant
Rondelles
d'Oignon
8 oz 400°F 12-15 minutes Dans le panier, tournant
Nuggets de
Poulet
8 oz 400°F 12 minutes
Sur deux plateaux, changez de
position à mi-chemin
Ailes de Poulet 7 oz 380°F 18 minutes
Sur un plateau, sur la deuxième
position de rack à partir du haut
Bâton de
Poisson
8 oz 390°F 12- 14 minutes
Sur un plateau, sur la deuxième
position de rack à partir du bas
Filet de Poisson
Pané
2 pcs- 5 oz
chacun
400°F 18-20 minutes
Sur un plateau, sur la deuxième
position de rack à partir du bas
Maïs Éclaté de
Crevettes
8 oz 360°F 12-14 minutes
Sur un plateau, sur la deuxième
position de rack à partir du haut
Saucisse du
Petit Déjeuner
8 oz 400 °F 18 minutes
Sur un plateau, sur la deuxième
position de rack à partir du bas
Empanadas
2 pcs- 3 oz
chacun
350°F 30 minutes
Sur un plateau, sur la deuxième
position de rack à partir du bas
Pizza
Personnelle
1 pc- 5 oz 350°F 15 minutes
Sur un plateau, sur la deuxième
position de rack à partir du bas
Hamburger 1 pc 380°F 20 minutes
Sur un plateau, retournez à
mi-chemin dans le temps
Offres de Poulet 8 oz 400°F 12-15 minutes
Sur un plateau, retournez à
mi-chemin dans le temps

FRANÇAIS
FRANÇAIS
65
64
Comment Déshydrater
Les aliments déshydratants tels que les légumes, les fruits, les viandes et plus
sont parfaits pour cuisiner, voyager, camper et grignoter. La déshydratation
des aliments frais et mûrs conservera les nutriments et intensifiera la saveur.
L’utilisation de fruits ou de légumes meurtris est acceptable pour la déshydratation
et contribue à réduire le gaspillage alimentaire. Coupez les ecchymoses avec
un couteau. Le séchage automatisé du four à friteuse Crunch Air rend la
déshydratation à la maison à la fois gratifiante et simpliste.
1. Placez la friteuse à air sur une surface plane et stable, loin de toute source de
chaleur et d’eau et branchez-la.
2. Assurez-vous que le bac d’égouttement est en place au bas de la friteuse.
REMARQUE: La porte de la friteuse à air ne se fermera pas si le bac
d’égouttement n’est pas placé correctement dans l’appareil.
3. Placer les aliments sur les plateaux de cuisson et placer les plateaux de
cuisson dans la bonne position. Ferme la porte en vous assurant qu’elle
clique.
REMARQUE: Si la porte est ouverte à un moment quelconque pendant que la
friteuse à air fonctionne, le temps de cuisson sera interrompu.
4. Sélectionnez le paramètre Déshydrater sur le panneau de commande.
5. Ajustez l’heure et la température préréglées en appuyant sur les boutons
TIME et/ou TEMP et en tournant le sélecteur d’heure et de température pour
régler.
6. Appuyez sur le bouton START/STOP situé sur le dessus de la friteuse pour
commencer le processus de déshydratation.
REMARQUE: Pour obtenir les meilleurs résultats et les plus uniformes, faites
pivoter les plateaux de la position supérieure à la position inférieure, et vice
versa, au milieu de la cuisson.
7. Pendant que la friteuse à air fonctionne, l’affichage alterne entre la température
réglée et le temps restant.
8. Une fois le temps de cuisson terminé, l’appareil émet 3 bips et s’éteint
automatiquement.
REMARQUE: Appuyez sur START/STOP à tout moment pour arrêter le
processus de cuisson. L’heure et la température disparaîtront de l’écran et
seuls les voyants de fonctionnement resteront. Le ventilateur restera allumé
pendant environ 20 secondes avant que l’unité ne s’éteigne complètement.
9. Portez des gants de cuisine pour retirer les plateaux chauds de la friteuse et
les pinces pour manipuler les aliments chauds.
Tableau de Déshydratation de la Friteuse à Air
Suivez le tableau des aliments courants qui peuvent être déshydratés en utilisant
la durée, la température et les instructions suggérées.
PRODUIT
ALIMENTAIRE
TEMP TEMPS INSTRUCTIONS
Fruit
Pommes 135°F 8-10 heures Noyau et trancher en rondelles de 1/4 de pouce. Faire tremper
dans de l'eau acidulée. Changez la position du plateau à
mi-chemin.
Abricots 135°F 10 heures Peler et couper en morceaux de 1/4 de pouce. Changez la
position du plateau à mi-chemin.
Mangue/Papaye 135°F 10 heures Peler et couper en morceaux de 1/4 de pouce. Changez la
position du plateau à mi-chemin.
Kiwi 135°F 6 heures Peler et couper en morceaux de 1/4 de pouce. Changez la
position du plateau à mi-chemin.
Tranches d'orange 135°F 10 heures Changez la position du plateau à mi-chemin.
Fraises 135°F 6 heures Trancher en morceaux de 1/4 de pouce. Changez la position
du plateau à mi-chemin.
Bananes 135°F 5-6 heures Peler et couper en morceaux de 1/4 de pouce. Changez la
position du plateau à mi-chemin.
Des Légumes
Carottes 145°F 10-11
heures
Peler et couper en morceaux de 1/8 de pouce. Changez la
position du plateau à mi-chemin.
Ail 145°F 6-7 heures Peler et hacher. Changez la position du plateau à mi-chemin.
Tomates 145°F 10-11
heures
Placez le côté peau vers le bas. Changez la position du plateau
à mi-chemin.
Champignons 145°F 3-5 heures Placez le côté peau vers le bas. Changez la position du plateau
à mi-chemin.
Poivrons 145°F 4-8 horas Placez le côté peau vers le bas. Changez la position du plateau
à mi-chemin.
Zucchini 145°F 7-9 heures Hacher et placer la peau vers le bas. Changez la position du
plateau à mi-chemin.
Boeuf Séché
Carne Seca 145°F 5-6 heures Retourner et changer les positions du plateau à mi-chemin.
Poisson Séché 145°F 8-12 heures Retourner et changer les positions du plateau à mi-chemin.
FRANÇAIS
FRANÇAIS
65
64
Comment Déshydrater
Les aliments déshydratants tels que les légumes, les fruits, les viandes et plus
sont parfaits pour cuisiner, voyager, camper et grignoter. La déshydratation
des aliments frais et mûrs conservera les nutriments et intensifiera la saveur.
L’utilisation de fruits ou de légumes meurtris est acceptable pour la déshydratation
et contribue à réduire le gaspillage alimentaire. Coupez les ecchymoses avec
un couteau. Le séchage automatisé du four à friteuse Crunch Air rend la
déshydratation à la maison à la fois gratifiante et simpliste.
1. Placez la friteuse à air sur une surface plane et stable, loin de toute source de
chaleur et d’eau et branchez-la.
2. Assurez-vous que le bac d’égouttement est en place au bas de la friteuse.
REMARQUE: La porte de la friteuse à air ne se fermera pas si le bac
d’égouttement n’est pas placé correctement dans l’appareil.
3. Placer les aliments sur les plateaux de cuisson et placer les plateaux de
cuisson dans la bonne position. Ferme la porte en vous assurant qu’elle
clique.
REMARQUE: Si la porte est ouverte à un moment quelconque pendant que la
friteuse à air fonctionne, le temps de cuisson sera interrompu.
4. Sélectionnez le paramètre Déshydrater sur le panneau de commande.
5. Ajustez l’heure et la température préréglées en appuyant sur les boutons
TIME et/ou TEMP et en tournant le sélecteur d’heure et de température pour
régler.
6. Appuyez sur le bouton START/STOP situé sur le dessus de la friteuse pour
commencer le processus de déshydratation.
REMARQUE: Pour obtenir les meilleurs résultats et les plus uniformes, faites
pivoter les plateaux de la position supérieure à la position inférieure, et vice
versa, au milieu de la cuisson.
7. Pendant que la friteuse à air fonctionne, l’affichage alterne entre la température
réglée et le temps restant.
8. Une fois le temps de cuisson terminé, l’appareil émet 3 bips et s’éteint
automatiquement.
REMARQUE: Appuyez sur START/STOP à tout moment pour arrêter le
processus de cuisson. L’heure et la température disparaîtront de l’écran et
seuls les voyants de fonctionnement resteront. Le ventilateur restera allumé
pendant environ 20 secondes avant que l’unité ne s’éteigne complètement.
9. Portez des gants de cuisine pour retirer les plateaux chauds de la friteuse et
les pinces pour manipuler les aliments chauds.
Tableau de Déshydratation de la Friteuse à Air
Suivez le tableau des aliments courants qui peuvent être déshydratés en utilisant
la durée, la température et les instructions suggérées.
PRODUIT
ALIMENTAIRE
TEMP TEMPS INSTRUCTIONS
Fruit
Pommes 135°F 8-10 heures Noyau et trancher en rondelles de 1/4 de pouce. Faire tremper
dans de l'eau acidulée. Changez la position du plateau à
mi-chemin.
Abricots 135°F 10 heures Peler et couper en morceaux de 1/4 de pouce. Changez la
position du plateau à mi-chemin.
Mangue/Papaye 135°F 10 heures Peler et couper en morceaux de 1/4 de pouce. Changez la
position du plateau à mi-chemin.
Kiwi 135°F 6 heures Peler et couper en morceaux de 1/4 de pouce. Changez la
position du plateau à mi-chemin.
Tranches d'orange 135°F 10 heures Changez la position du plateau à mi-chemin.
Fraises 135°F 6 heures Trancher en morceaux de 1/4 de pouce. Changez la position
du plateau à mi-chemin.
Bananes 135°F 5-6 heures Peler et couper en morceaux de 1/4 de pouce. Changez la
position du plateau à mi-chemin.
Des Légumes
Carottes 145°F 10-11
heures
Peler et couper en morceaux de 1/8 de pouce. Changez la
position du plateau à mi-chemin.
Ail 145°F 6-7 heures Peler et hacher. Changez la position du plateau à mi-chemin.
Tomates 145°F 10-11
heures
Placez le côté peau vers le bas. Changez la position du plateau
à mi-chemin.
Champignons 145°F 3-5 heures Placez le côté peau vers le bas. Changez la position du plateau
à mi-chemin.
Poivrons 145°F 4-8 horas Placez le côté peau vers le bas. Changez la position du plateau
à mi-chemin.
Zucchini 145°F 7-9 heures Hacher et placer la peau vers le bas. Changez la position du
plateau à mi-chemin.
Boeuf Séché
Carne Seca 145°F 5-6 heures Retourner et changer les positions du plateau à mi-chemin.
Poisson Séché 145°F 8-12 heures Retourner et changer les positions du plateau à mi-chemin.

FRANÇAIS
FRANÇAIS
67
66
Rôtissoire: Avant la Première Utilisation
• Lisez toutes les étiquettes de matériel et d’avertissement.
• Lavez toutes les pièces et accessoires utilisés dans le processus de cuisson
avec de l’eau chaude savonneuse.
REMARQUE: Seuls les accessoires vont au lave-vaisselle.
• Nettoyez l’intérieur et l’extérieur de l’unité de cuisson avec un chiffon propre et
humide.
• Placez l’appareil sur une surface stable, plane, horizontale et résistante à la
chaleur.
• Sélectionnez l’accessoire de cuisine approprié pour votre recette.
Comment Préparer la barre de Rôtisserie
Poulet: Si vous faites cuire un poulet dans la rôtissoire, assurez-vous que tous
les viscères ont été enlevés, assaisonnés et correctement attachés.
1. Insérez la barre de rôtisserie dans la cavité du poulet afin que le poulet puisse
bien accrocher sur la barre. Placez le poulet avec la barre sur une planche à
découper et nettoyez les extrémités de la barre.
2. Tenez la tige d’une main et l’une des fourchettes de rôtissoire, les pointes
pointant vers le poulet de l’autre main. Insérez la tige dans les encoches
carrées du support de rôtissoire.
ATTENTION: Les fourches sont tranchantes. Traitez avec soin.
3. Piquez le poulet avec la fourchette et insérez complètement les pointes. Fixez
la fourche en serrant la vis. Répétez de l’autre côté.
REMARQUE: Une fois que les vis sont serrées, il doit y avoir au moins 1
pouce d’espace aux deux extrémités de la tige. Le poulet doit également être
sûr; Vous ne devriez pas pouvoir glisser d’avant en arrière sur la barre.
Viande Désossée (boeuf, porc, etc.) ou Fruit (ananas, etc.)
1. Insérez la barre de rôtisserie, dans le sens de la longueur, au centre de la
viande ou du fruit. Placez la viande ou le fruit avec la barre sur une planche à
découper et nettoyez les extrémités de la barre.
REMARQUE: Si la barre ne perce pas suffisamment vos aliments pour les
insérer, faites soigneusement une incision avec un couteau de cuisine bien
aiguisé pour faciliter la perforation initiale.
2. Tenez la barre d’une main et l’une des fourchettes de rôtissoire, les pointes
pointant vers les aliments de l’autre main. Insérez la tige dans les encoches
carrées du support du torréfacteur. Utilisez des fourchettes uniquement
si nécessaire pour contenir des aliments plus grands que la largeur des
fourchettes.
ATTENTION: Les fourches sont tranchantes. Traitez avec soin.
3. Piquez la viande ou le fruit avec la fourchette et insérez complètement les
pointes. Fixez la fourche en serrant la vis. Répétez de l’autre côté.
REMARQUE: Une fois que les vis sont serrées, il doit y avoir au moins 1
pouce d’espace aux deux extrémités de la tige. La nourriture doit également
être sûre; Vous ne devriez pas pouvoir glisser d’avant en arrière sur la barre.
Comment Utiliser la Barre de Rôtisserie
La barre de rôtissoire doit être utilisée avec les supports de rôtissoire. La barre
de rôtisserie vous permet de cuire du poulet entier, de grosses coupes de viande,
des fruits et plus encore. Le poids maximum autorisé par la barre de rôtissoire est
de 4 livres.
1. Placez la friteuse à air sur une surface plane et stable, loin de toute source de
chaleur et d’eau et branchez-la.
2. Assurez-vous que le bac d’égouttement est en place au bas de la friteuse.
REMARQUE: La porte de la friteuse à air ne se fermera pas si le bac
d’égouttement n’est pas placé correctement dans l’appareil.
3. Tenez le côté gauche de la barre de rôtisserie avec la main gauche et le côté
droit avec la droite.
4. Guidez la barre de rôtisserie préparée dans la friteuse à air en position de
rôtisserie. Placez le côté gauche de la rôtissoire sur l’engrenage rond situé
sur la paroi intérieure gauche. Une fois en place, soulevez le côté droit de
la barre du tournebroche et placez-le sur le support du tournebroche sur la
paroi intérieure droite. Faites-le glisser jusqu’à ce qu’il atteigne le support de
la rôtissoire et qu’il soit aligné avec le côté gauche. Fermez la porte en vous
assurant qu’elle clique.
REMARQUE: Si la porte est ouverte à un moment quelconque pendant que la
friteuse à air fonctionne, le temps de cuisson sera interrompu.
5. Sélectionnez la fonction préréglée souhaitée en appuyant sur le bouton
approprié.
6. Si vous le souhaitez, appuyez sur le bouton TEMP pour régler la température
en tournant le sélecteur de temps et de température sur le dessus de la
friteuse à air.
7. Si vous le souhaitez, appuyez sur le bouton TIME pour régler le temps de
cuisson en tournant le sélecteur de temps et de température sur le dessus de
la friteuse.
8. Appuyez sur le bouton START/STOP situé sur le dessus de la friteuse pour
commencer la cuisson.
9. Une fois la friteuse à air en marche, appuyez sur le bouton ROTATE pour
commencer la rotation de la rôtissoire. Pendant que la friteuse à air fonctionne,
l’affichage alterne entre la température réglée et le temps restant.
REMARQUE: Appuyez sur START/STOP à tout moment pour arrêter le
processus de cuisson. L’heure et la température disparaîtront de l’écran et
seuls les voyants de fonctionnement resteront. Le ventilateur restera allumé
pendant environ 20 secondes avant que l’unité ne s’éteigne complètement.
10. Une fois le temps de cuisson terminé, l’appareil émet 3 bips et s’éteint
automatiquement.

FRANÇAIS
FRANÇAIS
69
68
11. Portez des gants de cuisine avec la poignée du torréfacteur pour retirer la
barre chaude contenant les aliments de la friteuse. La barre et les fourches
seront CHAUDES, soyez extrêmement prudent lorsque vous dévissez les
fourches.
Comment Utiliser le Panier de Rôtisserie
Le panier de rôtisserie est parfait pour préparer uniformément des aliments frits,
tels que des frites, des ailes de poulet et plus encore. Le poids maximum autorisé
par le panier de la rôtissoire est de 4 livres.
1. Placez la friteuse à air sur une surface plane et stable, loin de toute source de
chaleur et d’eau et branchez-la.
2. Retirez tous les bacs, à l’exception du bac d’égouttement. Assurez-vous que
le bac d’égouttement est en place au bas de la friteuse.
REMARQUE: La porte de la friteuse à air ne se fermera pas si le bac
d’égouttement n’est pas placé correctement dans l’appareil.
3. Placez les aliments assaisonnés à l’intérieur du panier du rôtissoire et fermez-
le.
4. Tenez le panier de rôtissoire scellé dans vos mains avec le côté avec le
couvercle sur votre main droite.
5. Guidez le panier de la rôtissoire dans la friteuse à air en position rôtissoire.
Placez le côté gauche du panier dans le train rond situé sur le mur intérieur
gauche. Une fois en place, soulevez le côté droit du panier de rôtissoire et
placez-le dans le support de rôtissoire sur la paroi intérieure droite. Faites-le
glisser jusqu’à ce qu’il atteigne le support de la rôtissoire et qu’il soit aligné
avec le côté gauche. Fermez la porte en vous assurant qu’elle clique.
REMARQUE: Si la porte est ouverte à un moment quelconque pendant que la
friteuse à air fonctionne, le temps de cuisson sera interrompu.
6. Sélectionnez la fonction préréglée souhaitée en appuyant sur le bouton
approprié.
7. Si vous le souhaitez, appuyez sur le bouton TEMP pour régler la température
en tournant le sélecteur de temps et de température sur le dessus de la
friteuse à air.
8. Si vous le souhaitez, appuyez sur le bouton TIME pour régler le temps de
cuisson en tournant le sélecteur de temps et de température sur le dessus de
la friteuse.
9. Appuyez sur le bouton START/STOP situé sur le dessus de la friteuse pour
commencer le processus de cuisson.
10. Une fois la friteuse à air en marche, appuyez sur le bouton ROTATE pour
commencer la rotation de la rôtissoire. Pendant que la friteuse à air fonctionne,
l’affichage alterne entre la température réglée et le temps restant.
REMARQUE: Appuyez sur START/STOP à tout moment pour arrêter le
processus de cuisson. L’heure et la température disparaîtront de l’écran et
seuls les voyants de fonctionnement resteront. Le ventilateur restera allumé
pendant environ 20 secondes avant que l’unité ne s’éteigne complètement.
11. Une fois le temps de cuisson terminé, l’appareil émet 3 bips et s’éteint
automatiquement.
12. Portez des gants de cuisine avec l’outil de manipulation de la rôtissoire pour
retirer le panier chaud contenant les aliments de la friteuse. Utilisez des gants
de cuisine ou un torchon pour ouvrir la porte du panier.
Comment Utiliser l’outil de Gestion de la Rôtisserie
1. Tenez l’outil de manipulation par sa poignée.
2. Guidez l’outil de fonctionnement vers la friteuse. Placez-le sous la barre ou le
panier de la rôtissoire.
3. Utilisez l’outil d’entraînement pour soulever le côté droit de la rôtissoire. Une
fois libre, soulevez le côté gauche.
4. Retirez délicatement la barre ou le panier de la rôtissoire et les aliments de la
friteuse.
Conseils de Friture à l’air
• Presque tous les aliments que vous cuisinez au four peuvent être frits dans l’air.
• Les aliments sont cuits mieux et plus uniformément lorsqu’ils sont de taille
et d’épaisseur similaires. Les petits aliments nécessitent moins de temps de
cuisson que les plus gros.
• Les petits aliments peuvent être cuits à des températures plus élevées que les
plus gros, car ils nécessitent généralement moins de temps pour cuire.
• Pour de meilleurs résultats dans les plus brefs délais, faites frire les aliments en
couches individuelles.
• Il n’est pas nécessaire de jeter la plupart des aliments préparés dans l’huile
avant de les faire frire dans l’air. La plupart d’entre eux contiennent déjà de
l’huile et d’autres ingrédients qui améliorent la texture dorée et croustillante.
• Les hors-d’œuvre surgelés et les hors-d’œuvre font très bien frire dans l’air.
• Tournez les plateaux à mi-chemin du cycle de cuisson pour garantir des
résultats plus uniformes.
• Mélangez les aliments que vous préparez à partir de zéro, comme les frites,
avec de l’huile, dans un bol séparé, pour améliorer le brunissement et la texture
croustillante. Les aliments frais ne contiennent pas les mêmes huiles, graisses
et autres ingrédients qui contiennent des aliments préparés qui favorisent le
brunissement et la texture croquante.
• Lorsque vous préparez des frites avec des pommes de terre fraîches, assurez-
vous qu’elles sont complètement sèches avant de les faire cuire dans la
friteuse. Même les plus petites gouttes d’humidité les empêcheront de devenir
croquantes.
• Lorsque vous faites frire des aliments battus dans l’air, utilisez des pâtes
épaisses et pâteuses. Les pâtes fines, telles que celles utilisées pour faire

FRANÇAIS
FRANÇAIS
71
70
la tempura, fonctionneront et ne durciront pas assez rapidement dans une
friteuse traditionnelle.
• Couvrir les aliments battus de chapelure ou de riz soufflé, puis les saupoudrer
d’huile, peut aider à créer des versions croquantes et plus saines de vos
aliments frits préférés.
• Faites cuire le poulet jusqu’à ce qu’il atteigne une température interne de 165°F.
• La friteuse à air est idéale pour réchauffer des aliments. Pour réchauffer vos
aliments, réglez la température à 300 ° F pendant 10 minutes maximum. Utilisez
un thermomètre pour vous assurer que les aliments atteignent une température
interne de 165°F, la température sécuritaire des aliments.
• N’utilisez aucun plat ou récipient en papier ou en plastique dans la friteuse.
• Le papier d’aluminium et le papier parchemin ne peuvent être utilisés que dans
la friteuse à air sur les grilles de cuisson. Ne placez pas de papier d’aluminium
ou de papier parchemin dans le panier de la rôtissoire.
• Il n’est pas recommandé d’utiliser les outils de la friteuse pour autre chose que
leur utilisation prévue avec la friteuse à air, car cela pourrait endommager les
composants.
• N’utilisez pas l’égouttoir comme plaque à pâtisserie.
Nettoyage et Entretien
Ne lavez aucune partie de la friteuse au lave-vaisselle, à l’exception des
accessoires amovibles. Lavez toujours soigneusement les plateaux de cuisson,
les outils de rôtissoire et le plateau d’égouttement après chaque utilisation.
1. Lorsque la friteuse est débranchée et complètement froide, essuyez
délicatement l’extérieur avec un chiffon humide ou une serviette en papier.
Ne plongez jamais la friteuse à air ou son bouchon dans l’eau ou tout autre
liquide. La friteuse à air n’est pas lavable au lave-vaisselle.
2. Lavez toutes les pièces amovibles avec une éponge et de l’eau chaude
savonneuse. La barre de rôtissoire et le panier peuvent être lavés avec une
brosse de nettoyage douce. N’utilisez pas de produits de nettoyage abrasifs
ou de tampons à récurer. Toutes les pièces amovibles vont au lave-vaisselle.
REMARQUE: Si des miettes ou des particules d’aliments se logent dans
les charnières ou les crevasses de la porte de la friteuse, utilisez une petite
brosse pour les nettoyer. N’essayez pas de retirer la porte pour le nettoyer.
3. Bien sécher et conserver dans un endroit frais et sec.
71
Dépannage
Si des problèmes surviennent lors de l’utilisation de la friteuse à air, voici une
liste de solutions simples pour vous aider. Si le problème persiste, appelez notre
service à la clientèle pour obtenir de l’aide au 1-855-928-6748.
Problème La porte de la friteuse ne se fermera pas après avoir mis les
plateaux de cuisine à l’intérieur.
Solution Veillez à insérer les plateaux avec le côté incurvé en premier. Si
les plateaux ont été insérés à l’envers, la porte ne se fermera
pas.
Problème La friteuse ne s’allume pas.
Solution Assurez-vous que l’unité est correctement connectée et que la
porte de la friteuse est correctement fermée. Assurez-vous de
régler un temps de cuisson avant d’appuyer sur le bouton Start/
Stop.
Problème Le panier/barre de rôtissoire ne tourne pas.
Solution Assurez-vous d’appuyer sur le bouton ROTATE pour utiliser la
fonction rotissserie. Assurez-vous de ne pas dépasser la limite
de poids de 4 lb. Lors du chargement de la nourriture.
Problème Je sens un peu d’air sortir par la porte lorsque j’utilise la friteuse.
Solution C’est normal. La porte n’est pas hermétique. Il y a certains
points où l’air circule pour faciliter la ventilation.
Problème De la fumée blanche sort de la friteuse.
Solution La fumée blanche se produit souvent lorsque les aliments gras
sont cuits ou s’il reste de la graisse provenant d’une utilisation
précédente. Assurez-vous que les évents ne sont pas bloqués
et que vous nettoyez correctement la friteuse et les accessoires
après chaque utilisation.
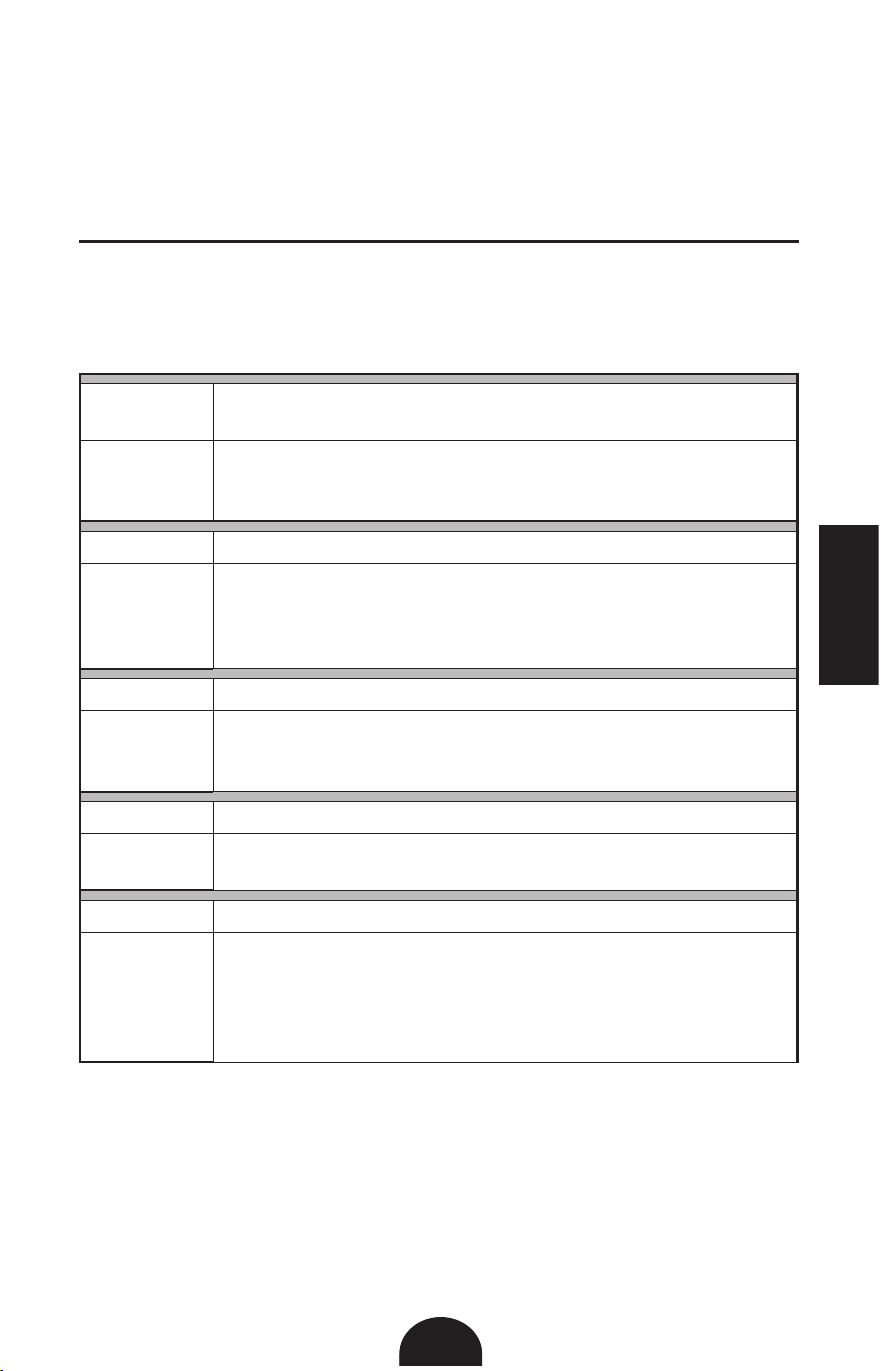
FRANÇAIS
FRANÇAIS
71
70
la tempura, fonctionneront et ne durciront pas assez rapidement dans une
friteuse traditionnelle.
• Couvrir les aliments battus de chapelure ou de riz soufflé, puis les saupoudrer
d’huile, peut aider à créer des versions croquantes et plus saines de vos
aliments frits préférés.
• Faites cuire le poulet jusqu’à ce qu’il atteigne une température interne de 165°F.
• La friteuse à air est idéale pour réchauffer des aliments. Pour réchauffer vos
aliments, réglez la température à 300 ° F pendant 10 minutes maximum. Utilisez
un thermomètre pour vous assurer que les aliments atteignent une température
interne de 165°F, la température sécuritaire des aliments.
• N’utilisez aucun plat ou récipient en papier ou en plastique dans la friteuse.
• Le papier d’aluminium et le papier parchemin ne peuvent être utilisés que dans
la friteuse à air sur les grilles de cuisson. Ne placez pas de papier d’aluminium
ou de papier parchemin dans le panier de la rôtissoire.
• Il n’est pas recommandé d’utiliser les outils de la friteuse pour autre chose que
leur utilisation prévue avec la friteuse à air, car cela pourrait endommager les
composants.
• N’utilisez pas l’égouttoir comme plaque à pâtisserie.
Nettoyage et Entretien
Ne lavez aucune partie de la friteuse au lave-vaisselle, à l’exception des
accessoires amovibles. Lavez toujours soigneusement les plateaux de cuisson,
les outils de rôtissoire et le plateau d’égouttement après chaque utilisation.
1. Lorsque la friteuse est débranchée et complètement froide, essuyez
délicatement l’extérieur avec un chiffon humide ou une serviette en papier.
Ne plongez jamais la friteuse à air ou son bouchon dans l’eau ou tout autre
liquide. La friteuse à air n’est pas lavable au lave-vaisselle.
2. Lavez toutes les pièces amovibles avec une éponge et de l’eau chaude
savonneuse. La barre de rôtissoire et le panier peuvent être lavés avec une
brosse de nettoyage douce. N’utilisez pas de produits de nettoyage abrasifs
ou de tampons à récurer. Toutes les pièces amovibles vont au lave-vaisselle.
REMARQUE: Si des miettes ou des particules d’aliments se logent dans
les charnières ou les crevasses de la porte de la friteuse, utilisez une petite
brosse pour les nettoyer. N’essayez pas de retirer la porte pour le nettoyer.
3. Bien sécher et conserver dans un endroit frais et sec.
71
Dépannage
Si des problèmes surviennent lors de l’utilisation de la friteuse à air, voici une
liste de solutions simples pour vous aider. Si le problème persiste, appelez notre
service à la clientèle pour obtenir de l’aide au 1-855-928-6748.
Problème La porte de la friteuse ne se fermera pas après avoir mis les
plateaux de cuisine à l’intérieur.
Solution Veillez à insérer les plateaux avec le côté incurvé en premier. Si
les plateaux ont été insérés à l’envers, la porte ne se fermera
pas.
Problème La friteuse ne s’allume pas.
Solution Assurez-vous que l’unité est correctement connectée et que la
porte de la friteuse est correctement fermée. Assurez-vous de
régler un temps de cuisson avant d’appuyer sur le bouton Start/
Stop.
Problème Le panier/barre de rôtissoire ne tourne pas.
Solution Assurez-vous d’appuyer sur le bouton ROTATE pour utiliser la
fonction rotissserie. Assurez-vous de ne pas dépasser la limite
de poids de 4 lb. Lors du chargement de la nourriture.
Problème Je sens un peu d’air sortir par la porte lorsque j’utilise la friteuse.
Solution C’est normal. La porte n’est pas hermétique. Il y a certains
points où l’air circule pour faciliter la ventilation.
Problème De la fumée blanche sort de la friteuse.
Solution La fumée blanche se produit souvent lorsque les aliments gras
sont cuits ou s’il reste de la graisse provenant d’une utilisation
précédente. Assurez-vous que les évents ne sont pas bloqués
et que vous nettoyez correctement la friteuse et les accessoires
après chaque utilisation.

73
72
Limited Warranty
This manufacturer’s product warranty extends to the original consumer purchaser of the
product. Neither the retailer nor any other company involved in the sale or promotion of this
product is a co-warrantor of this manufacturer warranty.
WARRANTY DURATION: The air fryer is guaranteed to be free from defects in material and
workmanship for a period of one (1) year from the date of purchase by the first user or gift
recipient, provided that the unit is used in accordance with the use and care instructions
supplied, and it is for household use only.
WARRANTY COVERAGE: This product is warranted against defective materials or
workmanship. This warranty is void if the product has been damaged by accident, in
shipment, unreasonable use, misuse, neglect, improper service, commercial use, repairs
by unauthorized personnel, or other causes not arising out of defects in materials or
workmanship. This warranty is effective only if the product is purchased and operated in
the USA and Canada. It does not extend to any units which have been used in violation
of written instructions furnished by the manufacturer or to units which have been altered
or modified or to damage to products or parts thereof which have had the serial number
removed, altered, defaced or rendered illegible.
A valid proof-of-purchase is required. A valid proof-of-purchase is a receipt specifying the
item, date purchased, and cost of the item. A gift receipt with the date of purchase and item
is also an acceptable proof of warranty.
Moving and/or perishable parts such as accessories, internal component parts, etc. which
are subject to normal wear and tear are excluded from the warranty.
WARRANTY DISCLAIMERS: This warranty is in lieu of all warranties expressed or implied,
and no representative or person is authorized to assume for manufacturer any other liability
in connection with the sale of our products. There shall be no claims for defects or failure
under any theory of tort, contract or commercial law including, but not limited to, negligence,
gross negligence, strict liability, breach of warranty and breach of contract.
WARRANTY PERFORMANCE: During the above one-year warranty period, a product
with a defect can either be repaired or replaced with a reconditioned comparable model (at
manufacturer’s option). The repaired or replacement product is in warranty for the balance
of the one year warranty period and an additional one-month period. There cannot be a
charge for such repair or replacement.
SERVICE AND REPAIR: If service is required for an appliance, you should first call toll free
1-855-928-6748 between the hours of 8:00 A.M. and 5:00 P.M. Monday through Thursday.
On Friday the hours are between 8:00 A.M. and 2:30 P.M. Eastern Standard Time.
If repairs become necessary during the warranty period, you might need to return the unit,
postage pre-paid to:
MARKET SOLUTIONS GROUP
125 BROAD AVENUE
UNIT C-18
NORTH BERGEN, NJ 07047
NOTE: Manufacturer cannot assume responsibility for loss or damage during incoming
shipment. For your protection, carefully package the product for shipment and insure it with
the carrier. Be sure to enclose the following items with your appliance: your full name, return
address, and daytime phone number; a note describing the problem you experienced; a
copy of your sales receipt or other proof of purchase to determine warranty status. C.O.D.
shipments cannot be accepted.
For spare parts or assistance not requiring the return of the product itself, please contact
our Customer Service Department at 1-855-ZAVOR4U (1-855-928-6748).
ZAVOR PRODUCT REGISTRATION
Register your product on our website at www.zavor.us/register or scan below:

The manufacturer reserves the right to modify the
terms described in this manual.
El fabricante se reserva el derecho de modicar
los modelos descritos en el presente libro de
instrucciones.
Le fabricant se reserve le droit de modier les
modèles décrits dans la brochure.
P.O. Box 704
Lyndhurst, NJ 07071
www.zavoramerica.com
1-855-928-6748
Version 2.00