Documents: Go to download!
User Manual
- User Manual - (English)
- Quick Start Manual - (English)
- Installation Intructions - (English)
- Energy Guide - (English)
- Operation
- Control Panel
- Clothing Care
- Maintenance
- Troubleshooting
Table of contents
User manual Washer
Operation
Before Washing
Prepare Wash Load
Empty Pockets and Cuffs
Make sure all pockets are empty and turn them inside out. One bobby pin, metal or plastic toy, nail or sharp object in a load can catch laundry, cause tears and plug the pump. Facial tissue left in a pocket will produce extreme “lint”. A crayon or lipstick in a wash load may cause stains that cannot be removed. Roll down cuffs and shake out grass, sand and gravel.
Strings on clothing such as hooded sweatshirts may get caught in or around the agitator. Remove the strings if possible or tie them together.
Mend Rips and Tears
Little holes can become bigger in the washer. Mend holes and tears before placing garments in the washer.
Close Zipper and Fasten Hooks
These can catch on garments in a wash load and tear them. Tie belts and sashes so they won’t wind around clothes.
Check For Colorfastness
Squeeze a portion of garment in warm or hot sudsy water. If the color bleeds or runs, wash the item separately in cold water.
Sort Items
Different items use different wash cycles and temperatures. Always follow the manufacturer’s care label. Proper sorting is easy if you follow a few guidelines:
1. Sort by Color: Separate items into loads of whites, darks, lights and non-colorfast.
2. Sort by Fabric and Construction: Separate items into loads of cottons/linens, permanent press, synthetics/blends/ poly knits, and delicates.
3. Sort by Temperature: Separate items into loads that can be washed in cold, warm or hot water.
4. Sort by Type and Amount of Soil: Heavily soiled clothes will need extra treatment. Lightly soiled clothes can become dingy if washed with heavily soiled items.
5. Sort Lint “Shedders” From Lint “Receivers”: Some fabrics attract lint and should not be washed with lint-shedding loads. Lint shedders are cottons, terry towels, chenille bedspreads, rugs and clothes that have been heavily bleached. Lint receivers are synthetics, permanent or durable press, knits (including socks), corduroy, and other smooth fabrics.
Pretreat
Pretreat shirt collars and cuffs with a pretreat product or liquid detergent when placing them in the washer. Before washing, treat special stains individually.
Loading the Washer
Load Articles
NOTE: Always add detergent first.
- Load larger and heavier items first so they are at the bottom of the washtub.
- Load items by the amount of space they take up, not by their weight.
- Mix large and small items in a load to get the best washing results. For example, don't wash a single large item such as a throw rug. Add several smaller items to avoid an out-ofbalance condition.
- An out-of-balance load may limit spin speeds.
- The left decimal point on the display may blink on/off at the end of a cycle if the load did not reach maximum speed. This can indicate an unbalanced load.
- Washing buoyant items, such as pillows, is not recommended.
- Do not wash a large, bulky, king-size comforter.
- Drop items loosely into the washtub. The bulk of the clothes rather than the weight will determine load size. Do not pack items in or wrap them around the agitator. Overloading can cause poor cleaning, excessive wrinkling and tears.
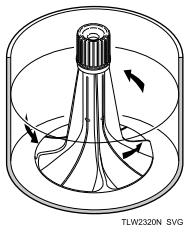
- Items should move freely through the wash water for best cleaning results.
- When washing very large items, do not fill washtub as full as with other loads.
Load Size - Auto Fill Water Levels
- This washer has an Auto Fill feature. It will automatically select the proper water level for the load size and type of fabric that is being washed. Auto Fill is recommended for the best wash performance in all cycles.
- Auto Fill works in multiple stages. During the first fill step of the cycle, water will fill to the minimum level programmed for the specific cycle selected. Once the wash step begins, the control starts sensing the load. Once sensing is complete more water may be added to optimize wash results.
- If you pause the cycle after it started, the Auto Fill sensing stage will begin again once the cycle is resumed. It will determine if any items have been added and if more water is needed.
- Overloading the washtub can result in poor washing and rinsing.
Load Size - Manual Water Levels
- Although the Auto Fill selection is recommended for the best wash performance in all cycles, there are three manual load size selections as well.
- The water level in your washer should fit the size of your wash load. Small loads will use lower water levels. There must be enough water in the washtub to allow items to move and turn over freely.
WRONG Water Level for Size of Load

CORRECT Water Level for Size of Load

- Overloading the washtub can result in poor washing and rinsing.
IMPORTANT: If in doubt when using a manual selection, always use a larger load size. Most average loads will require the Large Load Size setting. Failure to have the correct volume of water relative to the load may decrease washer performance.
| Manual Load Sizes | |
| Small | 1-2 permanent press dress shirts or 2 pillow cases or 1 lightweight dress or similar size load |
| Medium | 6-7 permanent press shirts or 2 twin sheets, 2 pillow cases or 8 standard bath towels, 6 wash cloths |
| Large | 8-9 shirts, 5 pair polyester pants or 2 queen size sheets, 4 pillow cases, 2 nightgowns, 1 pair men’s pajamas or 1 queen size bedspread |
The manual load size water levels will vary depending on the wash cycle selected. If the wrong load size is selected, the machine may add more water.
Wash Temperature
Hot
Hot water is the most effective for cleaning, but it is not recommended for all fabric types (read labels).
Warm
The Warm Wash is useful for providing a thorough cleaning on light and moderately soiled clothing without damaging fabric or adding to color fading. Warm water also reduces wrinkling.
Warm water can also be used in the rinse water. Use with noncolorfast or dark colors, permanent press, silks, woolens, nylon, and acrylic.
Cold
The Cold Wash is ideal for delicate items. Although its cleaning abilities are not as great as with hot or warm water, it is useful for colors that bleed easily and for sensitive fabrics.
The Warm/Warm temperature selection will use warm rinse water. All other rinses use cold water. It is the most beneficial for fabrics. Cold rinses reduce wrinkling and color fading. In addition, cold rinses will save money and energy.
NOTE: In wash temperatures colder than 60°F [16°C], detergents do not dissolve well. This may cause ineffective cleaning, or lint and residue to form.
NOTE: Always follow manufacturer’s care labels.
Water Supply Temperature
Water temperature is determined by the temperature of the incoming water supply. The washer does not heat or cool the water.
For example, northern climates will have much colder incoming water during the winter months. Southern climates will have much warmer cold water during the summer months.
Wash Temperature Guide
| Water Temperature | Use | Comments |
| HOT |
• Sturdy whites and colorfast items • Work clothes • Soiled items • Diapers |
• Best cleaning for items soiled with oily or greasy stains, grass, or ink. |
| WARM |
• Light and moderately soiled items • Non-colorfast or dark colors • Permanent press • Silks, woolens, nylon, acrylic |
• Rinsing of some items • Reduces wrinkling in permanent press fabrics • Less fading • Reduces shrinking in knits |
| COLD |
• Non-colorfast fabrics • Extra delicate clothing |
• Saves energy • Reduces color fading • Reduces wrinkling • Reduces shrinking |
Energy
You can save energy when washing by following these guidelines:
- Heating water accounts for the greatest energy expense when washing. Save on heating water by using warm or cold washes.
- Wash full loads, but do not overload.
- Use Soak option for heavily soiled items to reduce the need for higher soil level selections.
Control Panel
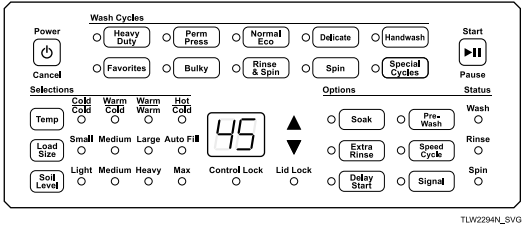
Digital Display
The two-digit display is used to show the time remaining in a cycle.
If the cycle time is over 99 minutes the control will display 1H, 2H, etc., and then the additional minutes over one or two hours. If the cycle time is over nine hours, the cycle will round up to the nearest hour and the control will display 10 and then Hr.
At the end of a cycle, the control will display 01 while the machine checks to make sure it is safe to unlock the lid. Once the lid is unlocked, the display will show 00 and the red Lid Locked status light will turn off.
When the control is powered off, the right-most decimal in the display will flash every five minutes to indicate that the machine is in Idle Mode.
The display also shows diagnostic codes.
If no keypads have been pressed for five minutes after a cycle is finished, the control will enter Idle Mode. A light in the lower right corner of the digital display will flash quickly once every five minutes. Press the Power/Cancel keypad to exit this mode and power the display for cycle/option selection. This light will flash again after five minutes when it re-enters Idle Mode.
Audio Signals
The audio signal that sounds when a keypad is pressed can be turned on or off.
Press and hold both the Delicate and Spin keypads at the same time to turn the keypress audio signal on or off.
The audio signal that sounds to resume a paused cycle can be turned on or off.
Press and hold both the Temp and Soil Level keypads at the same time to turn the resume audio signal on or off.
Cycles
The following cycle descriptions will help determine which cycle to choose depending on the type of laundry being washed. The descriptions are standard settings that may be modified using the Selections and Options.
The last cycle that is set, including selections and options, is saved even if the control is turned off.
Heavy Duty
Use for sturdy items, like play or work clothes, heavily soiled jeans, T-shirts, etc. The wash time selection will depend on the type of fabric and the amount of soil. For the best results when cleaning heavily soiled items, use a higher soil level selection. Lightly soiled items require less wash time.
Perm Press
Use for permanent press items and synthetics. The final spin is a medium spin speed.
Normal Eco
This cycle uses a spray rinse to reduce water consumption. It also uses less hot water. This cycle is recommended for washing everyday cottons and linens. If using fabric softener in this cycle, select the Extra Rinse option.
Delicate
Wash items with delicate and/or gentle on the garment tag in this cycle. Due to this cycle’s uniquely designed motion, stiff jeans and throw rugs also wash well in this cycle.
This cycle is designed to gently move items through the water so it fills to a higher water level. It also has a low speed final spin.
Handwash
Wash items with handwash on the garment tag in this cycle. This cycle is designed to gently move items through the water so it fills to a higher water level. It includes a gentle agitation only, a short wash time, cold water, and a very low spin.
Favorites
The Favorites keypad allows the user to save different cycles, selections and options for later use. Nine favorite cycles can be saved.
- Press the Favorites keypad. The control will display the cycle and modifier settings for the first Favorite Cycle. The 2- digit display will switch between F1 and the cycle time for the selected cycle. If a Special Cyle is selected, the 2-digit display will switch between F1, P1 and the cycle time.
- Press the keypads for the desired cycle, selection and option settings.
- Press the Favorites, Start/Pause or Delay Start keypad to save the current settings.
- Press the Power/Cancel keypad to discard the current settings.
- The next Favorite cycle, F2, will be displayed.
After the cycles have been saved, they can be accessed using the up and down arrow keypads after pressing the Favorites keypad.
Options
The following options can be used to modify the currently chosen cycle, signal volume and control lock.
Soak
The Soak option is added to the beginning of the cycle. Use for heavily soiled or stained clothing. The washtub will fill with water, agitate for a reduced period of time, and pause for the set amount of time.
The Soak LED will flash to indicate that you can set the amount of soak time by pressing the Soak keypad again or the up and down arrow keypads. The time will increase by 15 minutes up to an hour and then go up by one hour increments. The maximum soak time is 24 hours.
The soak LED also will flash during any soak portion of the cycle.
Pre-Wash
The Pre-Wash option adds an additional eight-minute wash before the selected cycle. At the end of the pre-wash, the dirty wash water will drain from the tub and the machine will sound a three-second tone to indicate that pre-wash has completed. The lid will unlock so any additional laundry supplies may be added.
Push the start button to resume the selected cycle. If there is no activity for two minutes, the cycle will resume automatically and the machine will refill with water and continue with the selected cycle.
Extra Rinse
This Option will provide an additional rinse to the selected cycle. With the Warm/Warm temperature selection this rinse will use warm water. All other temperature selections use cold water.
Speed Cycle
Selecting the Speed Cycle Option will shorten the wash agitate and final spin times by 30%.
Delay Start
Pressing the Delay Start Option will allow the cycle to begin up to 24 hours later. Pressing it once will delay the cycle by one hour and 1h will display on the control. Press the Delay Start keypad again or the up arrow keypad. The time will increase by one hour. Press the Start/Pause keypad to begin the countdown.
While setting the Delay Start Option, the cycle time and the Delay Start keypad light will flash (1 second on/off).
After the Delay Start Option is started, the Delay Start keypad light will flash (1 second on/off).
Signal
Pressing the Signal keypad will change the end of cycle signal volume. There are four settings: Off, Low, Medium, High.
Control Lock (Secure keypad)
Pressing and holding the Signal keypad for three seconds will turn on the Control Lock. The Control Lock status light will be lit. While Control Lock is on, no other keypad presses are allowed. Press and hold the Signal keypad again to turn the option off.
Status
The active Status light will flash at the beginning of the cycle. The Status lights are lit throughout the cycle to show what part of the cycle is running.
| Light | Description |
| Wash | The Wash status light is lit during the first fill step and the wash step of the cycle including Pre-Wash and Soak, if selected. |
| Rinse | The Rinse status light is lit during the rinse portions of the cycle including Extra Rinse, if selected. |
| Spin | The Spin status light is lit during the final spin portion of the cycle. |
| Lid Lock | The Lid Lock status light will flash when trying to lock. It is lit any time the lid is locked. |
Table 4
To Wash Clothes
IMPORTANT: Before using your new washer, make sure the washer cord is connected to an appropriate electrical outlet that is properly installed and connected to a protective earth/ground. Make sure the washer hoses are connected to the hot and cold water faucets, and that the faucets are turned on. Be sure the drain hose is not kinked and is inserted into a drain. Refer to the INSTALLATION INSTRUCTIONS for details of proper washer installation.
IMPORTANT: Prior to first wash, use an all purpose cleaner, or a detergent and water solution, and a damp cloth to remove shipping dust from inside of wash drum.
1. Get the clothes ready for washing. Empty pockets and cuffs. Sort items into separate loads. Pretreat stains and heavily soiled areas.
IMPORTANT: Remove all sharp objects from laundry to avoid tears and rips to items during normal machine operation.
2. Measure and add low sudsing, High Efficiency (HE) detergent to the washtub. Follow instructions on detergent package for amount to use.
NOTE: High efficiency (HE) detergent is recommended for use in this machine. Look for the HE logo or “high efficiency” on the detergent’s label.
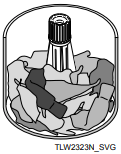
3. Add clothes loosely into the washtub (16 lbs. [7.2 kg] maximum dry clothes load).
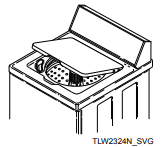
4. Close the lid. The washer will not fill, agitate or spin with the lid open.
5. If not already on (control lights will be lit), turn on the washer. Press the Power button to turn on the washer.
6. Select the cycle according to the type of fabric being washed. Refer to Cycles section. If the selected cycle is not the correct cycle for the fabric being washed, you may change the cycle selection at any time until the first wash fill is complete.
NOTE: The Normal Eco cycle is recommended for everyday cottons and linens.
7. If desired change the Selections and Options settings.
8. Press the Start/Pause button to begin the cycle. The lid will stay unlocked during the first fill so you can easily add items. The lid will lock automatically after the initial wetdown fill and before agitation begins.
NOTE: Lid must be closed for fill, agitation and spin to start.
During the first fill when the Auto Fill Load Size is selected, water fills to the minimum level programmed for the specific cycle selected. Once the wash step begins, the control starts sensing the load. Once sensing is complete more water may be added to optimize wash results.
The washer will stop (pause) shortly before the wash and rinse spins. They are a normal part of the cycle.
The lid will automatically unlock at the end of the cycle after a short pause to ensure there is no washtub movement.
Pausing the Cycle
Although the lid stays unlocked during the first fill so you can add items, you can also pause the cycle and unlock the lid.
NOTE: You can’t pause a cycle right after starting it. There is a short delay while the machine is energizing.
If the lid is opened during fill or while Delay Start is active, the cycle will pause and the display will alternate between St and the remaining time. The Start/Pause button must be pressed to restart the cycle. If the lid has been reclosed and the Start/ Pause button has not been pressed after 10 seconds, a chime will sound as a reminder that the cycle has not been restarted
. To pause a running cycle, press the Start/Pause button once. The lid will unlock after about 10 seconds if the cycle is in agitate or up to 60 seconds if the cycle is in spin. The display will alternate between St and the remaining cycle time.
After closing the lid, press the Start/Pause button once more to re-start the cycle. The cycle will resume after a 10-second delay. The washer’s controls are reactivating.
The Auto Fill sensing stage will begin again after the cycle has been paused. If you pause the cycle to add an item, once the cycle resumes it will sense if more water needs to be added or not.
Manual Soaking
Do not fill the washer and open the lid or press the Start/ Pause button to perform a soak cycle. Use the Soak option on the control panel to perform this operation.
Optional Features
Bleach Dispenser
The bleach dispenser is located in the left front corner, under the lid.
Use liquid bleach in the dispenser. Powdered bleach must not be used in the dispenser. Add powdered bleach to the wash water.
Use no more than one cup chlorine bleach for large loads, three-quarters cup for medium and one-half cup for small loads.
Carefully pour recommended amount of bleach into the dispenser before the start of the wash cycle.
Be careful not to spill undiluted bleach. It is a strong chemical and can damage some fabrics if it is not properly diluted.
Bleach is very corrosive and overfilling the dispenser can cause chemical damage to the washer components. Components damaged by bleach are not covered under the product warranty.
Fabric Softener Dispenser
Fabric softener should not be used with the Normal Eco cycle unless the Extra Rinse option is also selected.
To Use Dispenser
After the clothes are loaded into the washtub and before the start of the WASH cycle, pour the proper amount of liquid fabric softener into the bottle measuring cap (refer to bottle directions). Pour into dispenser.
The large fabric softener dispenser allows for the fabric softener to be diluted with water. We recommend adding water up to the fill level. Do not exceed tip of arrow which indicates correct fill level. Over-filling can allow fabric softener to spill onto the clothes, causing stains on clothes if the softener comes into contact with detergent suds.
Setting the water level to medium or higher will result in better performance from the fabric softener.
The fabric softener will remain in the dispenser during the wash fill, agitation and spin. At the end of the wash spin, the liquid fabric softener will be dispensed into the washtub through the slots in the agitator and will be mixed with the incoming rinse water.
To Clean the Dispenser
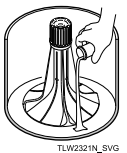
- Grasp the entire fabric softener assembly firmly with both hands and place your thumbs inside the hole at the top.
- Pull quickly up and towards you. The assembly will come off the agitator.
- Lay down a cloth on a hard, flat surface.
- Lay the assembly on the cloth on its side so the vertical lines are facing up.
- Place your palms on the ridge at the base of the dispenser housing and press down firmly. The assembly will split apart for easy cleaning.
- Soak housing, cup and funnel in hot soapy water. Use a small brush to scrub if needed.
- Rinse housing, cup and funnel clean.
- The inside of the agitator can also be cleaned.
- After cleaning, install dispenser funnel, cup and housing until they click into place.
- Push assembly directly downward onto top of agitator until firmly snapped in place.
IMPORTANT: When adding detergent to the wash load, DO NOT allow any detergent to enter the softener dispenser cup. If this happens, refer to the cleaning instructions.
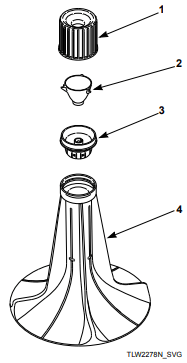
1. Dispenser Housing
2. Dispenser Cup
3. Dispenser Funnel
See other models: ATGE9ABLACK AFNE9BAW01ADGE8BGASN AWNE92 ATGE9AGASLP ADEE9R
4. Agitator
Use Tips
- Fabric softener spilled onto garments may cause staining.
- To remove, dampen stain and rub with bar soap. Wash as usual.
- Liquid fabric softeners will be dispensed during the first rinse and should not be combined with bleach, bluing, starch, detergents, soaps or packaged water conditioners.
- Fabric softener is not to be used in dispenser when using
- Prewash cycle, if available.
- When adding detergent to wash water, do not allow any to enter into softener dispenser cup, as softener will become gummy.
To prevent softener buildup, the dispenser can be filled with clean water for automatic cleaning. This can be done in washing cycles other than when softener is used.
Clothing Care
Clothing Concerns
To keep clothes looking white or bright, use good washing practices at all times to prevent a gradual build-up of soil or water hardness minerals on them. If you notice that your clothes are not as bright as they should be, take corrective measures immediately
| Problem | Cause | Solution |
| Gray or Dingy Clothes | Insufficient Detergent |
Add more detergent to washtub before loading clothes. Mild detergents are not suitable for average soil. |
| Improper Sorting | Wash whites separately. Separate light from heavily soiled items. Clothes can pick up soil from dirty wash water. | |
| Nonphosphate Detergent and Hard Water | Follow package directions. Soften water if possible. | |
| Water Not Hot Enough | White clothes will stay whiter with hot wash water. Increase temperature. | |
| Overcrowding Washer | Clothes must circulate freely through the water for best results. | |
| Yellowed Clothes | Unremoved Soil | Skin soil is hard to remove. Check hem edge of sheets and pillowcases, bottom end of t-shirts, etc. If this portion is white and center is yellow, the fabric contains unremoved soil. Use sufficient detergent and a hot wash. Chlorine bleach may be needed. |
| Clothes Stained from Iron in the Water | To test for an iron stain, use a rust remover that is recommended for use with washing machines on a portion of the garment. Follow bottle directions for larger items. | |
| Older Clothes | Some white fabrics turn yellow with age and cannot be whitened. | |
| Clothes Tearing or Damaged | Improper Use of Chlorine Bleach |
No correction for bleach damaged clothes. Always measure and dilute bleach. Take extra care to avoid unwanted spilling. |
| Insufficient Precare | Fasten all hooks and zippers. Mend tears. Remove objects from pockets. | |
| Overcrowding or Overloading | Make sure all items can move freely during agitation. | |
| Excessive Lint | Improper Sorting | Fabrics that shed lint cannot be washed with fabrics that receive lint. |
| Insufficient Detergent/Non-phosphate Detergent | Use enough detergent so lint remains suspended in water and flushed out. Do not oversuds the water. | |
| Mixing Fabric Types |
Knits and permanent press attract lint. Wash these only with similar items. Use fabric softener in rinse water. |
|
| Wrinkling | Improper Sorting | Heavy items like towels should not be washed with light items like nightgowns. |
| Improper Cycle | Make sure cycle selected is appropriate for type of clothes. | |
| Improper Temperature | Using a warm or cold wash and a cold rinse reduces wrinkling. | |
| Too Many Clothes in Washer | Clothes must circulate freely through the water for best results. |
Maintenance
Cold Weather Care
If the unit is delivered on a cold day (below freezing), or is stored in an unheated room or area during the cold months, do not attempt to operate the washer until it has had a chance to warm up. Water from the previous cycle may remain.
Winterizing the Washer
Follow these steps to prevent damage from freezing water.
1. Unplug washer.
2. Remove two screws from bottom of front panel.
3. Remove hose from drain pump.
4. Let water drain out and reconnect hose.
5. Turn off water supply.
6. Remove fill hoses and allow them to drain.
7. Use compressed air to blow water out of water valve:
a. Plug washer into electrical power.
b. Select a Warm wash temperature.
c. Start a cycle. This will open both sides of water valve.
d. Use compressed air to blow out any residual water.
Care of Your Washer
Use only a damp or sudsy cloth for cleaning the control panel. Some cleaning products may harm the finish on the control panel or damage the interior. DO NOT use products that contain alcohol on the control panel. Wipe the panel dry after cleaning.
Wipe the washer cabinet as needed. If detergent, bleach or other washing products are spilled on the cabinet, wipe immediately. Some products will cause permanent damage if spilled on the cabinet.
Do not use scouring pads or abrasive cleansers on control panel or cabinet.
The washtub will need no particular care though it may need rinsing or wiping after some unusual loads have been washed. This also may be necessary if too little detergent has been used.
Leave the lid open to allow the inside of the washer to dry out after use. This helps prevent musty odors from developing.
The agitator should not be removed except for service. The washtub is designed to be self cleaning.
Replacing Hoses
Hoses and other rubber parts deteriorate after extended use. Hoses may develop cracks, blisters or material wear from the temperature and constant high pressure they are subjected to.
ll hoses should be checked on a monthly basis for any visible signs of deterioration. Any hose showing the signs of deterioration listed above should be replaced immediately. All hoses should be replaced every five years.
Flood safe hoses often can be the cause for no fill or slow fill issues. They are not recommended. Only use replacement fill hoses from the manufacturer.
Filter Screens
Check the filter screens in the fill hoses for debris or damage every six months. Clean or replace them if necessary.
If the washer is filling with water slower than normal, check the filter screens. Clean or replace them if necessary.
Order filter screen Part No. 803615 from the nearest authorized parts distributor.
Vacations and Extended Non-Use
IMPORTANT: To avoid possible property damage due to flooding, turn off the water supply to the washer whenever there will be an extended period of non-use.
Troubleshooting
Try these troubleshooting tips before making a service call.
They may save you time and money.
| Washer Symptom | Possible Cause/Solution |
| Won't Fill |
|
| Won't Start |
|
| Won't Agitate |
|
| Won't Spin |
|
| Stops/Pauses During Cycle |
|
| Won't Drain |
|
| Water Leaks |
|
| Is Noisy |
|
| Load Is Too Wet |
|
| Wrong Water Temperature |
|
| Too Many Soap Suds |
|
| Control not responding to keypad selections |
|
| Washer Symptom | Possible Cause/Solution |
 on digital display on digital display |
|
 on digital display on digital display |
|
 on digital display on digital display |
|
 on digital display on digital display |
|
 on digital display on digital display |
|
 on digital display on digital display |
|
 on digital display on digital display |
|
 on digital display on digital display |
|
 on digital display on digital display |
|
| Left Decimal Point blinking on display one second on/one second off |
|
 on digital display on digital display |
|
 on digital display on digital display |
|
 , cycle time remaining on digital display , cycle time remaining on digital display |
|
Other  Codes Codes |
|
