User manual Motorcycle
Operation Guide
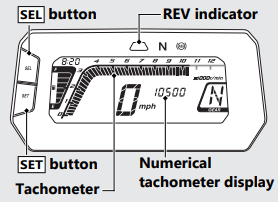
Instruments
Setting Mode A
If the SET button is not pressed for about 30 seconds, the control is automatically switched from the setting mode to the ordinary display.
If the SET button is not pressed for about 30 seconds, items in the process of being set will be discarded and only items where settings have been finalised will be applied. Only if the ignition switch is turned to the OFF position will items in the process of being set and those that are finalised be applied.
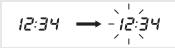
1 Clock setting:
1 Turn the ignition switch to the ON position.
2 Press and hold the SEL and the SET buttons until the hour digits start flashing.
3 Press the SEL button until the desired hour is displayed.
- Press and hold the SEL button to advance the hour fast.
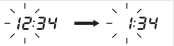
4 Press the SET button. The minute digits start flashing.

5 Press the SEL button until the desired minute is displayed.
- Press and hold the SEL button to advance the minute fast.

6 Press the SET button. The clock is set, and then the display moves to the backlight brightness adjustment.
2 Backlight brightness adjustment:
You can adjust the brightness to one of five levels.
1 Press SEL button. The brightness is switched.
2 Press SET button. The backlight is set, and then the display moves to the changing the speed and mileage unit.
3 Changing the speed and mileage unit:
1 Press SEL button to select either "mph" and "mile" or "km/h" and "km".

2 Press SET button. The speed and mileage unit is set, and then the display moves to the changing the fuel mileage meter unit.
4 Changing the fuel mileage meter unit:
1 When the “km/h” for speed and “km” for mileage are selected
- Press SEL button to select “L/100km” or “km/L”.
Canada only
When the “mph” for speed and “mile” for mileage are selected
Press SEL button to select “mile/L” or “mile/gal”.
- When "mile/gal" is selected, the unit of the fuel consumption is changed to "gal".
2 Press SET button. The fuel mileage meter unit is set, and then the display moves to the ordinary display.
Setting Mode B
If the SET button is not pressed for about 30 seconds, the control is automatically switched from the setting mode to the ordinary display.
If the SET button is not pressed for about 30 seconds, items in the process of being set will be discarded and only items where settings have been finalised will be applied. Only if the ignition switch is turned to the OFF position will items in the process of being set and those that are finalised be applied.
1 Setting of REV indicator:
You can change the setting of the REV indicator.
REV indicator is blinking while setting.
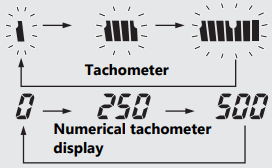
1 To change the setting mode B, turn the ignition switch to the ON position while pressing SEL button until the display check is finished. The blinking of bar segment in the tachometer shows the currently applied REV indicator lighting RPM, and the numerical tachometer display shows it.
- Tachometer bar segment is displayed as conventional display, regardless of set up display method.
2 Each time SEL button is pressed, the lighting RPM set value increase by 250 r/min (rpm) (one segment). When the set value exceeds the allowable range, the RPM set value automatically returns to 4,000 r/min (rpm).
- Press and hold the SEL button to advance the REV indicator lighting setting value fast.
Available Setting Range
4,000 r/min (rpm) -to- 10,500 r/min (rpm)
3 Press SET button. The REV indicator lighting RPM is set, and then the display moves to the setting of REV indicator lighting interval RPM.
At the same time, the blinking bar segment shows the currently applied setting originated from the REV indicator lighting RPM and the numerical tachometer display shows the REV indicator lighting interval RPM.
4 Each time SEL button is pressed, the number of REV indicator lighting interval RPM is switched among 0 r/min (rpm), 250 r/min (rpm) and 500 r/min (rpm) in this order.
Ex When REV indicator lighting RPM is setting 8,000 r/min (rpm) and REV indicator lighting interval RPM is 250 r/min (rpm).
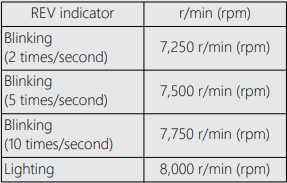
If the REV indicator lighting interval RPM is 0, the REV indicator starts to lighting when reaching to the REV indicator lighting RPM.
5 Press SET button. The REV indicator lighting interval RPM is set, and then the display moves to the brightness adjustment of the REV indicator.
The REV indicator switches from blinking to lighting.
6 Press SEL button. The brightness is switched.
You can adjust the brightness to one of five levels.
7 Press SET button. The brightness of the REV indicator is set, and then the display moves to the display setting of the tachometer.
2 Changing of tachometer display mode:
You can change the display mode of the tachometer.
- Press SEL button to switch the display mode of tachometer.
- Press SET button. The currently selected displaying mode is set, and the control returns to the ordinary display
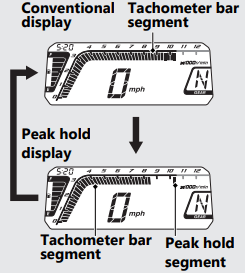
Conventional display
Shows the engine RPM on the tachometer bar segment.
Peak hold display
Shows the engine RPM on the tachometer bar segment and peak hold segment.
The peak hold segment keeps to show the maximum engine RPM temporarily.
Ex Engine revolutions per minutes 10,500 r/min (rpm)
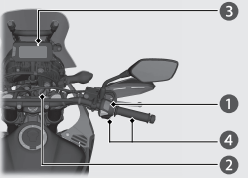
ABS function on the rear wheel
To turn off the ABS function on the rear wheel
- Stop the vehicle.
- Press and hold the rear ABS switch until the rear ABS OFF indicator starts flashing, then release the switch while the indicator is flashing.
- The rear ABS OFF indicator is on, when the ABS function on the rear wheel is turned off.
- The ABS function on the rear wheel remains on, if the switch is released after indicator stops flashing.
To turn on the ABS function on both wheels
- Stop the vehicle.
- Press and hold the rear ABS switch until the rear ABS OFF indicator is turned off, or turn the ignition switch to the OFF position and the ON position.

Starting the Engine
Start your engine using the following procedure, regardless of whether the engine is cold or warm.
NOTICE
- If the engine does not start within 5 seconds, turn the ignition switch to the OFF position and wait 10 seconds before trying to start the engine again to recover battery voltage.
- Extended fast idling and revving the engine can damage the engine, and the exhaust system.
- The engine will not start if the throttle is fully open.
- Make sure the engine stop switch is in the
 (Run) position.
- Turn the ignition switch to the ON position.
- Shift the transmission to Neutral
 indicator to come on). Alternatively, pull in the clutch lever to start your vehicle with the transmission in gear so long as the side stand is raised.
- Press the start button with the throttle completely closed.
- If you cannot start the engine, open the throttle slightly (about 1/8 in (3 mm), without freeplay) and press the start button.
About 1/8 in (3 mm), without freeplay
If the engine does not start:
- Open the throttle fully and press the start button for 5 seconds.
- Repeat the normal starting procedure.
- If the engine starts, open the throttle slightly if idling is unstable.
- If the engine does not start, wait 10 seconds before trying steps (1) & (2) again.
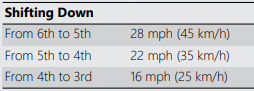
Shifting Gears
Your vehicle transmission has 6 forward gears in a one-down, five-up shift pattern.
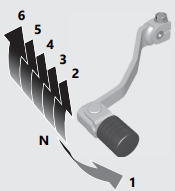
If you put the vehicle in gear with the side stand down, the engine will shut off.
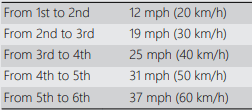
Recommended Shift Points
Shifting Up
NOTICE Improper shifting can damage the engine, transmission, and drive train. Also, coasting or towing the vehicle for long distances with the engine off can damage the transmission.
Refueling
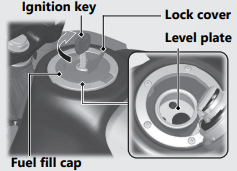
Do not fill with fuel above the level plate.
Fuel type: Unleaded gasoline only
Recommended fuel octane number: Pump Octane Number (PON) 86 or higher.
Tank capacity: 3.38 US gal (12.8 L)
Opening the Fuel Fill Cap
Open the lock cover, insert the ignition key, and turn it clockwise to open the fuel fill cap.
Closing the Fuel Fill Cap
- After refueling, push the fuel fill cap closed until it locks.
- Remove the key and close the lock cover.
- The key cannot be removed if the fuel fill cap is not locked.
Storage Equipment
Helmet Holder
The helmet holder is located on the left side of the vehicle.
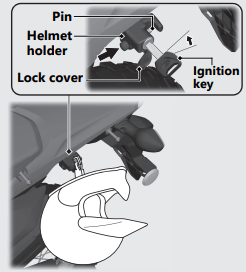
Unlocking
Open the lock cover, insert the ignition key and turn it counterclockwise.
Locking
- Hang your helmet on the holder pin and push it in to lock.
- Remove the key and close the lock cover.
- Use the helmet holder only when parked.
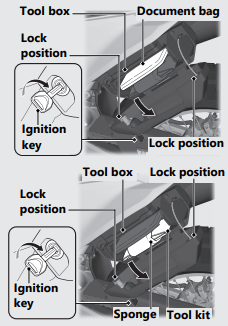
Document Bag and Tool Kit
The document bag and tool kit are stored in the tool box located on the left side of the vehicle.
Open
Insert the ignition key and turn it clockwise to open the tool box.
Close
Close the tool box and push the lock positions until it is firmly closed. Remove the ignition key.
- Make sure the tool box is closed before riding.
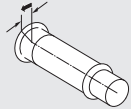
- As shown in the illustration, wrap the tool kit with a sponge and store it in the tool box.
Maintenance
Maintenance Fundamentals
Pre-ride Inspection
To ensure safety, it is your responsibility to perform a pre-ride inspection and make sure that any problem you find is corrected. A preride inspection is a must, not only for safety, but because having a breakdown, or even a flat tire, can be a major inconvenience.
Before riding on-road, or returning to pavement after riding off-road, take a few moments to walk around your vehicle and look for any loose parts or anything that appears unusual.
Also check the following.
- Tire tread wear and air pressures are within limits. -> P. 69
- Lights, horn, and turn signals operate normally.
- Check the condition of the drive chain. Adjust slack and lubricate as needed. -> P. 67
Check the following items if you are carrying a passenger or cargo:
- Combined weight is within load limits. -> P. 132
- Cargo is secured properly.
Check the following items after you get on your vehicle:
- Throttle action moves smoothly without binding. -> P. 93
- Brake lever and pedal operate normally.
- Check the fuel level and refuel when needed. -> P. 14, -> P. 49
- Engine stop switch functions properly. -> P. 43
Check the following items at regular intervals:
- Oil level is between the upper and lower level marks. -> P. 79
- Brake fluid level is
Front: above the LOWER level mark. -> P. 83
Rear: above the LWR level mark. -> P. 83
- Engine coolant level is between the UPPER and LOWER level marks. -> P. 81
- Side stand functions properly. -> P. 86
Before riding off-road check all of the preceding plus the following:
- Make sure spokes are tight. Check the rims for any damage. -> P. 89
- Oil level is between the upper and lower marks. -> P. 79
- Check the fuel level and refuel when needed. -> P. 14, -> P. 49
- Be sure the fuel fill cap is securely fastened. -> P. 49
- Clutch lever operates smoothly. Adjust freeplay if necessary. -> P. 90
- Check for loose cables and other parts, and anything that appears abnormal.
- Use a wrench to check the tightness of all accessible nuts, bolts and fasteners.
Replacing Parts
Always use Honda Genuine Parts or their equivalents to ensure reliability and safety.
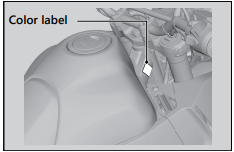
When ordering colored components, specify the model name, color, and code mentioned on the color label.
The color label is attached to the right side of the frame.
Battery
Your vehicle has a maintenance-free type battery. You do not have to check the battery electrolyte level or add distilled water. Clean the battery terminals if they become dirty or corroded.
Do not remove the battery cap seals. There is no need to remove the cap when charging.
NOTICE An improperly disposed of battery can be harmful to the environment and human health. Always confirm local regulations for proper battery disposal instruction.
What to do in an emergency
If any of the following occur, immediately see your doctor.
- Electrolyte splashes into your eyes:
- Wash your eyes repeatedly with cool water for at least 15 minutes. Using water under pressure can damage your eyes.
- Electrolyte splashes onto your skin:
- Remove affected clothing and wash your skin thoroughly using water.
- Electrolyte splashes into your mouth:
- Rinse mouth thoroughly with water, and do not swallow.
WARNING: Battery posts, terminals, and related accessories contain lead and lead compounds. Wash your hands after handling.
Cleaning the Battery Terminals
- Remove the battery. -> P. 72
- If the terminals are starting to corrode and are coated with a white substance, wash with warm water and wipe clean.
- If the terminals are heavily corroded, clean and polish the terminals with a wire brush or sandpaper. Wear safety glasses.

4. After cleaning, reinstall the battery.
The battery has a limited life span. Consult your dealer about when you should replace the battery. Always replace the battery with another maintenance-free battery of the same type.
Charging
If you use electrical accessories that drain the battery or you do not ride frequently, we recommend that you charge the battery every 30 days using a charger designed specifically for your Honda, which can be purchased from your dealer. Read the information that came with your battery charger and follow the instructions on the battery. Avoid using an automobile-type battery charger, as these can overheat a motorcycle battery and cause permanent damage.
Make sure the ignition switch is in the OFF position before charging the battery.
NOTICE Improper charging can damage the battery. If you can’t charge the battery or it appears unable to hold a charge, contact your dealer.
NOTICE Jump starting using an automobile battery can damage your vehicle's electrical system and is not recommended. Bump starting is also not recommended.
NOTICE Installing non-Honda electrical accessories can overload the electrical system, discharging the battery and possibly damaging the system.
Fuses
Fuses protect the electrical circuits on your vehicle. If something electrical on your vehicle stops working, check for and replace any blown fuses. -> P. 103
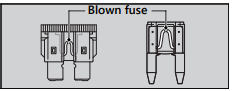
Inspecting and Replacing Fuses
Turn the ignition switch to the OFF position to remove and inspect fuses. If a fuse is blown, replace with a fuse of the same rating. For fuse ratings, see “Specifications.” -> P. 134
NOTICE Replacing a fuse with one that has a higher rating greatly increases the chance of damage to the electrical system.
If a fuse fails repeatedly, you likely have an electrical fault. Have your vehicle inspected by your dealer.
Engine Oil
Engine oil consumption varies and oil quality deteriorates according to riding conditions and time elapsed.
Check the engine oil level regularly, and add the recommended engine oil if necessary. Dirty oil or old oil should be changed as soon as possible.
Selecting the Engine Oil
For recommended engine oil, see “Specifications.” -> P. 133
If you use non-Honda engine oil, check the label to make sure that the oil satisfies all of the following standards:
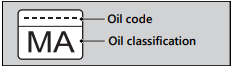
- JASO T 903 standard*1: MA
- SAE standard*2: 10W-30
- API classification*3: SG or higher
*1. The JASO T 903 standard is an index for engine oils for 4-stroke motorcycle engines. There are two classes: MA and MB. For example, the following label shows the MA classification.
*2. The SAE standard grades oils by their viscosity.
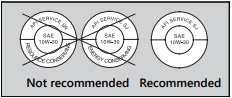
*3. The API classification specifies the quality and performance rating of engine oils. Use SG or higher oils, excluding oils marked as “Energy Conserving” or “Resource Conserving” on the circular API service symbol.
Brake Fluid
Do not add or replace brake fluid, except in an emergency. Use only fresh brake fluid from a sealed container. If you do add fluid, have the brake system serviced by your dealer as soon as possible.
NOTICE Brake fluid can damage plastic and painted surfaces. Wipe up spills immediately and wash thoroughly.
Drive Chain
The drive chain must be inspected and lubricated regularly. Inspect the chain more frequently if you often ride on bad roads, ride at high speed, or ride with repeated fast acceleration. -> P. 87
If the chain does not move smoothly, makes strange noises, has damaged rollers, has loose pins, has missing O-rings, or kinks, have the chain inspected by your dealer.
Also inspect the drive sprocket and driven sprocket. If either has worn or damaged teeth, have the sprocket replaced by your dealer.

NOTICE Use of a new chain with worn sprockets will cause rapid chain wear.
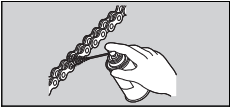
Cleaning and Lubricating
After inspecting the slack, clean the chain and sprockets while rotating the rear wheel. Use a dry cloth with chain cleaner designed specifically for O-ring chains, or neutral detergent. Use a soft brush if the chain is dirty. After cleaning, wipe dry and lubricate with the recommended lubricant.
Recommended lubricant: Pro Honda HP Chain Lube or equivalent
Do not use a steam cleaner, a high pressure cleaner, a wire brush, volatile solvent such as gasoline and benzene, abrasive cleaner, chain cleaner or lubricant NOT designed specifically for O-ring chains as these can damage the rubber O-ring seals.
Avoid getting lubricant on the brakes or tires. Avoid applying excess chain lubricant to prevent spray onto your clothes and the vehicle.
Recommended Coolant
Pro Honda HP Coolant is a pre-mixed solution of antifreeze and distilled water.
Concentration: 50% antifreeze and 50% distilled water
A concentration of antifreeze below 40% will not provide proper corrosion and cold temperature protection.
A concentration of up to 60% will provide better protection in colder climates.
NOTICE Using coolant not specified for aluminum engines or tap/mineral water can cause corrosion.
Crankcase Breather
Service more frequently when riding in rain, at full throttle, or after the vehicle is washed or overturned. Service if the deposit level can be seen in the transparent section of the drain tube.
If the drain tube overflows, the air filter may become contaminated with engine oil causing poor engine performance.
Tires (Inspecting/Replacing)
Checking the Air Pressure
Visually inspect your tires and use an air pressure gauge to measure the air pressure before each off-road ride and whenever you return to pavement after riding off-road. If you only ride on pavement, check the pressure at least once a month or any time you think the tires look low. Always check air pressure when your tires are cold.
If you decide to adjust the tire pressure for a particular off-road riding condition, make changes a little at a time.
Inspecting for Damage
Inspect the tires for cuts, slits, or cracks that exposes fabric or cords, or nails or other foreign objects embedded in the side of the tire or the tread. Also inspect for any unusual bumps or bulges in the side walls of the tires.
Inspecting for Abnormal Wear
Inspect the tires for signs of abnormal wear on the contact surface.
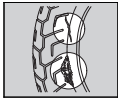
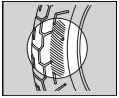
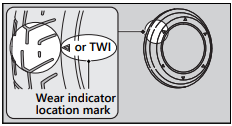
Inspecting Tread Depth
Inspect the tread wear indicators. If they become visible, replace the tires immediately. For safe riding, you should replace the tires when the minimum tread depth is reached.
Inspecting Rims and Valve Stems
Inspect the rims for damage and loose spokes. Also inspect the valve stems for their positions. A tilted valve stem indicates the tube is slipping inside the tire or the tire is slipping on the rim. See your dealer.
Have your tires replaced by your dealer. For recommended tires, air pressure and minimum tread depth, see “Specifications.” -> P. 133
Follow these guidelines whenever you replace tires.
- Use the recommended tires or equivalents of the same size, construction, speed rating, and load range.
- Remember to replace the inner tube whenever you replace a tire. The old tube will probably be stretched, and it could fail if installed in a new tire.
Troubleshooting
Engine Will Not Start
Starter Motor Operates But Engine Does Not Start
Check the following items:
- Check the correct engine starting sequence. -> P. 46
- Check that there is gasoline in the fuel tank.
- Check if the PGM-FI malfunction indicator lamp (MIL) is on.
If the indicator lamp is on, contact your dealer as soon as possible.
Starter Motor Does Not Operate
Check the following items:
- Check the correct engine starting sequence. -> P. 46
- Make sure engine stop switch is in the
 (Run) position. -> P. 43
- Check for a blown fuse. -> P. 103
- Check for a loose battery connectionn (-> P. 72) or battery terminal corrosion (-> P. 63).
- Check the condition of the battery. -> P. 100
If the problem continues, have your vehicle inspected by your dealer.
Overheating (High coolant temperature indicator is on)
The engine is overheating when the following occurs:
- High coolant temperature indicator comes on.
- Acceleration becomes sluggish. If this occurs, pull safely to the side of the road and perform the following procedure.
Extended fast idling may cause the high coolant temperature indicator to come on.
NOTICE Continuing to ride with an overheated engine can cause serious damage to the engine.
1. Stop the engine using the ignition switch, and then turn the ignition switch to the ON position.
2. Check that the radiator fan is operating, and then turn the ignition switch to the OFF position.
If the fan is not operating:
Suspect a fault. Do not start the engine. Transport your vehicle to your dealer.
If the fan is operating:
Allow the engine to cool with the ignition switch in the OFF position.
3. After the engine has cooled, inspect the radiator hose and check if there is a leak. -> P. 81
If there is a leak:
Do not start the engine. Transport your vehicle to your dealer.
4. Check the coolant level in the reserve tank. -> P. 81
- Add coolant as necessary.
5. If 1-4 check normal, you may continue riding, but closely monitor the high coolant temperature indicator.
Warning Indicators On or Flashing
PGM-FI (Programmed Fuel Injection) Malfunction Indicator Lamp (MIL)
If the indicator comes on while riding, you may have a serious problem with the PGM-FI system. Reduce speed and have your vehicle inspected by your dealer as soon as possible.
ABS (Anti-lock Brake System) Indicator
CRF300LRA
If the indicator operates in one of the following ways, you may have a serious problem with the ABS. Reduce your speed and have your vehicle inspected by your dealer as soon as possible.
- Indicator comes on or starts flashing while riding.
- Indicator does not come on when the ignition switch is in the ON position.
- Indicator does not go off at speeds above 6 mph (10 km/h).
If the ABS indicator stays on, your brakes will continue to work as a conventional system, but without the anti-locking function.
The ABS indicator may flash if you turn the rear wheel while the rear wheel is lifted off the ground. In this case, turn the ignition switch to the OFF position, and then to the ON position again. The ABS indicator will go off after your speed reaches 19 mph (30 km/h).
Other Warning Indications
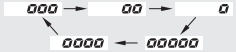
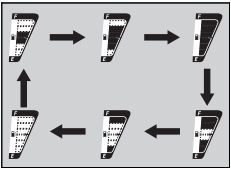
Fuel Gauge Failure Indication
If the fuel system has an error, the fuel gauge indicators will be displayed as shown in the illustration.
If this occurs, see your dealer as soon as possible.

Tire Puncture
Repairing a puncture or removing a wheel requires special tools and technical expertise. We recommend you have this type of service performed by your dealer.
After an emergency repair, always have the tire inspected/replaced by your dealer.
Tube Repair and Replacement
If a tube is punctured or damaged, you should replace it as soon as possible. A tube that is repaired may not have the same reliability as a new one, and it may fail while you are riding.
If you need to make a temporary repair by patching a tube or using an aerosol sealant, ride cautiously at reduced speed and have the tube replaced before you ride again.
Anytime a tube is replaced, the tire should be carefully inspected as described.
Electrical Trouble
Battery Goes Dead
Charge the battery using a motorcycle battery charger.
Remove the battery from the vehicle before charging.
Do not use an automobile-type battery charger, as these can overheat a motorcycle battery and cause permanent damage. If the battery does not recover after recharging, contact your dealer.
NOTICE
- Jump starting using an automobile battery can damage your vehicle's electrical system and is not recommended.
- Bump starting is also not recommended.
Burned-out Light Bulb
Follow the procedure below to replace a burned-out light bulb.
Turn the ignition switch to the OFF or LOCK position.
Allow the bulb to cool before replacing it.
Do not use bulbs other than those specified.
Check the replacement bulb for correct operation before riding.
For the light bulb wattage, see “Specifications.” -> P. 134
The headlights, license plate light uses several LEDs. If there is an LED which is not turned on, see your dealer for servicing.
Brake light/Taillight Bulb
1. Remove the seat. -> P. 74
2. Remove the hook bolts and collars.
3. Remove the prongs from the grommets.
4. Remove the rear fender.
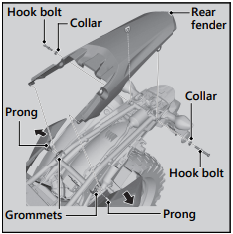
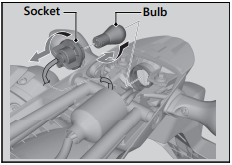
5. Turn the socket counterclockwise, and remove it.
6. Slightly press the bulb and turn it counterclockwise.
7. Install a new bulb and parts in the reverse order of removal.
8. Tighten the hook bolts.
Torque: 15 lbf·ft (21 N·m, 2.1 kgf·m)
Front/Rear Turn Signal Bulb
1. Remove the screw.
2. Remove the turn signal lens.
3. Slightly press the bulb and turn it counterclockwise.
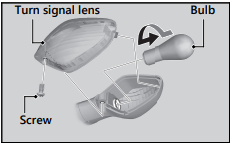
4. Install a new bulb and parts in the reverse order of removal.
Blown Fuse
Before handling fuses, see “Inspecting and Replacing Fuses.” -> P. 65
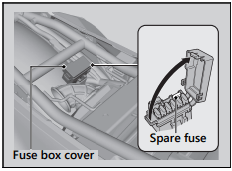
Fuse Box A
1. Remove the seat. -> P. 74
2. Open the fuse box cover.
3. Pull the fuses out with the fuse puller in the tool kit one by one check for a blown fuse. Always replace a blown fuse with a spare of the same rating.
4. Close the fuse box cover.
5. Install the seat.
Main Fuse
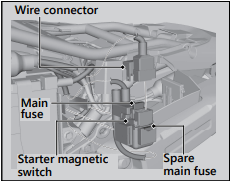
1. Remove the left side cover. -> P. 76
2. Pull the starter magnetic switch out.
3. Disconnect the wire connector of the starter magnetic switch.
4. Pull the main fuse out and check for a blown fuse. Always replace a blown fuse with a spare of the same rating. u Spare main fuse is provided in the starter magnetic switch.
5. Reinstall parts in the reverse order of removal.
Fuse Box B
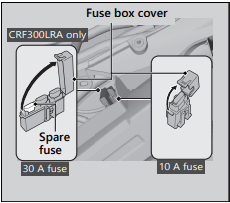
1. Remove the left side cover. -> P. 76
2. Open the fuse box cover.
3. Pull the fuses out with the fuse puller in the tool kit one by one check for a blown fuse. Always replace a blown fuse with a spare of the same rating. u Spare fuse for the 10 A fuse is in the fuse box A. -> P. 103
4. Close the fuse box cover.
5. Reinstall parts in the reverse order of removal.
NOTICE If a fuse fails repeatedly, you likely have an electrical problem. Have your vehicle inspected by your dealer.
Unstable Engine Operation Occurs Intermittently
If the fuel pump filter is clogged, unstable engine operation will occur intermittently while riding.
Even if this symptom occurs, you can continue to ride your vehicle.
If unstable engine operation occurs even if sufficient fuel is available, have your vehicle inspected by your dealer as soon as possible