Honda PIONEER 520 SXS 2021 Scooter
Product's Documents
Below are documents related to this product, you can read online or download:
- Owner's manual - (English) Read Online | Download pdf

This is manual of HONDA Pioneer.
Starting & Stopping the Engine
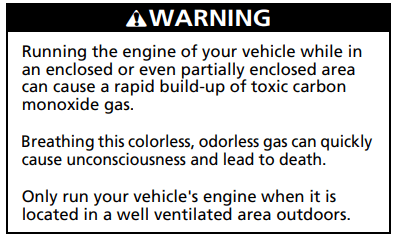
For safety, we recommend that you start the engine in a well-ventilated area. If that is not practical, move the vehicle outdoors as soon as possible. The engine’s exhaust contains carbon monoxide, a colorless and odorless gas that can cause illness and even death.
The starter motor will operate when the transmission is in neutral or the brake pedal is pressed.
You should do the following checks and adjustments before you drive your vehicle.
Before START:
Starting the engine:
1. Apply the parking brake.
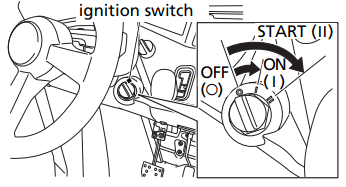
2. Press on the brake pedal. Insert the key and turn the ignition switch to the ON (I) position. Confirm the transmission is in neutral, and the neutral indicator is on.
3. To start the engine, without touching the accelerator pedal, turn the ignition switch to the START (II) position.
4. If the engine does not start within 5 seconds, or starts but stalls right away, repeat step 3 with the accelerator pedal pressed halfway down.
5. If the engine fails to start, press the accelerator pedal all the way down, and hold it there while starting to clear flooding. If the engine still does not start, return to step 3.
Shifting Gears
Selecting a AT/MT Mode
Your SXS has two transmission modes: AT and MT. You can select the desired shift mode with the AT/MT switch.
This mode automatically shifts the gears with optimal timing according to your driving conditions.
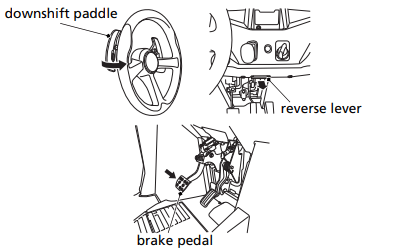
The gear position indicator shows “D” for forward gears, “N” for neutral, and “R” for reverse. Select gear position with the right side upshift paddle and left side downshift paddle.
You can temporarily shift up or down by operating the shift paddles while driving in AT mode. At the same time, the shifted gear is shown on the gear position indicator.
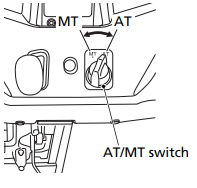
In this mode, the gears are shifted manually through shift paddle operation.
You can select five forward gears, neutral and reverse by operating the right side upshift paddle and left side downshift paddle.
The gear position indicator will show “1, 2, 3, 4, or 5” for forward gears, “N” for neutral, and “R” for reverse.
NOTICE
Improper shifting can damage the engine, transmission, and drive train. Also, coasting or towing the SXS for long distance with the engine off can damage the transmission.
Driving in AT mode
After starting the engine and letting it warm up, follow these procedures:

The transmission cannot be upshifted from neutral to D gear when the engine speed is above 3,000 rpm or the ground speed is above 2 mph (3 km/h) or the accelerator pedal is pressed.
If the gear position indicator shows "-", shift the gear by pulling the gearshift paddles.
Temporarily changing gears by operating the shift paddle while AT mode is selected
You can temporarily change gears by operating the shift paddles even while AT mode is selected.
When operating the shift paddles while AT mode is selected, the D displayed in the gear position indicator changes to a gear position number (1 – 5).
Because the gear change is temporary, the vehicle automatically returns to normal AT mode under the following conditions:
Driving in MT mode
To upshift the transmission, pull the right side upshift paddle once.
To downshift the transmission, pull the left side downshift paddle once.
After starting the engine and letting it warm up, follow this procedure:
The transmission cannot be upshifted from neutral to 1st gear when the engine speed is above 3,000 rpm or the ground speed is above mph (3 km/h) or the accelerator pedal is pressed.
If the electric shift system malfunctions, the transmission cannot be shifted by pulling the gearshift paddles. See your dealer. (In an emergency, a gear may be selected manually so you may move the vehicle.
Driving in Reverse
If you need to drive in reverse, make sure the area behind you is clear and only operate the SXS at low speed.
Selecting a Drive Mode
| 2WD | This mode supplies power to the rear wheels only, this mode is best for surfaces with good traction. |
| 4WD | This mode supplies power to the front and rear wheels. Steering will require slightly more effort than with 2WD. This mode is recommended for driving on surfaces with poor traction |
Before using the drive mode select lever to change from one mode to another, be sure the vehicle is stopped and the engine is idling.
Parking
Look for a level parking area with a firm surface. Avoid parking on a slope or on loose or slippery surfaces when possible. If you must park on a slope, block the wheels to help keep the vehicle from sliding.
After bringing your vehicle to a stop:
Fully push the parking brake lever down when releasing the parking brake.
Your Honda SXS has been designed with many safety features to help protect you. These include a strong occupant protection structure, seat belts, doors, and side nets. However, no safety system can prevent all injuries.
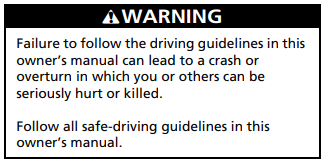
Safe Driving Precautions
We also recommend that you complete the Recreational OffHighway Vehicle (ROV) E-Course. The free course is available at www.ROHVA.org. The two-hour ROV E-Course is a multi-media, interactive, online safety course that reinforces:
Off-highway Use Only
Your Honda SXS was designed for use on a wide variety of terrain and situations. However, it should not be driven on any public road, paved or unpaved, because it is not equipped to legally or safely drive on such roads.
Remember to obey all local off-road regulations, obtain permission before driving on someone else’s private property, and respect all no trespassing” signs.
Control Speed
Driving at excessive speed for the terrain or other conditions increases the chance of a crash or overturn. Always reduce speed when driving on hilly terrain, or when carrying cargo or towing a trailer.
Use Extra Care on Unfamiliar Terrain
When driving in a new area, keep your speed low and check the terrain ahead for possible problems, such as large rocks, bumps, holes, or drop-offs. Don’t drive fast on unfamiliar terrain or when visibility is limited. If you drive in an area with other vehicles, be sure to keep a safe distance to avoid a collision.
Do Not Perform Stunts
Keep all four wheels on the ground at all times. Showing off or attempting to perform stunts could lead to a crash or overturn in which the driver, a passenger, or others could be seriously hurt or killed.
Off-road Driving Considerations
Your Honda SXS was designed and intended for off-road use. In the event that you must drive on a paved surface, be aware that your
Honda SXS will feel and handle different than it does on dirt. The tires will also wear much faster.
Vehicle Design
The Honda SXS handles somewhat differently from on-highway vehicles due in part to features that allow it to perform its role as an off-highway recreational vehicle. For example, this Honda SXS has a higher center of gravity than cars designed for use only on pavement. It is also equipped with large low-pressure tires that allow good traction in sand, loose dirt, wet grass and other low-traction surfaces.
These advantages come at some cost. Because your vehicle is taller and rides higher off the ground, it can more easily tip or roll over if you make abrupt turns or drive on sloped terrain.
Off-highway Environments
Driving on private property, or in approved off-highway areas, means you leave a generally predictable and orderly world behind.
You won’t find lane markers or traffic signals, and no one will be there to warn you of trouble ahead. It’s up to you to assess situations and drive within limits. The terrain has limits (it may be too steep or bumpy, for example). The vehicle has limits (e.g., traction, stability, and power). And you may be limited by lack of experience.
Surface Considerations
The kind of surface you drive on can have important effects on how your vehicle handles. For example, on loose or soft surfaces you’ll need more time and distance to accelerate, turn, or brake to a stop.
Avoid any sudden sharp turn, particularly on pavement and other hard surfaces. And always slow down after moving from one type of surface to another until you get accustomed to how your vehicle handles.
Reading the Terrain
Because visual information comes in unpredictable ways off-road, you need to stay alert, constantly survey the terrain, and go slow enough to analyze situations and make good decisions.
As your eyes search the terrain ahead, watch for changes in surface conditions. One minute you can be on firm soil and the next in soft sand or deep mud. A path can quickly change from level to bumpy, slope at a dangerous angle, or disappear in a drop-off. Always keep your eyes open for holes, washouts, or obstacles that could upset or damage the vehicle.
Of course, if you cannot see clearly, due to tall grass for example, stop safely, get out of the vehicle, and survey the area for a safe route.
Controlling Speed
Whether you travel off-road or on pavement, the general rule is to keep your speed low. Of course, you’ll need enough speed to keep moving forward, but too much speed leads to problems.
When driving off-road at higher speeds, you have less time to read the terrain and make good decisions. The drive can also be more bumpy, and there’s a greater chance of the vehicle sliding if you brake or turn quickly on wet soil, gravel, or another slippery surface.
Never go faster than conditions allow.
Driving with Cargo or Pulling a Trailer
The added weight of carrying cargo or pulling a trailer will affect how your vehicle accelerates, brakes, and handles. The added weight and length of a trailer will affect your directional control.
Please follow these guidelines whenever you carry cargo or pull a trailer:
Basic Driving
Making Turns
The basic turning technique for Honda SXS is to drive at low speed and gradually adjust the amount of steering to suit the surface. Do not make sudden sharp turns, either off-road or on pavement.
If your vehicle ever skids sideways during a turn, steer in the direction of the skid. Also, avoid hard braking or accelerating until you have regained directional control.
Braking
The best off-road braking technique is to gently step down on the brake pedal, then increase pressure as more braking is needed. Light braking may be all you need on soft surfaces, such as sand or loose dirt. Avoid hard braking on any surface.
Driving on Hills
Hills present some of the greatest challenges and hazards, especially if you are carrying cargo or pulling a trailer. If you are new to offroad driving, start with gentle inclines, take time to learn how your vehicle handles on slopes, and read the information that follows.
Even if you have previous off-road driving experience, the guidelines below should serve as important reminders.
Approaching a Hill
When you approach a hill, you need to decide whether it is one that you, your passenger, your cargo and your vehicle can handle. For example, ask yourself:
If you do not know the answers to these questions before beginning an ascent, you should stop and walk up the hill to find out.
Driving Up a Hill
If you decide that it is safe to drive your Honda SXS up a hill:
If You Stall Going Up a Hill
If a hill is steeper than you expected, traction is poor, or you don’t maintain sufficient speed, you may begin to stall. If that happens:
Driving Down a Hill
Before driving down a hill, as with driving up a hill, you need to evaluate whether you can make it safely to the bottom and away from the slope.
Ask yourself:
If you decide it is safe to drive down a hill:
Crossing a Hill
Before traversing a hill, consider these facts:
If you can’t clearly see all terrain conditions (good traction, no bumps, holes or other obstacles, etc.), stop and walk the slope before you drive on it. If you have any doubt whether you can safely drive across a slope, don’t do it. Find another route.
Avoiding Obstacles
When driving off-road, always watch for bumps, pot holes, rain ruts and other obstacles. Large bumps and holes can bounce you around and cause you to lose control or get stuck. Slow down whenever you drive on rough terrain.
Driving Through Water
Before driving through water, stop and make sure that:
If you decide you can safely cross the water:
Driving at Night
If you drive your Honda SXS at night, always drive slower and more cautiously than you would in daylight.
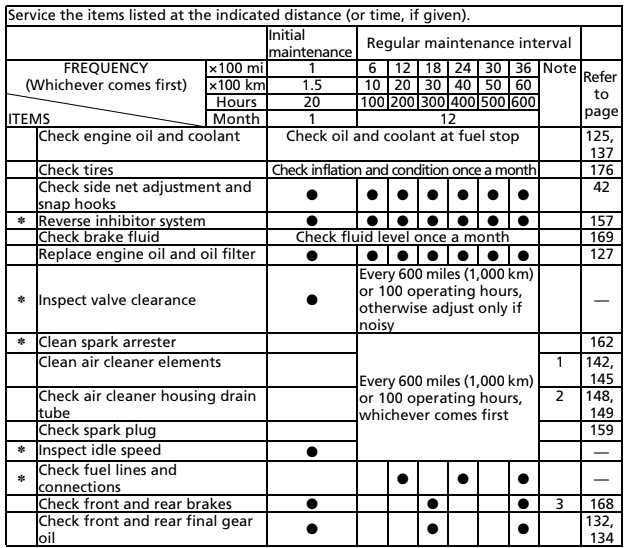
Maintenance Schedule
Initial Maintenance
Appears at 100 miles (150 km) or 20 operating hours, whichever comes first.
Regular Maintenance Interval 1
Appears 600 miles (1,000 km) or 100 operating hours after the Initial Maintenance is performed and maintenance minder is reset
Regular Maintenance Interval 2
Appears 600 miles (1,000 km) or 100 operating hours after the Initial Maintenance Interval 1 is performed and maintenance minder is reset

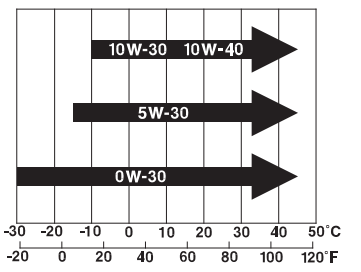
| API classification | SG or higher except oils labeled as energy conserving or resource conserving on the circular API service label |
| viscosity (weight) | SAE 10W-30 |
| JASO T 903 standard | MA |
| suggested oil* | Pro Honda GN4 4-stroke oil (USA & Canada) or Honda 4-stroke oil, or an equivalent motorcycle oil. |
*Suggested oils are equal in performance to SJ oils that are not labeled as energy conserving or resource conserving on the circular API service label.
Other viscosities shown in the following chart may be used when the average temperature in your driving area is within the indicated range.
JASO T 903 standard
The JASO T 903 standard is an index for engine oils for 4-stroke motorcycle engines.
There are two classes: MA and MB.
Oil conforming to the standard is labeled on the oil container. For example, the following label shows the MA classification.

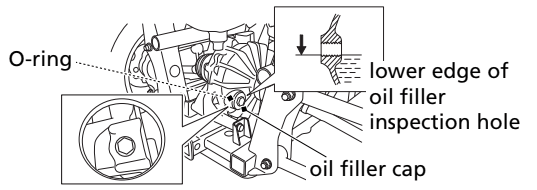
Checking & Adding Oil
Check the engine oil level each day before operating your Honda SXS and add, if needed.
Before driving your SXS, check the engine oil level.
UNDER SEAT BOTTOM
LEFT SIDE
Drain the Engine Oil:
UNDER SEAT BOTTOM
LEFT SIDE

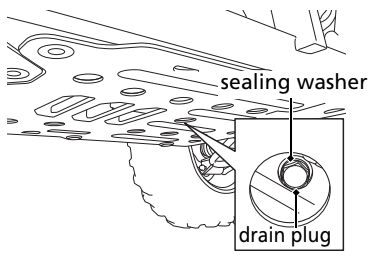
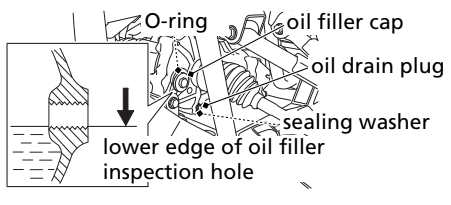
4. Place an oil drain pan under the crankcase.
5. Remove the engine oil drain plug and sealing washer.
UNDER BODY
Install a New Engine Oil Filter:
6. Remove the seat back
7. Remove the center rear panel
8. Remove the clips and screws from right seat bottom cover and flip it forward leaving ECU and wiring in place. The oil filter can be accessed on right side of engine.
UNDER SEAT BOTTOMRIGHT SIDE
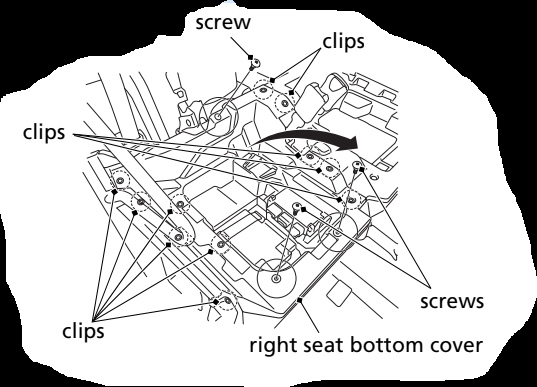
9. Remove the oil filter cover by removing the bolts. Let the remaining oil drain out. Discard the oil filter in an approved manner.
10. Coat new O-rings with engine oil and install them into each groove in the filter cover and crank case.
11. Reposition the spring to the engine crankcase and install a new oil filter with the rubber seal facing out, away from the engine.
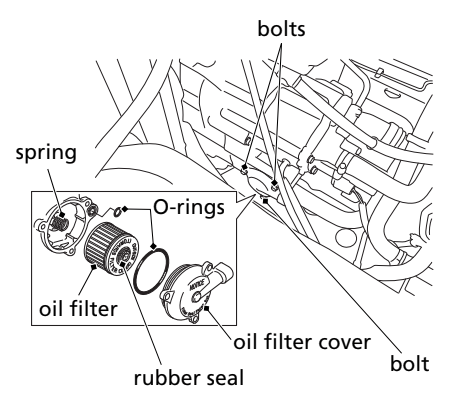
12. Reinstall the oil filter cover, making sure the bolts are tightened to the specified torque: 9 lbf·ft (12 N·m, 1.2 kgf·m)
13. Pour the drained oil into a suitable container and dispose of it in an approved manner.
NOTICE Improper disposal of drained fluids is harmful to the environment.
14. Install the right seat bottom cover by flipping it back. Install the clips. Install the screws and tighten them to the specified torque: 5.9 lbf·ft (8 N·m, 0.8 kgf·m)
15. Install the center rear panel.
16. Install the seat back.
Add Engine Oil:
17.Reinstall the drain plug with a new sealing washer, and tighten
the drain plug to the specified torque: 18 lbf·ft (25 N·m, 2.5 kgf·m)
18. Lower your Honda SXS safely.
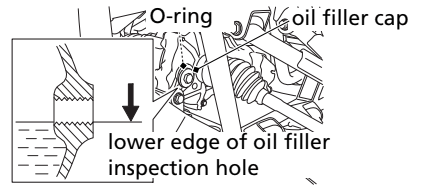
19. Fill the crankcase with the recommended oil, approximately: 3.2 US qt (3.0 l)
20.Reinstall the oil filler cap/dipstick.
21.Reinstall the rubber dust cover.
22.Reinstall the seat bottom.
23.Start the engine and let it idle for 3 – 5 minutes.
24.Remove the seat bottom and fold open the rubber dust cover.
25.Stop the engine and after 2 – 3 minutes, check the oil level. Make
sure the oil is between the upper and lower level marks on the
dipstick. If necessary, add more oil but do not overfill.
26.Reinstall the oil filler cap/dipstick and rubber dust cover.
27.Reinstall the seat bottom.
28.Check that there are no oil leaks.
If a torque wrench is not used for installation, see your dealer as
soon as possible to verify proper assembly.
Checking Oil
LEFT FRONT
Changing Oil
Change the oil with the front final gear at normal operating temperature to assure complete and rapid draining.
LEFT FRONT
Checking Oil
Check the rear final gear oil level every 1,800 miles (3,000 km) or hours of operating your Honda SXS, and add if needed.
RIGHT REAR
Changing Oil
Checking & Adding Coolant
Check the engine coolant level every day before operating your Honda SXS and add, if needed.
UNDER FRONT HOOD
RIGHT FRONT
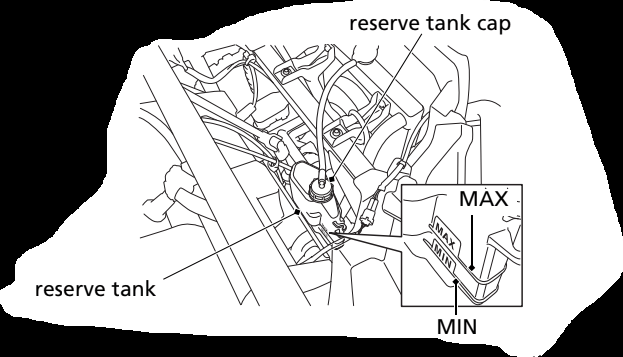
5. Add coolant to the reserve tank as required to bring the coolant level to the MAX level mark.
6. After adding coolant, install the reserve tank cap and install the front hood.
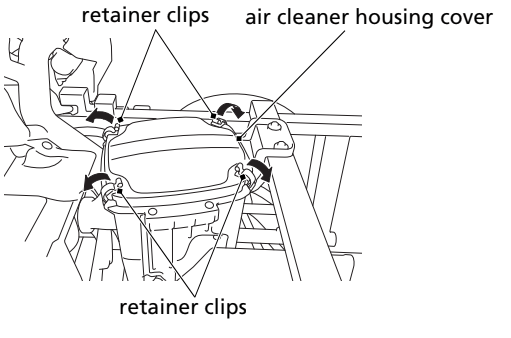
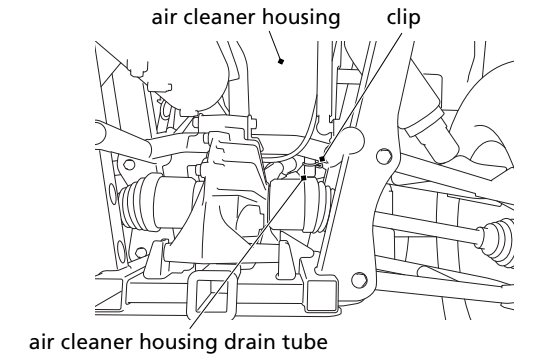
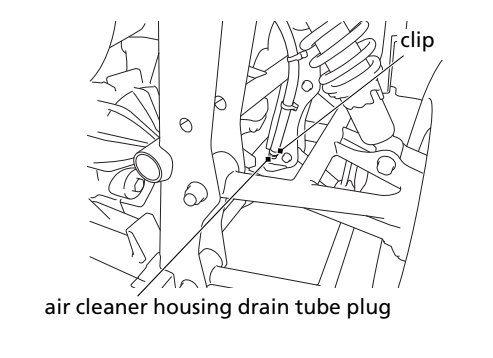
Cleaning
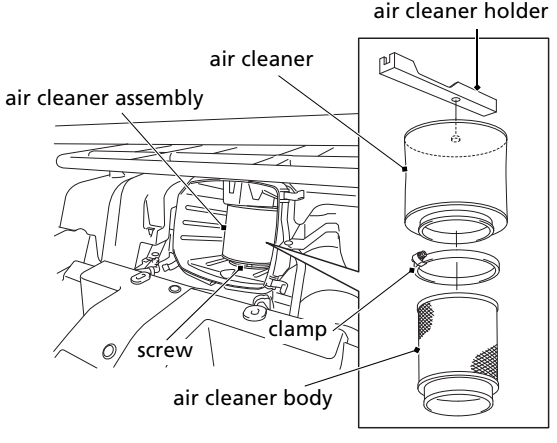
1. Lift the cargo bed.
2. Unlatch the retainer clips.
3. Remove the air cleaner housing cover.
UNDER CARGO BED
4. Loosen the screw and remove the air cleaner assembly from the air cleaner housing.
5. Unscrew the clamp.
6. Remove the air cleaner from the air cleaner body.
7. Gently wash the air cleaner with the Pro Honda Air Filter cleaner or an equivalent. Do not use kerosene or gasoline. After cleaning, gently squeeze out the remaining solvent. Avoid twisting or wringing the air cleaner. This can tear the foam.
8. Inspect for tears or cracks in the foam or seams of the air cleaner. Replace the air cleaner if it is damaged.
UNDER CARGO BED
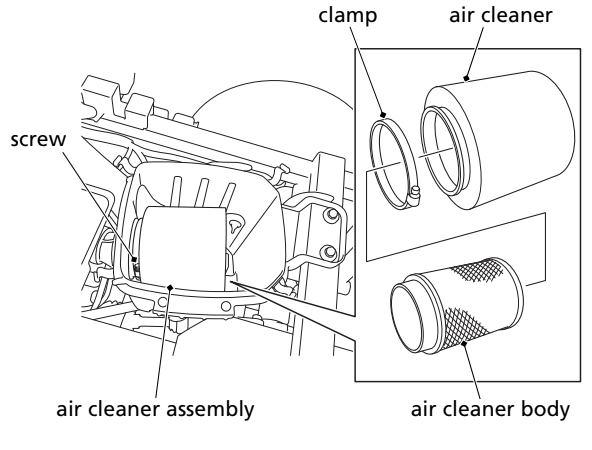
9. Allow the air cleaner to dry thoroughly before applying oil. A wet air cleaner will not fully absorb the oil.
10. Pour clean Pro Honda Foam Filter Oil or an equivalent over the entire surface of the air cleaner. Use both hands to evenly spread the oil into the air cleaner. Gently squeeze out any excess oil. (To keep your hands dry, place the air cleaner in a clean plastic bag before spreading the oil into the air cleaner.)
11. Install the air cleaner on the air cleaner body.
12. Install the clamp.
13. Insert the air cleaner assembly into the air cleaner housing.
14. Fasten the screw.
15. Reassemble in the reverse order of removal.
16. Lower the cargo bed.
UNDER CARGO CARRIER

UNDER CARGO CARRIER
SXS520M2
RIGHT REAR
SXS500M2
RIGHT REAR
Fluid Level Inspection
Check the fluid level on level ground.
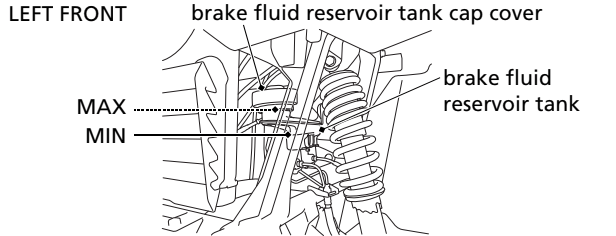
2. Return the brake fluid reservoir tank cap cover to its normal position.
Worn brake pads should be replaced. If the pads are not worn, have your brake system inspected for leaks.
Brake Pedal Inspection
Check that the brake pedal moves smoothly and does not feel abnormally spongy.
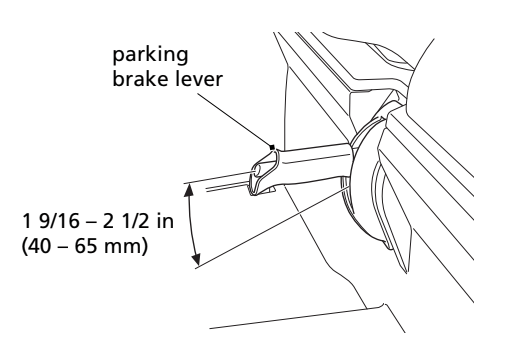
Parking Brake Lever Freeplay
Inspection
Measure the freeplay of the parking brake.
Freeplay is measured from the lever fully disengaged (at stopper) to when lever is pulled up and resistance is felt in lever.
Parking brake lever freeplay is: 1 9/16 – 2 1/2 in (40 – 65 mm)
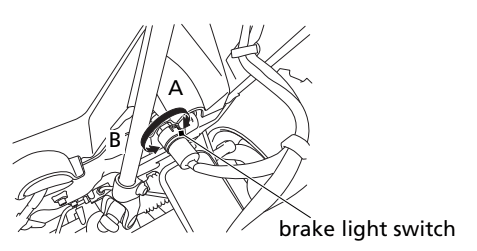
Brake Light Switch Adjustment
Periodically check the operation of the brake light switch. It is located under the front hood, just above -- and slightly behind -- the brake fluid reservoir.
The brake light should turn on just before the brake works.
Adjustment is done by holding the switch body and turning the adjusting nut. Turn the nut in direction (A) if the switch operates too late, and in direction (B) if the switch operates too soon.
UNDER FRONT HOOD
LEFT SIDE
Inspection
Whenever you check the tire pressures, you should also look for:
Also, if you hit a hard object or obstacle while driving, stop as soon
as you safely can and carefully inspect the tires for damage.
Tread Wear
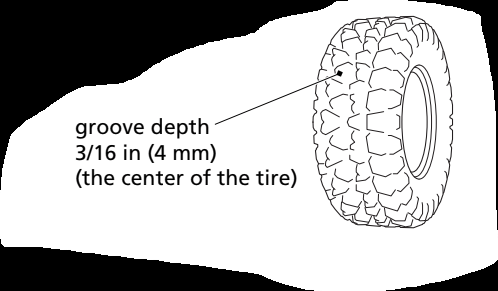
To check the condition of a tire tread, measure the groove depth in the center of the tire.
For best performance, you should replace a tire before the tread depth at the center reaches the following limits:
| front | 3/16 in (4 mm) |
| rear | 3/16 in (4 mm) |
SXS500M2
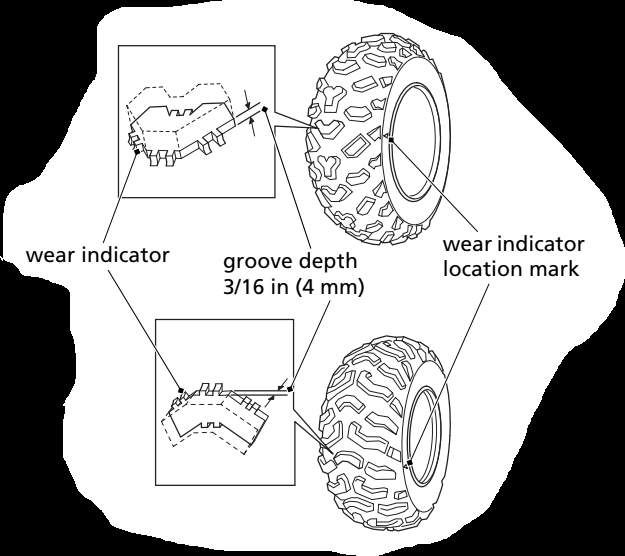
To check the condition of a tire tread, measure the groove depth in the center of the tire, or check the wear indicator.
For best performance, you should replace a tire before the tread depth at the center reaches the following limits:
| front | 3/16 in (4 mm) |
| rear | 3/16 in (4 mm) |
Tire Replacement
The recommended tires for your Honda SXS are:
SXS520M2
| front | 24X8.00-12 NHS Vee Rubber V-392 |
| rear | 24X10.00-12 NHS Vee Rubber V-392 |
SXS500M2
| front | 24X8.00-12 NHS MAXXIS M977H |
| rear | 24X10.00-12 NHS MAXXIS M978H |
Inspection
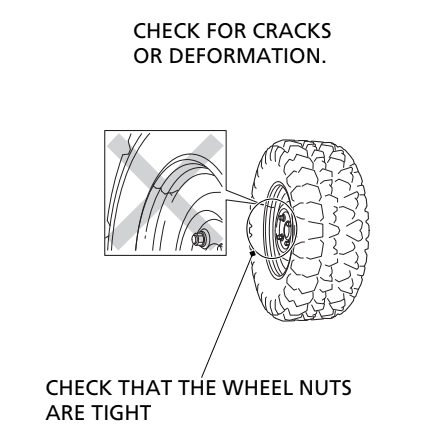
Check that the wheel nuts are tight and there are no cracks or deformation in the wheel.
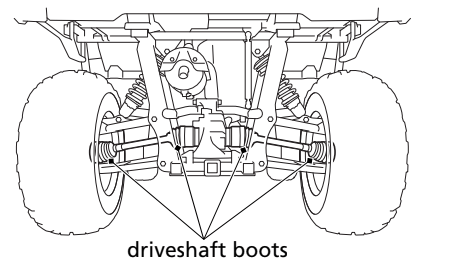
Check the boots for tears or traces of splattered grease.
If necessary, have your dealer replace them.
FRONT
SXS520M2 shown
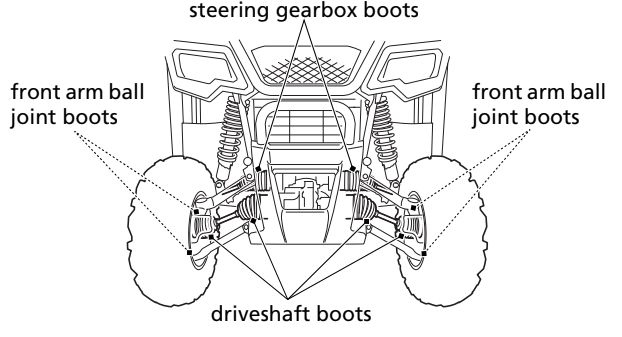
REAR
SXS520M2 shown
NOTICE Your battery is a maintenance-free type and can be permanently damaged if the cap strip is removed.
Removal
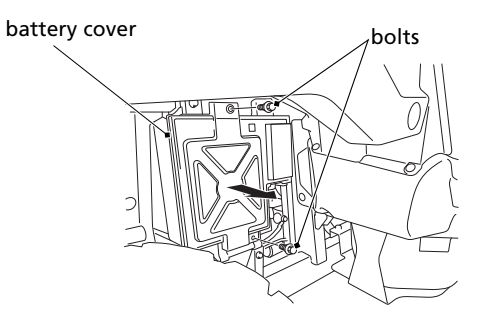
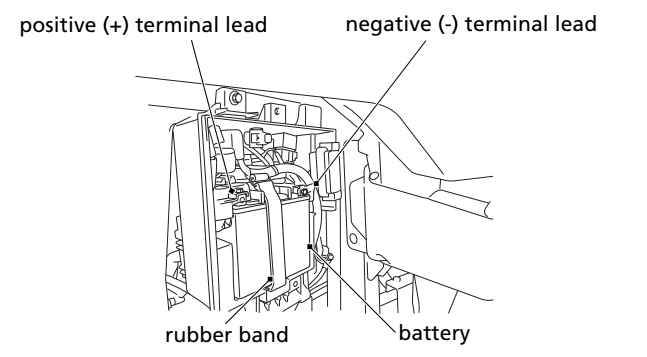
Installation
Reinstall in the reverse order of removal.
Be sure to connect the positive (+) terminal first, then the negative (-) terminal.
Make sure the clock is set to the proper time after the battery is reconnected
Engine Quits or Won’t Start
Proper operation and maintenance can prevent starting and engine performance problems. In many cases, the cause of the problem may be a simple operational oversight.
If you have a problem starting the engine — or experience poor engine performance — the following information may help you. If you can’t correct the problem, see your dealer. If your SXS won’t start, listen as you turn the ignition key to the
START (II) position. If you don’t hear the starter motor turning, refer to the Starter motor doesn’t operate symptom. If you can hear the starter motor working normally, refer to the Starter motor works, but the engine won’t start symptom.
| SYMPTOM: Starter motor doesn’t operate. | |
POSSIBLE CAUSE | WHAT TO DO |
| transmission not in neutral | Shift into neutral or press on the brake pedal. |
| blown fuse | Replace with a new fuse of the same rating |
| battery lead loose | Tighten the battery lead. |
| low battery | Charge the battery. If charging doesn’t help, see your dealer. |
| faulty starter motor | If all possible causes are negative, the starter motor may be faulty. See your dealer. |
| SYMPTOM:Starter motor works, but the engine won’t start. | |
POSSIBLE CAUSE | WHAT TO DO |
| out of fuel | Fill the fuel tank. |
| flooded engine | Starting the engine |
| loose or unconnected spark plug cap | Install the spark plug cap securely. If the engine still won’t start, see your dealer. |
| loose battery cables | Tighten the battery terminal bolts. |
| weak battery | Charge the battery. If charging doesn’t help, see your dealer. |
| SYMPTOM: Engine starts, but runs poorly. | |
POSSIBLE CAUSE | WHAT TO DO |
| high coolant temperature | Check the high coolant temperature indicator. |
| runs erratically, misfires | May damage catalytic converter. See your dealer. |
| blubbers (rich fuel mixture) | See your dealer. |
| sooty exhaust (rich fuel mixture) | See your dealer. |
| detonates or pings under load | If applicable, switch to the recommended octane gasoline or change your brand of gasoline. If the problem persists, see your dealer. |
| afterfires (backfires) | May damage catalytic. See your dealer. |
| pre-ignition (runs on after ignition switched OFF) | May damage catalytic converter. See your dealer. |
| SYMPTOM: Engine starts, but runs poorly or dies when hot. | |
POSSIBLE CAUSE | WHAT TO DO |
| poor or inadequate fuel flow due to clogged fuel filter | See your dealer. (ensure clean fuel supply) |
Shift Paddles Do Not Function
If one or both shift paddles do not function, see the following instructions. If proper function cannot be restored, see your dealer.
Transmission Is Not Functioning Properly
When the transmission is not shifting properly, the gear position indicator will show “–” and blink or the gear position(“1”, “2”, N”or “R”)is blinking.
See your dealer to check and restore the transmission.
If the gear position indicator shows “–” and blink or the gear position(“1”, “2”, “3”, “4”, “5”, “N”or “R”)is blinking while driving, perform the following:
If these efforts do not restore proper operation, have your SXS inspected by your dealer.
When the “–” is blinking or the gear position(“1”, “2”, “3”, “4”, N”or “R”)is blinking in the gear position indicator:
Restart the engine; drive the SXS by operating the shift paddles to a location where it can be loaded and transported to your dealer. We recommend that you drive slowly in 1st gear.
When the display on the gear position indicator returns to normal:
You may drive on the SXS as usual after restarting the engine.
However, we urge you to have your SXS inspected by your dealer.
Emergency Gear Selection & Operation
If the shift paddles do not operate, use the following procedure to manually select a gear so you may drive the vehicle to a location where it can be loaded and transported to a dealer.
1. Make sure unit is on level ground.
2. Turn the ignition switch to the “ON” (l) position.
3. Remove the seat bottom.
4. Gear change tool is located under the seat bottom on left side.
5. Check the neutral indicator:
6. Apply the parking brake.
7. Turn the key to start the engine.
8. Select the gear you want. For running on level ground: 3rd or 4th gear position. For mountain roads: 2nd or 3rd gear.
9. Return the gear change tool to its holder under the seat bottom.
10. Install the rubber dust cover.
11. Install the seat bottom.
12. Get into the SXS. Drive it at a safe speed to a place where it can be repaired or serviced.
How to Shift Gears Manually:
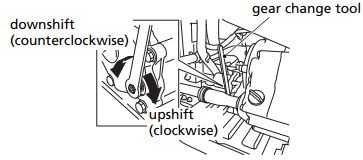
Do not attempt to shift gears manually using the gear change tool while driving.
If the transmission is shifted manually when the electric shift system is functioning, the system will shutdown automatically and the shift paddles will not operate. To reactivate the system, turn the ignition switch to the “OFF” (O) position, then turn it back to the “ON” (l) position.
Flat Tire
Emergency Wheel Removal/Installation
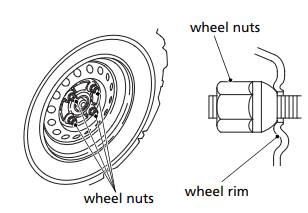
Removal
Installation
If a torque wrench was not used for installation, see your dealer as soon as possible to verify proper assembly. Improper assembly may lead to loss of control and braking capability.
High Coolant Temperature Indicator Lights
Normally, the high coolant temperature indicator will only light momentarily when you turn the ignition ON (l). Occasionally, it may flicker at or near idling speed.
High coolant temperature may be caused by restriction of air flow to the radiator (such as mud caked on the radiator), extended idling, an oil leak, a coolant leak, a low oil level, a low coolant level, or extended operation under adverse conditions.
If the all sections of the coolant temperature gauge including segment H and high coolant temperature indicator are on while you’re driving, don’t ignore it. Pull safely to a stop. Stop the engine as soon as it’s safe to do so, and let it cool.
NOTICE
Continuing to drive with high coolant temperature or an overheated engine can cause serious engine damage.
If the coolant temperature gauge and indicator return to normal, resume driving. If there is a leak, do not drive the SXS until the leak is repaired by your dealer.
If there’s a mild coolant leak, you can drive for a while, carefully watching the coolant temperature gauge and indicator. Be prepared to stop and add more coolant or water. If the leak is bad, transport your Honda SXS to your dealer.
Fuse Blows
All of the electrical circuits on your Honda SXS have fuses to protect them from damage caused by excess current flow (short circuit or overload).
If something electrical on your Honda SXS stops working, the first thing you should check for is a blown fuse.
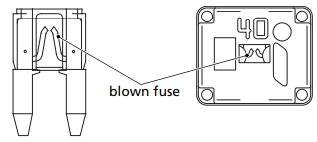
Check all the fuses before looking elsewhere for another possible cause of the problem. Replace any blown fuses and check component operation.
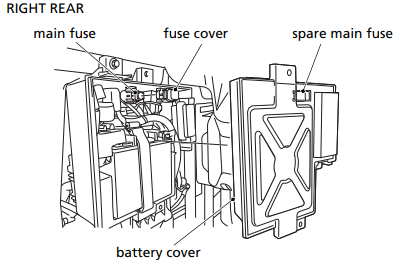
The main fuse and the circuit fuses are located in the battery box under the right side of rear fender.
Recommended Fuses
| main fuse | 40 A |
| circuit fuses | 30 A, 15 A x 4, 10 A x 2 |
Main Fuse Access
NOTICE
If you do not have a spare fuse and you cannot drive the Honda SXS without fixing the problem, take a fuse of the same rating or a lower rating from one of the other circuits that you can do without temporarily.
If you replace a blown fuse with a spare fuse that has a lower rating, replace the fuse with the correct rating as soon as you can. Also remember to replace any spare fuses that were installed.
If the replacement fuse of the same rating burns out in a short time, there is probably a serious electrical problem on your Honda SXS. Leave the blown fuse in that circuit and have your Honda SXS checked by your dealer.
Crash
Personal safety is your first priority after a crash. If you or anyone else has been injured, take time to assess the severity of the injuries and whether it is safe to continue driving. If you cannot drive safely, send someone for help. Do not drive if you will risk further injury.
If you decide that you are capable of driving your SXS safely, first evaluate the condition of your SXS. If the engine is still running, turn it off and look it over carefully; inspect it for fluid leaks, check the tightness of critical nuts and bolts securing such parts as the steering wheel, control levers, brakes, and wheels.
If there is minor damage, or you are unsure about possible damage but decide to try driving the Honda SXS back to your base, drive slowly and cautiously.
Sometimes, crash damage is hidden or not immediately apparent. When you get home, thoroughly check your Honda SXS and correct any problems you find. Also, be sure to have your dealer check the frame, suspension, seat belts, and occupant protective structure after any serious crash.
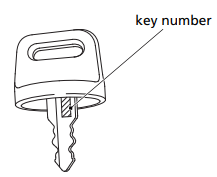
Lose Your Key
Be sure to record your key number. Store the spare key and recorded key number in a safe location. You’ll need this number to have a duplicate key made.
If you lose your key and aren’t carrying a duplicate, either get your spare or have one made. If you don’t know your key number, call the dealer where you purchased your Honda SXS. They may have it listed in their records. If they don’t, transport your Honda SXS to them or the nearest dealer. The dealer will probably have to remove the ignition switch assembly to find the key number so they can make a key for you.
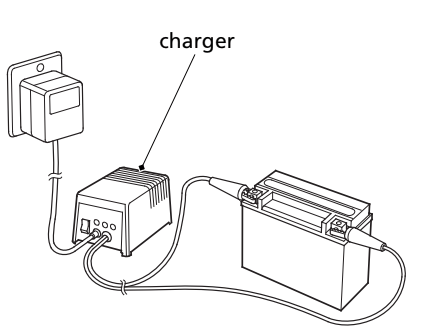
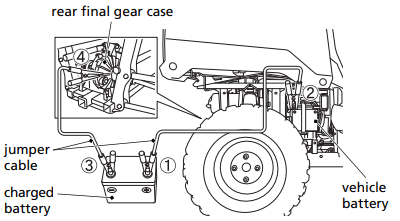
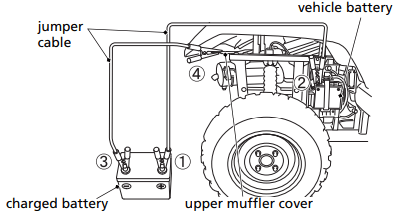
Low Battery
If the battery is low, the starter motor doesn’t operate or works poorly, and you can’t start the engine.
Jump starting your Honda SXS should be avoided. Instead, the battery should be removed and recharged.
If you can’t charge the battery or it appears unable to hold a charge, contact your dealer.
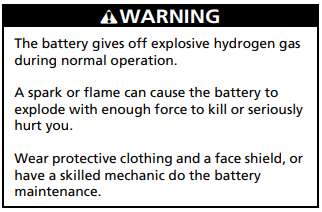
WARNING: Battery posts, terminals and related accessories contain lead and lead compounds. Wash your hands after handling.
However, when there is no option other than jump starting, follow the instructions given below.
NOTICE
If a battery sits in extreme cold, the electrolyte inside can freeze. Attempting to jump start with a frozen battery can cause it to rupture.
Use a battery that is the same as the one in the vehicle or an equivalent.
Component Fails
The brake lines, control cables, and other components can be damaged as you drive in dense brush or over rocky terrain. Making a trailside repair depends on how serious the damage is and what tools and supplies you have with you.
Vehicle Speed Does Not Exceed 15 mph (24 km/h)
Reference file: Honda PIONEER 520 SXS 2021 Scooter
Series: SXS520M2
Additionally, the document applies to other Honda models: SXS500M2