Owner Manual Scooter
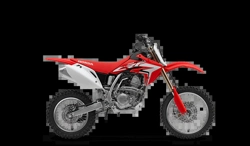
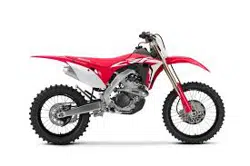
Parts Location

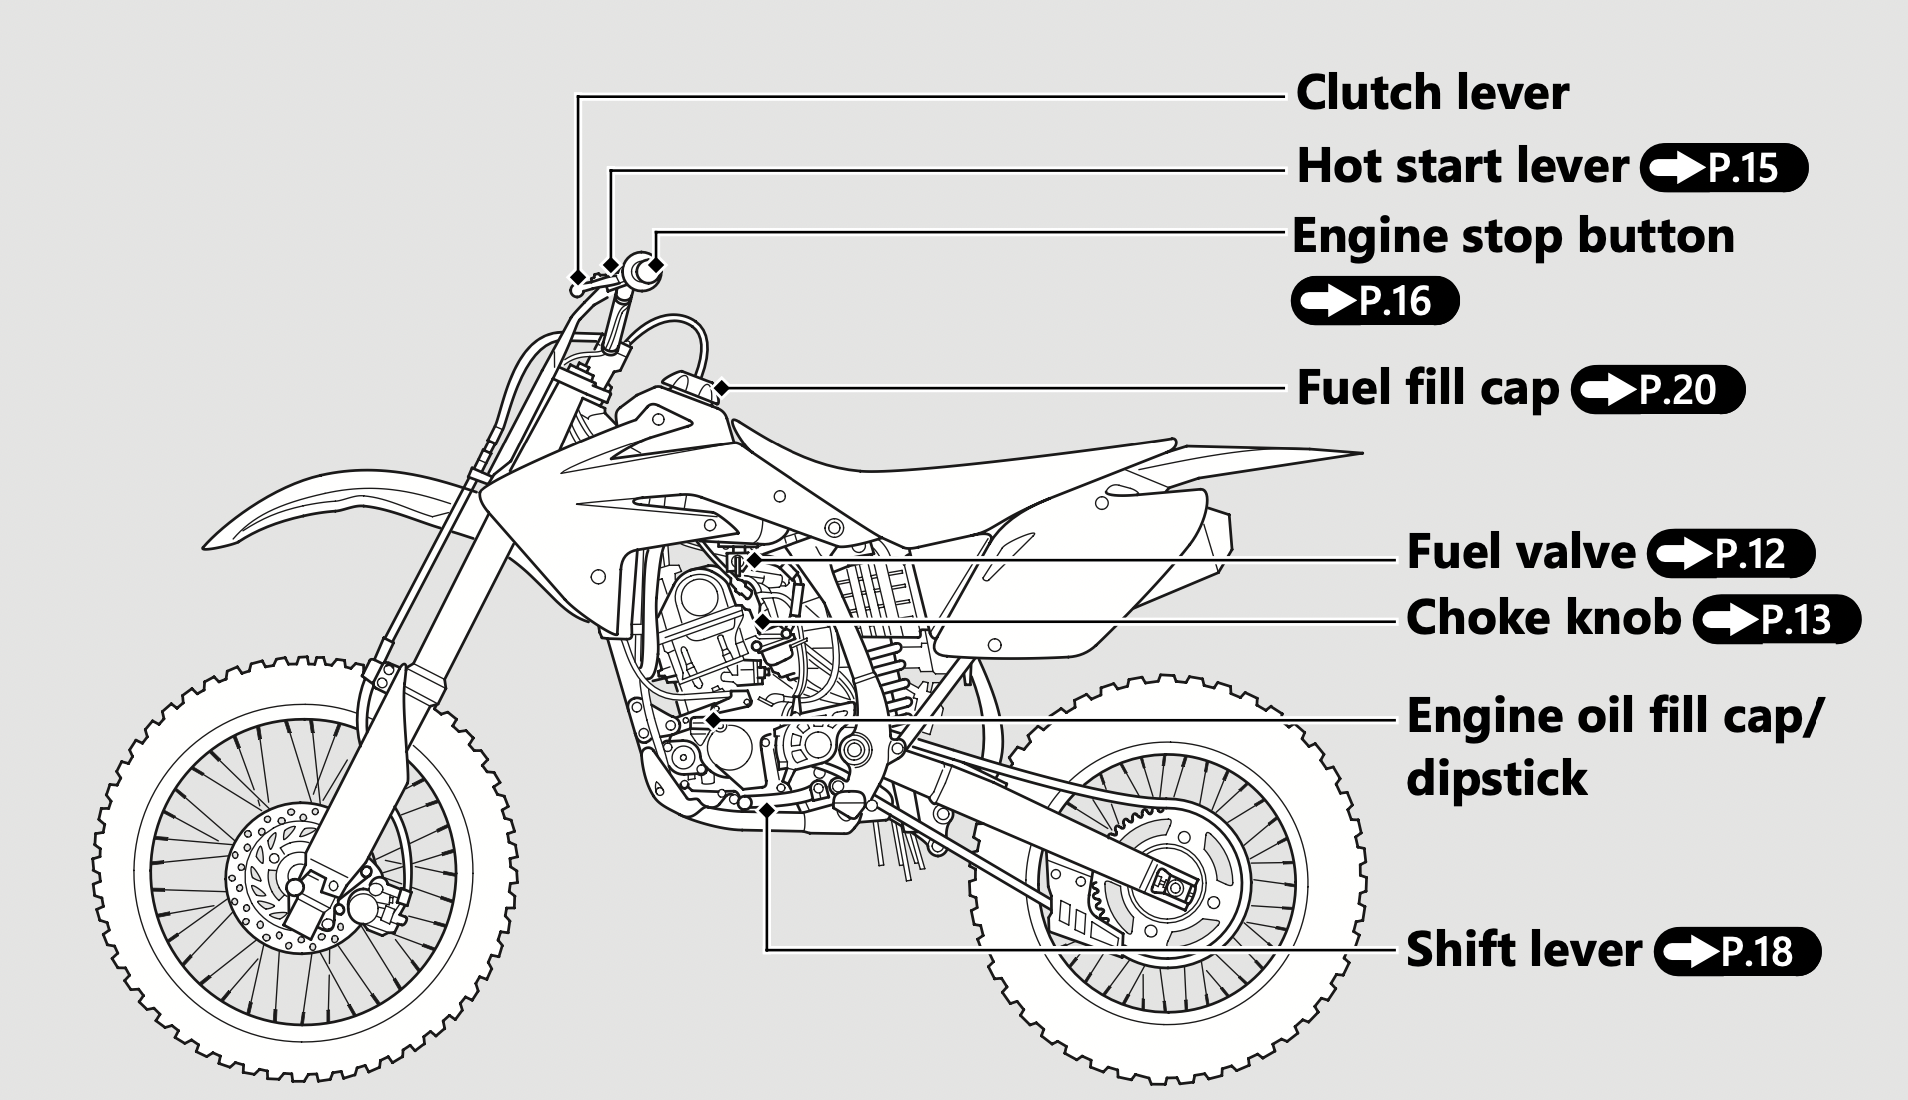
Fuel Valve
The two-way fuel valve is used to control the flow of fuel from the fuel tank to the carburetor.
ON: normal position for riding.
OFF: for stopping, storing, or transportation.
Starting the Engine
Start your engine using the following procedure.
To restart a warm engine, follow the procedure for “Warm Engine Starting”.
NOTICE
- Extended fast idling and revving the engine can damage the engine, and the exhaust system.
- Snapping the throttle or fast idling for more than about 5 minutes may cause exhaust pipe discoloration.
- Do not operate the kickstarter while the engine is running as engine damage could result. Do not apply excessive force on the kickstarter.
- Fold up the kickstarter after the kickstarter is returned to the pedal stop.
Cold Engine Starting
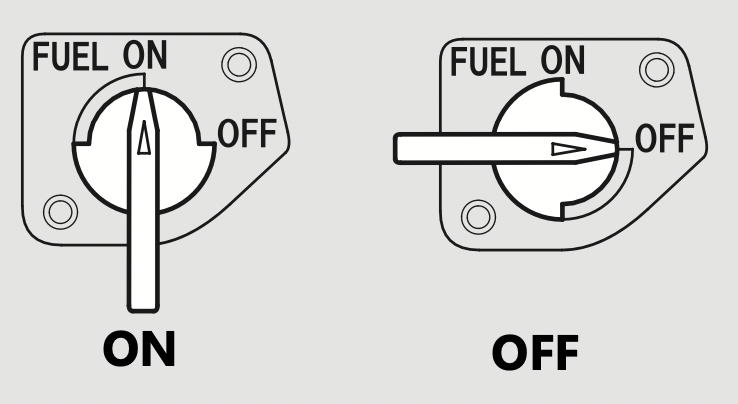
- Turn the fuel valve ON.
- Shift the transmission into neutral.
- If the temperature is 95°F (35°C) or below, pull the choke knob fully out.
- If the temperature is below 32°F (0°C), open the throttle two or three times.
The engine requires a richer mixture for starting in cold weather. When the throttle is so opened, the accelerator pump will feed extra fuel to the cylinder, thereby facilitating starting in cold weather.
- With the throttle closed, operate the kickstarter starting from the top of the kickstarter stroke, and kick through to the bottom of the stroke with a rapid, continuous motion.
Do not open the throttle, As the carburetor is equipped with an accelerator pump, excessive fuel will be charged into the engine, and the spark plug will be fouled if the throttle is opened and closed repeatedly. Excessive fuel in the engine makes kickstarting difficult.
- About a minute after the engine starts, push the choke knob all the way to fully OFF. If idling is unstable, open the throttle slightly.
Warm Engine Starting
- Turn the fuel valve ON.
- Shift the transmission into neutral.
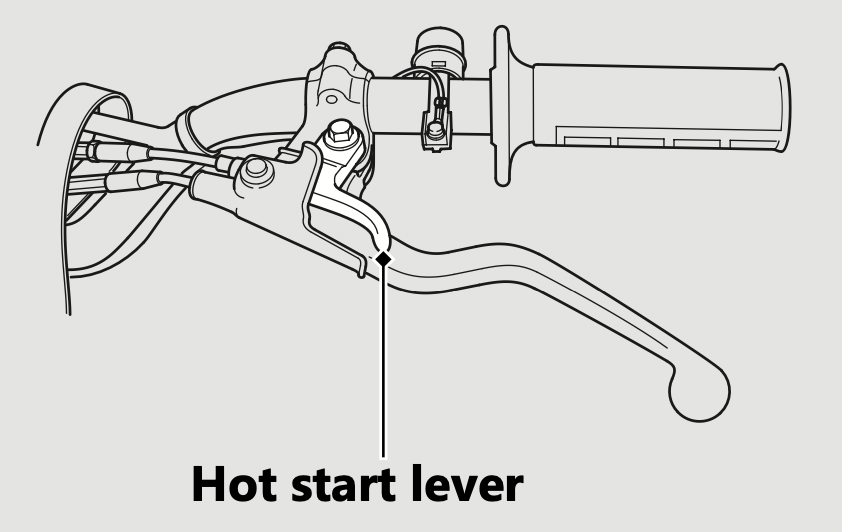
- Pull the hot start lever and kick-start the engine.
Do not open the throttle.
- As soon as the engine starts, release the hot start lever.
Starting the engine after a stall during riding or after a fall
- Shift the transmission into neutral.
- Pull the hot start lever and kick-start the engine.
Do not open the throttle.
- As soon as the engine starts, release the hot start lever.
Starting the engine with it flooded
If the engine fails to start after repeated attempts, it may be flooded with excess fuel.
To clear a flooded engine:
- Shift the transmission into neutral.
- With the throttle fully opened, repeat kickstarter operation approximately ten times very slowly to discharge excessive fuel from the engine.
- Pull the hot start lever and kick-start the engine.
Do not open the throttle.
- As soon as the engine starts, release the hot start lever.
When you stop the engine
Normal Engine Stop

- Shift the transmission into neutral.
- Turn the fuel valve OFF.
- Lightly open the throttle two or three times, and then close it.
- Push and hold the engine stop button until the engine stops completely.
Failure to close the fuel valve may cause the carburetor to overflow, result in hard starting.
Emergency Engine Stop
To stop the engine in an emergency, push and hold the engine stop button.
Shifting Gears
Your vehicle transmission has 5 forward gears in a one-down, four-up shift pattern.
- After the engine has been warmed up, the vehicle is ready for riding.
- While the engine is idling, pull in the clutch lever and depress the shift lever to shift into 1st (low) gear.
- Slowly release the clutch lever and at the same time gradually increase engine speed by opening the throttle. Coordination of the throttle and clutch lever will assure a smooth positive start.
NOTICE: When moving off from a standing start, be careful not to use too much throttle. The vehicle may “wheelie” over backwards.
- When the vehicle attains a moderate speed, close the throttle, pull in the clutch lever and shift to 2nd gear by raising the shift lever.
- This sequence is repeated to progressively shift to 3rd, 4th, 5th (top) gear. Raise the shift lever to shift to a higher gear and depress it to downshift. Each stroke of the shift lever engages the next gear in sequence. The shift lever automatically returns to the horizontal position when released.
NOTICE: Downshifting can help slow your vehicle, especially on downhills. However, downshifting when engine rpm is too high can cause engine damage.
NOTICE: Improper shifting can damage the engine, transmission, and drive train. Also, coasting or towing the vehicle for long distances with the engine off can damage the transmission.
Refueling
Be careful not to damage the fuel pump while filling the fuel tank.
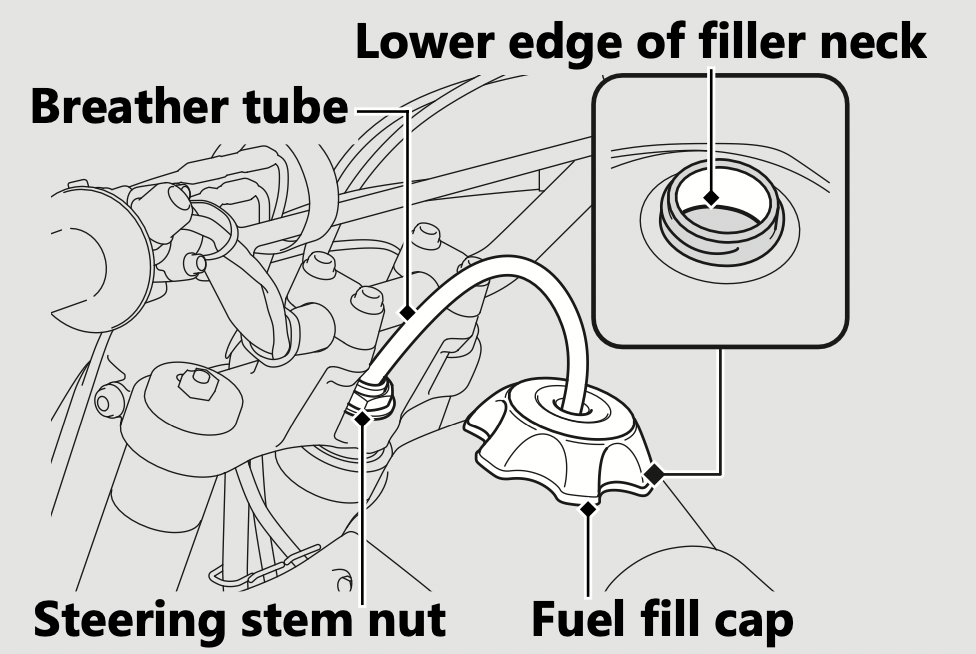
Do not fill with fuel above the lower edge of the filler neck.
Fuel type: Unleaded gasoline only
Recommended fuel octane number: Pump Octane Number (PON) 91 or higher.
Tank capacity: 1.14 US gal (4.3 L)
Opening the Fuel Fill Cap
- Pull the breather tube out of the steering stem nut.
- Turn the fuel fill cap counterclockwise and remove it.
Closing the Fuel Fill Cap
- After refueling, close the fuel fill cap securely.
- Insert the breather tube in the steering stem nut.
WARNING
Gasoline is highly flammable and explosive. You can be burned or seriously injured when handling fuel.
- Stop the engine, and keep heat, sparks, and flame away.
- Handle fuel only outdoors.
- Wipe up spills immediately.
Troubleshooting
Engine Will Not Start
Engine Does Not Start
Check the following items:
- Check the correct engine starting sequence.
- Check that there is gasoline in the fuel tank.
Caring for Your Vehicle
Frequent cleaning and polishing is important to ensure the life of your Honda. A clean vehicle makes it easier to spot potential problems. While you're cleaning, be sure to look for damage, wear, and gasoline or oil leaks.
Washing
Allow the engine, muffler, brakes, and other high-temperature parts to cool before washing.
- Rinse your vehicle thoroughly using a low pressure garden hose to remove loose dirt.
- If necessary, use a sponge or a soft towel with mild cleaner to remove road grime.
Clean the plastic components with extra care to avoid scratching them.
Avoid directing water into the air cleaner, muffler, and electrical parts.
Do not use steel wool to clean the frame as it could damage or discolor the frame surface. Scotch Brite Hand Pad #7447maroon is for removing stains on the non-coated aluminum frame only.
- Thoroughly rinse your vehicle with plenty of clean water and dry with a soft, clean cloth.
- After the vehicle dries, lubricate any moving parts.
Make sure that no lubricant spills onto the brakes or tires. Brake discs, pads, drum or shoes contaminated with oil will suffer greatly reduced braking effectiveness and can lead to a crash.
- Lubricate the drive chain immediately after washing and drying the vehicle.
- Apply a coat of wax to prevent corrosion.
Avoid products that contain harsh detergents or chemical solvents. These can damage the metal, paint, and plastic on your vehicle.
Keep the wax clear of the tires and brakes.
If your vehicle has any matte painted parts, do not apply a coat of wax to the matte painted surface.
Washing Precautions
Follow these guidelines when washing:
- Do not use high-pressure washers:
- High-pressure water cleaners can damage moving parts and electrical parts, rendering them inoperable.
- Water in the air intake can be drawn into the carburetor and/or enter the air cleaner.
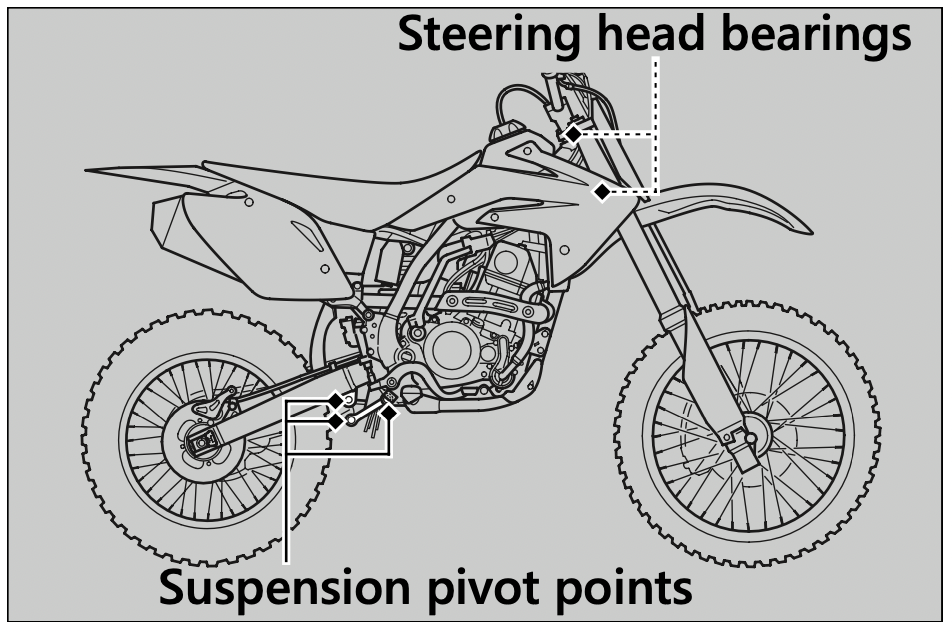
- If you use a high pressure washer, avoid spraying the following areas:
brake master cylinders
drive chain
engine stop button
muffler outlet
steering head bearings
suspension pivot points
under fuel tank
carburetor
under seat
wheel hubs
- Do not direct water at the muffler:
- Water in the muffler can prevent starting and causes rust in the muffler.
- Dry the brakes:
- Water adversely affects braking effectiveness. After washing, apply the brakes intermittently at low speed to help dry them.
- Do not direct water at the air cleaner:
- Water in the air cleaner can prevent the engine from starting.
- Do not use wax or polishing compounds on matte painted surface:
- Use a soft cloth or sponge, plenty of water, and a mild detergent to clean matte painted surfaces. Dry with a soft clean cloth.
Condensation Control
Some condensation can form within the transmission cavity as well. This is natural and just one more reason you should change the engine and transmission oil often.
Aluminum Components
Aluminium will corrode from contact with dirt, mud, or road salt. Clean aluminium parts regularly and follow these guidelines to avoid scratches:
- Do not use stiff brushes, steel wool, or cleaners containing abrasives.
Exhaust Pipe and Muffler
The exhaust pipe and muffler are stainless steel but may become stained by mud or dust.
To remove mud or dust, use a wet sponge and a liquid kitchen abrasive, then rinse well with clean water. Dry with chamois or a soft towel.
If necessary, remove heat stains by using a commercially available fine texture compound. Then rinse by the same manner as removing mud or dust.
NOTICE: Even though the exhaust is made of stainless steel, it can become stained. Remove all marks and blemishes as soon as they are noticed.
Storing Your Vehicle
If you won't be riding for an extended period, follow these guidelines:
- Wash your vehicle.
- Change the engine oil and filter.
- Replace the transmission oil.
- Inflate the tires to their recommended pressures.
- Drain the coolant.
- Lubricate the drive chain.
- Place your vehicle on an optional workstand or equivalent to raise both tires off the ground.
- Drain the fuel from the fuel tank and carburetor into an approved gasoline container. Turn the fuel valve OFF and loosen the carburetor drain screw. Drain gasoline into an approved container. Retighten the drain screw.
- Stuff a rag into the muffler outlet. Then tie a plastic bag over the end of the muffler to prevent moisture from entering.
- Store your vehicle in an unheated area, free of dampness, away from sunlight, with a minimum of daily temperature variation.
- Cover your vehicle with a porous material.
Avoid using plastic or similar non-breathing, coated materials that restrict air flow and allow heat and moisture to accumulate.
To remove your vehicle from storage, follow these guidelines:
- Uncover and clean your vehicle.
- Change the engine oil if more than 4 months have passed since the start of storage.
- Change the transmission oil if more than 4 months have passed since the start of storage.
- Uncover the end of the muffler and remove the rag from the muffler outlet.
- Fill the fuel tank with the recommended fuel.
- Pour a fresh recommended coolant mixture slowly into the radiator fill hole up to the filler neck.
- Perform all maintenance checks.
Transporting Your Vehicle
If your vehicle needs to be transported, it should be carried on a motorcycle trailer or a flatbed truck or trailer that has a loading ramp or lifting platform, and motorcycle tie-down straps. Never try to tow your vehicle with a wheel or wheels on the ground.
NOTICE: Towing your vehicle can cause serious damage to the transmission.
If you use a truck or motorcycle trailer to transport your vehicle, we recommend that you follow these guidelines:
- Use a loading ramp.
- Drain the fuel from the fuel tank and carburetor into an approved gasoline container.
- Secure the vehicle in an upright position, using motorcycle tie-down straps. Avoid using rope, which can loosen and allow the vehicle to fall over.
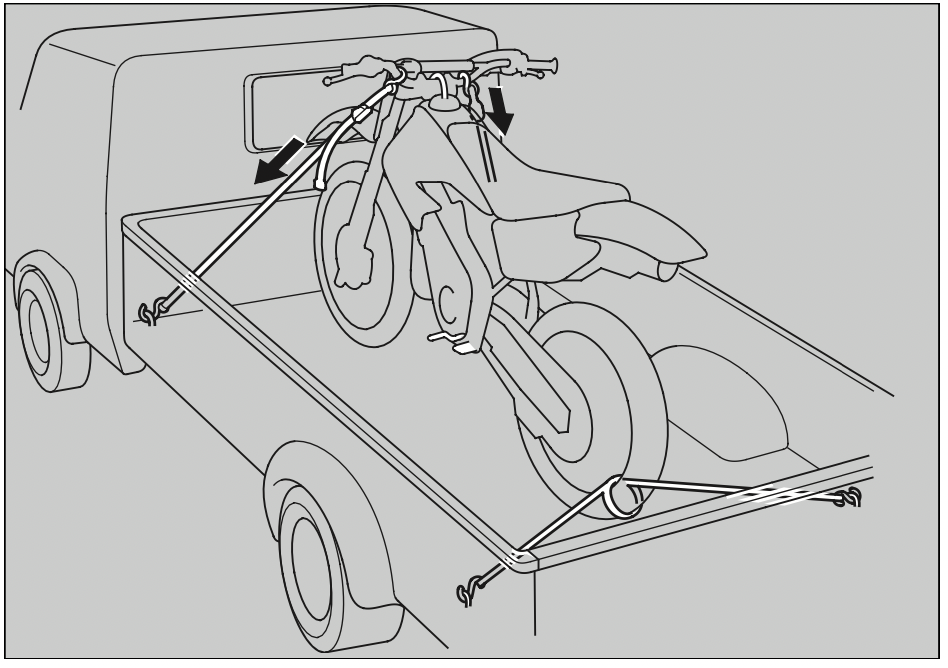
To secure your vehicle, brace the front wheel against the front of the truck bed or trailer rail. Attach the lower ends of two straps to the tiedown hooks on truck bed or trailer rail. Attach the upper ends of the straps to the handlebar (one on the right side, the other on the left), close to the fork.
Check that the tie-down straps do not contact any control cables or electrical wiring.
Tighten both straps until the front suspension is compressed about half-way. Too much pressure is unnecessary and could damage the fork seals.
Use another tie-down strap to keep the rear of the vehicle from moving.
We recommend that you do not transport your vehicle on its side. This can damage the vehicle, and leaking gasoline could be a hazard.
You & the Environment
Owning and riding a vehicle can be enjoyable, but you must do your part to protect the environment.
Choose Sensible Cleaners
Use a biodegradable detergent when you wash your vehicle. Avoid aerosol spray cleaners that contain chlorofluorocarbons (CFCs) which damage the atmosphere's protective ozone layer.
Recycle Wastes
Put oil and other toxic wastes in approved containers and take them to a recycling center. Call your local or state office of public works or environmental services to find a recycling center in your area, and to get instructions on how to dispose of non-recyclable wastes. Do not place used engine oil in the trash, or pour it down a drain or on the ground. Used oil, gasoline, coolant, and cleaning solvents contain poisons that can hurt refuse workers and contaminate drinking water, lakes, rivers, and oceans.
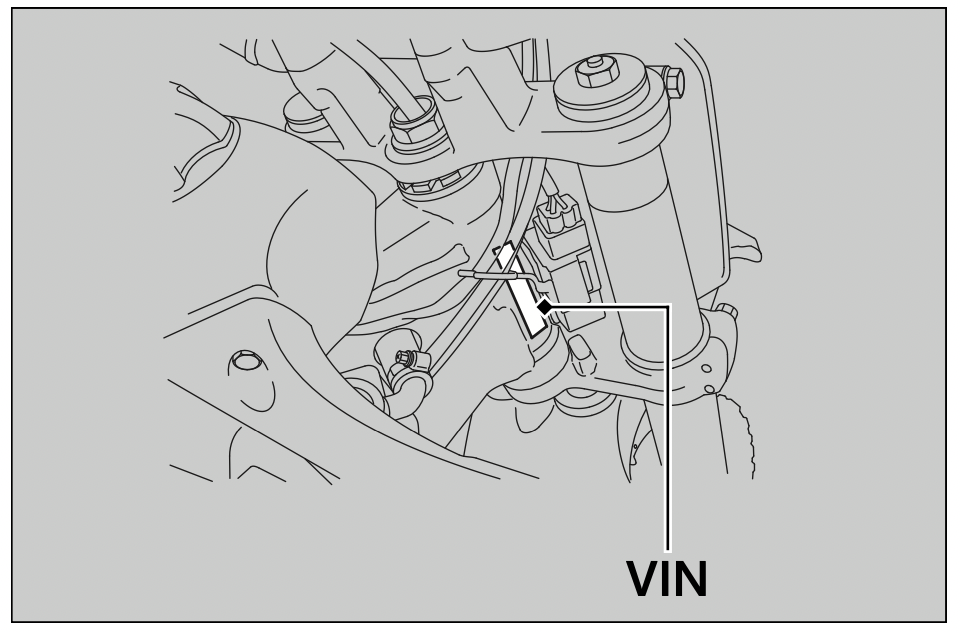
Vehicle Identification Number
The VIN and engine serial number uniquely identify your vehicle and are required in order to register your vehicle. They may also be required when ordering replacement parts. You should record these numbers and keep them in a safe place.

Oxygenated Fuels
Some conventional fuels blended with alcohol or an ether compound are available in some locales to help reduce emissions to meet clean air standards. These gasolines are collectively referred to as oxygenated fuels. If you plan to use oxygenated fuel, check that it is unleaded and meets the minimum octane rating and blend requirement.
The following fuel blends have been approved for use in your vehicle:
- Ethanol (ethyl alcohol) up to 10% by volume.
- Gasoline containing ethanol may be marketed under the name Gasohol.
- Do not use gasoline containing methanol (methyl alcohol).
If you accidentally fill your fuel tank with an oxygenated fuel containing higher percentages, you may experience performance problems. To resolve the problem, have your dealer drain the fuel tank and replace with the correct fuel. Fuel system or performance problems resulting from the use of an oxygenated fuel containing higher percentages are not covered by your warranty.
NOTICE: Improper use of oxygenated fuels can damage metal, rubber, and plastic parts of your fuel system.
Oxygenated fuel can also damage paint.
If you notice any undesirable operating symptoms or performance problems, try a different brand of gasoline.