User manual FOOD DEHYDRATOR MACHINE
-738719.png)
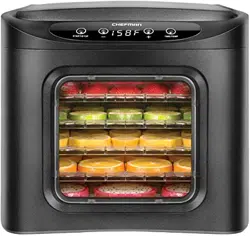
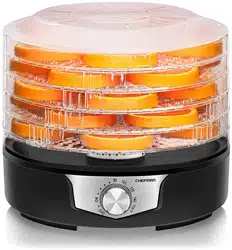
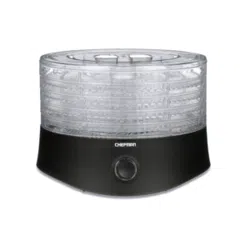
FEATURES
-561663.png)
1. DOOR
2. WINDOW
3. CONTROL PANEL
4. TRAY (6 PCS)
5. FRUIT ROLL MESH
6. DRIP TRAY
-517438.png)
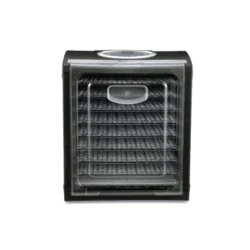
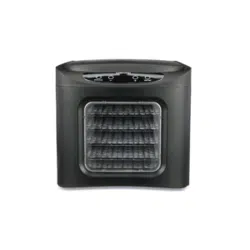
7. START/STOP BUTTON
8. LOWER TIME/TEMP
9. RAISE TIME/TEMP
10. TIME/TEMP BUTTON
OPERATING INSTRUCTIONS
Control Panel - all features and functions of the dehydrator can be controlled from this panel.
TIME/TEMP Button - toggles between time or temperature settings.
Window Door - swings out from left to right to easily access the food trays. Make sure all trays are fully pushed back before you open or close the door.
Drying Trays - Six plastic trays are designed to hold and support significant quantities of food to dry. The racks are perforated to allow air to circulate for drying and to allow any moisture or debris to fall to the drip pan.
Protective Food Sheet - You may dry fragile or thinly sliced foods. The protective food sheet has smaller perforations that will allow these foods to stay intact while they are dried. Use this feature to dry rolled fruit or fruit leather. Always place the protective food sheet together with a drying tray. Lightly coat the protective food sheet with cooking spray before adding fruit or other fragile foods for drying. The spray will help assist foods to slip off easily after they have been dried.
Drip Pan - catches drips of moisture or debris from food while drying. This pan will help keep the interior of the dehydrator clean.
BEFORE FIRST USE
- Place the unit on a level, flat surface that is clean and dry.
- Wash the drying trays and protective food sheet in a warm soapy water. Dry thoroughly.
- Use a soft, damp cloth to clean the exterior of the dehydrator and door. Dry with a paper towel or soft cloth.
- Plug the dehydrator into an electrical outlet. Display will show "0000".
- Turn on the unit as a dry-run for 30 minutes before you attempt to dehydrate food. This prepares the interior for your initial use. Smoke or odors are normal during the initial preparation drying time.
SETTING TIME AND TEMPERATURE SETTING TO START
- Place prepared foods on the Drying Trays (see food preparation tips) and securely close door. Do not overload the drying trays with food.
- Food should be placed on drying trays in single layers ONLY, not touching or overlapping in any way.
- Insert the plug into a grounded electric outlet.
- Check your recipe instructions or the chart in this manual to set your desired temperature and time (See Page 10).
- Press "TIME/TEMP" to set time and temperature, then press "START/STOP" to begin dehydrating.
CHANGING TIME AND TEMP SETTINGS WHILE DRYING
You can change the time or temperature of the drying process before or after you have started the dehydrating. The drying time range is in 30-minute increments from 00:30 hours to 19 hours 30 minutes. The temperature range is from 95°-158°.
Follow these step by step directions:
a. To change the drying time during drying press the TIME/TEMP Button
Press the “+” icon to increase the time
Press the “-” icon to decrease the time
b. To change the temperature during the drying process, press the TIME/TEMP Button
Press the “+” icon to increase the time
Press the “-” icon to decrease the time
Increases or decreases in Temperature are done in 5° F increments.
NOTES ON TIME AND TEMPERATURE ADJUSTMENTS
- The time remaining in the drying process is always shown on the LED display.
- When the new temperature is set, the LED display will automatically return to indicate the remaining drying time.
- You can check the new temperature by pressing the TIME/TEMP button.
Caution: Use caution when opening the door while food is drying. Although temperatures are not very high, burns can occur from the hot air. Use pot holders or mitts while opening and closing the door and handling the drying trays. Opening the door can increase drying time.
WHEN DRYING PROCESS IS COMPLETE
- When the drying process is complete, the LED display will indicate "END".
- The heating element will automatically turn off.
- The automatic fan will automatically turn off after 10 seconds.
- The dehydrator will beep to indicate that the drying process is complete.
- The LED display will display "END".
- Carefully remove food on trays using pot holders or oven mitts.
- Unplug power cord from the wall outlet.
FOOD DEHYDRATING GUIDE
The drying time for any food is dependent on several factors, including: Food type, thickness, quantity, and ambient humidity levels in the room.
Because of these factors, you will want to occasionally check the food as it dries and determine whether or not it is ready to be removed.
Tip: One easy way to determine if food is dried is to place a piece in a small zipper seal plastic bag. Seal the bag and shake it lightly. If moisture appears, the food is not ready to be removed.
DRYING FRUIT HINTS & TIPS
Select fruit that is ripe; avoid fruit that is not yet ripe or over-ripe. If not yet ripe, the texture and taste may be unappealing; if over-ripe, the texture may be mushy and bland.
- Wash fruit just before drying to remove any debris or dirt.
- Do not use fruit that has blemishes, evidence of bug infestation or worms, or discoloration.
- Cut off parts of fruit that appear to be bruised or damaged in transit.
- Discard pits, stones, seeds and other inedible parts of the fruit.
- Peel fruit, if desired, or if rinds or peels lend a bitter or unappetizing taste or texture.
- Always peel waxed or sprayed fruit.
- Slice or cut fruit as desired (see notes following).
DRYING VEGETABLES HINTS & TIPS
- Start with the freshest crisp vegetables.
- Unripe vegetables often have an extremely bitter, acidic flavor. Avoid vegetables that are not ripe or over-ripe to produce the best tasting dehydrated vegetables
- Wash and dry vegetables just before drying to remove any debris or dirt.
- Do not use vegetables that have blemishes, evidence of bug infestation or worms, or discoloration.
- Cut off parts of vegetables that appear to be bruised or damaged in transit.
- Discard seeds, stems, rinds and other inedible parts of the vegetable.
- Peel vegetables; almost all vegetables should be peeled or cut before drying. Rinds or peels lend a bitter or unappetizing taste or texture.
CUTTING & SLICING VEGETABLES HINTS & TIPS
- To create uniform pieces, slice or quarter vegetables as needed.
- Pieces should be no larger than 1-2 inches in diameter.
- Cut thin slices of dense vegetables, such as potatoes and beets.
- Trim ends or leave some vegetables whole, such as asparagus and green beans.
- The pre-treatment of vegetables is usually recommended and is best accomplished by blanching over boiling water for 2 to 3 minutes, just long enough to set the color and remove acidic flavors.
DRYING NUTS HINTS & TIPS
- To reduce enzymes, first soak raw nuts in plenty of water for 24 hours before drying.
- Nuts vary in soaking and drying times. The nuts will expand in size - allow plenty of room in the soaking jar or bowl
- Drain the nuts and dry until crispy, about 10 hours.
- Store in air-tight containers.
DRYING HERBS & EDIBLE FLOWERS HINTS & TIPS
- Rinse thoroughly in cold water and gently dry.
- Remove any dead or discolored leaves.
- Spread on Drying Trays and dry for up to 8 hours. Remove and cool.
- Break or crush the herbs and store in a self-sealing container in a dark, cool place.
- Flowers can be dried in much the same way and used as garnishes or for flavoring.
CAUTION: Be confident that the flowers and herbs selected for drying are edible and pose no danger or threat if consumed. If in doubt, throw away the herbs or flowers. After blanching, arrange on the Drying Trays.
DRYING MEAT OR FISH HINTS & TIPS
IMPORTANT: The USDA's current recommendation (as of 2017) for making jerky safely is to pre-heat meat to 160°F and poultry to 165°F before the dehydrating process. This step ensures that any bacteria present will be destroyed by wet heat. Because this product only reaches 158°F, before dehydrating meat or poultry, make sure to heat up the food to the recommended temperature as directed.
Suggestions for Safe Meat Dehydration include:
- To properly dry meat, ALWAYS use temperatures above 140°F to avoid potentially dangerous bacteria growth.
- You can boil the meat for 5 minutes prior to dehydrating. Once the internal temperature of the meat (160°F) or poultry (165°F) has reached its respective recommended temperature, the food is safe to dehydrate.
- You can dehydrate the meat or poultry first (at a safe recommended temperature) and then afterward, place in your oven at a minimum temperature of 165°F (74°C) for at least minutes.
- Meat must be sliced very thinly to be dried. Partially freeze meat for up to 1 hour. Remove and slice thinly across the grain. Place on the Drying Trays right away. Do not crowd or overlap the meat slices.
- When done, test a piece of meat. It should crack when bent without snapping. Remove and cool completely on racks. Store in sealed plastic bags for up to 2 weeks or freeze until use.
- Create a great low fat Teriyaki Chicken Jerky by thinly slicing chicken breasts and marinating in Teriyaki sauce for 1 hour prior to drying. Arrange on Drying Trays right away right away and dry at 145°F until crisp. When done, add crushed red pepper, chili powder or other spices to kick up the flavor.
- Seafood fillets should also be thinly sliced. If needed, partially freeze the fish first, then thinly slice with a sharp knife. Remove any bones, even small ones, for best results.
Cooking Guide
-835361.png)
-490904.png)
-110878.png)
CLEANING & MAINTENANCE
CLEANING INSTRUCTIONS
- Always allow the dehydrator to cool completely before cleaning.
- Unplug the dehydrator before cleaning.
- After each use, clean and dry the drying trays and protective food sheet in warm, soapy water.
- Use a damp cloth to clean the dehydrator and door as needed.
- Do not immerse the dehydrator in water. Use nonabrasive cleaners or soft soap only.
- Do not place drying trays or protective food sheets in dishwasher.