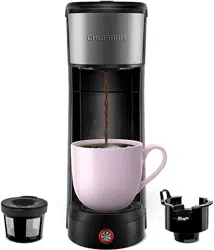
Coffee will disperse into frothing mug or travel mug..
Brew button will blink, indicating cycle is almost finished.
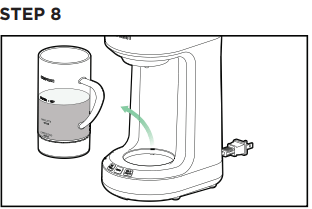
Once appliance stops running, carefully remove mug and enjoy!
Always remove and dispose of K-Cup® after brewing.
HOW TO BREW WITH COFFEE GROUNDS
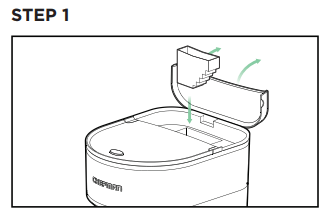
Lift up water tank lid to place water level indicator inside.
Paying attention to water levels, pour in desired amount of water. NOTE: For best results, we recommend 8 oz. filtered water.
Plug in appliance. NOTE: All buttons will blink once indicating appliance is on.
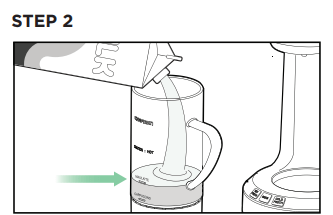
To open brew chamber, push lid release button.
Pull up “Open” tab on removable coffee filter.
Add 1 tbsp. coffee grounds.
Snap filter closed. Wipe away excess coffee from rim of filter.
Insert filter into removable pod holder in brew chamber.
Push down brew chamber lid to close.
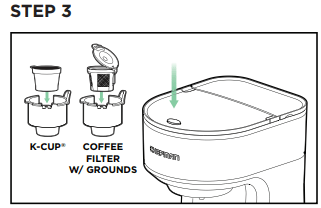
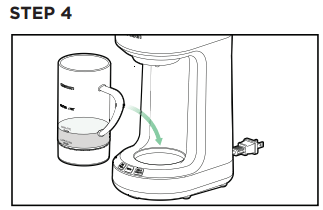
Place included frothing mug or travel mug under drip spout.
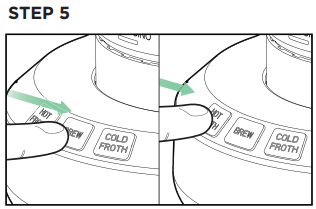
Press Brew button. NOTE: Brew button will illuminate, indicating brewing cycle is beginning. NOTE: Brew button illuminates. Hot Froth button blinks indicating it can be selected as well. See "How to Hot Froth and Brew" for instructions. NOTE: Note: To cancel brewing cycle, press Brew button again.
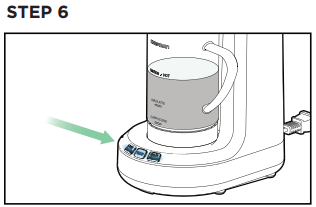
Coffee will disperse into frothing mug or travel mug.
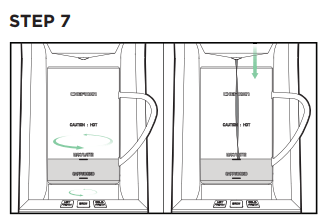
Brew button will blink, indicating cycle is almost finished.
Once appliance stops running, carefully remove mug and enjoy!
HOW TO MAKE COLD FROTH (*Requires frothing mug.)
Plug in appliance. NOTE: All buttons will blink once, indicating appliance is on.
Pour desired amount of milk into frothing mug. Do not fill above LATTE/MAX line.
Frother on bottom of mug will spin, aerating and frothing milk.
Cold Froth button will blink, indicating frothing cycle is almost finished.
Once appliance stops running, carefully remove mug.
Top iced coffee, espresso, matcha, or any other beverage with this cold froth and enjoy!
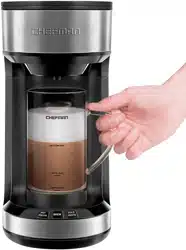
HOW TO MAKE HOT FROTH(*Requires frothing mug.)
Plug in appliance. NOTE: All buttons will blink once, indicating appliance is on.
Pour desired amount of milk into frothing mug. Do not fill above LATTE/MAX line.
Place frothing mug under drip spout.
Press Hot Froth button. NOTE: To cancel hot froth cycle, press Hot Froth button.
Frother on bottom of mug will spin, aerating and frothing milk.
Hot Froth button will blink, indicating frothing cycle is almost finished.
Once appliance stops running, carefully remove mug.
Top coffee, matcha or any other beverages with hot froth and enjoy
HOW TO HOT FROTH AND BREW (*Requires frothing mug.)
Lift up water tank lid to place water level indicator inside.
Paying attention to water levels, pour in desired amount of water.
Plug in appliance. NOTE: All buttons will blink once, indicating appliance is on.
To open brew chamber, push lid release button.
Add K-Cup® or coffee grounds. (Refer back to page 4).
Push down brew chamber lid to close.
Pour desired amount of milk into frothing mug. Do not fill above LATTE/MAX line.
Place frothing mug under drip spout.
Press Brew button. NOTE: Brew button will illuminate, and Hot Froth will blink.
Select Hot Froth button as it blinks. NOTE: Order of buttons pressed does not affect the brewing cycle. Frothing cycle always runs first.
Frother on bottom of mug will spin, aerating and frothing milk.
After frothing is complete, appliance begins brewing and coffee will disperse into mug.
Hot Froth and Brew buttons will blink, indicating both cycles are almost finished.
Once appliance stops running, carefully remove hot mug and enjoy!
Always remove and dispose of K-Cup® and/or coffee grounds after brewing.
HOW TO BREW WITH COFFEE GROUNDS
Lift up water tank lid to place water level indicator inside.
Paying attention to water levels, pour in desired amount of water. NOTE: For best results, we recommend 8 oz of filtered water.
Plug in appliance. NOTE: All buttons blink once indicating appliance is on.
To open brew chamber, push lid release button.
Pull up “Open” tab on removable coffee filter.
Add 1 tbsp of coffee grounds.
Snap filter closed. Wipe away excess coffee from rim of filter.
Insert filter into removable pod holder in brew chamber.
Push down brew chamber lid to close.
Place included frothing mug, or travel mug, under drip spout.
Press Brew button.
Coffee will disperse into mug.
Brew button will blink, indicating cycle is almost finished.
Once appliance stops running, carefully remove mug and enjoy!
CLEANING AND MAINTENANCE
HOW TO CLEAN FROTH AND BREW
Unplug appliance and let cool.
Open water tank and brew chamber lids.
Remove and wash pod holder, coffee filter, water level indicator, and mug with a sponge and warm, soapy water. Appliance and accessories are not dishwasher safe. Never immerse appliance or plug in water or any other liquid.
Wipe exterior of appliance and interiors of brew chamber and water tank clean with a soft, damp, lint-free cloth. CAUTION: When opening lid and handling pod holder, be mindful of puncturing needle for K-Cup® located inside brew chamber.
Leave water tank and brew chamber lids open to fully dry.
Once dry, store appliance unplugged, in a cool, dry place.
HOW TO USE SELF-CLEANING FEATURE
This feature prevents and removes mineral build-up. We recommend using this feature after every few uses.
Fill water tank with 20 oz. water or a combination of 19 oz. water and 1 oz. white vinegar. NOTE: For best results, we recommend using the water/vinegar mixture.
Place mug under drip spout.
Remove coffee filter.
Plug in appliance.
Press and hold Brew button for about 5 seconds, or until button illuminates and blinks.
Appliance will dispense hot water.
When water stops dispensing, Brew button will blink for 20 more minutes until it dispenses remaining water.
Do not remove coffee mug from base until Brew button light stops flashing and turns off completely.
After Brew button light has turned off completely, carefully remove hot mug from base.
Discard brewed cleaning mixture. NOTE: If using a water/vinegar mixture, we recommend repeating this process 4 more times with water to prevent vinegar taste
TROUBLESHOOTING AND FAQS
Q: Can I use any type of mug to froth?
A: Only the included frothing mug will work to froth milk, but you can use any standard mug to brew coffee.
Q: Can I froth and brew at the same time?
A: You can set the Froth+Brew to immediately brew coffee upon completion of a Hot Froth cycle (see instructions on reverse side).
Q: What should I do if the water tank is overfilled and the brewing cycle has already begun?
A: Let cycle run or press Brew or Froth buttons to cancel. Do not pour out water while the appliance is plugged in or hot.
If you realize you’ve overfilled the water tank as you’re brewing, let cycle run or press Brew or Froth buttons to cancel. Do not attempt to take appliance and turn upside down to pour water out. Hot water will disperse from drip spout.
Milk and creamer do not belong in water tank. Only use water in water tank.
For best results, we recommend using filtered water. If using a K-Cup®, remove the coffee filter first.
CULINARY FROTHING AND BREWING TIPS
To froth, you must only use the included frothing mug.
You cannot use the Cold Froth and Brew buttons in one cycle.
You can froth any type of milk. Just keep in mind milk varies in thickness depending on what type it is. Almond milk froth will not be as thick as oat or cow’s milk. To make a thick froth, use a creamer or whole milk.
After frothing, don’t let froth sit for too long or else it will settle and separate.
Ground coffee becomes stale faster than whole beans. Keep in mind when buying ground coffee to look for latest expiration date or a smaller quantity.
Water quality varies. For best results, use bottled or filtered water. Do not use distilled water.