Spring Breeze Fragrance Discs Replacement Pack (2-pack) or Odor Eliminating Scent Discs (2-pack)
Triangle Mop Pad Foot
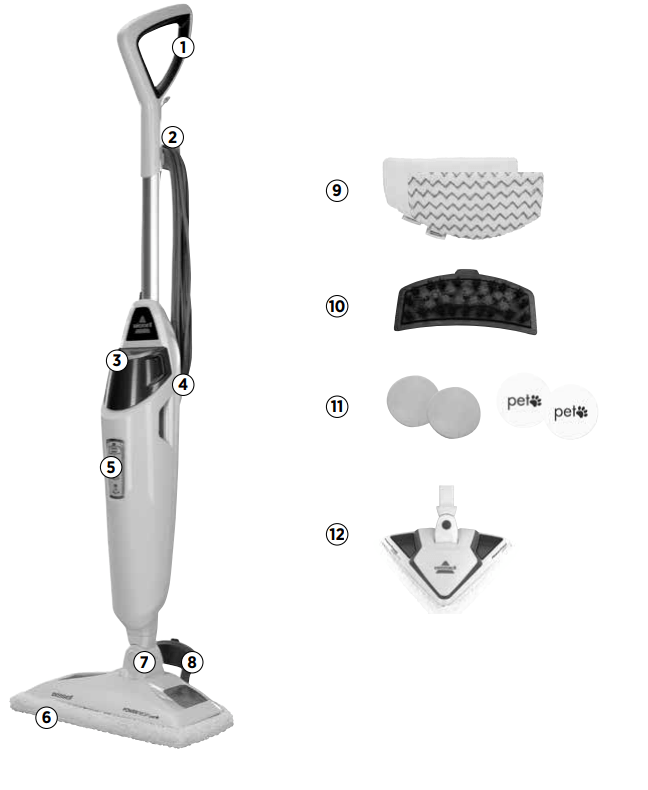
Assembly
Your PowerFresh® Pet Steam Mop assembles quickly and easily. It is packaged with the following items:
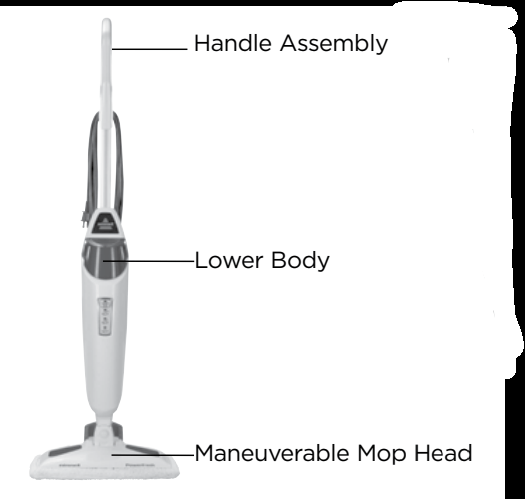
Handle Assembly with one screw
Lower Body
Maneuverable Mop Head
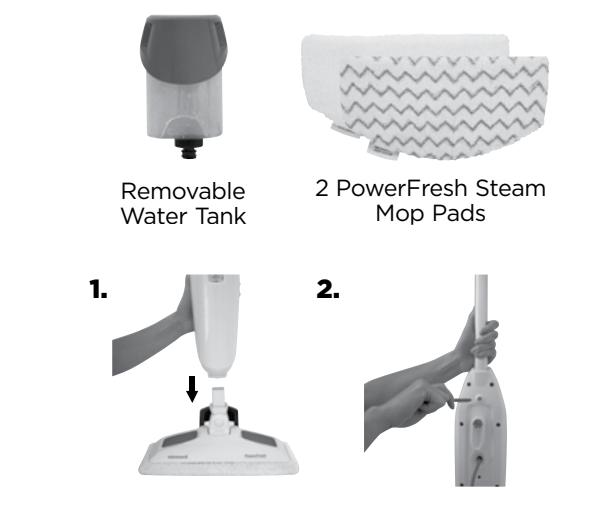
Removable Water Tank
Removable Easy Scrubber (attached to mop head)
2- PowerFresh® Pet Steam Mop Pads
2- Spring Breeze Fragrance Discs
Attach lower body to mop head by snapping it into place.
Slide handle assembly down and screw until tightened. PowerFresh® Pet Steam Mop assembly is now complete.
WARNING Exercise extreme care when using the PowerFresh® Pet on hardwood floors. Prolonged application of steam in one area increases the risk of damage to the surface treatment on timber floors. Test steam mop in an inconspicuous area before mopping a large area. The steam mop generates hot steam, so move the unit continuously when depressing the trigger. The trigger does not need to be depressed at all times. Regular foot traffic and direct sunlight will wear down timber floor surface treatment, making it more susceptible to steam damage. Check with your timber floor treatment and application specialist prior to steam mop operation.
Operations
Special Features
WARNING Do not attempt to use your PowerFresh® Pet Steam Mop without water in the tank. You may hear a knocking sound indicating there is no water.
Removable water tank
The water tank is located on the top of the steam mop. It can be refilled with water any time during use. Distilled or demineralized water is recommended in place of tap water.
Do not use chemicals in the water tank of your PowerFresh® Pet Steam Mop.
SmartSet™ Steam Control
(Low, Medium, High) SmartSet™ Steam
Control indicator light will stop blinking when PowerFresh® Pet Steam Mop is ready to use.
Then press the Steam Level button to choose the level of steam you desire.
Microfiber Mop Pads
Reusable microfiber mop pads are machine washable and safe for virtually all hard floor surfaces. Your steam mop may have come with two different pads. The white microfiber pad is best for everyday use on delicate flooring like sealed hardwoods and laminate. The gray and white striped pad can be used for scrubbing heavily soiled floors and cleaning tougher messes. .
Removable Easy Scrubber
Quickly clean sticky messes by pressing the Easy Scrubber with your foot and locking it into position. Clean grout and crevices easily with this effective tool.
Triangle Mop Pad Foot
Some units may come with an additional triangle foot. To use, attach the lower body to the mop head by snapping it into place. Use to clean in corners and other hard to reach areas.
Getting ready
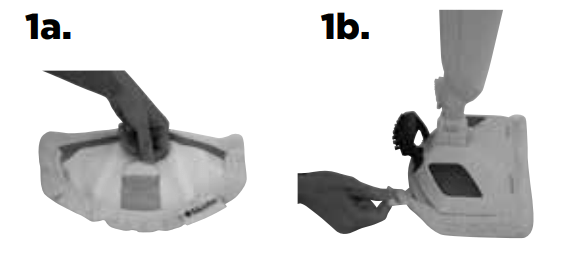
The mop pad may have already come attached to the mop head, if not follow steps 1a and 1b below.
Add Freshening Disc and attach mop pad
Insert Spring Breeze Freshening Disc into pocket inside mop pad. Use the whole disc for a refreshing scent or cut in half for a lighter scent.
Set mop head in mop pad, making sure quick-grip release tab is located on the back.
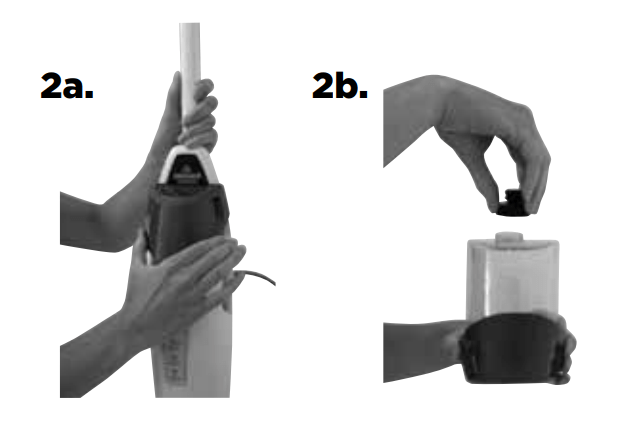
Fill the water tank
Remove tank by lifting straight up and away from unit.
Unscrew cap at bottom of water tank.
Fill water tank with water. For best results, water should be at room temperature.
Replace the cap, tighten until snug.
Replace water tank by gently sliding tank into place and press down firmly.
Twist the Quick Release™ cord wrap clockwise to unwrap the power cord completely and plug into a 120-Volt outlet as described on the Important Safety Instructions, page 3.
SmartSet™ Steam Select Indicator light will glow when the steam mop is ready to use. Press the Steam Level button to choose the level of steam you desire.
NOTE: Upon first use of the PowerFresh® Pet Steam Mop or first use after refilling the water tank, the pump may make a “knocking” sound. This is normal and should only last a few seconds.
Before you clean
Thoroughly sweep or vacuum floor prior to cleaning with the PowerFresh® Pet Steam Mop.
Cleaning hard floors
Your steam mop is designed to clean hard flooring such as ceramic tile, vinyl, laminate, marble, stone and sealed hard wood floors. Use of your steam mop on waxed or some unwaxed floors may result in a diminished glossiness. The steam mop is not for use on unsealed wood floors. For best results test in an inconspicuous area and check the care instructions from your flooring manufacturer.
Plug the unit in and wait 30 seconds for it to heat up. Choose the level of steam to clean your floor: Low (delicate floors), Medium (regular cleaning), High (durable floors or sticky messes). Begin cleaning by slowly passing the unit over the floor surface.
To thoroughly clean dried-on sticky spots place the scrubby pad on the steam mop. Then press and lock the Easy Scrubber brush into place and slowly move the brush over the sticky spot to remove.
To turn off the steam mop, continue to press the Steam Level button until the blue light is illuminated above the Steam Level button.
When the steam mop stops emitting steam, unplug the unit. Simply remove the water tank, refill, and continue steaming.
NOTE: To be sure to sanitize an area of your floor, use the microfiber cloth pads and slowly and evenly stroke the Powerfresh Pet back and forth at least three times over the area using continuous steam. For best results, remove the pad and wash after use.
Carpet Refresher Attachment (select models)
This accessory is recommended for the refreshing of carpets. Once the steam mop is cradled in the carpet refresher attachment, it will easily glide over the carpet.
NOTE: Always be sure a mop pad is in place before placing in carpet refresher attachment. Only white mop pads should be used with the carpet attachment. Do not use carpet attachment on spots or stains, or glide it over the same spot for no longer than 20 seconds.
Place the swivel mop head, with mop pad attached, in the carpet refresher attachment. NOTE: The PowerFresh® Pet Steam Mop rests in the carpet refresher attachment (select models) and may not stay attached to the swivel mop head. It is meant to glide over the carpet.
Fill the water tank with water. Begin refreshing your carpet or rug by pushing the steam mop in a forward and backward motion, releasing steam as you go.
When you have finished refreshing your carpet or rug, unplug the steam mop and remove from the carpet or rug.
NOTE: Move the steam mop and carpet refresher attachment in a continuous motion until you are finished. This product is not intended to be used as a carpet cleaner, only a carpet refresher or deodorizer. Never attempt to use the steam mop on carpet without the carpet refresher attachment in place. DO NOT leave the mop in a stationary position.
Maintenance & Care
When you’re done
Unplug power cord from outlet.
Carefully remove the mop pad using the Quick Release™ tab from the mop head. The mop pad and lower assembly may be hot. Remove Spring Breeze Freshening Disc from mop pad.
Any water remaining in the water tank should be emptied prior to machine storage.
Mop pad can be machine washed in warm water. Use only liquid detergents. Do not use fabric softeners or bleach. For best results, air dry.
Wrap power cord around quick release cord wrap on back of the steam mop.
Wipe all surfaces of the steam mop with a soft cloth. Store upright in a protected, dry area.
WARNING To reduce the risk of electric shock, turn power switch off and disconnect polarized plug from electrical outlet before performing maintenance or troubleshooting checks.
CAUTION Upright storage of the cleaner with a wet mop pad may result in the formation of white marks on your floor. To remove the white marks, clean area with vinegar.
Troubleshooting
WARNING To reduce the risk of electric shock, turn power switch off and disconnect polarized plug from electrical outlet before performing maintenance or troubleshooting checks.
Problem
Possible causes
Remedies
Reduced steam or no steam
Water tank empty
Fill tank
Steam level not selected
Select steam level by pushing steam level button
Please do not return this product to the store.
Other maintenance or service not included in the manual should be performed by an authorized service representative. Thank you for selecting a BISSELL product.

 WARNING Exercise extreme care when using the PowerFresh® Pet on hardwood floors. Prolonged application of steam in one area increases the risk of damage to the surface treatment on timber floors. Test steam mop in an inconspicuous area before mopping a large area. The steam mop generates hot steam, so move the unit continuously when depressing the trigger. The trigger does not need to be depressed at all times. Regular foot traffic and direct sunlight will wear down timber floor surface treatment, making it more susceptible to steam damage. Check with your timber floor treatment and application specialist prior to steam mop operation.