

2
Original user manual, written in the English Language
Future Cleaning Technologies B.V.
Hoppenkuil 27b, 5626 DD Eindhoven, The Netherlands
Telephone: +31402662400
Email: hello@i-teamglobal.com
Internet: www.i-teamglobal.com
Model: I-GUM GAS VERSION
Date: 09/04/2020
Product code: K.1.IMOPLT.FCT.1100C
Version: v.1.0

3
Preface
Thank you for choosing the i-mop® Lite, the auto scrubber that cleans faster, cleaner, safer, greener,
and is better for everyone. The i-mop Lite's compact design allows you to clean right to the edge and
under obstacles, minimizing manual scrubbing. The battery operated i-mop Lite is equipped with two
counter-rotating brushes that provide a deep scrub and a great cleaning result. The i-mop Lite
significantly reduces the amount of water and chemicals needed which both leads to a greener result
and reduces the risk of slippery floors.
Please read this manual carefully for important information and operating instructions before using
the i-mop Lite. Save this manual for future reference. This i-mop Lite will provide excellent
performance. The best results will be obtained when the i-mop Lite is:
• Regularly maintained per the i-mop Lite preventive maintenance instructions in this manual.
• Operated with reasonable care and caution.
• Maintained with manufacturer-supplied parts.
When this manual refers to “the manufacturer”, this means Future Cleaning Technologies B.V., an
affiliate company of i-team in Eindhoven, the Netherlands. When this manual mentions “the
partner”, this refers to your local i-team resell and support service partner.
Purpose of the user manual
The purpose of the user manual is to provide the user with information in such a way that during the
life of the i-mop Lite the machine is used correctly, efficiently and safely, even in the event of
reasonably foreseeable misuse, as described in section 1.2 of this manual.
The user manual contains instructions regarding:
• Personal operator safety
• Intended and non-intended use of the i-mop Lite
• Instructions for daily use
• Maintenance instructions
• Storage conditions
• Disposal of the i-mop Lite
These instructions must be considered to avoid risks that could lead to physical and/or material
damage.
Target audience
This user manual is intended for operators of the i-mop Lite and their supervisors, as well as partners
and importers.
Operators of the i-mop Lite
The i-mop Lite may only be operated by a person who has correctly read and understood the
instructions in this manual, or is trained by an experienced operator who has read and understood
the instructions in this manual.
4
Reading guide
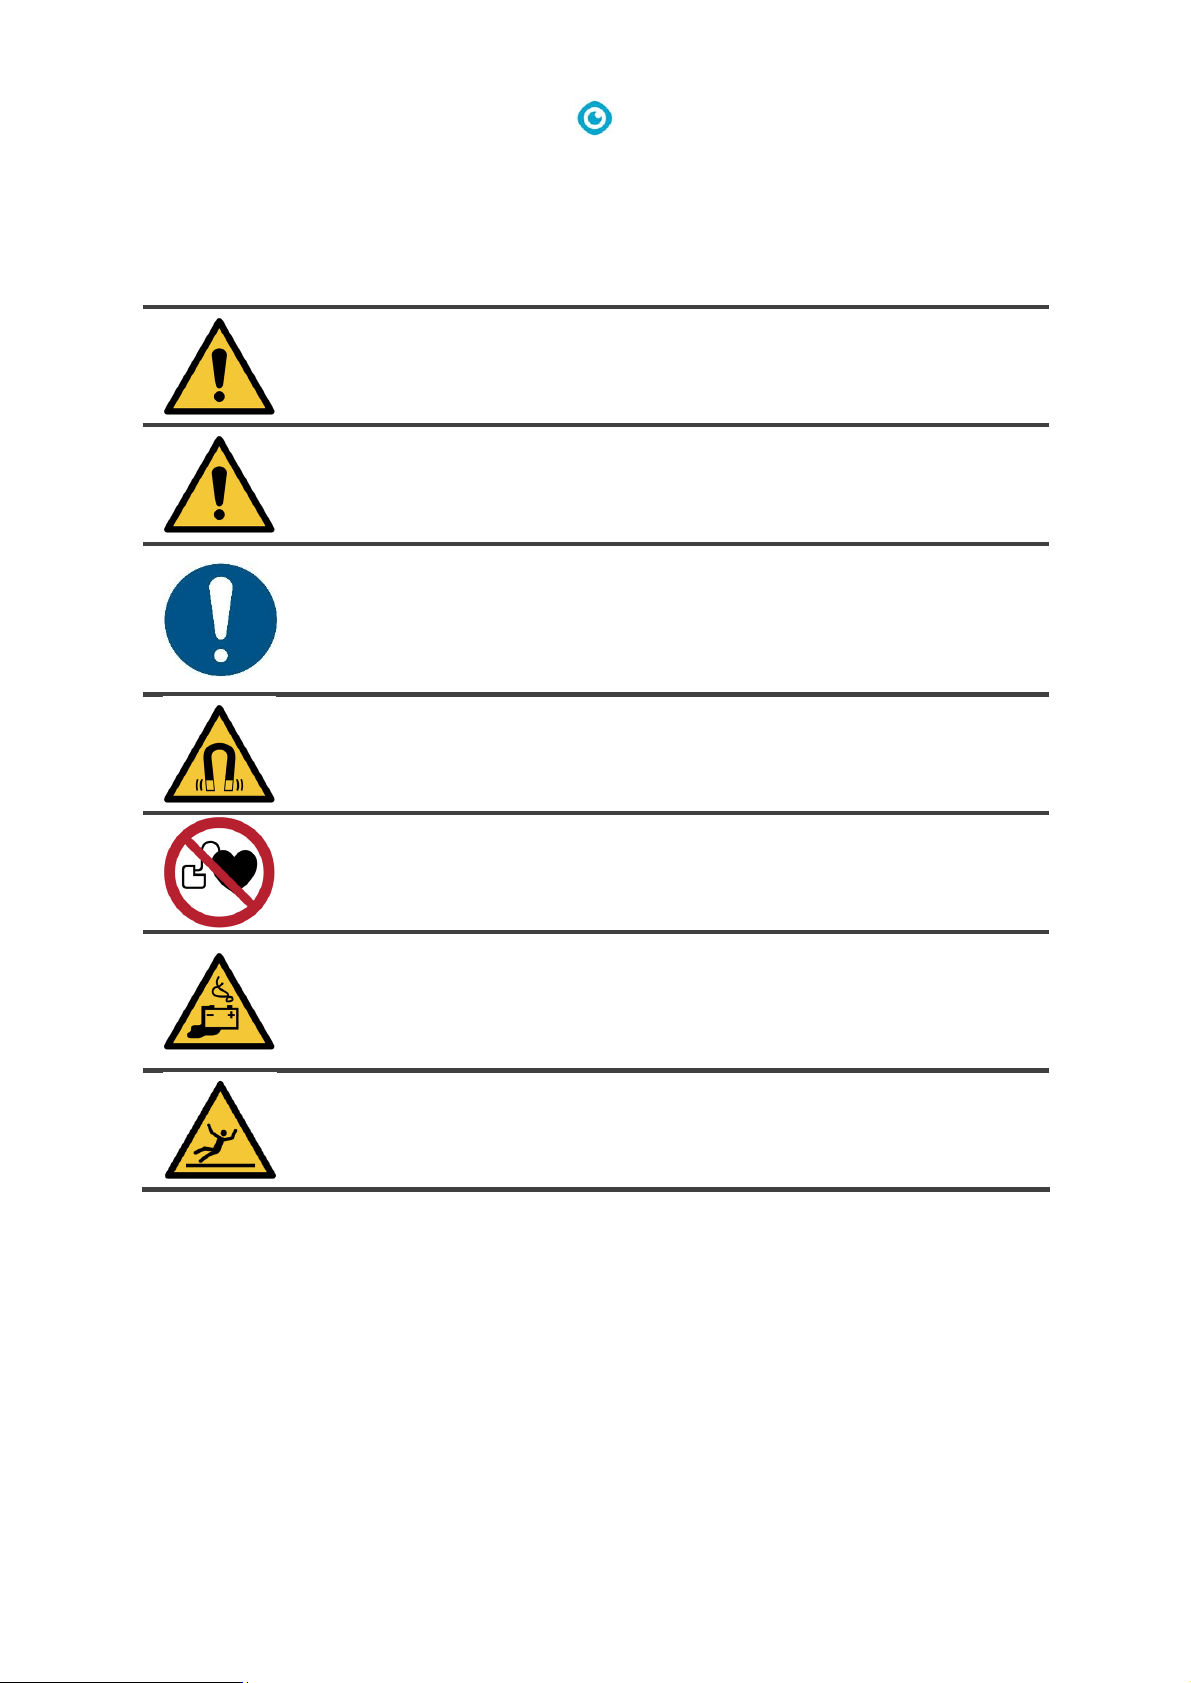
The following symbols and terms are used throughout this manual to alert the reader to
safety issues and important information:
Symbol
Term
Explanation
WARNING
Indicates a hazardous situation which, if the safety
instructions are not followed, can lead to injuries of the
operator or bystanders and light and/or moderate
damage to the product or the environment.
CAUTION
Indicates a hazardous situation which, if the safety
instructions are not followed, can lead to light and / or
moderate damage to the product or the environment.
ATTENTION
Indicates a liability situation, where the
manufacturer or its partners and affiliates cannot
be held accountable for damages caused by non-
compliance.
STRONG MAGNET
Indicates the machine contains strong magnets. These
can cause pacemakers to stop working or cause
electronic data to be damaged, such as information
stored on access passes.
PACEMAKER
Indicates operators and maintenance crew wearing
pacemakers should keep a minimal distance of 6 in / 15
cm. In this specific case operators may not use the
machine as a backpack.
BATTERIES
Indicates a battery-operated machine, batteries must
be charged according to the instructions in the separate
class I battery charger user manual. Batteries must be
disposed of according to your local laws and
regulations.
SLIPPERY SURFACE
Indicates the machine can cause floors to become
slippery. In the workplace, it is advised to place slippery
surface signs in these areas.

5
Content
Preface .................................................................................................................................................................... 3
Purpose of the user manual .................................................................................................................................... 3
Target audience ...................................................................................................................................................... 3
Operators of the i-mop Lite .................................................................................................................................... 3
Reading guide .......................................................................................................................................................... 4
1 Introduction .................................................................................................................................................... 7
1.1 Intended use of the product .................................................................................................................. 7
1.2 Non-intended use of the product .......................................................................................................... 8
1.3 Lifespan .................................................................................................................................................. 8
1.4 Modifications ......................................................................................................................................... 8
1.5 Specifications ......................................................................................................................................... 9
1.6 Warranty .............................................................................................................................................. 10
1.7 Identification ....................................................................................................................................... 10
2 Description ................................................................................................................................................... 11
3 Safety ............................................................................................................................................................ 12
3.1 General safety instructions .................................................................................................................. 12
3.1.1 Sweep before scrub ......................................................................................................................... 12
3.1.2 Brush condition ............................................................................................................................... 12
3.1.3 Machine orientation ........................................................................................................................ 12
3.1.4 Strong magnets ............................................................................................................................... 12
3.1.5 Battery ............................................................................................................................................. 12
3.2 Risks during operation ......................................................................................................................... 13
3.2.1 Dress safely ..................................................................................................................................... 13
3.2.2 Mark the job site ............................................................................................................................. 13
3.2.3 Careful when parking ...................................................................................................................... 13
3.3 Risks after operation............................................................................................................................ 13
3.3.1 Remove battery ............................................................................................................................... 13
3.3.2 Machine orientation ........................................................................................................................ 13
4 Transport and storage .................................................................................................................................. 14
4.1 General ................................................................................................................................................ 14
4.2 Park position ........................................................................................................................................ 14
4.3 Transport outside ................................................................................................................................ 15
4.4 Transport in a vehicle .......................................................................................................................... 16
5 Assembly and installation ............................................................................................................................. 17
5.1 Unboxing .............................................................................................................................................. 17
5.2 Assembly .............................................................................................................................................. 18
5.2.1 Charge the battery .......................................................................................................................... 18

6
5.2.2 Attach the brushes .......................................................................................................................... 18
5.2.3 Attach the squeegee ....................................................................................................................... 19
5.2.4 Install cleaning solution tank ........................................................................................................... 19
5.2.5 Install recovery tank ........................................................................................................................ 20
6 Operation ..................................................................................................................................................... 21
6.1 Before you start ................................................................................................................................... 21
6.1.1 Insert the battery ............................................................................................................................ 21
6.1.2 Fill the cleaning solution tank ......................................................................................................... 22
6.2 Operation procedure ........................................................................................................................... 22
6.2.1 Walking to the job site .................................................................................................................... 22
6.2.2 At the job site .................................................................................................................................. 23
6.2.3 ECO mode ........................................................................................................................................ 26
6.2.4 Turn off the i-mop® Lite .................................................................................................................. 26
6.2.5 Emptying tanks ................................................................................................................................ 26
6.3 Cleaning and storage ........................................................................................................................... 27
6.3.1 Flush the system .............................................................................................................................. 27
6.3.2 Cleaning the tanks ........................................................................................................................... 27
6.3.3 Clean the filter ................................................................................................................................. 28
6.3.4 Remove the battery ........................................................................................................................ 28
6.3.5 Check the brushes and squeegee .................................................................................................... 29
6.3.6 Store in an upright position ............................................................................................................. 29
7 Maintenance ................................................................................................................................................ 30
7.1 Brush replacement .............................................................................................................................. 30
7.2 Squeegee replacement ........................................................................................................................ 31
7.2.1 Detach the squeegee....................................................................................................................... 31
7.2.2 Flip/replace the squeegee blade ..................................................................................................... 31
7.2.3 Attach the squeegee ....................................................................................................................... 32
7.3 Replace vacuum hose .......................................................................................................................... 32
7.4 Recommended additional cleaning ..................................................................................................... 32
7.5 Recommended service time ................................................................................................................ 32
7.6 Accessories .......................................................................................................................................... 33
8 Troubleshooting ........................................................................................................................................... 34
9 Decommissioning and disposal .................................................................................................................... 35
10 Attachments ................................................................................................................................................. 36
10.1 CE Certificate ....................................................................................................................................... 36
7
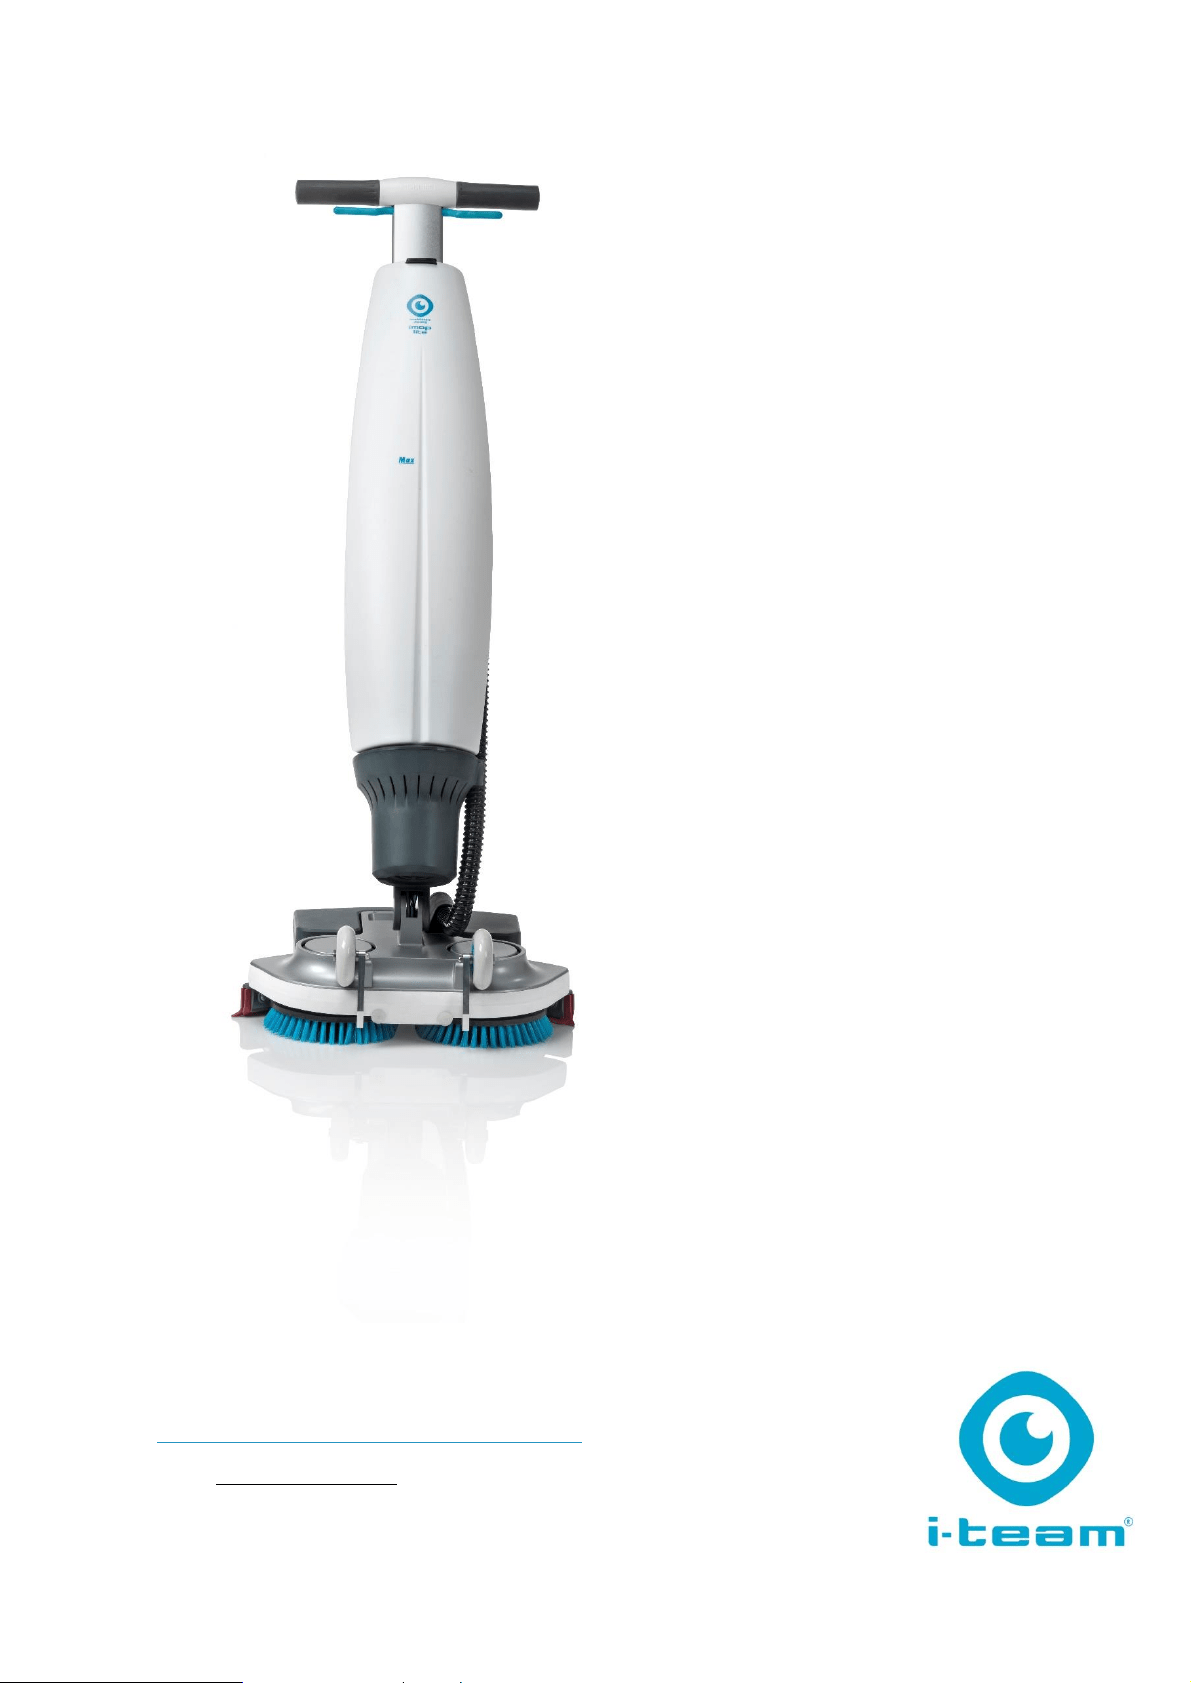
1 Introduction
The i-mop® Lite is an easy and safe machine to use. This manual helps you to get started and explains
the operation and maintenance procedure. You will be pleasantly surprised by the fast and effective
use of the battery operated i-mop Lite. The batteries must be fully charged before use. Please refer
to the user manual of the class I battery charger for correct procedure.
This manual is intended for those who work with the i-mop Lite and/or perform daily maintenance.
The manual must be read in full before the first actions. This manual describes the correct method of
use, safety measures, maintenance and transport.
The manufacturer continuously improves all their products based on user experience and feedback.
Any deviations between the texts and/or images from the manual and your i-mop Lite can therefore
arise from the difference in model or from possible changes due to continuous development and
innovation.
1.1 Intended use of the product
The i-mop Lite is a specialized machine for
scrubbing hard floor surfaces. You can use any
type of water-based scrubbing detergent.
The fluid tank, brushes and squeegee come in
HACCP color coded versions (blue, green, red,
yellow and orange). All three items are easily
replaced. This allows you to use different
cleaning solutions, — for instance, when you
move from the food preparing area to the
restaurant. ALWAYS use the same color for fluid
tank, brush and squeegee.
Figure 1
8
1.2 Non-intended use of the product
WARNING
Non-intended use can have consequences for the safety of operators and bystanders
and will void the warranty on the product.
• NEVER operate the i-mop® Lite near flammable dusts, liquids or vapors.
• NEVER operate the i-mop Lite when flammable or poisonous liquids like gasoline, oil, acids, or
other volatile substances are on the floor.
• DO NOT fill the i-mop Lite with any flammable detergent. ONLY use the water-based cleaning
solutions.
• DO NOT use water that exceeds 113° F/45° C. Using water above this temperature will void the
tank warranty.
• DO NOT use cleaning solutions with pH below 3 or above 11 in order to prevent damage to
sensitive components.
• DO NOT use the i-mop Lite outdoors or on uneven surfaces.
• DO NOT operate this i-mop Lite over electrical floor outlets in order to avoid electrical shock.
• NO RIDERS! Do not carry passengers on top of the i-mop Lite.
• DO NOT use the i-mop Lite as stepladder or platform.
• DO NOT store the i-mop Lite outside in order to avoid damage to electronic components.
• ONLY use manufacturer-supplied parts for maintenance.
• KEEP AWAY from children! The i-mop Lite is a professional cleaning machine to be used by trained
adults only.
1.3 Lifespan
Each i-mop® Lite is guaranteed to operate for at least 2000 hours. The wear on brushes and
squeegee heavily depends on the roughness of the surface. They need to be checked regularly.
CAUTION
To ensure proper and safe operation throughout the life of the i-mop Lite, the machine
must be checked every 300 hours by an authorized i-team partner.
1.4 Modifications
It is not permitted to make modifications to the design of the i-mop Lite without consultation and
permission from the manufacturer. This affects the warranty, see section 1.6.
9
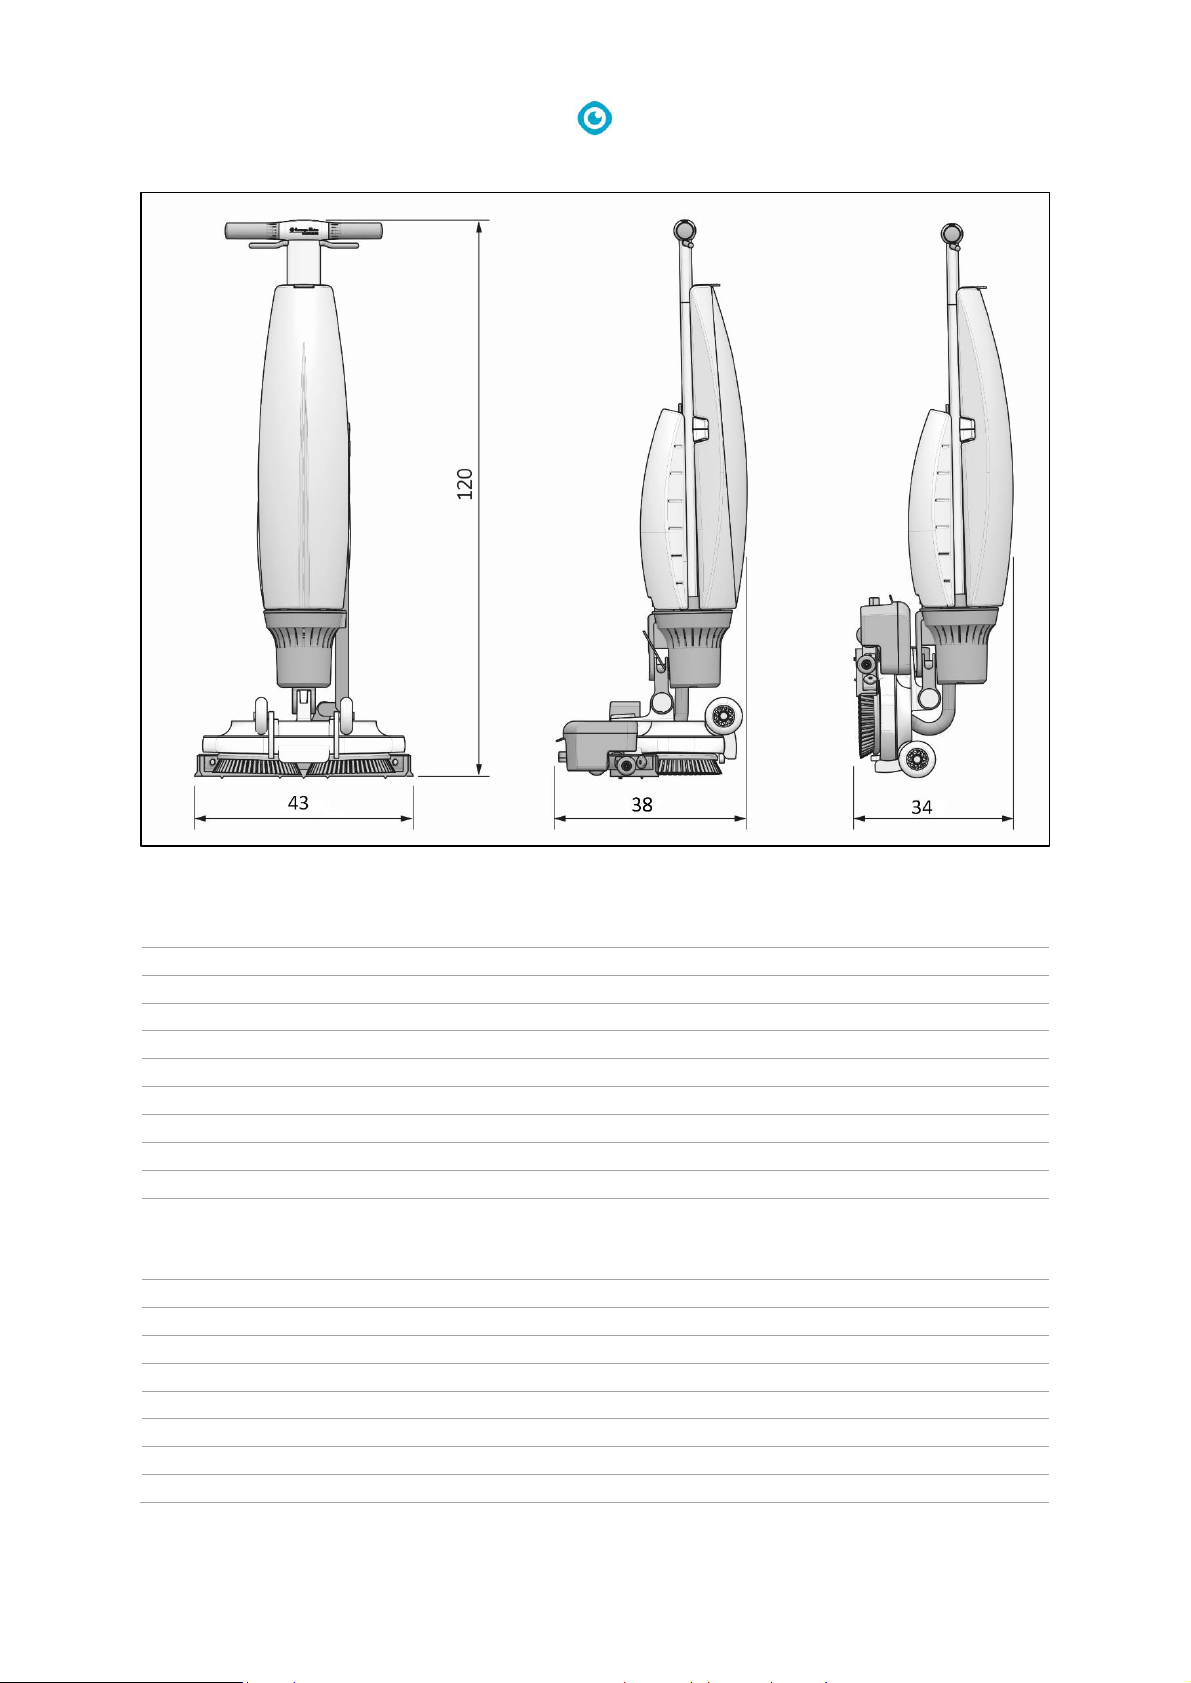
1.5 Specifications
Product size:
120 x 43 x 38 cm
Product size in park position:
120 x 43 x 34 cm
Weight (including Battery):
12.5 kg
Li-on battery:
DC (18V, 12.48Ah, 250Wh)
Battery capacity:
1 Battery
Operation time of batteries:
45 min
Brush pressure:
13 kg
Brush speed:
500 rpm
Solution tank capacity:
3 L
Recovery tank capacity:
5 L / 3 L recommended max
Vibration:
Amplitude (mm) <= 0.5086
Velocity (m/s) <= 0.0068
Acceleration (m/s
2
) <= 1.435
Noise level (1m):
68Db
Theoretical performance:
Up to 1400 m2 per hour
Practical performance:
700 - 1000 m2 per hour
Castor wheels:
YES
Power cut off at park position:
NO
Angle power cut off:
YES < 45°
Timer:
NO
Fluid Shortage Warning:
NO
Figure 2
10
1.6 Warranty
The i-mop Lite should be used as intended and described in this manual. Using the i-mop Lite outside
will void the warranty on the product.
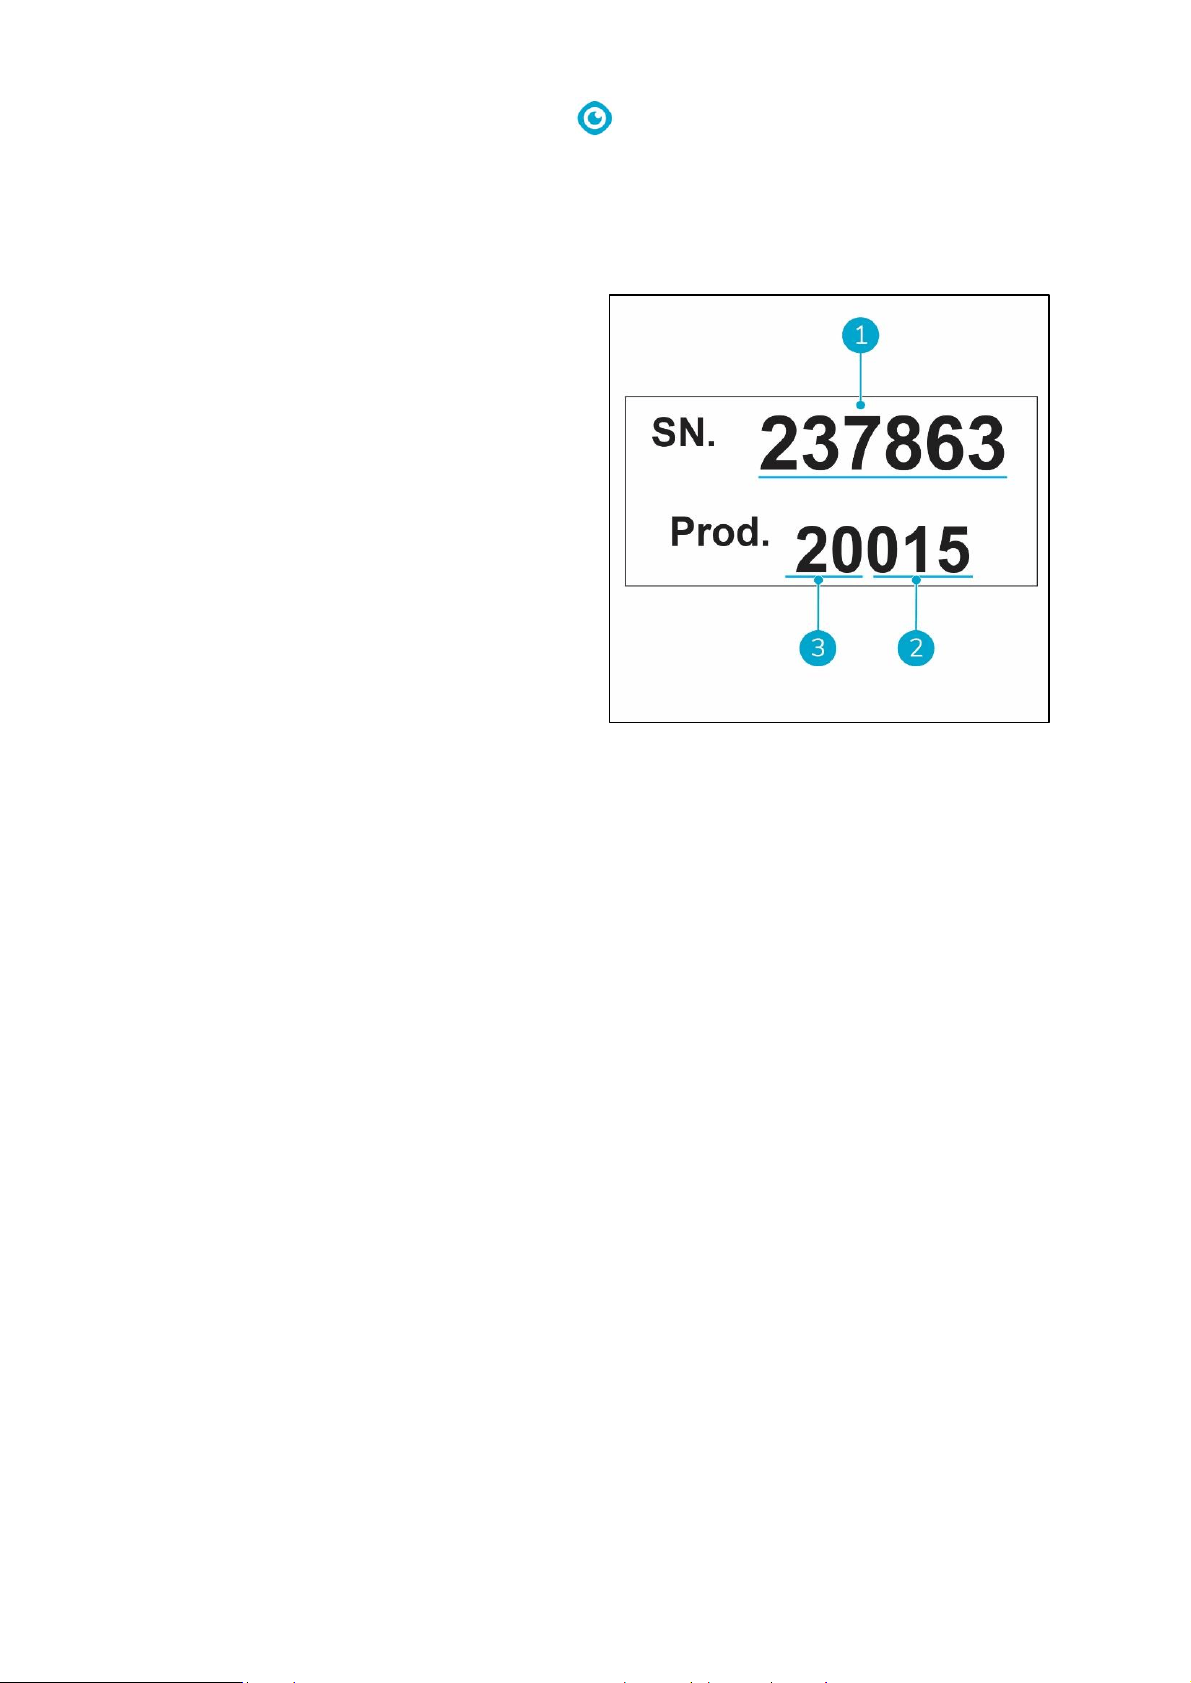
1.7 Identification
The ID tag, containing a serial number and
production number, can be found on the bar
behind the wastewater tank.
1. Serial number
2. Production day
3. Production year
Figure 3
11
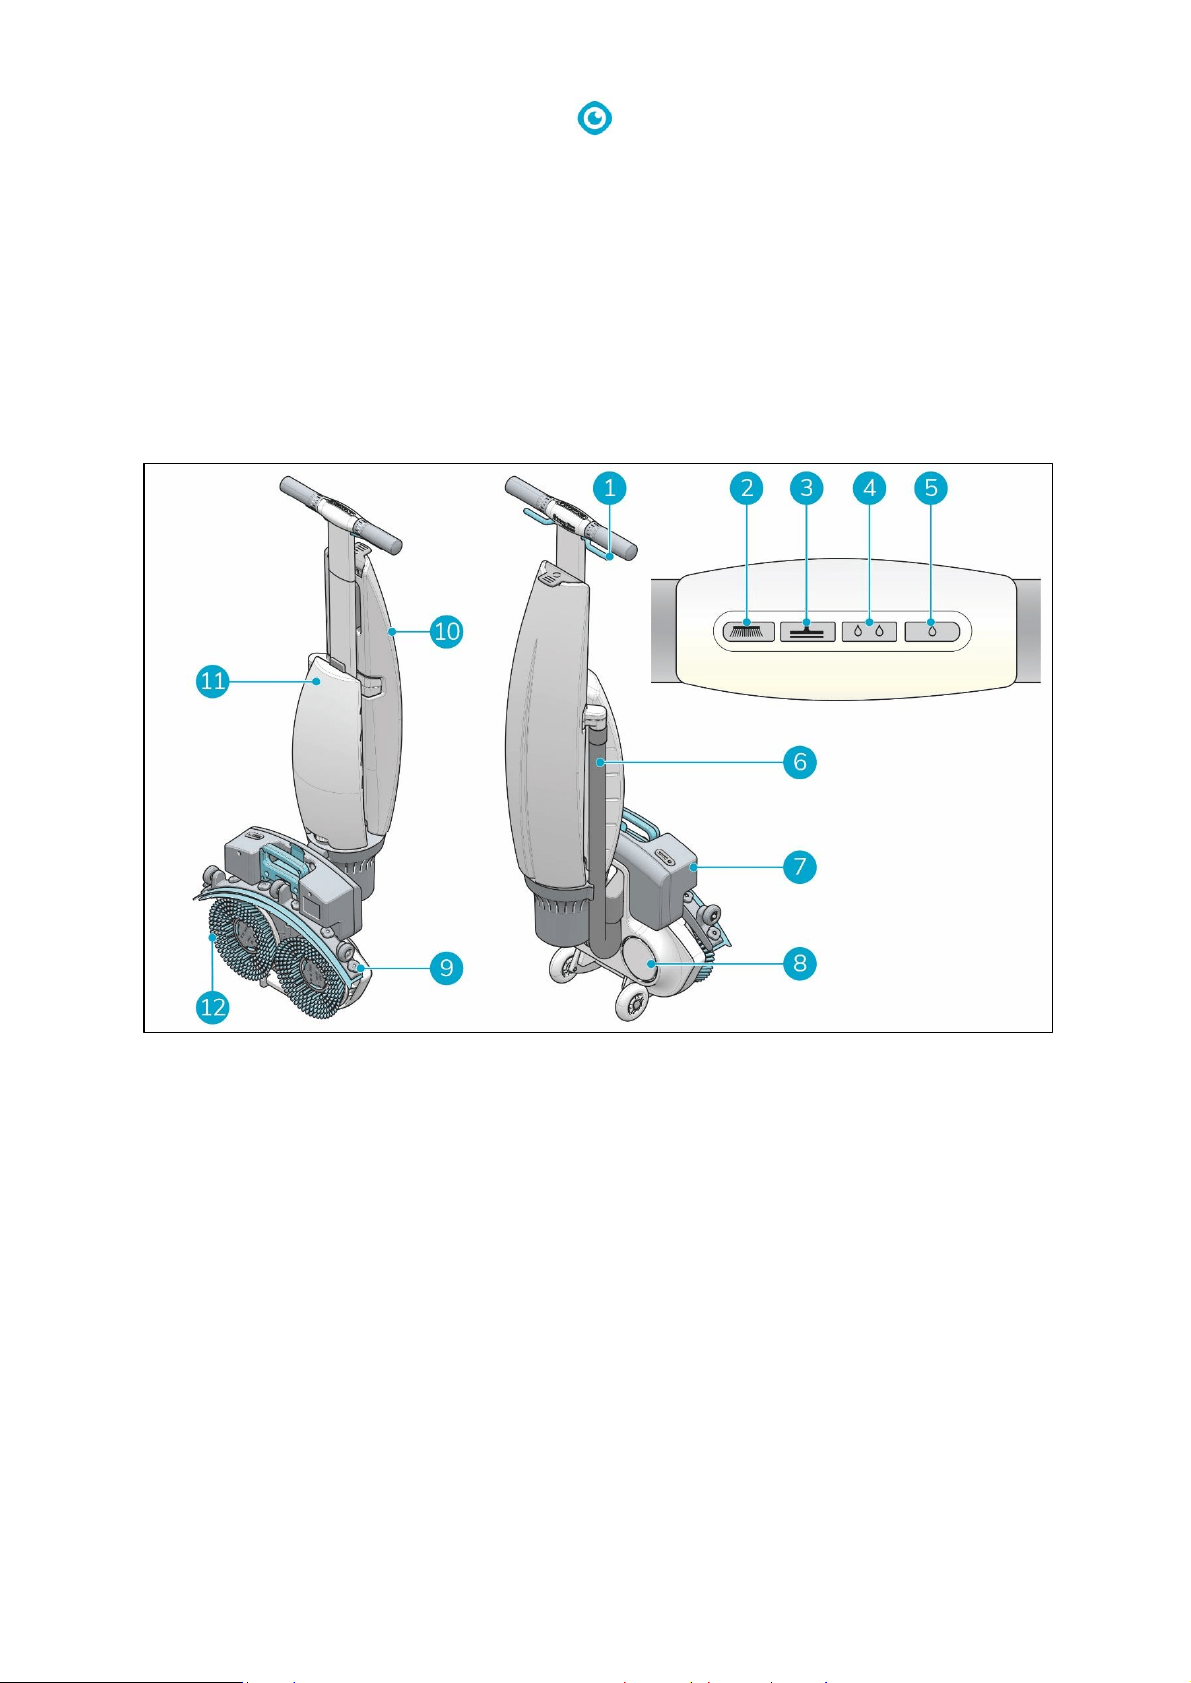
2 Description
The compact i-mop® Lite consists of two main parts:
• The body that contains the motor, cleaning solution tank, recovery tank, handle with triggers and
control panel.
• The scrub deck that contains the brushes and squeegee.
The i-mop Lite can be folded into a park position; this is recommended for storage.
The i-mop Lite consists of:
Figure 4
Legend
1. Trigger
2. Control panel - Brush on
3. Control panel - Vacuum on
4. Control panel - High water level
5. Control panel - Low water level
6. Vacuum hose
7. Battery
8. Scrub deck
9. Squeegee
10. Recovery tank
11. Solution tank
12. Rotating brushes
12
3 Safety
Safety comes first. Therefore, please take your time to read and understand these safety
instructions. Improper use can case cause harm or void the manufacturer’s warranty.
3.1 General safety instructions
3.1.1 Sweep before scrub
Remove loose objects from the floor that can be propelled by the rotating brushes.
3.1.2 Brush condition
Make sure to check the condition of the brush before use. Change the brush only when the machine
is turned off in a park position.
3.1.3 Machine orientation
Always keep the body of the i-mop® Lite in an upright position when cleaning fluid or batteries are
inserted.
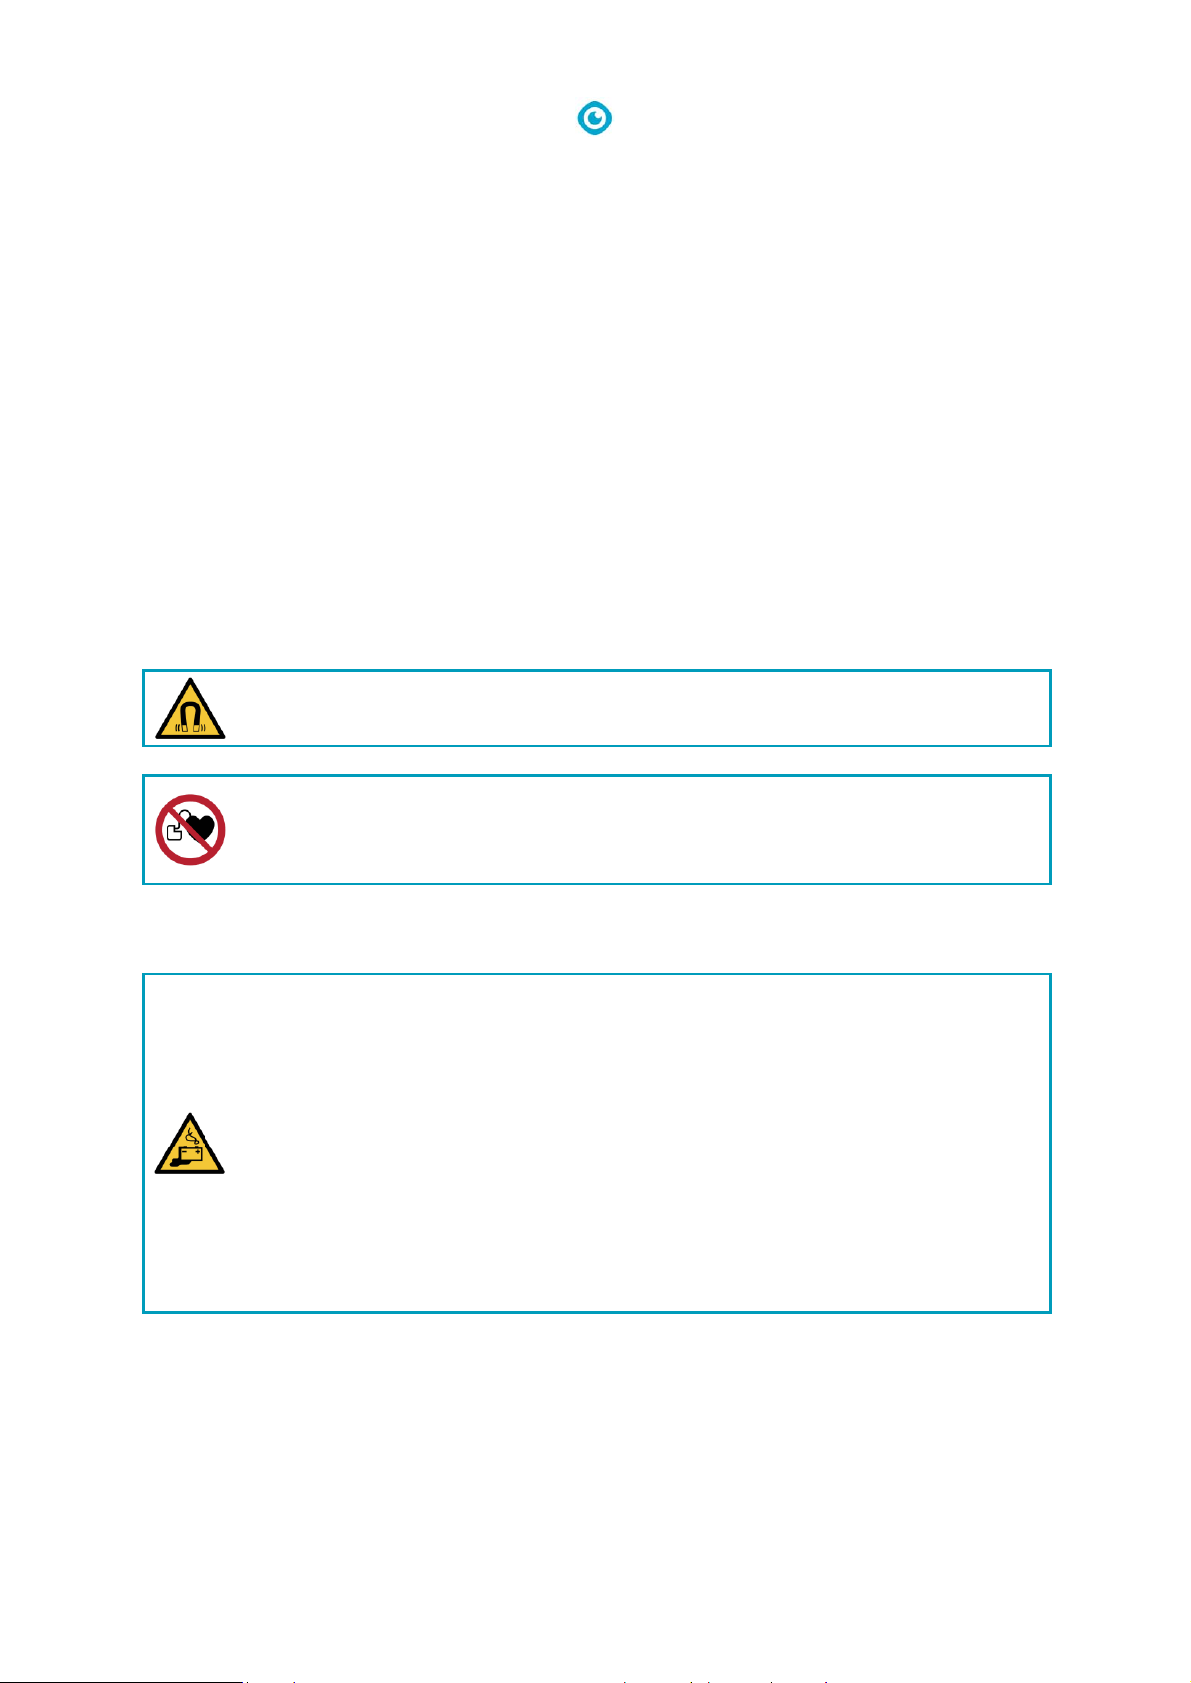
3.1.4 Strong magnets
CAUTION
Please be aware of the integrated magnets that hold the fluid tanks in place.
WARNING
Operators and maintenance crew wearing pacemakers should keep a minimal distance
of 6 in/15 cm.
3.1.5 Battery
Always use the automatic battery charger provided by the manufacturer.
CAUTION
During normal operation, the 18V battery cause no safety hazard on their own. Please
keep the following safety instructions regarding the battery in mind:
• Do not crush, pierce or damage in any way.
• Do not heat or incinerate.
• Do not short-circuit.
• Do not dismantle.
• Keep dry.
• Only charge between 5° C~40° C / 41° F~104° F.
• Only use between 5° C~45° C / 41° F~113° F.

13
3.2 Risks during operation
3.2.1 Dress safely
Do not wear a necktie, scarf, or any loose or dangling clothing or jewelry while operating this i-mop®
Lite. These can tangle in rotating parts, causing serious injury or death.
3.2.2 Mark the job site
WARNING
During operation the cleaning solution can cause slippery patches on the floor.
Therefore, it is advised to mark the job site to warn passersby.
3.2.3 Careful when parking
Do not park the i-mop Lite on ramps or slopes. Always park the i-mop Lite on a level, hard surface.
3.3 Risks after operation
3.3.1 Remove battery
Remove the battery before executing any cleaning or maintenance task.
3.3.2 Machine orientation
Always keep the body of the i-mop Lite in an upright position when replacing brushes or squeegee.

14
4 Transport and storage
4.1 General
CAUTION
Always keep the body of the i-mop® Lite in an upright position when filling the cleaning
solution tank or inserting the battery.
Before storage or transport, drain the machine and remove the battery after each use.
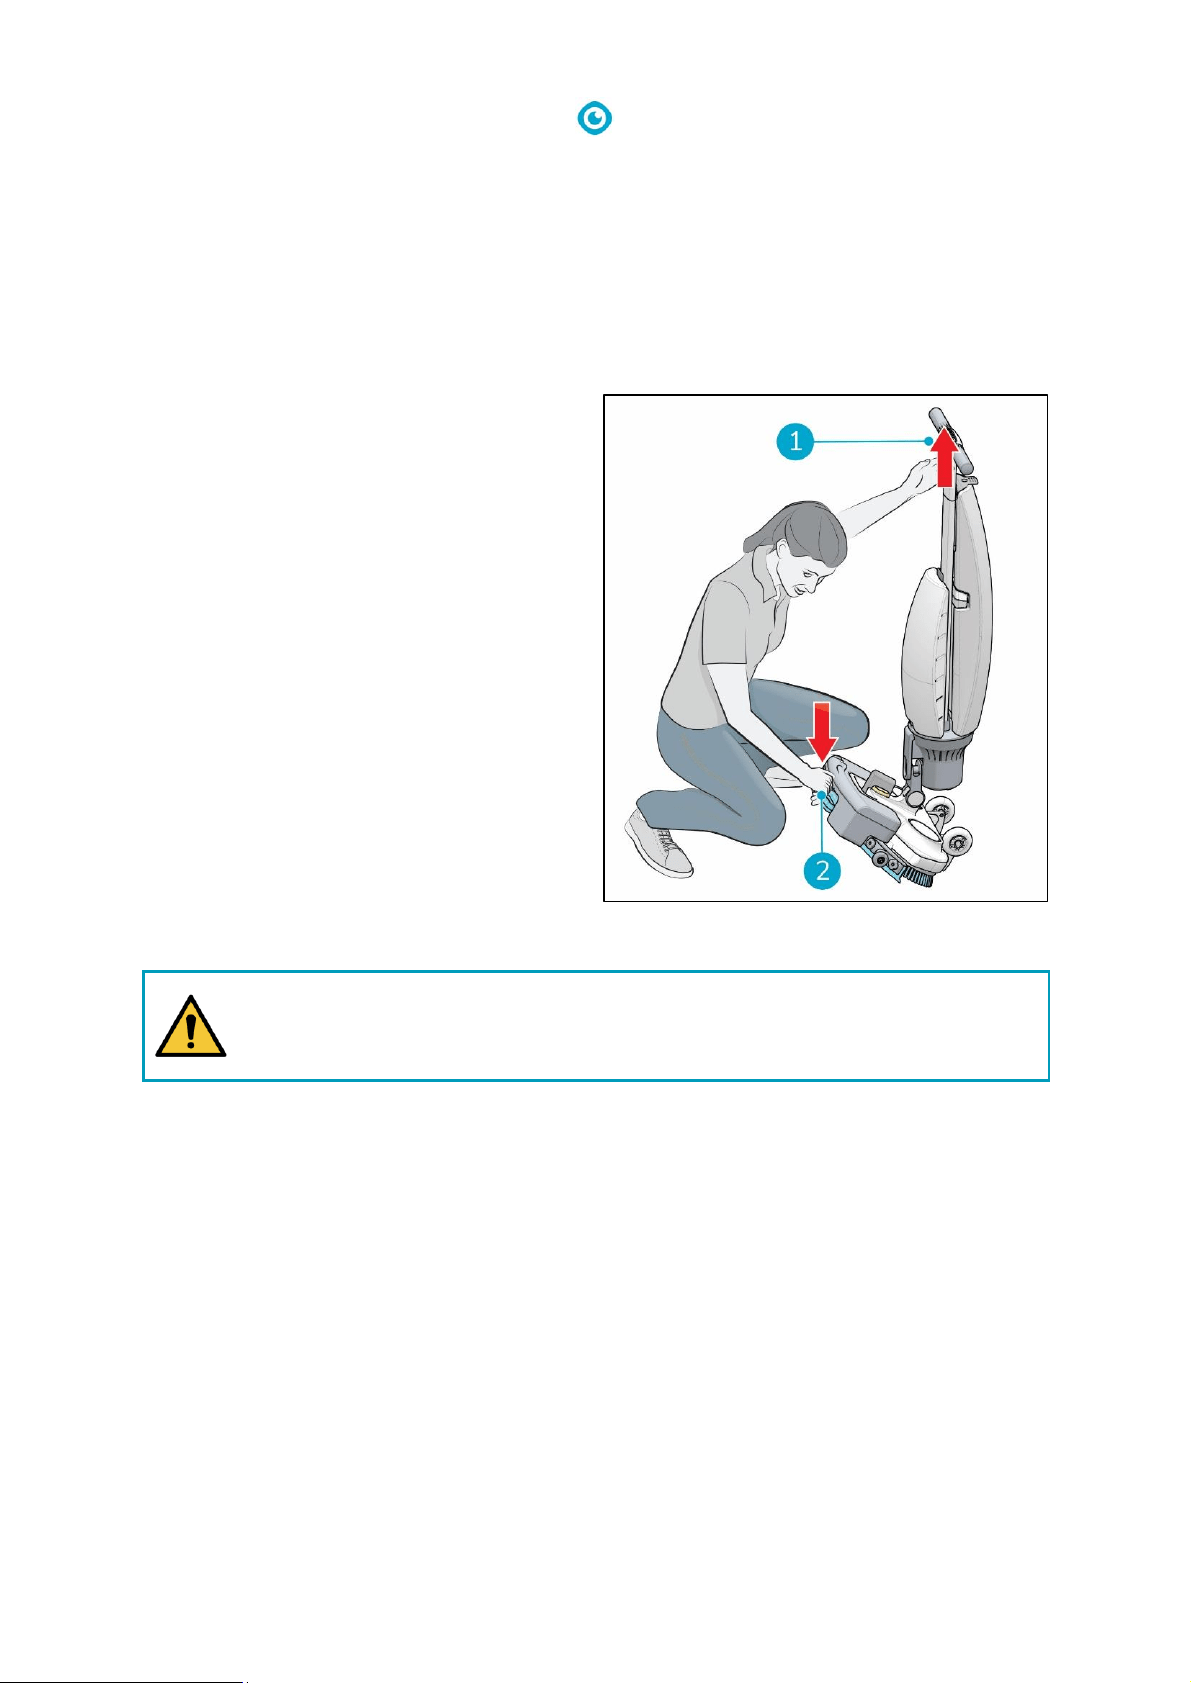
4.2 Park position
The park position is the upright vertical position for storage and maintenance tasks.
1. Make sure the vacuum hose (Figure 5, pos 2) is pushed back into the machine so it cannot get
squeezed.
2. Crouch down and hold the handle (Figure 5, pos 1) with one hand while holding the scrub deck
(Figure 5, pos 3) with your other hand.
3. Lift the scrub deck slowly until it stands upright on the front wheels (Figure 5, pos 4). Guide the
body towards the scrub deck until it snaps into a resting position.
Figure 5
15
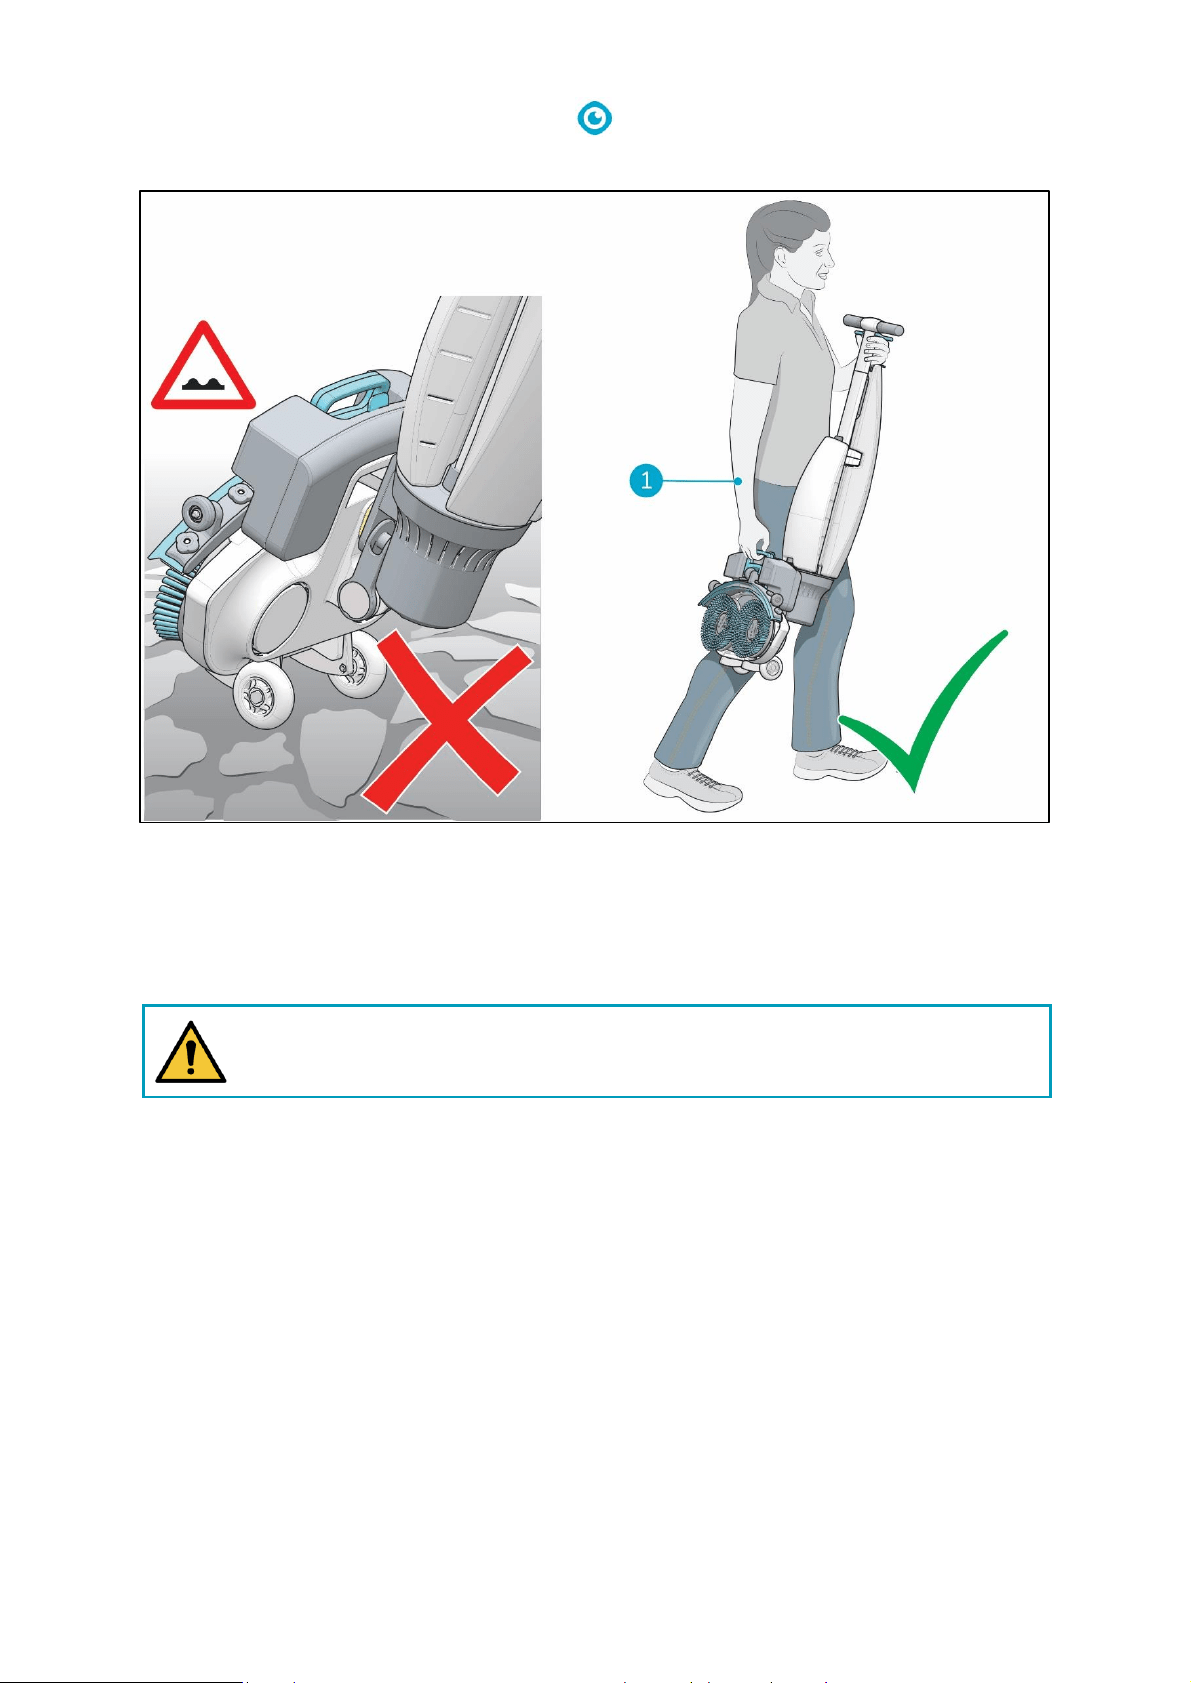
4.3 Transport outside
When outside:
1. Put the i-mop® Lite in park position (see 4.2).
2. Carry the i-mop Lite with one hand while holding the handle (Figure 6, pos 1) with your other
hand.
CAUTION
The transport wheels are not designed to roll over dirty surfaces, sand can cause the
wheels to block. Lift the i-mop Lite going from one building to another.
Figure 6
16
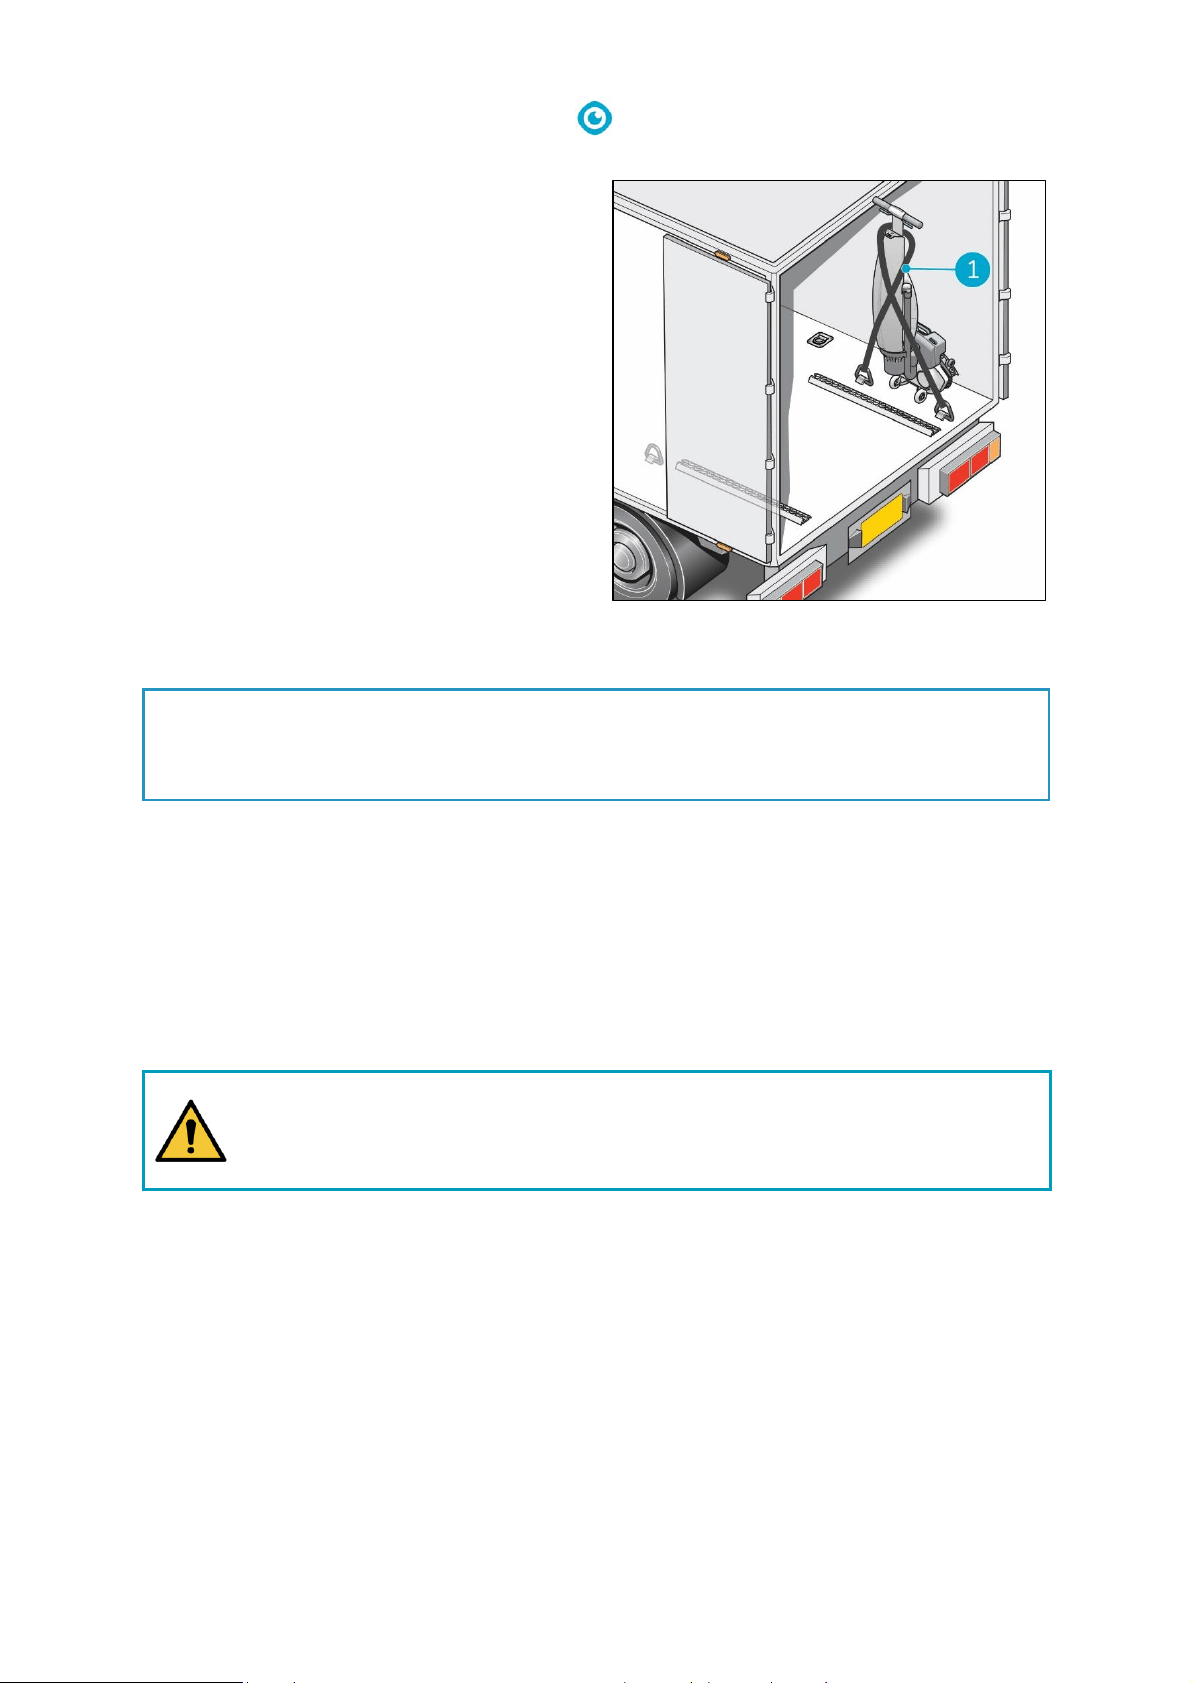
4.4 Transport in a vehicle
The preferred way to transport your i-mop® Lite
is in an upright position and safely secured.
1. Make sure both tanks are empty.
2. Put the i-mop Lite in park position (see 4.2).
3. Remove the batteries.
4. Lift the i-mop Lite into the vehicle.
5. Secure the i-mop, using a tension belt or
another appropriate restraint (Figure 7,
pos 1).
As the i-mop® Lite is a compact machine, it fits in the trunk of your car. Before loading the i-mop Lite
into your vehicle, make sure both tanks and the battery are removed.
1. Put the i-mop Lite in park position (see 4.2)
2. Remove the battery and both tanks.
3. Set the i-mop Lite into a horizontal position.
4. Prevent the i-mop Lite from moving around during transport by using a tension belt or another
appropriate restraint.
CAUTION
The seal of the solution and recovery tank can be damaged during transport in
horizontal position. Make sure you remove them before loading the machine into your
car. Improper use will void the warranty.
TIP:
The i-stand wall mount accessory can be installed in the back of a truck. It allows you to secure
the i-mop and transport the i-mop in an upright position. Please contact our sales department
for more information.
Figure 7

17
5 Assembly and installation
The i-mop® Lite does not require much assembly. Most importantly, you will have to attach the
brushes and squeegee.
5.1 Unboxing
The i-mop Lite body is packed in a single box. The battery and charger are delivered in a separate box
and can be ordered separately.
Figure 8
Legend
1.
1x i-mop Lite main body
6.
1x squeegee assembly
2.
1x suction filter
7.
2x brushes
3.
1x battery charger manual
8.
1x recovery tank
4.
1x battery charger
9.
1x cleaning solution tank
5.
1x battery
10.
1x this manual
18
5.2 Assembly
5.2.1 Charge the battery
Charge the battery according to the instructions in the battery charger manual. Make sure the
battery is charged monthly.
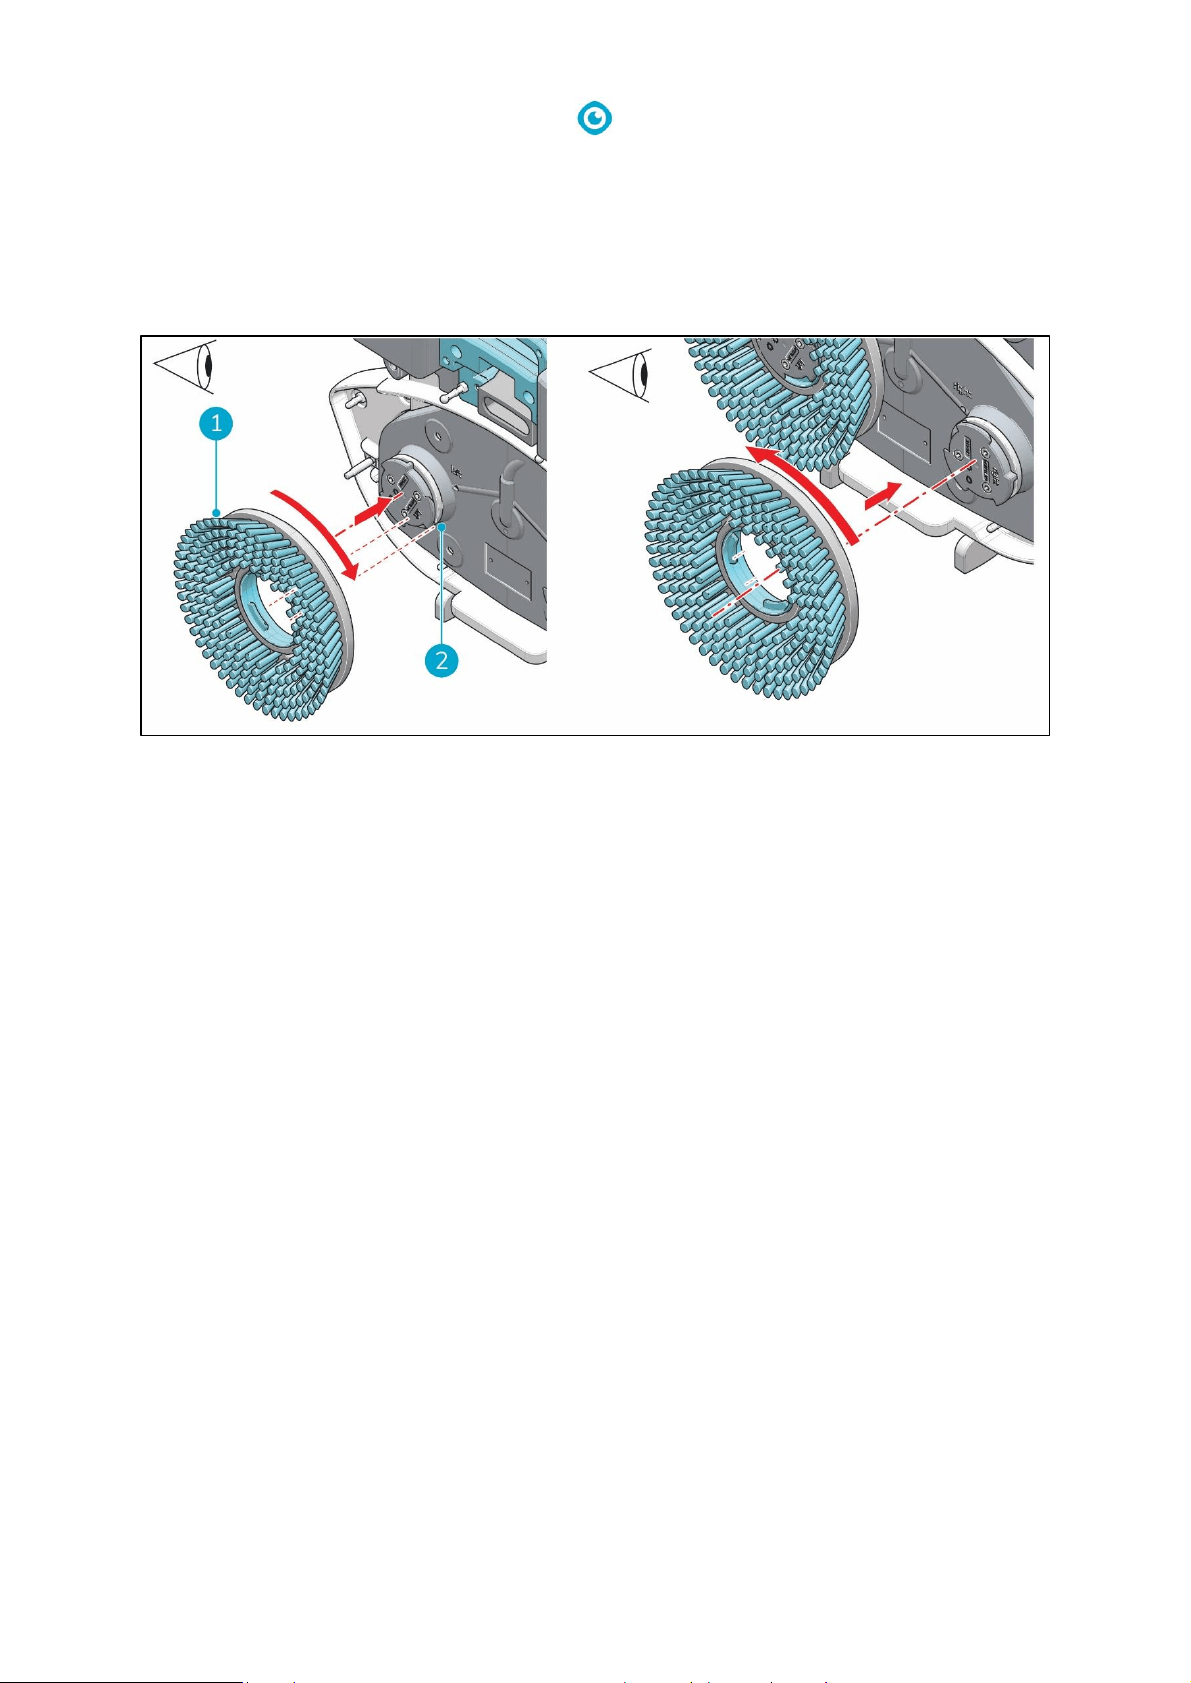
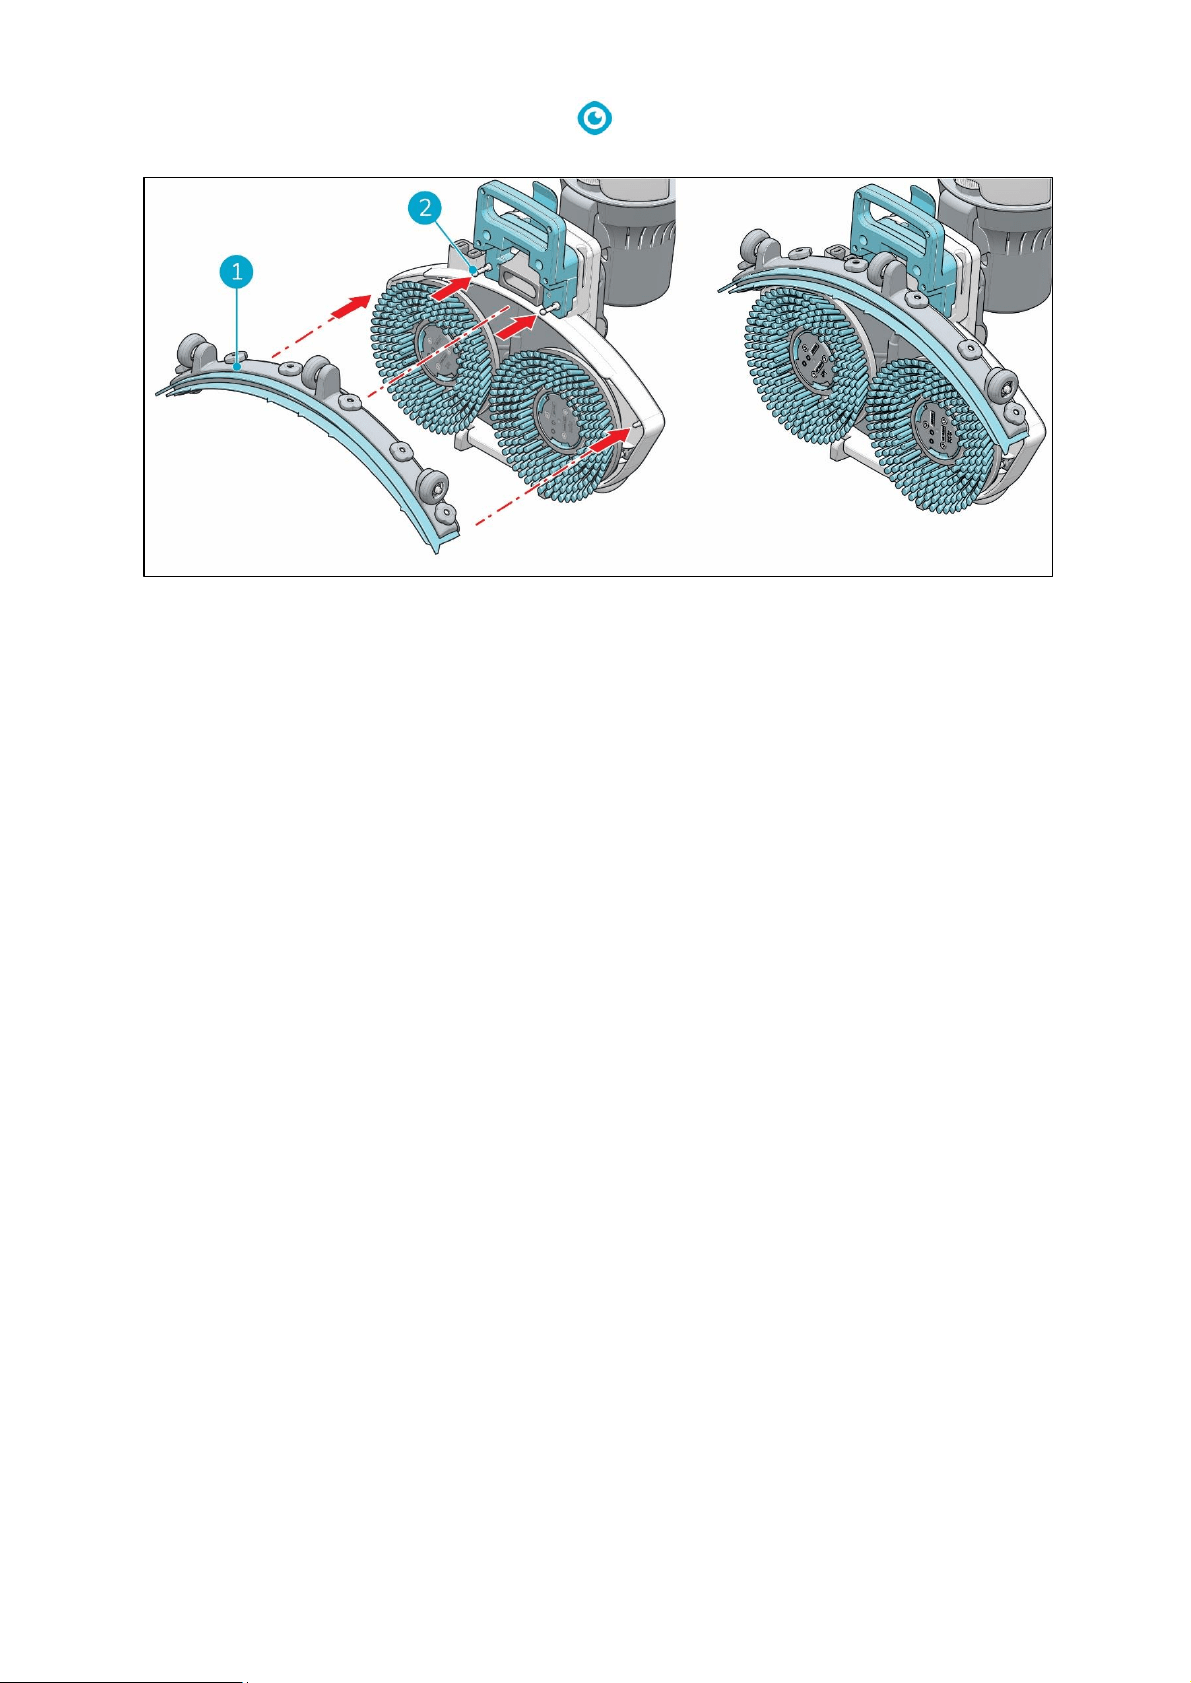
5.2.2 Attach the brushes
To attach the brushes:
1. Put the i-mop Lite in park position (see 4.2).
2. Hold the scrub deck firmly with one hand.
3. Align the left brush (Figure 9, pos 1) with the left motor disk (Figure 9, pos 2). Align the latches
and cut-outs in the brush and motor disk.
4. Push the brush on the motor disk.
5. Turn the left brush clockwise until you see the motor disk turning. The brush is now in place.
6. Align the right brush with the right motor disk. Align the latches and cut-outs in the brush and
motor disk.
7. Push the brush on the motor disk.
8. Turn the right brush anticlockwise until you see the motor disk turning. The brush is now in
place.
Figure 9
19
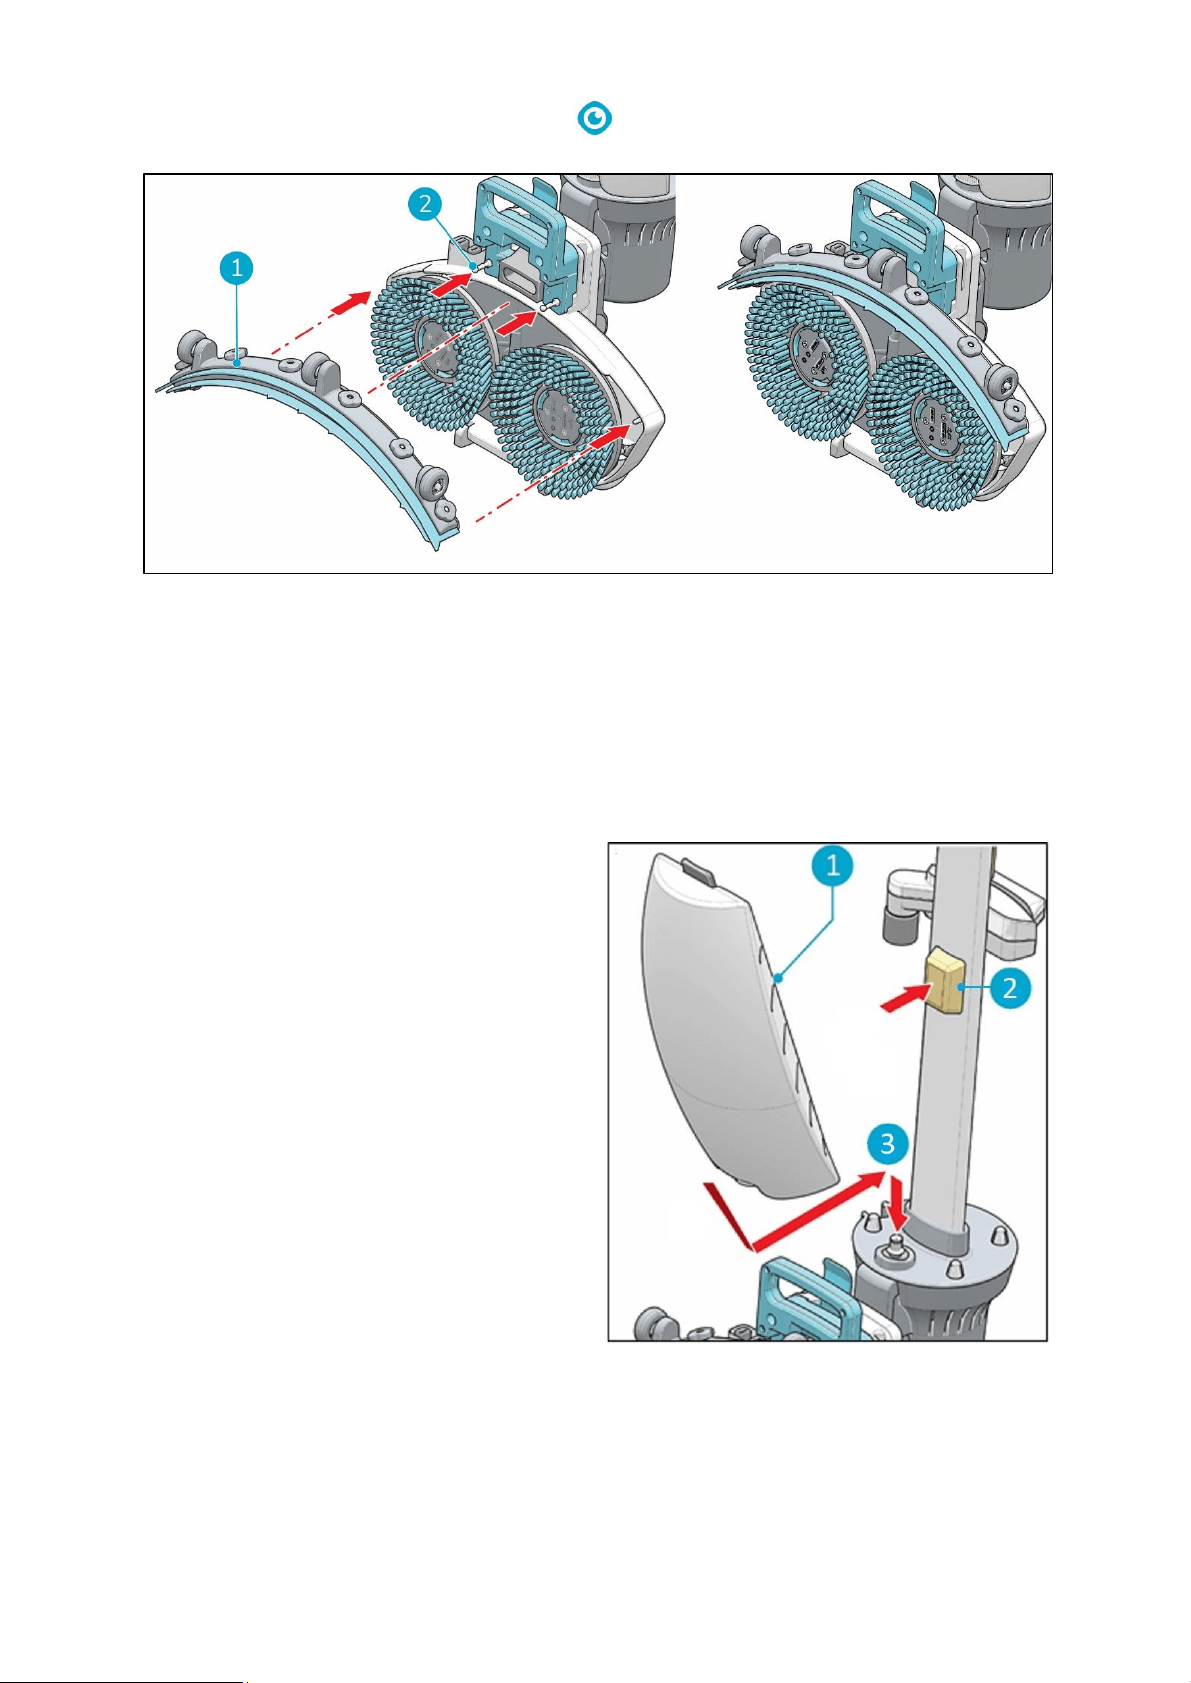
5.2.3 Attach the squeegee
Figure 10
To attach the squeegee:
1. Hold the scrub deck firmly with one hand.
2. Align the pins on the scrub deck (Figure 10, pos 2) with the holes on the squeegee (Figure 10,
pos 1).
3. Push the left side of the squeegee in place.
4. Push the right side of the squeegee in place.
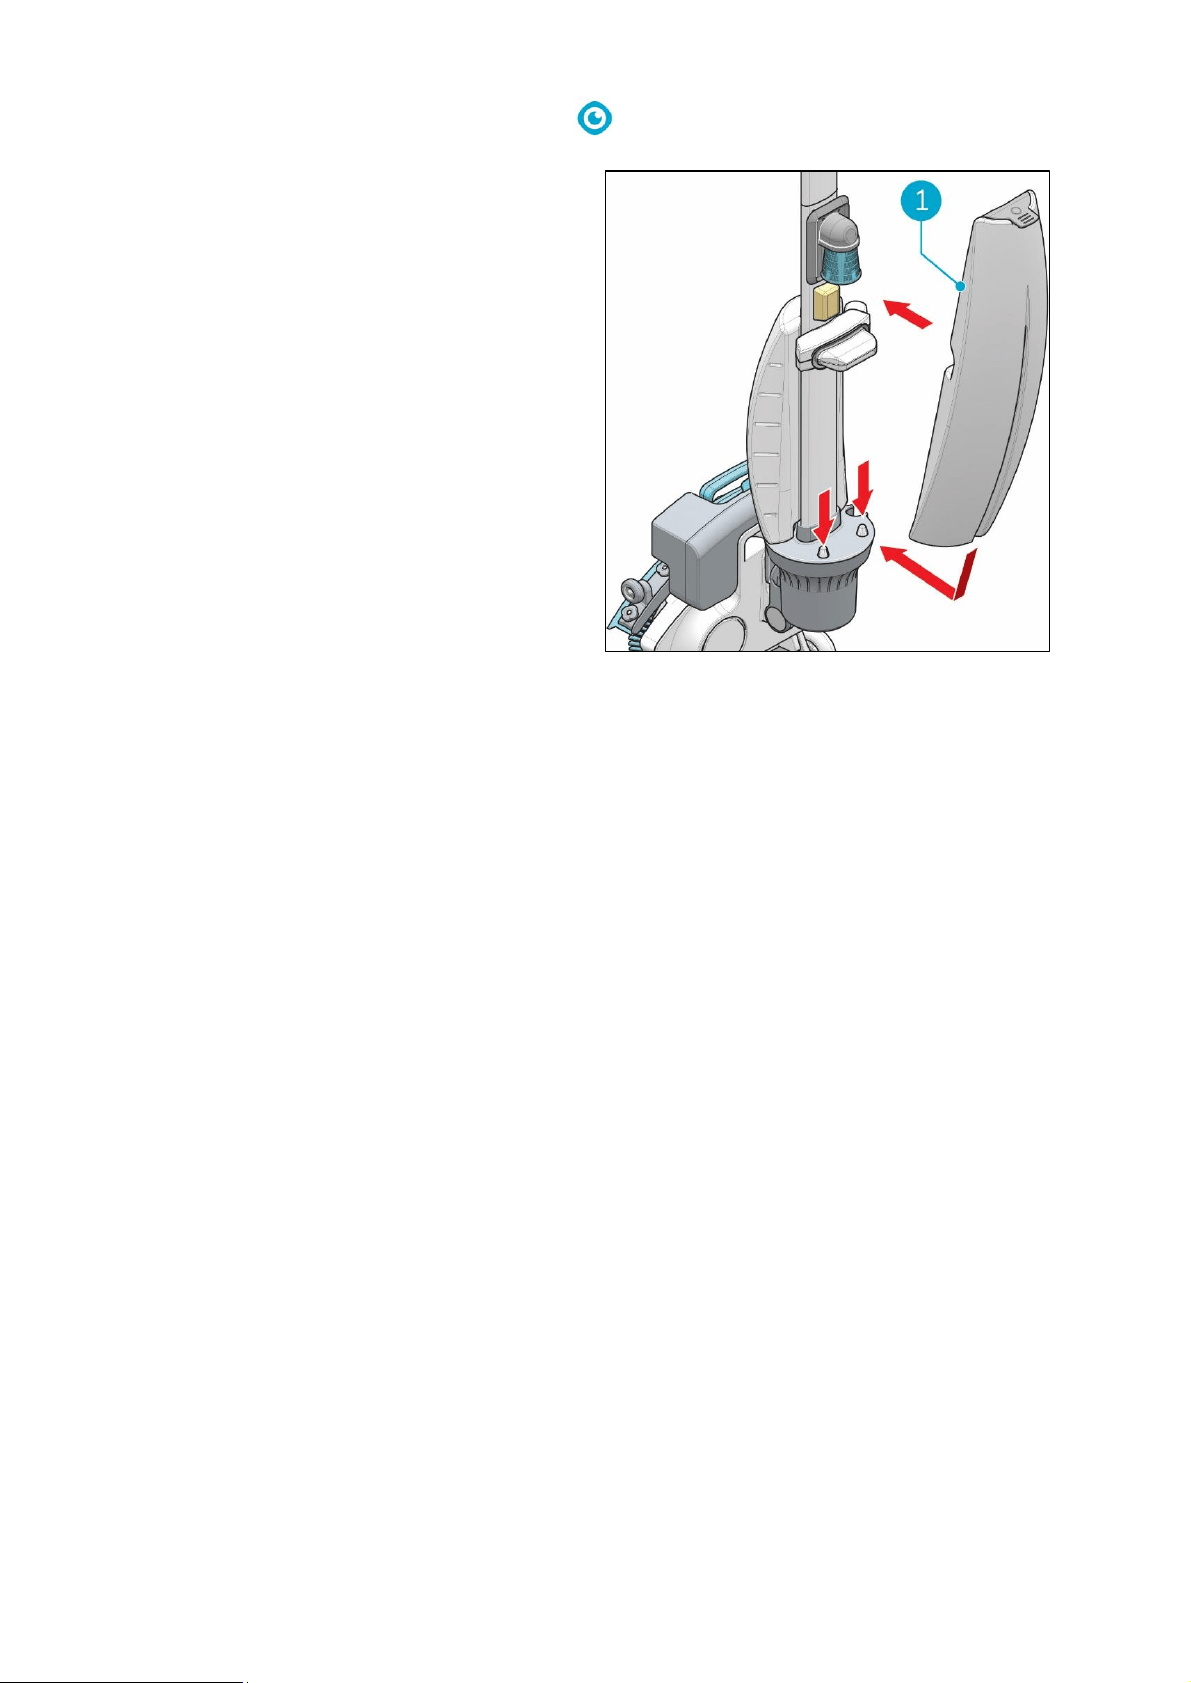
5.2.4 Install cleaning solution tank
1. Put the tank (Figure 11, pos 1) on the i-mop®
Lite with the valve first.
2. Press the tank downward on the nipple
(Figure 11, pos 3) to break the valve seal.
3. Push the tank in place, the magnet (Figure
11, pos 2) will lock the solution tank in place.
Figure 11
21
6 Operation
6.1 Before you start
Check the brushes and squeegee for wear and tear (see chapter 7 on maintenance).
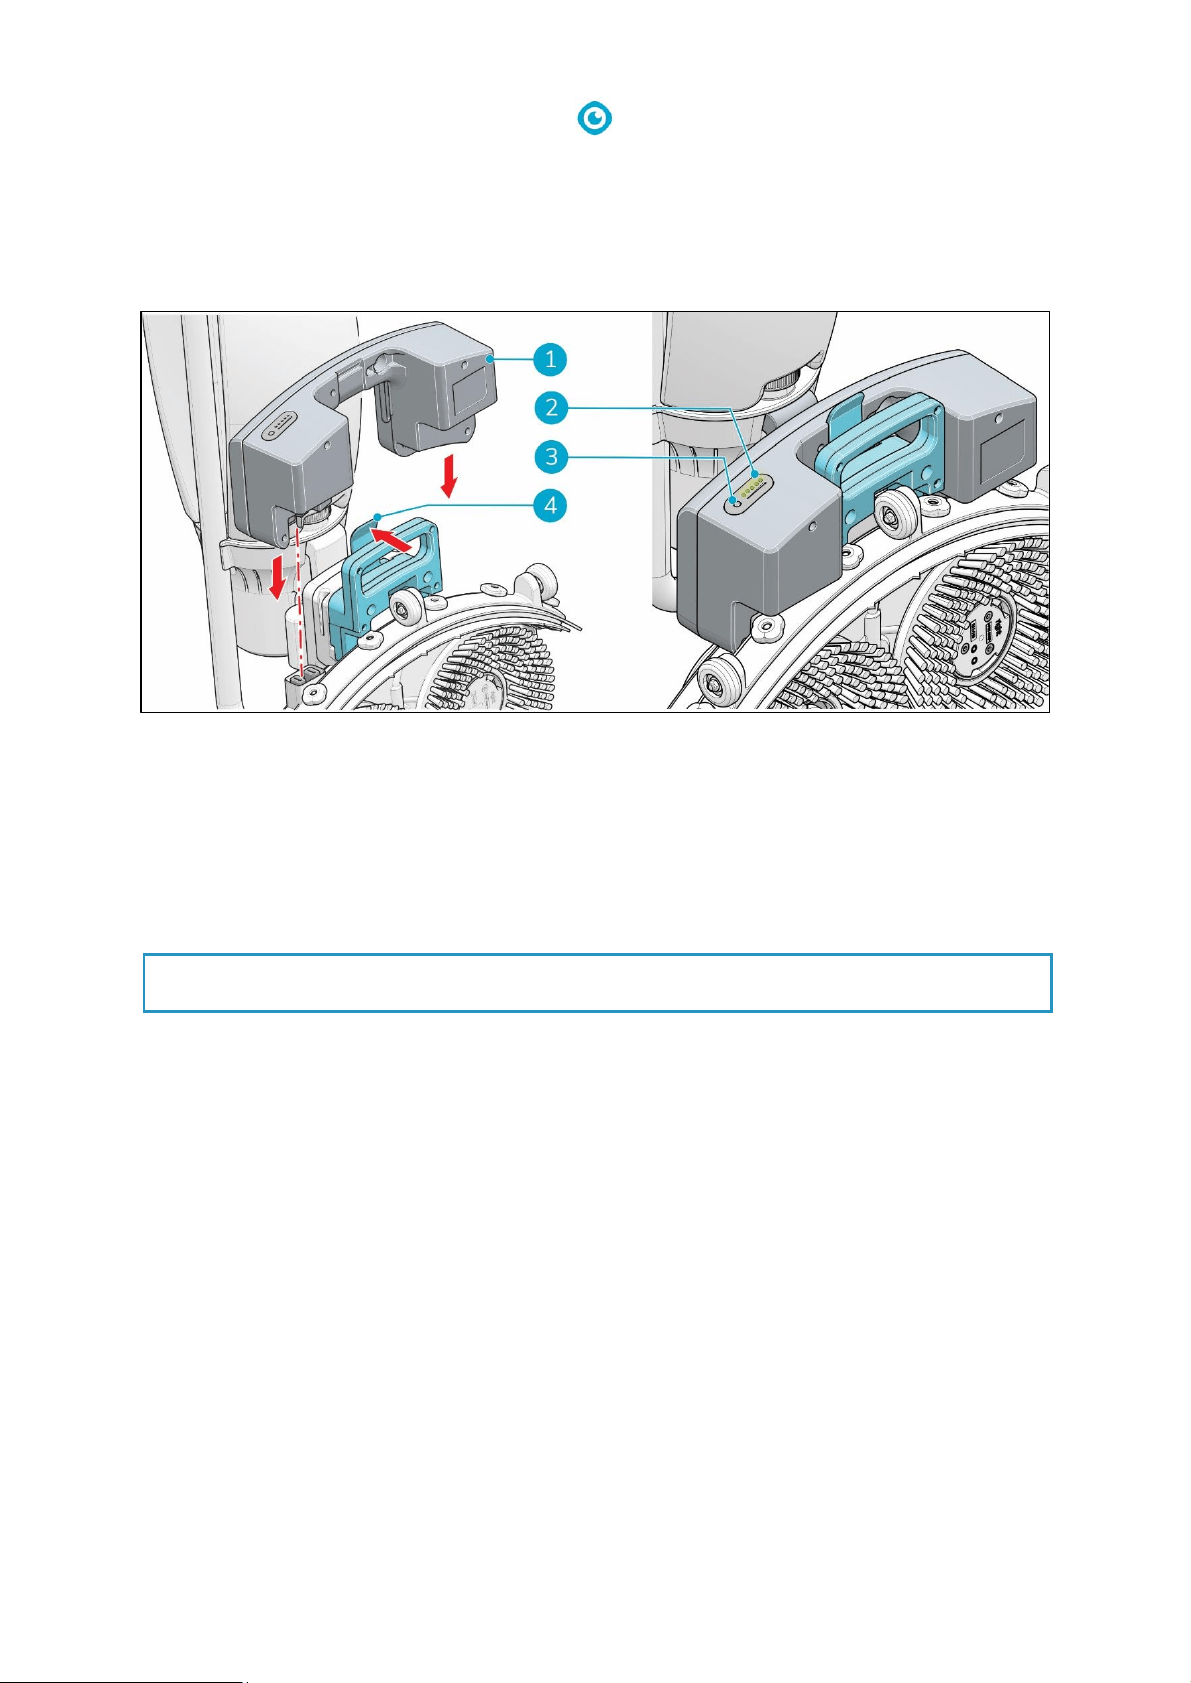
6.1.1 Insert the battery
Figure 13
1. Put the i-mop® Lite in park position (see 4.2).
2. Push the battery (Figure 13, pos 1) in the battery slot. A click signals the battery is locked in place
by the retaining clip (Figure 13, pos 4).
3. During operation, you can check the amount of power left (Figure 13, pos 2) by pressing the
power indicator (Figure 13, pos 3) on the battery.
TIP:
It is not recommended to use the battery when charged below 40%.
22
6.1.2 Fill the cleaning solution tank
1. Remove the stopper.
2. Pour in a maximum of 0.79 gal/ 3 L of
cleaning fluid.
3. Replace stopper and make sure it seals tight.
4. Put the i-mop® Lite in park position (see 4.2).
5. Put the tank on the i-mop Lite with the valve
first (Figure 14, pos 1).
6. Press the tank downward to break the valve
seal.
7. Push the tank in place, the magnet will lock
the solution tank in place.
8. Clean your hands afterwards.
6.2 Operation procedure
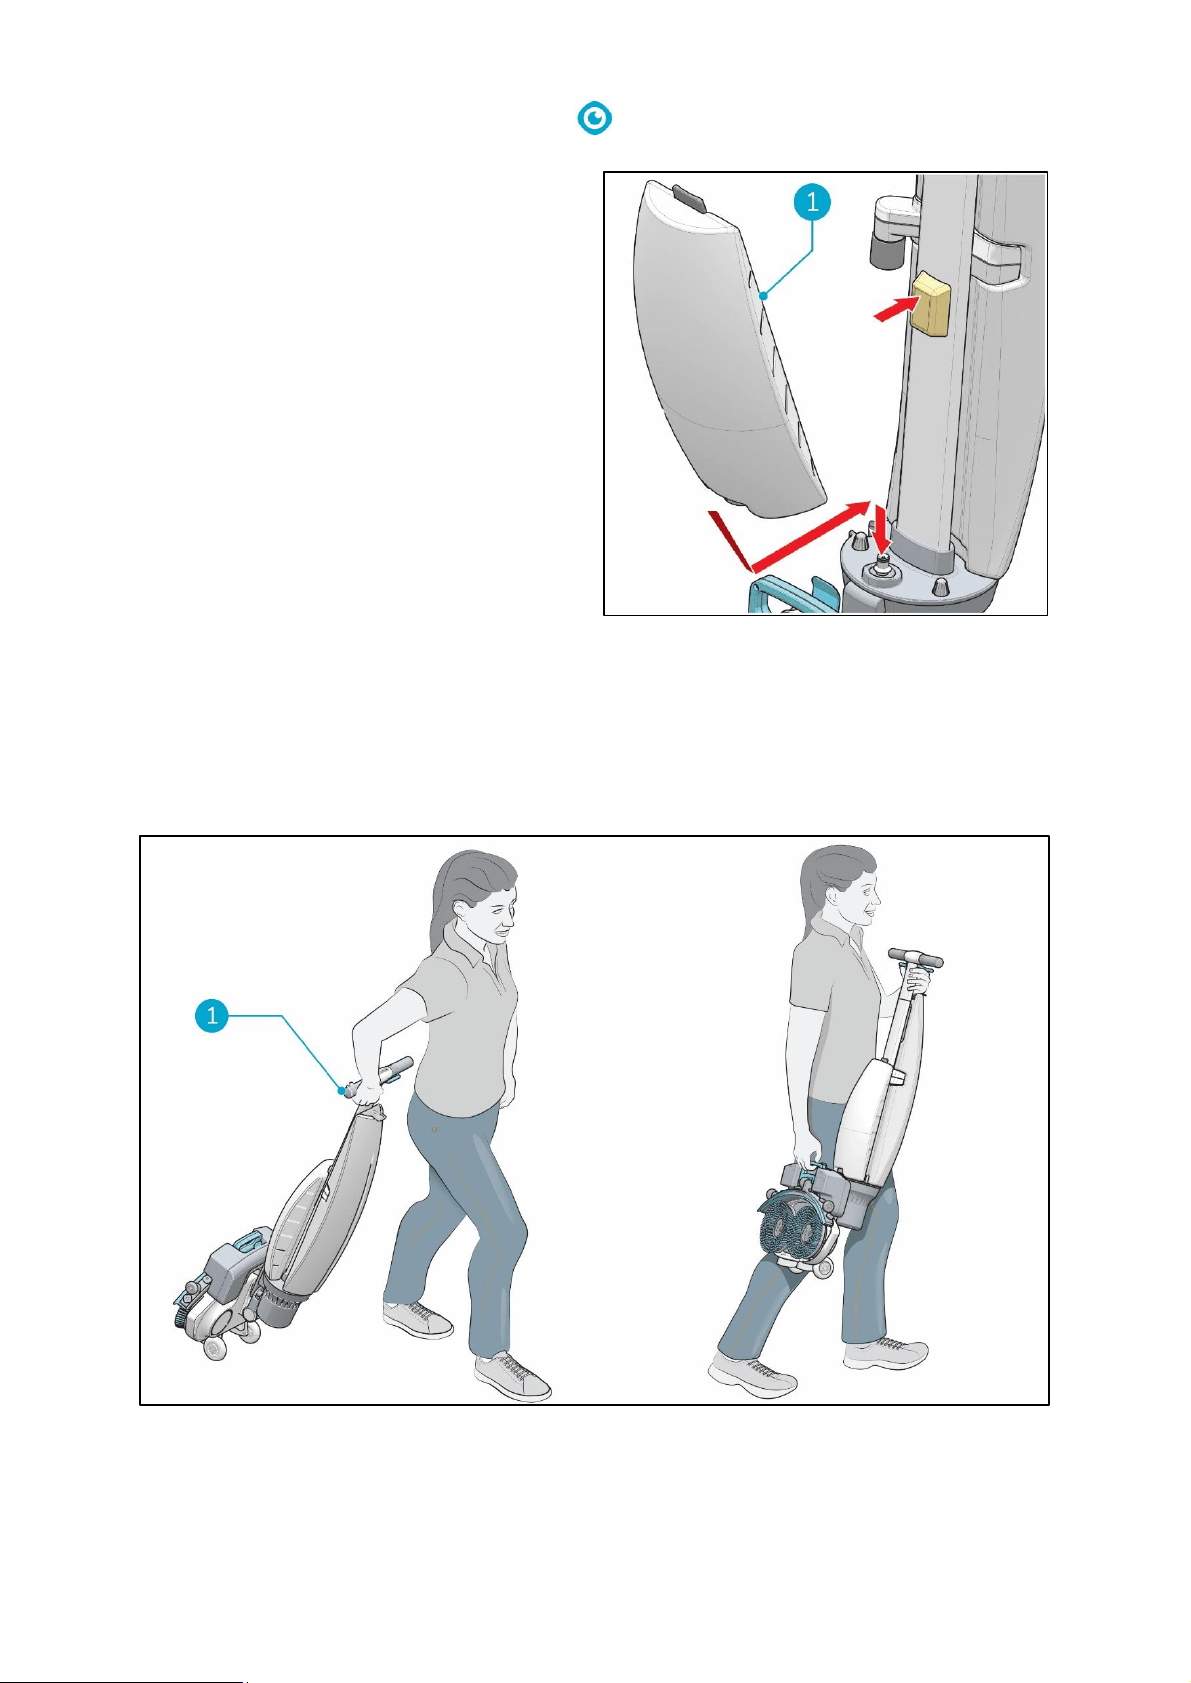
6.2.1 Walking to the job site
Figure 15
To move the i-mop Lite from one location to another one in a building:
Figure 14
23
1. Put the i-mop® Lite in park position (see 4.2).
2. Hold the handle with one hand (Figure 15, pos 1).
3. Don't forget to bring a wet floor marker.
4. Walk slowly and pay extra attention if you pull the i-mop Lite over obstacles.
5. To lift the i-mop Lite over obstacles, always use two hands.
• Hold the handle with one hand.
• Lift the scrub deck with the other hand.
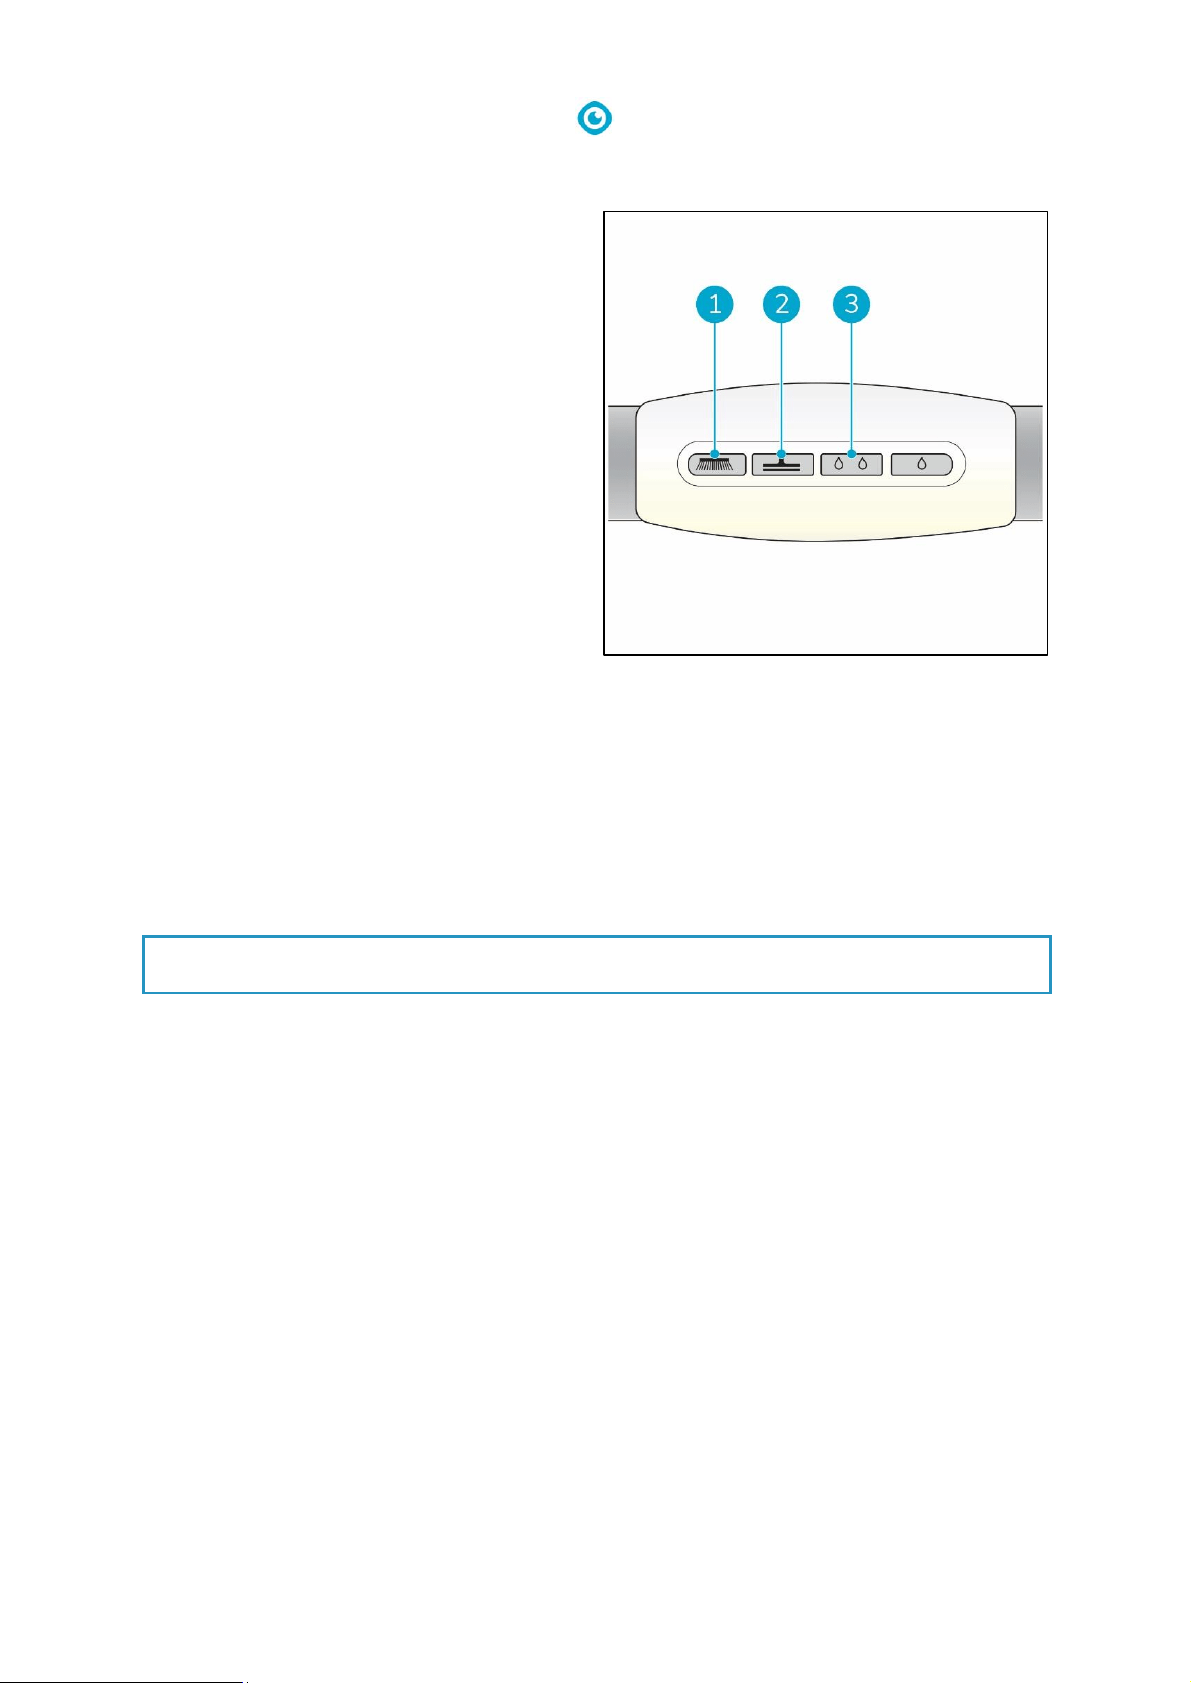
6.2.2 At the job site
1. Mark the job site using a wet floor marker.
2. Crouch down while holding the scrub deck
firmly with one hand (Figure 16, pos 2).
3. Push the handle forward with your other
hand (Figure 16, pos 1).
4. Bring the scrub deck slowly down to the
floor.
WARNING
Never push down the scrub deck with your foot.
Figure 16
24
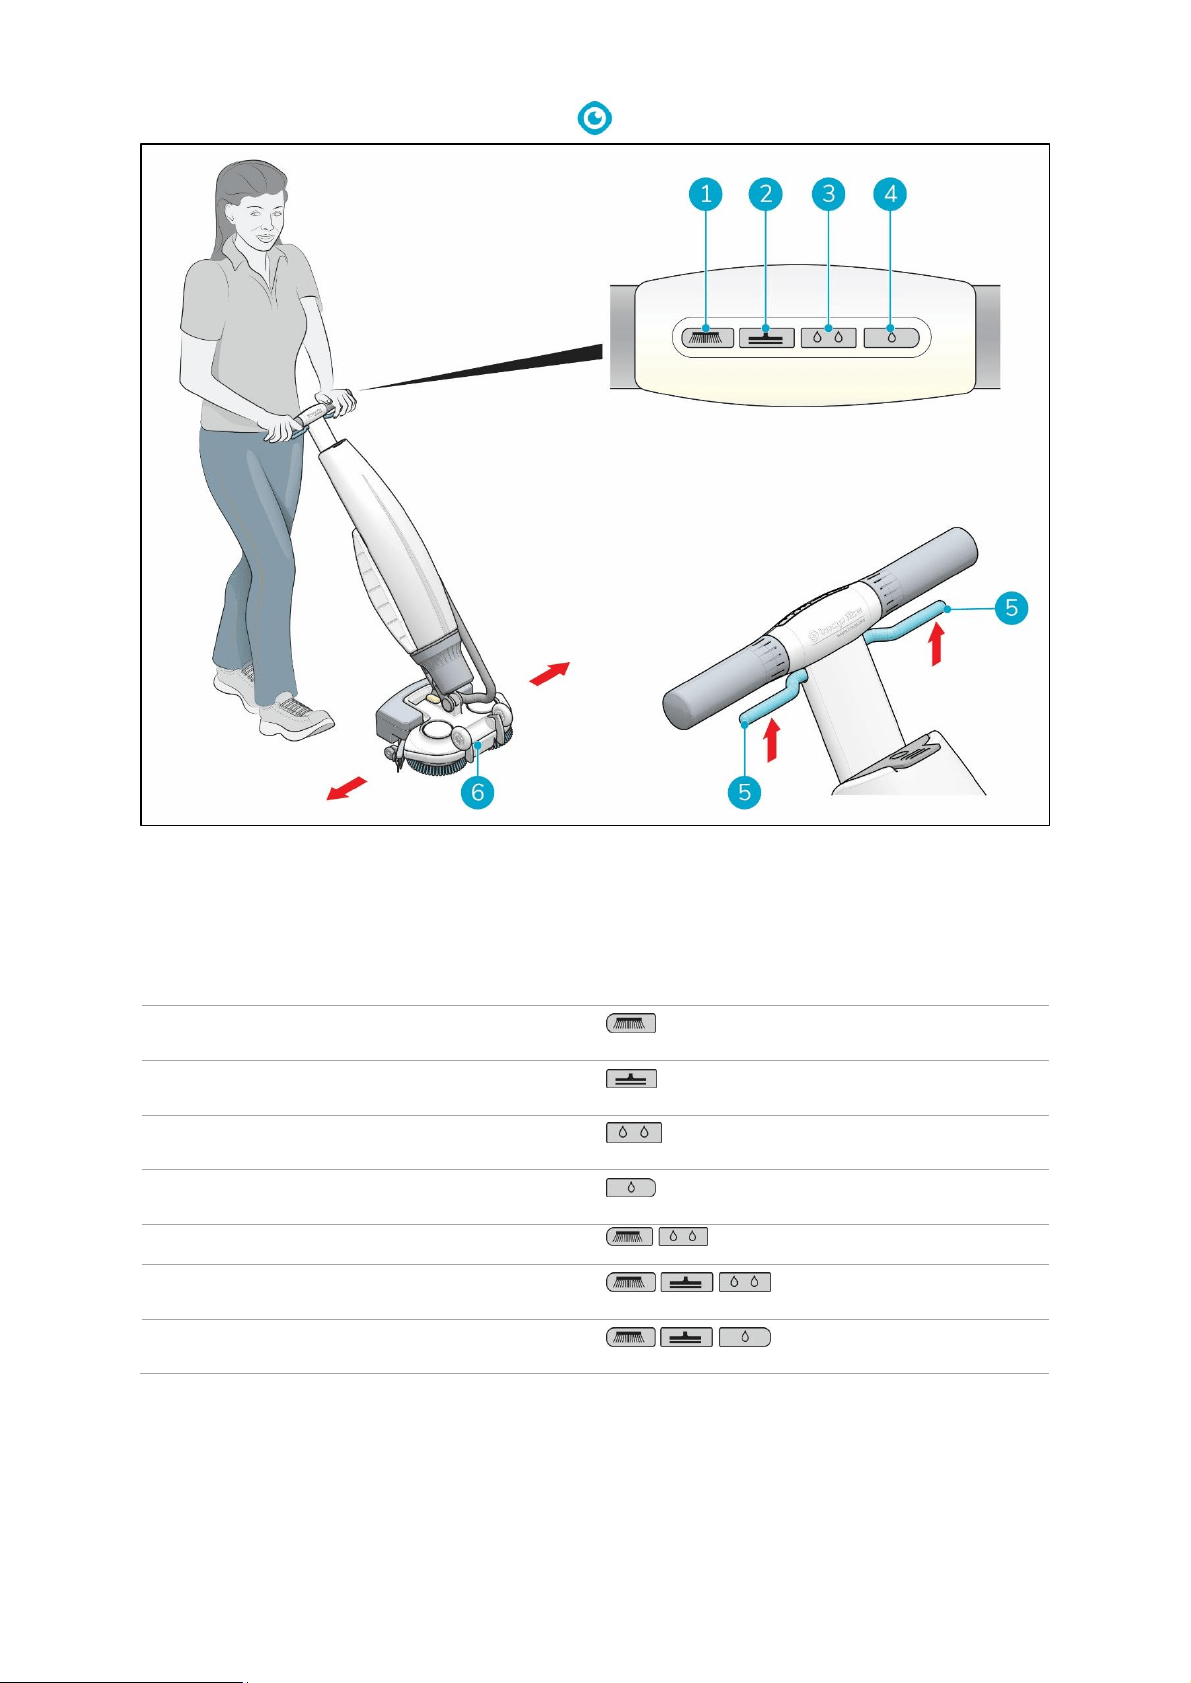
Figure 17
5. Stand behind the i-mop® Lite.
6. Choose your cleaning mode via the buttons on the control panel (Figure 17, pos 1 to 4). You can
select the options independently or combined.
Mode
Press
Brush only
Vacuum only
Use cleaning solution
Use Eco mode
Brush and cleaning solution
Brush and cleaning solution and vacuum
Brush and Eco and vacuum
7. Hold the handle with both hands.
8. Squeeze the trigger on the handle (Figure 17, pos 5). This will also start the i-mop Lite
9. Once the trigger is squeezed the i-mop Lite will move forward.
10. Walk behind the i-mop Lite.
25
11. Steer by gently turning the handle left or right to move the scrub deck (Figure 17, pos 6).
12. Releasing the trigger (Figure 17, pos 5) will immediately stop the i-mop Lite. The vacuum motor
will stop after 3 seconds.
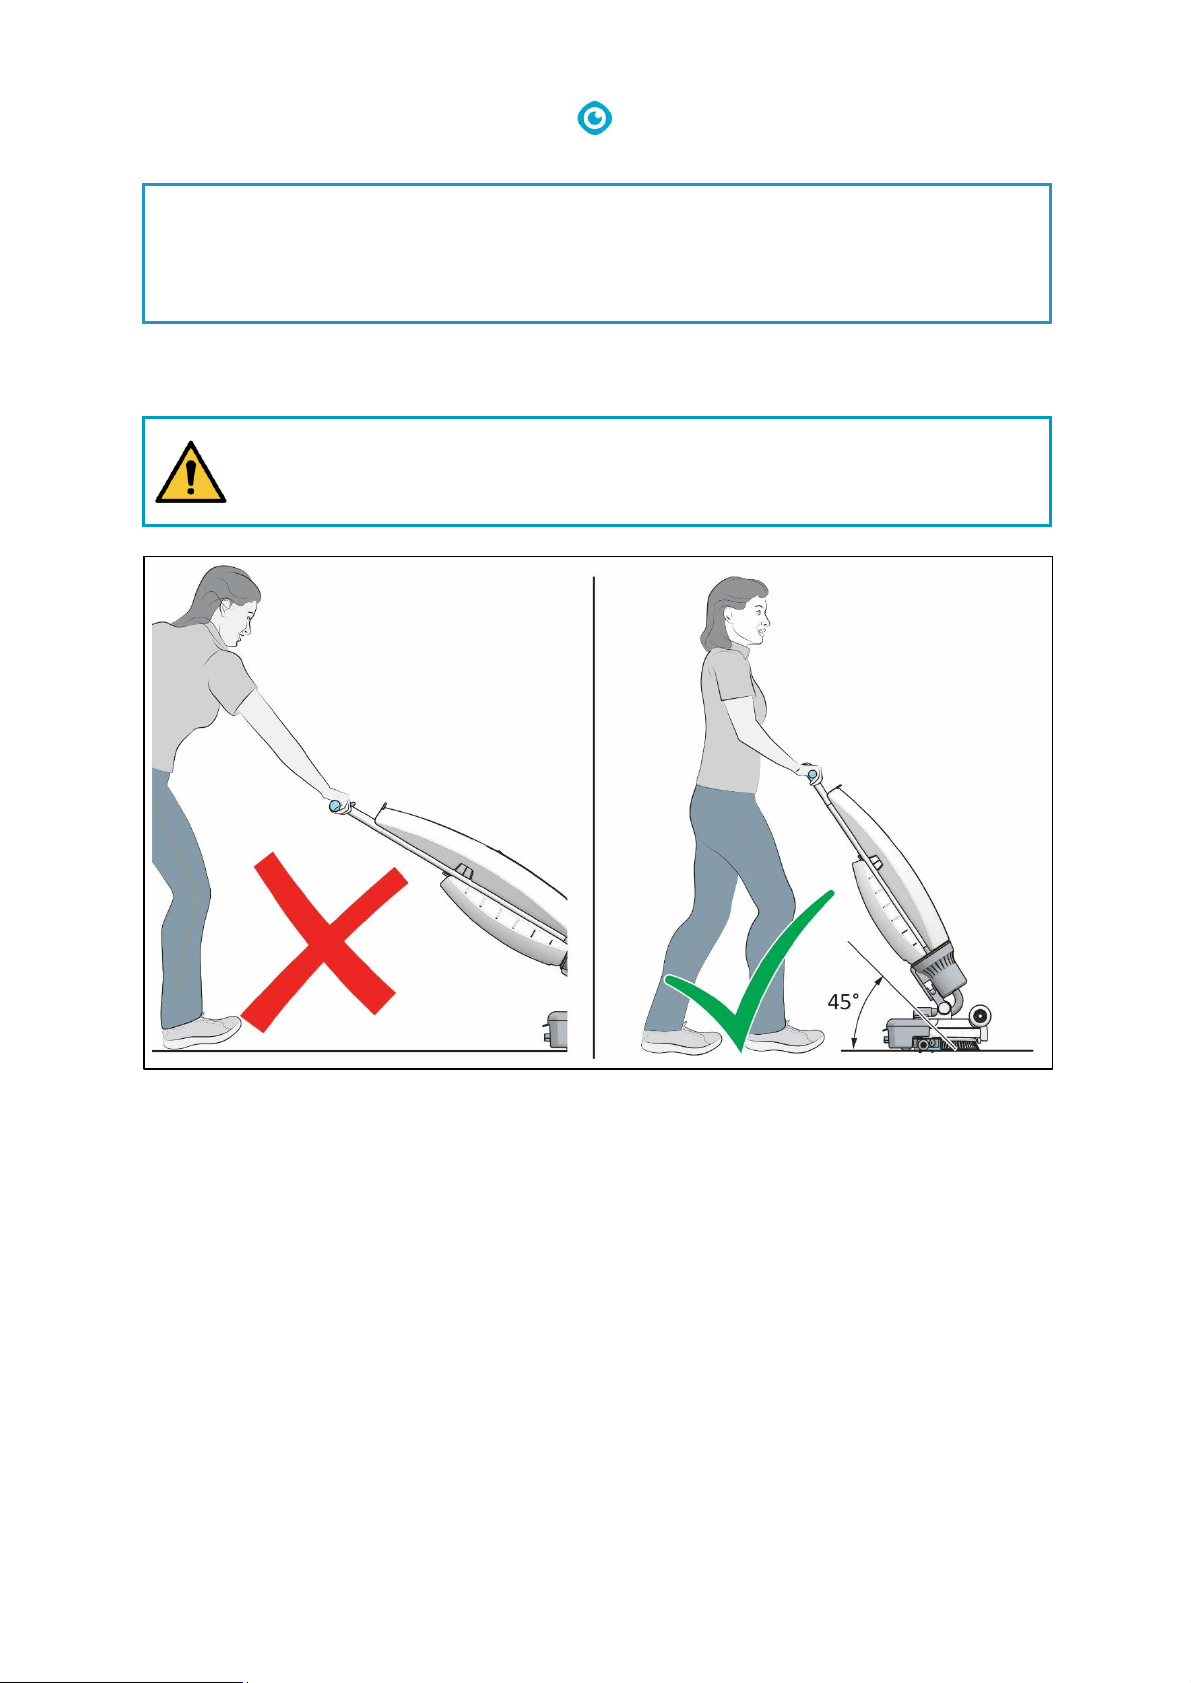
WARNING
Do not operate the i-mop Lite at greater than arm’s length. Operating below a 45-
degree angle can cause water to run into the vacuum engine.
Figure 18
TIP: Learn to swivel
Operating the i-mop® Lite is very intuitive and like steering a bicycle. The i-mop Lite is designed
to move forward. To turn, stop walking and use your inside hand (the hand in the direction you
want to go to) to turn the handle. The i-mop Lite can swivel 360 degrees making it possible to
reverse direction.
26
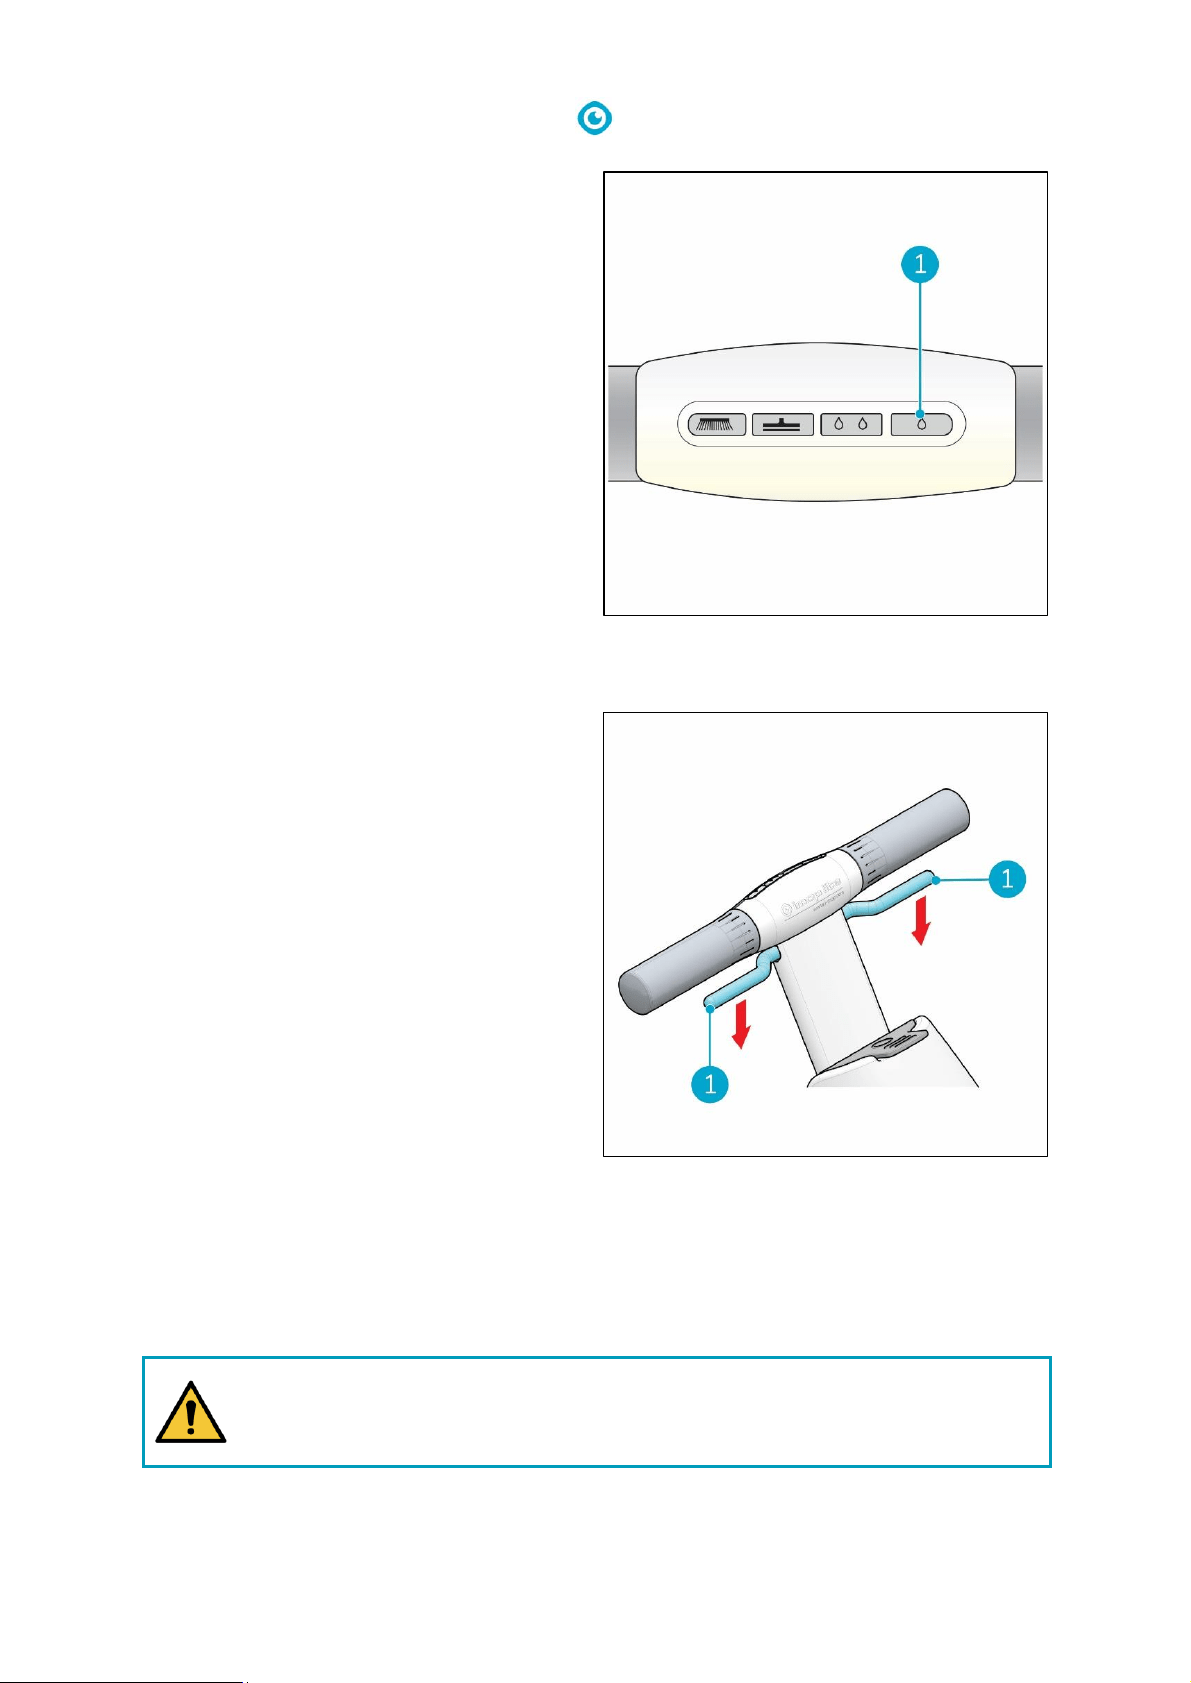
6.2.3 ECO mode
The ECO mode will use 40% less cleaning
solution.
1. Turn on the ECO mode by pushing the ECO
button (Figure 19, pos 1).
2. Turn off ECO mode by pushing the ECO mode
again.
6.2.4 Turn off the i-mop® Lite
Releasing the trigger (Figure 20, pos 1) will
automatically stop the i-mop Lite.
Note that the vacuum motor will continue to run
for approximately 3 more seconds.
6.2.5 Emptying tanks
Dispose water or cleaning solution from both tanks in an appropriate drain. Even though the recovery
tank is bigger, empty it each time the cleaning solution tank is filled.
WARNING
Please observe the local provisions regarding solution disposal related to wastewater
treatment.
Figure 19
Figure 20
27
6.3 Cleaning and storage
6.3.1 Flush the system
Be sure to flush the tanks out completely. To
thoroughly flush out any solution in the lines and
valves:
1. Refill solution tank with 0.5 to 1 liter of clean
water.
2. Press the Brush and Cleaning solution and
Vacuum buttons on the control panel.
3. Use the trigger to start the i-mop® Lite and
allow it to flush the system.
6.3.2 Cleaning the tanks
1. Dispose water or cleaning solution from both tanks in an appropriate drain.
2. To clean the recovery tank thoroughly:
• Partially fill the tank with fresh water and hold it horizontally with the holes facing up.
• Tilt the tank repeatedly, thoroughly rinsing all the dirt and debris out from the tank.
3. To clean the solution tank, follow the same procedure.
TIP: Dry the tanks
Slightly open both tank caps before storage to allow the tanks to dry.
Figure 21
28
6.3.3 Clean the filter
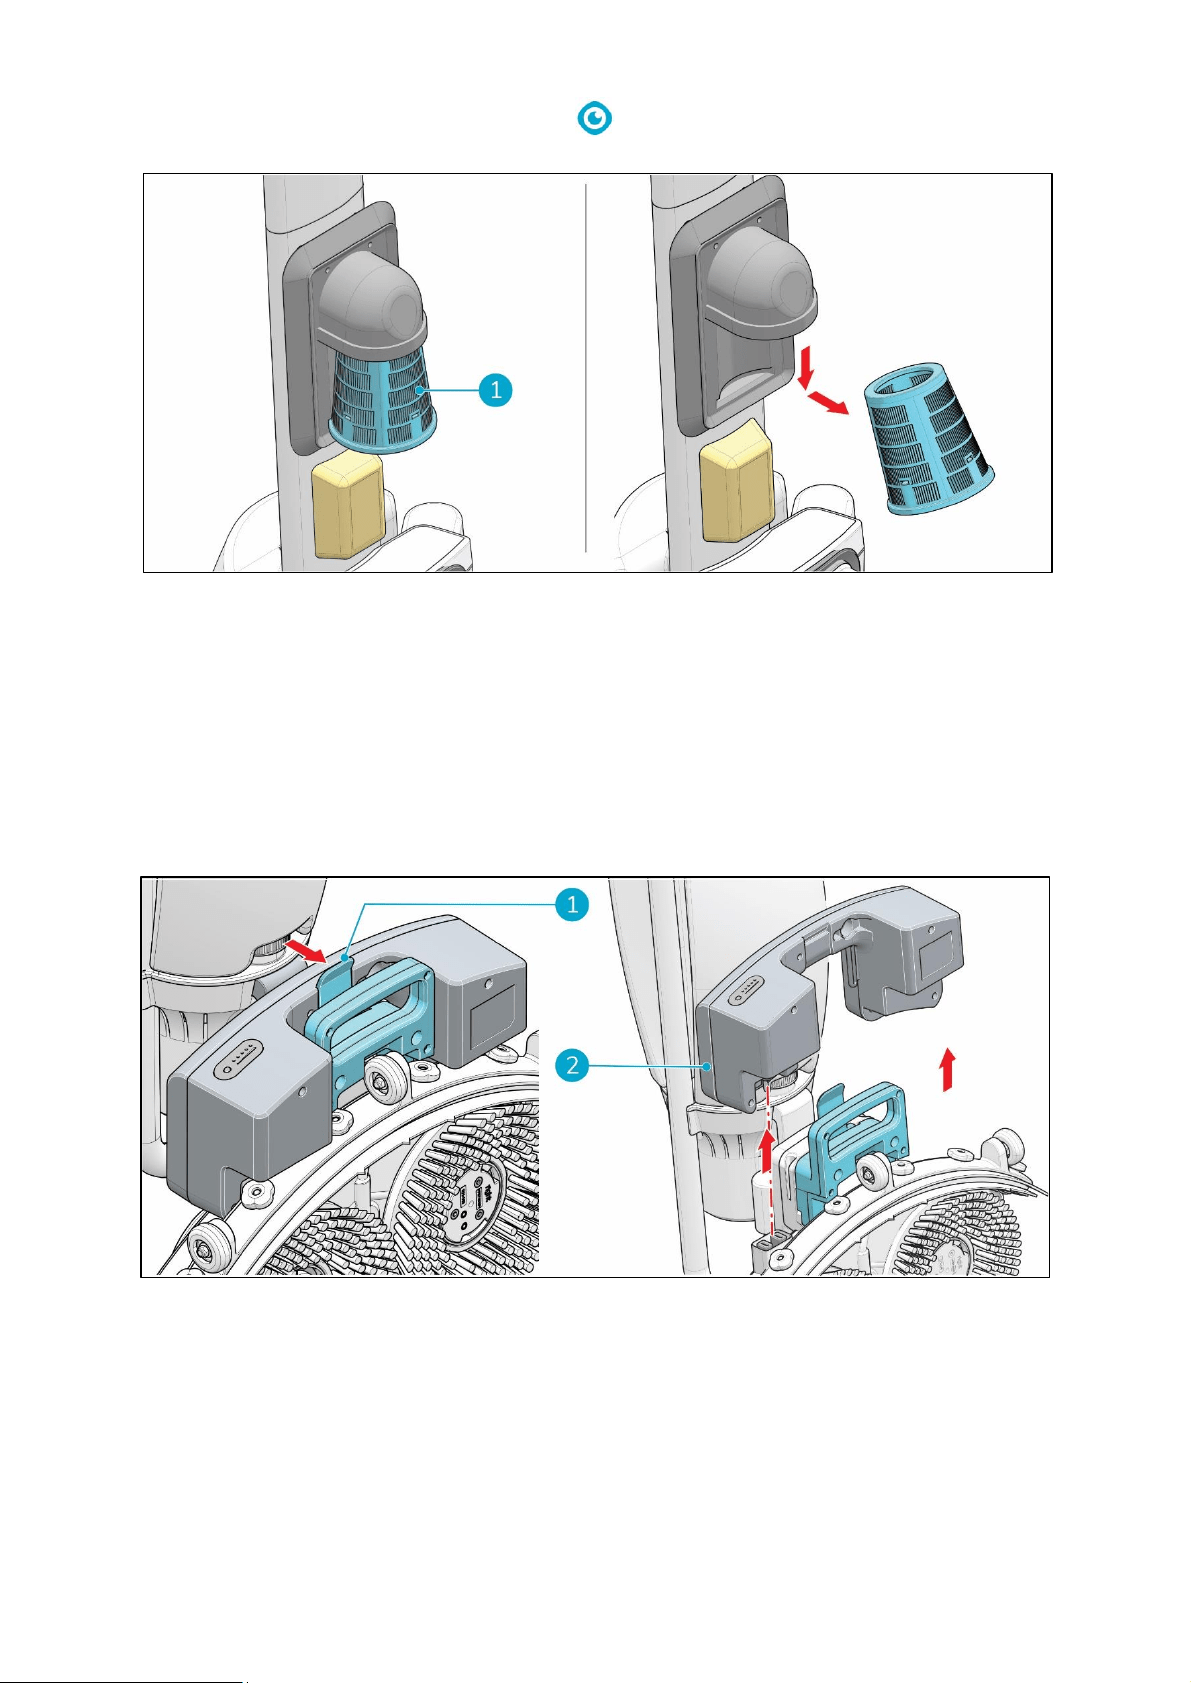
1. Put the i-mop® Lite in park position (see 4.2).
2. Remove the recovery tank.
3. Release the blue suction filter (Figure 22, pos 1) from beneath the rubber holder by tilting it
slightly and pulling it out.
4. Clean the filter.
5. Place the filter back in the rubber holder.
6. Put the recovery tank back on the machine.
6.3.4 Remove the battery
1. Put the i-mop Lite in park position (see 4.2).
2. Hold the i-mop Lite by the scrub deck to stabilize.
3. While pressing the retaining clip inwards (Figure 23, pos 1), pull the battery away (Figure 23,
pos 2).
4. When the i-mop Lite isn't used regularly, store the charged battery in a dry, clean place.
5. Make sure the battery is charged monthly.
Figure 22
Figure 23
29
6.3.5 Check the brushes and squeegee
1. Check to see if both brushes are clean and intact, see 7.1 on how to remove them.
• Clean them under fresh water or replace them if necessary.
• Replace brushes if the yellow wear indicator is the same height as other bristles.
2. Check to see if the squeegee is clean and intact. See 7.2 on how to remove it.
• Clean it with fresh water and wipe it with a clean, damp cloth.
• Replace the squeegee blades when necessary.
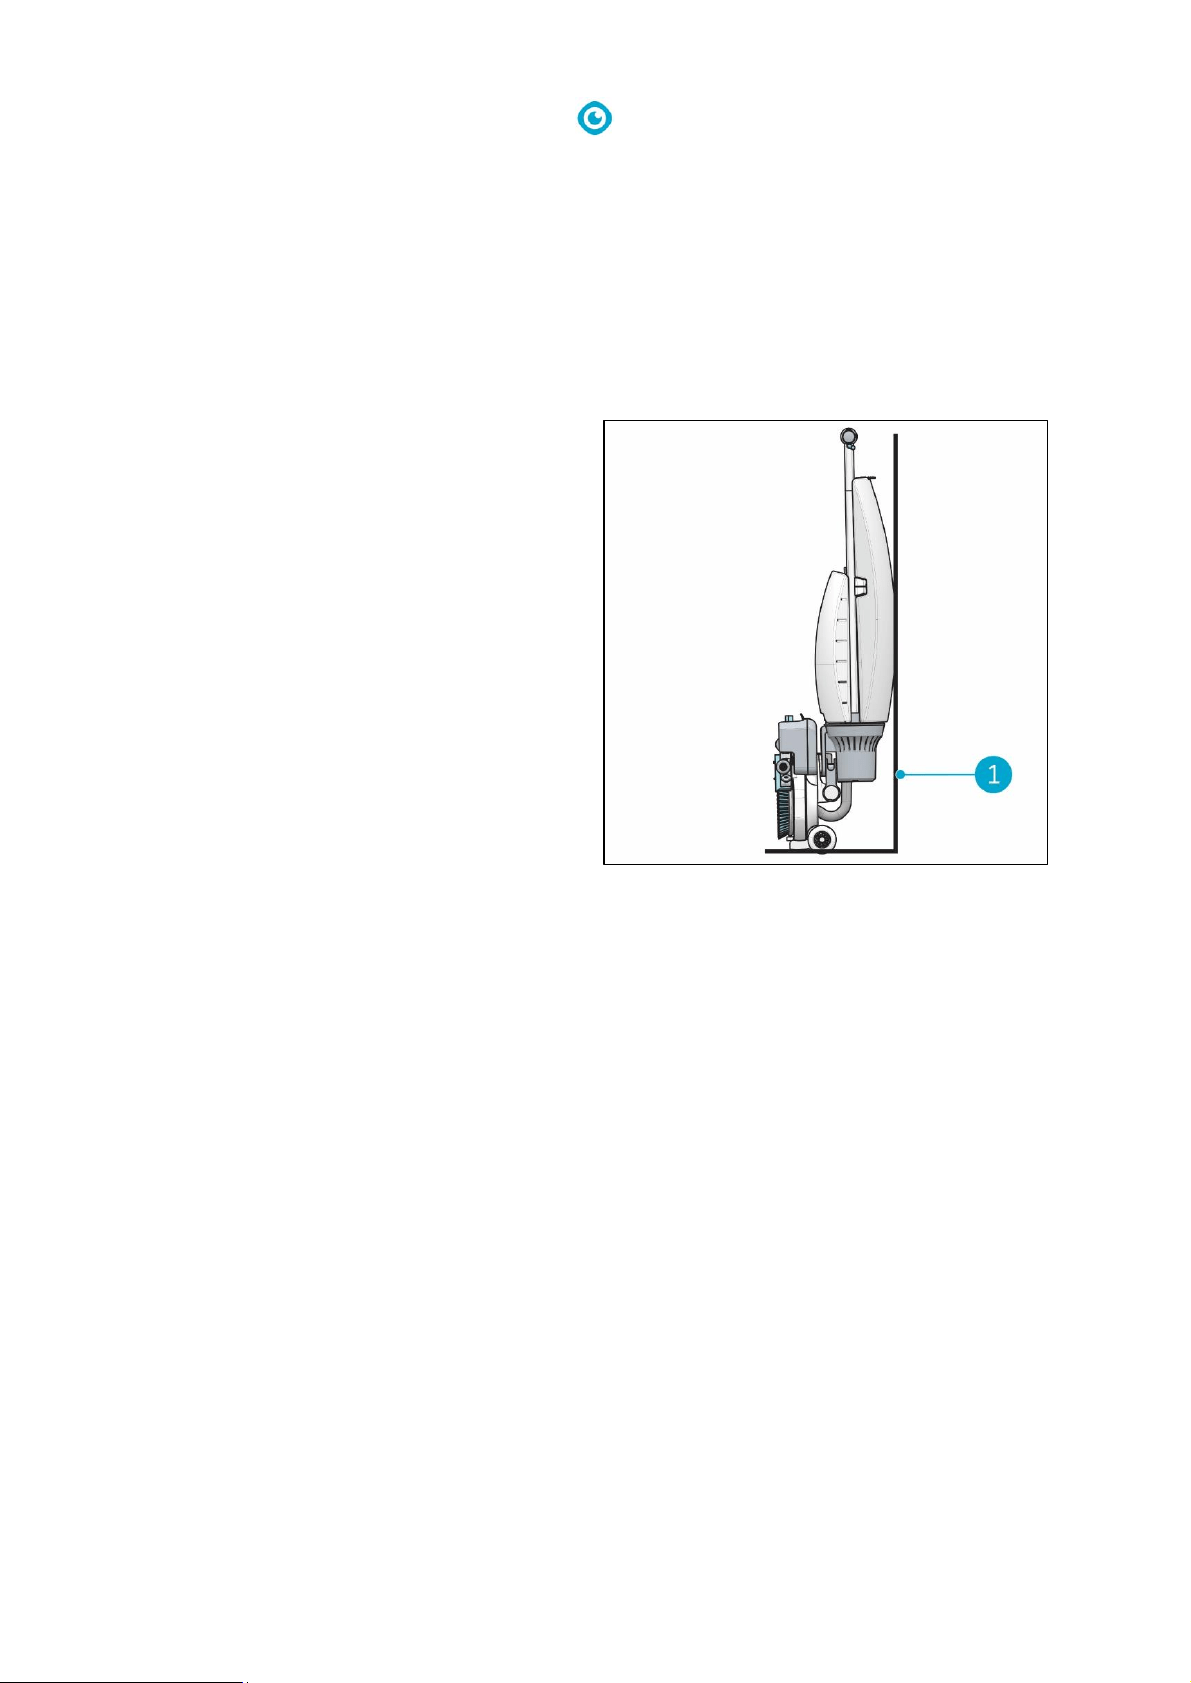
6.3.6 Store in an upright position
1. Please ensure that the i-mop® Lite is parked
in a place where nobody can bump into it.
2. Put the i-mop Lite in park position (see 4.2).
3. Store the i-mop Lite close to a wall (Figure
24, pos 1) with the handle pointing towards
the wall and the brushes facing away from
the wall.
Figure 24
30
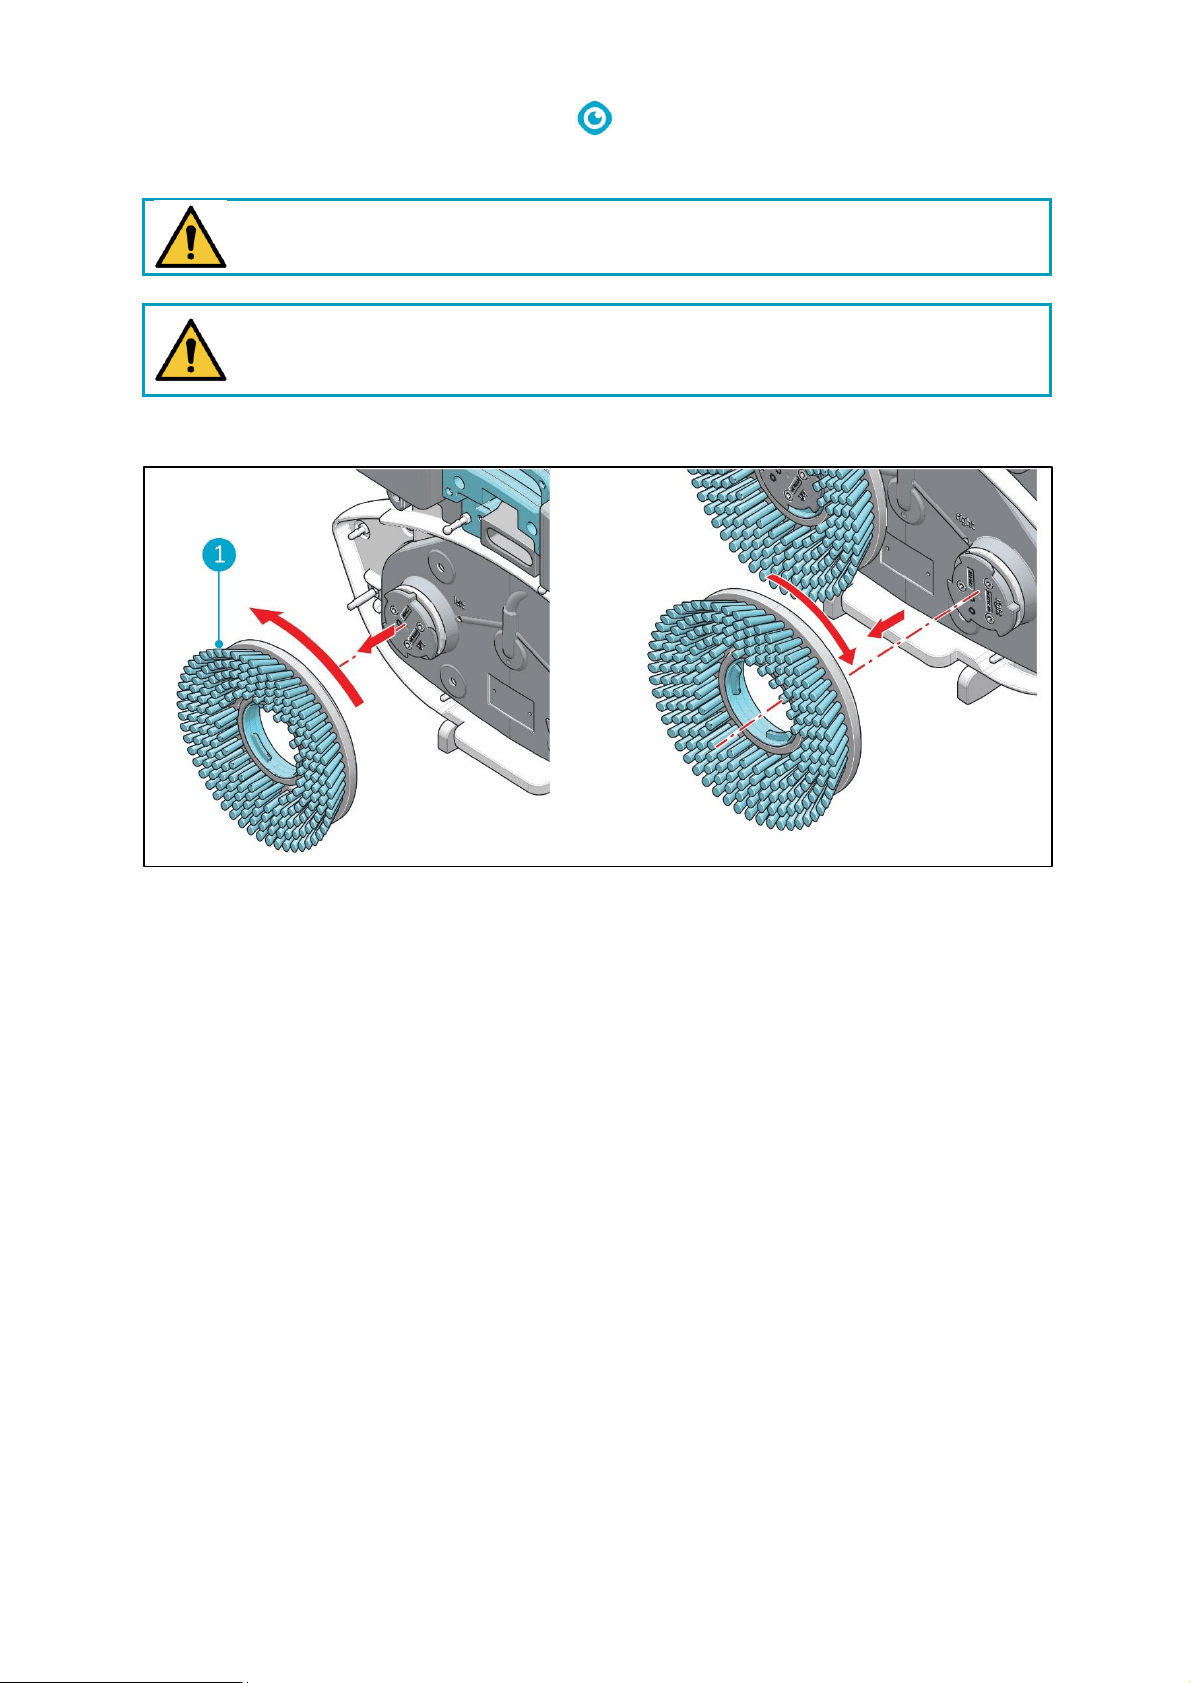
7 Maintenance
CAUTION
Remove the battery before executing any cleaning or maintenance task.
CAUTION
Always keep the body of the i-mop Lite in an upright position when replacing brushes or
squeegee.
7.1 Brush replacement
Figure 25
The brushes are attached to the scrub deck via a bayonet fitting.
1. Put the i-mop Lite in park position (see 4.2).
2. Hold the scrub deck firmly with one hand.
3. Using your other hand to turn the left brush (Figure 25, pos 1) anticlockwise until you feel
resistance or see the motor disk turning as well.
4. Pull the brush off the motor disk toward you.
5. Turn the right brush clockwise until you feel resistance or see the motor disk turning as well.
6. Pull the brush off the motor disk toward you.
7. Visually inspect the motor disks.
8. Clean the i-mop Lite scrub deck with a clean, dry cloth before you install the brushes.
31
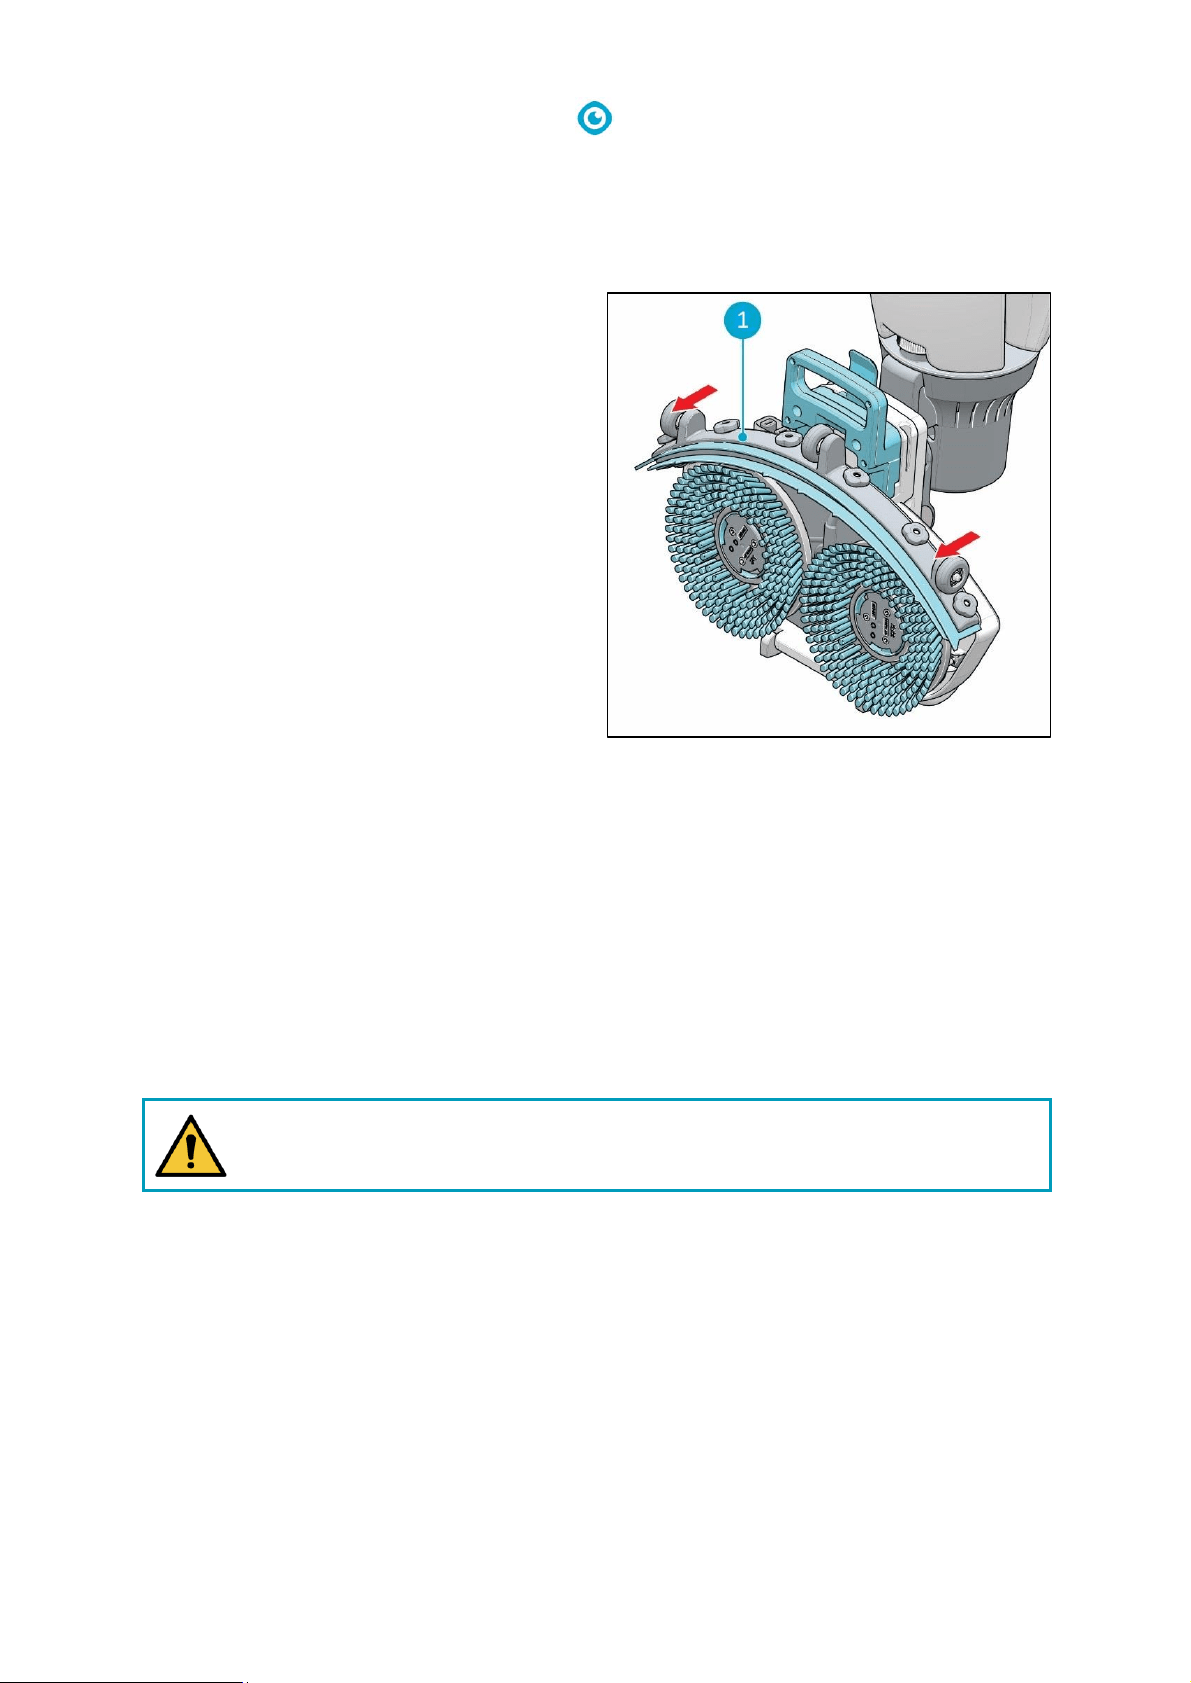
7.2 Squeegee replacement
The squeegee blades come in pairs and wear out over time. When you notice the floor is no longer
being dried properly, replace the squeegee blades.
7.2.1 Detach the squeegee
1. Put the i-mop® Lite in park position (see 4.2).
2. Hold the scrub deck firmly with one hand.
3. Pull on the left side of the squeegee (Figure
26, pos 1) to remove it.
4. Pull on the right side of the squeegee to
remove it.
5. Remove the vacuum hose from the squeegee
by twisting the hose.
7.2.2 Flip/replace the squeegee blade
1. Unscrew the 6 plastic nuts on the back.
2. Take off the squeegee rear plate.
3. Once the plastic part is removed, you can easily take off the rear rubber blade.
4. Push the 6 screws through the front blade in order to remove the squeegee front plate.
5. Take off the rear rubber blade.
6. Inspect the front and rear rubber blades:
• The first time: flip the blades so the top of the blade is now facing the floor. Push the front
plate screws through the holes.
• The second time: attach a new set of blades. Push the front plate screws through the holes.
CAUTION
The special squeegee blades that contain small arrow-like shapes cannot be switched.
These need to be replaced every time.
7. Put back the plastic rear plate.
8. Screw the 6 plastic nuts on the back.
Figure 26
32
7.2.3 Attach the squeegee
Figure 27
To attach the squeegee:
1. Hold the scrub deck firmly with one hand.
2. Align the pins on the scrub deck (Figure 27, pos 2) with the holes on the squeegee
(Figure 27, pos 1).
3. Push the left side of the squeegee in place.
4. Push the right side of the squeegee in place.
7.3 Replace vacuum hose
1. Detach the squeegee as described in 7.2.1.
2. Remove the solution tank and the recovery tank. You can see where the vacuum hose is
connected at the i-mop® Lite handle.
3. Hold the scrub deck firmly with one hand.
4. Remove the hose connector from the scrub deck.
5. Detach the vacuum hose from the connector by twisting the hose 1/4 turn.
6. Remove the vacuum hose from the i-mop Lite.
7. Now you can carefully pull the vacuum hose from the handle and unscrew the hose connector.
8. Place the new hose by following the above steps in reversed order.
9. Reinstall the squeegee.
7.4 Recommended additional cleaning
Clean the exterior of the i-mop Lite weekly with a non-abrasive, non-solvent cleaner or a clean, damp
cloth. To clean the scrub deck, remove the brushes, and then use a non-abrasive, non-solvent
cleaner or a clean, damp cloth.
7.5 Recommended service time
It is recommended to schedule a full service by one of our service partners every 500 hours.

33
7.6 Accessories
The i-mop® Lite can be equipped with different brushes and polishing pads. The use of these
accessories is only allowed by experienced and trained operators as some polishing pads can be
abrasive and can cause damage to the floor surface when applied incorrectly. For more information
please contact our sales department, or the partner who provided the i-mop Lite.

34
8 Troubleshooting
Problem
Cause
Solution
No power
No battery
Insert battery
Empty battery
Charge battery
Battery incorrectly placed
Remove and reinstall battery
Insufficient/no water
flow
Wrong program
Check the operating mode on
the control panel
Eco mode on
Check the ECO mode light on
the control panel
Empty tank
Fill the tank
Tank incorrectly placed
The tank valve must be clicked
on the nipple to open the seal,
replace the tank
Filter blocked
Ensure the solution tank has
no dirt particles and the filter is
clean
Blocked water pipe
Request for service
Poor water recovery
Squeegee opening blocked
Remove the pipe and clean the
squeegee opening
Tears in squeegee blades
Replace squeegee blades
Filter blocked
Check the yellow filter and
clean if necessary
Vacuum hose blocked
Check and remove blockage
Vacuum pump not running
Request for service
Leakage
Tanks incorrectly placed
Check and reattach fluid tanks
Tear in vacuum hose
Replace vacuum hose or
request for service
Battery not charging
Battery is at end of life
Replace battery
35
9 Decommissioning and disposal
ATTENTION
It is the responsibility of the i-mop® Lite owner to dispose of the product responsibly.
At the end-of-life the i-mop Lite still contains valuable resources and needs to be disposed of
according to your local laws and regulations regarding recycling of electrical equipment.
Before disposal please:
1. Drain the machine (see section 6.3).
2. Remove the battery for separate disposal (see section 6.3.4).
TIP:
Alternatively, keep the battery for use in another i-mop Lite.
3. Remove all loose components like brushes, tanks and squeegee.
4. Dispose all items according to your local laws and regulations.

36
10 Attachments
10.1 CE Certificate
