
User manual
Body-worn Recorder
DVT
VideoTracer

2
Tble of contents
Importnt informtion
Sfety instructions
Clening nd disinfection
Disposl of your old product
About this user mnul
Symbols used
Your bodyworn recorder
Product highlights
Wht’s in the box
Overview of the recorder
Getting strted
Chrging the bttery
Turn the device on nd o
Set the dte nd time
Set the device lnguge
Video recording
Recording screen
Record video
Strt nd nish video recording
Zoom function
Night vision
Mrk importnt recordings
Photos
Audio recording
Recording screen
Record n udio le
Strt nd nish n udio recording
Mrk importnt recordings
Use the Noise cut feture
Plybck
Plybck screen video recordings
Plybck screen udio recordings
Plybck screen photos
Ply bck les
Select le
Strt plybck
Onetouch plybck
Mrk importnt les
Delete les
Settings
Settings mode
Audio recording settings
Video recording settings
Photo settings
Device settings
Using the cmer clip
Attch cmer clip
Detch cmer clip
How to wer the clip
Using the mgnetic pin
Attch pin
Tble of contents
Dt mngement
Trnsfer dt to computer
Reset your device settings
Service nd support
Disply device informtion
Contct Philips prtner
Troubleshooting
Technicl dt

3Important information
1 Importnt
informtion
Don’t make any adjustments and modications that
aren’t described in this manual. Follow all safety
instructions to ensure proper operation of the device. The
manufacturer assumes no liability for damages resulting
from non-compliance with the safety instructions.
Sfety instructions
• Protect the device from rain and liquids to prevent
damage to the device or a short circuit.
• Don’t expose the device to excessive heat caused by
placing it on a heating device or in direct sunlight.
• Protect the cables from damage by being trapped,
particularly at the plugs and where cables exit the
housing.
• Back up your data and recordings. The manufacturer’s
warranty doesn’t cover loss of data resulting from user
actions.
• Don’t perform any maintenance operations that aren’t
described in this user manual. Don’t disassemble the
device into its component parts to carry out repairs.
The device may only be repaired in authorized service
centers.
Rechrgeble built-in bttery
• Don’t attempt to replace the battery yourself. The
battery may only be replaced in authorized service
centers.
• Before your battery is replaced by an authorized
service center, back up your data and recordings.
• Batteries contain substances that may pollute the
environment. Used batteries should be disposed of at
an ocial collection point.
Dt reset
Philips VideoTracer has an internal memory with 16 GB
built-in storage. If you want to perform a factory data
reset, observe the following cautions:
• Back up your data and recordings. Performing a
factory data reset will delete all data on your device.
• Formatting the memory on a computer may cause
incompatibilities with your device. Format the memory
only on the device.
Hering protection
Observe the following guidelines when you use
headphones:
• Set the volume to a moderate level and don’t use
headphones to listen for excessively long periods of
time.
• Be particularly careful to avoid adjusting the volume to
a level that your hearing can’t deal with.
• Don’t turn the volume up so high that you can’t hear
what is going on around you.
• In potentially dangerous situations, be particularly
careful or temporarily discontinue use.
• Don’t use headphones while you are operating a
motorized vehicle, cycling, skateboarding, and so on.
You could be a hazard to yourself and other road
users, and possibly be breaking the law.
Legl restrictions on recording
• The use of the device’s recording function is subject to
the legal restrictions that may apply in your country.
You should also respect the privacy and personal
rights of third parties if you record talks or lectures.
• If you want to record telephone calls, check if this
is legal in your country. In certain countries, you
may be legally required to inform the person you
are conversing with on the telephone that you are
recording the conversation.
Clening nd disinfection
• Before cleaning, disconnect all cables from the device.
• To clean the device, use a soft dry cloth.
• To disinfect the device, use products for disinfection of
surfaces in clinical areas and patient care equipment,
such as surface disinfectant wipes.
• Don’t use harsh chemicals or strong detergents.
• Avoid getting moisture in openings.
• Don’t rub or strike the surface with anything hard or
sharp as this may scratch or damage the surface
permanently.
Disposl of your old product
Europe
A crossed-out wheeled bin symbol attached to
a product indicates that the product is covered
by the European Directive 2011/65/EU. Please
get informed about the local separate collection
system for electrical and electronic products.
Please act according to your local rules and
don’t dispose of your old products with your normal
household waste. Correct disposal of your old product
helps to prevent potential negative consequences for the
environment and human health.
United Sttes
Rechrgeble Li-ion bttery:
• Your product is designed and manufactured with high
quality materials and components, which can be
recycled and reused. For recycling information, please
contact your local waste management facilities or visit
www.recycle.philips.com.
• This appliance contains a rechargeable lithium-ion
battery which must be disposed of properly.
eeeeeeee›

4 Important information
About this user mnul
Find a quick overview of your device on the next pages.
For detailed description, see the following chapters of
this user manual. Read the instructions carefully.
Symbols used
Tip
• This symbol identies information that helps you to
use your device more eciently and simply.
Note
• This symbol indicates notices which you should
observe when handling or operating the device.
Caution
• This symbol warns of damage to the device and
possible data loss. Damage can be caused by
improper handling.
• Contact your local town or city ocials for battery
disposal information.
You can also call 1-800-822-8837 or visit
www.call2recycle.org for battery drop-o locations.
• For assistance, visit our website
www.philips.com/support or call
1-800-243-3050 toll free.
Rechrgeble NiMH bttery:
• Your product is designed and manufactured with high
quality materials and components, which can be
recycled and reused. For recycling information, please
contact your local waste management facilities or visit
www.recycle.philips.com.
• This appliance contains a rechargeable NiMH battery
which must be disposed of properly.
• Contact your local town or city ocials for battery
disposal information.
You can also call 1-800-822-8837 or visit
www.call2recycle.org for battery drop-o locations.
• For assistance, visit our website
www.philips.com/support or call
1-800-243-3050 toll free.
Cnd
Rechrgeble Li-ion bttery:
• Your product is designed and manufactured with high
quality materials and components, which can be
recycled and reused. For recycling information, please
contact your local waste management facilities or visit
www.recycle.philips.com.
• This appliance contains a rechargeable lithium-ion
battery which mustbe disposed of properly.
• Contact your local town or city ocials for battery
disposal information.
You can also call 888-224-9764 or visit
www.call2recycle.ca for battery drop-o locations.
• For assistance, visit our website www.philips.com/
support or call
1-800-243-7884 toll free.
Rechrgeble NiMH bttery:
• Your product is designed and manufactured with high
quality materials and components, which can be
recycled and reused. For recycling information, please
contact your local waste management facilities or visit
www.recycle.philips.com.
• This appliance contains a rechargeable NiMH battery
which must be disposed of properly.
• Contact your local town or city ocials for battery
disposal information.
• You can also call 888-224-9764 or visit
www.call2recycle.ca for battery drop-o locations.
• For assistance, visit our website
www.philips.com/support or call
1-800-243-7884 toll free
5Your body-worn recorder
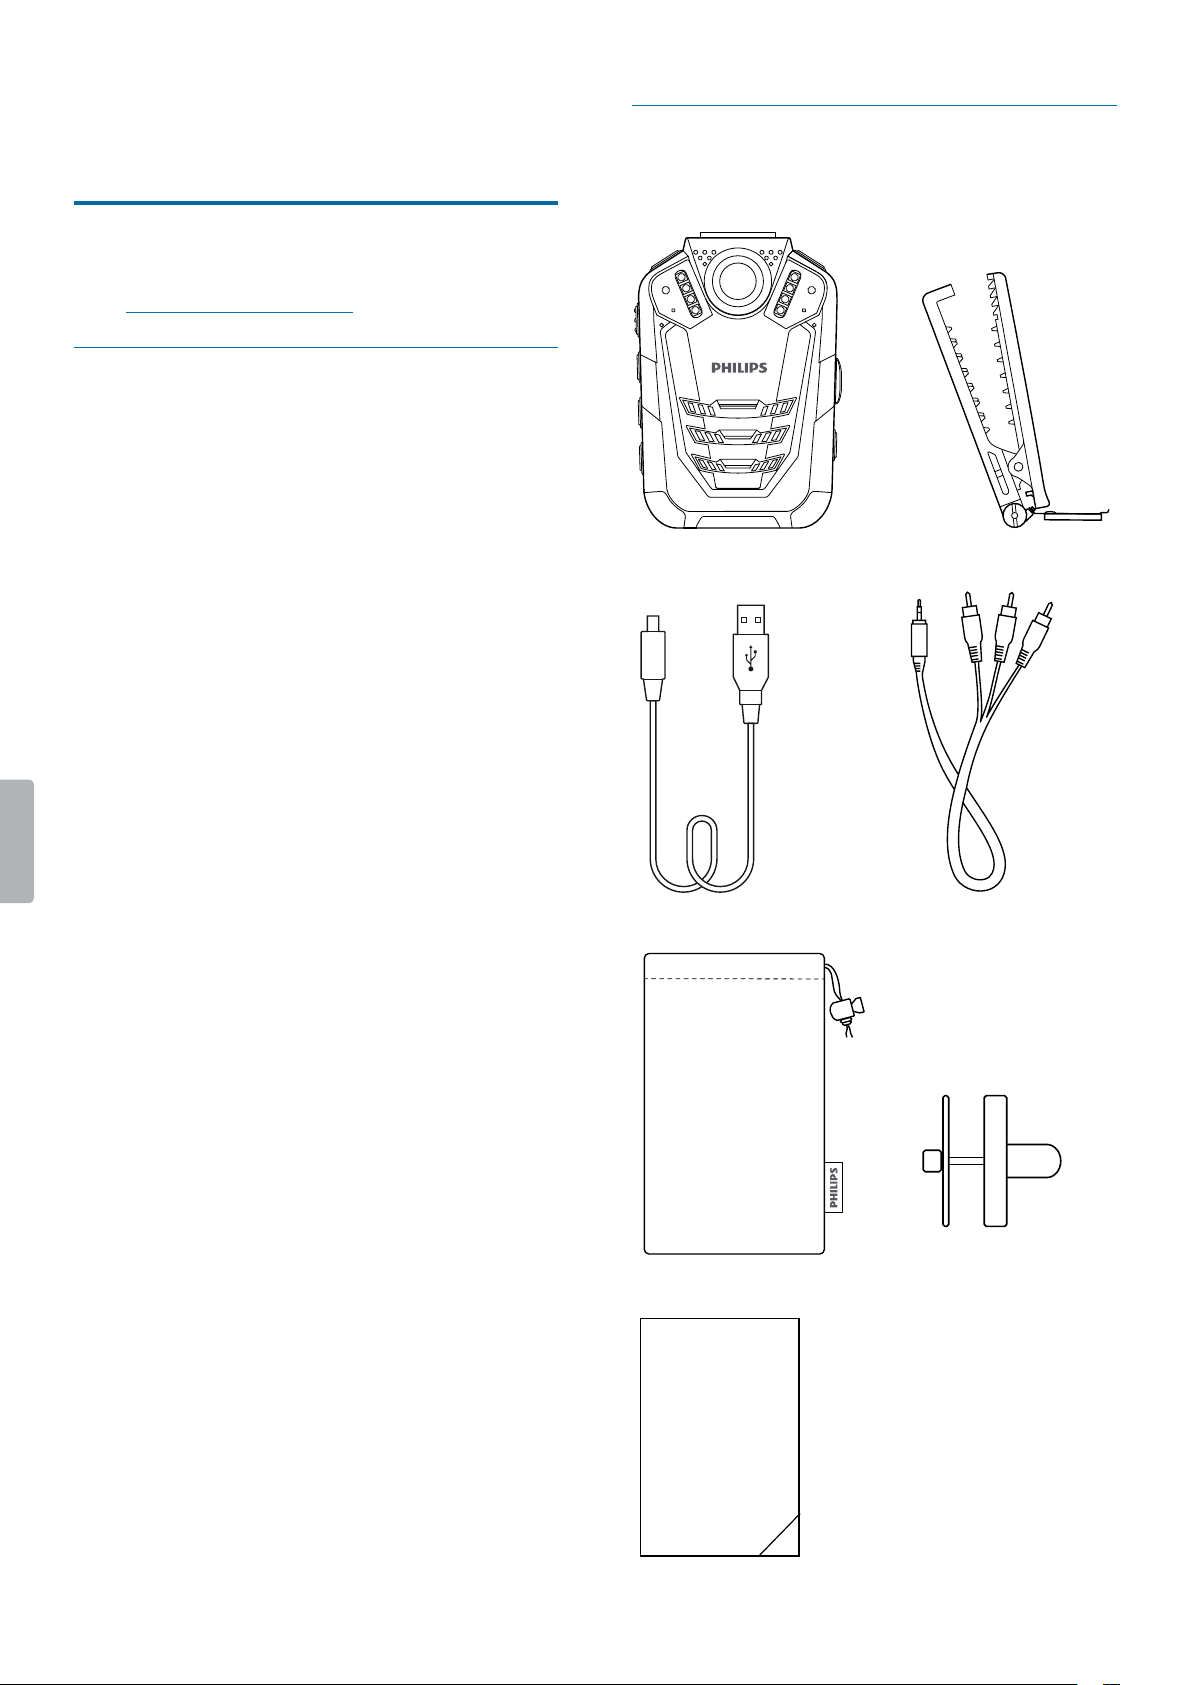
Wht’s in the box
Quick
start
guide
2 Your body-worn
recorder
We are delighted that you have chosen a Philips device.
Visit our website for comprehensive support, such as user
manuals, software downloads, warranty information and
more: www.philips.com/dictation.
Product highlights
• HD video and audio recording
• Quality night recordings
• Motion detection
• Pre-recording and post-recording
• Built-in GPS
• Water mark with a unique user ID, a time and date
stamp
• 170° wide-angle lense
• 2˝ LCD screen
• Extra long battery life
• Robust and water-resistant design
6 Your body-worn recorder
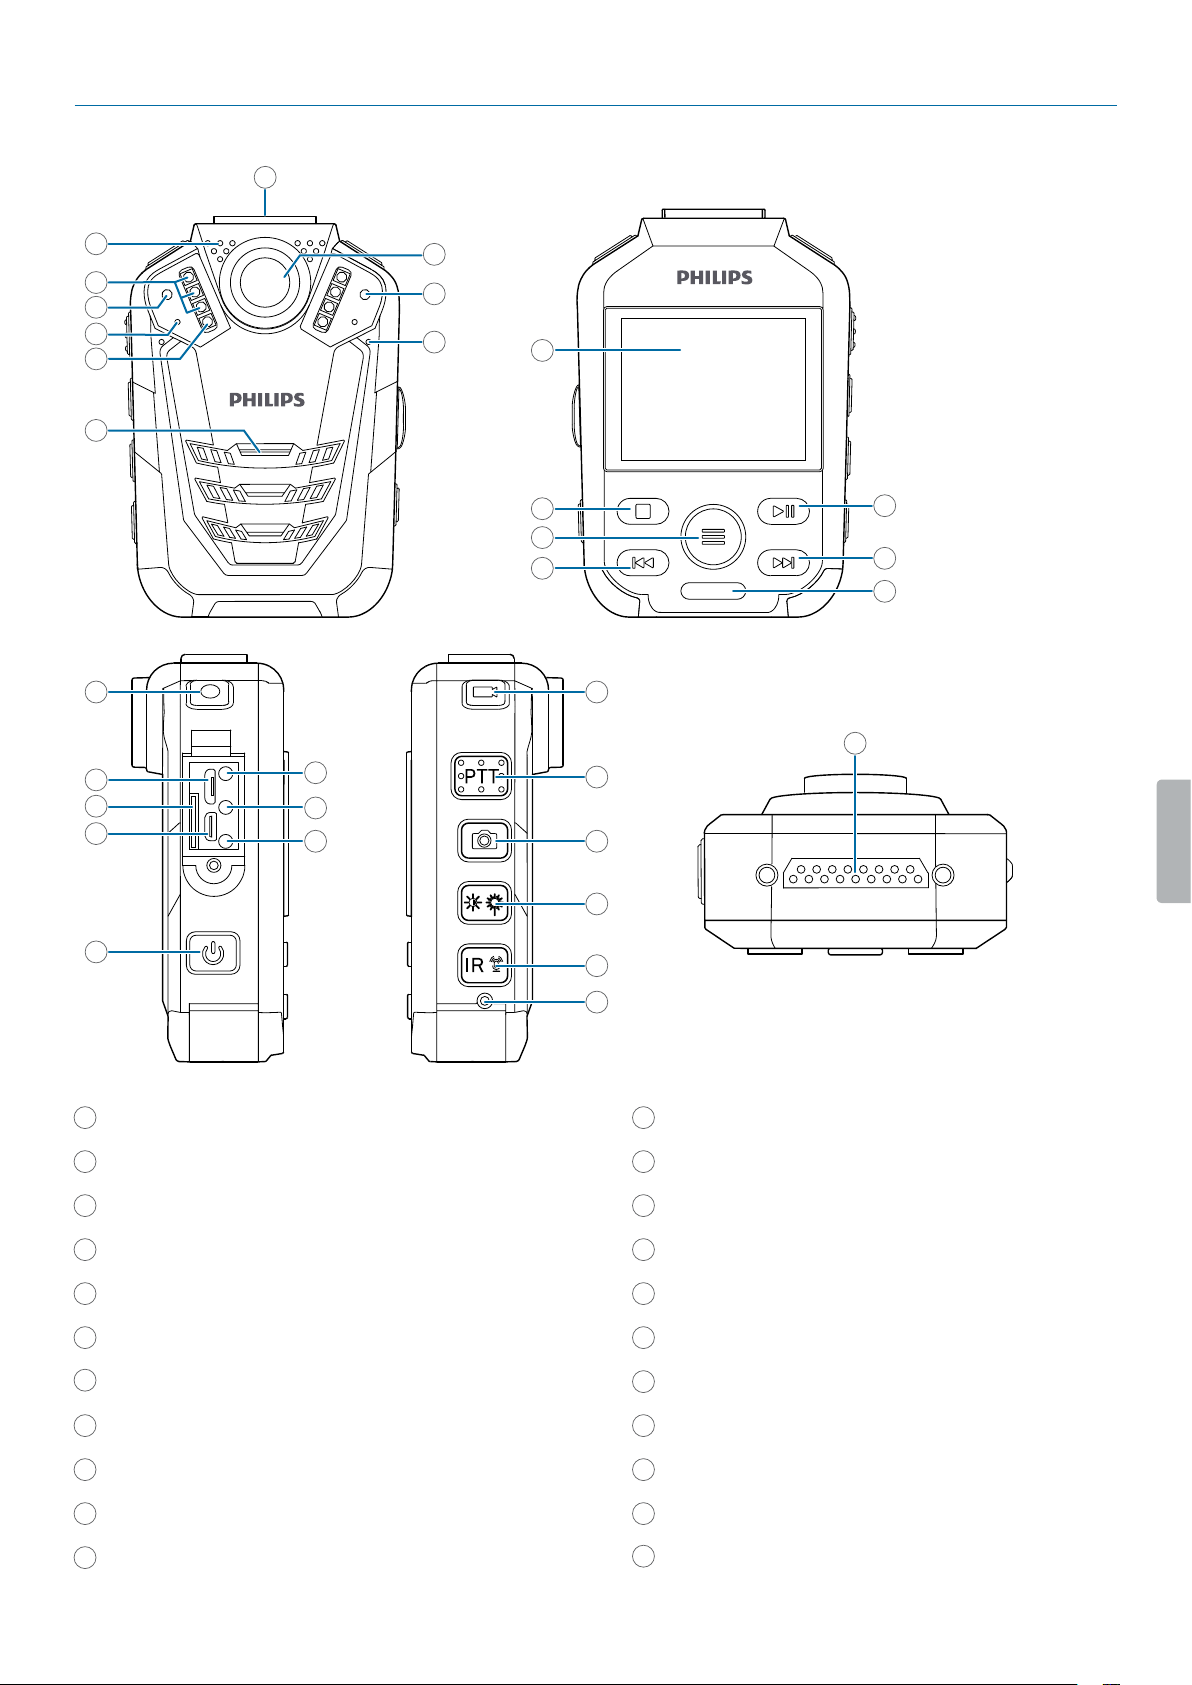
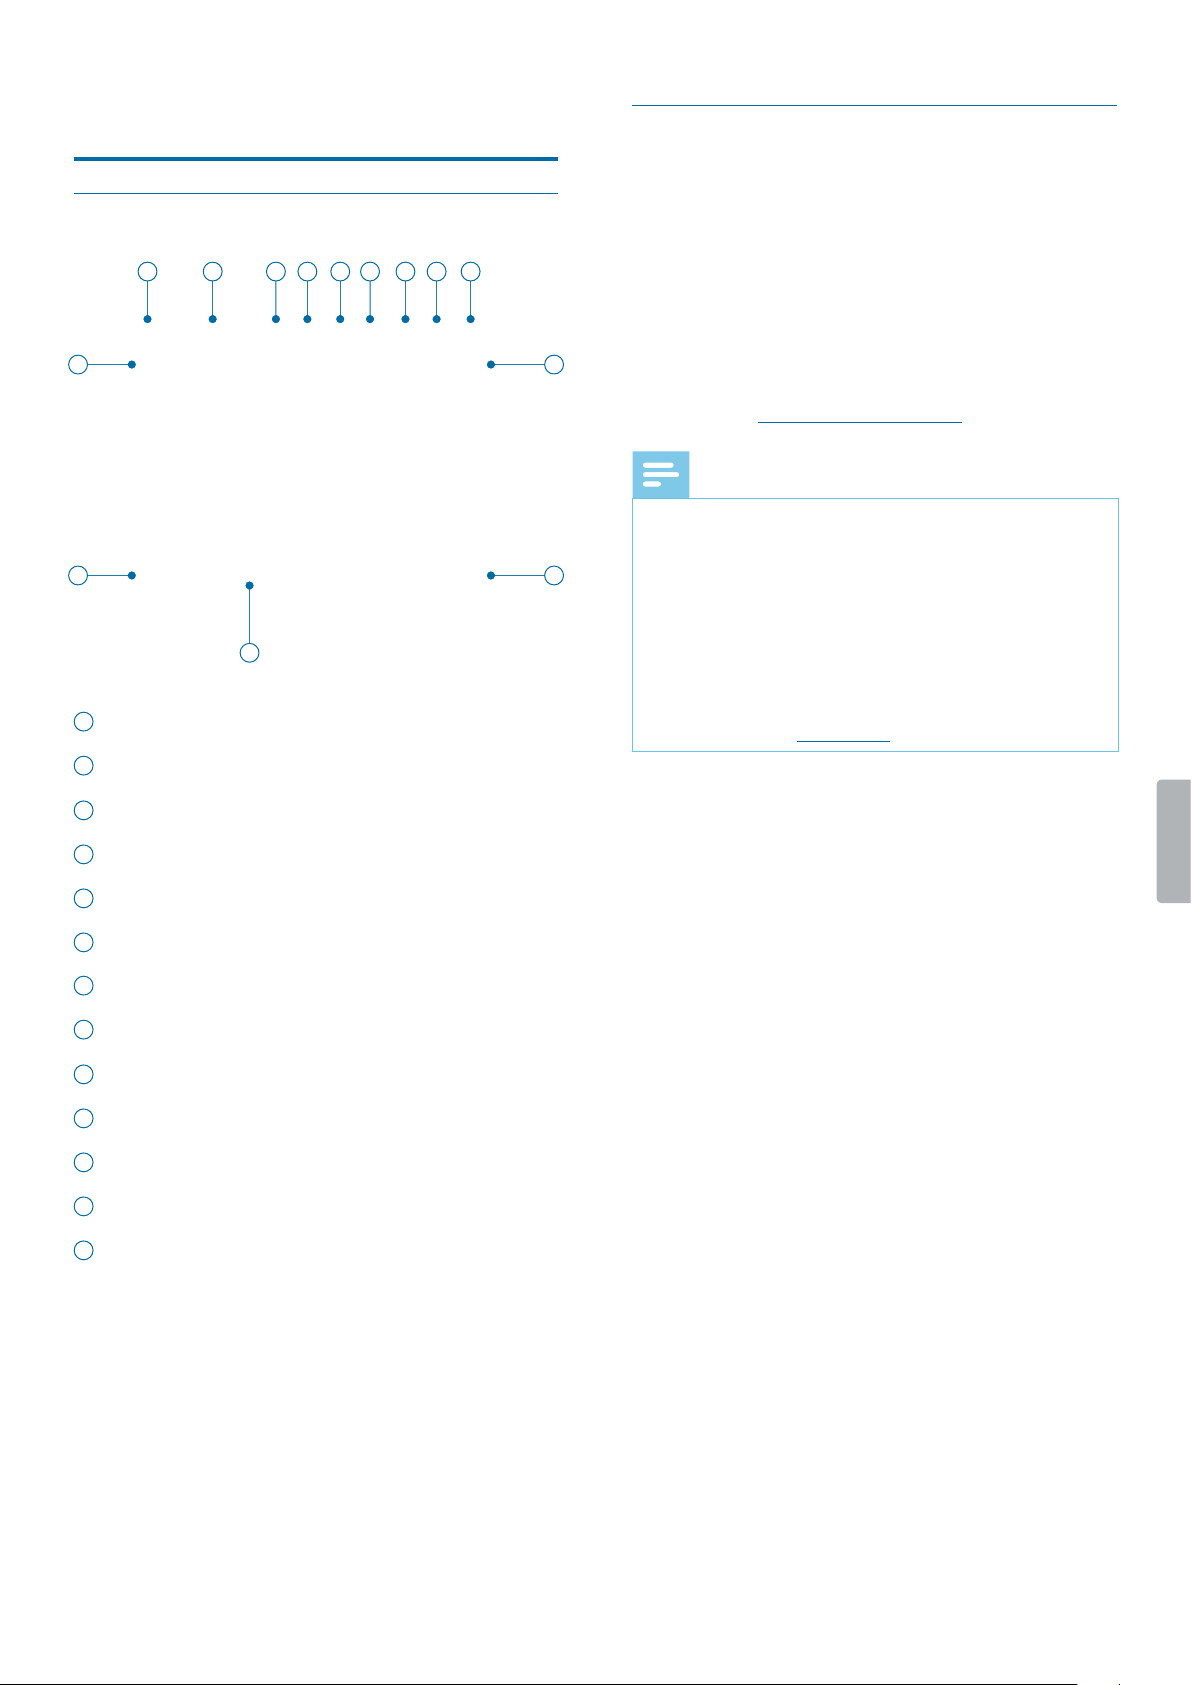
1
Slot for camera clip
2
Microphone for radio set (radio set not included)
3
Infrared lamp
4
Light sensor
5
Record/Status LED
6
LED light
7
Camera lense
8
Laser light
9
Microphone
10
Speaker
11
Screen
12
Stop/Return button
13
Menu button
14
Fast rewind, Previous track, Navigation button
15
Play/Pause, Conrmation button
16
Fast forward, Next track, Navigation button
17
Notch for pin
18
Audio recording button
19
Micro USB port
20
SD card slot
21
HDMI slot
22
Headphone jack
Overview of the recorder
2
8
7
1
9
10
19
20
21
22
23
24
25
14
13
15
17
16
12
26
30
31
27
28
29
3
6
4
5
11
18
32

7Your body-worn recorder
23
AV OUT port
24
AV IN port
25
On/O button
26
Video recording button
27
Push-to-talk button for radio set (radio set not
included)
28
Photo button
29
Lighting/Laser button
30
Infrared/File marking button
31
Reset button
32
Interface for docking station (docking station not
included)
8 Getting started
3 Getting strted
Caution
• Before you connect and install your recorder, rst
read the safety instructions (see Safety instructions).
Chrging the bttery
Charge the built-in battery before you use the device
for the rst time or if you haven’t used it for an extended
time period. If the battery is completely discharged and
your device turns o, allow the battery to charge for a
while before you turn on the device.
Note
• The length of the USB cable might impact the
charging speed. Longer cables usually extend the
charging time.
• While the device is connected to a computer, it can’t
be operated manually.
• If you charge your device via computer instead of
using a power supply unit, the charging speed might
slow down due to a lower charging current. For fast
charging, use a USB power supply unit with at least
two ampere (not included).
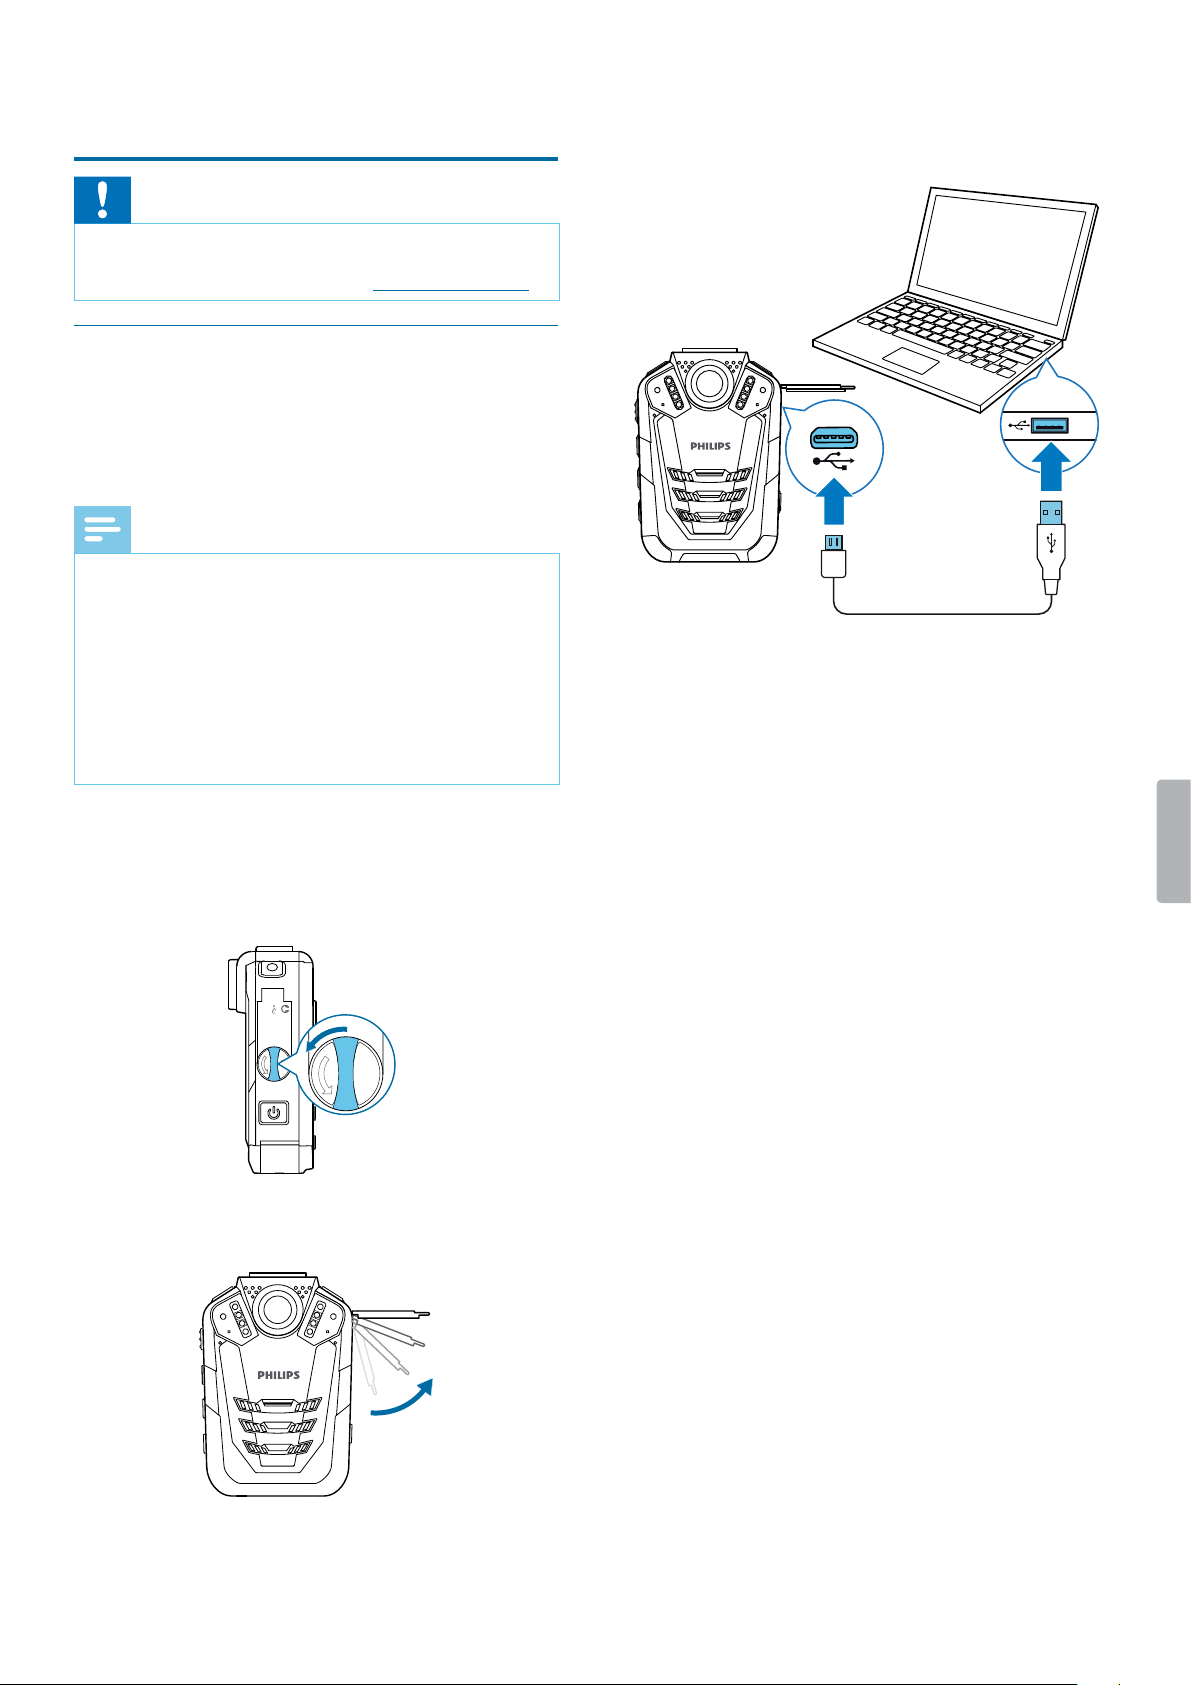
1
Make sure that your computer is turned on. The
device can be charged when it’s turned on or o.
2
Open the closure of the cover on the left side of the
device.
OPEN
MICRO
HDMI
AV IN AV OUT
SD
OPEN
SD
3
Lift the cover.
4
Connect the VideoTracer to your computer via the
supplied USB cable.
X A charging battery icon appears on the screen
if the VideoTracer is turned on and the Record/
Status LED light glows green indicating that the
device is recharging.
X When the device is fully recharged, the Record/
Status LED turns o.

9Getting started
Turn the device on nd o
To turn the device on or o:
• Press and hold the Power button for two seconds until
the device gently vibrates.
Note
• When the battery indicator is displayed, charge
the device promptly.
Set the dte nd time
You can always change the date and time as well as the
time format on your device.
1
On the start screen, press the Menu button to
open the settings screen.
2
Press the Menu button to scroll to the Device
settings menu.
3
Press the Fast forward button to scroll to the Dte/
time setting, and then press the Play/Pause button
to conrm your selection.
4
Use the Fast forward, Fast rewind and Menu buttons
to set the date and time.
5
Press the Play/Pause button to conrm your settings.
6
To return to the recording screen, press the Stop
button.
Set the device lnguge
You can always change the language of your device.
1
On the start screen, press the Menu button to
open the settings screen.
2
Press the Menu button to scroll to the Device
settings menu.
3
Press the Fast forward button to scroll to the
Lnguge setting, and then press the Play/Pause
button to conrm your selection.
4
Press the Fast forward button to scroll to your desired
language, and then press the Play/Pause button to
conrm your selection.
5
To return to the recording screen, press the Stop
button.
10 Video recording
4 Video recording
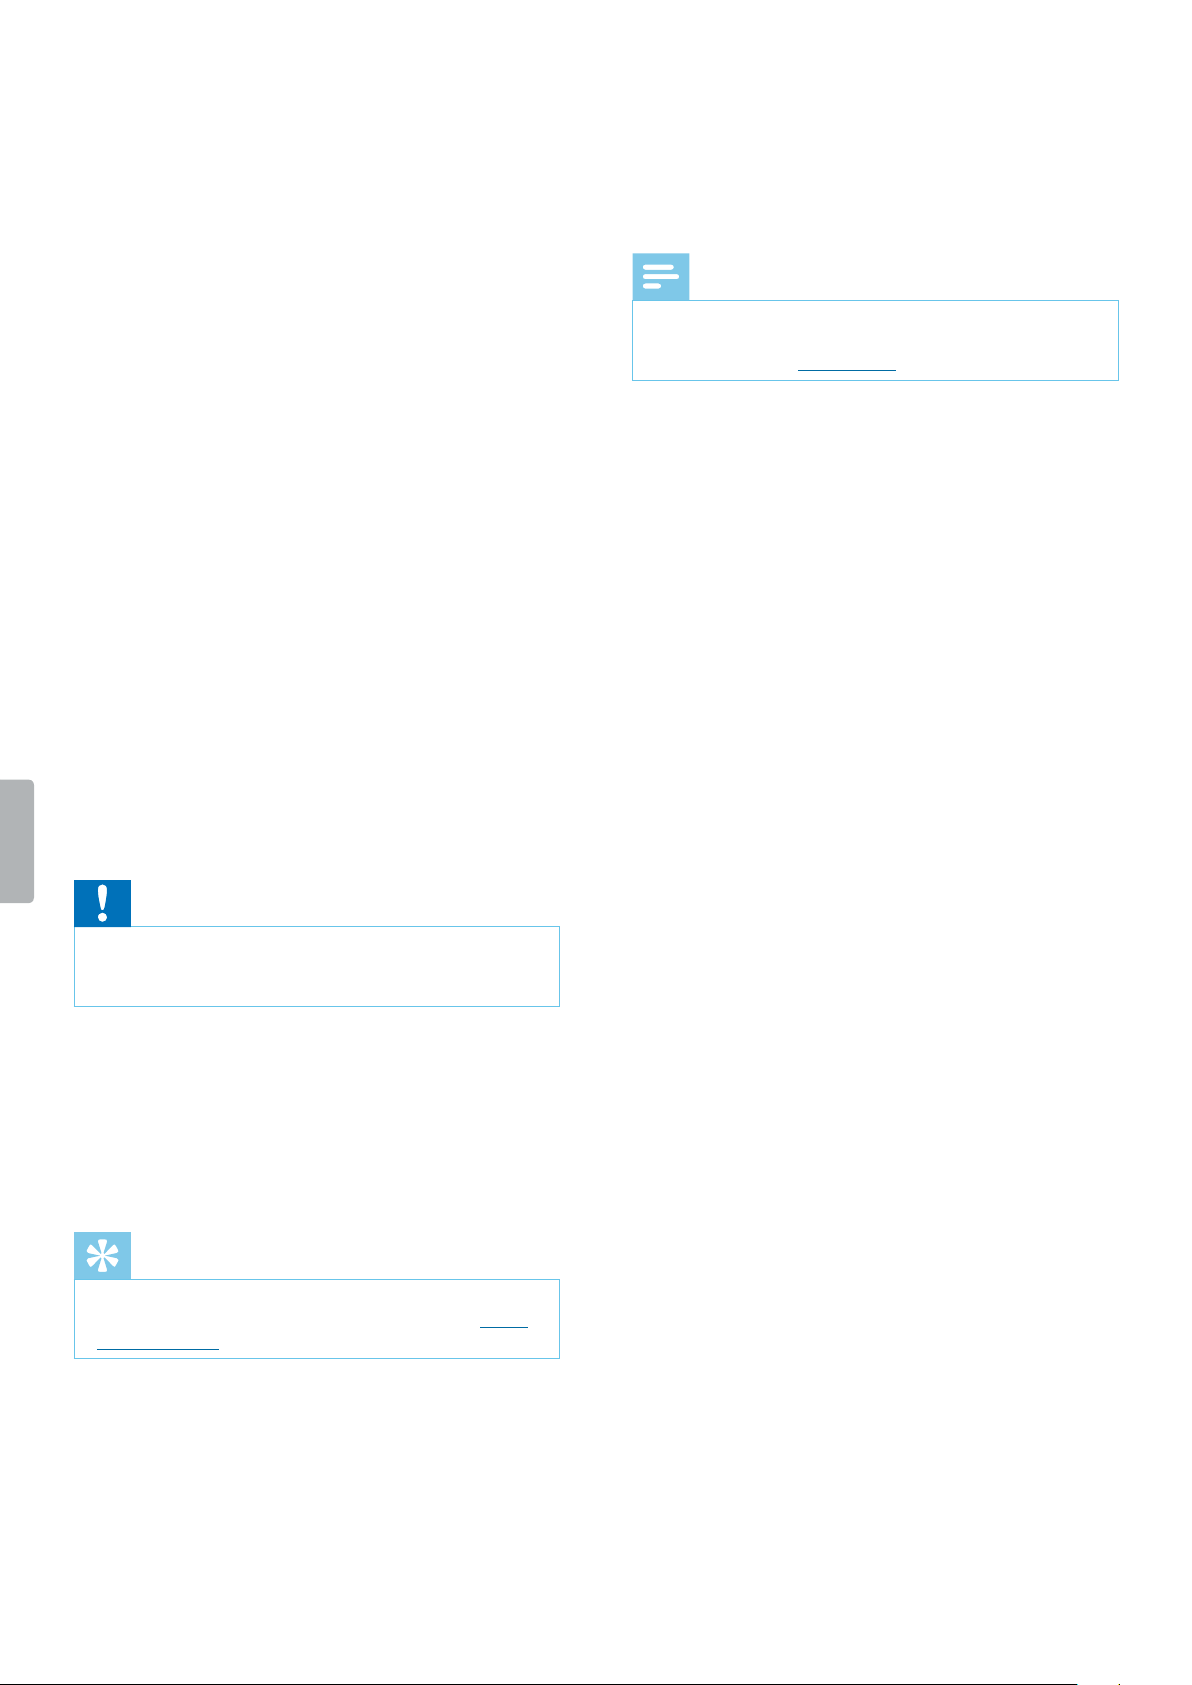
Recording screen
11
12
10
13
2 431 5 6 7 8 9
10
1
Recording mode
2
Current recording time
3
GPS indication
4
Night mode
5
Motion sensor
6
Noise cut
7
Resolution
8
Remaining storage capacity
9
Battery status
10
GPS coordinates
11
Current date of recording
12
Current time of recording
13
ID number
Record video
Before you strt recording:
• Make sure your device has enough battery power left.
When the battery is almost discharged, the battery
icon on your display will start ashing red.
When the battery is empty, the device will turn o and
your current recording will automatically be saved.
• Set the desired preferences for your recording and
make a test recording in order to achieve the best
recording results. For more information about recording
settings, see Video recording settings.
Note
• Be careful not to cover the microphones while
recording. This might result in a lower recording
quality.
• Do not remove the memory card while recording. This
might result in damaging the recorded le.
• If the recording time of your current recording exceeds
the available storage capacity, the recording will stop.
In this case, delete les from your device to make
more storage available. However, the recording only
stops if loop recording is not activated. For more
information, see Video loop.
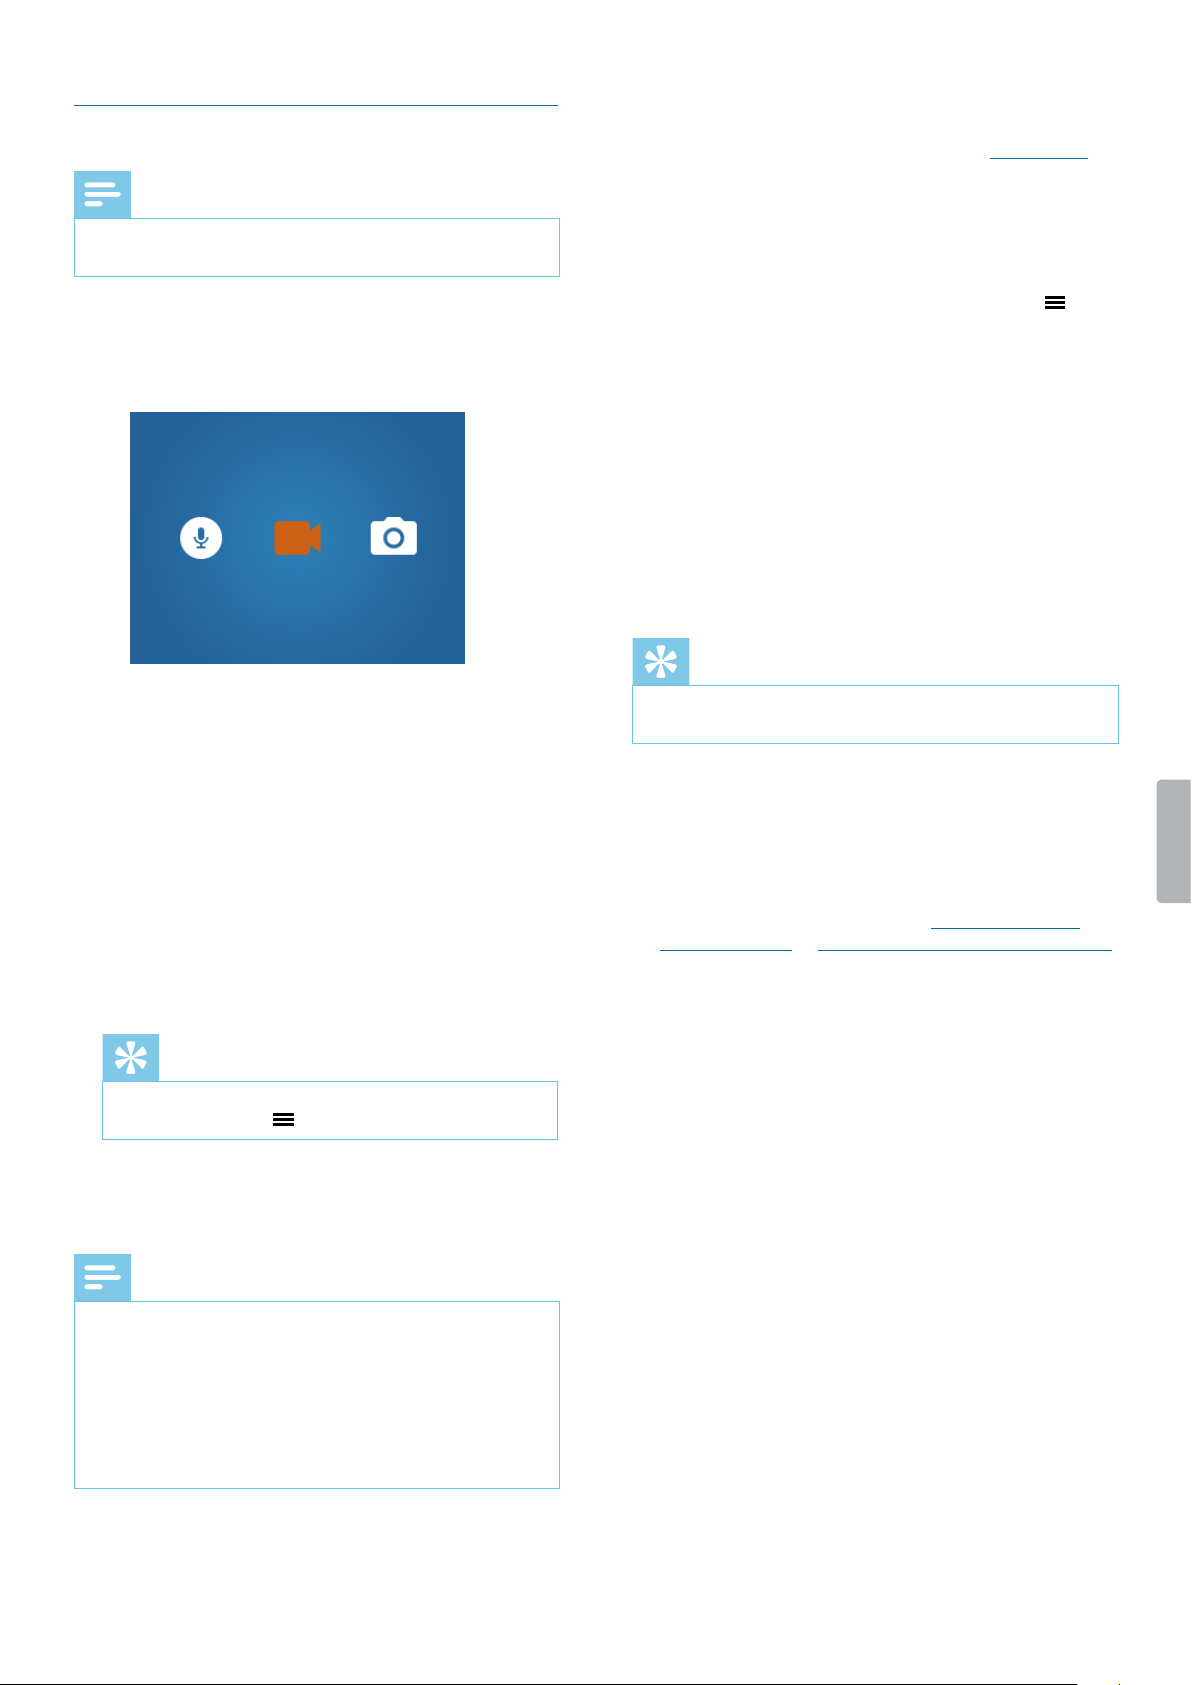
Strt nd nish video recording
1
On the start screen, press the Video recording button
on the top of the device.
X The device vibrates once.
X The Record/Status LED light ashes red.
2
To nish recording, press the Video recording button
on the top of the device.again.
X The device vibrates twice.
X The Record/Status LED light glows green.
X The recording is automatically saved to your video
recordings folder.
Zoom function
You can zoom in and out while recording a video.
• To zoom in, press and hold the Fast forward button.
• To zoom out, press and hold the Fast rewind button.
11Video recording
Night vision
When you are lming at night or in a low-light
environment, you can improve the visibility and quality
of your video by using the night mode or the additional
LED light.
Activte night mode
• On the start screen or in video recording mode, press
and hold the Infrared button.
X The screen turns black and white.
• To turn o night mode, press and hold the Infrared
button again.
Turn on LED light
• On the start screen or in video recording mode, press
and hold the Lighting/Laser button.
• To turn o the LED light, press and hold the Lighting/
Laser button again.
Turn on lser light
Use the laser light to locate the recording area more
easily when video recording at night or in a low-light
environment.
• On the start screen or in video recording mode, shortly
press the Lighting/Laser button.
• To turn o the laser light, shortly press the Lighting/
Laser button again.
Caution
• Be careful when pointing at something with the laser
light! Laser radiation can be highly damaging for your
eyes. Avoid any eye exposure to direct radiation!
Mrk importnt recordings
You can mark important recordings in order to prevent
them from being deleted by loop recording.
• During recording, shortly press the Infrared button.
X An orange star appears in the bottom right corner
of the recording.
Tip
• You can also mark the reocrding after you have
nished recording. For more information, see Mark
important les.
Photos
You can take pictures of an event while video recording.
• Press the Photo button while recording.
X The picture is saved to your image folder.
Note
• Use the night mode or the additional LED light when
taking photos in a low-light environment. For more
information, see Night vision.
12 Audio recording
5 Audio recording
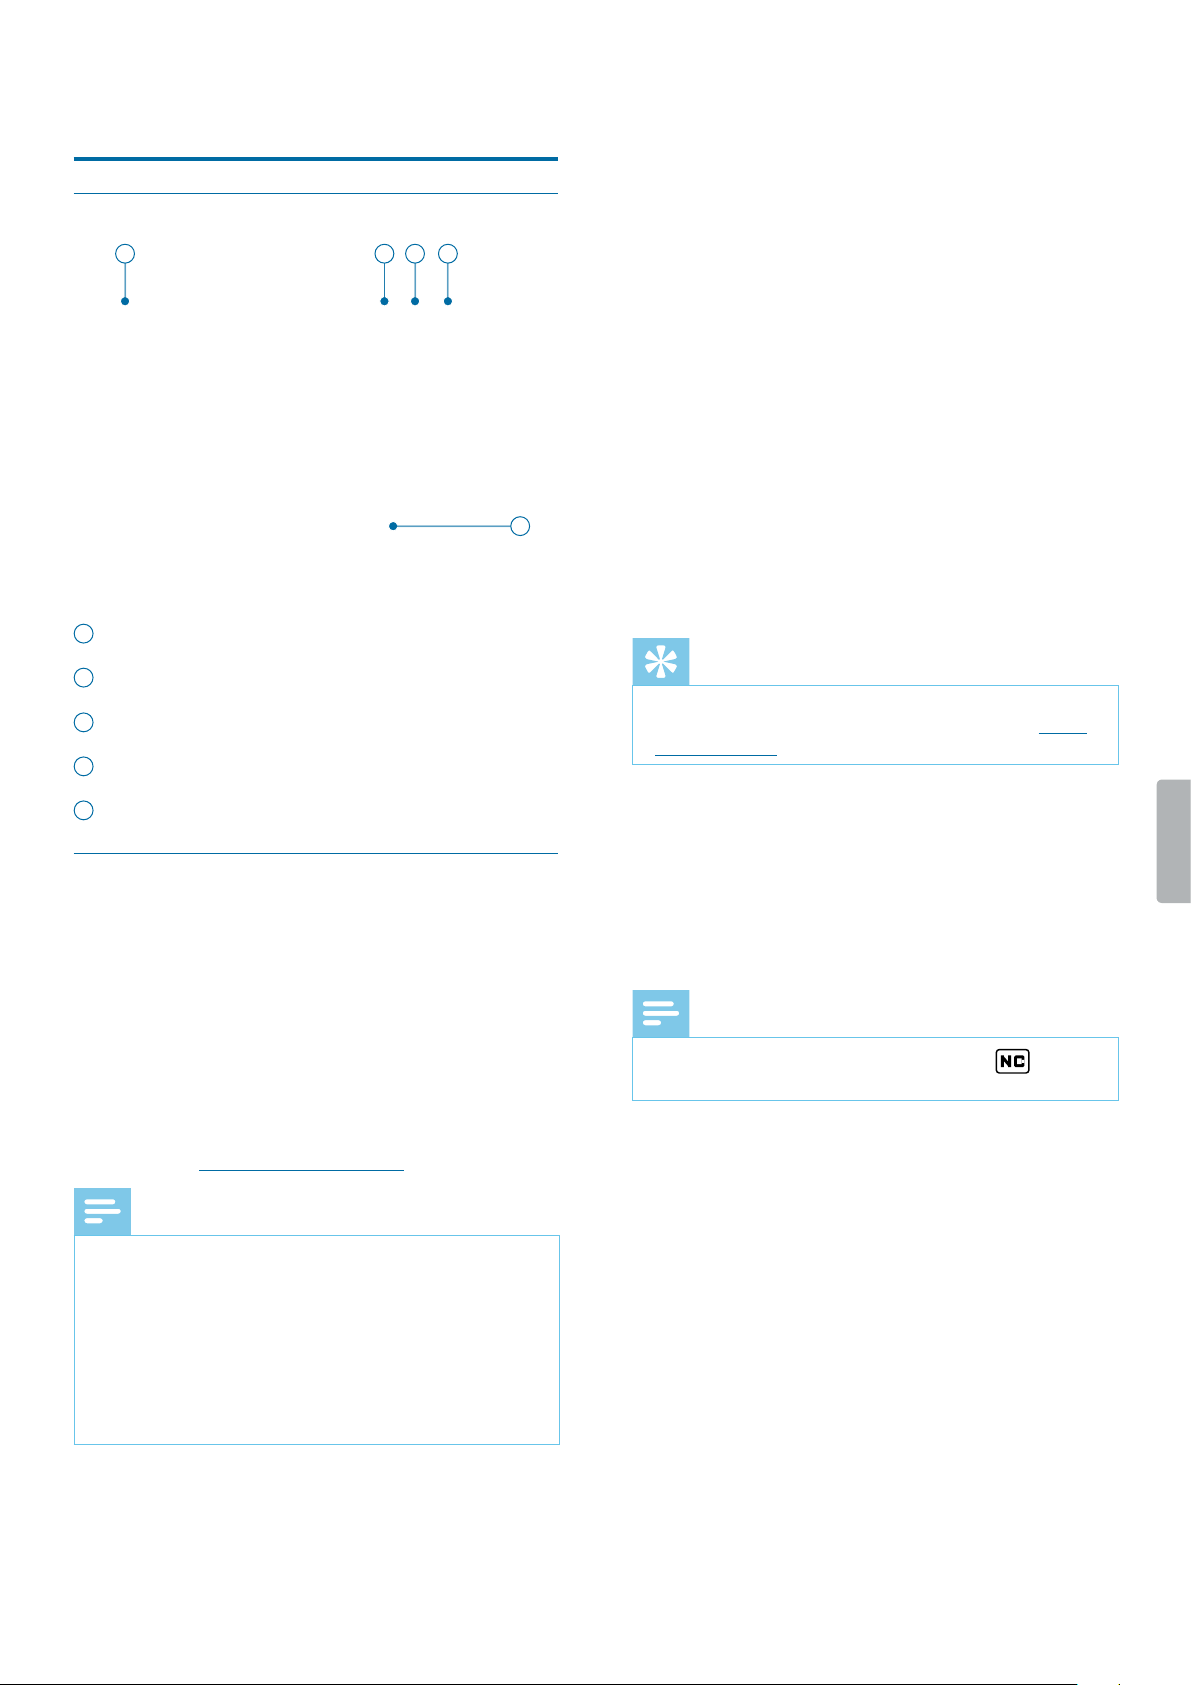
Recording screen
2 43
5
1
1
Recording mode
2
Recording quality
3
Current memory card capacity
4
Battery status
5
Audio time
Record n udio le
Before you strt recording:
• Make sure your device has enough battery power left.
When the battery is almost discharged, the battery
icon on your display will start ashing red.
When the battery is empty, the device will turn o and
your current recording will automatically be saved.
• Set the desired preferences for your recording and
make a test recording in order to achieve the best
recording results. For more information about recording
settings, see Audio recording settings.
Note
• Be careful not to cover the microphones while
recording. This might result in a lower recording
quality.
• Do not remove the memory card while recording. This
might result in damaging the recorded le.
• If the recording time of your current recording exceeds
the available storage capacity, the recording will stop.
In this case, delete les from your device to make
more storage available.
Strt nd nish n udio recording
1
On the start screen, press the Audio recording button
on the top of the device.
X The device vibrates once.
X The Record/Status LED ashes orange.
2
To nish recording, press the Audio recording button
on the top of the device.again.
X The device vibrates once.
X The Record/Status LED glows green.
X The recording is automatically saved to your
audio recordings folder.
Mrk importnt recordings
You can mark important recordings in order to prevent
them from being deleted by loop recording.
• During recording, shortly press the Infrared button.
X An orange star appears in the bottom right corner
of the recording.
Tip
• You can also mark the reocrding after you have
nished recording. For more information, see Mark
important les.
Use the Noise cut feture
Turn the Noise cut feature on in order to reduce
background noise while recording. This way, especially
audio recordings sound clearer. You can activate the
Noice cut feature in the audio recording settings in the
Settings menu.
Note
• When Noise cut is enabled, you will see on the
top of the starting screen.
13Playback
6 Plybck
Plybck screen video recordings
4
3
5 6
7
2
1
1
Passed playback time
2
Playback status
3
Total time of recording
4
File name
5
File number of current le
6
Total number of les in folder
7
Marker for important recording
Plybck screen udio recordings
2
3 4 5
1
1
Passed playback time
2
Repeat mode
3
File name
4
File number of current le
5
Total number of les in folder
6
Playback status
Plybck screen photos
1
2 3
1
File name
2
File number of current le
3
Total number of les in folder
6
14 Playback
Ply bck les
Note
• If you have connected headphones to your
VideoTracer, the built-in speakers are disabled.
Select le
1
On the start screen, press the Play/Pause button.
X The folder overview is displayed.
2
Use the Fast forward and Fast rewind buttons to
select one of the following folders: audio recordings,
video recordings or images.
3
Press the Play/Pause button to enter the desired
recordings folder.
X All les in the folder are displayed.
4
Use the Fast forward and Fast rewind buttons to
select a recording or image, and then press the Play/
Pause button to open the recording or image.
5
To play back an audio or a video recording, press the
Play/Pause button. To pause playback, press the
Play/Pause button again.
Tip
• You can control the playback volume by pressing
the Menu button .
6
To return to the previous screen, press the Stop
button once. To return to the start screen, press the
Stop button three times.
Note
• A maximum of nine les is displayed on one page of
a folder. If your folder contains more than nine les,
you have to scroll to the next page by using the Fast
forward button. The number of the current le and the
existing les is displayed in the bottom right corner of
the le list screen.
• You can also switch between the les in stop mode
on the playback screen.
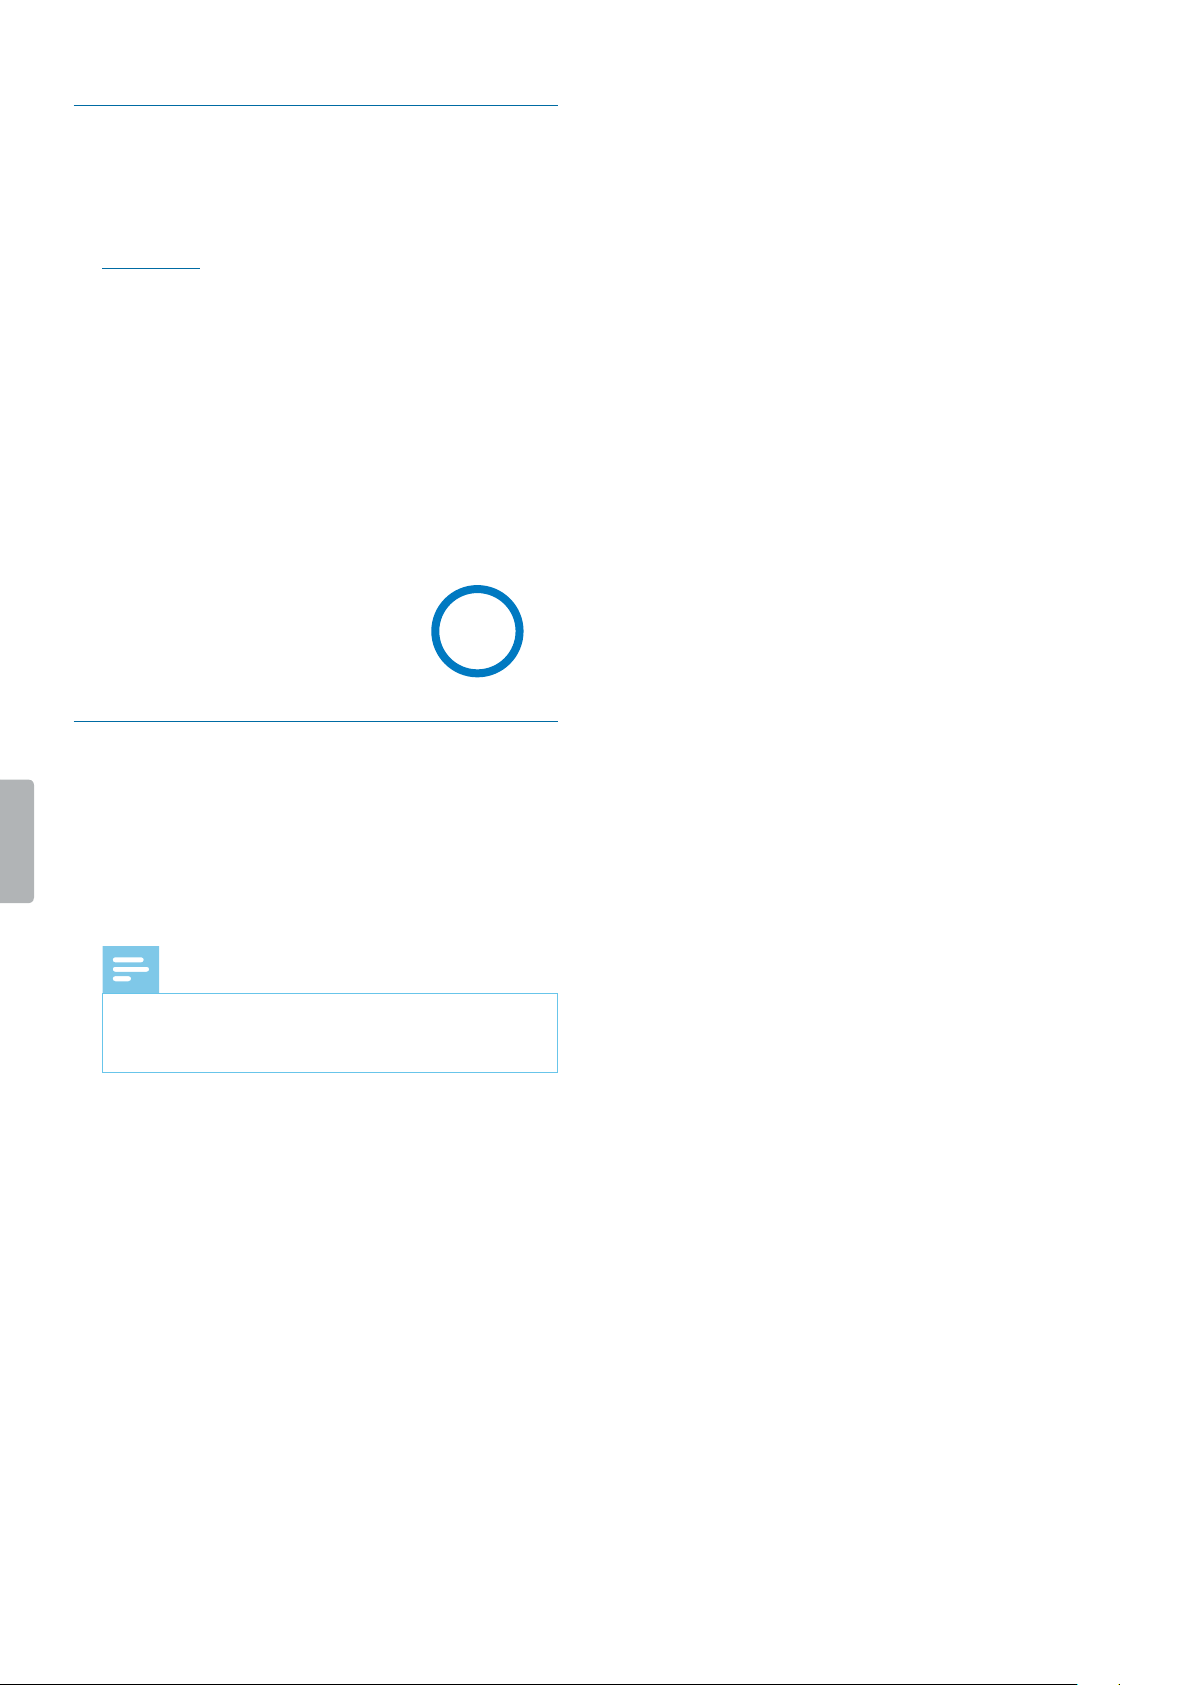
Strt plybck
1
Select your desired le as described in Select a le.
2
To start playback of a recording, press the Play/
Pause button.
To pause playback, press the Play/Pause button
again.
3
To adjust the volume, press the Menu button and
then press the Fast forward button for volume up or
the Fast rewind button for volume down.
X The volume display will disappear after eight
seconds.
4
To stop playback and return to the le list, press the
Stop button.
Fst rewind or fst forwrd (only video recordings)
• In playback mode, press the Fast rewind or Fast
forward button to the desired part of the recording and
then press the Play/Pause button.
Tip
• If you press the fast forward button twice or more, you
can increase the playback speed by up to 64 times.
One-touch plybck
You can play back your recorded le immediately after
nishing recording with only one touch.
1
Record your le as described in Start and nish a
video recording or Start and nish an audio recording.
2
Immediatley after nishing recording, press the Stop
button once.
X Playback of the last recorded le will start.
15Playback
Mrk importnt les
You can mark important recordings and images in order
to prevent them from being deleted by loop recording.
1
Select and open your desired le as described in
Select a le.
2
Press the Infrared button to mark the recording.
X An orange star appears in the bottom right corner
of the recording.
Delete les
You can only delete les from your VideoTracer in the le
manager on your computer. It is not possible to delete
les directly on the device.
1
Turn your VideoTracer on and connect the device to
the computer via the supplied micro USB cable.
X A charging battery icon appears on the screen.
Note
• Make sure that VideoTracer is turned on or
otherwise it will not be recognized by your
computer!
2
Open Windows Explorer on a Windows computer, or
open Finder on a Mac computer.
X VideoTracer is recognized as an external drive.
3
Double-click the VideoTracer drive.
X The content of your VideoTracer is displayed in a
new window.
4
Select the les that need to be deleted, right-click on
the les and then click Delete.
16 Settings
7 Settings
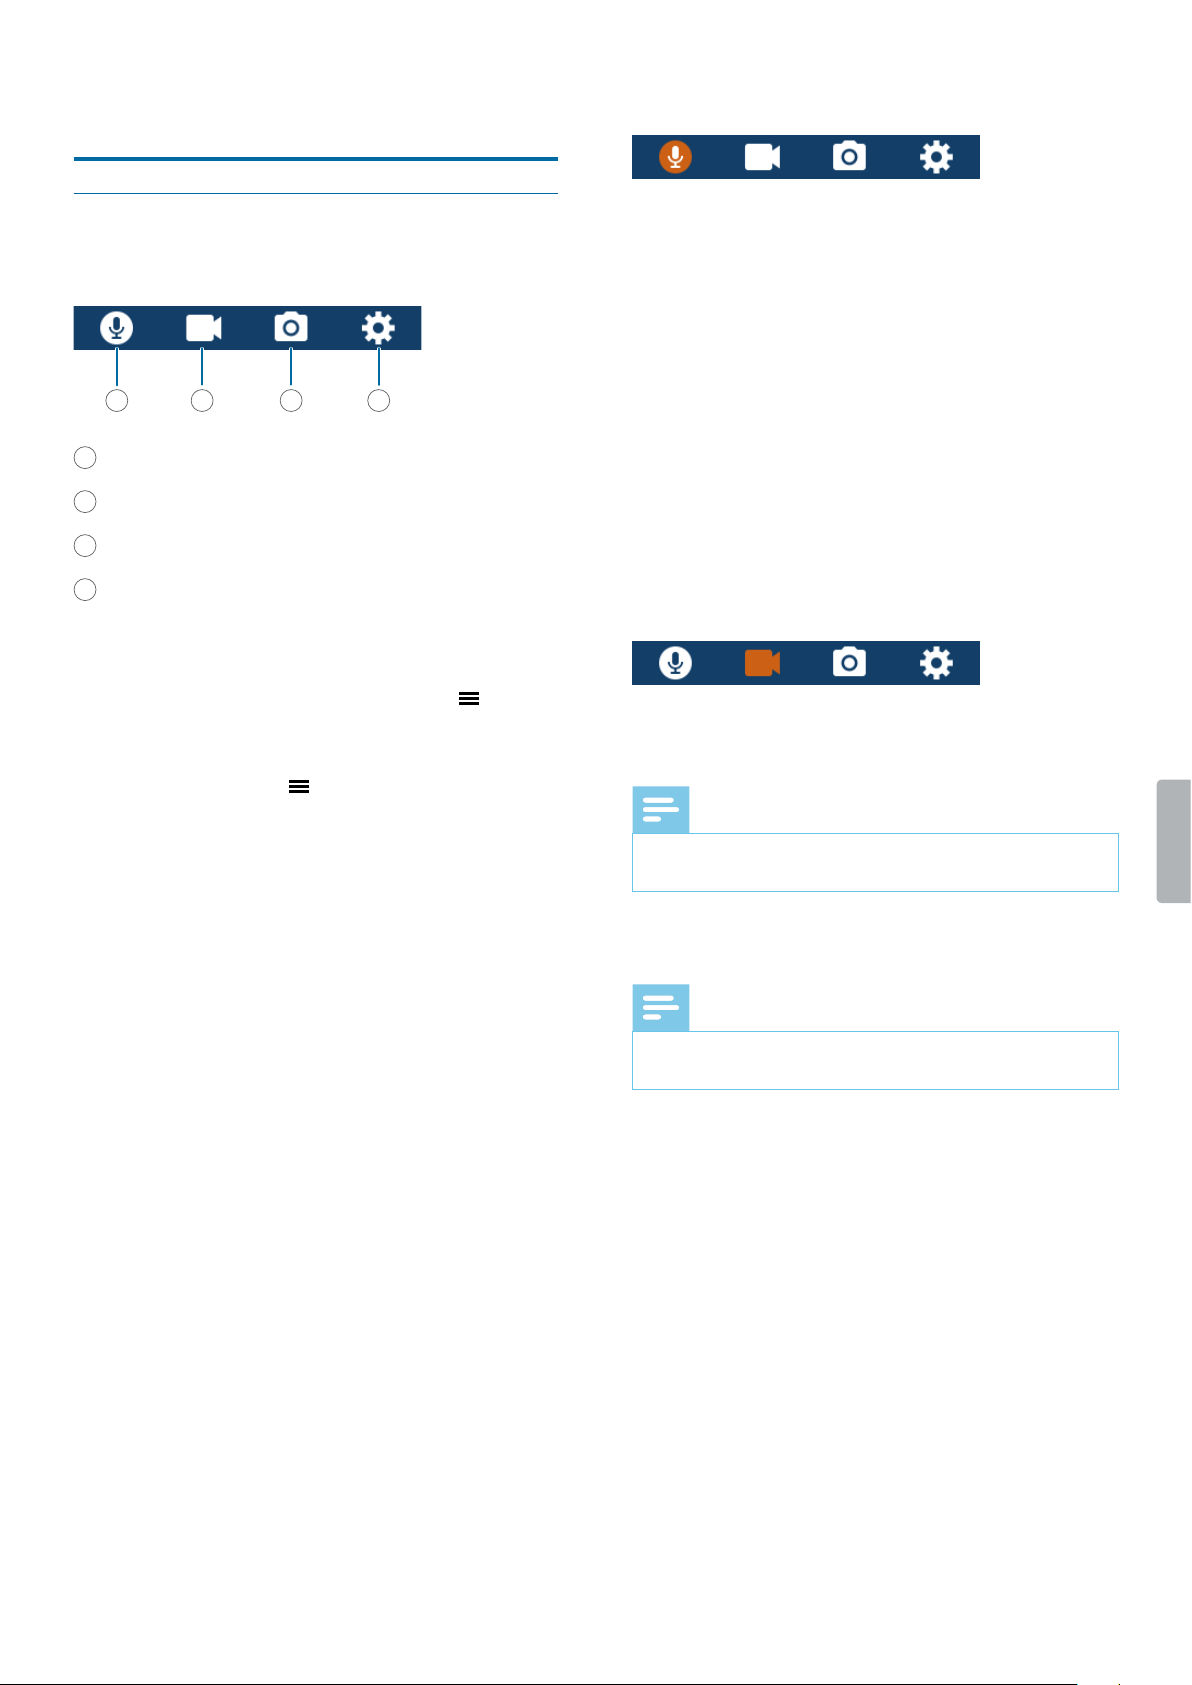
Settings mode
In the settings mode, you can change and adjust various
settings according to your own preferences.
1
Audio recording settings
2
Video recording settings
3
Photo settings
4
Device settings
Strt the settings mode
• On the start screen, press the Menu button .
Switch between settings menus
• Press the Menu button .
Scroll through settings of ech settings menu
• Use the Fast forward or Fast rewind button.
Select setting or conrm selection
• Press the Play/Pause button.
Return to settings screen
• In the sub-menu screen, press the Stop button.
Exit the settings mode nd return to strt screen
• In the settings overview, press the Stop button.
Audio recording settings
Qulity
You can set the bit rate for each recording according to
your own preferences.
Mic sensitivity
Adjust the microphone sensitivity of your VideoTracer.
Select the sensitivity according to the background noise
and distance between sound source and microphone.
Noise cut
Turn the Noise cut feature on in order to reduce
background noise while recording. This way, especially
audio recordings sound clearer.
Video recording settings
Resolution
Select the resolution of your video recording.
Note
• The higher the resolution, the larger the recording le
will be and the more memory space will be required.
Qulity
Select the quality of your video recording.
Note
• The higher the quality, the larger the recording le will
be and the more memory space will be required.
In-cr Mode
Activate the In-car Mode to use your VideoTracer in the
car. You can either record with or without audio sound.
When the In-Car Mode is activated and the device
is connected to the charger in your car, the device
automatically starts recording. When the charger is
disconnected, the recording will automatically be saved
and the device will turn o.
Video loop
When this function is enabled, the device will
automatically delete the very rst recording in the
recordings list when the available memory capacity is
400 MB or less, and then continue recording.
1 2 3 4
17Settings
Pre-recording
When the pre-recording function is enabled, the device
will start recording a video some seconds prior to the
event. At maximum resolution (2304 × 1296 px at 30 fps),
pre-recording starts 20 seconds before the event. At
lowest resolution (848 × 480 px at 25 fps), pre-recording
starts 50 seconds prior to the event.
Note
• Pre-recording consumes additional battery power.
Make sure that you have enough battery power left if
you use this feature.
Post-recording
When this function is enabled, you can keep recording
for a set time interval after nishing the recording. Post-
recording will automatically start after you have stopped
the recording.
Photo settings
Resolution
Select the resolution of your photos.
Note
• The higher the resolution, the larger the recording le
will be and the more memory space will be required.
Qulity
Select the quality of your photos.
Note
• The higher the quality, the larger the recording le will
be and the more memory space will be required.
EV
When you select the EV (exposure value) setting, you
can adjust the brightness of your photos.
Burst shots
You can select the number of photos that are taken
sequently when pressing the Camera button on the start
screen.
Timer
With the timer function, you can select a pre-run time
before a photo is taken. When you press the Photo
button, the timer will start counting down automatically.
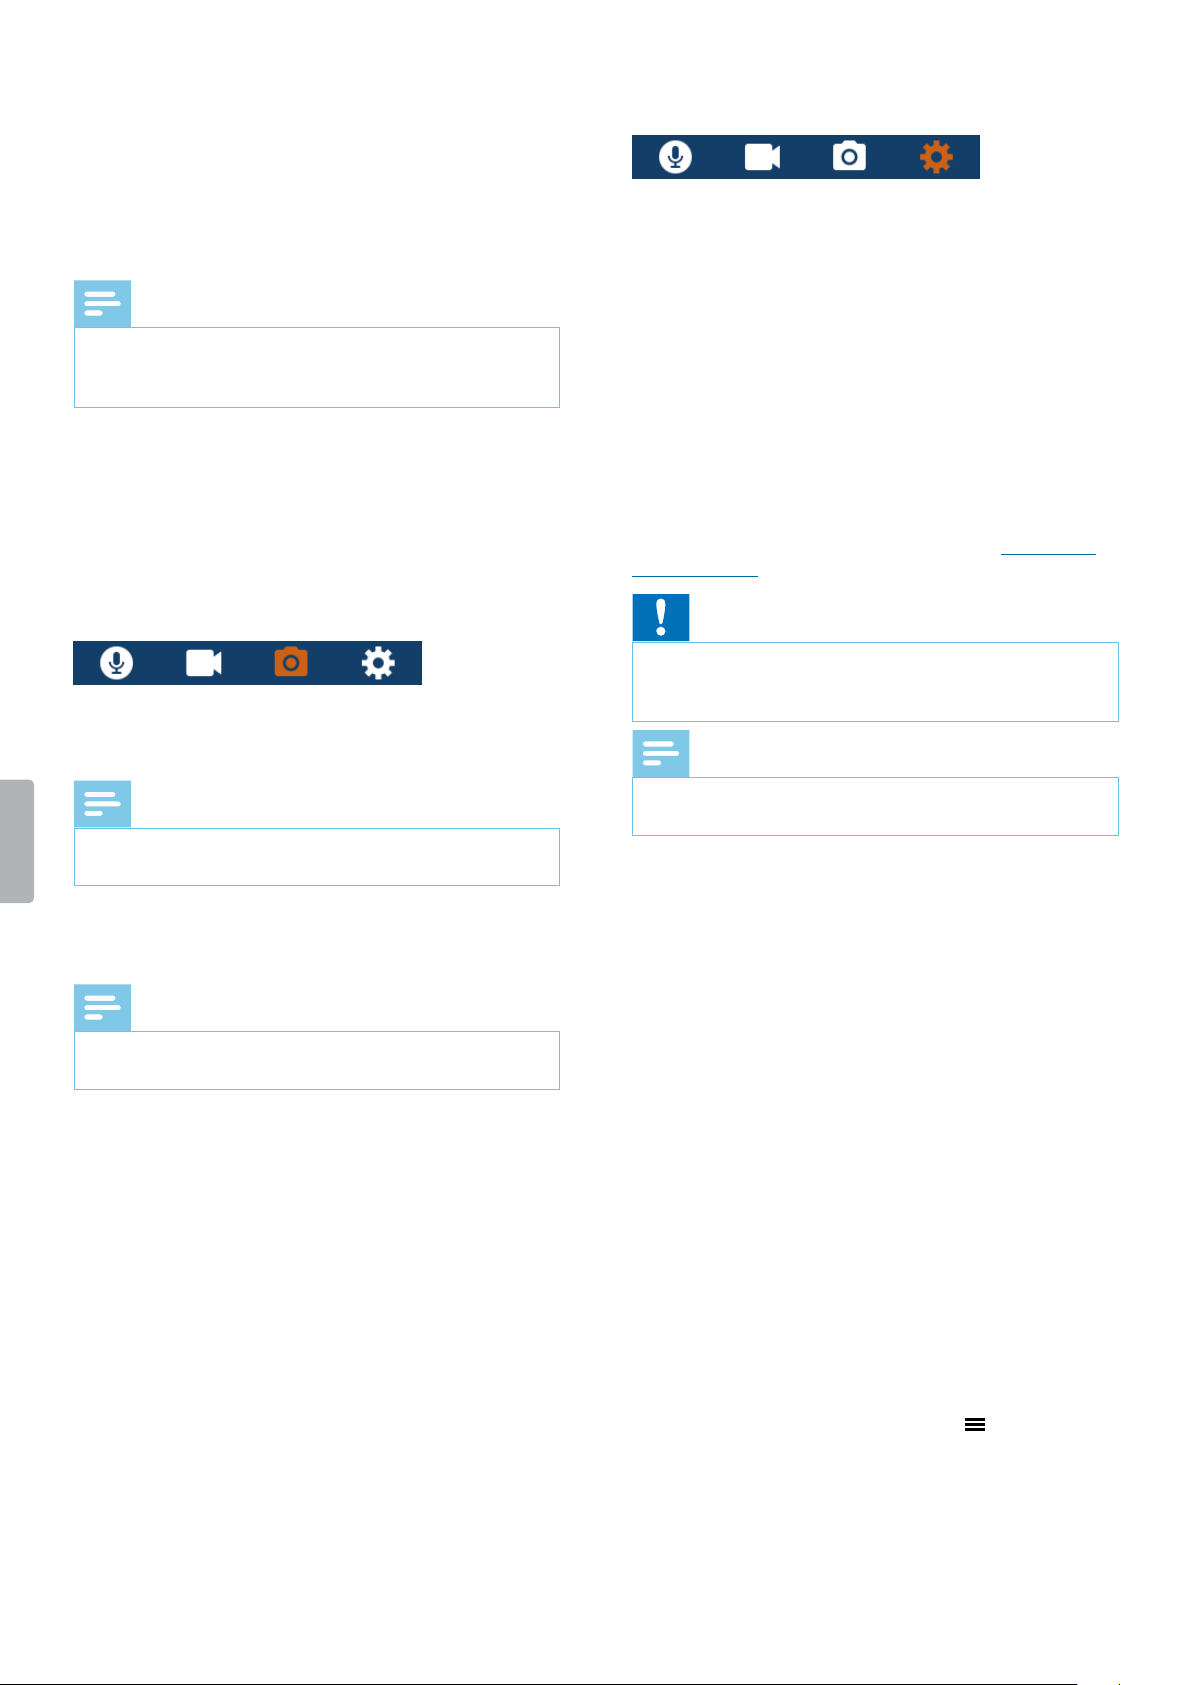
Device settings
Lnguge
Select your desired device language from the language
list. You can change the language whenever you want.
TV Mode
Select if you want to use NTSC or PAL standard when
connecting your VideoTracer to a TV for playback of
video recordings.
Reset device
You can reset your menu settings to their default state—
the way they were when you rst purchased your device
and turned it on. For more information, see Reset your
device settings.
Caution
• Resetting your menu settings will delete all settings
you have made on your device. After a reset, you will
have to adjust all settings again.
Note
• Your data won’t be deleted and is still available after
resetting the menu settings.
LCD brightness
Adjust the brightness of your screen acccording to your
own requirements.
Dte/time
You can always change the system date and time on
your device. Use the Fast forward, Fast rewind and Menu
buttons to set the date and time.
Auto o
Select a time for your device to automatically turn o
when you don’t operate it.
LCD uto o
Select a time for your screen to automatically turn o
when you don’t operate it.
Volume
Set the volume for playback of your video and audio
recordings. You can also control the volume during
playback by pressing the Menu button .
18 Settings
Auto divide
During recording, the auto-divide feature will
automatically split the current recording and save a new
le at the time interval you have pre-selected.
Note
• Additionally to your pre-selected time interval for the
auto-divide feature, the device will automatically
save your recording every hour.
System sounds
Select if you want the device sounds, such as key tone
and power on/o sound, to be turned on or o.
Record beep
Select if you want to hear a record beep whenever you
start and nish a recording.
Indictor light
Select if you want the Record/Status LED to be turned
on or o during recording.
Night Mode
Select if you want to manually activate the Night Mode
or if the device should start this mode automatically
when in low-light environments.
Motion sensor
Activate motion detecion to automatically start video
recording as soon as an object is moving in front of the
lense.
Note
• After activating the motion sensor, you must rst press
the Video recording button to enable recording. The
recording will then only start when an object enters
the lense area.
GPS
Activate GPS to add GPS coordinates to your photos.
The coordinates are displayed on the playback screen
when you view the photo in playback mode. You can
also see the coordinates in Windows File Explorer when
you connect your VideoTracer to a computer.
Note
• To receive a good GPS signal, we recommend using
the device in an outside area.
• When the device is searching for a GPS signal, the
GPS search symbol ashes on the screen . When
a GPS signal has been received, the GPS symbol is
displayed on the screen .
ID Number
Set the ID number of your VideoTracer, which identies
your device. Your ID number is helpful for support
enquiries, for example.
Informtion
See various information about your device, such as the
available memory space, remaining recording time, or
the rmware version.
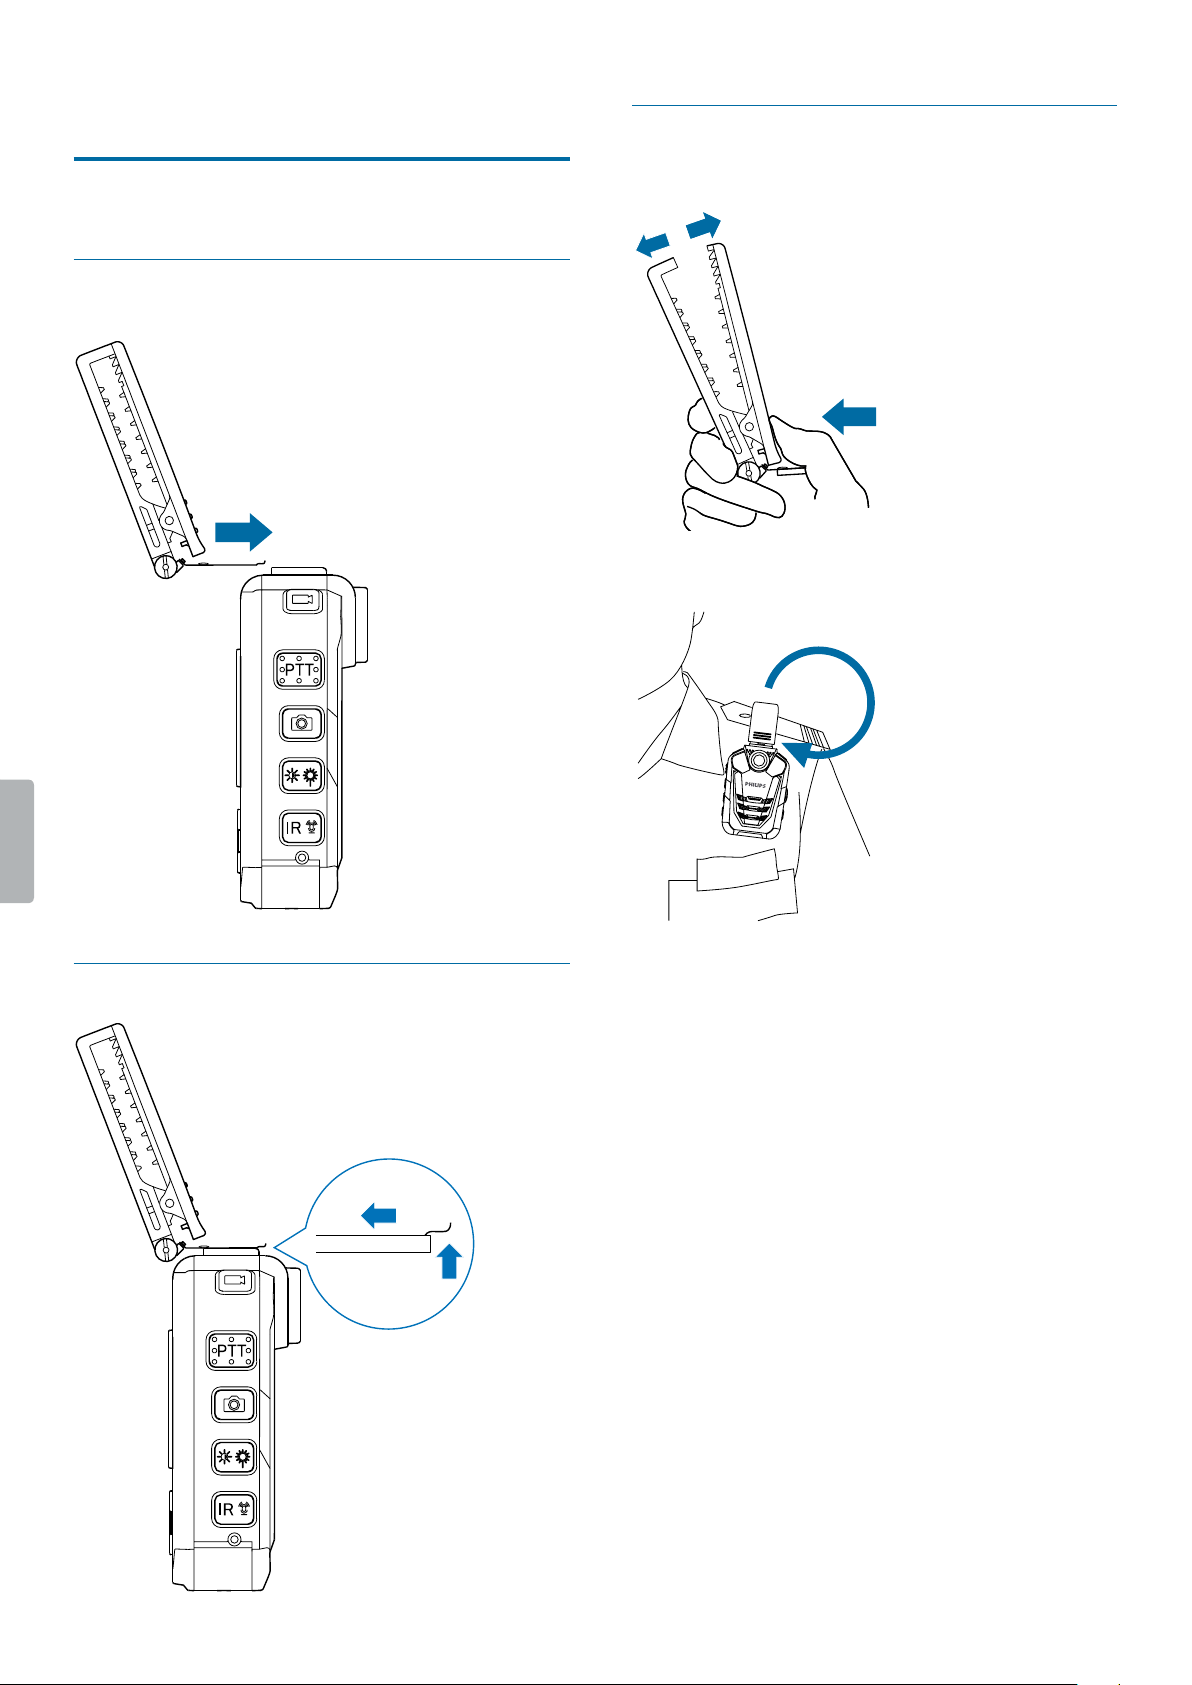
19Using the camera clip
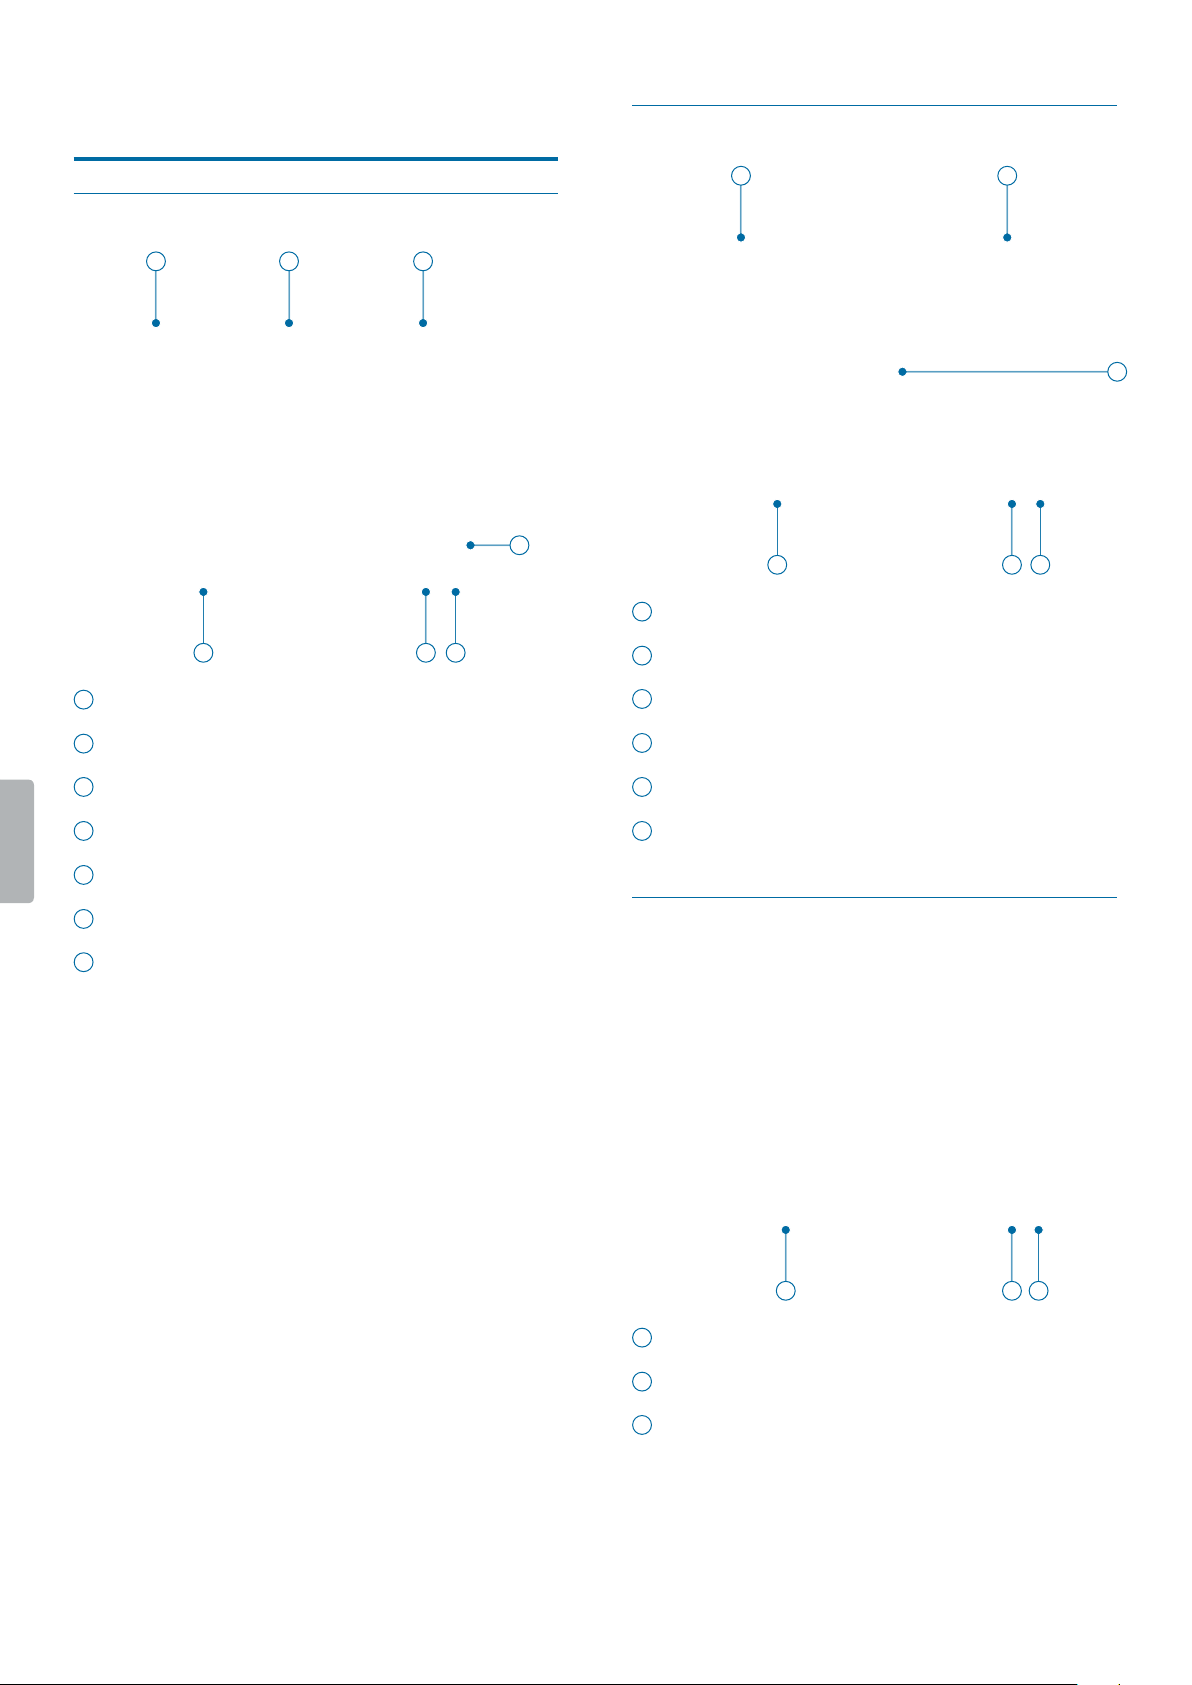
8 Using the cmer clip
Use the supplied camera clip to attach your VideoTracer to
your clothes.
Attch cmer clip
Detch cmer clip
How to wer the clip
1
2
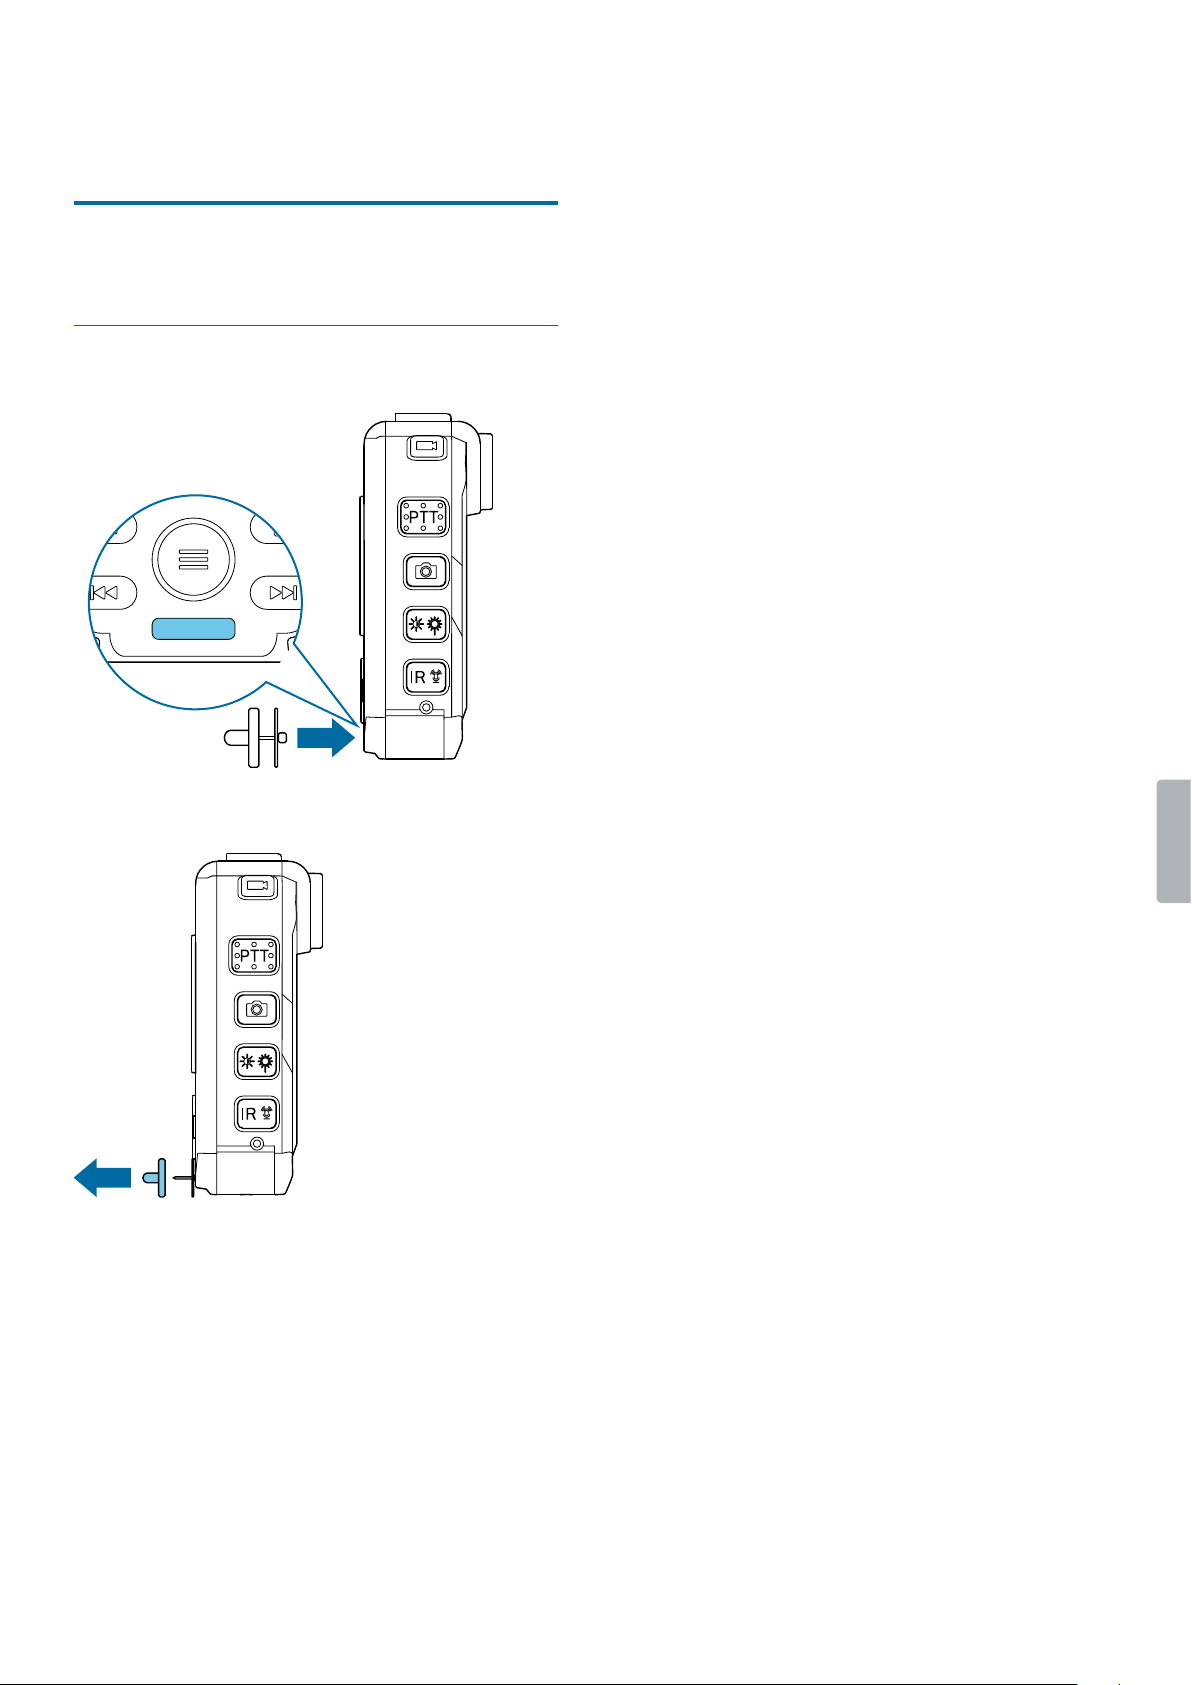
20 Using the magnetic pin
9 Using the mgnetic
pin
Use the supplied magnetic pin additionally to the
camera clip to allow even rmer attachment of your
VideoTracer.
Attch pin
1
2

21Data management
10 Dt mngement
Trnsfer dt to computer
You can use your recorder as a USB mass storage to
conveniently store, back up and move les. Link the
device to a computer with a USB cable. Your recorder will
automatically be recognized as a mass storage device.
You don’t need to install any software.
For more information on how to connect your device to a
computer, see the illustration in Charging the battery.
Caution
• Don’t disconnect the USB cable from the device while
you are transferring les. This might cause data loss.
Note
• Make sure your VideoTracer is turned on if you want
to move les from the device to the computer.
• While the device is connected to a computer, it can’t
be operated manually.
Trnsfer dt from VideoTrcer to the computer
1
Make sure your VideoTracer is turned on and connect
the device to the computer via the supplied micro
USB cable.
X A charging battery icon appears on the screen
and the Record/Status LED glows green.
2
Open Windows Explorer on a Windows computer, or
open Finder on a Mac computer.
X VideoTracer is recognized as an external drive.
3
Double-click the VideoTracer drive.
X The content of your VideoTracer is displayed in a
new window.
4
Select the desired les in the FILE folder. and copy,
cut or drag them to the desired location on your
computer.
Reset your device settings
You can reset your menu settings to their default state—
the way they were when you rst purchased your device
and turned it on.
Caution
• Resetting your menu settings will delete all settings
you have made on your device. After a reset, you will
have to adjust all settings again.
Note
• Your data won’t be deleted and is still available after
resetting the menu settings.
To reset your settings:
1
On the start screen, press the Menu button to
open the settings screen.
2
Press the Menu button to scroll to the Device
settings menu.
3
Press the Fast forward button to scroll to the Reset
device setting. Press the Play/Pause button to
conrm your selection.
4
Select Yes.
X The device automatically reboots.
X All settings on your device are reset to their
default state.

22 Service and support
11 Service nd support
Don’t perform any maintenance operations that aren’t
described in this user manual. Don’t disassemble the
device into its component parts to carry out repairs.
The device may only be repaired in authorized service
centers.
Disply device informtion
See various information about your device, such as the
available memory space, the remaining video and audio
time, or the rmware version.
1
On the start screen, press the Menu button to
open the settings screen.
2
Press the Menu button to switch to the Device
settings menu.
3
Press the Fast forward button to scroll to the
Informtion setting. Press the Play/Pause button to
conrm your selection.
4
Press the Fast forward button to switch to the next
page.
Contct Philips prtner
If you have any questions about your VideoTracer
or experience technical issues, contact one of our
supporting Philips partners. The local partner you
purchased your VideoTracer from will strive to answer
your questions and to solve your problem as soon as
possible.

23Service and support
Troubleshooting
Find the most common problems you could encounter
with your VideoTracer in the following table. If you are
unable to solve the problem with the information below,
contact the supporting Philips partner you purchased
your device from.
Problem Possible cuse Solution
The device doesn’t turn on. • The battery has run out of
power.
• Charge the device for a while and
then turn it on again.
I can’t record with the device. • You have reached the
maximum le number or the
device’s memory is full.
• Delete some les or move them to an
external device.
The device doesn’t respond. • There is a problem with the
software.
• Try to turn the device o and then
restart it.
• If you can’t turn the device o, reset
the device by pressing the Reset
button. For more information, see
the illustration in Overview of the
recorder. Resetting the device won’t
delete any settings or data.
The device doesn’t play back recordings. • The volume is o or too low. • Turn on or turn up the volume.
I can’t hear anything from the speakers. • The headphones are
connected to the device.
• The volume is o or too low.
• Unplug the headphones.
• Turn on or turn up the volume.
I can’t hear anything from the
headphones.
• The volume is o or too low.
• The headphones aren’t
connected properly.
• The headphones are
connected to the wrong jack
(i.e. external microphone jack).
• Turn on or turn up the volume.
• Disconnect the headphones and
connect them to the headphones
jack again.
• Disconnect the headphones and
connect them to the headphones
jack.
The picture or video quality is poor. • The camera lense is dirty. • Clean the camera lense with a soft,
dry cloth.
The quality of audio recordings is too low
or there’s too much background noise in
my audio recordings.
• The microphone sensitivity is
set too high.
• Change the microphone sensitivity to
medium or low. For more information,
see Mic sensitivity.

24 Technical data
12 Technicl dt
Device
• Product dimensions (W × D × H): 61 × 91 × 34 mm
(2.4 × 3.6 × 1.3 inches)
• Weight: 180 g (6.2 oz.)
Connectivity
• Headphones: Stereo jack, 2.5 mm
• AV in: 2.5 mm
• AV out: 2.5 mm
• HDMI: type D (micro)
• USB: micro USB 2.0
• MicroSD card socket: up to 128 GB
Disply
• Type: LCD color display
• Diagonal screen size: 5.1 cm (0.6 inches)
• Resolution: 320 × 240 px
Video recording
• Chipset: Ambarella A7LA50
• Sensor: 5 MP CMOS sensor
• Viewing angle: 170 degrees
• Video resolution: 2560 × 1080 px (21:9)
• 25/30 fps, 2304 × 1296 px (16:9) 25/30 fps,
• 1920 × 1080 px (16:9) 25/30 fps, 1280 × 720 px
• (16:9) 25/30/50/60 fps, 848 × 480 px (16:9)
• 25/30/50/60 fps
• Video encoding: H.264
• Video format: MPEG4
• Loop recording
• Automatic le spit: 5 /10 / 15 / 20 / 30 minutes
• Pre-recording function: max. 50 seconds
• Post-recording function: 5 /10 / 15 / 30 / 60
• seconds
• Motion detection: low, medium, high
• Car DVR mode
Night recording
• Infrared light: 6 IR LEDs
• Flash light: 2 LEDs
• Up to 6 meters with visible face image
Audio recording
• Built-in microphone
• Audio format: WAV
• Recording mode: HQ (1536 kbps), SLP (385
• kbps)
• Microphone sensitivity: low, medium, high
• Noise cut
Photo cpturing
• Image size: 32 MP, 23 MP, 20 MP, 18 MP,
• 16 MP, 14 MP, 12 MP, 8 MP, 5 MP, 3 MP
• Image format: JPEG
• Photo quality: super ne, ne, normal
• Burst shots: 3 / 5 / 10 / 20 photos in a row
• Self-timer: 3 / 5 / 10 / 30 / 60 seconds
• EV correction
Memory
• Memory card (external): microSD card up to 128 GB
Security
• File tagging with GPS coordinates
• Water mark: user ID, time and date stamp embedded
in video
• Unique user ID: 5-digit device ID and 6-digit personal
ID
• Auto-divide function to prevent corruption of video
les caused by erroneous operation
• Recordings can only be deleted on the computer via
USB cable.
Power
• Battery type: Li-polymer built-in battery
• Battery capacity: 3400 mAh
• Battery lifetime: 9.2 hours (848 × 480 px), 9 hours
(1280 × 720 px), 8.4 hours (1920 × 1080 px), 8.2 hours
(2560 × 1080 px), 7.2 hours (2304 × 1296 px)
• Charging time (full charge): approx. 5 hours
Green specictions
• Compliant to 2011/65/EU (RoHS)
Opertion conditions
• Temperature: 5°–45°C
• Humidity: 10% – 90%, non-condensing
• IP67 water and dust resistance
System requirements
• Operating System: Windows 10, Windows 8,
Windows 7, macOS 10
• Free USB port

25Technical data
FCC Wrning Sttement
œ
Changes or modications not expressly approved by the
party responsible for compliance could void the user’s
authority to operate the equipment.
This equipment has been tested and found to comply
with the limits for a Class B digital device, pursuant
to Part 15 of the FCC Rules. These limits are designed
to provide reasonable protection against harmful
interference in a residential installation. This equipment
generates uses and can radiate radio frequency energy
and, if not installed and used in accordance with the
instructions, may cause harmful interference to radio
communications. However, there is no guarantee that
interference will not occur in a particular installation. If
this equipment does cause harmful interference to radio
or television reception, which can be determined by
turning the equipment o and on, the user is encouraged
to try to correct the interference by one or more of the
following measures:
• Reorient or relocate the receiving antenna.
• Increase the separation between the equipment and
receiver.
• Connect the equipment into an outlet on a circuit
dierent from that to which the receiver is connected
• Consult the dealer or an experienced radio/TV
technician for help.
Neither Speech Processing Solutions GmbH nor its
aliates shall be liable to the purchaser of this product
or third parties with respect to claims for damages,
losses, costs or expenses incurred by purchaser or
third parties as a result of an accident,misuse or abuse
of this product or unauthorized modications, repair,
modication of the product or failure to meet the
operating and maintenance instructions provided by the
manufacturer.
MPEG Layer-3 audio coding technology licensed from
Fraunhofer IIS and Thomson Licensing.
This user manual is a document with no contractual
nature. We accept no liability for changes, mistakes or
printing errors.

a
Issue date 2018-10-16
Version 1.0
© 2018 Speech Processing Solutions GmbH. All rights reserved.
Specications are subject to change without notice. Philips and the Philips shield
emblem are registered trademarks of Koninklijke Philips N.V. and are used by Speech
Processing Solutions GmbH under license from Koninklijke Philips N.V.
All trademarks are the property of their respective owners.
www.philips.com/dictation
