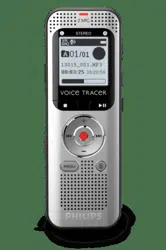
USER MANUAL VOICE TRACER
Digital Voice Tracer
Product highlights
- Super-fast USB transfer of recordings and data
- USB mass storage ensures optimum compatibility
- Fast and simple file management using four folders
What's in the box
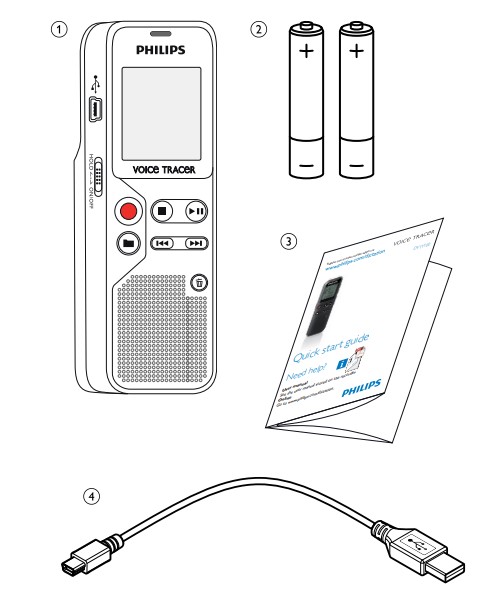
- Device
- Two AAA batteries
- Quick-start guide
- USB cable to connect to a computer
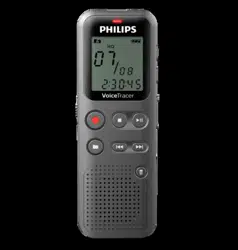
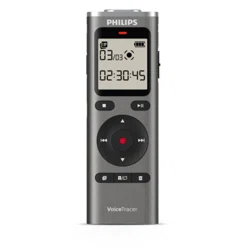
Product overview
Front and rear sides
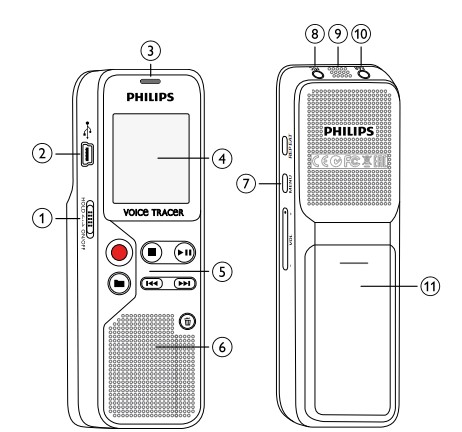
- ON/OFF switch / HOLD (keypad lock)
- Micro USB port for computer connection
- Status LED: Red – device is recording Green – device is playing back Yellow – data is being transferred to/from the computer
- Display
- Operating panel with keys
- Speaker
- Operating panel with keys
- External microphone socket, (stereo jack, 3.5 mm)
- Microphone
- Headphone socket (stereo jack, 3.5 mm)
- Battery compartment
First steps
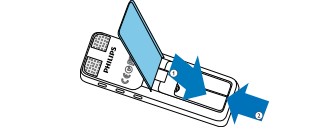
Inserting the batteries
Your device is supplied with two AAA batteries.
- Slide the battery compartment cover downwards.

- Fold the cover out
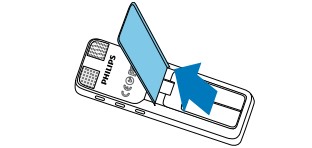
- Insert the batteries or rechargeable batteries into the device as shown. Ensure correct polarity!
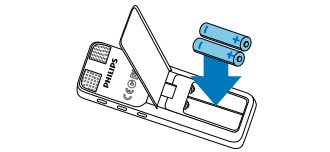
- Fold the cover in. Push the cover up until it engages.
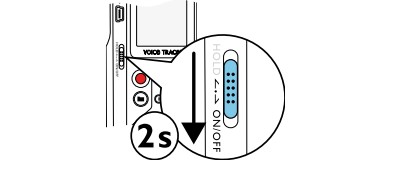
Power on/off
- Slide the on/off switch on the side of the device downwards for approximately two seconds. The device turns on and the start-up screen is displayed
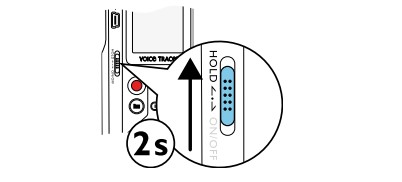
- To power off, pull down the power switch on the side of the device again and hold for about two seconds.
Enabling/disabling the keypad lock
The keypad lock deactivates all keys on the device. The timer function of the device continues to function.
- Slide the HOLD switch up into the HOLD position to lock the keypad of the device.
- Slide the HOLD switch down to the Off position to disengage the HOLD
Accessories
Connecting the headphones
- Turn down the volume of the device before you plug in the headphones.
- Insert the stereo jack into the headphone connection EAR on the top of the device.
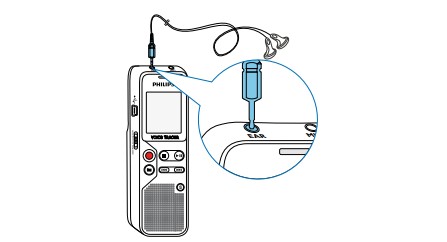
- Turn up the volume until you reach a comfortable listening level. The speaker is switched off when headphones are connected.
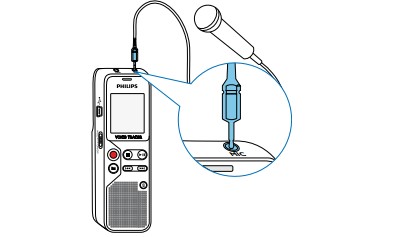
Connecting an external microphone
- Stop the recording currently in progress.
- Insert the jack into the microphone connection MIC on the top of the device.
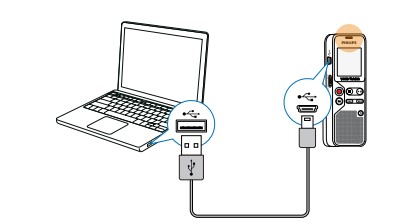
Connecting to a computer
You can select one of the following options once you have connected the device to a computer
- A USB mass storage device: You can use the File Explorer to access the device data without installing additional software. It is automatically displayed, similarly to a USB memory stick or card, as a mass storage device. It is a convenient way to store, back up and and move files.
- Plug the USB connector into a USB port on your computer.
- Insert the micro USB plug into the USB port on the side of the device. The device is displayed as a mass storage device in File Explorer.
Transferring files from or to the device
You can use the File Explorer to access the device data without installing additional software. It is automatically displayed, similarly to a USB memory stick or card, as a mass storage device.
- Connect the device to the computer as described.
- Open File Explorer. The device is automatically displayed, similarly to a USB memory stick or card, as a mass storage device. The Voice folder on the device contains recordings.
- Copy or move files to your computer or delete files to archive recordings and free up space on the device.
Disconnecting from a computer
- Select Eject USB in File Explorer.
- Disconnect the USB cable from the computer.
Playback
Selecting a recording
- In stop mode (start-up screen), press
 to select the desired folder for the recording. The following symbols will be displayed, depending on the selected folder:
  – internal memory.
- Press
 while the device is stopped. The position indicator jumps to the start of the next file.
- Press
 while the device is stopped. The position indicator jumps to the start of the preceding recording
Playing a recording back
- Select the required file as described.
- Press
 to playback the selected file. The record/play indicator will light green. During playback, the time indication for the recording is shown on the display
- Press the +/ – buttons to adjust the volume.
- Press the key to pause playback. The playback will stop and the green LED will start blinking
- Press to continue playback from the previous position.
- Press the
 key to stop playback.
Quick search
You can scan backward or forward in the current file at a fast speed. This allows to find a specific part of the recording
- During playback press and hold one of the two navigation keys or . The selected recording is searched for at high speed in either forward or rewind mode.
- Release the key
Repeating playback
You can automatically repeat playback of a certain file, folder or sequence (=loop).
- Select the required file as described.
- Press to playback the selected file.
- Press MENU briefly.
- Using either / , select whether you wish either the playback of an individual recording or a folder to repeat automatically
- Press the record key,
 , to confirm.
Endless loop / sequence repeating
- Select the required file as described.
- Press to playback the selected file.
- Press REPEAT, to specify the sequence start point.
- Press REPEAT, to specify the sequence end point. The selected sequence is played in an endless loop.
- Press REPEAT, to stop repeating of the sequence and continue with normal playback.
Protecting a recording / lock file
You can protect recordings against unintentional deletion.
- Select the required file as described.
- Press MENU briefly.
- Using / select LOCK.
- Press the record key, , to confirm.
Unprotect / unlock file
- Select the required file as described.
- Press MENU briefly.
- Using / select UNLOCK.
- Press the record key, , to confirm.
Troubleshooting
The device does not turn on
- The batteries or rechargeable batteries are not inserted correctly.
- Check to ensure that the batteries or rechargeable batteries are correctly inserted. Make sure the polarity is correct.
- Batteries are empty.
- Replace or recharge the batteries
The device does not playback recordings
- The keypad lock may be enabled.
- Slide the HOLD switch to the "Off" position.
- No recordings are saved in the device.
The device does not respond.
- Remove the batteries/rechargeable batteries and insert them again.
I cannot hear anything from the speaker.
- A headset is connected to the device.
- The volume is at the lowest setting
The recording session does not start
- Keypad lock (HOLD) is switched on.
- Slide the HOLD switch to the "Off" position.
- The maximum number of recordings may have been reached or the available space for recording is full.
- Delete some recordings or move them to an external device.
I cannot hear anything from the headphones.
- The headphones are incorrectly connected.
- Check the headphone connection.
- The volume is at the lowest setting.
Appendix
The information in this user manual has been produced to the best of our knowledge. It (particularly the technical data) may be modified or updated at any time without prior notice
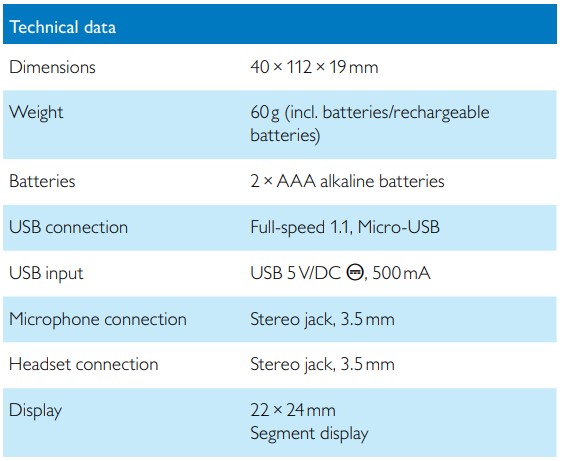
Technical data