User manual Audio Recorder
Digital Voice Tracer
Product highlights
- Voice-activated recording mode without pressing buttons
- Slot for microSD card for extra memory
- Highlight important parts of your recording using index marks
- Noise reduction for clear recordings
- Stereo recording
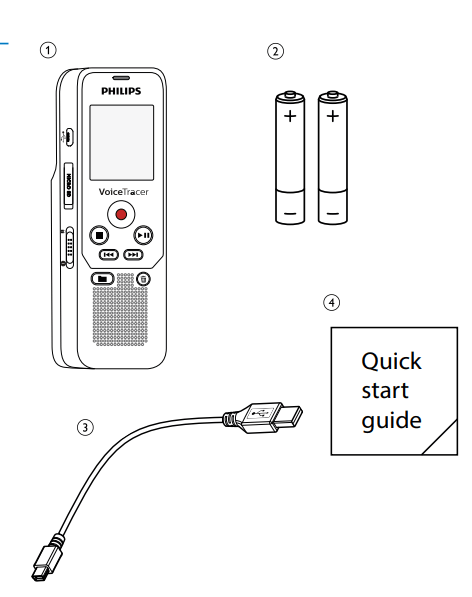
What's in the box
- Device
- Two AAA batteries
- USB cable to connect to a computer
- Quick-start guide
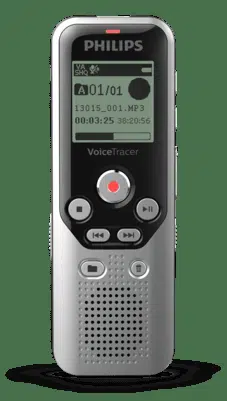
Product overviews
Front and rear sides
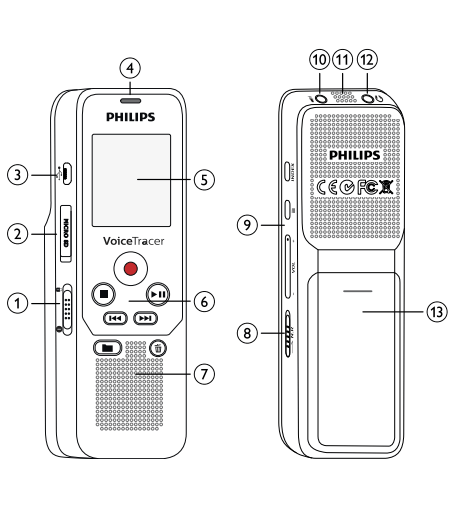
- On/off switch, keypad lock
- Slot for memory card (microSD card)
- Micro USB port for computer connection
- Status LED: Red – device is recording Green – device is playing back Yellow – data is being transferred to/from the computer
- Display
- Operating panel with keys
- Speaker
- Noise reduction
- Operating panel with keys
- External microphone socket, (stereo jack, 3.5 mm)
- Microphone
- Headphone socket (stereo jack, 3.5 mm)
- Battery compartment
Keys
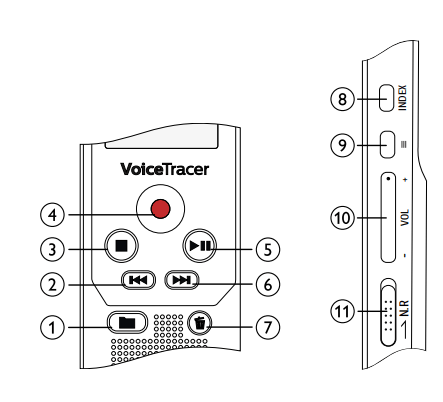
 Stop mode: Change folder
 Short press: jump to the previous recording Long press: fast seek rewind mode Menu navigation: display previous menu tab
 Stop playback (stop key), close menu
  Start recording (record key), confirm selection
 Play recording (playback key), Pause playback (pause key)
 Short press: jump to the next recording Long press: fast seek forward mode Menu navigation: call next menu tab
  Delete recording (delete key)
 - Short press: set index mark, long press: display list of index registers (INDEX key)
- Call up menu functions (Menu key)
- + Increase volume, menu navigation: Select menu functions – Volume down, menu navigation: Select menu functions
- Switch on noise reduction (N.R key)
Start-up screen

Note: The position of the symbols may vary, depending on the model, the mode and the selected functions.
First steps
Use the installation guide on the following pages to start using your device quickly and easily.
Caution: Follow the instructions on handling the device, especially the batteries and rechargeable batteries (see also chapter 1.1.1 Batteries and rechargeable batteries)
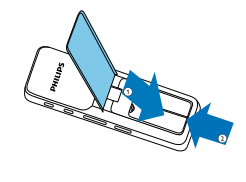
Inserting the batteries
Your device is supplied with two AAA batteries.
1 Slide the battery compartment cover downwards.
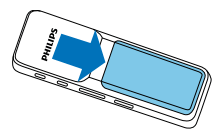
2 Fold the cover out.

3 Insert the batteries or rechargeable batteries as shown into the device. Make sure the polarity is correct.

4 Fold the cover in. Push the cover up until it engages.
Power on/off
1 Slide the on/off switch on the side of the device downwards for approximately two seconds.
- The device turns on and the start-up screen is displayed.
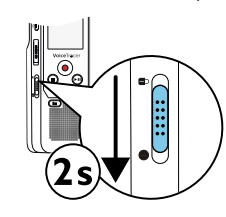
2 To power off, pull down the power switch on the side of the device again and hold for about two seconds.
Note: The device switches itself off automatically if no keyis pressed within a pre-set period of time (see also chapter 8.3.2 AUTOOFF)
Initial installation process
When using for the first time, you must set the display language as well as the date and time of the device.
Language selection
- Follow the description in the chapter "Select language" (see also chapter 8.2.1 Select language)
- Note: Your language might not be available. Select an alternative one.
Set date & time
- Follow the description in the chapter "Set date & time" (see also chapter 8.3.1 Set date & time)
Enabling/disabling the keypad lock
The keypad lock deactivates all keys on the device. The timer function of the device continues to function.
1 Slide the on/off switch up into the  position to lock the keypad of the device.
- The display briefly shows ‘Hold’.

2 Slide the on/off switch down to the Off position to disengage the keypad lock.
Inserting a microSD card
Caution: Do not remove the memory card while recording is in progress. If you do this, data may be damaged or lost.
1 Flip the memory card slot cover to the side.
2 Insert the microSD card into the card slot with the contacts facing upwards.
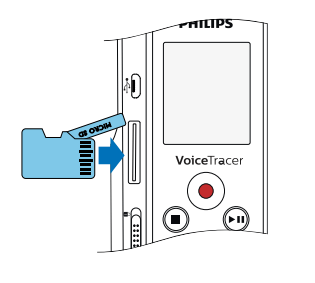
3 Insert the memory card until it snaps into place.
4 To remove the card press the memory card slightly until the snapping mechanism unlocks and the card is ejected.
Accessories
- Depending on the type of the device, the product package may include various accessories. Additional accessories may be obtained directly from your retailer
How to connect headphones
Warning: Set the volume to a moderate level and do not use headphones to listen for excessively long periods of time. Exposure to intense sound can cause hearing damage. Observe the Hearing safety instructions (see also chapter 1.1.3 Hearing protection)
- Turn down the volume of the device before you plug in the headphones.
- Insert the stereo jack into the headphone connection
 on the top of the device.
- Turn up the volume until you reach a comfortable listening level. The speaker is switched off when headphones are connected.
Connecting an external microphone
Note
- If you connect an external microphone to the device, the recording source will switch automatically and the device microphone will turn off.
- If you connect an external microphone, the device will record stereo sound. The integrated microphone only records mono sound.
- Stop the recording currently in progress.
- Insert the jack into the microphone connection
 on the top of the device.
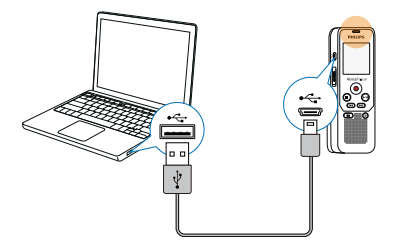
Connecting to a computer
You can select one of the following options once you have connected the device to a computer
- A USB mass storage device: You can use the File Explorer to access the device data without installing additional software. The device is automatically displayed as a mass storage device. It is a convenient way to store, back up and and move files. (see also chapter 4.7.1 Transferring files from or to the device)
1 Plug the USB connector into a USB port on your computer.
2 Insert the micro USB plug into the USB port on the side of the device.
- The device is displayed as a mass storage device in File Explorer
Caution
- Do not disconnect the device from the computer while files are transferred from or to the device (the status LED indicator flashes yellow when data is being transferred). This this may damage or corrupt the files.
- Do not format the drive of the device on a computer. If you want to delete all data, use the Format memory function (see also chapter 9.1.2 Memory formatting)
Transferring files from or to the device: You can use the File Explorer to access the device data without installing additional software. The device is automatically displayed as a mass storage device.
- Connect the device to the computer as described.
- Open File Explorer.
- The device is automatically displayed, similarly to a USB memory stick or card, as a mass storage device.
- Copy or move files to your computer or delete files to archive recordings and free up space on the device.
Caution
- Do not disconnect the device from the computer while files are transferred from or to the device (the status LED indicator flashes yellow when data is being transferred). This this may damage or corrupt the files.
- Do not format the drive of the device on a computer. If you want to delete all data, use the Format memory function (see also chapter 9.1.2 Memory formatting)
Disconnecting from a computer
- Select Eject USB in File Explorer.
- Disconnect the USB cable from the computer.
Record
The device offers many features that you can use during recording or to improve the quality of a recording. Use the timer and the voice activation functions to start a recording automatically
Creating a recording
- Before starting a recording, set the required recording quality and microphone sensitivity.
- When you record in environments with lots of noise in the background (e.g. while in a crowd or during a train or car journey), you can enable the noise reduction function to reduce the background noise (see also chapter 8.1.4 Enabling/disabling noise reduction)
Caution: Do not remove batteries or rechargeable batteries from the device while it is recording. If you do this, data may be damaged or lost. Device malfunctions may also occur.
- (start-up screen), press
 a to select the desired folder for the recording.
- The following symbols will be displayed, depending on the selected location folder:
 ,
,  ,
,  ,
,  – internal memory,
  ,
,  ,
,  ,
,  – memory card.
- Point the built-in microphone toward the sound source and press
 .
.
- The record/play indicator lights red. The recording duration and the remaining recording time are displayed in the selected folder on the display.
- Press to pause recording.
- The record/play indicator will blink red.
- Press the key to resume recording.
- Press the
 key to stop recording.
- The device returns to stop mode.
Note
- Start a new recording: To stop the current recording and start a new one, press .
- To prevent files becoming too big during a long recording, for example a meeting lasting several hours, you can automatically split recordings (see also chapter 8.1.7 Setting auto divide).
- Each folder can store up to 99 files. The size of the memory depends on the location folder and the quality of a recording (see also chapter 8.1.2 Setting recording quality, page 26). If the recording time or the number of files exceeds the available capacity, recording stops and a message is displayed. You cannot make any more recordings. Delete the recordings which you no longer require, or connect the device to a computer and transfer the files to your computer.
Tip: If you are to start a long recording session, replace or recharge the batteries before you begin. 
Recording using an external microphone
- If you connect an external microphone to the device, the recording source will switch automatically and the device's microphone will be turned off.
- If you connect an external microphone, the device will record stereo sound. The integrated microphone only records mono sound.
Starting recording automatically
You have two options to start automatic recording: Timer function and voice activation.
Use Timer function: You can use this function to start a recording at a specified date and time. The device can record from the device's microphone or an external microphone.
- Customize the timer settings in the Settings menu and turn on the feature (see also chapter 8.1.5 Setting the timer).
- The device will start recording at a specified time. The device can be switched off at this time or the keypad can be locked.
Use voice activation: When voice-activated recording is enabled, recording will start when you begin speaking. When you stop speaking, the device will automatically pause recording after three seconds of silence, and resume only when you begin speaking again. Use the voice activation level to set the volume at which the device should begin recording
- Customize the voice-activated recording settings in the Settings menu and turn on the feature (see also chapter 8.1.6 Enabling/ disabling voice-activated recording).
- If this feature is on, the
 symbol is displayed.
- Press the key.
- The devices switches to standby mode. The (
 ) symbol will be displayed. Recording will start when you begin speaking. When you stop speaking, the device will automatically pause recording after three seconds of silence.
- Press the key to stop recording.
- The device returns to stop mode.
Playback
Selecting a recording
- Press to select the desired folder while the device is stopped.
- The following symbols will be displayed, depending on the selected location folder: , , , – internal memory, , , , – memory card..
- Press while the device is stopped.
- The position indicator jumps to the start of the next file.
- Press
 while the device is stopped.
- The position indicator jumps to the start of the preceding recording
Playback a recording
- Select the required file as described.
- Press to playback the selected file.
- The record/play indicator will light green. The total playback time of the current file will be shown on the display.
- Press the +/– buttons to adjust the volume.
- Press the key to pause playback.
- The playback will stop and the green LED will start blinking.
- Press to continue playback from the previous position.
- Press the key to stop playback.
Adjusting playback speed
- During playback press the Menu key.
- Press +/– to set the desired playback speed.
- Press the record key to confirm.
Quick search
You can scan backward or forward in the current file at a fast speed. This allows to find a specific part of the recording.
- During playback press and hold one of the two navigation keys or .
- The selected recording is searched for at high speed in either forward or rewind mode.
- Release the key
- to resume playback at the selected speed form the current position.
Protecting a recording / lock file
You can protect recordings against unintentional deletion.
- Select the required file as described.
- Press the Menu key.
- Press / to select the file menu
 .
.
- Press the record key to confirm.
- Press +/ – to select the Lock file function.
- Press the record key to confirm.
- Use +/ – Lock to select.
- Press the record key to confirm.
Unprotect / unlock file
- Select the required file as described.
- Press the Menu key.
- Press / to select the file menu .
- Press the record key to confirm.
- Press +/ – to select the Lock file function.
- Press the record key to confirm.
- Use +/ – Unlock to select.
- Press the record key to confirm.
Delete
You can delete an individual recording on the device or all the recordings in the folder.
Deleting recordings on the device
You can delete individual recordings from the device. Connect the device to a computer if you want to delete multiple files.
Caution: Only delete the recordings that you no longer need. Keep in mind that deleted recordings cannot be recovered.
- In stop mode (start-up screen) select the folder in which you wish to delete a recording by pressing .
- Press / to select the recording that you wish to delete.
- Press the delete key .
- Press +/ – Delete to select.
- Press the record key to confirm.
- Use +/ – OK to select.
- Press to confirm the deletion.
- The recording is deleted. Sequential file numbers are reassigned automatically
Deleting all recordings in the folder
You can delete all recordings in the selected folder. Connect the device to a computer if you want to rename an entire folder.
- In stop mode (start screen), select the folder in which you wish to delete all recordings by pressing .
- Press the delete key .
- Press +/ – Delete all to select.
- Press the record key to confirm.
- Use +/ – OK to select.
- Press to confirm the deletion.
- All recordings in the folder are deleted. The numbering of the recordings is renewed.
Settings
- Press and hold the the Menu keyfor at least two seconds while the device is stopped (start-up screen) to enter the Settings menu.
- Note: Press the j keyat the end of an operation to return to the stop mode. Press the j keyduring the operation to cancel the operation without saving and return to the stop mode.
Recording settings
Set file location: The display shows a folder icon which indicates where the recordings are currently being stored: , , , – internal memory, , , , – memory card.
- In stop mode (start-up screen), press the Menu key.
- Press / to select the device settings menu
 .
.
- Press the record key to confirm.
- Press +/ – to select the Memory select function.
- Press the record key to confirm.
- Press +/ – to select if you want to save the files in the internal memory or on the microSD card.
- Press the record key to confirm.
- Press the key to exit the menu.
Tip: Press the key to cancel the operation without saving and return to the stop mode.
Setting recording quality: Use the recording quality settings to set the file format and the quality of the recording as the data rate (bit rate). The higher the recording quality the bigger the file and the less recordings you can create.
- In stop mode (start-up screen), press the Menu key.
- Press the h/b key to select the record settings menu
 .
.
- Press the record key to confirm.
- Press +/ – to select the Quality settings function.
- Press the record key to confirm.
- Press +/ – to select the required recording quality.
- The selected quality setting icon will be displayed.
 – high quality, format: WAV, 384kbit/s
 – above-average recording time, format: WAV, 128 kbit/s
 – maximum recording time, format: WAV, 64/32 kbit/s
- Press the record key to confirm.
- Press the key to exit the menu.
Tip: Press the key to cancel the operation without saving and return to the stop mode.
Setting microphone sensitivity: You can customize the microphone settings to suit the recording conditions. Adjust the recording sensitivity to avoid recording background noises and to adapt to the recording environment.
- In stop mode (start-up screen), press the Menu key.
- Press the / key to select the record settings menu Ó.
- Press the record key to confirm.
- Press +/ – to select the Mic sensitivity function.
- Press the record key g to confirm.
- Press +/ – to select the required recording quality.
- The selected microphone/recording sensitivity icon will be displayed.
- High – high sensitivity, source far away
- Low – low sensitivity, source very near
- Press the record key to confirm.
- Press the key to exit the menu
Enabling/disabling noise reduction
- When you record in environments with lots of background (e.g. while in a crowd or during a train or car journey), you can enable the noise reduction function to reduce the background noise.
1 In stop mode, drag the switch on the side of the device upwards into the position N.R.
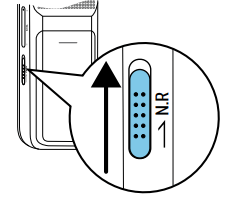
2 Press the record key to start recording.
- If this feature is on, the
 symbol is displayed.
Note: Noise reduction is only possible with PCM recording quality  . If you switch on noise reduction, the device automatically switches to PCM recording quality
Setting the timer: You can use this function to start a recording at a specified date and time. The device can record from the device's microphone or an external microphone.
- In stop mode (start-up screen), press the Menu key.
- Press the / key to select the record settings menu .
- Press the record key to confirm.
- Press +/ – to select the Timer function.
- Press the record key to confirm.
- Press +/ – to select the Set the begin function to set the alarm.
- Press the record key to confirm.
- Press +/– to select the Set date function.
- Press the record key to confirm.
- Set the date as described in (see also chapter 8.3.1 Set date & time).
- Press the record key to confirm.
- Press +/– to select the Set time function.
- Press the record key to confirm.
- Set the time as described in (see also chapter 8.3.1 Set date & time).
- Press the record key to confirm.
- Press the stop key .
- Press +/ – to select the Duration function to set the recording duration.
- Press the record key to confirm.
- Press +/ – to set the required recording duration. Press no limit for unlimited recording.
- Press the record key to confirm.
- Press +/ – to select the Record source function to set the sound source.
- Press the record key to confirm.
- Press +/ – to select if the device should record from an internal microphone or an external source.
- Press the record key g to confirm.
- Press the stop key .
- The device will start recording at a specified time.
Tip: Press the j key to cancel the operation without saving and return to the stop mode
Enabling/disabling voice-activated recording: If voice-activated recording is enabled, recording session will start when you begin speaking. When you stop speaking, the device will automatically pause recording after three seconds of silence, and resume only when you begin speaking again. Use the voice activation level to set the volume at which the device should begin recording.
- In stop mode (start-up screen), press the Menu key.
- Press the / key to select the record settings menu .
- Press the record key to confirm.
- Press +/ – to select the Voice Activation function.
- Press the record key to confirm.
- Press +/ – to select the On function.
- Press the record key to confirm.
- If this feature is on, the
 symbol is displayed.
- Press +/ – to select the Off function to turn off voice-activated recording.
Troubleshooting
1. The device does not turn on
- The batteries or rechargeable batteries are not inserted correctly.
- Check to ensure that the batteries or rechargeable batteries are correctly inserted. Make sure the polarity is correct.
- Batteries are empty.
- Replace or recharge the batteries.
2. The device does not playback recordings
- The keypad lock may be enabled.
- Slide the on/off switch to the "Off" position.
- No recordings are saved in the device.
3. The device does not respond.
- Remove the batteries/rechargeable batteries and insert them again
4. The microSD card cannot be selected as a recording location
- There is no memory card in the device.
- Insert a memory card into the device.
- The memory card is not formatted (file system FAT32).
- Format the memory card in the device.
5. I cannot hear anything from the speaker.
- A headset is connected to the device.
- The volume is at the lowest setting
6. The recording session does not start
- Pre-recording or voice-activated recording mode may be enabled.
- The keypad lock may be enabled.
- Slide the on/off switch to the "Off" position.
- The maximum number of recordings may have been reached or the available space for recording is full.
- Delete some recordings or move them to an external device.
- Select another location folder
7. I cannot hear anything from the headphones.
- The headphones are incorrectly connected.
- Check the headphone connection.
- The volume is at the lowest setting.
8. External microphone records mono sound only
- Switch external sound source to stereo microphone.