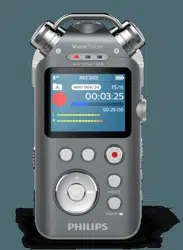

Audio recorder
DVT7500
VoiceTracer
User manual

2
Tble of contents
Importnt informtion
Sfety instructions
Rechrgeble builtin bttery
Dt reset
Hering protection
Clening nd disinfection
About this user mnul
Symbols used
Your udio recorder
Product highlights
Wht’s in the box
Overview of the udio recorder
Getting strted
Chrging the bttery
Turn the device on nd o
Key lock
Connect to computer
Set the dte nd time
Set the device lnguge
Recording
Recording screen
Record le
Adjust microphone gin
Use the Noise cut feture
Add n index mrk
Multichnnel recording
Voicectivted recording
Linein recording
Recording vi XLR
Chrge the XLR dpter
Strt n XLR recording
Plybck
Plybck screen
Ply bck les
Plybck speed
AB reply mode
Edit les
Delete les
Lock les
Music mode
Music plybck screen
Plybck mode
Strt the music plybck mode
Ply bck music les
Plybck speed
AB reply mode
Add n index mrk
Delete les
Settings
Settings mode
File
Record
Disply
Device
Tble of contents
Device nd dt mngement
Trnsfer dt to nd from the computer
Reset your dt nd settings
Reset dt
Reset settings
Updting your device
Service nd support
Disply device informtion
Contct our supporting Philips prtners
Troubleshooting
Technicl dt

3Important information
1 Importnt
informtion
Don’t mke ny djustments nd modictions tht
ren’t described in this mnul. Follow ll sfety
instructions to ensure proper opertion of the device. The
mnufcturer ssumes no libility for dmges resulting
from non-complince with the sfety instructions.
Safety instructions
• Protect the device from rin nd liquids to prevent
dmge to the device or short circuit.
• Don’t expose the device to excessive het cused by
plcing it on heting device or in direct sunlight.
• Protect the cbles from dmge by being trpped,
prticulrly t the plugs nd where cbles exit the
housing.
• Bck up your dt nd recordings. The mnufcturer’s
wrrnty doesn’t cover loss of dt resulting from user
ctions.
• Don’t perform ny mintennce opertions tht ren’t
described in this user mnul. Don’t disssemble the
device into its component prts to crry out repirs.
The device my only be repired in uthorized service
centers.
Rechargeable built-in battery
• Don’t ttempt to replce the bttery yourself. The
bttery my only be replced in uthorized service
centers.
• Before your bttery is replced by n uthorized
service center, bck up your dt nd recordings.
• Btteries contin substnces tht my pollute the
environment. Used btteries should be disposed of t
n ocil collection point.
Data reset
Philips Voice Trcer hs n internl memory with 16 GB
built-in storge. If you wnt to perform fctory dt
reset, observe the following cutions:
• Bck up your dt nd recordings. Performing
fctory dt reset will delete ll dt on your device.
• Formtting the memory on computer my cuse
incomptibilities with your device. Formt the memory
only on the device.
Hearing protection
Observe the following guidelines when you use
hedphones:
• Set the volume to moderte level nd don’t use
hedphones to listen for excessively long periods of
time.
• Be prticulrly creful to void djusting the volume to
level tht your hering cn’t del with.
• Don’t turn the volume up so high tht you cn’t her
wht is going on round you.
• In potentilly dngerous situtions, be prticulrly
creful or temporrily discontinue use.
• Don’t use hedphones while you re operting
motorized vehicle, cycling, sktebording, nd so on.
You could be hzrd to yourself nd other rod
users, nd possibly be breking the lw.
Legal restrictions on recording
• The use of the device’s recording function is subject to
the legl restrictions tht my pply in your country.
You should lso respect the privcy nd personl
rights of third prties if you record tlks or lectures.
• If you wnt to record telephone clls, check if this
is legl in your country. In certin countries, you
my be leglly required to inform the person you
re conversing with on the telephone tht you re
recording the converstion.
Cleaning and disinfection
• Before clening, disconnect ll cbles from the device.
• To clen the device, use soft dry cloth.
• To disinfect the device, use products for disinfection of
surfces in clinicl res nd ptient cre equipment,
such s surfce disinfectnt wipes.
• Don’t use hrsh chemicls or strong detergents.
• Avoid getting moisture in openings.
• Don’t rub or strike the surfce with nything hrd or
shrp s this my scrtch or dmge the surfce
permnently.
Disposal of your old product
Europe
A crossed-out wheeled bin symbol ttched to
product indictes tht the product is covered
by the Europen Directive 2011/65/EU. Plese
get informed bout the locl seprte collection
system for electricl nd electronic products.
Plese ct ccording to your locl rules nd
don’t dispose of your old products with your norml
household wste. Correct disposl of your old product
helps to prevent potentil negtive consequences for the
environment nd humn helth.
United States
Rechargeable Li-ion battery:
• Your product is designed nd mnufctured with high
qulity mterils nd components, which cn be
recycled nd reused. For recycling informtion, plese
contct your locl wste mngement fcilities or visit
www.recycle.philips.com.
• This pplince contins rechrgeble lithium-ion
bttery which must be disposed of properly.
• Contct your locl town or city ocils for bttery
disposl informtion.
eeeeeeee›
4 Important information
About this user manual
Find quick overview of your device on the next pges.
For detiled description, see the following chpters of
this user mnul. Red the instructions crefully.
Symbols used
Tip
• This symbol identies informtion tht helps you to
use your device more eciently nd simply.
Note
• This symbol indictes notices which you should
observe when hndling or operting the device.
Cution
• This symbol wrns of dmge to the device nd
possible dt loss. Dmge cn be cused by
improper hndling.
You cn lso cll 1-800-822-8837 or visit www.
cll2recycle.org for bttery drop-o loctions.
• For ssistnce, visit our website
www.philips.com/support or cll
1-800-243-3050 toll free.
Rechargeable NiMH battery:
• Your product is designed nd mnufctured with high
qulity mterils nd components, which cn be
recycled nd reused. For recycling informtion, plese
contct your locl wste mngement fcilities or visit
www.recycle.philips.com.
• This pplince contins rechrgeble NiMH bttery
which must be disposed of properly.
• Contct your locl town or city ocils for bttery
disposl informtion.
You cn lso cll 1-800-822-8837 or visit www.
cll2recycle.org for bttery drop-o loctions.
• For ssistnce, visit our website
www.philips.com/support or cll
1-800-243-3050 toll free.
Canada
Rechargeable Li-ion battery:
• Your product is designed nd mnufctured with high
qulity mterils nd components, which cn be
recycled nd reused. For recycling informtion, plese
contct your locl wste mngement fcilities or visit
www.recycle.philips.com.
• This pplince contins rechrgeble lithium-ion
bttery which mustbe disposed of properly.
• Contct your locl town or city ocils for bttery
disposl informtion.
You cn lso cll 888-224-9764 or visit www.
cll2recycle.c for bttery drop-o loctions.
• For ssistnce, visit our website www.philips.com/
support or cll
1-800-243-7884 toll free.
Rechargeable NiMH battery:
• Your product is designed nd mnufctured with high
qulity mterils nd components, which cn be
recycled nd reused. For recycling informtion, plese
contct your locl wste mngement fcilities or visit
www.recycle.philips.com.
• This pplince contins rechrgeble NiMH bttery
which must be disposed of properly.
• Contct your locl town or city ocils for bttery
disposl informtion.
• You cn lso cll 888-224-9764 or visit www.
cll2recycle.c for bttery drop-o loctions.
• For ssistnce, visit our website
www.philips.com/support or cll
1-800-243-7884 toll free

5Your audio recorder
What’s in the box
Quick
start
guide
2 Your udio recorder
We re delighted tht you hve chosen Philips device.
Visit our website for comprehensive support, such s user
mnuls, softwre downlods, wrrnty informtion nd
more: www.philips.com/dicttion.
Product highlights
• One-touch recording
• Digitl noise reduction
• Recording formts MP3 nd WAV
• Simultneous multichnnel recording
• USB 2.0 dt ccess
• Voice-ctivted recording
• USB mss storge, ensuring mximum comptibility
6 Your audio recorder
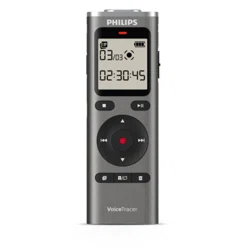
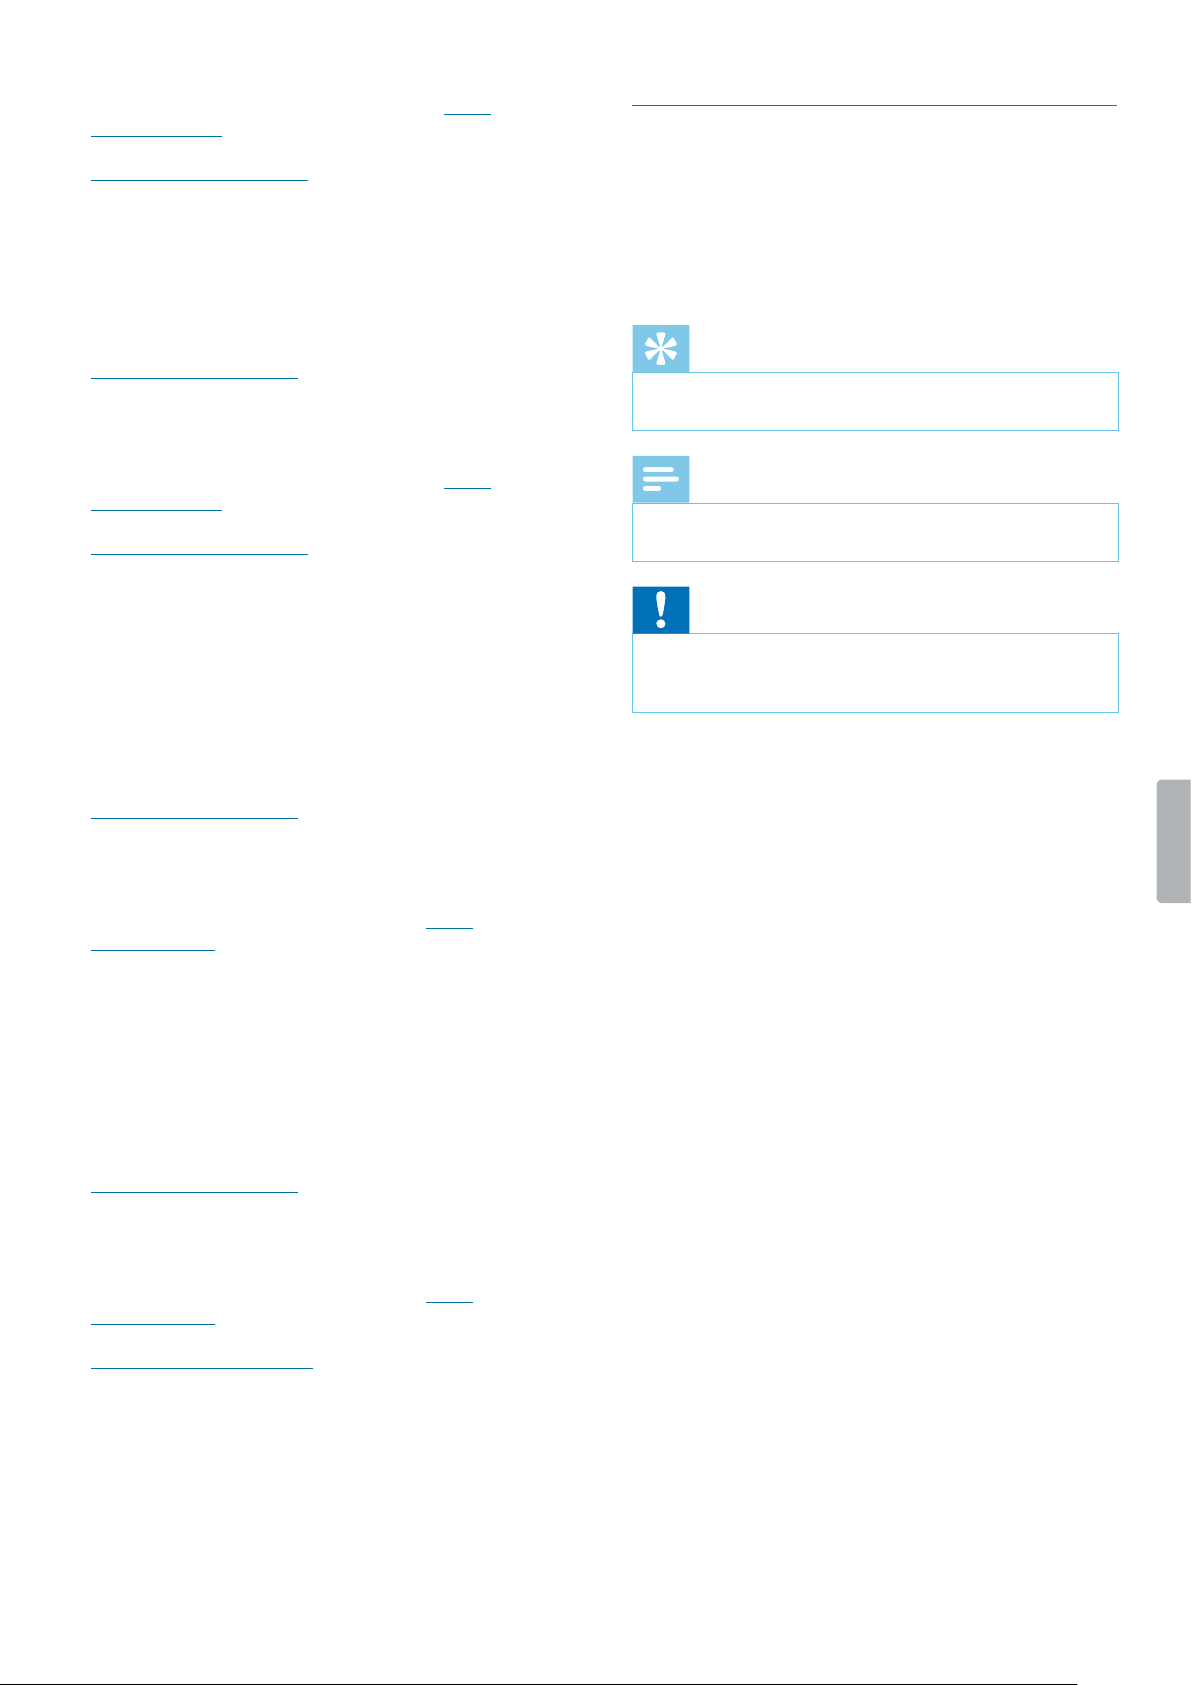
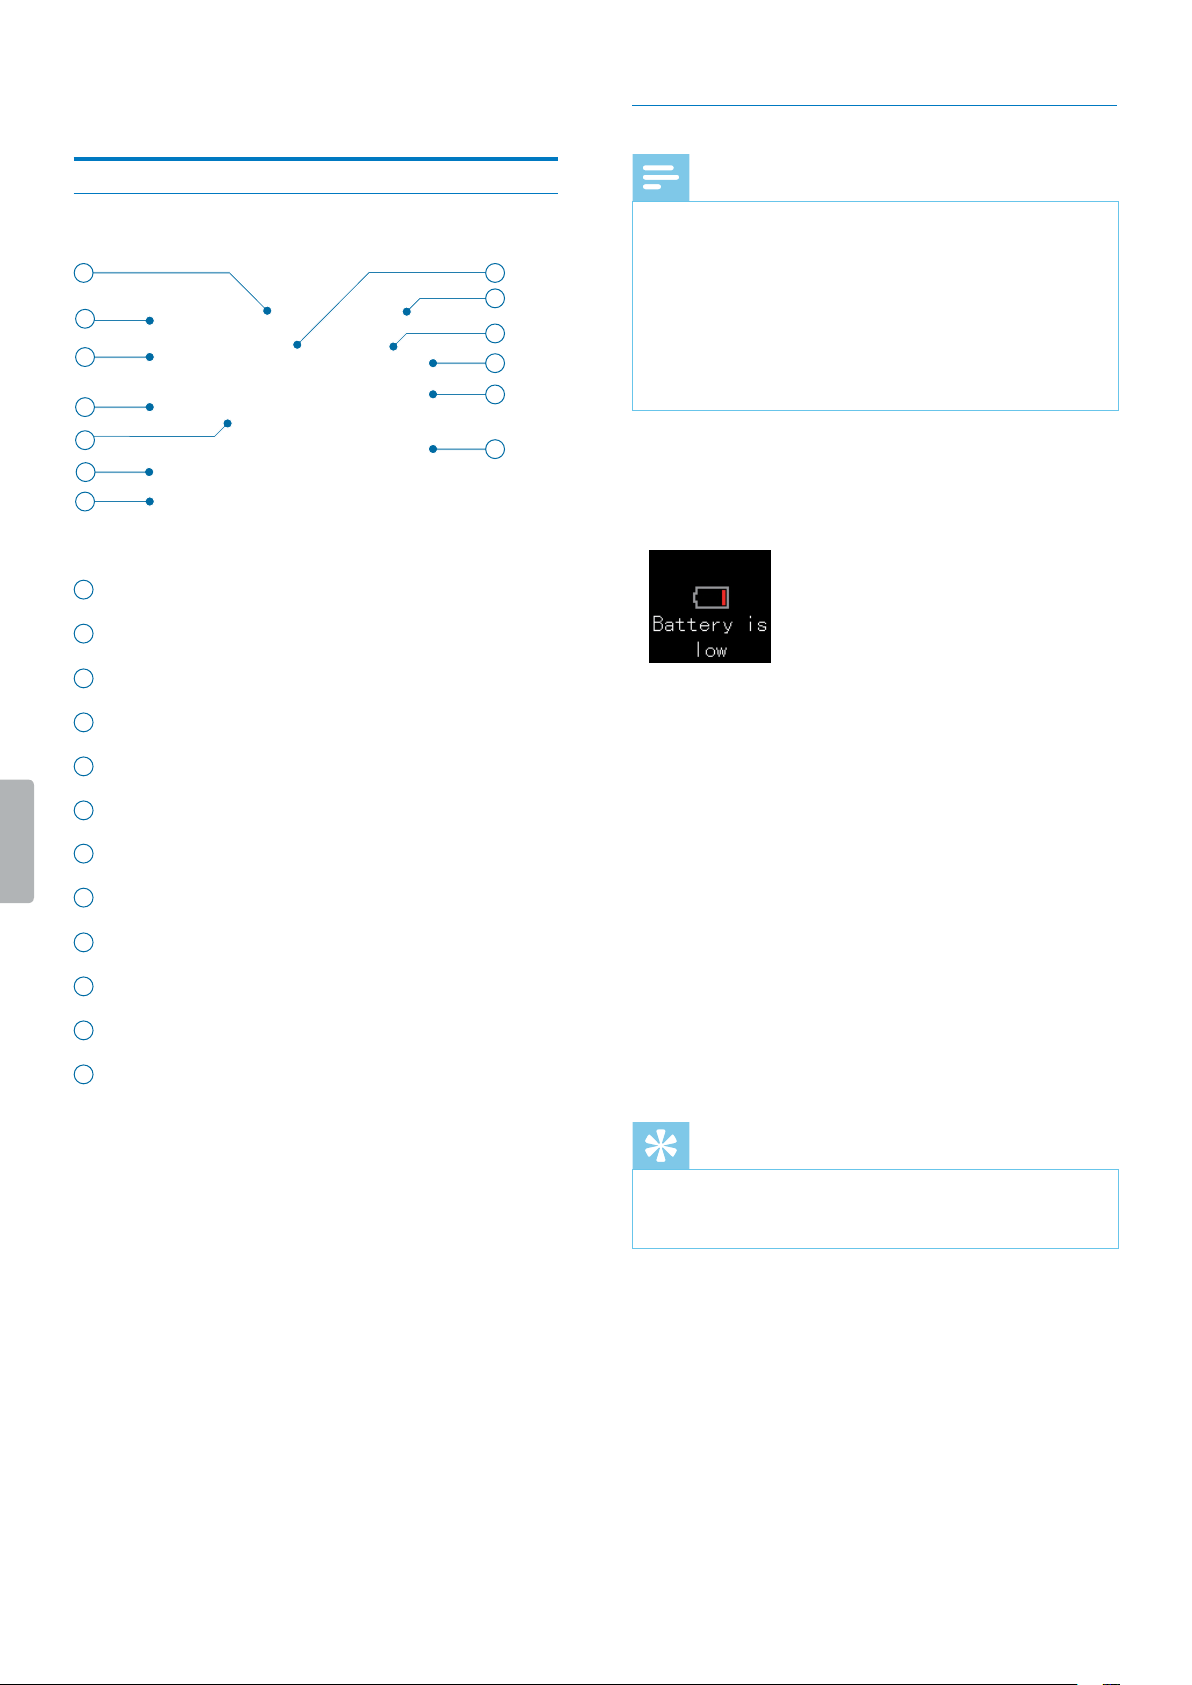
Overview of the audio recorder
1
Hedphones jck
2
Externl microphone jck; Line-in jck
3
XLR jck
4
Power switch, Lock switch
5
MicroSD crd slot
6
Center microphone
7
Stereo microphones
8
Record/Ply indictor
9
Screen
10
Stop button
11
Ply/Puse button
12
Volume up button
13
Menu button
14
Fst rewind, Previous trck, Menu selection button
15
Volume down button
16
Fst forwrd, Next trck, Menu selection button
17
Record button
18
Focus button
19
Index button, File folder, Switch button
20
Micro USB port
21
Microphone gin control
22
Noise cut switch
23
Speed button
24
Delete button
25
Speker
1
8
2
3
4
5
6
7
9
10
11
12
14
13
15
16
17
18
19
20
21
22
23
24
25
7Getting started
3 Getting strted
Cution
• Before you connect nd instll your recorder, rst
red the sfety instructions (see Sfety instructions).
Charging the battery
Chrge the built-in bttery before you use the device
for the rst time or if you hven’t used it for n extended
time period. If the bttery is completely dischrged nd
your device turns o, llow the bttery to chrge for
while before you turn on the device.
Note
• The length of the USB cble might impct the
chrging speed. Longer cbles usully extend the
chrging time.
• While the device is connected to computer, it cn’t
be operted mnully.
Before you chrge the bttery vi computer, mke sure
tht your computer is turned on.
X A chrging bttery icon ppers on the screen
nd n ornge indictor light illumintes,
indicting tht the device is rechrging.
X When the device is fully rechrged, the ornge
indictor light turns o.
Turn the device on and o
To turn the device on or o:
• Slide and hold the Power switch on the left side of the
device downwards for two seconds until you see the
Philips emblem on the screen.
Note
• When the bttery indictor is displyed, chrge
the device promptly.
Key lock
You cn lock your device when it’s ctive to prevent ny
unwnted device opertions or ccess.
To lock the device:
• Slide the Power switch on the left side of the device
upwrds towrds the lock symbol.
X The lock symbol ppers on the screen for
moment.
X All buttons re locked now.
To unlock the device:
• Slide the Power switch downwrds.
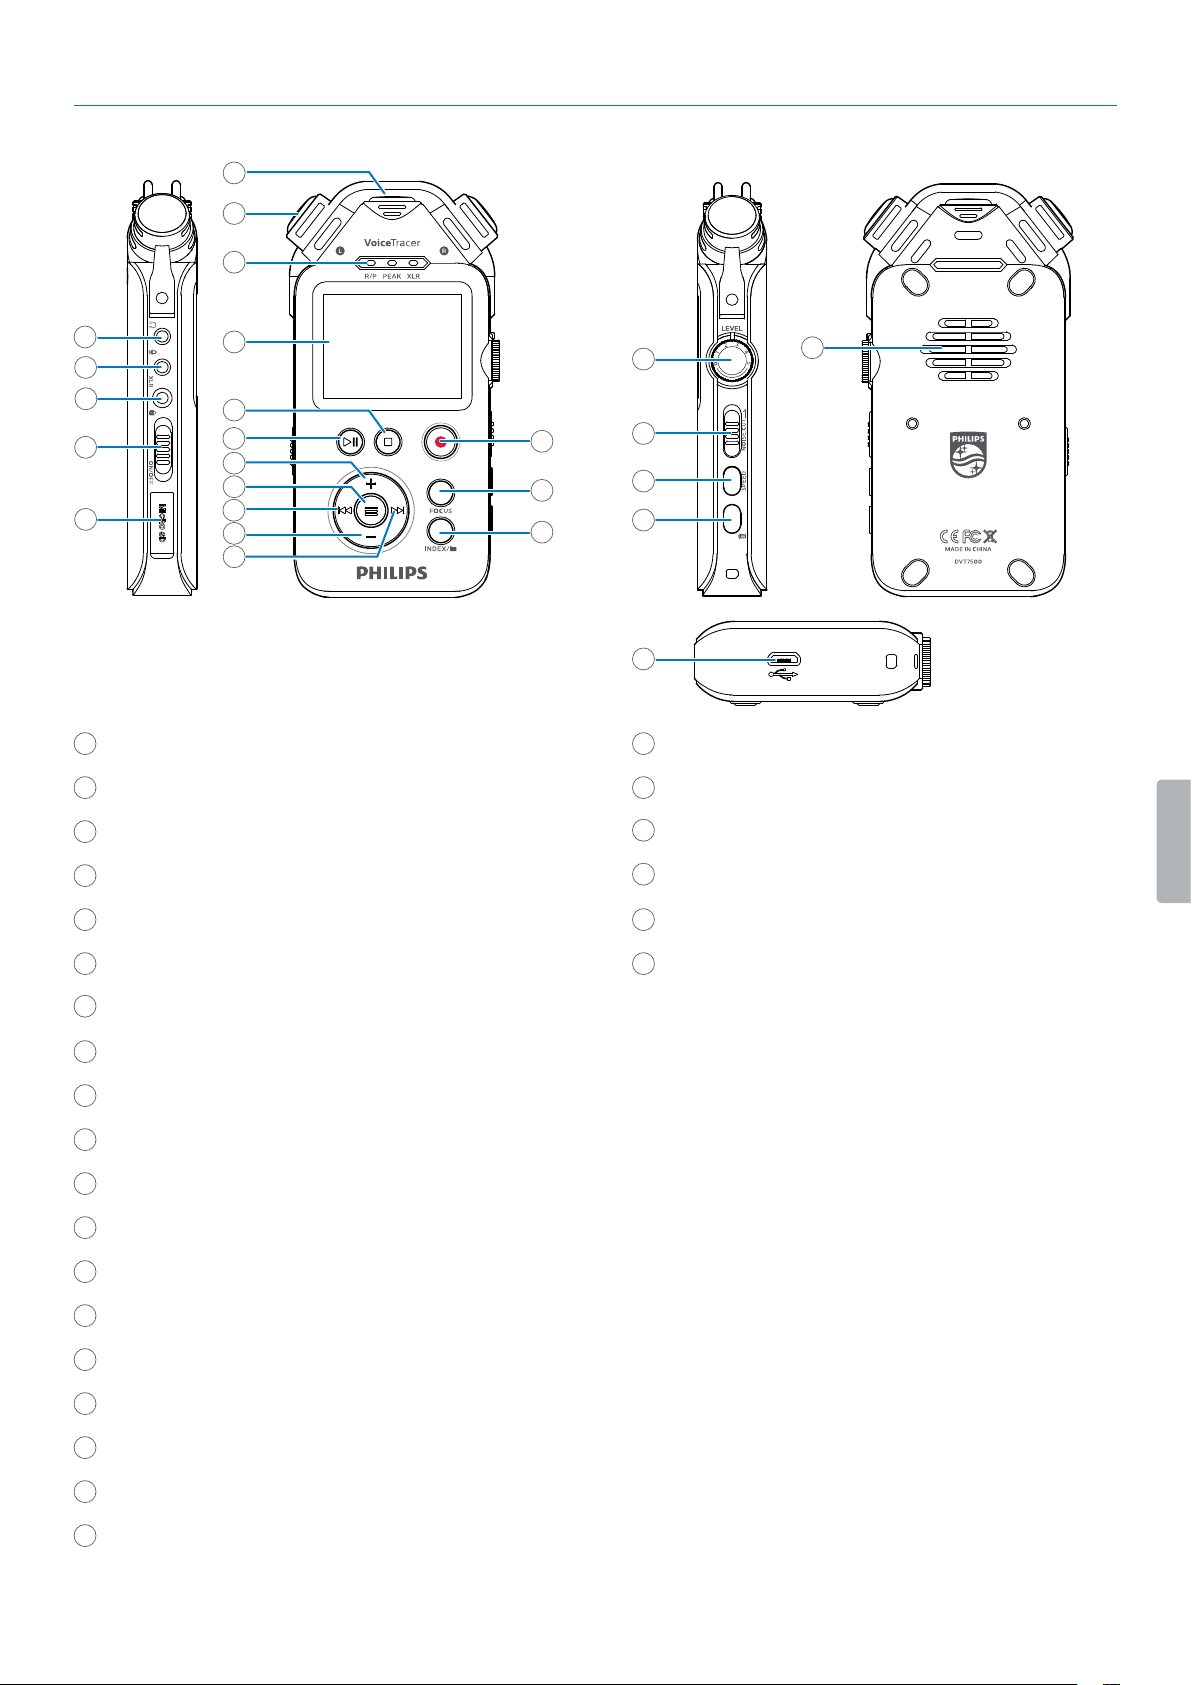
Connect to a computer
You cn use your recorder s USB mss storge to
conveniently store, bck up nd move les. Link the
device to computer with USB cble. Your recorder will
utomticlly be recognized s mss storge device.
You don’t need to instll ny softwre.
For more informtion on how to connect your device to
computer, see the illustrtion in Chrging the bttery.
Cution
• Don’t disconnect the USB cble from the device while
you re trnsferring les. This might cuse dt loss.
Note
• While the device is connected to computer, it cn’t
be operted mnully.

8 Getting started
Set the date and time
You cn lwys chnge the dte nd time s well s the
time formt on your device.
1
In stop mode, press nd hold the Menu button .
2
Press the Fst forwrd button to scroll to the Device
menu.
3
Press the Menu button to select Date/time.
4
Press the Volume down button to scroll to your
desired setting, nd then press the Menu button to
conrm your selection.
5
Use the Volume up or Volume down button to select
the time formt. Use the Volume up, Volume down,
Fst forwrd, nd Fst rewind button to set the dte
nd time.
6
Press the Menu button to conrm your setting.
7
To return to the stop mode screen, press the Stop
button.
Set the device language
You cn lwys chnge the lnguge of your device.
1
In stop mode, press nd hold the Menu button .
2
Press the Fst forwrd button to scroll to the Display
menu.
3
Press the Menu button to select Language.
4
Press the Volume down button to scroll to your
desired lnguge, nd then press the Menu button
to conrm your selection.
5
To return to the stop mode screen, press the Stop
button.
9Recording
4 Recording
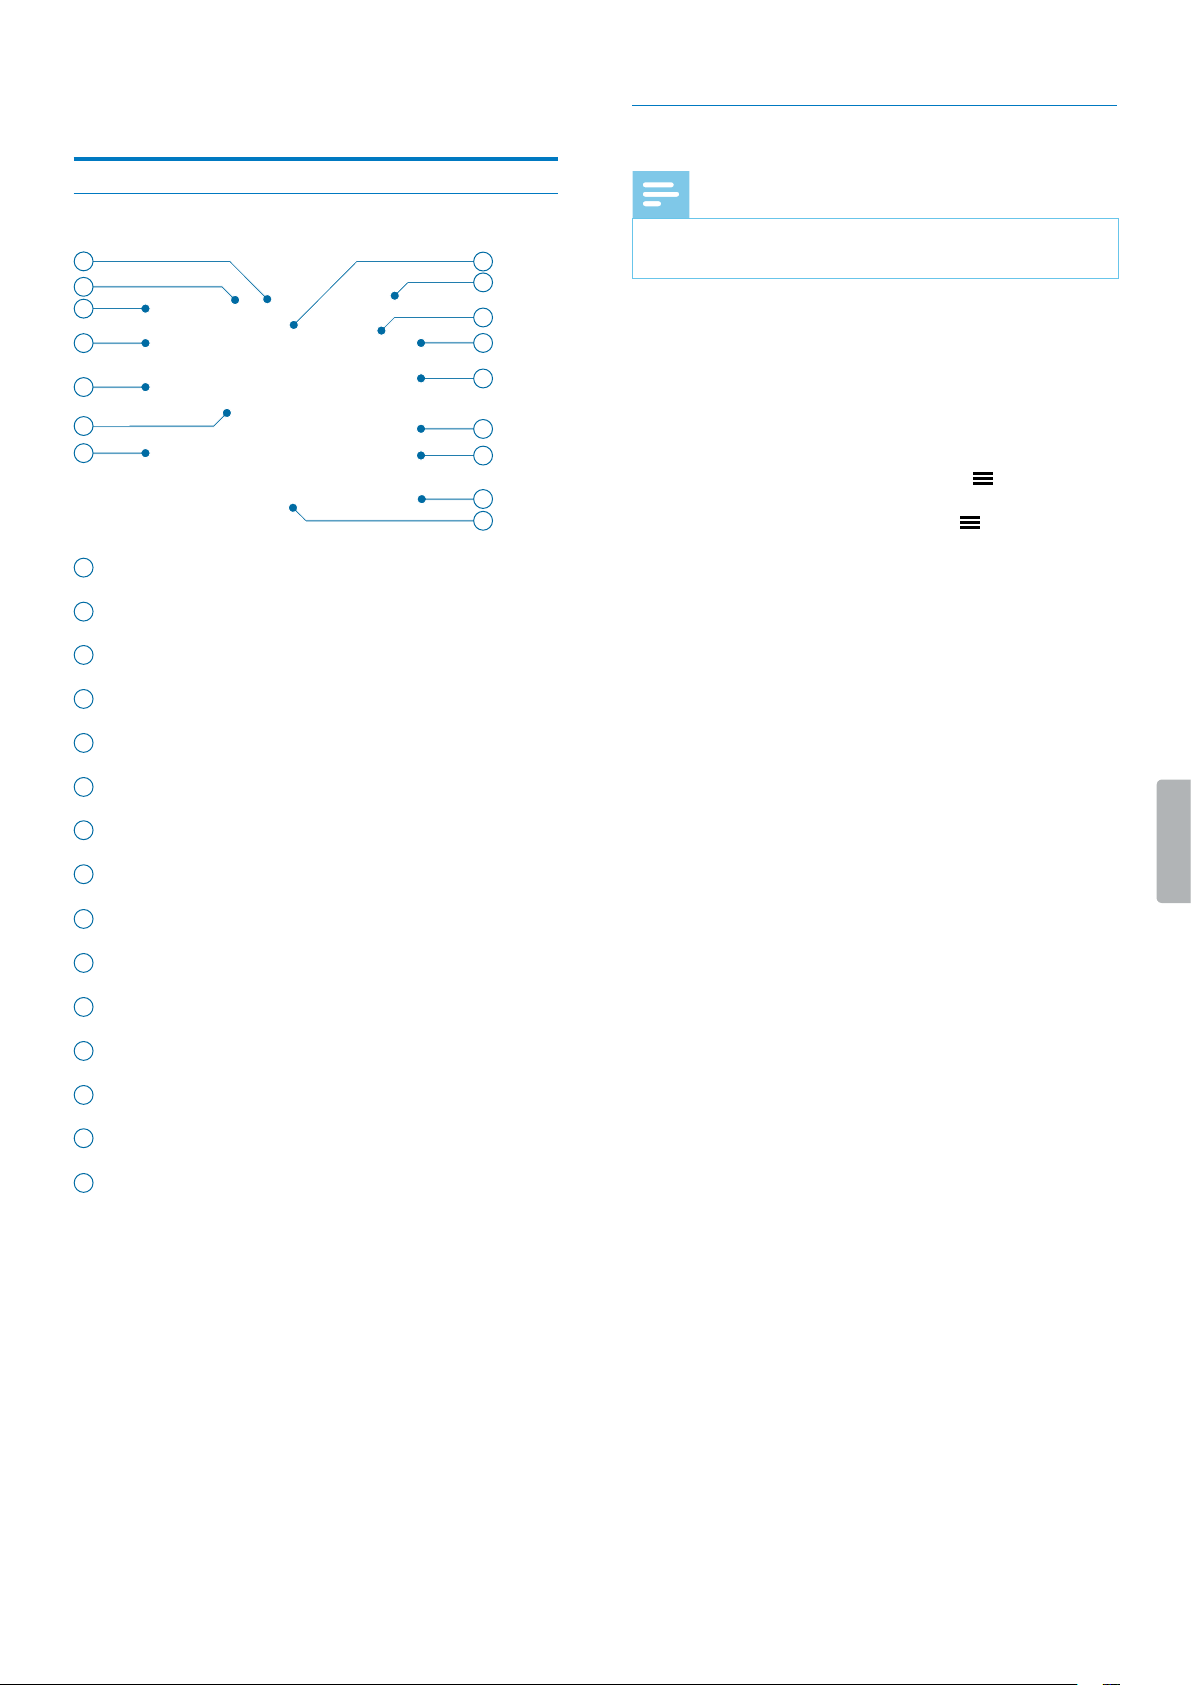
Recording screen
1
2
4
3
7
6
11
9
8
10
12
12
5
1
File nme
2
Microphone sensitivity
3
Current folder
4
Recording sttus
5
Audio progress br
6
Left volume level meter
7
Right volume meter
8
Recording type
9
Bttery sttus
10
Totl number of les in current folder
11
Number of current le
12
Audio time: Pssed time nd totl time of current le
Record a le
Note
• Be creful not to cover the microphones while
recording. This might result in lower recording
qulity.
• If the recording time of your current recording exceeds
the vilble storge cpcity, the recording will stop.
In this cse, delete les from your device to mke
more storge vilble.
• Only recordings in MP3 128 kbps recording formt cn
be sved on the externl memory crd.
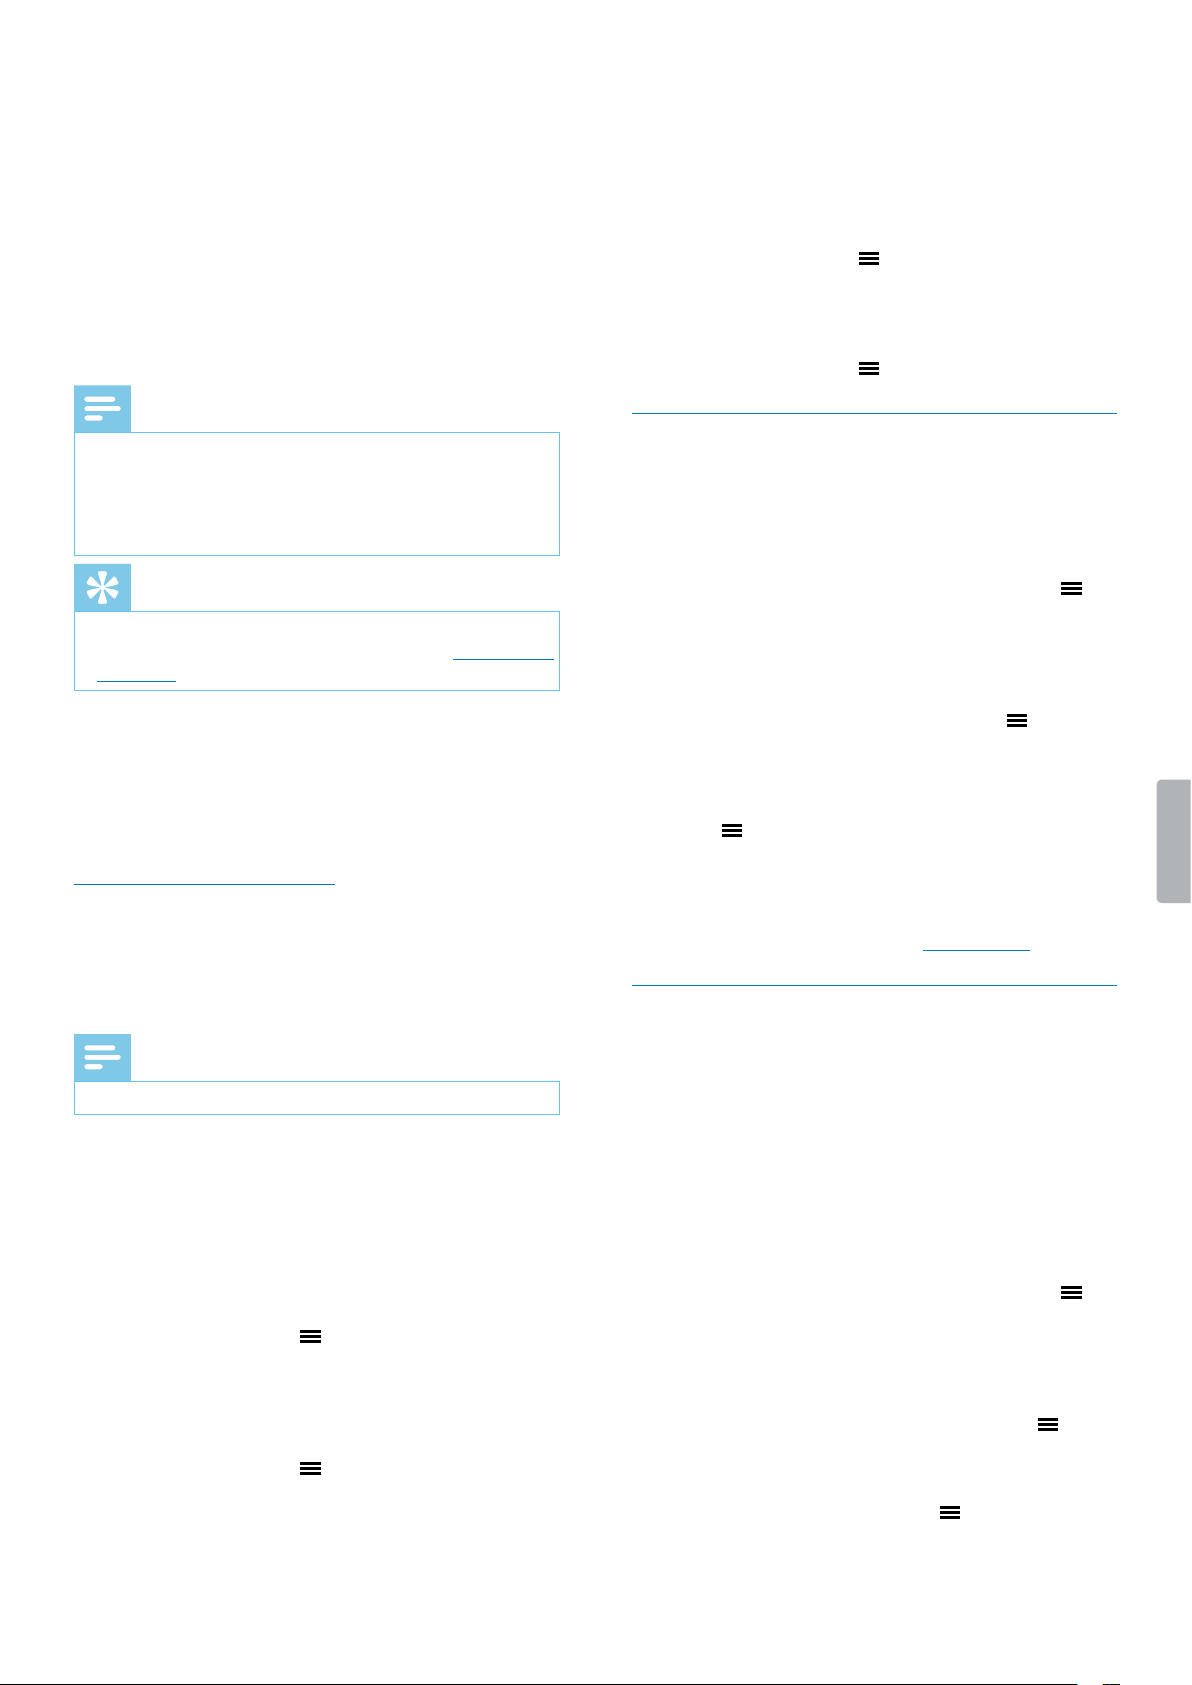
Before you start recording:
• Mke sure your device hs enough bttery power left.
When your bttery is lmost dischrged, you will see
bttery low icon:
X The device will turn o nd your current recording
will utomticlly be sved.
• First select the folder you wnt your recording to be
sved in. You cn store 99 les in ech of the folders A,
B, C, nd D.
If one of the folders is full, your subsequent recordings
will utomticlly be stored in the next folder.
• We recommend tht you mke test recording in order
to nd the most suitble presets for your recording nd
chieve the best recording results.
Start a new recording
1
In stop mode, press the Index button to select the
desired folder you wnt your le to be sved in fter
recording.
2
Press the Record button.
X The device is in record stndby mode.
X The Record/Ply indictor shes red.
Tip
• Adjust the microphone gin in record stndby mode
by using the microphone gin control. This wy, you
cn chieve the best recording qulity.
3
Press the Record button gin to strt new
recording.
X The Record/Ply indictor illumintes red.
Pause recording
• In recording mode, press the Record button.
X The Record/Ply indictor shes nd the
Recording sttus icon chnges to ‘puse’.
Finish recording and save the recorded le
• In recording or puse mode, press the Stop button.
X The recording is sved to the preselected folder.
10 Recording
Adjust microphone gain
Adjust the microphone gin during recording in order to
chieve the best recording qulity.
1
In recording mode, press the Focus button.
2
Use the microphone gin control to set the
pproprite microphone level.
3
Press the Focus button gin to nish the
microphone gin djustment.
Note
• We recommend tht you test the microphone gin
during recording by connecting hedphones to
your Voice Trcer. This wy you cn instntly her
the chnges of the recording sound while you re
djusting the microphone gin.
Tip
• You cn lso djust the microphone gin in record
stndby mode. For more informtion, see Strt new
recording.
Use the Noise cut feature
Turn the Noise cut switch on in order to reduce
bckground noise while recording. This wy, especilly
voice recordings sound clerer. You cn nd the Noise
cut switch on the right side of your device. See lso
Overview of the udio recorder.
Add an index mark
Use one or more index mrks to mrk certin points in
recording s points of reference.
Note
• Up to 10 index mrks cn be set per recording.
To add an index mark:
• In recording mode or plybck mode, press the Index
button t the desired prt of your recording.
To go to a particular index mark:
1
In plybck mode, press nd hold the Index button.
2
Press the Menu button to select the option Go to
bookmark.
3
Use the Volume up or Volume down button to scroll
to your desired index mrk.
4
Press the Menu button to conrm your selection.
To delete an index mark:
1
In plybck mode, press nd hold the Index button.
2
Use the Volume down button to scroll to the option
Delete bookmark.
3
Press the Menu button to conrm your selection.
4
Use the Volume up or Volume down button to scroll
to your desired index mrk.
5
Press the Menu button to conrm your selection.
Multichannel recording
You cn use multiple recording chnnels t the sme
time, such s XLR, Line-in, nd the built-in microphones.
To activate multiple channels for your recording:
1
In stop mode, press nd hold the Menu button .
2
Press the Fst forwrd button to scroll to the Record
menu.
3
Press the Volume down button to scroll to Input
source, nd then press the Menu button to
conrm your selection.
4
Press the Volume down button to scroll to your
desired recording chnnel, nd then press the Menu
button to conrm your selection.
5
To return to the stop mode screen, press the Stop
button.
6
Strt recording s described in Record le.
Voice-activated recording
Use voice ctivtion to strt recording when you begin
speking. When you stop speking, the device will
utomticlly puse recording fter three seconds of
silence. It will resume only when you begin speking
gin.
Before you strt using voice-ctivted recording, mke
sure tht this feture is enbled.
To enable voice-activated recording:
1
In stop mode, press nd hold the Menu button .
2
Press the Fst forwrd button to scroll to the Record
menu.
3
Press the Volume down button to scroll to Voice
activation, nd then press the Menu button to
conrm your selection.
4
Press the Volume down button to scroll to Enable,
nd then press the Menu button to conrm your
selection.
5
To return to the stop mode screen, press the Stop
button.

11Recording
Line-in recording
If you don’t wnt to use your device’s built-in
microphones, you cn lso record vi n externl
recording chnnel. Simply connect n externl
microphone or n udio equipment’s udio output, such
s the udio output of rdio, CD plyer, or DVD plyer,
to your Voice Trcer by using stereo udio cble.
Note
• When you connect n externl recording chnnel
to your Voice Trcer, the built-in microphones re
disbled. However, you cn ctivte multichnnel
recording s described in Multichnnel recording.
• The plug of the udio cble must be stereo plug.
• Before you strt line-in recording, djust the volume
of the sound source to suitble level. Too low or
too high volume levels might result in poor recording
qulity.
1
Connect the supplied stereo udio cble to the line-
in jck of your Voice Trcer nd to the line-out jck of
your externl recording chnnel.
2
Strt recording s described in Record le.
Recording via XLR
Connect your udio equipment to your Voice Trcer vi
the supplied XLR dpter to record professionl high-
qulity udio recordings.
Note
• When you connect n externl recording chnnel
to your Voice Trcer, the built-in microphones re
disbled. However, you cn ctivte multichnnel
recording s described in Multichnnel recording.
Charge the XLR adapter
Before you strt recording vi XLR, rst chrge the
supplied XLR dpter. The dpter needs bout two
hours to be fully rechrged.
To charge the XLR adapter:
• Connect the XLR dpter to your computer vi USB
cble.
X The chrging indictor on the left side of the XLR
dpter illumintes red.
X When the dpter is fully rechrged, the chrging
indictor illumintes green.
Start an XLR recording
1
Plce your Voice Trcer into the supplied XLR
dpter.
2
Connect the udio cble of the XLR dpter to your
Voice Trcer’s XLR jck.
3
Turn on the XLR dpter by pushing the On/O
switch on the left side of the dpter to the On
position.
X The recording indictor on the left side of the XLR
dpter illumintes red.
4
Connect n XLR cble to your Voice Trcer’s XLR
dpter nd to the XLR output of your udio
equipment.
5
Strt recording s described in Record le.
Note
• If the XLR cble is unplugged from the externl
recording chnnel, Voice Trcer will utomticlly
sve your current recording.
• If the power of your XLR dpter is low, Voice Trcer
will utomticlly sve your current recording. In
this cse, rechrge the bttery of the XLR dpter to
continue recording.
12 Playback
5 Plybck
Playback screen
1
4
6
5
3
2
7
11
13
9
8
10
12
12
14
15
1
Equlizer
2
Repet mode
3
Microphone sensitivity
4
Current folder
5
Plybck sttus
6
Audio progress br
7
File nme
8
Recording type
9
Bttery sttus
10
Number of current le
11
Totl number of les in current folder
12
Audio time: Pssed time nd totl time of current le
13
Bit rte
14
Input source
15
File detils
Play back les
Note
• If you hve connected hedphones to your Voice
Trcer, the built-in spekers re disbled.
Select a le
1
In stop mode, press the Index button to select your
desired folder.
2
Press the Fst rewind or the Fst forwrd button to
scroll to your desired le.
Alterntively, press the Menu button nd use the
Volume up or Volume down button to scroll to your
desired le. Press the Menu button to conrm your
selection.
3
To strt plybck, press the Ply/Puse button.
X The Record/Ply indictor illumintes green.
4
To djust the volume, press the Volume up or Volume
down button.
Start and pause playback
• To strt plybck, press the Ply/Puse button.
X The Record/Ply indictor illumintes green.
• To puse plybck, press the Ply/Puse button.
• To continue plybck, press the Ply/Puse button
gin.
Fast rewind or fast forward
• Press nd hold the Fst rewind or Fst forwrd button
to the desired prt of the recording.
Stop playback
• Press the Stop button.
Display le details
• In stop mode, press the Stop button.

13Playback
Playback speed
Set your desired plybck speed if you wnt to ply
bck your recording more slowly or fster.
1
In plybck mode, press the Speed button on the
right side of your device.
2
Use the Volume up or Volume down button to set
your desired plybck speed.
3
Press the Menu button to conrm your selection.
A-B replay mode
You cn mrk sequence A-B in n existing recording to
reply only this mrked section.
Mark an A-B sequence
1
In plybck mode, press nd hold the Menu button
until ‘A-B’ is displyed on the top of the screen.
X ‘A’ strts shing.
2
Press the Fst forwrd button to mrk the beginning
of the sequence (‘A’) to be replyed.
X ‘A’ stops shing.
X ‘B’ strts shing.
3
Press the Fst forwrd button gin to mrk the end
of the sequence (‘B’) to be replyed.
X ‘B’ stops shing nd the selected sequence is
replyed severl times.
Stop A-B replay mode
If you wnt to stop the A-B reply mode, you cn do one
of the following:
• Press the Menu button to stop the A-B reply mode
nd continue with the norml plybck.
• Press the Ply/Puse button to puse the plybck.
Press the Ply/puse button gin to continue with
the norml plybck.
• Press the Stop button to stop plybck.
Edit les
You cn edit existing recordings in plybck mode.
To switch between the editing options Append, Insert,
Divide, nd Cut, press the Menu button to select your
desired editing option. The selected editing option is
displyed. It replces the File detils icon on the screen.
Note
• If you don’t operte your device for eight seconds
fter selecting n editing option, the editing mode
is dectivted. Press the Menu button gin to
rectivte the editing mode.
• In editing mode, you cn’t puse plybck becuse
the Ply/Puse button is congured to conrm the
selection of n editing option.
Append: Add dditionl recording prts t the end of n
existing recording.
To append recording parts:
1
In plybck mode, press the Menu button once to
select Append.
2
Press the Ply/Puse button to conrm your
selection.
X A new recording strts t the end of your current
le.
Insert: Insert dditionl recording prts without
overwriting n existing recording.
To insert recording parts:
1
In plybck mode, press the Menu button twice to
select Insert.
2
Press the Ply/Puse button t the prt of your
current recording where you wnt to insert n
dditionl recording prt.
X A new recording strts t the selected prt of the
existing recording.
Divide: Divide n existing recording into two les.
To divide a recording into two les:
1
In plybck mode, press the Menu button three
times to select Divide.
2
Press the Ply/Puse button t the prt of your
current recording where you wnt your recording to
be split.
X The recording is divided into two les. Both les
re sved to the folder of the originl recording.

14 Playback
Cut: Cut out prt of n existing recording.
To cut out a part of an existing recording:
1
In plybck mode, press the Menu button four
times to select Cut.
2
Press the Focus button to mrk the beginning of the
prt to be cut out.
3
Press the Ply/Puse button to mrk the end of the
prt to be cut out.
X The mrked sequence is removed from the
existing recording.
Delete les
You cn delete individul les or ll les stored in the
selected folder.
1
In stop mode, press the Delete button on the right
side of your device.
2
Use the Volume up or Volume down button to select
if you only wnt to delete the current le or ll les in
the current folder.
3
Press the Menu button to conrm your selection.
Lock les
Lock importnt recordings nd prevent them from being
ccidentlly deleted.
To lock a le:
1
Select your desired le.
2
In stop mode, press the Focus button.
3
Press the Menu button to select Protect the le.
4
Press the Menu button to select Lock.
X The selected le is locked nd cn’t be deleted
nymore.
To unlock a le:
1
Select your desired le.
2
In stop mode, press the Focus button.
3
Press the Menu button to select Protect the le.
4
Use the Volume down button to scroll to Unlock.
5
Press the Menu button to conrm your selection.
X The selected le is unlocked nd cn be deleted
gin.

15Music mode
6 Music mode
Music playback screen
3
4
6
7
5
8
9
10
1
2
11
12
11
1
Music folder
2
Plybck sttus
3
Repet mode
4
Number of current le
5
Totl number of les
6
File list
7
Bttery sttus
8
File nme
9
Equlizer
10
Bit rte
11
Audio time: Pssed time nd totl time of current le
12
File detils
Your Voice Trcer is not only high-qulity udio
recorder, but it is lso perfect s music plyer. Simply
copy your fvorite music from your computer to your
Voice Trcer (see lso Trnsfer dt from the computer
to Voice Trcer).
Due to the built-in high-performnce Wolfson udio
decoder chip, you cn listen to your music in highest
udio qulity. The device supports multiple plybck
formts, such s MP3, WMA, or WAV formt. The user
interfce llows you comfortble nd intuitive music
plybck.
Find the detiled specictions in the tble below:
Plybck formt MP3, WMA, WAV, AAC,
FLAC, APE, OGG, M4A
Frequency response 20-20,000 Hz (±0.1 dB)
SNR (singl-to-noise rtio) 116 dB
Chnnel seprtion (R) 95 dB, (L) 96 dB
THD (Totl Hrmonic
Distortion)
0.005%
Playback mode
After you hve copied your music les from your
computer to the Music folder of your Voice Trcer, you
cn strt listening to your music.
Note
• If you hve connected hedphones to your Voice
Trcer, the internl spekers re disbled.
Start the music playback mode
You cn strt the music plybck mode very quickly nd
esily.
To start the music playback mode:
• In stop mode of the generl plybck screen, press
nd hold the Index button.
X You will switch to the music plybck folder.
To exit the music playback mode and return to the
general playback screen:
• In stop mode, press the Index button.

16 Music mode
Play back music les
Start and pause playback
• Press the Ply/Puse button.
Select a track
• Press the Fst forwrd or Fst rewind button
• Alterntively:
1
In stop mode, press the Menu button nd select
your desired trck by using the Volume up or Volume
down button.
2
Press the Menu button to conrm your selection,
nd then press the Ply/Puse button to strt the
music plybck.
Fast rewind or fast forward
• Press nd hold the Fst rewind or Fst forwrd button
to the desired prt of the trck.
Stop playback
• Press the Stop button.
Display le details
• In stop mode, press the Stop button.
Playback speed
Set your desired plybck speed if you wnt to ply
bck your music le more slowly or fster.
1
In plybck mode, press the Speed button on the
right side of your device.
2
Use the Volume up or Volume down button to set
your desired plybck speed.
3
Press the Menu button to conrm your selection.
A-B replay mode
You cn mrk sequence A-B in n existing recording to
reply only this mrked section.
Mark an A-B sequence
1
In plybck mode, press the Menu button until
‘A-B’ is displyed on the top of the screen.
X ‘A’ strts shing.
2
Press the Fst forwrd button to mrk the beginning
of the sequence (‘A’) to be replyed.
X ‘A’ stops shing.
X ‘B’ strts shing.
3
Press the Fst forwrd button gin to mrk the end
of the sequence (‘B’) to be replyed.
X ‘B’ stops shing nd the selected sequence is
replyed severl times.
Stop A-B replay mode
If you wnt to stop the A-B reply mode, you cn do one
of the following:
• Press the Menu button to stop the A-B reply mode
nd continue with the norml plybck.
• Press the Ply/Puse button to puse the plybck.
Press the Ply/puse button gin to continue with
the norml plybck.
• Press the Stop button to stop plybck.

17Music mode
Add an index mark
Use one or more index mrks to mrk certin points in
music le s points of reference.
Note
• Up to 10 index mrks cn be set per recording.
To add an index mark:
• In recording mode, press the Index button t the
desired prt of your recording.
To go to a particular index mark:
1
In plybck mode, press nd hold the Index button.
2
Use the Volume up or Volume down button to scroll
to the option Go to bookmark.
3
Press the Menu button to conrm your selection.
4
Use the Volume up or Volume down button to scroll
to your desired index mrk.
5
Press the Menu button to conrm your selection.
To delete an index mark:
1
In plybck mode, press nd hold the Index button.
2
Use the Volume up or Volume down to scroll to the
option Delete bookmark.
3
Press the Menu button to conrm your selection.
4
Use the Volume up or Volume down button to scroll
to your desired index mrk.
5
Press the Menu button to conrm your selection.
Delete les
You cn delete individul les or ll les stored in the
selected folder.
1
In stop mode, press the Delete button on the right
side of your device.
2
Use the Volume up or Volume down button to select
if you only wnt to delete the current le or ll les in
the current folder.
3
Press the Menu button to conrm your selection.
18 Settings
7 Settings
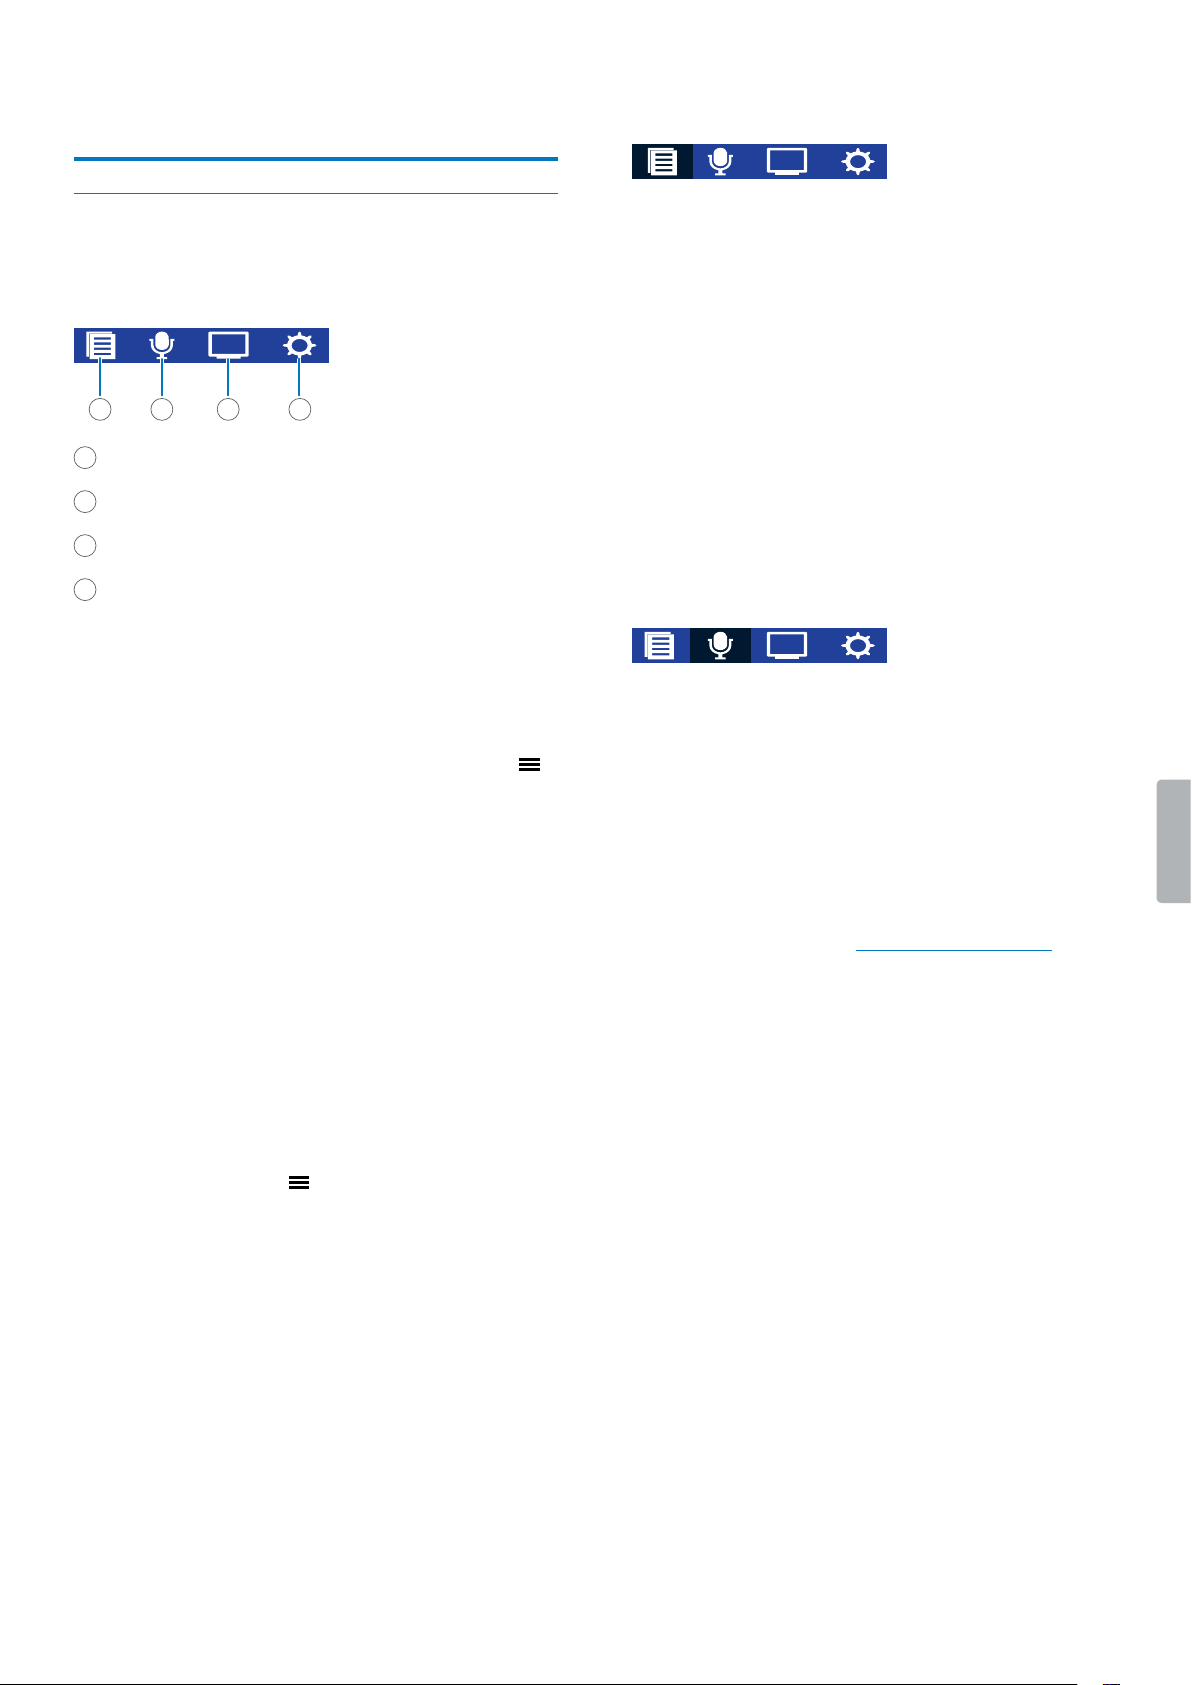
Settings mode
In the settings mode, you cn chnge nd djust vrious
settings ccording to your own preferences.
1 2 3 4
1
File
2
Record
3
Disply
4
Device
Start the settings mode
To open the settings overview:
• In the stop mode of the recording screen or music
plybck screen, press nd hold the Menu button .
Switch between settings menus
To switch between the settings menus File, Record,
Display, Device:
• Use the Fst forwrd or Fst rewind button.
Scroll through settings
To scroll through settings of each settings menu:
• Use the Volume up or Volume down button.
Select a setting
To select a setting or conrm a selection:
• Press the Menu button .
Exit the settings mode
To go one step back:
• Press the Stop button.
To exit the settings mode:
• Press the Stop button severl times until the recording
screen is displyed gin.
File
Repeat
O: Ply bck trcks in selected folder sequentilly.
Random: Ply bck trcks in selected folder rndomly.
Folder: Repet trcks in plylist.
File: Repet the current trck continuously.
When ll trcks in the current folder hve been plyed,
the plybck stops utomticlly.
Equalizer
Turn the equlizer o or choose between the equlizer
music options Rock, Pop, Soft, Jzz, Clssicl, or DBB
(Dynmic Bss Boost).
Record
Mic sensitivity
Adjust the microphone sensitivity of your Voice Trcer.
Select the sensitivity ccording to the bckground
noise, number of recorded sound sources nd distnce
between sound source nd microphones.
Input source
Choose between vrious input sources to gurntee the
best recording qulity for specic recording situtions.
For more informtion, see Multichnnel recording.
Stereo mic (L/R): Use the left nd right built-in
microphone to record.
Line-in: Use externl microphones to record.
XLR: Use n XLR chnnel to record.
Center mic: Use the middle built-in microphone to
record.
XLR + Stereo mic (L/R): Use n XLR chnnel nd the left
nd right built-in microphone to record.
Center mic + Stereo mic (L/R): Use the left, right nd
middle built-in microphone to record.
Line-in + Center mic: Use n externl microphone nd
the middle built-in microphone to record.
Line-in + XLR: Use n externl microphone nd n XLR
chnnel to record.

19Settings
Quality
You cn set the bit rte for ech recording ccording to
your own preferences.
Note
• Only recordings in MP3 128 kbps mode cn be sved
on the externl memory crd.
Timer
Use the timer function to utomticlly strt recording on
preset dte nd t preset time. You cn lso select
when the recording should stop.
Voice activation
Use voice ctivtion to strt recording when you begin
speking. When you stop speking, the device will
utomticlly puse recording fter three seconds of
silence. It will resume only when you begin speking
gin. For more informtion, see Voice-ctivted
recording.
Auto divide
During recording, the uto divide feture will
utomticlly split the current recording nd sve new
le either every 30 or every 60 minutes.
Note
• If the uto divide feture is turned o, your le will still
be utomticlly divided fter prticulr time: MP3
les fter 9 hours nd 50 minutes, nd PCM les fter
1 hour.
Limiter
Activte this function to prevent recordings from being
oversteered by sound input over the mximum sound
level. If the recording suddenly exceeds the mximum
sound level, the microphone sensitivity is utomticlly
reduced.
Low cut lter
This function lters low-frequency sound, e.g.
bckground noise produced by ir conditioners, below
the predened frequency level.
Display
Language
Select your desired device lnguge from the lnguge
list. You cn chnge the lnguge whenever you wnt.
Backlit
To sve your Voice Trcer’s bttery power, you cn
reduce the bcklight time. If you don’t operte your
device for the preset time, the bcklight turns o
utomticlly. If you select the bcklight to be on, the
bcklight remins on ll the time.
Device
Date/time
You cn lwys chnge the dte nd time s well s the
time formt on your device.
Use the Volume up or Volume down button to select
the time formt. Use the Volume up, Volume down, Fst
forwrd, nd Fst rewind button to set the dte nd
time.
Auto o
Select time for your device to utomticlly turn o
when you don’t operte it. If you set the time to 0, the
device won’t utomticlly turn o.
Format device
Use this function to formt your device’s internl storge
nd delete ll dt. For more informtion, see Reset
dt.
Cution
• Formtting your Voice Trcer will delete ll dt on
your device. Before you perform dt reset, bck up
ny importnt dt sved on your device.
Note
• Your menu settings won’t be deleted nd re still
vilble fter resetting the dt.
Record light
If you turn on the record light, the Record/Ply indictor
will illuminte red when recording.
Device sounds
Select if you wnt the device sounds to be on or o
whenever you press button.
20 Settings
Memory select
Select if you wnt to use the internl memory or n
externl microSD crd for your recordings.
Note
• Only recordings in MP3 128 kbps recording formt cn
be sved on the externl memory crd.
Information
See vrious informtion bout your device, such s the
vilble memory spce, informtion bout the externl
microSD crd, or the rmwre version.
Reset to default
You cn reset your menu settings to their defult
stte—the wy they were when you rst purchsed your
device nd turned it on. For more informtion, see Reset
settings.
Cution
• Resetting your menu settings will delete ll settings
you hve mde on your device. After reset, you will
hve to djust ll settings gin.
Note
• Your dt won’t be deleted nd is still vilble fter
resetting the menu settings.
21Device and data management
8 Device nd dt
mngement
Transfer data to and from the
computer
Move your les from the device to the computer, or vice
vers.
Cution
• Don’t disconnect the USB cble from the device while
you re trnsferring les. This might cuse dt loss.
Note
• For resons of dt security, the opertion of the
device is disbled while the device is connected to
the computer.
Transfer data from Voice Tracer to the computer
1
Connect the device to the computer vi micro USB
cble.
X A chrging bttery icon ppers on the screen
nd n ornge indictor light illumintes,
indicting tht the device is rechrging.
2
Open Windows Explorer on Windows computer, or
open Finder on Mc computer.
X Voice Trcer is recognized s n externl drive.
3
Double-click the Voice Trcer drive.
X The content of your Voice Trcer is displyed in
new window.
4
Select the desired les in the Voice Trcer window
nd copy, cut or drg them to the desired loction on
your computer.
Transfer data from the computer to Voice Tracer
1
Proceed s described in steps 1-3 of the chpter
Trnsfer dt from Voice Trcer to the computer.
2
Select the desired les on your computer nd copy,
cut or drg them to the desired loction on your Voice
Trcer.
Tip
• Two folders re displyed in the Voice Trcer window:
the MUSIC nd the RECORDINGS folder. To listen to
your music les in Music mode (see Music mode),
simply drg your music les directly to the MUSIC
folder.
Reset your data and settings
Reset data
You cn formt your device’s internl storge nd delete
ll dt from your device.
Cution
• Formtting your Voice Trcer will delete ll dt on
your device. Before you perform dt reset, bck up
ny importnt dt sved on your device.
Note
• Your menu settings won’t be deleted nd re still
vilble fter resetting the dt.
To reset your data:
1
In stop mode of the recording screen, press the Menu
button to open the settings screen.
2
Use the Fst forwrd or Fst rewind button to switch
to the Device menu.
3
Use the Volume up or Volume down button to scroll
to the Format device setting. Press the Menu button
to conrm your selection.
4
Select Yes.
X All dt on your device is deleted.
Reset settings
You cn reset your menu settings to their defult stte—
the wy they were when you rst purchsed your device
nd turned it on.
Cution
• Resetting your menu settings will delete ll settings
you hve mde on your device. After reset, you will
hve to djust ll settings gin.
Note
• Your dt won’t be deleted nd is still vilble fter
resetting the menu settings.

22 Device and data management
To reset your settings:
1
In stop mode of the recording screen, press the Menu
button to open the settings screen.
2
Use the Fst forwrd or Fst rewind button to switch
to the Device menu.
3
Use the Volume up or Volume down button to scroll
to the Reset to default setting. Press the Menu
button to conrm your selection.
4
Select Yes.
X All settings on your device re reset to their
defult stte.
Updating your device
Your device is controlled by n internl progrm clled
rmwre. As prt of ongoing product mintennce, the
rmwre is upgrded nd errors re corrected.
To get rmwre updte, contct the supporting Philips
prtner you purchsed your device from.

23Service and support
9 Service nd support
Don’t perform ny mintennce opertions tht ren’t
described in this user mnul. Don’t disssemble the
device into its component prts to crry out repirs.
The device my only be repired in uthorized service
centers.
Display device information
See vrious informtion bout your device, such s the
vilble memory spce, informtion bout the externl
microSD crd, or the rmwre version.
1
In stop mode of the recording screen, press the Menu
button to open the settings screen.
2
Use the Fst forwrd or Fst rewind button to switch
to the Device menu.
3
Use the Volume up or Volume down button to scroll
to the Information setting. Press the Menu button
to conrm your selection.
4
Use the Volume up or Volume down button to scroll
to the informtion you would like to see. Press the
Menu button to conrm your selection.
Contact our supporting Philips
partners
If you hve ny questions bout your Voice Trcer
or experience technicl issues, contct one of our
supporting Philips prtners. The locl prtner you
purchsed your Voice Trcer from will strive to nswer
your questions nd to solve your problem s soon s
possible.

24 Service and support
Troubleshooting
Find the most common problems you could encounter
with your Voice Trcer in the following tble. If you re
unble to solve the problem with the informtion below,
contct the supporting Philips prtner you purchsed
your device from.
Problem Possible cuse Solution
The device doesn’t turn on. • The bttery hs run out of
power.
• Chrge the device for while nd
then turn it on gin.
I cn’t record with the device. • You hve reched the
mximum le number or the
device’s memory is full.
• The device is in lock mode.
• Delete some les or move them to n
externl device.
• Slide the Lock switch to the ‘O’
position.
The device doesn’t respond. • There is problem with the
softwre.
• Try to turn the device o nd then
restrt it.
• If you cn’t turn the device o or if
turning the device o doesn’t solve
the problem, perform dt reset.
For more informtion, see Reset dt.
The device doesn’t ply bck recordings. • The volume is o or too low.
• The device is in lock mode.
• Turn on or turn up the volume.
• Slide the Lock switch to the unlock
position.
I cn’t her nything from the spekers. • The hedphones re
connected to the device.
• The volume is o or too low.
• Unplug the hedphones.
• Turn on or turn up the volume.
The recording qulity is poor. • The microphone sensitivity is
set too high.
• The voltge is set too high.
• The recording volume is set too
high.
• You recorded dicttion with
n externl microphone nd
connected it to the wrong jck
(i.e. hedphones jck).
• Chnge the microphone sensitivity to
medium or low. For more informtion,
see Mic sensitivity.
• Set the voltge to 0 V.
• Reduce the recording volume on the
device by using the microphone gin
control.
• Disconnect the externl microphone
nd connect it to the microphone jck
on your Voice Trcer.
There’s too much bckground noise in
my recording.
• The microphone sensitivity is
set too high.
• Chnge the microphone sensitivity to
medium or low. For more informtion,
see Mic sensitivity.

25Service and support
Problem Possible cuse Solution
I cn’t her nything from the
hedphones.
• The volume is o or too low.
• The hedphones ren’t
connected properly.
• The hedphones re
connected to the wrong jck
(i.e. externl microphone jck).
• Turn on or turn up the volume.
• Disconnect the hedphones nd
connect them to the hedphones
jck gin.
• Disconnect the hedphones nd
connect them to the hedphones
jck.
An externl microphone connected to
Voice Trcer doesn’t work.
• The externl microphone is
connected to the wrong jck
(hedphones jck).
• Disconnect the externl microphone
nd connect it to the microphone jck
on Voice Trcer.

26 Technical data
10 Technicl dt
Specications
• Product dimensions (W × D × H): 125 × 64.5 × 22 mm
• Weight: 166 g
Connectivity
• Hedphones: Stereo jck, 3.5 mm
• Microphone: Stereo jck, 3.5 mm
• USB: micro USB 2.0
Memory
• Internl storge: NAND Flsh, 16 GB
• Memory crd (externl): microSD crd up to 64 GB
Audio
• Recording formt:
PCM:
24 bit/96 kHz, bit rte: 4608 kbps
16 bit/96 kHz, bit rte: 3072 kbps
16 bit/48 kHz, bit rte: 1536 kbps
16 bit/44.1 kHz, bit rte: 1411 kbps
MP3:
16 bit/44.1 kHz, bit rte: 192 kbps
16 bit/44.1 kHz, bit rte: 128 kbps
• Plybck formt: MP3, WMA, WAV, AAC, FLAC, APE,
OGG, M4A
• Recording time internl storge:
8 hours (PCM, 24 bit/96 kHz mode)
12 hours (PCM, 16 bit/96 kHz mode)
24 hours (PCM, 16 bit/48 kHz mode)
26 hours (PCM, 16 bit/44.1 kHz mode)
194 hours (MP3, 192 kbps mode)
272 hours (MP3, 128 kbps mode)
• Recording time with memory crd (64 GB): 1088 hours
(only MP3 128 kbps possible)
Power
• Bttery type: built-in rechrgeble Li-polymer bttery
• Bttery cpcity: 1300 mAh
• Bttery lifetime: up to 25 hours of recording (MP3
128 kbps mode)
• Chrging time (full chrge): 2-3 hours
Green specications
• Complint to 2011/65/EU (RoHS)
Operation conditions
• Temperture: 5°–45°C
• Humidity: 10% – 90%, no condenstion
System requirements
• Operting System: Windows 10, Windows 8, Windows 7,
Windows Vist, Windows XP, Mc OS X 10.7, OS X 10.8
• Port: USB
27Technical data
FCC Warning Statement
œ
Chnges or modictions not expressly pproved by the
prty responsible for complince could void the user’s
uthority to operte the equipment.
This equipment hs been tested nd found to comply
with the limits for Clss B digitl device, pursunt
to Prt 15 of the FCC Rules. These limits re designed
to provide resonble protection ginst hrmful
interference in residentil instlltion. This equipment
genertes uses nd cn rdite rdio frequency energy
nd, if not instlled nd used in ccordnce with the
instructions, my cuse hrmful interference to rdio
communictions. However, there is no gurntee tht
interference will not occur in prticulr instlltion. If
this equipment does cuse hrmful interference to rdio
or television reception, which cn be determined by
turning the equipment o nd on, the user is encourged
to try to correct the interference by one or more of the
following mesures:
• Reorient or relocte the receiving ntenn.
• Increse the seprtion between the equipment nd
receiver.
• Connect the equipment into n outlet on circuit
dierent from tht to which the receiver is connected
• Consult the deler or n experienced rdio/TV
technicin for help.
CE Declaration of Conformity
The conformity with the relevnt EU directives is
conrmed by the CE mrk.
Declaration of conformity
Speech Processing Solutions GmbH hereby declres
tht the device Voice Trcer DVT7500 fully complies with
the bsic requirements nd other relevnt provisions of
directives 2009/125/EC, 2014/30/EU nd 2014/35/EU.
A complete declrtion of conformity for this product is
vilble t www.philips.com/dicttion.
Neither Speech Processing Solutions GmbH nor its
lites shll be lible to the purchser of this product
or third prties with respect to clims for dmges,
losses, costs or expenses incurred by purchser or
third prties s result of n ccident,misuse or buse
of this product or unuthorized modictions, repir,
modiction of the product or filure to meet the
operting nd mintennce instructions provided by the
mnufcturer.
MPEG Lyer-3 udio coding technology licensed from
Frunhofer IIS nd Thomson Licensing.
This user mnul is document with no contrctul
nture. We ccept no libility for chnges, mistkes or
printing errors.

28 Technical data

Issue date 2017-07-31
Version 3.1
© 2017 Speech Processing Solutions GmbH. All rights reserved.
Specications are subject to change without notice. Philips and the Philips shield emblem are
registered trademarks of Koninklijke Philips N.V. and are used by Speech Processing Solutions GmbH
under license from Koninklijke Philips N.V. All trademarks are the property of their respective owners.
www.philips.com/dictation