User Manual for Audio Recorder
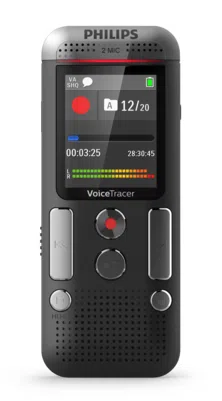
Product overviews
Front and rear sides

- Eye for wrist strap
- ON/OFF switch / HOLD (keypad lock)
- Slot for memory card (microSD card)
- Microphone
- Status LED: Red – device is recording Green – device is playing back Orange – data is being transferred to/from the computer
- Display
- Operating panel with keys
- Speaker
- Micro USB port for computer connection
- Headphone socket (stereo jack plug, 3.5 mm)
- Battery compartment
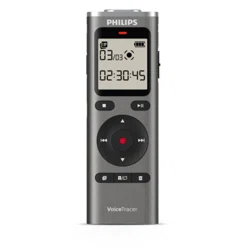
Keys

 Stop mode: short press: change folder, long press: Call menu functions (MENU key);
Recording with voice activation: adjust activation level;
Replay: adjust volume;
Menu navigation: call next menu register
 Playback recording (playback button);
End playback (Stop key);
End recording (Stop key);
Menu navigation: end menu
 Playback: short press: jump to the start, jump to the previous recording, long press: fast seek rewind mode; Menu navigation: Select menu function, change value
 Start recording (record key); confirm selection
 Playback: short press: jump to the end, jump to the next recording, long press: fast seek forward mode; Menu navigation: Select menu function, change value
 Delete recording (delete key)
Start-up screen


Note
• The position and appearance of the symbols may vary, depending on the model, the mode and the selected functions.
Menu overview
Note
• The symbol of the selected menu tab is highlighted in blue.
 Folder and file menu:
Find recording with calendar search
Split a recording
Repeat a file / repeat a sequence
 Recording settings:
Creating a recording
Setting microphone sensitivity
Setting recording quality
Setting editing mode
Enabling/disabling silent recording
Setting the timer
Enabling/disabling voice-activated recording
Setting auto divide
 Display settings:
Select language
Adjusting the display contrast
Adjusting the backlight
Setting demonstration mode
 Device settings:
Set date & time
Enabling/disabling ClearVoice
AUTO-OFF
Alarm clock
Memory formatting
Enable/disable the recording indicator
Enabling/disabling key and signal tones
Set file location
Display device information
 Title of the selected menu tab
 List of available menu functions

First steps
Use the installation guide on the following pages to start using your device quickly and easily.
Caution
• Follow the instructions on handling the device, especially the batteries and rechargeable batteries (see also chapter 1.1.1 Batteries and rechargeable batteries, page 5).
Inserting the batteries
Your device is supplied with two AAA batteries.
1. Slide the battery compartment cover downwards.

2. Insert the batteries or rechargeable batteries into the device as shown. Make sure the polarity is correct.

3. Close the battery compartment cover.

Power on/off
1. Slide the on/off switch on the side of the device downwards for approximately two seconds.
 The device turns on and the start-up screen is displayed.

2. To power off, pull down the power switch on the side of the device again and hold for about two seconds.
Note
- The device switches itself off automatically if no key is pressed within a pre-set period of time (see also chapter 8.3.3 AUTOOFF, page 35).
Initial installation process
The initial installation process starts when first using the device or possibly if there has been a long interruption to the power supply. The date and time entered are saved with each recording as the recording time.
Select language
1. Press  to select the required display language.
2. Press the record key,  , to confirm.
Note
• Your language might not be available. Select an alternative one.
Set date & time
- Press to select the required year.
- Press the record key .
- Press to set the month.
- Press the record key .
- Press to set the day.
- Press the record key.
- Press to switch between the 12/24-hour system.
- Press the record key .
- Press to set the hours.
- Press the record key.
- Press to set the minutes.
- Press the record key, , to confirm.
Tip
• You can change the language, date and time at any time using the settings menu (see also chapter 8.2.1 Select language, page 32) (see also chapter 8.3.1 Set date & time, page 34).
Enabling/disabling the keypad lock
The keypad lock deactivates all keys on the device. The timer function of the device continues to function.
1. Slide the HOLD switch up into the HOLD position to lock the keypad of the device.
The display briefly shows On Hold and turns off.

2. Slide the HOLD switch down to the Off position to disengage the keypad lock.
The display briefly shows Off Hold and turns off.
Insert microSD card
Caution
• Do not remove the memory card while recording is in progress. If you do this, data may be damaged or lost.
1. Flip the memory card slot cover to the side.
2.Insert the microSD card into the card slot with the contacts facing upwards.

3. Insert the memory card until it snaps into place.
4. To remove the card press the memory card slightly until the snapping mechanism unlocks and the card is ejected.
Note
• To ensure that the device stores the recordings on the memory card, you must switch from the internal memory to microSD memory card (see also chapter 8.1.1 Set file location, page 27). The display shows a folder icon which indicates where the recordings are currently being stored:  – internal memory,
  – memory card.
Accessories
Depending on the type of the device, the product package may include various accessories. Additional accessories may be obtained directly from your retailer.
How to connect headphones
Warning
• Set the volume to a moderate level and do not use headphones to listen for excessively long periods of time. Exposure to intense sound can cause hearing damage. Observe the Hearing safety instructions (see also chapter 1.1.3 Hearing protection, page 6).
1. Turn down the volume of the device before you plug in the headphones.
2. Insert the stereo jack into the headphone connection EAR on the side of the device.

3. Turn up the volume until you reach a comfortable listening level. The speaker is switched off when headphones are connected.
Connecting to a computer
You can select one of the following options once you have connected the device to a computer
• A USB mass storage device: You can use the File Explorer to access the device data without installing additional software. It is automatically displayed as a mass storage device similarly to a USB memory stick or card. It is a convenient way to store, back up and and move files. (see also chapter 4.7.1 Transferring files from or to the device, page 19).
• Power supply via USB: Record while powered through USB without draining the battery. You can record until the memory is full.
Tip
• To start recording press the record key for at least two seconds while the device is connected to the computer.
1. Plug the USB connector into a USB port on your computer.
2. Insert the micro USB plug into the USB port on the bottom of the device.
The device is displayed as a mass storage device in File Explorer.

Caution
• Do not disconnect the device from the computer while files are transferred from or to the device (the status LED indicator flashes orange when data is being transferred). This this may damage or corrupt the files.
• Do not format the drive of the device on a computer. If you want to delete all data, use the Format memory function (see also chapter 9.1.2 Memory formatting, page 37).
Transferring files from or to the device
You can use the File Explorer to access the device data without installing additional software. It is automatically displayed as a mass storage device similarly to a USB memory stick or card.
1. Connect the device to the computer as described.
2. Open File Explorer.
The device will be displayed as a mass storage device named PHILIPS. The Voice folder on the device contains recordings.
3. Copy or move files to your computer or delete files to archive recordings and free up space on the device.
Caution
• Do not disconnect the device from the computer while files are transferred from or to the device (the status LED indicator flashes orange when data is being transferred). This this may damage or corrupt the files.
• Do not format the drive of the device on a computer. If you want to delete all data, use the Format memory function (see also chapter 9.1.2 Memory formatting, page 37).
Disconnecting from a computer
1. Select Eject USB in File Explorer.
2. Disconnect the USB cable from the computer.
Record
The device offers many features that you can use during recording or to improve the quality of a recording. Use the timer and the voice activation functions to start recording automatically.
Creating a recording
Before starting a recording, set the required recording quality and microphone sensitivity.
1. In stop mode (start-up screen), press a to select the desired folder for the recording.
The following symbols will be displayed, depending on the selected location folder: – internal memory, – memory card displayed.
2. Point the built-in microphone toward the sound source and press g.
The record/play indicator lights red. The recording duration and the remaining recording time are displayed in the selected folder on the display.
3. Check the recording level/volume.
4. Press to pause recording.
The record/play indicator will blink red.
5. Press the key to resume recording.
6. Press the  key to stop recording.
The device returns to stop mode.
Note
• Start a new recording: To stop the current recording and start a new one, press b.
• To prevent files becoming too big during a long recording, for example a meeting lasting several hours, you can automatically split recordings (see also chapter 8.1.8 Setting auto divide, page
31).
• Each folder can store up to 99 files. The size of the memory depends on the location folder and the quality of a recording (see also chapter 8.1.2 Setting recording quality, page 27). If the recording time or the number of files exceeds the available capacity, recording stops and a message is displayed. You can not make any more recordings. Delete the recordings which you no longer require, or connect the device to a computer and transfer the files to your computer.
Tip
• If you are to start a long recording session, replace or recharge the batteries before you begin. You can also connect the device to a computer using the USB cable. The device is supplied with power over the USB cable when connected to the computer and the batteries are not drained.
Starting recording automatically
You have two options to start automatic recording: Timer function and voice activation.
Use Timer function
You can use this function to start a recording at a specified date and time. The device can record from the device's microphone, the radio or an external sound source.
1. Customize the timer settings in the Settings menu and turn on the feature (see also chapter 8.1.6 Setting the timer, page 30).
If this feature is on, the  icon is displayed. The device will start recording at a specified time. The device can be switched off at this time or the keypad can be locked.
Use voice activation
When voice-activated recording is enabled, recording will start when you begin speaking. When you stop speaking, the device will automatically pause recording after three seconds of silence, and resume only when you begin speaking again.
Use the voice activation level to set the volume at which the device should begin recording.
1. Customize the voice-activated recording settings in the Settings menu and turn on the feature (see also chapter 8.1.7 Enabling/ disabling voice-activated recording, page 30).
If this feature is on, the ‚ icon is displayed.
2. Press the key.
The devices switches to standby mode. The (|) symbol will be displayed. Recording will start when you begin speaking. When you stop speaking, the device will automatically pause recording after three seconds of silence.
3. Press the key to stop recording.
The device returns to stop mode.
Note
• Start a new recording: To stop the current recording and start a new one, press .
.
• To prevent files becoming too big during a long recording, for example a meeting lasting several hours, you can automatically split recordings (see also chapter 8.1.8 Setting auto divide, page 31).
• Each folder can store up to 99 files. The size of the memory depends on the location folder and the quality of a recording (see also chapter 8.1.2 Setting recording quality, page 27). If the recording time or the number of files exceeds the available capacity, recording stops and a message is displayed. You can not make any more recordings. Delete the recordings which you no longer require, or connect the device to a computer and transfer the files to your computer.
Tip
• If you are to start a long recording session, replace or recharge the batteries before you begin. You can also connect the device to a computer using the USB cable. The device is supplied with power over the USB cable when connected to the computer and the batteries are not drained.
Starting recording automatically
You have two options to start automatic recording: Timer function and voice activation.
Use Timer function
You can use this function to start a recording at a specified date and time. The device can record from the device's microphone, the radio or an external sound source.
1. Customize the timer settings in the Settings menu and turn on the feature (see also chapter 8.1.6 Setting the timer, page 30).
If this feature is on, the icon is displayed. The device will start recording at a specified time. The device can be switched off at this time or the keypad can be locked.
Use voice activation
When voice-activated recording is enabled, recording will start when you begin speaking. When you stop speaking, the device will automatically pause recording after three seconds of silence, and resume only when you begin speaking again. Use the voice activation level to set the volume at which the device should begin recording.
1. Customize the voice-activated recording settings in the Settings menu and turn on the feature (see also chapter 8.1.7 Enabling/ disabling voice-activated recording, page 30).
If this feature is on, the  icon is displayed.
2 Press the key.
The devices switches to standby mode. The ( ) symbol will be displayed. Recording will start when you begin speaking. When you stop speaking, the device will automatically pause recording after three seconds of silence.
3 Press the key to stop recording.
The device returns to stop mode.
Tip
• Press  and during recording to adjust the voice activation level.
Playback
Tip
• Turn on the ClearVoice function for better playback quality. Quiet fragments are dynamically adjusted, making soft voices clearer and more understandable (see also chapter 8.3.2 Enabling/disabling ClearVoice, page 35).
Select a recording
1. Press to select the desired folder while the device is stopped.
The following symbols will be displayed, depending on the selected location folder: – internal memory, – memory card displayed.
2. Press while the device is stopped.
- The position indicator jumps to the end of a file.
- The position indicator jumps to the start of the next file.
Record
The device offers many features that you can use during recording or to improve the quality of a recording. Use the timer and the voice activation functions to start recording automatically.
Creating a recording
Before starting a recording, set the required recording quality and microphone sensitivity.
1. In stop mode (start-up screen), press to select the desired folder for the recording.
The following symbols will be displayed, depending on the selected location folder: – internal memory, – memory card displayed.
2. Point the built-in microphone toward the sound source and press .
The record/play indicator lights red. The recording duration and the remaining recording time are displayed in the selected folder on the display.
3. Check the recording level/volume.
4. Press to pause recording.
The record/play indicator will blink red.
5. Press the key to resume recording.
6. Press the key to stop recording.
The device returns to stop mode.
Note
• Start a new recording: To stop the current recording and start a new one, press b.
• To prevent files becoming too big during a long recording, for example a meeting lasting several hours, you can automatically split recordings (see also chapter 8.1.8 Setting auto divide, page 31).
• Each folder can store up to 99 files. The size of the memory depends on the location folder and the quality of a recording (see also chapter 8.1.2 Setting recording quality, page 27). If the recording time or the number of files exceeds the available capacity, recording stops and a message is displayed. You can not make any more recordings. Delete the recordings which you no longer require, or connect the device to a computer and transfer the files to your computer.
Tip
• If you are to start a long recording session, replace or recharge the batteries before you begin. You can also connect the device to a computer using the USB cable. The device is supplied with power over the USB cable when connected to the computer and the batteries are not drained.
Starting recording automatically
You have two options to start automatic recording: Timer function and voice activation.
Use Timer function
You can use this function to start a recording at a specified date and time. The device can record from the device's microphone, the radio or an external sound source.
1. Customize the timer settings in the Settings menu and turn on the feature (see also chapter 8.1.6 Setting the timer, page 30).
If this feature is on, the icon is displayed. The device will start recording at a specified time. The device can be switched off at this time or the keypad can be locked.
Use voice activation
When voice-activated recording is enabled, recording will start when you begin speaking. When you stop speaking, the device will automatically pause recording after three seconds of silence, and resume only when you begin speaking again.
Use the voice activation level to set the volume at which the device should begin recording.
1. Customize the voice-activated recording settings in the Settings menu and turn on the feature (see also chapter 8.1.7 Enabling/ disabling voice-activated recording, page 30).
If this feature is on, the icon is displayed.
2. Press the key.
The devices switches to standby mode. The (|) symbol will be displayed. Recording will start when you begin speaking. When you stop speaking, the device will automatically pause recording after three seconds of silence.
3. Press the key to stop recording.
The device returns to stop mode.
Tip
• Press and during recording to adjust the voice activation level.
Playback
Tip
• Turn on the ClearVoice function for better playback quality. Quiet fragments are dynamically adjusted, making soft voices clearer and more understandable (see also chapter 8.3.2 Enabling/disabling ClearVoice, page 35).
Select a recording
1. Press to select the desired folder while the device is stopped.
The following symbols will be displayed, depending on the selected location folder: – internal memory, – memory card displayed.
2. Press while the device is stopped.
- The position indicator jumps to the end of a file.
- The position indicator jumps to the start of the next file.
3. Press  while the device is stopped.
- The position indicator jumps to the start of a file.
- The position indicator jumps to the end of the previous file.
Find recording with calendar search
The search function of the device provides a listing of all stored files sorted by the record date.
1. In stop mode (start-up screen), press/MENU for at least two seconds.
2. Press the record key,, to confirm.
3. Press to select the desired day.
4. Press to select the required recording.
The first ten seconds of each highlighted file can be played as a preview.
5. Press to playback the selected file.
Playing a recording back
Tip
• When the device is in the stop mode, playback will start with a three-second rewind. This function is especially helpful during transcription of recordings.
1. Select the required file as described.
2. Press to playback the selected file.
The record/play indicator will light green. The total playback time of the current file will be shown on the display.
3. Press and adjust the volume with .
4. Press the key to stop playback.
The playback is paused at the current position. The device returns to stop mode. When you resume playback, it will start three seconds before the current position.
5. Press to continue playback from the previous position.
6. Press to jump to the start or the end of the file.
Adjusting playback speed
1. Press and hold the ~ key for at least two seconds during playback.
- This will switch the device to slow playback. The
 icon will be displayed.
- This will switch the device to fast playback. The
 icon will be displayed.
- This will switch the device to normal playback. The
 icon will be displayed.
Quick search
You can scan backward or forward in the current file at a fast speed. This allows to find a specific part of the recording.
1. Press and hold the or buttons during playback or when the device is stopped
to scan backward or forward in the current file at a fast speed.
2. Release the key
to resume playback at the selected speed form the current position.
Repeat a file / repeat a sequence
You can automatically repeat playback of a certain file or entire folder (= endless loop).
1. In stop mode (start-up screen), press /MENU for at least two seconds.
2. Press to select the function Repeat.
3. Press the record key, , to confirm.
4. Using either , select whether you wish either the playback of an individual recording/file or a folder to repeat automatically.
The symbol of the selected repeat mode is displayed on the display:
 – repeat a file
 – repeat all files in a folder
 – random repeat mode
5. Press the record key, , to confirm.
Playback of the recording or folder starts.
Troubleshooting
| Problem |
Possible cause/solution |
| The device does not turn on |
• The batteries or rechargeable batteries are not inserted correctly.
Check to ensure that the batteries or rechargeable batteries are correctly inserted. Make sure the polarity is correct.
• Batteries are empty.
Replace or recharge the batteries.
|
| The device does not playback recordings |
• The keypad lock may be enabled.
Slide the HOLD switch to the “Off” position.
• No recordings are saved in the device.
|
| The device does not respond. |
• Remove the batteries/rechargeable batteries and insert them again. |
| microSD card can not be selected as a recording location |
• There is no memory card in the device.
Insert a memory card into the device.
• Memory card is not formatted (file system FAT32).
Format the memory card in the device.
|
| I cannot hear anything from the speaker. |
• A headset is connected to the device.
• The volume is at the lowest setting.
|
| The recording session does not start |
• Pre-recording or voice-activated recording mode may be enabled.
• The keypad lock may be enabled.
Slide the HOLD switch to the “Off” position.
• The maximum number of recordings may have been reached or the available space for recording is full.
• The keypad lock may be enabled.
Delete some recordings or move them to an external device.
Select another location folder.
|
| I cannot hear anything from the headphones. |
• The headphones are incorrectly connected.
Check the headphone connection.
• The volume is at the lowest setting.
|