
READ CAREFULLY
KEEP THESE INSTRUCTIONS
CHECK THE FOLLOWING
Tub trim does not interfere with the door
Dishwasher is square and level at both the top and bottom of the cabinet opening,
with no twisting or distortion of the tub or door
All 4 legs of the dishwasher are firmly in contact with the floor
Drain hose is not pinched between the dishwasher and adjacent cabinets or walls
Tub trim is fully seated on the tub flange
WARNING
CAUTION
FOR YOUR SAFETY
Read and observe all WARNINGS and CAUTIONS
shown throughout these instructions.
IMPORTANT – Observe all governing codes and
ordinances.
• Note to Installer – Be sure to leave these instructions
for the consumer’s and local inspector’s use.
• Note to Consumer – Keep these instructions with
your Owner’s Manual for future reference.
• Skill Level – Installation of this dishwasher requires
basic mechanical, electrical and plumbing skills. Proper
installation is the responsibility of the installer.
Product failure due to improper installation is not
covered under the GE Appliances Warranty. See
Warranty information.
• Completion Time – 1 to 3 Hours. New installations
require more time than replacement installations.
IMPORTANT – The dishwasher MUST be installed to
allow for future removal from the enclosure if service is
required.
Care should be exercised when the appliance is
installed or removed, to reduce the likelihood of
damage to the power supply cord.
If you received a damaged dishwasher, you should
immediately contact your dealer or builder.
Optional Accessories – See the Owner’s Manual for
available custom panel kits.
Your dishwasher is a water heating appliance.
31-4000211 Rev 2 10-20 GEA
BEFORE YOU BEGIN
Read these instructions completely and carefully.
• To reduce the risk of electric shock, fire, or injury to
persons, the installer must ensure that the dishwasher is
completely enclosed at the time of installation.
• FOR PERSONAL SAFETY: Remove house fuse or open
circuit breaker before beginning installation. Do not use
an extension cord or adapter plug with this appliance.
• The improper connection of the equipment grounding
conductor can result in a risk of electric shock. Check
with a qualified electrician or service representative if
you are in doubt that the appliance is properly grounded.
• If house wiring is not 2-wire with ground, a ground
must be provided by the installer. When house wiring
is aluminum, be sure to use UL-Listed anti-oxidant
compound and aluminum-to-copper connectors.
• To reduce the risk of electric shock, fire, or injury to
persons, the installer should check to ensure that wires
are not pinched or damaged, the house wiring is attached
to the junction box bracket through a strain relief, and
all electrical connections made at the time of install (wire
nuts) are contained inside of the junction box cover.
Do not remove wood base until you are ready to install
the dishwasher. The dishwasher will tip over when the
door is opened if base is removed.
While performing installations described in this booklet,
gloves, safety glasses or goggles should be worn.
See your Owner’s Manual for details on how to contact us regarding installation questions
Built-In Dishwashers
Installation
Instructions
PARTS SUPPLIED IN
INSTALLATION PACKAGE:
• Junction box cover and #10 hex-head screw
• Hose clamp
• Drain hose (approximately 58” long)
• Drain hose hanger
• 2 #8-18 hex head screws to secure brackets to
washer tub frame
• 1 top trim piece (on some models)
• 2 side trim pieces
• 2 mounting brackets for wood countertops
or side cabinets
• 2 #8-18 x 5/8” Phillips special head screws,
to secure dishwasher to underside of
countertop or to side cabinets
• Plug buttons
• Literature, samples and/or coupons
TOOLS YOU WILL NEED:
• Phillips-head screwdriver
• 1/4” and 5/16” nutdriver
• 6” Adjustable wrench
• Level
• Carpenter’s square
• Measuring tape
• Safety glasses
• Flashlight
• Bucket to catch water when flushing the line
• 15/16” socket (optional for skid removal)
• Gloves
• Pliers
For New Installations Only:
• Tubing cutter
• Drill and appropriate bits
• Hole saw set
MATERIALS YOU WILL NEED:
• 90° elbow (3/4”hose internal thread on one
end,opposite end sized to fit water supply)
• UL-listed wire nuts (3)
• Masking Tape
Materials For New Installations Only:
• Air gap for drain hose, if required
• Waste tee for house plumbing, if applicable
• Electrical cable or Power Cord Kit WX09X70910 (5.4 Ft)
or WX09X70911 (7.9 ft) depending on your installation.
• Hose clamp (if needed for optional drain hose)
• Strain relief for electrical connection
• Hand shut-off valve (recommended)
• Hot Water Line–3/8” minimum, copper tubing
(including ferrule, compression nut) or GE Appliances
Part # WX28X326, flexible braided hose.
• WD24X10065 drain hose (12’ long), if needed.
Installation Preparation
2
Hole Saw Set
Measuring Tape
Tubing Cutter
Drill and Bits
Phillips-Head
Screwdriver
15/16” Socket
1/4” and 5/16”
Nutdriver
6” Adjustable
Wrench
Bucket
Flashlight
Gloves
Carpenter’s
Square
Safety Glasses
Level
Drain Hose
Hose Clamp
#8 Hex-Head
Mounting Bracket
Screws
Drain Hose Hanger
Junction
Box Cover
#10
Hex-Head
Junction
Box Screw
1/2" long
Mounting
Brackets
#8 Phillips
Special
Head Screws
5/8" long
Literature
Top Trim Piece
(on some models)
Side Trim Pieces
Pliers
Hot Water Line
Strain Relief
Optional
12' Drain Hose
WD24X10065
Waste Tee
Electrical Cable
(or Power Cord,
if applicable)
Wire Nuts (3)
90°Elbow
Hand
Shut-Off
Valve
Air Gap
Coupler for
optional
drain hose
Plug Buttons
Masking Tape
Hose Clamp
3
Installation Preparation
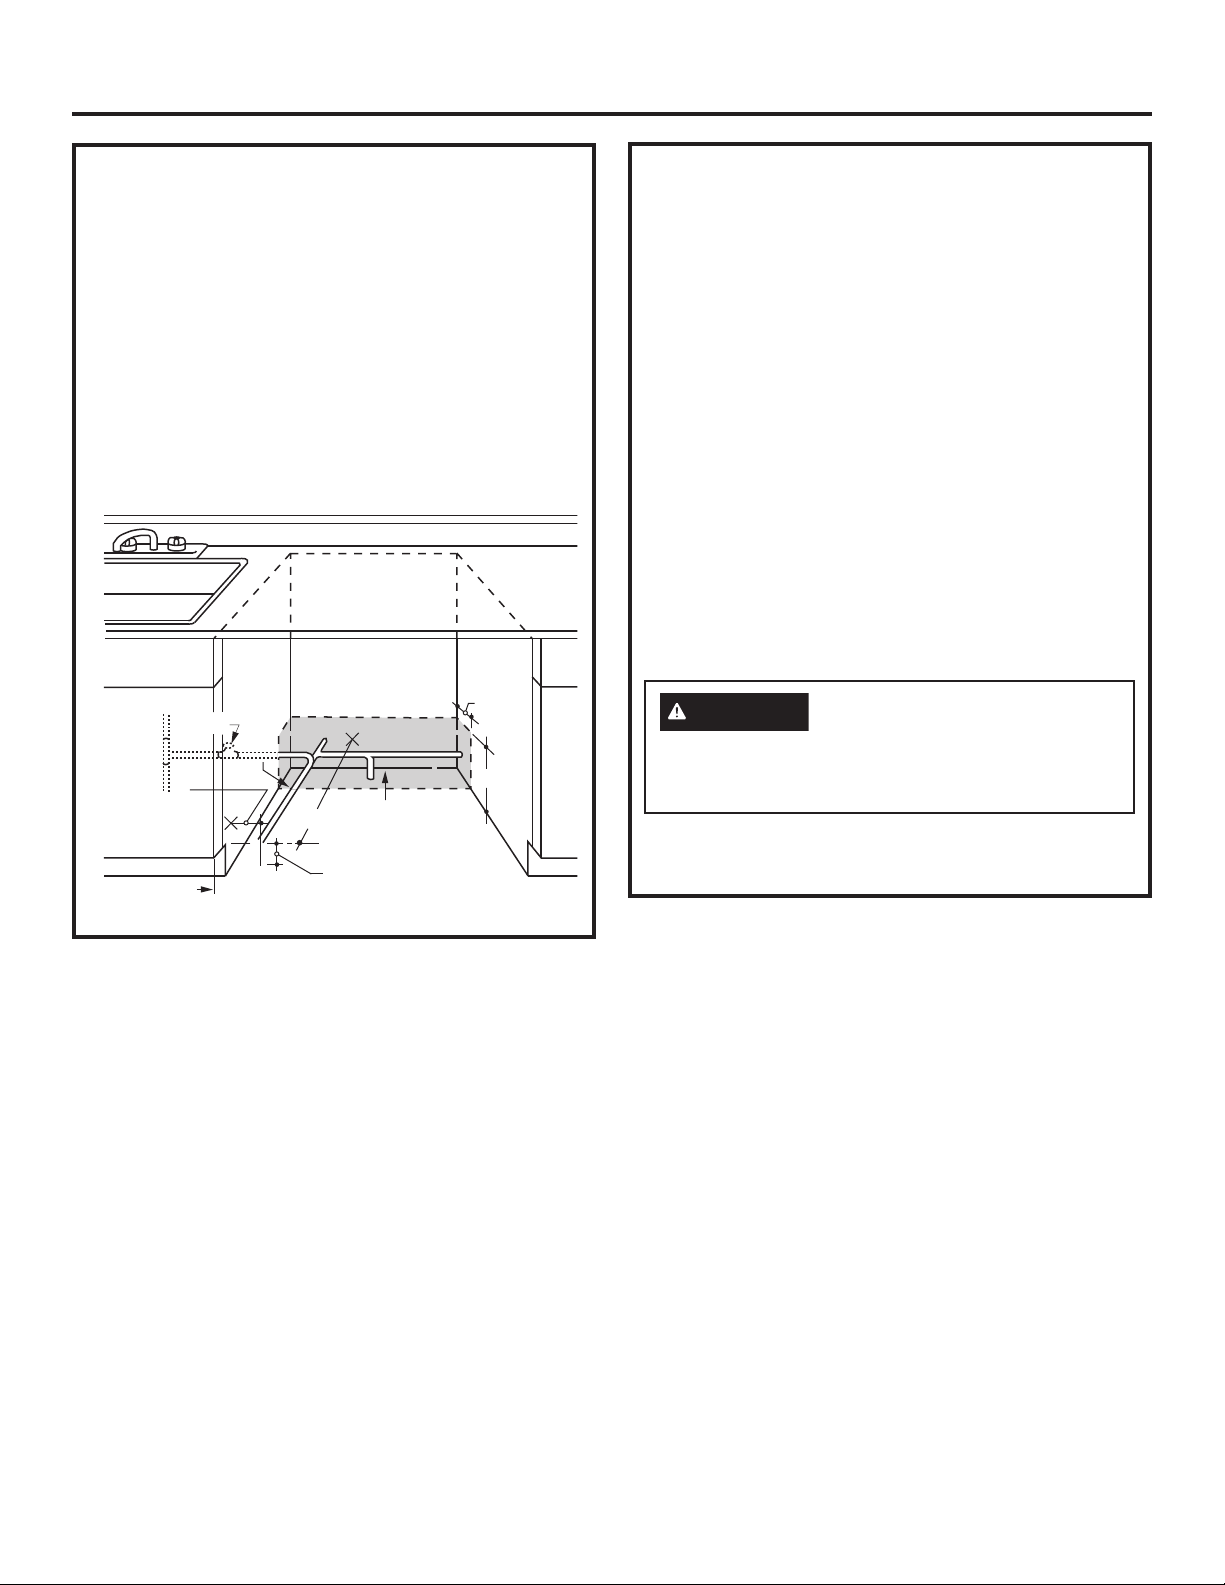
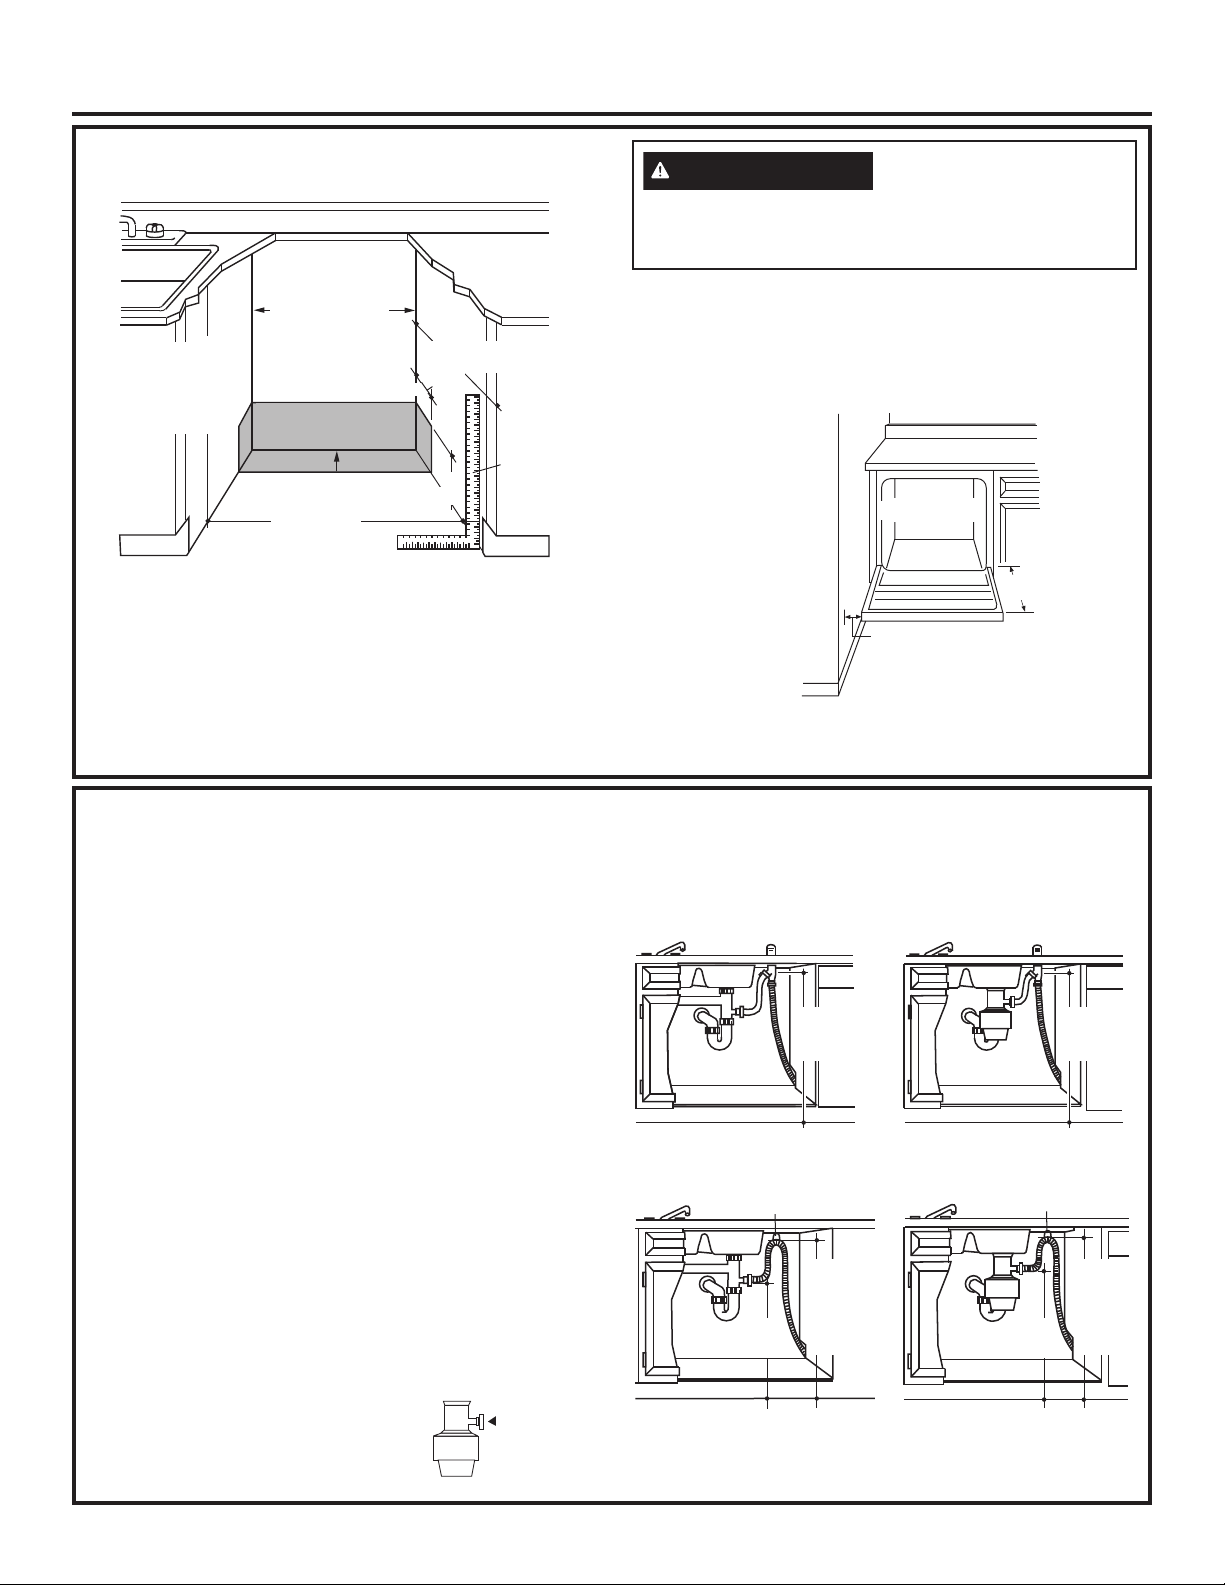
PREPARE DISHWASHER ENCLOSURE
• The rough cabinet opening must be at least 24” deep,
24” wide and approximately 34-1/2” high from floor to
underside of the countertop.
• The dishwasher must be installed so that drain hose is
no more than 16’ in length for proper drainage.
• The dishwasher must be fully enclosed on the top,
sides and back, and must not support any part of the
enclosure.
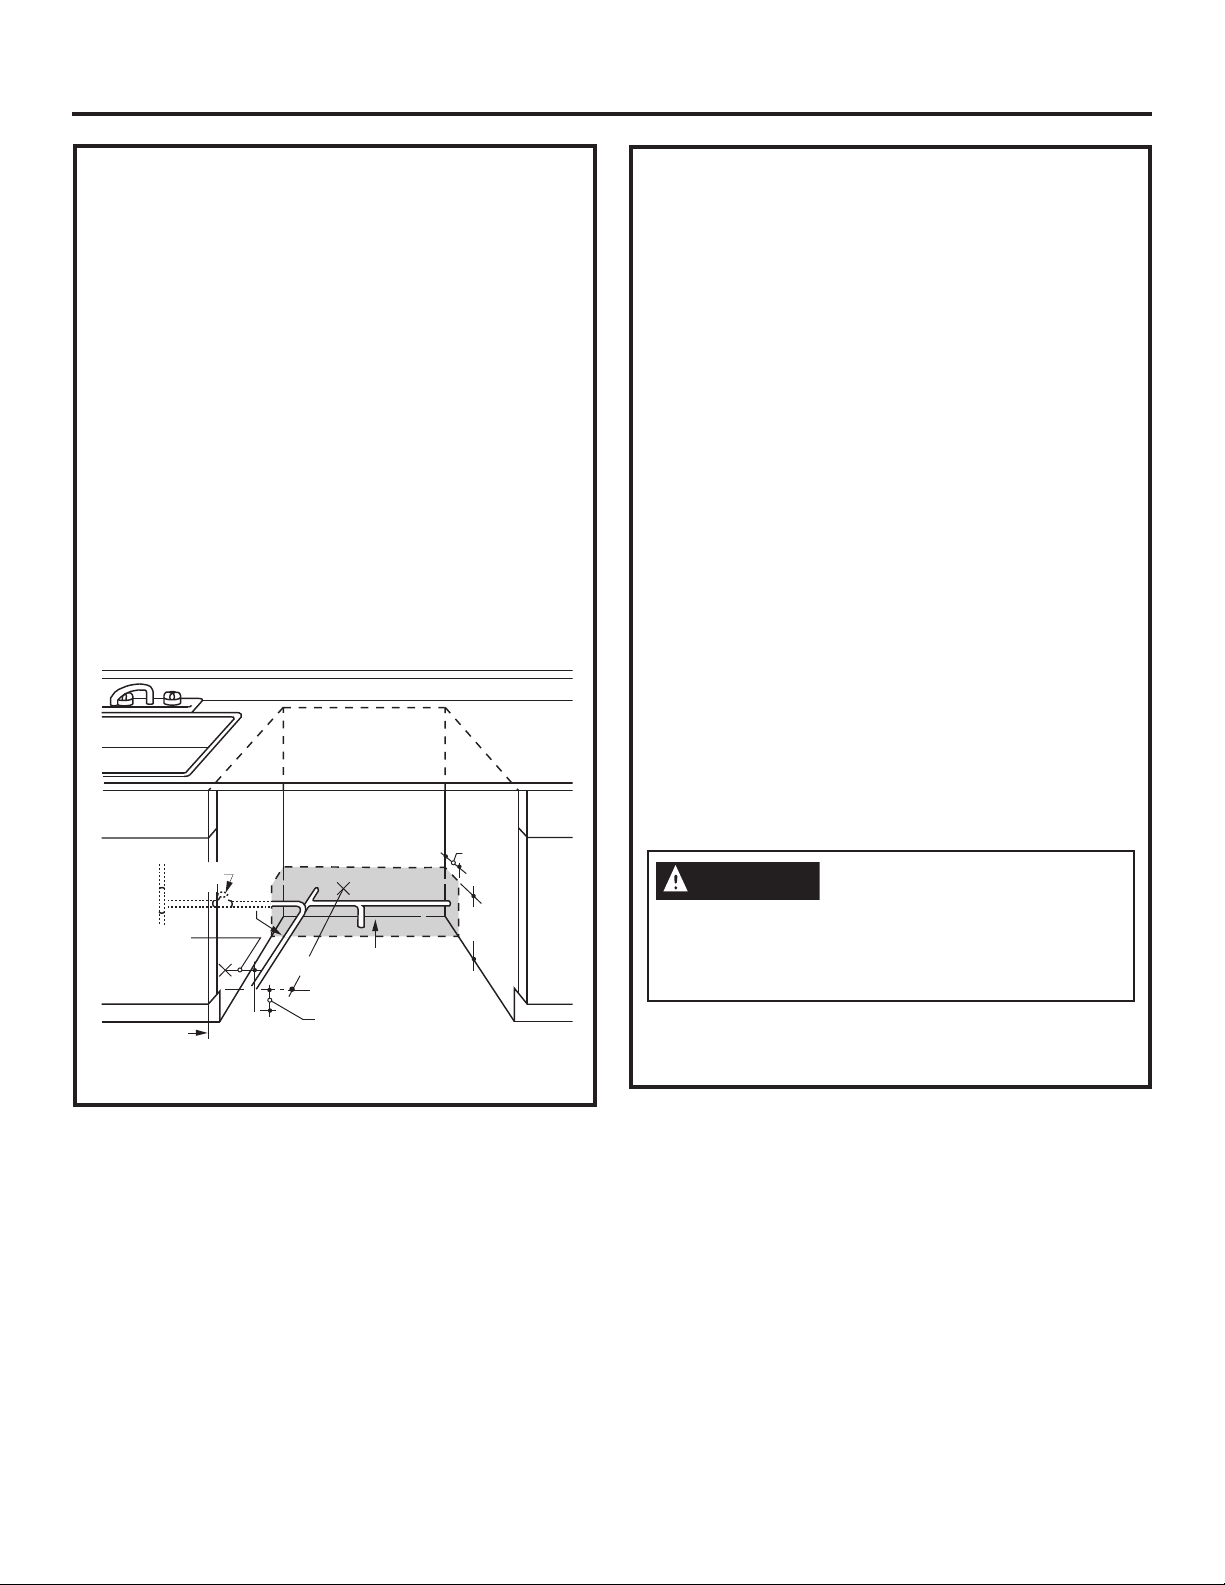
CLEARANCES: When installed into a corner, allow 2” min.
clearance between dishwasher and adjacent cabinet, wall
or other appliances. Allow 25-1/2” min. clearance from
the front of the dishwasher for door opening.
DRAIN REQUIREMENTS
• Follow local codes and ordinances.
• Do not exceed 16’ distance to drain.
NOTE : Air gap must be used if waste tee or disposer
connection is less than 18” above floor to prevent siphoning.
DETERMINE DRAIN METHOD
The type of drain installation depends on the following
questions.
• Do local codes or ordinances require an air gap?
• Is waste tee less than 18” above floor?
If the answer to either question is YES, Method 1
MUST be used.
•
If the answers are NO, either method may be used.
CABINET PREPARATION
• Drill a 1-1/2” diameter hole in the cabinet wall within
the shaded areas shown in PREPARE DISHWASHER
ENCLOSURE section for the drain hose connection.
The hole should be smooth with no sharp edges.
IMPORTANT – When connecting
drain line to disposer, check to be sure
that drain plug has been removed.
DISHWASHER WILL NOT DRAIN IF
PLUG IS LEFT IN PLACE.
Method 1 – Air Gap with Waste Tee or Disposer
An air gap must be used when required by local codes
and ordinances. The air gap must be installed according
to manufacturer’s instructions.
Tip: Avoid unnecessary service call charges.
Always be sure disposer drain plug has been removed
before attaching dishwasher drain hose to the disposer.
Remove
Drain
Plug
To reduce the risk of electric shock, fire, or injury to
persons, the installer must ensure that the dishwasher
is completely enclosed at the time of installation.
WARNING
Method 2 – “High Drain Loop” with Waste Tee or Disposer
DISHWASHER HANDLE DIMENSION: The dishwasher
door should be flush with the cabinet. For models with
a handle, the total depth (with handle) is 26-1/4” max.
depending on the model. Locate the Quick Specs document
online for more dishwasher dimensions.
34-1/2”+1/4”
Underside of
Countertop
to Floor
This Wall Area
Must be Free
of Pipes and
Wires
Cabinets
Square
and
Plumb
Plumbing and Electric Service
Must Enter Inside This Area
24”
Min.
4”
6”
24”
Min.
33-1/2” to 34-3/4”
Underside of
Countertop
to Floor
Figure A
Clearance for Door
Opening 2" Minimum
Countertop
Dishwasher
25-1/2"
Figure B
72”
max.
72”
max.
Figure C
Drain Hose Hanger
18”
min.
32” min. -
72” max.
Drain Hose Hanger
18”
min.
32” min. -
72” max.
Figure D
Installation Preparation
Cabinet Preparation & Wire Routing
•
The wiring may enter the opening from either side, rear
or the floor within the shaded area illustrated above in
Figure E and defined in Figure A.
• Cut a 1-1/2" maximum diameter hole to admit the
electrical cable. Edges of hole should be smooth and
rounded. Permanent wiring connections may pass
through the same hole as the drain hose and hot water
line, if convenient. If cabinet wall is metal, the hole
edge must be covered with a bushing.
NOTE:
Power cords with plug must pass through a
separate hole in the cabinet.
Electrical Connection to Dishwasher
Electrical connection is on the right front of dishwasher.
• For permanent connections the cable must be routed
as shown in Figure E. Cable must extend a minimum of
24" from the rear wall.
• For power cord connections, install a 3-prong
grounding type receptacle in the sink cabinet rear wall,
6" min. or 18" maximum from the opening, 6" to 18"
above the floor.
• Use only WX09X70910 or WX09X70911 Dishwasher
Power Cord Kit.
PREPARE ELECTRICAL WIRING
ELECTRICAL REQUIREMENTS
Be sure that the electrical connection and wire size are
adequate and in conformance with the National Electric
Code, ANSI/NFPA 70 – latest edition, and all local
codes and ordinances.
This appliance must have:
• 120V, 60Hz, AC-only, 15-ampere or 20-ampere, fused
electrical supply.
• Wiring must be 2 wire with ground and rated for 75°C
(167°F).
• If the electrical supply does not meet the above
requirements, call a licensed electrician before
proceeding.
It is recommended to have:
• A circuit breaker or time-delay fuse.
• A properly grounded individual branch circuit.
Grounding Instructions–Permanent Connection
This appliance must be connected to a grounded metal,
permanent wiring system, or an equipment-grounding
conductor must be run with the circuit conductors and
be connected to the equipment-grounding terminal or
lead on the appliance.
Grounding Instructions–Power Cord Models
This appliance must be grounded. In the event of a
malfunction or breakdown, grounding will reduce the risk
of electric shock by providing a path of least resistance
for electric current. This appliance is equipped with a
cord having an equipment-grounding conductor and
a grounding plug. The plug must be plugged into an
appropriate outlet that is installed and grounded in
accordance with all local codes and ordinances.
Figure E
4
White
18"
6"
24"
from Wall
3"
from
Cabinet
Alternate Receptacle
Location in Adjacent
Cabinet
Ground
Black
1-1/2" Dia. Hole (Max.)
18"
6"
Receptacle
Location
Area
FOR PERSONAL SAFETY: Remove house fuse or
open circuit breaker before beginning installation.
Do not use an extension cord or adapter plug with this
appliance.
WARNING
The improper connection of the equipment grounding
conductor can result in a risk of electric shock. Check
with a qualified electrician or service representative
if you are in doubt that the appliance is properly
grounded.
WARNING
For models equipped with power cord: Do not
modify the plug provided with the appliance; if it will
not fit the outlet, have a proper outlet installed by a
qualified technician.
WARNING
Water Line Connection
• If using a flexible braided supply hose, label
the hose with the installation date to use as
reference. Flexible braided hoses, elbows and
gaskets should be replaced in 5 years.
• Turn off the water supply.
• Install a hand shut-off valve in an accessible
location, such as under the sink. (Optional, but
strongly recommended and may be required by local
codes.)
• Water connection is on the left side of the
dishwasher. Install the hot water inlet line, using no
less than 3/8” copper tubing or a flexible braided
hose. Route the line as shown in Figure F and
extend forward at least 19” from rear wall.
• Adjust water heater for 120°F to 140°F temperature.
• Flush water line to clean out debris.
• The hot water supply line pressure must be 20-120
PSI.
Turn page to begin dishwasher
installation.
Installation Preparation
PREPARE HOT WATER LINE
NOTE: GE Appliances recommends copper tubing for
the water line, but if you choose to use flexible hose,
use GE Appliances WX28X326, flexible braided hose.
• The water supply line (3/8” copper tubing or flexible
braided hose) may enter from either side, rear or
floor within the shaded area shown in Figure F.
• The water supply line may pass through the same
hole as the electrical cable and drain hose. Or, cut
an additional 1-1/2" diameter hole to accommodate
the water line. If power cord with plug is used, water
line must not pass through power cord hole.
Figure F
6"
4"
Cabinet Face
Shut-off
Valve
2" From Floor
19" From Wall
2"
From
Cabinet
Hot
1-1/2”
Dia.
Hole
5
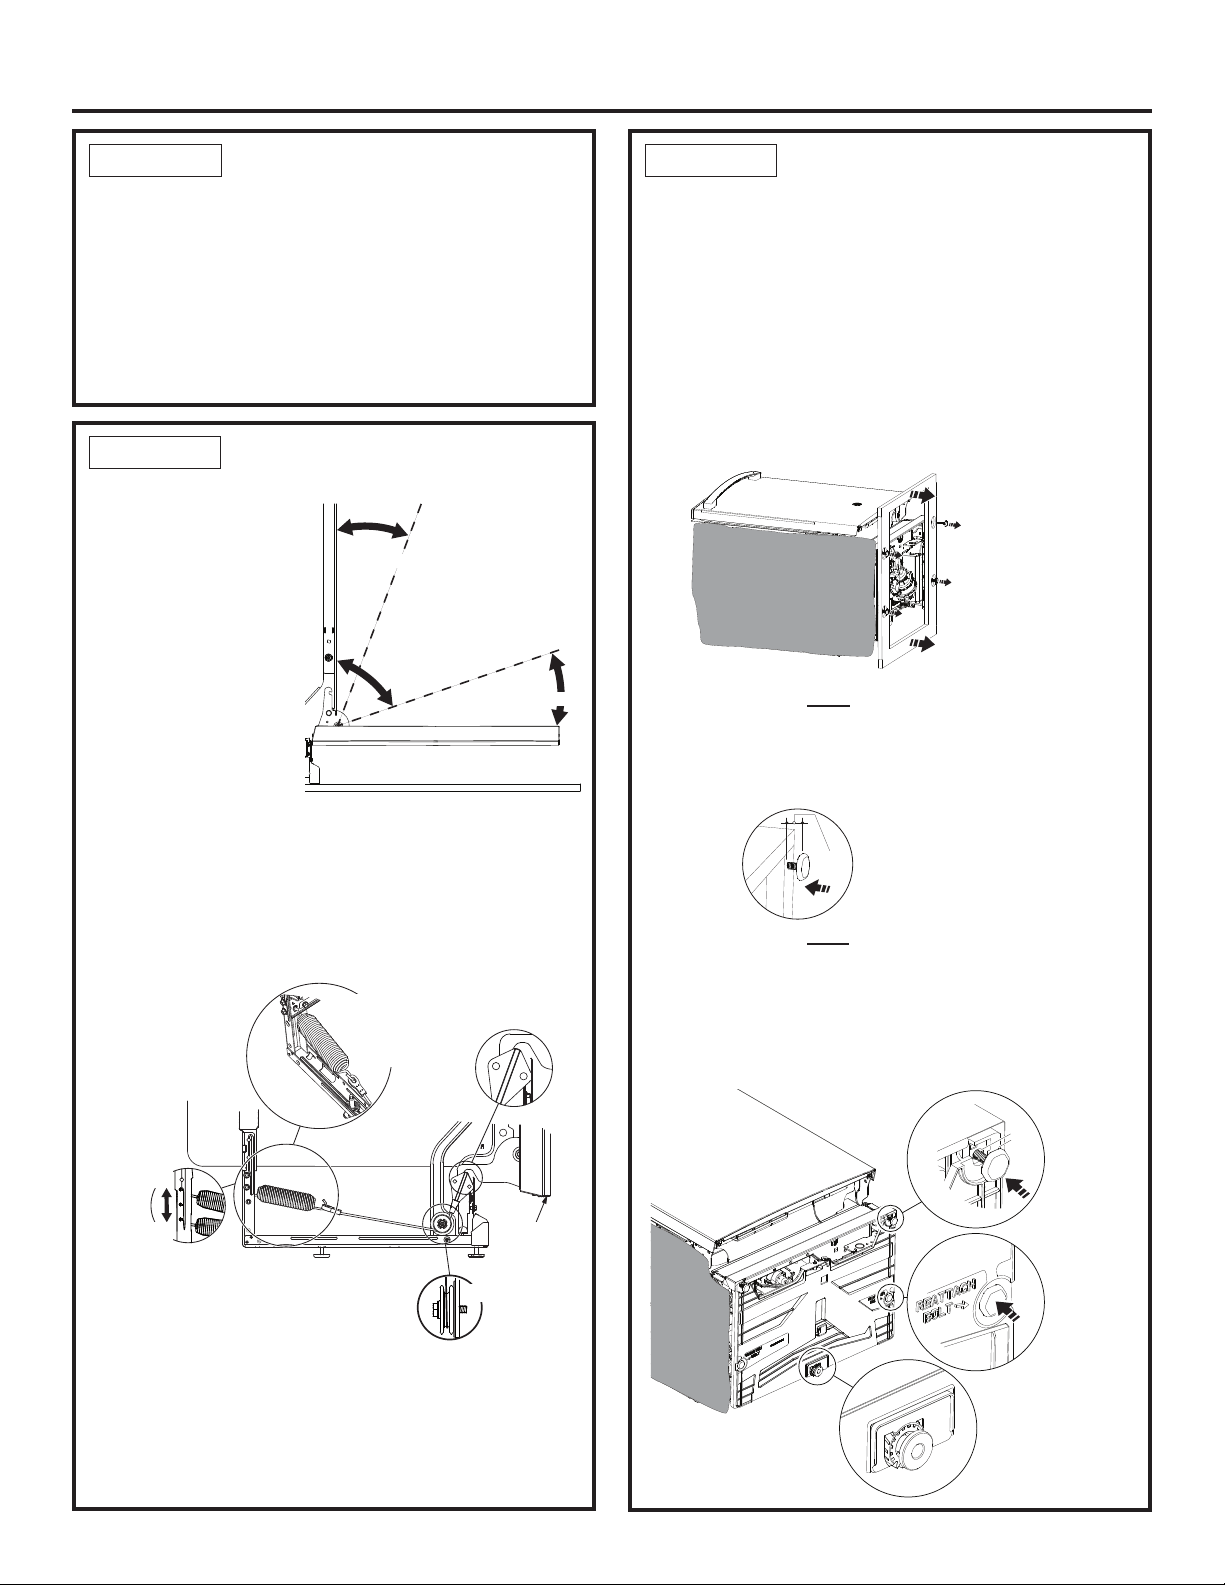
Do not remove wood base until you are ready to
install the dishwasher. The dishwasher will tip over
when the door is opened if base is removed.
CAUTION
STEP 1
PREPARATION
Locate the items in the installation package:
• Screws
• Junction box cover
• Drain hose and clamp
• Mounting brackets
• Trim pieces (on some models)
• Drain hose hanger
• Owner’s Manual
• Product samples and/or coupons
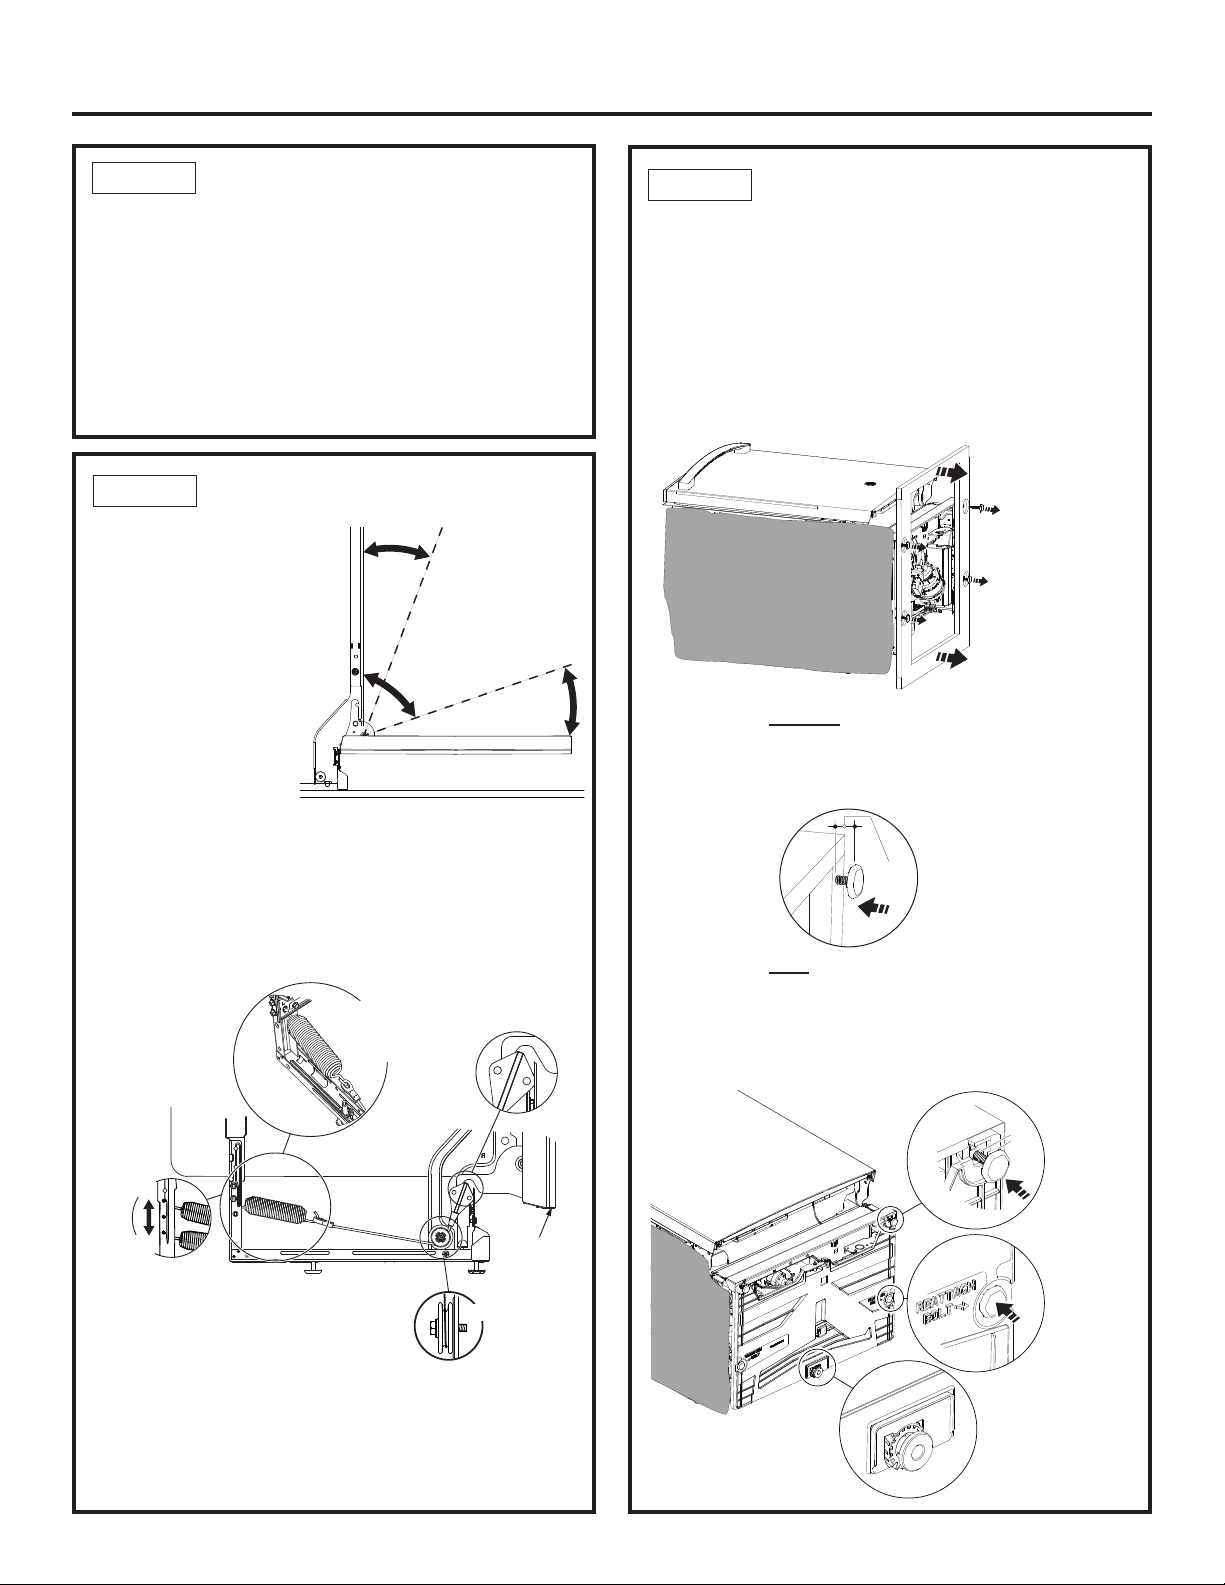
Dishwasher Installation
STEP 3
REMOVE WOOD BASE,
INSTALL LEVELING LEGS
IMPORTANT – Do not kick off wood base!
Damage will occur.
• Move the dishwasher close to the installation location
and lay it on its back. NOTE: Do not place the
dishwasher on its side.
• Remove the 4 leveling legs on the underside of the
wood base with a 15/16” socket wrench.
• Discard base.
• On models without the center bottom adjustable
leveling system:
Screw leveling legs back into the dishwasher frame,
approximately 1/2” from frame as shown.
• On models with the center bottom adjustable
leveling system:
Screw front leveling legs back into dishwasher frame
approximately 1/2”.
Screw rear leveling legs completely in until fully seated.
CHECK DOOR BALANCE
NOTE: If installing a
Custom Door Panel
(available on some
models), please
follow the instructions
found in the Custom
Door Panel kit
WD35X20417.
• With dishwasher
on the wood base,
check the door
balance by opening
and closing the door.
• Door is properly balanced if, when opened, it self
closes within 20° from vertical, stays in position from
20° to 70° and falls fully open beyond 70°.
• If necessary increase or decrease tension as shown.
Some models will have 2 springs on one side and
1 spring on the other side. Latch door and adjust
springs to correct balance.
Tip: Make sure door opens and closes smoothly.
Check door opening and closing. If door does not open
easily or falls too quickly, check spring cable routing.
The cable is held in place by “shoulders” on the pulley.
Check to be sure cable has not slipped over the pulley
shoulders and is routed as shown.
6
Figure G
Door
closes
within
20°
Door stays in
position from
20° to 70°
Door falls fully
open beyond 70°
Side View
Figure G
Figure H
Side View
Custom
door
panel
Spring
hooked
to hole
inside rail
NOTE: The number of
springs, on each side,
will vary by model.
Front View
Make sure pully
cables are within
pulley shoulders
Increase
Tension
Decrease
Tension
STEP 2
Approx
1/2"
Replace all 4 legs
to about 1/2” from
the frame
Remove all four
leveling legs and
the wood base
Appearance will vary
Replace 2
front legs
to about
1/2” from
the frame
Replace
2 back
legs and
screw in
completely
Leveling System
To be adjusted
later in Step 14.
1/2”
STEP 7
INSTALL DRAIN HOSE TO
DRAIN LOOP
Connect drain loop end to drain hose using the clamp
as shown in the figure.
NOTE: The high drain loop on the side of the tub is
designed for better wash performance. Do not remove
from the side of the tub.
STEP 8
POSITION WATER LINE
AND HOUSE WIRING
• Position water supply line and house wiring on the
floor of the opening to avoid interference with base
of dishwasher and components under dishwasher.
STEP 9
INSTALL DRAIN HOSE,
THROUGH CABINET
• Position dishwasher in front of cabinet opening,
and if present, dislodge drain hose from drain hose
clip. Insert drain hose into the hole in cabinet side.
If a power cord is used, guide the end through a
separate cabinet opening.
Tip: Prevent unnecessary service call charges for
fill, drain or noise concerns.
Position utility lines so they do not interfere with
anything under or behind the dishwasher.
Dishwasher Installation
STEP 5
FLOOR PROTECT PAN
(On some models)
• Pan should not be removed during installation.
STEP 6
INSTALL 90° ELBOW
• Thread 90° elbow
onto the water valve.
Ensure rubber gasket
is located between
valve and elbow.
• Do not overtighten
elbow. Water valve
bracket could bend
or water valve fitting
could break.
• Position the end
of the elbow to
face the rear of the
dishwasher.
Figure O
Water
Line
House
Wiring
4"
4"
6"
6"
7
Figure M
Water
Valve
Bracket
Fill Hose
Front of dishwasher
90° Elbow
House
Wiring
Power Cord
(If used)
Drain
Hose
Water
Line
Insulation
Blanket
Ensure drain hose is not
twisted or pinched
Maximum drain hose length
is 16’ from the rear of the
dishwasher
Do not disconnect or remove high
drain loop from left side of dishwasher
Pull insulation
blanket over
collar
Figure P
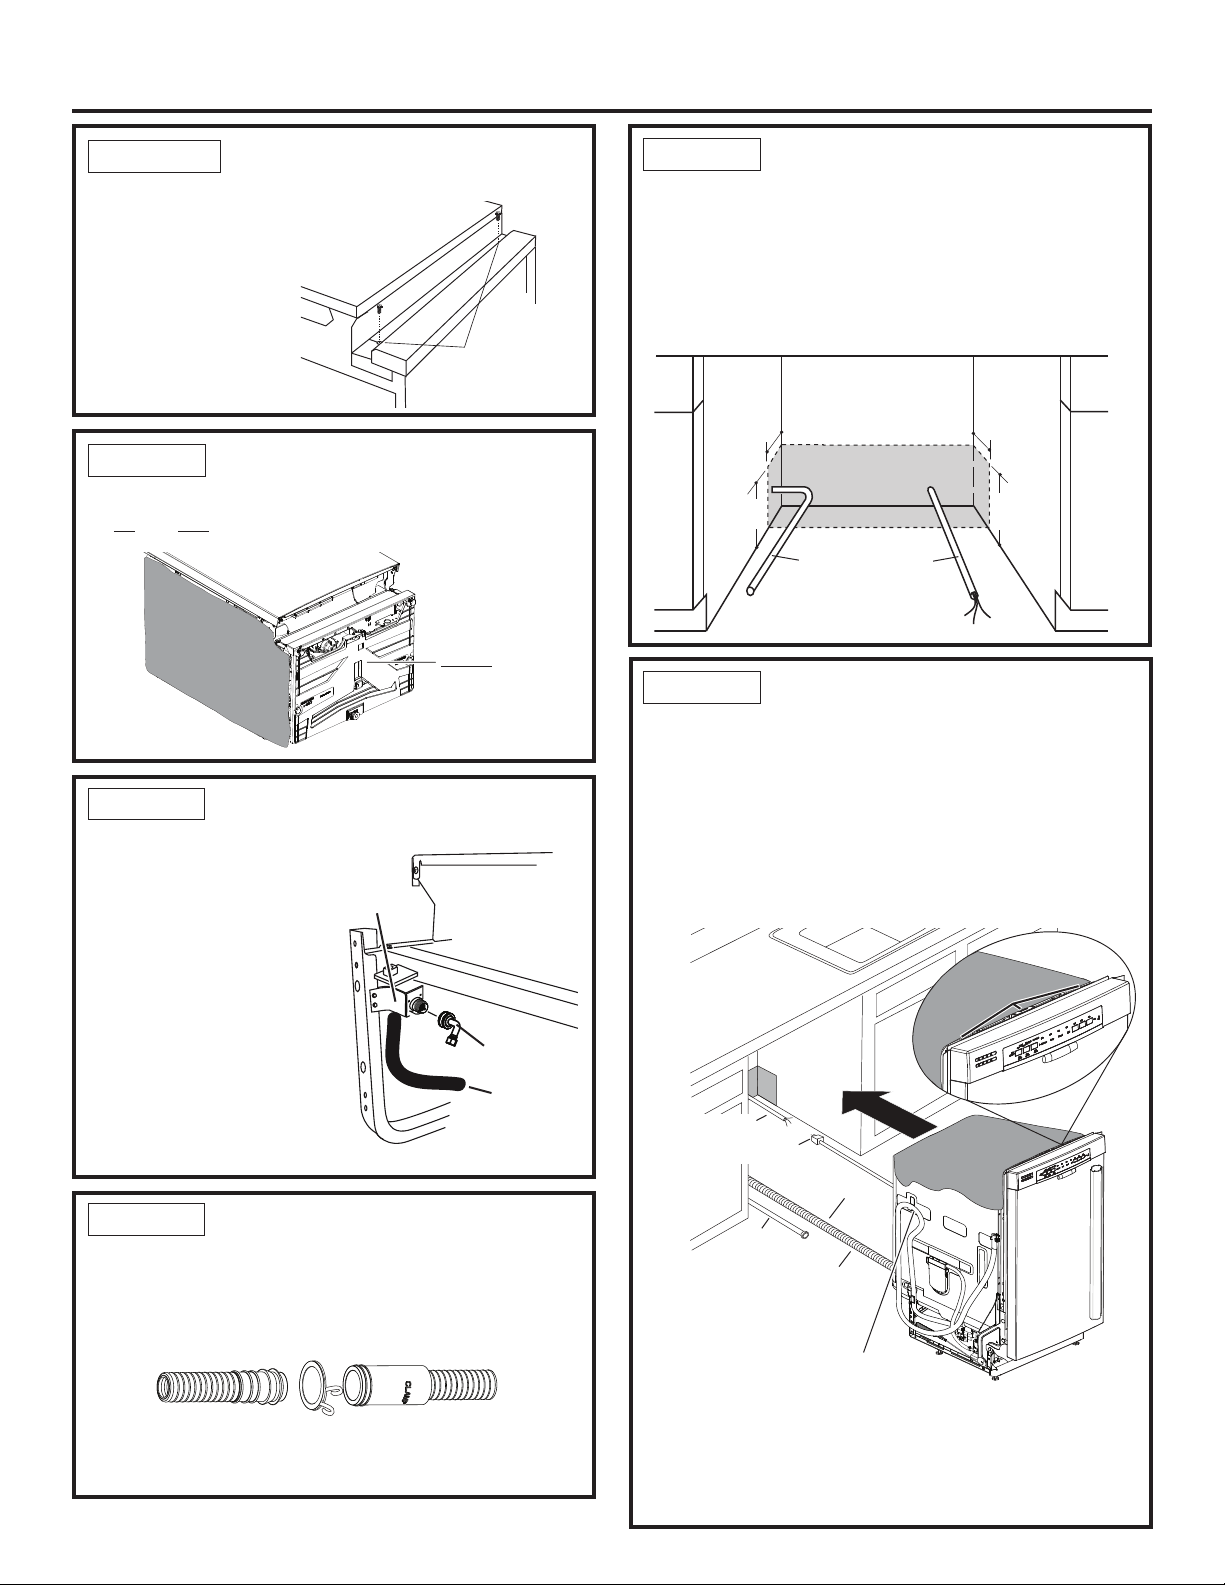
REMOVE TOEKICK
• Remove the 2
toekick screws
and toekick.
Set aside for
use in Step 22.
STEP 4
Toekick
Remove 2
Toekick Screws
Do not
remove
pan
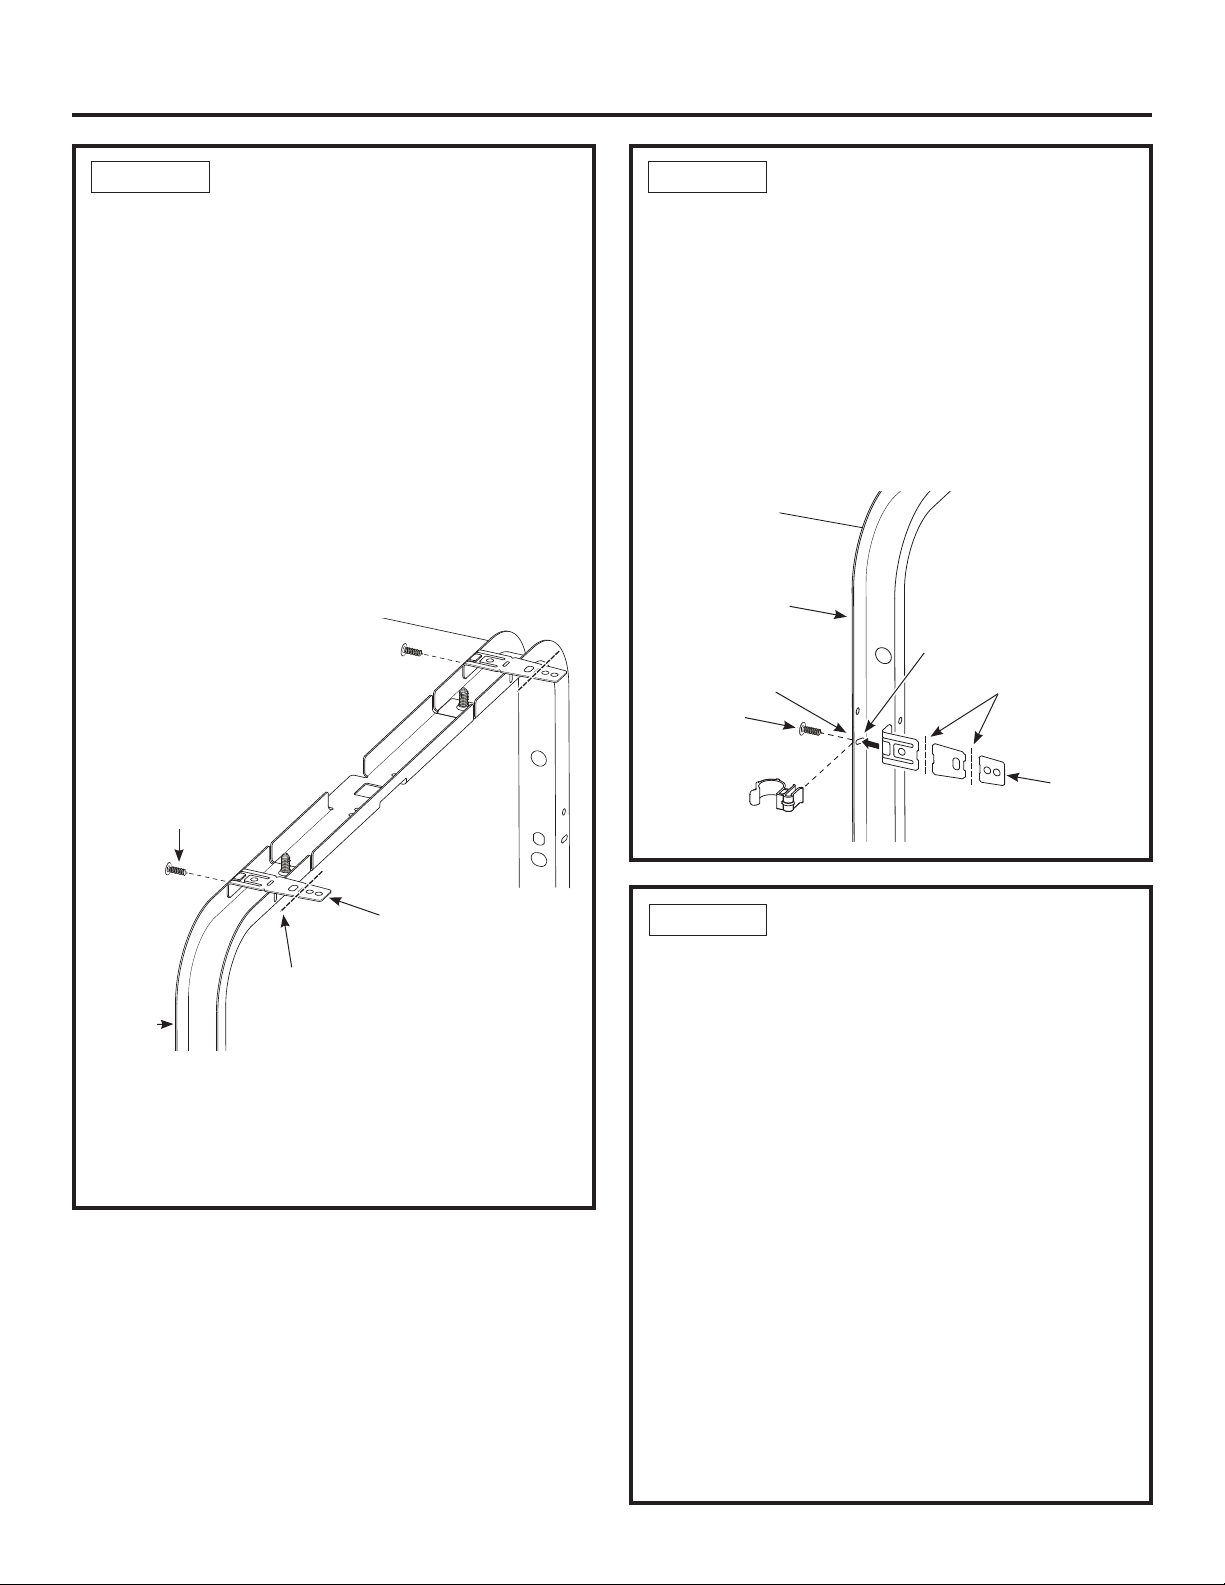
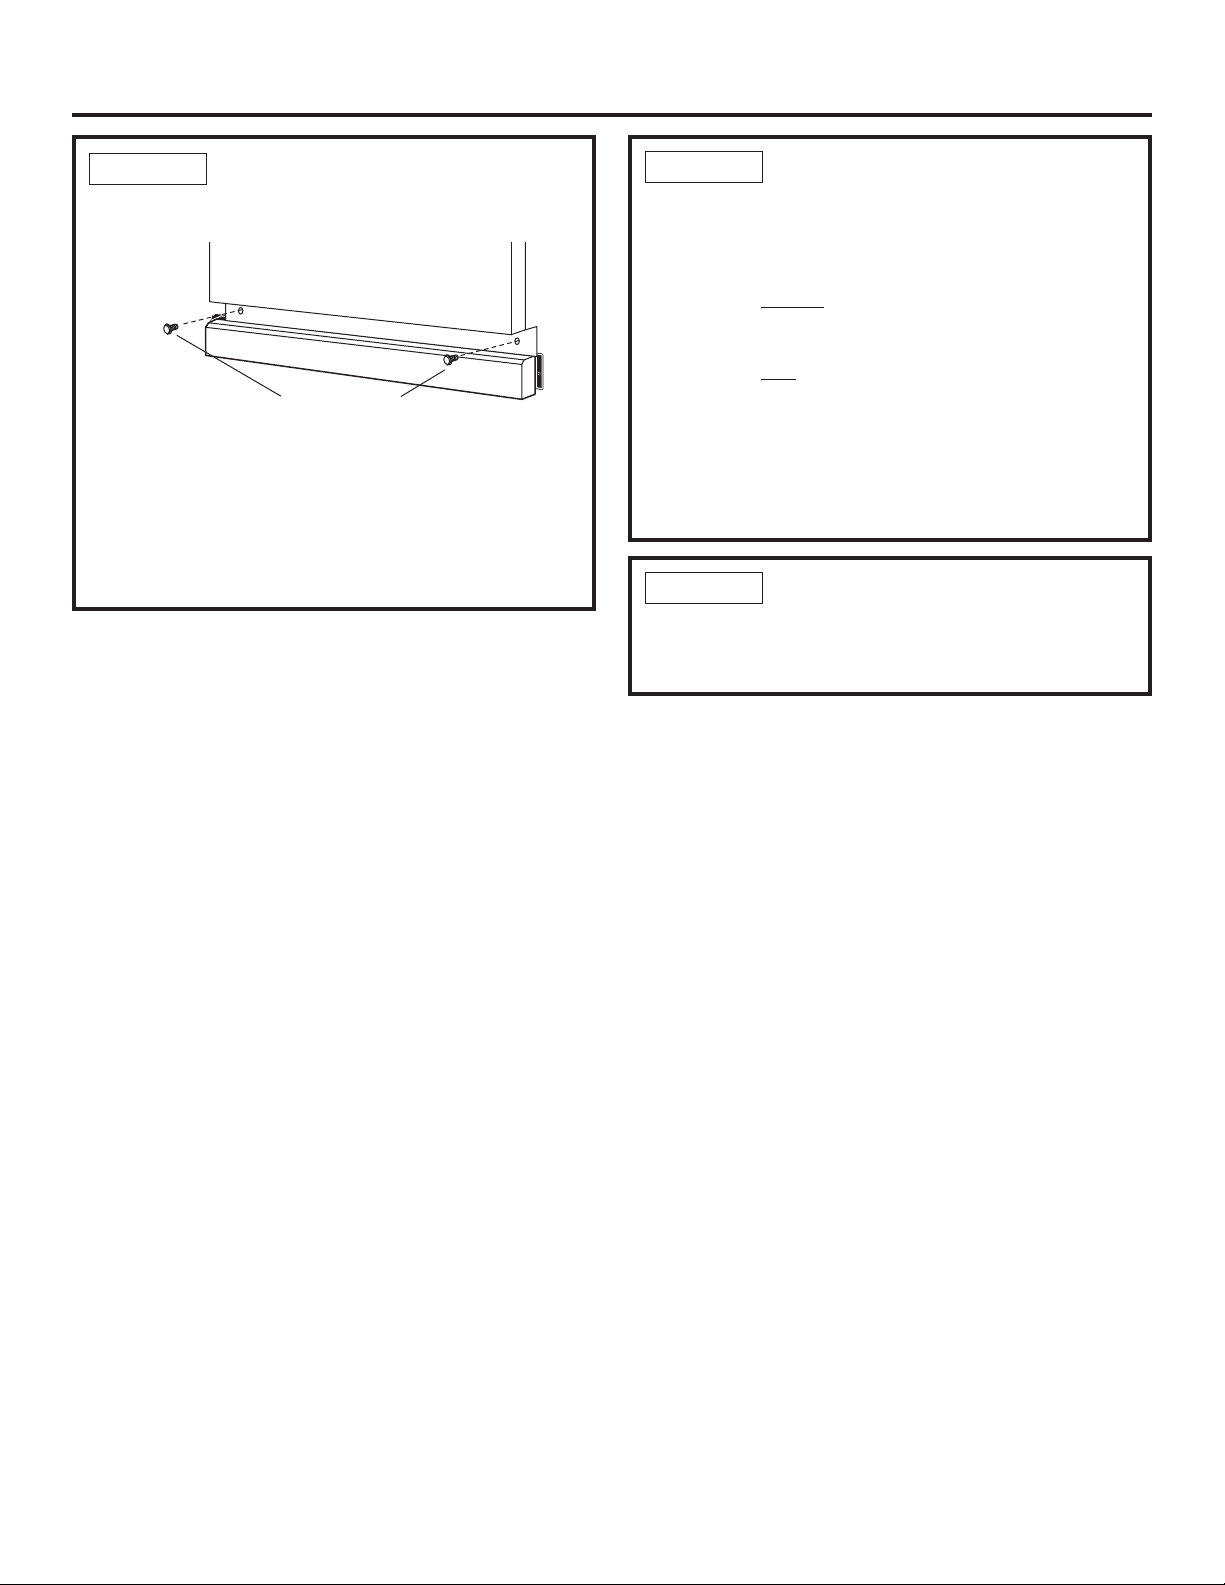
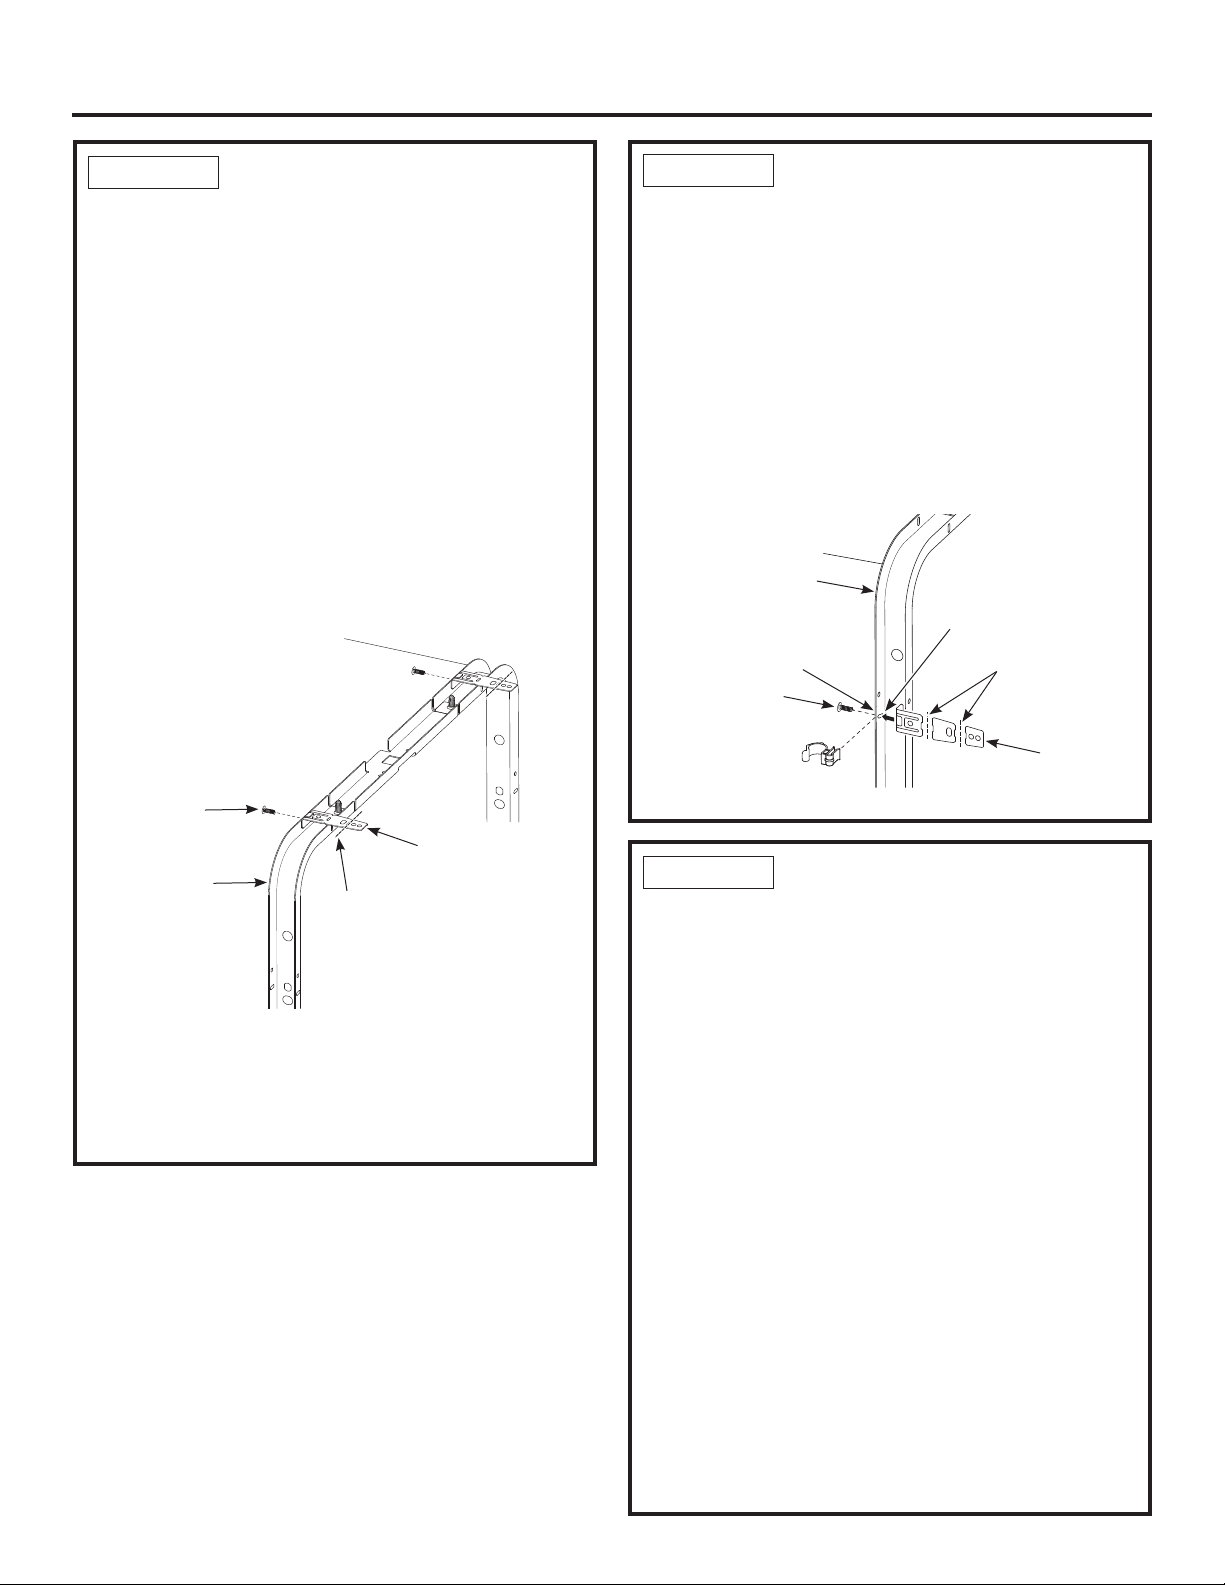
INSTALL TRIM PIECES
In this step you will need the trim pieces set aside in Step 1.
• Select the top trim piece (See Figure R) and line up
center to the top latch. Press the trim piece onto the
tub flange moving from one side to the other.
• Select the left trim piece (see Figure R). Align top
edge with the top trim and press it onto the left side
of the tub flange moving from the top to the bottom.
Repeat for the right side tub flange trim piece. (See
Figure R for right side trim piece.)
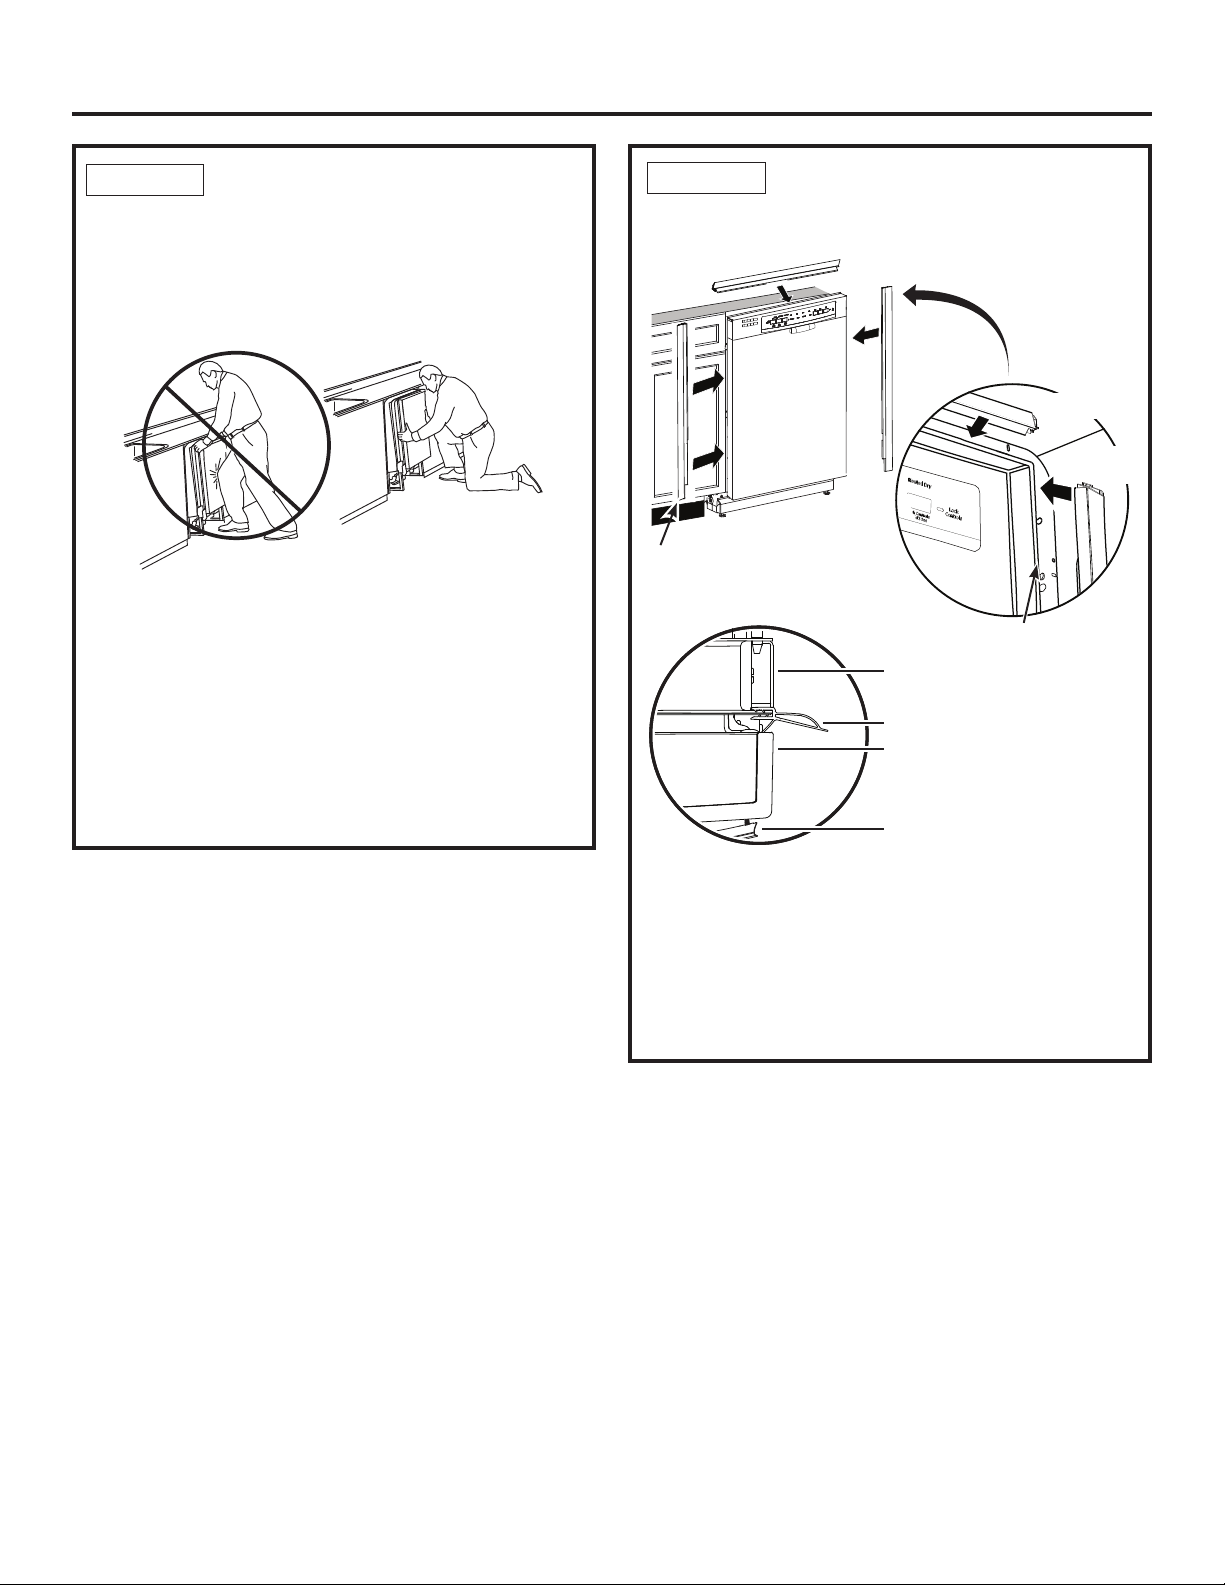
Dishwasher Installation
SLIDE DISHWASHER
THREE-FOURTHS OF
THE WAY INTO CABINET
IMPORTANT – Do not push against front panel with
knees. Damage will occur.
•
Grasp the sides of the front panel and slide
dishwasher into the opening a few inches at a time.
• As you proceed, pull the drain hose through the
opening under the sink. Stop pushing when the
dishwasher extends about 6 inches forward of
adjacent cabinets.
• Make sure drain hose is not kinked under or behind
the dishwasher.
• Make certain the house wiring, drain line and
water line do not interfere with components under
dishwasher.
STEP 10
Figure Q
Do not push against
front door panel with
knee. Damage to the
door panel will occur.
8
Top
View
Handle
Door
Tub trim
Tub frame
STEP 11
Side Trim
Figure R
Side
Trim
Top View
Side
Trim
Top Trim
Fully seat to tub flange
Dishwasher Installation
9
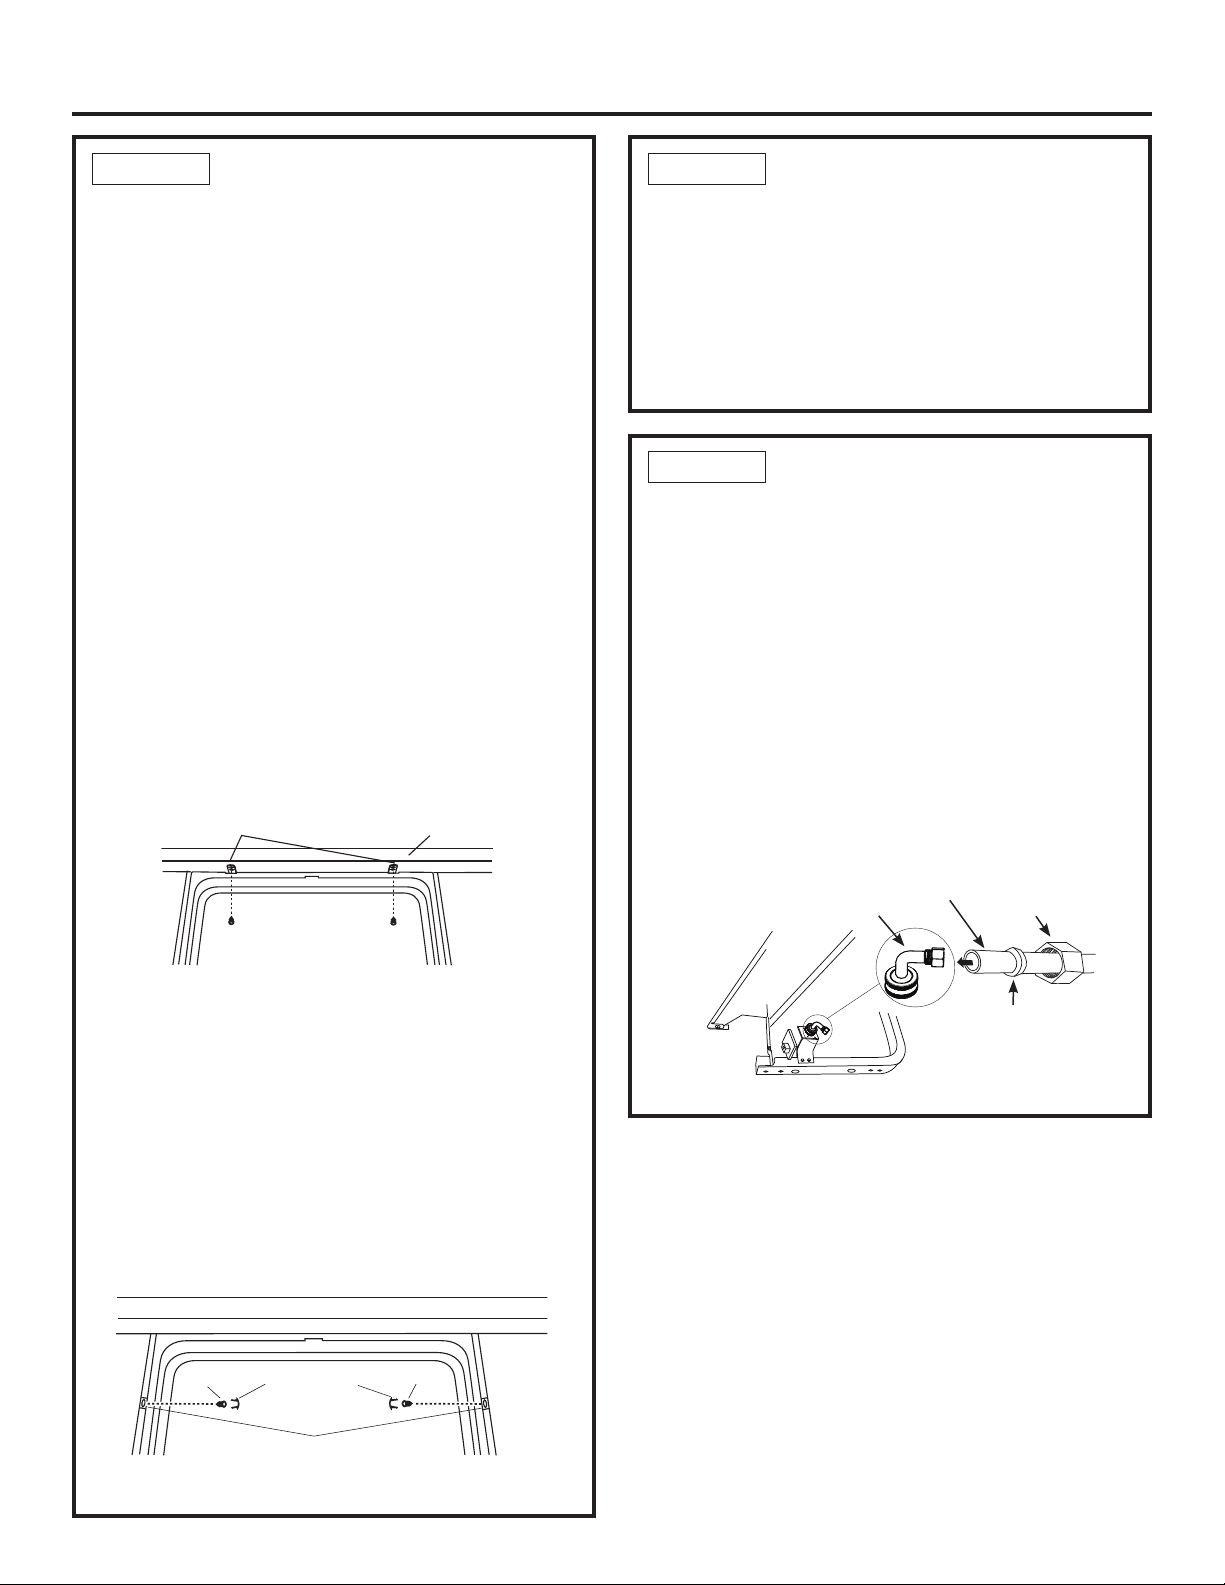
INSTALL MOUNTING
BRACKETS
You will need the mounting brackets and 2 #8 hex-
head screws set aside in Step 1.
You must install the mounting brackets onto the
dishwasher tub frame top or sides prior to sliding
the dishwasher into place under the countertop. This
dishwasher is capable of a true-flush installation at a
24” deep opening. The mounting brackets have several
available attachment positions to accommodate different
cabinet constructions.
Install mounting brackets on top if the
underside of countertop is wood or wood-like
material that accepts screws:
IMPORTANT - After installing brackets and before
closing the dishwasher door, adjust the brackets
by bending them up as needed, so that they do not
contact the top of the dishwasher door and cause
damage.
•
If you are installing the dishwasher under a counter
with a short overhang, the countertop brackets may
extend beyond the edge of the counter. If this is
the case, remove the excess length by repeatedly
bending the brackets at the front notch only until they
break.
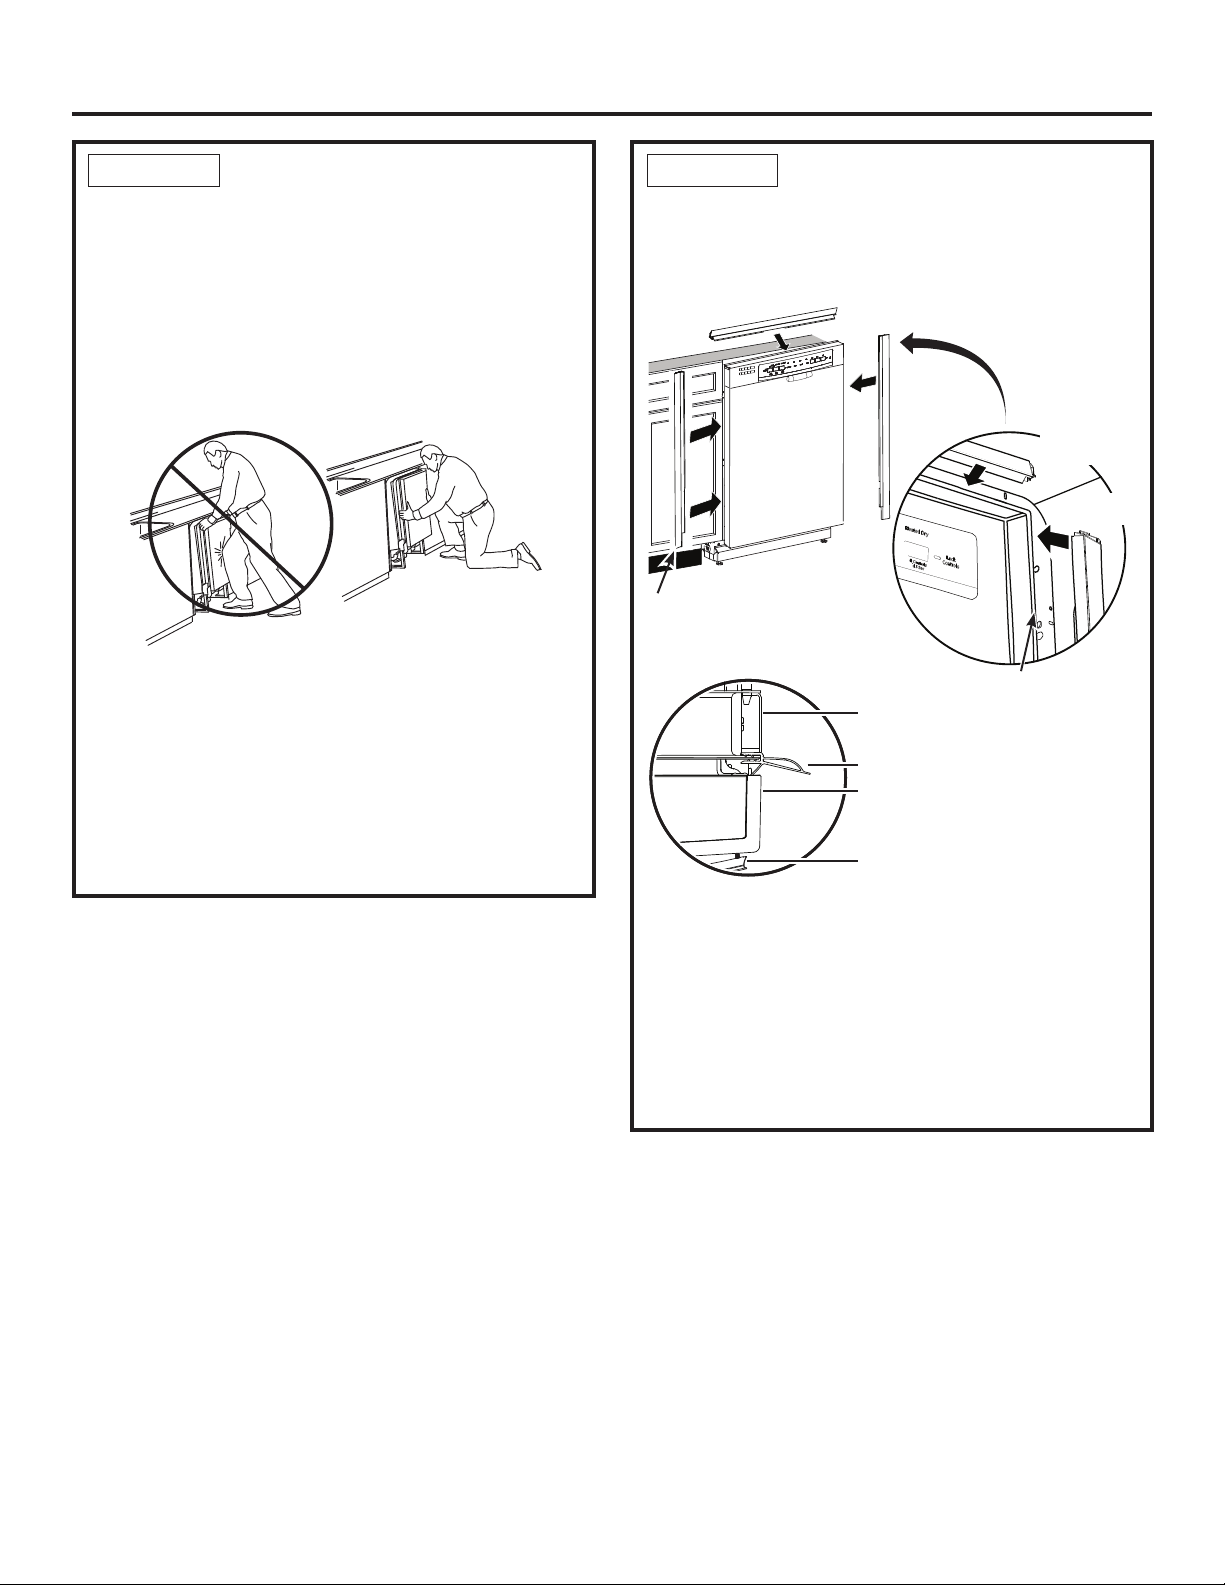
PUSH DISHWASHER INTO
FINAL POSITION
•
Check the tub insulation blanket, if equipped, to be
sure it is smoothly wrapped around the tub. It should
not be “bunched up” and it must not interfere with
the door springs. If the insulation is “bunched up” or
interfering with the springs, straighten and re-center
the blanket prior to sliding the dishwasher into its
final position.
•
Slide the dishwasher into the final position by
pushing on the sides of the door panel. Do not push
or pull the door in a partially open or closed position
when moving the dishwasher. Do not use a knee or
push on the center of the panel. If you do, damage to
the panel will likely result. Check that the dishwasher
is squarely positioned in the cabinet opening at
both the top and the bottom of the appliance prior to
mounting to the cabinet.
IMPORTANT – Before opening the dishwasher door,
be certain the edges of the dishwasher door panel
are behind the face of the adjacent cabinet and not
up against the cabinet face. Refer to Figure U. If the
dishwasher door is opened when the edge of the door
is against the face of the cabinet, dishwasher door
damage and cabinet damage will occur.
STEP 12
INSTALL MOUNTING
BRACKETS (CONT.)
Install mounting brackets on sides if the
countertop is granite or similar material that will
not accept wood screws:
• If present, remove drain hose clip from collar and
dispose.
•
Break off front portion of the tab with pliers at the
location shown prior to attaching to dishwasher.
•
Position the left-hand side bracket as shown. Attach
the bracket to the tub frame with the #8 screw through
the slotted hole below the round hole. Repeat with the
right bracket.
STEP 12
Figure T
Bracket
Dishwasher
tub frame
#8 Bracket
screw as
supplied
Side Mounting
Bend and break
here if necessary
Care should be taken
to ensure mounting
screws do not damage
cabinetry
Do not pinch the
latch wires in #8
bracket screw
Remove
this clip
Tub
Front
STEP 13
#8 Bracket
Screw
Bracket
Bend and break here
after installing if counter
has a short overhang.
Top Mounting
Figure S
Tub
Front
Dishwasher
tub frame
Dishwasher Installation
PUSH DISHWASHER
INTO
FINAL POSITION (CONT.)
•
Open and close the dishwasher door to be sure it
operates smoothly, and does not rub on the adjacent
cabinet.
Tip: Prevent unnecessary service charges for
panel damage or wash performance.
Check dishwasher alignment prior to opening
dishwasher door to prevent panel damage.
Make sure utility lines are not trapped or crushed behind
dishwasher. Crushed lines will restrict water flow.
LEVEL DISHWASHER
(CONT.)
•
Remove the lower dish
rack and place a level on
the door and lower rack
track as shown in figure.
If your model has a rear leveling system, the rear height
is adjusted from the front of the dishwasher along with the
2 front legs on the bottom of the dishwasher. Begin the
leveling process with the front legs by individually turning the
front 2 legs. Adjust the front legs first. When the front legs
are adjusted to a height resulting in an appropriate gap to
the upper cabinet, proceed to adjust the rear leveling system
by adjusting the leveling bolt as illustrated in the figure.
Turn the bolt to adjust the rear leveling system. Slowly rotate
the bolt clockwise to raise the back of the dishwasher, and
counterclockwise to lower it. Continue to adjust the feet until
the dishwasher is level as illustrated in the figure. Ensure all 3
legs are firmly in contact with the floor.
If your model has 4 leveling feet, adjust the
level of the dishwasher by individually turning
the 4 legs on the bottom of the dishwasher
as shown in figure.
•
The dishwasher is properly leveled when the level indicator is
centered left to right and front to back. Also, the dishwasher
door should close without hitting the side of the tub.
• Replace the lower rack.
Tip: Prevent unnecessary service charges. Verify
dishwasher is leveled.
Pull the dish racks half way out. They should stay put. Open
and close the door. The door should fit in the tub opening
without hitting the side of the tub. If the racks roll on their
own, or the door hits the side of tub, re-level the dishwasher.
10
STEP 13 STEP 14
LEVEL DISHWASHER
IMPORTANT – Dishwasher must be level for proper dish
rack operation, wash performance and door operation. The
dishwasher must be leveled left to right and front to back.
This ensures the dish racks will not roll in or out on their own,
circulation water will flow to the pump inlet, and the door will
close without hitting the side of the tub.
STEP 14
Figure U
Door Catches
on Cabinet Frame
Correct
Alignment
Incorrect Alignment
will result in door damage
Door
Fits and
Swings
Back
Behind
Cabinet
Frame
Check that tub trim does not
contact the door at all points
Tub trim may be trimmed if
necessary to ensure proper
door operation
Top
View
Handle
Door
Tub trim
Tub frame
Do not allow tub trim to get
trapped by or come into
contact with the door
Top
View
Tub trim
trapped
by door!
Cabinet
B
Turn front
leg to adjust
front height
Turn leveling system
bolt to adjust rear height
Turn front
leg to adjust
front height
Dishwasher Installation
11
POSITION DISHWASHER,
SECURE TO COUNTERTOP
OR CABINET
In this step you will need the 2 Phillips special head
screws from the screws set aside in Step 1.
The dishwasher must be secured to the countertop
or the cabinet sides. When the underside of the
countertop is wood, use Method 1. Use Method 2
when the underside of the countertop is made of a
material, such as granite, that will not accept wood
screws.
IMPORTANT – Prevent door panel and control
panel damage. Dishwasher must be positioned so
the front panel and control panel do not contact the
adjacent cabinets or countertop. Mounting screws
must be driven straight and flush. Protruding screw
heads could scratch the door panel or control panel
and interfere with door operation.
Method 1
Secure dishwasher to underside of wood countertop.
• Recheck alignment of the dishwasher in the cabinet.
Refer to Steps 13 and 14. Door panel and/or control
panel must not hit cabinets or countertop.
• Fasten the dishwasher to the underside of the
countertop with the 2 Phillips special head screws.
Refer to figure. Make certain screws are driven
straight and flush to prevent panel damage.
Method 2
Secure dishwasher to cabinet sides.
• Recheck alignment of the dishwasher in the cabinet.
Refer to Steps 13 and 14. Door panel and/or control
panel must not hit cabinets or countertop.
• Remove plug buttons. Do not discard.
• Fasten the dishwasher to the adjacent cabinets with
the 2 Phillips special head screws provided. Refer
to Figure X. Make certain screws are driven straight
and flush to prevent panel damage. Do not screw
into the cabinet face frame.
• Install plug buttons to the side of the tub in the holes
provided.
CONNECT WATER
SUPPLY
Connect water supply line to 90° elbow.
If using a flexible braided hose connection:
• Attach nut to 90° elbow using an adjustable wrench.
If using a copper tubing connection:
•
Slide compression nut, then ferrule over end of water
line.
• Insert water line into 90° elbow.
•
Slide ferrule against elbow and secure with
compression nut.
IMPORTANT – Check to be sure that door spring and/
or door spring cable do not rub or contact the fill hose
or water supply line. Test by opening and closing the
door. Re-route the water supply lines if a rubbing noise
or interference occurs.
Brackets
Wood Countertop
Figure X
Solid Surface Countertop
Side Brackets
Plug buttons
Screw
Screw
Figure Y
Compression
Nut
Hot Water
Supply Line
90° Elbow
Ferrule
Bottom Left Side
STEP 15
POSITION DISHWASHER,
SECURE TO COUNTERTOP
OR CABINET (CONT.)
• Re-check that the dishwasher is square and level at
both the top and bottom of the cabinet opening, with no
twisting or distortion of the tub or door after mounting to
the cabinets/countertop. Adjust if necessary.
• Confirm all leveling legs are in contact with the floor
to prevent the dishwasher from rocking and ensure
proper door and latch operation.
STEP 15
STEP 16
CONNECT DRAIN LINE
(CONT.)
• Connect drain line to air gap, waste tee or disposer
using the previously determined method. Secure
hose with a screw-type clamp.
Method 1 – Air gap with waste tee or disposer
Method 2 – “High drain loop” with waste tee or
disposer
With this method you will need the drain hose hanger
set aside in Step 1.
Fasten drain hose to underside of countertop with the
provided hanger.
IMPORTANT – When connecting drain line to
disposer, check to be sure that drain plug has been
removed. DISHWASHER WILL NOT DRAIN IF PLUG
IS LEFT IN PLACE.
Tip: Avoid unnecessary service call charges for a
no drain complaint.
Make sure excess drain hose has been pulled through
the cabinet opening. This will prevent excess hose
in the dishwasher cavity from becoming kinked or
crushed by the dishwasher.
Dishwasher Installation
Remove
Drain
Plug
12
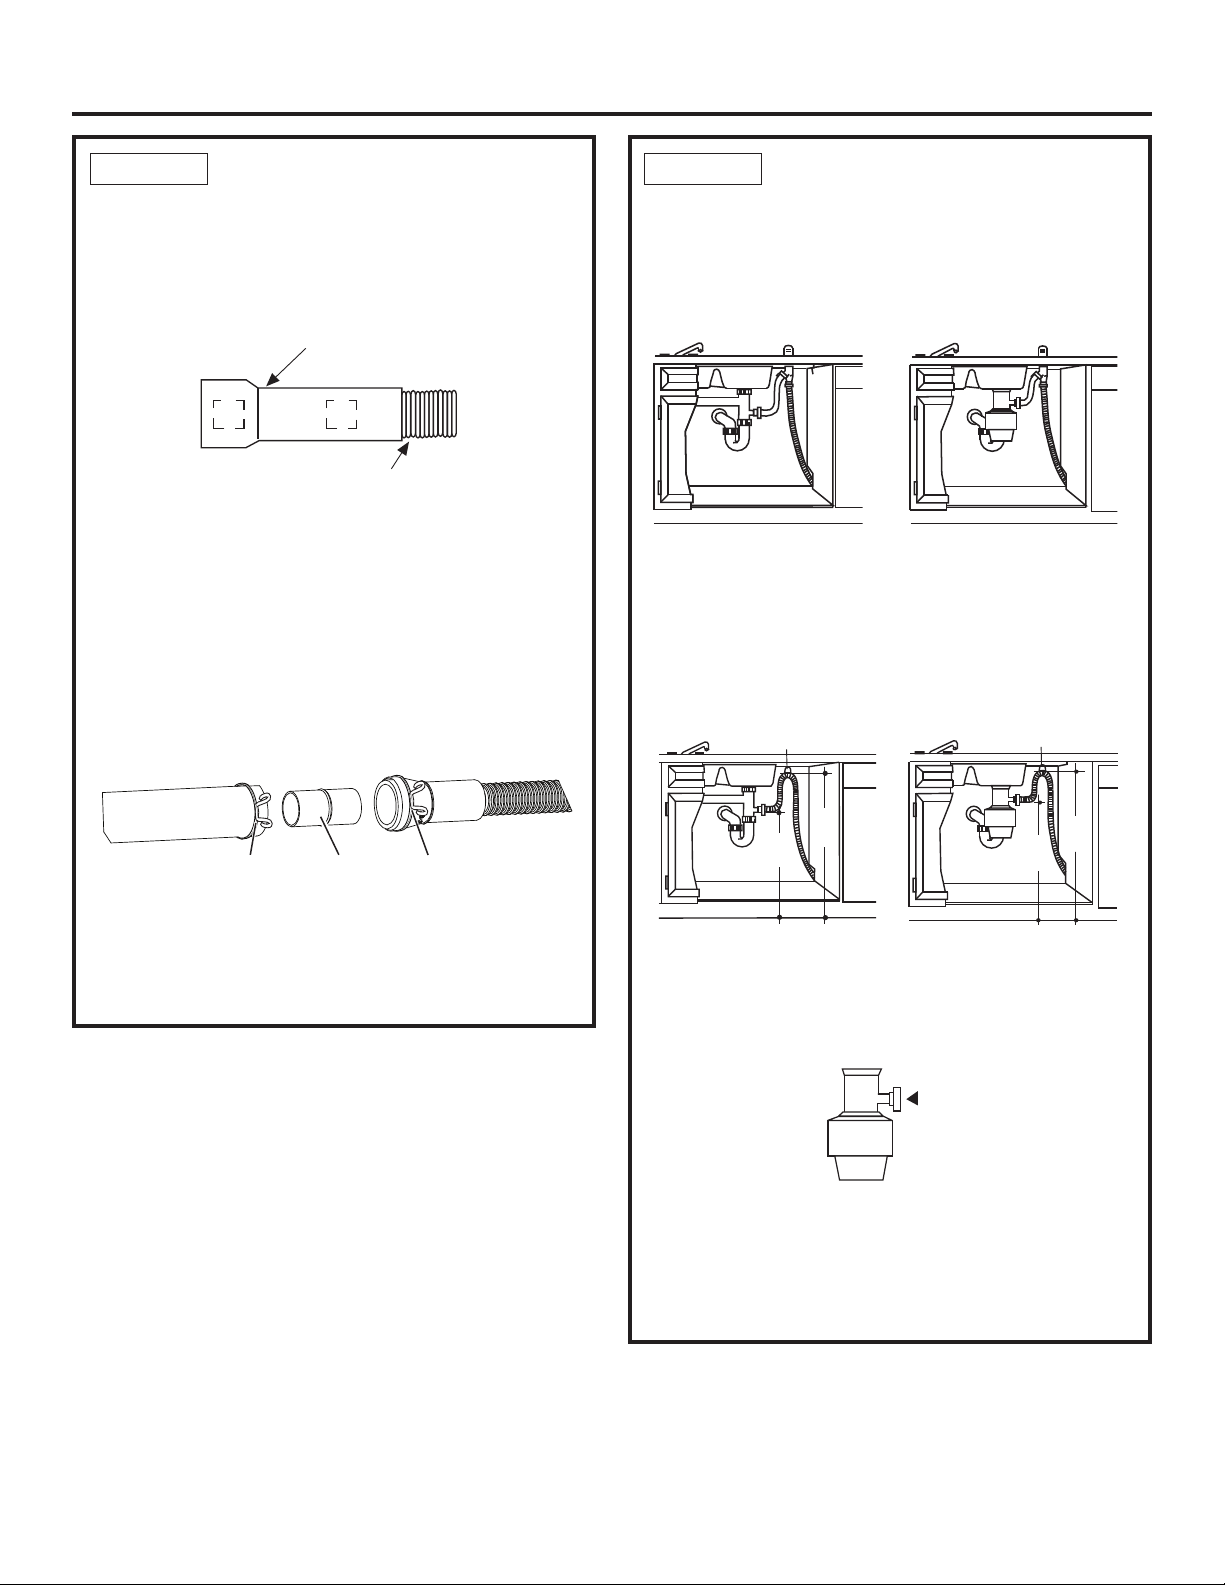
CONNECT DRAIN LINE
The molded end of the drain hose will fit 5/8” through 1”
diameter inlet ports on the air gap, waste tee or disposer.
• Determine size of inlet port.
• Cut drain hose connector on the marked line, if required,
to fit the inlet port.
• If a longer drain hose is required, replace the
provided user bag drain hose with GE Appliances
service part WD24X10065, a 12’ long hose which
can be connected directly to the drain loop already
attached to the unit (see Step 7). If service part hose
is not available, an additional hose with coupler, ID of
5/8” or 7/8” and no longer than 66”, may be attached
to the provided user bag drain hose. Secure the
connection with hose clamp (obtain locally) to the
provided user bag drain hose.
NOTE:
• TOTAL DRAIN HOSE LENGTH MUST NOT EXCEED
16’ FROM THE REAR OF THE DISHWASHER FOR
PROPER DRAIN OPERATION.
Figure Z
Cutting Line
1"
5/8"
IMPORTANT: Do not cut corrugated
portion of hose
STEP 17 STEP 17
Hose
Clamp
Coupler Hose
Clamp
Figure AA
Figure AB
Disposer Installation
Waste Tee Installation
Waste Tee Installation
Figure AC
18"
Min.
32"
Min.
32"
Min.
18"
Min.
Drain Hose Hanger
Drain Hose Hanger
Disposer Installation
Dishwasher Installation
13
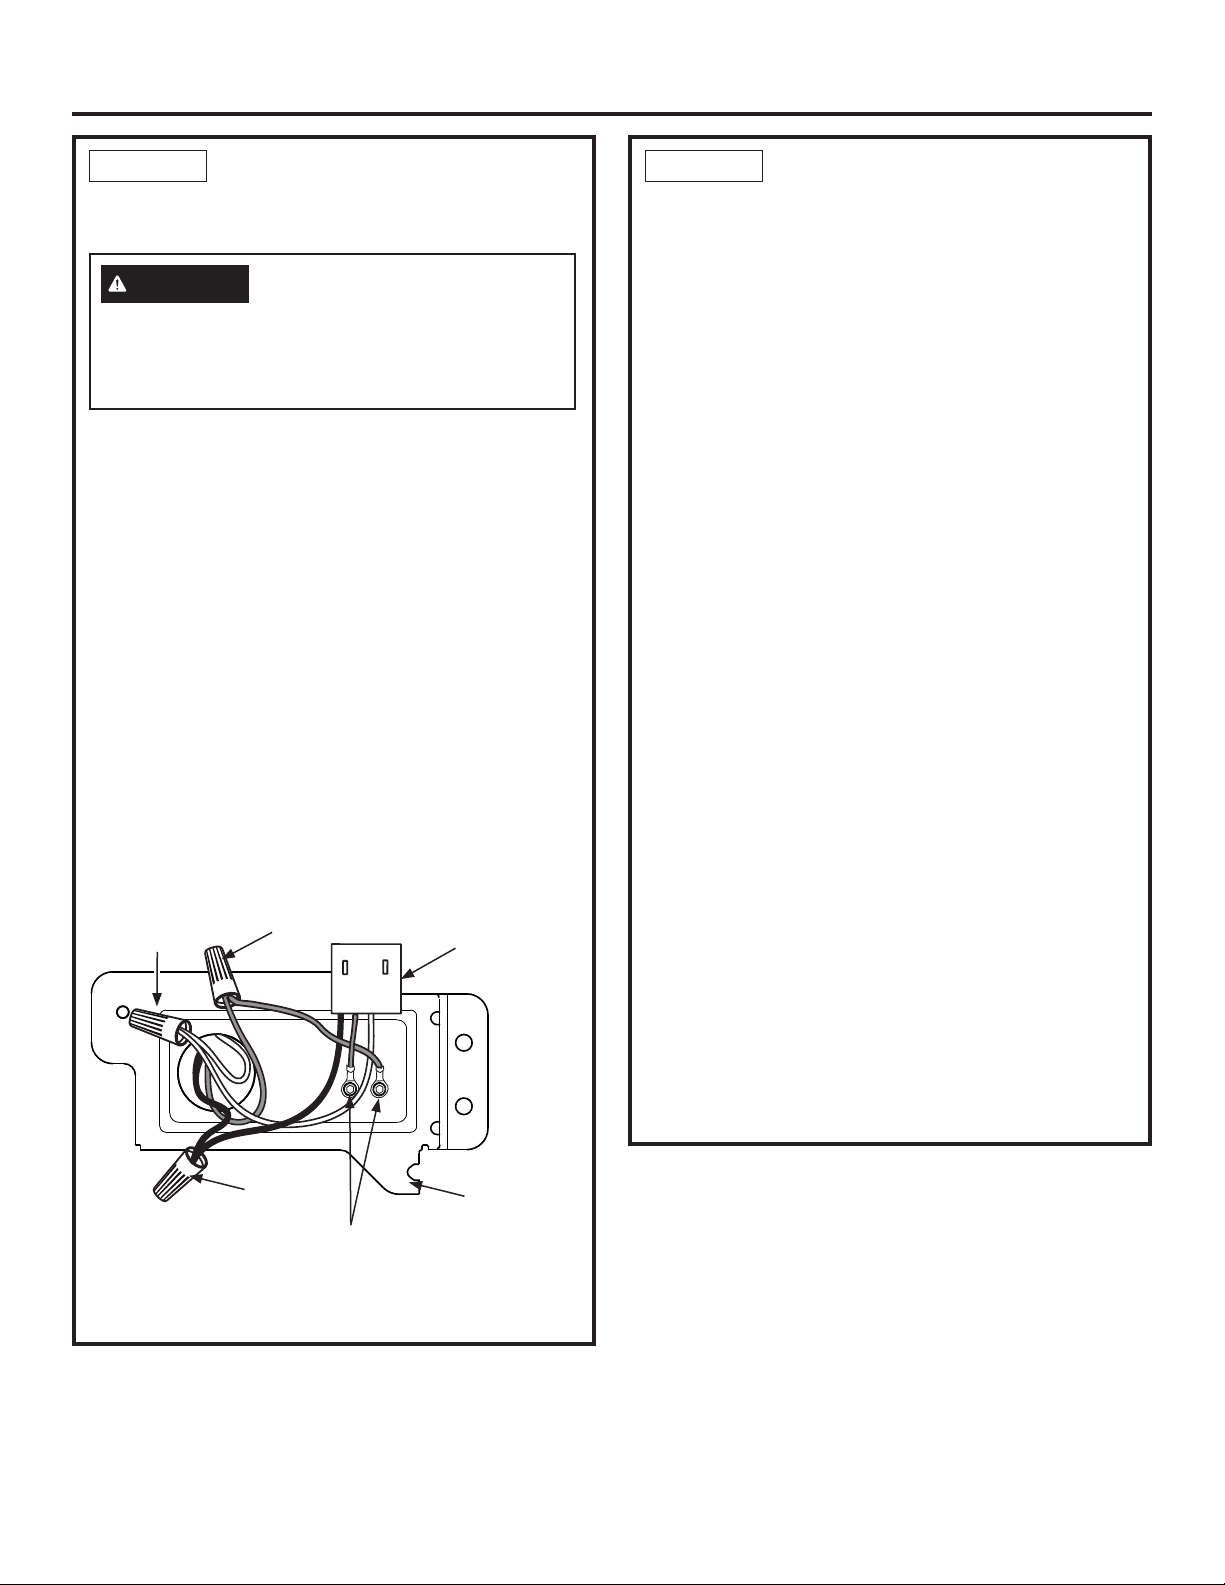
CONNECT POWER SUPPLY
If a power cord with plug is already installed
proceed to Step 19.
In this step you will need the junction box cover and
the #10 Hex head screw from the screws set aside in
Step 1.
• Secure house wiring to the back of the junction box
with a strain relief.
• Locate the 3 dishwasher wires, (white, black and
green) with the stripped ends coming out of the AC
jumper. Use UL listed wire nuts of appropriate size to
connect incoming ground to green, white to white and
black to black.
• Install the junction box cover using #10 hex head
screw. Check to be sure that wires are not pinched
under the cover.
• Make sure that the junction box cover is resting on
the mounting bracket.
• If using a Power Cord Kit, use GE Appliances part
number WX09X70910 or WX09X70911 and refer to
the included instructions.
Figure AD
Ground
(Green)
NOTE: Do not remove the
Junction Box Bracket.
AC
Jumper
Junction Box
Bracket
Black
White
Ground Screws
NOTE: All ground screws, brackets and wires must
remain intact.
If house wiring is not 2-wire with ground, a ground
must be provided by the installer. When house wiring
is aluminum, be sure to use UL-Listed anti-oxidant
compound and aluminum-to-copper connectors.
WARNING
STEP 18
PRETEST CHECKLIST
Review this list after installing your dishwasher to
avoid charges for a service call that is not covered
by your warranty.
• Check to be sure power is OFF.
• Open door and remove all foam and paper
packaging.
• Locate the Owner’s Manual set aside in Step 1.
• Read the Owner’s Manual for operating instructions.
• Check door opening and closing. If door does not
open and close freely, check for proper routing of
spring cable over pulley. If door drops or closes
when released, adjust spring tension. See Step 2.
• Check to be sure that wiring is secure under the
dishwasher, not pinched or in contact with door
springs or other components. See Step 18.
• Check door alignment with tub. If door hits tub, level
dishwasher. See Step 14.
• Check door alignment with cabinet. If door hits
cabinet, reposition dishwasher. See Step 13.
• Check that door spring does not contact water line,
fill hose, wiring or other components. See Step 13.
• Verify water supply and drain lines are not kinked
or in contact with other components. Contact with
motor or dishwasher frame could cause noise.
• Turn on the sink hot water faucet and verify water
temperature. Incoming water temperature must be
between 120°F and 140°F. A minimum of 120°F
temperature is required for best wash performance.
See “Prepare Hot Water Line,” page 5.
• Add 1 quart of water to the bottom of the dishwasher
to lubricate the pump seal.
• Turn on water supply. Check for leaks. Tighten
connections if needed.
• Remove protective film if present from the control
panel and door.
• Check that tub trim does not contact the door.
STEP 19
Dishwasher Installation
14
DISHWASHER WET TEST
• Turn on power supply or plug power cord into outlet,
if equipped.
• Select a cycle to run and push the Start pad.
• Ensure the door is latched. Dishwasher should start.
• Check to be sure that water enters the dishwasher.
If water does not enter the dishwasher, check to be
sure that water and power are turned on.
• Check for leaks under the dishwasher. If a leak
is found, turn off power at the breaker, and then
tighten water connections. Restore power after leak
is corrected.
NOTE: A small amount of water may splash out of
the fill funnel, on the right side of the tub, during the
first use after installation. Splash-out is most likely to
occur if there is air in the water supply line from new
construction or if the valve has been closed for an
extended time.
• Check for leaks around the door. A leak around
the door could be caused by door rubbing or
hitting against adjacent cabinets. Reposition the
dishwasher if necessary. See Step 13.
• Press and hold the Start pad for 3 seconds to
cancel the cycle. The unit will begin to drain. Check
drain lines. If leaks are found, turn off power at the
breaker and correct plumbing as necessary. Restore
power after corrections are made. See Steps 7, 8, 9,
10 and 17.
• Open dishwasher door and make sure all of the
water has drained. If not, check that disposer plug
has been removed and/or air gap is not plugged.
Also check drain hose to be sure it is not kinked
underneath or behind dishwasher. See Step 17.
• Press Start pad once again and run dishwasher
through another cycle. Check for leaks and correct if
required.
• Repeat these steps as necessary.
STEP 20
POSITION SOUND
INSULATION PIECE
(on some models)
• Locate the sound insulation package inside the
dishwasher.
• Stand the parts upright as shown.
• Locate the control box.
• Push insulation block portion under the dishwasher
until it is beneath the control box.
• Push the panel portion up to the front of the block.
• Tuck the sides of the front panel behind the toekick
attachment screw holes.
Control Box
Figure AH
STEP 21
Push the sides of the insulation behind the toekick
attachment screw holes
(on some models)
Toekick
Insulation Block
(On some models.)
Dishwasher
Door
B
Dishwasher Installation
LITERATURE
• Be sure to leave complete literature package, these Installation
Instructions and product samples and/or coupons with the
consumer.
REPLACE TOEKICK
• Place toekick against the legs of the dishwasher.
• Align the toekick with the bottom edge and make
sure it is against the floor.
• Insert and tighten the 2 toekick attachment screws.
The toekick should stay in contact with the floor.
Tip: Reduce sound from under the dishwasher.
Make sure toekick is against floor.
Figure AJ
Attachment
Screws
Toekick
CHECK THE FOLLOWING
• Tub trim does not interfere with the door
• Dishwasher is square and level at both the top and
bottom of the cabinet opening, with no twisting or
distortion of the tub or door
• On models without the adjustable leveling system,
make sure all 4 legs of the dishwasher are firmly in
contact with the floor
• On models with the adjustable leveling system, make
sure both front legs of the dishwasher and the center
rear leveling system leg are firmly in contact with the
floor
• Drain hose is not pinched between the dishwasher
and adjacent cabinets or walls
• Tub trim is fully seated on the tub flange
STEP 22
STEP 23
STEP 24
15

NOTE: Product improvement is a continuing endeavor. Therefore, materials, appearance and specifications are subject to change without notice.

VEUILLEZ LIRE ATTENTIVEMENT
CONSERVER CES DIRECTIVES
VÉRIFIEZ LES POINTS SUIVANTS
La moulure de la cuve ne gêne pas la porte
Le lave-vaisselle est d'équerre et de niveau par rapport au
bas et au haut de l'ouverture de l'armoire, sans torsion ni
déformation de la cuve ou de la porte
Les quatre (4) pieds reposent fermement sur le plancher
Le boyau de vidange n'est pas coincé entre le lave-
vaisselle et les armoires ou les murs adjacents
La moulure de cuve repose entièrement contre le bord
de la cuve
ARRÊT
POUR VOTRE SÉCURITÉ
Veuillez lire et observer toutes les mises en garde
AVERTISSEMENT et ATTENTION données dans les
présentes directives.
IMPORTANT – Observez tous les codes et
ordonnances en vigueur.
• Note à l’installateur – Veuillez laisser les présentes
directives au consommateur pour l’inspecteur local.
• Note au consommateur – Veuillez conserver les
présentes directives avec votre Manuel d’utilisation
pour consultation ultérieure.
• Compétences requises – L’installation de ce
lave-vaisselle exige des compétences de base en
mécanique, en électricité et en plomberie.
L’installateur est responsable de la qualité
de l’installation. Toute défaillance du produit
attribuable à une installation inadéquate n’est
pas couverte par la Garantie de GE Appliances.
Reportez-vous à la Garantie du produit.
• Durée de l’installation – Entre 1 et 3 heures.
L’installation d’un nouveau lave-vaisselle exige plus de
temps que le remplacement d’un ancien modèle.
IMPORTANT – Le lave-vaisselle DOIT être installé de
manière à ce qu’il puisse être sorti de son emplacement
si des réparations sont nécessaires.
Il importe d'user de prudence lorsque l'appareil est
installé ou déplacé afin de prévenir l'endommagement
du cordon d'alimentation.
Si le lave-vaisselle que vous avez reçu est endommagé,
communiquez immédiatement avec votre détaillant ou
l’entrepreneur en construction.
Accessoires facultatifs – Reportez-vous au Manuel
d’utilisation pour connaître les ensembles pour panneau
décoratif personnalisé offerts.
Votre lave-vaisselle est un appareil qui chauffe l’eau.
• Pour réduire les risques de choc électrique, d’incendie ou de
blessures, l’installateur doit s’assurer que le lave-vaisselle
est complètement encastré au moment de l’installation.
• POUR VOTRE SÉCURITÉ PERSONNELLE: Enlevez
le fusible ou déclenchez le disjoncteur au panneau
de distribution principal avant de commencer
l’installation. N’utilisez pas une rallonge électrique ou
un adaptateur de fiche avec cet appareil.
• Un branchement inadéquat du conducteur de
mise à la terre peut présenter des risques de choc
électrique. Si vous n’êtes pas certain que l’appareil
est correctement mis à la terre, consultez un
réparateur ou un électricien qualifié.
• Si le câblage électrique de la résidence n’est pas
constitué de deux fils plus un fil de mise à la terre,
l’installateur doit installer un fil de mise à la terre. Si le
câblage électrique de la résidence est en aluminium,
utilisez un agent antioxydant et des connecteurs pour
raccords «aluminium-cuivre» homologués UL.
• Pour réduire les risques de choc électrique, d’incendie
ou de blessures, l’installateur doit vérifier pour s’assurer
que les fils ne sont pas pliés ou en dommagés, que
le câblage domestique est fixé au support de boîte
de connexion par l’entremise d’un serre-câble et que
toutes les connexions électriques faites au moment de
l’installation (capuchons de connexion) se trouvent
à l’intérieur du couvercle de la boîte de connexion.
N’enlevez pas la base de bois avant d’être prêt à installer
le lave-vaisselle. Si vous enlevez la base de bois, le lave-
vaisselle pourrait basculer lorsque vous ouvrez la porte.
Pour effectuer l’installation décrite dans les
présentes directives, il faut porter des gants et
des lunettes de sécurité.
AVERTISSEMENT
ATTENTION
AVANT DE COMMENCER
Veuillez lire attentivement toutes les directives qui suivent.
Instructions
D’Installation
Lave-vaisselle encastré
Consultez votre Manuel du Propriétaire pour plus de détails sur la façon de nous contacter concernant les
questions d’installation
31-4000211 Rev 2 10-20 GEA

OUTILS NÉCESSAIRES:
• Tournevis cruciforme
• Tournevis à douille de 5/16 po et 1/4 po
• Clé à molette de 15 cm (6 po)
• Niveau
• Équerre de menuisier
• Ruban à mesurer
• Lunettes de sécurité
• Lampe de poche
• Seau pour attraper l’eau lors de la purge du tuyau
• Douille de 15/16 po (optionnelle pour
la dépose de la palette)
• Gants
• Pince
Pour une nouvelle installation:
• Coupe-tube
• Perceuse et mèches appropriées
• Jeu de scie-cloche
MATÉRIAUX NÉCESSAIRES:
• 90°, bague et écrou à compression (boyau avec filetage interne
19,1 mm [3/4 po] à une extrémité et de dimension adaptée à
la conduite d’alimentation à l’autre extrémité)
• Connecteurs vissables homologués UL (3)
• Ruban-cache
Pour une nouvelle installation:
• Coupure anti-refoulement pour le boyau de vidange, si nécessaire
• Raccord en T pour la plomberie de la résidence, s’il y a lieu
•
Câble électrique ou Trousse de cordon d’alimentation
WX09X70910 (5,4 pi) ou WX09X70911 (7,9 pi) en fonction de
votre installation.
• Collier (si nécessaire pour boyau de vidange optionnel)
• Bague anti-traction pour le raccordement électrique
• Robinet d’arrêt (recommandé)
• Conduite d’eau chaude – 9,5 mm (3/8 po) minimum, tuyau en
cuivre (incluant la bague et l’écrou à compression) ou la pièce
WX28X326 de GE Appliances, boyau métallique flexible.
• Boyau de vidange de 3,7 m (12 pi) de long WD24X10065,
si nécessaire
PIÈCES FOURNIES DANS
L’EMBALLAGE:
• C
ouvercle de la boîte de jonction et vis à tête hexagonale n° 10
• Collier
• Boyau de vidange (147 cm/58 po de long)
• Support de tuyau de vidange
• 2 Vis à tête hexagonale no 8-18 pour fixer les
supports au cadre de la cuve du lave-vaisselle
• 1 Garniture supérieure (certains modèles)
• 2 Moulures latérales
• 2 Supports de montage pour comptoirs ou
armoires latérales en bois
• 2 Vis à tête spéciale Phillips n° 8-18 x 15,8 mm (5/8 po) pour fixer
le lave-vaisselle au dessous du comptoir ou armoires latérales
• 2 Boutons de bouchon
• Documentation, échantillons et(ou) bons
Préparation pour l’installation
Scie-cloche
Ruban à mesurer
Coupe-tube
Perceuse et
mèches
Tournevis
cruciforme
Douille de 15/16
Tournevis à douille
de 5/16 po et 1/4 po
Clé à molette de
15 cm (6 po)
Seau
Lampe de poche
Gants
Équerre de
menuisier
Lunettes de sécurité
Niveau
Boyau de vidange
Vis à tête spéciale
Phillips n° 8
de 15,8 mm (5/8 po)
de long
Vis à tête
hexagonale n° 10
de 12,7 mm (1/2
po) de long pour
boîte de jonction
Collier
Couvercle de la
boîte de jonction
et vis à tête
hexagonale n° 10
Supports de
montage
Support de tuyau
de vidange
Vis à tête hexagonale
n° 8 pour support de
montage
Documentation
Garniture (supérieure)
(certains modèles)
Moulures latérales
Coupure anti-
refoulement
Bague
anti-traction
Raccord
en T
Câble électrique (ou
cordon d’alimentation,
s’il y a lieu)
Connecteurs
vissables (3)
Robinet
d’arrêt
Coude de 90°
Conduite d’eau
chaude
Pince
2
Raccord pour
boyau de vidange
facultatif
Boutons de
bouchon
Ruban-cache
Collier
Boyau de
vidange facultatif
(optionnel)
WD24X10065
Préparation pour l’installation
3
PRÉPARATION DE L’OUVERTURE
DANS LES ARMOIRES
• L’ouverture dans les armoires doit mesurer au moins 61,0 cm (24
po) de largeur et de profondeur, et environ 87,6 cm (34-1/2 po)
de hauteur à partir du plancher jusqu’au-dessous du comptoir.
• Le lave-vaisselle doit être installé de façon à ce que le boyau
de vidange mesure au maximum 4,88 mètres (16 pieds) pour
assurer une vidange adéquate.
• Le dessus, les côtés et l’arrière du lave-vaisselle doivent être
complètement dissimulés à l’intérieur de l’ouverture. Le lave-vaisselle
ne doit soutenir aucune partie de la structure des armoires.
DÉGAGEMENTS:
• Dans le cas
d’une installation
dans un coin,
veuillez prévoir
un dégagement
d’au moins 5,1
cm (2 po) entre
le lave-vaisselle
et les armoires,
le mur ou un
électroménager
adjacent. Veuillez
prévoir un
dégagement d’au
moins 65 cm (25-1/2 po) à l’avant du lave-vaisselle pour
l’ouverture de la porte.
EXIGENCES RELATIVES AU
SYSTÈME DE VIDANGE
• Veuillez observer les ordonnances et les codes locaux en vigueur.
• Le boyau de vidange doit avoir une longueur maximale de 4,88
mètres (16 pieds).
REMARQUE : Il faut installer une coupure anti-refoulement si le
raccord au broyeur à déchets ou au raccord en T se trouve à moins
de 46 cm (18 po) au-dessus du plancher afin d’éviter un siphonage.
CHOIX DE LA MÉTHODE DE VIDANGE
Le type d’installation de vidange dépend des conditions suivantes.
• Les ordonnances ou codes locaux en vigueur exigent-ils une
coupure anti-refoulement?
• Le raccord T se trouve-t-il à moins de 46cm (18po) du plancher?
Si vous répondez OUI à l’une ou l’autre de ces
questions, vous DEVEZ utiliser la méthode n° 1.
• Si vous répondez NON, vous pouvez employer l’une ou l’autre
des méthodes.
PRÉPARATION DES ARMOIRES
• Percez un trou de 3,8 cm (1-1/2 po) de diamètre dans la paroi de
l’armoire qui se trouve dans la partie ombrée de la PRÉPARATION
DE L’OUVERTURE DANS LES ARMOIRES pour le boyau de
vidange. Assurez-vous que l’orifice ne présente pas d’arêtes vives.
IMPORTANT – Lorsque vous branchez le boyau de vidange
à un broyeur à déchets, assurez-vous
d’enlever le bouchon de vidange. LE
LAVE-VAISSELLE NE POURRA PAS
SE VIDER SI VOUS LAISSEZ LE
BOUCHON EN PLACE.
Méthode n° 1 – Coupure anti-refoulement avec raccord en
T ou broyeur à déchets
Il faut installer une coupure anti-refoulement lorsqu’elle est exi-
gée par les ordonnances et les codes locaux en vigueur. Cette
coupure anti-refoulement doit être installée conformément aux
directives données par le fabricant.
Méthode n° 2 – Boucle de vidange élevée avec raccord en
T ou broyeur à déchets
Conseil: Pour éviter des frais de réparation inutiles.
Assurez-vous d’enlever le bouchon de vidange du broyeur à
déchets avant d’y brancher le boyau de vidange du lave-vaisselle.
Pour réduire les risques de
choc électrique, d’incendie
ou de blessures, l’installateur doit s’assurer que le
lave-vaisselle est complètement encastré au moment
de l’installation.
AVERTISSEMENT
Remove
Drain
Plug
Enlevez le
bouchon
de vidange
DIMENSION DE LA POIGNÉE DU LAVE-VAISSELLE : La
porte de ce lave-vaisselle doit être à niveau avec l’armoire.
Pour les modèles avec poignée, la profondeur totale (avec
poignée) est de 67,9 cm (26 ¼ po) maximum selon le modèle.
Consultez le document de spécifications rapides en ligne pour
obtenir plus de dimension de lave-vaisselles.
33-1/2 po to 34-3/4
po du dessous
du comptoir au
plancher
Le mur du fond
doit être exempt
de tuyaux ou
de fils
La partie ombrée est
réservée à la plomberie et
à l’électricité
Armoires à
l’équerre et
d’aplomb
61,0 cm
(24 po) min.
15,2 cm (6 po)
61,0 cm
(24 po) min.
10,1 cm
(4 po)
Figure A
Clearance for Door
Opening 2" Minimum
Countertop
Dishwasher
25-1/2"
Comptoir
Lave-vaisselle
5,1 cm (2 po) minimum
pour l’ouverture de la porte
65 cm (25-1/2 po)
Figure B
182,8 cm
(72 po)
max.
182,8 cm
(72 po)
max.
Figure C
Crochet pour boyau de vidange
82 cm
(32 po)
min. -
182,8 cm
(72 po)
max.
46 cm
(18 po) min.
Crochet pour
boyau de vidange
46 cm
(18 po) Min.
82 cm
(32 po)
min. -
182,8 cm
(72 po)
max.
Figure D

4
Préparation pour l’installation
Figure E
Zone pour
la prise de
courant
Autre emplacement
possible pour la prise
de courant dans une
armoire adjacente
46 cm (18 po)
46 cm
(18 po)
15 cm (6 po)
15 cm
(6 po)
Trou de 3,8 cm
(1-1/2 po) de dia.
(max.)
7,6 cm (3 po)
des armoires
61 cm (24
po) du mur
Mise à la terre
Noir
Blanc
POUR VOTRE SÉCURITÉ PERSONNELLE: Enlevez
le fusible ou déclenchez le disjoncteur au panneau
de distribution principal avant de commencer
l’installation. N’utilisez pas une rallonge électrique ou
un adaptateur de fiche avec cet appareil.
AVERTISSEMENT
Un branchement inadéquat du conducteur de
mise à la terre peut présenter des risques de choc
électrique. Si vous n’êtes pas certain que l’appareil est
correctement mis à la terre, consultez un réparateur
ou un électricien qualifié.
AVERTISSEMENT
ALIMENTATION ÉLECTRIQUE
Assurez-vous que le branchement électrique et le
calibre du fil sont adéquats et conformes avec la version
récente de la norme ANSI/NFPA 70, le Code national de
l’électricité, tous les règlements et toutes les ordonnances
de votre région.
L’alimentation électrique de cet appareil doit être :
• 120 V, 60 Hz, en courant alternatif seulement, avec un
fusible de 15 ou 20 A.
• Le câble électrique doit posséder deux fils, plus un fil de
mise à la terre, et résister à une température nominale de
75 °C (167 °F).
• Si votre alimentation électrique ne répond pas à ces
exigences, appelez un électricien agréé avant de
poursuivre l’installation.
Nous recommandons d’avoir :
• Un disjoncteur ou fusible temporisé.
• Un circuit de dérivation individuel mis à la terre approprié.
Mise à la terre – Branchement permanent
Cet appareil doit être branché à un réseau électrique
permanent mis à la terre. Sinon, il faut installer un
conducteur de mise à la terre avec les conducteurs du
circuit et le brancher à la borne de mise à la terre du
réseau ou au fil de mise à la terre de l’appareil.
Mise à la terre – Modèles dotés d’un cordon
d’alimentation
Cet appareil doit être mis à la terre. En cas de mauvais
fonctionnement ou de défaillance, la mise à la terre réduira
les risques de choc électrique en fournissant au courant
électrique un circuit de moindre résistance. Cet appareil est
doté d’un cordon d’alimentation possédant un conducteur
de mise à la terre et une fiche de mise à la terre. La fiche
doit être branchée dans une mise appropriée, installée et
mise à la terre en conformité avec tous les codes locaux et
ordonnances en vigueur.
Préparation des armoires et cheminement des fils
• Les fils peuvent entrer dans l’ouverture du côté droit, du
côté gauche, de l’arrière ou du plancher dans la partie
ombrée de la Figure E et de la Figure A.
• Percez un trou de 3,8 cm (1-1/2 po) de diamètre au
maximum pour le passage du câble électrique. Le bord du
trou doit être lisse et arrondi. Les fils électriques pour le
branchement permanent peuvent passer par le même trou
que le boyau de vidange et la conduite d’eau chaude, si
c’est plus pratique. Si le trou est pratiqué dans une paroi
en métal, les bords de l’orifice doivent être recouverts d’un
passe-fils pour protéger les fils.
REMARQUE: Le cordon d’alimentation doté d’une fiche
doit passer par un autre trou dans l’armoire.
Branchement électrique du lave-vaisselle
Le branchement électrique s’effectue du côté avant droit du
lave-vaisselle.
• Dans le cas d’un branchement permanent, le câble doit
être acheminé de la façon indiquée à la Figure E. Le câble
doit avoir une longueur minimale de 61 cm (24 po) à partir
du mur arrière.
• Dans le cas d’un branchement avec un cordon
d’alimentation, installez une prise de courant mise à la
terre à trois broches sur la paroi de l’armoire adjacente,
entre 15 cm (6 po) et 46 cm (18 po) de l’ouverture, et
entre 15 cm (6 po) et 46 cm (18 po) du plancher.
• Utilisez uniquement WX09X70910 ou WX09X70911
Trousse de cordon d’alimentation pour lave-vaisselle.
PRÉPARATION DU CÂBLAGE
ÉLECTRIQUE
Dans le cas des modèles dotés d’un cordon
d’alimentation : Ne modifiez pas la fiche fournie avec
l’appareil; si vous ne pouvez pas la brancher dans la
prise de courant, faites installer une prise de courant
appropriée par un technicien qualifié.
AVERTISSEMENT
5
Préparation pour l’installation
PRÉPARATION DE
L’ALIMENTATION EN
EAU CHAUDE
REMARQUE: GE Appliances recommande l’utilisation
d’un tuyau en cuivre pour la conduite d’alimentation en
eau, mais vous pouvez choisir un boyau flexible tressé no
WX28X326 de GE Appliances.
• La conduite d’alimentation en eau (tuyau de cuivre de
9,5 mm [3/8 po] ou boyau flexible tressé) peut entrer du
côté gauche, du côté droit, de l’arrière ou du plancher
dans la partie ombrée indiquée dans la Figure F.
• La conduite d’alimentation en eau doit passer dans
le même trou que le câble électrique et le boyau de
vidange. Ou vous pouvez percer un trou supplémentaire
de 3,8 cm (1-1/2 po) de diamètre pour le passage de
la conduite d’eau. Si l’appareil est doté d’un cordon
d’alimentation pourvu d’une fiche, la conduite d’eau
chaude ne doit pas passer par le même trou que le
cordon d’alimentation.
Raccordement de la conduite d’eau
chaude
• Si vous utilisez un boyau flexible tressé, étiquetez le
boyau et indiquez la date d’installation à des fins de
référence. Les boyaux flexibles, coudes et joints tressés
doivent être remplacés dans 5 ans.
• Coupez l’alimentation en eau.
• Installez un robinet d’arrêt à un endroit accessible, par
exemple sous l’évier. (Cette installation est facultative,
mais fortement recommandée, et peut même être
exigée
par les codes locaux en vigueur.)
• Le raccordement de la conduite d’eau s’effectue du côté
gauche du lave-vaisselle. Installez la conduite d’eau
chaude en utilisant un tuyau en cuivre de 9,5 mm (3/8
po) ou plus ou boyau flexible tressé. Acheminez la
conduite d’eau de la façon indiquée dans la Figure F et
amenez-la vers l’avant à au moins 48,2 cm (19 po) du
mur arrière.
• Réglez le chauffe-eau à une température variant entre
49 °C (120 °F) et 65 °C (140 °F).
• Rincez la conduite d’eau pour éliminer tous les débris.
Recueillez l’eau et les débris à l’aide d’un seau.
• La pression de la conduite d’alimentation en eau
chaude doit varier entre 1,4 bar (20 lb/po²) et 8,3 bars
(120 lb/po²).
Tournez la page pour commencer
l’installation du lave-vaisselle.
Figure F
Trou de
3,8 cm
(1-1/2 po)
de dia.
10,1 cm
(4 po)
15,2 cm
(6 po)
Robinet
d’arrêt
Eau
chaude
5,1 cm
(2 po) de
l’armoire
48,2 cm (19 po)
du mur arrière
Devant des
armoires
5,1 cm (2 po)
du plancher
N’enlevez pas la base de bois avant d’être prêt à
installer le lave-vaisselle. Si vous enlevez la base de
bois, le lave-vaisselle pourrait basculer lorsque vous
ouvrez la porte.
ATTENTION
Installation du lave-vaisselle
6
ENLÈVEMENT DE
LA BASE DE BOIS,
INSTALLATION DES
PIEDS DE NIVELLEMENT
IMPORTANT – Ne frappez pas sur la base de bois pour
l’enlever! Vous endommagerez ainsi l’appareil.
• Amenez le lave-vaisselle à proximité de son
emplacement définitif et couchez-le sur le dos.
REMARQUE : Ne placez pas le lave-vaisselle sur un de
ses côtés.
• Enlevez les quatre pieds de nivellement sous la base de
bois à l’aide d’une clé à douille de 23,8 cm (15/16 po).
• Retirez la base.
• Sur les modèles sans système de nivellement
réglable au centre inférieure :
R
emettez en place les pieds de nivellement sur le
lave-vaisselle, à 1,27 cm (1/2 po) environ du cadre,
comme indiqué dans l’illustration.
• Sur les modèles avec système de nivellement
réglable au centre inférieure :
Vissez les pieds de nivellement avant dans le cadre du
lave-vaisselle sur environ 1,27 cm (1/2 po).
Vissez les pieds de nivellement arrière dans le lave-
vaisselle jusqu’au bout.
PRÉPARATION
Prenez les pièces fournies dans l’emballage et mettez-les
de côté:
• Ensemble de vis
• Couvercle de la boîte de jonction
• Boyau de vidange et collier
• Supports de montage
• Moulures (certains modèles)
• Crochet pour boyau de vidange
• Manuel d’utilisation
• Échantillons et(ou) bons
ÉTAPE 1
VÉRIFICATION DE
L’ÉQUILIBRE DE LA PORTE
REMARQUE : Si vous
installez un panneau
personnalisé (offert sur
certains modèles), veuillez
suivre les instructions
fournies avec la trousse
du panneau personnalisé
WD35X20417.
• Sans enlever la base de
bois du lave-vaisselle,
vérifiez l’équilibre de la
porte en l’ouvrant et en
la fermant.
• La porte est
correctement équilibrée
si, étant ouverte, elle se
referme d’elle-même à l’intérieur de 20° de la verticale,
reste en position de 20° à 70°, et s’ouvre entièrement
au-delà de 70°.
• Si nécessaire, augmentez ou diminuez la tension, tel
qu’illustré. Certains modèles sont munis de 2 ressorts
d’un côté et d’un ressort de l’autre. Fermez la porte et
ajustez les ressorts pour rétablir l’équilibre de la porte.
Conseil: Pour que la porte ouvre et se ferme
facilement.Vérifiez la porte en l’ouvrant et en la fermant.
Si elle n’ouvre pas facilement ou s’ouvre trop rapidement,
vérifiez la disposition du câble du ressort. Le câble est
retenu en place par des «épaulements» sur la poulie.
Assurez-vous que le câble est bien installé sur les
épaulements de la poulie comme indiqué.
Figure G
La porte se
referme
La porte reste
en position de
20° à 70°
La porte
Vue latérale
au-delà de 70°
s'ouvre
entièrement
àl'intérieur
de 20°
Side View
Custom
door
panel
Spring
hooked
to hole
inside rail
NOTE: The number of
springs, on each side,
will vary by model.
Front View
Make sure pully
cables are within
pulley shoulders
Vue latérale
Figure H
Augmentation
la tension
Diminution
de la tension
Ressort
accroché
dans le trou
à l’intérieur
du rail basal
S'assurer que le
câble de poulie
se trouve entre
les
épaulements
de
la poulie
Vue avant
Panneau
personnalisé
REMARQUE : Le
nombre de ressorts,
de chaque côté, varie
selon le modèle.
Vue de l'intérieur
ÉTAPE 2
ÉTAPE 3
Approx
1/2"
Replacer les 4 pieds à
environ 1,27 cm (1/2 po)
du cadre
Replacez
les 2 pieds
avant à
environ
1,27 cm
(1/2 po) du
cadre
Replacer
les 2 pieds
arrière
et visser
jusqu’au
bout
Le système de
nivellement
sera réglé plus
loin à l’Étape 14.
1/2”
L’apparence variera
Enlevez tous les
quatre pieds de
nivellement et la
base en bois
POSITIONNEMENT DE
LA CONDUITE D’EAU
ET DE L’ALIMENTATION
ÉLECTRIQUE
• Positionnez la conduite d’alimentation en eau et le câblage
de la résidence sur le plancher de l’ouverture afin qu’ils
n’entrent pas en contact avec la base du lave-vaisselle et les
pièces sous l’appareil.
INSERTION DU BOYAU DE
VIDANGE DANS L’ORIFICE
DE L’ARMOIRE
• Placez le lave-vaisselle devant l’ouverture de l’armoire, et si
elle est présente, délogez le boyau de vidange de sa fixation à
ressort.
Insérez le boyau de vidange dans l’orifice que
vous avez
précédemment percé dans la paroi des armoires.
Si l’appareil
est doté d’un cordon d’alimentation, faites
passer l’extrémité du
cordon dans un l’ouverture dans les
armoires distinct.
Conseil: Pour éviter des frais de réparation inutiles pour
des problèmes de remplissage, de vidange ou de bruit.
Placez la conduite d’eau et le câble électrique de manière à ce
qu’ils n’entrent pas en contact avec quoi que ce soit à l’arrière
ou en dessous du lave-vaisselle.
Installation du lave-vaisselle
PLATEAU PROTÈGE-
PLANCHER (certains modèles)
• Il ne faut pas enlever le plateau pendant l’installation.
7
INSTALLATION DU COUDE
DE 90°
• Vissez le coude de 90° dans
l’électrovanne. Assurez-vous
que le joint d’étanchéité en
caoutchouc se situe entre
l’électrovanne et le coude.
• Ne serrez pas le coude de
façon excessive; le support
de l’électrovanne pourrait
se déformer ou le raccord
de l’électrovanne pourrait se
casser.
• Tournez l’extrémité du
coude pour qu’il pointe vers
l’arrière du lave-vaisselle.
RACCORDEMENT DU
BOYAU DE VIDANGE À LA
BOUCLE DE VIDANGE
Raccordez l’extrémité de la boucle de vidange au boyau
de vidange à l’aide du collier de serrage, comme illustré.
REMARQUE : La boucle de vidange élevée sur le côté de
la baignoire est conçue pour améliorer les performances
de lavage. Ne retirez pas du côté de la baignoire.
Figure O
Conduite
d’alimentation
en eau
10,1 cm
(4 po)
10,1 cm
(4 po)
15,2 cm
(6 po)
15,2 cm
(6 po)
Alimentation
électrique
de la résidence
ÉTAPE 6
ÉTAPE 5
ÉTAPE 7
ÉTAPE 8
ÉTAPE 9
Figure M
Support
de
l’électrovanne
Boyau de
remplissage
Devant du lave-vaisselle
Coude de 90°
ENLÈVEMENT DU
PANNEAU INFÉRIEUR
• Enlevez les deux
vis du panneau
inférieur, ainsi que
le panneau inférieur.
Mettez-les de côté
pour les réutiliser à
l’étape 22.
Enlevez
les deux vis du
panneau inférieur
Panneau inférieur
ÉTAPE 4
Alimentation
électrique de
la résidence
Cordon
d’alimentation
(si utilisé)
Boyau
de
vidange
Conduite
d’eau
Isolant
Assurez-vous que le boyau de
vidange n’est ni tordu ni coincé
La longueur maximale du tuyau
de vidange est de 4,88 m (16 pi)
à l’arrière du lave-vaisselle
Ne débranchez ni ne retirez la
boucle de vidange haute du côté
gauche du lave-vaisselle
Tirez la couverture
isolante par-dessus
le collet
Figure P
Ne pas
enlever le
plateau
INSTALLATION DES
MOULURES
Au cours de cette étape, vous aurez besoin des moulures
mises de côté à l’étape 1.
• Prenez la garniture supérieure (voir la figure R) et
centrez-la avec le loquet supérieur. Appuyez la garniture
contre le support de gaine en la déplaçant de gauche à
droite.
• Prenez la garniture gauche (voir la figure R). Alignez
le bord supérieure de la garniture et appuyez-le contre
le côté gauche du support de gaine en le déplaçant
de haut en bas. Répétez cette étape pour le côté droit
de la garniture. (Voir la figure R pour le côté droit de la
garniture.)
8
Installation du lave-vaisselle
INSERTION AUX TROIS
QUARTS DU LAVE-
VAISSELLE DANS
L’OUVERTURE
IMPORTANT – Ne poussez pas sur le panneau
avant avec vos genoux. Vous pourriez endommager
l’appareil.
• Saisissez le panneau avant de l’appareil par les côtés
et faites glisser le lave-vaisselle dans l’ouverture de
quelques centimètres ou pouces à la fois.
• Tirez sur le boyau de vidange et le cordon d’alimentation,
s’il y a lieu, par les trous des armoires adjacentes au fur
et à mesure. Arrêtez lorsque le lave-vaisselle dépasse le
devant des armoires adjacentes d’environ 15 cm (6 po).
• Assurez-vous que le boyau de vidange n’est pas plié à
l’arrière ou en dessous du lave-vaisselle.
• Assurez-vous que le câble électrique de la résidence, le
boyau de vidange et la conduite d’eau n’entrent pas en
contact avec des pièces sous le lave-vaisselle.
Figure Q
Do not push against
Ne poussez pas sur le panneau avant de la porte avec
votre genou. Vous risquez d’endommager le panneau
de porte.
Vue de
dessus
Poignée
Porte
Moulure de cuve
Cadre de
la cuve
ÉTAPE 10
ÉTAPE 11
Moulure
latérales
Figure R
Moulure
latérales
Vue de
dessus
Moulure
latérales
Garniture
(supérieure)
Contact total contre le bord
de cuve
9
Installation du lave-vaisselle
INSTALLATION DES
SUPPORTS DE MONTAGE
Vous aurez besoin des supports de montage et de deux
(2) vis à tête hexagonale no 8 mises de côté à l’étape 1.
Vous devez poser les supports de montage sur le dessus
ou les côtés du cadre de la cuve du lave-vaisselle avant
de glisser le lave-vaisselle en place sous le comptoir. Ce
lave-vaisselle est adapté à une installation complètement
encastrable dans une ouverture de 61 cm (24 po) de
profondeur. Les supports de montage possèdent plusieurs
options de fixation afin de répondre à plusieurs types de
constructions d’armoires.
Posez les supports de montage sur le dessus
si le dessous du comptoir est en bois ou un
matériau similaire qui accepte les vis :
IMPORTANT - Après installation des supports et avant de
fermer la porte du lave-vaisselle, ajustez les supports en
les pliant de façon à ce qu’ils ne soient pas en contact avec
le haut de la porte du lave-vaisselle et ne causent pas de
dommage.
• Si vous installez le lave-vaisselle sous un comptoir dont
la profondeur est plus courte, il est possible que les
supports pour le comptoir dépasse à l’avant du comptoir.
Si c’est le cas, supprimez la longueur excédentaire en
courbant à répétition les supports vis-à-vis de l’encoche
avant seulement, jusqu’à la cassure.
INSTLLATION DU
LAVE-VAISSELLE DANS
SON EMPLACEMENT
DÉFINITIF
• Vérifiez l’isolant de la cuve, s’il y a lieu, pour vous assurer
qu’il enveloppe complètement la cuve. L’isolant ne doit
pas «retrousser» ou entrer en contact avec les ressorts
de la porte. Si l’isolant est «déplacé» ou entre en contact
avec les ressorts, replacez-le correctement avant de faire
glisser l’appareil dans son emplacement définitif.
• Faites glisser le lave-vaisselle dans son emplacement
définitif en poussant sur les côtés du panneau de la porte.
Abstenez-vous de pousser ou tirer la porte en position
fermée ou partiellement ouverte lors du déplacement
du lave-vaisselle. Ne poussez pas sur le centre du
panneau avec votre genou. Vous pourriez endommager
le panneau. Avant de fixer le lave-vaisselle sur l’armoire,
assurez-vous qu’il est placé d’équerre dans l’ouverture,
aussi bien dans sa partie inférieure que supérieure.
IMPORTANT – Avant d’ouvrir la porte du lave-vaisselle,
assurez-vous que les bords du panneau de porte du
lave-vaisselle sont en retrait par rapport au devant des
armoires adjacentes, et non pas appuyés contre le devant
des armoires. Reportez-vous à la Figure U. Si vous
ouvrez la porte du lave-vaisselle et que le bord de la porte
est appuyé contre le devant des armoires, vous pourriez
endommager la porte du lave-vaisselle et les armoires.
ÉTAPE 12
INSTALLATION DES
SUPPORTS DE MONTAGE
(SUITE)
Posez les supports de montage sur les côtés si
le comptoir est en granite ou un matériau similaire
qui n’accepte pas les vis à bois :
• Si elle est présente, enlevez la fixation à ressort de
boyau de vidange du collet et mettez-la au rebut.
• Cassez la partie avant de la languette à l’aide de pince à
l’endroit indiqué, avant la fixation sur le lave-vaisselle.
• Placez le support latéral gauche tel qu’indiqué. À l’aide
d’une vis no 8, fixez le support sur le cadre de cuve à
travers le trou oblong sous le trou rond. Faites de même
avec le support droit.
ÉTAPE 12
ÉTAPE 13
Cadre de la
cuve du lave-
vaisselle
Vis de
support
no° 8
Support
Courber et casser ici
après l’installation si le
comptoir présente un
léger surplomb
Montage sur le dessus
Figure S
Avant
de la
cuve
Figure T
Support
Cadre de la cuve
du lave-vaisselle
Vis de support
no° 8
Montage latéral
Courber et casser
ici le cas échéant
Veillez à ce que les vis
de montage n’abîment
pas les armoires
Ne coincez pas les fils
du loquet en insérant la
vis de support no 8
Enlevez cette
fixation à ressort
Avant de
la cuve
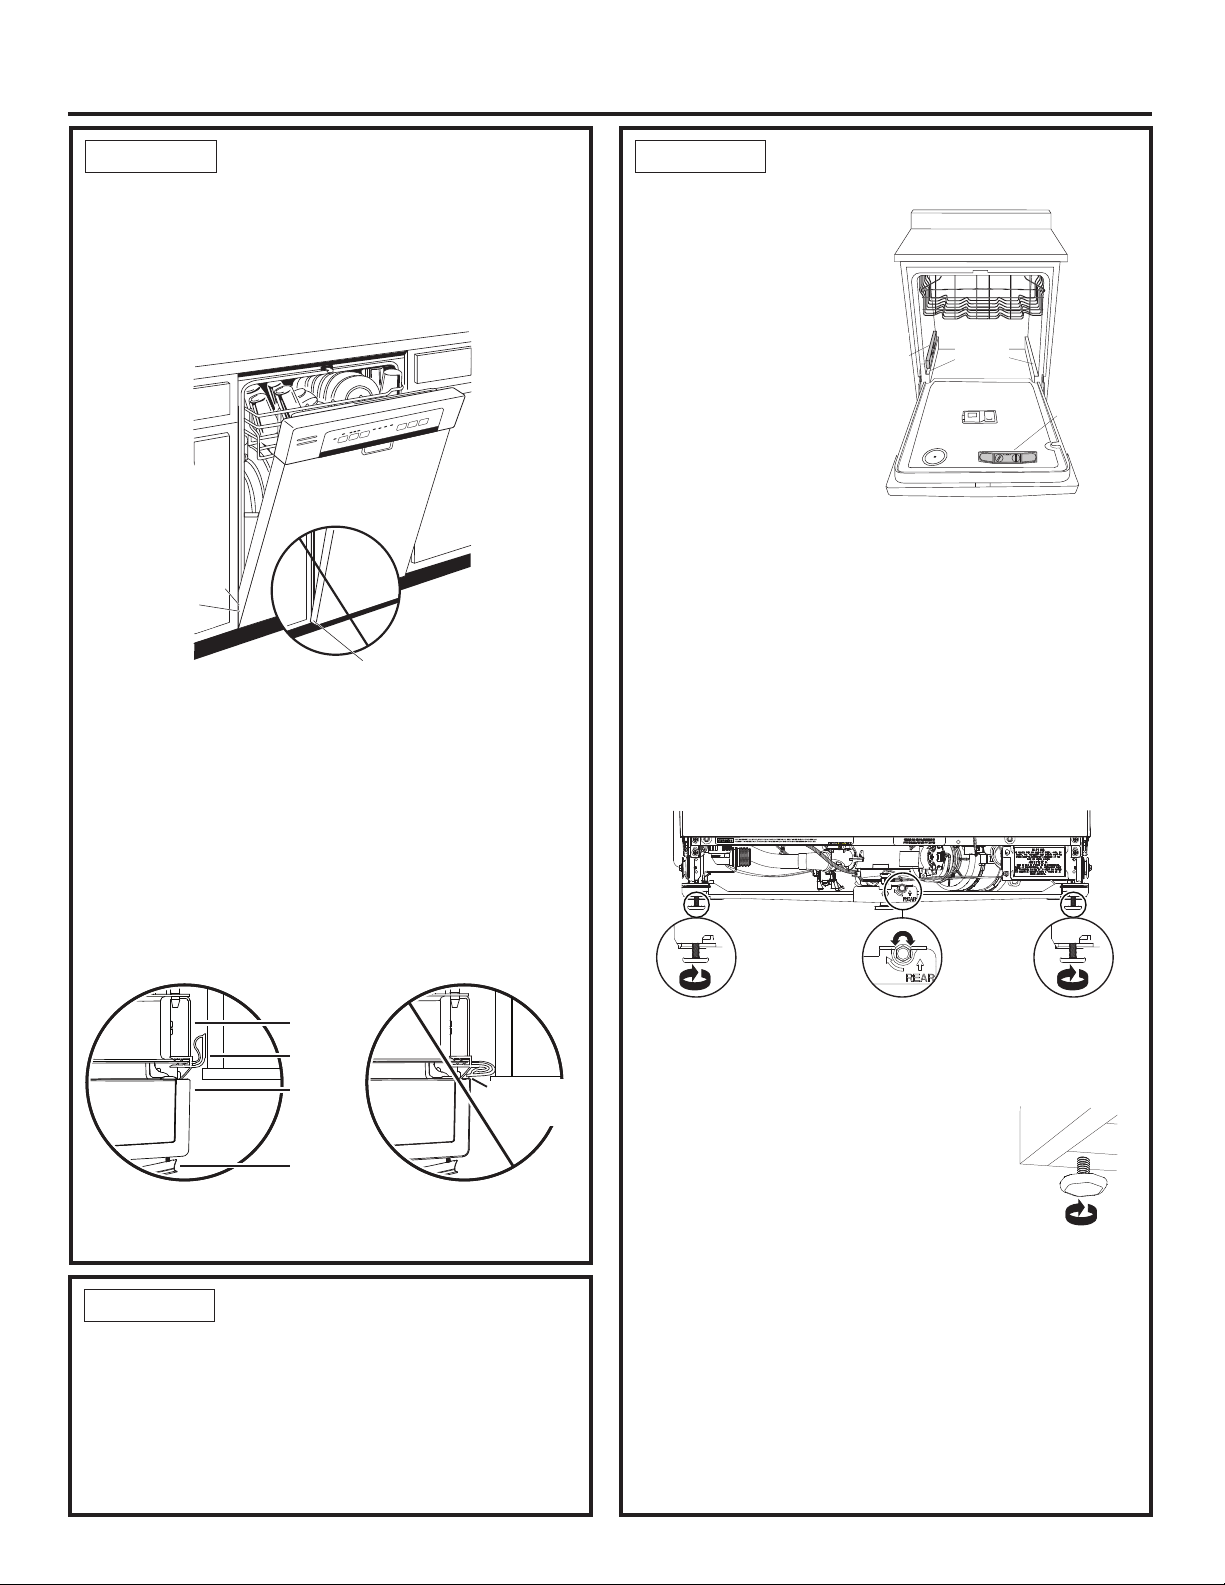
MISE DE NIVEAU DU
LAVE-VAISSELLE (SUITE)
• Enlevez le panier
inférieur et placez un
niveau sur la porte et
sur le rail du panier
inférieur, comme
indiqué à la figure.
Si votre modèle est doté d’un système de nivellement
arrière, la hauteur arrière se règle depuis l’avant du lave-
vaisselle avec les deux pattes avant situées au bas du
lave-vaisselle. Tournez individuellement les 2 pattes et les
2 boulons avant. Réglez d’abord les pieds avant. Lorsque
les pieds avant sont réglés à une hauteur procurant le
dégagement approprié à l’armoire supérieure, procédez au
nivellement arrière en réglant le boulon de nivellement comme
illustré. Tournez le boulon pour régler le nivellement arrière.
Tournez-le dans le sens des aiguilles pour élever l’arrière
du lave-vaisselle, et dans le sens contraire pour le baisser.
Continuez à régler le pied jusqu’à ce que le lave-vaisselle soit
de niveau comme illustré. Assurez-vous que tous les 3 pieds
sont fermement en contact avec le plancher.
Si votre modèle est équipé de 4 pattes de
nivelage, mettez le lave-vaisselle de niveau
en vissant ou dévissant chacun des quatre
pieds de nivellement sous l’appareil, comme
indiqué à la figure.
• Le lave-vaisselle est correctement de niveau lorsque
l’indicateur de niveau est centré de gauche à droite et de
l’avant vers l’arrière. La porte du lave-vaisselle devrait se
fermer sans frotter contre les côtés de la cuve.
• Remettez en place le panier inférieur.
Conseil: Pour éviter des frais de réparation inutiles,
vérifiez si le lave-vaisselle est de niveau.
Sortez les paniers à moitié. Ils doivent demeurer immobiles.
Ouvrez et fermez la porte. La porte doit être bien ajustée à
l’ouverture de la cuve sans frotter sur les côtés. Si les paniers
rentrent ou sortent tout seuls ou si la porte frotte contre les
côtés de la cuve, remettez le lave-vaisselle de niveau.
10
Installation du lave-vaisselle
INSTLLATION DU
LAVE-VAISSELLE DANS
SON EMPLACEMENT
DÉFINITIF (SUITE)
• Ouvrez et fermez la porte du lave-vaisselle pour vous
assurer qu’elle fonctionne correctement et qu’elle ne
frotte pas contre les armoires adjacentes.
Conseil: Pour éviter des frais de réparation inutiles
pour des dommages au panneau avant ou un
problème d’efficacité de lavage.
Vérifiez l’alignement du lave-vaisselle avant d’ouvrir la porte
afin de prévenir tout dommage au panneau de la porte.
Assurez-vous que la conduite d’eau et le câble électrique
ne sont pas coincés ou écrasés à l’arrière du lave-
vaisselle. Une conduite écrasée réduit le débit d’eau.
Assurez-vous que la
moulure de cuve ne touche
la porte en aucun point
Si nécessaire, la moulure
de cuve peut être rognée
pour assurer le bon
fonctionnement de la porte
Vue de
dessus
Poignée
Porte
Moulure
de cuve
Cadre de
la cuve
Ne laissez pas la moulure de
cuve se coincer dans la porte ou
entrer en contact avec celle-ci
Vue de
dessus
Moulure de
cuve coincée
dans la porte!
Vérifiez si
l’appareil est
de niveau de
l’avant vers
l’arrière
Vérifiez si
l’appareil est
de niveau de
gauche à droite
Rails du
panier
inférieur
ÉTAPE 13 ÉTAPE 14
MISE DE NIVEAU DU
LAVE-VAISSELLE
IMPORTANT – Le lave-vaisselle doit être de niveau pour
assurer le bon fonctionnement des paniers et de la porte du
lave-vaisselle et obtenir une bonne efficacité de lavage. Le
lave-vaisselle doit être mis de niveau de gauche à droite,
et de l’avant vers l’arrière. De cette façon, les paniers de
l’appareil ne rentreront pas ou ne sortiront pas tout seuls,
l’eau circulera correctement vers l’orifice d’entrée de la pompe
et la porte se fermera sans frotter sur les côtés de la cuve
.
ÉTAPE 14
Figure U
La porte
s’ouvre et
se ferme
en retrait
par rapport
aux armoires
Alignement
correct
Un alignement incorrect
causera des dommages
à la porte
La porte est appuyée contre
le devant des armoires
B
Tourner le
pied avant
pour régler
la hauteur
avant
Tourner le boulon de
nivellement pour régler
la hauteur arrière
Tourner le
pied avant
pour régler
la hauteur
avant
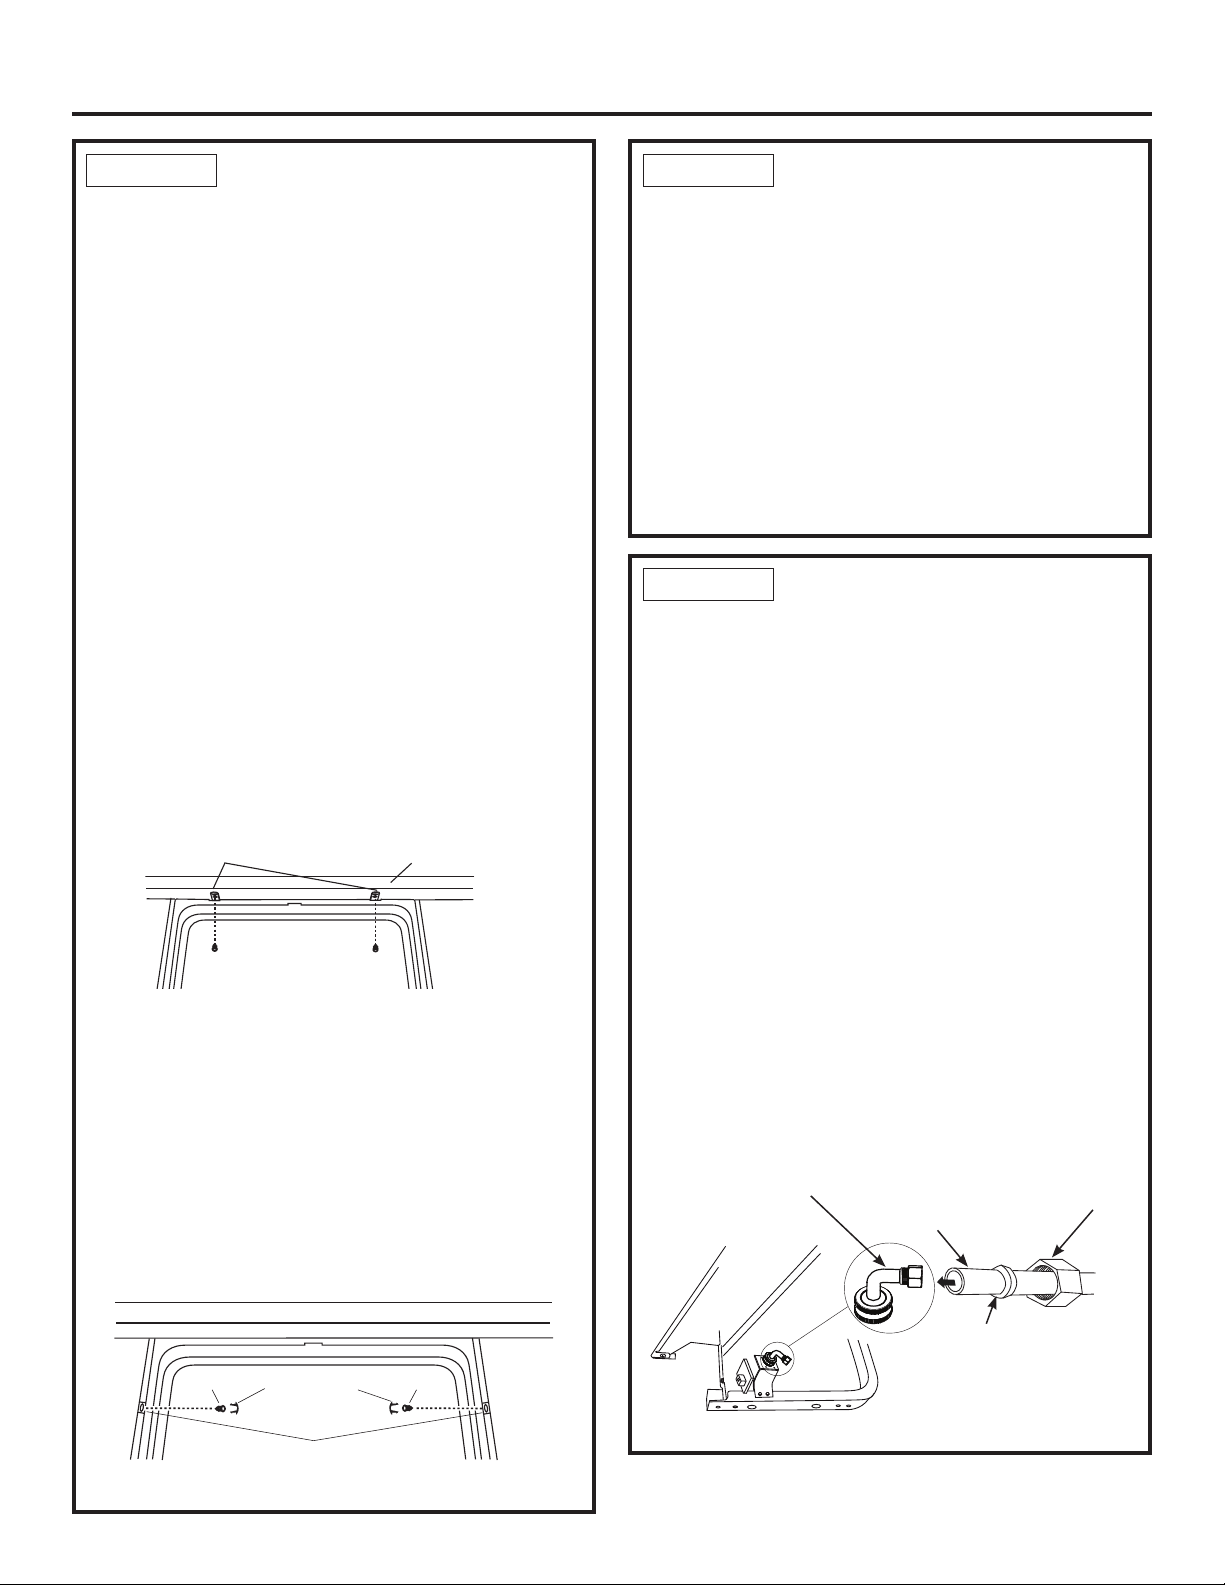
11
Installation du lave-vaisselle
FIXATION DU LAVE-
VAISSELLE AU-DESSOUS
DU COMPTOIR OU AUX
CÔTÉS DES ARMOIRES
Au cours de cette étape, vous aurez besoin des deux vis à
tête spéciale Phillips mises de côté à l’étape 1.
Le lave-vaisselle doit être fixé au dessous du comptoir ou aux
côtés des armoires. Lorsque le dessous du comptoir est en
bois, utilisez la méthode n° 1. Lorsque le dessous du comptoir
est fabriqué à l’aide d’un matériau qui n’accepte pas les vis à
bois, par exemple en granite, utilisez la méthode n° 2.
IMPORTANT– Pour éviter tout dommage au panneau de la
porte et au tableau de commande, il faut que le lave-vaisselle
soit installé de manière que le panneau avant et le tableau
de commande n’entrent pas en contact avec les armoires
adjacentes ou le comptoir. Vissez les vis complètement
et bien droites. Les têtes de vis qui dépassent pourraient
égratigner le panneau de porte ou le tableau de commande
et créer de l’interférence lors de l’ouverture de la porte.
Méthode n° 1
Fixation du lave-vaisselle au dessous d’un comptoir
en bois.
• Revérifiez l’alignement du lave-vaisselle dans l’ouverture des
armoires. Reportez-vous aux étapes 13 et 14. Le panneau
de porte et(ou) le tableau de commande ne doivent pas
entrer en contact avec les armoires ou le comptoir.
• Fixez le lave-vaisselle au dessous du comptoir à l’aide
des deux vis à tête spéciale Phillips. Reportez-vous à
la figure. Assurez-vous de visser complètement les vis
bien droites afin que les têtes soient affleurantes pour ne
pas endommager le panneau.
Méthode n° 2
Fixation du lave-vaisselle aux côtés des armoires.
• Revérifiez l’alignement du lave-vaisselle dans l’ouverture des
armoires. Reportez-vous aux étapes 13 et 14. Le panneau
de porte et(ou) le tableau de commande ne doivent pas
entrer en contact avec les armoires ou le comptoir.
• Retirez les bouchons. Conservez-les.
• Fixez le lave-vaisselle au dessous du comptoir à l’aide
des deux vis à tête spéciale Phillips. Reportez-vous à la
Figure X. Assurez-vous de visser complètement les vis
bien droites afin que les têtes soient affleurantes pour
ne pas endommager le panneau.
• Installez les boutons de bouchon sur le côté de la cuve
dans les trous prévus à cet effet.
RACCORDEMENT DE
L’ALIMENTATION EN EAU
Raccordez la conduite d’alimentation en eau au coude
de 90°.
Si vous décidez de faire le raccordement avec un
boyau flexible tressé :
• Fixez le coude de 90° avec une clé à molette
ISi vous décidez de faire le raccordement avec un
tuyau en cuivre :
• Glissez l’écrou à compression puis la bague d’extrémité
à l’extrémité de la conduite d’alimentation en eau.
• Insérez la conduite d’alimentation en eau dans le coude
de 90°.
• Glissez la bague d’extrémité contre le coude et fixez
avec l’écrou à compression.
IMPORTANT – Assurez-vous que les ressorts et(ou)
les câbles des ressorts de la porte n’entrent pas en
contact avec le boyau de remplissage ou la conduite
d’alimentation en eau. Pour vérifier, ouvrez et refermez la
porte. Déplacez la conduite d’alimentation en eau ou pliez
légèrement le support de l’électrovanne si vous entendez
un bruit de frottement ou s’il y a de l’interférence lors de
l’ouverture de la porte.
Supports
Comptoir en bois
Supports latéraux
Bouchons
Vis
Vis
Comptoir de surface solide
Figure X
Figure Y
Écrou à
compression
Bague
Coude de 90°
Conduite
d’alimentation en
eau chaude
Côté inférieur gauche
ÉTAPE 15
FIXATION DU LAVE-
VAISSELLE AU-DESSOUS
DU COMPTOIR OU AUX
CÔTÉS DES ARMOIRES
(SUITE)
• Vérifiez une nouvelle fois que le lave-vaisselle est
d’équerre et de niveau aussi bien dans le haut que
dans le bas de l’ouverture d’armoire, sans torsion ni
déformation de la cuve ou de la porte après le montage
des armoires ou du comptoir. Procédez à un ajustement
si nécessaire.
• Assurez-vous que tous les pieds de nivellement
reposent fermement sur le plancher afin de prévenir
le balancement du lave-vaisselle et garantir le bon
fonctionnement de la porte et du loquet.
ÉTAPE 15
ÉTAPE 16
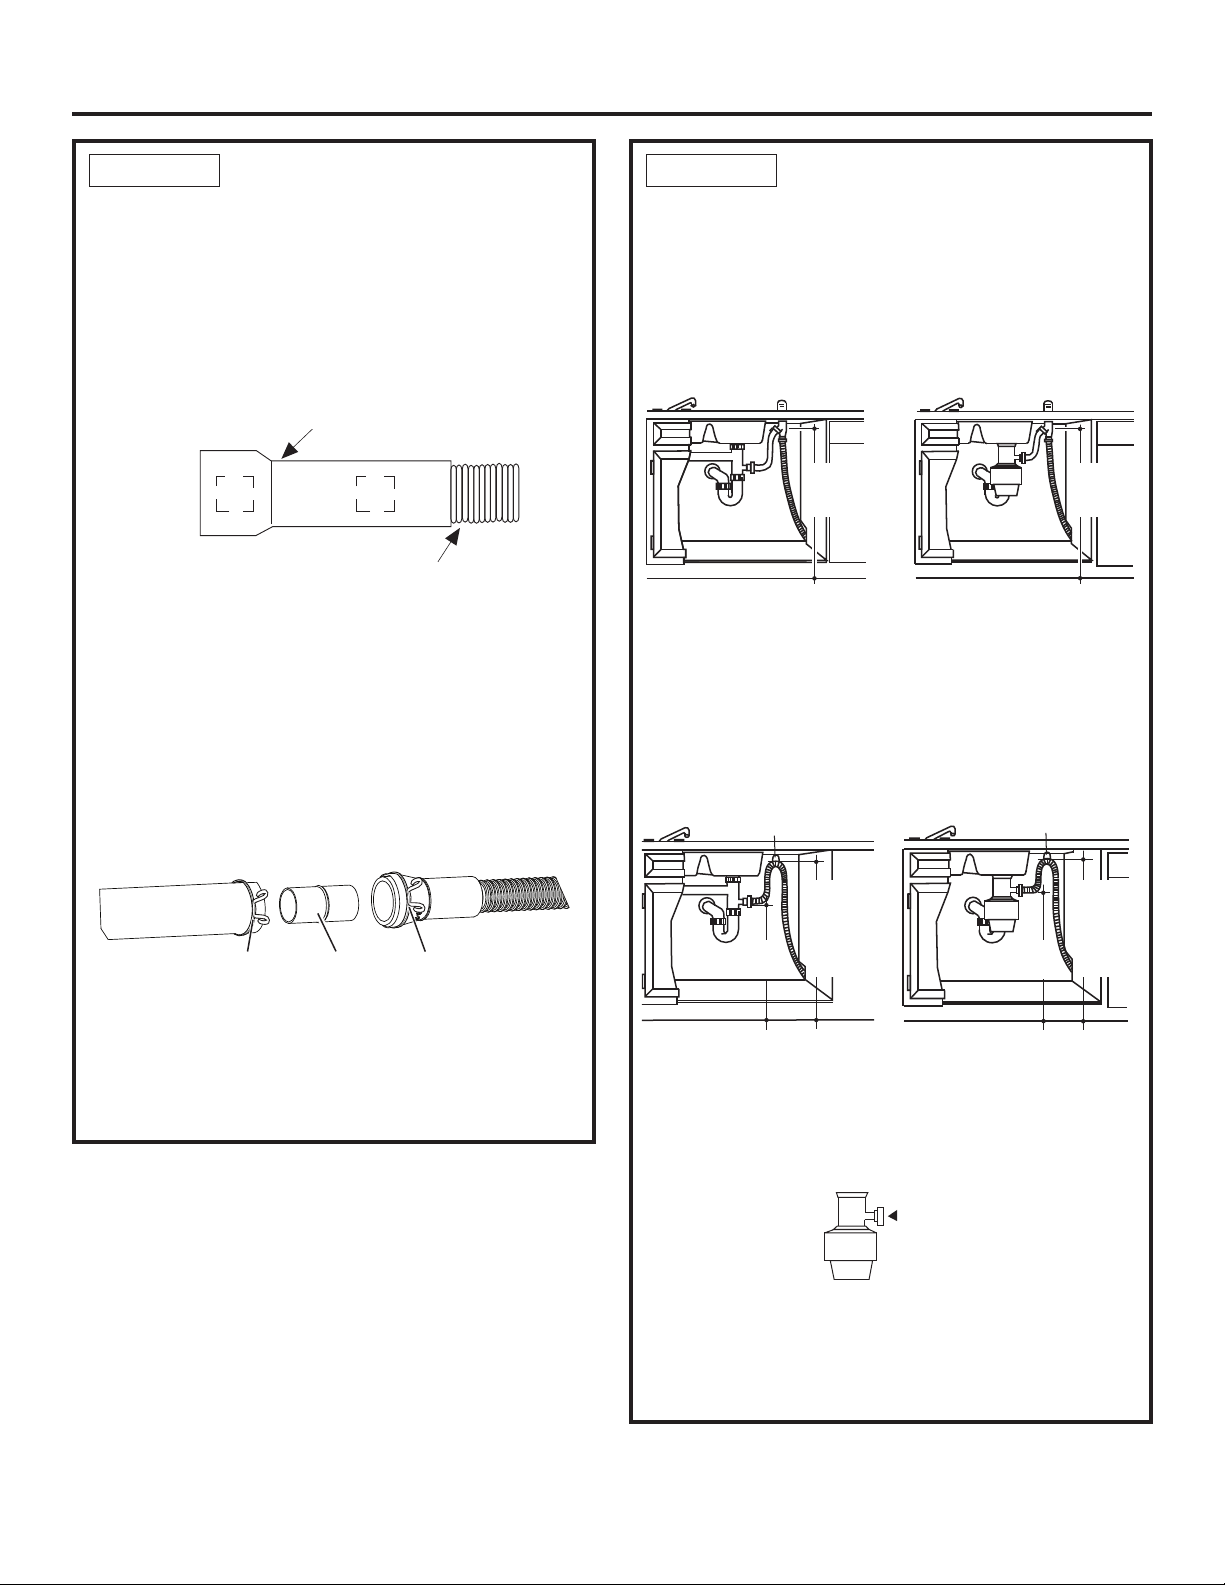
RACCORDEMENT DU
BOYAU DE VIDANGE
(SUITE)
• Branchez le boyau de vidange à la coupure anti-
refoulement, au raccord en T ou au broyeur à déchets
à l’aide de la méthode choisie précédemment. Fixez
solidement le boyau à l’aide d’un collier à vis sans fin.
Méthode n° 1 – Coupure anti-refoulement avec
raccord en T ou broyeur à déchets
Méthode n° 2 – Boucle de vidange élevée avec
raccord en T ou broyeur à déchets
Pour cette méthode, vous aurez besoin du crochet pour
boyau de vidange mis de côté à l’étape 1.
Fixez le boyau de vidange au-dessous du comptoir à
l’aide du crochet fourni.
IMPORTANT – Lorsque vous raccordez le boyau de
vidange à un broyeur à déchets, assurez-vous d’enlever
le bouchon de vidange. LE LAVE-VAISSELLE NE SE
VIDERA PAS SI LE BOUCHON EST LAISSÉ EN PLACE.
Conseil: Pour éviter les frais de réparation inutiles
pour un problème de vidange.
Tirez sur le boyau de vidange par l’ouverture pratiquée
dans les armoires afin d’empêcher le lave-vaisselle
d’écraser ou de plier une longueur excessive de boyau.
12
Installation du lave-vaisselle
RACCORDEMENT DU
BOYAU DE VIDANGE
L’extrémité moulée du boyau de vidange est conçue pour
s’installer sur l’orifice d’entrée d’un diamètre variant entre
15,8 mm (5/8 po) et 25,4 mm (1 po) de la coupure anti-
refoulement, du raccord en T ou du broyeur à déchets.
• Mesurez le diamètre de l’orifice d’entrée.
• Coupez le raccord du boyau de vidange à l’endroit indiqué,
au besoin, pour qu’il soit bien adapté à l’orifice d’entrée.
• Si un boyau de vidange plus long est nécessaire,
remplacez celui fourni dans la trousse par la pièce de
rechange GE Appliance WD24X10065, un boyau d’une
longueur de 3,7 m (12 pi) pouvant se fixer directement à la
boucle de vidange déjà attachée à l’appareil (voir l’étape
7). Si le boyau de rechange n’est pas disponible, un boyau
additionnel avec raccord 5/8 ou 7/8 po (D.I.) et d’une
longueur n’excédant pas 1,7 m (66 po), peut être raccordé
au boyau de vidange fourni. Fixez le raccordement au
boyau fourni à l’aide de collier de serrage (à trouver sur
place).
REMARQUE :
• LA LONGUEUR TOTALE DU TUYAU DE VIDANGE
NE DOIT PAS DÉPASSER 4,88 M (16 PIEDS)
DE L’ARRIÈRE DU LAVE-VAISSELLE POUR UN
FONCTIONNEMENT CORRECTE DE LA VIDANGE.
Figure Z
Ligne de coupe
25,4 mm (1 po)
15,8 mm (5/8 po)
IMPORTANT: Ne coupez pas la partie ondulée du boyau
Remove
Drain
Plug
Enlevez le
bouchon
de vidange
ÉTAPE 17 ÉTAPE 17
Collier Raccord Collier
Figure AA
182,8 cm
(72 po)
max.
182,8 cm
(72 po)
max.
Figure AB
Installation avec raccord en T
Installation avec
broyeur à déchets
Crochet pour boyau de vidange
82 cm
(32 po)
min. -
182,8 cm
(72 po)
max.
46 cm
(18 po) min.
Crochet pour
boyau de vidange
46 cm
(18 po) Min.
82 cm
(32 po)
min. -
182,8 cm
(72 po)
max.
Figure AC
Installation avec raccord en T
Installation avec
broyeur à déchets
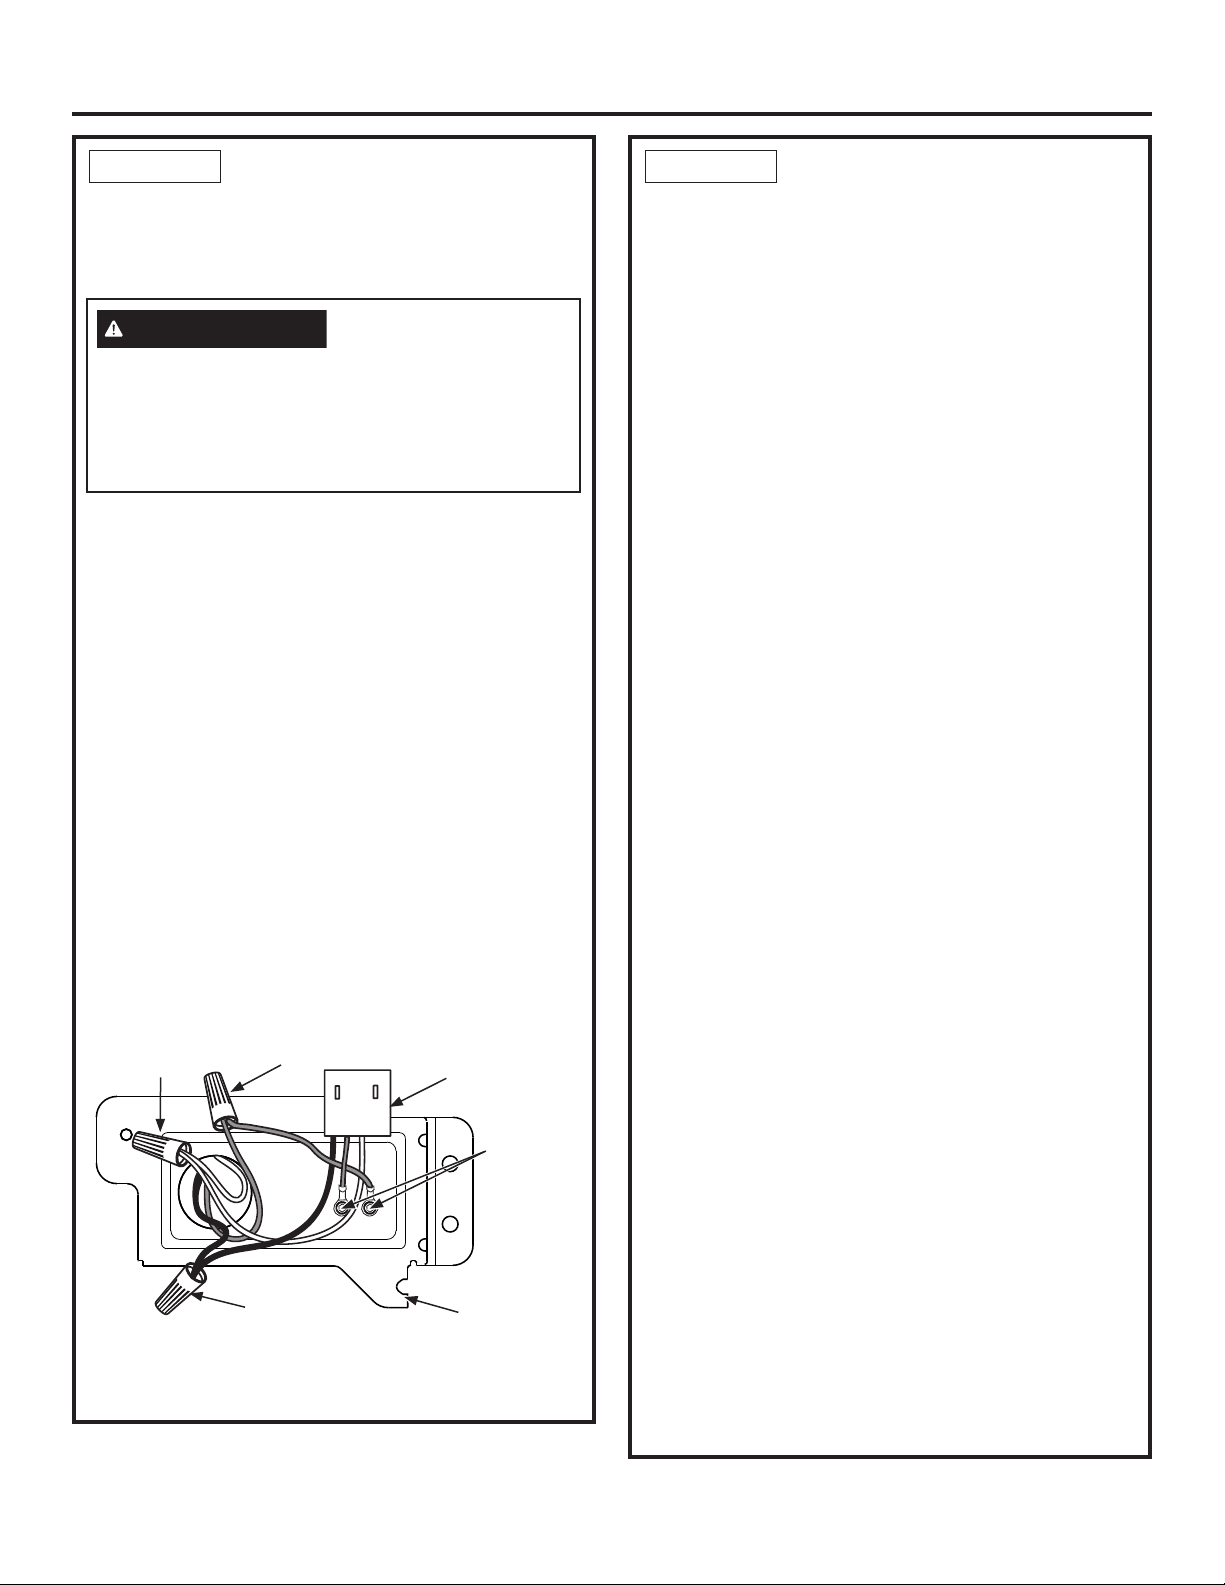
Installation du lave-vaisselle
13
BRANCHEMENT DE
L’ALIMENTATION
ÉLECTRIQUE
Si un cordon d’alimentation pourvu d’une fiche est
déjà installé sur l’appareil, passez à l’étape 19.
Au cours de cette étape, vous aurez besoin du couvercle
de la boîte de jonction et de la vis à tête hexagonale n°
10, mis de côté à l’étape 1.
• Fixez le câblage de la résidence à l’arrière de la boîte
de jonction à l’aide d’une bague anti-traction.
• Repérez les trois (3) fils du lave-vaisselle, (blanc, noir et
vert) avec les bouts dénudés dépassant des cavaliers CA.
Utilisez les capuchons de connexion homologués UL de
taille appropriée pour connecter le fil de terre arrivant au fil
vert, le blanc au blanc et le noir au noir.
• Installez le couvercle de la boîte de jonction à l’aide de la
vis à tête hexagonale n° 10. Assurez-vous que les fils ne
sont pas coincés sous le couvercle.
• Assurez-vous que le couvercle de la boîte de jonction
repose sur le support de montage.
• Si vous utilisez une trousse pour cordon d’alimentation,
utiliser le numéro de partie GE Appliances WX09X70910
ou WX09X70911 et veuillez consulter les instructions
fournies avec la trousse.
Figure AD
REMARQUE : N'enlevez pas le
support de la boîte de jonction.
Cavalier
CA
Support de
la boîte de
jonction
Blanc
Noir
Mise à la
terre (Vert)
Vis de
mise à
la terre
REMARQUE : Toutes les vis et tous les supports et les fils
servant de mise à la terre doivent demeurer intacts.
Si le câblage électrique de la résidence n’est pas
constitué de deux fils plus un fil de mise à la terre,
l’installateur doit installer un fil de mise à la terre. Si le
câblage électrique de la résidence est en aluminium,
utilisez un agent antioxydant et des connecteurs pour
raccords «aluminium-cuivre» homologués UL.
AVERTISSEMENT
ÉTAPE 18
LISTE DE CONTRÔLE
PRÉLIMINAIRE
Passez en revue cette liste après l’installation de
votre lave-vaisselle pour éviter des frais de réparation
inutiles non couverts par votre garantie.
• Assurez-vous que le courant électrique est coupé
à la source.
• Ouvrez la porte du lave-vaisselle et enlevez tout le
matériel d’emballage en carton et en mousse.
• Prenez le Manuel d’utilisation mis de côté à l’étape 1.
• Veuillez lire le Manuel d’utilisation pour vous familiariser
avec le fonctionnement de l’appareil.
• Vérifiez l’ouverture et la fermeture de la porte. Si la
porte n’ouvre pas et ne se ferme pas librement, vérifiez
si le câble du ressort est installé sur la poulie. Si la
porte s’ouvre complètement ou se ferme lorsque vous
la relâchez, réglez la tension du ressort. Reportez-vous
à l’étape 2.
• Assurez-vous que le câblage électrique est bien placé
sous le lave-vaisselle, qu’il n’est pas coincé ou qu’il
n’entre pas en contact avec les ressorts de la porte ou
d’autres pièces de l’appareil. Reportez-vous à l’étape
18.
• Vérifiez si la porte est bien parallèle par rapport à la
cuve. Si la porte frotte sur la cuve, mettez le lave-
vaisselle de niveau. Reportez-vous aux étapes 14.
• Vérifiez si la porte du lave-vaisselle est bien parallèle
par rapport aux armoires. Si la porte frotte contre les
armoires, repositionnez le lave-vaisselle. Reportez-vous
à l’étape 13.
• Assurez-vous que les ressorts de la porte n’entrent pas
en contact avec la conduite d’alimentation, le boyau de
remplissage, le câblage électrique ou toute autre pièce
de l’appareil. Reportez-vous à l’étape 13.
• Assurez-vous que la conduite d’alimentation en eau et
le boyau de vidange ne sont pas pliés ou n’entrent pas
en contact avec d’autres pièces. Tout contact avec le
moteur ou le cadre du lave-vaisselle pourrait provoquer
l’apparition de bruits.
• Ouvrez le robinet d’eau chaude de l’évier et vérifiez
si la température de l’eau varie entre 49 °C (120 °F)
et 60 °C (140 °F). La température de l’eau doit être
d’au moins 49 °C (120 °F) pour assurer une efficacité
de lavage optimale. Reportez-vous à la section
«Préparation de l’alimentation en eau chaude» à la
page 5.
• Versez 1 litre d’eau dans le fond du lave-vaisselle pour
lubrifier le joint de la pompe.
• Ouvrez l’alimentation en eau chaude. Vérifiez s’il y a
des fuites. Serrez les raccords au besoin.
• Enlevez la pellicule protectrice, s’il y a lieu, sur le
tableau de commande et la porte.
• Assurez-vous que la moulure de cuve ne touche pas à
la porte.
ÉTAPE 19
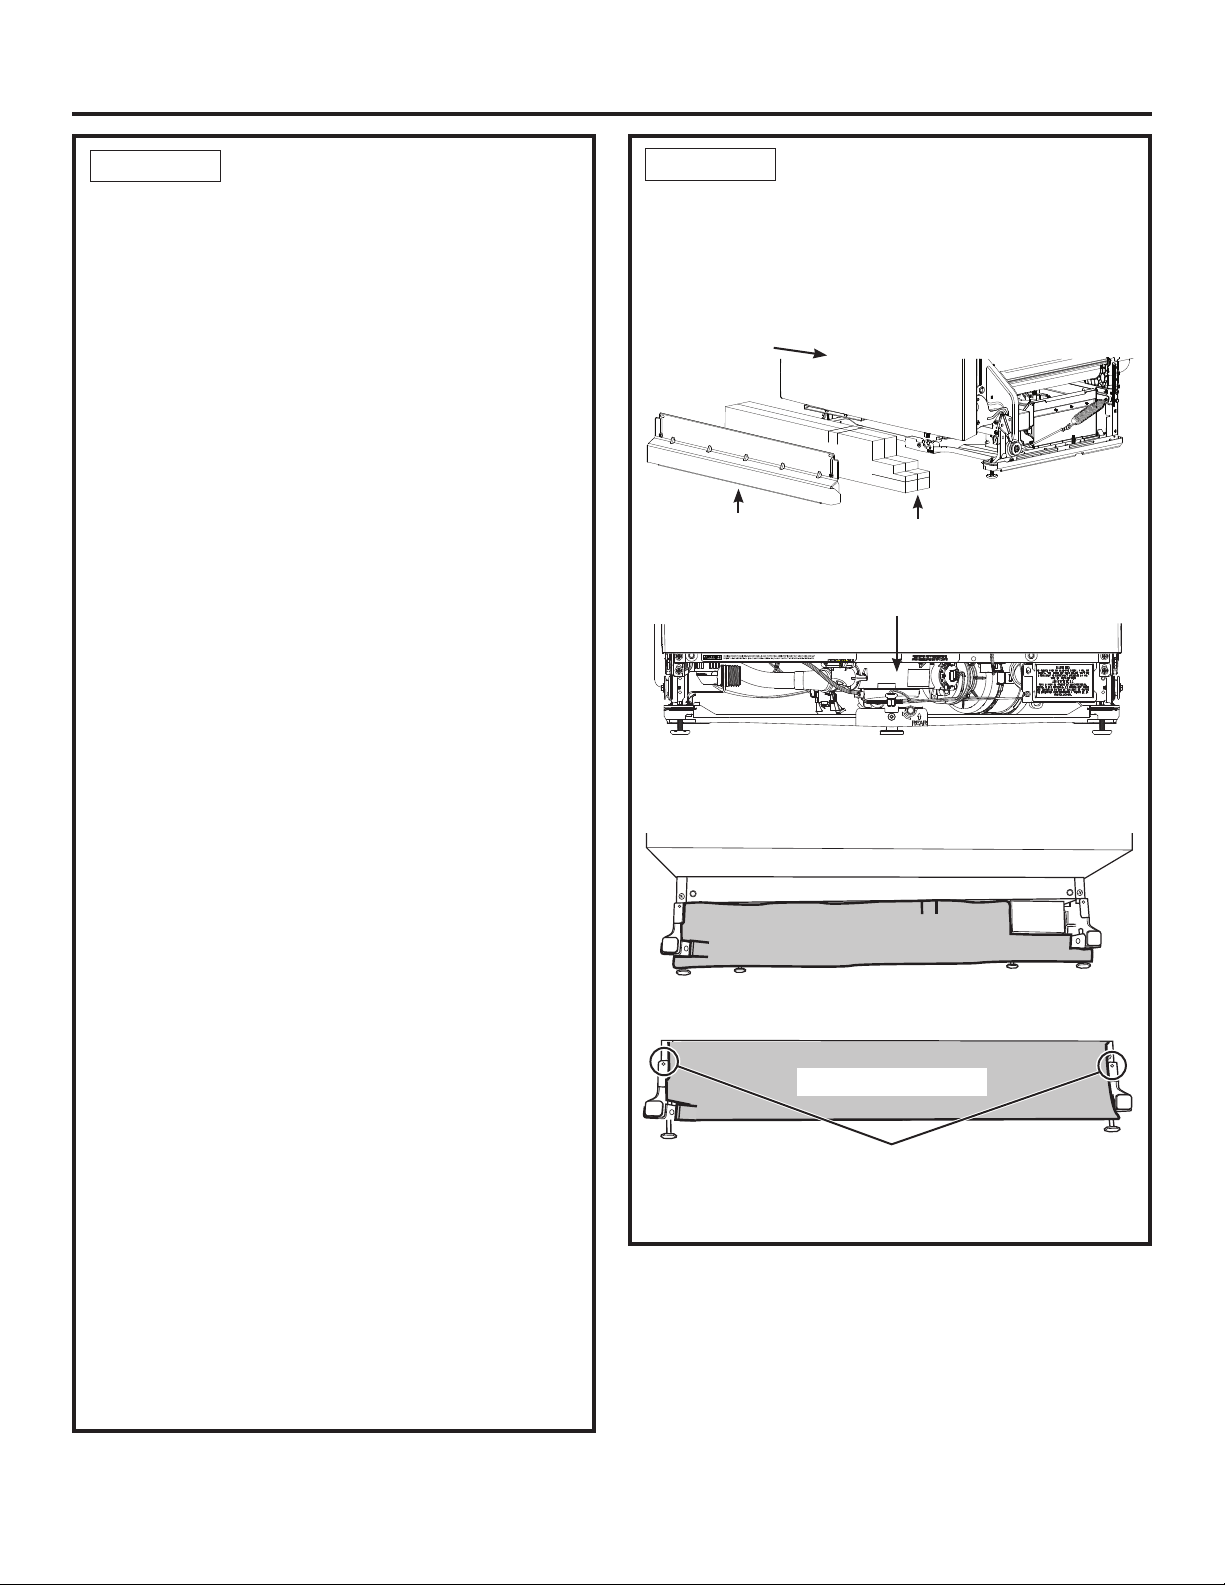
MISE EN PLACE DE
L’ISOLANT
ACOUSTIQUE
(certains modèles)
• Situez l’ensemble d’insonorisation inférieur à l’intérieur
du lave-vaisselle.
• Placer les pièces à la verticale comme illustré.
• Repérer la boîte de commande.
• Pousser le matériau la partie du bloc sous le lave-
vaisselle jusqu’à ce se trouve sous la boîte de
commande.
• Poussez la partie panneau sur le devant du bloc.
• Rentrer les côtés du panneau frontal derrière les trous de
vis de fixation du coup-de-pied.
Figure AH
Boîte de commande
ÉTAPE 21
Installation du lave-vaisselle
ESSAI DU LAVE-
VAISSELLE AVEC
DE L’EAU
• Rétablissez l’alimentation électrique ou si l’appareil est
doté d’un cordon d’alimentation, branchez-le dans la
prise de courant murale.
• Sélectionnez un cycle à exécuter et pressez la touche
Start (Démarrer)
.
• Vérifiez que la porte est verrouillée. Le lave-vaisselle
devrait démarrer.
• Assurez-vous que le lave-vaisselle se remplit. Si le
lave-vaisselle ne se remplit pas d’eau, vérifiez si le
robinet de la conduite est ouvert et si le lave-vaisselle
est sous tension.
• Vérifiez s’il y a des fuites sous le lave-vaisselle. Si
tel est le cas, coupez l’alimentation électrique en
déclenchant le disjoncteur, serrez les raccords, puis
rétablissez le courant.
REMARQUE : Une petite quantité d’eau peut être
projetée hors de l’entonnoir de remplissage du côté
droit de la cuve lors de la première utilisation. Cette
projection survient habituellement en présence d’air
dans la conduite d’eau d’une nouvelle construction ou
si le robinet a été fermé pendant une longue période.
• Vérifiez s’il y a des fuites autour de la porte. Ces
fuites peuvent être causées par le frottement de la
porte du lave-vaisselle contre les armoires adjacentes.
Repositionnez le lave-vaisselle au besoin. Reportez-
vous à l’étape 13.
• Maintenez enfoncée la touche Start (Démarrer) .
durant 3 secondes pour annuler le cycle. L’appareil
commencera à se vidanger. Vérifiez le boyau de
vidange. S’il présente des fuites, coupez l’alimentation
électrique en déclenchant le disjoncteur et corrigez
le problème de plomberie, au besoin. Rétablissez le
courant après avoir colmaté la fuite. Reportez-vous
aux étapes 7, 8, 9, 10 et 17.
• Ouvrez la porte du lave-vaisselle et assurez-vous que
la majeure partie de l’eau a été vidangée. Si l’appareil
ne s’est pas vidé, assurez-vous que le bouchon de
vidange du broyeur à déchets a été enlevé et(ou) que
la coupure anti-refoulement est exempte de débris.
Vérifiez également le boyau de vidange pour vous
assurer qu’il n’est pas coincé en dessous ou à l’arrière
du lave-vaisselle. Reportez-vous à l’étape 17.
• Appuyez sur la touche Start (Démarrer) une fois de
plus et lancer le lave-vaisselle dans un autre cycle.
Vérifiez l’absence de fuites et apportez des correctifs si
nécessaire.
• Répétez ces étapes que nécessaire.
14
ÉTAPE 20
Pousser les côtés du matériau insonorisant derrière
les trous de vis de fixation du coup-de-pied.
(certains modèles)
Panneau
inférieur
Matériau Bloc
(Sur certains modèles)
La porte du
lave-vaisselle
B
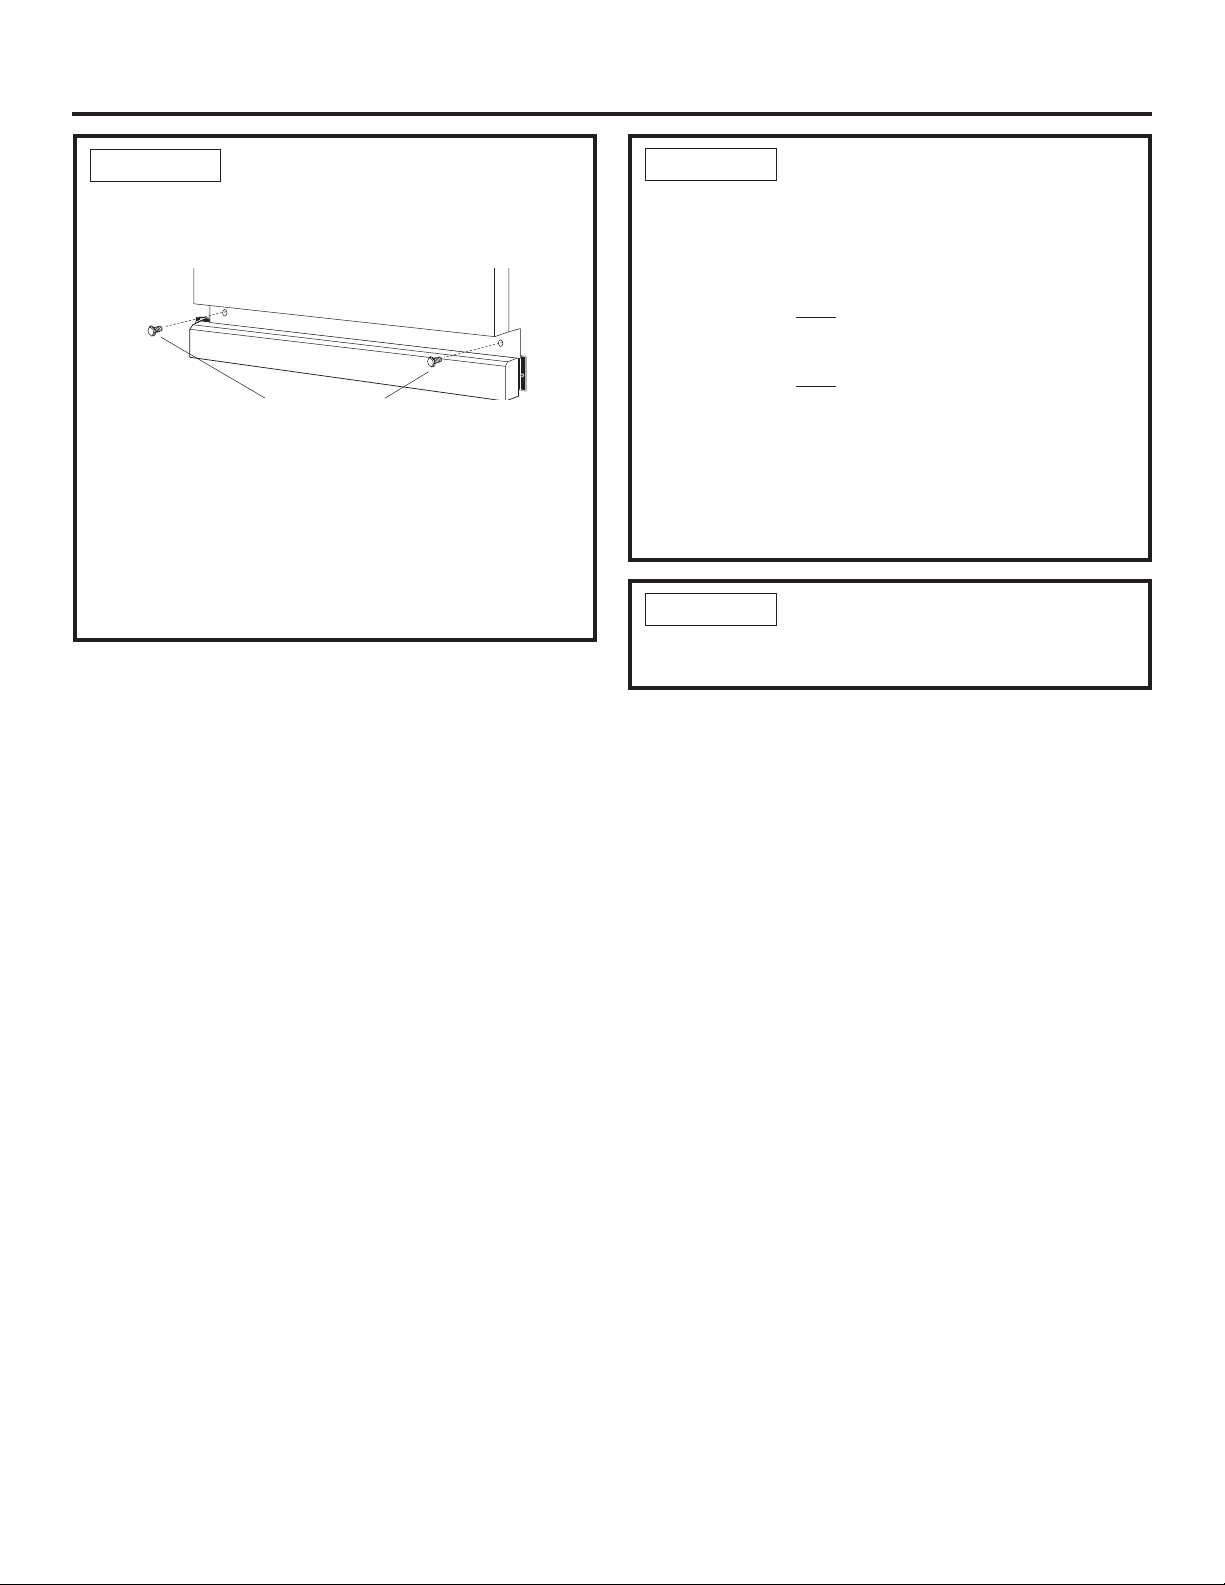
Installation du lave-vaisselle
RÉINSTALLATION DU
PANNEAU INFÉRIEUR
• Appuyez le panneau inférieur contre les pieds de
nivellement du lave-vaisselle.
• Alignez le panneau inférieur par rapport au bas de la
porte et assurez-vous qu’il repose sur le plancher.
• Insérez et serrez les deux vis de fixation du panneau
inférieur. Le panneau inférieur doit demeurer en contact
avec le plancher.
Conseil: Pour atténuer le bruit provenant du dessous
du lave-vaisselle. Assurez-vous que le panneau
inférieur repose sur le plancher.
Figure AJ
Panneau inférieur
Vis de fixation
DOCUMENTATION
• Laissez le Manuel d’utilisation, les directives d’installation,
les échantillons et(ou) les bons au consommateur.
VÉRIFIEZ LES POINTS
SUIVANTS
• La moulure de la cuve ne gêne pas la porte
• Le lave-vaisselle est d’équerre et de niveau par rapport
au bas et au haut de l’ouverture de l’armoire, sans
torsion ni déformation de la cuve ou de la porte
• Sur les modèles sans système de nivellement réglable,
assurez-vous que tous les 4 pieds du lave-vaisselle sont
fermement en contact avec le plancher.
• Sur les modèles avec système de nivellement réglable,
assurez-vous que les deux pieds avant ainsi que le pied
de nivellement du centre arrière sont fermement en
contact avec le plancher.
• Le boyau de vidange n’est pas coincé entre le lave-vaisselle
et les armoires ou les murs adjacents
• La moulure de cuve repose entièrement contre le bord de
la cuve
ÉTAPE 22
ÉTAPE 23
ÉTAPE 24
15

NOTE: Nous nous efforçons continuellement d’améliorer les produits. Par conséquent, les matériaux,
l’aspect et les caractéristiques sont assujettis à des changements sans préavis.
LEA DETENIDAMENTE
CONSERVE ESTAS INSTRUCCIONES
ALTO
ALTO
CONTROLE LO SIGUIENTE
(OERUGHGHODWLQDQRLQWHU¿HUHFRQODSXHUWD
(OODYDYDMLOODVHVFXDGUDGR\HVWiQLYHODGRWDQWRHQOD
SDUWHVXSHULRUFRPRHQODLQIHULRUGHODDEHUWXUDGHO
JDELQHWHVLQUHWRUFLPLHQWRQLGLVWRUVLyQGHODWLQDRGHOD
SXHUWD
/DVSDWDVGHOODYDYDMLOODVHVWiQDSR\DGDVGHPDQHUD¿UPH
FRQWUDHOVXHOR
/DPDQJXHUDGHGUHQDMHQRWLHQHWRUFHGXUDVHQWUHHO
ODYDYDMLOODV\ORVJDELQHWHVRSDUHGHVDG\DFHQWHV
(OERUGHGHODWLQDHVWiFRPSOHWDPHQWHDSR\DGRHQHO
reborde de la tina
PARA SU SEGURIDAD
Lea y cumpla con todas las ADVERTENCIAS y
PRECAUCIONES que figuran en estas instrucciones.
IMPORTANTE –&XPSODFRQWRGRVORVFyGLJRV\
RUGHQDQ]DVJXEHUQDPHQWDOHV
• Nota para el Instalador – Asegúrese de entregar
HVWDVLQVWUXFFLRQHVDOFRQVXPLGRU\DOLQVSHFWRUORFDO
• Nota para el Consumidor ±*XDUGHHVWDVLQVWUXFFLRQHV
FRQVX0DQXDOGHO3URSLHWDULRSDUDUHIHUHQFLDIXWXUD
• Nivel de habilidad±/DLQVWDODFLyQGHHVWH
ODYDYDMLOODVUHTXLHUHXQQLYHOEiVLFRGHKDELOLGDGHV
PHFiQLFDVHOpFWULFDV\GHSORPHUtDLa correcta
instalación del producto es responsabilidad del
instalador. Si se producen fallas en el producto
debido a una instalación inadecuada, la Garantía
del Producto de GE Appliances no cubrirá las
mismas. Consulte la información de la Garantía.
• Tiempo de instalación – 1 y 3 horas. Las
LQVWDODFLRQHVQXHYDVUHTXLHUHQPiVWLHPSRTXHODV
LQVWDODFLRQHVGHUHHPSOD]R
IMPORTANTE – El lavavajillas DEBE ser instalado
SDUDSHUPLWLUHOUHWLURIXWXURGHVXXELFDFLyQVLVH
UHTXLHUHUHDOL]DUHOVHUYLFLRWpFQLFR
6HGHEHUiWHQHUFXLGDGRFXDQGRHOHOHFWURGRPpVWLFR
VHDLQVWDODGRRUHWLUDGRDILQGHUHGXFLUODSRVLELOLGDG
GHGDxRVVREUHHOFDEOHGHVXPLQLVWURHOpFWULFR
6LHOODYDYDMLOODVTXHUHFLELyHVWiGDxDGRVHGHEHUtD
FRPXQLFDUGHLQPHGLDWRFRQVXYHQGHGRURIDEULFDQWH
$FFHVRULRV2SFLRQDOHV±3DUDFRQVXOWDUVREUH
GLVSRQLELOLGDGGHNLWVGHSDQHOHVSHUVRQDOL]DGRV
FRQVXOWHHO0DQXDOGHO3URSLHWDULR
6XODYDYDMLOODVHVXQHOHFWURGRPpVWLFRGRQGHVHFDOLHQWDDJXD
ANTES DE COMENZAR
/HDHVWDVLQVWUXFFLRQHVHQVXWRWDOLGDG\DWHQWDPHQWH
•
3DUDUHGXFLUHOULHVJRGHGHVFDUJDHOpFWULFDLQFHQGLR
ROHVLRQHVDSHUVRQDVHOLQVWDODGRUGHEHDVHJXUDUVH
GHTXHHOODYDSODWRVHVWpFRPSOHWDPHQWHFHUUDGRHQHO
PRPHQWRGHODLQVWDODFLyQ
•
3$5$6(*85,'$'3(5621$/4XLWHHOIXVLEOHR
DEUDHOLQWHUUXSWRUGHFLUFXLWRVDQWHVGHFRPHQ]DU
ODLQVWDODFLyQ1RXWLOLFHXQFDEOHGHH[WHQVLyQRXQ
HQFKXIHDGDSWDGRUFRQHVWHDUWHIDFWR
•
/DFRQH[LyQLQDGHFXDGDGHOFRQGXFWRUGHFRQH[LyQ
DWLHUUDGHOHTXLSDPLHQWRSXHGHSURYRFDUXQULHVJR
GHGHVFDUJDHOpFWULFD&RQVXOWHDXQHOHFWULFLVWD
FDOL¿FDGRRUHSUHVHQWDQWHGHVHUYLFLRWpFQLFRVLWLHQH
GXGDVVREUHODFRUUHFWDFRQH[LyQDWLHUUDGHODSDUDWR
•
6LHOFDEOHDGRGRPpVWLFRQRFXHQWDFRQXQFDEOH
GHKLORVFRQFRQH[LyQDWLHUUDXQLQVWDODGRUGHEH
UHDOL]DUXQDFRQH[LyQDWLHUUD&XDQGRHOFDEOHDGR
GRPpVWLFRHVGHDOXPLQLRDVHJ~UHVHGHXVDUXQ
FRPSXHVWRDQWLR[LGDQWH\FRQHFWRUHVGHDOXPLQLRD
FREUHDSUREDGRVSRU8/
• 3DUDUHGXFLUHOULHVJRGHGHVFDUJDHOpFWULFDLQFHQGLRR
OHVLRQHVDSHUVRQDVHOLQVWDODGRUGHEHUiUHDOL]DUXQ
FRQWUROSDUDDVHJXUDUTXHORVFDEOHVQRHVWpQSHOOL]FDGRV
QLGDxDGRVTXHHOFDEOHDGRGHOKRJDUHVWpFRQHFWDGRDOD
ILFKDGHODFDMDGHHPSDOPHVDWUDYpVGHXQDPRUWLJXDGRU
GHUHIXHU]R\TXHWRGDVODVFRQH[LRQHVHOpFWULFDV
UHDOL]DGDVHQHOPRPHQWRGHODLQVWDODFLyQWXHUFDVSDUD
FDEOHVHVWpQGHQWURGHODWDSDGHODFDMDGHHPSDOPHV
1RTXLWHODEDVHGHPDGHUDKDVWDTXHHVWpOLVWRSDUD
LQVWDODUHOODYDSODWRV6LVHTXLWDODEDVHHOODYDSODWRVVH
YROFDUiFXDQGRVHDEUDODSXHUWD
Al realizar las instalaciones descriptas en este manual, se
deberán usar guantes, anteojos o gafas de seguridad.
ADVERTENCIA
PRECAUCIÓN
Consulte el Manual del propietario para obtener detalles sobre cómo ponerse en contacto con nosotros si
tiene preguntas sobre la instalación.
Lavavajillas Incorporado
Instrucciones
de Instalación
31-4000211 Rev 2 10-20 GEA
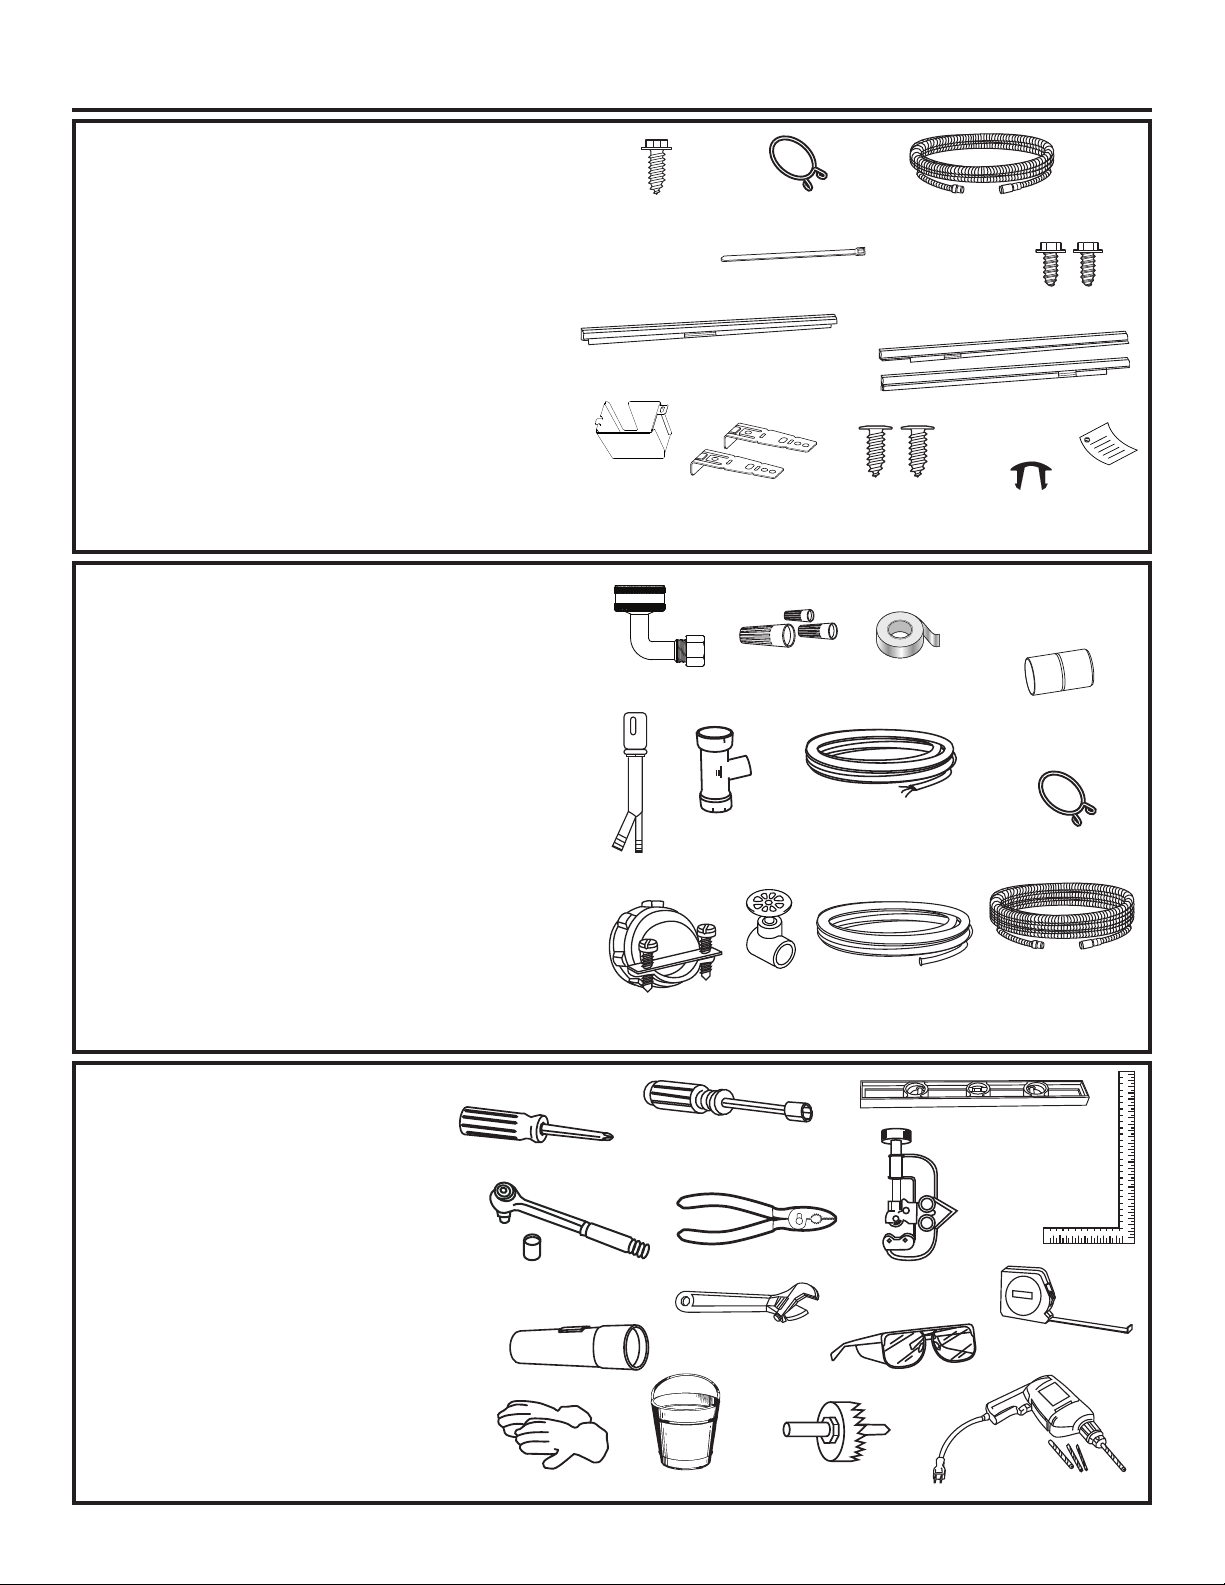
Destornillador Phillips
Llave de tuercas
de ¼” y de 5/16”
HERRAMIENTAS NECESARIAS:
• 'HVWRUQLOODGRU3KLOOLSV
• /ODYHGHWXHUFDVGHó´\GH´
• /ODYHDMXVWDEOHGH´
• 1LYHO
• (VFXDGUDGHFDUSLQWHUR
• &LQWDGHPHGLFLyQ
• *DIDVGHVHJXULGDG
• Linterna
• %DOGHSDUDFRQWHQHUHODJXDDOGHVDJRWDUODOtQHD
• 7RPDFRUULHQWHGH´RSFLRQDOSDUDHOUHWLUR
GHODEDVH
• *XDQWHV
• 3LQ]DV
Sólo para Instalaciones Nuevas:
• &RUWDGRUGHWXERV
• 7DODGUR\EURFDVDSURSLDGDV
• (TXLSRGHFDODGRUD
MATERIALES NECESARIAS:
• &RGRGHURVFDLQWHUQDGHODPDQJXHUDGHô´HQXQ
H[WUHPR\HOH[WUHPRRSXHVWRFRLQFLGHFRQHOVXPLQLVWUR
GHDJXDWRILWZDWHUVXSSO\
• 7XHUFDVGHFDEOHVGHODOLVWDGH8/
• &LQWDDGKHVLYDVLHVDSOLFDEOH
Materiales Necesarios para Instalaciones Nuevas:
• %UHFKDGHDLUHSDUDODPDQJXHUDGHGHVDJHVLVHUHTXLHUH
• 7GHGHVHFKRVSDUDSORPHUtDKRJDUHxDVLFRUUHVSRQGH
• &DEOHHOpFWULFRR.LWGHOFDEOHGHFRUULHQWHWX09X70910
SLHVRWX09X70911SLHVGHSHQGLHQGRGHVXLQVWDODFLyQ
• $EUD]DGHUDGHODPDQJXHUDVLHVQHFHVDULRSDUDOD
PDQJXHUDGHGUHQDMHRSFLRQDO
• $PRUWLJXDGRUGHUHIXHU]RSDUDODFRQH[LyQHOpFWULFD
• 9iOYXODGHFLHUUHPDQXDOUHFRPHQGDGR
• /tQHDGH$JXD&DOLHQWH±PtQLPRGHWXEHUtDGHFREUH
LQFOX\HQGRDEUD]DGHUDGHUHIXHURWXHUFDGHFRPSUHVLyQ
R3LH]DGH*($SSOLDQFHVQWX28X326PDQJXHUD
WUHQ]DGDIOH[LEOH
• 0DQJXHUDGHGHVDJHWD24X10065GHORQJLWXGVL
VHUHTXLHUH
PIEZAS SUMINISTRADAS EN
EL PAQUETE DE INSTALACIÓN:
• 7DSDGHODFDMDGHHPSDOPHV\WRUQLOORGHFDEH]D
KH[DJRQDOQ
• $EUD]DGHUDGHODPDQJXHUD
• 0DQJXHUDGHGHVDJHDSUR[GHORQJLWXG
• 6RVWHQHGRUGHODPDQJXHUDGHGHVDJH
• 7RUQLOORVGHFDEH]DKH[DJRQDOQSDUDDVHJXUDUORV
VRSRUWHVGHODHVWUXFWXUDGHODWXEHUtDGHODODYDGRUD
• 3LH]DGHOERUGHVXSHULRUDOJXQRVPRGHORV
• 3LH]DVGHOERUGHODWHUDO
• 6RSRUWHVGHPRQWDMHSDUDPHVDGDVGHPDGHUDR
gabinetes laterales
• 7RUQLOORVGHFDEH]DHVSHFLDO3KLOOLSVQ[´SDUD
DVHJXUDUHOODYDYDMLOODVDODSDUWHLQIHULRUGHODPHVDGDR
a los gabinetes laterales
• %RWRQHVGHOHQFKXIH
• 7H[WRVPXHVWUDV\RFXSRQHV
Brecha
de aire
Amortiguador
de refuerzo
Equipo de caladora
Manguera de desagüe
(aprox. 58" de
longitud)
Abrazadera de
la manguera
2 Piezas del borde lateral
Tomacorriente
de 15/16”
Balde
Cortador de
tubos
Taladro
y brocas
apropiadas
Linterna
Guantes
Escuadra
de
carpintero
Llave ajustable
de 6”
Gafas de seguridad
Válvula
de cierre
manual
Cinta de
medición
Sostenedor de la
manguera de desagüe
Tapa de
la caja de
empalmes
#10
Tornillo
de cabeza
hexagonal
nº 10
Manguera de
desagüe (12')
opcional
WD24X10065
Línea de Agua
Caliente
T de
desechos
Cable eléctrico o cable de
corriente dependiendo de
sus modelos
Tuercas
de cables
Nivel
2 Soportes
de montaje
2 Tornillos de cabeza
especial Phillips nº
8-18 x 5/8”
2 Tornillos de cabeza
hexagonal nº 8-18
Pinzas
Textos
Codo de 90º
Preparación de la Instalación
2
Sujetador para
manguera de drenaje
opcional
1 Pieza del borde superior
(algunos modelos)
Botones del
enchufe
Cinta
adhesiva
Abrazadera de
la manguera
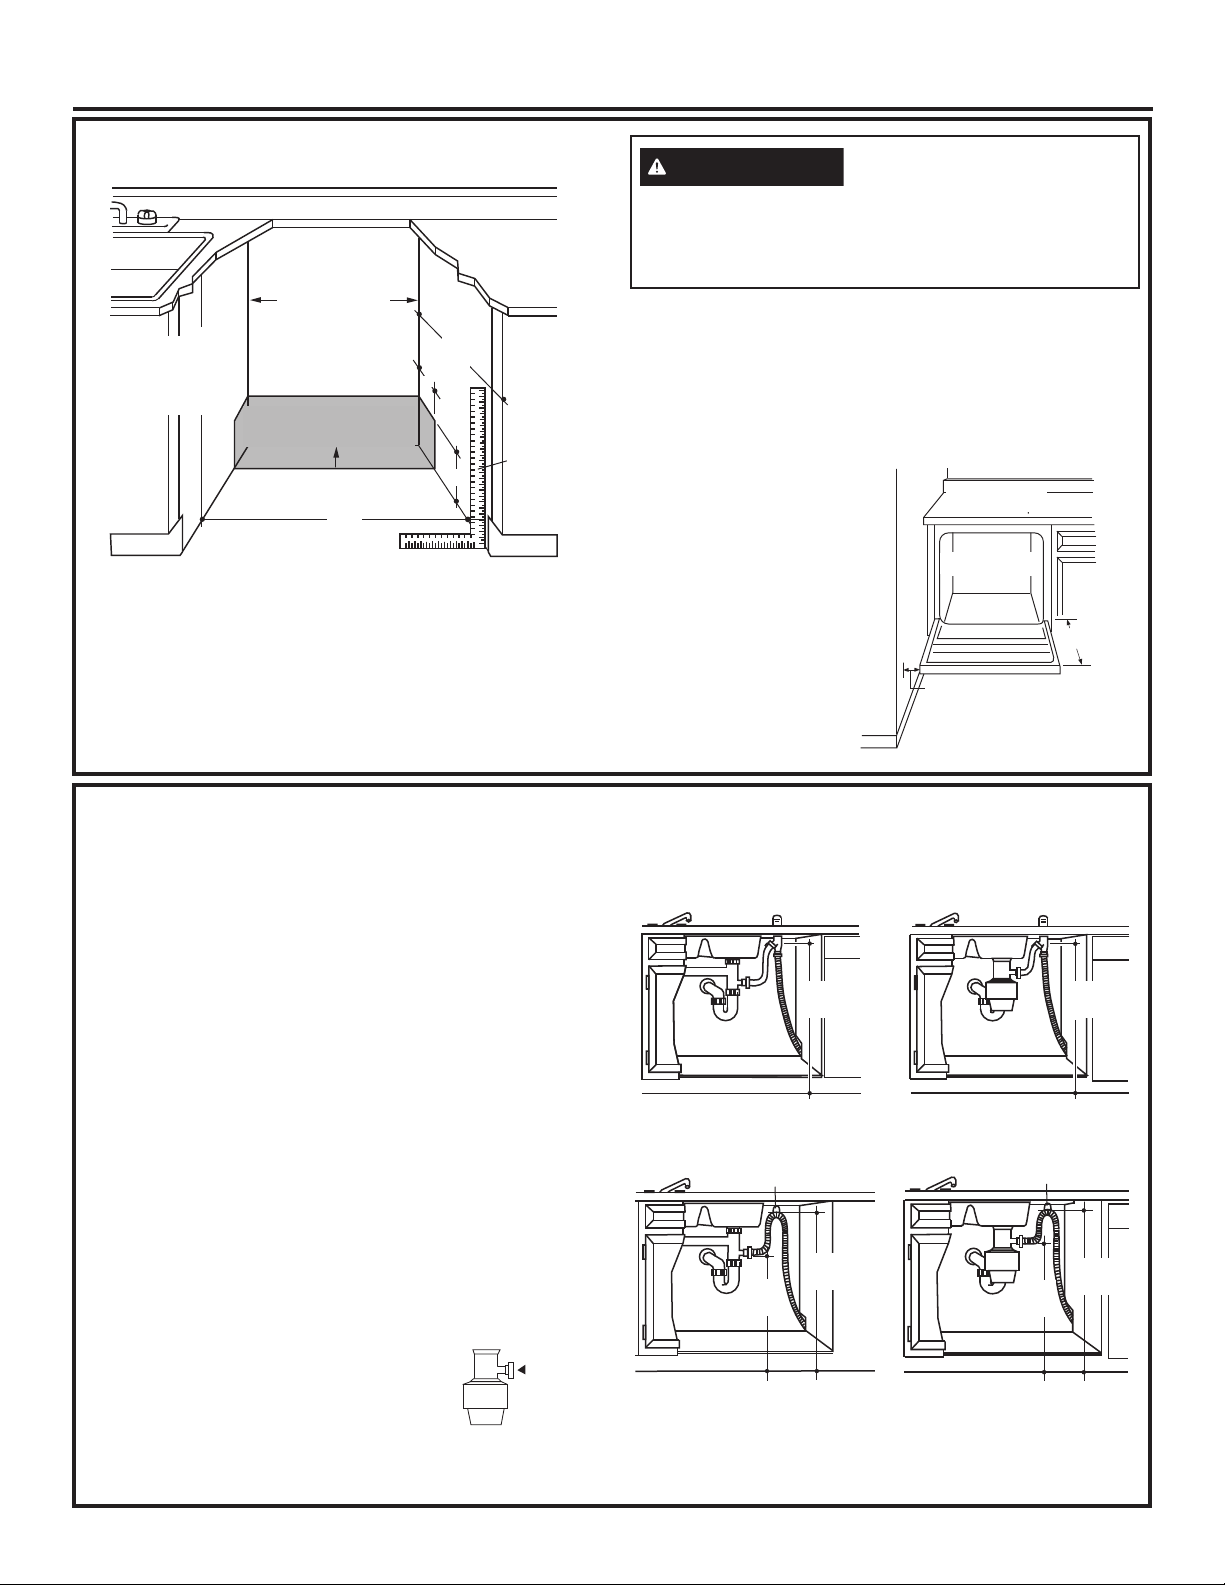
3
Preparación de la Instalación
REQUISITOS PARA EL DESAGÜE
&XPSODFRQORVFyGLJRV\RUGHQDQ]DVORFDOHV
1RVXSHUHXQDGLVWDQFLDGHKDVWDHOGHVDJH
NOTA: 6HGHEHUiXVDUXQDEUHFKDGHDLUHVLOD7GH
GHVHFKRVRODFRQH[LyQGHOHOLPLQDGRUGHGHVHFKRVHVWiD
PHQRVGH´VREUHHOSLVRSDUDHYLWDUHOVLIRQDMH
DETERMINE EL MÉTODO DE DESAGÜE
(OWLSRGHLQVWDODFLyQGHOGHVDJHGHSHQGHGHODVVLJXLHQWHV
FXHVWLRQHV
• ¢5HTXLHUHQORVFyGLJRVXRUGHQDQ]DVORFDOHVXQDEUHFKD
de aire?
• ¢(VWiOD7GHGHVHFKRVDPHQRVGH´VREUHHOSLVR"
Si la respuesta a cualquiera de estas preguntas
es SÍ, se DEBERÁ usar el Método 1.
• 6LODVUHVSXHVWDVVRQ12VHSRGUiXVDUFXDOTXLHUPpWRGR
PREPARACIÓN DEL GABINETE
3HUIRUHXQDJXMHURGHòGHGLiPHWURHQODSDUHG
GHOJDELQHWHGHQWURGHODViUHDVVRPEUHDGDVTXHVH
PXHVWUDQHQOD)LJXUD$SDUDODFRQH[LyQGHODPDQJXHUD
GHGHVDJH(ODJXMHURGHEHUiVHUUHDOL]DGRGHIRUPD
SDUHMDVLQH[WUHPRVILORVRV
IMPORTANTE – $OFRQHFWDUOD
OtQHDGHGHVDJHDOHOLPLQDGRUGHUHVLGXRV
DVHJ~UHVHGHTXHHOHQFKXIHGHOGHVDJH
KD\DVLGRUHWLUDGR(//$9$9$-,//$612
+$5È(/'(6$*27(6,(/(1&+8)((67È
&2/2&$'2
Método 1 – Brecha de aire con T de desechos o
eliminador de desechos
6HGHEHUiXVDUXQDEUHFKDGHDLUHFXDQGRORVFyGLJRV\RU-
GHQDQ]DVORFDOHVORUHTXLHUDQ/DEUHFKDGHDLUHGHEHUiVHU
LQVWDODGDGHDFXHUGRFRQODVLQVWUXFFLRQHVGHOIDEULFDQWH
Método 2 – “Bucle de Desagote Alto" con T de
desechos o eliminador de desechos
Consejo: Evite costos innecesarios de llamadas al
servicio técnico.
6LHPSUHDVHJ~UHVHGHTXHHOHQFKXIHGHOGHVDJHGH
GHVHFKRVKD\DVLGRUHWLUDGRDQWHVGHDGKHULUODPDQDJXHUD
GHGHVDJHGHOODYDYDMLOODVDOHOLPLQDGRUGHGHVHFKRV
PREPARE EL AMURADO DEL
LAVAVAJILLAS
/DDEHUWXUDU~VWLFDGHOJDELQHWHGHEHUiWHQHUSRUORPHQRV
GHSURIXQGLGDGGHDQFKR\DSUR[LPDGDPHQWH
GHDOWRGHVGHHOSLVRKDVWDHOODWHUDOGHODPHVDGD
(OODYDYDMLOODVVHGHEHUiLQVWDODUGHIRUPDWDOTXHOD
PDQJXHUDGHGHVDJHQRWHQJDPiVGHGHORQWLJXG
SDUDXQGHVDJHDGHFXDGR
•(OODYDYDMLOODVGHEHUiHVWDUFRPSOHWDPHQWHDPXUDGRDOD
SDUWHVXSHULRUFRVWDGRV\SDUWHWUDVHUD\QRGHEHUiWHQHU
DSR\DGDQLQJXQDSDUWHGHODPXUDGR
ESPACIO NECESARIO:
• &XDQGRVHLQVWDOHHQXQD
HVTXLQDGHMHXQHVSDFLR
PtQLPRGH´HQWUHHO
ODYDYDMLOODV\HOJDELQHWH
DG\DFHQWHODSDUHG\
RWURVHOHFWURGRPpVWLFRV
'HMHXQHVSDFLRPtQLPR
GH´GHVGHHOIUHQWH
GHOODYDYDMLOODVKDVWDOD
DEHUWXUDGHODSXHUWD
)LJXUD%
3DUDUHGXFLUHOULHVJRGHGHVFDUJDHOpFWULFDLQFHQGLR
ROHVLRQHVDSHUVRQDVHOLQVWDODGRUGHEHDVHJXUDUVH
GHTXHHOODYDSODWRVHVWpFRPSOHWDPHQWHFHUUDGRHQHO
PRPHQWRGHODLQVWDODFLyQ
34-1/2”+1/4”
Underside of
Countertop
to Floor
This Wall Area
Must be Free
of Pipes and
Wires
Cabinets
Square
and
Plumb
Plumbing and Electric Service
Must Enter Inside This Area
24”
Min.
4”
6”
24”
Min.
Figura A
´D
´HQODSDUWH
LQIHULRUGHVGHOD
PHVDGDDOSLVR
El area de
HVWDSDUHG
GHEHUi
estar
libre de
FDxHUtDVR
FDEOHV
6HGHEHUiQSRGHUUHDOL]DU
ORVVHUYLFLRVGHSORPHUtD\
HOpFWULFRVGHQWURGHHVWDiUHD
Gabinetes
a
HVFXDGUD
\DSORPR
Clearance for Door
Opening 2" Minimum
Countertop
Dishwasher
25-1/2"
0HVDGD
Lavavajillas
(VSDFLRPtQLPRGH´
GHVGHODDEHUWXUDGHOD
SXHUWD
Figura B
ADVERTENCIA
Remove
Drain
Plug
5HWLUHHO
HQFKXIH
del
GHVDJH
´
PD[
´
PD[
Figura C
Figura D
´
PLQ
´PLQ
´PD[
*DQFKRGHODPDQJXHUD
GHGHVDJH
´
PLQ
´PLQ
´PD[
*DQFKRGHODPDQJXHUD
GHGHVDJH
DIMENSIÓN DE LA MANIGUETA DEL LAVAVAJILLAS:
/DSXHUWDGHOODYDYDMLOODVGHEHHVWDUDOUDVFRQHOJDELQHWH
3DUDORVPRGHORVFRQPDQLJXHWDODSURIXQGLGDGWRWDOFRQ
PDQLJXHWDHVGH´FRPRPi[LPRGHSHQGLHQGR
GHOPRGHOR%XVTXHHOGRFXPHQWRGHHVSHFLILFDFLRQHV
UiSLGDVHQLQWHUQHWSDUDREWHQHUPiVGLPHQVLRQHVGHO
ODYDYDMLOODV

PREPARACIÓN DEL CABLEADO
ELÉCTRICO
Preparación de la Instalación
4
REQUISITOS ELÉCTRICOS
$VHJ~UHVHGHTXHODFRQH[LyQHOpFWULFD\HOWDPDxRGHO
FDEOHVHDQORVDGHFXDGRV\TXHFXPSODQFRQHO&yGLJR
1DFLRQDOGH(OHFWULFLGDG$16,1)3$±~OWLPDHGLFLyQ\
FRQWRGRVORVFyGLJRV\RUGHQDQ]DVORFDOHV
Este electrodoméstico deberá contar con:
9+]&$~QLFDPHQWHDPSHUHVRDPSHUHV
VXPLQLVWURHOpFWULFRFRQIXVLEOH
(OFDEOHDGRGHEHUiFRQVWDUGHFDEOHVFRQWLHUUD\
UHVLVWHQWHD))
6LHOVXPLQLVWURHOpFWULFRSURYLVWRQRFXPSOHFRQORV
UHTXLVLWRVDQWHULRUHVOODPHDXQHOHFWULFLVWDPDWULFXODGR
DQWHVGHSURFHGHU
Se recomienda contar con:
8QGLV\XQWRU\XQIXVLEOHGHUHWDUGR
8QFLUFXLWRGHHPSDOPHVLQGLYLGXDOFRUUHFWDPHQWH
FRQHFWDGRDWLHUUD
Instrucciones de Conexión a Tierra – Conexión
Permanente
(VWHHOHFWURGRPpVWLFRGHEHHVWDUFRQHFWDGRDXQVLVWHPD
GHFDEOHDGRGHPHWDOSHUPDQHQWHFRQFRQH[LyQDWLHUUD
RVHGHEHUiWHQGHUXQFRQGXFWRSDUDODFRQH[LyQDWLHUUD
GHOHTXLSRFRQORVFRQGXFWRUHVGHOFLUFXLWR\FRQHFWDGRDO
WHUPLQDOGHWLHUUDGHOHTXLSRRDOFRQGXFWRUGHVXPLQLVWUR
GHOHOHFWURGRPpVWLFR
Instrucciones de Conexión a Tierra – Modelos con
Cables de Corriente
(VWHHOHFWURGRPpVWLFRGHEHUiHVWDUFRQHFWDGRDWLHUUD
(QFDVRGHPDOIXQFLRQDPLHQWRRDYHUtDODFRQH[LyQ
DWLHUUDUHGXFLUiHOULHVJRGHGHVFDUJDVHOpFWULFDVDO
EULQGDUXQFDPLQRFRQXQDUHVLVWHQFLDPHQRUSDUDOD
FRUULHQWHHOpFWULFD(VWHHOHFWURGRPpVWLFRHVWiHTXLSDGR
FRQXQFDEOHFRQXQFRQGXFWRUSDUDODFRQH[LyQD
WLHUUDGHOHTXLSR\XQHQFKXIHFRQFRQH[LyQDWLHUUD
(OHQFKXIHGHEHUiHVWDUFRQHFWDGRDXQWRPDFRUULHQWH
LQVWDODGRHQIRUPDDGHFXDGD\FRQFRQH[LyQDWLHUUDGH
DFXHUGRFRQWRGRVORVFyGLJRV\RUGHQDQ]DVORFDOHV
Preparación del Gabinete y Enrutador del Cable
(OFDEOHDGRSRGUiLQJUHVDUSRUODDEHUWXUDGHFXDOTXLHUD
GHORVODGRVGHVGHODSDUWHWUDVHUDRGHVGHHOSLVR
GHQWURGHOiUHDVRPEUDGDTXHDSDUHFHLOXVWUDGDPiV
DUULEDHQOD)LJXUD(\GHILQLGDHQOD)LJXUD$
&RUWHXQDJXMHURGHXQPi[LPRGHò´GHGLiPHWUR
SDUDDGPLWLUHOFDEOHHOpFWULFR/RVH[WUHPRVGHO
DJXMHURGHEHUtDQHVWDUSDUHMRV\UHGRQGHDGRV'HVHU
FRQYHQLHQWHODVFRQH[LRQHVGHOFDEOHDGRSHUPDQHQWH
SRGUiQSDVDUDWUDYpVGHOPLVPRDJXMHURTXHOD
PDQJXHUDGHGHVDJH\ODOtQHDGHDJXDFDOLHQWH6LOD
SDUHGGHOJDELQHWHHVPHWiOLFDHOH[WUHPRGHODJXMHUR
GHEHUiHVWDUFXELHUWRFRQXQDLVODQWH127$/RVFDEOHV
GHFRUULHQWHFRQHQFKXIHGHEHUiQSDVDUDWUDYpVGHXQ
DJXMHURVHSDUDGR
NOTA:/RVFDEOHVGHDOLPHQWDFLyQFRQHQFKXIHWLHQHQTXH
SDVDUDWUDYpVGHXQDJXMHURVHSDUDGRHQHOJDELQHWH
Conexión Eléctrica al Lavavajillas
/DFRQH[LyQHOpFWULFDVHHQFXHQWUDVREUHHOIUHQWH
GHUHFKRGHOODYDYDMLOODV
3DUDUHDOL]DUFRQH[LRQHVSHUPDQHQWHVHOFDEOHGHEHUi
KDFHUXQUHFRUULGRFRPRVHPXHVWUDHQOD)LJXUD((O
FDEOHVHGHEHUiH[WHQGHUXQPtQLPRGHGHVGHOD
SDUHGWUDVHUD
3DUDUHDOL]DUFRQH[LRQHVGHFDEOHVGHFRUULHQWH
LQVWDOHXQUHFHSWiFXORFRQFRQH[LyQDWLHUUDGH
FODYLMDVHQODSDUHGWUDVHUDGHOJDELQHWHGHOODYDERD
XQPtQLPRGH´RDXQPi[LPRGH´GHVGHOD
DEHUWXUD\GH´D´VREUHHOSLVR
8VHVyORHO.LWGHO&DEOHGH&RUULHQWHGHO/DYDYDMLOODV
WX09X70910 o WX09X70911
Blanco
18"
6"
24” desde
la pared
3”
desde
el gabinete
Ubicación de
receptáculo
alternativo en el
gabinete adyacente
Tierra
Negro
Agujero de 1 ½”
de diám. (máx.)
18"
6"
Área de
ubicación
del
receptáculo
Figura E
3$5$6(*85,'$'3(5621$/4XLWHHOIXVLEOHR
DEUDHOLQWHUUXSWRUGHFLUFXLWRVDQWHVGHFRPHQ]DU
ODLQVWDODFLyQ1RXWLOLFHXQFDEOHGHH[WHQVLyQRXQ
HQFKXIHDGDSWDGRUFRQHVWHDUWHIDFWR
ADVERTENCIA
/DFRQH[LyQLQDGHFXDGDGHOFRQGXFWRUGHFRQH[LyQD
WLHUUDGHOHTXLSDPLHQWRSXHGHSURYRFDUXQULHVJRGH
GHVFDUJDHOpFWULFD&RQVXOWHDXQHOHFWULFLVWDFDOL¿FDGRR
UHSUHVHQWDQWHGHVHUYLFLRWpFQLFRVLWLHQHGXGDVVREUHOD
FRUUHFWDFRQH[LyQDWLHUUDGHODSDUDWR
ADVERTENCIA
Con los modelos equipados con cable de
corriente:1RPRGLILTXHHOHQFKXIHSURYLVWRFRQHO
HOHFWURGRPpVWLFRVLQRFRLQFLGHFRQHOWRPDFRUULHQWH
VROLFLWHODLQVWDODFLyQGHXQWRPDFRUULHQWHDSURSLDGRD
XQHOHFWULFLVWDFDOLILFDGR
ADVERTENCIA
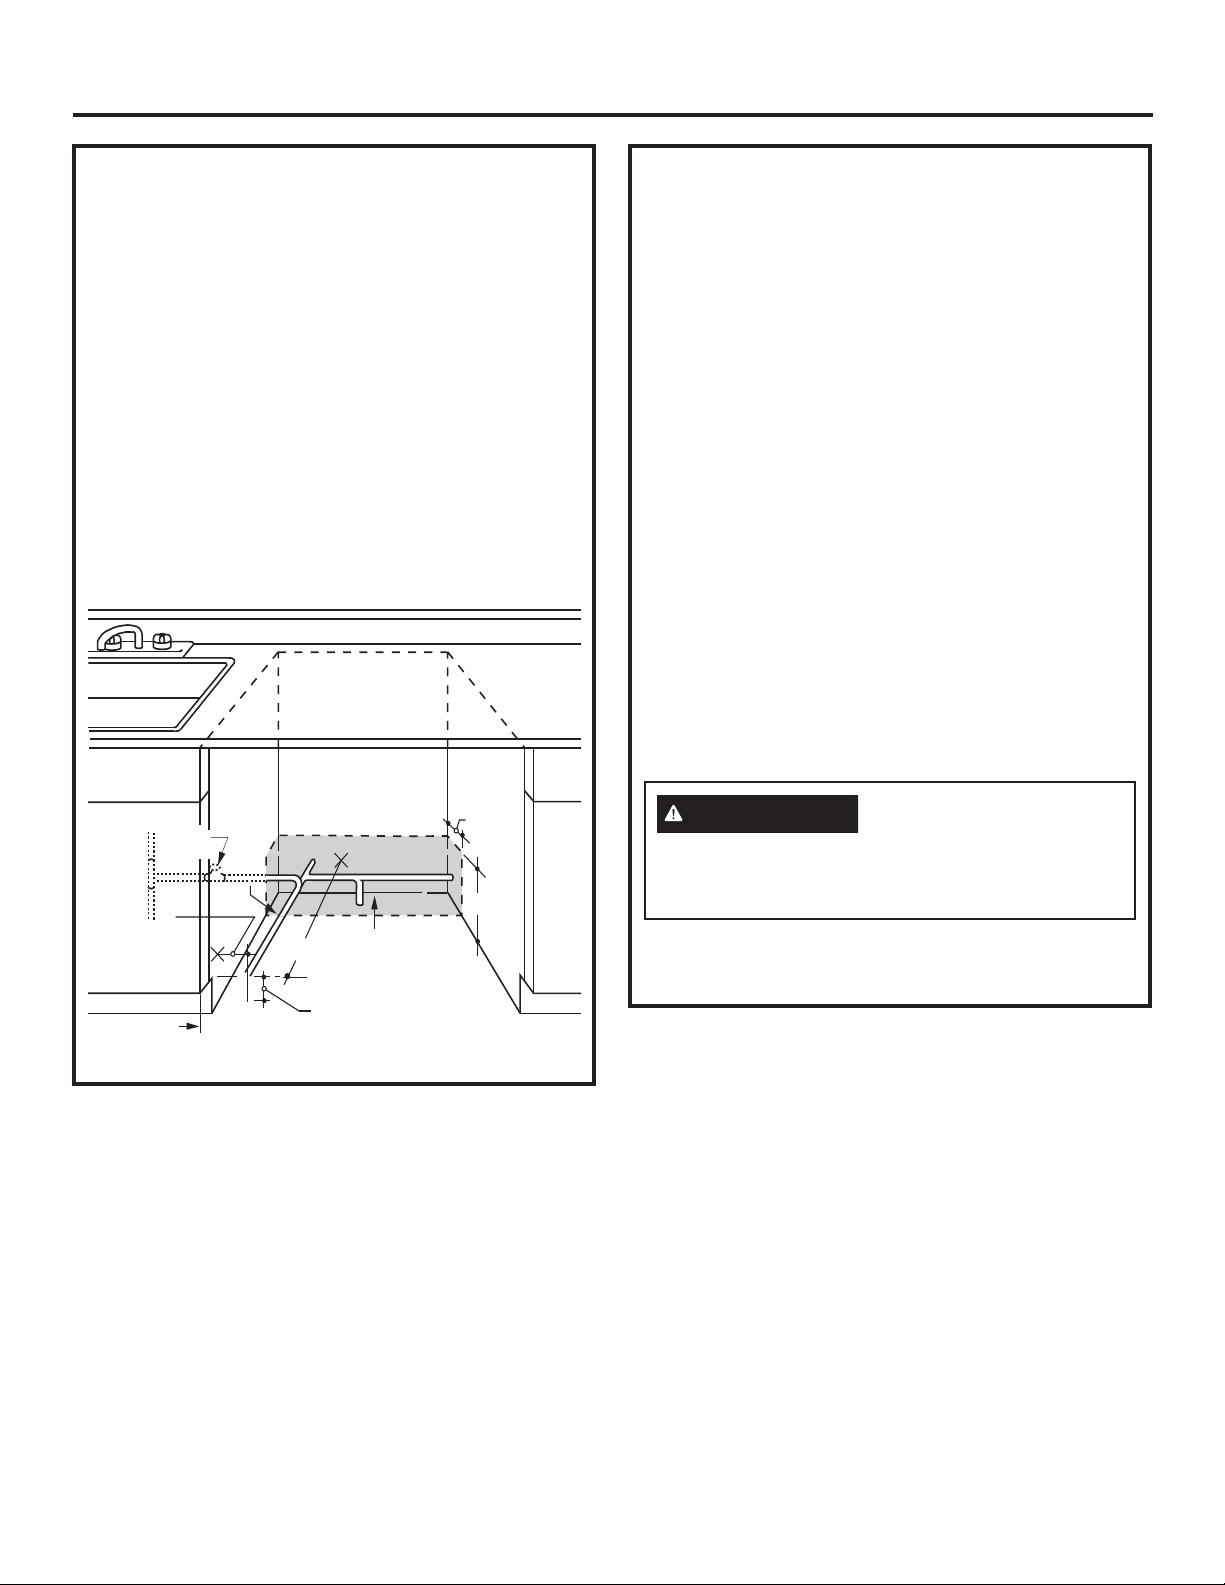
PREPARACIÓN DE LA LÍNEA DE
AGUA CALIENTE
NOTA:*($SSOLDQFHVUHFRPLHQGDHOXVRGHWXEHUtDV
GHFREUHSDUDODOtQHDGHDJXDSHURVLGHFLGHXVDU
XQDPDQJXHUDIOH[LEOHXVHODPDQJXHUDWUHQ]DGDIOH[-
ible WX28X326GH*($SSOLDQFHV
/DOtQHDGHVXPLQLVWURGHDJXDODWXEHUtDGHFREUHGH
´RODPDQJXHUDWUHQ]DGDIOH[LEOHSRGUiLQJUHVDU
GHVGHFXDOTXLHUDGHORVODWHUDOHVGHVGHODSDUWH
WUDVHUDRGHVGHHOSLVRGHQWURGHOiUHDVRPEUHDGD
TXHVHPXHVWUDHQOD)LJXUD)
/DOtQHDGHVXPLQLVWURGHDJXDSRGUiSDVDUD
WUDYpVGHOPLVPRDJXMHURTXHHOFDEOHHOpFWULFR\OD
PDQJXHUDGHGHVDJH2FRUWHXQDJXMHURGHXQ
GLiPHWURDGLFLRQDOGHò´SDUDXELFDUODOtQHDGH
DJXD6LVHXWLOL]DHOFDEOHGHFRUULHQWHFRQHQFKXIH
ODOtQHDGHDJXDQRGHEHUiSDVDUDWUDYpVGHODJXMHUR
GHOFDEOHGHFRUULHQWH
Figura F
6"
4"
Cara del
gabinete
Válvula
de cierre
2” desde el piso
19” desde la pared
2”
desde
el
gabinete
Agujero
de 1 ½”
de diám.
Caliente
5
Preparación de la Instalación
Conexión de la Línea de Agua
•6LXVDUiXQDPDQJXHUDGHVXPLQLVWURWUHQ]DGD
IOH[LEOHHWLTXHWHODPDQJXHUDFRQODIHFKDGH
LQVWDODFLyQSDUDXVDUFRPRUHIHUHQFLD/DVPDQJXHUDV
WUHQ]DGDVIOH[LEOHVFRGR\MXQWDVGHEHUiQVHU
UHHPSOD]DGDVFDGDDxRV
• &LHUUHHOVXPLQLVWURGHDJXD
• ,QVWDOHXQDYiOYXODGHFLHUUHPDQXDOHQXQDXELFDFLyQ
DFFHVLEOHWDOFRPRGHEDMRGHOODYDER2SFLRQDOSHUR
DOWDPHQWHUHFRPHQGDGR\SRGUiVHUUHTXHULGRSRUORV
FyGLJRVORFDOHV
• /DFRQH[LyQGHODJXDVHHQFXHQWUDGHOODGRL]TXLHUGR
GHOODYDYDMLOODV,QVWDOHODOtQHDGHHQWUDGDGH
DJXDFDOLHQWHXVDQGRXQDWXEHUtDGHFREUHRXQD
PDQJXHUDWUHQ]DGDIOH[LEOHGHQRPHQRVGH
(QUXWHODOtQHDFRPRVHPXHVWUDHQOD)LJXUD)\
H[WLHQGDODPLVPDKDFLDDGHODQWHSRUORPHQRV
GHVGHODSDUHGWUDVHUD
• $MXVWHHOFDOHQWDGRUGHDJXDDXQDWHPSHUDWXUDGH
HQWUH)\)
'HVSHMHODOtQHDGHDJXDSDUDUHWLUDUHVFRPEURV
• /DSUHVLyQGHODOtQHDGHVXPLQLVWURGHDJXDFDOLHQWH
GHEHUiVHUGHHQWUH\36,
Dé vuelta la página para iniciar la
instalación del lavavajillas
1RTXLWHODEDVHGHPDGHUDKDVWDTXHHVWpOLVWR
SDUDLQVWDODUHOODYDSODWRV6LVHTXLWDODEDVHHO
ODYDSODWRVVHYROFDUiFXDQGRVHDEUDODSXHUWD
PRECAUCIÓN
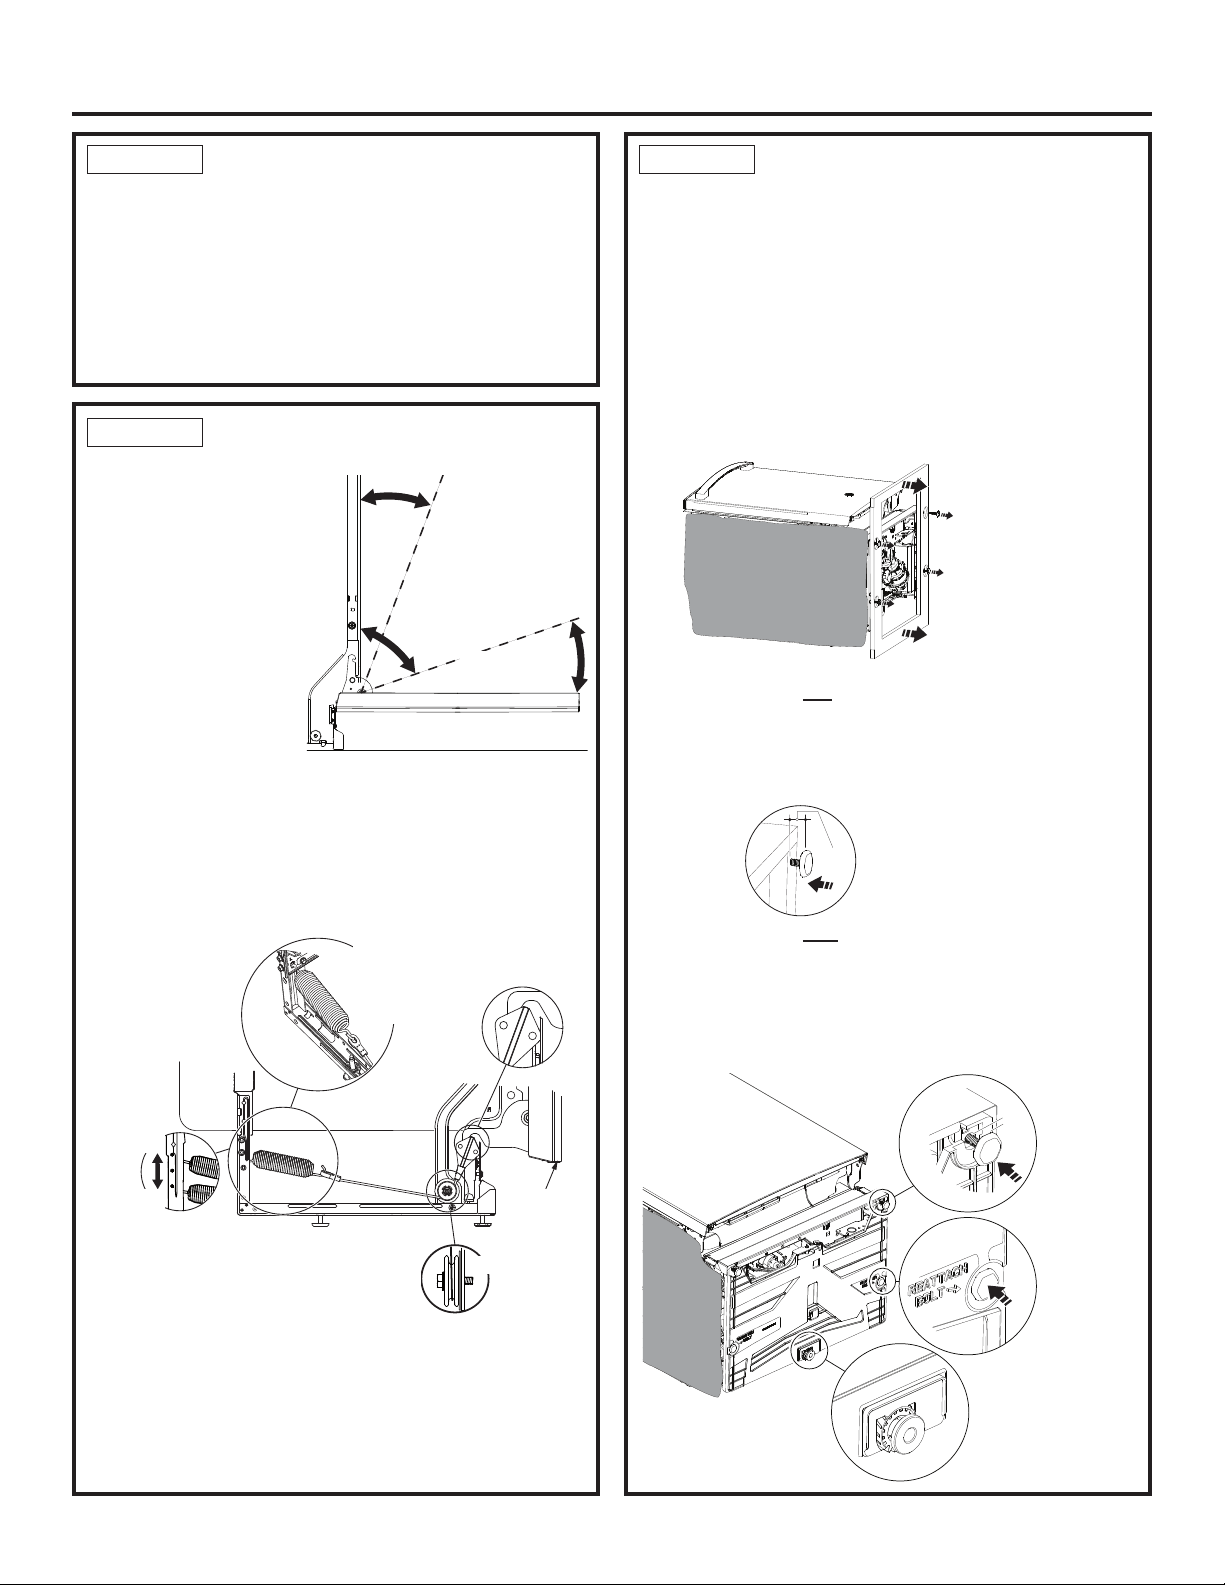
CONTROL DEL EQUILIBRIO
DE LA PUERTA
NOTA:
6LLQVWDODUiXQ
3DQHO3HUVRQDOL]DGRGH
OD3XHUWDGLVSRQLEOHHQ
DOJXQRVPRGHORVVLJD
ODVLQVWUXFFLRQHVTXHVH
HQFXHQWUDQHQHONLWGHO
3DQHO3HUVRQDOL]DGRGH
OD3XHUWD
WD35X20417
• Con el lavavajillas en
ODEDVHGHPDGHUD
FRQWUROHHOHTXLOLEULR
GHODSXHUWDDEULHQGR\
FHUUDQGRODPLVPD
/DSXHUWDHVWiFRUUHFWDPHQWHHTXLOLEUDGDVLXQDYH]
DELHUWDVHFLHUUDVRODGHQWURGHORVGHVGHHOiQJXOR
YHUWLFDOSHUPDQHFHHQVXSRVLFLyQGHVGHXQiQJXORGH
HQWUH\\VHDEUHWRWDOPHQWHDPiVGH
'HVHUQHFHVDULRLQFUHPHQWHRUHGX]FDODWHQVLyQFRPR
VHPXHVWUD$OJXQRVPRGHORVFXHQWDQFRQUHVRUWHV
VREUHXQODGR\UHVRUWHGHORWURODGR7UDEHODSXHUWD\
DMXVWHORVUHVRUWHVKDVWDORJUDUHOHTXLOLEULRFRUUHFWR
Consejo: Asegúrese de que la puerta se abra y se
cierre de forma pareja
. &RQWUROHODDSHUWXUD\FLHUUHGH
ODSXHUWD6LODSXHUWDQRVHDEUHIiFLOPHQWHRVHFLHUUD
GHPDVLDGRUiSLGRFRQWUROHHOUHFRUULGRGHOFDEOHGHO
UHVRUWH(OFDEOHHVWiVRVWHQLGRSRUORV³KRPEURV´GHOD
SROHD$VHJ~UHVHGHTXHHOFDEOHQRVHKD\DUHVEDODGR
GHORVKRPEURVGHODSROHD\TXHHVWpFRORFDGRFRPRVH
PXHVWUD
RETIRE LA BASE DE
MADERA, INSTALE LAS
PATAS NIVELADORAS
IMPORTANTE – £1RSDWHHODEDVHGHPDGHUD
6HSURGXFLUiQGDxRV
0XHYDHOODYDYDMLOODVFHUFDGHODXELFDFLyQGHOD
LQVWDODFLyQ\KDJDTXHVHDSR\HVREUHVXSDUWH
WUDVHUDNOTA:1RFRORTXHHOODYDYDMLOODVHQVXODGR
5HWLUHODVSDWDVQLYHODGRUDVVREUHODSDUWHLQIHULRUGH
ODEDVHGHPDGHUDFRQXQDOODYHGHWRPDFRUULHQWHGH
´
'HVFDUWHODEDVH
• En los modelos sin el sistema de nivelación
ajustable desde la parte inferior central:
9XHOYDDDWRUQLOODUODVSDWDVQLYHODGRUDVDODHVWUXFWXUD
GHOODYDYDMLOODVDDSUR[LPDGDPHQWHGHVGHOD
HVWUXFWXUDFRPRVHPXHVWUD
• En los modelos con el sistema de nivelación
ajustable desde la parte inferior central:
9XHOYDDDWRUQLOODUODVSDWDVQLYHODGRUDVfrontales en la
HVWUXFWXUDGHOODYDYDMLOODVDSUR[LPDGDPHQWH´
$WRUQLOOHODVSDWDVQLYHODGRUDVHQVXWRWDOLGDGKDVWDTXH
TXHGHQFRPSOHWDPHQWHSRVLFLRQDGDV
La
SXHUWD
VHFLHUUD
dentro
de los
20º
/DSXHUWD
SHUPDQHFHHQ
ODSRVLFLyQGH
HQWUH\
/DSXHUWDTXHGD
FRPSOHWDPHQWH
DELHUWDDPiVGH
Vista lateral
Instalación del Lavavajillas
PREPARACIÓN
8ELTXHORVtWHPVHQHOSDTXHWHGHLQVWDODFLyQ
• Tornillos
7DSDGHODFDMDGHHPSDOPHV
0DQJXHUDGHGHVDJH\FODYLMD
6RSRUWHVGHPRQWDMH
3LH]DGHORVERUGHVHQDOJXQRVPRGHORV
*DQFKRGHODPDQJXHUDGHGHVDJH
0DQXDOGHOSURSLHWDULR
7H[WRVPXHVWUDV\RFXSRQHV
Side View
Custom
door
panel
Spring
hooked
to hole
inside rail
NOTE: The number of
springs, on each side,
will vary by model.
Front View
Make sure pully
cables are within
pulley shoulders
,QFUHPHQWDU
ODWHQVLyQ
5HGXFLU
ODWHQVLyQ
Vista lateral
3DQHOGH
ODSXHUWDD
PHGLGD
9LVWDIURQWDO
Vista interior
$VHJ~UHVHGHTXH
HOFDEOHGHODSROHD
HVWpGHQWURGHORV
KRPEURVGHODSROHD
5HVRUWH
HQJDQFKDGRDO
DJXMHURTXHVH
HQFXHQWUDGHQWUR
del riel de la base
NOTA: La cantidad de
resorte, a cada lado,
varía según el modelo.
Figura H
6
PASO 2
PASO 1 PASO 3
Approx
1/2"
5HHPSODFHODVSDWDV
KDVWDDSUR[LPDGDPHQWH
´GHVGHHOPDUFR
5HWLUHODV
FXDWURSDWDV
niveladoras
\ODEDVHGH
PDGHUD
/DDSDULHQFLDYDULDUi
5HHPSODFH
ODVSDWDV
delanteras
KDVWDDSUR[
´GHVGH
HOPDUFR
5HHPSODFH
ODVSDWDV
traseras
\DWRUQLOOH
ODVPLVPDV
FRPSOHWD
PHQWH
Sistema de
Nivelación
(ODMXVWHVHUHDOL]DUi
OXHJRHQHO3DVR
1/2”
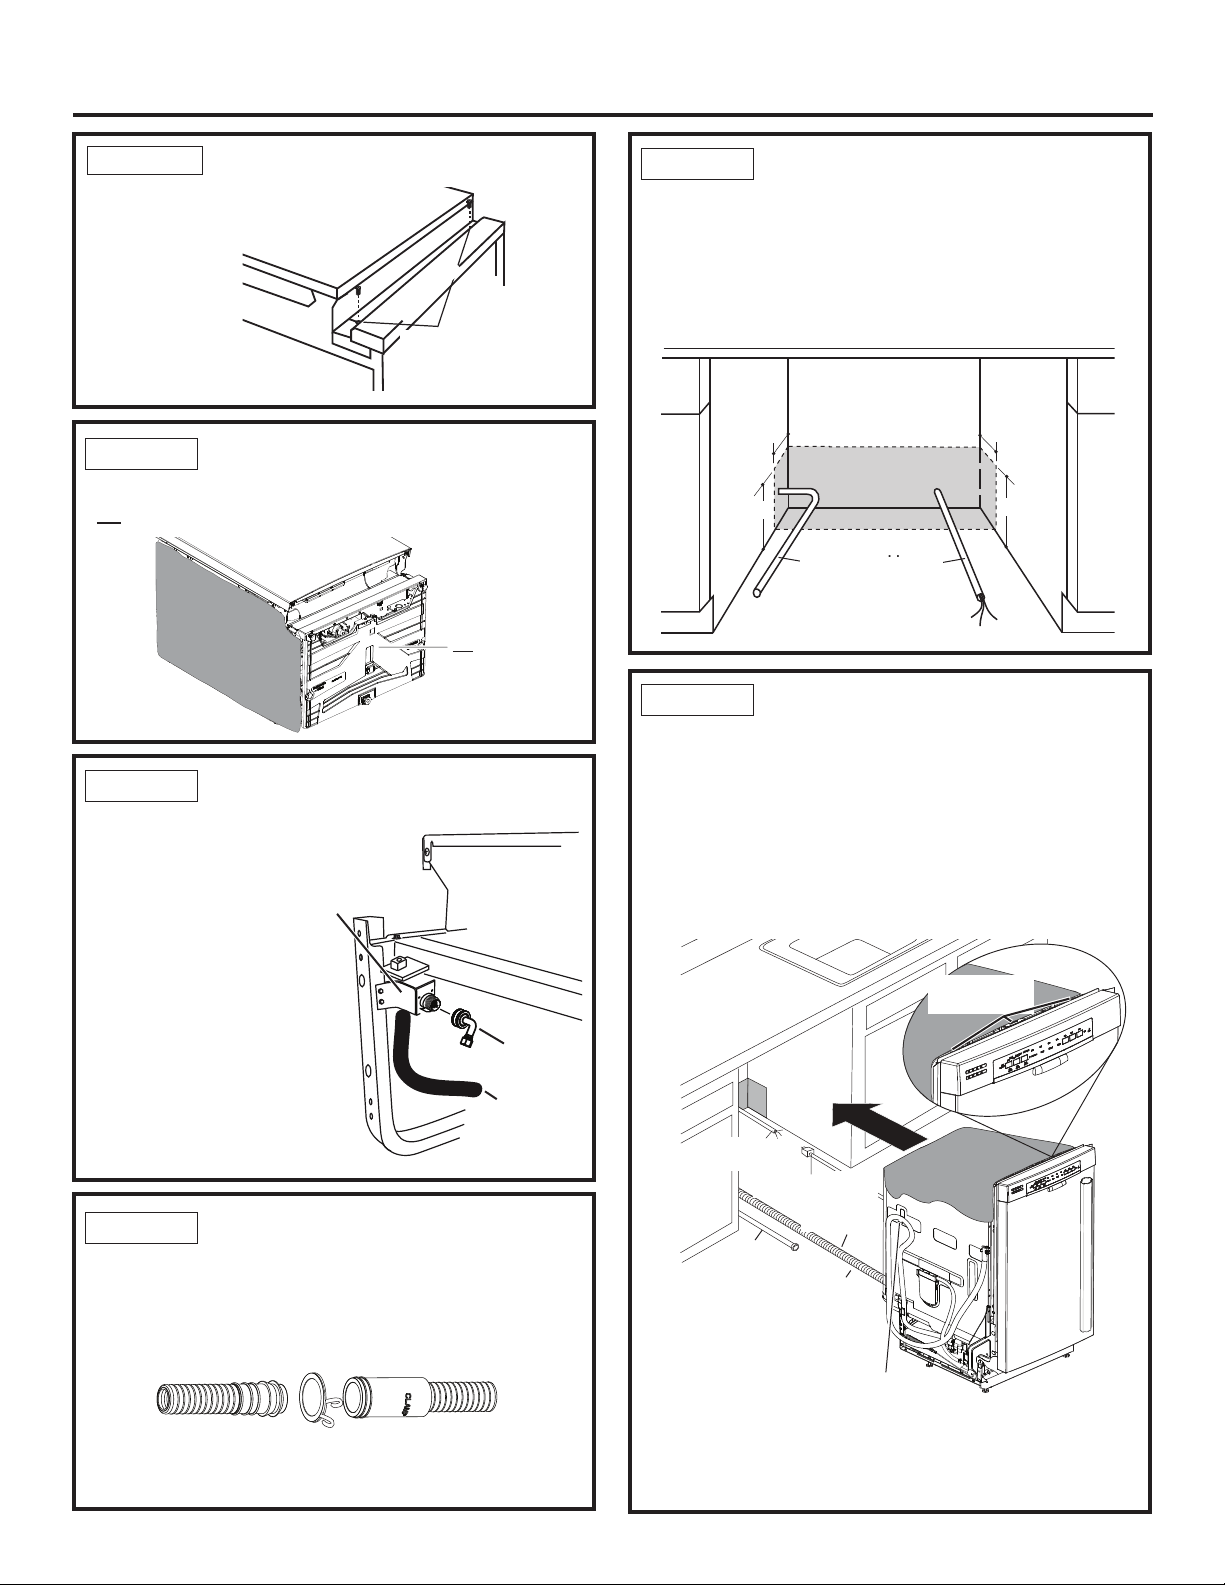
RETIRE EL ZÓCALO
• 5HWLUHORV
tornillos del
]yFDOR\HO
]yFDOR'HMH
DXQFRVWDGR
SDUDXVRHQHO
3DVR
Toekick
Remove 2
Toekick Screws
=yFDOR
5HWLUHORV
7RUQLOORVGHO=yFDOR
PASO 4
LA PAN PROTECCIÓN DEL
PISO (algunos modelos)
• 1RVHGHEHUiUHWLUDUODEDQGHMDGXUDQWHODLQVWDODFLyQ
INSTALE LA MANGUERA
DE DESAGÜE AL BUCLE
DE DESAGÜE
&RQHFWHHOH[WUHPRGHOEXFOHGHGHVDJHDODPDQJXHUD
GHGHVDJHXVDQGRXQDDEUD]DGHUDFRPRVHPXHVWUDHQ
ODILJXUD
NOTA:(OEXFOHDOWRGHGHVDJHVREUHHOFRVWDGRGH
ODFDxHUtDIXHGLVHxDGRSDUDXQPHMRUUHQGLPLHQWRGHO
ODYDGR1RORUHWLUHGHOODWHUDOGHODWXEHUtD
INSTALE LA MANGUERA
DE DESAGÜE A TRAVÉS
DEL GABINETE
3RVLFLRQHHOODYDYDMLOODVIUHQWHDODDEHUWXUDGHOJDELQHWH
\GHHVWDUSUHVHQWHUHWLUHODPDQJXHUDGHGHVDJHGH
VXUHVSHFWLYDFODYLMD
,QVHUWHODPDQJXHUDGHGHVDJH
HQHODJXMHURODWHUDOGHOJDELQHWH6LVHXVDXQFDEOHGH
FRUULHQWHJXLHHOH[WUHPRDWUDYpVGHXQDEHUWXUDGHO
JDELQHWHVHSDUDGR
Consejo: Evite llamadas innecesarias al servicio
técnico con relación al llenado, desagüe o ruidos.
3RVLFLRQHODVWXEHUtDVGHORVVHUYLFLRVGHPRGRTXHQR
LQWHUILHUDQFRQQDGDGHEDMRRGHWUiVGHOODYDYDMLOODV
POSICIONE LA LÍNEA DE
AGUA Y EL CABLEADO DE
LA CASA
3RVLFLRQHODOtQHDGHVXPLQLVWURGHDJXD\HOFDEOHDGR
GHODFDVDVREUHOSLVRGHODDEHUWXUDDILQGHHYLWDU
LQWHUIHUHQFLDVFRQODEDVHGHOODYDYDMLOODV\ORV
FRPSRQHQWHVGHEDMRGHOPLVPR
INSTALE UN CODO DE 90º
• (QURVTXHXQFRGRGH
HQODYiOYXODGH
DJXD$VHJ~UHVHGHTXH
ODMXQWDGHJRPDHVWp
XELFDGDHQWUHODYiOYXOD
\HOFRGR
• 1RDMXVWHHOFRGRHQ
H[FHVR(OVRSRUWHGHOD
YiOYXODGHDJXDVHSRGUtD
LQFOLQDURHODFFHVRULR
GHODYiOYXODGHDJXDVH
SRGUtDURPSHU
• 3RVLFLRQHHOH[WUHPRGHO
FRGRGHPRGRTXHPLUH
KDFLDODSDUWHWUDVHUDGHO
ODYDYDMLOODV
Figura O
Water
Line
House
Wiring
4"
4"
6"
6"
/tQHD
de
DJXD
Cableado
GHODFDVD
7
Instalación del Lavavajillas
PASO 6
PASO 7
PASO 5
PASO 9
PASO 8
Figura M
6RSRUWHGH
ODYiOYXODGH
DJXD
0DQJXHUD
de llenado
)UHQWHGHOODYDYDMLOODV
Codo
de 90º
Cableado
GHODFDVD
&DEOHGHFRUULHQWH
VLVHXVD
0DQJXHUD
GHGHVDJH
/tQHD
GHDJXD
0DQWD
aislante
$VHJ~UHVHGHTXHODPDQJXHUD
GHGUHQDMHQRHVWpWRUFLGDQLVHD
SHOOL]FDGD
/DORQJLWXGPi[LPDGHODPDQJXHUD
GHGHVDJHHVGHGHVGHODSDUWH
trasera del lavavajillas
1RGHVFRQHFWHQLUHWLUHHOUXORGHGUHQDMH
DOWRGHOODGRL]TXLHUGRGHOODYDYDMLOODV
&RORTXHODPDQWD
aislante sobre el
FXHOOR
Figura P
1R retire la
EDQGHMD
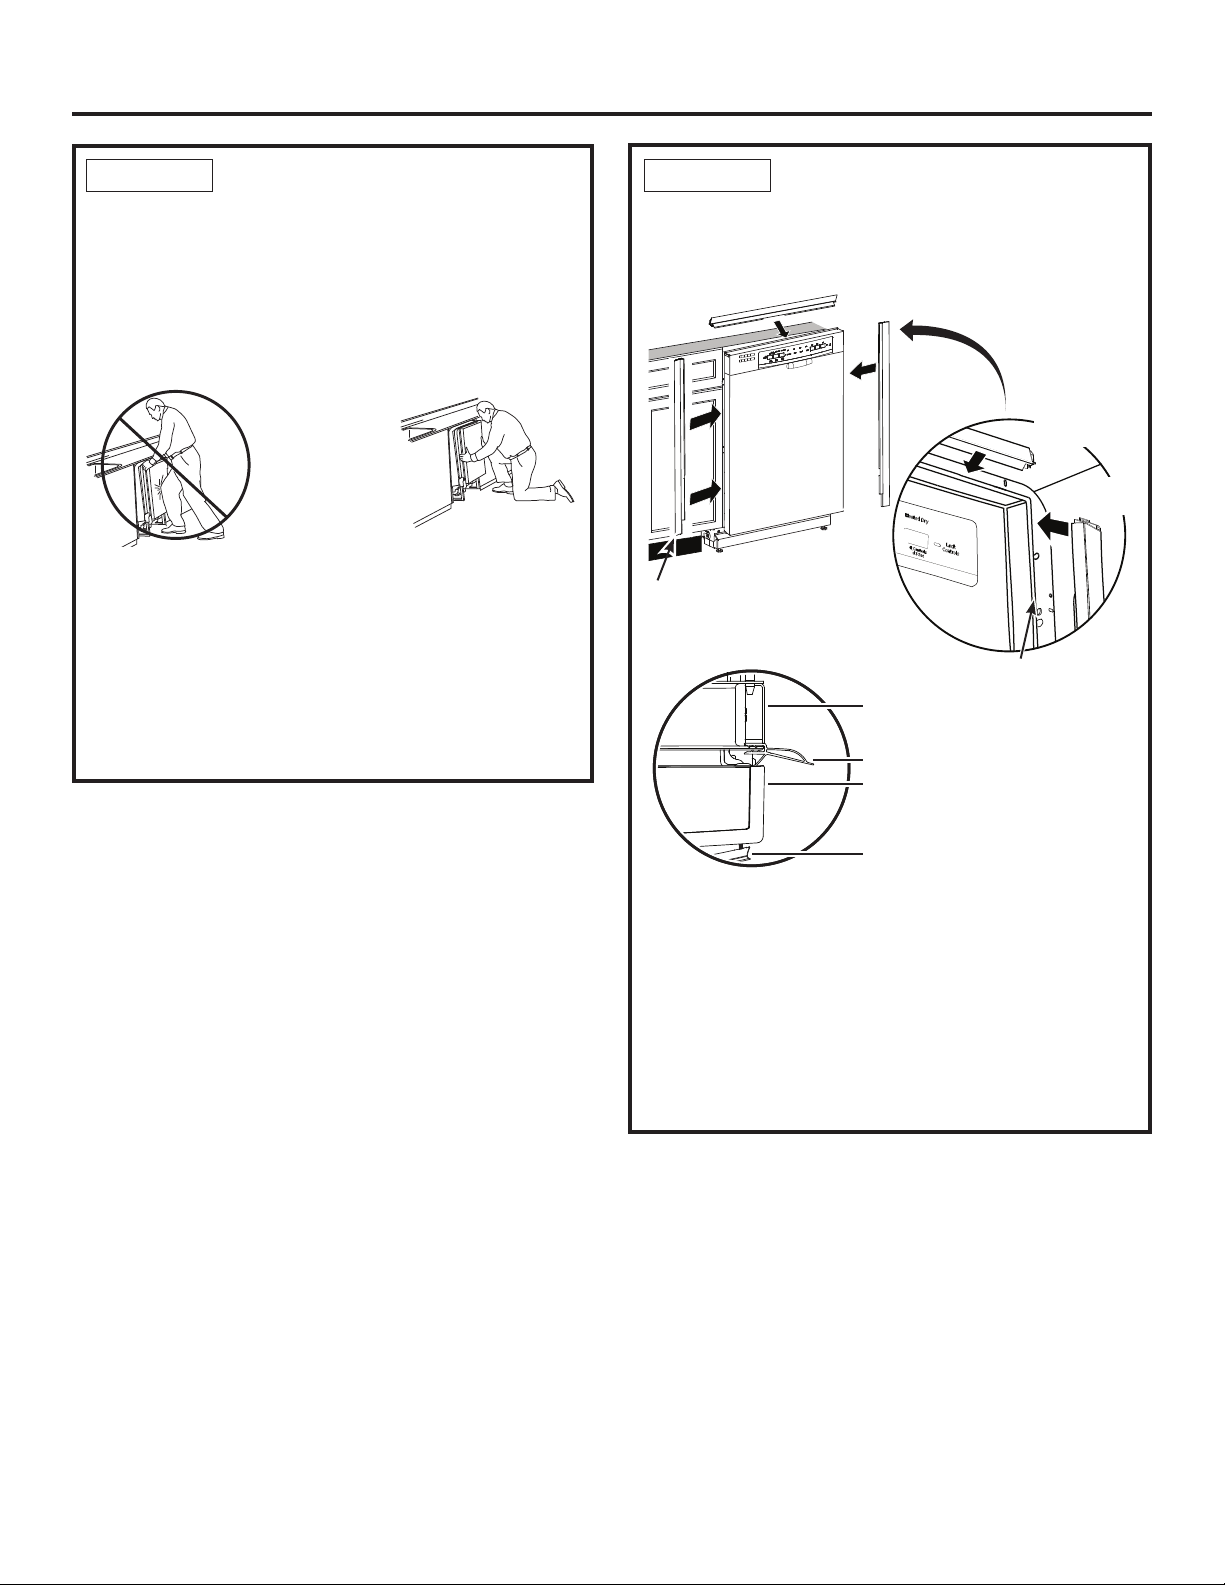
INSTALE LAS PIEZAS DE
LOS BORDES
(QHVWHSDVRQHFHVLWDUiODVSLH]DVGHORVERUGHV
VHSDUDGDVHQHO3DVR
6HOHFFLRQHODSLH]DGHOERUGHVXSHULRU9HDOD)LJXUD5
\DOLQHHHOFHQWURFRQODWUDEDVXSHULRU3UHVLRQHODSLH]D
GHOERUGHVREUHODSHVWDxDGHODWXEHUtDPRYLHQGROD
PLVPDGH
XQODGRDRWUR
6HOHFFLRQHODSLH]DGHOERUGHL]TXLHUGRYHDOD)LJXUD
5$OLQHHHOH[WUHPRVXSHULRUFRQHOERUGHVXSHULRU\
SUHVLRQHHOPLVPRVREUHHOODWHUDOL]TXLHUGRGHODSHVWDxD
GHODWXEHUtDUHDOL]DQGRHOPRYLPLHQWRGHVGHODSDUWH
VXSHULRUDODSDUWHLQIHULRU5HSLWDFRQODSLH]DGHOERUGHGH
ODSHVWDxDGHODWXEHUtDODWHUDOGHUHFKD&RQVXOWHODSLH]D
GHOERUGHGHOODWHUDOGHUHFKRHQOD)LJXUD5
Instalación del Lavavajillas
8
DESLICE EL LAVAVAJILLAS
TRES CUARTOS DEL
RECORRIDO
DENTRO
DEL GABINETE
IMPORTANTE – 1RORHPSXMHFRQWUDHOSDQHOIURQWDO
FRQODVURGLOODV6HSURGXFLUiQGDxRV
7RPHORVODWHUDOHVGHOSDQHOIURQWDO\GHVOLFHHO
ODYDYDMLOODVHQODDEHUWXUDGHDSRFDVSXOJDGDVSRUYH]
• $OSURFHGHUHPSXMHODPDQJXHUDGHGHVDJHDWUDYpV
GHODDEHUWXUDGHEDMRGHOODYDER'HMHGHHPSXMDU
FXDQGRHOODYDYDMLOODVVHH[WLHQGDXQDVSXOJDGDVKDFLD
DGHODQWHGHORVJDELQHWHVDG\DFHQWHV
• $VHJ~UHVHGHTXHODPDQJXHUDGHGHVDJHQRHVWp
UHWRUFLGDGHEDMRRGHWUiVGHOODYDYDMLOODV
• $VHJ~UHVHGHTXHHOFDEOHDGRGHODFDVDODOtQHD
GHGHVDJH\ODOtQHDGHDJXDQRLQWHUILHUDQFRQORV
FRPSRQHQWHVTXHVHHQFXHQWUDQGHEDMRGHOODYDYDMLOODV
Figura Q
No lo empuje contra
el panel de la puerta
frontal con la
rodilla.
Se poducirán daños
sobre el panel de la
puerta.
PASO 10
Vista
VXSHULRU
0DQLMD
3XHUWD
Borde de la tina
(VWUXFWXUD
de la
WXEHUtD
PASO 11
Borde
lateral
Figura R
Borde
lateral
Vista
VXSHULRU
Borde
lateral
Borde
VXSHULRU
$SR\RFRPSOHWRHQHO
reborde de la tina
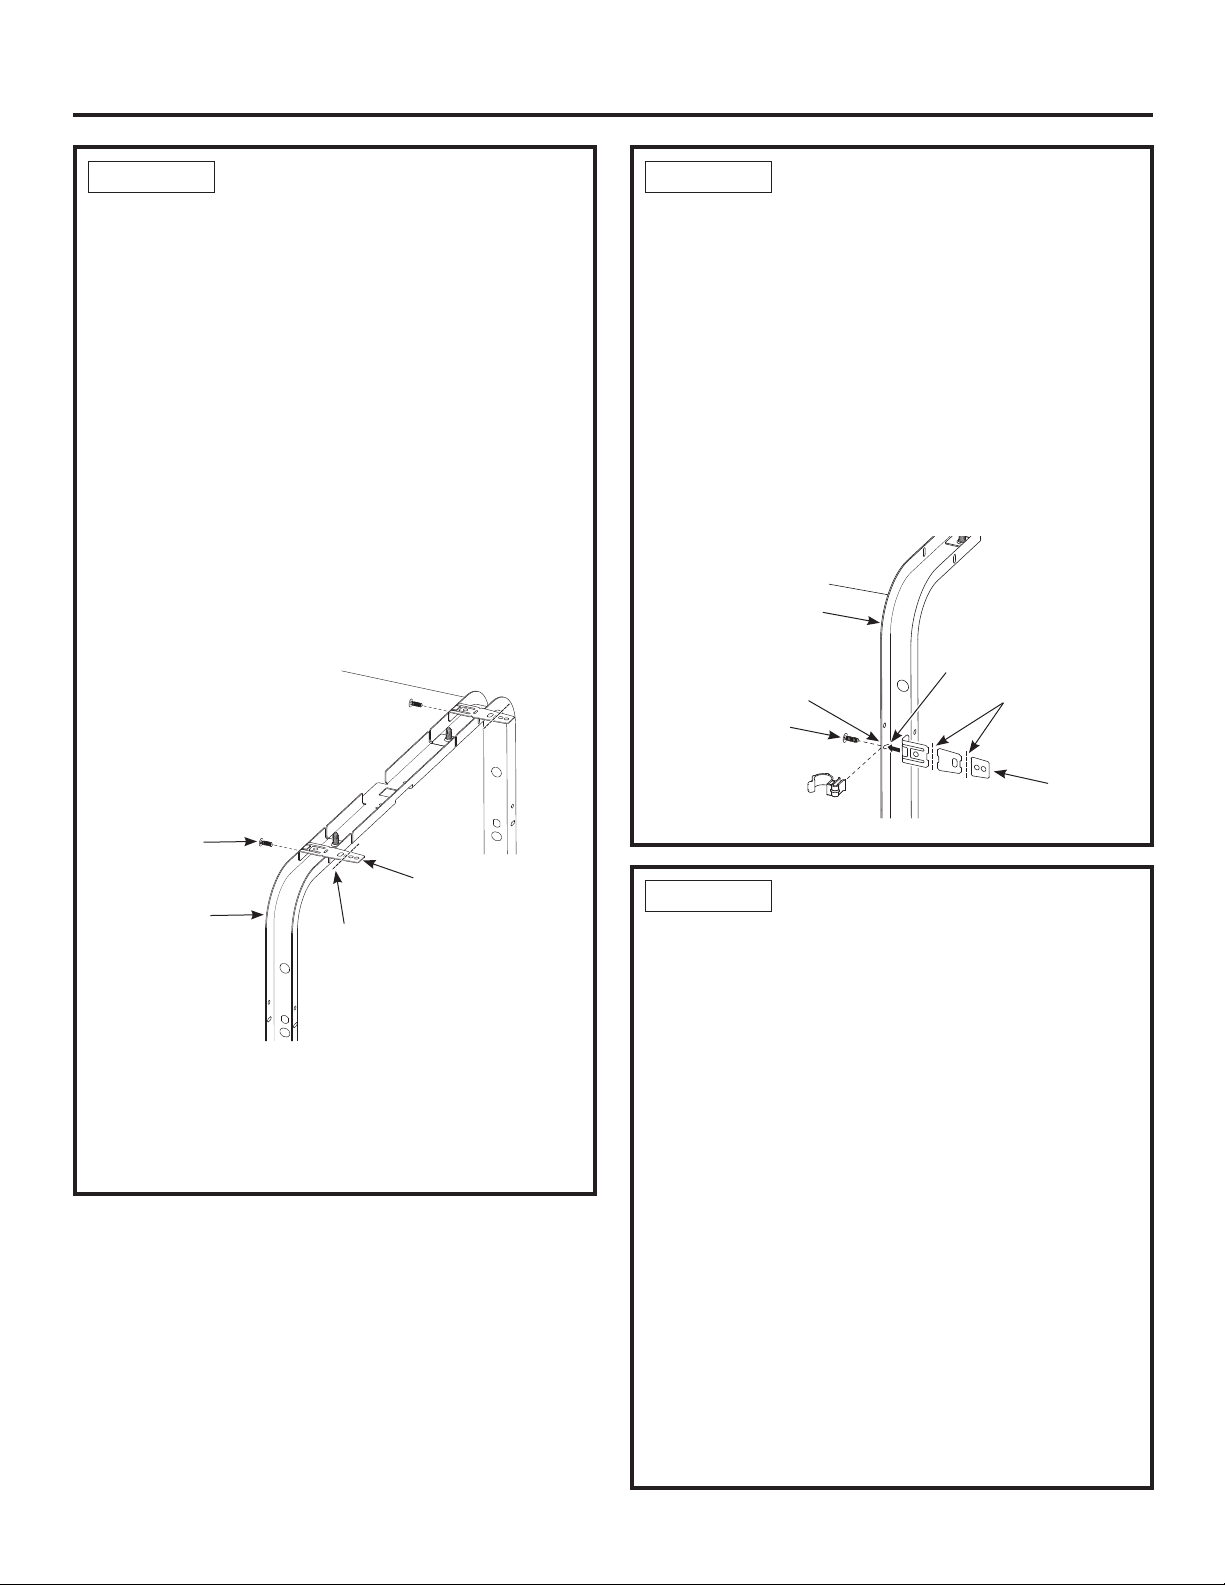
9
Instalación del Lavavajillas
INSTALE LOS SOPORTES
DE MONTAJE
1HFHVLWDUiORVVRSRUWHVGHPRQWDMH\ORVWRUQLOORV
KH[DJRQDOHVQTXHVHSDUyHQHO3DVR
'HEHUiLQVWDODUORVVRSRUWHVGHPRQWDMHHQODSDUWHVXSHULRU
RODWHUDOGHODHVWUXFWXUDGHODWXEHUtDGHOODYDYDMLOODVDQWHV
GHGHVOL]DUHOODYDYDMLOODVHQVXXELFDFLyQGHEDMRGHOD
PHVDGD(VWHODYDYDMLOODVSXHGHUHDOL]DUXQDLQVWDODFLyQ
GHGHVFDUJDHQXQDDEHUWXUDGHXQDSURIXQGLGDGGH´
/RVVRSRUWHVGHPRQWDMHFXHQWDQFRQYDULDVSRVLFLRQHV
GHDGKHUHQFLDGLVSRQLEOHVSDUDXELFDUGLIHUHQWHV
FRQVWUXFFLRQHVGHJDELQHWHV
Instale los soportes de montaje en la parte superior
si el lado inferior de la mesada es de madera o de un
material similar que acepte la colocación de tornillos:
IMPORTANTE - /XHJRGHLQVWDODUORVVRSRUWHV\DQWHV
GHFHUUDUODSXHUWDGHOODYDYDMLOODVDMXVWHORVVRSRUWHV
LQFOLQDQGRORVPLVPRVVHJ~QVHDQHFHVDULRGHPRGRTXH
QRWHQJDQFRQWDFWRFRQODSDUWHVXSHULRUGHODSXHUWDGHO
ODYDYDMLOODVQLRFDVLRQHQGDxRV
6LLQVWDODUiHOODYDYDMLOODVGHEDMRGHXQDPHVDGDFRQ
XQFROJDQWHFRUWRORVVRSRUWHVGHODPHVDGDVHSRGUiQ
H[WHQGHUPiVDOOiGHOH[WUHPRGHODPHVDGD6LpVWHHV
HOFDVRUHWLUHODORQJLWXGH[FHVLYDLQFOLQDQGRGHIRUPD
UHSHWLGDORVVRSRUWHVGHODUDQXUDIURQWDOVyORKDVWDTXH
VHTXLHEUHQ
COLOQUE EL
LAVAVAJILLAS EN SU
POSICIÓN FINAL
&RQWUROHTXHODPDQWDDLVODQWHVLHVWiSUHVHQWHHVWp
HQYXHOWDGHIRUPDSDUHMDDOUHGHGRUGHODWXEHUtD1RGHEHUtD
HVWDU³DPRQWRQDGD´\QRGHEHLQWHUIHULUFRQORVUHVRUWHVGH
ODSXHUWD6LHODLVODQWHHVWi³DPRQWRQDGR´RLQWHUILHUHFRQ
ORVUHVRUWHVDODUJXH\YXHOYDDFHQWUDUODPDQWDDQWHVGH
GHVOL]DUHOODYDYDMLOODVKDVWDVXSRVLFLyQILQDO
'HVOLFHHOODYDYDMLOODVKDVWDODSRVLFLyQILQDOHPSXMDQGR
ORVFRVWDGRVGHOSDQHOGHODSXHUWD1RHPSXMHODSXHUWD
KDFLDDGHODQWHRDWUiVHQXQDSRVLFLyQSDUFLDOPHQWH
DELHUWDRFHUUDGDDOPRYHUHOODYDYDMLOODV1RXVHOD
URGLOODQLHPSXMHVREUHHOFHQWURGHOSDQHO6LORKDFHHV
SRVLEOHTXHVHGDxHHOSDQHO&RQWUROHTXHHOODYDYDMLOODV
HVWpSRVLFLRQDGRGHIRUPDIURQWDOHQODDEHUWXUDGHO
JDELQHWHWDQWRHQODSDUWHVXSHULRUFRPRLQIHULRUGHO
HOHFWURGRPpVWLFRDQWHVGHPRQWDUHOPLVPRDOJDELQHWH
IMPORTANTE – $QWHVGHDEULUODSXHUWDGHOODYDYDMLOODV
DVHJ~UHVHGHTXHORVH[WUHPRVGHOSDQHOGHODSXHUWDGHO
ODYDYDMLOODVHVWpQGHWUiVGHODFDUDGHOJDELQHWHDG\DFHQWH
\FRQWUDODFDUDGHOJDELQHWH&RQVXOWHOD)LJXUD86LOD
SXHUWDGHOODYDYDMLOODVHVDELHUWDFXDQGRHOH[WUHPRGH
ODSXHUWDHVWiFRQWUDODFDUDGHOJDELQHWHVHSURGXFLUiQ
GDxRVVREUHODSXHUWDGHOODYDYDMLOODV\HOJDELQHWH
PASO 12
INSTALE LOS SOPORTES
DE MONTAJE (CONT.)
Instale los soportes de montaje a los costados
si la mesada es de granito o de un material
similar que no acepte tornillos de madera:
• 'HHVWDUSUHVHQWHUHWLUHODFODYLMDGHODPDQJXHUDGH
GHVDJHGHOFXHOOR\GHVFDUWHODPLVPD
4XLHEUHODSDUWHIURQWDOGHODOHQJHWDFRQXQDWLMHUDHQ
ODXELFDFLyQPRVWUDGDDQWHVGHUHDOL]DUODDGKHVLyQDO
ODYDYDMLOODV
3RVLFLRQHHOVRSRUWHGHOODGRL]TXLHUGRFRPRVHPXHVWUD
$GKLHUDHOVRSRUWHDODHVWUXFWXUDGHODWXEHUtDFRQHOWRUQLOOR
QDWUDYpVGHODJXMHURUDQXUDGRGHEDMRGHODJXMHUR
UHGRQGHDGR5HSLWDHVWHSDVRFRQHOVRSRUWHGHUHFKR
PASO 12
PASO 13
(VWUXFWXUDGH
ODWXEHUtDGHO
lavavajillas
Tornillo de
VRSRUWH
Q
6RSRUWH
,QFOLQH\TXLHEUHDTXt
OXHJRGHLQVWDODUVLOD
PHVDGDFXHQWDFRQXQ
FROJDQWHFRUWR
Montaje superior
Figura S
Frente
de la
Tubería
Figura T
6RSRUWH
(VWUXFWXUDGHODWXEHUtD
del lavavajillas
7RUQLOORSDUD
VRSRUWHQ
WDOFRPRIXH
VXPLQLVWUDGR
Montaje lateral
,QFOLQH\TXLHEUH
DTXtGHVHU
QHFHVDULR
6HGHEHUiWHQHUFXLGDGR
SDUDDVHJXUDUTXHORV
WRUQLOORVGHPRQWDMHQR
dañen los gabinetes
1RWXHU]DORVFDEOHV
de la traba en el tornillo
GHOVRSRUWHQ
5HWLUHHVWD
FODYLMD
Frente de
la Tubería

COLOQUE EL
LAVAVAJILLAS EN SU
POSICIÓN FINAL (CONT.)
• $EUD\FLHUUHODSXHUWDGHOODYDYDMLOODVSDUDDVHJXUDUTXH
IXQFLRQHGHIRUPDSDUHMD\TXHQRKD\DIURWDFLyQFRQWUD
HOJDELQHWHDG\DFHQWH
Consejo: Evite cargos innecesarios del servicio técnico
por daños sobre el panel o el rendimiento de la lavadora.
&RQWUROHODDOLQHDFLyQGHOODYDYDMLOODVDQWHVGHDEULUOD
SXHUWDGHOODYDYDMLOODVDILQGHHYLWDUGDxRVVREUHHOSDQHO
$VHJ~UHVHGHTXHODVOtQHDVGHORVVHUYLFLRVQRTXHGHQ
DWUDSDGDVRDSODVWDGDVGHWUiVGHOODYDYDMLOODV/DVOtQHDV
DSODVWDGDVUHVWULQJLUiQHOIOXMRGHDJXD
Instalación del Lavavajillas
10
NIVELE EL LAVAVAJILLAS
(CONT.)
• 5HWLUHHOHVWDQWHGHSODWRV
LQIHULRU\FRORTXHXQQLYHO
HQODSXHUWD\HQODOtQHD
deslizante del estante
LQIHULRUHQODILJXUD
Si su modelo cuenta con un sistema de nivelación
trasera,ODDOWXUDWUDVHUDVHSRGUiDMXVWDUGHVGHODSDUWH
IURQWDOGHOODYDYDMLOODVMXQWRFRQODVSDWDVIURQWDOHVHQ
ODSDUWHLQIHULRUGHOODYDYDMLOODV&RPLHQFHHOSURFHVRGH
QLYHODFLyQSRUODVSDWDVIURQWDOHVJLUDQGRGHIRUPDLQGLYLGXDO
ODVSDWDVIURQWDOHV$MXVWHODVSDWDVGHODQWHUDVSULPHUR
&XDQGRODVSDWDVGHODQWHUDVVRQDMXVWDGDVDXQDDOWXUD
TXHJHQHUHXQDEUHFKDDSURSLDGDFRQHOJDELQHWHVXSHULRU
SURFHGDDDMXVWDUHOVLVWHPDGHQLYHODFLyQWUDVHUDDMXVWDQGR
HOWRUQLOORGHQLYHODFLyQFRPRVHPXHVWUDHQODILJXUD*LUH
HOWRUQLOORSDUDDMXVWDUHOVLVWHPDGHQLYHODFLyQWUDVHUD'H
IRUPDOHQWDgire el tornillo en sentido horario para elevar
la parte trasera del lavavajillas, y en sentido antihorario
para hacerla descender&RQWLQ~HDMXVWDQGRORVSLHVKDVWD
TXHHOODYDYDMLOODVHVWpQLYHODGRFRPRVHPXHVWUDHQOD
)LJXUD$VHJ~UHVHGHTXHODVSDWDVWHQJDQXQFRQWDFWR
ILUPHFRQHOSLVR
Si su modelo cuenta con 4 patas
niveladoras,DMXVWHHOQLYHOGHOODYDYDMLOODV
JLUDQGRGHIRUPDLQGLYLGXDOODVSDWDVHQOD
SDUWHLQIHULRUGHOODYDYDMLOODVFRPRVHLOXVWUD
HQODILJXUD
• (OODYDYDMLOODVHVWiFRUUHFWDPHQWHQLYHODGRFXDQGRHO
LQGLFDGRUGHQLYHOHVWiFHQWUDGRGHL]TXLHUGDDGHUHFKD\GHO
IUHQWHDODSDUWHWUDVHUD$GHPiVODSXHUWDGHOODYDYDMLOODV
VHGHEHUtDFHUUDUVLQJROSHDUHOFRVWDGRGHODWXEHUtD
• 5HHPSODFHHOHVWDQWHLQIHULRU
Consejo: Evite cargos innecesarios del servicio
técnico. Verifique que el lavavajillas esté nivelado.
(PSXMHORVHVWDQWHVGHORVSODWRVKDFLDDIXHUDKDVWDOD
PLWDGGHVXUHFRUULGR'HEHUtDQSHUPDQHFHUILMRV$EUD\
FLHUUHODSXHUWD/DSXHUWDGHEHUtDDMXVWDUVHHQODDEHUWXUD
GHODWXEHUtDVLQJROSHDUHOFRVWDGRGHHVWD~OWLPD6LORV
HVWDQWHVJLUDQSRUVtVRORVRVLODSXHUWDJROSHDHOFRVWDGR
GHODWXEHUtDYXHOYDDQLYHODUHOODYDYDMLOODV
Controle
la
QLYHODFLyQ
GHOIUHQWH
KDVWD
DWUiV
Controle
la
QLYHODFLyQ
GHXQ
FRVWDGR
al otro
Baje las
OtQHDV
deslizantes
del estante
Figura U
&RQWUROHTXHHOERUGHGHOD
WLQDQRWHQJDFRQWDFWRFRQ
WRGRVORVSXQWRV
(OERUGHGHODWLQDSXHGH
VHUDFRUWDGRGHVHU
QHFHVDULRSDUDDVHJXUDUXQ
IXQFLRQDPLHQWRDGHFXDGR
GHODSXHUWD
Vista
VXSHULRU
0DQLMD
3XHUWD
Borde de
la tina
(VWUXFWX-
ra de la
WXEHUtD
1RSHUPLWDTXHHOERUGHGHOD
WLQDTXHGHDWUDSDGRSRUQLHQWUH
HQFRQWDFWRFRQODSXHUWD
Vista
VXSHULRU
¡Borde de la
WLQDDWUDSDGR
SRUODSXHUWD
PASO 13 PASO 14
NIVELE EL LAVAVAJILLAS
IMPORTANTE – (OODYDYDMLOODVGHEHUiHVWDUQLYHODGRSDUD
XQIXQFLRQDPLHQWRDSURSLDGRGHOHVWDQWHGHORVSODWRVHO
UHQGLPLHQWRGHOODYDGR\HOIXQFLRQDPLHQWRGHODSXHUWD(O
ODYDYDMLOODVGHEHUiHVWDUQLYHODGRGHL]TXLHUGDDGHUHFKD\
GHOIUHQWHDODSDUWHWUDVHUD(VWRDVHJXUDTXHORVHVWDQWHV
GHORVSODWRVQRJLUHQKDFLDDGHQWURRDIXHUDSRUVtVRORV
TXHHODJXDFLUFXODQWHIOX\DKDFLDODHQWUDGDGHODERPED\
TXHODSXHUWDVHFLHUUHVLQJROSHDUHOFRVWDGRGHODWXEHUtD
PASO 14
Door Catches
on Cabinet Frame
Correct
Alignment
Incorrect Alignment
will result in door damage
Door
Fits and
Swings
Back
Behind
Cabinet
Frame
/DSXHUWD
VHDMXVWD\
EDODQFHD
GHWUiVGHOD
HVWUXFWXUD
del gabinete
Alineación
correcta
Una alineación
incorrectaKDUDTXH
ODSXHUWDVHGDxH
/DSXHUWDTXHGD
DWUDSDGDHQOD
HVWUXFWXUDGHOJDELQHWH
B
*LUHODSDWD
GHODQWHUDSDUD
DMXVWDUODDOWXUD
IURQWDO
Gire el tornillo del
VLVWHPDGHQLYHODFLyQ
SDUDDMXVWDUODDOWXUD
WUDVHUD
*LUHODSDWD
GHODQWHUDSDUD
DMXVWDUODDOWXUD
IURQWDO
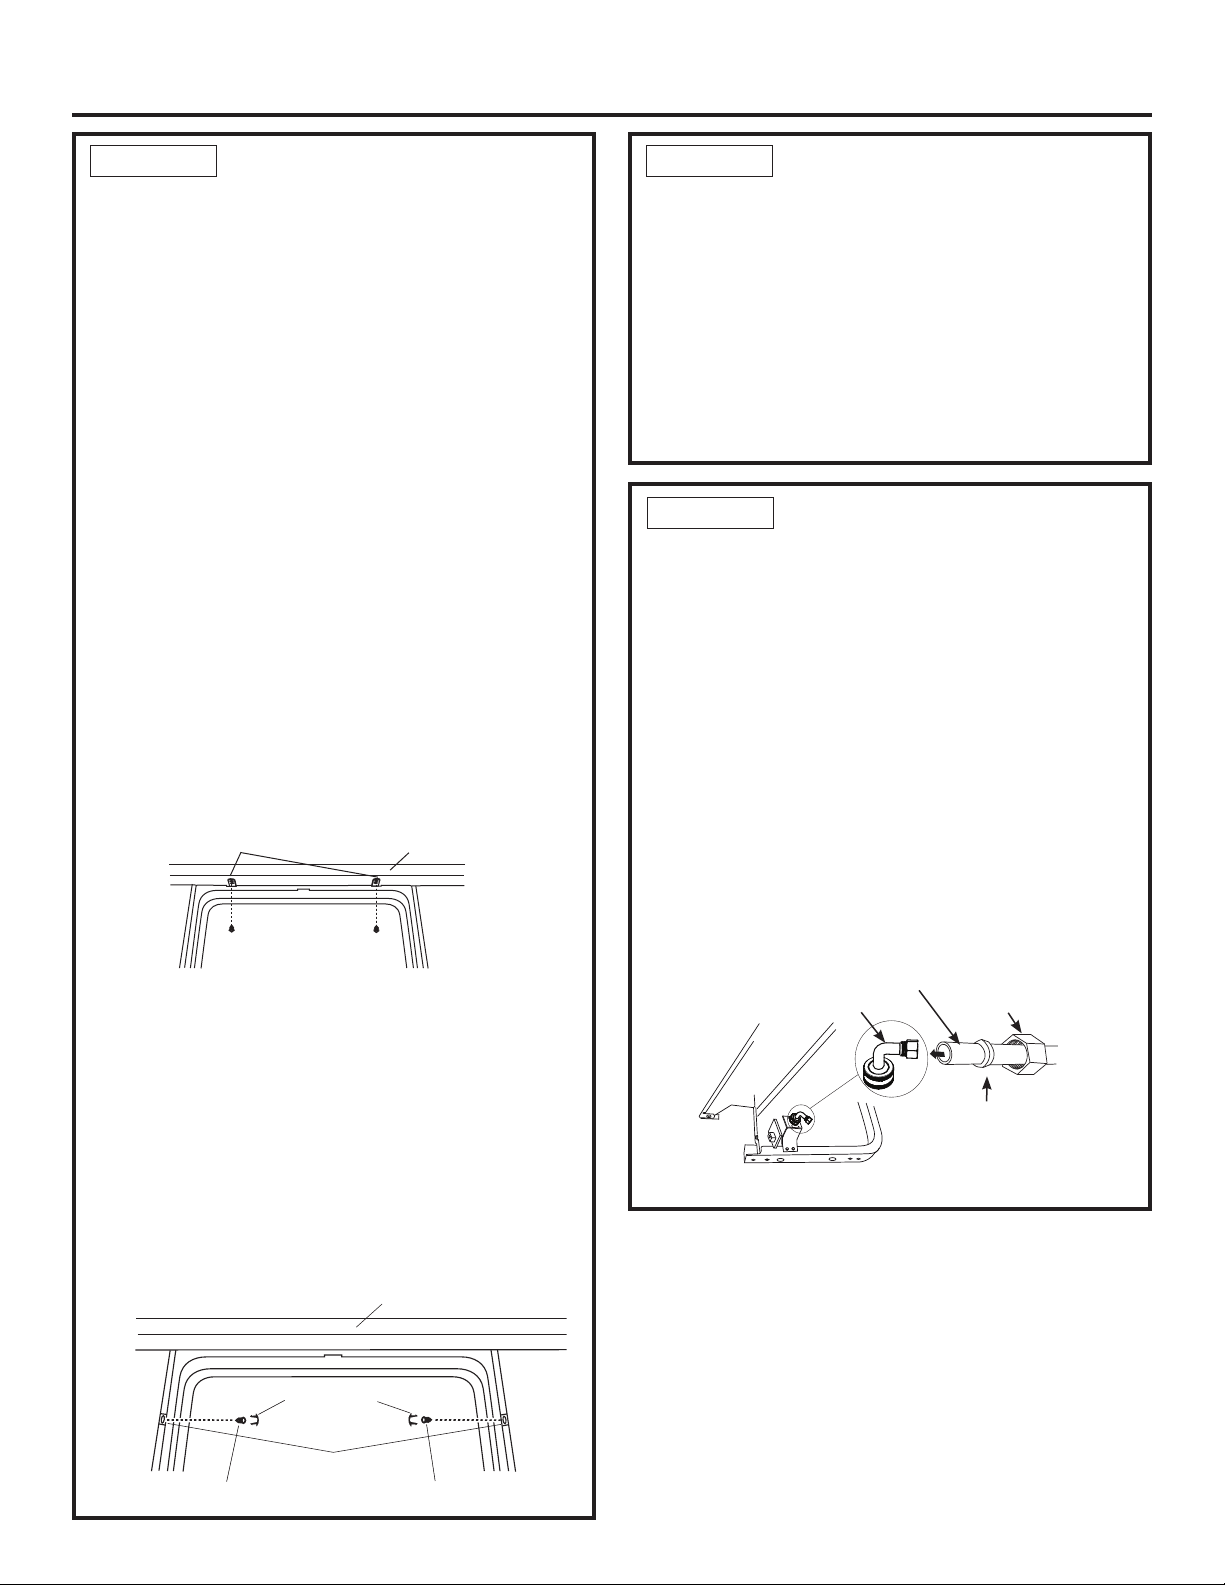
11
Instalación del Lavavajillas
CONEXIÓN AL
SUMINISTRO DE AGUA
&RQHFWHODOtQHDGHVXPLQLVWURGHDJXDDOFRGRGH
Si usará una conexión con una manguera trenzada
flexible:
•
$MXVWHODWXHUFDDOFRGRGHXVDQGRXQDOODYH
DMXVWDEOH
Si usará una conexión a una tubería de cobre:
•
'HVOLFHODWXHUFDGHFRPSUHVLyQ\OXHJRXQDDEUD]DGHUD
GHUHIXHU]RVREUHHOH[WUHPRGHODOtQHDGHDJXD
•
,QVHUWHODOtQHDGHDJXDHQHOFRGRGH
•
'HVOLFHODDEUD]DGHUDGHUHIXHU]RFRQWUDHOFRGR\
DVHJXUHODPLVPDFRQXQDWXHUFDGHFRPSUHVLyQ
IMPORTANTE – $VHJ~UHVHGHTXHHOUHVRUWHGHODSXHUWD
\RHOFDEOHGHOUHVRUWHGHODSXHUWDQRWHQJDQIURWDFLyQ
QLFRQWDFWRFRQODPDQJXHUDGHOOHQDGRRODOtQHDGH
VXPLQLVWURGHDJXD&RQWUROHHVWRDEULHQGR\FHUUDQGROD
SXHUWD6LVHSURGXFHXQXLGRGHIURWDFLyQRLQWHUIHUHQFLD
UHGLULMDODVOtQHDVGHVXPLQLVWURGHDJXD
Figura Y
Tuerca de
compresión
Línea de suministro
de agua caliente
Codo de 90º
Abrazadera
de refuerzo
Lado inferior izquierdo
POSICIONE EL
LAVAVAJILLAS, ASEGURE
EL MISMO A LA MESADA
O EL GABINETE
(QHVWHSDVRQHFHVLWDUiORVWRUQLOORVFRQFDEH]DHVSHFLDO
3KLOOLSVGHORVWRUQLOORVTXHVHSDUyHQHO3DVR
(OODYDYDMLOODVGHEHUiHVWDUDVHJXUDGRDODPHVDGDRDORV
FRVWDGRVGHOJDELQHWH&XDQGRHOODGRLQIHULRUGHODPHVDGD
VHDGHPDGHUDXVHHOMétodo 18VHHOMétodo 2FXDQGR
HOODGRLQIHULRUGHODPHVDGDHVWpKHFKRGHXQPDWHULDO
TXHQRDFHSWHWRUQLOORVGHPDGHUDWDOFRPRHOJUDQLWR
IMPORTANTE – (YLWHGDxRVVREUHHOSDQHOGHOD
SXHUWD\HOSDQHOGHFRQWURO(OODYDYDMLOODVGHEHUiHVWDU
SRVLFLRQDGRGHPRGRTXHHOSDQHOIURQWDO\HOSDQHOGH
FRQWUROQRWHQJDQFRQWDFWRFRQORVJDELQHWHVDG\DFHQWHVR
ODPHVDGD/RVWRUQLOORVGHPRQWDMHGHEHUiQVHUFRORFDGRV
GHIRUPDUHFWD/DVFDEH]DVVDOLHQWHVGHORVWRUQLOORV
SRGUtDQUD\DUHOSDQHOGHODSXHUWDRHOSDQHOGHFRQWUROH
LQWHUIHULUFRQHO
IXQFLRQDPLHQWRGHODSXHUWD
Método 1
Asegure el lavavajillas sobre la parte inferior de la
mesada de madera.
9XHOYDDFRQWURODUODDOLQHDFLyQGHOODYDYDMLOODVHQHO
JDELQHWH&RQVXOWHORV3DVRV\(OSDQHOGHOD
SXHUWD\RHOSDQHOGHFRQWUROQRGHEHUiQJROSHDUORV
JDELQHWHVQLODPHVDGD
$MXVWHHOODYDYDMLOODVDODSDUWHLQIHULRUGHODPHVDGDFRQ
WRUQLOORVGHFDEH]DHVSHFLDO3KLOOLSV&RQVXOWHODILJXUD
$VHJ~UHVHGHTXHORVWRUQLOORVHVWpQFRORFDGRVGHIRUPD
UHFWDSDUDHYLWDUGDxRVVREUHHOSDxHO
Método 2
Asegure el lavavajillas a los costados del gabinete.
9XHOYDDFRQWURODUODDOLQHDFLyQGHOODYDYDMLOODVHQHO
JDELQHWH&RQVXOWHORV3DVRV\(OSDQHOGHOD
SXHUWD\RHOSDQHOGHFRQWUROQRGHEHUiQJROSHDUORV
JDELQHWHVRODPHVDGD
5HWLUHORVERWRQHVGHOHQFKXIH1RORVGHVFDUWH
$MXVWHHOODYDYDMLOODVDORVJDELQHWHVDG\DFHQWHVFRQORV
WRUQLOORVGHFDEH]DHVSHFLDO3KLOOLSVSURYLVWRV&RQVXOWHOD
)LJXUD;$VHJ~UHVHGHTXHORVWRUQLOORVHVWpQFRORFDGRV
GHIRUPDUHFWDSDUDHYLWDUGDxRVVREUHHOSDxHO
,QVWDOHORVERWRQHVGHOHQFKXIHDOFRVWDGRGHODWXEHUtD
HQORVDJXMHURVSURYLVWRV
Figura X
Mesada con superficie sólida
Soportes laterales
Botones del enchufe
Tornillo
Tornillo
Soportes
Mesada de madera
PASO 15
POSICIONE EL
LAVAVAJILLAS, ASEGURE
EL MISMO A LA MESADA
O EL GABINETE (CONT.)
• 9XHOYDDFRQWURODUTXHHOODYDYDMLOODVHVWpHQiQJXORUHFWR
\QLYHODGRWDQWRHQODSDUWHVXSHULRUFRPRHQODSDUWH
LQIHULRUGHODDEHUWXUDGHOJDELQHWHVLQWRUFHGXUDVQL
GLVWRUVLyQGHODWXEHUtDRGHODSXHUWDOXHJRGHPRQWDU
ORVJDELQHWHVPHVDGD+DJDDMXVWHVVLHVQHFHVDULR
&RQ¿UPHTXHWRGDVODVSDWDVQLYHODGRUDVWHQJDQ
FRQWDFWRFRQHOSLVRD¿QGHHYLWDUTXHHOODYDYDMLOODVVH
EDODQFHH\SDUDDVHJXUDUXQIXQFLRQDPLHQWRDGHFXDGR
GHODSXHUWD\ODWUDEDDQGODWFKRSHUDWLRQ
PASO 15
PASO 16
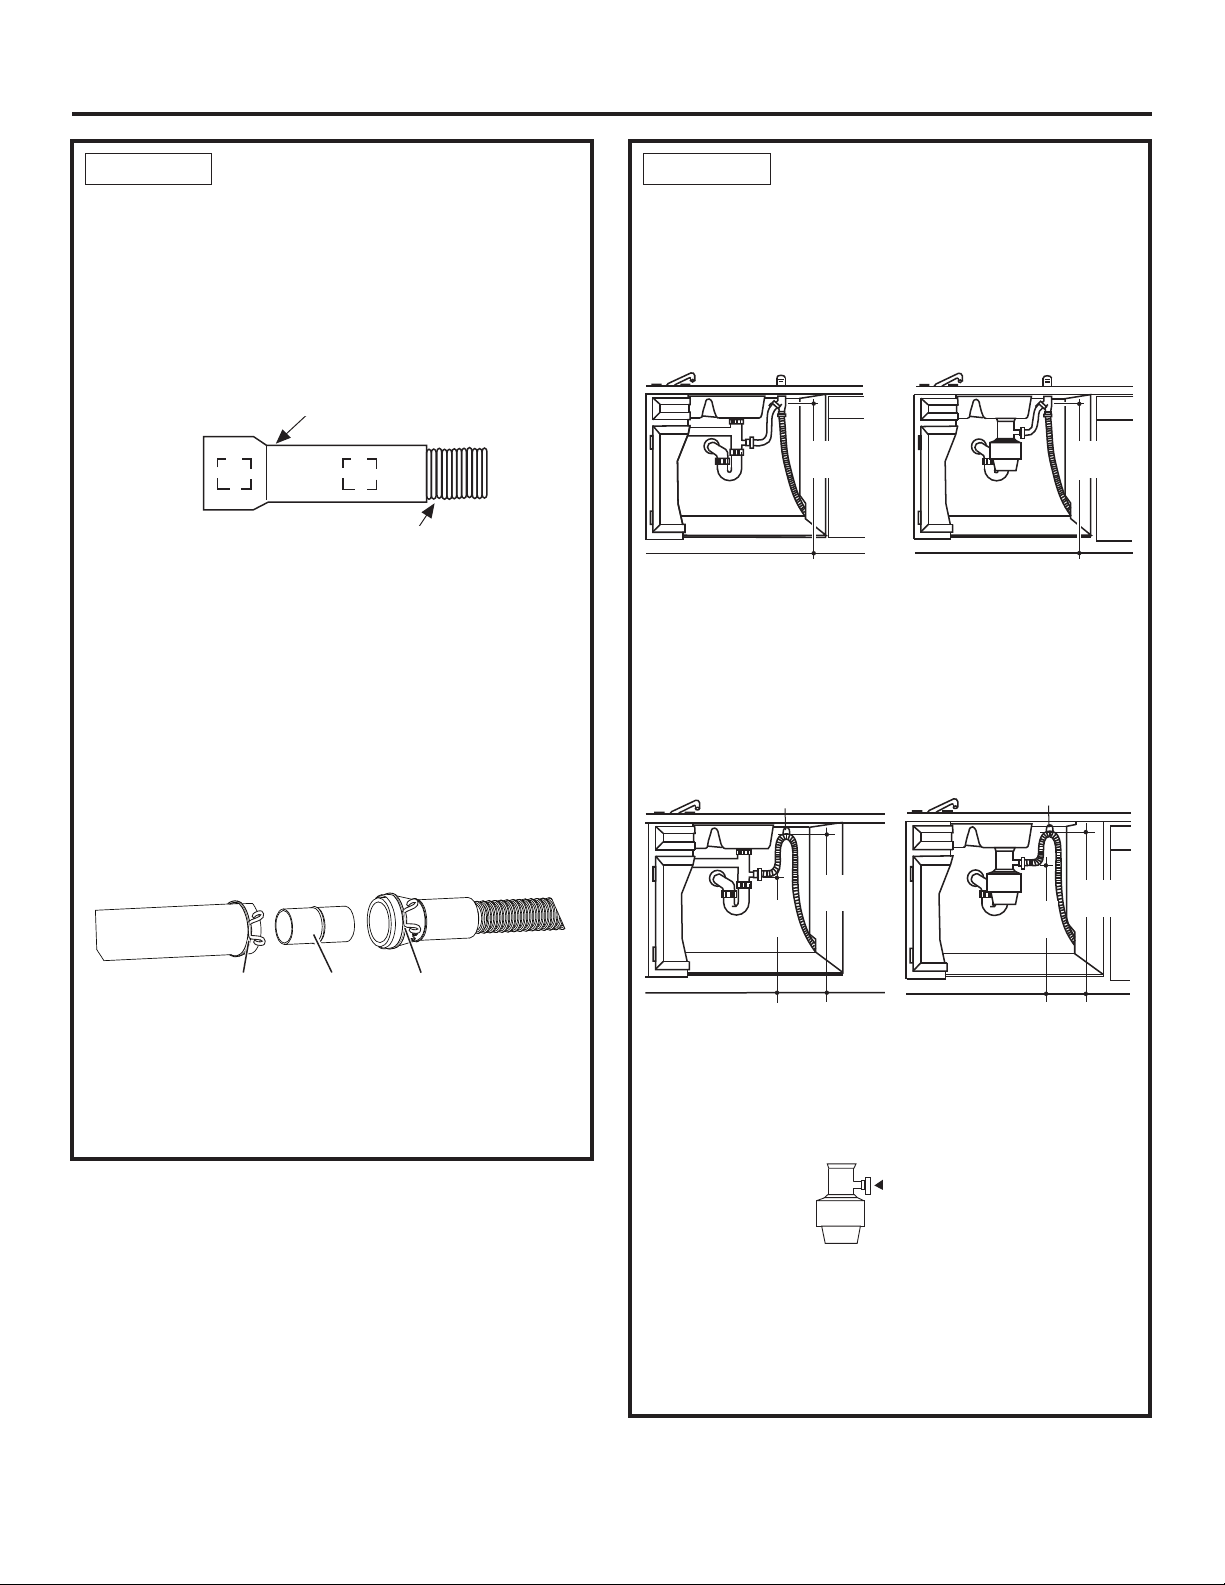
CONECTE LA LÍNEA DE
DESAGÜE (CONT.)
&RQHFWHODOtQHDGHGHVDJHDODEUHFKDGHDLUHOD7GH
GHVHFKRVRHOHOLPLQDGRUGHGHVHFKRVXVDQGRHOPpWRGR
GHWHUPLQDGRSUHYLDPHQWH$VHJXUHODPDQJXHUDFRQXQD
FODYLMDWLSRWRUQLOOR
Método 1 – Brecha de aire con T de desechos o el
eliminador de desechos
Método 2 – “Bucle de desagüe alto" con T de
desechos o el eliminador de desechos
&RQHVWHPpWRGRQHFHVLWDUiHOJDQFKRGHODPDQJXHUDGH
GHVDJHTXHVHSDUyHQHO3DVR
$MXVWHODPDQJXHUDGHGHVDJHDODSDUWHLQIHULRUGHOD
PHVDGDFRQHOJDQFKRSURYLVWR
IMPORTANTE – $OFRQHFWDUODOtQHDGHGHVDJHDO
HOLPLQDGRUGHGHVHFKRVDVHJ~UHVHGHTXHHOHQFKXIHGHO
GHVDJHKD\DVLGRUHWLUDGR(//$9$9$-,//$612+$5È
(/'(6$*h(6,(/(1&+8)((67È&2/2&$'2
Consejo: Evite cargos innecesarios del servicio técnico
debido a reclamos por falta de desagüe.
$VHJ~UHVHGHTXHODPDQJXHUDGHGHVDJHKD\DVLGR
SDVDGDSRUODDEHUWXUDGHOJDELQHWH(VWRHYLWDUiTXHHO
H[FHVRGHPDQJXHUDHQODFDYLGDGGHOODYDYDMLOODVVHD
UHWRUFLGRRDSODVWDGRSRUHOODYDYDMLOODV
Remove
Drain
Plug
5HWLUHHO
HQFKXIHGHO
GHVDJH
Instalación del Lavavajillas
12
CONECTE LA LÍNEA DE
DESAGÜE
(OH[WUHPRPROGHDGRGHODPDQJXHUDGHGHVDJH
FRLQFLGLUiFRQSXHUWRVGHHQWUDGDGH´D´GHGLiPHWUR
HQODEUHFKDGHDLUHOD7GHGHVHFKRVRHOHOLPLQDGRUGH
GHVHFKRV
'HWHUPLQHHOWDPDxRGHOSXHUWRGHHQWUDGD
&RUWHHOFRQHFWRUGHODPDQJXHUDGHGHVDJHHQODOtQHD
PDUFDGDVLVHUHTXLHUHSDUDTXHFRLQFLGDFRQHOSXHUWR
de
HQWUDGD
• (QFDVRGHUHTXHULUXQDPDQJXHUDPiVODUJDUHHPSODFH
ODPDQJXHUDGHGHVDJHFRQEROVRGHXVXDULRSRUODSLH]D
GHOVHUYLFLRWpFQLFRGH*($SSOLDQFHVWD24X10065XQD
PDQJXHUDGHXQDORQJLWXGGH¶TXHSXHGHVHUFRQHFWDGD
GLUHFWDPHQWHDOEXFOHGHGHVDJH\DDGKHULGDDOD
XQLGDGOHDHO3DVR6LODSLH]DGHODPDQJXHUDQRHVWi
GLVSRQLEOHHQHOVHUYLFLRWpFQLFRXQDPDQJXHUDDGLFLRQDO
FRQVXMHFLyQFRQXQGLiPHWURLQWHUQRGH´R´\
FRQXQDORQJLWXGQRVXSHULRUDSRGUiVHUDGKHULGDD
ODPDQJXHUDGHGHVDJHFRQEROVRGHXVXDULRSURYLVWD
$VHJXUHODFRQH[LyQFRQODDEUD]DGHUDSDUDPDQJXHUD
REWHQHUORFDOPHQWHDODPDQJXHUDGHGHVDJHFRQEROVR
GHXVXDULRSURYLVWD
NOTA:
• LA LONGITUD TOTAL DE LA MANGUERA DE DESAGÜE
NO DEBE EXCEDER LOS 16' DESDE LA PARTE
TRASERA DEL LAVAVAJILLAS PARA QUE PUEDA
DRENAR CORRECTAMENTE.
Figura Z
Cutting
Line
1"
5/8"
IMPORTANT: Do not cut corrugat
e
ifh
Línea de corte
IMPORTANTE:1RFRUWHODSDUWH
FRDUUXJDGDGHODPDQJXHUD
PASO 17 PASO 17
Abrazadera
de la
0DQJXHUD
&RXSOHU Abrazadera
de la
0DQJXHUD
Figura AA
,QVWDODFLyQGHOHOLPLQDGRU
GHGHVHFKRV
´
PD[
Figura AB
´
PD[
,QVWDODFLyQGHOD7GHGHVHFKRV
Figura AC
,QVWDODFLyQGHOHOLPLQDGRU
GHGHVHFKRV
´
PLQ
´PLQ
´PD[
*DQFKRGHODPDQJXHUD
GHGHVDJH
´
PLQ
´PLQ
´PD[
*DQFKRGHODPDQJXHUD
GHGHVDJH
,QVWDODFLyQGHOD7GHGHVHFKRV

13
Instalación del Lavavajillas
CONECTE EL SUMINISTRO
DE CORRIENTE
Si un cable de corriente con un enchufe ya está
instalado, proceda al Paso 19.
(QHVWHSDVRQHFHVLWDUiODWDSDGHODFDMDGHHPSDOPHV
\HOWRUQLOORGHFDEH]DKH[DJRQDOQSDUDORVWRUQLOORV
VHSDUDGRVHQHO3DVR
$VHJXUHHOFDEOHDGRGHODFDVDDODSDUWHWUDVHUDGHOD
FDMDGHHPSDOPHVFRQXQDPRUWLJXDGRUGHUHIXHU]R
• 8ELTXHORVFDEOHVGHOODYDYDMLOODVEODQFRQHJUR\
YHUGHFRQORVH[WUHPRVFRQWLUDVTXHVREUHVDOHQGHO
SXHQWHGH&$8VHWXHUFDVSDUDFDEOHVDSUREDGRVSRU
8/TXHVHDQGHOWDPDxRDSURSLDGRSDUDFRQHFWDUHO
FDEOHGHWLHUUDHQWUDQWHDOYHUGHHOEODQFRDOEODQFR\HO
QHJURDOQHJUR
• ,QVWDOHODWDSDGHODFDMDGHHPSDOPHVXVDQGRXQWRUQLOOR
GHFDEH]DKH[DJRQDOQ$VHJ~UHVHGHTXHORV
FDEOHVQRVXIUDQFRUWHVGHEDMRGHODWDSD
• $VHJ~UHVHGHTXHODWDSDGHODFDMDGHHPSDOPHVVH
DSR\HVREUHHOVRSRUWHGHPRQWDMH
• 6LXVDUiXQ.LWGH&DEOHVGH&RUULHQWHXWLOL]DUHOQ~PHUR
GHSLH]D*($SSOLDQFHVWX09X70910 o WX09X70911 \
FRQVXOWHODVLQVWUXFFLRQHVLQFOXLGDV
Figura AD
Tierra
9HUGH
NOTA:1RUHWLUHHOVRSRUWHGH
ODFDMDGHHPSDOPHV
3XHQWH
de CA
6RSRUWHGH
ODFDMDGH
HPSDOPHV
1HJUR
%ODQFR
Tornillos
de
FRQH[LyQ
a tierra
NOTA: TRGRVORVWRUQLOORVVRSRUWHV\FDEOHVGHFRQH[LyQ
DWLHUUDGHEHQSHUPDQHFHULQWDFWRV
6LHOFDEOHDGRGRPpVWLFRQRFXHQWDFRQXQFDEOH
GHKLORVFRQFRQH[LyQDWLHUUDXQLQVWDODGRUGHEH
UHDOL]DUXQDFRQH[LyQDWLHUUD&XDQGRHOFDEOHDGR
GRPpVWLFRHVGHDOXPLQLRDVHJ~UHVHGHXVDUXQ
FRPSXHVWRDQWLR[LGDQWH\FRQHFWRUHVGHDOXPLQLRD
FREUHDSUREDGRVRU8/
ADVERTENCIA
PASO 18
LISTA DE CONTROL DE
EVALUACIÓN PREVIA
5HYLVHHVWDOLVWDOXHJRGHLQVWDODUHOODYDYDMLOODVD¿Q
de evitar cargos por llamadas al servicio técnico, las
cuales no están cubiertas por su garantía.
• $VHJ~UHVHGHTXHHOHQFHQGLGRHVWpHQOFF$SDJDGR
• $EUDODSXHUWD\UHWLUHWRGDODJRPDHVSXPD\HOSDSHOGH
HPEDODMH
• 8ELTXHHO0DQXDOGHO3URSLHWDULRVHSDUDGRHQHO3DVR
• 3DUDDFFHGHUDLQVWUXFFLRQHVGHXVRFRQVXOWHHO0DQXDO
GHO3URSLHWDULR
• &RQWUROHODDSHUWXUD\FLHUUHGHODSXHUWD6LODSXHUWD
QRVHDEUH\FLHUUDOLEUHPHQWHFRQWUROHODXELFDFLyQ
FRUUHFWDGHOFDEOHGHUHVRUWHVREUHODSROHD6LODSXHUWD
VHFDHRFLHUUDDOVHUOLEHUDGDDMXVWHODWHQVLyQGHO
UHVRUWH&RQVXOWHHO3DVR
• $VHJ~UHVHGHTXHHOFDEOHDGRHVWpDVHJXUDGRGHEDMR
GHOODYDYDMLOODVVLQFRUWHVQLHQFRQWDFWRFRQUHVRUWHVGH
ODSXHUWDXRWURVFRPSDUWLPLHQWRV&RQVXOWHHO3DVR
• &RQWUROHODDOLQHDFLyQGHODSXHUWDFRQODWXEHUtD6LOD
SXHUWDJROSHDODWXEHUtDQLYHOHHOODYDYDMLOODV&RQVXOWH
HO3DVR
• &RQWUROHODDOLQHDFLyQGHODSXHUWDFRQHOJDELQHWH6L
ODSXHUWDJROSHDHOJDELQHWHUHSRVLFLRQHHOODYDYDMLOODV
&RQVXOWHHO3DVR
• &RQWUROHTXHHOUHVRUWHGHODSXHUWDQRWHQJDFRQWDFWR
FRQODOtQHDGHDJXDODPDQJXHUDGHOOHQDGRHO
FDEOHDGRXRWURVFRPSRQHQWHV&RQVXOWHHO3DVR
• 9HULILTXHTXHHOVXPLQLVWURGHDJXD\ODVOtQHDVGH
GHVDJHQRHVWpQUHWRUFLGDVQLHQFRQWDFWRFRQRWURV
FRPSRQHQWHV(OFRQWDFWRFRQHOPRWRURODHVWUXFWXUD
GHOODYDYDMLOODVSRGUtDJHQHUDUUXLGRV
• $EUDHOJULIRGHDJXDFDOLHQWHGHOODYDER\YHULILTXHOD
WHPSHUDWXUDGHODJXD/DWHPSHUDWXUDGHODJXDHQWUDQWH
GHEHUiVHUGHHQWUH)\)6HUHTXLHUHXQD
WHPSHUDWXUDPtQLPDGH)SDUDXQPHMRUUHQGLPLHQWR
GHOODYDGR&RQVXOWHOD³3UHSDUDFLyQGHOD/tQHDGH
$JXD&DOLHQWH´HQODSiJLQD
• $JUHJXHFXDUWRGHDJXDDODSDUWHLQIHULRUGHO
ODYDYDMLOODVDILQGHOXEULFDUODMXQWDGHODERPED
• $FWLYHHOVXPLQLVWURGHDJXD&RQWUROHTXHQRKD\D
SpUGLGDV'HVHUQHFHVDULRDMXVWHODVFRQH[LRQHV
• 5HWLUHODSHOtFXODSURWHFWRUDVLVHHQFXHQWUDSUHVHQWHHQ
HOSDQHOGHFRQWURO\ODSXHUWDGRRU
• &RQWUROHTXHHOERUGHGHODWLQDQRHQWUHHQFRQWDFWRFRQ
ODSXHUWD
PASO 19
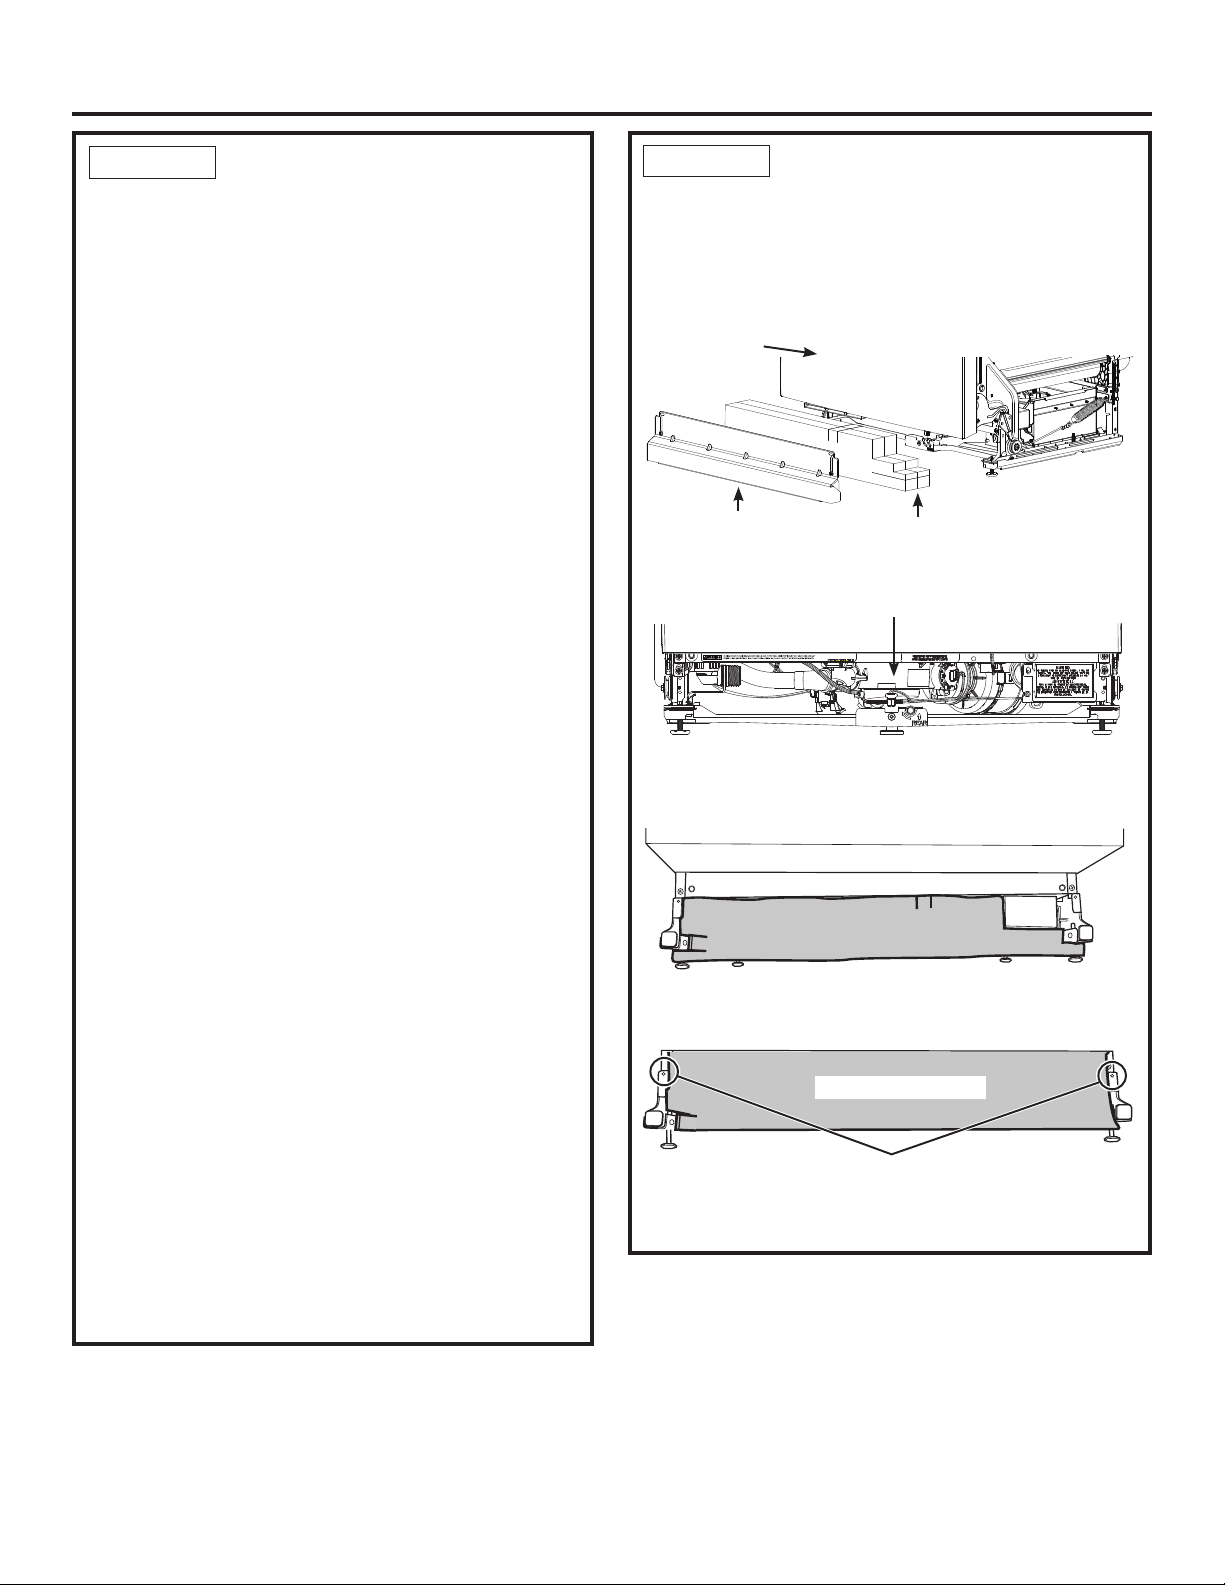
Instalación del Lavavajillas
PRUEBA DE MOJADO
DEL LAVAVAJILLAS
• $FWLYHODFRUULHQWH\HQFKXIHHOFDEOHGHFRUULHQWHHQHO
WRPDFRUULHQWHVLHVWiHTXLSDGRGHHVWHPRGR
• 6HOHFFLRQHXQFLFOR\SUHVLRQHHOERWyQStart,QLFLDU
• $VHJ~UHVHGHTXHODSXHUWDHVWpWUDEDGD(OODYDYDMLOODV
VHGHEHUtDLQLFLDU
• $VHJ~UHVHGHTXHHODJXDHQWUHDOODYDYDMLOODV6LQR
HQWUDDJXDDOODYDYDMLOODVDVHJ~UHVHGHTXHHODJXD\OD
FRUULHQWHHVWpQDFWLYDGDV
• &RQWUROHTXHQRKD\DSpUGLGDVGHEDMRGHOODYDYDMLOODV
6LHQFXHQWUDXQDJRWHUDDSDJXHODFRUULHQWHGHVGH
HOGLV\XQWRU\OXHJRDMXVWHODVFRQH[LRQHVGHODJXD
5HLQLFLHODFRUULHQWHXQDYH]TXHODSpUGLGDVHD
FRUUHJLGD
NOTA:(VSRVLEOHTXHXQDSHTXHxDFDQWLGDGGHDJXD
VHDGHUUDPDGDGHOW~QHOGHOOHQDGRVREUHHOODGR
GHUHFKRGHODEDxHUDGXUDQWHHOSULPHUXVROXHJRGH
ODLQVWDODFLyQ(VPX\SUREDEOHTXHHOGHUUDPHVH
SURGX]FDVLKD\DLUHHQODWXEHUtDGHVXPLQLVWURGH
DJXDGHXQDFRQVWUXFFLyQQXHYDRVLODYiOYXODHVWXYR
FHUUDGDGXUDQWHXQSHUtRGRGHWLHPSRSURORQJDGR
• &RQWUROHTXHQRKD\DJRWHUDVDOUHGHGRUGHODSXHUWD
8QDJRWHUDDOUHGHGRUGHODSXHUWDSRGUtDVHURFDVLRQDGD
SRUIURWDFLyQFRQODSXHUWDRJROSHVFRQWUDJDELQHWHV
DG\DFHQWHV'HVHUQHFHVDULRUHSRVLFLRQHHOODYDYDMLOODV
&RQVXOWHHO3DVR
• 0DQWHQJDSUHVLRQDGRHOERWyQStart,QLFLDUGXUDQWH
VHJXQGRVSDUDFDQFHODUHOFLFOR/DXQLGDGFRPHQ]DUi
DUHDOL]DUHOGHVDJH&RQWUROHODVOtQHDVGHGHVDJH
6LVHHQFXHQWUDQSpUGLGDVFRUWHODFRUULHQWHGHVGHHO
GLV\XQWRU\FRUULMDORVSUREOHPDVGHODSORPHUtDVHJ~Q
VHDQHFHVDULR5HLQLFLHODFRUULHQWHXQDYH]UHDOL]DGDV
ODVFRUUHFFLRQHV&RQVXOWHORV3DVRV\
• $EUDODSXHUWDGHOODYDYDMLOODV\DVHJ~UHVHGHTXHWRGD
HODJXDVHDGHVDJRWDGD'HQRVHUDVtFRQWUROHTXH
HOFDEOHGHOHOLPLQDGRUGHGHVHFKRVKD\DVLGRUHWLUDGR
\RTXHODEUHFKDGHDLUHQRHVWpHQFKXIDGD7DPELpQ
FRQWUROHODPDQJXHUDGHGHVDJHSDUDDVHJXUDUTXHQR
HVWpUHWRUFLGDGHEDMRRGHWUiVGHOODYDYDMLOODV&RQVXOWH
HO3DVR
• 3UHVLRQHHOERWyQStart,QLFLDUXQDYH]PiV\KDJD
IXQFLRQDUHOODYDYDMLOODVHQRWURFLFOR&RQWUROHTXHQR
KD\DJRWHUDV\FRUULMDODVPLVPDVGHVHUQHFHVDULR
• 5HSLWDHVWRVSDVRVVHJ~QVHDQHFHVDULR
PASO 20
POSICIONE LA PIEZA DE
AISLACIÓN DE SONIDO
(algunos modelos)
8ELTXHHOSDTXHWHGHODLVODQWHGHVRQLGRGHQWURGHO
ODYDYDMLOODV
• 3RVLFLyQHODVSLH]DVHQIRUPDYHUWLFDOFRPRVHPXHVWUD
8ELTXHODFDMDGHFRQWURO
• (PSXMHODSDUWHGHOEORTXHDLVODQWHGHEDMRGHO
ODYDYDMLOODVKDVWDTXHTXHGHGHEDMRGHODFDMDGH
FRQWURO
•
(PSXMHODSDUWHGHOSDQHOKDFLDDUULEDKDVWDHOIUHQWHGHO
EORTXH
• $MXVWHORVFRVWDGRVGHOSDQHOIURQWDOGHWUiVGHORVDJXMHURV
GHORVWRUQLOORVSDUDDGKHULUHO]yFDOR
Figura AH
PASO 21
14
Empuje los costados del aislante detrás de los
agujeros de los tornillos para adherir el zócalo.
DOJXQRVPRGHORV
=yFDOR
%ORTXH$LVODQWH
(QDOJXQRVPRGHORV
3XHUWDGHO
Lavavajillas
Caja de Control
B

Instalación del Lavavajillas
REEMPLACE EL ZÓCALO
&RORTXHHO]yFDORFRQWUDODVSDWDVGHOODYDYDMLOODV
• $OLQHHHO]yFDORFRQHOH[WUHPRLQIHULRU\DVHJ~UHVHGH
TXHHVWpFRQWUDHOSLVR
• ,QVHUWH\DMXVWHORVWRUQLOORVGHDJDUUHDO]yFDOR(O
]yFDORGHEHUiSHUPDQHFHUHQFRQWDFWRFRQHOSLVR
Consejo: Reduzca el sonido debajo del lavavajillas.
Asegúrese de que el zócalo esté contra la pared.
Figura AJ
Attachment
Screws
Toekick
=yFDOR
Tornillos de
agarre
TEXTOS
$VHJ~UHVHGHHQWUHJDUDOFRQVXPLGRUHOSDTXHWH
FRPSOHWRGHWH[WRVHVWDV,QVWUXFFLRQHVGH,QVWDODFLyQ\
PXHVWUDV\RFXSRQHVGHOSURGXFWR
CONTROLE LO SIGUIENTE
(OERUGHGHODWLQDQRLQWHU¿HUHFRQODSXHUWD
(OODYDYDMLOODVHVFXDGUDGR\HVWiQLYHODGRWDQWRHQOD
SDUWHVXSHULRUFRPRHQODLQIHULRUGHODDEHUWXUDGHO
JDELQHWHVLQUHWRUFLPLHQWRQLGLVWRUVLyQGHODWLQDRGHOD
SXHUWD
(QORVPRGHORVsinVLVWHPDGHQLYHODFLyQDMXVWDEOH
DVHJ~UHVHGHTXHODVSDWDVGHOODYDYDMLOODVSRVHDQXQ
FRQWDFWR¿UPHFRQHOSLVR
(QORVPRGHORVFRQHOVLVWHPDGHQLYHODFLyQDMXVWDEOH
DVHJ~UHVHGHTXHDPEDVSDWDVGHODQWHUDVGHO
ODYDYDMLOODV\ODSDWDGHOVLVWHPDGHQLYHODFLyQFHQWUDO
WUDVHUDSRVHDQXQFRQWDFWRILUPHFRQHOSLVR
/DPDQJXHUDGHGUHQDMHQRWLHQHWRUFHGXUDVHQWUHHO
ODYDYDMLOODV\ORVJDELQHWHVRSDUHGHVDG\DFHQWHV
(OERUGHGHODWLQDHVWiFRPSOHWDPHQWHDSR\DGRHQHO
reborde de la tina
PASO 22
PASO 23
PASO 24
15

NOTA: /DPHMRUDGHORVSURGXFWRVHVXQHVIXHU]RFRQWLQXR3RUORWDQWRORVPDWHULDOHV
ODDSDULHQFLD\ODVHVSHFLILFDFLRQHVSXHGHQVXIULUFDPELRVVLQSUHYLRDYLVR
3ULQWHGLQWKH8QLWHG6WDWHV
