
Write the model and serial
numbers here:
Model # _________________
Serial # _________________
You can
the rating label on
the front behind the range drawer.
OWNER’S MANUAL
RANGES
Electric Radiant Slide-In
295D3313P010 rev.0 Pub. Num. 29-6374
SAFETY INFORMATION . . . . . . . . . . 3
USING THE RANGE
Surface Units . . . . . . . . . . . . . . . . . . . . . . . . . . . 8
Cookware for Radiant Copoktop . . . . . . . . . .10
Oven Controls . . . . . . . . . . . . . . . . . . . . . . . . . .12
Settings . . . . . . . . . . . . . . . . . . . . . . . . . . . . . . .13
Options . . . . . . . . . . . . . . . . . . . . . . . . . . . . . . .14
Sabbath Mode . . . . . . . . . . . . . . . . . . . . . . . . . .15
Oven Racks . . . . . . . . . . . . . . . . . . . . . . . . . . . .16
Aluminum Foil and Oven Liners . . . . . . . . . . .17
Cookware . . . . . . . . . . . . . . . . . . . . . . . . . . . . . .17
Cooking Modes . . . . . . . . . . . . . . . . . . . . . . . . .18
Probe . . . . . . . . . . . . . . . . . . . . . . . . . . . . . . . . .19
Cooking Guide . . . . . . . . . . . . . . . . . . . . . . . . 20
WiFi Connect and Remote Enable . . . . . . . .21
CARE AND CLEANING
Cleaning the Range – Exterior . . . . . . . . . . . 22
Cleaning the Range – Interior . . . . . . . . . . . 23
Cleaning the Glass Cooktop . . . . . . . . . . . . . 24
Probe . . . . . . . . . . . . . . . . . . . . . . . . . . . . . . . . 25
Oven Light . . . . . . . . . . . . . . . . . . . . . . . . . . . . 26
Oven Door . . . . . . . . . . . . . . . . . . . . . . . . . . . . 26
TROUBLESHOOTING TIPS. . . . . . . 27
WARRANTY . . . . . . . . . . . . . . . . . . . . . . . 30
ACCESSORIES . . . . . . . . . . . . . . . . . . . . .31
CONSUMER SUPPORT . . . . . . . . . . . 32
PCS915
PCS940
PCS980
GE is a trademark of the General Electric Company. Manufactured under trademark license.

2
THANK YOU FOR MAKING GE APPLIANCES A PART OF YOUR HOME.
Whether you grew up with GE Appliances, or this is your first, we’re happy to have you in the family.
We take pride in the craftsmanship, innovation and design that goes into every GE Appliances
product, and we think you will too. Among other things, registration of your appliance ensures that we
can deliver important product information and warranty details when you need them.
Register your GE appliance now online. Helpful websites and phone numbers are available in the
Consumer Support section of this Owner’s Manual. You may also mail in the pre-printed registration
card included in the packing material.
3
READ AND SAVE THESE INSTRUCTIONS
IMPORTANT SAFETY INFORMATION
READ ALL INSTRUCTIONS BEFORE USING THE APPLIANCE
SAFETY INFORMATION
ANTI-TIP DEVICE
To reduce the risk of tipping the range,
the range must be secured by a properly
installed anti-tip bracket. See installation
instructions shipped with the bracket for
complete details before attempting to install.
For Free-Standing and Slide-In Ranges
To check if the bracket is installed and
engaged properly, look underneath the
range to see that the rear leveling leg is
engaged in the bracket. On some models, the storage drawer or kick panel
can be removed for easy inspection. If visual inspection is not possible,
slide the range forward, confirm the anti-tip bracket is securely attached to
the floor or wall, and slide the range back so the rear leveling leg is under
the anti-tip bracket.
If the range is pulled from the wall for any reason, always repeat this
procedure to verify the range is properly secured by the anti-tip bracket.
Never completely remove the leveling legs or the range will not be secured
to the anti-tip device properly.
WARNING
Read all safety instructions before using the product. Failure to follow these instructions may result
in fire, electrical shock, serious injury or death.
• A child or adult can tip the range and be killed.
• Install the anti-tip bracket to the wall or floor.
•
Engage the range to the anti-tip bracket by sliding the
range back such that the foot is engaged.
• Re-engage the anti-tip bracket if the range is moved.
• Failure to do so can result in death or serious burns
to children or adults.
Tip-Over Hazard
WARNING
Anti-Tip
Bracket
Leveling Leg
Free-Standing and Slide-In Ranges
WARNING
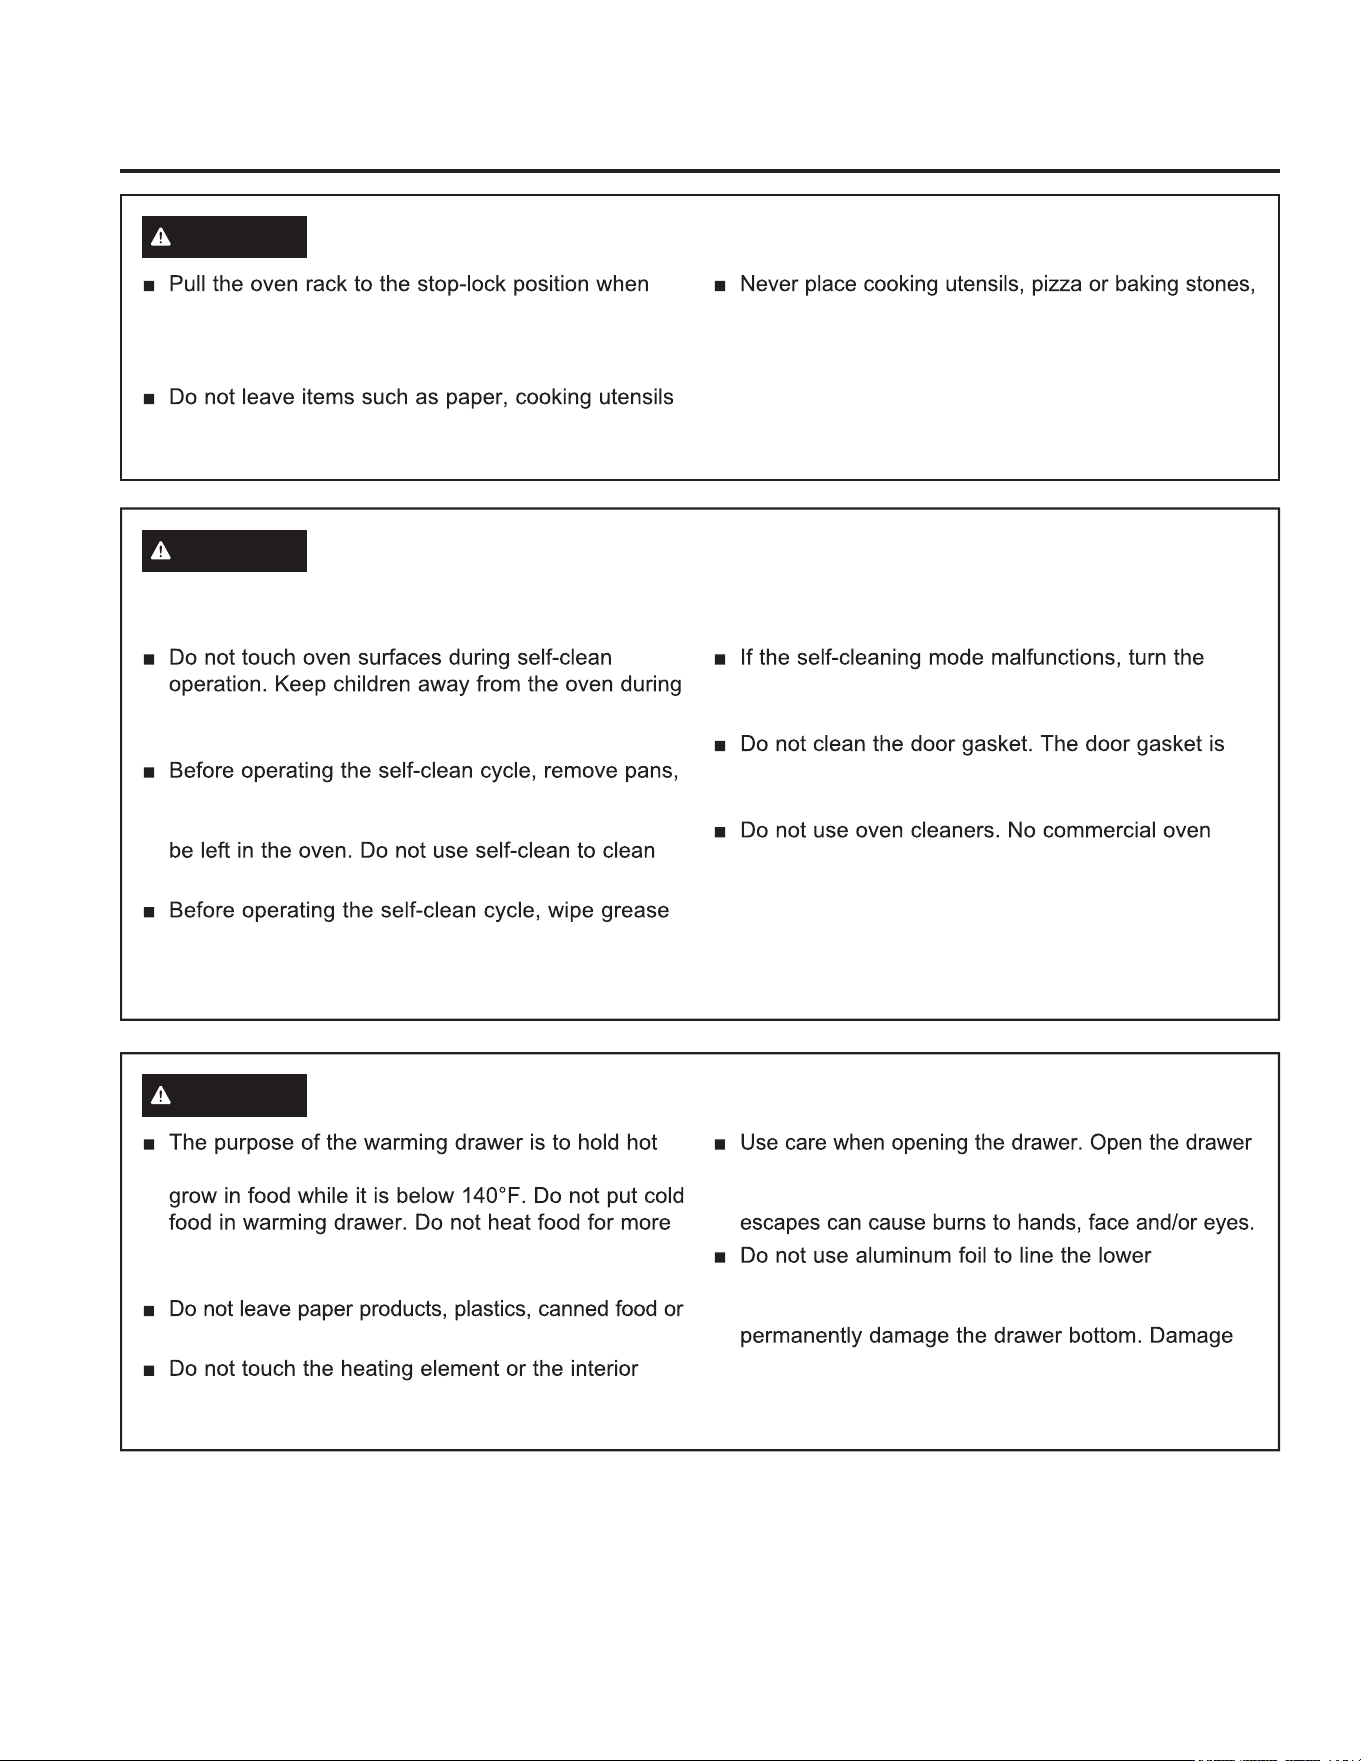
GENERAL SAFETY INSTRUCTIONS
This unit has been tested and found to comply with the limits for a class B digital device, pursuant to Part 18
of the FCC rules. These limits are designed to provide reasonable protection against harmful interference in a
residential installation. This unit generates, uses and can radiate radio frequency energy and, if not installed and
used in accordance with the instructions, may cause harmful interference to radio communications. However,
there is no guarantee that interference will not occur in a particular installation. If this unit does cause harmful
interference to radio or television reception, which can be determined by turning the unit off and on, the user is
encouraged to try to correct the interference by one or more of the following measures:
CAUTION
Persons with a pacemaker or similar medical device should exercise caution when
using or standing near an induction unit while it is in operation. The electromagnetic field may affect the
working of the pacemaker or similar medical device. It is advisable to consult your doctor or the pacemaker
manufacturer about your particular situation.
described in this Owner’s Manual.
grounded by a qualified installer in accordance with
the provided installation instructions.
range unless it is specifically recommended in this
manual. All other servicing should be transferred to
a qualified technician.
4
WARNING
KEEP FLAMMABLE MATERIALS AWAY FROM THE RANGE
Failure to do so may result in fire or personal injury.
or near the cooktop, including paper, plastic, pot
holders, linens, wall coverings, curtains, drapes and
gasoline or other flammable vapors and liquids.
using the appliance. These garments may ignite if
they contact hot surfaces causing severe burns.
materials accumulate in or near the range. Grease
in the oven or on the cooktop may ignite.
not be allowed to accumulate on the hood or filter.
SAFETY INFORMATION
READ AND SAVE THESE INSTRUCTIONS
WARNING
IN THE EVENT OF A FIRE, TAKE THE FOLLOWING
STEPS TO PREVENT INJURY AND FIRE SPREADING
a flaming pan. Turn the controls off. Smother a
flaming pan on a surface unit by covering the pan
completely with a well-fitting lid, cookie sheet or flat
fire extinguisher.
the fire by closing the oven door and turning the
oven off or by using a multi-purpose dry chemical or
foam-type fire extinguisher.
the oven off and wait for the fire to go out.
force the door open. Introduction of fresh air at self-
clean temperatures may lead to a burst of flame
from the oven. Failure to follow this instruction may
result in severe burns.
IMPORTANT SAFETY INFORMATION
READ ALL INSTRUCTIONS BEFORE USING THE APPLIANCE
WARNING
GENERAL SAFETY INSTRUCTIONS (Cont.)
or disconnect the power supply at the household
distribution panel by removing the fuse or switching
off the circuit breaker.
be left alone or unattended in an area where an
appliance is in use. They should never be allowed
to climb, sit or stand on any part of the appliance.
CAUTION
children above a range or on the backguard of a
items could be seriously injured.
holders on hot surfaces may result in burns from
other bulky cloth in place of pot holders.
the room.
or the interior surface of the oven. These surfaces
may be hot enough to burn even though they are
or let clothing or other flammable materials contact
the surface units, areas nearby the surface units or
any interior area of the oven; allow sufficient time
for cooling first. Other surfaces of the appliance
may become hot enough to cause burns. Potentially
hot surfaces include the cooktop, areas facing the
cooktop, oven vent opening, surfaces near the
opening and crevices around the oven door.
could build up and the container could burst,
causing an injury.
oven bottom or anywhere in the oven, except as
described in this manual. Oven liners can trap heat
or melt, resulting in damage to the product and risk
of shock, smoke or fire.
glass. Shock, fire or cuts may occur.
an internal temperature of 160°F and poultry to at
least an internal temperature of 180°F. Cooking
to these temperatures usually protects against
foodborne illness.
5
SAFETY INFORMATION
READ AND SAVE THESE INSTRUCTIONS
IMPORTANT SAFETY INFORMATION
READ ALL INSTRUCTIONS BEFORE USING THE APPLIANCE
WARNING
COOKTOP SAFETY INSTRUCTIONS
or high heat settings. Boilovers cause smoking and
greasy spillovers that may catch on fire.
to heat beyond its smoking point, oil may ignite
resulting in fire that may spread to surrounding
possible to monitor oil temperature.
amount of oil when shallow pan-frying and avoid
cooking frozen foods with excessive amounts of ice.
earthenware or other glazed containers are suitable
for cooktop service; others may break because of
the sudden change in temperature.
flammable materials and spillage, the handle of a
container should be turned toward the center of the
range without extending over nearby surface units.
the fan on.
WARNING
GLASS COOKTOP SAFETY INSTRUCTIONS
surface of the cooktop will retain heat after the
controls have been turned off.
should break, cleaning solutions and spillovers
may penetrate the broken cooktop and create a
risk of electric shock. Contact a qualified technician
immediately.
can be scratched with items such as knives, sharp
instruments, rings or other jewelry, and rivets on
clothing.
®
ceramic Cooktop Cleaner
and CERAMA BRYTE
®
Cleaning Pad to clean
the cooktop. Wait until the cooktop cools and the
indicator light goes out before cleaning. A wet
sponge or cloth on a hot surface can cause steam
burns. Some cleaners can produce noxious fumes if
applied to a hot surface. NOTE: Sugar spills are an
exception. They should be scraped off while still hot
using an oven mitt and a scraper. See the Cleaning
the glass cooktop section for detailed instructions.
cleaning cream label.
fire on the glass cooktop, even when it is not being
used. If the cooktop is inadvertently turned on, they
may ignite. Heat from the cooktop or oven vent after
it is turned off may cause them to ignite also.
spoons and lids on the cooktop surface since they
can get hot.
WARNING
OVEN SAFETY INSTRUCTIONS
door. Hot air or steam which escapes can cause
a glowing spot during use or shows other signs
of damage. A glowing spot indicates the heating
element may fail and present a potential burn, fire,
or shock hazard. Turn the oven off immediately and
have the heating element replaced by a qualified
service technician.
the oven may ignite.
cool. If rack must be moved while oven is hot, do not
let pot holder contact hot heating element in oven.
follow the manufacturer’s directions.
6
SAFETY INFORMATION
READ AND SAVE THESE INSTRUCTIONS
IMPORTANT SAFETY INFORMATION
READ ALL INSTRUCTIONS BEFORE USING THE APPLIANCE
WARNING
SELF-CLEANING OVEN SAFETY INSTRUCTIONS
The self-cleaning feature operates the oven at temperatures high enough to burn away food soils in the oven.
Follow these instructions for safe operation.
self-cleaning. Failure to follow these instructions
may cause burns.
shiny metal oven racks and other utensils from the
oven. Only gray porcelain-coated oven racks may
other parts, such as drip pans or bowls.
and food soils from the oven. Excessive amount
of grease may ignite leading to smoke damage to
your home.
oven off and disconnect the power supply. Have it
serviced by a qualified technician.
essential for a good seal. Care should be taken not
to rub, damage or move the gasket.
cleaner or oven liner protective coating of any kind
should be used in or around any part of the oven.
WARNING
WARMING DRAWER SAFETY INSTRUCTIONS (Some models)
cooked foods at serving temperature. Bacteria will
than 2 hours. Failure to follow these instructions
may result in foodborne illness.
combustible materials in the drawer. They may ignite.
surface of the drawer. These surfaces may be hot
enough to cause burns.
a crack and let hot air or steam escape before
removing or replacing food. Hot air or steam that
drawer. The foil will trap heat below, and upset
the performance of the oven. Foil can melt and
from improper use of aluminum foil is not covered
by the product warranty.
WARNING
OVEN SAFETY INSTRUCTIONS (Cont.)
loading and unloading food from the oven. This
helps prevent burns from touching hot surfaces of
the door and oven walls.
or food in the oven when not in use. Items stored in
an oven can ignite.
or any type of foil or liner on the oven floor. These
items can trap heat or melt, resulting in damage to
the product and risk of shock, smoke or fire.
7
How to Remove Protective Shipping Film and Packaging Tape
Carefully grasp a corner of the protective shipping film
with your fingers and slowly peel it from the appliance
Remove all of the film before using the appliance for the
first time.w
To assure no damage is done to the finish of the
product, the safest way to remove the adhesive from
packaging tape on new appliances is an application of
a household liquid dishwashing detergent. Apply with a
soft cloth and allow to soak.
NOTE: The adhesive must be removed from all parts. It
cannot be removed if it is baked on.
SAFETY INFORMATION
READ AND SAVE THESE INSTRUCTIONS
IMPORTANT SAFETY INFORMATION
READ ALL INSTRUCTIONS BEFORE USING THE APPLIANCE
Remote Enable Equipment (Some models)
This device complies with part 15 of the FCC Rules.
Operation is subject to the following two conditions: (1)
This device may not cause harmful interference, and
(2) this device must accept any interference received,
including interference that may cause undesired operation.
The wireless communication equipment installed on this
range has been tested and found to comply with the
limits for a Class B digital device, pursuant to part 15 of
the FCC Rules. These limits are designed to:
(a) provide reasonable protection against harmful
interference in a residential installation. This equipment
generates, uses, and can radiate radio frequency energy
and, if not installed and used in accordance with the
instructions, may cause harmful interference to radio
communications. However, there is no guarantee that
interference will not occur in a particular installation. If
this equipment does cause harmful interference to radio
or television reception, which can be determined by
turning the equipment off and on, the user is encouraged
to try to correct the interference by one or more of the
following measures:
receiver.
different from that to which the receiver is connected.
technician for help.
(b) accept any interference received, including interference
that may cause undesired operation of the device.
Note that any changes or modifications to the wireless
communication device installed on this oven that are not
expressly approved by the manufacturer could void the
user’s authority to operate the equipment.
8
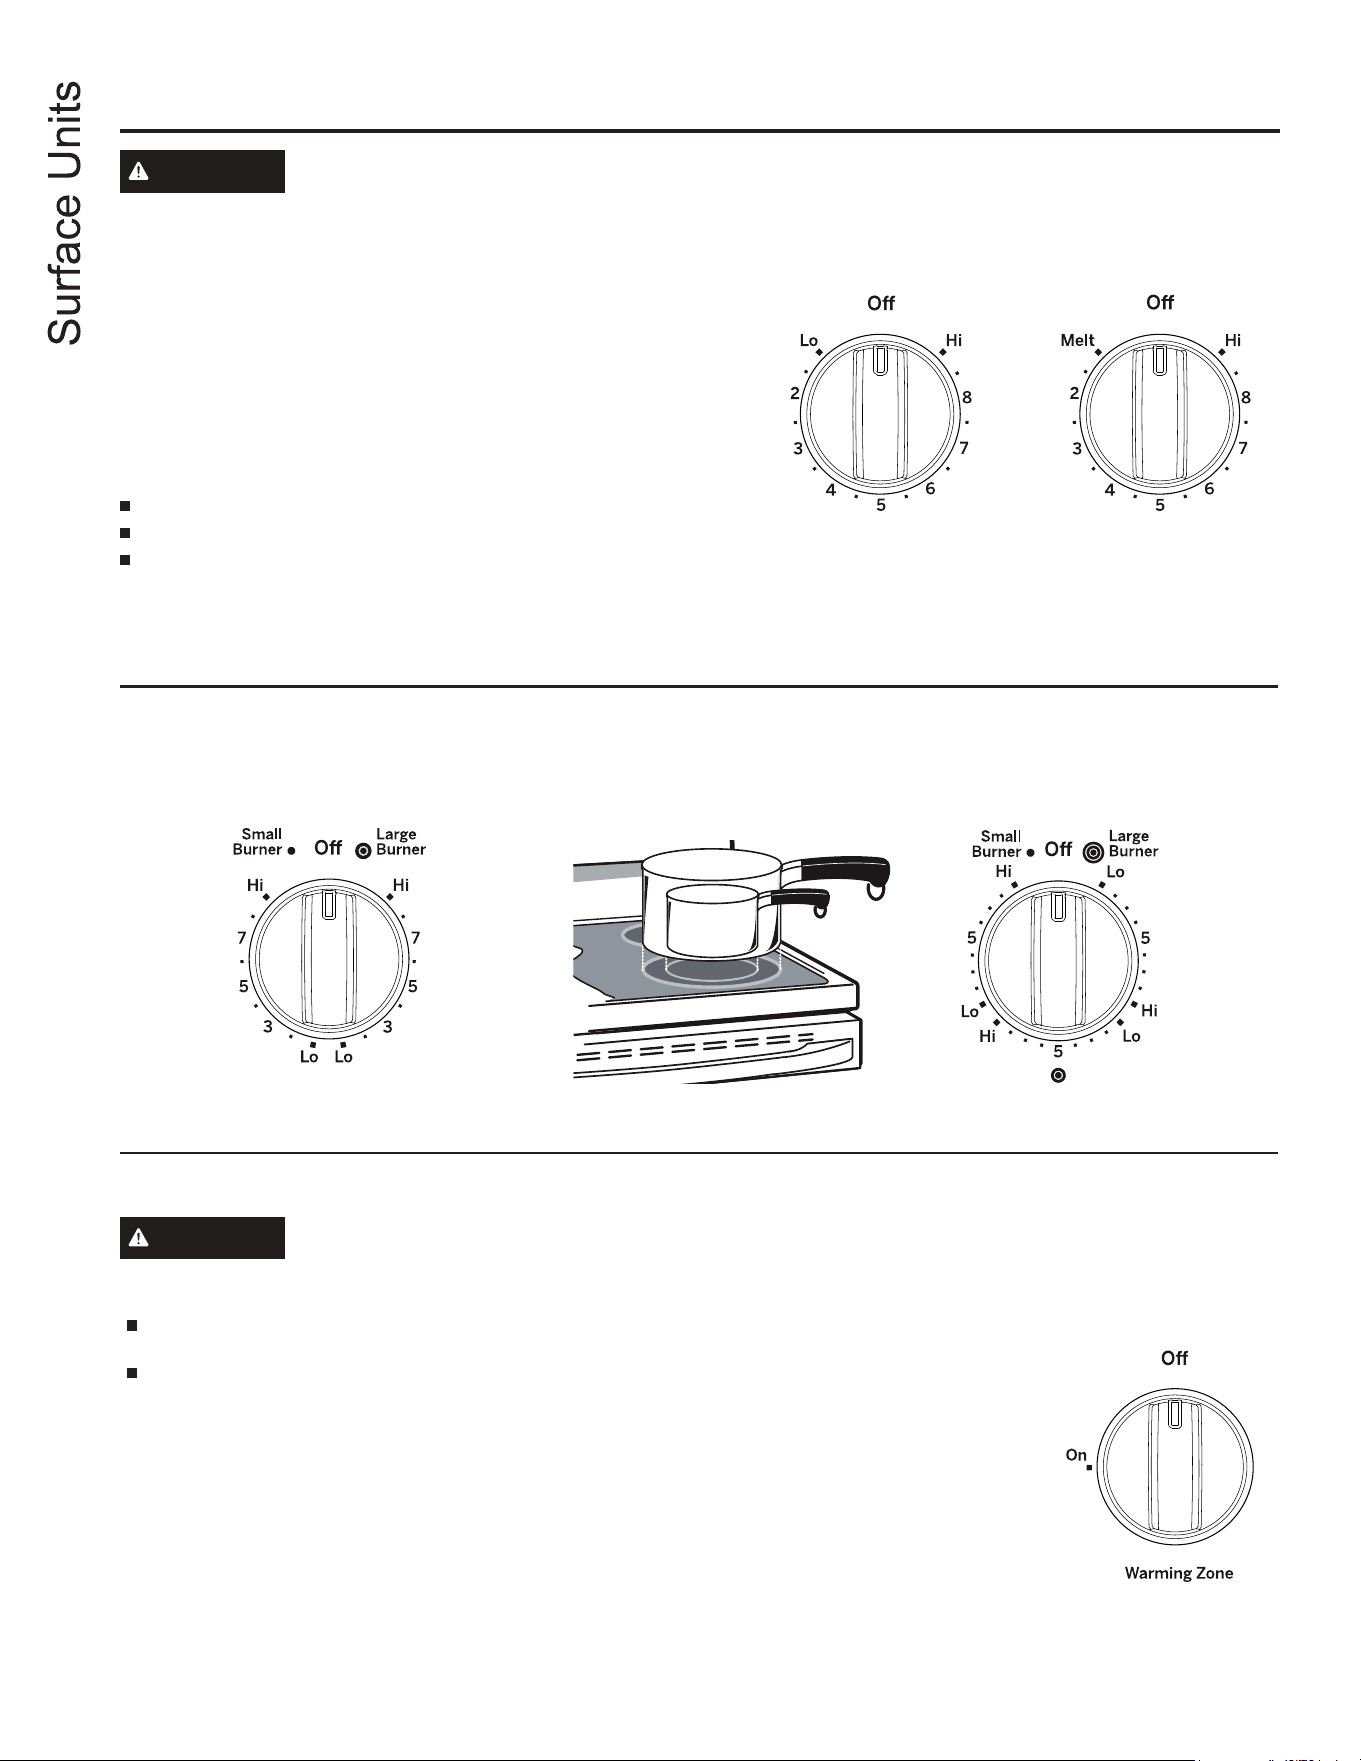
USING THE RANGE:
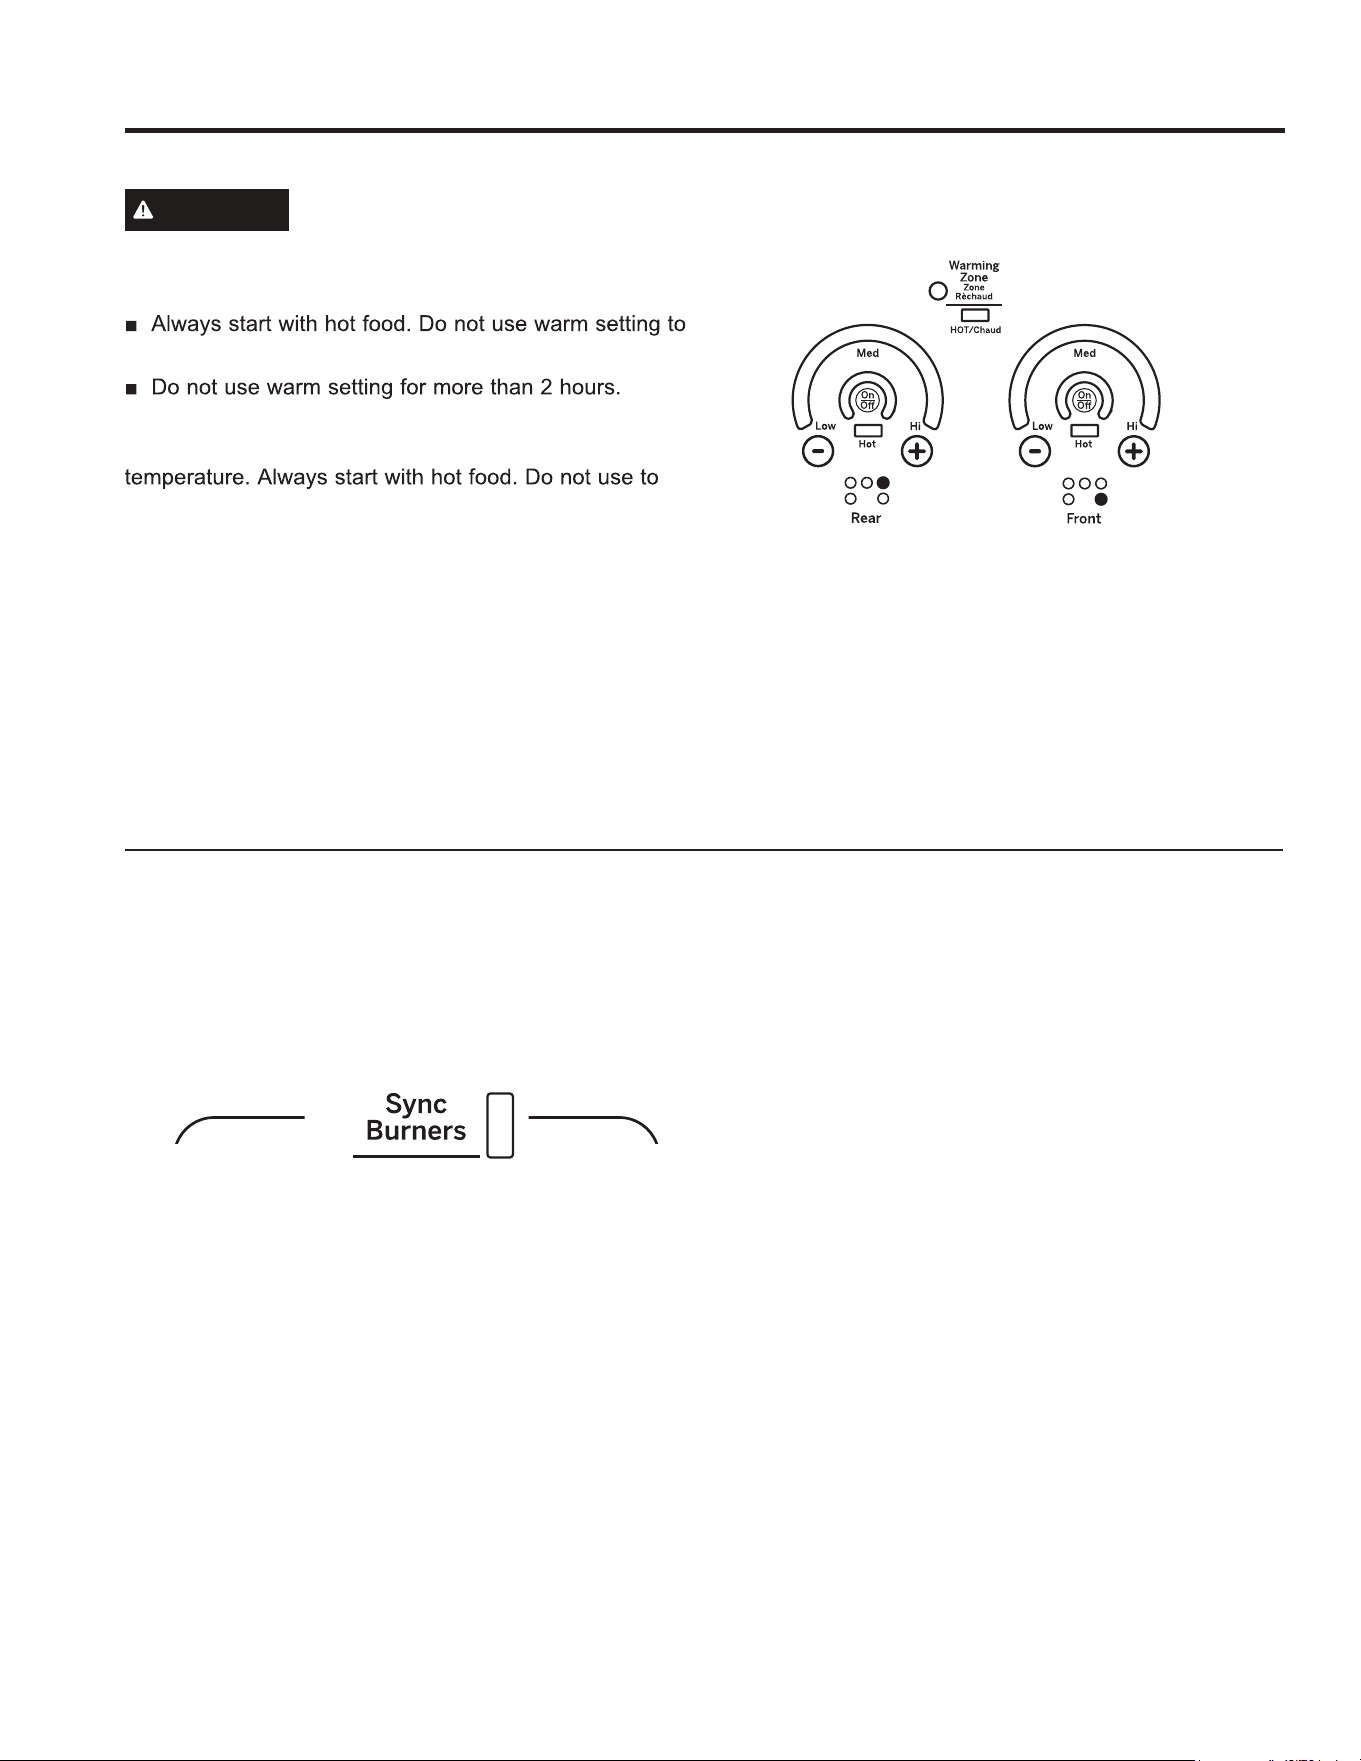
Surface Units - Knob Models
WARNING
WARNING
WARNINGWARNING
FIRE HAZARD: Never leave the range unattended with the cooktop on medium or high serrings.
Keep flammable items away from the cooktop. Turn off all controls when done cooking. Failure to
follow these instructions can result in fire, serious injury or death.
Throughout this manual, features and apperance may vary from your model.
The surface unit has 2 or 3 cooking sizes to select from so you can match the size of the unit to the size of the cookware
you are using.
Models with a Dual-Ring surface
element only.
Models with a Tri-Ring surface
element only.
Melt
setting (on some models) will
melt chocolate or butter.
Using the Warming Zone (on some models)
How to Set
Push the knob in and turn in either direction to the setting
you want.
A surface ON indicator light will glow when any surface
unit is on.
For glass cooktop surfaces:
A HOT COOKTOP indicator light will:
come on when the unit is hot to the touch.
stay on even after the unit is turned off.
stay on until the unit is cooled to approximetaley 150°F.
At both OFF and HI the control clicks
into position. You may hear slight
clicking sounds during cooking,
indicating the control is maintaining
your desired setting.
Be sure you turn the control knob to
OFF when you finish cooking.
Dual and Triple Surface Units and Control Knobs (on some models)
FOOD POISON HAZARD: Bacteria may grow in food
at temperatures below 140°F.
Always start with hot food. Do not use warm setting
to heat cold food.
Do not use warm setting for more than 2 hours.
The WARMING ZONE, located in the back center of
the glass surface, will keep hot, cooked food at serving
temperature. Always start with hot food. Do not use to
heat cold food. Placing uncooked or cold food on the
WARMING ZONE could result in foodborne illness.
Turn the control knob to the ON position.
For models using the touch pads for warming zone
control, see section on “Using the Oven” for additional
details.
For best results, all foods on the WARMING ZONE should
be covered with a lid or aluminum foil. When warming
pastries or breads, the cover should be vented to allow
moisture to escape.
The initial temperature, type and
amount of food, type of pan, and
the time held will
affect the quality
of the food. Always use pot
holders or oven mitts when remo-
ving food from the WARMING
ZONE, since cookware and plates
will be hot.
NOTE: The surface warmer will
not glow red like the cooking
elements.
9
USING THE RANGE:
Surface Units - Knob - Free (models PCS980)
NOTE: All protective packing must be removed from all parts. It cannot be removed if it is baked on.
Models with a Tri-Ring
surface elemnt only.
Radiant Glass Cooktop
The surface unit cycle on and off to maintain your
selected control setting. This is normal.
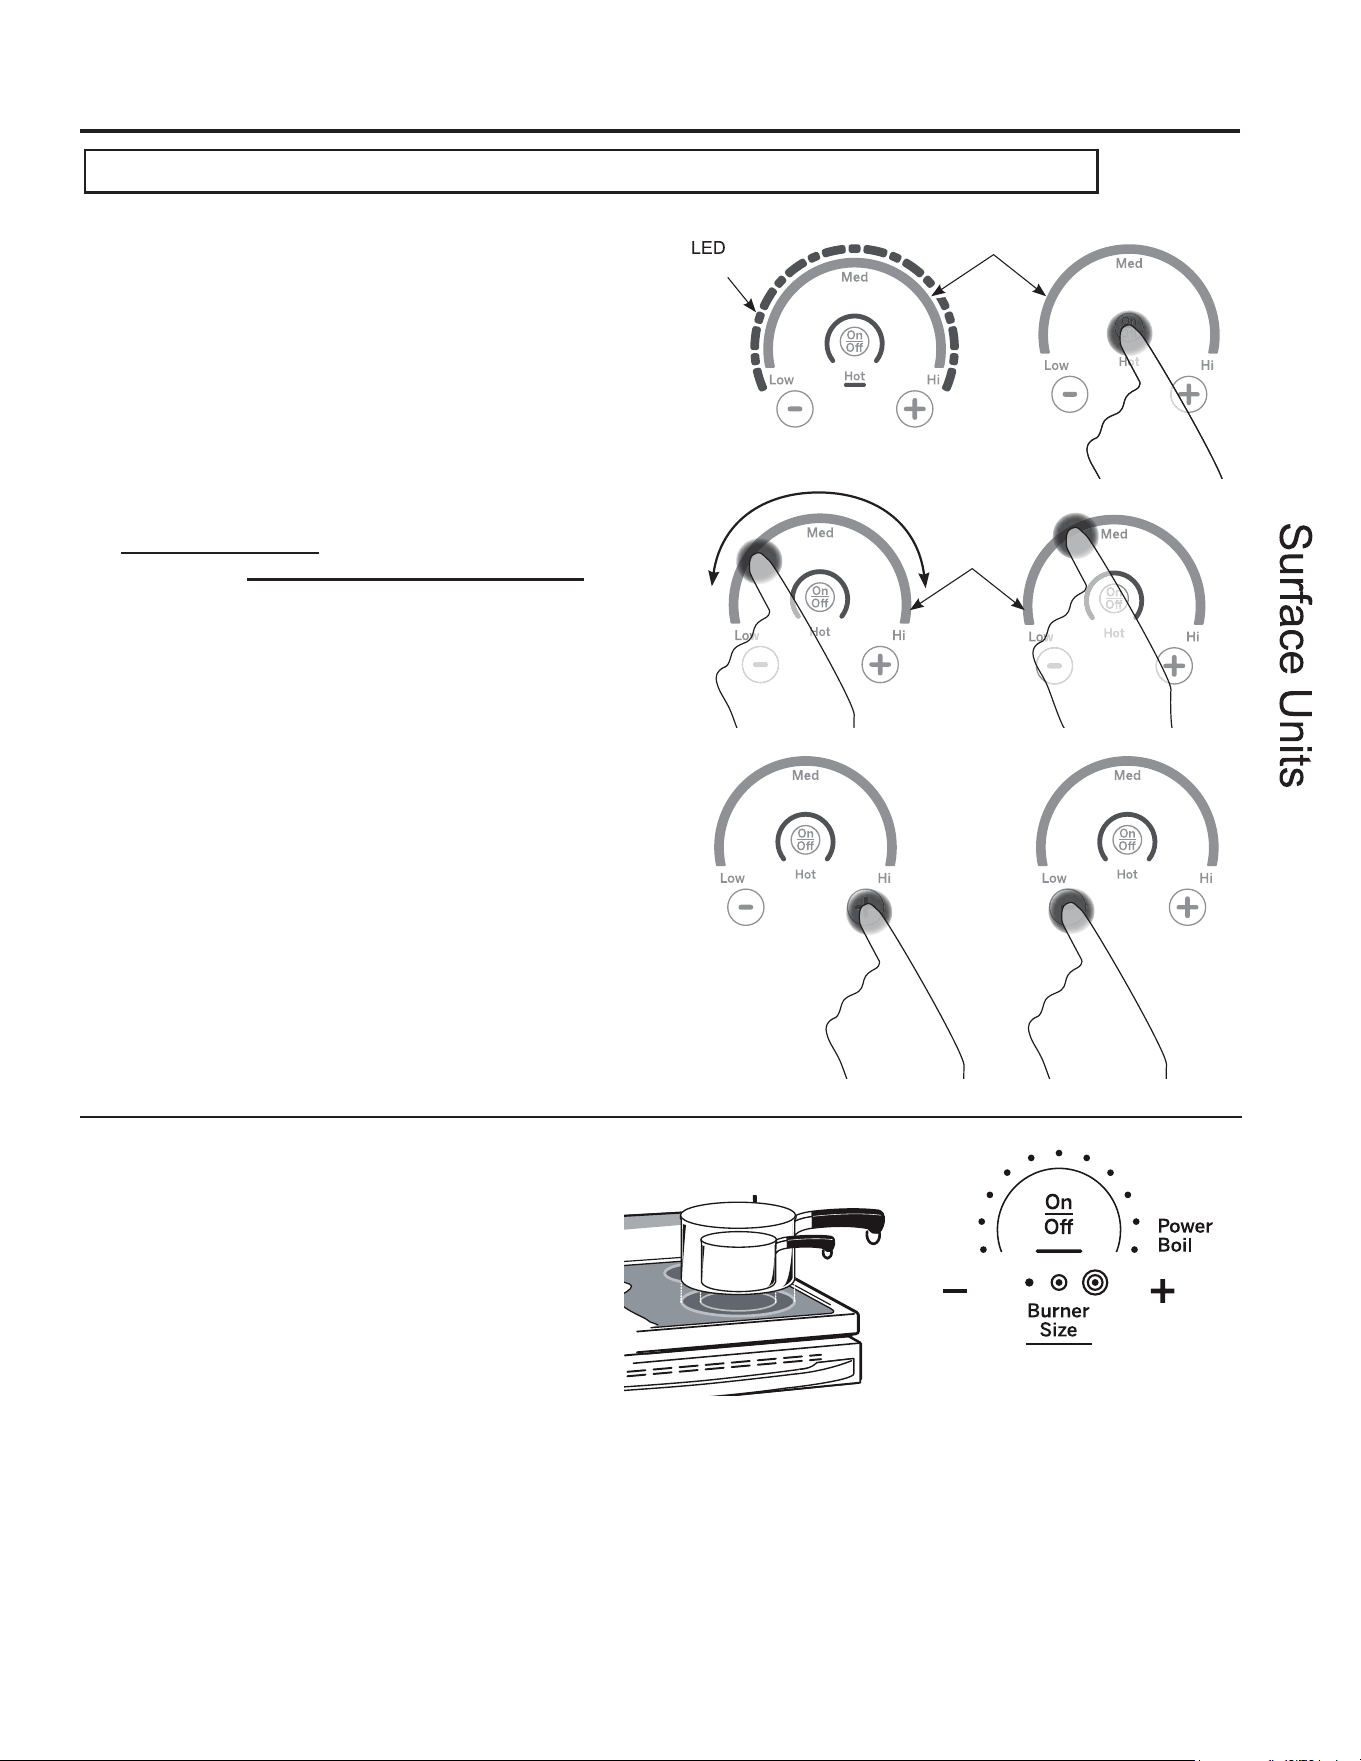
Dual and Triple Surface Units
The surface unit has 2 or 3 cooking sizes to select
from so you can match the size of the unit to the
size of the cookware you are using.
Place your Induction designed cookware on the cooking
surface.
Turn element(s) On: Place your induction designed
cookware on the cooking surface. Touch and hold On/
Off pad about half a second. A chime can be heard with
each touch to any pad.
Power level can be selected in any of the following ways:
1. Swipe the gray arc (on the graphics) to the desired
power level. There is no sensor on the LEDs, or;
2. Touch Anywhere along the gray arc, or;
3. Touch + or - pads to adjust power level, or;
4. Shortcut to Hi: Immediately after turning unit on, touch
the + pad, or;
5. Shortcut to Low: Immediately after turning unit on,
touch the - pad.
Gray Arc
Swipe Area
Lights
Gray Arc Swipe Area
10
USING THE RANGE: Surface Units
Surface Units (models PCS980)
Using the Warming Zone (on some models)
WARNING
FOOD POISON HAZARD: Bacteria may grow in food at
temperatures below 140°F.
heat cold food.
The WARMING ZONE, located in the back center of
the glass surface, will keep hot, cooked food at serving
heat cold food. Placing uncooked or cold food on the
WARMING ZONE could result in foodborne illness.
To turn the WARMING ZONE on, press Warming Zone
ON/OFF, select Lo, Med or Hi with the number pads,
and press Start.
For best results, all foods on the WARMING ZONE
should be covered with a lid or aluminum foil. When
warming pastries or breads, the cover should be vented
to allow moisture to escape.
The initial temperature, type and amount of food, type of
pan, and the time held will affect the quality of the food.
Always use pot holders or oven mitts when removing
food from the WARMING ZONE, since cookware and
plates will be hot.
How To Synchronize Left Elements
To Turn On
Hold the Sync Burners pad for about half a second to
connect the two elements. Operate either element as
described in Operating the Cooktop Elements to adjust
power level.
To Turn Off
1. Touch the On/Off pad on either element to turn off
the Sync Burners.
or
2. Touch the Sync Burners to turn both elements off.
11
USING THE RANGE: Cookware for Induction Cooktop
Home Canning Tips
Be sure the canner is centered over the surface
unit.
Make sure the canner is flat on the bottom.
To prevent burns from steam or heat, use
caution when canning.
Use recipes and procedures from reputable sources.
These are available from manufacturers such as Ball®
and Kerr®.
Flat-bottomed canners are recommended. Use of water
bath canners with rippled bottoms may extend the time
required to bring the water to a boil.
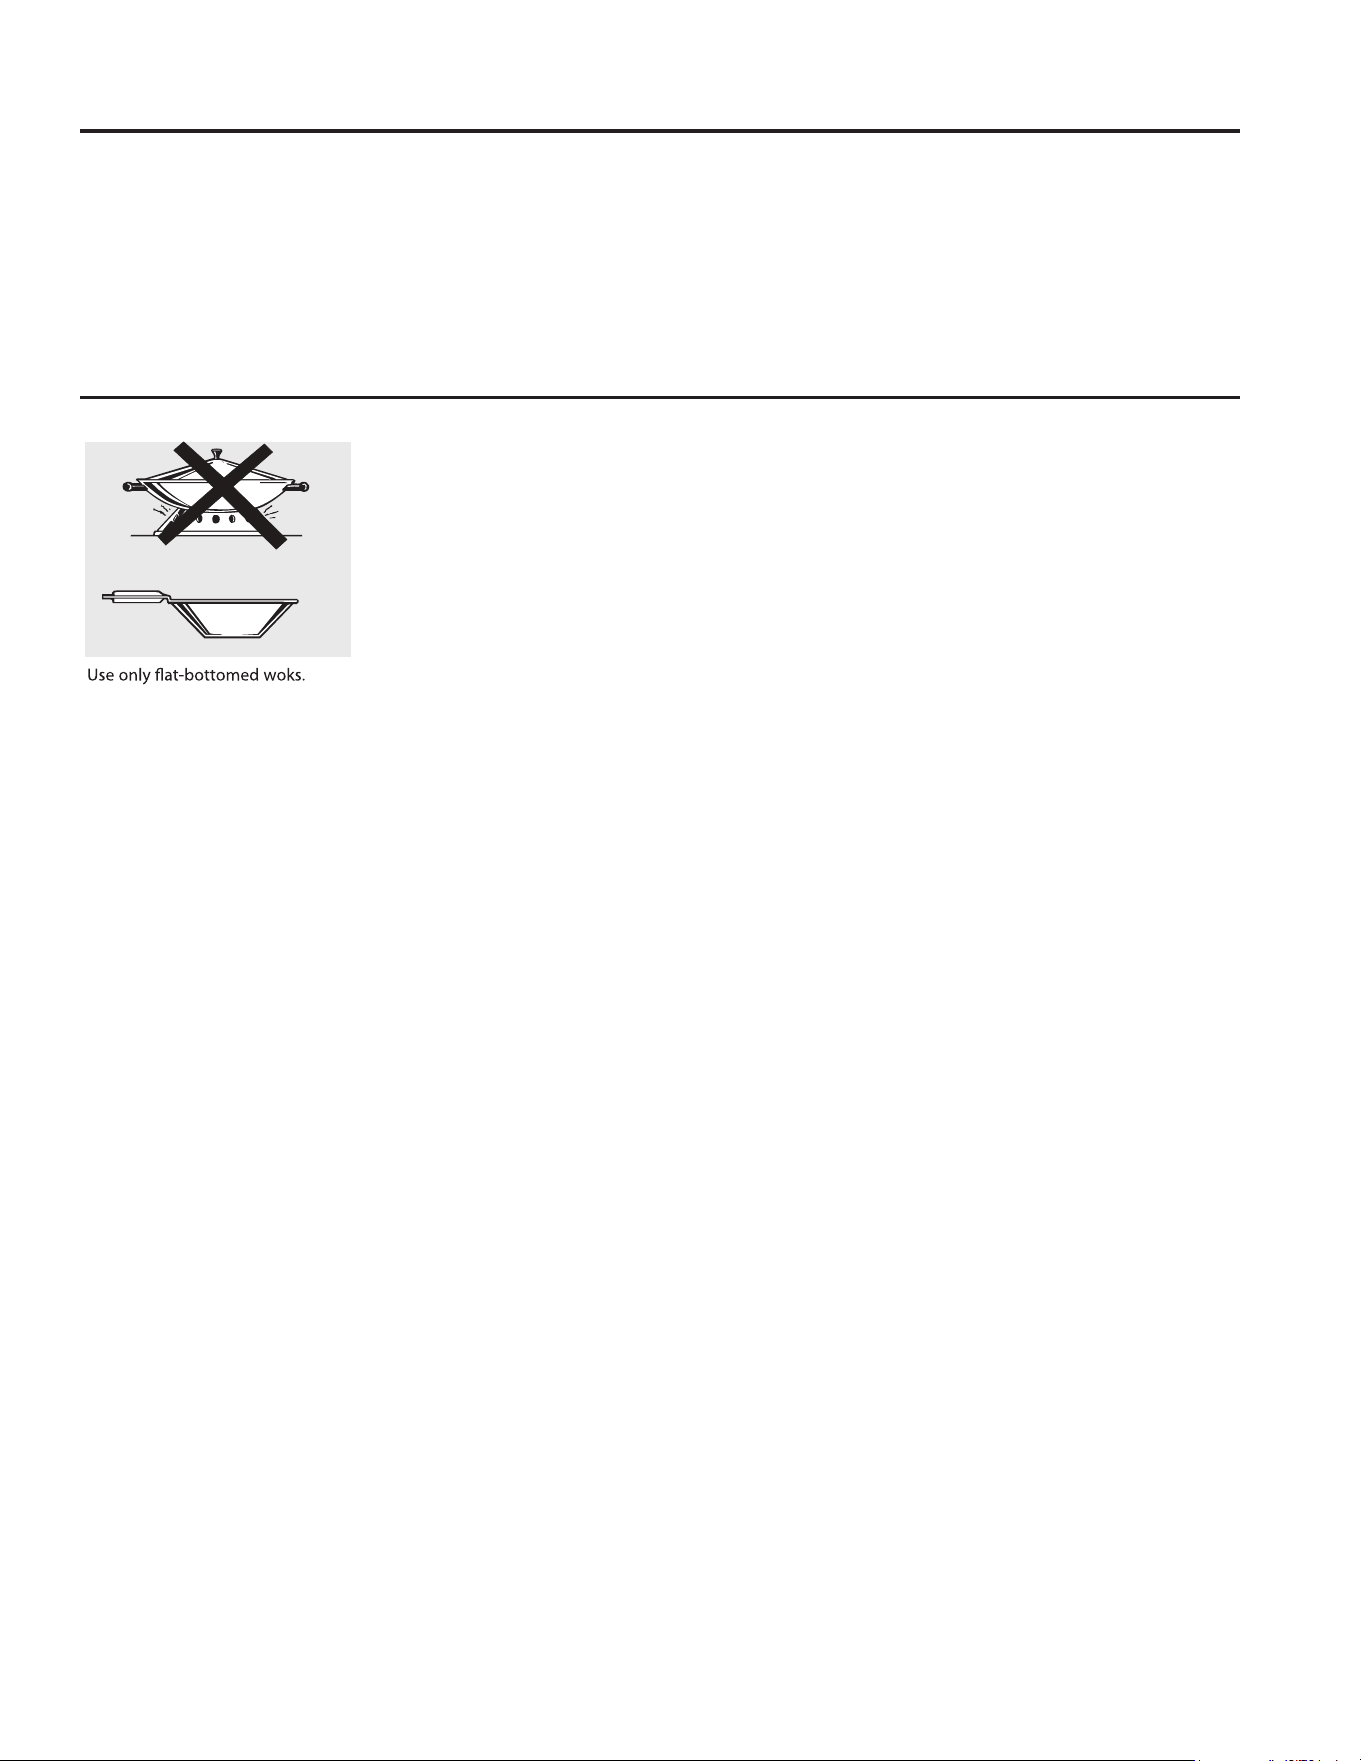
Wok Cooking
We recommend that you use only a
flat-bottomed wok. They are available
at your lopcal retail store.
Do not use woks that have support
rings.
Do not use round-bottom woks. You could
be seriously burned if the wok tipped over.
12
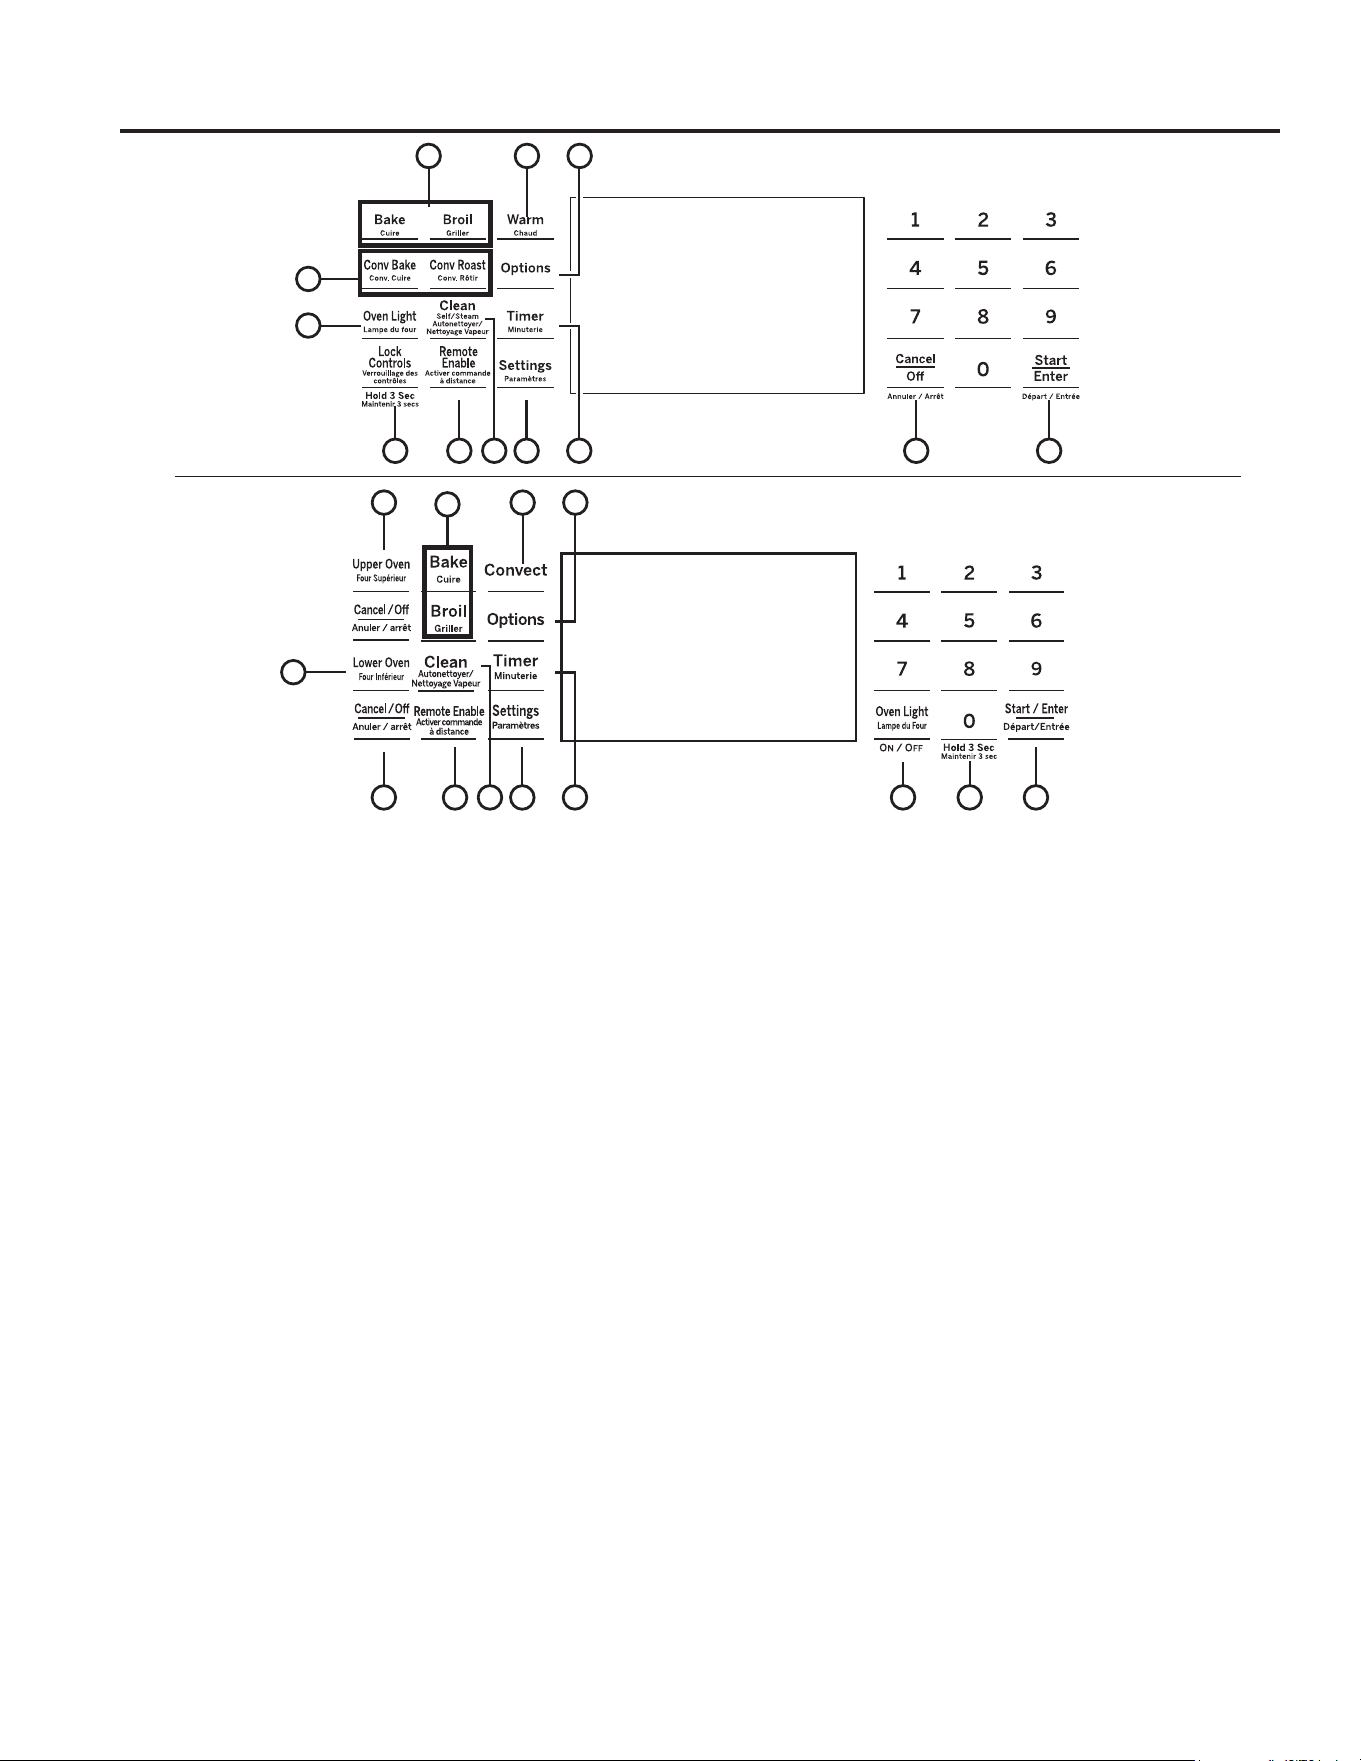
USING THE RANGE: Oven Controls
Oven Controls
1
8
2 3
7 54 6
9
10 11
12
13
2
13
7 54 98
1
6
10
11
12
Models PCS915 - PCS940
Models PCS980
1. Convection Cooking Modes: Convection
cooking mode uses increased air circulation to
improve performance. See the Cooking Modes
section for more information.
2. Traditional Cooking Modes: Your oven has
has the following traditional cooking modes: Bake
and Broil. See the Cooking Modes section for more
information.
3. Warm: Will keep hot, cooked foods at serving
temperature. See the Cooking Modes section for
more information.
4. Clean: Your oven has two cleaning modes: Self
Clean and Steam Clean. See the Cleaning the Oven
section for important information about using these
modes.
5. Start/Enter: Must be pressed to start any
cooking, cleaning, or timed function.
6. Cancel/Off: Cancels ALL oven operations
except the clock, timer and warming drawer.
7. Timer: Works as a countdown timer. Press the
Timer pad and use the number pads to program the
time in hours and minutes. Press the Start/Enter
pad. The oven will continue to operate when the
timer countdown is complete. To turn the timer off,
press the Timer pad.
8. Oven Light: Turns the oven light on or off.
9. Lock Controls: Locks out the control so that
pressing the pads does not activate the controls.
Press the Lock Controls pad, for three seconds
to lock or unlock the control. Cancel/Off is always
active, even when the control is locked.
10. Remote Enable: Allows you to control your
oven remotely. To be able to start the oven remotely,
press the Remote Enable pad and “Remote” will be
lit in the display. The oven can now be remotely
started with a connected device. Opening the oven
door or pressing the Remote Enable pad will remove
“Remote” from the display and prevent you from being
able to turn the oven on remotely. If “Remote” is not
shown in the display, you are still able to change the
oven settings or turn the oven off. AFter using the
oven, remember to verify that the “Remote” icon is
displayed if you wish to start the oven remotely in
the future. For instructions on how to connect your
oven, see the WiFi Connect section of this manual.
11. Settings: See the Settings section for more information.
12.
13. Upper Oven and Lower Oven:
Designates
which oven the controls will operate. Select an oven
before following the steps for starting a cooking or
cleaning mode.
Options: See the Options section for more
information.
13
Settings
USING THE RANGE: Settings
The Options and Settings pads open up more detailed menus in the display that allow access to additional
functions. For each you select the function in the display using the associated number pad. You can exit at
any time by pressing the Options or Settings pad again.
Clock
This setting sets the oven clock time. Press the Settings
pad and select Clock. Select Set Clock and follow the
instructions to set the clock. This feature also specifies
how the time of day will be displayed. You can select
a standard 12-hour clock (12H), 24-hour military time
display (24H), or no clock displayed (Off). Press the
Settings pad, select Set Clock and select either 12/24 hr
or On/Off.
WiFi
Select Settings and WiFi. It is necessary to turn on WiFi
before using Remote Enable on your oven.
Bluetooth
®
- Chef Connect
This is a pairing feature for use with other compatible
Chef Connect enabled products like an over-the-
range microwave oven or range hood. To pair those
products to the range Press the Settings pad and select
Bluetooth
®
. Select Pair and follow the corresponding
instructions included with the mating Chef Connect
enabled product. The range will cancel pairing mode
after two minutes if no mating device is detected. Select
Remove to confirm product is paired or to un-pair from
range. The Precision Cooking Probe can also be paired
using the Bluetooth
®
feature.
Sabbath
See the Sabbath Mode section.
Auto Conversion
When using Convection Bake and Convection Roast
cooking, Auto Recipe Conversion will automatically
convert the regular baking temperatures entered to
convection bake cooking temperatures when turned
on. Note that this option does not convert convection
bake cooking times, it only converts temperatures. This
feature may be turned On or Off. Select Settings, Auto
Conversion is 5th option and shows up on first display of
settings, and Auto Conversion then follow the prompts
to turn this feature on or off.
Auto Off
This feature shuts the oven down after 12 hours of
continuous operation. It may be enabled or disabled.
Select Settings, More, and Auto Off to turn this feature
on or off.
Sound
You can adjust the volume and type of alert your appliance
uses. Select Settings, More, and Sound. Follow prompts
for making volume adjustments or for changing between
continuous and single alert tones. A continuous setting
will continue to sound a tone until a button on the control
is pressed. The oven tone volume can be adjusted. The
control will sound the oven tone at the new volume level
each time the sound level is changed.
F/C (Fahrenheit or Celsius)
The oven control is set to use Fahrenheit temperatures
(F), but you can change it to use Celsius temperatures
(C). Select Settings, More, and F/C to alter between
temperature scales displayed.
Adjust the Oven temperature
This feature allows the oven baking and convection
baking temperature to be adjusted up to 35ºF hotter
your oven temperature is too hot or too cold and wish to
change it. This adjustment affects Bake and Convection
Settings and Oven Adjust to add More Heat or
Less Heat and then press Save.
Oven Info
Select Settings, More, and Oven Info to turn this
feature on or off. This setting displays Model Number and
Select
14
Options
USING THE RANGE: Options
The Options and Settings pads open up more detailed menus in the display that allow access to additional
functions. For each you select the function in the display using the associated number pad. You can exit at
any time by pressing the Options or Settings pad again.
These settings include Warm, Proof, Frozen - Snacks, Frozen Pizza, and Baked Goods. See the cooking
modes section for more information.
You must first select a mode (bake, convection bake, convection roast) and then select Options to get to the
following functions.
Cook Time (Some models)
Counts down cooking time and turns o
Warm (Some models)
Will keep hot, cooked foods at serving temperature. See
the Cooking Modes section for more information.
ff the oven when
the cooking time is complete. Select a desired cooking
temperature. Press the Options pad and select Cook
Time
and minutes. Then press Start/Enter.
Delay Time (Some models)
time when you want the oven to start. Select a desired
temperature. Press the Options pad and select Delay
Time
for the oven to turn on, and then press Start/Enter
Time is not available with all modes.
NOTE:
spoil easily – such as milk, eggs, fish, stuffing, poultry,
and port – should not be allowed to sit for more than
1 hour before or after cooking. Room temperature
promotes the growth of harmful bacteria. Be sure that the
oven light is off because heat from the bulb will speed
harmful bacteria growth.
Oven Probe (Some models)
Monitors internal food temperature and turns the oven
off when the food reaches the programmed temperature.
Insert the probe, press the desired cooking mode, and
program the probe temperature. See the Cooking Modes
Section for more information. The probe can only be used
with Bake, Convection Bake, and Convection Roast.
Proof (not available).
Frozen (not available).
Baked Goods (not available).
15
by the consumer include the disabling of tones, disabling of oven lights, and delays of about 30 seconds to one
minute on display changes. Only continuous baking or timed baking is allowed in the Sabbath mode. Cooking in the
Sabbath mode is a two-step process, first the Sabbath mode must be set and then the bake mode must be set.
Setting the Sabbath Mode
Press the Settings pad, select Sabbath, and select
Turn on. A single bracket “]” will appear in the display
indicating that the Sabbath mode is set. The clock will not
be displayed. Continuous bake or timed bake can now be
programmed.
Starting a Continuous Bake
1. Press the Bake pad.
2. If the desired temperature is 350F, press Start/
Enter. If a different cooking temperature is desired,
use the 1 through 5 number pads to select a preset
cooking temperature, then press Start/Enter. Refer
to the graphic below to determine which pad sets the
desired cooking temperature.
After a delay, a second bracket “] [“ will
appear in the
display indicating that the oven is baking.
Adjusting the Temperature
1. Press Bake, use the 1 through 5 number pads to
select a different preset cooking temperature, and
press Start/Enter.
2. Since no feedback is given during temperature
change, an oven thermometer can be used to confirm
temperature changes.
Starting a Timed Bake
1. Press the Bake pad.
2. If the desired temperature is 350F, use the 6 through
0 number pads to select a cooking time. If a cooking
temperature other than 350F is desired, use the 1
through 5 number pads to select a preset cooking
temperature, then select the cooking time. Refer to
the graphic on this page to determine which pad sets
the desired cooking temperature and cooking time.
3. Press .
After a delay, a second bracket “] [“ will appear in the
display indicating that the oven is baking. When the cook
time expires, the display will change back to a single
bracket “]” indicating that the oven is no longer baking.
No tone will sound when the cook time is complete.
Exit the Sabbath Mode
Exiting the Sabbath mode should be done after the
Sabbath is over.
1. Press Cancel/Off to end any bake mode that may be
running.
2. Press and hold Settings pad until Sabbath Mode off
is
displayed.
Sabbath Mode Power Outage Note
If a power outage occurs while the oven is in Sabbath
Mode, the unit will return to Sabbath Mode when power
is restored, however the oven will return to the off state
even if it was in the middle of a bake cycle when the
power outage occurred.
USING THE RANGE: Sabbath Mode
Temperature (°F)
Time (hours)
200
325
2.5h
250
400
3h
4h
300
2h
3.5h
1 = 200°F, 2 = 250°F, 3 = 300°F, 4 = 325°F, 5 = 400°F
6 = 2 hours, 7 = 2.5 hours, 8 = 3 hours, 9 = 3.5 hours, 0 = 4 hours
Sabbath Mode
Start/Enter
After a delay, a se
display indicatin
time expires,
bracket “]”
No tone
16
The number of rack positions may vary by model.
Rail
Fully Open Position
Grasp here
USING THE RANGE: Oven Racks
Oven Racks
Recommended rack positions for various types of
foods are provided in the Cooking Guide. Adjusting
rack position is one way to impact cooking results. For
example, if you would prefer darker tops on cakes,
muffins, or cookies, try moving food one rack position
higher. If you find foods are too brown on top try moving
them down next time.
When baking with multiple pans and on multiple racks,
ensure there is at least 1½" between pans to allow
sufficient space for air to flow.
flat racks.
To avoid possible burns, place the racks in the desired
position before you turn the oven on.
Extension Racks (Some models).
Always pull the rack out by its upper front rail to its fully
open position, when placing or removing cookware.
If extension racks are difficult to extend, lubricate the
racks with the graphite lubricant provided with your
oven. Remove the rack from the oven, remove debris in
the side tracks with a paper towel, shake the graphite
lubricant and place 4 small drops on the two bottom
tracks of the left and right sides. Open and close the
rack several times to distribute the lubricant.
To order additional graphite lubricant, see the
Accessories and Consumer Support sections at the end
of this manual.
To Remove An Extension Rack:
1. Make sure the rack is pushed all the way into the
oven so that side paddles on the rack disengage from
the oven support.
2. Slide the rack toward you to the bump (stop position)
on the rack support.
3. Firmly grasp both sides of the rack frame and the
sliding rack, tilt the front end up and pull it out.
To Replace An Extension Rack:
1. Firmly grasp both sides of the rack frame and the
sliding rack.
2. Place the curved end of the rack (stop-locks) onto the
oven supports, tilt up the front of the rack and push it
in as far as it will go.
If extension racks are difficult to replace or remove, wipe
on the rack slides.
To Lubricate the Paddle:
Shake lubricant and apply to the moving parts of the
paddle mechanisms as shown.
17
USING THE RANGE: Aluminum Foil and Oven Liners
Cookware
Cookware Guidelines
The material, finish, and size of cookware affect baking
performance.
than light, shiny pans. Pans that absorb heat more
readily can result in a browner, crisper, and thicker crust.
If using dark and coated cookware check food earlier
than minimum cook time. If undesirable results are
obtained with this type of cookware consider reducing
oven temperature by 25°F next time.
Shiny pans can produce more evenly cooked baked
goods such as cakes and cookies.
Glass and ceramic pans heat slowly but retain heat well.
These types of pans work well for dishes such as pies
and custards.
Air insulated pans heat slowly and can reduce bottom
browning.
CAUTION
Do not use any type of foil or oven liner to cover the oven bottom. These items can trap heat
or melt, resulting in damage to the product and risk of shock, smoke or fire. Damage from improper use of
these items is not covered by the product warranty.
Aluminum Foil and Oven Liners
Foil may be used to catch spills by placing a sheet on a lower rack, several inches below the food. Do not use more
foil than necessary and never antirely cover an oven rack with aluminum foil. Keep foil at least 1-1/2” from oven walls
to prevent poor heat circulation.

18
USING THE RANGE: Cooking Modes
Your oven has a variety of cooking modes to help you get the best results. These modes are described below. See
the Cooking Guide for rack position and other recommendations for specific modes and foods.
Bake
The bake mode is for baking and roasting. When
preparing baked goods such as cakes, cookies and
pastries, always preheat the oven first. To use this
mode press the Bake pad, enter a temperature with the
number pads, and then press Start/Enter.
Broil
placing food close to the broil element or burner
increases smoking, spattering and the possibility of fats
igniting. It is not necessary to preheat when using the
Broil modes.
The Broil High mode uses intense heat from the upper
a seared surface and rare interior. To use this mode
press the Broil pad once and then press Start/Enter.
The Broil Low mode uses less intense heat from the
upper element or burner to cook food thoroughly while
way through. To use this mode press the Broil
and then press Start/Enter.
Convection Bake Multi Rack (Some models)
The Convection Bake mode is intended for baking
on multiple racks at the same time. This mode uses
air movement from the convection fan to enhance
cooking evenness. Your oven is equipped with Auto
Recipe Conversion, so it is not necessary to adjust the
temperature when using this mode. Always preheat
when using this mode. Baking times may be slightly
longer for multiple racks than what would be expected
for a single rack. To use this mode press the Conv Bake
pad, enter a temperature with number pads, and then
press Start/Enter.
Convection Roast
The Convection Roast mode is intended for roasting
whole cuts of meat on a single rack. This mode uses air
movement from the convection fan to improve browning
and reduce cooking time. Check food earlier than the
recipe suggested time when using this mode, or use the
probe (see the Probe section for more information). It is
not necessary to preheat when using this mode. To use
this mode press the Conv Roast pad, enter a temperature
with the number pads, and then press Start/Enter.
Baked Goods
The Baked Goods mode is designed for cooking cakes,
breads, cookies, and similar foods on a single rack. This
mode is designed to provide lighter top browning and
better volume. Some foods may require longer cook times
relative to when cooked in the traditional bake mode.
Frozen Snacks
The Frozen Snacks modes are designed to cook frozen
foods such as potato nuggets, French fries, and similar
frozen snacks and appetizers. Most food will cook within
package recommended times. Adjust cooking time
according to individual preferences.
on a single rack. This mode does not require preheating
the oven. Food should be placed in the oven before or
immediately upon starting the mode.
on two racks simultaneously. This mode includes a
preheating cycle to prepare the oven for multi-rack baking.
Frozen Pizza
The Frozen Pizza modes are designed to cook
frozen pizzas. Most pizzas will cook within package
recommended times. Adjust cooking time according to
individual preferences.
This mode does not require preheating the oven. Food
should be placed in the oven before or immediately upon
starting the mode.
simultaneously. This mode includes a preheating cycle to
prepare the oven for multi-rack baking.
Warm
Warm modes are designed to keep hot, cooked foods hot.
Cover foods that should remain moist and do not cover
not use Warm to heat cold food. It is recommended that
food not be kept warm for more than 2 hours.
Some models may also have warming drawers. Three
settings are available - use High for items such as
stews, meats, and potatoes; use Medium for items such
as casseroles and pizzas; use Low for items such as
breads, waffles, and also for warming oven-safe dishes.
Proof
Proof mode maintains a warm environment for rising
yeast leavened dough. If the oven is too warm, Proof
mode will not operate and the display will show “Oven
too hot for Proof”. For best results cover the dough while
proofing and check early to avoid over-proofing.
Cooking Modes
19
Proper Probe Placement
After preparing the meat and placing it on the cooking
pan follow these instructions for proper probe placement.
probe will rest in the center of the thickest part of
the food. For best performance the probe should
be fully inserted into the food. If the probe is not
located properly, it may not accurately measure the
temperature of the coolest portion of the food. Some
foods, particularly small items, are not well suited for
cooking with the probe due to their shape or size.
part of the breast.
of the roast.
center of the lowest large muscle or joint.
probe into the center of the dish.
the meatiest area, parallel to the backbone.
Probe Usage
To use the probe with preheating:
1. Set the desired cook mode (Bake, Convection Bake,
or Convection Roast).
2. Insert the probe into the food (see Proper Probe
Placement).
3. Once the oven is preheated, place the food in the
oven and connect the probe to the probe outlet,
walls and probe outlet are hot.
4. Program the probe temperature by pressing the
Options pad, selecting the probe option, and entering
the desired food temperature. The maximum internal
food temperature that you can set is 200°F.
To use the probe without preheating:
1. Insert the probe into the food (see Proper Probe
Placement).
2. Place the food in the oven and connect the probe into
the probe outlet in the oven.
3. Set the desired cook mode (Bake, Convection Bake,
or Convection Roast).
4. Program the probe temperature by pressing the
Options pad and selecting the Probe option and
entering the desired food temperature. The maximum
internal food temperature that you can set is
200°F
.
Probe Care Guidelines
product may result in damage to the probe outlet.
and removing them from the meat and outlet
pull on the cable when removing it.
completely defrosted before inserting the probe.
from the outlet until the oven has cooled.
steam clean cycle.
Probe
USING THE RANGE: Probe
WARNING
Consuming undercooked food can result in foodborne illness. Use probe according to
the following instructions to ensure all portions of the food reach minimum safe cooking temperatures.
Recommendations for minimum safe food temperatures can be found at
www.foodsafety.gov or www.IsItDoneYet.gov.
Internal food temperature is frequently used as an indicator of doneness, especially for roasts and
poultry. The Probe mode monitors the internal food temperature and turns the oven off when the internal
food temperature reaches the programmed temperature.
Always check the temperature at multiple locations in the food with a food thermometer after cooking to
ensure that all portions of the food have reached the minimum safe internal temperature for that food.
20
USING THE RANGE: Cooking Guide
Cooking Guide
FOOD TYPE
RECOMMENDED
MODE(S)
RECOMMENDED
RACK POSITION(S) ADDITIONAL SUGGESTIONS
Baked Goods
Layer cakes, sheet cakes,
bundt cakes, muffins, quick
breads on a Single Rack
4ekaB
Layer cakes* on Multiple
Racks
5 dna 3ekaB
Ensure adequate airflow
(see illustration below).
Chif 1ekaB)doof legna( sekac nof
Cookies, biscuits, scones on
a Single Rack
4ekaB
Cookies, biscuits, scones on
Multiple Racks
Bake
Convection Bake
3 and 5
2, 4, and 6 (3 rack
recommended only for
Convection Bake)
Ensure adequate airflow.
Beef & Pork
6iH liorBsregrubmaH
For best performance center food below the broil heating element.
6iH liorBspohC & skaetS
For best performance center food below the broil heating element.
4 ro 3ekaBstsaoR
Poultry
4 ro 3ekaBnekcihc elohW
Bone-in chicken breasts,
legs, thighs
.tsrif nwod edis niks liorB .sedom iH liorB diova ecuas ni detaoc ro dedaerb fI2iH liorB
lower oven. For best performance when broiling, center food below the broil
heating element.
Broil Lo
Bake
2 or 3
Boneless chicken breasts
Broil Lo
Bake
broiling. For best performance when broiling, center food below the broil
heating element.
2ro1ekaByekrut elohW
3or2ekaBtsaerB yekruT
Fish Broil Lo
broiling. For best performance center food below the broil heating element.
Casseroles 4 ro 3ekaB
Frozen Convenience Foods
Pizza, french fries, tator tots,
chicken nuggets, appetizers
on a Single Rack
4 ro 3ekaB
Pizza, french fries, tator tots,
chicken nuggets, appetizers
on Multiple Racks
Bake
Convection Bake
3 and 5
*When baking four cake layers at a time, use racks 3
and 5. Place the pans as shown so that one pan is not
directly above another.
Cook food thoroughly to help protect against food
borne illness. Minimum safe food temperature
recommendations for food safety can be found at
www.IsItDoneYet.gov. Make sure to use a food
thermometer to take food temperatures.
Rack position for baking 4 layer cakes.
b
2 or 3

21
USING THE RANGE: WiFi Connect and Remote Enable
* Compatible Apple or Android devices and home WiFi network required.
Connecting your WiFi Connect Enabled oven
Your GE Appliances oven is designed to provide you with two-way communication between your appliance and
smart devices. By using the WiFi Connect features, you will be able to control essential oven operations such as
temperature settings, timers and cooking modes using your smartphone or tablet.*
What you will need
Your GE Appliances oven uses your existing home WiFi
network to communicate between the appliance and your
smart device. In order to setup your GE Appliances oven,
you will need to gather some information:
1. Each GE Appliances oven has a connected appliance
information label that includes an Appliance Network
Name and Password. These are the two important
details that you will need to connect to the appliance.
The label is typically located inside the door of the
oven or drawer.
2. Have your smart phone or tablet ready with the ability
to access the internet and download apps.
3. You will need to know the password of your home
WiFi router. Have this password ready while you are
setting up your GE Appliances oven.
Connect your GE Appliances oven
1. On your smart phone or tablet visit
connected appliance features and to download the
appropriate app.
2. Follow the app onscreen instructions to connect your
GE Appliances oven.
3. Once the process is complete, the connection light
located on your GE Appliances oven display will stay
on solid and the app will confirm you are connected.
4. If the connection light does not turn on or is blinking,
follow the instructions on the app to reconnect. If
issues continue, please call the Connected Call
Center 1.866.626.2000 and ask for assistance
regarding oven wireless connectivity.
To connect additional smart devices, repeat steps 1 and 2.
Note that any changes or modifications to the remote
enable device installed on this oven that are not
expressly approved by the manufacturer could void the
user’s authority to operate the equipment.
FCC: ZKJ-WCATA001
Network: GE_XXXXXX_XXXX
Password: XXXXXXXX
PT. NO. 229C6272G001-0
IC: 10229A-WCATA001
MAC ID: XX - XX - XX - XX - XX - XX
Connected Appliance Information
Sample Label
WiFi Connect and Remote Enable (Some models)
22
Cleaning the Range – Exterior
CARE AND CLEANING: Cleaning the Range – Exterior
WARNING
If your range is removed for cleaning, servicing or any reason, be sure the
anti-tip device is reengaged properly when the range is replaced. Failure to
take this precaution could result in tipping of the range and can result in death
or serious burns to children or adults.
Be sure all controls are off and all surfaces are cool before cleaning any part of the range.
Control Lockout
If desired, the touch pads may be deactivated before
cleaning.
See Lock Controls in the Oven Controls section in this
manual.
Clean up splatters with a damp cloth.
You may also use a glass cleaner.
abrasives of any kind.
Reactivate the touch pads after cleaning.
Control Panel
It’s a good idea to wipe the control panel after each use.
Clean with mild soap and water or vinegar and water,
rinse with clean water and polish dry with a soft cloth.
plastic scouring pads or oven cleaners on the control
Stainless Steel.
Oven Exterior
liquid cleansers, steel wool, plastic scouring pads, or
cleaning powders on the interior or exterior of the oven.
Clean with a mild soap and water or vinegar and water
solution. Rinse with clean water and dry with a soft cloth.
When cleaning surfaces, make sure that they are at
room temperature and not in direct sunlight.
If stain on the door vent trim is persistent, use a mild
abrasive cleaner and a sponge-scrubber for best results.
Spillage of marinades, fruit juices, tomato sauces and
basting liquids containing acids may cause discoloration
and should be wiped up immediately. Let hot surfaces
Painted Surfaces
Painted surfaces include the sides of the range and the
door, top of control panel and the drawer front. Clean
these with soap and water or a vinegar and water solution.
powders, steel wool or harsh abrasives on any painted
surface, including Black Stainless Steel.
Stainless Steel excluding Black Stainless Steel (on some models)
To clean the stainless steel surface, use warm sudsy
water or a stainless steel cleaner or polish. Always wipe
the surface in the direction of the grain. Follow the cleaner
instructions for cleaning the stainless steel surface.
To inquire about purchasing cleaning products
including stainless steel appliance cleaner or polish,
see the Accessories and Consumer Support sections
at the end of this manual.
23
The interior of your new oven can be cleaned manually or by using Steam Clean or Self Clean modes.
Spillage of marinades, fruit juices, tomato sauces and basting liquids containing acids may cause discoloration and
should be wiped up immediately. Let hot surfaces cool, then clean and rinse.
Manual Cleaning
liquid cleansers, steel wool, scouring pads, or cleaning
powders on the interior of the oven. Clean with a mild
soap and water or vinegar and water solution. Rinse with
clean water and dry with a soft cloth. When cleaning
surfaces, make sure that they are at room temperature.
CARE AND CLEANING: Cleaning the Range – Interior
Cleaning the Range – Interior
Steam Clean Mode
Steam clean is intended to clean small spills using water
and a lower cleaning temperature than Self-Clean.
To use the Steam Clean feature, wipe grease and soils
from the oven. Pour one cup of water into the bottom
of the oven. Close the door. Press the Clean pad twice
to select Steam and then press Start/Enter. The oven
door will lock. You can not open the door during the
30 minute steam clean as this will decrease the steam
clean performance. At the end of the steam clean cycle
the door will unlock. Wipe out any excess water and
any remaining soil.
Self Clean Mode
Read Self-Cleaning Oven Safety Instructions at the
beginning of this manual before using Self Clean Mode.
Self clean uses very high temperatures to clean the oven
interior. The oven door will lock when using this feature.
Before operating the self-clean cycle, wipe up grease and
soils from the oven. Remove all items from the oven other
than enameled (dark color) racks. Shiny or silver racks
and any cookware or other items should all be removed
from the oven before initiating a self-clean cycle. Close
the door. Press the Self Clean pad and a default self-
clean time is displayed. The clean time can be changed
to any time between 3:00 and 5:00 hours by using the
number pads to enter a different time and pressing
Enter. For heavily soiled ovens, the maximum 5 hour
clean time is recommended. If you wish to use the default
time, press the Start/Enter pad. The oven will turn off
automatically when the self-clean cycle is complete. The
door will stay locked until the oven has cooled down. After
the oven has cooled down wipe any ash out of the oven.
We recommend venting your kitchen with an open
window or using a ventilation fan or hood during the first
self-clean cycle.
Soil on the front frame of the range and outside the
gasket on the door will need to be cleaned by hand.
Clean these areas with hot water, soap-filled steel-wool
pads or cleansers such as Soft Scrub
®
. Rinse well with
clean water and dry.
the oven door gasket cannot withstand abrasion. It is
essential for the gasket to remain intact. If you notice it
becoming worn or frayed, replace it.
Make sure the oven light bulb cover is in place and the
oven light is off.
IMPORTANT: The health of some birds is extremely
sensitive to the fumes given off during the self-cleaning
cycle of any range. Move birds to another well-
ventilated room.
The surface units are automatically disabled during the
self-clean cycle. Wait until the self-clean cycle is finished
to set and use the surface units.
To stop a self clean cycle press the Cancel/Off pad.
The door will unlatch once the oven has cooled below
the locking temperature. You will not be able to open the
door right away unless the oven has cooled below the
locking temperature.
Racks
All racks can be washed with warm, soapy water.
Enameled (not shiny) racks can be left in the cavity
during self clean.
Racks may be more difficult to slide, especially after
a self-clean. Put some vegetable oil on a soft cloth or
paper towel and rub onto the left and right edges.
Oven Heating Elements
soil will burn off when the elements are heated.
The bake element is not exposed and is under the oven
floor. Clean the oven floor with warm, soapy water.
Wipe up heavy soil on the oven bottom.
24
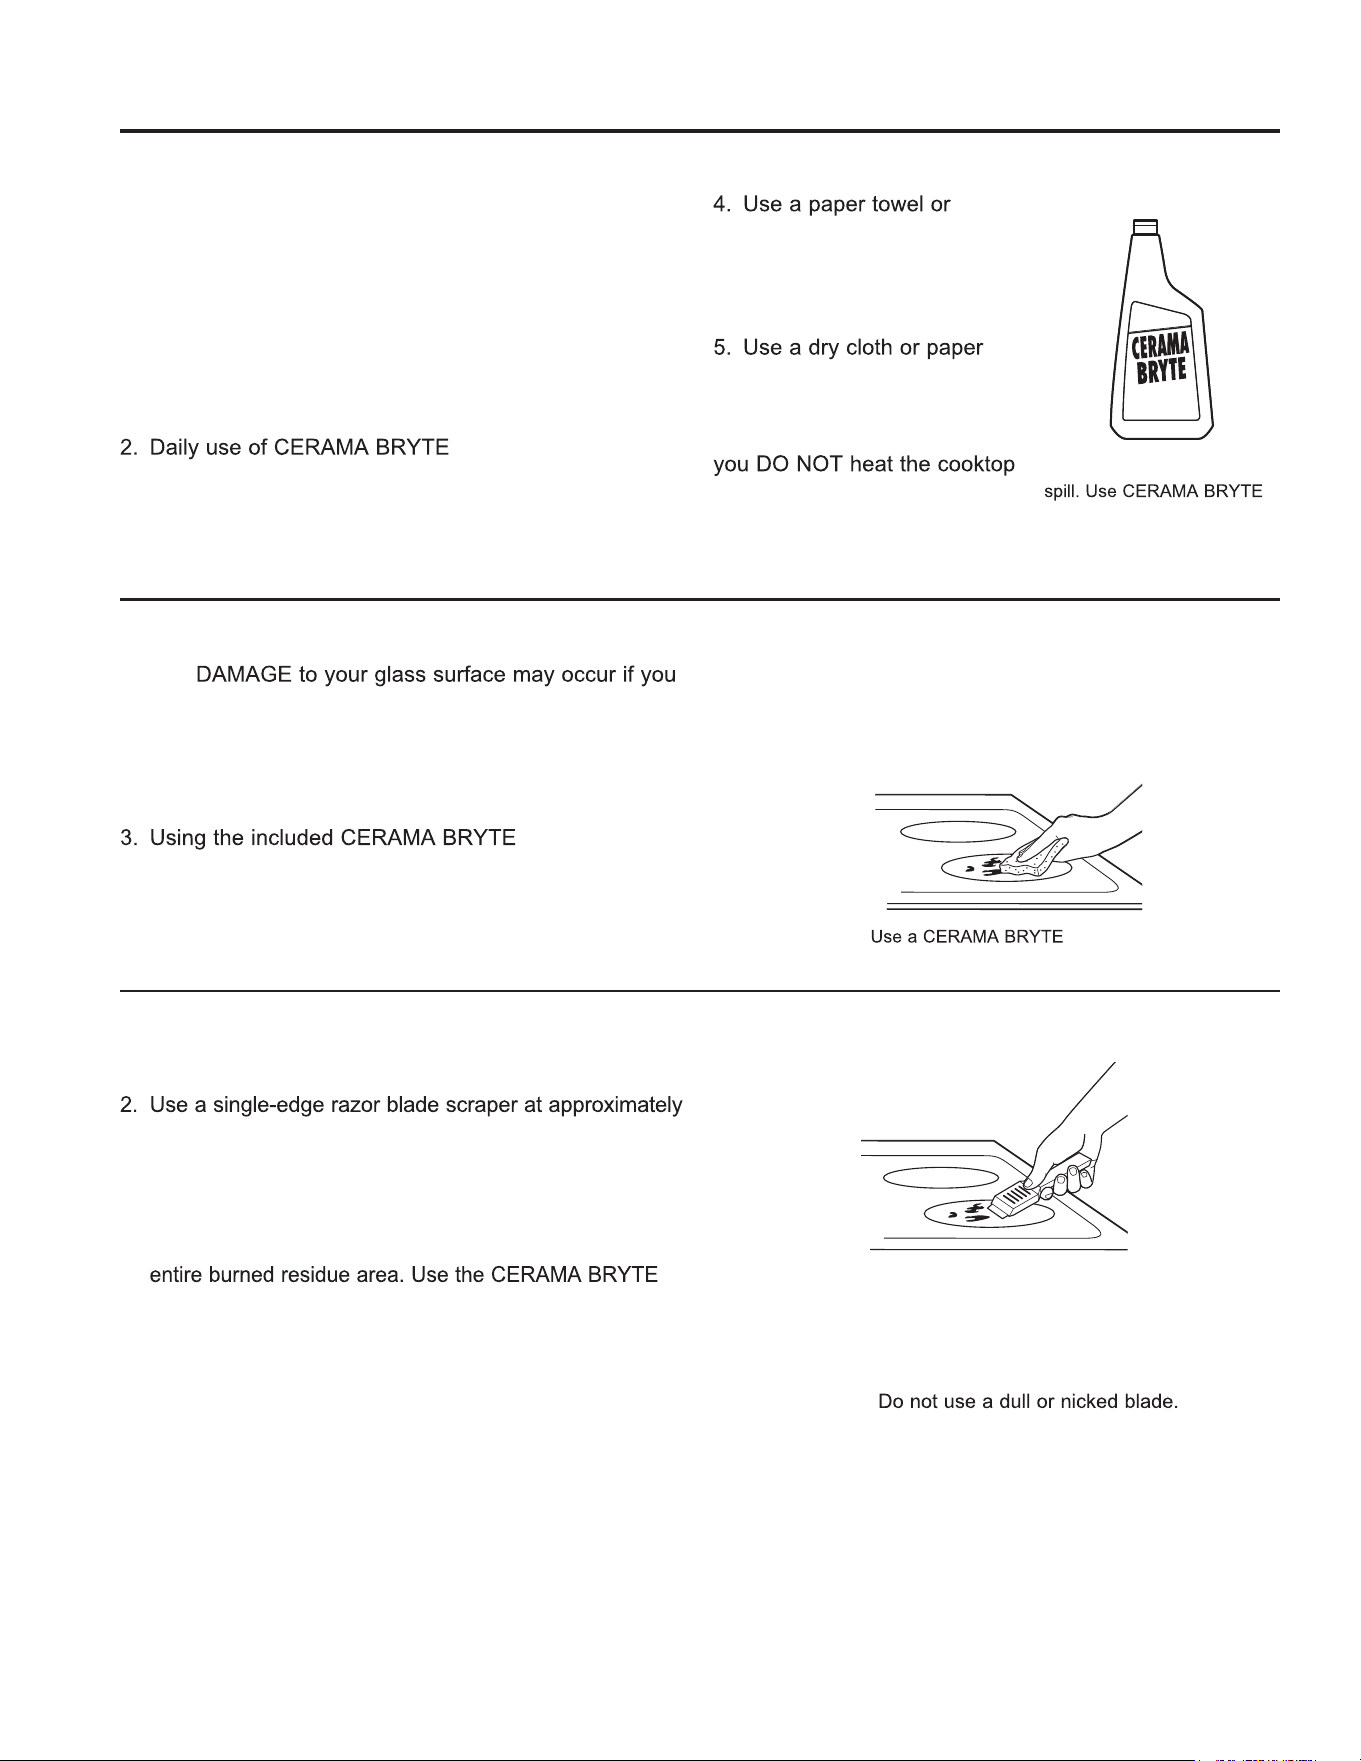
Normal Daily Use Cleaning
ONLY use CERAMA BRYTE
®
Ceramic Cooktop
Cleaner on the glass cooktop. Other creams may not
be as effective.
To maintain and protect the surface of your glass cooktop,
follow these steps:
1. Before using the cooktop for the first time, clean it
with CERAMA BRYTE
®
Ceramic Cooktop Cleaner.
This helps protect the top and makes cleanup easier.
®
Ceramic Cooktop
Cleaner will help keep the cooktop looking new.
3. Shake the cleaning cream well. Apply a few drops of
CERAMA BRYTE
®
Ceramic Cooktop Cleaner directly
to the cooktop.
CERAMA BRYTE
®
Cleaning
Pad for Ceramic Cooktops
to clean the entire cooktop
surface.
towel to remove all cleaning
residue. No need to rinse.
NOTE: It is very important that
until it has been cleaned
thoroughly.
Burned-On Residue
NOTE:
use scrub pads other than those recommended.
1. Allow the cooktop to cool.
2. Spread a few drops of CERAMA BRYTE
®
Ceramic
Cooktop Cleaner on the entire burned residue area.
®
Cleaning Pad
for Ceramic Cooktops, rub the residue area, applying
pressure as needed.
4. If any residue remains, repeat the steps listed above
as needed.
5. For additional protection, after all residue has been
removed, polish the entire surface with CERAMA
Ceramic Cooktop Cleaner and a paper towel.
Heavy, Burned-On Residue
1. Allow the cooktop to cool.
a 45° angle against the glass surface and scrape the
soil. It will be necessary to apply pressure to the razor
scraper in order to remove the residue.
3. After scraping with the razor scraper, spread a few drops
of CERAMA BRYTE
®
Ceramic Cooktop Cleaner on the
®
Cleaning Pad to remove any remaining residue.
4. For additional protection, after all residue has been
removed, polish the entire surface with CERAMA
BRYTE
®
Ceramic Cooktop Cleaner and a paper towel.
Clean your cooktop after each
®
Ceramic Cooktop Cleaner.
The CERAMA BRYTE
®
Ceramic Cooktop Scraper and all
recommended supplies are available through our Parts Center.
See the Accessories and Consumer Support sections at the
end of this manual.
NOTE:
CARE AND CLEANING: Cleaning the Glass Cooktop
Cleaning the Glass Cooktop
®
Cleaning
Pad for Ceramic Cooktops.
BRYTE
®
Ceramic
25
Metal Marks and Scratches
1. Be careful not to slide pots and pans across your
cooktop. It will leave metal markings on the cooktop
surface.
These marks are removable using the CERAMA
BRYTE
®
Ceramic Cooktop Cleaner with the CERAMA
BRYTE
®
Cleaning Pad for Ceramic Cooktops.
2. If pots with a thin overlay of aluminum or copper
are allowed to boil dry, the overlay may leave black
discoloration on the cooktop.
This should be removed immediately before heating
again or the discoloration may be permanent.
NOTE: Carefully check the bottom of pans for roughness
that would scratch the cooktop.
Damage from Sugary Spills and Melted Plastic
Special care should be taken when removing hot substances to avoid permanent damage of the glass surface.
Sugary spillovers (such as jellies, fudge, candy, syrups) or melted plastics can cause pitting of the surface of your
cooktop (not covered by the warranty) unless the spill is removed while still hot. Special care should be taken when
removing hot substances.
Be sure to use a new, sharp razor scraper.
1. Turn off all surface units. Remove hot pans.
2. Wearing an oven mitt:
the spill to a cool area on the cooktop.
b. Remove the spill with paper towels.
3. Any remaining spillover should be left until the surface
of the cooktop has cooled.
residue has been completely removed.
If pitting or indentation in the glass surface has
already occurred, the cooktop glass will have to be
replaced. In this case, service will be necessary.
Cleaning the Glass Cooktop (Cont.)
CARE AND CLEANING:
Probe
The temperature probe may be cleaned with soap and
water or a soap-filled scouring pad. Cool the temperature
probe before cleaning. Scour stubborn spots with a soap-
filled scouring pad, rinse and dry.
To order additional temperature probes, see the
Accessories and Consumer Support sections at the end
of this manual.
during a self or steam clean cycle.
NOTE:
26
WARNING
SHOCK OR BURN HAZARD: Before replacing oven light bulb, disconnect the electrical power to the
range at the main fuse or circuit breaker panel. Failure to do so may result in electric shock or burn.
CAUTION
BURN HAZARD: The glass cover and bulb should be removed when cool. Touching hot glass with
bare hands or a damp cloth can cause burns.
Oven Light Replacement
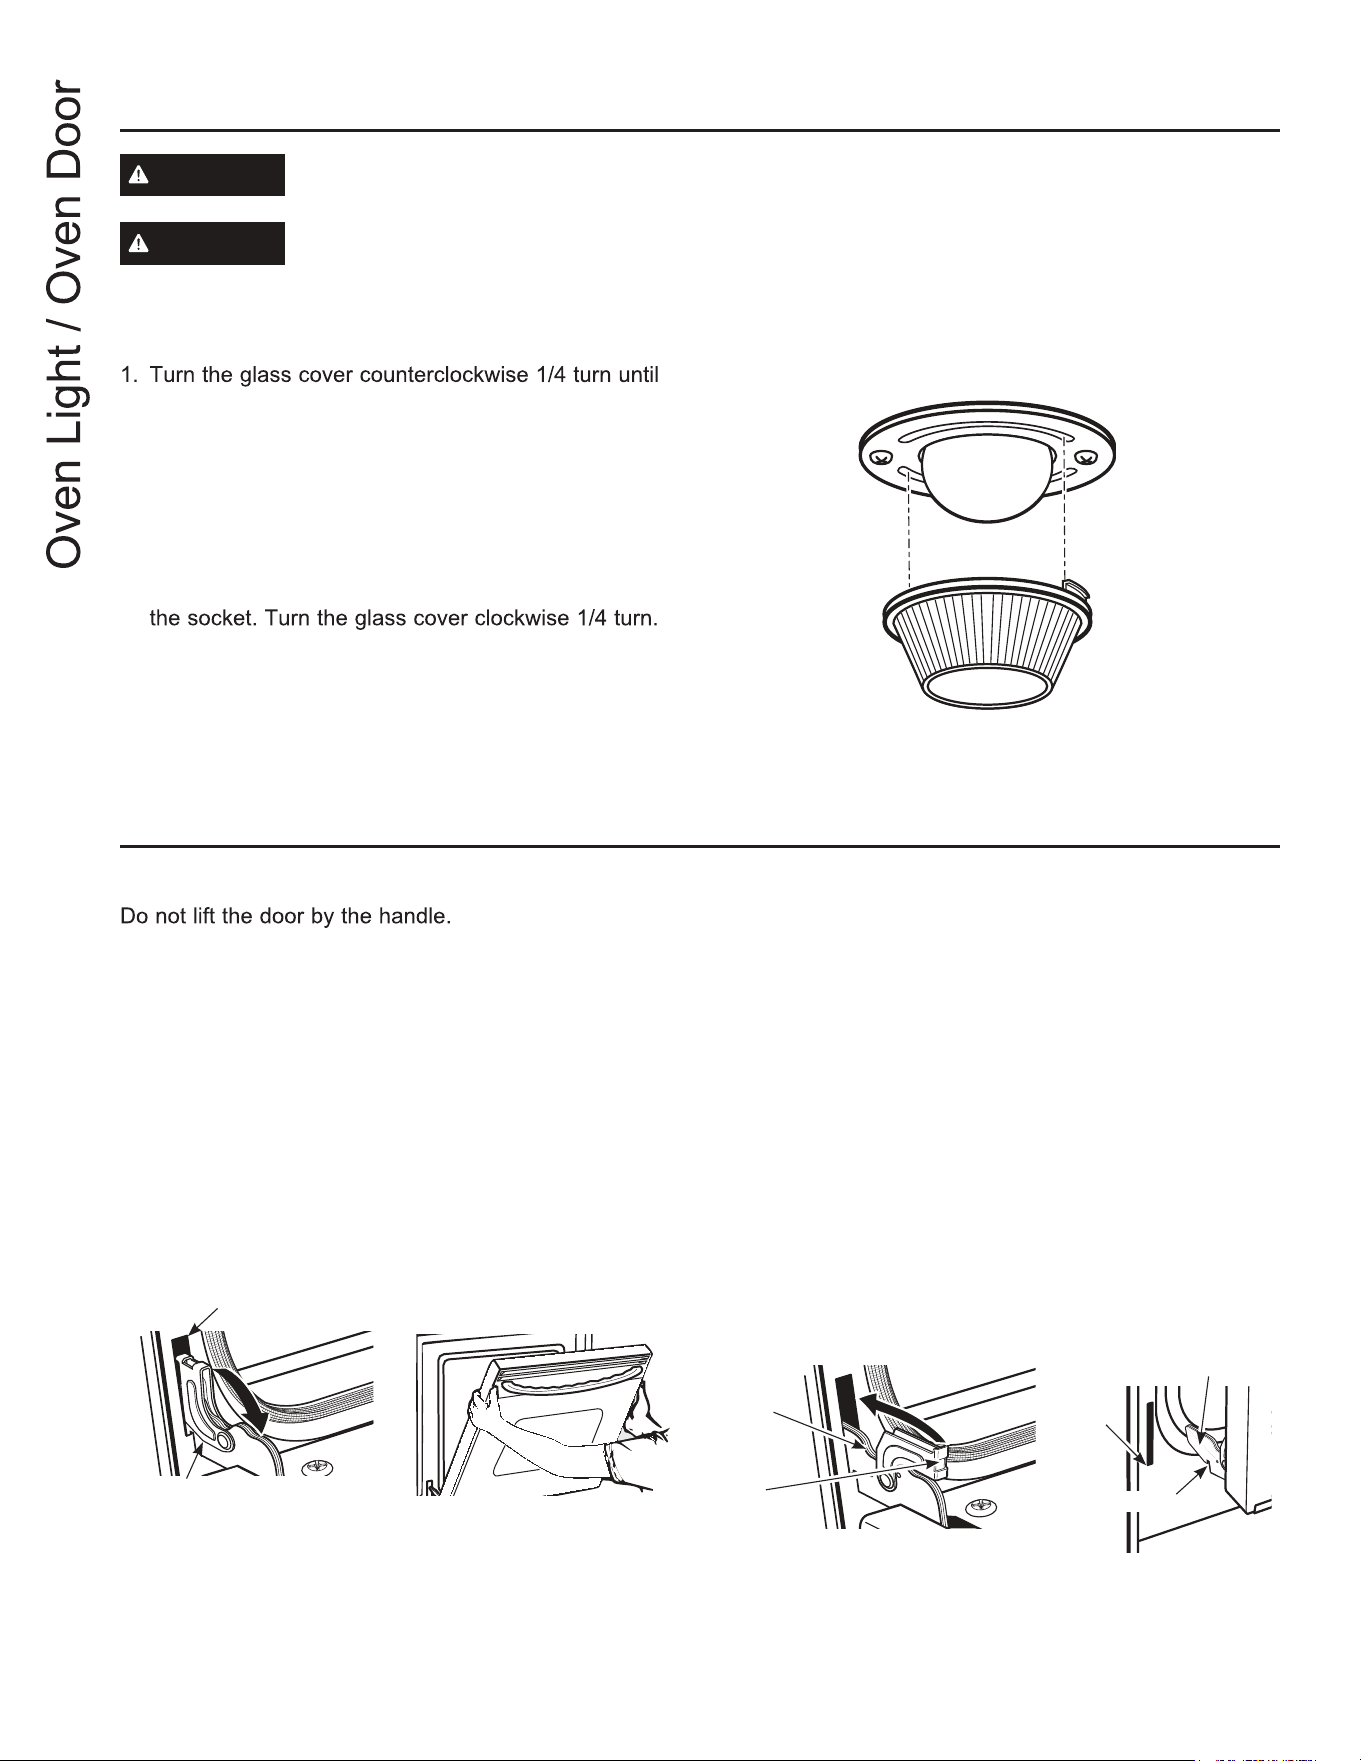
To remove:
the tabs of the glass cover clear the grooves of the
socket. Wearing latex gloves may offer a better grip.
2. Remove the bulb by turning it counter-clockwise.
To replace:
1. Replace bulb with a new 40-watt appliance bulb.
Insert the bulb and turn it clockwise until it is tight.
2. Place the tabs of the glass cover into the grooves of
For improved lighting inside the oven, clean the glass
cover frequently using a wet cloth. This should be
done when the oven is completely cool.
3. Reconnect electrical power to the oven.
CARE AND CLEANING:
Oven Light
The door is very heavy. Be careful when removing and lifting the door.
To remove the door:
1. Fully open the door.
2. Pull the hinge locks down toward the door frame, to
the unlocked position. A tool, such as a small flat-
blade screwdriver, may be required.
3. Firmly grasp both sides of the door at the top.
4. Close door to the door removal position. The door
should be open approximately 3" with no obstruction
above the door.
5. Lift door up and out until both hinge arms are clear of
the slots.
To replace the door:
1. Firmly grasp both sides of the door at the top.
2. Starting on the left side, with the door at the same
angle as the removal position, seat the indentation of
the hinge arm into the bottom edge of the hinge slot.
The notch in the hinge arm must be fully seated into
the bottom of the slot. Repeat for right side.
3. Fully open the door. If the door will not fully open, the
indentation is not seated correctly in the bottom edge
of the slot.
4. Push the hinge locks up against the front frame of the
oven cavity, to the locked position.
5. Close the oven door.
Removal position
Hinge lock
Slot
Pull hinge locks down to unlock
Push hinge locks up to lock
Hinge
lock
Hinge
arm
Indentation
Bottom
edge of
slot
Hinge arm
Oven Door
27
TROUBLESHOOTING TIPS
Troubleshooting Tips ... Before you call for service
Save time and money! Review the charts on the following pages first and you may not need to call for service.
Problem Possible Cause What To Do
Surface units do not
work properly or
flashing power setting.
Improper cookware being used.
size for the element being used. See the Pan size and shape section.
Pan is too small. Pan size is below the minimum size for the element. See the Pan size
Pan not positioned correctly. Center the pan in the cooking zone.
Pan is not in full contact with glass
surface.
Pan must be flat.
In some areas, the power (voltage)
may be low.
Cover pan with a lid until desired heat is obtained.
A fuse in your home may be blown
or the circuit breaker tripped.
Replace the fuse or reset the circuit breaker.
Cooktop controls improperly set. Check to see that the control is set properly. Press On then + or -
Surface unit setting
changed or turned off
unexpectedly.
High cooktop temperature. Allow the internal fan to cool the cooktop. Check if pan boiled dry.
Scratches (may appear
as cracks) on cooktop
glass surface.
Incorrect cleaning methods being
used.
Scratches are not removable. Tiny scratches will become less visible in
time as a result of cleaning.
Cookware with rough bottoms being
used or coarse particles (salt or
sand) were between the cookware
and the surface of the cooktop.
Cookware has been slid across the
cooktop surface.
To avoid scratches, use the recommended cleaning procedures. Make
sure bottoms of cookware are clean before use, and use cookware with
smooth bottoms.
Areas of discoloration
on the cooktop.
Food spillovers not cleaned before
next use.
See the Cleaning the glass cooktop section.
Hot surface on a model with a light-
colored cooktop.
This
is normal. The surface may appear discolored when it is hot. This
is temporary and will disappear as the glass cools.
Plastic melted to the
surface.
Hot cooktop came into contact with
plastic placed on the hot cooktop.
Cleaning the glass cooktop section.
Pitting (or indentation)
of the cooktop.
Hot sugar mixture spilled on the
cooktop.
Call a qualified technician for replacement.
My new oven doesn't
cook like my old one.
Is something wrong
with the temperature
settings?
Your new oven has a different
cooking system from your old oven
and therefore may cook differently
than your old oven.
For the first few uses, follow your recipe times and temperatures
carefully. If you still think your new oven is too hot or too cold, you
can adjust the temperature yourself to meet your specific cooking
preference. NOTE: This adjustment affects Bake, and Convection Bake
temperatures; it will not affect Broil or Clean.
Food does not bake
properly.
Oven controls improperly set. See the Cooking Modes section.
Rack position is incorrect or rack is
not level.
See the Cooking Modes section and Cooking Guide.
Incorrect cookware or cookware of
improper size being used.
See the Cookware section.
Oven temperature needs adjustment. See the Special Features section.
Ingredient substitution. Substituting ingredients can change the recipe outcome.
Food does not broil
properly.
Oven controls improperly set. Make sure you select the appropriate broil mode.
Improper rack position being used. See Cooking Guide for rack location suggestions.
Food being cooked in a hot pan. Make sure cookware is cool.
Cookware not suited for broiling.
The probe is plugged into the outlet
in the oven.
Aluminum foil used on the broiling
pan and grid has not been fitted
properly and slit as recommended.
If using aluminum foil conform to pan slits.
In some areas the power (voltage)
may be low.
Preheat the broil element for 10 minutes.
Oven temperature too
hot or too cold.
Oven temperature needs adjustment. See the Special Features section.
28
TROUBLESHOOTING TIPS
Troubleshooting Tips ... Before you call for service
Problem Possible Cause What To Do
Oven does not work or
appears not to work.
Plug on range is not completely inserted in
the electrical outlet.
Make sure electrical plug is plugged into a live, properly grounded
outlet.
A fuse in your home may be blown or the
circuit breaker tripped.
Replace the fuse or reset the circuit breaker.
Oven controls improperly set.
Oven is in Sabbath Mode.
Features section.
“Crackling” or “popping”
sound.
This is the sound of the metal heating
and cooling during both the cooking and
cleaning functions.
This is normal.
Why is my range making a
"clicking" noise when using
my oven?
Your range cycles the heating elements by
turning relays on and off to maintain the
oven temperature.
This is normal.
Clock and timer do not work. A fuse in your home may be blown or the
circuit breaker tripped.
Replace the fuse or reset the circuit breaker.
Plug on range is not completely inserted in
the electrical outlet.
Make sure electrical plug is plugged into a live, properly grounded
outlet.
Oven controls improperly set.
Oven door is crooked. The door is out of position. Because the oven door is removable, it sometimes gets out of
position during installation. To straighten the door, re-install the
Cleaning" section.
Oven light does not work. Light bulb is loose or defective. Tighten or replace bulb.
Pad operating light is broken.
Oven will not self-clean. The temperature is too high to set a self-
clean operation.
Allow the oven to cool and reset the controls.
Oven controls improperly set. See the Cleaning the Oven section.
The probe is plugged into the outlet in the
oven.
Remove the probe from the oven.
Oven will not steam clean. Display flashes HOT. Allow the oven to cool to room temperature and reset the
controls.
Oven controls improperly set.
Oven door is not closed. Make sure you close the door to start steam clean cycle.
Excessive smoking during
clean cycle.
Excessive soil or grease. Press the Cancel/Off pad. Open the windows to rid the room of
smoke. Wait until the LOCKED light goes off. Wipe up the excess
soil and reset the clean cycle.
Excessive smoking during
broiling.
Food too close to burner element. Lower the rack position of the food.
Oven door will not open after
a clean cycle.
Oven too hot. Allow the oven to cool below locking temperature.
Oven not clean after a clean
cycle.
Oven controls improperly set. See the Cleaning the Oven section.
Oven was heavily soiled. Clean up heavy spillovers before starting the clean cycle.
Heavily soiled ovens may need to self-clean again or for a longer
period of time.
"LOCK DOOR" flashes in the
display.
The self-clean cycle has been selected but
the door is not closed.
Close the oven door.
DOOR LOCK light is on when
you want to cook.
The oven door is
locked because the
temperature inside the oven has not
dropped below the locking temperature.
Press the Cancel/Off pad. Allow the oven to cool.
“F— and a number or letter”
flash in the display.
You have a function error code. Press the Cancel/Off pad. Allow the oven to cool for one hour. Put
the oven back into operation.
If the function code repeats.
reconnect power. If the function error code repeats, call for service.
Display goes blank. A fuse in your home may be blown or the
circuit breaker tripped.
Replace the fuse or reset the circuit breaker.
The clock is turned off. See the Special features section.
Oven or cooktop will not stay
set.
Function error.
power. If repeating, call for service.
Call for service.
29
TROUBLESHOOTING TIPS
Troubleshooting Tips ... Before you call for service
Problem Possible Cause What To Do
Power outage, clock flashes. Power outage or surge. Reset the clock. If the oven was in use, you must reset it by
pressing the Cancel/Off pad, setting the clock and resetting
any cooking function.
“Burning” or “oily” odor
emitting from the vent.
This is normal in a new oven and will
disappear in time.
To speed the process, set a self-clean cycle for a minimum of
3 hours. See the Cleaning the Oven section.
Strong odor. An odor from the insulation around the
inside of the oven is normal for the first
few times the oven is used.
This is temporary and will go away after several uses or a
self-clean cycle.
yllacitamotua yam naf noitcevnoc A.esion naF
turn on and off.
This is normal. The fan is designed to operate intermittently to
maximize cooking evenness. The convection fan will operate
during preheat of the bake cycle. The fan will turn off after the
oven is heated to the set temperature. This is normal.
A cooling fan may automatically turn on
and off.
This is normal. The cooling fan will turn off and on to cool
internal parts. It may
run after the oven is turned off.
My oven door glass appears
to be "tinted" or have a
"rainbow" color. Is this
defective?
No. The inner oven glass is coated with
a heat barrier to reflect the heat back
into the oven to prevent heat loss and
keep the outer door cool while baking.
tint or rainbow color.
Sometimes the oven takes
longer to preheat to the
same temperature.
Cookware or food in oven. The cookware or food in the oven will cause the oven to take
longer to preheat. Remove items to reduce preheat time.
Number of racks in oven. Adding more racks to the oven will cause the oven to take
longer to preheat. Remove some racks.
Different cooking modes. The different cooking modes use different preheat methods to
heat the oven for the specific cooking mode. Some modes will
take longer than others (i.e. convection bake).
Display flashes. Power failure. Reset the clock.
Control signals after
entering cooking time or
start time.
You forgot to enter a bake temperature
or cleaning time.
Touch the Bake pad and desired temperature or the Self
pad and desired clean time.
Oven racks are difficult to
slide.
The shiny, silver-colored racks were
cleaned in a self-clean cycle.
Apply a small amount of vegetable oil to a paper towel and
spray with Pam
®
or other lubricant sprays.
Steam from the vent. When using the ovens, it is normal
to see steam coming out of the
oven vents. As the number of racks
or amount of food being cooked
increases, the amount of visible steam
will increase.
This is normal.
Warming drawer will not
work.
A fuse in your home may be blown or
the circuit breaker tripped.
Replace the fuse or reset the circuit breaker.
Controls improperly set.
Excessive condensation in
the drawer.
Liquid in drawer. Remove liquid.
Uncovered foods. Cover food with lid or aluminum foil.
Temperature setting too high. Reduce temperature setting.
Food dries out in the
warming drawer.
Moisture escaping. Cover food with lid or aluminum foil.
Drawer not fully closed. Push drawer in until latch engages.
Water remaining on oven
floor after Steam Clean cycle.
This is normal. Remove any remaining water with a dry cloth or sponge.
“Probe” appears in the
display.
This is reminding you to enter a probe
temperature after plugging in the probe.
Enter a probe temperature.
Clean
30
GEAppliances.ca
All warranty service is provided by our Factory Service Centers, or an authorized Customer Care
®
technician. To schedule
service online, visit us at www.GEAppliances.ca, or call 1.800.561.3344. Please have your serial number and your
model number available when calling for service.
Servicing your appliance may require the use of the onboard data port for diagnostics. This gives a GE Appliances factory
service technician the ability to quickly diagnose any issues with your appliance and helps GE Appliances improve its
products by providing GE Appliances with information on your appliance. If you do not want your appliance data to be
sent to GE Appliances, please advise your technician not to submit the data to GE Appliances at the time of service.
What MC Comercial will not cover:
Service trips to your home to teach you how to use
the product.
modified or used for other than the intended purpose
or used commercially.
cleaners other than the recommended cleaning
creams and pads.
spills of sugary materials or melted plastic that
are not cleaned according to the directions in the
Owner's Manual.
breakers.
floods or acts of God.
blemishes not reported within 48 hours of delivery.
possible defects with this appliance.
EXCLUSION OF IMPLIED WARRANTIES
Your sole and exclusive remedy is product repair as provided in this Limited Warranty. Any implied warranties,
including the implied warranties of merchantability or fitness for a particular purpose, are limited to one year or
the shortest period allowed by law.
For the period of MC Comercial Will Provide:
One year
From the date
of the original
purchase
Any part
limited one-year warranty, MC Comercial will provide, free of charge, all labor and in-home
service to replace the defective part.
Staple your receipt here. Proof of the original purchase
date is needed to obtain service under the warranty.
WARRANTY
GE Appliances Electric Range Warranty
This warranty is extended to the original purchaser and any succeeding owner for products purchased in Canada for
home use within Canada. If the product is located in an area where service by a GE Authorized Servicer is not available,
you may be responsible for a trip charge or you may be required to bring the product to an Authorized GE Service location.
Some provinces do not allow the exclusion or limitation of incidental or consequential damages. This warranty gives
you specific legal rights, and you may also have other rights which vary from province to province. To know what your
legal rights are, consult your local or provincial consumer affairs office.
Warrantor: MC Commercial, Burlington, ON, L7R 5B6
31
ACCESSORIES
Looking For Something More?
GE Appliances offers a variety of accessories to
improve your cooking and maintenance experiences!
Refer to the Consumer Support page for phone numbers
and website information.
The following products and more are available:
Accessories
Accessories
Small Broiler Pan (8 ¾ ” x 1 ¼” x 13 ½ “)
Large Broiler Pan (12 ¾ ” x 1 ¼” x 16 ½ “)
Parts
Oven racks
Oven elements
Light bulbs
Cleaning Supplies
CitruShine™ Stainless Steel Wipes
CERAMA BRYTE
®
Stainless Steel Appliance Cleaner
CERAMA BRYTE
®
Cleaning Pads for Ceramic Cooktops
CERAMA BRYTE
®
Ceramic Cooktop Cleaner
CERAMA BRYTE
®
Ceramic Cooktop Scraper
32
Printed in Mexico
Consumer Support
CONSUMER SUPPORT
GE Appliances Website
Have a question or need assistance with your appliance? Try the GE Appliances Website 24 hours a day, any day
of the year! You can also shop for more great GE Appliances products and take advantage of all our on-line support
GEAppliances.ca
Register Your Appliance
Register your new appliance on-line at your convenience! Timely product registration will allow for enhanced
communication and prompt service under the terms of your warranty, should the need arise. You may also mail in
GEAppliances.ca
Schedule Service
Expert GE Appliances repair service is only one step away from your door. Get on-line and schedule your service at
GEAppliances.ca or call 1-800.561.3344 during normal business
hours.
Remote Connectivity
For assistance with wireless network connectivity (for models with remote enable),
visit our website at GEAppliances.com/ge/connected-appliances/
Parts and Accessories
Individuals qualified to service their own appliances can have parts or accessories sent directly to their homes
GEApplianceparts.com or by phone at 877.959.8688 during normal business hours.
Instructions contained in this manual cover procedures to be performed by any user. Other servicing
generally should be referred to qualified service personnel. Caution must be exercised, since improper
servicing may cause unsafe operation.
Contact Us
If you are not satisfied with the service you receive from GE Appliances, contact us on our Website with all the
details including your phone number, or write to:
MC Comercial | Factory Lane Moncton, New Brunswick E1C 9M3.

Inscrivez ci-dessous les numéros
de modèle et de série:
N° de modèle _________________
N° de série _________________
Ils se trouvent sur une étiquette
derrière le tiroir de rangement, sur le
cadre de la cuisinière.
RANGES
Cuisinières à électriques
295D3313P010 rev.0 Pub. Num. 29-6374
GE est une marque de commerce de General Electric Company. Fabriqué sous licence de marque.
CONSIGNES DE SÉCURITÉ . . . . . . . 35
MODE D’EMPLOI
Eléments de surface . . . . . . . . . . . . . . . . . . . . 40
Ustensiles pour les tables de cuisson. . . . . . . 42
Commandes du Four . . . . . . . . . . . . . . . . . . . . .44
Paramètres . . . . . . . . . . . . . . . . . . . . . . . . . . . . .46
Options . . . . . . . . . . . . . . . . . . . . . . . . . . . . . . .46
Mode Sabbat . . . . . . . . . . . . . . . . . . . . . . . . . 47
Grilles . . . . . . . . . . . . . . . . . . . . . . . . . . . . . . . . . .48
Papier d’aluminium ou autres Revêtements de
Four . . . . . . . . . . . . . . . . . . . . . . . . . . . . . . . . . . . 49
Batteries de Cuisine . . . . . . . . . . . . . . . . . . . . . . .49
Modes de Cuisson . . . . . . . . . . . . . . . . . . . . . . . .50
Sonde. . . . . . . . . . . . . . . . . . . . . . . . . . . . . . . . . . 51
Guide de Cuisine
. . . . . . . . . . . . . . . . . . . . . . .52
Connexion WiFi et Activation à Distance . . . 53
ENTRETIEN ET NETTOYAGE
Nettoyage de la cuisinière – Extérieur. . . . . . 54
Nettoyage de la cuisinière – Intérieur . . . . . . 55
Nettoyage de la vitre de la table de cuisson . 57
Sonde . . . . . . . . . . . . . . . . . . . . . . . . . . . . . . . . . 57
Lumière du four. . . . . . . . . . . . . . . . . . . . . . . . . 58
Porte du four . . . . . . . . . . . . . . . . . . . . . . . . . . . 58
DÉPANNAGE . . . . . . . . . . . . . . . . . . . . . . . 59
GARANTIE . . . . . . . . . . . . . . . . . . . . . . . . . 62
ACCÉSSOIRES . . . . . . . . . . . . . . . . . . . . . .63
SERVICE À LA CLIENTÈLE. . . . . . . . 64
Manuel d’utilisation et
instructions d’installation
PCS915
PCS940
PCS980

34
MERCI D’INCLUIR LES ELECTROMENAGERS GE DANS VOTRE MAISON.
Que vous ayez grandi avec les Electroménagers GE ou que ce soit votre premier
achat, nous sommes heureux que vous soyez intégrant de la famille.
Nous sommes fiers du savoir-faire, de l’innovation et du design utilisés dans tous les
Électroménagers GE, et nous pensons que vous le serez aussi. Parmi de nombreux bénéfices,
l’enregistrement de votre électroménager nous permet de vous délivrer d’importantes informations
et de détails de garantie quand vous en avez besoin.
Enregistrer votre Electroménager GE en ligne maintenant. De nombreux sites utiles et
numéros de téléphones sont à votre disposition dans la section Service à la clientèle de ce manuel
d’utilisation. Vous pouvez également poster la carte d'enregistrement pré-imprimée incluse
dans l'emballage.
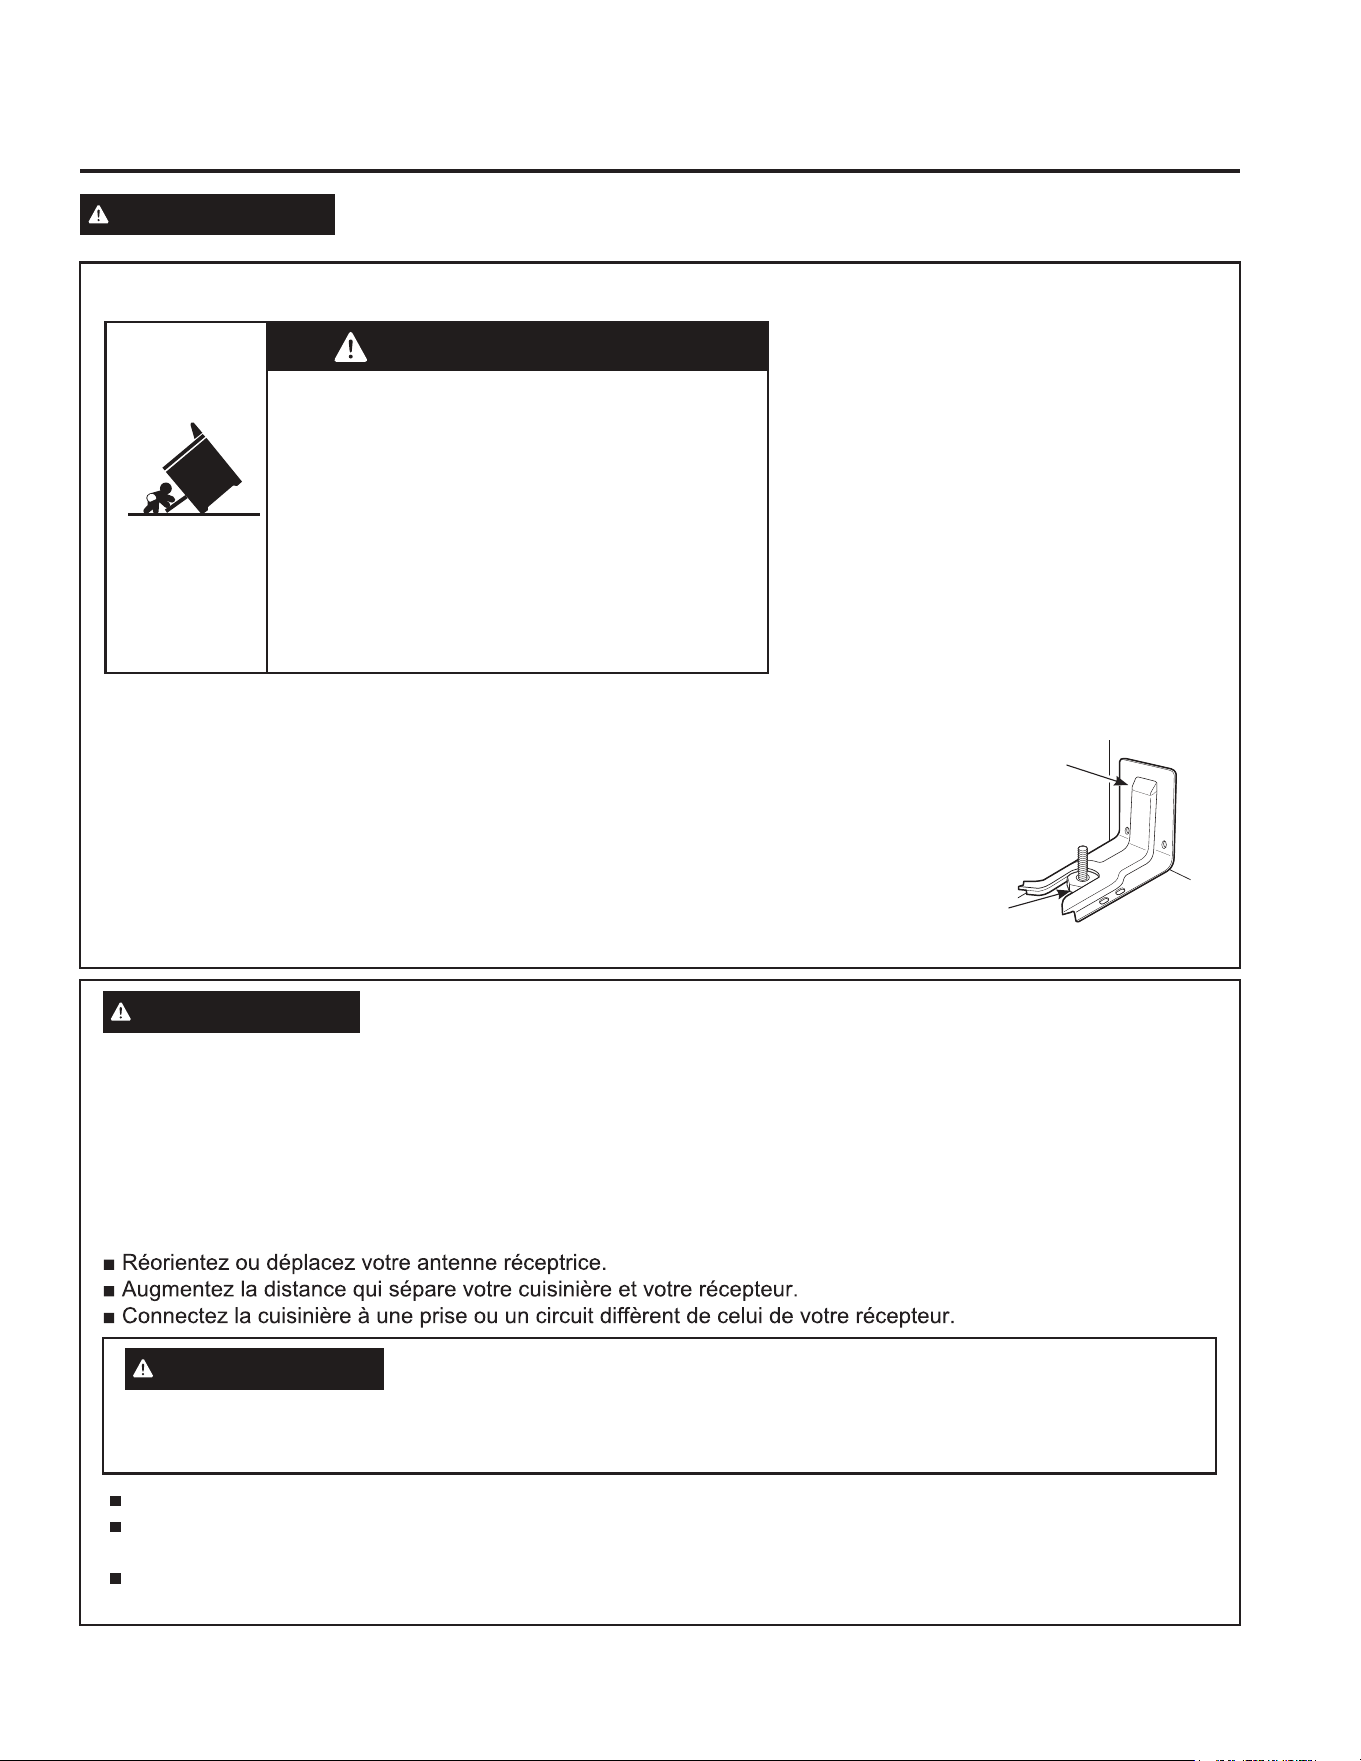
35
LISEZ ET CONSERVEZ CES INSTRUCTIONS
CONSEILS ANTIBASCULEMENT
Pour éviter tout risque de basculement, votre
cuisinière doit être fixée à l’aide d’un dispo-
sitif anti-basculement fourni. Reportez-vous
aux instructions du dispositif anti-basculement
fournies dans le manuel avant toute
installation.
Pour les cuisinières pose-libre ou
encastrables
Pour vérifier si le dispositif est bien installé,
retirez le tiroir de rangement et inspectez
sous la cuisinière au niveau du pied de
nivellement arrière. Assurez-vous qu’il est
engagé fermement dans la fente.
Sur certains modèles, le tiroir de rangement ou la plaque de protection peuvent être retirés pour faciliter l’inspection.
Si une inspection visuelle n’est pas réalisable, glisser la cuisinière vers l’avant, vérifier que le support anti-
basculement est solidement fixé au sol ou au mur, et replacer la cuisinière
pour que le pied de mise à niveau arrière repose sous le support
anti-basculement.
Si vous devez déplacer la cuisinière, peu importe la raison, vous devez
toujours répéter cette procédure pour vérifier le bon fonctionnement du
support anti-basculement.
Ne jamais retirer complément les pieds de mise à niveau, car la cuisinière
ne serait pas bien fixée au support anti-basculement.
AVERTISSEMENT
Si les instructions de ce guide ne sont pas lues et suivies, des risques d’incendie, de
décharge électrique, de dommages corporels ou même d’accidents mortels peuvent survenir.
Les enfants et les adultes peuvent renverser la
cuisinière causant leur mort.
• Installer le dispositif anti-basculement au mur ou
sur le sol.
• Pour installer la cuisinières sur le dispositif
anti-basculement, glissez-la jusqu’à ce que le
pied soit bloqué
• Incérez de nouveau la cuisinière dans le dispositif
anti-basculement si celle-ci a été déplacée.
• Si les consignes ne sont pas respectées, cela peut
entrainer de graves blessure ainsi que le décès
d’enfants ou d’adultes.
AVERTISSEMENT
Crochet
Anti Basculement
Pied de mise à
niveau pour
les cuisinières
Cuisinières intégrables et encastrables
AVERTISSEMENT
CONSIGNES DE SECURITÉ GÉNÉRALE
Appareil a été testé et prouvé être conforme aux limites d'un appareil numérique de classe B, conformément à la
partie 18 des règles de la FCC. Les règles sont conçues pour apporter une protection de base contre des
interférences dangereuses dans le cadre d’une installation résidentielle. Cet appareil émet et utilise des énergies
radio électriques, et s’il n’est pas installé et utilisé d’après les instructions, cela peut engendrer de dangereuses
interférences. Cependant, dans tous types d’installation, il n’est pas garanti que cette interférence n’aura pas lieu.
Si cet appareil n’émet pas de dangereuses interférences à la réception de votre radio ou télévision, ce qui peut
être déterminé en allumant et en l’éteignant, l’utilisateur est encouragé à corriger l’interférence en suivant une ou
plusieurs des mesures suivantes:
Les personnes ayant un stimulateur cardiaque ou un dispositif médical similaire
doivent prendre des précautions quant à l’utilisation de l’appareil si celui –ci est en fonctionnement. Le
champélectromagnétique peut affecter le fonctionnement du stimulateur cardiaque ou du dispositif médical
similaire. Il est recommandé de consulter votre docteur ou le fabriquant du stimulateur cardiaque.
CONSIGNES DE SÉCURITÉ IMPORTANTES. LISEZ
TOUTES LES INSTRUCTIONS AVANT D’UTILISER VOTRE APPAREIL
AVERTISSEMENT
N’utilisez cet appareil que pour l’usage pour lequel il a été prévu, comme il est écrit dans ce manuel de l’utilisateur.
Assurez-vous que votre appareil a été correctement posé et installé par un installateur qualifié, conformément aux
instructions d’installations fournies.
Ne tentez pas de réparer ou de remplacer toute pièce de votre cuisinière, à moins que cela ne soit spécifique-
ment recommandé dans le présent manuel. Confiez toutes les autres réparations à un technicien qualifié.
CONSIGNES DE SÉCURITÉ
36
AVERTISSEMENT
ÉLOIGNEZ TOUS MATERIAUX INFLAMABLES DE LA CUISINIÈRE
En cas de non-respect des consignes, des incendies ou des dommages corporaux peuvent être provoqués.
CONSIGNES DE SÉCURITÉ IMPORTANTES. LISEZ
TOUTES LES INSTRUCTIONS AVANT D’UTILISER VOTRE APPAREIL
AVERTISSEMENT
GENERAL SAFETY INSTRUCTIONS (Cont.)
ATTENTION
Avant toute réparation, coupez l’alimentation électrique
de la cuisinière ou panneau d’alimentation en électricité
de l’habitation, en retirant le fusible ou déconnectant
le coupe-circuit.
Ne laissez pas les enfants sans surveillance – les
enfants ne devraient pas être laissés seuls ou sans
surveillance dans un endroit où un appareil électro-
ménager est en cours d’utilisation, ils ne devraient pas
non plus être autorisés à s’assoir ou se tenir debout
sur toute partie de l’appareil.
Ne rangez pas d’objets pouvant
intéresser les enfants au-dessus de la cuisinière ou
sur son dosseret. Les enfants s’exposeraient à de
graves blessures s’ils grimpaient sur la cuisinière pour
les atteindre.
Utilisez uniquement des poignées sèches. La vapeur
émise par des poignées humides en contact avec une
surface chaude pourrait vous brûler. Ne laissez pas
les poignées entrer en contact avec les bruleurs, la
grille du bruleur ou l’élément chauffant du four.
N’utilisez pas de torchon ou d’autre tissu épais à la
place de poignées.
N’utilisez jamais votre appareil pour chauffer ou
réchauffer la pièce.
Ne touchez pas les éléments de surface, les éléments
chauffants ou la surface intérieur du four. Ces surfaces
peuvent être suffisamment chaudes pour entrainer
des brulures même si elles sont foncées.
Pendant et après l’utilisation, ne touchez pas ou ne
laissez pas les vêtements ou tout autre matériau
inflammable entrer en contact avec les éléments de
surface, leur périphérie, ou toute partie de l’intérieur
du four, attendez suffisamment de temps que la
cuisinière refroidisse. Les surfaces pouvant chauffer
sont les plaques de cuisson, les zones en face les
plaques de cuisson, l’évent du four, les surfaces
situées près de l’évent et les fentes situées autour de
la porte du four.
Ne faites pas chauffer de récipient fermé. La pression
accumulée risquerait de faire éclater le récipient et de
causer des blessures.
N’utilisez aucun type de film aluminium ou revêtement
pour couvrir le bas du four ou toutes autres parties du
four, sauf si indiqué dans le manuel. Les revêtements
de four peuvent capturer la chaleur ou fondre, ce qui
provoquera la détérioration du produit ainsi que des
risques de suffocation, fumée ou incendie.
Evitez de rayer ou de frapper les portes en verre, les
surfaces de cuisson ou les tableaux de commande.
Cela pourrait casser le verre. Ne cuisinez pas sur un
appareil dont le verre est brisé. Un choc électrique, un
incendie ou des coupures pourraient en résulter.
Faites bien cuire la viande ou la volaille – la viande à
au moins une température interne de 70 ° C (160 ° F)
et la volaille à moins une température interne de 80°C
(180 ° F). Cuisiner à ces températures protège
généralement contre les maladies d'origine alimentaire.
N’utilisez et ne rangez pas de matériaux inflammables à proximité du four ou de la table de cuisson, comme du papier,
plastique, casseroles, draps, revêtements muraux, rideaux, draperies, essence ou autre produit inflammable liquide.
Ne portez jamais de vêtements amples pendant l’utilisation de l’appareil. Ces vêtements peuvent prendre feu s’ils
entrent en contact avec les éléments de surface chauffant provoquant de sévères brulures.
Ne pas laisser de produit gras de cuisine ou autres matériaux inflammables s’accumuler dans ou près de la
cuisinière. La graisse dans le four ou sur la table de cuisson peut s’enflammer.
Nettoyez votre hotte fréquemment. La graisse ne doit pas s’accumuler dans la hotte ou le filtre.
LISEZ ET CONSERVEZ CES INSTRUCTIONS
AVERTISSEMENT
EN CAS D’INCENDIE, SUIVEZ LES ÉTAPES SUIVANTES POUR
EVITER LES BLESSURES ET EMPÊCHER L’INCENDIE DE SE
PROPAGER.
Ne versez pas d’eau sur les feux de friture. Ne jamais prendre une poêle en feu. Étouffez les flammes d’une poêle
en feu en la couvrant complètement d’un couvercle adapté, d’une plaque à pâtisserie ou d’un plateau. Utiliser un
produit multi usage ou un extincteur à mousse, si besoin.
Si un incendie se déclare dans le four pendant la cuisson, arrêter le four et tenez la porte fermée jusqu’à ce que
l’incendie s’éteigne. Utilisez un produit multi usage ou un extincteur à mousse, si besoin.
Si un incendie se déclare dans le four pendant l’auto-nettoyage, éteignez le four et attendez que l’incendie
s’étouffe. Ne tentez pas d’ouvrir la porte par la force. En cas d’introduction d’air frais dans le four lorsque celui-ci
est à une température d’auto-nettoyage, un jet de flammes peut s’échapper. Le non-respect de cette consigne
peut engendrer de graves brûlures
CONSIGNES DE SÉCURITÉ

37
CONSIGNES DE SÉCURITÉ
LISEZ ET CONSERVEZ CES INSTRUCTIONS
CONSIGNES DE SÉCURITÉ IMPORTANTES.
LISEZ
TOUTES LES INSTRUCTIONS AVANT D’UTILISER VOTRE APPAREIL
AVERTISSEMENT
CONSIGNES DE SÉCURITÉ POUR LA TABLE DE CUISSON
AVERTISSEMENT
CONSIGNES DE SÉCURITÉ POUR LA PLAQUE DE CUISSON
EN VERRE/VITROCÉRAMIQUE
AVERTISSEMENT
CONSIGNES DE SÉCURITÉ DU FOUR
Ne jamais laissez sans surveillance les brûleurs de sur-
face à des températures hautes ou élevés. Les débor-
dements provoquent de la fumée et les débordements
d’aliments graisseux peuvent rendre feux.
Ne jamais laissez l’huile sans surveillance lorsque vous
faites de la friture. Si elle surchauffe et dégage de la
fumée, l’huile peut s’enflammer et provoquer un incendie
qui pourrait se propager dans les placards environnant.
Utilisez un thermomètre à friture, lorsque cela est possible,
pour surveiller la température de l’huile.
Pour éviter les projections d’huile et les incendies, utilisez
une quantité minimale d’huile lorsque vous faites frire
des aliments dans une poêle peu profonde et évitez de
cuire des aliments surgelés ayant trop de glace.
Seulement certains types de verre, verre/céramique,
faïence ou autre récipients en argile sont compatibles
avec la table à cuisson; les autres peuvent se briser
due au changement soudain de température.
Pour minimiser les risques de brûlures, de combustion
de matériaux inflammables et de débordement, la
poignée du récipient devrait être dirigée vers le centre
de la cuisinière, sans toutefois la placer au-dessus des
brûleurs.
Pour faire flambé des aliments sous une hotte, vous
devez mettre la hotte en marche.
Faites attention quand vous utilisez la plaque de
cuisson. La surface en verre des plaques maintiendra
la chaleur après avoir éteint les boutons.
Ne cuisinez pas sur les plaques cassées. Si la vitre
de la table se brise, les produits de nettoyage ainsi
que des débordements pourront pénétrer dans la
fissure et engendrer un risque d’électrocution.
Contacter un technicien immédiatement.
Évitez de rayer la surface de cuisson en verre. La
surface de cuisson en verre peut être rayée par des
objets tels que les couteaux, les instruments aiguisés,
bagues ou autres bijoux, et les rivets des vêtements.
Utilisez CERAMA BRYTE Nettoyant pour plaque en
céramique et CERAMA BRYTE Lingette Nettoyante
pour nettoyer les plaques. Attendre que les plaques
refroidissent avant de les nettoyer.
Si vous utilisez des éponges ou tissus humides sur
une surface chaude, cela peut provoquer des vapeurs
brulantes. Certains nettoyants peuvent produire des
fumées nocives une fois en contact avec une surface
chaude.
Remarque: Cette recommandation ne s’applique pas
aux éclaboussures de sucre. Ils doivent être enlevés
quand ils sont encore chauds utilisant un gant de
cuisine. Veuillez-vous reporter à la section Nettoyage
de la surface de cuisson en verre pour plus de détails.
Lisez et suivez toutes les instructions et avertisse-
ments sur l’étiquette des crèmes de nettoyage.
Ne posez ni ne rangez des objets susceptibles de
fondre ou prendre feu sur la surface de cuisson en
verre, même quand elle n’est pas en cours d’utilisation.
Si la table de cuisson est allumée par inadvertance,
les objets peuvent s’enflammer. La chaleur des
plaques ou du four après avoir été éteint peuvent
aussi brûler les objets.
Ne pas placez des objets métalliques comme les
couteux, fourchettes,cuillères, ou couvercles sur la
table de cuisson car elles peuvent chauffer.
Tenez-vous à l’écart de la cuisinière en ouvrant la porte
du four. L’air chaud ou la vapeur qui s’en échappent
pourrait brûler les mains, le visage et/ou les yeux.
N’utilisez pas le four si la chaleur des éléments déve-
loppe une zone brillante ou montre d’autres signes de
détérioration. Une zone brillante
Indique que les éléments chauffants peuvent faire
défaut et engendrer une brulure potentielle, un incendie
ou un choc électrique.
Éteignez immédiatement le four et faites remplacer
les éléments chauffants par un technicien qualifié.
Veuillez à ne pas obstruer la ventilation du four.
Assurez-vous que le four ne représente pas d’accu-
mulation de graisse.
Placez la grille du four à la position désirée lorsque
le four est froid. Si vous devez manipuler les grilles
lorsqu’elles sont chaudes, veuillez À ne pas laisser
vos poignées ou gants de cuisine entrer en contact
avec les éléments chauffant du four.
Quand vous utilisez des sachets de cuisson ou grill
dans le four, suivez les instructions du fabricant.
38
CONSIGNES DE SÉCURITÉ
LISEZ ET CONSERVEZ CES INSTRUCTIONS
CONSIGNES DE SÉCURITÉ IMPORTANTES.
LISEZ
TOUTES LES INSTRUCTIONS AVANT D’UTILISER VOTRE APPAREIL
AVERTISSEMENT
CONSIGNES DE SÉCURITÉ DE L’AUTO-NETTOYAGE DU FOUR
La fonction d’auto-nettoyage règle le four à une température assez élevée pour brûler les résidus alimentaires
présents dans le four. Suivez ces consignes pour un fonctionnement sécuritaire.
AVERTISSEMENT
CONSIGNES DE SÉCURITÉ POUR LE TIROIR CHAUFFE-PLAT
(certains modèles)
AVERTISSEMENT
CONSIGNES DE SÉCURITÉ DU FOUR (Suite.)
Tirez la grille du four jusqu’à la butée pour mettre et
sortir des aliments du four. Ceci aide à prévenir des
risques de brûlures au touché des surfaces chaudes
de la porte et des parois du four.
Ne laissez pas des produits en papiers, ustensiles
de cuisine ou aliments dans le four quand il n’est
pas en cours d’utilisation. Les objets peuvent prendre
feux.
Ne laissez jamais des ustensiles de cuisine, pizza,
pierre a cuisson ou aucun type de papier ou revête-
ment sur la paroi inférieure du four. Ces articles
peuvent garder la chaleur ou fondre, créant des
dommages et des risques de choc, fumée ou incendie.
Ne touchez pas les surfaces du four pendant l’auto-
nettoyage. Eloignez les enfants du four pendant
l’opération d’auto-nettoyage. Ne pas suivre ces
consignes peut engendrer des risques de brûlures.
Avant d’utiliser le programme d’auto-nettoyage,
retirez les casseroles, les grilles de four métalliques
brillantes et tout autre ustensile du four. Seules les
grilles en revêtement en porcelaine peuvent être
laissées dans le four. N’utilisez pas l’auto-nettoyage
pour nettoyer d’autres pièces, comme des poêles
ou bols.
Avant de lancer le programme d'auto-nettoyage,
essuyez la graisse et les résidus alimentaires du four.
Un excès de graisse pourrait prendre feu et la fumée
pourrait endommager votre domicile.
Si la fonction d'auto-nettoyage fonctionne mal,
éteignez le four et coupez l'alimentation. Contactez un
technicien qualifié pour faire réparer l'appareil.
Ne nettoyez pas le joint de la porte. Ce joint est
essentiel à une bonne étanchéité de la porte. Prenez
soin de ne pas frotter, l’endommager ou de bouger le joint.
N'utilisez pas de produits de nettoyage pour four.
N'utilisez pas de produit commercial de nettoyage pour
four ou de revêtement protecteur pour four sur aucune
des parties internes ou externes du four.
Le tiroir chauffe-plat est conçu pour maintenir les
aliments cuits à la température où ils seront servis.
Des bactéries se développeront dans les aliments
si la température est inférieure à 140 °F (60 °C). Ne
mettez pas de nourriture froide dans le tiroir chauffe-
plat. Ne réchauffez pas d'aliments pendant plus de
2 heures. Le non-respect de ces consignes peut
engendrer des intoxications alimentaires.
Ne laissez pas d'articles en papier, en plastique,
d'aliments en boîtes de conserve ou de matériaux
combustibles dans le tiroir .Ils pourraient s'enflammer.
Ne touchez pas l'élément chauffant ou la surface
intérieure du tiroir. Ces surfaces peuvent être assez
chaudes pour causer des brûlures.
Faites preuve de prudence lorsque vous ouvrez le
tiroir. Entrouvrez le tiroir et laissez l'air chaud ou la
vapeur s'échapper avant d'enlever ou de remettre des
aliments. De l'air chaud ou de la vapeur s'échappant
du four pourrait brûler vos mains, votre visage et/ou
vos yeux.
N'utilisez pas de papier d'aluminium pour recouvrir le
tiroir- réchaud. Le papier d'aluminium est un excellent
isolant thermique et retient la chaleur. Il affecte la
performance du tiroir et peut présenter un risque
d'incendie. Les dommages provoqués par un usage
inapproprié du papier d’aluminium ne sont pas couverts
par la garantie.

39
Comment enlever le Film d'Expédition Protecteur et la Bande d'Emballage
Saisissez délicatement avec vos doigts un coin du film
d'expédition protecteur et décollez-le doucement de la
surface de l’appareil .Ne pas utilisez des objets pointus
pour retirer le film protecteur.
Retirez tout le film avant d'utiliser l'appareil pour la
première fois.
Pour assurer qu'aucun dommage n'est causé à la finition du
produit, le moyen le plus sûr d'enlever l'adhésif du ruban
d'emballage sur les nouveaux appareils, est l'application d'un
détergent à vaisselle liquide ménager. Appliquer avec un
chiffon doux et laisser tremper.
Remarque: L'adhésif doit être retiré de toutes les pièces.
Il ne peut pas être retiré s'il est cuit.
CONSIGNES DE SÉCURITÉ
LISEZ ET CONSERVEZ CES INSTRUCTIONS
CONSIGNES DE SÉCURITÉ IMPORTANTES.
LISEZ
TOUTES LES INSTRUCTIONS AVANT D’UTILISER VOTRE APPAREIL
Activation de l’équipement à distance (Sur certains modèles)
Cet appareil est conforme à la partie 15 des règles FCC.
Le fonctionnement est soumis aux deux conditions
suivantes: (1) Cet appareil ne doit pas provoquer
d'interférences nuisibles, et
(2) cet appareil doit accepter toute interférence reçue, y
compris les interférences pouvant provoquer un
fonctionnement indésirable.
L'équipement de communication sans fil installé sur cette
gamme a été testé et déclaré conforme aux limites d'un
appareil numérique de classe B, conformément à la partie
15 des règles de la FCC. Ces limites sont conçues pour:
a) fournir une protection raisonnable contre les
interférences nuisibles dans une installation résidentielle.
Cet équipement génère, utilise et peut émettre de
l'énergie radiofréquence et, s'il n'est pas installé et utilisé
conformément aux instructions, peut causer des
interférences nuisibles aux communications radio.
Cependant, il n'y a aucune garantie que des
interférences ne se produiront pas dans une installation
particulière. Si cet équipement cause des interférences
nuisibles à la réception de votre radio ou télévision, ce
qui peut être déterminé en éteignant et en rallumant
l'équipement, l'utilisateur est encouragé à essayer de
corriger l'interférence en suivant une ou plusieurs des
mesures suivantes:
Réorientez ou déplacez l’antenne de réception
Augmentez la distance entre l’équipement et le récepteur.
Connectez l’équipement sur une autre sortie ou
équipement diffèrent a la connexion du récepteur.
Consultez un vendeur ou un technicien radio/TV pour
de l’aide.
(b) accepter toute interférence reçue, y compris les
interférences susceptibles de provoquer un
fonctionnement indésirable de l'appareil.
Notez que tout changement ou modification du dispositif
de communication sans fil installé sur ce four, qui n'est
pas expressément approuvé par le fabricant, peut annuler
l'autorité de l'utilisateur à manipuler l'équipement.
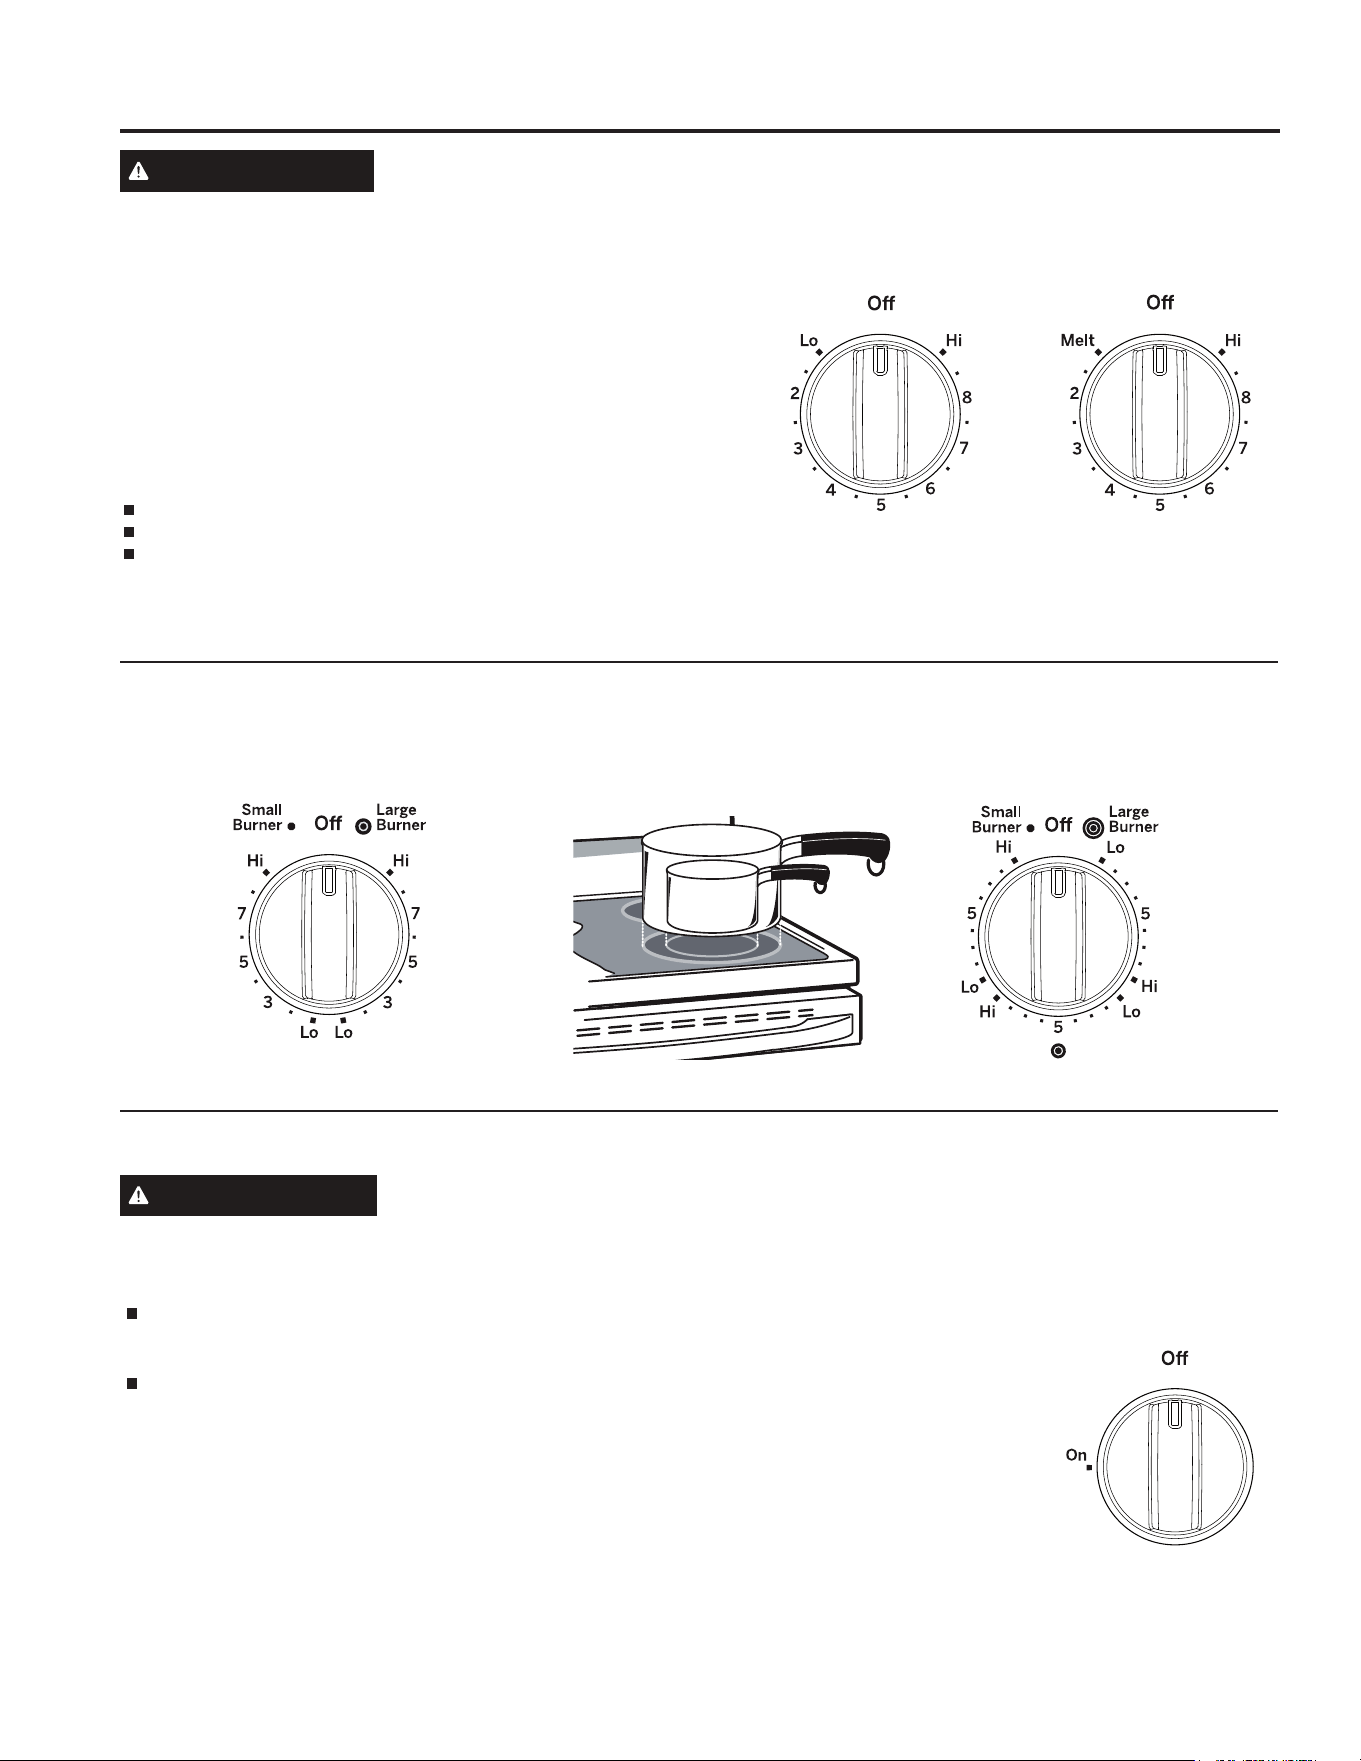
40
EN UTILISANT LA GAMME: Unité de Surface
Cuisinières – Modèles avec Boutons de Commande
AVERTISSEMENT
AVERTISSEMENT
RISQUE D’INCENCIE: Ne jamais laissez la cuisinière sans surveillance quand les plaques
de cuissons sont en moyenne ou haute chaleur. Eloignez les objets inflammables de la
L’espace de cuisson offre 2 ou 3 plaques de cuisson de tailles différentes pour sélectionner celle qui convient le mieux
à l’ustensile de cuisine utilisé.
Modèles avec bouton à double commande
Modèles avec bouton à triple commande
Commande Melt (Fonde)
(sur certains modèles) fondra le
chocolat ou le beurre.
Utilisation de la zone de réchauffage (sur certains modèles)
Réglage
Appuyez sur le bouton et tournez-le dans une direction
jusqu’au réglage souhaité.
Un voyant de surface s’allumera quand le bouton de
commande sera enclenché.
Pour la table de cuisson en verre/vitrocéramique:
Le voyant de surface chaude:
En position OFF et MAX (HI), le bouton
de commande fera un clic une fois
enclenché. Vous pouvez percevoir de
légers bruits pendant la cuisson, indiquant
que la commande maintient la position désirée.
Assurez – vous d’éteindre le bouton sur la
position OFF quand vous avez fini de cuisiner.
Double ou Triple Espaces de Cuisson et Bouton de Commandes (sur certains modèles)
RISQUE D’EMPOISONNEMENT ALIMENTAIRE: Les
bactéries de la nourriture peuvent se développer à des
températures en dessous de 60 ° C (140°F) .
Toujours commencer avec des aliments chauds. Ne
pas utiliser la commande de réchauffage pour
chauffer des aliments froids.
N’utilisez pas la commande de réchauffage pendant
plus de 2 heures.
La ZONE DE RÉCHAUFFAGE (WARMING ZONE)
qui est située au milieu et à l’arrière de la surface en
verre, gardera vos aliments cuisines chaud pour les
servir. Commencez toujours en y mettant des aliments
chauds. Ne l’utilisez pas pour réchauffer des aliments
non cuits ou froids sur la ZONE DE RECHAUFFAGE,
vous vous exposez a des maladies d’origine alimentaire.
Tournez le bouton de commande sur la position ON.
Pour les modèles utilisant les touches tactiles pour le
control de la zone de réchauffage, veuillez-vous
reporter à la section « Utilisation du four » pour plus
d’information.
table de cuisson. Éteignez tous les boutons une fois terminé de cuisiner. Le non-respect des consignes peut résulter
en un incendie, blessures graves ou la mort.
A travers le guide d’utilisateur, les caractéristiques et images peuvent varier de votre modèle.
S’allume quand l’élément est chaud au toucher.
Reste allumé même après l’arrêt de l’élément.
Brille jusqu’à ce que l’élément ait refroidi à une
température approximative de 65.5 °C (150 °F).
Pour obtenir les meilleurs résultats, tous les aliments places
sur la ZONE DE RECHAUFFAGE devraient être recouverts
d’un couvercle ou de papier d’aluminium.
La température initiale, ou la quantité de nourriture, le type
de casserole, et le temps affecteront
la qualité du produit. Vous devez
toujours utiliser une poignée ou
des gants de cuisine quand vous
retirez des aliments de la ZONE
DE RECHAUFFAGE, car les
ustensiles de cuisine seront chauds.
REMARQUE: La surface de
réchauffement ne s’allumera pas
en rouge comme les éléments de
cuisson.
Zone de Réchauffage

41
EN UTILISANT LA GAMME: Unité de Surface:
Unité de Surface – Sans Bouton (modèles PCS980)
Remarque: Tous les emballages de protection doivent être retirés de toutes les pièces. Ils ne peu pas être retirés s’ils ont été chauffés.
Modèles avec un élément de
surface Tri-Ring (Trois Surfaces).
Table de Cuisson en Verre/Vitrocéramique
Radiant
L'unité de surface s’active et se désactive pour maintenir
le réglage sélectionné. Ceci est normal.
Placez votre batterie de cuisine conçue pour induction sur
la surface de cuisson.
Allumez le (s) élément (s): Placez votre batterie de cuisine
conçue par induction sur la surface de cuisson. Appuyez et
maintenez le bouton On/Off (Marche / Arrêt) environ une
demi-seconde. Une sonnerie doit être entendue avec chaque
touche de n’importe quel contrôle.
Le niveau de puissance peut être sélectionné de l'une des
manières suivantes:
1. Faites glisser l'arc de cercle gris (voir les graphiques)
jusqu'au niveau de puissance souhaité. Il n'y a pas de
capteur sur les LED, ou;
2. Touchez n'importe où sur l'arc de cercle gris, ou;
3. Touchez les options + ou - pour ajuster le niveau de
puissance, ou;
4. Raccourci vers Hi (Max): Immédiatement après avoir
allumé l'unité, touchez la touche +, ou;
5. Raccourci vers Low (Min): immédiatement après avoir
allumé l'unité, touchez le signe -
Unités de Surface Double et Triple
L'unité de surface possède 2 ou 3 tailles de cuisson
pour vous permettre de sélectionner la taille
correspondante de l'unité à la taille de l'ustensile
que vous utilisez.
Gray Arc
Swipe Area
Lights
Gray Arc Swipe Area
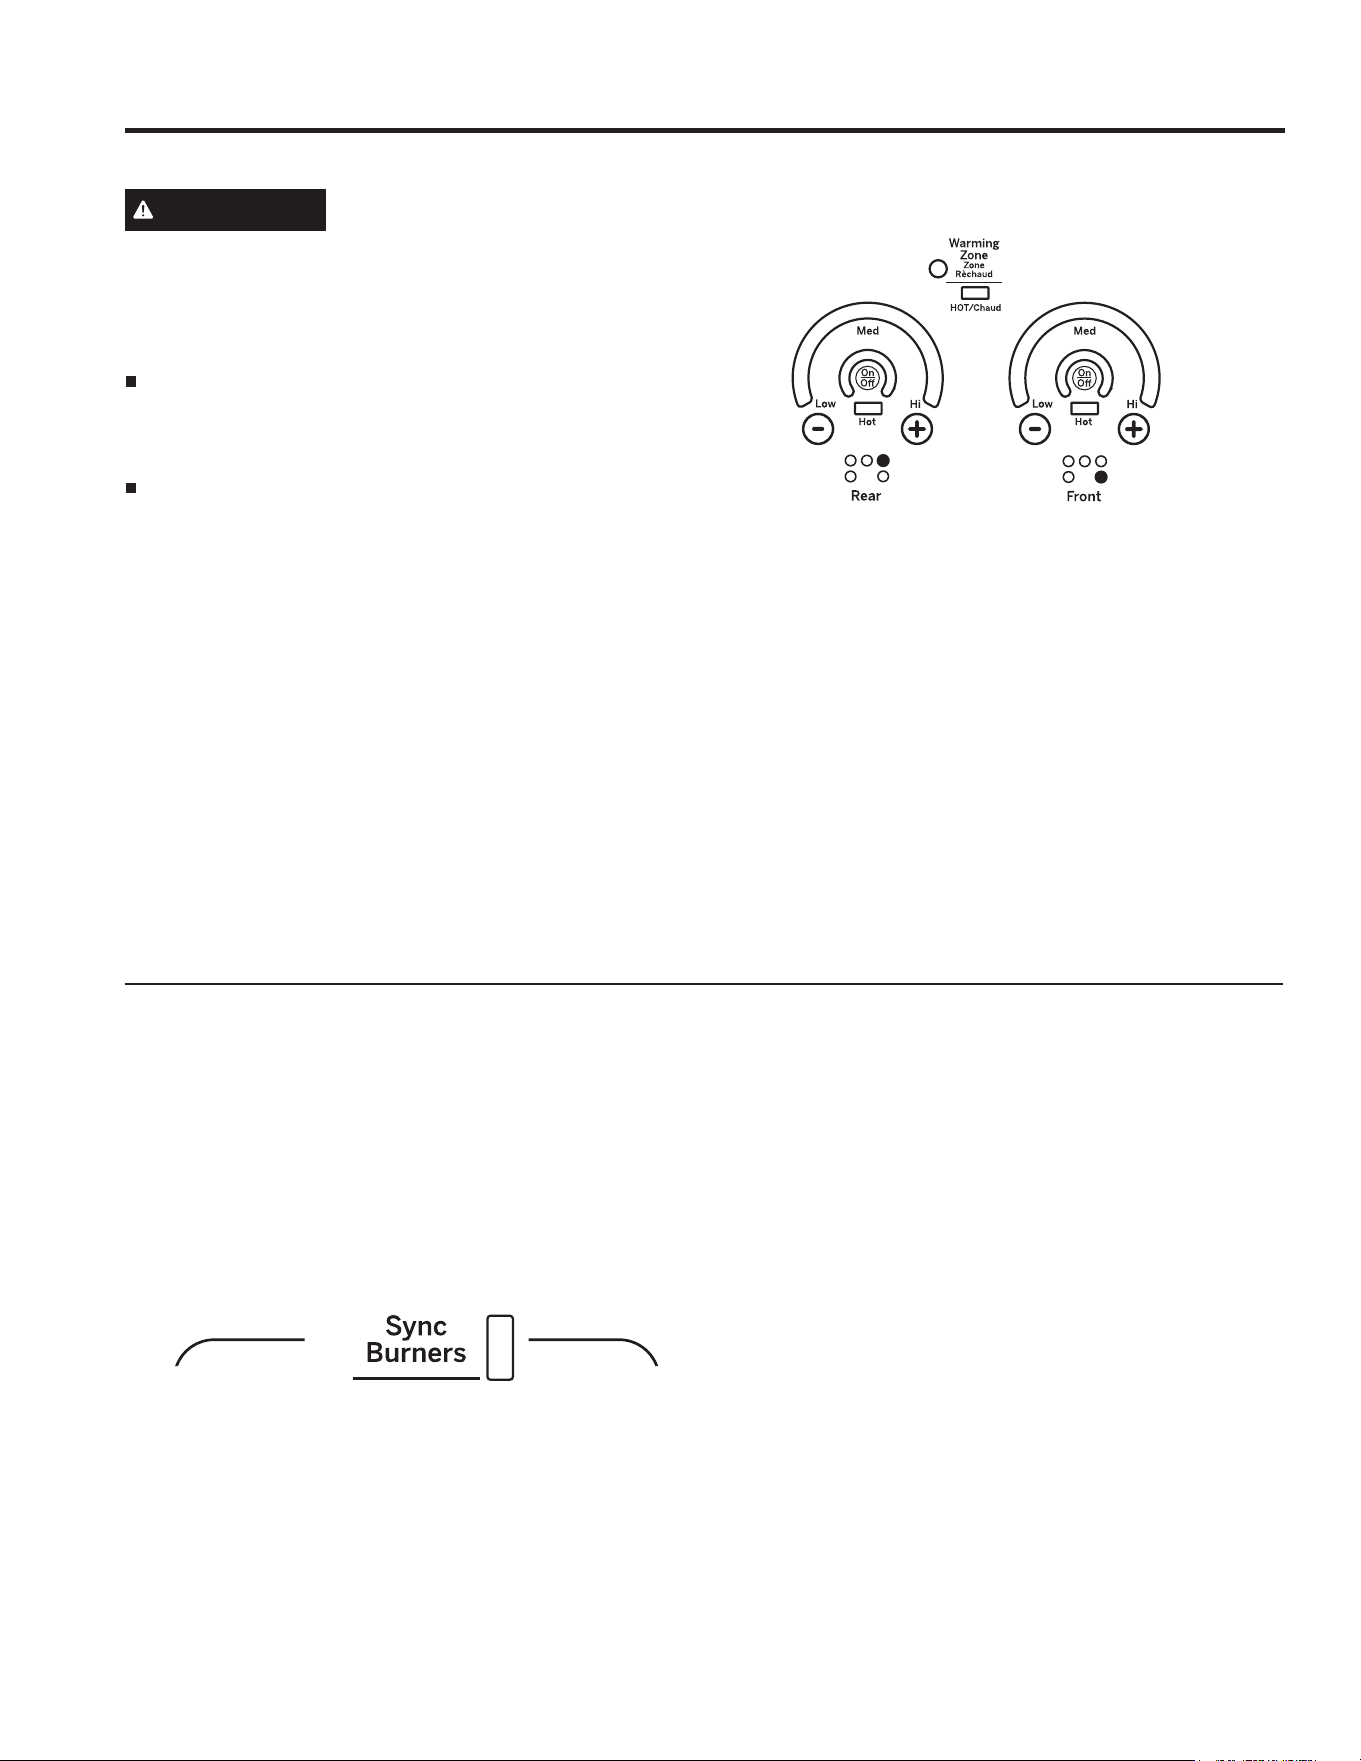
42
EN UTILISANT LA GAMME: Éléments de Surface
Éléments de Surface (modèles PCS980)
Utilisation de la Zone de Réchauffage (sur certains modèles)
ATTENTION
RISQUE D’EMPOISONNEMENT ALIMENTAIRE:
Les bactéries peuvent pousser dans les aliments
à des températures inférieures à 60°C (140 °F).
Commencez toujours avec de la nourriture chaude.
N'utilisez pas le réglage chaud pour réchauffer des
aliments froids.
N'utilisez pas le réglage chaud pendant plus de 2
heures.
La ZONE DE RÉCHAUFFAGE, située au centre
arrière de la surface vitrée, gardera la nourriture
chaude et cuite à une température de service.
Commencez toujours avec de la nourriture chaude.
Ne pas utiliser cette option pour chauffer de la
nourriture froide. Placer des aliments non cuits ou
froids sur la ZONE DE RÉCHAUFFAGE peut entraîner
des maladies d'origine alimentaire.
Pour activer la ZONE DE RÉCHAUFFAGE, appuyez
sur Warming Zone ON/OFF (MARCHE / ARRÊT),
sélectionnez Lo (Min), Med ou Hi (Max) avec les
touches numériques et appuyez sur Start.
Pour de meilleurs résultats, tous les aliments de la
ZONE DE RÉCHAUFFAGE doivent être couverts d'un
couvercle ou d'une feuille d'aluminium. Lorsque vous
réchauffez des pâtisseries ou du pain, le couvercle doit
être ventilé pour permettre à l'humidité de s'échapper.
La température initiale, le type et la quantité de nourriture,
le type de casserole et le temps passé auront une
incidence sur la qualité de la nourriture.
Utilisez toujours des poignées ou des gants de cuisine
lorsque vous retirez des aliments de la ZONE DE
RÉCHAUFFAGE, car les ustensiles et les assiettes
seront chauds.
Comment Synchroniser les Éléments de Gauche
Pour Allumer
Maintenez le bouton Sync Burners (Sync Brûleurs)
enfoncé pendant environ une demi-seconde pour
connecter les deux éléments. Utiliser l'un ou l'autre des
éléments décrit dans Utilisation des éléments de la table
de cuisson pour ajuster niveau d'énergie.
Pour Éteindre
1. Appuyez sur le bouton On/Off (Marche / Arrêt) de
l'un des éléments pour 'éteindre les brûleurs de
synchronisation.
2. Touchez la touche Sync Burners (Syn Brûleurs)
pour éteindre les deux éléments.
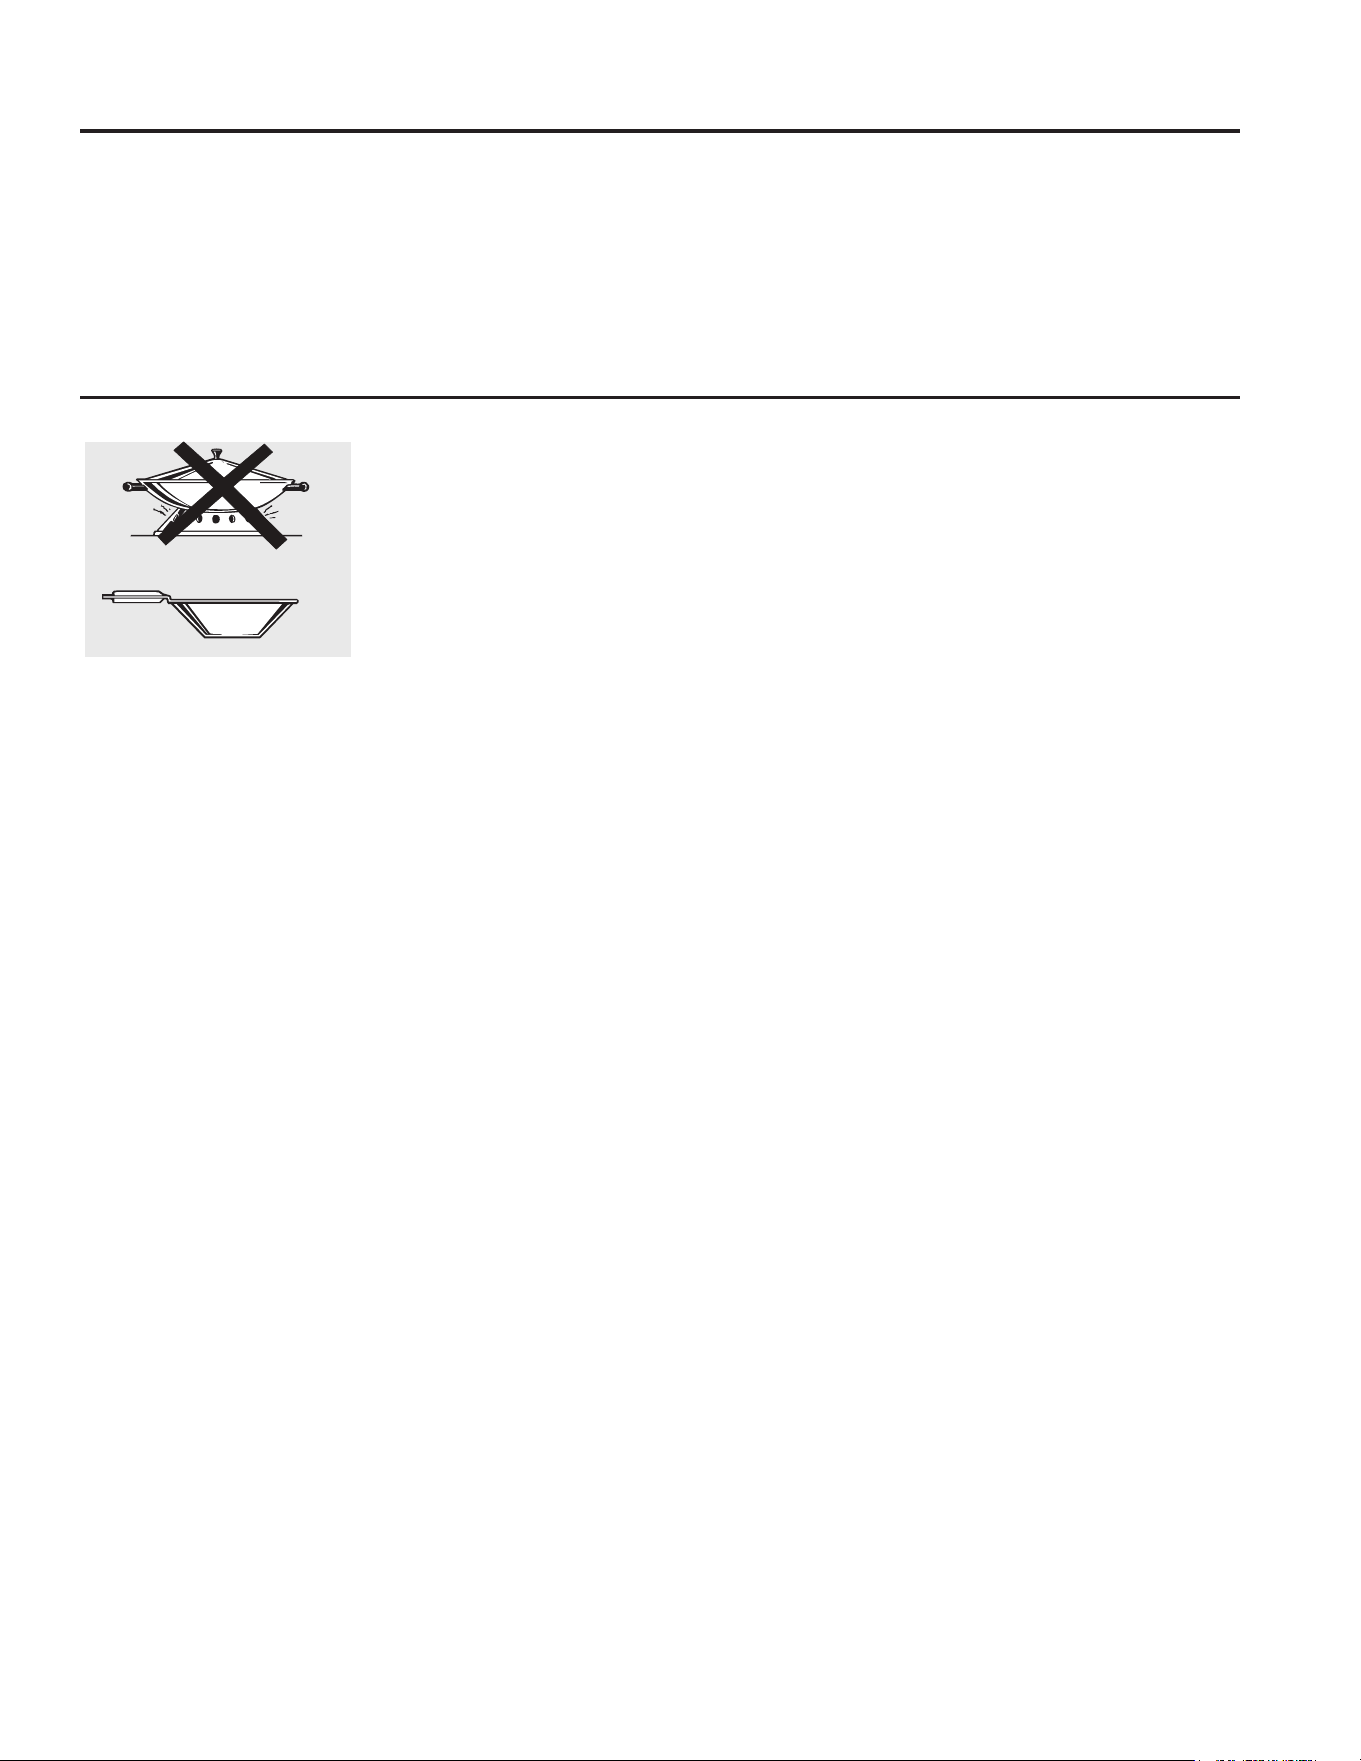
43
EN UTILISANT LA GAMME: Éléments de Surface
Conseils Production de Conserves Maison
Assurez-vous que la cocotte-minute est placée au milieu
de la plaque.
Assurez-vous que la cocotte-minute est un fond plat.
Pour éviter des brulures dues à la vapeur ou à la chaleur,
prenez vos précautions à l’ouverture.
Utilisez des récipients, et les procédures de sources sures.
Pour pourrez les retrouver chez les fabricants comme
Ball® et Kerr®.
Les cocottes-minute à fond plat sont recommandées.
L’utilisation de la cocotte-minute avec un fond d’eau
peuvent augmenter le temps d’ébullition.
Cuisson au Wok
Nous recommandons d’utiliser que des
Woks à fond plat. Vous pourrez les
trouver chez votre marchand habituel.
Ne pas utiliser des Woks qui possèdent
un support d’anneaux.
Ne pas utiliser des Woks à fond profond.
Vous pourriez vous brûler gravement si le
Wok se renverse.
Utilisez seulement des Woks à fond plat
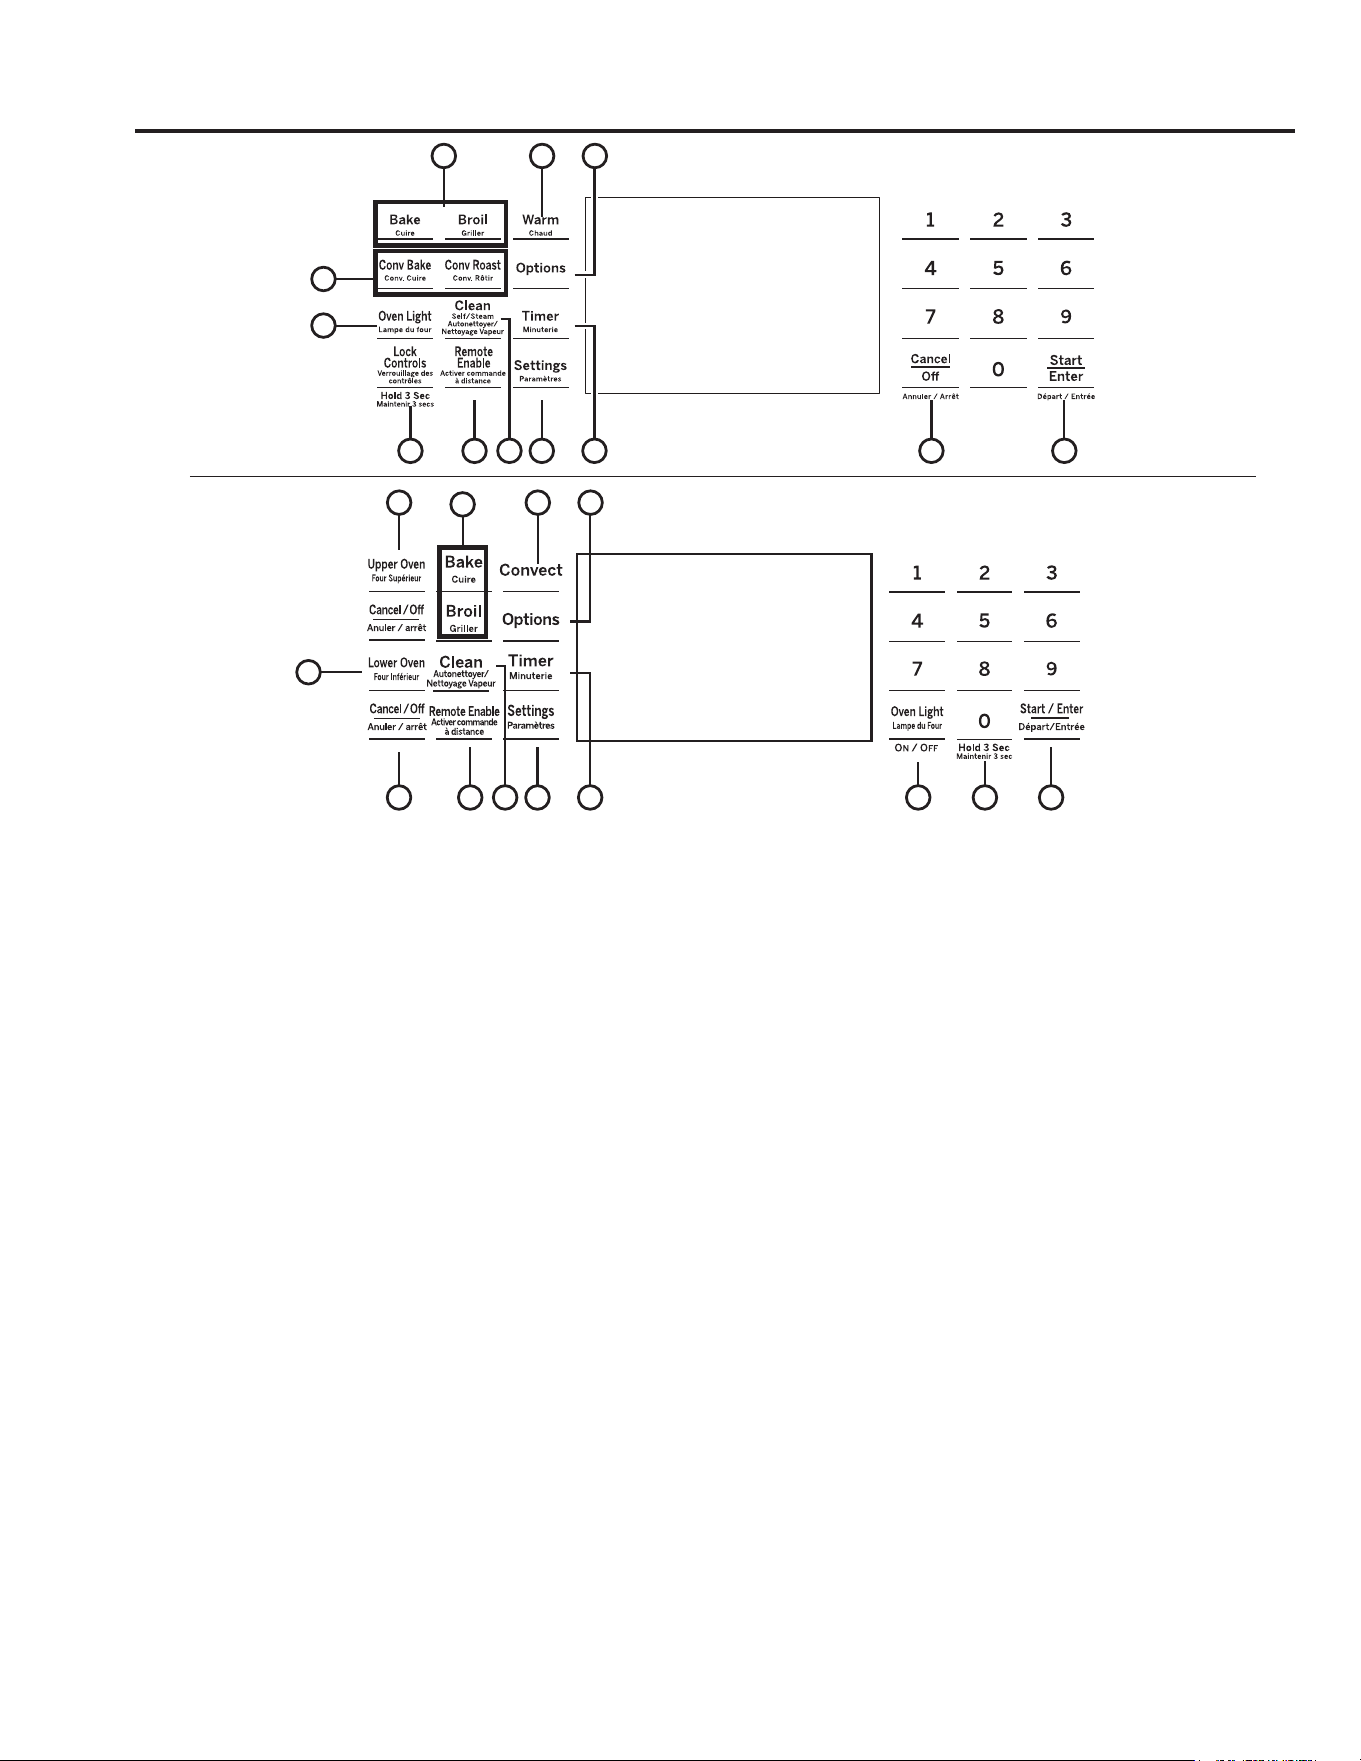
44
EN UTILISANT LA GAMME: Commandes du Four
Commandes du Four
13
2
13
7 54 98
1
6
10
11
12
Modèles PCS980
1. Touche Convection Cooking (Cuisson à
Convection):
La cuisson à convection augmente
l’air circulant pour une meilleure performance. Reportez
-vous à la section des Modes de Cuisson pour plus
de détails.
2. Touche Cuisson Traditionnelle: Votre four
possède les modes traditionnels de cuisson suivant:
Cuire et Gratiner (bake and broil). Reportez-vous à la
section des Modes de Cuisson pour plus de détails.
3. Warm (Chaud): Gardera votre nourriture cuisinée
chaude, à température de service. Reportez-vous à la
section des Modes de Cuisson pour plus de détails.
4. Nettoyage: Votre four a deux modes de nettoyage:
Auto-nettoyage ou Nettoyage à Vapeur. Reportez-vous
à la section Nettoyage du Four pour plus de détails.
5. Start/Enter (Départ/Entrer): Appuyez sur les touches
pour commencer à cuire, nettoyer ou utiliser les
fonctions minutée.
6. Cancel/ Off (Annuler/Arrêt): Annule toutes les
opérations excepté l’horloge, le chronomètre et le tiroir
garde-chaud.
7. Timer (Minuterie): Fonctionne comme un compte
à rebours. Appuyez sur la touche Timer et utilisez les
touches numériques pour programmer le temps en
heures et minutes. Appuyez sur la touche Start / Enter.
Le four continuera de fonctionner lorsque le compte à
rebours de la minuterie sera terminé. Pour éteindre la
minuterie, appuyez sur la touche Timer (Minuterie).
8. Lumière du four: Allume ou éteint la lumière
du four.
9. Lock Controls (Verrouillage): Verrouille le centre
de contrôle afin que si l’on appuie sur les touches, cela
n'active pas les commandes. Appuyez sur la touche
Verrouillage des commandes pendant trois secondes
pour verrouiller ou déverrouiller. La commande. Cancel/
Off (Annuler / Désactiver) est toujours active, même
lorsque le contrôle est verrouillé.
10. Remote Enable: (Activation à distance): Vous
permet de contrôler votre four à distance. Pour pouvoir
démarrer le four à distance, appuyez sur la touche Remote
Enable et le voyant de «Remote» s'allumera sur l'affichage.
Le four peut maintenant être démarré à distance avec
un appareil connecté. Ouvrir la porte du four ou appuyer
sur la touche d'activation à distance retirera "Remote"
de l'affichage et vous empêchera d'allumer le four à
distance. Si "Remote" n'apparaît pas sur l'affichage, vous
pouvez toujours modifier les réglages du four ou éteindre
le four. Après avoir utilisé le four, n'oubliez pas de vérifier
que l'icône "Remote" est affichée si vous souhaitez
redémarrer le four à l'avenir. Pour plus d'informations sur
la connexion de votre four, reportez-vous à la section
Connexion WiFi de ce manuel.
11. Paramètres: Voir la section Paramètres pour plus
d'informations.
12. Options: Voir la section Options pour plus d'informations.
13. Four supérieur et four inférieur: Désigner quel
four les contrôles vont fonctionner. Sélectionnez un four
avant de suivre les étapes pour commencer un mode de
cuisson ou de nettoyage
1
8
2 3
7 54 6
9
10 11
12
Modèles PCS915 - PCS940

45
Réglages
EN UTILISANT LA GAMME: Réglages
Les touches Options et Paramètres ouvrent des menus plus détaillés à l'écran qui permettent d'accéder à des
fonctions supplémentaires. Pour chacun d'eux, sélectionnez la fonction dans l'affichage en utilisant la touche
tactile numérique associée. Vous pouvez sortir à tout moment en appuyant de nouveau sur la touche Options
ou Paramètres.
HORLOGE
WIFI
Sélectionnez Settings (Paramètres) et WiFi. Il est
nécessaire d'activer le WiFi avant d'utiliser Remote
Enable (Activation à Distance) sur votre four.
Bluetooth® - Chef Connect
Il s'agit d'une fonction d'appariement à utiliser avec
d'autres produits compatibles avec Connect compa-
tibles, tels qu'un four à micro-ondes ou une hotte de
cuisine haut de gamme. Pour associer ces produits à
la gamme appuyez sur la touche Settings (Paramètres)
et sélectionnez Bluetooth®. Sélectionnez Pair et suivez
les instructions correspondantes fournies avec le
produit compatible avec Connexion Chef. La gamme
annulera le mode d'appariement après deux minutes
si aucun dispositif d'accouplement n'est détecté.
Sélectionnez Remove (Supprimer) pour confirmer que
le produit est apparié ou pour le désélectionner. La
sonde de cuisson de précision peut également être
associée à l'aide de la fonction Bluetooth®.
Sabbath
Voir la section Mode Sabbat.
Auto Conversion
Lors de l'utilisation de la Cuisson à Convection et du
Rôtissage à Convection, l’option Auto Conversion saura
automatiquement convertir les températures de cuisson
normales pour des températures de cuisson à convection
quand celui-ci est allumé.
Notez que cette option ne convertit pas les temps de
cuisson, il convertit seulement les températures. Cette
fonction peut être activée ou désactivée. Sélectionne
Settings (Paramètres), et l’Auto Conversion est la
5ème option et apparaît sur le premier affichage de
paramètres puis suivez les instructions pour activer ou
désactiver cette fonctionnalité.
Auto Off
TCette caractéristique éteint le four après 12 heures
d’opération continue. Elle peut être activée ou désactivée.
Sélectionnez Settings (Paramètres), Plus (More) et
Désactivation automatique (Auto OFF) pour activer
ou désactiver cette fonctionnalité
F/C (Fahrenheit or Celsius)
Le contrôle du four est réglé pour utiliser les températures
Fahrenheit (F), mais vous pouvez le changer pour utiliser
les températures Celsius (C). Sélectionnez Paramètres,
Plus et F / C pour modifier les échelles de température
affichées.
Sound
Vous pouvez ajuster le volume et le type d'alerte utilisés
par votre électroménager. Sélectionnez Settings
(Paramètres, Plus (More) et Son (Sound). Suivez les
instructions pour effectuer des ajustements de volume ou
pour permuter entre les tonalités d'alerte continues et
simples. Un réglage continu continuera à émettre une
tonalité jusqu'à ce que vous appuyiez sur un bouton de la
commande. Le volume de la tonalité du four peut être ajusté.
La commande retiendra la tonalité du four chaque fois que
le niveau sonore sera modifié.
Réglage de la température du four
Cette caractéristique permet de régler la température de
cuisson du four et la température de cuisson par convection
jusqu'à 1.7 °C (35ºF) plus chaud ou 1.7 °C (35ºF) plus froid.
Utilisez cette fonctionnalité si vous pensez que la
température de votre four est trop chaude ou trop froide et
que vous désirez la changer. Cet ajustement affecte les
modes de cuisson et de cuisson par convection. Sélectionnez
Settings (Paramètres) et Réglage du four (Over Adjust)
pour ajouter Plus de chaleur (More Heat) ou Moins de
chaleur (Less Heat), puis appuyez sur Enregistrer (Save).
Information du Four
Sélectionnez Settings (Paramètres), Plus (More) et Infos
sur le four (Oven Info) pour activer ou désactiver cette
fonction. Ce paramètre affiche le numéro de modèle et la
version du Software.
Ce réglage règle l'heure de l'horloge du four. Appuyez
sur la touche Settings (Paramètres) et sélectionnez
Clock (Horloge). Sélectionnez Set Clock (Définir
l'horloge) et suivez les instructions pour régler l'horloge.
Cette fonctionnalité spécifie également comment l'heu-
re du jour sera affichée. Vous pouvez sélectionner une
horloge standard de 12 heures (12H), un affichage de
l'heure militaire de 24 heures (24H) ou aucune horloge
affichée (Off). Appuyez sur la touche Settings
(Paramètres), sélectionnez Set Clock (Définir l'horloge
et sélectionnez 12/24 heures ou On/Off (Activé /
Désactivé).

46
Paramètres (opcions)
EN UTILISANT LA GAMME: Paramètres
Les touches Options et Settings (Paramètres) ouvrent des menus plus détaillés à l'écran qui permettent
d'accéder à des fonctions supplémentaires. Pour chacun d'eux, sélectionnez la fonction dans l'affichage en
utilisant la touche numérique associée. Vous pouvez quitter à tout moment en appuyant de nouveau sur la
touche Options ou Settings (Paramètres).
Ces paramètres incluent Chaud, Proof, Congelés - Snacks, Pizza surgelée et Produits de boulangerie. Voir
la section modes de cuisson pour plus d'informations.
Temps de Cuisson (Cook Time)
(sur certains modèles)
Vous devez d'abord sélectionner un mode (cuisson, cuisson par convection, rôtissage par convection), puis
sélectionner Options pour accéder aux fonctions suivantes.
Décompte le temps de cuisson et éteint le four lorsque
le temps de cuisson est écoulé. Sélectionnez un mode
de cuisson désiré. Utilisez les touches tactiles pour
programmer une température de cuisson. Appuyez sur
la touche Options et sélectionnez Cook Time.
Utilisez les touches numériques pour programmer le
temps de cuisson en heures et minutes. Puis appuyez
sur Start / Enter.
Temporisation (Delay Time) (sur certains
modèles)
Remarque: Quand vous utilisez l’option Temporisateur
(Delay Time), la nourriture peut s’abîmer facilement –
par exemple le lait, les œufs, le poisson, la farce, la
volaille et le porc - ne devrait pas être laissé pendant
plus d'une heure avant ou après la cuisson. La
température ambiante favorise la croissance de bactéries
dangereuses.
Assurez-vous que la lumière du four est éteinte car la
chaleur de l'ampoule accélère la croissance des bactéries
nocives.
Sonde du Four (Oven Probe) (sur certains
modèles)
Surveille la température interne des aliments et éteint le
four lorsque les aliments atteignent la température
programmée. Insérez la sonde, appuyez sur le mode de
cuisson souhaité et programmez la température de la
sonde. Voir la section Modes de cuisson pour plus
d'informations. La sonde ne peut être utilisée qu'avec la
cuisson au four, la cuisson par convection et le rôtissage
par convection.
Preuve (proof) (non disponible).
Congelé (frezen) (non disponible).
Cuisson au four (baked goods) (non
disponible).
Temporise quand le four est allumé. Utilisez cette option
pour définir l'heure à laquelle vous voulez que le four
démarre. Sélectionnez le mode de cuisson désiré. Utilisez
les touches tactiles numérotées pour programmer votre
température de cuisson. Appuyez sur la touche
Options et sélectionner Delay Time. Utilisez les touches
numérotées pour programmer le jour et l’heure ou le
four devra s’allumer, puis appuyez sur Start/Enter. Le
temporisateur Delay Time n’est pas disponible sur tous
les appareils.
Warm (Chaud) (sur certains modèles)
Gardera votre nourrite cuisinée chaude, à température
de service. Reportez-vous à la section des Modes de
Cuisson pour plus de détails.
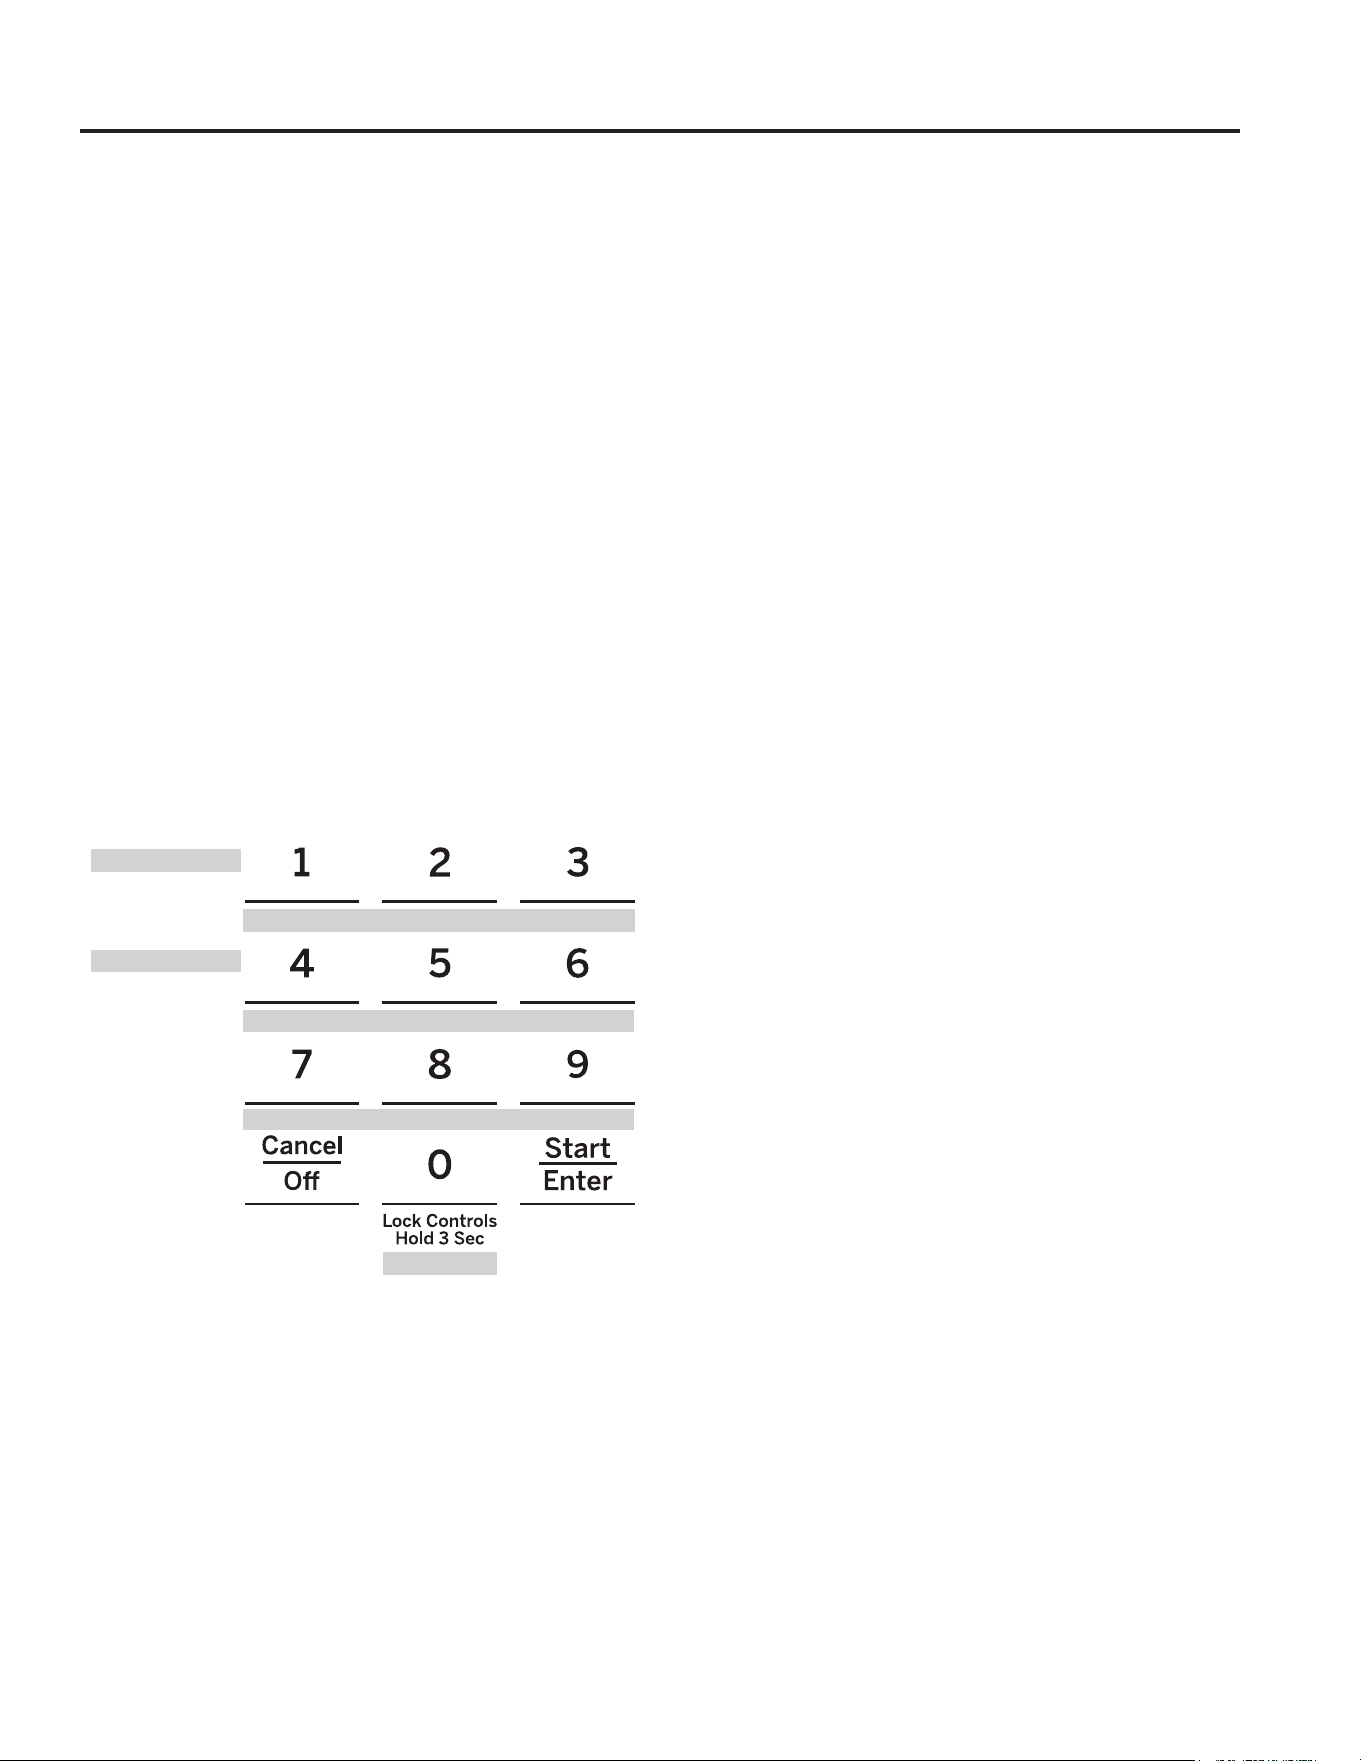
47
Le mode Sabbat est compatible avec les équipements standards de Star K. Certains modes observés par le
consommateur comprennent la désactivation des sons, la désactivation des lumières du four, et des retards d'environ
30 secondes à une minute sur les changements d'affichage. Seule la cuisson continue ou la cuisson minutée est
autorisée en mode Sabbat. La cuisson en mode Sabbat est un processus en deux étapes, d'abord le mode Sabbat
doit être réglé, puis le mode de cuisson doit être réglé.
Régler le Mode Sabbat
Appuyez sur la touche Paramètres, sélectionnez Sabbat
et sélectionnez Activer. Une seule parenthèse "]"
apparaîtra sur l'affichage indiquant que le mode Sabbat
est activé. L'horloge ne sera pas affichée. La cuisson
continue ou la cuisson minutée peuvent maintenant être
programmées.
Commencer la Cuisson Continue
1. Appuyez sur la touche tactile Bake (Cuire).
2. Si la température désirée est de 175°C (350F),
appuyez sur Start / Enter. Si vous souhaitez une
température de cuisson différente, utilisez les touches
numériques 1 à 5 pour sélectionner une température
de cuisson prédéfinie, puis appuyez sur Envoi / Entrée.
Reportez-vous au graphique ci-dessous pour déterminer
quelle touche règle la température de cuisson désirée.
Après un délai, une deuxième parenthèse "] [" apparaîtra
sur l'affichage indiquant que le four est en cours de cuisson.
Réglage de la Température
1. Appuyez sur Bake (Cuire), utilisez les touches
numériques 1 à 5 pour sélectionner une température
de cuisson prédéfinie différente et appuyez sur Start /
Enter.
2. Puisqu'aucun retour n'est donné pendant le changement
de température, un thermomètre de four peut être utilisé
pour confirmer les changements de température.
Démarrer une cuisson minutée
1. Appuyez sur la touche tactile Bake (Cuire)
Si la température désirée est de 175°C (350F), utilisez
les touches numériques 6 à 0 pour sélectionner une
durée de cuisson. Si la température de cuisson souhaitée
est autre que 175°C (350F), utilisez les touches
numériques 1 à 5 pour sélectionner une température de
cuisson prédéfinie, puis sélectionnez la durée de cuisson.
Reportez-vous au graphique de cette page pour
déterminer quelle touche règle la température de cuisson
et la durée de cuisson désirées.
2. Appuyez sur Start/Enter.
Après un délai, une deuxième parenthèse "] [" apparaîtra
sur l'affichage indiquant que le four est en cours de
cuisson. Lorsque le temps de cuisson expire, l'affichage
revient à une seule parenthèse "]" indiquant que le four ne
cuit plus. Aucune tonalité ne retentit lorsque le temps de
cuisson est terminé.
Sortir du Mode Sabbat
Quitter le mode Sabbat devrait être fait après la fin du
sabbat.
1. Appuyez sur Cancel/Off (Annuler / Arrêt) pour mettre
fin au mode de cuisson en cours.
2. Appuyez sur la touche Paramètres et maintenez-la
enfoncée jusqu'à ce que le mode Sabbat désactivé
soit affiché.
Remarque : Panne de Courant en Mode
Sabbat
Si une coupure de courant se produit lorsque le four est
en mode Sabbat, l'appareil retournera au mode Sabbat
lorsque l'alimentation sera rétablie. Cependant, le four
restera éteint même s'il était en cours de cuisson.
EN UTILISANT LA GAMME: Mode Sabbat
Température (°F)
Temps (heures)
200
325
2.5h
250
400
3h
4h
300
2h
3.5h
1 = 200°F, 2 = 250°F, 3 = 300°F, 4 = 325°F, 5 = 400°F
Mode Sabbat
6 = 2 heures, 7 = 2.5 heures, 8 = 3 heures, 9 = 3.5 heures, 0 = 4 heures

48
Le nombre de grille varie selon le modèle
Position ouverte
Prenez ici
EN UTILISANT LA GAMME: Grilles du Four
Grilles du Four
Les positions de grille recommandées pour différents types d'aliments
sont fournies dans le Guide de cuisson. Le réglage de la position de la
grille est un moyen d'influencer les résultats de cuisson. Par exemple,
si vous préférez des sommets plus foncés sur des gâteaux, des muffins
ou des biscuits, essayez de déplacer les aliments d'un étage plus haut.
Si vous trouvez que les aliments sont trop cuits sur le dessus, essayez
de les déplacer la prochaine fois.
Lors de la cuisson avec plusieurs plats et sur plusieurs grilles, assurez-
vous qu'il y a au moins un espace 3,8 cm ( 1½ po) entre les plats pour
laisser suffisamment d'espace pour que l'air puisse circuler.
Votre four peut être fourni avec une extension de grille et/ou traditionne
les plaques de cuisson.
Pour éviter les brûlures, placez les grilles dans la position désirée avant
d'allumer le four.
Extension de Grilles
Tirez toujours la grille par sa glissière avant supérieure jusqu'à sa
position complètement ouverte, lors de la mise en place ou du retrait de
la batterie de cuisine.
Si les grilles d'extension sont difficiles à rallonger, lubrifiez les grilles
avec le lubrifiant graphite fourni avec votre four. Retirez le portoir du
four, retirez les débris dans les rails latéraux avec une serviette en
papier, secouez le lubrifiant graphite et placez 4 petites gouttes sur les
deux pistes inférieures des côtés gauche et droit. Ouvrez et fermez le
rack plusieurs fois pour répartir le lubrifiant.
Pour commander du lubrifiant graphite supplémentaire, reportez-vous
aux sections Accessoires et Support aux consommateurs à la fin de ce
manuel.
Enlever une Extension de Grille:
1. Assurez-vous que la grille soit complètement enfoncée dans le four
afin que les palettes latérales du support se désengagent du support
du four.
2. Faites glisser la grille vers vous jusqu'à la butée (position d'arrêt) sur
e support de grille.
3. Saisir fermement les deux côtés du châssis et de la grille coulissante,
incliner l'extrémité avant vers le haut et la retirer.
Remplacer une Extension de Grille:
1. Saisir fermement les deux côtés du châssis et du support coulissant.
2. Placez l'extrémité incurvée de la grille (butées d'arrêt) sur les supports
du four, inclinez l'avant de la grille et poussez-la le plus loin possible.
Si les grilles supplémentaires sont difficiles à remplacer ou enlever,
utilisez de l’huile de cuisson sur les supports de grille de votre four. Ne
pas répandre de l’huile sur les grilles.
Pour graisser la Palette:
Agiter le lubrifiant et appliquer sur les parties mobiles des mécanismes
de la palette comme indiqué.
Devant
supérieur
de la grille

49
EN UTILISANT LA GAMME: Papier d'aluminium et revêtement de four
Batterie de Cuisine
Directives pour les Batteries de Cuisine
Le matériau, la finition et la taille des ustensiles de cuisson
affectent les performances de cuisson.
Les casseroles obscures, antiadhésives, et mates absorbent
la chaleur plus facilement que les casseroles claires et
brillantes.
Les casseroles qui absorbent la chaleur plus facilement
peuvent donner une croûte plus brune, plus croustillante et
plus épaisse. Si vous utilisez des ustensiles de cuisine
foncés et enrobés, vérifiez les aliments plus tôt que le temps
de cuisson minimum. Si des résultats indésirables sont
obtenus avec ce type de batterie de cuisine, pensez à réduire
la température du four de 4°F (25 ° F) la prochaine fois.
AVERTISSEMENT
N'utilisez aucun type de papier d’aluminium ou de revêtement de four pour couvrir
Papier d'Aluminium et Revêtement de Four
Le papier d’aluminium peut être utilise pour récupérer des débordements en plaçant une feuille sur une grille inferieure,
quelques centimètres en dessous de la nourriture. N’utilisez pas plus de feuille nécessaire et une jamais recouvrir
entièrement le four avec du papier d’aluminium. Gardez le papier d’aluminium à une distance minimum de 2 à 4 cms
des murs du four pour éviter de bloquer la circulation de l’air.
le fond du four. Ces articles peuvent piéger la chaleur ou fondre, entraînant la détérioration du produit et des
risques de choc, de fumée ou d'incendie. Les dommages résultant d'une mauvaise utilisation de ces articles
ne sont pas couverts par la garantie du produit.
Les casseroles brillantes peuvent donner des prépara-
tions cuites plus uniformément tels que des gâteaux et
des biscuits.
Les casseroles en verre et en céramique chauffent
lentement mais retiennent bien la chaleur. Ces types de
casseroles fonctionnent bien pour les plats tels que les
tartes et les crèmes.
Les casseroles isolées à l'air chauffent lentement et
peuvent réduire le brunissement du fond.
Garder vos batteries de cuisine propres pour permettr
une cuisson uniforme.

50
EN UTILISANT LA GAMME: Modes de cuisson
Votre four a une variété de modes de cuisson pour vous aider à obtenir les meilleurs résultats. Ces modes sont décrits
ci-dessous. Voir le Guide de cuisson pour la position de la grille et d'autres recommandations pour les modes et les
aliments spécifiques.
Bake (Cuire)
Ce mode de cuisson est pour la cuisson et le gril. Quand
sont préparés des plats comme des gâteaux, cookies et
desserts, faire toujours préchauffer le four en premier.
Pour utiliser ce mode, appuyer sur la touche Bake (Cuire),
Entrez la température à l’aide des touches numérotées,
puis appuyez sur Start/ Enter.
Broil (Gril)
Four a Convection Multiples Grilles
Le mode de cuisson par convection est conçu pour la
cuisson sur plusieurs grilles en même temps. Ce mode
utilise le mouvement d'air du ventilateur de convection
pour améliorer l'uniformité de la cuisson. Votre four est
équipé de la conversion automatique de recette, il n'est
donc pas nécessaire d'ajuster la température lorsque vous
utilisez ce mode. Toujours préchauffer en utilisant ce mode.
Les durées de cuisson peuvent être légèrement plus
longues pour plusieurs grilles que ce qui serait attendu
pour une seule grille. Pour utiliser ce mode, appuyez sur
la touche Conv Bake (Cuire Convection), entrez une
température avec les touches numériques, puis appuyez
sur Start / Enter
Gril à Convection
Pâtisseries
Le mode Convection Roast (Gril à Convection) est conçu
pour rôtir des morceaux entiers de viande sur une seule
grille. Ce mode utilise le mouvement d'air du ventilateur de
convection pour améliorer le brunissement et réduire le
temps de cuisson. Vérifiez la nourriture plus tôt que le temps
suggéré par la recette lorsque vous utilisez ce mode, ou
utilisez la sonde (voir la section Sonde pour plus d'informations).
Il n'est pas nécessaire de préchauffer en utilisant ce mode.
Pour utiliser ce mode, appuyez sur la touche Conv Ro Roast
(Gril Convection), entrez une température avec les touches
numériques, puis appuyez sur Start / Enter.
Le mode Bake Goods (Pâtisseries) a été conçu pour cuire
les gâteaux, pains, cookies ou les aliments similaires sur
une seule grille. Ce mode a été conçu pour donner une
dorure sur le dessus et un faire gonfler les aliments.
Certaines préparations demanderont plus de temps de cuisson
qu’avec le mode Bake traditional (Cuisson Traditionnelle).
Produits/Snacks Congelés
Les modes Frozen Snacks (Produits/Snacks Congelés)
sont conçus pour cuire des aliments congelés tels que des
pépites de pommes de terre, des frites et des collations et
amuse-gueule similaires. La plupart des aliments cuisent
dans les délais recommandés. Ajuster le temps de cuisson
en fonction des préférences individuelles.
Utilisez le mode Frozen Snacks (Produits/Snacks Congelés)
quand vous cuisinez des snacks congelés sur
une seule grille.
Ce mode ne nécessite pas de préchauffage du four. Les
aliments doivent être placés dans le four avant ou immé-
diatement après le démarrage du mode. Utilisez le mode
Frozen Snacks (Produits/Snacks Congelés) quand vous
cuisinez des snacks congelés sur deux grilles simultanément.
Ce mode comprend un cycle de préchauffage pour préparer
le four à la cuisson multi-grilles
Pizza Congelée
Les modes Frozen Pizza (Pizza Congelée) sont conçus
pour cuire des pizzas surgelées. La plupart des pizzas
cuisent dans les délais recommandés. Ajuster le temps de
cuisson en fonction des préférences individuelles.
Utilisez le mode Forzen Pizza (Pizza Congelée) quand
vous cuisinez sur une seule grille. Ce mode ne nécessite
pas de préchauffage du four. Les aliments doivent être
placés dans le four avant ou immédiatement après le
démarrage du mode.
Utilisez le mode Forzen Pizza (Pizza Congelée) quand
vous cuisinez sur deux grilles simultanément. Ce mode
comprend un cycle de préchauffage pour préparer le four
à la cuisson multi-grilles.
Garde Chaud (Warm)
Les modes Warm (chauds) sont conçus pour garder les
aliments cuits chauds. Couvez la nourriture à l’aide de
protections humides et ne couvrez pas la nourriture
destinée à être mangée croustillante. Préchauffer le four
n’est pas nécessaire. Ne pas utiliser l’option Warm (Chaud)
pour réchauffer les aliments froids. Il est recommandé de
ne pas garder les aliments au chaud pendant plus de 2 heures.
Certains modèles peuvent également avoir des tiroirs
chauffants. Trois réglages sont disponibles - utilisez Haut
pour les aliments tels que les ragoûts, les viandes et les
pommes de terre; utiliser le milieu pour les articles tels
que les préparations mélangées et les pizzas; Utilisez
Minimum pour les articles tels que les pains, les gaufres,
et aussi pour réchauffer la vaisselle allant au four.
Proof (Levée
Le mode Proof (Levée) maintient un environnement chaud
pour lever la pâte à levure. Si le four est trop chaud, le
mode Proof (Levée) ne fonctionnera pas et l'affichage
indiquera "Four too hot for Proof"(Four trop Chaud pour la
Levée). Pour de meilleurs résultats, couvrir la pâte pendant
l’utilisation de Proof (Levée) et vérifier tôt pour éviter une
mauvaise levée de la pâte.
Modes de Cuisson
Toujours utiliser le mode gril avec la porte et tiroir du four
fermés. Surveillez de près la nourriture que vous griller.
Faires attention quand vous griller des aliments. Le fait de
placer des aliments à proximité de l'élément du gril ou du
brûleur augmente la fumée, les éclaboussures et la
possibilité d'inflammation des graisses. Il n'est pas nécessaire
de préchauffer lorsque vous utilisez le mode Broil.(Gril).
Le mode Broil Max (Hi) (Gril Max) utilise une forte température
dans la partie supérieur haute pour griller les aliments.
Utilisez le mode Broil Hi (Gril Max) quand vous voulez griller
une fine tranche de steak à l’extérieur et garder la moelleuse
et crue à l’intérieur.
Pour utiliser ce mode, appuyez une fois sur la touche Broil
(Gril) et appuyez sur Start / Enter.
Le mode Broil Low (Gril Min) utilise une chaleur moins
intense de l'élément supérieur ou du brûleur pour cuire/
dorer la surface.
Utilisez le mode Broil Low pour des tranches de viande ou
de nourriture plus épaisses, que vous souhaitez cuire
entièrement. Pour utiliser ce mode, appuyez sur Broil (Gril),
puis appuyez sur Start / Enter.
51
Placement Correct de la Sonde
Après avoir préparé la viande et l'avoir placée sur le plat
de cuisson, suivez ces instructions pour placer correcte-
ment la sonde.
Insérez la sonde dans la nourriture, jusqu’à ce que la
pointe de la sonde atteigne le centre de la partie la plus
épaisse de la nourriture. Pour de meilleures performan-
ces, la sonde doit être complètement insérée dans les
aliments.
Si la sonde n'est pas correctement positionnée, il se
peut qu'elle ne mesure pas avec précision la température
de la portion la plus froide de la nourriture. Certains
aliments, en particulier les petits articles, ne sont pas
adaptés à la cuisson avec la sonde en raison de leur forme
ou de leur taille.
La sonde ne doit pas toucher l’os, la graisse ou le cartilage.
Pour les volailles entières, enfoncez la sonde dans la
partie la plus épaisse de la poitrine.
Pour les viandes sans os, insérez la sonde dans la
partie centrale du morceau.
Pour les jambons ou moutons avec os, insérez la
sonde dans la partie centrale du plus gros muscle ou
ligament.
Pour les préparations de type Meatloaf (Pain de Viande),
insérez la sonde dans la partie centrale.
Pour le poisson, insérez la sonde juste au-dessus des
branchies, dans la partie la plus pleine, parallèle au
réseau dorsal.
Utilisation de la Sonde
Pour utiliser la sonde avec préchauffage:
1. Réglez le mode de cuisson désiré (cuisson au four,
cuisson par convection ou rôtissage par convection).
2. Insérer la sonde dans l'aliment (voir Positionnement
Correct de la Sonde).
3. Une fois que le four préchauffé, placez la nourriture
dans le four et connectez la sonde à une prise
Assurez-vous que la sonde soit correctement insérée.
4. Programmez la température de la sonde en appuyant
sur la touche Options, en sélectionnant l'option Probe
(Sonde) et en saisissant la température désirée. La
température maximale de l'aliment interne que vous
pouvez régler est de 90°C (200°F).
Utiliser la Sonde sans Préchauffage:
1. Insérer la sonde dans l'aliment (voir Positionnement
Correct de la Sonde).
2. Placez les aliments dans le four et connectez la sonde
à la prise du four.
3. Réglez le mode de cuisson souhaité (cuisson au four,
cuisson par convection ou rôtissage par convection).
4. Programmez la température de la sonde en appuyant
sur la touche Options et en sélectionnant l'option Probe
(Sonde) et en entrant la température désirée. La
température maximale de l'aliment interne que vous pouvez
régler est de 90 ° C (200 ° F).
Guide d’Entretien de la Sonde
Sonde
UTILISER LA GAMME: Sonde
AVERTISSEMENT
Consommer de la nourriture insuffisamment cuite peut entraîner des maladies
d'origine alimentaire. Utilisez la sonde selon les instructions suivantes pour vous assurer que toutes les
parties de l'aliment atteignent des températures de cuisson minimales. Des recommandations pour des
températures minimales de sécurité alimentaire peuvent être trouvées sur www.foodsafety.gov ou
www.IsItDoneYet.gov.
La température interne des aliments est fréquemment utilisée comme indicateur de cuisson, en particulier
pour les rôtis et la volaille. Le mode Probe (Sonde) surveille la température interne des aliments et éteint le
four lorsque la température interne des aliments atteint la température programmée.
Vérifiez toujours la température à plusieurs endroits dans les aliments avec un thermomètre à aliments
après la cuisson pour vous assurer que toutes les parties de l'aliment ont atteint la température interne
minimale sécuritaire pour cet aliment.
Utilisez une sonde autre que celle qui vous est fournie
avec ce produit peut engendrer des dommages à la
connexion de la sonde.
Utilisez les poignes de la sonde quand vous l’insérez et
l’enlevez de la viande et de la prise.
Pour éviter d’abîmer la sonde, n’utilisez pas de pinces
pour retirer le câble.
Pour éviter de casser la sonde, assurez-vous que la
nourriture soit complètement décongelée avant d’y
insérer la sonde.
Pour éviter d’éventuelles brûlures, ne retirez pas la sonde
de a prise quand elle est encore chaude.
Ne jamais laisser la sonde à l’intérieur du four pendant
l’auto-nettoyage ou le nettoyage à vapeur.
Ne ranger pas la sonde dans le four.

52
UTILISER LA GAMME: Guide de Cuisson
Guide de Cuisson
ALIMENT
MODE (S)
RECOMMANDES
POSITION(S)
DE GRILLE COMMENTAIRES
Pâtisseries
Gâteaux à un ou plusieurs
étages, muffins, pains sur
une Seule Grille
4Bake (Cuire)
Gâteaux à plusieurs étages
Sur plusieurs grilles
3 et 5Bake (Cuire)
Assurez-vous d’une ventilation adéquate (Voir illustration ci-dessous).
Gâteaux en Mousseline 1Bake (Cuire)
Cookies, biscuits, scone
Sur une seule
4Bake (Cuire)
Cookies, biscuits, scones
Sur plusieurs grilles
Bake (Cuire)
Convection Bake
(Cuisson à Convection)
3 et 5
2,4, et 6
(rangée 3
Recommandée seulement pour
Convection Bake (Cuisson à Convection)
Assurez-vous d’une ventilation adéquate.
Bœuf & Porc Hamburgers
6Broil Hi (Gril Max)Hamburgers
Gardez la porte ouverte quand vous utilisez l’option Gril. Utiliser un plat pour
Gril, déplacez les aliments pour plus ou moins de cuisson. Surveillez votre
plat pendant le gril. Pour obtenir de meilleurs résultats placez les aliments
sous l’élément chaud du Gril.
6Broil Hi (Gril Max)Steaks & Côtelettes
Gardez la porte ouverte quand vous utilisez l’option Gril. Utiliser un plat pour Gril,
déplacez les aliments pour plus ou moins de cuisson. Surveillez votre plat pendant
le gril.
Pour obtenir de meilleurs résultats placez les aliments sous l’élément chaud du Gril.
3 ou 4Bake (Cuire)Rôti
Volaille
3 ou 4Bake (Cuire)Poulet entier
Poitrines de poulet non
désossées, ambes, cuisses
Si panés ou enrobés de sauce, évitez les modes Broil Hi (Gril Max). Faire griller la
peau vers le bas en premier. Gardez la porte ouverte quand vous utilisez l’option
Gril. Utiliser un plat pour Gril déplacez les aliments pour plus ou moins de cuisson.
Surveillez votre plat pendant le gril.
Pour obtenir de meilleurs résultats placez les aliments sous l’élément chaud du Gril.
2Broil Hi (Gril Max)
Broil Lo (Gril Min)
Bake (Cuire)
2 ou 3
1 ou 2Bake (Cuire)Dinde entière
2 ou 3Bake (Cuire)Poitrine de dinde
Poisson Broil Lo (Gril Min)
Gardez la porte ouverte quand vous utilisez l’option Gril. Utiliser un plat pour Gril,
déplacez les aliments pour plus ou moins de cuisson. Surveillez votre plat pendant le gril.
Pour obtenir de meilleurs résultats placez les aliments sous l’élément chaud du Gril.
Préparations 3 ou 4Bake (Cuire)
Aliments de commodité congelés
Pizza, frites, tater tot
(pommes de terre), nuggets
de pulet, apéritifs, sur une
seule grille
3 ou 4
Bake (Cuire)
Pizza, frites, tater tot
(pommes de terre), nuggets
de pulet, apéritifs, sur une
eule grille
Bake (Cuire)
Convection
Bake Bake
(Cuisson à Convection
3 et 5
*Lors de la cuisson de quatre gâteaux à la fois, utilisez des grilles
3 et 5. Placez les plats comme indiqué de façon à ce les plats de
soient pas directement placés au-dessus de l’autre.
Faites bien cuire les aliments pour les protéger contre les
maladies alimentaires. Les recommandations pour la
température minimale de sécurité alimentaire peuvent être
trouvés sur le site www.IsItDoneYet.gov.
Assurez-vous d'utiliser une sonde à aliment pour prendre
les températures des aliments.
Positions des Grilles pour la Cuisson de 4 Gâteaux
Utilisez les ustensiles de cuisine brillants
Utilisez les ustensiles de cuisine brillants.
Utilisez les ustensiles de cuisine brillants
Utilisez une poêle creuse de type poêle à griller. Préchauffer n’est pas nécessaire.
Utilisez une poêle creuse de type poêle à griller.
Utilisez une poêle creuse de type poêle à griller.
Utilisez une poêle creuse de type poêle à griller.
Utilisez les ustensiles de cuisine brillants
Utilisez les ustensiles de cuisine brillants

53
UTILISER LA GAMME: Connexion wifi et activation à distance
Connecter le WiFi de votre Four à Connexion à Distance
Votre four GE Appliances est conçu pour vous fournir une communication bidirectionnelle entre votre appareil et les
appareils intelligents. En utilisant les fonctions WiFi Connect, vous pourrez contrôler les opérations essentielles du
four telles que les réglages de température, les minuteries et les modes de cuisson en utilisant votre smartphone ou
votre tablette. *
Vous aurez besoin
Votre four GE Appliances utilise votre réseau WiFi
domestique existant pour communiquer entre l'appareil
et votre appareil intelligent. Pour configurer votre four
GE Appliances, vous devrez rassembler quelques
informations:
1. Chaque four GE Appliances a une étiquette
d'informations sur l'appareil connecté qui comprend
un nom de réseau d'appareils et un mot de passe. Ce
sont les deux détails importants dont vous aurez besoin
pour vous connecter à l'électroménager. L'étiquette est
généralement située à l'intérieur de la porte du four ou
du tiroir.
2. Préparez votre smartphone ou votre tablette avec la
connexion à Internet la possibilité de télécharger des
applications.
3. Vous aurez besoin de connaître le mot de passe de votre
routeur WiFi domestique. Avoir ce mot de passe prêt
pendant que vous configurez votre four GE Appliances.
* Appareils compatibles Apple ou Android et réseau WiFi domestique
requis.
Connecter votre four GE Appliances
1. Sur votre smartphone ou tablette, visitez le site
www.GEApplicances.com/connect pour en savoir
plus sur les options de connectivite et télécharger
l’application correcte.
2. Suivez les instructions à l'écran de l'application pour
connecter votre four GE Appliances.
3. Une fois le processus terminé, le voyant de connexion
situé sur l'écran de votre four GE Appliances restera
allumé et l'application vous confirmera que vous êtes
connecté.
4. Si le voyant de connexion ne s'allume pas ou clignote,
suivez les instructions de l'application pour vous
reconnecter. Si les problèmes persistent, veuillez
appeler le Centre d'appels connectés au 1.866.626.2000
et demander de l'aide concernant la connectivité sans
fil du four.
Pour connecter d'autres périphériques intelligents,
répétez les étapes 1 et 2.
Notez que tous les changements ou modifications apportés
au dispositif d'activation à distance installé sur ce four
qui ne sont pas expressément approuvés par le fabricant
peuvent annuler l'autorité de l'utilisateur à utiliser
l'équipement.
FCC: ZKJ-WCATA001
Network: GE_XXXXXX_XXXX
Password: XXXXXXXX
PT. NO. 229C6272G001-0
IC: 10229A-WCATA001
MAC ID: XX - XX - XX - XX - XX - XX
Connected Appliance Information
Exemple d’Etiquette
Connexion WiFi et Activation à Distance (sur certains modèles)
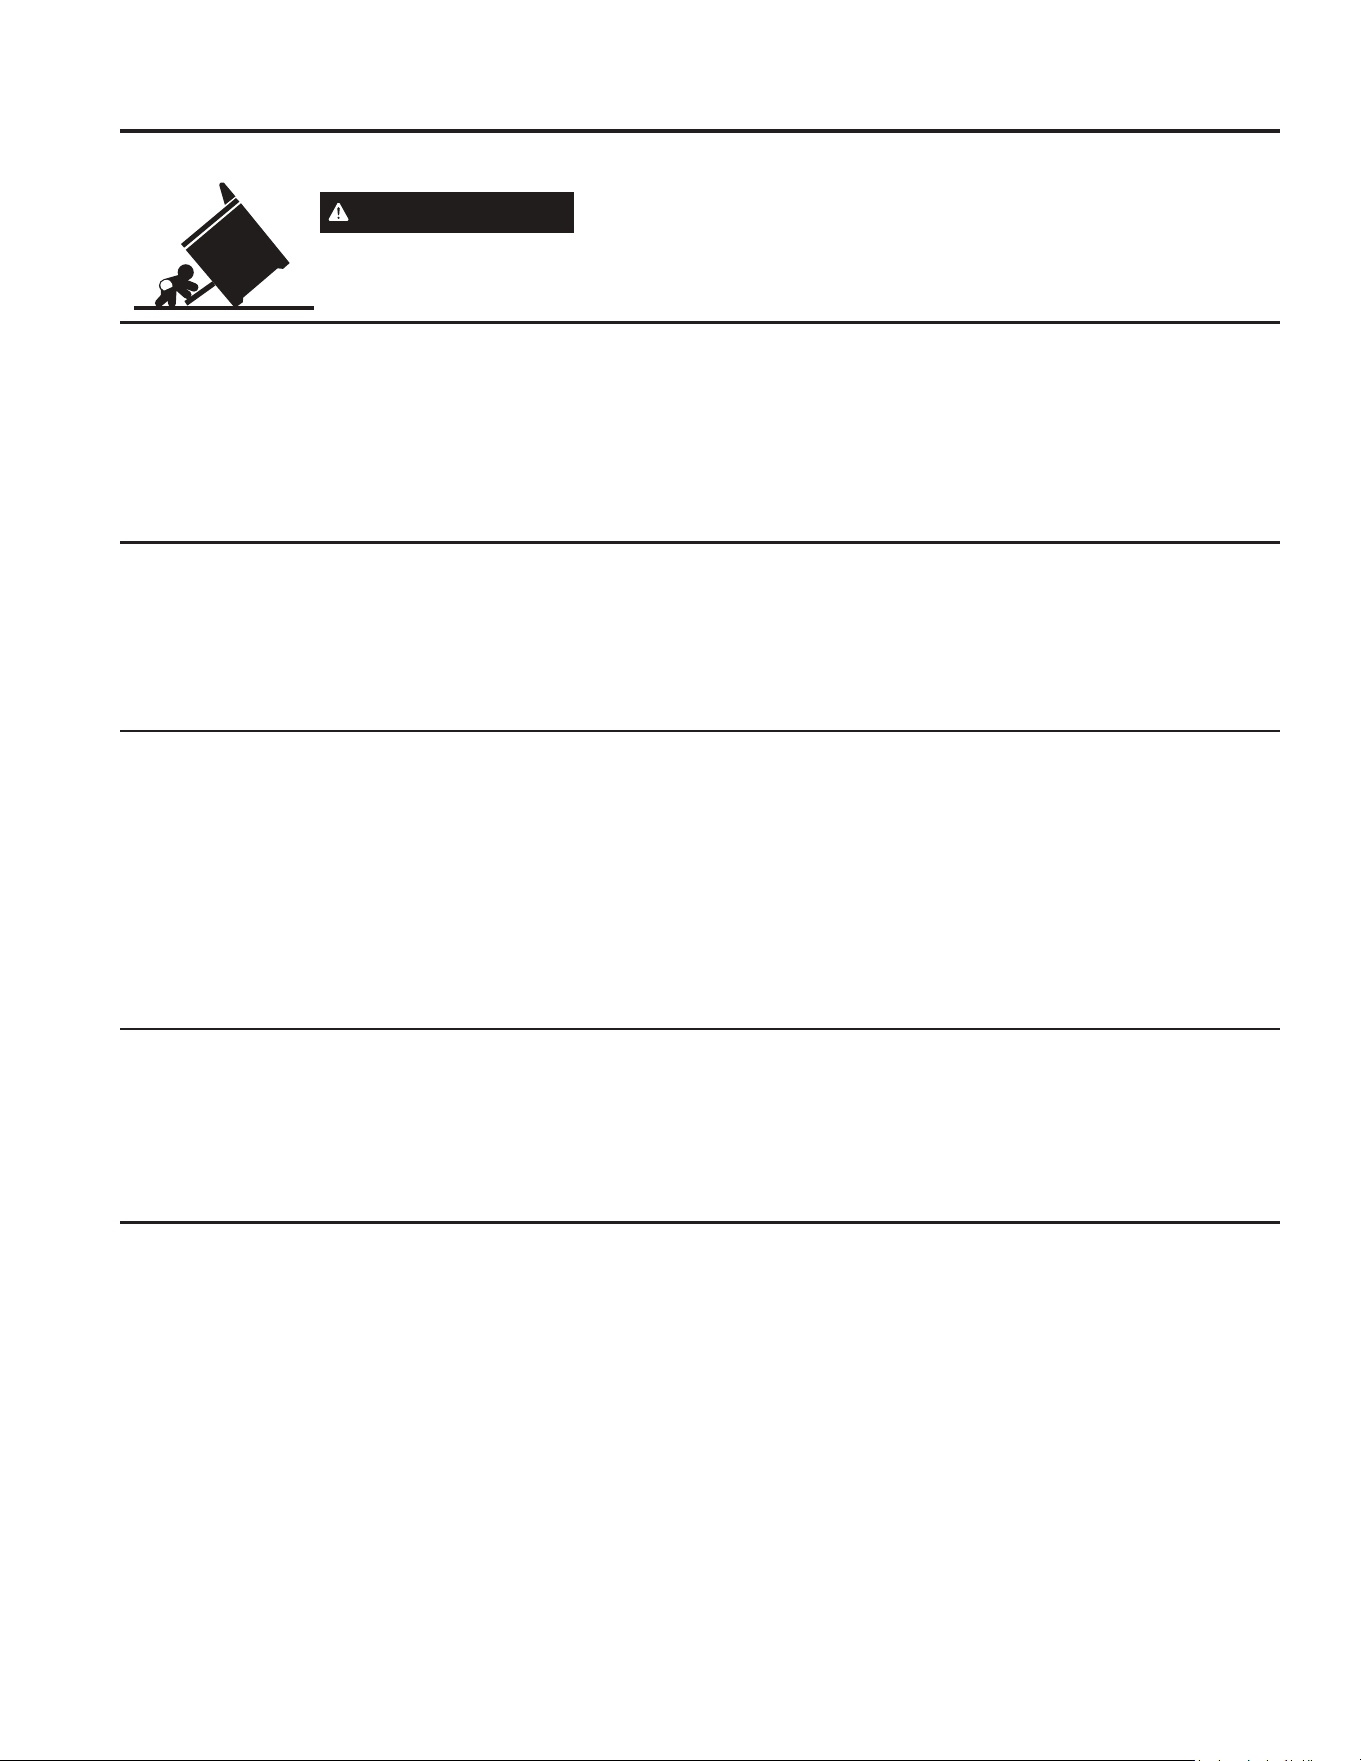
54
Nettoyage de la Cuisinière - Extérieur
SOIN ET NETTOYAGE:
Nettoyage de la cuisinière - extérieur
AVERTISSEMENT
Si votre cuisinière est retirée pour le nettoyage, l'entretien ou pour
toute autre raison, assurez-vous que le dispositif anti-basculement
Assurez-vous que toutes les commandes sont éteintes et que toutes les surfaces soient froides avant de nettoyer
toute partie de la cuisinière
Contrôle de verrouillage
Si vous le souhaitez, les touches tactiles peuvent être
désactivées avant le nettoyage.
Voir Commandes de verrouillage dans la section
contrôles du four de ce manuel.
Nettoyer les éclaboussures avec un chiffon humide.
Vous pouvez également utiliser un nettoyant pour vitres.
Enlevez de la terre à l’aide d’eau chaude et de savon.
N’utilisez pas de produits abrasifs.
Réactivez les touches tactiles après le nettoyage
Panneau de Contrôle
C'est une bonne idée d'essuyer le panneau de contrôle
après chaque utilisation.
Nettoyer avec du savon doux et de l'eau ou du vinaigre
mélangé avec de l'eau, rincer à l'eau claire et sécher
avec un chiffon doux.
Extérieur du Four
Surfaces Peintes
Acier Inoxydable excluant Black Stainless Steel
(Acier Inoxydable Noir) (sur certains modèles)
est correctement réenclenché lorsque la cuisinière est remplacée. Le non-respect de cette
consigne pourrait entraîner un basculement de la cuisinière et entraîner la mort ou des brûlures
graves chez les enfants ou les adultes.
N'utilisez pas de nettoyant abrasif, des nettoyants liquides
forts, des éponges à récurer en plastique ou nettoyeurs
à four sur le panneau de contrôle – ils détérioreront la
finition ainsi que l’Acier Inoxydable Noir.
N’utilisez pas de nettoyant à four, nettoyants abrasifs
ou de forts nettoyants liquides, des éponges d'acier,
des tampons à récurer en plastique ou des poudres
nettoyantes à l'intérieur ou à l'extérieur du four.
Nettoyer avec un savon doux et de l'eau ou du vinaigre
mélangé avec de l'eau. Rincer à l'eau propre et sécher
avec un chiffon doux. Lorsque vous nettoyez les
surfaces, assurez-vous qu'elles sont à température
ambiante et non à la lumière directe du soleil.
Si une tâche sur l'évent de la porte est persistante, utilisez
un nettoyant abrasif doux et une éponge à gratter pour
de meilleurs résultats.
Le renversement de marinades, de jus de fruits, de
sauce tomate et de liquide à badigeonner contenant
des acides peut provoquer une décoloration et doit être
immédiatement essuyé. Laissez les surfaces chaudes.
Les surfaces peintes comprennent les côtés de la
cuisinière et la porte, le dessus du panneau de
commande et le devant du tiroir. Nettoyer les avec de
l'eau et du savon ou avec une solution d'eau et de
vinaigre.
Ne pas utilisez des nettoyants de four commerciaux,
nettoyants en poudre, la laine d'acier ou les abrasifs durs
sur aucune surface peinte même avec un produit spécial
pour l’Acier Inoxydable Noir (Black Stainless Steel).
N’utilisez pas de d’éponges métalliques qui rayeront
la surface.
Pour nettoyer la surface en acier inoxydable, utilisez
de l'eau savonnée chaude ou un nettoyant en acier
inoxydable. Toujours essuyer la surface dans la direction
du grain. Suivez les instructions du nettoyant pour
nettoyer la surface en acier inoxydable.
Pour en savoir plus sur l'achat de produits de nettoyage
y compris le nettoyant ou le vernis pour appareils ménagers
en acier inoxydable, voir les sections Accessoires et
Support aux consommateurs à la fin de ce manuel.

55
L'intérieur de votre nouveau four peut être nettoyé manuellement ou en utilisant les modes Steam Clean (Nettoyage
Vapeur) ou Auto-nettoyage.
Le renversement de marinades, de jus de fruits, de sauce tomate et de liquide à badigeonner contenant des acide peut
provoquer une décoloration et doit être immédiatement essuyé. Laisser refroidir les surfaces chaudes, puis nettoyer et rincer.
Guide du Nettoyage
N’utilisez pas de nettoyant à four, nettoyants abrasifs
ou de forts nettoyants liquides, de la laine d'acier, des
tampons à récurer en plastique ou des poudres
nettoyantes à l'intérieur du four. Nettoyez avec un
savon doux et de l’eau ou du vinaigre mélangé avec de
l’eau. Rincez avec de l’eau propre et essu yez avec un
chiffon doux. Assurez-vous que les surfaces soient à
température ambiante pour les nettoyer.
SOIN ET NETTOYAGE: Nettoyage de la cuisinière - intérieur
Nettoyage de la cuisinière - Intérieur
Mode Nettoyage à la Vapeur (Steam Clean)
Le nettoyage à la vapeur est conçu pour nettoyer les
petits déversements en utilisant de l'eau et une tempé-
rature de nettoyage inférieure à celle de l'auto-nettoyant.
Pour utiliser la fonction Nettoyage à la vapeur, essuyez
la graisse et les saletés du four. Verser une tasse d'eau
dans le fond du four. Fermez la porte. Appuyez deux fois
sur la touche Clean pour sélectionner Steam (Vapeur),
puis appuyez sur Start / Enter.
La porte du four se verrouillera. Vous ne pouvez pas
ouvrir la porte pendant le nettoyage à la vapeur de 30
minutes, car cela réduira les performances de nettoyage
à la vapeur. À la fin du cycle de nettoyage à la vapeur,
la porte se déverrouille. Essuyez tout excès d'eau et le
reste des saletés.
Mode Auto-nettoyant
Lisez les instructions de sécurité du four auto-nettoyant au
début de ce manuel avant d'utiliser le mode auto-nettoyant.
L'auto-nettoyage utilise des températures très élevées pour
nettoyer l'intérieur du four. La porte du four se verrouille
lorsque vous utilisez cette fonction. Avant d'effectuer le
cycle d'auto-nettoyage, essuyez la graisse et les saletés
du four. Retirez tous les éléments du four autres que les
supports émaillés (de couleur foncée). Les grilles brillantes
ou en argent et tout ustensile de cuisson ou autre doivent
être retirés du four avant d'entreprendre un cycle
d'auto-nettoyage.
Fermez la porte. Appuyez sur la touche Auto-nettoyage et
un temps d'auto-nettoyage par défaut s'affiche. Le temps
de nettoyage peut être modifié entre 3h00 et 5h00 en
utilisant les touches numériques pour entrer une heure
différente et en appuyant sur Entrer. Pour les fours très
sales, le temps de nettoyage maximum de 5 heures est
recommandé. Si vous souhaitez utiliser l'heure par défaut,
appuyez sur la touche Start/Enter. Le four s'éteint
automatiquement lorsque le cycle d'auto-nettoyage est
terminé. La porte restera verrouillée jusqu'à ce que le
four ait refroidi. Une fois le four refroidi, essuyez les
cendres du four.
Nous vous recommandons de ventiler votre cuisine avec
une fenêtre ouverte ou d'utiliser un ventilateur ou une hott
lors du premier cycle d'auto-nettoyage.
Le sol sur le châssis avant de la cuisinière et à l'extérieur
du joint de la porte devra être nettoyé à la main. Nettoyez
ces zones avec de l'eau chaude, des tampons en laine
d'acier ou des nettoyants tels que Soft Scrub®. Rincer à
l'eau claire et sécher.
Ne pas nettoyer le joint. Les fibres de vitre du joint de la
porte du four ne peuvent pas résister à l'abrasion. Il est
essentiel que le joint reste intact. Si vous remarquez qu'il
devient usé ou effiloché, remplacez-le.
Assurez-vous que le couvercle de l'ampoule du four est
en place et que la lumière du four est éteinte.
IMPORTANT: La santé de certains oiseaux est extrêmement
sensible aux vapeurs émises durant le cycle d'auto-nettoyage
de toute gamme. Déplacez les oiseaux dans une autre
pièce bien ventilée.
Les unités de surface sont automatiquement désactivées
pendant le cycle d'auto-nettoyage. Attendez que le cycle
d'auto-nettoyage soit terminé pour régler et utiliser les
unités de surface.
Pour arrêter un cycle d'auto-nettoyage, appuyez sur la
touche Cancel / Off. La porte se déverrouillera une fois
que le four aura refroidi en dessous de la température de
verrouillage. Vous ne pourrez pas ouvrir la porte
immédiatement si le four n'a pas refroidi à une température
inférieure à la température de verrouillage.
Grilles
Tous les supports peuvent être lavés avec de l'eau chaude
et savonneuse. Grilles émaillées (non brillantes) peuvent
être laissés dans la cavité pendant l’auto-nettoyage.
Les grilles peuvent être plus difficiles à glisser, surtout
après l’auto-nettoyage. Mettez de l'huile végétale sur un
chiffon doux ou une serviette en papier et frottez sur les
bords gauche et droit.
Éléments Chauffants du Four
Ne nettoyez pas les éléments de cuisson et de gril.
Toute saleté brûlera lorsque les éléments seront chauffés.
L'élément de cuisson n'est pas exposé et se trouve sous le
sol du four.
Nettoyez le fond du four avec de l'eau chaude et savonneuse.
Nettoyez les saletés sur le sol du Four
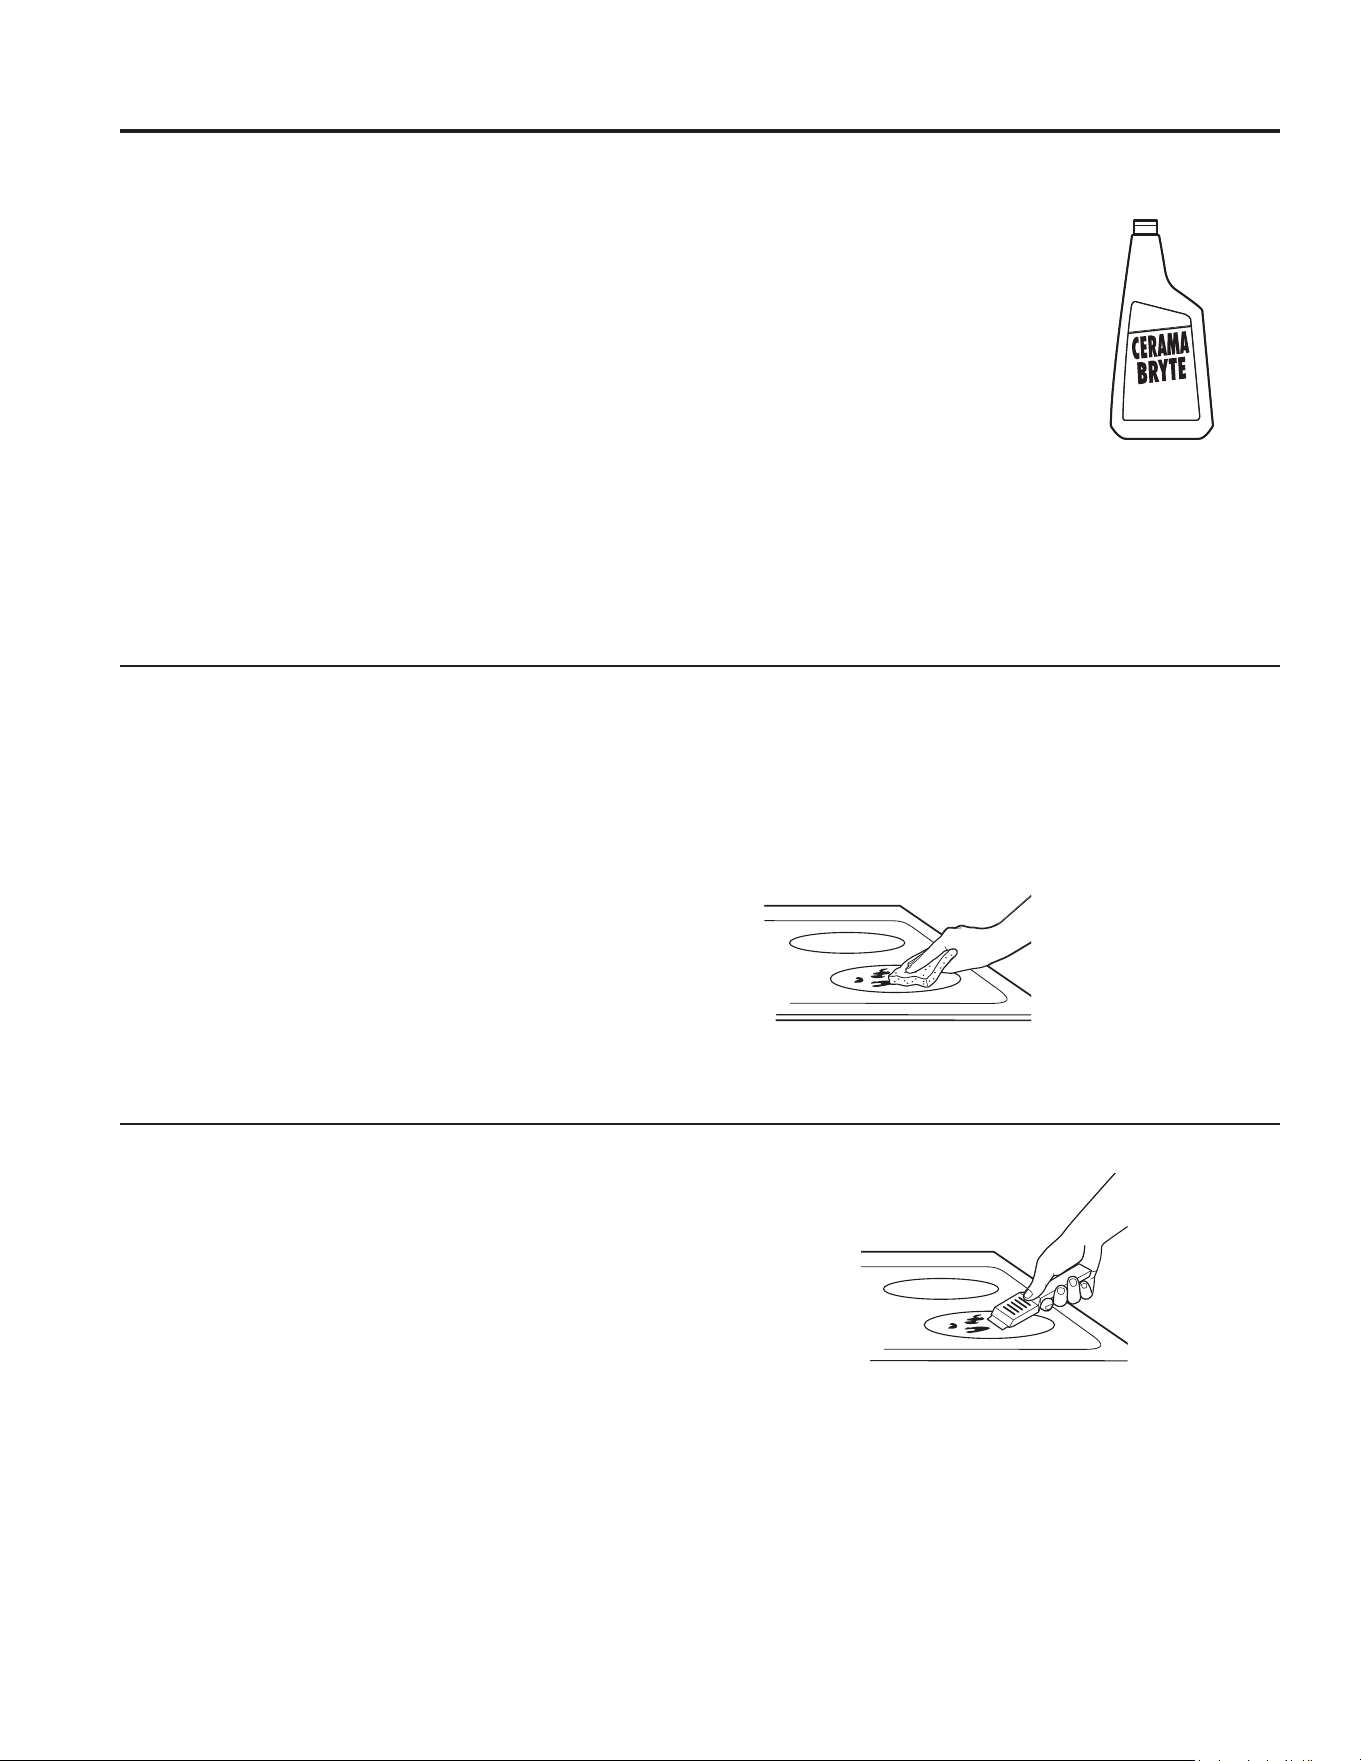
56
Nettoyage Quotidien
UTILISEZ UNIQUEMENT sur la surface de cuisson en céramique le nettoyant CERAMA BRYTE® Ceramic Cooktop.
D'autres crèmes peuvent être moins efficaces.
Pour entretenir et protéger la surface de votre
table de cuisson en verre, Suivez ces étapes:
1. Avant d'utiliser la table de cuisson pour la
première fois, nettoyez-la avec CERAMA
BRYTE® Ceramic Cooktop Cleaner.
Cela aide à protéger le dessus et facilite le
nettoyage.
2. Utilisez tous les jours la crème CERAMA
BRYTE® Ceramic Cooktop.
3. Secouez bien la crème nettoyante. Appliquez
quelques gouttes de CERAMA BRYTE®
Ceramic Cooktop Cleaner directement
sur la table de cuisson.
Résidus Brûlés
Remarque: Des DETERIORATIONS de votre vitre peuvent apparaitre si vous utilisez des éponges à récurer autre
que celles qui vous sont recommandées.
1. Permettre à la table de cuisson de refroidir.
2. Étalez quelques gouttes de CERAMA
BRYTE® Ceramic Cleaner sur toute la zone
des résidus brûlés.
3. Utilisez aussi les lingettes CERAMA BRYTE®
Cleaning Pad for Ceramic Cooktop, frotter la
zone de résidus, en appliquant la pression
nécessaire.
4. S'il reste des résidus, répétez les étapes
ci-dessus le nombre de fois nécessaire.
Résidus épais Brûlés
1. Permettre à la table de cuisson de refroidir.
2. Utilisez un rasoir d’une seule lame pour frotter
à un angle d’environ 45 ° contre la surface de
verre et gratter la saleté. Il sera nécessaire
d'appliquer une pression sur le rasoir afin
d'enlever le résidu.
3. Après avoir gratté avec le rasoir, étaler quelques
gouttes de CERAMA BRYTE® Ceramic Cooktop
Cleaner sur la totalité du résidu brûlé. Utilisez les
lingettes CERAMA BRYTE® Cleaning Pad for
Ceramic Cooktop pour enlever les restes de résidu.
4. Pour une protection supplémentaire, après que
tout résidu ait été enlevé, polir toute la surface
avec CERAMA BRYTE® Ceramic Cleaner et un
essuie-tout.
Nettoyez votre table à chaque
tâche. Utilisez la crème CERAMA
BRYTE® Ceramic Cooktop.
Le grattoir CERAMA BRYTE® en céramique et
toutes les fournitures recommandées sont
disponibles dans notre centre de pièces.
Voir les sections Accessoires et Soutien
aux consommateurs à fin de ce manuel.
Remarque: N’utilisez pas une lame
émoussée ou usée.
SOIN ET NETTOYAGE: Nettoyage de la plaque de cuisson
Nettoyage de la Plaque de Cuisson
Utilisez des lingettes CERAMA BRYTE®
Cleaning Pad for Ceramic Cooktops.
4. Utilisez un essuie-tout ou une lingette
CERAMA BRYTE® ® Cleaning Pad
for Ceramic Cooktops pour nettoyer
entièrement la Surface.
5. Utilisez un chiffon sec ou du papier
essuie-tout pour enlever tout résidu de
nettoyant. Il n’est pas nécessaire de
rincer.
REMARQUE: Ne pas chauffer les plaques
jusqu’à la fin du nettoyage.
5. Pour une protection supplémentaire, après que tout
résid ait été enlevé, polir toute la surface avec
CERAMA BRYTE® Ceramic Cleaner et un essuie-tout.
57
Marques de métal et Égratignures
1. Veillez à ne pas faire glisser les casseroles et poêles
sur votre table de cuisson. Il laissera des marques
métalliques sur la surface de la table de cuisson. Ces
marques peuvent être enlevées en utilisant le nettoyant
pour surface de cuisson en céramique CERAMA BRYTE®
avec le tampon de nettoyage CERAMA BRYTE® pour
les surfaces de cuisson en céramique.
2. Si l'on fait bouillir à sec des casseroles recouvertes
d'une fine couche d'aluminium ou de cuivre, le
revêtement peut laisser une décoloration noire sur la
table de cuisson. Cela doit être retiré immédiatement
avant de chauffer à nouveau ou la décoloration peut
être permanente.
NOTE: Vérifiez soigneusement le fond des casseroles
pour la rugosité qui rayerait la table de cuisson.
Dommages causés par des Déversements de matières Sucrées et de Plastique Fondu
Des précautions particulières doivent être prises lors du retrait des substances chaudes afin d'éviter des dommages
permanents à la surface du verre. Les éclaboussures de sucre (comme les gelées, le fudge, les bonbons, les sirops)
ou les plastiques fondus peuvent causer de l’érosion sur la surface de la plaque de cuisson (non couvert par la garantie)
à moins que le déversement soit encore chaud. Des précautions particulières doivent être prises lors du retrait de
substances chaudes.
Nettoyage de la Table de Cuisson (Suite.)
SOIN ET NETTOYAGE: Nettoyage de la table de cuisson / sonde
Sonde
Le thermomètre de la sonde peut être nettoyée avec du savon et de l'eau ou une éponge à récurer pleine de savon.
Laissez refroidir la sonde avant le nettoyage. Eliminez les taches tenaces avec une éponge pleine de savon, rincer et
sécher.
Pour commander des sondes supplémentaires, voir les sections.
Accessoires et Support aux consommateurs à la fin de ce manuel.
Ne pas plonger la sonde dans l’eau.
Ne pas ranger la sonde dans le four.
Ne pas laisser la sonde dans le four pendant le cycle de
Nettoyage vapeur ou d’auto-nettoyage.
Assurez-vous d'utiliser un nouveau grattoir à lame
tranchante.
N'utilisez pas une lame émoussée ou entaillée.
1. Éteignez toutes les unités de surface. Retirer les
casseroles chaudes.
Avec un gant de cuisine:
a. Utilisez un rasoir grattoir à une seule lame pour
déplacer le déversement à un endroit froid de la
table de cuisson.
b. Retirer le déversement avec des serviettes en
papier.
3. Tout débordement restant doit être laissé jusqu'à ce
que la surface de la table de cuisson ait refroidi.
4. N'utilisez pas les plaques de cuisson avant d’avoir
enlevé entièrement tout résidu.
Remarque: Si de l’érosion ou des indentations ont déjà
eu lieu sur la surface du verre, la vitre de la table de
cuisson devra être remplacée. Dans ce cas, la révision
sera nécessaire.
58
AVERTISSEMENT:
RISQUE DE CHOC OU DE BRÛLURE: Avant de remplacer l'ampoule du four, débrancher
l'alimentation électrique de la cuisinière du fusible principal ou du panneau disjoncteur. Le
non-respect de ces consignes peut entraîner un choc électrique ou une brûlure.
RISQUE DE BRÛLURE:
Le couvercle en verre et l'ampoule doivent être retirés lorsqu'ils sont refroidis.
Toucher le verre chaud à mains nues ou avec un linge humide peut causer des brûlures.
Remplacement de la Lumière du four
Pour retirer l’ampoule:
1. Tournez le couvercle en verre dans le sens inverse des aiguilles
d’une montre d'un quart de tour jusqu'à ce que les languettes du
couvercle en verre se retirent des rainures de la douille. Le port
de gants en latex peut offrir une meilleure adhérence.
2. Retirez l'ampoule en la tournant dans le sens inverse des aiguilles
d'une montre.
Pour remplacer l’ampoule:
1. Remplacez l'ampoule par une nouvelle ampoule d'électroménager
de 40 watts. Insérez l'ampoule et tournez-la dans le sens des
aiguilles d'une montre jusqu'à ce qu'elle soit serrée.
2. Placez les languettes de la couverture de verre dans les rainures
de la douille. Tournez la vitre dans le sens des aiguilles d'une montre
d'un quart de tour. Pour améliorer l'éclairage à l'intérieur du four,
nettoyez fréquemment le couvercle en verre à l'aide d'un chiffon
humide. Cela devrait être fait lorsque le four est complètement froid.
3. Rebranchez l'alimentation électrique du four.
SOIN ET NETTOYAGE:
Lumière du four / porte du four
Lumière du Four
La porte est très lourde. Soyez prudent lorsque vous retirez et soulevez la porte.
Ne pas soulever la porte par sa poignée.
Pour enlever la porte:
1. Ouvrez entièrement la porte.
2. Tirez les verrous de la charnière vers le cadre de la
porte, en position déverrouillée. Un outil, tel qu'un petit
tournevis à lame plate, peut être nécessaire.
3. Saisir fermement les deux côtés de la porte par haut.
4. Fermez la porte jusqu'à la position de retrait. La porte
devrait être ouverte d'environ 7 cm (3 ") sans obstruction
au-dessus de la porte.
5. Soulevez la porte vers le haut et vers l'extérieur jusqu'à
ce que les deux bras de charnière soient dégagés des
fentes.
Position de Retrait
Serrure de
Charnière
Ouverture
Serrure
de
Charnière
Bras
de
Charnière
Encoche
Bord Infèrieur
de
l’ouverture
Bras de Charnière
Porte du Four
Pour remplacer la porte:
1. Saisir fermement les deux côtés de la porte vers le
haut.
2. En commençant sur le côté gauche, avec la porte dans
le même angle que la position de retrait, placez
l'indentation du bras de charnière dans le bord inférieur
de la fente de la charnière. L'encoche du bras de charnière
doit être complètement insérée dans le fond de la fente.
Répétez pour le côté droit.
3. Ouvrez complètement la porte. Si la porte ne s'ouvre
pas complètement, l'indentation n'est pas correctement
installée dans le bord inférieur de la fente.
4. Poussez les verrous de la charnière contre le cadre avant
de la cavité du four jusqu'à la position verrouillée.
5. Fermez la porte du four.
59
CONSEILS DE DÉPANNAGE
Conseils de Dépannage... Avant d'appeler le service.
Gagnez du temps et de l'argent! Consultez d'abord les tableaux des pages suivantes et vous n'aurez peut-être pas
besoin d'appeler le service.
Problème Cause possible Que Faire
Les unités de surface
ne fonctionnent pas
correctement ou le
bouton de réglage
clignote.
Batterie de cuisine inappropriée
utilisée.
Casserole trop petite.
Casserole est mal positionnée
La casserole n'est pas en contact
total avec la surface en verre.
Dans certaines régions, la puissance
(tension) peut être faible
Un fusible dans votre maison peut avoir
grillé ou le coupe-circuit s'est déclenché
Les commandes de la plaque de
cuisson sont mal réglées.
Réglage de l'unité de
surface change ou
s’éteint de façon inattendue
Haute température de cuisson.
Rayures (peuvent
apparaître comme des
fissures) sur la surface
de la plaque de cuisson
en verre.
Utilisation de batterie de cuisine avec
des fonds rugueux étant usagées ou
sales (sel ou sable) entre les ustensiles
de cuisine et la surface de la plaque
de cuisson.
Les ustensiles de cuisine ont été
glissés sur la surface de cuisson.
Zones de décoloration
sur la plaque de
cuisson.
Les débordements d'aliments n'ont
pas été nettoyés avant l’utilisation.
Surface chaude sur un modèle clair
de plaque de cuisson.
Plastique fondu su
la surface.
La plaque de cuisson chaude est entrée
en contact avec du plastique placé dessus
Corrosion (ou indentation)
de la plaque de cuisson
Mélange de sucre chaud renversé
sur la plaque de cuisson.
Mon nouveau four ne
fonctionne pas comme
mon ancien. Quelque
chose ne va pas avec les
paramètres de température?
Votre nouveau four à un différent
système de cuisson qui diffère de
votre ancien four et peut donc cuisiner
différemment que votre ancien four.
La nourriture ne cuit
pas correctement.
Les commandes du four sont mal réglées.
La position de la grille est incorrecte ou
la grille n'est pas au bon niveau.
La température du four nécessite un
ajustement.
Substitution d'ingrédient.
La nourriture ne grille
pas correctement.
Les commandes du four sont mal réglées.
La nourriture est cuite dans une poêle
chaude.
Batterie de cuisine non adaptée à la
cuisson au gril.
La sonde est branchée dans la sortie
du four.
Feuille d'aluminium utilisée sur le la
casserole gril N’a pas été installée
correctement comme recommandé.
Température du four
Trop chaude ou trop froide.
Dans certaines régions, la puissance
(tension)
peut être faible.
Erreur dans le choix des ustensiles de cuisine. Utilisez un aimant pour vérifier si les
ustensiles sont compatibles avec les plaques à induction. Utilisez une poêle plate
et compatible avec les plaque à induction qui est fait minimum la taille de l’élément
utilise. Voir la section Taille et forme des casseroles.
La taille de la poêle est inférieure à la taille minimale de l'élément. Voir la taille
des Poêles.
Centrez la poêle dans la zone de cuisson
La casserole doit être plate.
Couvrir la casserole avec un couvercle jusqu'à obtention de la chaleur désirée.
Remplacer le fusible ou réinitialiser le disjoncteur.
Vérifiez que le contrôle soit correctement défini. Appuyez sur On puis sur + ou -
Laissez le ventilateur interne refroidir la plaque de cuisson. Vérifiez si la poêle
est bien sèche
Méthodes de nettoyage incorrectes.
Les rayures ne sont pas possible à retirer. De minuscules rayures deviendront
moins visibles avec le temps grâce au nettoyage.
Pour éviter les rayures, utilisez les procédures de nettoyage recommandées.
Assurez-vous que les fonds de la batterie de cuisine sont propres avant utilisation,
et utilisez des ustensiles de cuisson avec fonds lisses.
Voir la section Nettoyage de la surface de cuisson en verre.
Appelez un technicien qualifié pour le remplacement.
Nettoyage de la section de la table de cuisson en verre
C'est normal. La surface peut sembler décolorée quand il fait chaud. Ceci
est temporaire et disparaîtra à mesure que le verre refroidira.
Pour les premières utilisations, suivez bien les temps et les températures de vos
recettes. Si vous pensez toujours que votre nouveau four est trop chaud ou
trop froid, vous pouvez ajuster la température vous-même pour répondre à
votre façon de cuisiner.
REMARQUE: Cet ajustement affecte les températures la cuisson au four et
la cuisson par convection. Cela n'affectera pas Broil (Gril) ou Clean (Nettoyage).
Substituer des ingrédients peut changer le résultat de la recette.
Voir la section Fonctions spéciales.
Voir la section Modes de Cuisson et Guide de Cuisson
Voir la section Modes de cuisson.
Position incorrecte de la grille en cours
d'utilisation.
Préchauffez l'élément du gril pendant 10 minutes. La température du four
nécessite un ajustement. Voir la section Fonctions spéciales.
Assurez-vous de sélectionner le mode de cuisson gril approprié.
Voir le Guide de cuisson pour les suggestions d'emplacement des grilles.
Assurez-vous que la batterie de cuisine soit froide.
Utilisez une casserole spécialement conçue pour la cuisson au gril.
Débranchez et retirez la sonde du four.
Utilisez une feuille d'aluminium conforme aux formes de la casserole.
60
CONSEILS DE DÉPANNAGE
Conseils de Dépannage... Avant d'appeler le service.
Problème Cause possible
Le four ne fonctionne pas ou
semble ne pas fonctionner.
La prise de courant n'est pas complètement
insérée dans la prise électrique.
Un fusible dans votre maison peut avoir
grillé ou le coupe-circuit s'est déclenché.
Les commandes du four sont mal réglées
Le four est en mode Sabbat
Son de craquement C'est le son du métal chauffant et le
refroidissent pendant la cuisson et La
fonction de nettoyage.
Pourquoi mon électroménager
fait-il un Bruit de "clic" lors de
l'utilisation mon four?
Votre cuisinière fait cycler les éléments
chauffants en allumant et éteignant les
relais pour maintenir la température du four.
L'horloge et la minuterie ne
fonctionnent pas.
Un fusible dans votre maison peut avoir
grillé ou le coupe-circuit s'est déclenché.
La prise de courant n'est pas complètement
insérée dans la prise électrique.
Les commandes du four sont mal réglées.
La porte du four est tordue
La porte est hors position.
Le four ne s'auto-nettoie pas.
La température est trop élevée pour définir
opération auto-nettoyage.
Les commandes du four sont mal réglées
Le four ne se nettoie pas
la vapeur
La porte du four n'est pas fermée.
Fumée excessive pendant
cycle de nettoyage.
Saleté ou graisse excessive.
Fumée excessive pendant Le
gril
Aliments trop près de l'élément du brûleur.
La porte du four ne s'ouvre Four trop chaud.
"LOCK DOOR" (porte verro-
uillée)clignote dans afficher
Le voyant DOOR LOCK porte
verrouillée) est allumé lorsque
Vous voulez cuisiner.
La porte du four est verrouillée Parce que
la température à l'intérieur du four n'a pas
Atteint la température de verrouillage.
"F- et un nombre ou une
lettre" clignote à l'écran.
Vous avez un code d'erreur de fonction.
L'affichage devient vide.
L'horloge est éteinte
Le four ou la table de cuisson
ne reste pas programmé.
Erreur de fonction.
Que Faire
Vérifiez que le four n'est pas en mode Sabbat. Voir la section
Fonctions spéciales.
Voir la section Utilisation du four.
Remplacer le fusible ou réinitialiser le disjoncteur.
Assurez-vous que la prise électrique est branchée sur une prise
de courant, correctement mise à la terre sortie.
Ceci est normal.
Ceci est normal.
Remplacer le fusible ou réinitialiser le disjoncteur.
Assurez-vous que la prise électrique est branchée sur une prise de
courant, correctement mise à la terre sortie.
Voir la section Utilisation de la minuterie de cuisine.
l'installation. Pour redresser la porte, réinstallez la porte. Voir la
section «Enlever la porte» dans la partie Entretien et Nettoyahe.
La lumière de fonctionnement des touches
est cassée.
Appelez le service.
Débranchez toute l'alimentation du four pendant au moins 30
secondes, puis reconnectez l'alimentation. Si le code d'erreur de la
fonction se répète, appelez le service.
Voir la section Caractéristiques spéciales.
Un fusible dans votre maison peut avoir
grillé ou le coupe-circuit s'est déclenché.
Remplacer le fusible ou réinitialiser le disjoncteur.
Si le code de fonction se répète.
Appuyez sur le bouton Cancel/ Off (Annuler / Eteindre). Laissez le
four refroidir pendant une heure. Remettre le four en marche.
Débranchez toute l'alimentation du four pendant au moins 30
secondes, puis reconnectez l'alimentation. Si le code d'erreur de
la fonction se répète, appelez le service.
Appuyez sur le bouton Cancel/Off (Annuler / Eteindre). Laissez le
four refroidir.
Fermez la porte du four.Mais la porte n’est pas fermée.
Laissez le four refroidir en dessous de la température de
verrouillage.
Abaissez la position de la grille.
Appuyez sur le bouton Cancel/Off (Annuler / Eteindre). Ouvrez
les fenêtres pour faire sortir la fumée de la pièce. Attendez que le
voyant LOCKED( Verrouillage) s'éteigne. Essuyez l'excès de
saleté et réinitialiser le cycle de nettoyage.
Les commandes du four sont mal réglées.
L'affichage clignote HOT (CHAUD).
Laissez le four refroidir à température ambiante et réinitialisez
contrôles
Voir la section Nettoyage du four.
Assurez-vous de fermer la porte pour démarrer le cycle de
nettoyage à la vapeur.
Retirez la sonde du four.
Voir la section Nettoyage du four.
61
CONSEILS DE DÉPANNAGE
Conseils de Dépannage... Avant d'appeler le service.
Problème Cause possible
Panne de courant, l'horloge
clignote.
Panne de courant ou surtension.
"Brûlant" ou odeur "huileuse"
Émise de l'évent.
Ceci est normal dans un nouveau four et
va disparaître avec le temps.
Forte odeur.
Une odeur venant de l'isolation autour de
l'intérieur du four est normale lors des
premières utilisations
Bruit de ventilateur.
Un ventilateur à convection peut
automatiquement s’allumer et s’éteindre.
La prise de courant n'est pas complètement
insérée dans la prise électrique.
La vitre de ma porte du four
apparaît être teinté ou avoir
la couleur de l’"arc-en-ciel".
Est-ce défectueux?
Non, le verre du four intérieur est recouvert
d’ une barrière thermique qui reflète la
chaleur dans le four pour éviter la perte de
chaleur et Gardez la porte extérieure fraîche
pendant la cuisson.
Parfois, le four prend plus de
préchauffer à la même
température.
Batterie de cuisine ou de la nourriture dans
le four.
Nombre de grilles dans le four.
L'affichage clignote.
Panne électrique.
Les grilles du four sont
difficiles à faire glisser.
Les étagères brillantes et argentées ont été
nettoyées dans un cycle autonettoyant.
La vapeur sort de l'évent.
Le tiroir chauffant fontionne
pas.
Un fusible dans votre maison peut avoir
grillé ou le coupe-circuit s'est déclenché.
La nourriture s'assèche dans
le tiroir chauffant.
Que Faire
Réinitialiser l'horloge. Si le four était en cours d'utilisation, vous
devez le réinitialiser en appuyant sur la touche Cancel / Off, puis
en réglant l'horloge et en réinitialisant toute fonction de cuisson.
Pour accélérer le processus, définissez un cycle d'auto-nettoyage
d'un minimum de 3 heures. Voir la section Nettoyage du four.
Ceci est temporaire et disparaîtra après plusieurs utilisations
oucycle d'auto-nettoyage
Ceci est normal. Le ventilateur de refroidissement s'éteindra et
s’allumera pour refroidir les parties internes. Il peut fonctionner
après que le four soit éteint.
Ceci est normal. Sous certaines lumières ou angles, vous pouvez
voir cette teinte ou couleur arc-en-ciel.
L'humidité s'échappe.
Commandes mal réglées.
Remplacer le fusible ou réinitialiser le disjoncteur.
Voir la section Utilisation du tiroir chauffant.
Ceci est normal.
Lors de l'utilisation du four, il est normal de
voir de la vapeur sortir de l’ évent du four.
Si le nombre de grilles ou quantité d'aliments
en cours de cuisson augmente, la quantité
de vapeur visible augmentera aussi.
Appliquez une petite quantité d'huile végétale sur une serviette en
papier et vaporiser avec Pam® ou d'autres sprays lubrifiants.
Réinitialiser l'horloge.
Si vous ajoutez plus de grilles dans le four, celui-ci prendra plus
de temps à préchauffer. Enlevez quelques supports.
La batterie de cuisine ou la nourriture dans le four influencera le
temps du four à préchauffer. Retirez les éléments pour réduire le
temps de préchauffage.
Un ventilateur de refroidissement peut
s'allumer automatiquement
Ceci est normal. Le ventilateur est conçu pour fonctionner par
intermittence pour maximiser l'uniformité de cuisson. Le ventilateur
de convection fonctionnera pendant le préchauffage du cycle de
cuisson. Le ventilateur s'éteint après que le four ait chauffé à la
température réglée. Ceci est normal
Différents modes de cuisson
Les différents modes de cuisson utilisent des méthodes de
préchauffage distinctes pour préchauffez le four selon un mode de
cuisson spécifique. Certains modes seront plus longs que
d'autres (c.-à-d. cuisson par convection).
Signaux de contrôle après
Avoir entré le temps de
cuisson ou l’Heure de Départ.
Vous avez oublié d'entrer une température
de cuisson ou le temps de nettoyage.
Touchez la touche Bake (Cuire) et la température désirée ou la
touche Self Clean (Auto-Nettoyage) et le temps de nettoyage
souhaité.
Condensation excessive dans
le tiroir.
Liquide dans le tiroir.
Aliments non couverts
Réglage de la température trop élevé.
Enlever le liquide.
Couvrez les aliments à l'aide d'un couvercle ou de papier d'aluminium.
Réduire le réglage de la température
Le tiroir n'est pas complètement fermé.
Couvrez les aliments à l’aide d’un couvercle ou de papier d’aluminium
Poussez le tiroir jusqu'à ce que le loquet s'enclenche.
Eau restant dans le socle du
four après le cycle de nettoyage
à la vapeur.
Ceci est normal. Enlevez l’excédent d'eau avec un chiffon sec ou une éponge.
"Sonde" apparaît sur l’ écran.
Ceci vous rappelle d'entrer la sonde après
l’ avoir branchée.
Entrez une sonde pour mesurer la température.

62
GEAppliances.ca
Tous les services de garantie sont fournis par nos centres de service après-vente ou par un technicien agréé par Customer
Care®. Pour planifier un service en ligne, visitez notre site Web au www.GEAppliances.ca ou composez le 1.800.561.3344.
Veuillez avoir votre numéro de série et votre numéro de modèle disponibles lorsque vous appelez pour un service.
L'entretien de votre appareil peut nécessiter l'utilisation du port de données intégré pour les diagnostics. Ceci permet à
un technicien de service d'usine de GE Appliances de diagnostiquer rapidement tout problème avec votre appareil et
aide GE Appliances à améliorer ses produits en fournissant à GE Appliances des informations sur votre appareil. Si vous
ne voulez pas que les données de votre appareil soient envoyées à GE Appliances, veuillez aviser votre technicien de ne
pas soumettre les données à GE Appliances au moment du service.
Ce que MC Comercial ne prend pas en charge:
Des voyages de service à votre domicile pour vous
apprendre à utiliser le produit.
Mauvaise installation, livraison ou maintenance.
Le non fonctionnement du produit s'il est abusé, mal
utilisé, modifié ou utilisé à d'autres fins que celles pour
lesquelles il est utilisé commercialement.
Dommages causés à la surface de cuisson en verre
par l'utilisation de nettoyants autres que les crèmes et
lingettes de nettoyage recommandés.
Les dommages à la table de cuisson en verre causés
par des éclaboussures de matériaux sucrés ou de
plastique fondu qui n'ont pas été nettoyés conformément
aux instructions du mode d'emploi.
EXCLUSION DE GARANTIES IMPLICITES
Votre seul et unique recours est la réparation du produit tel qu’il est prévu dans cette garantie limitée. Toute garantie
implicite, y compris les garanties implicites de qualité marchande ou d'adéquation à un usage particulier, est limitée
à un an ou à la période la plus courte autorisée par la loi.
Pour la période
MC Comercial fournira:
d’une année
Depuis la date
Originale d’
achat
N'importe quelle partie de la cuisinière ne fonctionne plus en raison d'un défaut de matériaux
et de fabrication.
Durant cette garantie limitée d'un an, MC Comercial fournira gratuitement toute la
main-d'œuvre et le service à domicile pour remplacer la pièce défectueuse.
Date is needed to obtain service under the warranty.
Staple your receipt here. Proof of the original purchase
GARANTIE
Garantie Cuisinière Électrique GE Appliances
Remplacement des fusibles de la maison ou remise
à zéro des disjoncteurs.
Les dommages au produit causés par un accident, un
incendie, une inondation ou un cas de force majeure.
Les dommages à la finition, tels que la rouille de surface,
le ternissement ou les petites imperfections non
signalées dans les 48 heures suivant la livraison.
Les dommages accidentels ou consécutifs causés par
d'éventuels défauts de cet appareil.
Dommages causés après la livraison.
Produit non accessible pour fournir le service requis.
Service pour réparer ou remplacer les ampoules à
l'exception des lampes à DEL.
Cette garantie est offerte à l’acheteur initial, ainsi qu’à tout propriétaire subséquent d’un produit acheté au Canada
en vue d’une utilisation domestique au Canada. Si le produit se situe dans une zone où aucun réparateur agréé par
GE n'est disponible, vous devrez peut-être assumer les frais de déplacement de celui-ci ou apporter le produit à un
atelier de réparation agréé par GE. Si vous avez besoin de pièces de rechange, nous vous recommandons de n'utiliser
que des pièces d'origine spécifiées de GE. Ces pièces ont été conçues pour fonctionner avec votre appareil et ont
été fabriquées et testées afin de répondre aux spécifications de GE.
Dans certains États ou province, il est interdit d’exclure ou de limiter les dommages indirects ou accessoires. Il est
alors possible que les limitations ou exclusions ci-dessus ne s'appliquent pas dans votre cas. La présente garantie
vous confère des droits juridiques spécifiques. Vous pouvez bénéficier d'autres droits, qui varient d'un État ou d'une
province à l'autre. Pour connaître les droits dont vous bénéficiez, communiquez avec le bureau des Relations avec
les consommateurs de votre région ou de votre province.
Garant : MC Commercial, Burlington, ON, L7R 5B6

63
ACCESSORIES
Vous cherchez quelque chose de plus?
GE Appliances offre une variété d'accessoires pour
améliorez vos expériences de cuisson et d'entretien!
Reportez-vous à la page du support client pour les numéros de téléphone
et les informations sur le site Web.
Les produits suivants et plus sont disponibles:
Accessories
Accessories
Petite lèchefrite (8 ¾ ” x 1 ¼” x 13 ½ “)
Grande lèchefrite (12 ¾ ” x 1 ¼” x 16 ½ “)
Extra grande lèchefrite (17 ”x 1 ¼” x 19 1/4 “)
Pièces Détachées
Grilles de Four
Eléments de Four
Ampoules
Produits de Nettoyage
Lingettes CitruShine™ Stainless Steel
Crème de Nettoyage en Acier inoxydable CERAMA BRYTE®
Lingettes pour table de cuisson CERAMA BRYTE®
Crème de Nettoyage Table de Cuisson en Ceramique CERAMA BRYTE®
Grattoir de table de cuisson CERAMA BRYTE®
Kit (Kit comprend crème et grattoir de table de cuisson) 50 par 60 cms.
*La grande casserole de la friture ne rentre pas dans cuisinières de 20 po / 24 po
** La lèchefrite XL ne convient pas aux fours muraux de 60 cms, aux encastrés de
68 cms ou aux cuisinières de 50 par 60 cms.

64
Imprimé au Mexique
Service à la Clientèle
SERVICE À LA CLIENTÈLE
Lorem ipsum dolor sit amet, consectetuer adipiscing elit, sed diam nonummy nibh euismod
Site Web de GE Appliances
Vous avez une question ou avez besoin d'aide avec votre appareil? Essayez le site GE Appliances 24 heures sur 24,
n'importe quel jour de l'année! Vous pouvez également acheter d'autres produits GE Appliances et profiter de tout
notre support en ligne de votre choix. Aux Etats-Unis : GEAppliances.ca.
Enregistrer votre Electroménager
Enregistrez votre nouvel appareil en ligne à votre convenance! L'enregistrement rapide du produit permettra une
meilleure communication et un service rapide selon les termes de votre garantie, le cas échéant. Vous pouvez
également poster dans le panier de la partie de pré-registration incluyant le material. Aux Etats-Unis: GEAppliances.ca.
Horaire de Service
Le service de réparation Expert GE Appliances n'est qu'à un pas de votre porte. Mettez-vous en ligne et planifiez
votre service à GE Appliances repair service tous les jours de l’année aux Etats-Unis: GEAppliances.ca ou appelez
le 1-800.561.3344 pendant les horaires ouvrables.
Connexion à Distance
Pour obtenir de l'aide sur la connectivité réseau sans fil (pour les modèles avec activation à distance), visitez notre
site GEAppliances.com/ge/connected-appliances/ ou appelez le 800.220.6899 aux Etats-Unis
Pièces et Accessoires
Les personnes qualifiées pour entretenir leurs propres appareils peuvent recevoir des pièces ou des accessoires
directement chez eux (les cartes VISA/ MasterCard et Discover cards sont acceptés.) Achetez en ligne aujourd’hui
24 heures sur 24.
Aux Etats-Unis : GEApplianceparts.com ou appelez au 877.959.8688 pendant les horaires d’ouverture.
Les instructions contenues dans ce manuel couvrent les procédures à effectuer par tout utilisateur. Les autres
réparations doivent généralement être confiées à du personnel qualifié. Il faut faire preuve de prudence, car un
mauvais entretien peut entraîner un fonctionnement dangereux.
Contactez nous
Si vous n'êtes pas satisfait du service que vous recevez de GE Appliances, contactez-nous sur notre site Web avec
tous les détails, y compris votre numéro de téléphone, ou écrivez à:
MC Comercial | Factory Lane Moncton (Nouveau-Brunswick) E1C 9M3.
