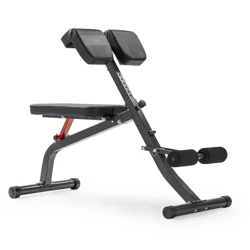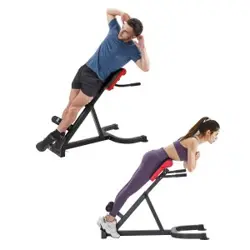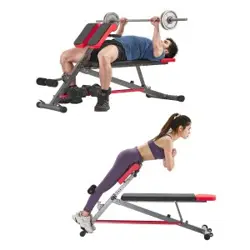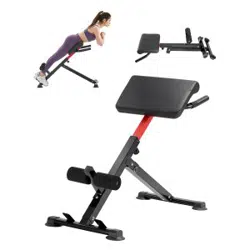
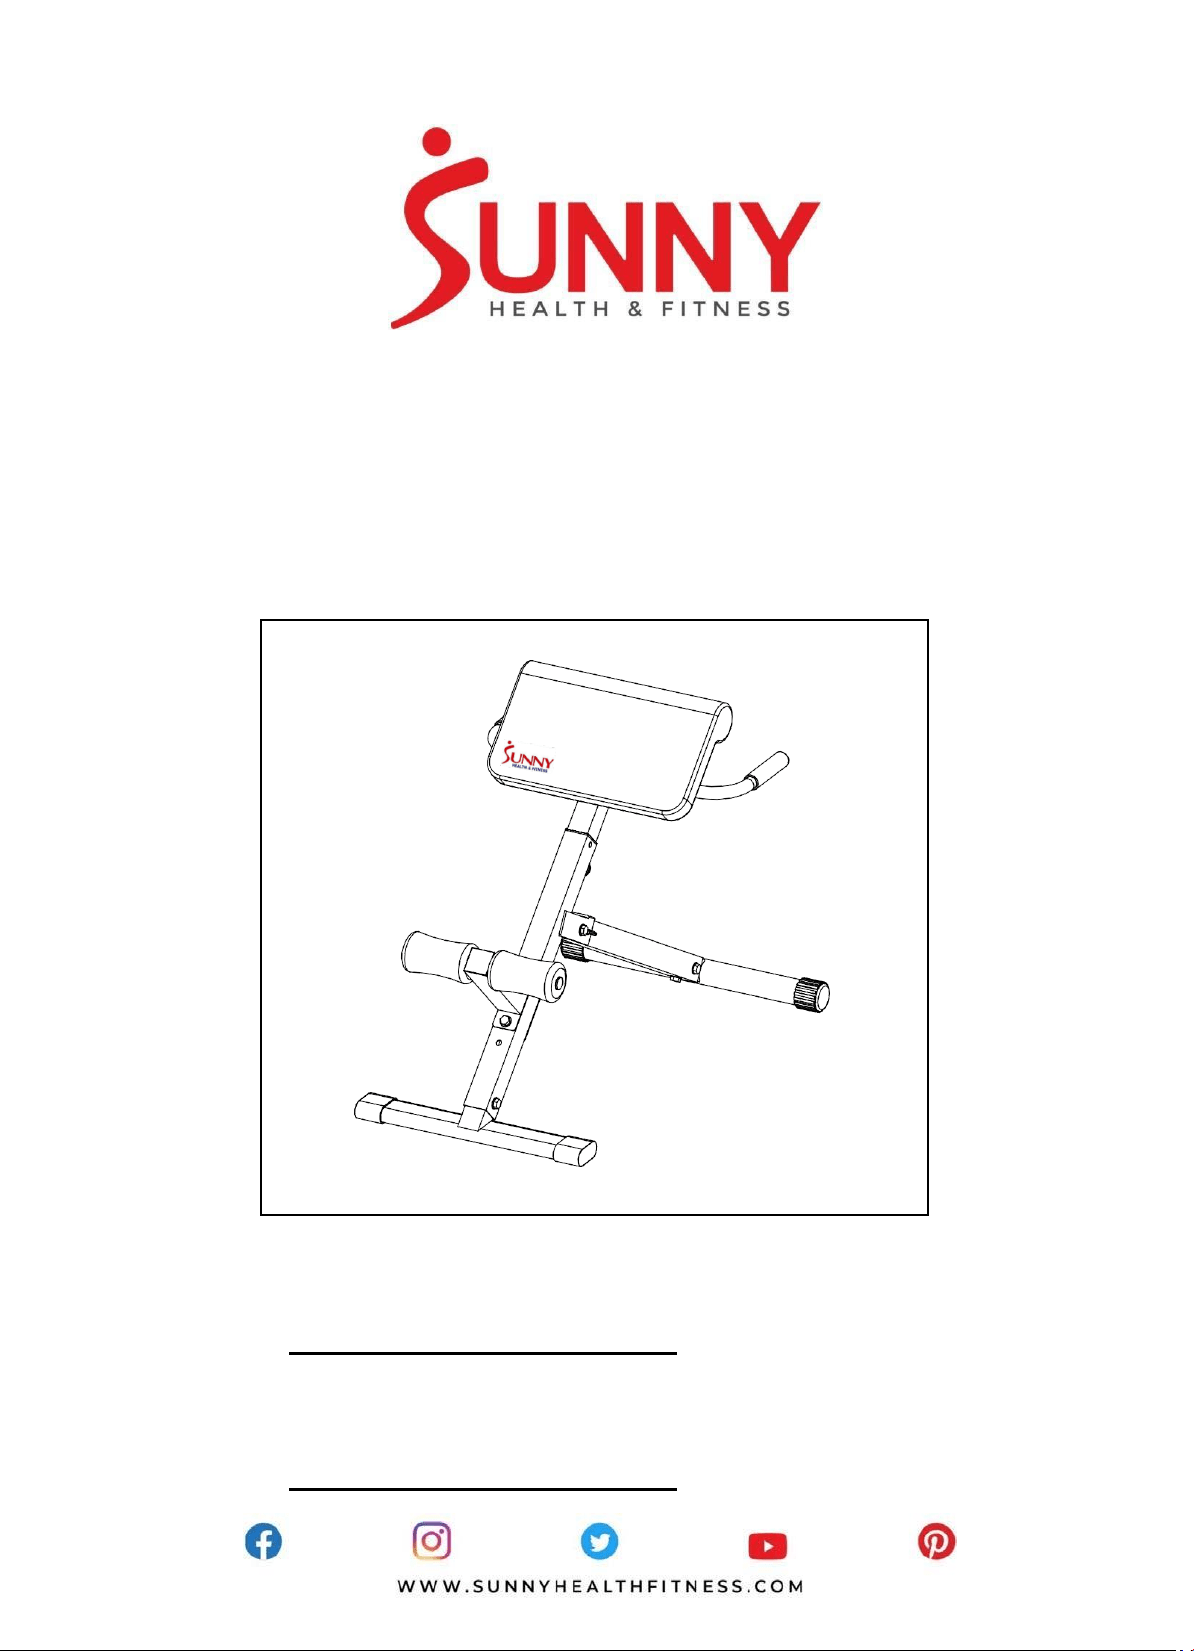
45 DEGREE HYPEREXTENSION
ROMAN CHAIR
SF-H6629
USER MANUAL
English, Page 1~9 IMPORTANT! Please retain owner’s manual for maintenance and adjustment
instructions. Your satisfaction is very important to us, PLEASE DO NOT
RETURN UNTIL YOU HAVE CONTACTED US:
[email protected] or 1- 877 - 90SUNNY (877-907-8669).
Español, Page 10~14 ¡IMPORTANTE! Conserve el manual del propietario para las instrucciones de
mantenimiento y ajuste. Su satisfacción es muy importante para nosotros, NO
DEVUELVA HASTA HABERNOS CONTACTADO:
[email protected] ó 1- 877 - 90SUNNY (877-907-8669).

1
IMPORTANT SAFETY INFORMATION
We thank you for choosing our product. To ensure your safety and health, please use this
equipment correctly. It is important to read this entire manual before assembling and using
the equipment. Safe and effective use can only be assured if the equipment is assembled,
maintained, and used properly. It is your responsibility to ensure that all users of the
equipment are informed of all warnings and precautions.
1.
Before starting any exercise program you should consult your physician to determine
if you have any medical or physical conditions that could put your health and safety
at risk or prevent you from using the equipment properly. Your physician’s advice is
essential if you are taking any medication that may affect your heart rate, blood
pressure, or cholesterol level.
2.
Be aware of your body’s signals. Incorrect or excessive exercise can damage your
health. Stop exercising if you experience any of the following symptoms: pain,
tightness in your chest, irregular heartbeat, shortness of breath, lightheadedness,
dizziness, or feelings of nausea. If you do experience any of these conditions, you
should consult your physician before continuing with your exercise program.
3.
Keep children and pets away from the equipment. The equipment is designed for
adult use only.
4.
Use the equipment on a solid, flat level surface with a protective cover for your floor
or carpet. To ensure safety, the equipment should have at least 4 feet (1.2 m) of free
space all around it.
5.
Ensure that all nuts and bolts are securely tightened before using the equipment. The
safety of the equipment can only be maintained if it is regularly examined for damage
and/or wear and tear.
6.
Always use the equipment as indicated. If you find any defective components while
assembling or checking the equipment, or if you hear any unusual noises coming
from the equipment during exercise, stop using the equipment immediately and don’t
use the equipment until the problem has been rectified.
7.
Wear suitable clothing while using the equipment. Avoid wearing loose clothing that
may become entangled in the equipment.
8.
Do not place fingers or objects into the moving parts of the equipment.
9.
The maximum weight capacity of this unit is 250 pound (113 kg).
10. This equipment is not suitable for therapeutic use.
11. Move with caution when lifting and moving the equipment. Always use proper lifting
technique and seek assistance if necessary.
12. Your product is intended for use in cool, dry conditions. Avoid storage in extreme
cold, hot, or damp areas as this may lead to corrosion and other related problems.
13. This equipment is designed for indoor use only! It is not intended for commercial use!

2
INFORMACIÓN IMPORTANTE DE SEGURIDAD
Gracias por haber elegido nuestro producto. Para garantizar su seguridad y salud, utilice este
equipo correctamente. Es importante leer todo el manual antes de instalar y usar el equipo.
Solo se puede garantizar el uso seguro y eficaz del equipo si se instala, mantiene y utiliza
correctamente. Es su responsabilidad asegurarse de que todos los usuarios de los equipos
conozcan todas las advertencias y precauciones.
1. Antes de comenzar cualquier programa de ejercicios, consulta con su médico para
determinar si tiene alguna condición médica o física que puede poner en riesgo su salud
y seguridad o que podría impedir que utilice el equipo adecuadamente. El consejo de su
médico es esencial en caso de que esté tomando algún medicamento que podría afectar
su ritmo cardíaco, presión arterial o nivel de colesterol.
2. Esté atento a las señales de su cuerpo. Ejercitarse de manera incorrecta o excesiva puede
dañar su salud. Deje de hacer ejercicio si experimenta alguno de los siguientes síntomas:
dolor, opresión en el pecho, latidos cardíacos irregulares, falta de aliento, sensación de
desmayo, mareos o sensación de náuseas. Si presenta alguna de esas condiciones,
consulta con su médico antes de continuar con su programa de ejercicios.
3. Mantenga el equipo lejos del alcance de niños y mascotas. El equipo está diseñado para
el uso exclusivo de adultos.
4. Utilice el equipo en una superficie plana y sólida con una cubierta protectora para su piso
o alfombra. Para garantizar su seguridad, el equipo debe tener al menos 60CM (2 pies)
de espacio libre a su alrededor.
5. Asegúrese de que todas las tuercas y pernos estén bien ajustados antes de usar el equipo.
Solo puede conservarse la seguridad del equipo si se inspecciona regularmente para
detectar daños o desgaste.
6. Siempre utilice el equipo como se indica. Si encuentra algún componente defectuoso
mientras instala o revisa el equipo, o si escucha ruidos extraños que provienen del equipo
durante el ejercicio, deje de utilizarlo inmediatamente y no lo utilice hasta que el problema
se ha corregido.
7. Use ropa adecuada cuando utilice el equipo. Evite usar ropa suelta que pueda enredarse
en el equipo.
8. No coloque los dedos u objetos en las partes móviles del equipo.
9. La capacidad máxima de peso de esta unidad es de 113 KG (250 libras).
10. El equipo no es adecuado para uso terapéutico.
11. Muévase con cuidado cuando levante y mueva el equipo a fin de que no se dañe la
espalda. Siempre utilice la técnica de levantamiento adecuada y pida ayuda en caso de
que sea necesario.
12. Su producto está diseñado para usar en condiciones frescas y secas. Debe evitar de
tenerlo en lugares extremadamente frías, calientes o húmedas, ya que pueden provocar
corrosión y otros problemas relacionados.
13. ¡Este equipo está diseñado solamente para uso interior! ¡No es para uso comercial!
3
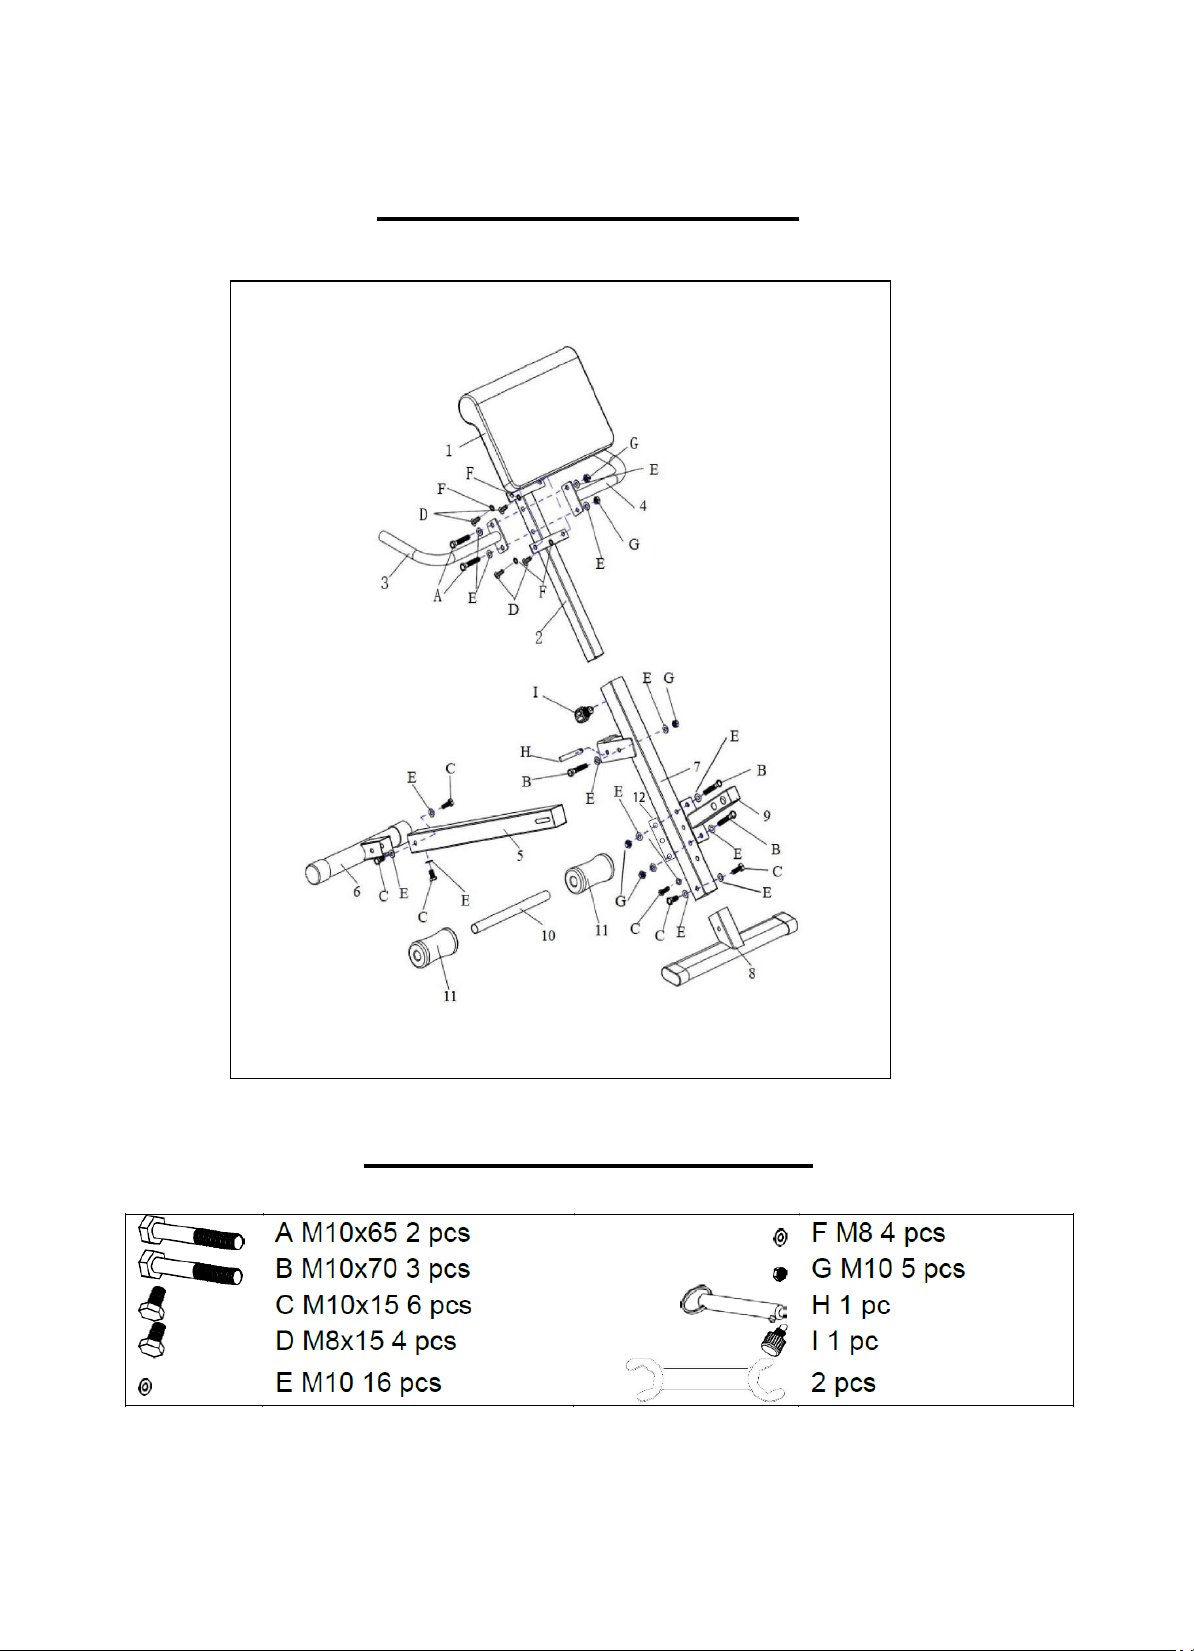
EXPLODED DIAGRAM
HARDWARE PACKAGE
4
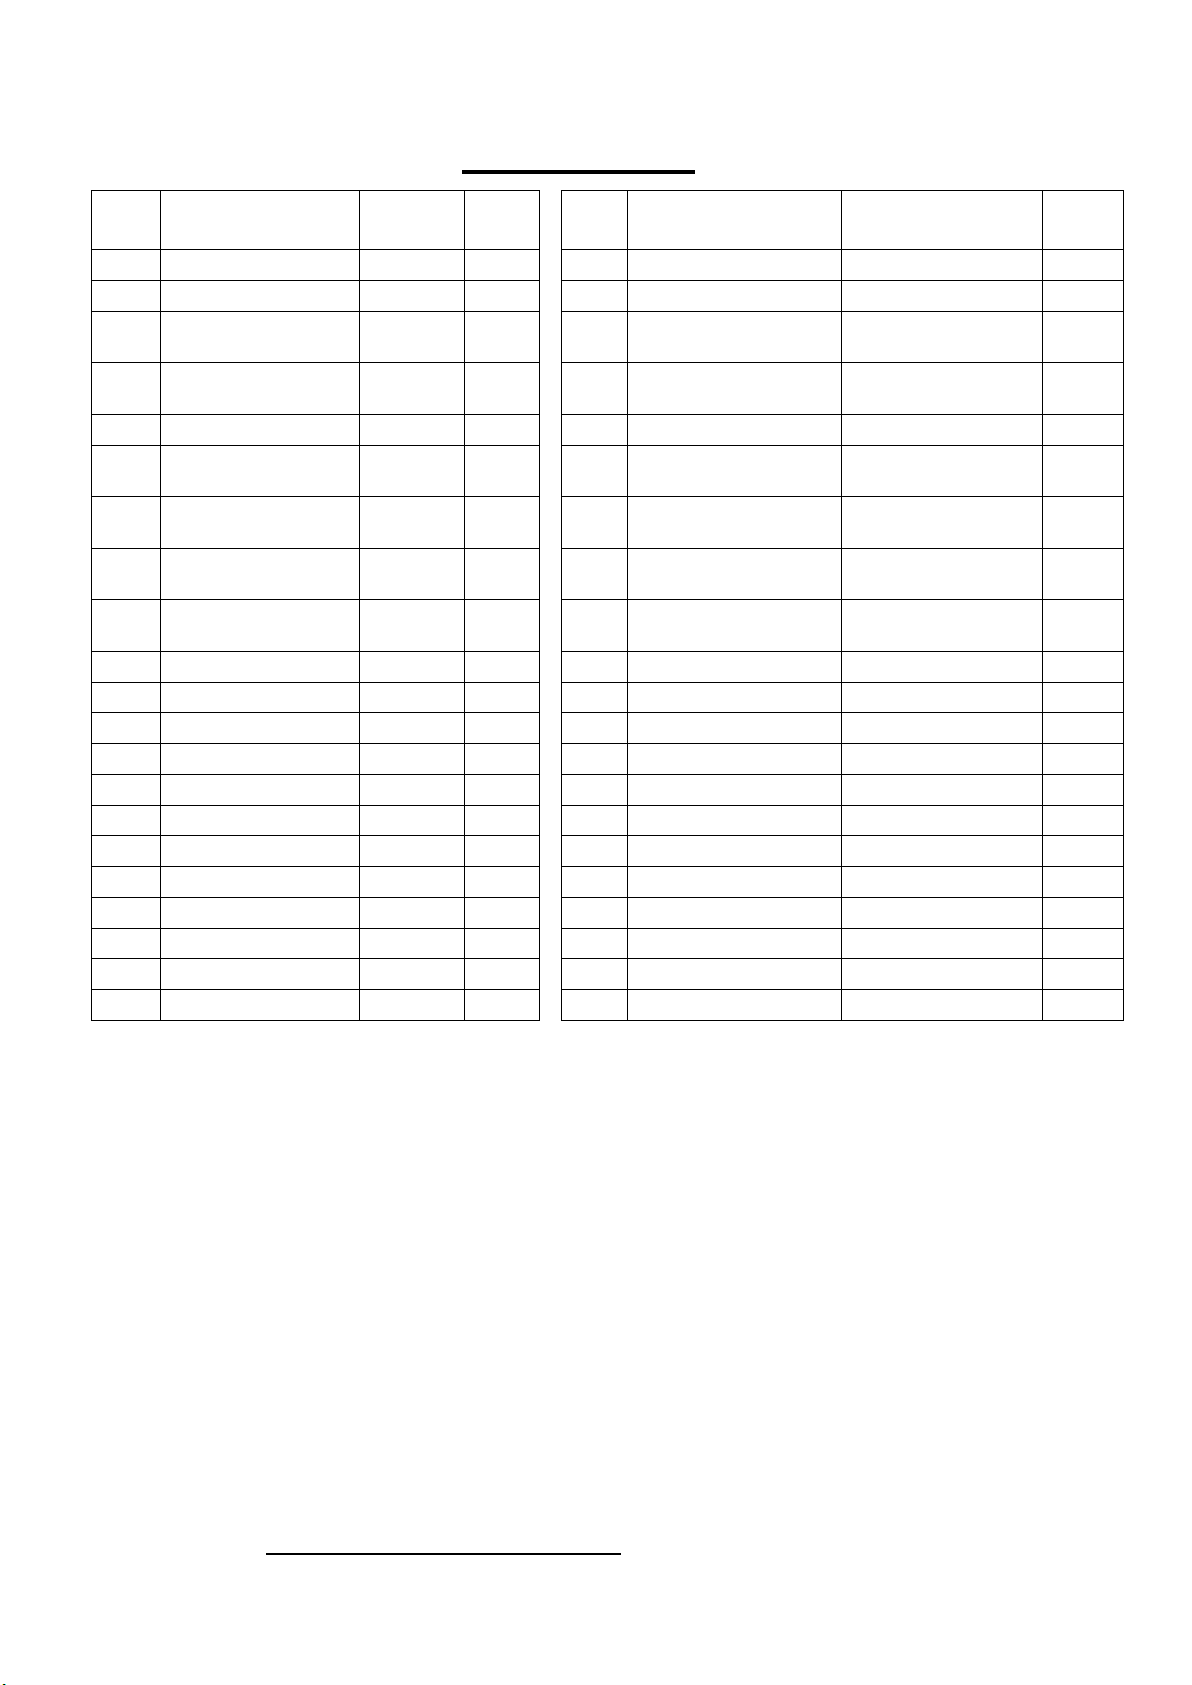
PARTS LIST
NO.
Description
Spec.
Qty
n.°
Descripción
Especificaciones
Cant.
1
Cushion
1
1
Almohadón
1
2
Adjustable Tube
1
2
Tubo Ajustable
1
3
Right Handle Bar
1
3
Barra de Manija
Derecha
1
4
Left Handle Bar
1
4
Barra de Manija
Izquierdo
1
5
Back Stand Tube
1
5
Tubo Trasero
1
6
Back Base Tube
1
6
Tubo de Base
Trasero
1
7
Front Stand
Adjustable Tube
1
7
Tubo Delantero
Ajustable
1
8
Front Base Tube
1
8
Tubo de Base
Delantero
1
9
Leg Support Tube
1
9
Tubo de Soporte
de Pata
1
10
Foam Tube
1
10
Tubo de Espuma
1
11
Foam
2
11
Espuma
2
12
Support Plate
1
12
Placa de Soporte
1
A
Hex Bolt
M10x65
2
A
Perno Hexagonal
M10x65
2
B
Hex Bolt
M10x70
3
B
Perno Hexagonal
M10x70
3
C
Hex Bolt
M10x15
6
C
Perno Hexagonal
M10x15
6
D
Hex Bolt
M8x15
4
D
Perno Hexagonal
M8x15
4
E
Washer
M10
16
E
Arandela
M10
16
F
Washer
M8
4
F
Arandela
M8
4
G
Nut
M10
5
G
Tuerca
M10
5
H
Lock Pin
1
H
Clavija de Bloqueo
1
I
Lock Pin
1
I
Perilla de Bloqueo
1
Ordering Replacement Parts (U.S. and Canadian Customers only)
Please provide the following information in order for us to accurately identify the part(s)
needed:
The model number (found on cover of manual)
The product name (found on cover of manual)
The part number found on the “EXPLODED DIAGRAM” and “PARTS LIST” (found near
the front of the manual)
8669).
Pedido de piezas de repuesto (solo para clientes de EE. UU. y Canadá)
Proporcione la siguiente información para que podamos identificar con precisión las piezas
necesarias:
El número de modelo (se encuentra en la portada del manual).
El nombre del producto (se encuentra en la portada del manual).
El número de pieza que se encuentra en el “ESQUEMA DE LAS PIEZAS” y en la
“LISTA DE PIEZAS” (se encuentra al principio del manual).
Contáctenos en [email protected] o 1- 877 - 90SUNNY (877-907-8669).
5
ASSEMBLY INSTRUCTIONS
We value your experience using Sunny Health and Fitness products. For assistance with
parts or troubleshooting, please contact us at [email protected] or 1-877-
90SUNNY (877-907-8669).
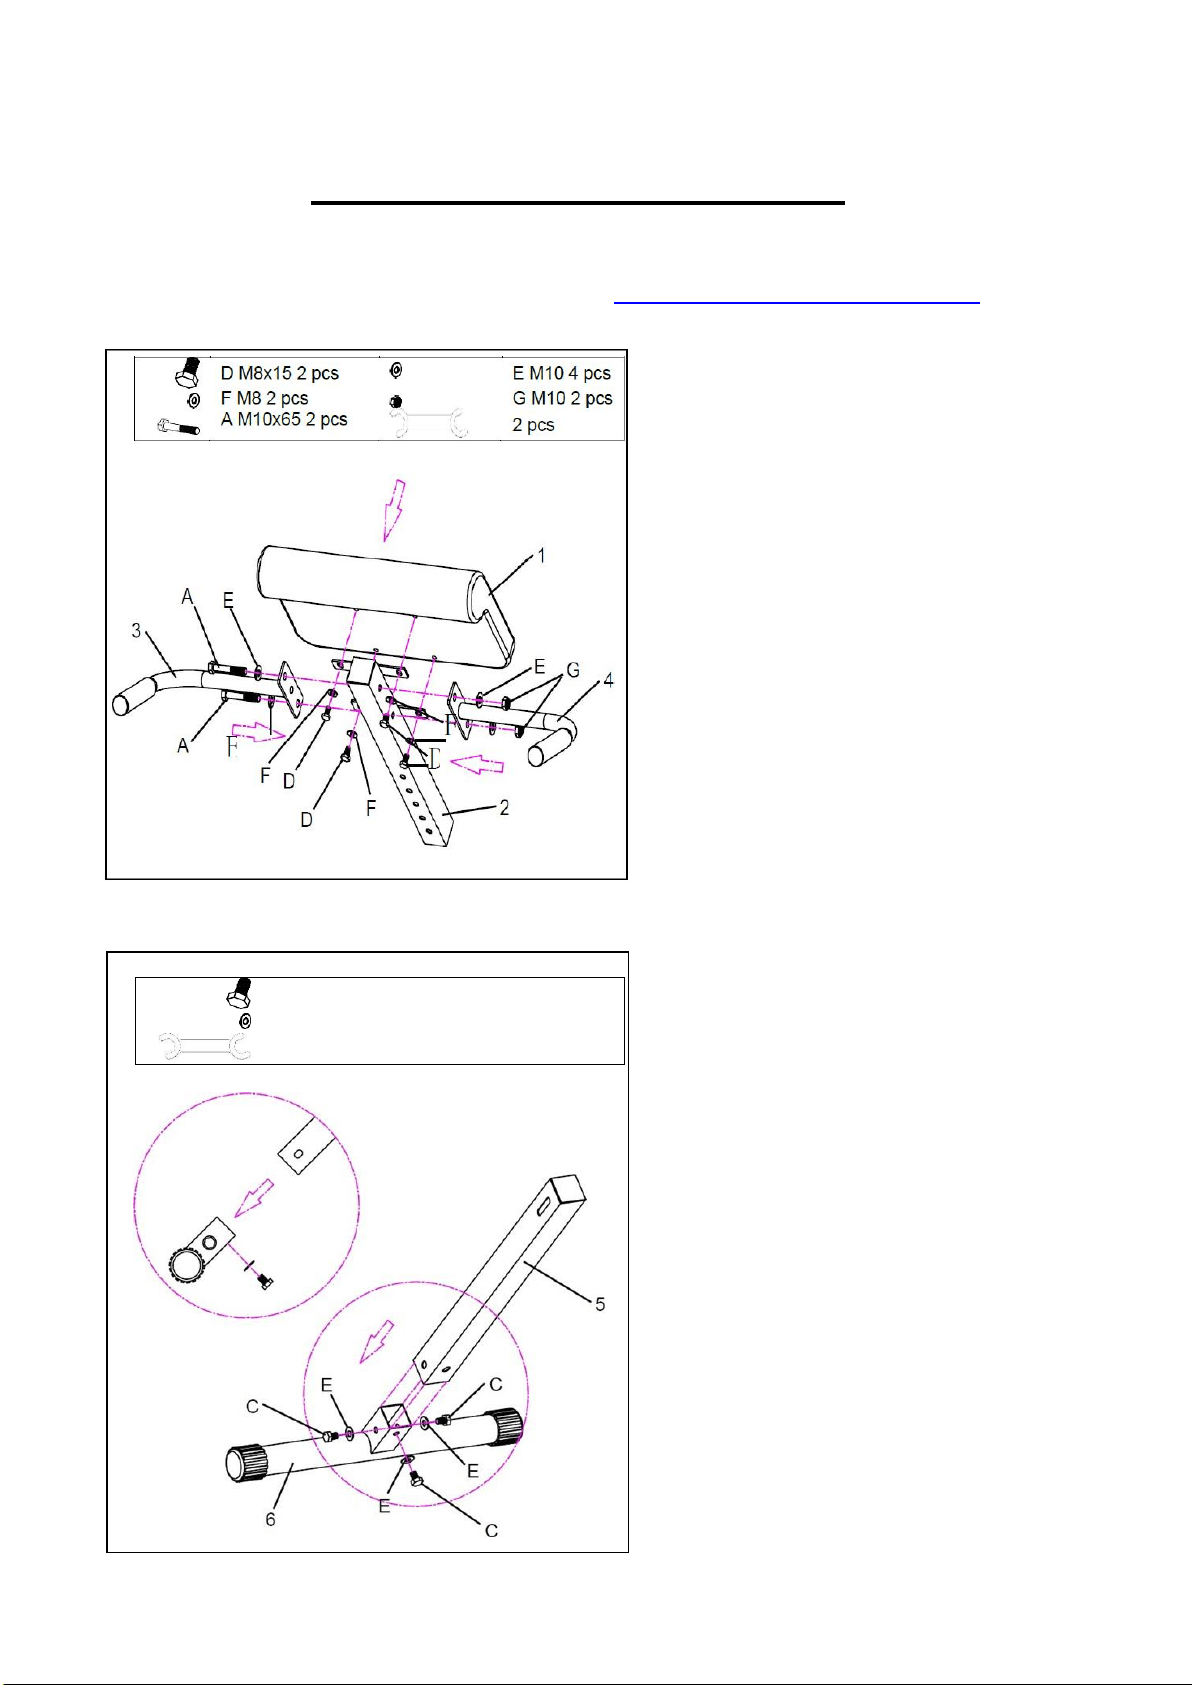
STEP 1:
Attach the Cushion (No. 1) to the
Adjustable Tube (No. 2), using 2
Hex Bolts (D) and 2 Washers (F).
Attach Right Handlebar (No. 3) and
Left Handlebar (No. 4) to Adjustable
Tube (No. 2), using 2 Hex Bolts (A),
4 Washers (E) and 2 Nuts (G).
Tighten with Spanner Wrench.
STEP 2:
Insert Back Stand Tube (No. 5) into
Back Base Tube (No. 6). Secure
using 3 Hex Bolts (C) and 3
Washers (E). Tighten with Spanner
Wrenhten with Spanner Wrench.
D M8x15 2 pcs
E M10 4 pcs
F M8 2 pcs
G M10 2 pcs
A M10x65 2 pcs
2 pcs
F
E
D
C M10x15 3 pcs
E M10 3 pcs
2 pcs
6
ASSEMBLY INSTRUCTIONS
We value your experience using Sunny Health and Fitness products. For assistance with
parts or troubleshooting, please contact us at [email protected] or 1-877-
90SUNNY (877-907-8669).
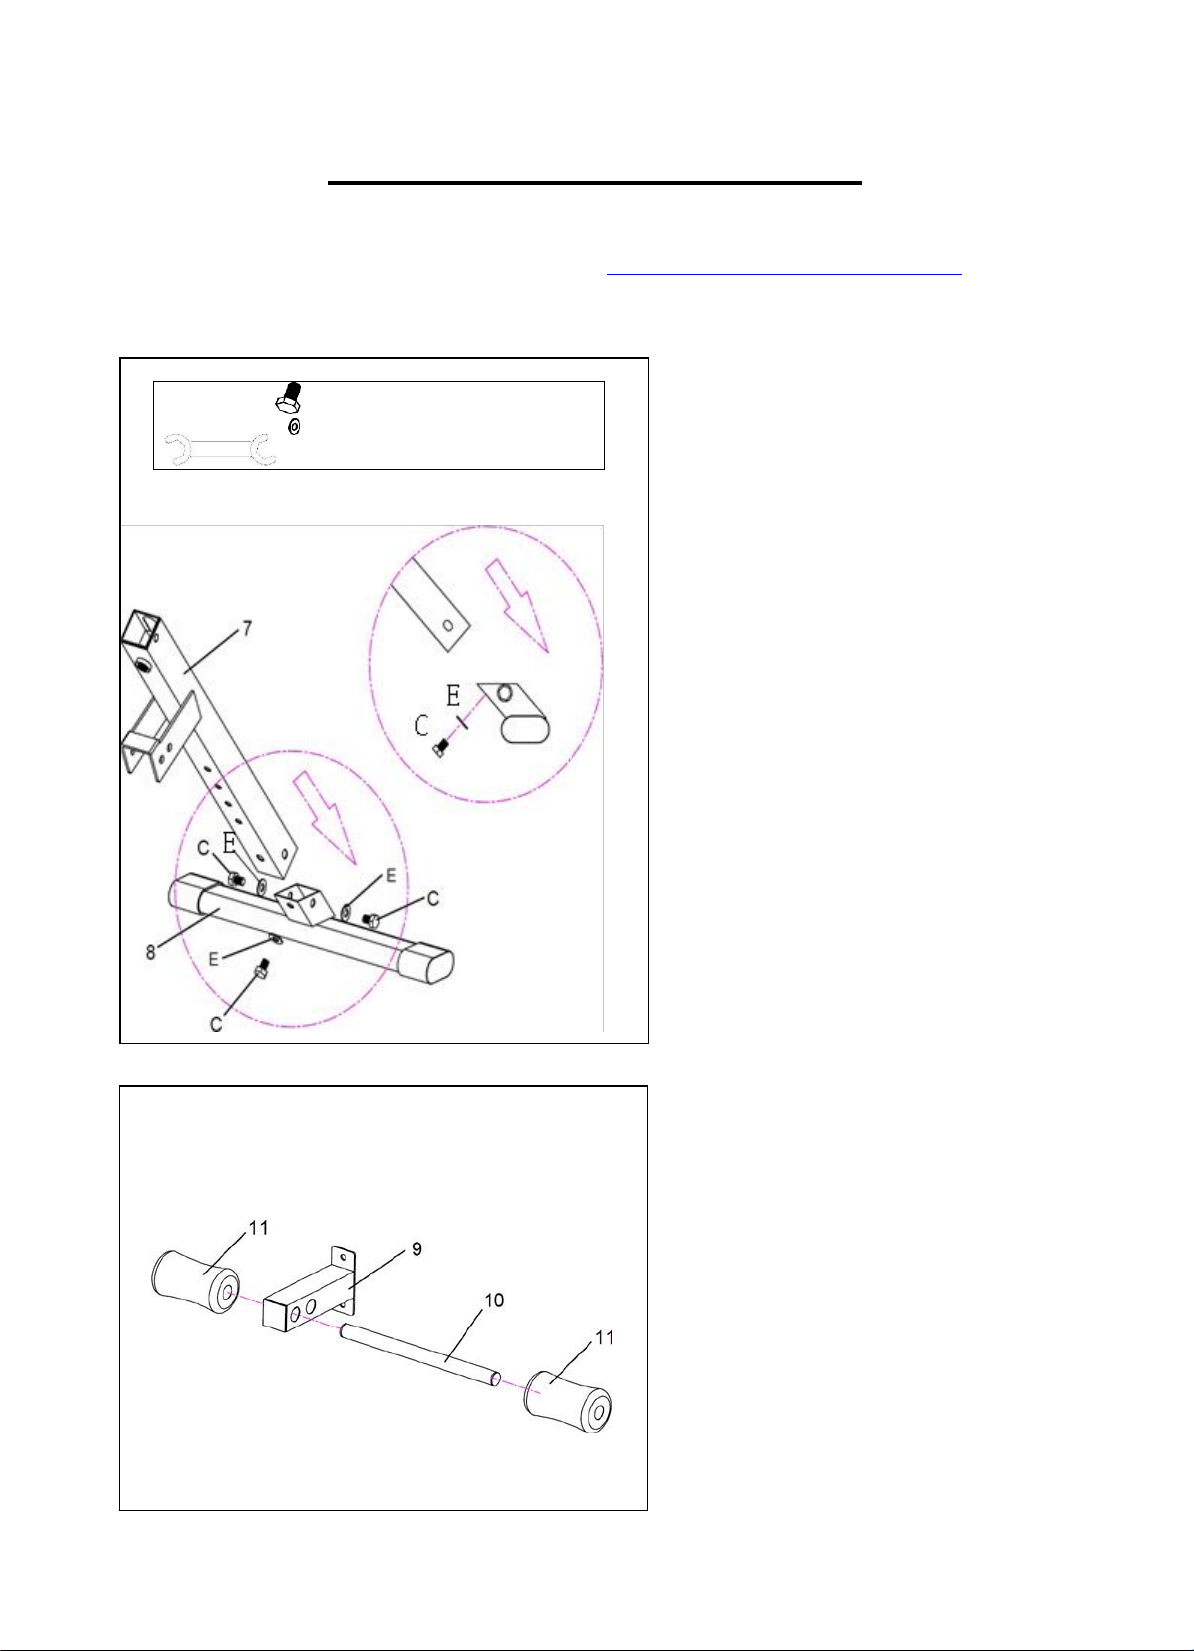
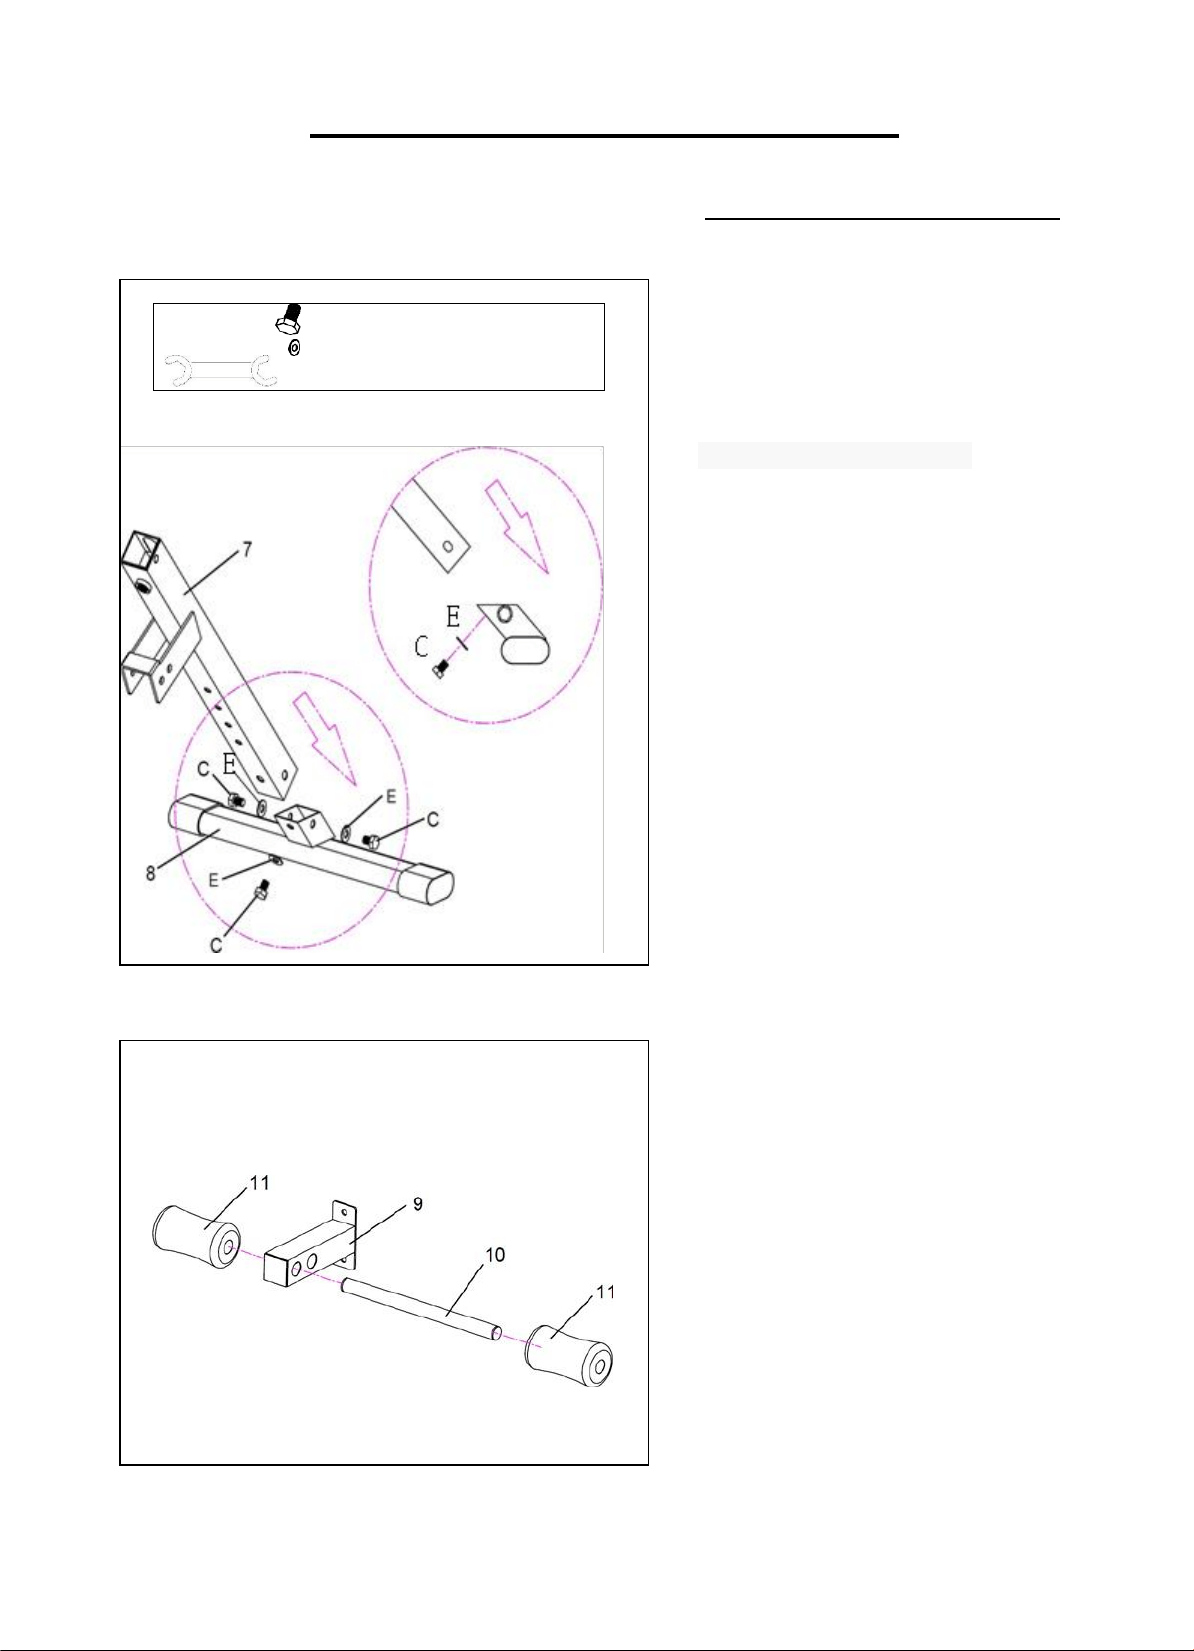
STEP 3:
Insert Front Stand Adjustable
Tube (No. 7) into Front Base Tube
(No. 8). Secure using 3 Hex Bolts
(C) and 3 Washers (E). Tighten with
Spanner Wrench.
STEP 4:
Insert Foam Tube (No. 10) through
the hole of the Leg Support Tube
(No. 9). Then put Foams (No. 11) on
both ends of the Foam Tube (No.
10).
C M10x15 3 pcs
E M10 3 pcs
2 pcs
7
ASSEMBLY INSTRUCTIONS
We value your experience using Sunny Health and Fitness products. For assistance with
parts or troubleshooting, please contact us at support@sunnyhealthfitness.com or 1-877-
90SUNNY (877-907-8669).
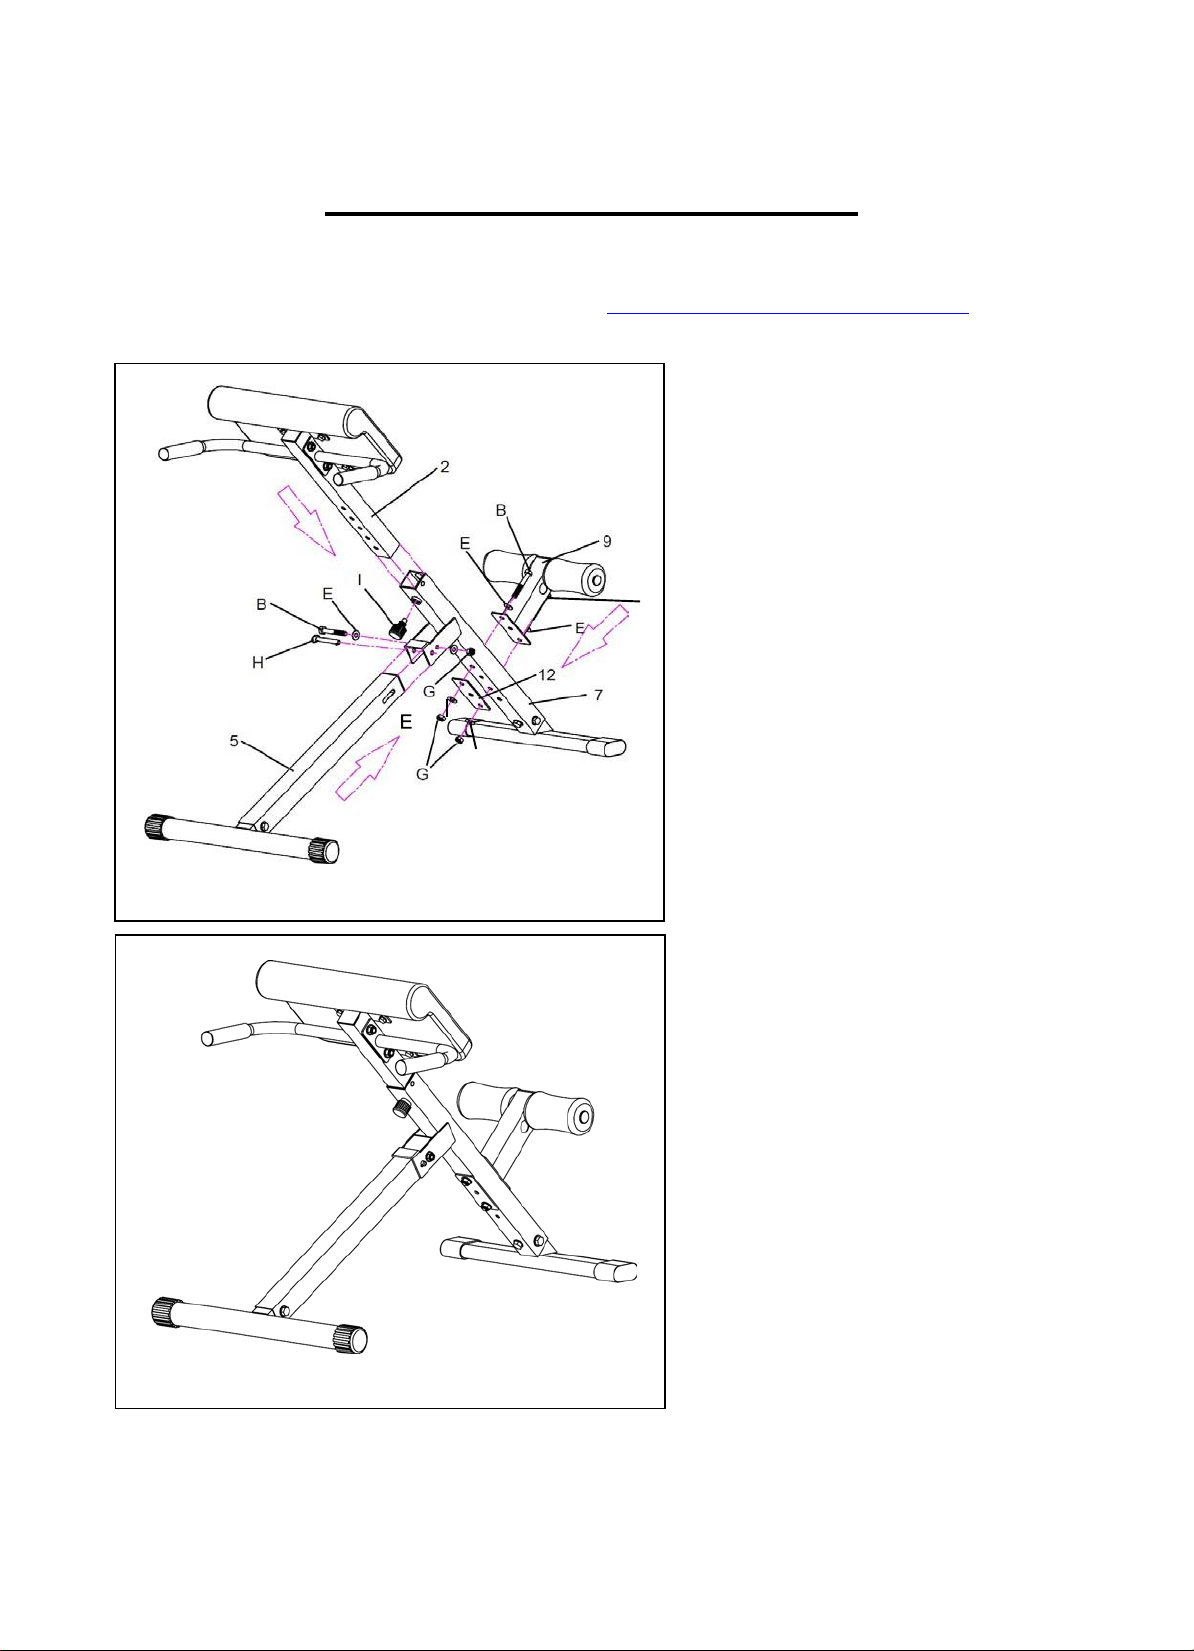
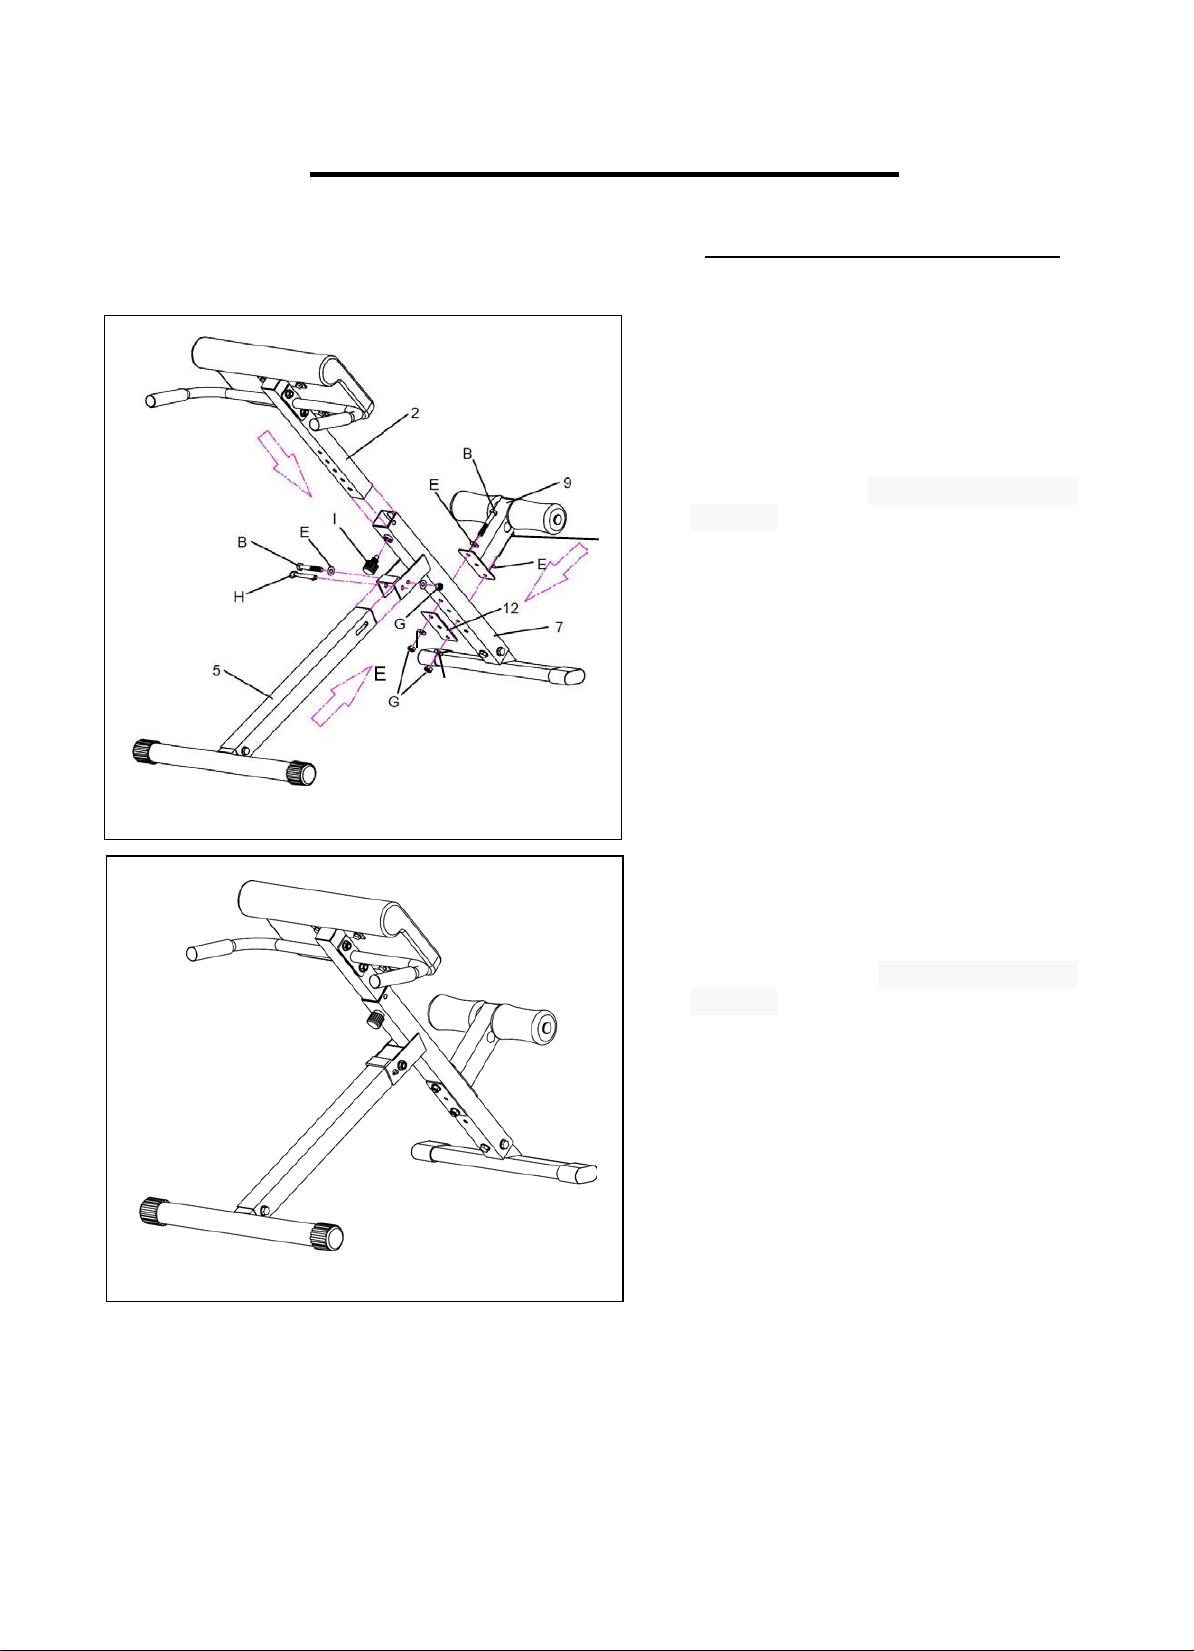
STEP 5:
Attach Back Stand Tube (No. 5) to
Front Stand Adjustable Tube (No.
7) using Hex Bolt (B), 2 Washers
(E), and Nut (G). Tighten with
Spanner Wrench.
Insert Lock Pin (H).
Place bench on floor, make sure the
Tubes are level on the floor. Tighten
all the Hex Bolts and Nuts.
Insert Adjustable Tube (2) into
Front Stand Adjustable Tube (No.
7).
Insert Lock Pin (I) and turn to tighten.
Attach Leg Support Tube (No. 9) to
Front Stand Adjustable Tube (No.
7), using Hex Bolt (B), 4 Washers
(E), Support Plate (No. 12), and 2
Nuts (G). Tighten with Spanner
Wrench.
The assembly is complete!
E
8
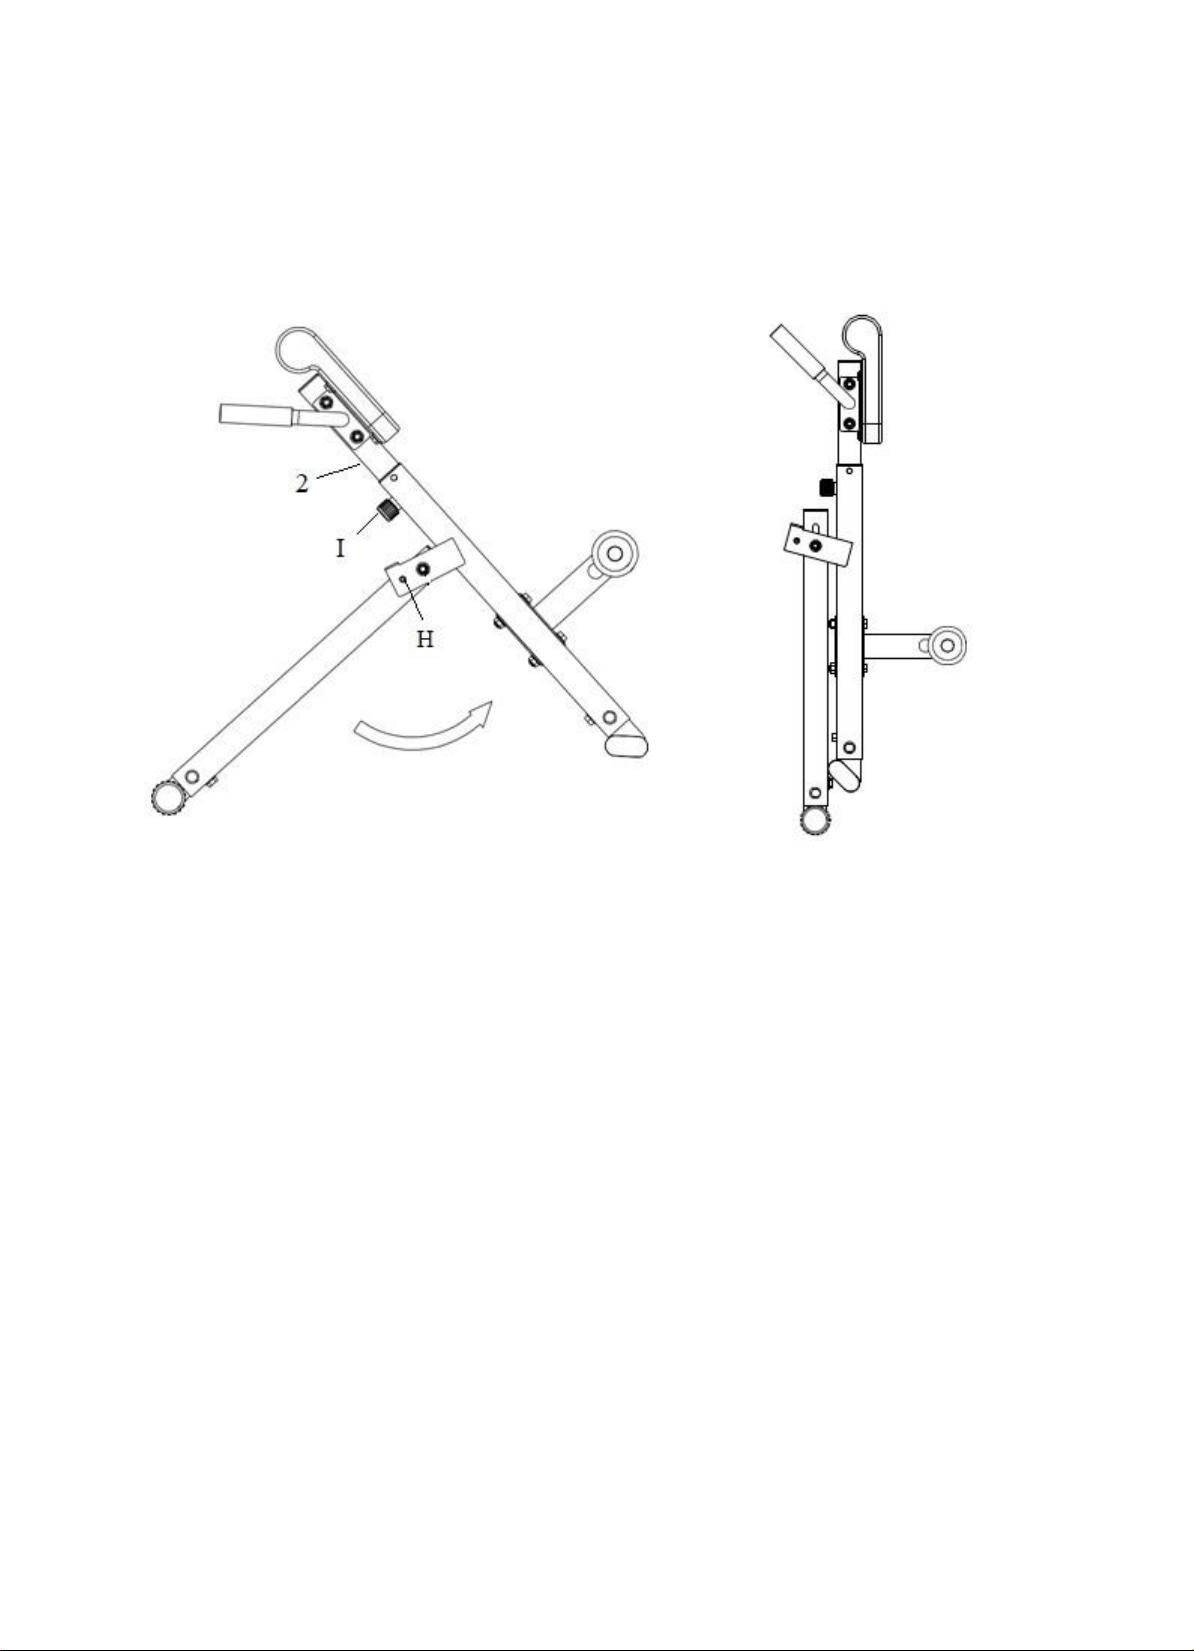
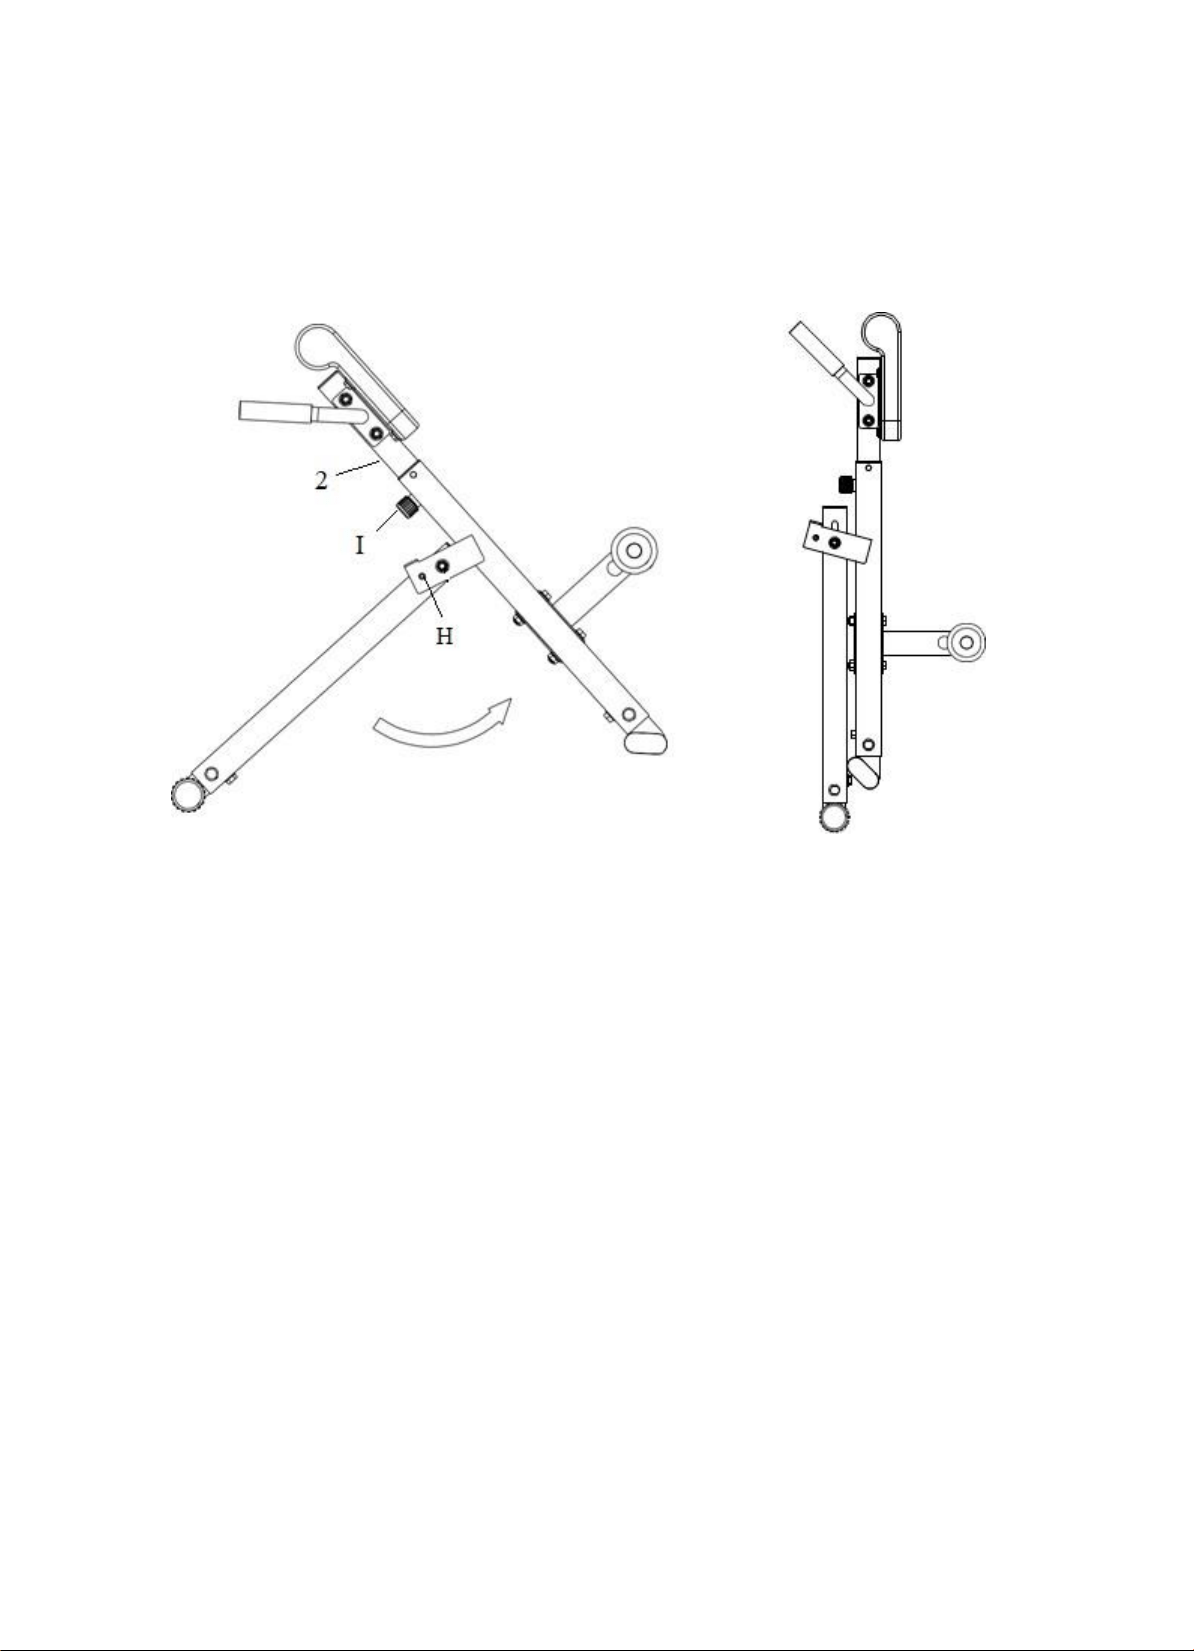
TO ADJUST THE CUSHION HEIGHT:
With one hand, turn Lock Pin (I) to loosen and pull on it. With the other hand, move
the adjustable tube to desired height. Insert Lock Pin (I) into one of the five settings
to secure and turn to tighten.
TO FOLD THE BENCH:
Pull out Lock Pin (H). Fold the bench. Insert Lock Pin (H). When folded, bench will not
stand on its own. It has to lean against wall.

9
MAINTENANCE INSTRUCTION
IMPORTANT:
Safe and effective use can only be achieved if the equipment is assembled, maintained and used
properly. It is your responsibility to ensure that the equipment is maintained regularly. Any
components found to be worn and/or damaged should be replaced before continuing use of the
equipment. Equipment should only be used and stored indoors, prolonged exposure to weathering
and changes in temperature and humidity may have a severe impact on moving parts of the
machine.
Daily Maintenance:
Clean and remove sweat and moisture after each use.
Perform inspection of all nuts and bolts associated with moving parts of the
equipment, tighten as required.
Check the mobility of moving parts and components on the equipment, lubricate if required.
Clean plastic parts of the equipment using a damp cloth, clean metal parts of the equipment
using a dry cloth. Do not use cleaning products to clean the equipment.
Weekly Maintenance:
Thoroughly inspect the parts of the equipment; nuts, bolts, hex bolts and moving parts such as the
slide collar, seat/back pad, support bar, etc. Tighten or replace parts as required.
Monthly Maintenance:
Inspect the frame and inner working components for wear and tear as well as damage,
maintenance or replace as required.

10
INSTRUCCIONES DE ARMADO
Valoramos su experiencia con los productos de Sunny Health and Fitness. Para asistencia
con repuestos o solución de problemas, contáctenos en support@sunnyhealthfitness.com o
al 1-877-90SUNNY (877-907-8669).
PASO 1:
Conecte el Almohadón (1) al Tubo
Ajustable (2), usando Pernos
Hexagonales (D) y Arandelas (F).
Conecte la Barra de Manija Derecha
(3) y la Barra de Manija Izquierda
(4) al Tubo Ajustable (2), usando
2 Pernos Hexagonales (A),
4 Arandelas (E) y 2 Tuercas (G).
Apriete con Llave Inglesa.
PASO 2:
Inserte el Tubo Trasero (5) en el
Tubo de Base Trasero (6). Asegure
usando Pernos Hexagonales (C) y
Arandelas (E). Apriete con Llave
Inglesa.
C M10x15 3 pcs
E M10 3 pcs
2 pcs
11
INSTRUCCIONES DE ARMADO
Valoramos su experiencia con los productos de Sunny Health and Fitness. Para asistencia
con repuestos o solución de problemas, contáctenos en support@sunnyhealthfitness.com o al
1-877-90SUNNY (877-907-8669).
PASO 3:
Inserte el Tubo Delantero Ajustable
(7) en el Tubo de Base Delantero (8).
Asegure usando 3 Pernos
Hexagonales (C) y 3 Arandelas (E).
Apriete con Llave Inglesa.
PASO 4:
Inserte el Tubo de Espuma (10) a
través del orificio del Tubo de
Soporte de Pata (9). Despues pon la
Espuma (11) en los extremos del
Tubo de Espuma (10).
C M10x15 3 pcs
E M10 3 pcs
2 pcs
12
INSTRUCCIONES DE ARMADO
Valoramos su experiencia con los productos de Sunny Health and Fitness. Para asistencia
con repuestos o solución de problemas, contáctenos en support@sunnyhealthfitness.com o al
1-877-90SUNNY (877-907-8669).
PASO 5:
Fije el Tubo Trasero (5) al Tubo
Delantero Ajustable (7), usando un
Perno Hexagonal (B), Arandela (E) y
Tuerca (G). Apriete con Llave
Inglesa.
Inserte la Clavija de Bloqueo (H).
Coloque el banco en el piso,
asegurándose de que los Tubos estén
nivelados en el piso. Apretar todo el
Pernos Hexagonales y Tuercas.
Inserte el Tubo Ajustable (2) en el
Tubo Delantero Ajustable (7).
Insertar la Perilla (I) y gire para apretar.
Conecte el Tubo de Soporte de Pata
(9) al Tubo Delantero Ajustable (7),
usando un Perno Hexagonal (B),
Arandela (E), Placa de Soporte (12)
y Tuercas (G). Apriete con Llave
Inglesa.
¡El armado está completo!
E
13
Para ajustar la altura del almohadón.
Con una mano, gire la Perilla de Bloqueo (I) para aflojarlo y tirar de él. Con la otra mano,
mueve el tubo ajustable a la altura deseada. Inserte la Perilla de Bloqueo (I) en una de las
cinco configuraciones para asegurar y girar para apretar.
Para plegar la banca:
Tire la Clavija de Bloqueo (H). Dobla el banco. Inserte la Clavija de Bloqueo (H). Cuando
esté doblado, el banco no va a pararse solo. Tiene que apoyarse contra la pared.

14
INSTRUCCIONES DE MANTENIMIENTO
IMPORTANTE:
Solo se puede archivar un uso seguro y eficaz del equipo si se instala, mantiene y utiliza
correctamente. Es su responsabilidad asegurarse de que se realice mantenimiento en el equipo
con regularidad. Si encuentra algún componente gastado o dañado, deberá reemplazarlo antes
de seguir usando el equipo. El equipo solo se debe utilizar y almacenar en recintos cerrados;
la exposición prolongada a la intemperie y los cambios de temperatura y humedad pueden
tener un grave impacto sobre los componentes eléctricos y las piezas móviles de la máquina.
Mantenimiento diario:
Limpie y elimine el sudor y la humedad después de cada uso.
Inspeccione todos los pernos y tuercas asociadas con las piezas móviles del equipo;
ajústelos según sea necesario.
Controle la movilidad de las piezas y componentes móviles en el equipo; lubrique si es
necesario.
Limpie las piezas de plástico del equipo con un paño húmedo. Limpie las partes metálicas
del equipo con un paño seco. No utilice productos de limpieza para limpiar el equipo.
Mantenimiento semanal:
Inspeccione minuciosamente las partes del equipo; las tuercas, los pernos, los tornillos y las
partes móviles como el anillo corredizo, la almohadilla del asiento y respaldo, las barras de
soporte, etc. Apriete o reemplace las piezas según sea necesario.
Mantenimiento mensual:
Inspeccione que la estructura y los componentes de trabajo internos no presentan desgaste,
defectos o daños. Realice mantenimiento o reemplazo según sea necesario.
Version 1.6