
Technical Support and E-Warranty Certificate
www.vevor.com/support
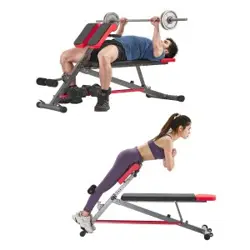
Long stool Roman chair
MODEL:SJ1018
We continue to be committed to provide you tools with competitive price.
"Save Half", "Half Price" or any other similar expressions used by us only
represents an estimate of savings you might benefit from buying certain tools
with us compared to the major top brands and does not necessarily mean to cover
all categories of tools offered by us. You are kindly reminded to verify carefully
when you are placing an order with us if you are actually Saving
Half in comparison with the top major brands.
1
Long stool Roman chair
MODEL:SJ1018
NEED HELP? CONTACT US!
Have product questions? Need technical support? Please feel free to
contact us:
Technical Support and E-Warranty Certificate
www.vevor.com/support
This is the original instruction, please read all manual instructions
carefully before operating. VEVOR reserves a clear interpretation of our
user manual. The appearance of the product shall be subject to the
product you received. Please forgive us that we won't inform you again if
there are any technology or software updates on our product.

2
Thank you very much for choosing this product.
Please read all of the instructions before using it.The information will help
you achieve the best possible results.
Operation safety
WARNING:
Please read all instructions before using this product
It is the Owner's responsibility to ensure that all users of this
product are fully aware of all warnings and precautions.
Do not use it if you are pregnant
Before beginning any exercise program consult your
physician.
Read all instruction before using this product.
Keep children and pets away from sit-up bench while in
use.Children should not use.The product. without adult
supervision.
Inspect and tighten all parts each time before using this sit-up bench.
Please clean this machine using damped wipes only.Do not use any
cleansers.Please Consult with customer service if you have any
questions.
This product should be placed on a flat surface when using.Place an
anti-slippery mat under the machine if needed.
Please wear proper clothes when using this product.
Do not use it if it is not functional or parts are not well-assembled.
If you feel any chest pains,nausea,dizziness,or short of breadth,you
should stop exercising immediately and consult your physician
before continuing.
Before use, always ensure that your product is positioned on a
solid, hard-flat surface.
Store idle equipment out of reach of children and do not allow anyone
unfamiliar with the equipment to use it. This tool is dangerous in the
hands of untrained users.
·

3
When using the product, the crowd of onlookers must keep adistance of
3 meters to avoid accidental injury
Exercise Plans
1.Beginners are recommended to start with less reps,5 reps as 1set for
example and add reps as goes.
2.Please do not exercise half an hour before /after meals or 1 hour before
sleep.
3.Please make exercise plans.
At NO time should pets or children under the age of 12 be
closer to the product than 3 m (10 feet). At NO time should
children under the age of 12 use the product. Children over
the age of 12 should not use the product without adult
supervision.

4
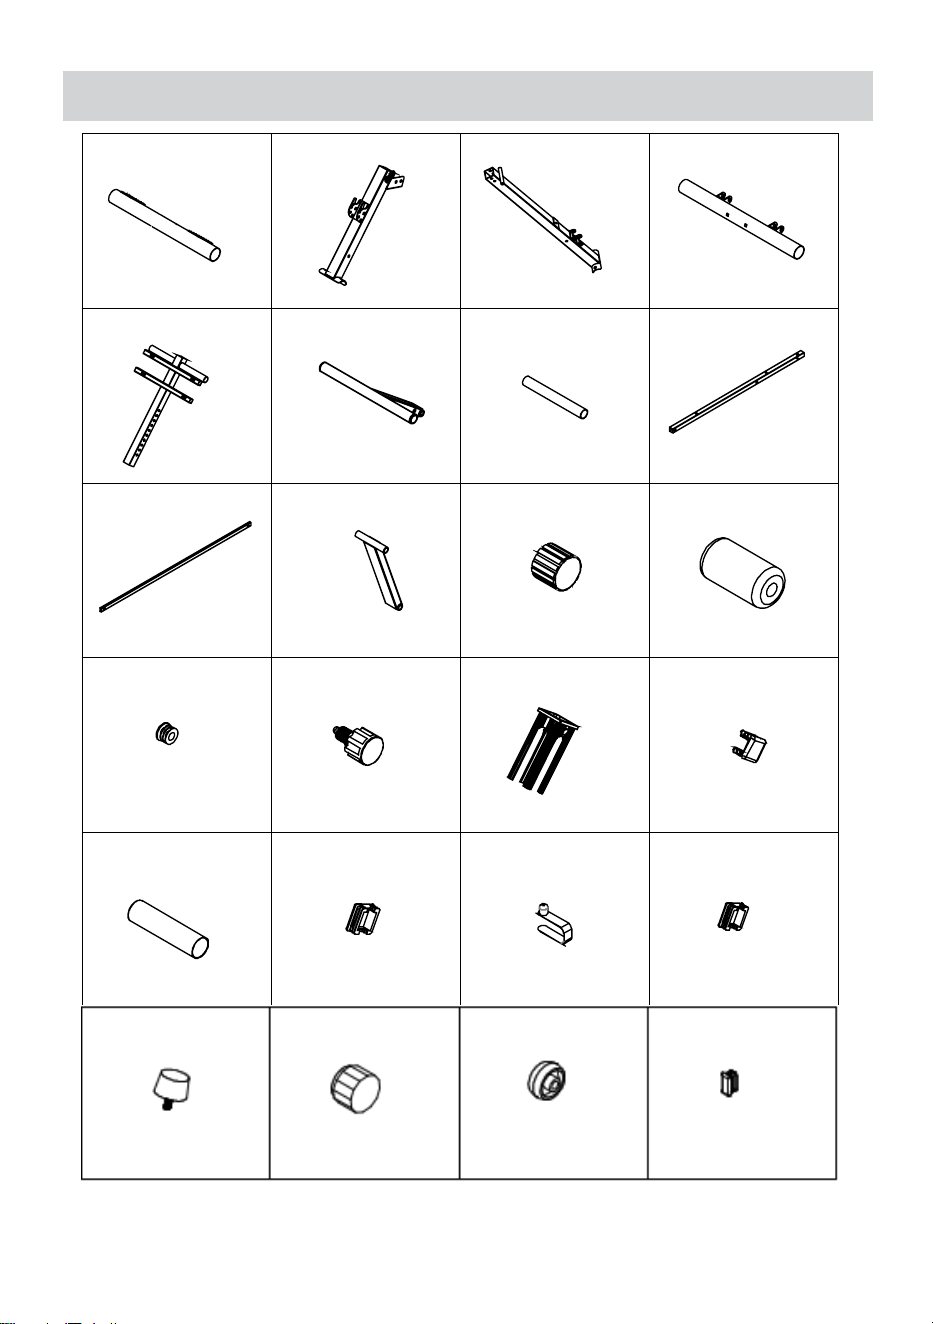
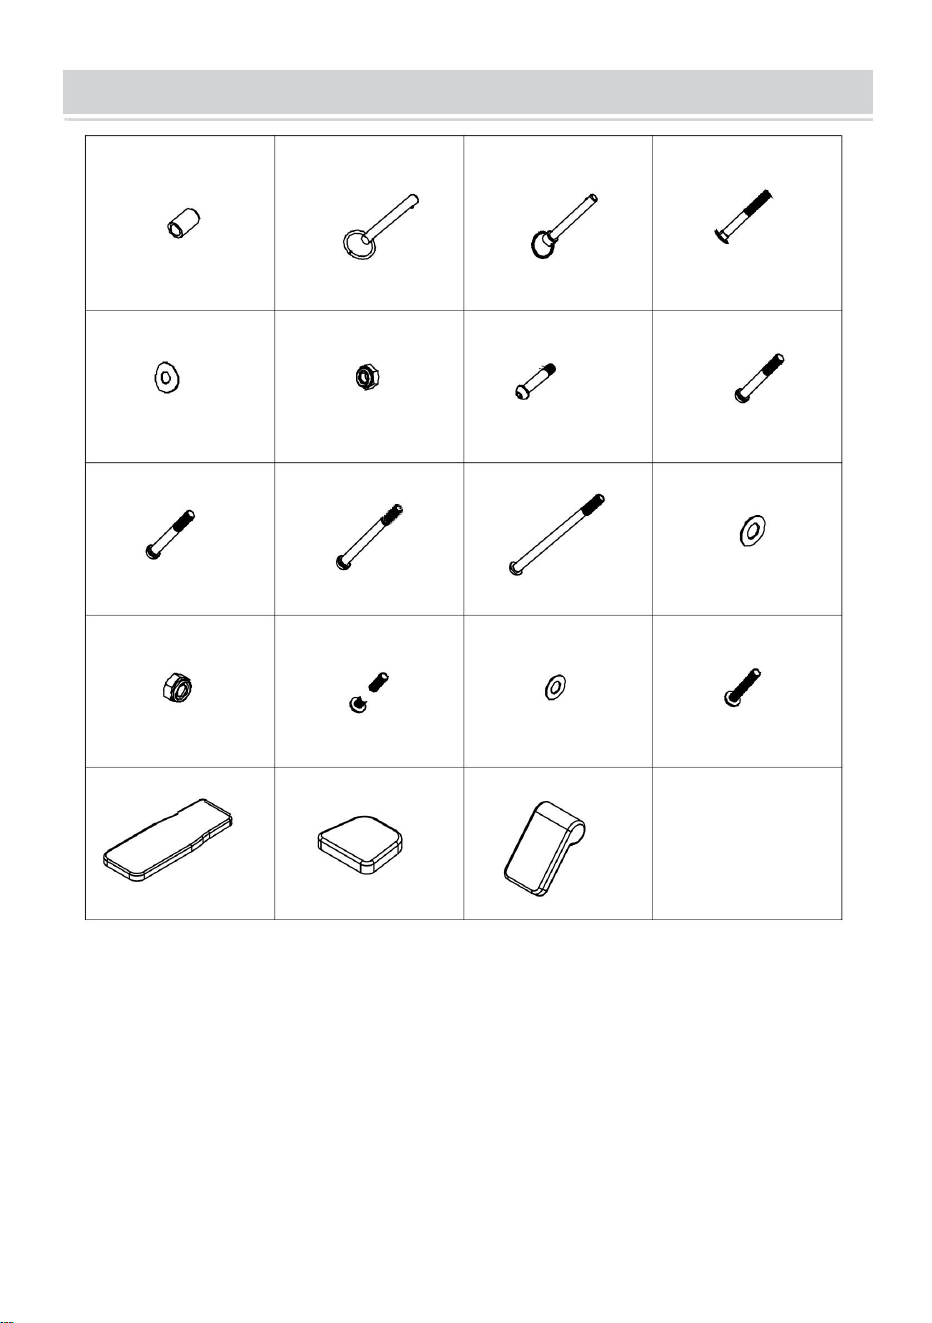
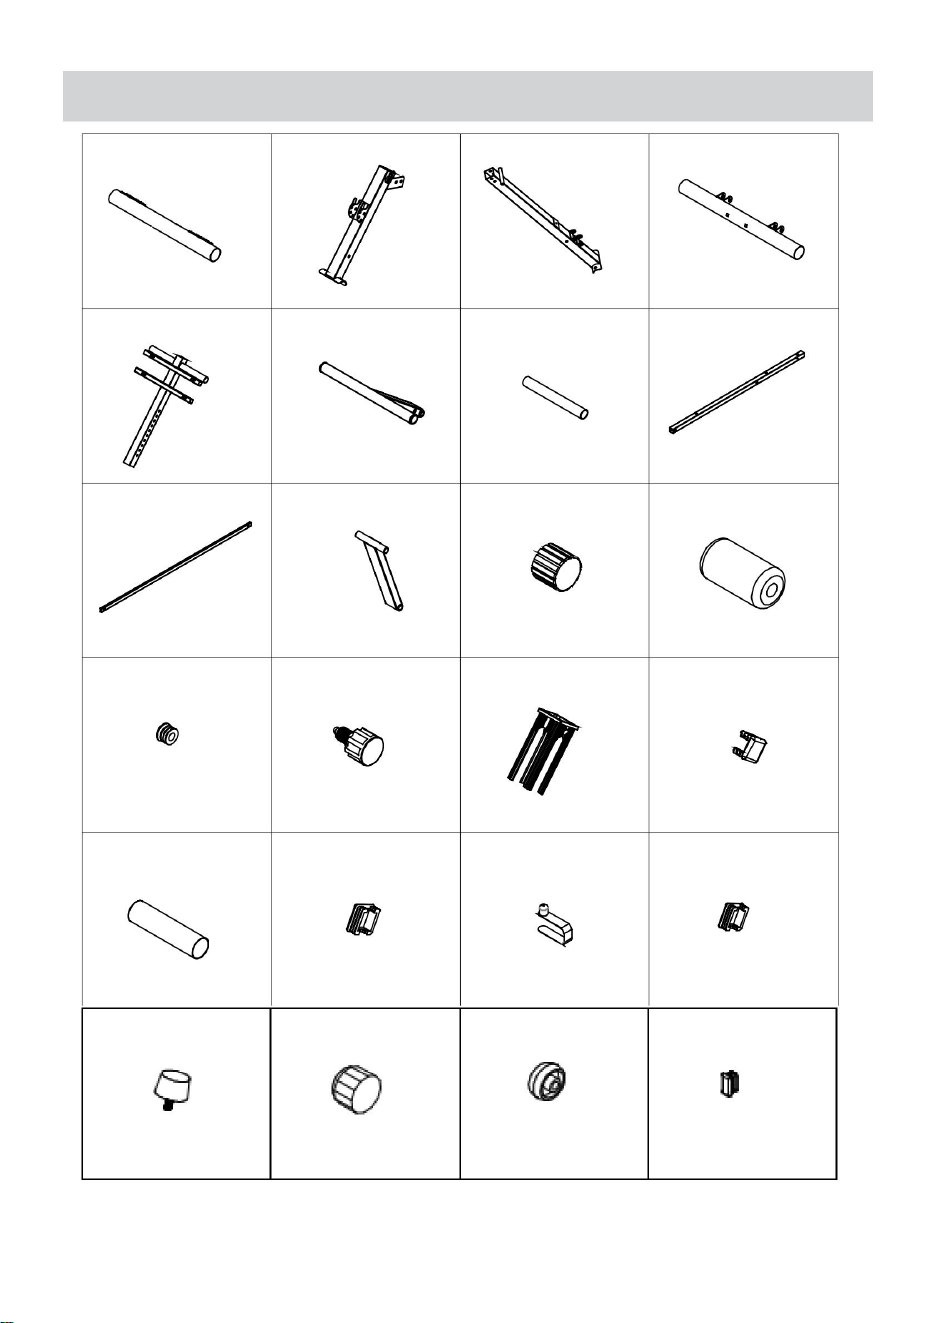
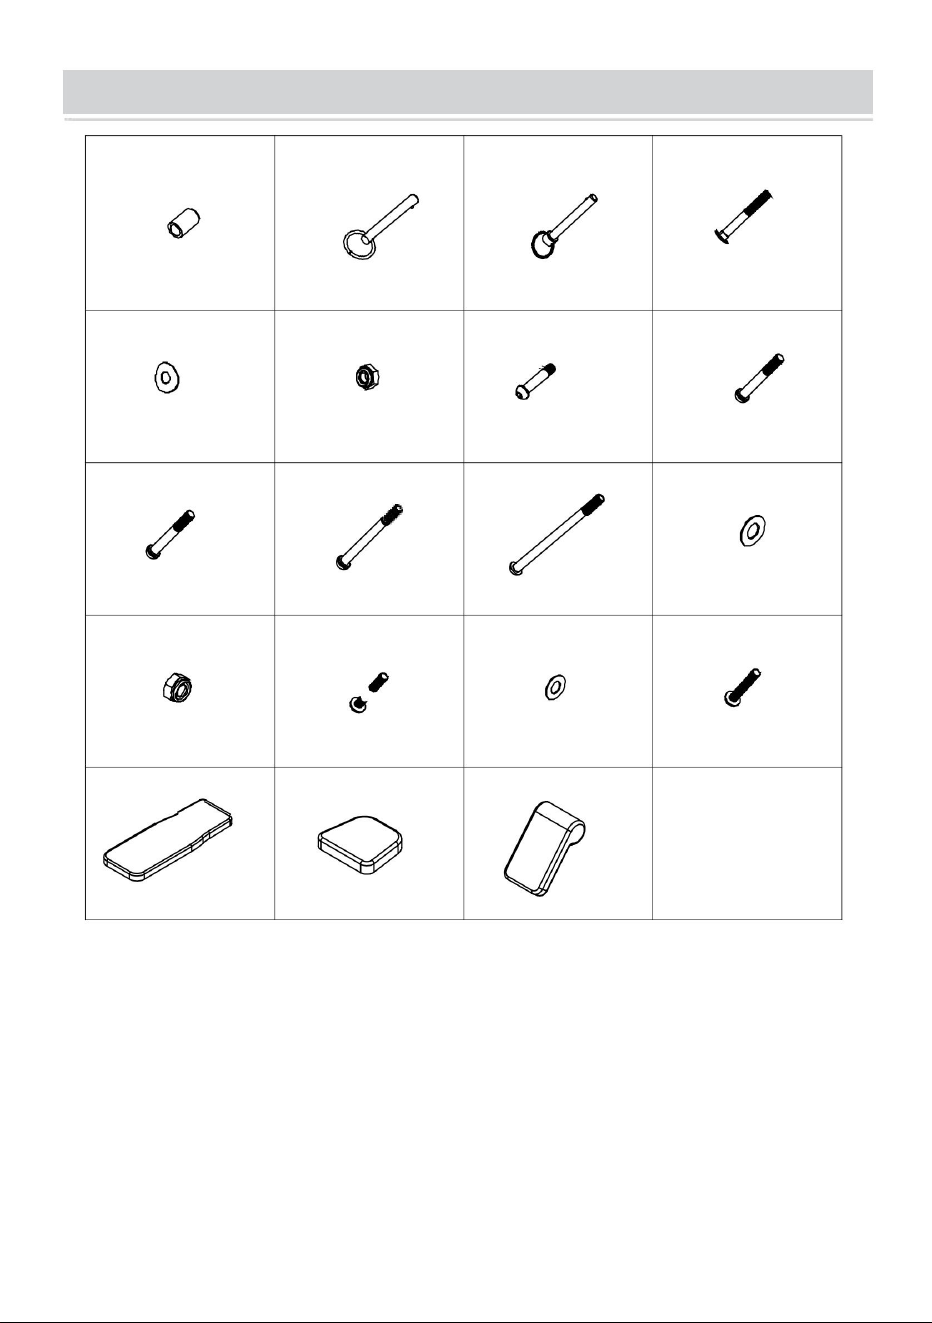
Part List
No
Description
Qty
No
Description
Qty
01
Front Base Tube
1
23
Wheel
2
02
Front Upright tube
1
24
End Cap 20x10mm
4
03
Rear Support tube
1
25
Bushing
4
04
Rear Base Tube
1
26
Lock Pin M10x60mm
1
05
Adjustable Tube
1
27
Lock Pin M8x60mm
1
06
Foam Frame
1
28
Carriage Bolt M8x65mm
4
07
Handle Bar
2
29
Arc Washer M8
4
08
Backrest Cushion Tube
2
30
Nylon Nut M8
4
09
Dumbbell Bar
2
31
Allen Bolt M10x50mm
2
10
Backrest Cushion Support
Tube
1
32
Allen Bolt M10x65mm
1
11
End Cap 50mm (Front)
2
33
Allen Bolt M10x70mm
2
12
Foam
2
34
Allen Bolt M10x130mm
2
13
Round End Cap 25mm
2
35
Allen Bolt M10x165mm
2
14
Adjustable Knob
1
36
Flat Washer M10
18
15
Spacer 50vs38mm
1
37
Nylon Nut M10
9
16
Square End Cap 20x20mm
4
38
Allen Bolt M8x40 mm
6
17
Handle Grip
2
39
Flat Washer M8
10
18
Square End Cap 38x38mm
1
40
Allen Bolt M8x35mm
4
19
V Buckle
2
41
Backrest Cushion
1
20
Square End Cap 25x25mm
4
42
Headrest Cushion
1
21
Bumper
4
43
Cushion
1
22
End Cap 50mm(Rear)
2

5
33
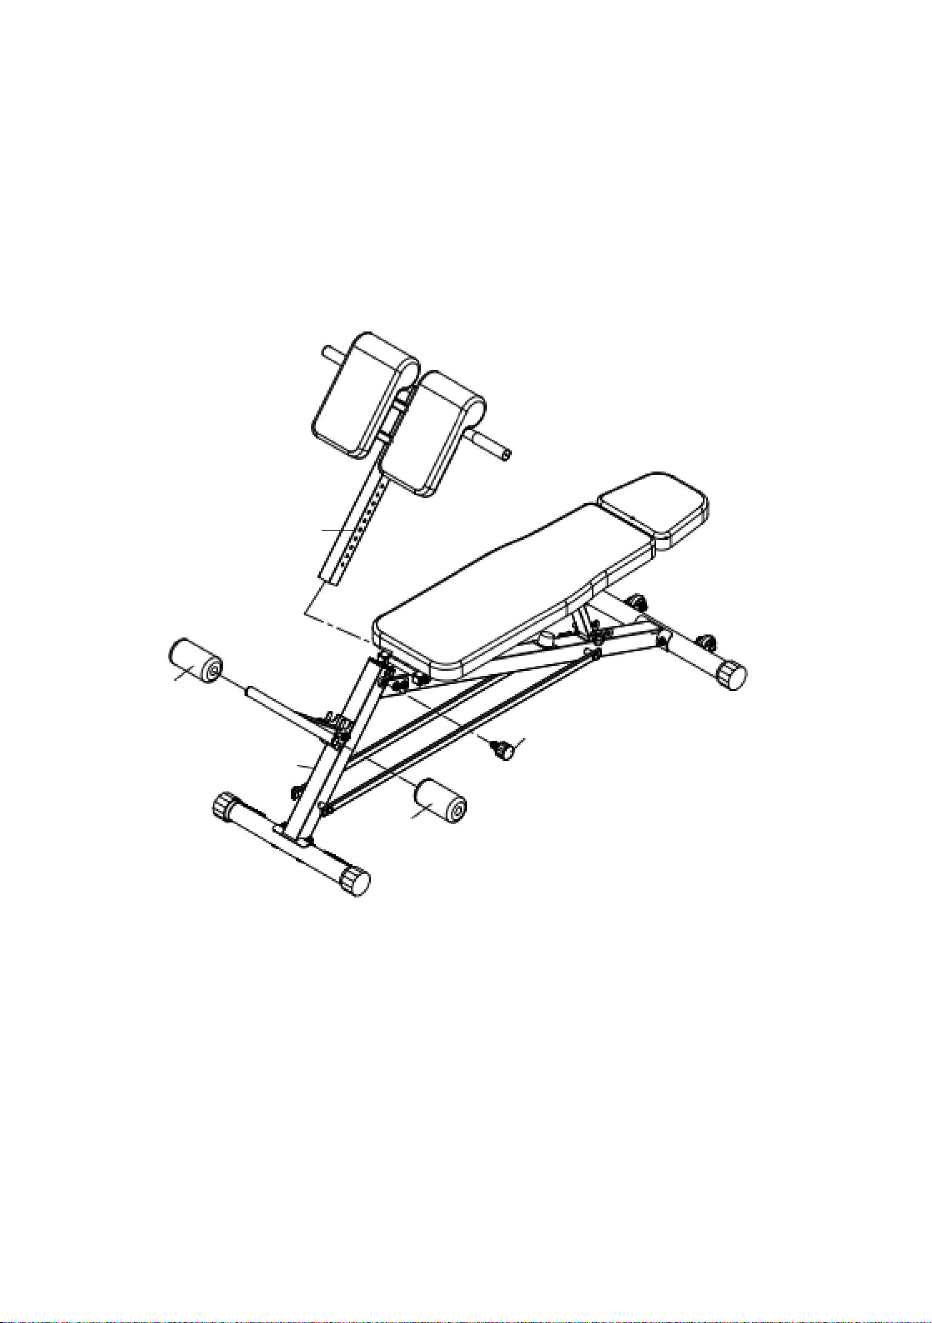
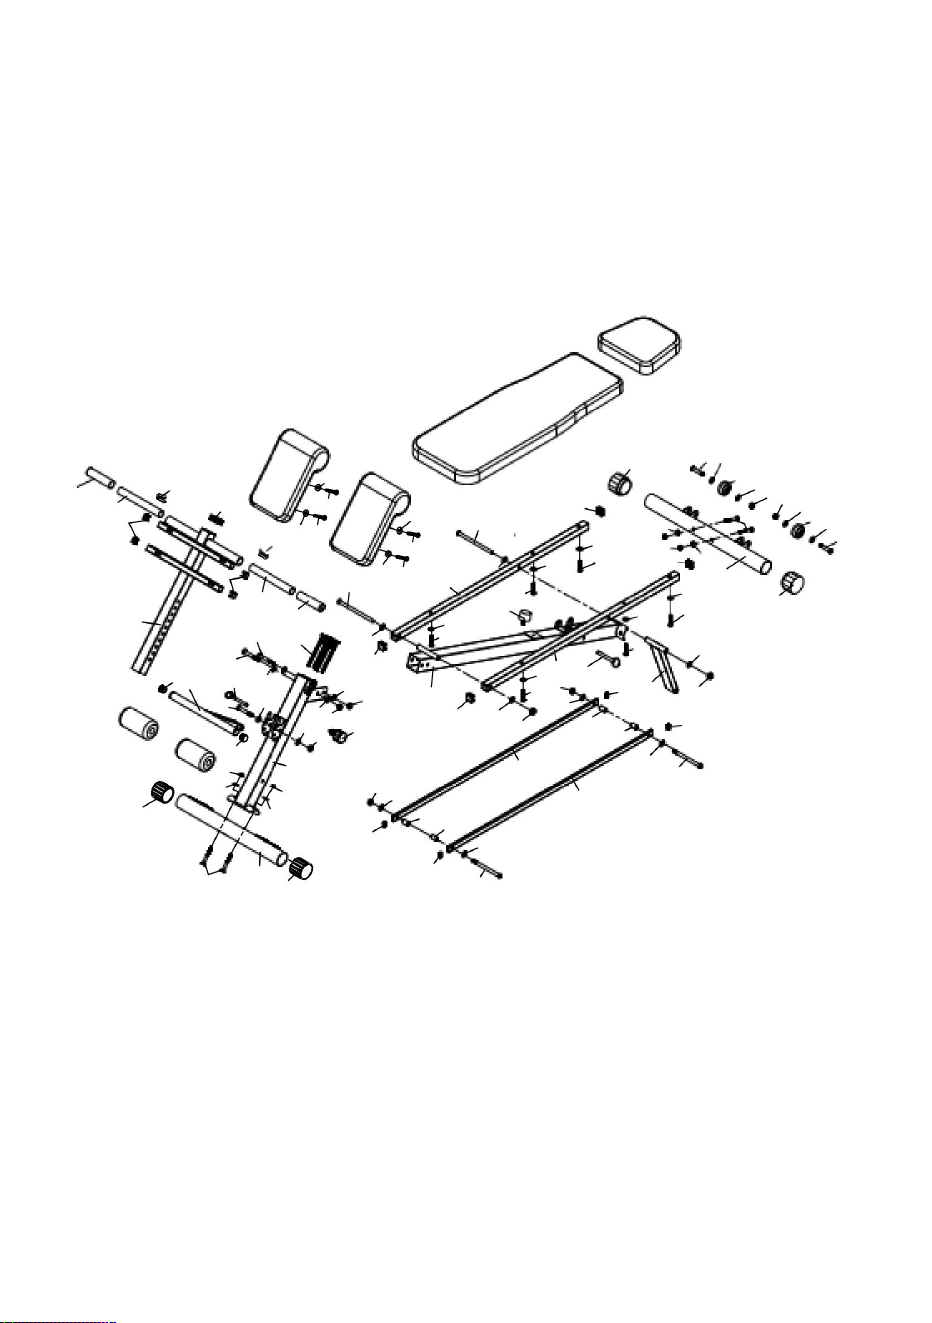
Exploded Diagram
Please note that not all of the parts and hardware you see here will be
used while you are
assembling the machine because some of these are already pre-installed.
42
41
43
19
40
18
43
40
40
39
40
08
38
07
21
05
33
38
36
36
37
38
36
37
36
37
13
36
02
30
29
09
29
25
25
24
36
01
34
30
29
30
39
38
23
17
36
37
37
24 10
19
36
31
37
29
24
06
23
39
20
03
08
09
07
04
20
27
20
28
20
26
28
25
25
31
39
35
36
39
36
39
35
32
39
37
36
36
38
36
39
36
36
37
39
30
36
36
39
34
36
37
38
24
22
22
16
13
16
17
15
12
14
12
11
11
6
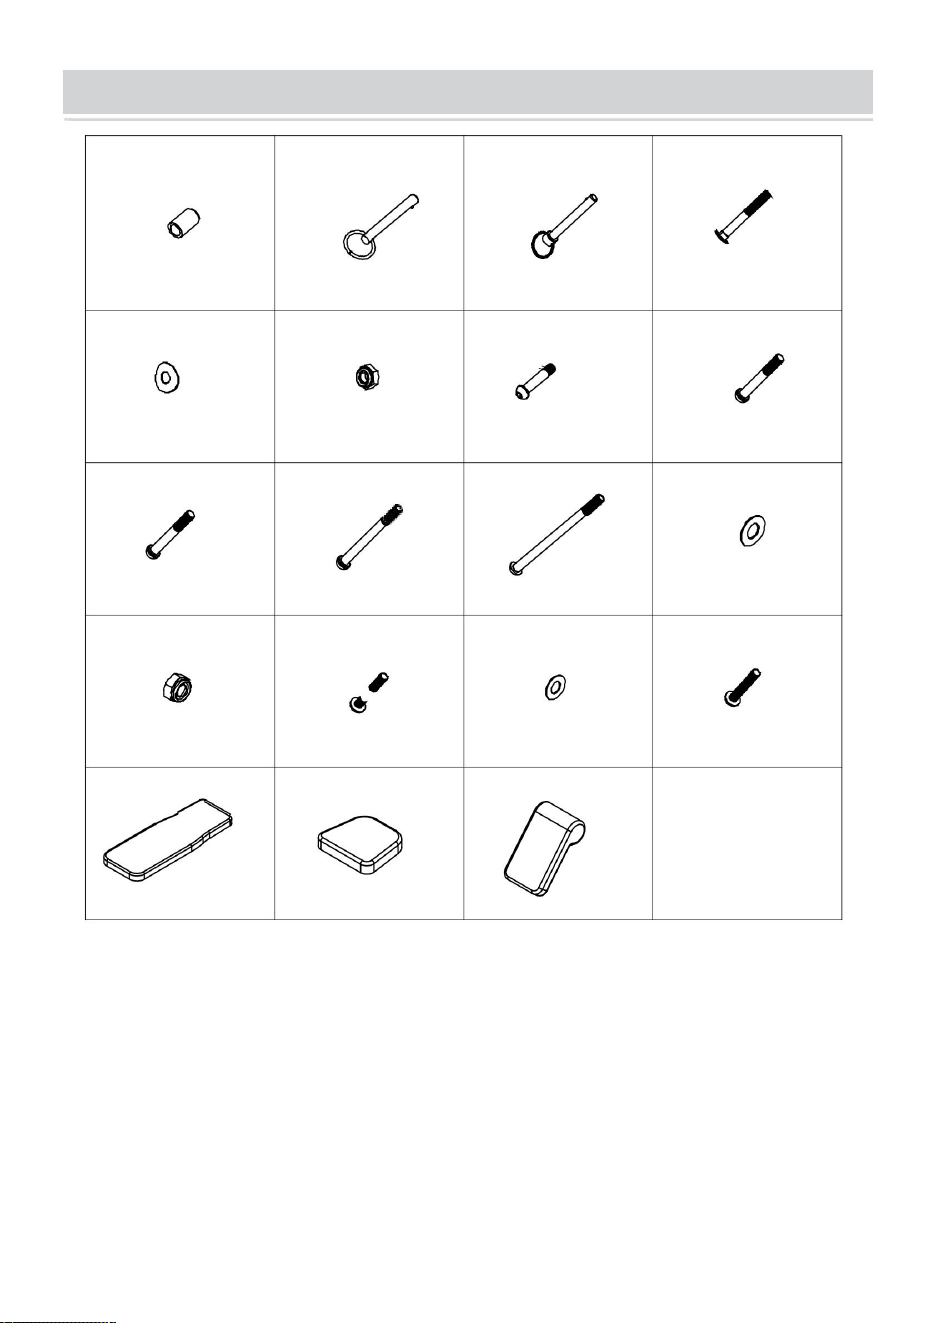
Part List
1.
2.
3.
4.
1 PC
1 PC
1 PC
1 PC
5.
6.
7.
8.
1 PC
1 PC
2 PCS
2 PCS
9.
10.
11.
12.
2 PCS
1 PC
2 PCS
2 PCS
13.
14.
15.
16.
2 PCS
1 PC
1 PC
4 PCS
17.
18.
19.
20.
2 PCS
1 PC
2 PCS
4 PCS
21. 22. 23. 24.
1 PC 2 PCS 2 PCS 4 PCS
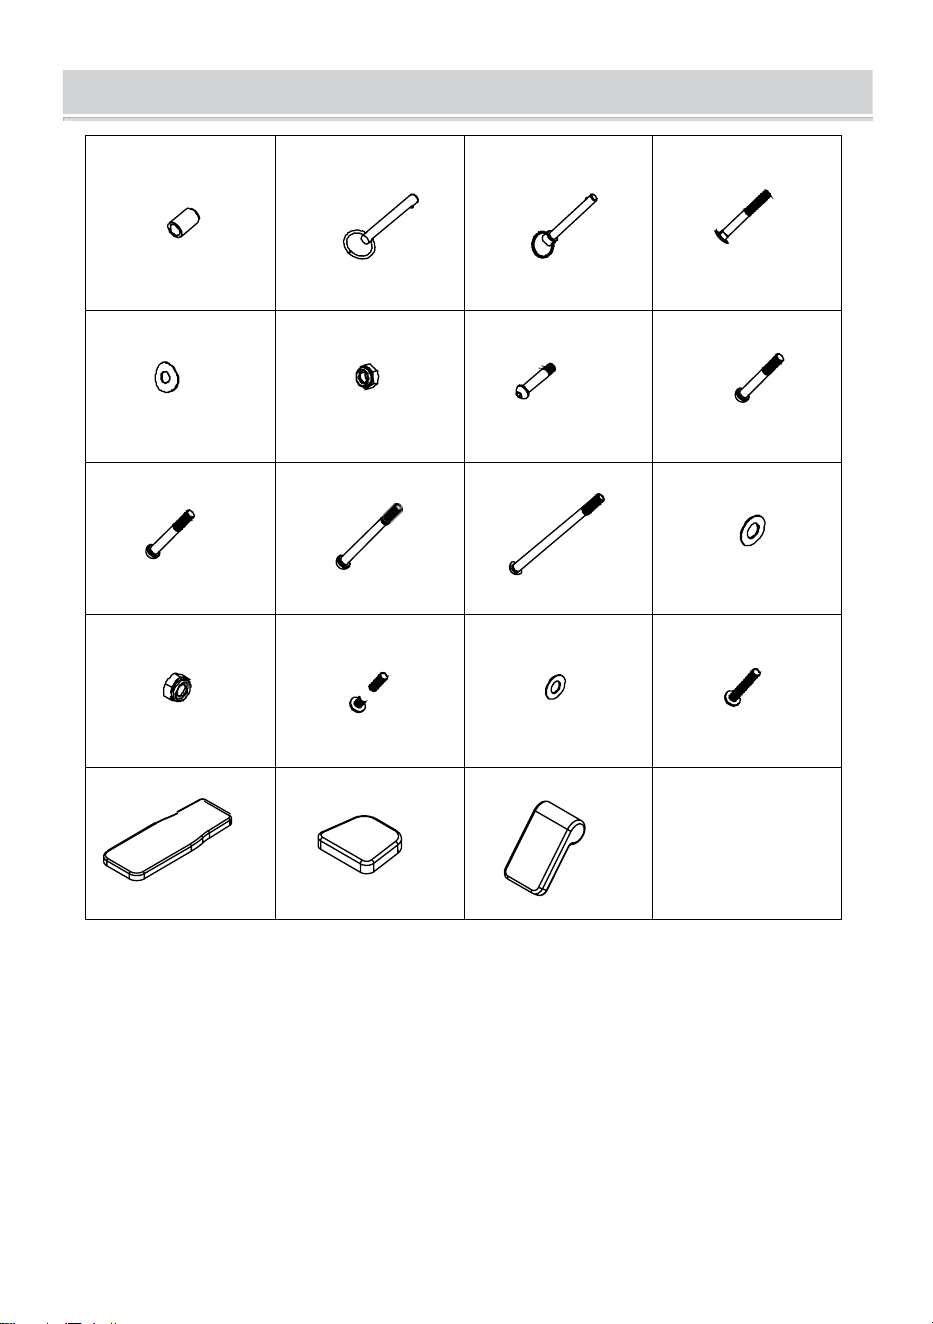
Part List
7
25.
26.
1 PC
27.
1 PC
28.
4 PCS
4 PCS
29.
4 PCS
30.
4 PCS
31.
2 PCS
32.
1 PC
33.
2 PCS
34.
2 PCS
35.
2 PCS
36.
18 PCS
37.
9 PCS
38.
39.
10 PCS
40.
4 PCS
6 PCS
41.
1 PC
42.
1 PC
43.
1 PC
NOTE: To avoid misalignment due to over-tightening, please do not use a
wrench at this time.
Hand-tightening for now will help ensure easy assembly.
Wrench-tightening should be performed after all parts are assembled to
ensure all nuts, bolts, and parts are tightly secured before use.
With the help of an assistant.
Assembly
8
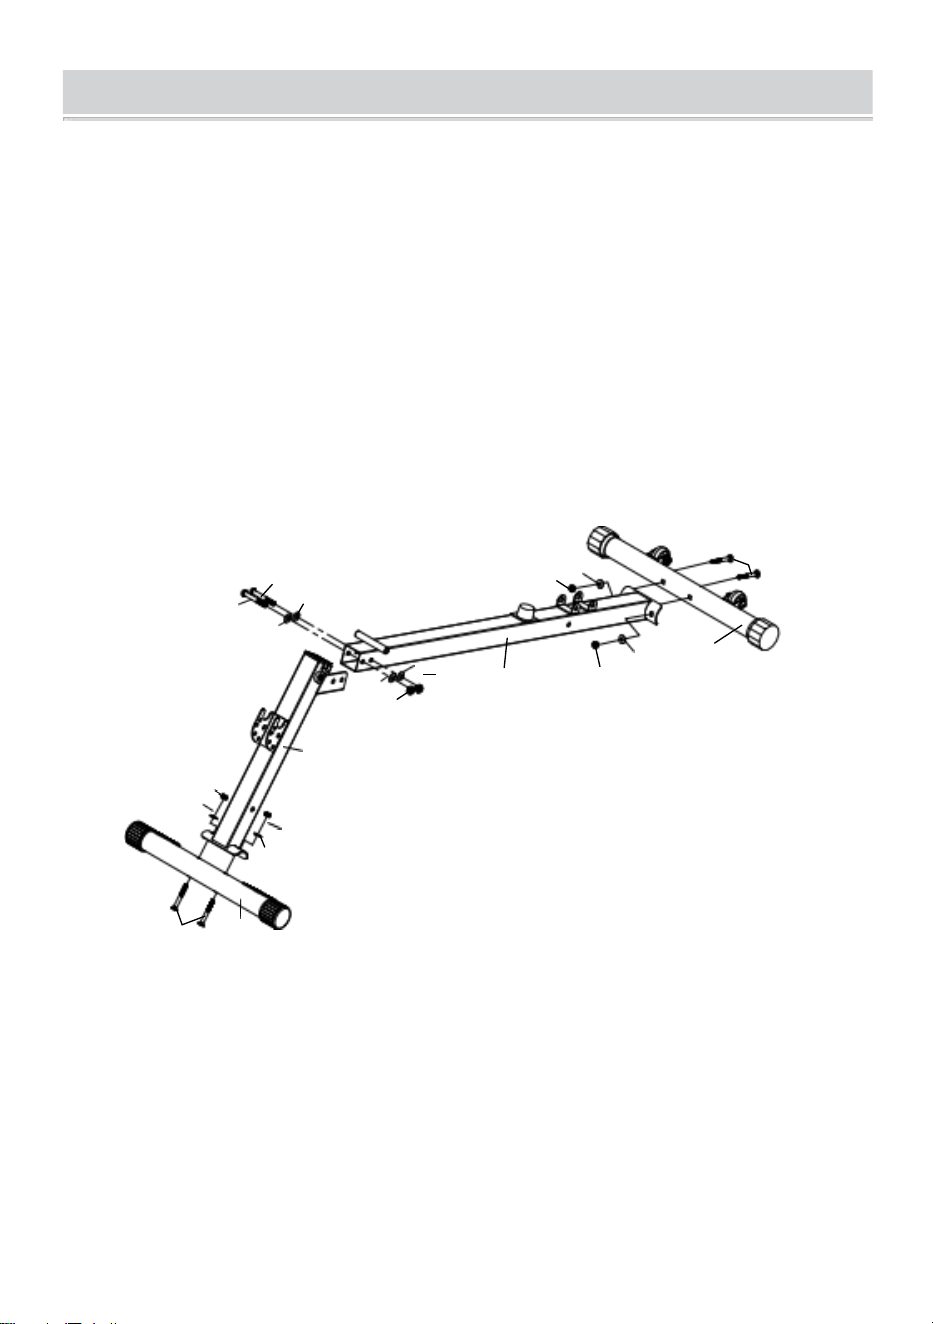
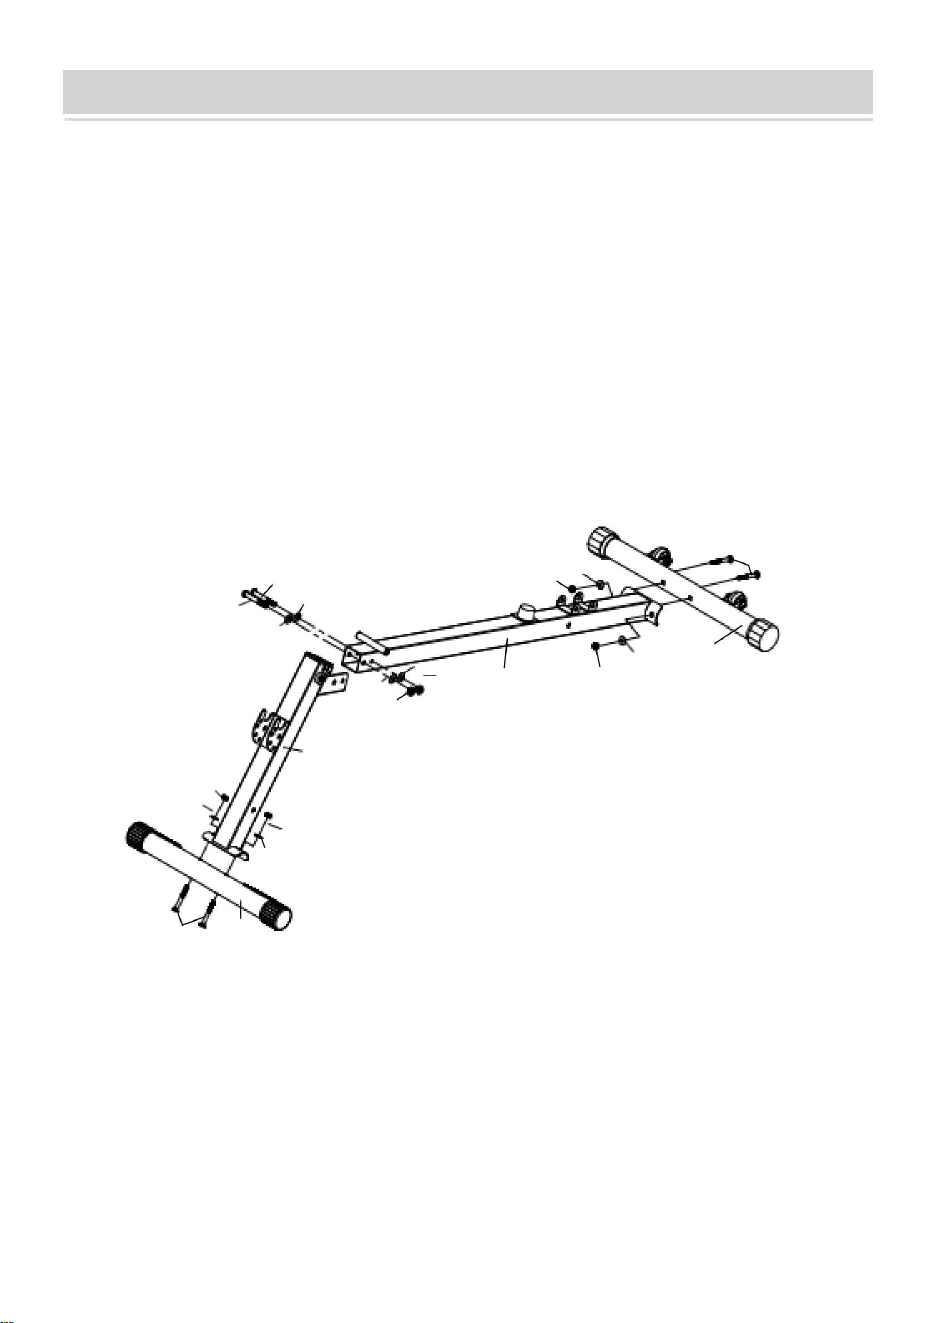
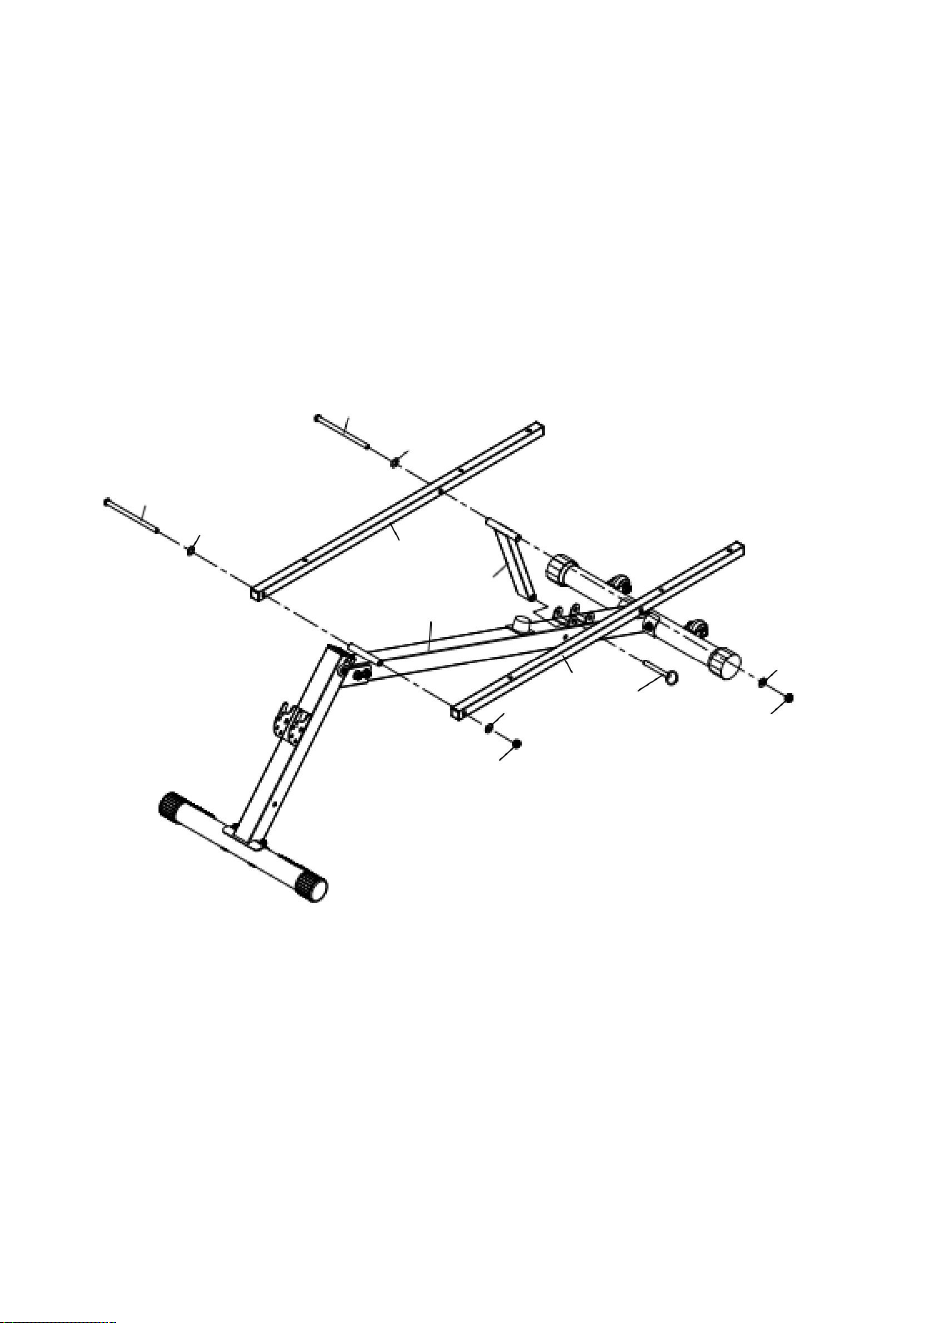
Step 1:
A) Attach Front Base Tube (01) to Front Upright Tube (02) using two
Carriage Bolts (28), two Arc Washers (29) and two Nylon Nuts (30).
B) Attach Rear Base Tube (04) to Rear Support Tube (03) using two
Carriage Bolts (28), two Arc Washers (29) and two Nylon Nuts (30).
C) Attach Rear Support Tube (03) assembled to Front Upright Tube
(02) using two Allen Bolts (33), four Flat Washers (36) and two Nylon
Nuts (37).
28
33
36
36
04
29
03
36
37
02
30
29
30
29
01
30
33
29
28
30
36
37

9
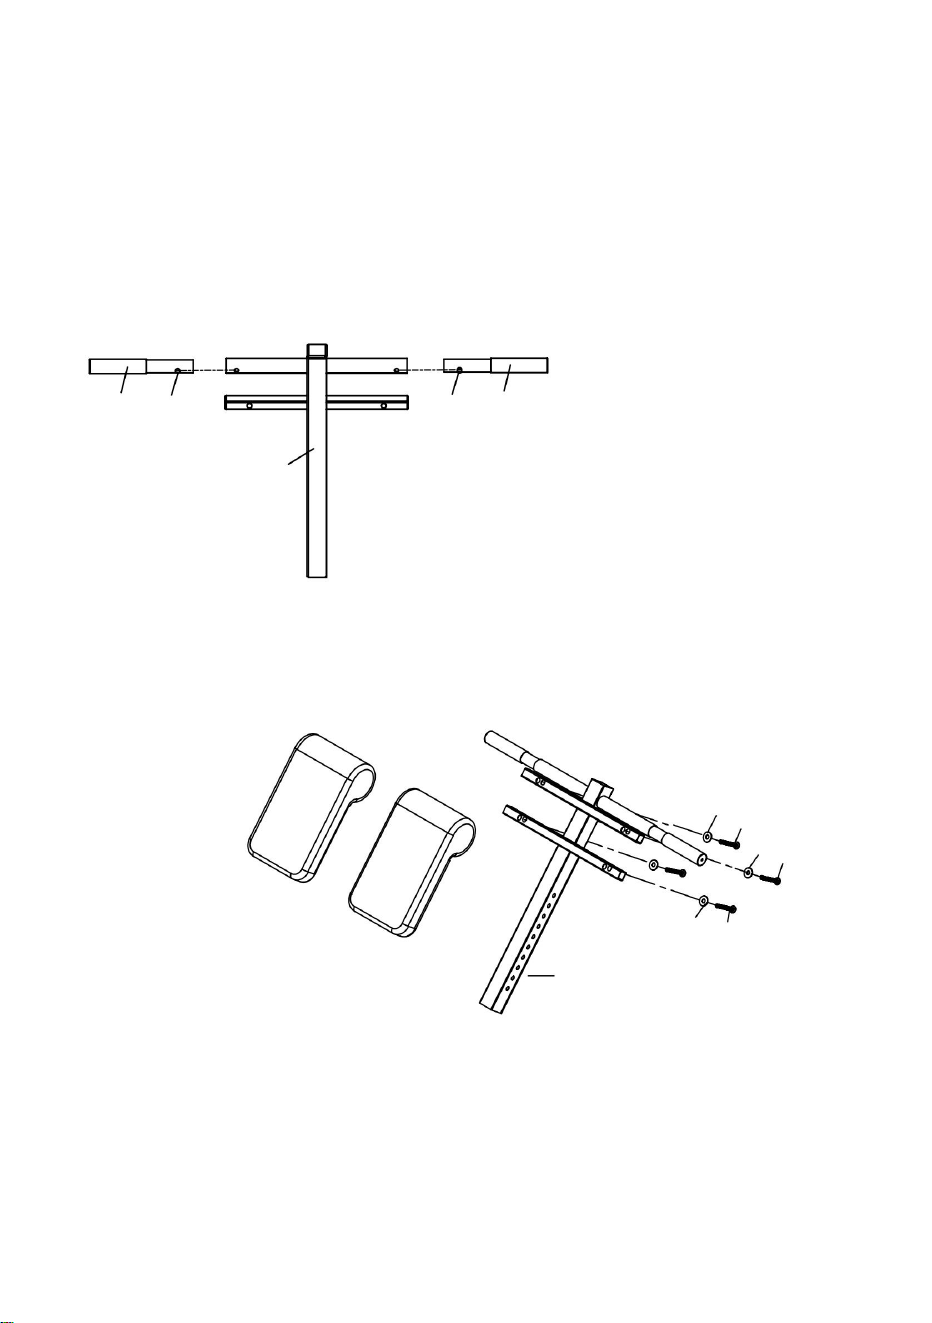
Step 2:
A) Attach both Backrest Cushion Tubes (08) to the welding part on the
Rear Support Tube (03) using one Allen Bolt (35), two Flat Washers
(36) and one Nylon Nut (37).
B) Attach Backrest Cushion Support Tubes (10) to Backrest Cushion
Tubes (09) using one Allen Bolt (35), two Flat Washers (36) and one
Nylon Nut (37), then insert the Lock Pin (26).
35
36
35
36
08
10
03
36
08
26
36
37
37
10
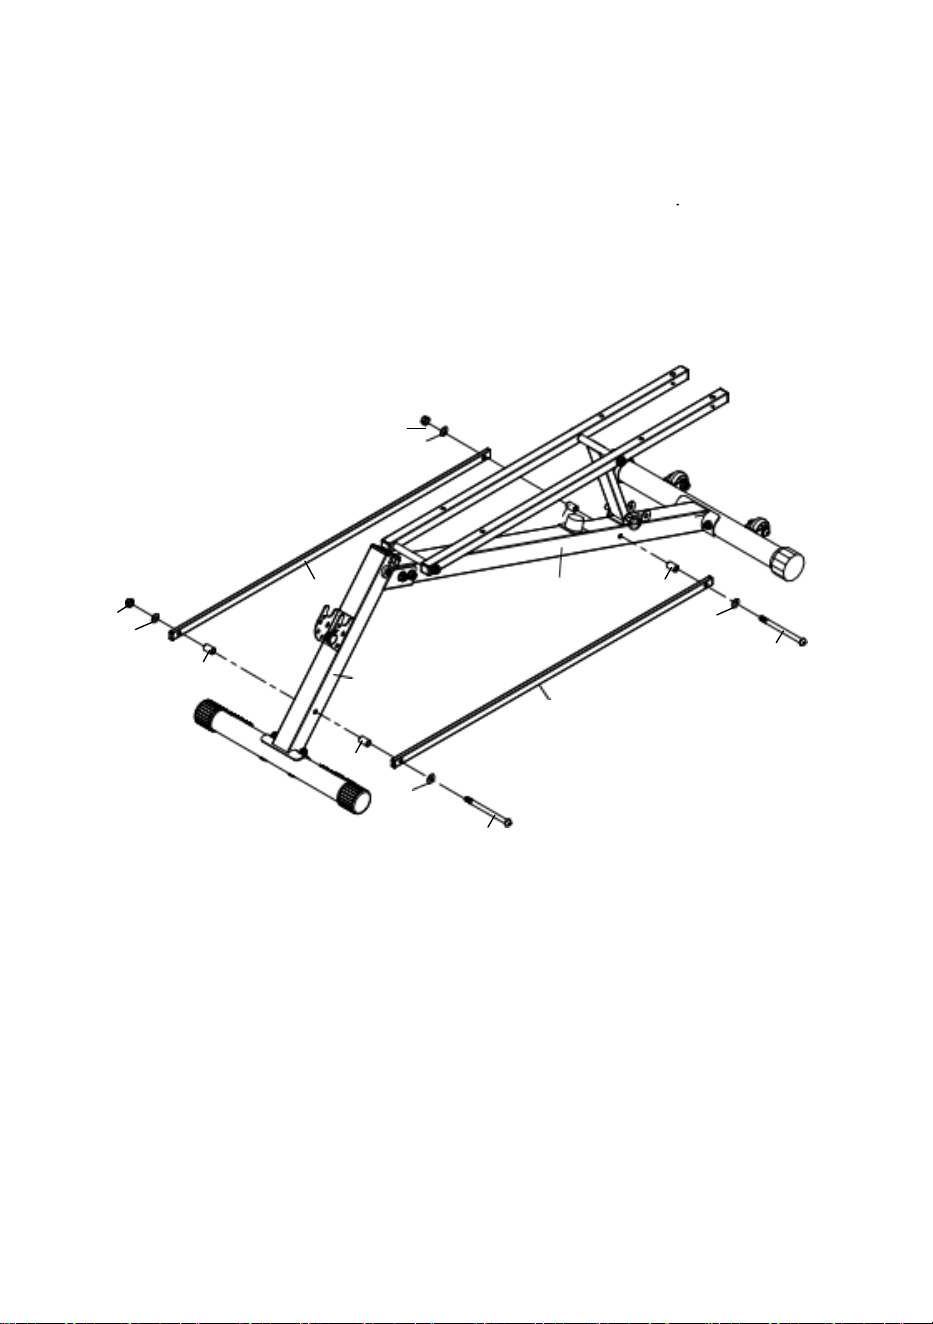
Step 3:
A) Attach Dumbbell Bar (09) to Rear Support Tubes (03) with four
Bushing (25) using two Allen Bolt (34), four Flat Washers (36)
and two Nylon Nuts (37).
37
36
25
03
36
36
34
25
02
09
25
36
34
09
25
37

11
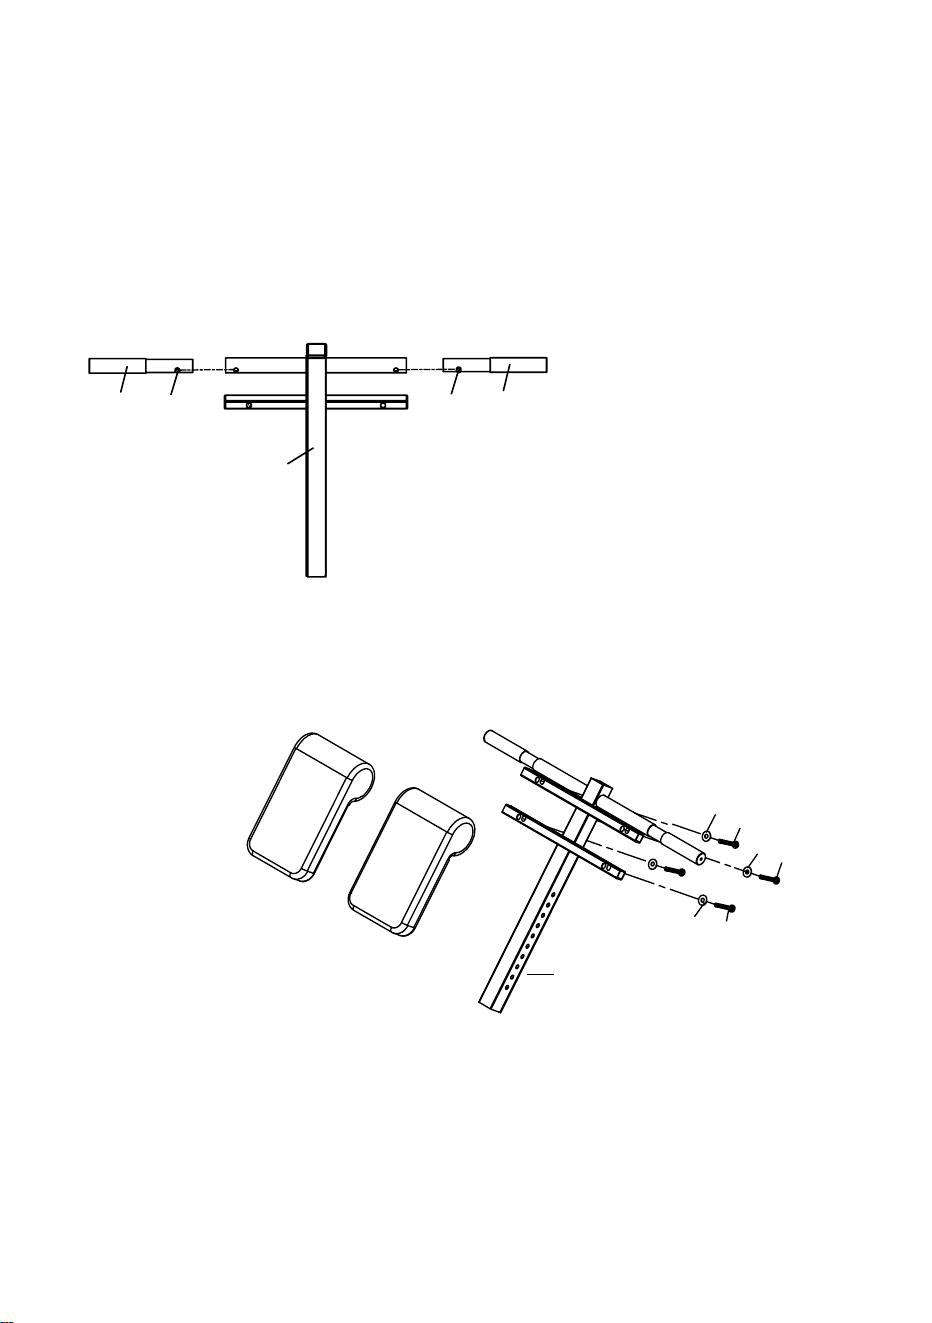
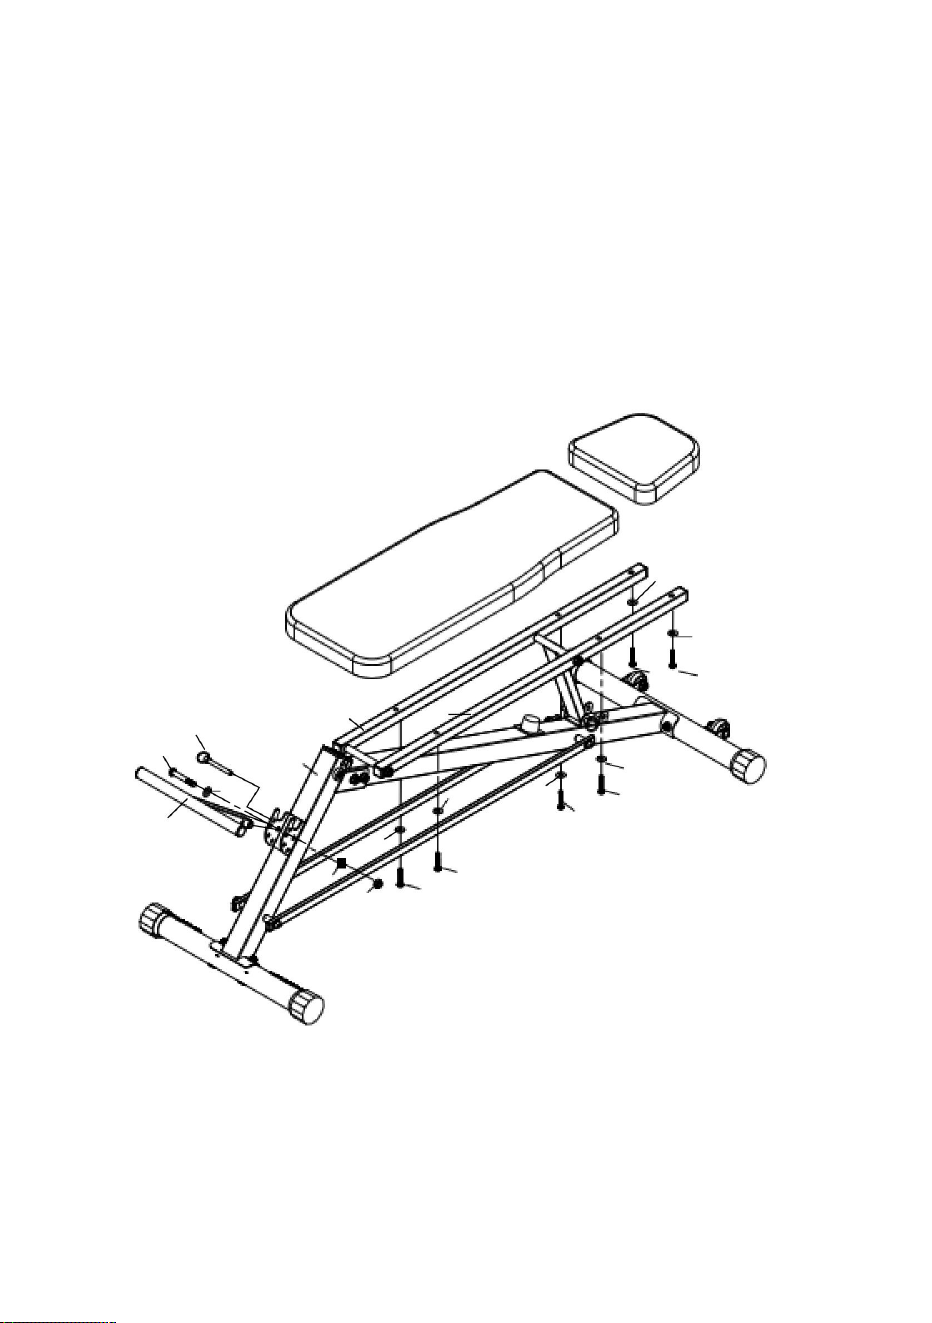
Step 4:
A) Attach Backrest Cushion (41) and Headrest Cushion (42) to Backrest
Cushion Tubes (08) using six Allen Bolt (38) and six Flat Washers (39).
B) Attach Foam Frame (06) to Front Upright Tube (02) using one Allen
Bolt (32), two Flat Washers (36) and one Nylon Nut (37). Then Insert
the Lock Pin (27).
42
41
39
38
38
08
27
32
02
36
38
06
39
36
37
38
38
39
38
39
08
39
39
12
w
w
w
19 07
Step 5:
Insert the Handle Bar (07) to the round tube on Adjustable Tube (05)
until the V Buckle (19) enters the hole.
Attach both Cushions (43) to Adjustable Tube (05) using four Allen
Bolts (40) and four Flat Washers (39).
07 19
05
43
40
05
39 40
43
40
39
39

13
Step 6:
A) Insert Adjustable Tube (05) assembled to Front Upright Tube (02)
secure with Adjustable Knob (14).
B) Slide two Foams (12) to each side of Foam Frame (06).
05
12
14
02
12
THE ASSEMBLY PROCESS IS NOW COMPLETE.
For your safety, Please tighten the screw and adjust it to the appropriate
position.
Please visually and functionally inspect and test the unit after assembly is
complete.
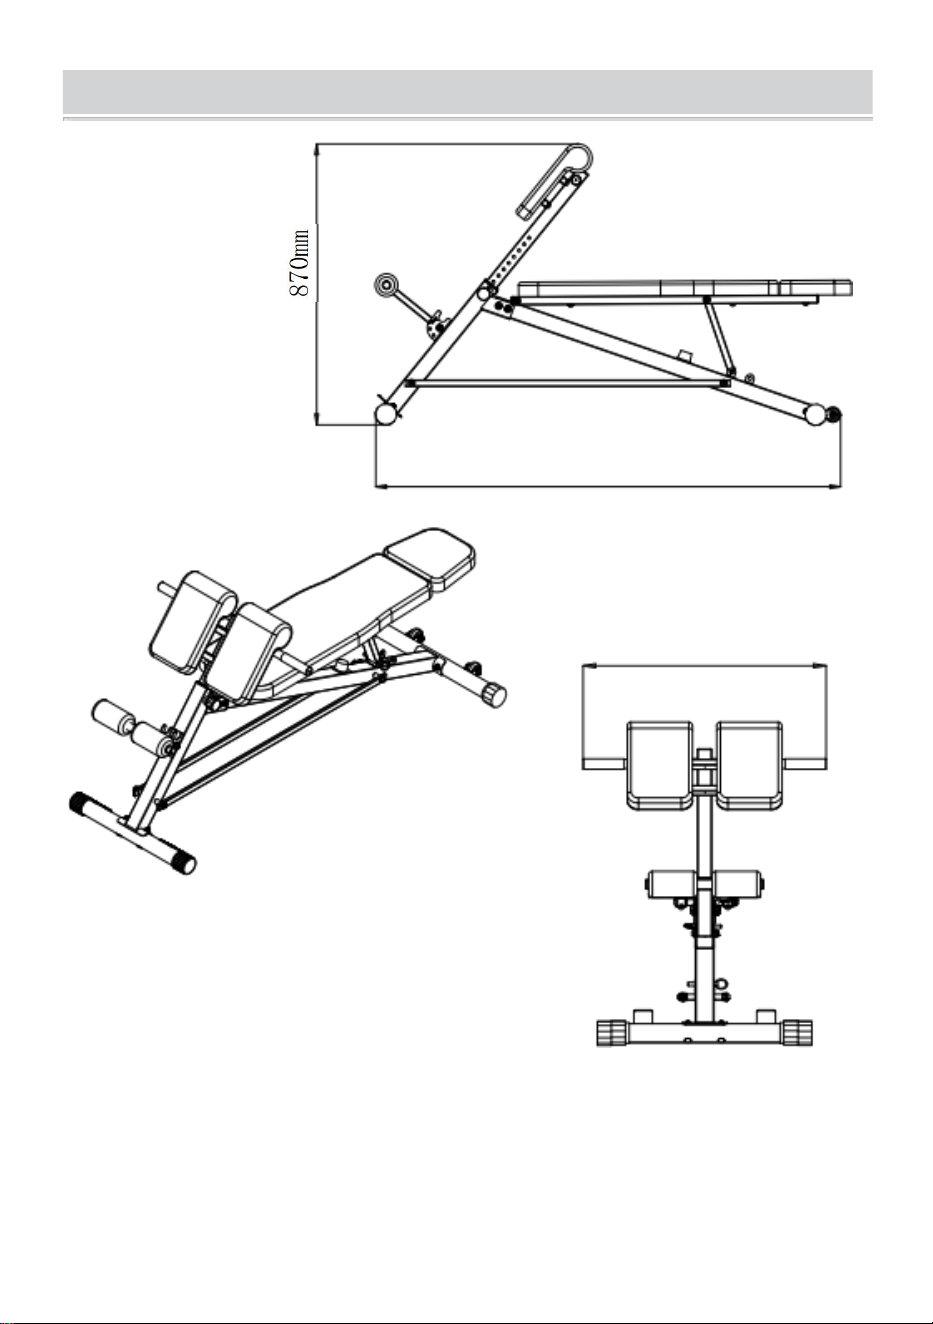
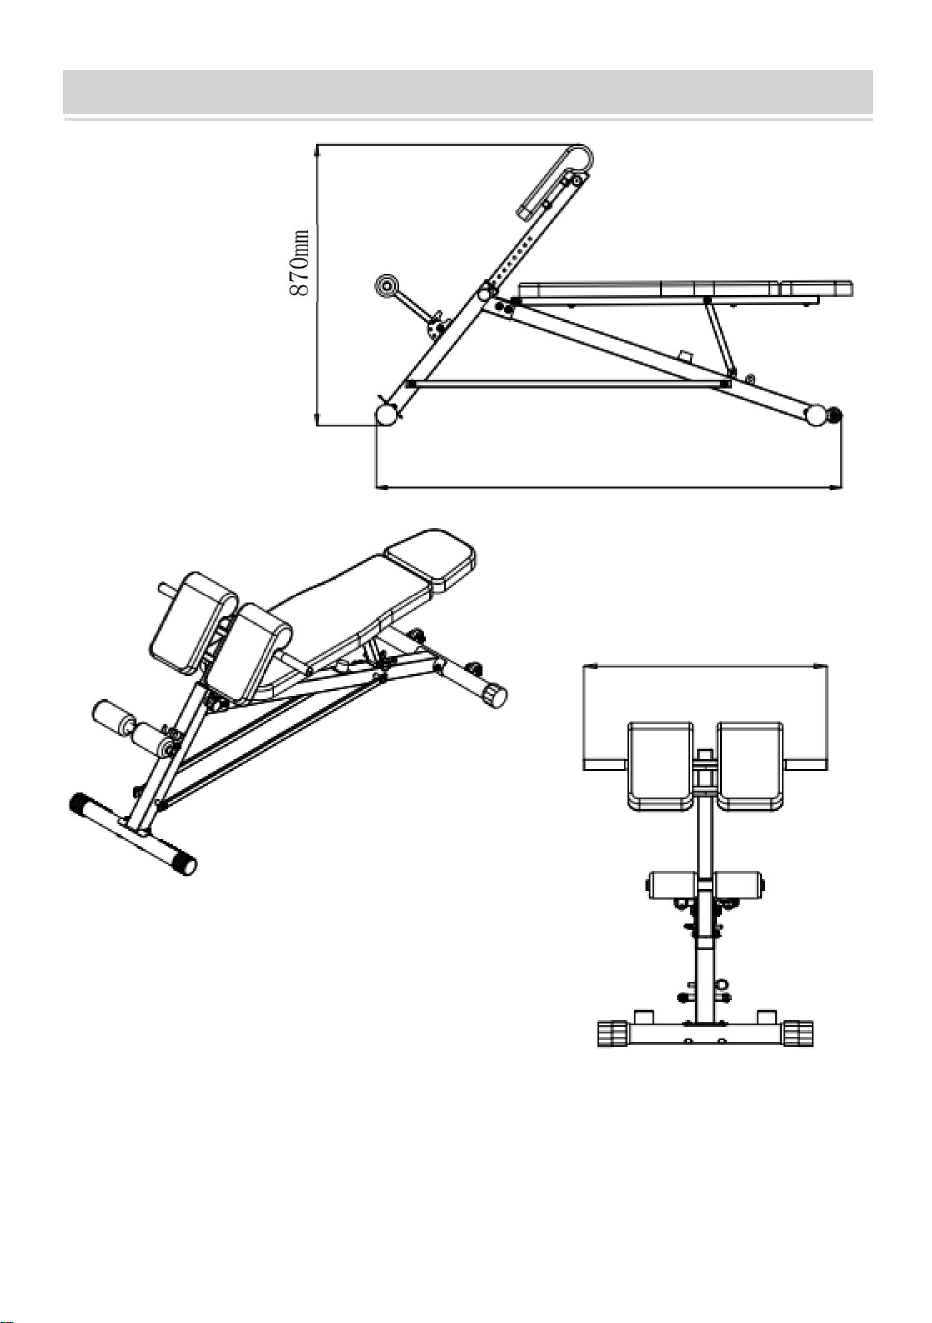
Product size chart
14
1470mm
655mm
NOTE : The Maximum Weight Capacity for this product is 660 lbs or
300kgs. Only one person should use this piece of equipment at one time.

Cleaning and disinfection
15
1. Wipe the surface with a wet cotton cloth.
2. Check the screws regularly every 3 months for loosening and tighten
the screws

Manufacturer: Shanghaimuxinmuyeyouxiangongsi
Address: Shuangchenglu 803nong11hao1602A-1609shi, baoshanqu,
shanghai 200000 CN.
Imported to AUS: SIHAO PTY LTD. 1 ROKEVA STREETEASTWOOD
NSW 2122 Australia
Imported to USA: Sanven Technology Ltd. Suite 250, 9166 Anaheim
Place, Rancho Cucamonga, CA 91730
YH CONSULTING LIMITED. C/O YH Consulting
Limited Office 147, Centurion House, London
Road, Staines-upon-Thames, Surrey, TW18 4AX
E-CrossStu GmbH
Mainzer Landstr.69,
60329 Frankfurt am Main.
UK
REP
EC
REP


MODÈLE:SJ1018
TabouretlongChaiseromaine
Assistancetechniqueetcertificatdegarantie
électroniquewww.vevor.com/support
«Économisezlamoitié»,«Moitiéprix»outouteautreexpressionsimilaireutiliséepar
nousnereprésentequ'uneestimationdeséconomiesquevouspourriezréaliserenachetant
certainsoutilscheznousparrapportauxgrandesmarquesetnecouvrepasnécessairementtoutes
lescatégoriesd'outilsquenousproposons.Nousvousrappelonsdebienvouloirvérifier
soigneusementlorsquevouspassezunecommandecheznoussivous
économisezréellementlamoitiéparrapportauxgrandesmarques.
Nouscontinuonsànousengageràvousfournirdesoutilsàdesprixcompétitifs.
Machine Translated by Google

Assistancetechniqueetcertificatdegarantieélectronique
www.vevor.com/support
Vousavezdesquestionssurnosproduits?Vousavezbesoind'assistancetechnique?N'hésitezpasà
nouscontacter:
Ils'agitdelanoticed'utilisationd'origine.Veuillezlireattentivementtouteslesinstructionsdu
manuelavantdel'utiliser.VEVORseréserveledroitd'interpréterclairementnotremanueld'utilisation.
L'apparenceduproduitdépendduproduitquevousavezreçu.Veuilleznousexcuser,nousne
vousinformeronsplusencasdemiseàjourtechnologiqueoulogicielledenotreproduit.
BESOIND'AIDE?CONTACTEZNOUS!
MODÈLE:SJ1018
TabouretlongChaiseromaine
1
Machine Translated by Google

2
vousobtenezlesmeilleursrésultatspossibles.
Liseztouteslesinstructionsavantd'utiliserceproduit.Gardezles
enfantsetlesanimauxdomestiqueséloignésdubancderedressementassispendant
tapisantidérapantsouslamachinesinécessaire.Veuillezporter
desvêtementsappropriéslorsquevousutilisezceproduit.Nel'utilisezpass'il
n'estpasfonctionnelousilespiècesnesontpasbienassemblées.Sivousressentezdesdouleurs
thoraciques,desnausées,desétourdissementsouunmanqued'énergie,vous
vousdevezimmédiatementarrêterdefairedel'exerciceetconsultervotremédecin
utilisation.Lesenfantsnedoiventpasutiliserleproduit.sansl'autorisationd'unadulte
avantdecontinuer.
Avantutilisation,assurezvoustoujoursquevotreproduitestpositionnésurune
surfacesolide,dureetplate.
surveillance.
Rangezl'équipementinutiliséhorsdeportéedesenfantsetnelaissezpersonne
AVERTISSEMENT:
nesontpasfamiliersavecl'équipementpourl'utiliser.Cetoutilestdangereuxdansle
Veuillezliretouteslesinstructionsavantd'utiliserceproduit
Inspectezetserreztouteslespiècesavantchaqueutilisationdecebancderedressement.Veuillez
nettoyercettemachineenutilisantuniquementdeslingetteshumides.N'utilisezpasde
Ilestdelaresponsabilitédupropriétairedes'assurerquetouslesutilisateursdece
nettoyants.Veuillezconsulterleserviceclientsivousavezdes
mainsd'utilisateursnonformés.
produitsontpleinementconscientsdetouslesavertissementsetprécautions.
Nel'utilisezpassivousêtesenceinte
desquestions.
Mercibeaucoupd'avoirchoisiceproduit.
Avantdecommencertoutprogrammed'exercice,consultezvotre
médecin.
Ceproduitdoitêtreplacésurunesurfaceplanelorsdesonutilisation.Placezun
Veuillezliretouteslesinstructionsavantdel'utiliser.Lesinformationsvousaideront
∙
Sécuritédefonctionnement
Machine Translated by Google

3
Lesanimauxdomestiquesoulesenfantsdemoinsde12ansnedoiventenaucuncasse
trouveràmoinsde3m(10pieds)duproduit.Lesenfantsdemoinsde12ansnedoiventen
aucuncasutiliserleproduit.Lesenfantsdeplusde12ansnedoiventpasutiliserleproduit
sanslasurveillanced'unadulte.
3.Veuillezfairedesplansd’exercice.
1.Ilestrecommandéauxdébutantsdecommenceravecmoinsderépétitions,5répétitionsen1sériepar
exempleetd'ajouterdesrépétitionsaufuretàmesure.
Lorsdel'utilisationduproduit,lafouledespectateursdoitgarderunedistancede3mètrespouréviterlesblessures
accidentelles
2.Veuilleznepasfaired’exerciceunedemiheureavant/aprèslesrepasouuneheureavantdedormir.
Programmesd'exercices
Machine Translated by Google

4
Listedespièces
18
01Tubedebaseavant
25Bague
31boulonsAllenM10x50mm
1
11Embout50mm(avant)
2
21Parechocs
Quantité
2
2
36RondelleplateM10
4
05Tuberéglable
1
1
16Emboutcarré20x20mm4
2
24Embouts20x10mm
30ÉcrouennylonM8
35boulonsAllenM10x165mm
9
41Coussindedossier
2
39RondelleplateM8
22Embout50mm(arrière)
09Barred'haltères
1
15Entretoise50vs38mm
1
02Tubeverticalavant
1
2
2
1
Rondelleàarc29M8
34boulonsAllenM10x130mm
4
Description
06Cadreenmousse
1
10Supportdecoussindedossier
38BoulonsAllenM8x40mm
20Emboutcarré25x25mm442Coussind'appuitête
Description
28BoulondecarrosserieM8x65mm4
4
14Boutonréglable
6
03Tubedesupportarrière
4
1
33BoulonAllenM10x70mm
1
18Emboutcarré38x38mm140BoulonAllenM8x35mm
2
Roue23
4
13Emboutrond25mm
2
1
27GoupilledeverrouillageM8x60mm
Tube
17Poignée
Coussin443
07Guidon
2
1
10
Non
1
Boucle19V
2
QtéNon
12Mousse
1
1
04Tubedebasearrière
32boulonsAllenM10x65mm
26GoupillesdeverrouillageM10x60mm
37ÉcrouennylonM10
08Tubedecoussindedossier
2
2
2
Machine Translated by Google

36
30
20
31
38
40
39
2410
16
02
20
36
37
36
24
31
40
36
17
12
32
35
43
33
20
11
13
28
03
05
30
19
39
40
14
13
36
36
23
07
39
36
37
30
29
18
33
16
34
35
42
39
43
15
37
36
29
20
08
39
37
38
38
25
25
22
22
40
06
39
38
36
29
39
04
36
37
38
24
25
36
38
34
37
37
36
36
37
3736
23
36
26
39
24
25
11
29
30
41
09
36
36
07
39
12
01
39
19
27
21
09
17
08
28
36
Schémaéclaté
Veuilleznoterquetouteslespiècesetlematérielquevousvoyezicine
serontpasutilisés
lorsdel'assemblagedelamachine,carcertainsd'entreeuxsontdéjàpréinstallés.
5
Machine Translated by Google

6
Listedespièces
4.
4pièces
1pièce
2pièces
13.
18.
23.
10.
15.
20.
5.
1pièce
3.
8.
2pièces
1pièce
2pièces
16.
2pièces
2pièces
4pièces
21.
1pièce
1pièce
2pièces 4pièces
17.
22.
1pièce
2pièces
11.
2pièces
1.
6.
1pièce
9.
14.
19.
1pièce
24.
2.
7.
12.
2pièces
2pièces
1pièce
1pièce
1pièce
Machine Translated by Google
28.
1pièce
1pièce
37.
42.
34.
39.
1pièce
29.
27.
32.
2pièces
6pièces
40.
1pièce
2pièces
4pièces
4pièces
4pièces
41.
1pièce
2pièces
35.
18PCS
25.
30.
4pièces
33.
38.
43.
1pièce
26.
31.
36.
9pièces
4pièces
2pièces
10pièces
Pourl'instant,serrezàlamainpourgarantirunassemblagefacile.
Leserrageàlaclédoitêtreeffectuéunefoisquetouteslespiècessontassemblées.
cléàmoletteàcemomentlà.
REMARQUE:pourévitertoutdésalignementdûàunserrageexcessif,n'utilisezpasde
assurezvousquetouslesécrous,boulonsetpiècessontbienfixésavantutilisation.
Avecl'aided'unassistant.
Listedespièces
7
Machine Translated by Google
02
33
30
29
04
30
29
29
01
28
30
29
36
37
28
30
03
36
33
36
36
37
B)Fixezletubedebasearrière(04)autubedesupportarrière(03)àl'aidededeux
boulonsdecarrosserie(28),dedeuxrondellesenarc(29)etdedeuxécrousennylon(30).
A)Fixezletubedebaseavant(01)autubeverticalavant(02)àl'aidededeuxboulons
decarrosserie(28),dedeuxrondellesarquées(29)etdedeuxécrousennylon(30).
Étape1:
C)Fixezletubedesupportarrière(03)assembléautubeverticalavant(02)àl'aidede
deuxboulonsAllen(33),dequatrerondellesplates(36)etdedeuxécrousennylon(37).
Assemblée
8
Machine Translated by Google

08
10
03
36
36
36
35
35
08
37
37
36
26
B)Fixezlestubesdesupportducoussindedossier(10)auxtubesducoussinde
dossier(09)àl'aided'unboulonAllen(35),dedeuxrondellesplates(36)etd'un
écrouennylon(37),puisinsérezlagoupilledeverrouillage(26).
Étape
2:A)Fixezlesdeuxtubesdecoussindedossier(08)àlapiècedesoudagesurletube
desupportarrière(03)àl'aided'unboulonAllen(35),dedeuxrondellesplates(36)
etd'unécrouennylon(37).
9
Machine Translated by Google

36
02
25
09
25
03
09
36
25
34
37
36
34
36
37
25
Étape
3:A)Fixezlabarred'haltères(09)auxtubesdesupportarrière(03)avecquatre
bagues(25)àl'aidededeuxboulonsAllen(34),dequatrerondellesplates
(36)etdedeuxécrousennylon(37).
10
Machine Translated by Google

42
32
06
39
39
02
36
39
38
41
38
39
38
38
36
37
38
39
08
08
39
27
38
B)Fixezlecadreenmousse(06)autubeverticalavant(02)àl'aided'unboulonAllen
(32),dedeuxrondellesplates(36)etd'unécrouennylon(37).Insérezensuitela
goupilledeverrouillage(27).
Étape
4:A)Fixezlecoussindedossier(41)etlecoussind'appuitête(42)auxtubesdecoussin
dedossier(08)àl'aidedesixboulonsAllen(38)etdesixrondellesplates(39).
11
Machine Translated by Google
0719
1907
05
43
39
40
39
40
43
05
3940
Dans
Étape
5:Insérezleguidon(07)dansletuberonddutuberéglable(05)jusqu'àceque
laboucleenV(19)entredansletrou.
Fixezlesdeuxcoussins(43)autuberéglable(05)àl'aidedequatreboulons
Allen(40)etdequatrerondellesplates(39).
Dans
Dans
12
Machine Translated by Google

14
02
12
05
12
LEPROCESSUSD'ASSEMBLAGEESTMAINTENANTTERMINÉ.
B)Faitesglisserdeuxmousses(12)dechaquecôtéducadreenmousse(06).
Étape6:
A)Insérezletuberéglable(05)assembléautubeverticalavant(02)etfixezleavecle
boutonréglable(14).
Pourvotresécurité,veuillezserrerlavisetl'ajusteràlapositionappropriée.
Veuillezinspecterettestervisuellementetfonctionnellementl'unitéunefoisl'assemblageterminé.
13
Machine Translated by Google

REMARQUE:Lacapacitédepoidsmaximaledeceproduitestde
660lbou300kg.Uneseulepersonneàlafoisdoitutilisercetéquipement.
1470mm
Tableaudestaillesdesproduits
655mm
14
Machine Translated by Google

2.Vérifiezrégulièrementlesvistousles3moispourvoirsiellessontdesserréeset
resserrezles.
1.Essuyezlasurfaceavecunchiffonencotonhumide.
Nettoyageetdésinfection
15
Machine Translated by Google

REPRÉSENTANTDELACE
REPRÉSENTANTDUROYAUMEUNI
ImportéenAUS:SIHAOPTYLTD.1ROKEVASTREETEASTWOODNSW2122
AustralieImportéaux
USA:SanvenTechnologyLtd.Suite250,9166AnaheimPlace,RanchoCucamonga,
CA91730
MainzerLandstr.69,
YHCONSULTINGLIMITED.C/OYHConsultingLimited
Bureau147,CenturionHouse,LondonRoad,Staines
uponThames,Surrey,TW184AX
Fabricant:ShanghaimuxinmuyeyouxiangongsiAdresse:
Shuangchenglu803nong11hao1602A1609shi,baoshanqu,shanghai200000CN.
ECrossStuGmbH
60329FrancfortsurleMain.
Machine Translated by Google

Machine Translated by Google

Machine Translated by Google


MODELL:SJ1018
Langer Hocker Römischer Stuhl
Technischer Support und E-Garantie-Zertifikat
www.vevor.com/support
Wir sind weiterhin bestrebt, Ihnen Werkzeuge zu wettbewerbsfähigen Preisen anzubieten.
„Sparen Sie die Hälfte“, „Halber Preis“ oder andere ähnliche Ausdrücke, die wir verwenden,
stellen nur eine Schätzung der Ersparnis dar, die Sie beim Kauf bestimmter Werkzeuge bei uns
im Vergleich zu den großen Topmarken erzielen können, und decken nicht unbedingt alle von uns
angebotenen Werkzeugkategorien ab. Wir möchten Sie freundlich daran erinnern, bei der
Bestellung bei uns sorgfältig zu prüfen, ob Sie im Vergleich zu den großen
Topmarken tatsächlich die Hälfte sparen.
Machine Translated by Google

Brauchen Sie Hilfe? Kontaktieren Sie uns!
MODELL:SJ1018
Technischer Support und E-Garantie-Zertifikat www.vevor.com/
support
Sie haben Fragen zu unseren Produkten? Sie benötigen technischen Support? Dann kontaktieren
Sie uns gerne:
Dies ist die Originalanleitung. Bitte lesen Sie alle Anweisungen sorgfältig durch, bevor Sie
das Gerät in Betrieb nehmen. VEVOR behält sich eine klare Auslegung unserer Bedienungsanleitung
vor. Das Erscheinungsbild des Produkts richtet sich nach dem Produkt, das Sie erhalten
haben. Bitte verzeihen Sie uns, dass wir Sie nicht erneut informieren, wenn es Technologie- oder
Software-Updates für unser Produkt gibt.
Langer Hocker Römischer Stuhl
1
Machine Translated by Google

Betriebssicherheit
Vielen Dank, dass Sie sich für dieses Produkt entschieden haben.
Arzt.
ÿ Bevor Sie mit einem Trainingsprogramm beginnen, konsultieren Sie Ihren
ÿ Dieses Produkt sollte bei Gebrauch auf einer ebenen Fläche platziert werden.
Bitte lesen Sie alle Anweisungen vor der Verwendung. Die Informationen helfen
·
Legen Sie bei Bedarf eine rutschfeste Matte unter die Maschine.
ÿ Bitte tragen Sie bei der Verwendung dieses Produkts geeignete Kleidung. ÿ
Verwenden Sie es nicht, wenn es nicht funktioniert oder Teile nicht richtig zusammengebaut
sind. ÿ Wenn Sie Brustschmerzen, Übelkeit, Schwindel oder Kurzatmigkeit verspüren,
sollten Sie das Training sofort abbrechen und Ihren Arzt aufsuchen
Es liegt in der Verantwortung des Eigentümers, sicherzustellen, dass alle Benutzer dieser
Reinigungsmittel.Bitte wenden Sie sich an den Kundendienst, wenn Sie Fragen haben
Hände ungeschulter Benutzer.
Produkt sind sich aller Warnungen und Vorsichtsmaßnahmen bewusst. ÿ
Verwenden Sie es nicht, wenn Sie schwanger sind
Fragen.
Aufsicht.
ÿ Bewahren Sie unbenutzte Geräte außerhalb der Reichweite von Kindern auf und lassen Sie niemanden
WARNUNG:
mit der Ausrüstung nicht vertraut sind, um sie zu benutzen. Dieses Werkzeug ist gefährlich in der
Bitte lesen Sie alle Anweisungen, bevor Sie dieses Produkt verwenden
erzielen Sie die bestmöglichen Ergebnisse.
ÿ Lesen Sie alle Anweisungen, bevor Sie dieses Produkt verwenden.
ÿ Halten Sie Kinder und Haustiere von der Sit-Up-Bank fern, während sie
ÿ Überprüfen Sie alle Teile vor jedem Gebrauch der Sit-Up-Bank und ziehen Sie sie fest. ÿ Reinigen
Sie das Gerät bitte nur mit feuchten Tüchern. Verwenden Sie keine
bevor Sie fortfahren. ÿ
Stellen Sie vor dem Gebrauch immer sicher, dass Ihr Produkt auf einem
Kinder sollten das Produkt nicht ohne Aufsicht eines Erwachsenen verwenden.
feste, harte, ebene Oberfläche.
2
Machine Translated by Google

Trainingspläne
Haustiere oder Kinder unter 12 Jahren sollten sich zu KEINEM Zeitpunkt näher als 3 m
(10 Fuß) am Produkt aufhalten. Kinder unter 12 Jahren sollten das Produkt zu KEINEM
Zeitpunkt benutzen. Kinder über 12 Jahren sollten das Produkt nicht ohne Aufsicht eines
Erwachsenen benutzen.
3. Bitte machen Sie Trainingspläne.
1. Anfängern wird empfohlen, mit weniger Wiederholungen zu beginnen, z.ÿB. 5 Wiederholungen als 1 Satz,
und nach und nach Wiederholungen hinzuzufügen.
ÿ Bei der Verwendung des Produkts muss die Zuschauermenge einen Abstand von 3 Metern einhalten, um
versehentliche Verletzungen zu vermeiden
2. Bitte treiben Sie eine halbe Stunde vor/nach dem Essen und eine Stunde vor dem Schlafengehen keinen Sport.
3
Machine Translated by Google

2
2
1
16 Quadratische Endkappe 20x20mm 4
05 Verstellbares Rohr
1
41 Rückenpolster
9
24 Endkappe 20x10mm
30 Nylonmutter M8
35 Inbusschraube M10x165mm
21 Stoßfänger
1
11 Endkappe 50mm (Vorne)
01 Vorderes Basisrohr
25 Buchse
31 Inbusschraube M10x50mm
2
36 Unterlegscheibe M10
4
2
2
Menge
29 Bogenscheibe M8
34 Inbusschraube M10x130mm
1
2
38 Inbusschraube M8x40 mm
20 Quadratische Endkappe 25x25mm 4 42 Kopfstützenpolster
06 Schaumstoffrahmen
1
10 Rückenlehnenpolster
Beschreibung
4
09 Hantelstange
1
22 Endkappe 50 mm (hinten)
2
39 Unterlegscheibe M8
1
2
02 Vorderes Standrohr
15 Abstandshalter 50vs38mm
1
1
13 Runde Endkappe 25mm
2
4
23 Rad
07 Lenker
17 Handgriff
4 43 Kissen
27 Sicherungsstift M8x60mm
Rohr
6
4
14 Einstellbarer Knopf
Beschreibung
28 Schlossschraube M8x65mm 4
2
33 Inbusschraube M10x70mm
18 Vierkant-Endkappe 38x38mm 1 40 Inbusschraube M8x35mm
4
1
1
03 Hinteres Stützrohr
32 Inbusschraube M10x65mm
37 Nylonmutter M10
04 Hinteres Basisrohr 26 Sicherungsstift M10x60mm
1
2
18
2
2
08 Rückenpolsterrohr
NEIN
1
10
2
1
Menge Nein
1
12 Schaum
19 V Schnalle
Stückliste
4
Machine Translated by Google

09
32
12
17
36
40
31
28
13
20
11
43
35
33
02
40
39
31
30
20
38
24 10
24
36
37
36
20
16
16
33
34
18
36
37
30
29
37
36
43
39
15
42
35
19
39
40
36
30
05
03
39
07
36
23
13
14
25
38
36
37
04
39
36
37
37 36
23
36
37
36
37
34
38
36
25
25
38
08
39
37
38
20
29
24
29
39
38
36
40
22
06
22
21
27
39
19
12
36
36
28
08
01
17
09
41
29
30
24
25
39
26
07
39
36
11
36
Explosionszeichnung
Bitte beachten Sie, dass Sie beim Zusammenbau der Maschine nicht
alle hier gezeigten
Teile und Hardware verwenden, da einige davon bereits vorinstalliert sind.
5
Machine Translated by Google
6
Stückliste
18.
4.
1 Stück
1 Stück
1 Stück
4 Stück
23.
2.
7.
12.
2 STK
1 Stück
2 STK
1 Stück
9.
14.
19.
24.
1.
6.
11.
1 Stück
2 STK
2 STK
17.
22.
4 Stück
1 Stück
2 STK
1 Stück
16.
4 Stück
2 STK
21.
2 STK
3.
8.
2 STK
1 Stück
2 STK
5.
10.
15.
20.
1 Stück
1 Stück
2 STK
13.
Machine Translated by Google

42.
28.
4 Stück
2 STK
10 STK
26.
31.
36.
9 Stück
1 Stück
4 Stück
33.
38.
43.
25.
30.
35.
1 Stück
2 STK
18 Stück
41.
4 Stück
2 STK
4 Stück
40.
4 Stück
1 Stück
32.
27.
2 STK
6 Stück
29.
34.
39.
1 Stück
1 Stück
1 Stück
37.
Durch Festziehen mit der Hand wird eine einfache Montage gewährleistet.
Das Anziehen mit dem Schraubenschlüssel sollte erst erfolgen, nachdem alle Teile zusammengebaut sind.
Schraubenschlüssel zu diesem Zeitpunkt.
HINWEIS: Um eine Fehlausrichtung durch zu festes Anziehen zu vermeiden, verwenden Sie bitte keinen
Stellen Sie vor der Verwendung sicher, dass alle Muttern, Schrauben und Teile fest angezogen sind.
Mit Hilfe eines Assistenten.
Stückliste
7
Machine Translated by Google

36
33
36
36
37
02
29
36
37
28
30
03
29
29
01
28
30
33
30
29
04
30
B) Befestigen Sie das hintere Basisrohr (04) mit zwei Schlossschrauben (28), zwei
Bogenscheiben (29) und zwei Nylonmuttern (30) am hinteren Stützrohr (03).
A) Befestigen Sie das vordere Basisrohr (01) mit zwei Schlossschrauben (28), zwei
Bogenscheiben (29) und zwei Nylonmuttern (30) am vorderen aufrechten Rohr (02).
Schritt 1:
C) Befestigen Sie das hintere Stützrohr (03) mit zwei Inbusschrauben (33), vier
Unterlegscheiben (36) und zwei Nylonmuttern (37) am vorderen aufrechten Rohr
(02).
Montage
8
Machine Translated by Google

08
10
03
36
35
36
36
35
08
26
37
37
36
B) Befestigen Sie die Rückenpolster-Stützrohre (10) an den Rückenpolsterrohren (09)
mit Hilfe einer Inbusschraube (35), zwei Unterlegscheiben (36) und einer Nylonmutter
(37) und setzen Sie dann den Sicherungsstift (26) ein.
Schritt
2: A) Befestigen Sie beide Rückenlehnenpolsterrohre (08) mit einer Inbusschraube (35),
zwei Unterlegscheiben (36) und einer Nylonmutter (37) am Schweißteil des hinteren
Stützrohrs (03).
9
Machine Translated by Google

10
Schritt
3: A) Befestigen Sie die Hantelstange (09) mit vier Buchsen (25) an den hinteren
Stützrohren (03), wobei Sie zwei Inbusschrauben (34), vier Unterlegscheiben
(36) und zwei Nylonmuttern (37) verwenden.
34
36
37
25
25
34
37
36
25
03
09
36
02
36
25
09
Machine Translated by Google

11
B) Befestigen Sie den Schaumstoffrahmen (06) mit einer Inbusschraube (32), zwei
Unterlegscheiben (36) und einer Nylonmutter (37) am vorderen Stützrohr (02). Setzen Sie
dann den Sicherungsstift (27) ein.
Schritt
4: A) Befestigen Sie das Rückenpolster (41) und das Kopfstützenpolster (42) mit sechs
Inbusschrauben (38) und sechs Unterlegscheiben (39) an den Rückenpolsterrohren (08).
08
08
39
27
38
06
38
36
37
38
39
39
38
41
38
39
42
32
38
39
39
02
36
Machine Translated by Google

In
39
40
39
40
43
43
05
39 40
07 19
19 07
05
Befestigen Sie beide Kissen (43) mit vier Inbusschrauben (40) und vier
Unterlegscheiben (39) am verstellbaren Rohr (05).
Schritt
5: Stecken Sie die Griffstange (07) in das Rundrohr am verstellbaren Rohr (05),
bis die V-Schnalle (19) in die Öffnung einrastet.
In
In
12
Machine Translated by Google

12
02
14
05
12
B) Schieben Sie zwei Schaumstoffe (12) auf jede Seite des Schaumstoffrahmens (06).
DER MONTAGEVORGANG IST JETZT ABGESCHLOSSEN.
Schritt 6:
A) Setzen Sie das verstellbare Rohr (05) in das vordere aufrecht stehende Rohr (02) ein und
befestigen Sie es mit dem verstellbaren Knopf (14).
Bitte ziehen Sie zu Ihrer Sicherheit die Schraube fest und bringen Sie sie in die entsprechende Position.
Bitte führen Sie nach Abschluss der Montage eine Sicht- und Funktionsprüfung des Geräts durch und testen
Sie es.
13
Machine Translated by Google
HINWEIS: Die maximale Gewichtskapazität für dieses Produkt beträgt 660
lbs oder 300 kg. Dieses Gerät sollte jeweils nur von einer Person verwendet werden.
655 mm
Produktgrößentabelle
1470 mm
14
Machine Translated by Google

2. Überprüfen Sie die Schrauben regelmäßig alle 3 Monate auf Lockerung und ziehen Sie die Schrauben
fest
1. Wischen Sie die Oberfläche mit einem feuchten Baumwolltuch ab.
Reinigung und Desinfektion
15
Machine Translated by Google

UK REP
Vertreter der EG
YH CONSULTING LIMITED. C/O YH Consulting Limited
Office 147, Centurion House, London Road, Staines-
upon-Thames, Surrey, TW18 4AX
Mainzer Landstr.69,
Importiert nach AUS: SIHAO PTY LTD. 1 ROKEVA STREETEASTWOOD NSW 2122
Australien Importiert
nach USA: Sanven Technology Ltd. Suite 250, 9166 Anaheim Place, Rancho
Cucamonga, CA 91730
Hersteller: Shanghaimuxinmuyeyouxiangongsi Adresse:
Shuangchenglu 803nong11hao1602A-1609shi, baoshanqu, Shanghai 200000 CN.
E-CrossStu GmbH
60329 Frankfurt am Main.
Machine Translated by Google

Machine Translated by Google

Machine Translated by Google


MODELLO:SJ1018
Sgabello lungo sedia romana
Supporto tecnico e certificato di garanzia
elettronica www.vevor.com/support
"Risparmia la metà", "Metà prezzo" o qualsiasi altra espressione simile da noi
utilizzata rappresenta solo una stima del risparmio che potresti ottenere acquistando
determinati utensili con noi rispetto ai principali marchi principali e non significa
necessariamente coprire tutte le categorie di utensili da noi offerti. Ti ricordiamo
gentilmente di verificare attentamente quando effettui un ordine con noi
se stai effettivamente risparmiando la metà rispetto ai principali marchi principali.
Continuiamo a impegnarci per fornirvi strumenti a prezzi competitivi.
Machine Translated by Google

Supporto tecnico e certificato di garanzia elettronica
www.vevor.com/support
Hai domande sui prodotti? Hai bisogno di supporto tecnico? Non esitare a contattarci:
Questa è l'istruzione originale, si prega di leggere attentamente tutte le istruzioni del
manuale prima di utilizzare. VEVOR si riserva una chiara interpretazione del nostro manuale
utente. L'aspetto del prodotto sarà soggetto al prodotto ricevuto. Vi preghiamo di
perdonarci se non vi informeremo di nuovo se ci sono aggiornamenti tecnologici o software
sul nostro prodotto.
HAI BISOGNO DI AIUTO? CONTATTACI!
MODELLO:SJ1018
Sgabello lungo sedia romana
1
Machine Translated by Google

Sicurezza operativa
si ottengono i migliori risultati possibili.
ÿ Leggere tutte le istruzioni prima di utilizzare questo prodotto. ÿ
Tenere i bambini e gli animali domestici lontani dalla panca per sit-up mentre è in uso.
tappetino antiscivolo sotto la macchina se necessario. ÿ Si prega
di indossare abiti adeguati quando si utilizza questo prodotto. ÿ Non utilizzarlo
se non è funzionante o se le parti non sono ben assemblate. ÿ Se si avvertono dolori al petto,
nausea, vertigini o mancanza di respiro,
dovresti interrompere immediatamente l'attività fisica e consultare il tuo medico
utilizzare.I bambini non devono utilizzare.Il prodotto. senza la supervisione di un adulto
prima di continuare. ÿ
Prima dell'uso, assicurarsi sempre che il prodotto sia posizionato su un
superficie solida, dura e piana.
supervisione.
ÿ Conservare l'attrezzatura inutilizzata fuori dalla portata dei bambini e non consentirne l'uso a nessuno.
AVVERTIMENTO:
non familiarità con l'attrezzatura per utilizzarlo. Questo strumento è pericoloso in
Si prega di leggere tutte le istruzioni prima di utilizzare questo prodotto
ÿ Ispezionare e serrare tutte le parti ogni volta prima di utilizzare questa panca per sit-up. ÿ Si prega di
pulire questa macchina utilizzando solo salviette umide. Non utilizzare
È responsabilità del Proprietario garantire che tutti gli utenti di questo
detergenti. Si prega di consultare il servizio clienti se si dispone di
mani di utenti non addestrati.
prodotto sono pienamente consapevoli di tutte le avvertenze e precauzioni. ÿ
Non utilizzarlo se sei incinta
domande.
Grazie mille per aver scelto questo prodotto.
ÿ Prima di iniziare qualsiasi programma di esercizi consultare il proprio medico curante.
medico.
ÿ Questo prodotto deve essere posizionato su una superficie piana durante l'uso. Posizionare un
Si prega di leggere tutte le istruzioni prima di utilizzarlo. Le informazioni saranno utili
·
2
Machine Translated by Google

Piani di esercizi
1. Si consiglia ai principianti di iniziare con meno ripetizioni, ad esempio 5 ripetizioni in una serie, e di
aggiungerne altre man mano che si procede.
3. Si prega di pianificare gli esercizi.
In NESSUN momento gli animali domestici o i bambini di età inferiore ai 12 anni
devono essere più vicini al prodotto di 3 m (10 piedi). In NESSUN momento i
bambini di età inferiore ai 12 anni devono usare il prodotto. I bambini di età superiore
ai 12 anni non devono usare il prodotto senza la supervisione di un adulto.
ÿ Quando si utilizza il prodotto, la folla di spettatori deve mantenere una distanza di 3 metri per evitare
lesioni accidentali
2. Si prega di non fare esercizio fisico mezz'ora prima/dopo i pasti o un'ora prima di dormire.
3
Machine Translated by Google

9
NO
1
2
1
10
Quantità n.
12 Schiuma
1
Fibbia 19 V
2
04 Tubo di base posteriore
32 Bullone a brugola M10x65mm
26 Perno di bloccaggio M10x60mm
37 Dado in nylon M10
1
2
2
2
18
08 Tubo cuscino schienale
4
14 Manopola regolabile
6
Descrizione
28 Bullone per carrozza M8x65mm 4
33 Bullone a brugola M10x70mm
18 Tappo terminale quadrato 38x38mm 1 40 Bullone Allen M8x35mm
2
03 Tubo di supporto posteriore
4
1
1
1
23 Ruota
4
13 Tappo terminale tondo 25mm
2
07 Manubrio
27 Perno di bloccaggio M8x60mm
Tubo
17 Impugnatura
4 43 Cuscino
09 Barra con manubri
1
2
39 Rondella piatta M8
22 Tappo terminale 50mm (posteriore)
02 Tubo verticale anteriore
1
2
15 Distanziatore 50 vs 38 mm
1
1
29 Rondella ad arco M8
34 Bullone a brugola M10x130mm
2
06 Telaio in schiuma
1
10 Supporto per cuscino schienale
38 Bullone a brugola M8x40 mm
20 Tappo terminale quadrato 25x25mm 4 42 Cuscino poggiatesta
4
1
11 Tappo terminale 50mm (anteriore)
Descrizione
2
21 Paraurti
01 Tubo di base anteriore
25 Boccola
31 Bullone a brugola M10x50mm
36 Rondella piatta M10
4
Quantità
2
2
2
05 Tubo regolabile
1
1
16 Tappo terminale quadrato 20x20mm 4
41 Cuscino schienale
24 Tappo terminale 20x10mm
30 Dado in nylon M8
35 Bullone a brugola M10x165mm
Elenco delle parti
4
Machine Translated by Google

5
Diagramma esploso
Si prega di notare che non tutti i componenti e l'hardware qui visualizzati
verranno utilizzati
durante l'assemblaggio della macchina, poiché alcuni di essi sono già preinstallati.
20
11
41
29
30
39
26
24
25
11
07
39
36
36
09
39
19
21
27
12
01
28
08
36
36
09
17
38
08
39
37
38
25
25
20
29
39
38
36
29
22
40
22
06
25
24
39
38
04
36
37
37
36
36
37
37 36
23
36
38
36
37
34
19
39
40
05
03
30
36
23
39
07
13
14
36
18
16
33
36
37
30
29
43
39
15
37
36
34
35
42
40
39
24 10
02
31
30
20
38
36
37
24
16
36
20
32
12
40
31
17
36
13
28
43
35
33
Machine Translated by Google

4.
4 PZ
1 pz.
2 PZ
13.
18.
23.
10.
15.
20.
5.
1 pz.
3.
8.
2 PZ
1 pz.
2 PZ
16.
2 PZ
2 PZ
4 PZ
21.
1 pz.
1 pz.
2 PZ 4 PZ
17.
22.
1 pz.
2 PZ
11.
2 PZ
1.
6.
1 pz.
14.
9.
19.
1 pz.
24.
2.
7.
12.
2 PZ
2 PZ
1 pz.
1 pz.
1 pz.
Elenco delle parti
6
Machine Translated by Google
Per facilitare il montaggio, per ora è consigliabile stringere a mano.
Il serraggio con la chiave deve essere eseguito dopo aver assemblato tutte le parti
chiave inglese in questo momento.
NOTA: per evitare disallineamenti dovuti a serraggio eccessivo, non utilizzare un
assicurarsi che tutti i dadi, i bulloni e le parti siano ben serrati prima dell'uso.
Con l'aiuto di un assistente.
28.
1 pz.
1 pz.
37.
42.
34.
39.
1 pz.
29.
27.
32.
2 PZ
6 PZ
40.
1 pz.
2 PZ
4 PZ
4 PZ
4 PZ
41.
1 pz.
2 PZ
35.
18 POLLICI
25.
30.
4 PZ
38.
33.
43.
1 pz.
26.
31.
36.
9 PZ
4 PZ
2 PZ
10 PZ
Elenco delle parti
7
Machine Translated by Google

33
37
30
29
30
04
29
29
01
28
30
29
36
37
28
03
30
36
33
36
36
02
B) Fissare il tubo di base posteriore (04) al tubo di supporto posteriore (03)
utilizzando due bulloni per carrozze (28), due rondelle ad arco (29) e due dadi in nylon (30).
A) Fissare il tubo di base anteriore (01) al tubo verticale anteriore (02) utilizzando
due bulloni per carrozze (28), due rondelle ad arco (29) e due dadi in nylon (30).
Fase 1:
C) Fissare il tubo di supporto posteriore (03) assemblato al tubo verticale anteriore
(02) utilizzando due bulloni Allen (33), quattro rondelle piatte (36) e due dadi in nylon
(37).
Assemblea
8
Machine Translated by Google

08
10
03
36
35
36
36
35
08
37
37
36
26
B) Fissare i tubi di supporto del cuscino dello schienale (10) ai tubi del cuscino dello
schienale (09) utilizzando un bullone a brugola (35), due rondelle piatte (36) e un
dado in nylon (37), quindi inserire il perno di bloccaggio (26).
Fase 2:
A) Fissare entrambi i tubi del cuscino dello schienale (08) alla parte di saldatura sul
tubo di supporto posteriore (03) utilizzando un bullone a brugola (35), due rondelle
piatte (36) e un dado in nylon (37).
9
Machine Translated by Google

36
02
25
09
25
03
09
36
25
34
37
36
34
36
37
25
Fase 3:
A) Fissare la barra del manubrio (09) ai tubi di supporto posteriori (03) con
quattro boccole (25) utilizzando due bulloni a brugola (34), quattro rondelle
piatte (36) e due dadi in nylon (37).
10
Machine Translated by Google

42
32
06
39
39
02
36
39
38
41
38
39
38
38
36
37
38
39
08
08
39
27
38
B) Fissare il telaio in schiuma (06) al tubo verticale anteriore (02) utilizzando un bullone
a brugola (32), due rondelle piatte (36) e un dado in nylon (37). Quindi inserire il
perno di bloccaggio (27).
Fase 4:
A) Fissare il cuscino dello schienale (41) e il cuscino del poggiatesta (42) ai tubi del
cuscino dello schienale (08) utilizzando sei bulloni Allen (38) e sei rondelle piatte (39).
11
Machine Translated by Google

07 19
19 07
05
43
39
40
39
40
43
05
39 40
In
Fissare entrambi i cuscini (43) al tubo regolabile (05) utilizzando quattro
bulloni Allen (40) e quattro rondelle piatte (39).
Fase 5:
Inserire il manubrio (07) nel tubo rotondo sul tubo regolabile (05) finché la
fibbia a V (19) non entra nel foro.
In
In
12
Machine Translated by Google
13
IL PROCESSO DI ASSEMBLAGGIO È ORA COMPLETATO.
B) Far scorrere due schiume (12) su ciascun lato del telaio in schiuma (06).
Fase 6:
A) Inserire il tubo regolabile (05) assemblato al tubo verticale anteriore (02) e fissarlo
con la manopola regolabile (14).
Per la vostra sicurezza, stringete la vite e regolatela nella posizione appropriata.
Una volta completato il montaggio, ispezionare e testare visivamente e funzionalmente l'unità.
12
02
14
05
12
Machine Translated by Google

14
1470mm
Tabella delle taglie del prodotto
655mm
NOTA: la capacità di peso massima per questo prodotto è di 660 libbre o
300 kg. Solo una persona alla volta dovrebbe usare questo pezzo di equipaggiamento.
Machine Translated by Google

15
Pulizia e disinfezione
2. Controllare regolarmente le viti ogni 3 mesi per allentarle e stringerle
1. Pulire la superficie con un panno di cotone umido.
Machine Translated by Google

Importato in AUS: SIHAO PTY LTD. 1 ROKEVA STREETEASTWOOD NSW 2122
Australia Importato negli
USA: Sanven Technology Ltd. Suite 250, 9166 Anaheim Place, Rancho Cucamonga,
CA 91730
Magonza Landstr.69,
YH CONSULTING LIMITED. C/O YH Consulting Limited
Ufficio 147, Centurion House, London Road, Staines-
upon-Thames, Surrey, TW18 4AX
Produttore: Shanghaimuxinmuyeyouxiangongsi Indirizzo:
Shuangchenglu 803nong11hao1602A-1609shi, baoshanqu, shanghai 200000 CN.
E-CrossStu GmbH
60329 Francoforte sul Meno.
Rappresentante della CE
RAPPRESENTANZA DEL REGNO UNITO
Machine Translated by Google

Machine Translated by Google

Machine Translated by Google


MODELO:SJ1018
"Ahorrelamitad","mitaddeprecio"ocualquierotraexpresiónsimilarqueutilicemos
solorepresentaunaestimacióndelahorroquepodríaobteneralcomprarciertas
herramientasconnosotrosencomparaciónconlasprincipalesmarcasynonecesariamente
significaquecubratodaslascategoríasdeherramientasqueofrecemos.Lerecordamos
que,alrealizarunpedidoconnosotros,verifiquecuidadosamentesi
realmenteestáahorrandolamitadencomparaciónconlasprincipalesmarcas.
Seguimoscomprometidosabrindarleherramientasaprecioscompetitivos.
Taburetelargosillaromana
Soportetécnicoycertificadodegarantíaelectrónica
www.vevor.com/support
Machine Translated by Google

Estassonlasinstruccionesoriginales,leaatentamentetodaslasinstruccionesdelmanual
antesdeutilizarelproducto.VEVORsereservaunainterpretaciónclaradenuestromanualde
usuario.Laaparienciadelproductoestarásujetaalproductoquerecibió.Perdónenosporno
informarlenuevamentesihayactualizacionesdetecnologíaosoftwareennuestroproducto.
¿Tienepreguntassobreelproducto?¿Necesitaasistenciatécnica?Nodudeenponerseencontacto
connosotros:
Soportetécnicoycertificadodegarantíaelectrónicawww.vevor.com/
support
1
¿NECESITAAYUDA?¡CONTÁCTENOS!
MODELO:SJ1018
Taburetelargosillaromana
Machine Translated by Google

Seguridaddeoperación
ADVERTENCIA:
productoconozcaplenamentetodaslasadvertenciasyprecauciones.Nolo
usesiestáembarazada
preguntas.
manosdeusuariosnocapacitados.
EsresponsabilidaddelPropietariogarantizarquetodoslosusuariosdeeste
limpiadores.Consulteconelserviciodeatenciónalclientesitienealguna
Leatodaslasinstruccionesantesdeusarlo.Lainformaciónleayudará.
∙
Coloqueunaalfombrillaantideslizantedebajodelamáquinasi
esnecesario.Useropaadecuadacuandoutiliceesteproducto.Noloutilice
sinofuncionaosilaspiezasnoestánbienensambladas.Sisientedoloresenelpecho,náuseas,
mareosofaltadeaire,
Debedejardehacerejercicioinmediatamenteyconsultarasumédico.
Muchasgraciasporelegiresteproducto.
Antesdecomenzarcualquierprogramadeejerciciosconsulteconsumédico.
médico.
Uso.Losniñosnodebenutilizarelproductosinlasupervisióndeunadulto.
Esteproductodebecolocarsesobreunasuperficieplanacuandoseutiliza.Coloqueun
superficiesólida,durayplana.
ustedconsiguelosmejoresresultadosposibles.
Leatodaslasinstruccionesantesdeusaresteproducto.Mantenga
alosniñosylasmascotasalejadosdelbancodeabdominalesmientrasestéenuso.
antesdecontinuar.
Antesdeusar,asegúresesiempredequesuproductoestécolocadosobreunasuperficieplana.
Noestáfamiliarizadoconelequipoparautilizarlo.Estaherramientaespeligrosaenel
Leatodaslasinstruccionesantesdeutilizaresteproducto.
supervisión.
Inspeccioneyajustetodaslaspiezascadavezantesdeusarestebancodeabdominales.Limpie
estamáquinasolocontoallitashúmedas.Noutilice
Guardeelequipofueradelalcancedelosniñosynopermitaquenadieloutilice.
2
Machine Translated by Google

Planesdeejercicios
1.Serecomiendaalosprincipiantescomenzarconmenosrepeticiones,5repeticionescomo1serie,por
ejemplo,yagregarrepeticionesamedidaqueavanza.
2.Nohagaejerciciomediahoraantesodespuésdelascomidasounahoraantesdedormir.
Enningúnmomentolasmascotasolosniñosmenoresde12añosdebenestaramenos
de3m(10pies)delproducto.Enningúnmomentolosniñosmenoresde12añosdeben
utilizarelproducto.Losniñosmayoresde12añosnodebenutilizarelproductosinla
supervisióndeunadulto.
Alutilizarelproducto,lamultituddeespectadoresdebemantenerunadistanciade3metrosparaevitarlesiones
accidentales.
3.Porfavorhagaplanesdeejercicio.
3
Machine Translated by Google

11Tapadeextremo50mm(delantera)
2
08Tubodelcojíndelrespaldo
21parachoques
2
2
2
18
1
04Tubodebasetrasero Pasadordebloqueo26M10x60mm
32tornillosAllenM10x65mm
37TuercadenailonM10
Hebillade19V
2
CantidadNo
2
1
12espuma
1
10
No
Pasadordebloqueo27M8x60mm
1
Tubo
17Empuñaduradelamanija
443Cojín
07Manillar
23Rueda
13tapasdeextremoredondasde25mm
4
2
1
03Tubodesoportetrasero
4
1
33PernoAllenM10x70mm
1
18Tapadeextremocuadrada38x38mm1PernoAllen40M8x35mm
2
Descripción
4
28PernodecarruajeM8x65mm4
14Perillaajustable
6
Descripción
4
1
10Soportedecojínderespaldo
06Marcodeespuma
38PernoAllenM8x40mm
2
20Tapadeextremocuadrada25x25mm442Cojínparareposacabezas
1
29ArandeladearcoM8
34tornillosAllenM10x130mm
15espaciadores50x38mm
1
02Tuboverticaldelantero
1
2
2
39ArandelaplanaM8
22Tapadeextremo50mm(trasera)
09Barraconmancuernas
1
24tapasdeextremode20x10mm
30TuercadenailonM8
35PernoAllenM10x165mm
9
41Cojínderespaldo
05Tuboajustable
1
1
16Tapadeextremocuadrada20x20mm4
2
Cantidad
2
2
36ArandelaplanaM10
4
01Tubodebasedelantero
1
25buje
31pernosAllenM10x50mm
Listadepiezas
4
Machine Translated by Google

5
Diagramadespiezado
Tengaencuentaquenotodaslaspiezasyelhardwarequeveaquí
seutilizarán
mientrasensamblalamáquinaporquealgunosdeellosyaestánpreinstalados.
38
2410
17
02
28
08
36
36
12
09
01
39
19
21
27
36
09
07
39
26
39
36
24
25
11
41
38
36
29
30
37
34
37
36
36
37
3736
23
36
39
04
38
36
37
25
24
22
40
22
39
38
06
36
29
20
38
08
39
37
38
29
25
25
34
42
35
43
39
15
37
36
37
36
30
29
18
16
33
13
14
36
36
23
39
07
05
03
30
19
39
40
43
35
33
20
13
11
28
40
31
17
36
32
12
16
36
20
36
37
24
31
40
39
30
20
Machine Translated by Google

1pieza
2piezas
13.
18.
23.
5.
10.
15.
20.
1pieza
16.
2piezas
2piezas
3.
8.
2piezas
1pieza
2piezas
1pieza
1pieza
2piezas
4piezas
1pieza
2piezas
2piezas
17.
21. 22.
4piezas
9.
1pieza
14.
19.
24.
1.
6.
11.
7.
2.
12.
2piezas
1pieza
2piezas
4.
1pieza
1pieza
1pieza
4piezas
Listadepiezas
6
Machine Translated by Google
Apretarloamanoporahoraayudaráagarantizarunmontajefácil.
Elaprieteconllavedeberealizarsedespuésdequetodaslaspiezasesténensambladas.
llaveenestemomento.
NOTA:Paraevitarladesalineacióndebidoaunajusteexcesivo,noutiliceun
Asegúresedequetodaslastuercas,pernosypiezasesténbienapretadosantesdesuuso.
Conlaayudadeunasistente.
7
1pieza
1pieza
37.
42.
29.
34.
39.
1pieza
40.
1pieza
32.
27.
2piezas
6piezas
4piezas
4piezas
2piezas
4piezas
1pieza
18piezas
2piezas
41.
33.
4piezas
38.
43.
25.
30.
35.
31.
26.
36.
9piezas
1pieza
28.
2piezas
4piezas
10piezas
Listadepiezas
Machine Translated by Google

30
03
28
29
36
37
36
02
37
36
33
36
04
30
30
29
33
01
28
29
30
29
8
A)Conecteeltubobasedelantero(01)altuboverticaldelantero(02)usandodos
pernosdecarruaje(28),dosarandelasdearco(29)ydostuercasdenailon(30).
C)Conecteeltubodesoportetrasero(03)ensambladoaltuboverticaldelantero
(02)usandodospernosAllen(33),cuatroarandelasplanas(36)ydostuercasde
nailon(37).
B)Conecteeltubodebasetrasero(04)altubodesoportetrasero(03)usando
dospernosdecarruaje(28),dosarandelasdearco(29)ydostuercasdenailon(30).
Paso1:
Asamblea
Machine Translated by Google
10
36
03
26
35
08
36
35
36
36
37
08
37
B)Conectelostubosdesoportedelcojíndelrespaldo(10)alostubosdelcojíndel
respaldo(09)usandounpernoAllen(35),dosarandelasplanas(36)yunatuerca
denailon(37),luegoinserteelpasadordebloqueo(26).
Paso2:
A)Conecteambostubosdelcojíndelrespaldo(08)alapiezadesoldaduraeneltubo
desoportetrasero(03)usandounpernoAllen(35),dosarandelasplanas(36)y
unatuercadenailon(37).
9
Machine Translated by Google

37
36
25
34
37
25
34
36
25
09
02
36
09
36
25
03
Paso3:
A)Conectelabarrademancuernas(09)alostubosdesoportetraseros(03)con
cuatrobujes(25)usandodospernosAllen(34),cuatroarandelasplanas
(36)ydostuercasdenailon(37).
10
Machine Translated by Google

41
38
39
37
38
36
27
06
38
08
08
39
39
02
36
42
32
39
38
39
38
39
38
B)Fijeelmarcodeespuma(06)altuboverticaldelantero(02)conunpernoAllen
(32),dosarandelasplanas(36)yunatuercadenailon(37).Luegoinserteel
pasadordebloqueo(27).
Paso4:
A)Fijeelcojíndelrespaldo(41)yelcojíndelreposacabezas(42)alostubosdel
cojíndelrespaldo(08)usandoseispernosAllen(38)yseisarandelasplanas(39).
11
Machine Translated by Google

0719
1907
05
En
En
Fijeamboscojines(43)altuboajustable(05)usandocuatropernosAllen
(40)ycuatroarandelasplanas(39).
Paso5:
Insertelabarradelmanillar(07)eneltuboredondodeltuboajustable(05)
hastaquelahebillaenV(19)entreenelorificio.
En
43
3940
39
40
39
40
43
05
12
Machine Translated by Google

13
B)Deslicedosespumas(12)acadaladodelmarcodeespuma(06).
Parasuseguridad,aprieteeltornilloyajústeloalaposiciónadecuada.
ELPROCESODEMONTAJEYAESTÁCOMPLETO.
Paso6:
A)Inserteeltuboajustable(05)ensambladoaltuboverticaldelantero(02)y
asegúreloconlaperillaajustable(14).
Inspeccioneypruebevisualyfuncionalmentelaunidadunavezcompletadoelensamblaje.
14
12
12
05
02
Machine Translated by Google

14
655mm
Tabladetallasdeproductos
1470mm
NOTA:Lacapacidadmáximadepesodeesteproductoesde660
lbo300kg.Solounapersonadebeutilizaresteequipoalavez.
Machine Translated by Google

2.Reviselostornillosperiódicamentecada3mesesparaversiestánflojosyapriételos.
1.Limpielasuperficieconunpañodealgodónhúmedo.
Limpiezaydesinfección
15
Machine Translated by Google

REPRESENTANTECE
REPRESENTANTEDELREINOUNIDO
YHCONSULTINGLIMITED.ALADIRECCIÓNDEYH
ConsultingLimitedOficina147,CenturionHouse,
LondonRoad,StainesuponThames,Surrey,TW184AX
ECrossStuGmbH
ImportadoaAUS:SIHAOPTYLTD.1ROKEVASTREETEASTWOODNSW2122
AustraliaImportadoa
EE.UU.:SanvenTechnologyLtd.Suite250,9166AnaheimPlace,RanchoCucamonga,
CA91730
Fabricante:ShanghaimuxinmuyeyouxiangongsiDirección:
Shuangchenglu803nong11hao1602A1609shi,baoshanqu,shanghai200000CN.
60329FráncfortdelMeno.
MainzerLandstraße69,
Machine Translated by Google

Machine Translated by Google

Machine Translated by Google


MODEL:SJ1018
„Oszczędzaj połowę”, „Połowa ceny” lub inne podobne wyrażenia używane przez
nas stanowią jedynie szacunkowe oszczędności, jakie możesz uzyskać, kupując u nas
określone narzędzia w porównaniu z głównymi markami i niekoniecznie oznaczają one
objęcie wszystkich kategorii oferowanych przez nas narzędzi. Uprzejmie przypominamy,
aby przy składaniu zamówienia dokładnie sprawdzić, czy faktycznie
oszczędzasz połowę w porównaniu z głównymi markami.
Nadal staramy się oferować Państwu narzędzia w konkurencyjnych cenach.
Długi stołek rzymski krzesło
Wsparcie techniczne i certyfikat gwarancji
elektronicznej www.vevor.com/support
Machine Translated by Google

Wsparcie techniczne i certyfikat gwarancji elektronicznej
www.vevor.com/support
Masz pytania dotyczące produktu? Potrzebujesz wsparcia technicznego? Skontaktuj się z
nami:
To jest oryginalna instrukcja, przed użyciem należy uważnie przeczytać wszystkie
instrukcje. VEVOR zastrzega sobie jasną interpretację naszej instrukcji obsługi. Wygląd
produktu będzie zależał od produktu, który otrzymałeś. Prosimy o wybaczenie, że nie
poinformujemy Cię ponownie, jeśli w naszym produkcie pojawią się jakiekolwiek aktualizacje
technologiczne lub oprogramowania.
1
POTRZEBUJESZ POMOCY? SKONTAKTUJ SIĘ Z NAMI!
MODEL:SJ1018
Długi stołek rzymski krzesło
Machine Translated by Google

Bezpieczeństwo działania
produkt jest w pełni świadomy wszystkich ostrzeżeń i środków ostrożności.
Nie należy stosować produktu w ciąży
pytania.
Właściciel jest odpowiedzialny za zapewnienie, że wszyscy użytkownicy tego serwisu
środki czyszczące. W razie jakichkolwiek pytań skontaktuj się z obsługą klienta.
Przed użyciem należy przeczytać wszystkie instrukcje. Informacje te będą pomocne
·
W razie potrzeby pod maszyną należy umieścić matę antypoślizgową.
Podczas korzystania z tego produktu należy nosić odpowiednie ubrania. Nie należy go
używać, jeśli nie działa lub jego części nie są prawidłowo zmontowane. W przypadku odczuwania bólu w klatce
piersiowej, nudności, zawrotów głowy lub braku szerokości geograficznej należy skontaktować się z lokalnym biurem obsługi klienta.
należy natychmiast przerwać ćwiczenia i skonsultować się z lekarzem
Dziękujemy bardzo za wybranie tego produktu.
lekarz.
Podczas używania produkt należy umieścić na płaskiej powierzchni.
Przed rozpoczęciem jakiegokolwiek programu ćwiczeń skonsultuj się z lekarzem.
w rękach nieprzeszkolonych użytkowników.
Dzieci nie powinny używać produktu. bez nadzoru osoby dorosłej.
twarda, płaska powierzchnia.
Przed użyciem tego produktu należy przeczytać całą instrukcję.
Podczas korzystania z ławki do ćwiczeń należy trzymać dzieci i zwierzęta domowe z dala od ławki.
osiągniesz najlepsze możliwe rezultaty.
przed kontynuowaniem.
Przed użyciem zawsze upewnij się, że produkt jest umieszczony na
nieznajomość sprzętu do jego użycia. To narzędzie jest niebezpieczne w
Przed użyciem tego produktu należy przeczytać wszystkie instrukcje.
Przed każdym użyciem ławki do brzuszków należy sprawdzić i dokręcić wszystkie części. Należy czyścić
tę maszynę wyłącznie za pomocą wilgotnych ściereczek. Nie należy używać żadnych środków czyszczących.
Przechowuj nieużywany sprzęt w miejscu niedostępnym dla dzieci i nie pozwalaj nikomu
nadzór.
OSTRZEŻENIE:
2
Machine Translated by Google

Plany ćwiczeń
1. Początkującym zaleca się rozpoczęcie od mniejszej liczby powtórzeń, na przykład 5 powtórzeń w 1 serii, a
następnie dodawanie powtórzeń w miarę postępów.
2. Prosimy nie ćwiczyć na pół godziny przed/po posiłku i na 1 godzinę przed snem.
W ŻADNYM momencie zwierzęta domowe lub dzieci poniżej 12 roku
życia nie powinny znajdować się bliżej produktu niż 3 m (10 stóp). W
ŻADNYM momencie dzieci poniżej 12 roku życia nie powinny używać
produktu. Dzieci powyżej 12 roku życia nie powinny używać produktu
bez nadzoru osoby dorosłej.
Podczas korzystania z produktu osoby postronne muszą zachować odległość 3 metrów, aby
uniknąć przypadkowych obrażeń.
3. Proszę zaplanować ćwiczenia.
3
Machine Translated by Google

10 Poduszka pod plecy
Śruba imbusowa 38 M8x40 mm
20 Zaślepka kwadratowa 25x25mm 4 42 Poduszka zagłówka
Opis
4
28 Śruba samochodowa M8x65mm 4
14 Pokrętło regulacyjne
6
03 Rura podporowa tylna
4
1
Śruba imbusowa 33 M10x70mm
1
18 Zaślepka kwadratowa 38x38mm 1 40 Śruba imbusowa M8x35mm
2
23 Koło
13 Okrągła końcówka 25mm
4
2
1
27 sworzni blokujących M8x60mm
Rura
17 Uchwyt uchwytu
4 43 Poduszka
07 Uchwyt
2
1
10
NIE
1
Klamra 19 V
2
Ilość Nie
1
12 pianka
1
04 Rura podstawy tylnej 26 sworzni blokujących M10x60mm
Śruba imbusowa 32 M10x65mm
37 Nakrętka nylonowa M10
08 Rura poduszki oparcia
2
2
2
18
01 Rura podstawy przedniej
1
11 Zaślepka 50mm (przód)
25 Tuleja
31 Śruba imbusowa M10x50mm
Ilość
2
2
2
36 Podkładka płaska M10
4
21 Zderzak
05 Regulowana rura
1
1
16 Zaślepka kwadratowa 20x20mm 4
2
24 Zaślepka końcowa 20x10mm
30 Nakrętka nylonowa M8
Śruba imbusowa 35 M10x165mm
9
41 Poduszka oparcia
2
Podkładka płaska 39 M8
22 Zaślepka 50mm (tył)
09 Sztanga do hantli
1
15 Dystans 50vs38mm
1
02 Przednia rura pionowa
1
2
2
1
Podkładka łukowa 29 M8
34 Śruba imbusowa M10x130mm
Opis
4
06 Rama piankowa
1
Lista części
4
Machine Translated by Google
15
37
36
20
38
29
08
39
37
38
25
22
25
40
22
39
38
06
36
29
39
38
04
36
37
25
24
38
36
37
34
37
36
36
37
37 36
23
36
39
26
24
25
11
41
29
30
36
09
07
39
36
12
01
39
19
21
27
09
17
28
08
36
36
31
40
39
30
20
38
16
24 10
36
20
36
37
02
24
40
17
31
36
32
12
43
35
33
20
13
11
28
05
03
30
19
39
40
13
14
36
36
23
39
07
36
37
30
29
18
16
33
34
42
35
43
39
Schemat wybuchowy
Należy pamiętać, że nie wszystkie części i elementy montażowe widoczne
tutaj będą
wykorzystane podczas montażu maszyny, ponieważ niektóre z nich są już zamontowane fabrycznie.
5
Machine Translated by Google

5.
2 SZT.
10.
15.
20.
1 szt.
23.
1 szt.
2 SZT.
13.
18.
4 szt.
2 SZT.
4 szt.
1 szt.
1 szt.
21.
16.
2 SZT.
2 SZT.
8.
3.
2 SZT.
1 szt.
2 SZT.
9.
1 szt.
1.
6.
11.
14.
17.
19.
1 szt.
2 SZT.
2 SZT.
22. 24.
1 szt.
1 szt.
4.
1 szt.
4 szt.
7.
2.
12.
2 SZT.
1 szt.
Lista części
6
Machine Translated by Google

Na razie dokręcanie ręczne ułatwi montaż.
Dokręcanie kluczem należy wykonać po zmontowaniu wszystkich części.
klucz w tym momencie.
UWAGA: Aby uniknąć rozbieżności spowodowanej nadmiernym dokręceniem, nie należy używać
Przed użyciem upewnij się, że wszystkie nakrętki, śruby i części są mocno dokręcone.
Z pomocą asystenta.
7
29.
34.
39.
1 szt.
1 szt.
1 szt.
37.
42.
2 SZT.
4 szt.
4 szt.
4 szt.
40.
1 szt.
27.
32.
2 SZT.
6 SZT.
33.
4 szt.
25.
30.
35.
38.
41.
43.
1 szt.
2 SZT.
18 SZT.
2 SZT.
4 szt.
28.
10 SZT.
31.
26.
36.
9 szt.
1 szt.
Lista części
Machine Translated by Google

30
03
29
36
37
36
02
37
28
36
36
33
04
30
33
30
29
01
28
30
29
29
8
B) Przymocuj tylną rurę podstawy (04) do tylnej rury podporowej (03) za pomocą dwóch śrub
podsadzkowych (28), dwóch podkładek łukowych (29) i dwóch nakrętek nylonowych (30).
C) Przymocuj tylną rurę podporową (03) zmontowaną z przednią rurą słupka (02) za pomocą
dwóch śrub imbusowych (33), czterech podkładek płaskich (36) i dwóch nakrętek nylonowych
(37).
A) Przymocuj przednią rurę podstawy (01) do przedniej rury słupka (02) za pomocą dwóch
śrub podsadzkowych (28), dwóch podkładek łukowych (29) i dwóch nakrętek nylonowych (30).
Krok 1:
Montaż
Machine Translated by Google

10
36
03
26
35
08
36
35
36
36
37
08
37
B) Przymocuj rurki podtrzymujące poduszkę oparcia (10) do rurek podtrzymujących poduszkę
oparcia (09) za pomocą jednej śruby imbusowej (35), dwóch podkładek płaskich (36) i jednej
nakrętki nylonowej (37), a następnie włóż sworzeń blokujący (26).
Krok 2: A)
Przymocuj obie rurki poduszki oparcia (08) do części spawanej na tylnej rurze podporowej (03) za
pomocą jednej śruby imbusowej (35), dwóch podkładek płaskich (36) i jednej nakrętki
nylonowej (37).
9
Machine Translated by Google

37
36
25
34
37
25
34
36
25
09
02
36
09
36
25
03
Krok 3:
A) Przymocuj sztangę hantli (09) do tylnych rur podporowych (03) za pomocą
czterech tulei (25) wykorzystując dwie śruby imbusowe (34), cztery podkładki
płaskie (36) i dwie nakrętki nylonowe (37).
10
Machine Translated by Google
38
39
38
36
27
06
38
37
08
39
08
39
02
36
32
42
39
38
39
38
38
39
41
B) Przymocuj ramę piankową (06) do przedniej rury pionowej (02) za pomocą jednej śruby
imbusowej (32), dwóch podkładek płaskich (36) i jednej nakrętki nylonowej (37). Następnie
włóż sworzeń blokujący (27).
Krok 4: A)
Przymocuj poduszkę oparcia (41) i poduszkę zagłówka (42) do rur poduszki oparcia (08) za
pomocą sześciu śrub imbusowych (38) i sześciu podkładek płaskich (39).
11
Machine Translated by Google

05
19 07
07 19
w
w
Przymocuj obie poduszki (43) do rurki regulowanej (05) za pomocą czterech śrub
imbusowych (40) i czterech podkładek płaskich (39).
Krok 5:
Wsuń kierownicę (07) do okrągłej rury na regulowanej rurze (05) aż klamra V (19)
wejdzie w otwór.
43
39 40
39
40
39
40
43
05
12
w
Machine Translated by Google

12
12
14
05
02
PROCES MONTAŻU ZOSTAŁ ZAKOŃCZONY.
Ze względów bezpieczeństwa dokręć śrubę i ustaw ją w odpowiedniej pozycji.
B) Przesuń dwie pianki (12) po każdej stronie ramy piankowej (06).
Krok 6:
A) Włóż regulowaną rurę (05) zmontowaną do przedniej pionowej rury (02) i
zabezpiecz ją pokrętłem regulacyjnym (14).
Po zakończeniu montażu należy przeprowadzić kontrolę wizualną i funkcjonalną oraz przetestować
urządzenie.
13
Machine Translated by Google

UWAGA: Maksymalna nośność tego produktu wynosi 660 funtów lub
300 kg. Tylko jedna osoba powinna używać tego urządzenia w tym samym czasie.
1470 mm
Tabela rozmiarów produktu
655 mm
14
Machine Translated by Google

2. Regularnie co 3 miesiące sprawdzaj, czy śruby się nie poluzowały, a następnie dokręcaj je.
1. Przetrzyj powierzchnię wilgotną bawełnianą ściereczką.
Czyszczenie i dezynfekcja
15
Machine Translated by Google

Przedstawiciel UE
REP WIELKIEJ BRYTANII
YH CONSULTING LIMITED. C/O YH Consulting Limited Biuro
147, Centurion House, London Road, Staines-upon-
Thames, Surrey, TW18 4AX
E-CrossStu GmbH
Importowane do AUS: SIHAO PTY LTD. 1 ROKEVA STREETEASTWOOD NSW 2122 Australia
Importowane do USA:
Sanven Technology Ltd. Suite 250, 9166 Anaheim Place, Rancho Cucamonga, CA 91730
Producent: Shanghaimuxinmuyeyouxiangongsi Adres:
Shuangchenglu 803nong11hao1602A-1609shi, baoshanqu, szanghaj 200000 CN.
60329 Frankfurt nad Menem.
Mainzer Landstr.69,
Machine Translated by Google

Machine Translated by Google

Machine Translated by Google


MODEL:SJ1018
"Save Half", "Half Price" of andere soortgelijke uitdrukkingen die wij gebruiken, geven alleen
een schatting weer van de besparingen die u kunt behalen door bepaalde gereedschappen bij ons
te kopen in vergelijking met de grote topmerken en betekent niet noodzakelijkerwijs dat alle categorieën
gereedschappen die wij aanbieden, worden gedekt. Wij herinneren u eraan om zorgvuldig te
controleren of u daadwerkelijk de helft bespaart in vergelijking met de grote
topmerken wanneer u een bestelling bij ons plaatst.
Wij streven er voortdurend naar om u gereedschappen tegen concurrerende prijzen te leveren.
Lange kruk Romeinse stoel
Technische ondersteuning en e-garantiecertificaat
www.vevor.com/support
Machine Translated by Google

Dit is de originele instructie, lees alle handleidingen zorgvuldig door voordat u het product
gebruikt. VEVOR behoudt zich een duidelijke interpretatie van onze gebruikershandleiding voor.
Het uiterlijk van het product is afhankelijk van het product dat u hebt ontvangen. Vergeef ons
dat we u niet opnieuw zullen informeren als er technologie- of software-updates voor ons product
zijn.
Heeft u vragen over het product? Heeft u technische ondersteuning nodig? Neem dan gerust
contact met ons op:
Technische ondersteuning en e-garantiecertificaat
www.vevor.com/support
1
HULP NODIG? NEEM CONTACT MET ONS OP!
MODEL:SJ1018
Lange kruk Romeinse stoel
Machine Translated by Google

Bedrijfsveiligheid
product volledig op de hoogte bent van alle waarschuwingen en
voorzorgsmaatregelen. ÿ Gebruik het niet als u zwanger bent
vragen.
Het is de verantwoordelijkheid van de Eigenaar om ervoor te zorgen dat alle gebruikers van deze
reinigingsmiddelen. Neem contact op met de klantenservice als u vragen heeft
Lees alle instructies voordat u het gebruikt. De informatie zal u helpen
·
antislipmat onder de machine indien nodig. ÿ Draag
geschikte kleding bij gebruik van dit product. ÿ Gebruik het niet als het
niet functioneel is of als onderdelen niet goed zijn gemonteerd. ÿ Als u pijn op de borst,
misselijkheid, duizeligheid of kortademigheid ervaart,
moet onmiddellijk stoppen met sporten en uw arts raadplegen
Hartelijk dank dat u voor dit product hebt gekozen.
arts.
ÿ Dit product moet op een vlakke ondergrond worden geplaatst tijdens gebruik. Plaats een
ÿ Raadpleeg uw arts voordat u met een trainingsprogramma begint.
handen van ongetrainde gebruikers.
Gebruik.Kinderen mogen het product niet gebruiken.zonder toezicht van volwassenen
stevig, hard en vlak oppervlak.
ÿ Lees alle instructies voordat u dit product gebruikt. ÿ Houd
kinderen en huisdieren uit de buurt van de sit-up bank terwijl u deze gebruikt.
behaalt u de best mogelijke resultaten.
voordat u verdergaat.
ÿ Zorg er vóór gebruik altijd voor dat uw product op een vlakke ondergrond staat.
onbekend met de apparatuur om het te gebruiken. Dit gereedschap is gevaarlijk in de
Lees alle instructies voordat u dit product gebruikt
ÿ Controleer en draai alle onderdelen elke keer vast voordat u deze sit-up bank gebruikt. ÿ
Maak dit apparaat alleen schoon met vochtige doekjes. Gebruik geen
ÿ Berg ongebruikte apparatuur buiten bereik van kinderen op en laat niemand deze gebruiken.
overzicht.
WAARSCHUWING:
2
Machine Translated by Google

Trainingsplannen
Huisdieren of kinderen jonger dan 12 jaar mogen NOOIT dichter bij het
product komen dan 3 m (10 voet). Kinderen jonger dan 12 jaar mogen het
product NOOIT gebruiken. Kinderen ouder dan 12 jaar mogen het product
NIET gebruiken zonder toezicht van een volwassene.
2. Sport niet een half uur voor/na de maaltijd en niet een uur voor het slapengaan.
1. Beginners wordt aangeraden om te beginnen met minder herhalingen, bijvoorbeeld 5 herhalingen
als 1 set, en daarna herhalingen toe te voegen.
ÿ Bij gebruik van het product moet de toeschouwersgroep een afstand van 3 meter aanhouden
om onbedoeld letsel te voorkomen
3. Maak een oefenplan.
3
Machine Translated by Google

17 Handgreep
4 43 Kussen
27 Vergrendelingspen M8x60mm
Buis
07 Stuur
13 Ronde eindkap 25mm
2
23 Wiel
4
1
4
1
03 Achterste steunbuis
1
2
33 Inbusbout M10x70mm
18 Vierkante eindkap 38x38mm 1 40 Inbusbout M8x35mm
Beschrijving
28 Rijtuigbout M8x65mm 4
6
4
14 Verstelbare knop
08 Rugleuningkussen Buis
2
18
2
2
1
32 Inbusbout M10x65mm
37 Nylonmoer M10
04 Achterste basisbuis 26 Borgpen M10x60mm
19 V Gesp
2
Aantal Nee
1
12 Schuim
10
2
1
Nee
1
9
24 Eindkap 20x10mm
30 Nylonmoer M8
35 Inbusbout M10x165mm
41 Rugleuningkussen
1
16 Vierkante eindkap 20x20mm 4
05 Verstelbare buis
1
2
2
2
Hoeveelheid
36 Vlakke sluitring M10
4
01 Voorste basisbuis
25 Bus
31 Inbusbout M10x50mm
21 Stootrand
1
11 Eindkap 50mm (Voorkant)
Beschrijving
4
2
38 Inbusbout M8x40 mm
20 Vierkante eindkap 25x25mm 4 42 Hoofdsteunkussen
06 Schuimframe
1
10 Rugleuningkussen Ondersteuning
2
29 Boogring M8
34 Inbusbout M10x130mm
1
15 Afstandhouder 50vs38mm
1
1
2
02 Voorste opstaande buis
22 Eindkap 50mm (achter)
2
39 Vlakke sluitring M8
09 Halterstang
1
Onderdelenlijst
4
Machine Translated by Google

37
34
38
36
36
37
37 36
23
36
37
36
38
36
37
39
04
25
24
40
22
22
06
29
39
38
36
20
29
25
25
38
08
39
37
38
17
09
36
36
28
08
12
01
21
27
39
19
36
09
07
39
36
24
25
39
26
41
29
30
11
20
11
43
35
33
13
28
17
36
40
31
32
12
36
20
16
24
36
37
31
30
20
38
02
40
39
42
35
24 10
34
37
36
43
39
15
36
37
30
29
16
33
18
36
13
14
39
07
36
23
30
05
03
19
39
40
Explosietekening
Houd er rekening mee dat niet alle onderdelen en hardware die u hier ziet,
worden gebruikt bij
het monteren van de machine, omdat sommige hiervan al vooraf zijn geïnstalleerd.
5
Machine Translated by Google

10.
2.
12.
15.
2 STUKS
20.
5.
1 stuk
1 stuk
2 STUKS
13.
18.
23.
1 stuk
1 stuk
2 STUKS
4 STUKS
21.
4 STUKS
3.
8.
2 STUKS
16.
1 stuk
2 STUKS 2 STUKS
1.
6.
11.
1 stuk
9.
14.
19.
24.
2 STUKS
1 stuk
2 STUKS
2 STUKS
17.
22.
4.
1 stuk
1 stuk
1 stuk
1 stuk 4 STUKS
2 STUKS
7.
Onderdelenlijst
6
Machine Translated by Google

Door het voorlopig met de hand vast te draaien, verloopt de montage gemakkelijker.
Het aandraaien met de sleutel moet worden uitgevoerd nadat alle onderdelen zijn gemonteerd.
sleutel op dit moment.
OPMERKING: Om verkeerde uitlijning door te strak aandraaien te voorkomen, mag u geen
Zorg ervoor dat alle moeren, bouten en onderdelen goed vastzitten voordat u ze gebruikt.
Met hulp van een assistent.
7
34.
26.
36.
39.
9 STUKS
1 stuk
29.
1 stuk
1 stuk
37.
42.
4 STUKS
4 STUKS
2 STUKS
4 STUKS
27.
32.
2 STUKS
40.
6 STUKS
1 stuk
25.
30.
35.
4 STUKS
33.
38.
43.
1 stuk
18 STUKS
2 STUKS
41.
28.
2 STUKS
4 STUKS
10 STUKS
1 stuk
31.
Onderdelenlijst
Machine Translated by Google

30
03
28
29
36
37
36
02
37
36
33
36
04
30
30
29
33
01
28
29
30
29
8
B) Bevestig de achterste basisbuis (04) aan de achterste steunbuis (03) met
behulp van twee wagenbouten (28), twee boogringen (29) en twee nylon moeren (30).
C) Bevestig de achterste steunbuis (03) aan de voorste staande buis (02) met
behulp van twee inbusbouten (33), vier platte ringen (36) en twee nylon moeren
(37).
A) Bevestig de voorste basisbuis (01) aan de voorste staande buis (02) met behulp
van twee wagenbouten (28), twee boogringen (29) en twee nylon moeren (30).
Stap 1:
Montage
Machine Translated by Google

9
Stap 2:
A) Bevestig beide rugleuningkussenbuizen (08) aan het lasgedeelte van de achterste
steunbuis (03) met behulp van één inbusbout (35), twee platte ringen (36) en één
nylon moer (37).
B) Bevestig de steunbuizen van het rugleuningkussen (10) aan de
rugleuningkussenbuizen (09) met behulp van één inbusbout (35), twee platte
ringen (36) en één nylon moer (37), en plaats vervolgens de borgpen (26).
10
36
03
36
36
08
35
35
08
37
37
36
26
Machine Translated by Google

10
Stap 3:
A) Bevestig de halterstang (09) aan de achterste steunbuizen (03) met vier
bussen (25) met behulp van twee inbusbouten (34), vier platte ringen
(36) en twee nylon moeren (37).
03
37
36
25
34
37
25
34
36
25
09
36
02
09
25
36
Machine Translated by Google

41
38
39
37
38
36
27
06
38
08
08
39
02
39
36
42
32
39
38
39
38
39
38
Stap 4:
A) Bevestig het rugleuningkussen (41) en het hoofdsteunkussen (42) aan de
rugleuningkussenbuizen (08) met behulp van zes inbusbouten (38) en zes platte ringen (39).
B) Bevestig het schuimframe (06) aan de voorste staande buis (02) met behulp van
één inbusbout (32), twee platte ringen (36) en één nylon moer (37). Plaats
vervolgens de borgpen (27).
11
Machine Translated by Google

05
19 07
07 19
In
In
Bevestig beide kussens (43) aan de verstelbare buis (05) met behulp van
vier inbusbouten (40) en vier platte ringen (39).
Stap 5:
Steek de stuurstang (07) in de ronde buis van de verstelbare buis (05) totdat
de V-gesp (19) in het gat zit.
In
43
39 40
39
40
39
40
43
05
12
Machine Translated by Google

13
HET MONTAGEPROCES IS NU VOLTOOID.
Voor uw veiligheid, draai de schroef vast en stel deze in op de juiste positie.
B) Schuif twee schuimen (12) aan elke kant van het schuimframe (06).
Stap 6:
A) Plaats de verstelbare buis (05) gemonteerd in de voorste staande buis (02) en
zet deze vast met de verstelbare knop (14).
Controleer en test het apparaat visueel en functioneel nadat de montage is voltooid.
14
12
12
05
02
Machine Translated by Google

14
1470mm
Productmaattabel
655mm
OPMERKING: Het maximale draagvermogen voor dit product is 660
lbs of 300 kg. Slechts één persoon mag dit stuk apparatuur tegelijk gebruiken.
Machine Translated by Google

15
Reiniging en desinfectie
2. Controleer de schroeven regelmatig om de 3 maanden op loszitten en draai de schroeven
vast
1. Veeg het oppervlak af met een natte katoenen doek.
Machine Translated by Google

YH CONSULTING LIMITED. C/O YH Consulting Limited
Kantoor 147, Centurion House, London Road, Staines-
upon-Thames, Surrey, TW18 4AX
E-CrossStu GmbH
Geïmporteerd naar AUS: SIHAO PTY LTD. 1 ROKEVA STREETEASTWOOD NSW
2122 Australië
Geïmporteerd naar de VS: Sanven Technology Ltd. Suite 250, 9166 Anaheim Place,
Rancho Cucamonga, CA 91730
Fabrikant: Shanghaimuxinmuyeyouxiangongsi Adres:
Shuangchenglu 803nong11hao1602A-1609shi, baoshanqu, shanghai 200000 CN.
60329 Frankfort aan de Main.
Mainzer Landstr.69,
VK REP
EC-REP
Machine Translated by Google

Machine Translated by Google

Machine Translated by Google


MODELL:SJ1018
Vi fortsätter att vara engagerade i att ge dig verktyg till konkurrenskraftiga priser.
"Spara hälften", "halva priset" eller andra liknande uttryck som används av oss
representerar bara en uppskattning av besparingar du kan dra nytta av att köpa vissa
verktyg hos oss jämfört med de stora toppmärkena och betyder inte nödvändigtvis att täcka
alla kategorier av verktyg som erbjuds av oss. Du påminns om att noggrant kontrollera
när du gör en beställning hos oss om du verkligen sparar hälften i
jämförelse med de främsta varumärkena.
Lång pall romersk stol
Teknisk support och e-garanticertifikat
www.vevor.com/support
Machine Translated by Google

Teknisk support och e-garanticertifikat www.vevor.com/
support
Har du produktfrågor? Behöver du teknisk support? Kontakta oss gärna:
Detta är den ursprungliga instruktionen, läs alla instruktioner noggrant innan du
använder den. VEVOR reserverar sig för en tydlig tolkning av vår användarmanual. Utseendet
på produkten är beroende av den produkt du fått. Ursäkta oss att vi inte kommer att
informera dig igen om det finns någon teknik eller mjukvaruuppdateringar på vår produkt.
1
BEHÖVER HJÄLP? KONTAKTA OSS!
MODELL:SJ1018
Lång pall romersk stol
Machine Translated by Google

2
·
Läs alla instruktioner innan du använder den. Informationen hjälper dig
bör sluta träna omedelbart och rådfråga din läkare
halkskyddsmatta under maskinen vid behov. ÿ Bär
lämpliga kläder när du använder denna produkt. ÿ Använd den
inte om den inte fungerar eller om delar inte är välmonterade. ÿ Om du känner
några bröstsmärtor, illamående, yrsel eller brist på bredd,
Tack så mycket för att du valde denna produkt.
läkare.
ÿ Innan du påbörjar något träningsprogram konsultera din
ÿ Denna produkt bör placeras på en plan yta vid användning. Placera en
frågor.
produkten är fullt medveten om alla varningar och
försiktighetsåtgärder. ÿ Använd det inte om du är gravid
Det är Ägarens ansvar att se till att alla användare av detta
rengöringsmedel. Rådgör med kundtjänst om du har några
händerna på outbildade användare.
obekant med utrustningen för att använda den. Detta verktyg är farligt i
Läs alla instruktioner innan du använder denna produkt
ÿ Inspektera och dra åt alla delar varje gång innan du använder denna sittbänk. ÿ
Rengör maskinen endast med fuktade våtservetter. Använd inga
tillsyn.
VARNING:
ÿ Förvara inaktiv utrustning utom räckhåll för barn och låt inte någon
solid, hård-plan yta.
användning.Barn ska inte använda.Produkten. utan vuxen
ÿ Läs alla instruktioner innan du använder denna produkt.
ÿ Håll barn och husdjur borta från sittbänken när du är inne
du uppnår bästa möjliga resultat.
innan du fortsätter.
ÿ Före användning, se alltid till att din produkt är placerad på en
Driftsäkerhet
Machine Translated by Google

3
1. Nybörjare rekommenderas att börja med färre reps, 5 reps som 1 set till
exempel och lägga till reps allt eftersom.
2. Träna inte en halvtimme före/efter måltider eller 1 timme före sömn.
INGEN tidpunkt får husdjur eller barn under 12 år vara närmare
produkten än 3 m (10 fot). ALDRIG bör barn under 12 år använda
produkten. Barn över 12 år bör inte använda produkten utan
uppsikt av vuxen.
ÿ När du använder produkten måste publiken av åskådare hålla ett avstånd på 3
meter för att undvika oavsiktlig skada
3. Gör träningsplaner.
Träningsplaner
Machine Translated by Google

4
Dellista
08 Ryggstödsdyna Tube
1
11 Ändlock 50 mm (framtill)
2
21 Stötfångare
01 Främre basrör
25 Bussning
31 insexbult M10x50mm
36 Flat Bricka M10
4
Antal
2
2
2
05 Justerbart rör
1
1
16 Fyrkantigt ändlock 20x20 mm 4
41 Ryggstödskudde
24 Ändlock 20x10mm
30 nylonmutter M8
35 insexbult M10x165mm
9
09 Hantelstång
1
2
39 Flat Bricka M8
22 Ändlock 50 mm (bak)
02 Främre Stående rör
1
2
15 Spacer 50vs38mm
1
1
29 Bågbricka M8
34 insexbult M10x130mm
2
06 Skumram
1
10 Stöd för ryggstöd
38 insexbult M8x40 mm
20 Fyrkantigt Ändlock 25x25mm 4 42 Nackstödskudde
Beskrivning
4
4
14 Justerbar knopp
6
Beskrivning
28 vagnsbult M8x65mm 4
33 insexbult M10x70mm
18 fyrkantigt ändlock 38x38mm 1 40 insexbult M8x35mm
2
03 Bakre stödrör
4
1
1
1
23 hjul
4
13 Rund gavel 25mm
2
07 Styre
27 Låsstift M8x60mm
Rör
17 Handtag
4 43 Dyna
Inga
1
2
1
10
Antal nr
1
12 Skum
19 V spänne
2
04 Bakre basrör
32 insexbult M10x65mm
26 Låsstift M10x60mm
37 Nylonmutter M10
1
2
2
2
18
Machine Translated by Google

17
40
39
24 10
02
31
30
20
38
36
37
24
16
36
20
32
12
40
31
17
36
13
28
43
35
33
20
11
19
39
40
05
03
30
36
23
39
07
13
14
36
18
16
33
36
37
30
29
43
39
15
37
36
34
42
35
38
08
39
37
38
25
25
20
29
39
38
36
29
22
40
22
06
25
24
39
04
38
36
37
37
36
36
37
37 36
23
36
38
36
37
34
11
41
29
30
39
26
24
25
07
39
36
36
09
39
21
19
27
12
01
28
08
36
36
09
Sprängt diagram
Observera att inte alla delar och hårdvara som du ser här kommer att
användas när du
monterar maskinen eftersom en del av dessa redan är förinstallerade.
5
Machine Translated by Google

2 st
13.
1 PC
4.
1 PC
1 PC
18.
4 st
2.
7.
12.
2 st
1 PC
2 st
1 PC
14.
9.
1.
6.
11.
17.
19.
22.
1 PC
2 st
2 st
24.
4 st
2 st
4 st
21.
1 PC
1 PC
16.
2 st
3.
2 st
8.
1 PC
2 st
5.
2 st
10.
15.
20.
1 PC
23.
1 PC
Dellista
6
Machine Translated by Google

Hand åtdragning för nu kommer att bidra till att säkerställa enkel montering.
Skiftnyckel åtdragning bör utföras efter att alla delar är monterade till
skiftnyckel vid denna tidpunkt.
OBS: För att undvika felinriktning på grund av överdragning, använd inte a
se till att alla muttrar, bultar och delar är ordentligt säkrade före användning.
Med hjälp av en assistent.
7
1 PC
37.
4 st
28.
2 st
10 st
42.
26.
31.
36.
9 st
1 PC
4 st
38.
33.
25.
30.
35.
41.
43.
1 PC
2 st
18 st2 st
4 st
4 st
4 st
40.
1 PC
27.
2 st
32.
6 st
29.
34.
39.
1 PC
1 PC
Dellista
Machine Translated by Google

36
02
37
36
33
36
03
30
29
36
37
28
01
28
30
29
29
30
04
33
30
29
8
B) Fäst det bakre basröret (04) på det bakre stödröret (03) med två
vagnbultar (28), två bågbrickor (29) och två nylonmuttrar (30).
C) Fäst det bakre stödröret (03) monterat på det främre upprättstående
röret (02) med två insexbultar (33), fyra plana brickor (36) och två
nylonmuttrar (37).
A) Fäst det främre basröret (01) på det främre stående röret (02) med
två vagnbultar (28), två bågbrickor (29) och två nylonmuttrar (30).
Steg 1:
Montering
Machine Translated by Google

36
10
03
36
35
08
36
35
08
26
37
37
36
B) Fäst ryggstödsdynornas stödrör (10) till ryggstödsdynornas rör (09)
med en insexbult (35), två plana brickor (36) och en nylonmutter (37),
sätt sedan i låsstiftet (26).
Steg
2: A) Fäst båda ryggstödsdynorna (08) till svetsdelen på det bakre
stödröret (03) med en insexbult (35), två platta brickor (36) och en
nylonmutter (37).
9
Machine Translated by Google
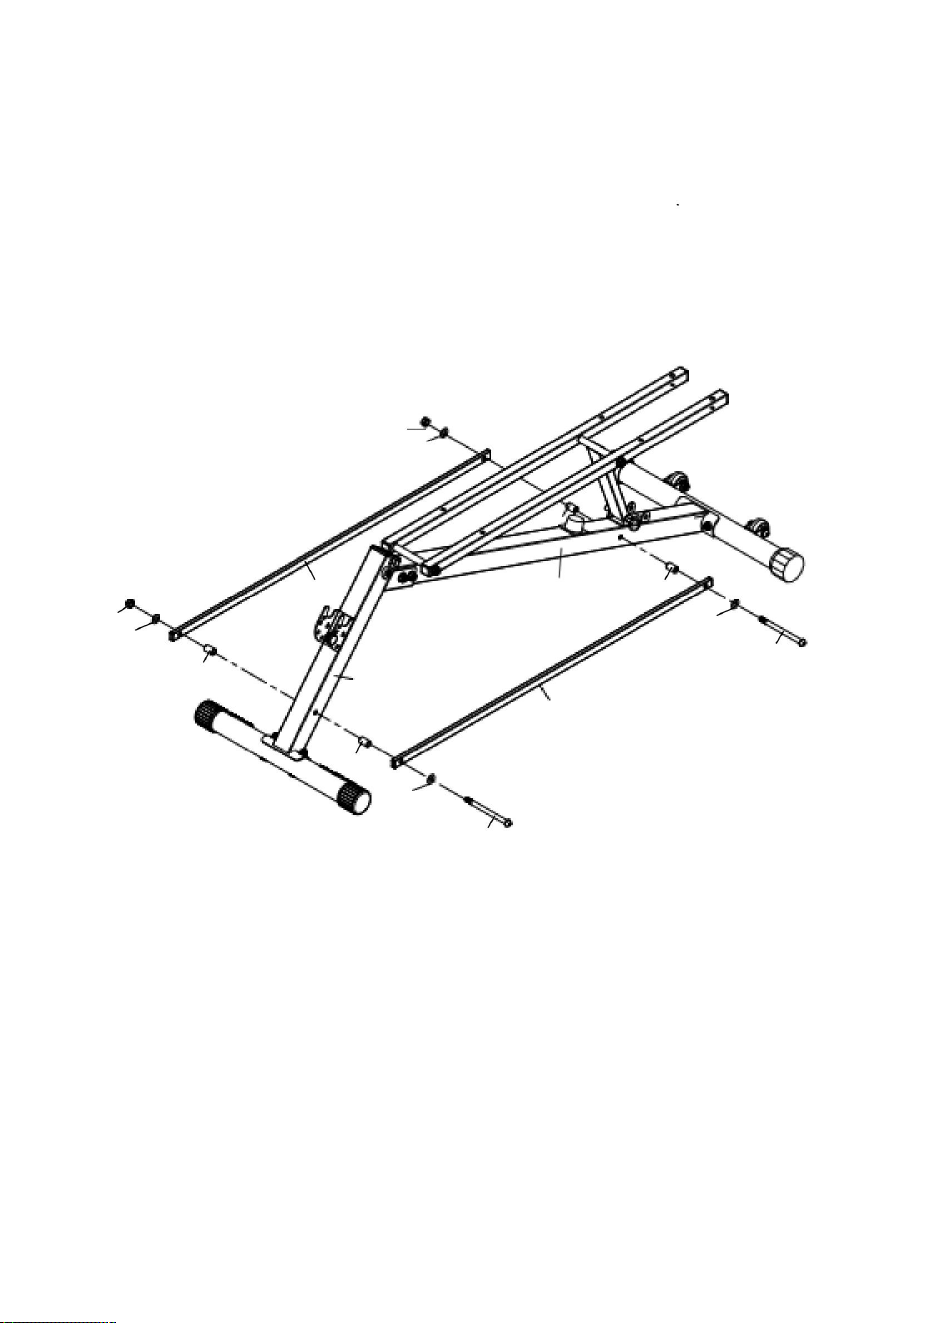
37
25
34
36
37
36
25
34
09
36
25
03
25
09
02
36
Steg
3: A) Fäst hantelstången (09) på de bakre stödrören (03) med fyra
bussningar (25) med två insexbultar (34), fyra plana brickor (36)
och två nylonmuttrar (37).
10
Machine Translated by Google

27
06
38
08
08
39
39
38
38
36
37
38
39
38
39
41
38
36
02
39
32
42
39
B) Fäst skumramen (06) på det främre upprättstående röret (02) med en
insexbult (32), två plana brickor (36) och en nylonmutter (37). Sätt
sedan i låsstiftet (27).
Steg
4: A) Fäst ryggstödskudden (41) och nackstödskudden (42) på
ryggstödskudden (08) med sex insexbultar (38) och sex platta brickor (39).
11
Machine Translated by Google
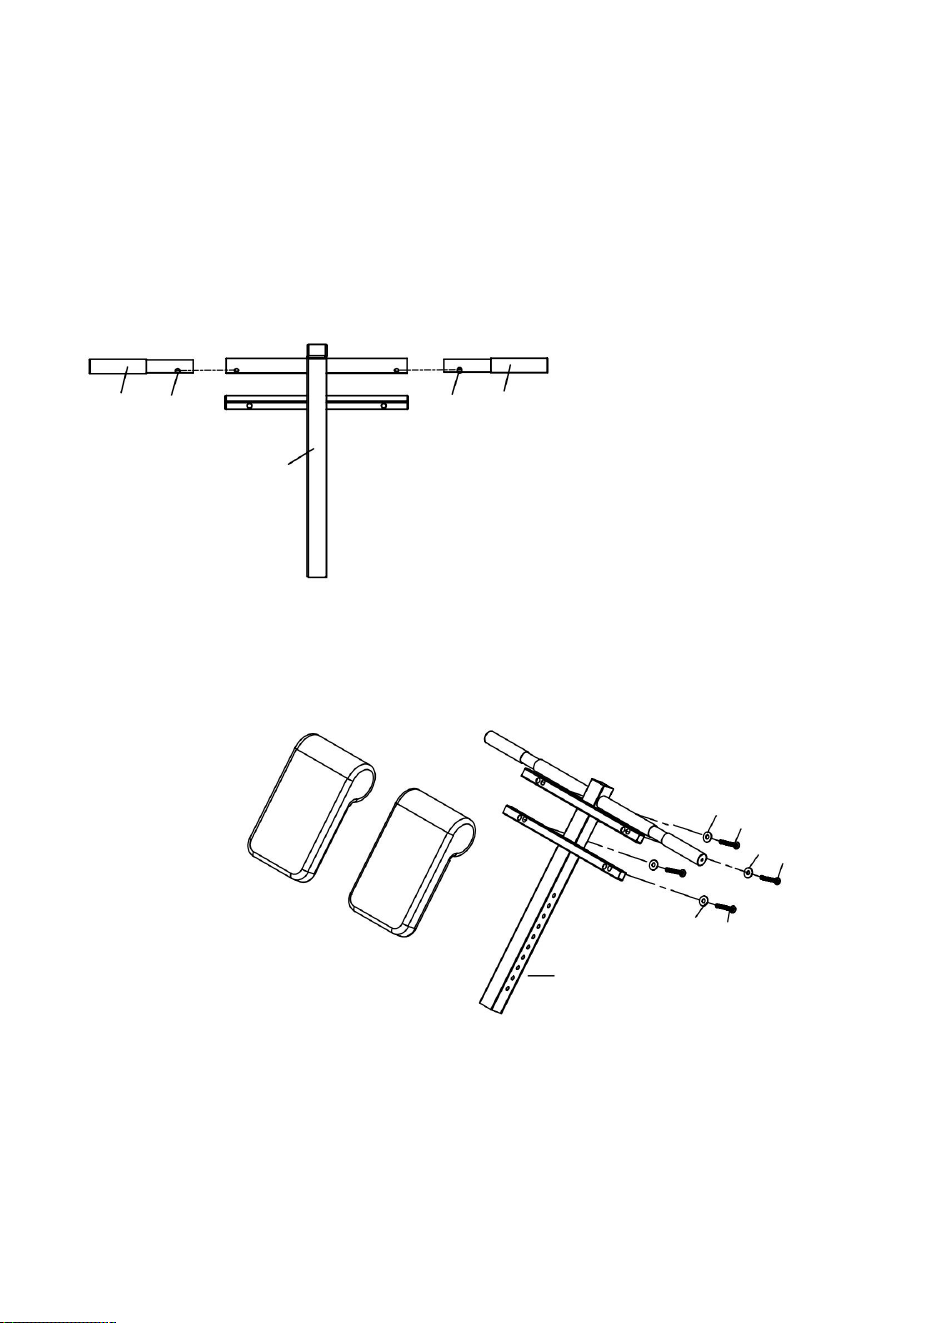
07 19
19 07
05
I
I
Steg
5: Sätt in handtaget (07) i det runda röret på det justerbara röret (05)
tills V-spännet (19) går in i hålet.
Fäst båda kuddarna (43) på det justerbara röret (05) med fyra
insexbultar (40) och fyra plana brickor (39).
43
39 40
39
40
39
40
43
05
12
I
Machine Translated by Google

13
B) Skjut två skum (12) till varje sida av skumramen (06).
För din säkerhet, Vänligen dra åt skruven och justera den till lämplig position.
MONTERINGSPROCESSEN ÄR NU AVSLUTAD.
Steg 6:
A) Sätt i det justerbara röret (05) monterat på det främre upprättstående röret (02)
och säkra det med justerbar knopp (14).
Inspektera och testa enheten visuellt och funktionellt efter att monteringen är klar.
14
12
12
05
02
Machine Translated by Google
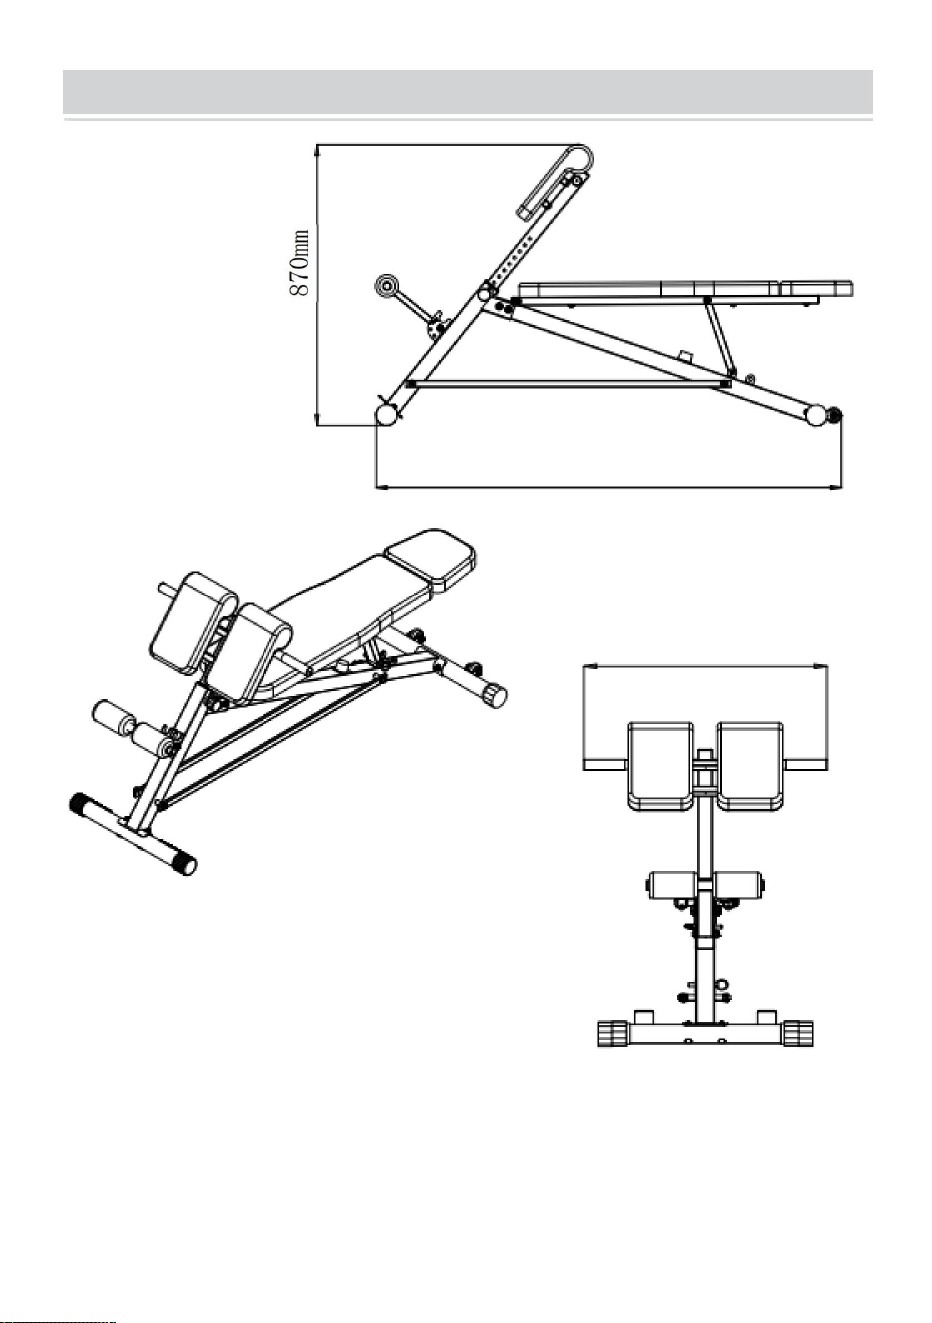
14
655 mm
Produktstorlekstabell
1470 mm
OBS: Den maximala viktkapaciteten för denna produkt är 660 lbs
eller 300 kg. Endast en person bör använda denna utrustning åt gången.
Machine Translated by Google

15
Rengöring och desinfektion
1. Torka av ytan med en våt bomullstrasa.
2. Kontrollera regelbundet att skruvarna har lossnat var tredje månad och dra åt dem
Machine Translated by Google

Importerad till AUS: SIHAO PTY LTD. 1 ROKEVA STREETEASTWOOD NSW 2122
Australien Importerad
till USA: Sanven Technology Ltd. Suite 250, 9166 Anaheim Place, Rancho Cucamonga,
CA 91730
E-CrossStu GmbH
YH CONSULTING LIMITED. C/O YH Consulting Limited
Office 147, Centurion House, London Road, Staines-
upon-Thames, Surrey, TW18 4AX
Tillverkare: Shanghaimuxinmuyeyouxiangongsi Adress:
Shuangchenglu 803nong11hao1602A-1609shi, baoshanqu, shanghai 200000 CN.
Mainzer Landstr.69,
60329 Frankfurt am Main.
EC REP
UK REP
Machine Translated by Google

Machine Translated by Google

Machine Translated by Google