1
REMOTE LIGHT INSTALLATION
MODEL 041A6287
INTRODUCTION
The remote light (garage door opener light) is designed to plug directly
into a standard 120V outlet. Select an appropriate location on the ceiling
to mount the light within 6 feet (1.83 m) of an electrical outlet so that the
cord and light are away from moving parts.
To reduce the risk of SEVERE INJURY or DEATH:
• This portable luminaire has a polarized plug (one blade is wider
than the other) as a feature to reduce the risk of electric shock.
• This plug will fit in a polarized outlet ONLY one way.
• If the plug does not fit fully in the outlet, reverse the plug.
• If it still does not fit, contact a qualified electrician.
• NEVER use with an extension cord unless plug can be fully
inserted.
• DO NOT alter the plug.
• Light is intended for ceiling mount and indoor applications ONLY.
WARNING: This product can expose you to chemicals
including lead, which are known to the State of California to
cause cancer or birth defects or other reproductive harm. For
more information go to www.P65Warnings.ca.gov
To prevent possible OVERHEATING of the endpanel or light socket:
• DO NOT use short neck or specialty light bulbs.
• DO NOT use halogen bulbs. Use ONLY incandescent.
• DO NOT use bulbs larger than 100W.
• ONLY use A19 size bulbs.
To provide an adequate visual alert, the garage door opener light bulb
MUST be a minimum of 40 Watt (or equivalent).
PROGRAMMING
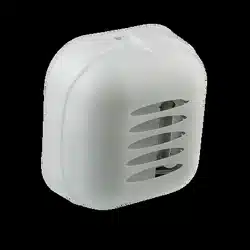
1. Press the "learn button" on light until LED
comes ON.
2. Activate the garage door using the handheld
remote, wall control or keyless entry.
3. It has learned the code and the light turns on.
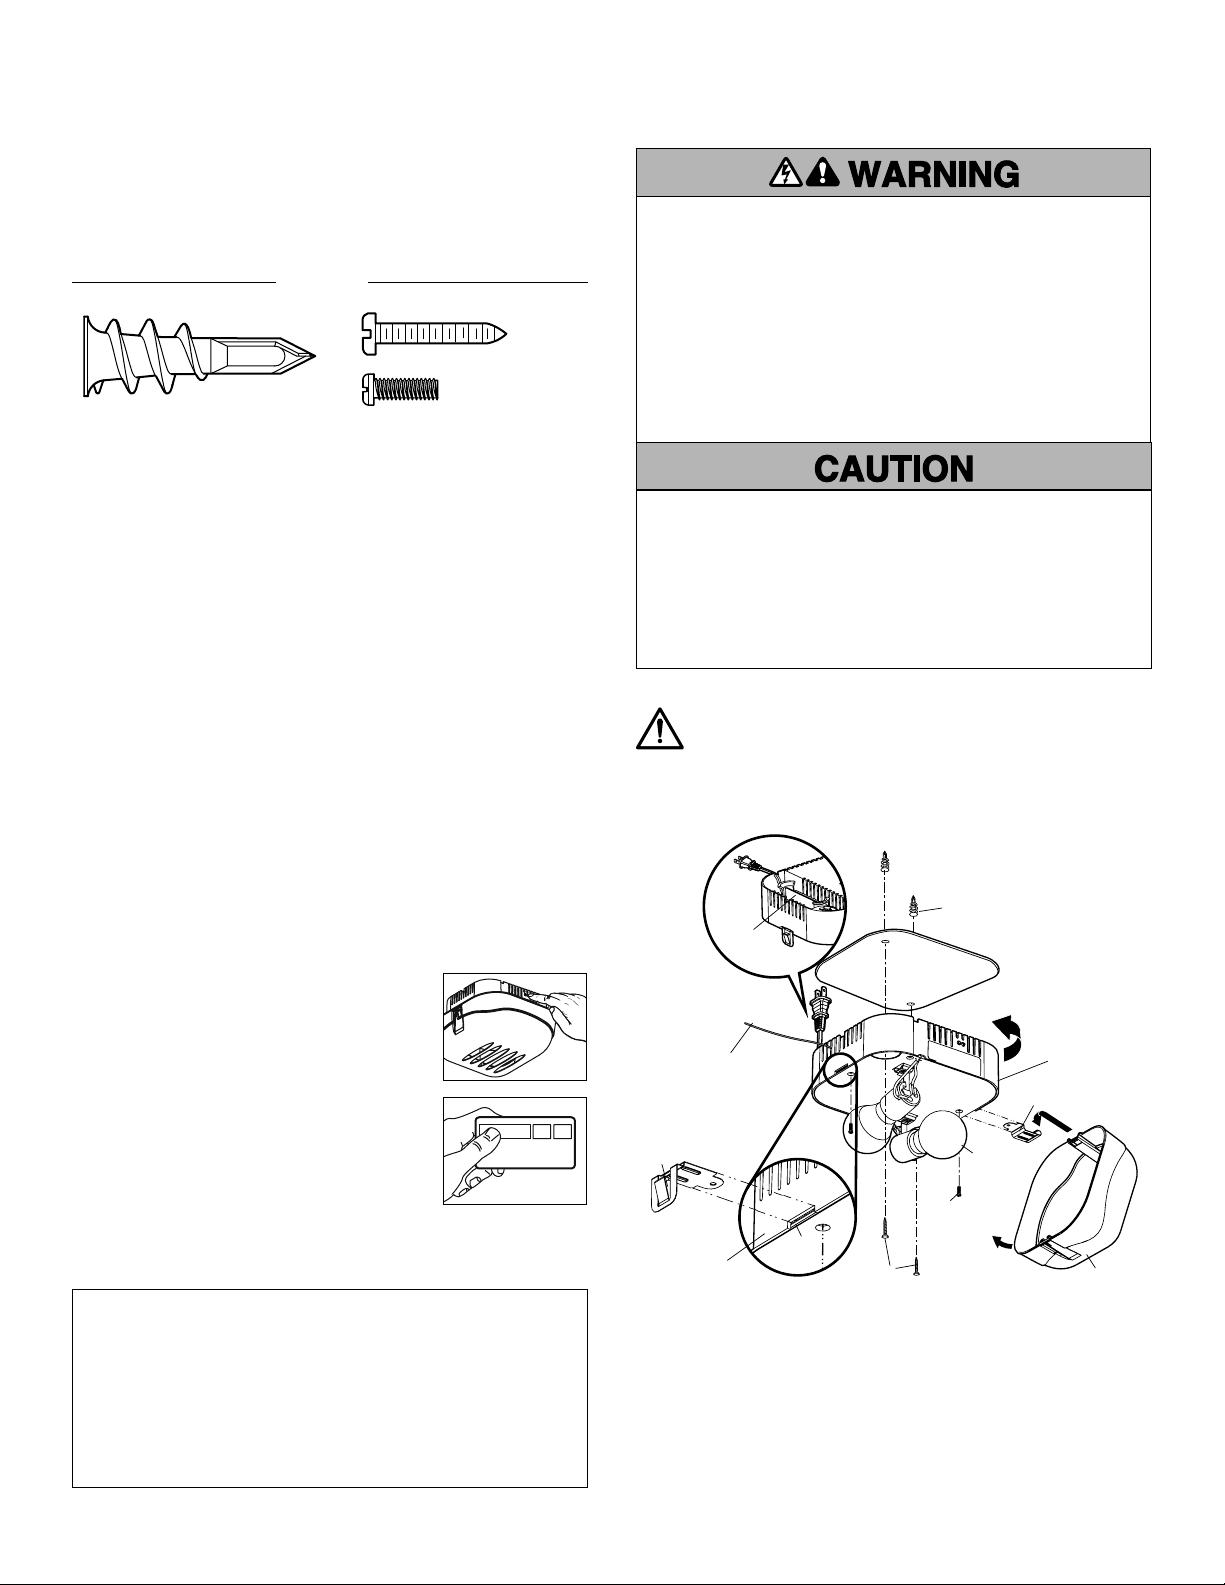
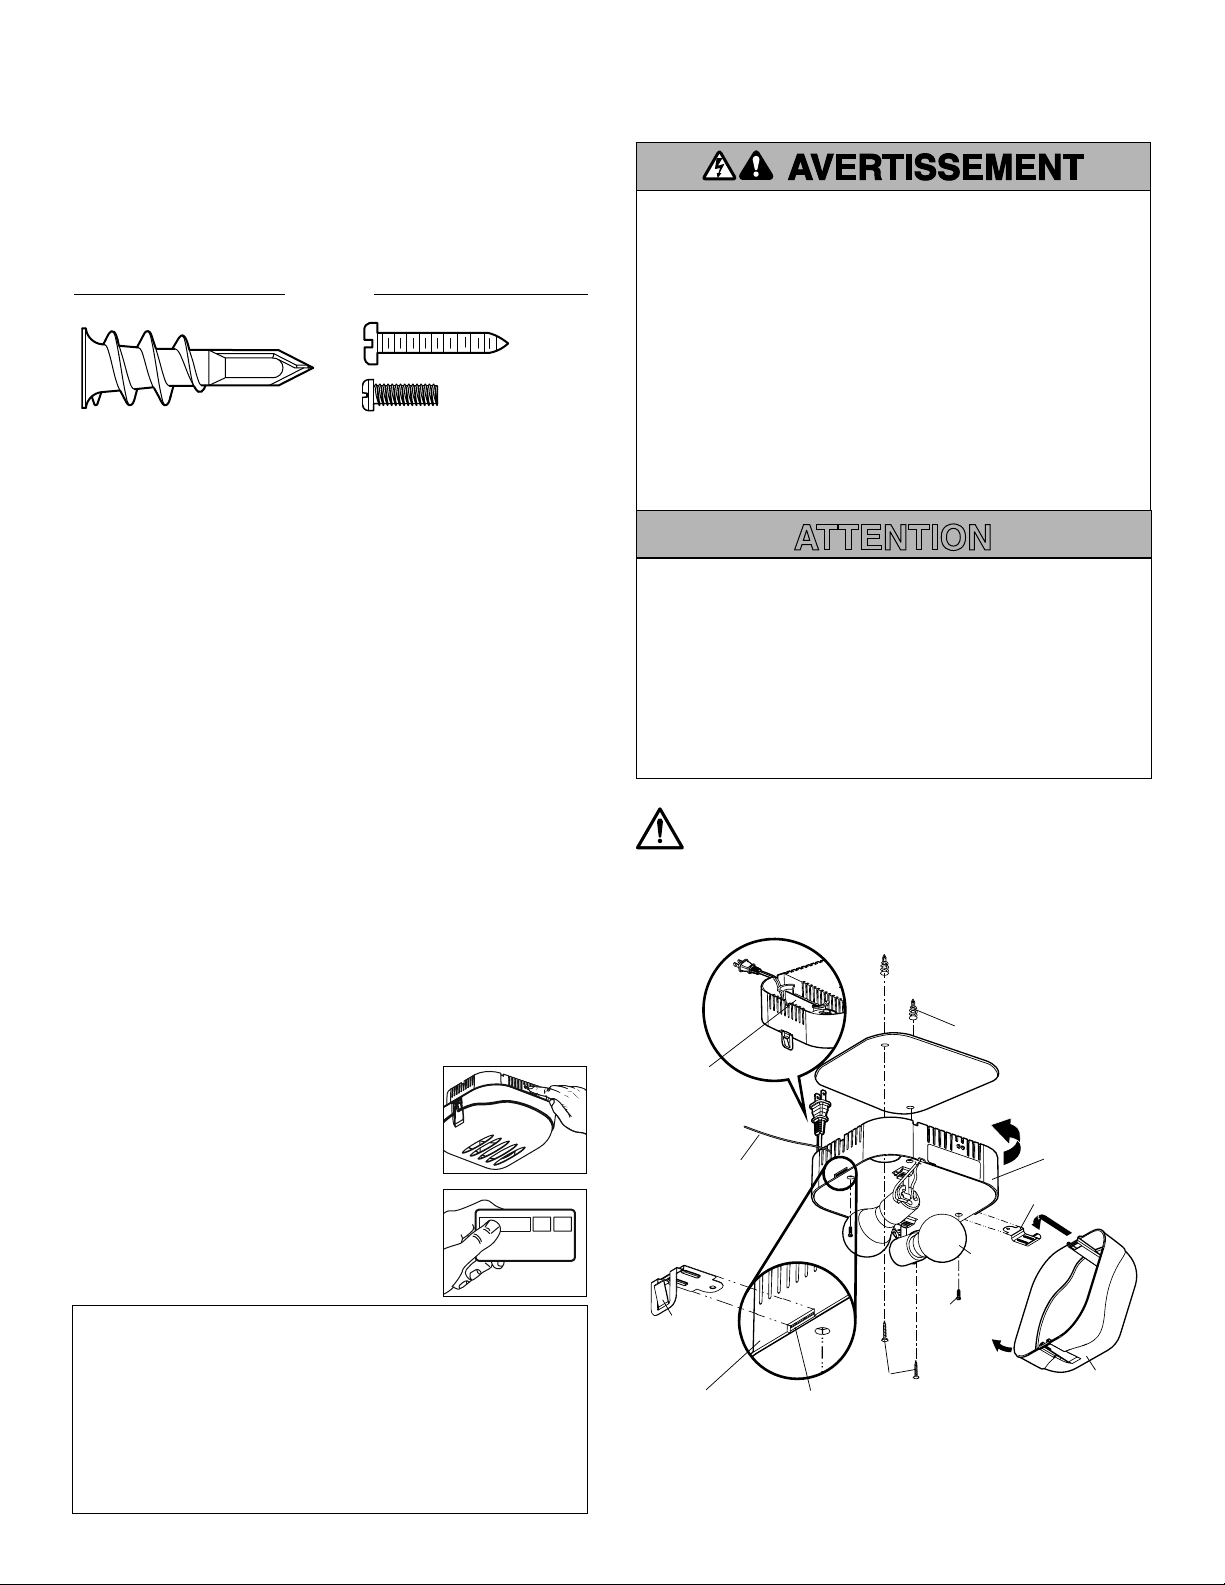
Latch Clip
Light Clip
Screw
Screws
Light Lens
Wall Anchor
Cord
Retainer
100 Watt
(max.)
Metal
Plate
Plastic
Housing
Hinge Clip
Drywall Anchor (screw-in) (2)
HARDWARE
Screw #4-20x7/16" (2)
Screw #6x1" (2)
Light Base
Antenna needs to be
fully exposed to prevent
intermittent light
behavior.
INSTALLATION
1. Install the hinge and latch clips. Clips slide in between the metal plate
and the plastic housing on each side of the light base. Secure the
clips to the light base using the #4-20 x 7/16" screws.
2. Install the mounting plate with the screws provided. Leave 1/8" (3
mm) of the thread exposed between the ceiling and the screw head.
NOTE: If installing light on drywall and a ceiling joist cannot be
located, use drywall anchors provided. No pilot hole is required for
drywall anchors.
3. Determine the length of power cord needed to reach the nearest
outlet. Wind any excess cord around cord retainer on the top side of
the light base.
4. Install the light base by pushing onto the screws and turning the base
clockwise to lock the light in place.
5. Install two Type A19 incandescent or compact fluorescent bulbs (100
watt maximum per bulb, 200 watts total). NOTE: Do not use LED
bulbs as they may reduce the range or performance of your remote
control(s).
6. Install the light lens by hooking one end of the lens over the hinge
and pressing up on the other end to latch into place.
7. Plug in the light to outlet.
NOTE: Light will not operate until the garage door opener is
activated. Multiple operators in the same garage may cause
interference between lights. Program all lights to one operator to
avoid interference.
NOTICE: This device complies with Part 15 of the FCC rules and Industry Canada’s license-exempt RSSs. Operation is subject
to the following two conditions: (1) this device may not cause harmful interference, and (2) this device must accept any
interference received, including interference that may cause undesired operation.
Any changes or modifications not expressly approved by the party responsible for compliance could void the user’s authority
to operate the equipment.
This device must be installed to ensure a minimum 20 cm (8 in.) distance is maintained between users/bystanders and device.
This device has been tested and found to comply with the limits for a Class B digital device, pursuant to part 15 of the FCC rules
and Industry Canada ICES standard. These limits are designed to provide reasonable protection against harmful interference in
a residential installation. This equipment generates, uses and can radiate radio frequency energy and, if not installed and used
in accordance with the instructions, may cause harmful interference to radio communications. However, there is no guarantee
that interference will not occur in a particular installation. If this equipment does cause harmful interference to radio or
television reception, which can be determined by turning the equipment off and on, the user is encouraged to try to correct the
interference by one or more of the following measures:
• Reorient or relocate the receiving antenna.
• Increase the separation between the equipment and receiver.
• Connect the equipment into an outlet on a circuit different from that to which the receiver is connected.
• Consult the dealer or an experienced radio/TV technician for help.
2
INSTALLATION DE LA LAMPE TÉLÉCOMMANDÉE
MODÈLE 041A6287
INSTALLATION
1. Installer la charnière et les agrafes de verrouillage. Les agrafes se
glissent entre la plaque de métal et le boîtier en plastique de chaque
côté de la base de la lampe. Fixer les agrafes à la base de la lampe
avec les vis no 4-20 x 7/16 de po
2. Installez la plaque de fixation à l’aide des vis fournies en laissant 3,1
mm (1/8de po) exposé. REMARQUE : Si l’installation de la lumière
se fait sur une cloison sèche et que la solive du plafond ne peut pas
être localisée, utiliser les goupilles murales fournies. Aucun orifice
témoin n’est requis pour les goupilles murales.
3. Déterminez la longueur du cordon électrique requis pour atteindre
la prise la plus proche. Enroulez tout excès de cordon autour du
dispositif de retenue du cordon dans la partie supérieure de la base
de la lumière.
4. Installez la base de la lumière en vissant les vis puis en tournant la
base dans le sens horaire pour verrouiller la lumière en place.
5. Installer deux ampoules fluorescentes compactes ou incandescentes
de type A19 (100 W maximum par ampoule pour un total de 200
W maximum). REMARQUE : Ne pas utiliser d'ampoules à DEL
sous risque de réduire la portée ou le rendement de votre ou vos
commandes à distance.
6. Installez la lentille de la lumière en accrochant l’une des extrémités
de la lentille par-dessus les charnières et en appuyant sur l’autre
pour la verrouiller en place.
7. Branchez la lumière dans la prise. REMARQUE : Light will not
operate until the garage door opener is activated. La présence de
plusieurs ouvre-portes dans un même garage peut causer une
interférence entre les lampes d’éclairage. Programmer toutes les
lampes sur le même actionneur pour éviter toute interférence.
Pour réduire le risque de BLESSURES GRAVES, voire MORTELLES :
• Ce luminaire portatif est doté d’une fiche polarisée (une lame
est plus large que l’autre) afin de réduire le risque de décharge
électrique.
• Cette fiche se branchera dans une prise de courant polarisée dans
UNE SEULE direction.
• Si la fiche ne s’insère pas complètement dans la prise, inverser sa
position.
• Si elle ne s’insère toujours pas, contacter un électricien compétent.
• NE JAMAIS utiliser la lampe avec un cordon prolongateur à moins
que la fiche puisse s’insérer complètement dans la prise.
• NE PAS modifier la fiche.
• La lampe est prévue pour un montage au plafond et à l’intérieur
SEULEMENT.
ATTENTION
AVERTISSEMENT
AVERTISSEMENT
AVERTISSEMENT
Pour éviter toute SURCHAUFFE éventuelle du panneau d’éclairage :
• NE PAS utiliser d’ampoules à col court ou de forme spéciale.
• NE PAS utiliser d’ampoules halogène. Utiliser UNIQUEMENT des
ampoules incandescentes.
• NE PAS utiliser d’ampoule plus grandes que 100W.
• SEULEMENT utiliser A19 ampoules de taille.
Pour fournir une alerte visuelle adéquate, les ampoules de l'ouvre-
porte de garage DOIVENT avoir une tension d'au moins 40 watts (ou
l'équivalent).
ATTENTION
AVERTISSEMENT
AVERTISSEMENT
AVERTISSEMENT
AVERTISSEMENT : Ce produit peut vous exposer à des produits
chimiques comme le plomb, reconnu par l’État de la Californie
comme cause de cancers, d’anomalies congénitales et d’autres
problèmes liés à la reproduction. Pour plus d’informations,
visitez www.P65Warnings.ca.gov
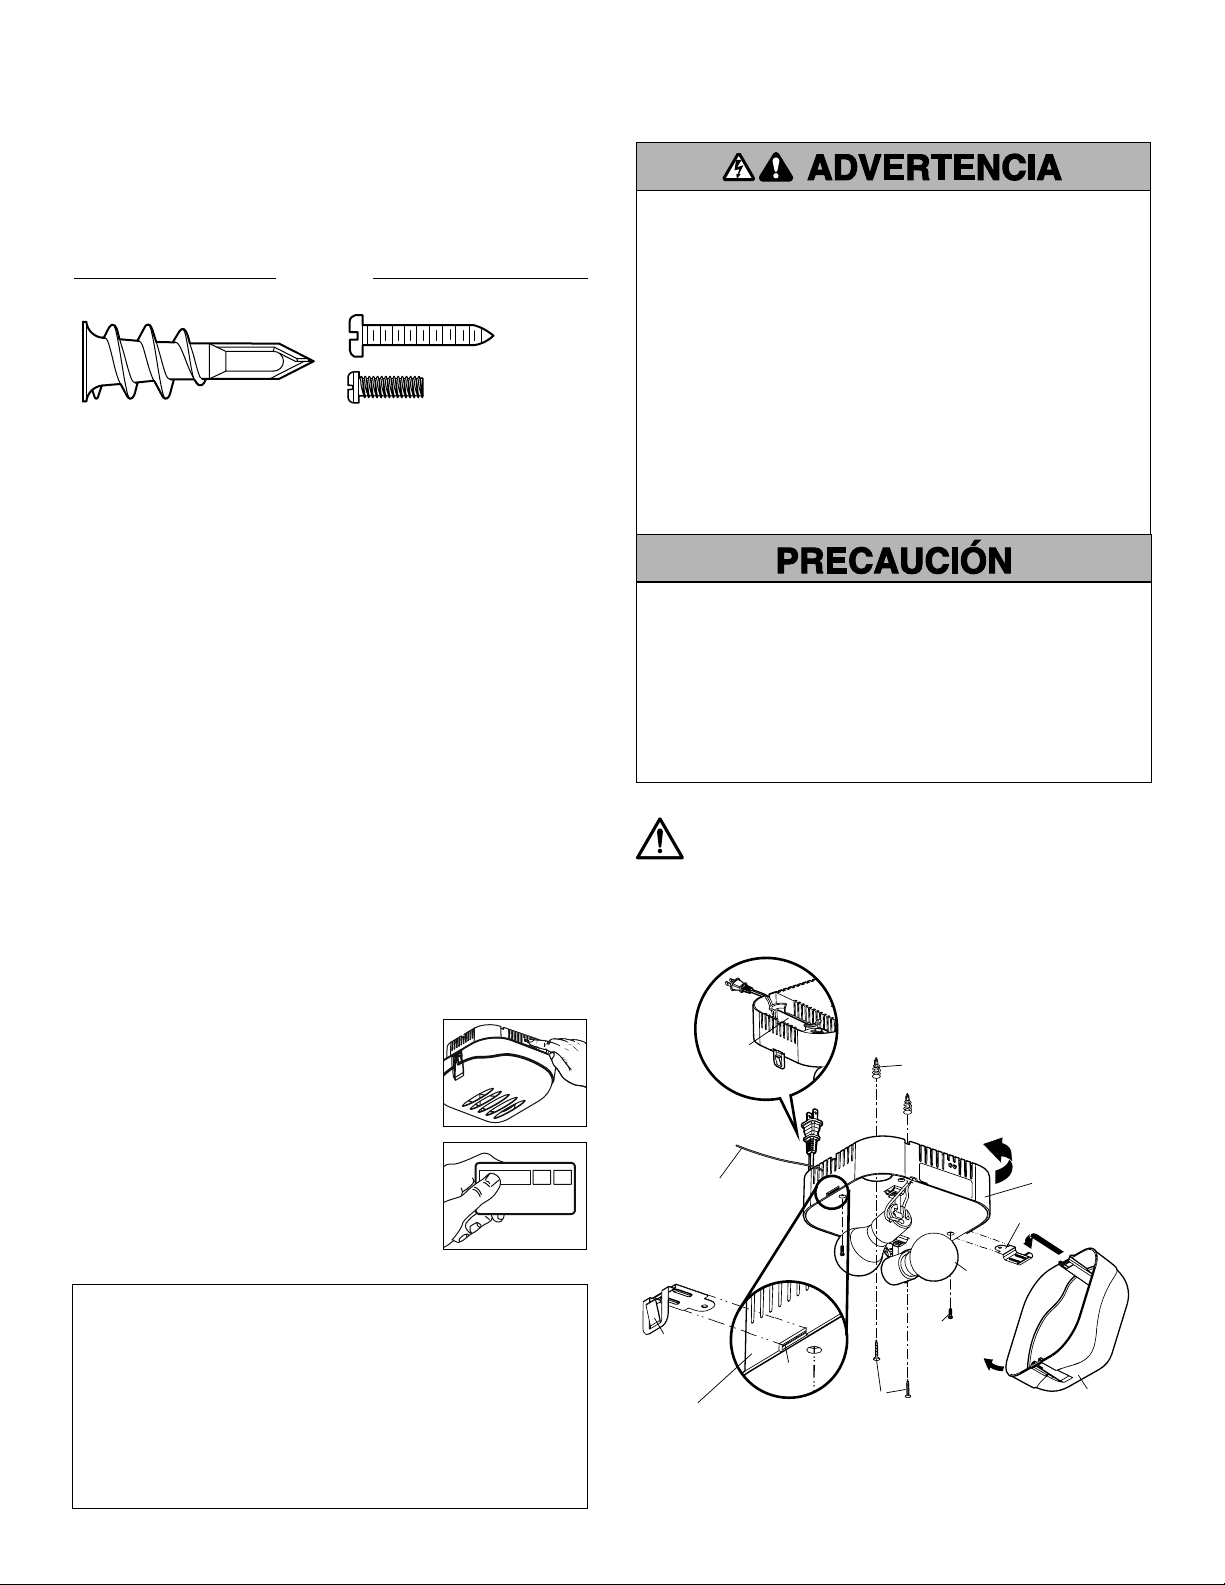
Pince de
verrouillage
Vis de la
pince de
la lumière
Vis
Lentille de
la lumière
Chevilles pour murs secs
Dispositif de
retenue du cordon
100 W
(maximum)
Plaque
métallique
Boîtier de
plastique
Pince à charnière
Chevilles pour murs secs (à vis) (2)
FIXATIONS
Vis 4-20x7/16 de po (2)
Vis 6x1 po (2)
Base de
l’éclairage
L’antenne doit être
complètement
exposée pour éviter
les fonctionnements
intermittents de
l’éclairage.
AVIS : Cet appareil est conforme aux dispositions de la partie 15 du règlement de la FCC et de l’exemption de licence IC (Industrie
Canada) RSS. L’utilisation est assujettie aux deux conditions suivantes : (1) ce dispositif ne peut causer d’interférences nuisibles, et
(2) ce dispositif doit accepter toute interférence reçue, y compris toute interférence pouvant causer un fonctionnement non désiré.
Tout changement ou modification non expressément approuvé par la partie responsable de la conformité pourrait annuler l’autorité de
l’utilisateur d’utiliser l’équipement.
Cet appareil doit être installé de manière à laisser une distance d’au moins 20 cm (8 po) entre celui-ci et l’utilisateur ou toute personne.
Cet appareil a été testé et déclaré conforme aux limites d’un dispositif numérique de Classe B, conformément à la partie 15 du
règlement de la FCC et de la norme NMB d’Innovation, Sciences et Développement économique Canada. Ces limites ont pour but de
fournir une protection raisonnable contre les interférences nuisibles dans une installation résidentielle. Cet équipement génère, utilise
et peut émettre des fréquences radio et, s’il n’est pas installé et utilisé conformément aux instructions, peut causer des interférences
nuisibles aux communications radio. Cependant, il n’existe aucune garantie que des interférences ne se produiront pas dans une
installation particulière. Si cet équipement provoque des interférences nuisibles à la réception d’une diffusion sonore ou visuelle,
ce qu’on peut déterminer en l’allumant et en l’éteignant, l’utilisateur est invité à essayer de résoudre ce problème en prenant une ou
plusieurs des mesures suivantes :
• Réorienter ou déplacer l’antenne de réception.
• Augmenter la distance entre l’équipement et le récepteur.
• Brancher l’appareil à une prise sur un circuit différent de celui du récepteur.
• Pour obtenir de l’aide, consulter le détaillant ou un radiotechnicien chevronné.
INTRODUCTION
L'éclairage à télécommande (l'éclairage de l'ouvre-porte de garage) est
conçue pour se brancher directement dans une prise standard de 120
V. Choisir l’endroit approprié au plafond pour monter la lampe à une
distance de 1,83 m (6 pi) d’une prise secteur afin que le cordon et la
lampe soient à l’écart des pièces en mouvement.
PROGRAMMATION
1. Appuyer sur le bouton d’apprentissage de la
lampe jusqu’à ce que la DEL s’allume.
2. Activer la porte de garage avec la
télécommande à main, la commande murale ou
l’émetteur à code.
3. L’appareil a appris le code et la lampe s’allume.
3
INSTALACIÓN DE LA LUZ REMOTA
MODELO 041A6287
INSTALACIÓN
1. Instale los ganchos para la bisagra y para el pestillo. Los ganchos se
deslizan entre la placa de metal y la carcasa de plástico de cada lado
de la base de la luz. Fije los ganchos a la base de la luz usando los
tornillos núm. 4-20 x 7/16 de pulg.
2. Instale la placa de montaje de techo con los tornillos
proporcionados. Deje 3.1 mm (1/8 de pulg.) de rosca expuestos
entre la placa de montaje de techo y la cabeza del tornillo.
NOTA: Si instala la luz en un panel de yeso y no puede encontrar la
viga del techo, use los anclajes de pared que se proporcionan. No se
requieren orificios piloto para los anclajes de pared.
3. Determine la longitud del cable de corriente necesaria para alcanzar
el tomacorriente más cercano. Enrolle el cable sobrante alrededor
del sujetador de cable situado en el lado superior de la base de la luz.
4. Instale la base de la luz apretando los tornillos y girando la base en
dirección de las agujas del reloj para fijar la luz en el lugar.
5. Instale dos bombillas incandescentes o fluorescentes compactas
tipo A19. Cada bombilla debe tener 100 vatios como máximo, 200
vatios en total. NOTA: No use lámparas de LED ya que pueden
reducir el alcance o incluso el funcionamiento del control remoto.
6. Instale el cristal de la luz enganchando un extremo del cristal en la
bisagra y presionando hacia arriba el otro extremo para sujetarlo en
su lugar.
7. Enchufe la luz al tomacorriente. NOTA: La luz no funcionará hasta
que se active el abre-puertas de garaje. Varios operadores en
el mismo garaje pueden ocasionar interferencia entre las luces.
Programe todas las luces a un operador para evitar interferencia.
Para reducir el riesgo de LESIONES GRAVES o la MUERTE:
• Esta luminaria portátil tiene un enchufe con clavijas de polaridad
diferenciada (una clavija es más ancha que la otra) como
característica para reducir el riesgo de descarga eléctrica.
• Este enchufe se conecta a un tomacorriente para clavijas de
polaridad diferenciada de una SOLA manera.
• Si el enchufe no entra correctamente en el tomacorriente, invierta
la posición del enchufe.
• Si aún así no entra, póngase en contacto con un electricista
calificado.
• NUNCA use una extensión a menos que el enchufe se pueda
insertar por completo.
• NO modifique el enchufe.
• La luz es SOLAMENTE para montar en el techo y en aplicaciones
interiores.
PRECAUCIÓN
ADVERTENCIA
Para evitar un posible SOBRECALENTAMIENTO del portabombillas:
• NO utilice bombillas de cuello corto ni de tipo especial.
• NO utilice bombillas halógenas. Utilice SÓLO bombillas
incandescentes.
• NO utilice bombillas más grande que 100W.
• SÓLO utilice bombillas de tamaño A19.
Para proporcionar una alerta visual adecuada, las bombillas del abre-
puertas de garaje DEBEN ser de un mínimo de 40 vatios (o equivalentes).
PRECAUCIÓN
ADVERTENCIA
ADVERTENCIA: Este producto puede exponerle a productos
químicos (incluido el plomo), que a consideración del estado
de California causan cáncer, defectos congénitos u otros daños
reproductivos. Para más información, visite www.P65Warnings.
ca.gov
Gancho de
pestillo
Tornillo
de la base
de la luz
Tornillos
Cristal de la
luz
Tarugos para panel de pared
Sujetador
de cable
Máximo
100W
Placa de
metal
Alojamiento
de plástico
Gancho de bisagra
Tarugos para panel de pared (atornillable) (2)
PERNERÍA
Tornillo de la base de la luz
núm. 4-20x7/16 de pulg. (2)
Tornillo núm. 6x1 pulg. (2)
Base de luz
Antena debe estar
completamente
expuesto para prevenir
comportamiento de la
luz intermitente.
INTRODUCCIÓN
La luz remota está diseñada para ser enchufada directamente en un
tomacorriente estándar de 120 V. Seleccione una ubicación apropiada
en el techo para montar la luz a menos de 1.8 m (6 pies) de un
tomacorriente de modo que el cable y la luz estén lejos de las piezas
móviles.
AVISO: Este dispositivo cumple con la Parte 15 de la reglamentación de la FCC y las normas de RSS de Industry Canada para
dispositivos exentos de licencia. La operación está sujeta a las siguientes dos condiciones: (1) es posible que este dispositivo no
cause interferencias perjudiciales, y (2) este dispositivo debe aceptar cualquier interferencia recibida, incluidas las interferencias
que puedan causar operaciones no deseadas.
Todo cambio o toda modificación no expresamente aprobada por la parte responsable del cumplimiento podría anular el derecho
de usar el equipo.
Este dispositivo debe instalarse para garantizar que se mantenga una distancia mínima de 20 cm entre los usuarios/transeúntes
y el dispositivo.
Este equipo ha sido probado y se ha comprobado que cumple con los límites establecidos para un dispositivo digital de Clase B,
según la Parte 15 de las normas de la FCC y la norma ICES de Industry Canada. Estos límites están diseñados para brindar una
protección razonable contra interferencias perjudiciales en instalaciones residenciales. Este equipo genera, usa y puede emitir
energía de radiofrecuencia. Si no se instala y utiliza de acuerdo con las instrucciones podrá causar una interferencia dañina a las
comunicaciones radiales. Sin embargo, no hay garantía de que no se produzcan interferencias en una instalación particular. Si este
equipo produce interferencia en la recepción de radio o televisión, lo cual puede determinarse apagando y encendiendo la unidad,
el usuario debe tratar de corregir el problema por medio de lo siguiente:
• Reorientar o reubicar la antena de recepción.
• Aumentar la distancia de separación entre el equipo y el receptor.
• Conectar el equipo a un tomacorriente de un circuito eléctrico diferente al que esté conectado el receptor.
• Consultar al distribuidor del producto o a un técnico idóneo de radio y televisión.
PROGRAMACIÓN
1. Presione el “botón de Aprendizaje” de la luz
hasta que el LED se ENCIENDA.
2. Active la puerta de garaje usando el control
remoto, el control de pared o la llave digital.
3. Ya aprendió el código. La luz se encenderá.

© 2017, LiftMaster
All Rights Reserved
Tous droits réservés
114A5080 Todos los Derechos Reservados