INSTRUCTION MANUAL PROGRAMMABLE 2LB. BREAD MAKER
IMPORTANT SAFEGUARDS
The Elite Brand takes consumer safety very seriously. Products are designed and manufactured with our valued consumers' safety in mind. Additionally. we ask that you exercise a level of caution when using any electrical appliance by following all instructions and important safeguards.
READ ALL INSTRUCTIONS BEFORE USE AND SAVE FOR FUTURE REFERENCE
WARNING: When using electrical appliances. basic safety precautions should always be followed as below:
- Before using check that the voltage of wall outlet corresponds to the one shown on the rating plate.
- This appliance is not intended for used by persons (including children) with reduced physical. sensory or mental capabilities. or lack of experience and knowledge. unless they have been given supervision or instruction concerning use of the appliances by a person responsible for their safety.
- Close supervision is necessary when any appliance is used by or near children. Children should be supervised to ensure that they do not play with the appliance. Do not touch hot surfaces. Use handles or knobs. Always use oven mitts to handle hot bread pan or hot bread.
- Do not put hand inside oven chamber after bread pan is removed. Heating unit will still be hot.
- To protect against electric shock do not immerse cord. plugs. or bread maker in water or other liquid.
- Unplug from outlet when not in use and cleaning. Allow to cool before putting or taking off parts. or before cleaning the appliance.
- Do not operate any appliance with a damaged cord or plug or after the appliance malfunctions. or is dropped or damaged in any manner. Return the appliance to manufacturer or the nearest authorized service agent for examination. repair or electrical /mechanical adjustment.
- The use of accessory attachments not recommended by the appliance manufacturer may cause injuries.
- Do not use outdoors and household use only.
- Do not let cord hang over edge of table or counter or touch hot surface.
- Do not place on or near a hot gas or electric burner. or in a heated oven.
- Extreme caution must be used when moving an appliance containing hot oil or other hot liquids.
- Never switch on the appliance without properly placed bread pan filled ingredients. Never beat the bread pan on the top or edge to remove the pan; this may damage the bread pan.
- To disconnect. turn all controls off (START/STOP); then remove plug from wall outlet.
- Do not place eyes or face in close proximity with tempered glass viewing window. in the event that the safety glass breaks.
- This appliance has been incorporated with a grounded plug. Please ensure the wall outlet in your house is well earthed.
- Do not touch any moving or spinning parts of the machine when baking.
- Do not operate the appliance for other than intended use.
- Clean oven interior carefully. Do not scratch or damage heating element tube.
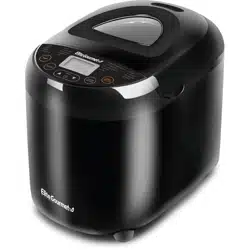
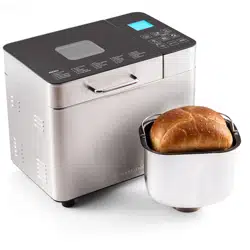
PARTS IDENTIFICATION

A. Air Vent
B. Viewing Window
C. Non-skid Feet
D. Cover
E. Control Panel
F. Bread Pan
G. Measuring Cup
H. Measuring Spoon
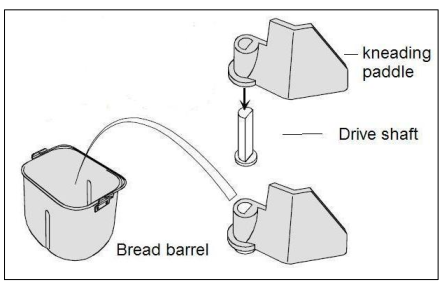
I. Kneading Blade
J. Metal Hook for lifting out the Kneading Blade
UNDERSTANDING THE CONTROL PANEL
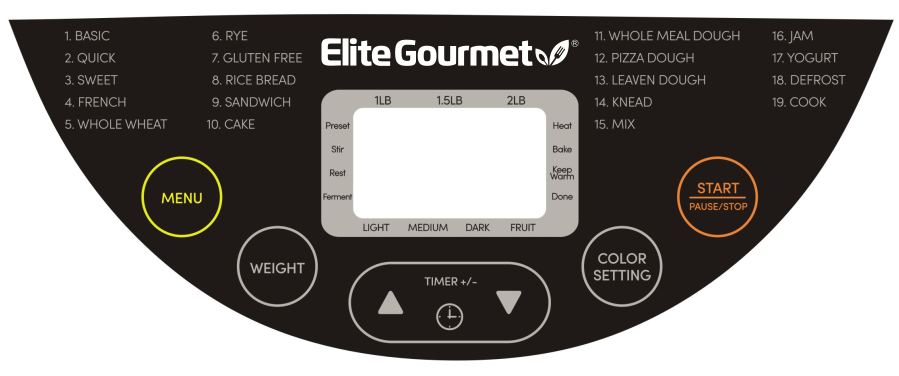
MENU BUTTON
Press the MENU button until desired program number (1-19) appears on the digital display. next to the remaining cooking time.
WEIGHT BUTTON
Press the WEIGHT button to move the arrow to desired loaf size: 1 LB. | .5LB or 2LB.
COLOR SETTING BUTTON
Press the COLOR SETTING button to move the arrow to desired crust color: Light, Medium, Dark.
DELAY TIMER +/- BUTTON
The most common use of the delay timer is to prepare bread overnight so that it is ready the next morning. It is possible to program up to 15 hours of delay time. DO NOT use for bread or dough containing fresh milk. yogurt. cheese. eggs. fruits. onions or any other ingredient which may deteriorate if left for a few hours in a hot and humid environment. This function delays the start of the bread-making process.
Press the up/down arrows to set delay timer in 10-minute increments. Press and hold button for rapid increase/decrease of delay time.
START/PAUSE/STOP button
When the machine is plugged in and the menu is set. SHORT PRESS (one click) the “START/PAUSE/STOP" button once to START a bread making cycle.
When making bread. SHORT PRESS (one click) the "START/PAUSE/STOP" button once to PAUSE the cycle. This will let the machine PAUSE for a maximum of 3 minutes. after which the unit will resume the set menu program. To reactivate before 3 minutes. simply SHORT PRESS the button once to START again.
When the machine is in use. LONG PRESS (hold down for at least 3 seconds) the "START/PAUSE/STOP" button until the beep sound (about 2 seconds) to STOP (cancel) a process.
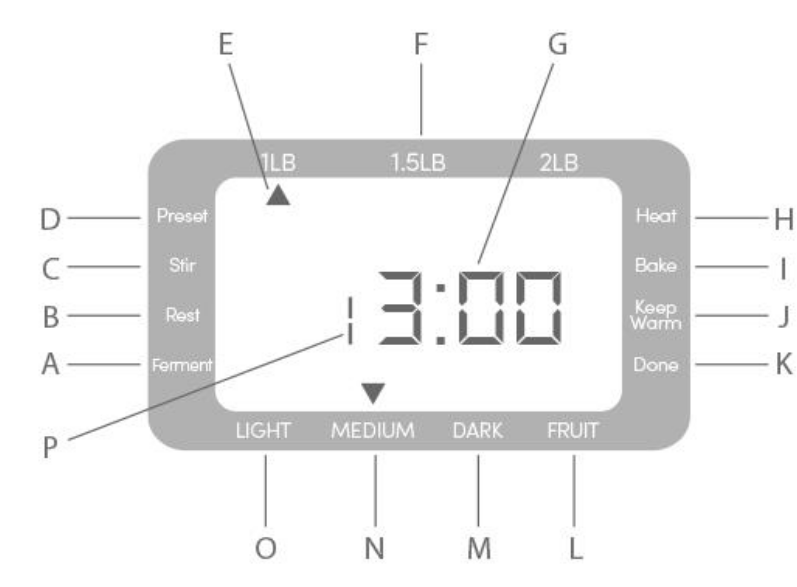
A. Ferment: Fermenting Cycle
B. Rest: Resting Cycle
C. Stir: Kneading Cycle
D. Preset
E. Indicator
F. Weight: loaf size of the bread
G. Timer
H. Heat: Pre-heating cycle.
I. Bake: Baking cycle.
J. Keep Warm: After the baking cycle is completed. the bread machine will switch to Keep Warm for up to 1 hour.
K. Done: The bread-making process is finished.
L. Fruit: Along with a beeping signal during the kneading cycle. this indicator lets you know when to add dried fruits. such as raisins. Raise the cover and sprinkle the fruits and nuts on top of the dough.
M. Dark: Dark browning.
L. Medium: Medium browning.
O. Light: Light browning.
P. Selected program
BEFORE FIRST USE
1. Carefully unpack the bread maker and remove all packaging materials. Check for any missing or damaged parts.
2. Wash and dry bread pan and kneading blade. Do not use scouring pads or any abrasives on the nonstick surface.
3. Before first use. operate the bread maker on the COOK (#19) mode and bake empty for about 10 minutes to burn off the manufacturing oils. Let the unit cool down and clean all the detached parts again.
NOTE: The bread maker may emit a little smoke and/or odor during first time use. This is normal for a newly manufactured appliance. Make sure the appliance has sufficient ventilation.
4. Dry all parts thoroughly. The bread maker is ready for use.
HOW TO USE YOUR BREAD MAKER
1. Wash and dry well all components.
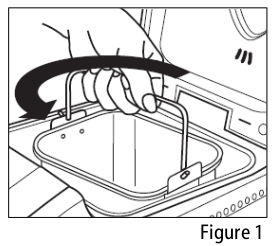
2. Using the bread pan handle. turn the bread pan counter-clockwise and then pull it out of the appliance (Fig 1).
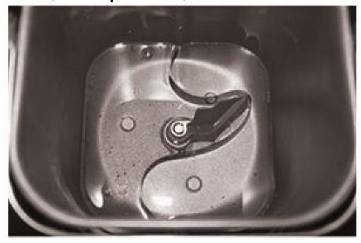
3. Mount the kneading blade (I) on the pin inside the pan (F) (Fig 2). place kneading blade on pin. with the arrow of the blade pointing up. pushing down as far as it will go. making sure flat surfaces are lined up.

4. Measure the ingredients with the measuring cup (G) or spoon (H) supplied and add them into the pan (F).
IMPORTANT: Make sure to read instructions for How to Add Ingredients on pages 9 - 12 and make sure to exactly follow the chosen Recipe from pages 14 - 18.
5. Place the bread pan into the bread maker and make sure it is firmly locked in place by turning it clockwise. (Fig 3).
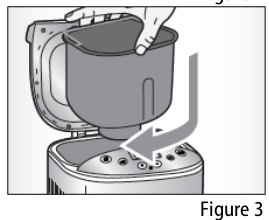
NOTE: Bread pan must lock into place for proper mixing and kneading.
CAUTION: It is essential to follow the sequence of adding ingredients as described in the recipes provided in this manual. Usually this sequence is: liquid ingredients. water. flour. eggs and others as in the recipe. Pour yeast last into the other ingredients. Avoid yeast coming in contact with salt or liquid ingredients.
6. Close the cover (D) and insert the plug into the electrical outlet. The display (E) will show "3:00". with two fixed dots. The machine is automatically set to program "1".
7. Press the MENU button to select the desired cooking program.
8. Press the WEIGHT button to select the desired weight (1Ib. 1.5lb. 2lb). The weight cannot be set in programs 8-19.
9. Press the COLOR SETTING button to select the desired browning (light. medium. dark). The browning cannot be set in programs 8-19.
10. If necessary. set the delay timer using the up/down buttons. The bread cycle will start after the delay timer counts down. If you do not set a time. the cycle will start immediately.
CAUTION: Be careful when using the Delay Timer function with perishable ingredients (such as eggs. dairy products. etc).
11. Press the START button. The machine beeps and begins processing the ingredients (if a delay timer has been set. processing will start after the delay timer counts down).
NOTE: During cooking it is possible that steam comes out from the fan under the cover: this is perfectly normal.
12. If you would like to add ingredients (fruits. nuts. seeds. etc.) the machine will beep10 times to signal when it is time to open the cover (D) and add these to the dough. This time varies according to the program.
13. To Stop/Cancel the selected program. press and hold the START button for 3 seconds.
14. When the time shown on the display is "0:00". the cooking process is finished. The appliance will beep 10 times and automatically switch to the "Keep Warm" mode for 1 hour. The ":" symbol will flash during this mode (Except after the "Knead" program).
15. After keeping warm for 1 hour. the "Keep Warm" mode will end. To cancel the "Keep Warm" mode before 60 minutes. press and hold the START button for 3 seconds.
16. Unplug the appliance from the electrical outlet and open the cover (D).
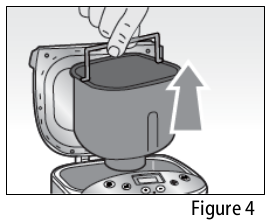
17. Bread pan and baking chamber will be hot and oven mitts should be used. Remove the bread pan by lifting the handle and turning it counter-clockwise to unlock and pull bread pan straight up from the base of the chamber. (Fig 4).
18. Using oven mitts. turn the bread pan upside down (with the bread pan handle folded down) onto a wire cooling rack or clean cooking surface and gently shake until bread falls out. Use a non-stick spatula to gently loosen the sides of the bread from the bread pan (Fig 5).
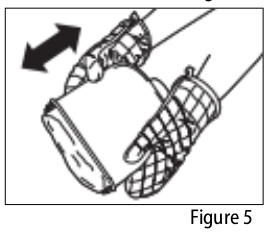
CAUTION: The pan becomes very hot. Be very careful when handling the pan. and always use protective gloves.
NOTE: Never use metal utensils to remove the bread from the pan (F). in order to avoid damaging the non-stick coating.
TIP: If kneading blade comes out in the loaf. remove it with a spatula or small utensil.
HOW TO ADD INGREDIENTS
ADDING INGREDIENTS INTO THE BREAD PAN
1. Remove the bread pan (F) by lifting the handle. turning counter-clockwise and lifting out. Place bread pan (F) on a clean. dry. level work surface.
CAUTION: It is important that the pan is filled with ingredients outside of the machine to avoid spilling ingredients onto the heating elements creating a potential fire hazard.
2. STRICTLY FOLLOW THE RECIPES provided in latter pages of this user manual for the measurements. the amounts. and the adding sequences of the ingredients for each cooking program. Eggs. butter. and milk should be used at room temperature because cold ingredients will de-activate the yeast.
3. USE ONLY THE MEASURING CUP AND THE MEASURING SPOONS PROVIDED. For example. 1 cup of water equals one full measuring cup (not 34 cup) of water; 1 TBSP of sugar means one full table spoon (the big measuring spoon) of sugar; 1 tsp of salt means one full teaspoon (the small measuring spoon) of salt.
With wet ingredients. after filling the measuring cup. place it on a flat surface and view it at eye level to make sure the amount of liquid is exact. With dry ingredients. always “level off” the measurement with the back of a knife or a spatula to make sure the measurement is exact. A helpful tip is to never use the measurement cup to scoop the ingredients (for example. flour). By scooping. you could add up to one tablespoon of extra ingredients. Fill the measuring cup with a spoon before leveling off.
4. ORDER OF ADDING INGREDIENTS
FIRST: water. milk. oil. eggs. sugar. salt. milk powder. etc.
SECOND: flours (including rye. oatmeal. etc. if needed)
THIRD: yeast (MUST be separate from wet ingredients)

TIP: With finger. make a small indentation on one side of the flour. Add yeast to indentation. making sure it does not come into contact with the liquid ingredients. eggs. sugar. salt. or milk powder.
Also. make sure ALL ingredients are at room temperature. (between 77 - 85°F) unless otherwise noted in the recipe.
- Keep additional ingredients (fruits. nuts. raisins. etc) on one side and add them during the second kneading when the appliance beeps 10 times.
- First introduce the liquid ingredients. Usually it is water but can include milk and/or eggs. Water must be warm (100°F). but not hot. The too hot or too cold water prevents the leavening.
- Do not use milk with the timer. It could curdle before beginning the bread preparation process.
- Add sugar and salt as indicated in the recipe.
- Add the "liquid" ingredients (honey. syrup. molasses. etc).
- Add the "dry" ingredients (flour. milk powder. herbs and spices).
- If you use the delay timer. it will not be possible to add fruit or nuts during the second kneading. so add them now.
- Finally. add instant yeast (or baking powder/sodium bicarbonate). Place it over the other ingredients - do not put it in the water. otherwise it will begin to act too soon.
- If you use the delay timer. it is essential to keep the yeast (baking powder/baking soda) separate from the water/liquid. otherwise the yeast will come into action. it will rise and collapse before the bread making process begins. The result will be a hard. dense. rough and edible product as a brick of a home. We advise to make a hole in the center of the dome of the flour and put the yeast.
FLOUR
The type of flour you use is very important. The most important element contained in the flour is the protein called gluten. which is the natural agent that gives the dough the ability to mould and to retain the carbon dioxide produced by the yeast. Buy flour which reads on the package "FOR BREAD.”
OTHER FLOURS FOR BREAD
They include wholegrain flour and other cereals. They provide an excellent dietary fiber intake but contain lower levels of gluten than white flour. This means that the wholegrain loaves tend to be smaller and denser than the white loaves. In general terms. if in the recipe you replace white flour with half wholegrain flour. your result will be a loaf of bread that tastes wholegrain but has the texture of white bread.
YEAST
Yeast is a living organism and should be kept in the refrigerator to remain fresh. It needs carbohydrates found in sugar and flour as nourishment. Yeast used in bread maker recipes will be sold under several different names: Bread machine yeast (preferred) active-dry yeast and instant yeast. During rising process. the yeast will produce carbon dioxide. The carbon dioxide will expand bread and make the inner fiber soften.
Before using. check the expiration date and storage time of yeast. Return to refrigerator immediately after each use. the fungus will be killed at high temperature usually the failure of bread rising is caused by the bad yeast.
TIP: To check whether your yeast is fresh and active:
- Pour 1 cup of warm water (110-120°F) into a measuring cup.
- Add 1 teaspoon white sugar into the cup and stir. then 1 tablespoon yeast over the water.
- Place the measuring cup in a warm place for about 10min. Do not stir the water.
- Fresh. active yeast will begin to bubble or “grow.” If it does not. the yeast is dead or inactive.
LIQUID INGREDIENTS
Liquid ingredients normally consist of water or milk or a mixture of the two. Water makes the crust crispier. Milk makes it softer and also the texture is softer.
There are conflicting opinions on what should be the temperature of the water. You can decide for yourself as you get more familiar with the appliance. Water is an essential ingredient for bread.
Generally a water temperature between 68°F and 77°F is the most appropriate. But if you want to accelerate the bread making process the water temperature must be between 115°F and 122°F. It is essential that water is of good quality. and preferably bottled and distilled. as the limestone in the water can compromise the successful outcome of the bread. Instead of water you can also use fresh milk or water with 2% milk powder. which enhances the taste and improves the color of the crust. Some recipes even mention fruit juice.
LOW FAT CONTENT
Do not use oils. margarines. etc. with a low percentage of fat. These products contain little fat and you may not get the desired results.
SUGAR
Sugar activates and feeds yeast allowing it to grow. It adds flavor and texture and helps to brown the crust. Honey. syrup and molasses can be used instead of sugar. provided that you adapt the liquid ingredient to compensate. Artificial sweeteners should not be used. as they do not feed the yeast. and some destroy it.
SALT
Salt helps control the growth of yeast. Unsalted bread may grow too much and then collapse.
EGGS
Eggs will make your bread richer in texture. add color and helps to shape the loaf. Eggs are considered a liquid ingredient. so if eggs are used in the recipe. it is necessary to adjust the other liquid ingredients otherwise the dough may be too wet to rise properly.
HERBS AND SPICES
These can be added at the beginning together with the main ingredients.
Herbs and spices. such as cinnamon. ginger. oregano. parsley and basil improve both taste and appearance. Use in small amounts (1-2 teaspoons) to avoid overpowering the taste of bread. Fresh herbs. such as garlic and chives. contain enough liquid to unbalance the recipe dosages. so it is important to always balance the liquid content.
ADDITIONAL INGREDIENTS
Additional ingredients (fruits. nuts. raisins. etc) can be added only in programs that provide them. Dried fruits and nuts must be cut into small pieces. cheese must be grated. chocolate must be chopped into small pieces and not in lumps. Do not add more than those indicated in the recipes. otherwise the bread may not grow properly. Pay attention to the fresh fruit and nuts because they contain liquid (juice and oil). so adjust the amount of main liquid ingredient to compensate.
USING OUTSIDE RECIPES
If you are new to bread making, please only use the recipes provided by us to gain enough bread making experience before trying out outside recipes or developing your own. If you use an entirely different recipe that is not especially designed for our bread maker, you cannot use the pre-programmed automatic settings. It’s recommended that you strictly follow a provided recipe first and then make adjustments based on a proven recipe to get your house special bread. Please note that the total weight of ingredients from that outside recipe should NOT exceed 2lb and the main flour type ingredients should NOT exceed 4 cups.
IMPORTANT TIPS
- If during the cycle. the program is interrupted by a power cut or mishandling. the machine has a 15-minute protection time during which the settings are saved. The cycle starts again where it stopped. Beyond that time. the settings are lost.
- If the kneading blade comes out with the bread. remove it with the hook accessory before slicing the bread. Since the kneading blade can be disconnected from the pan. it is not a malfunction if it comes out in your bread.
- Please add the ingredients in the order specified by the recipes. This allows the bread maker to mix the ingredients in the most efficient manner possible. It also serves to keep the yeast from combining with the liquid before the dough has started to mix. which is essential when using the delay timer. It’s recommended that you strictly follow a provided recipe first and then make adjustments based ona proven recipe to prepare a special recipe.
- The kneading blade may “stick” in place after baking. Running warm or hot water over the kneading blade should loosen it enough to be removed. If still stuck. soak in hot water for about 10-15 minutes.
- It's important for ingredients to be at room temperature before adding them to the bread pan. even when the delay timer is being used. Milk. butter. eggs must not be used directly from a fridge. They should be put outside to obtain the room temperature before being added to the pan. Water must be between 77°F and 85°F.
- If you plan to run a second program to bake another loaf. open the cover and wait 30 minutes before beginning the second operation.
- Accurate measuring of ingredients is vital. Please do not use a kitchen tablespoon or teaspoon as they are inaccurate. Incorrect measurements could result in a poor end product.
- The small measuring spoon (teaspoon, tsp) is provided for measuring small amounts of dry or liquid ingredients: yeast. salt, powdered milk, honey, molasses, etc.
- The big measuring spoon (tablespoon. TBSP) is provided for measuring dry or liquid ingredients: oil. sugar. etc.
- After filling the measuring cup. place it on a flat surface and view it at eye level to make sure the amount of liquid is exact. Then. double check. With dry ingredients. use a spoon to place ingredients into the measuring cup then “level off” the measurement with the back of a knife or spatula to make sure the measurement is exact. A helpful tip is to never use the cup to scoop the ingredients (for example. flour). By scooping. you could add up to one TBSP of extra ingredients. Fill the measuring cup with a spoon before leveling off.
- For each bread recipe. there is a desired bread weight. The upper weight limit is the total weight limit of all the ingredients in the recipe and its variations. It is also printed on the control panel: 1lb. 1.5lb. 2lb.
CONSISTENCY OF THE DOUGH
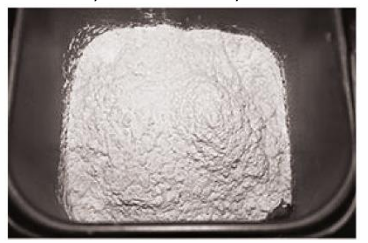
Check the product during the first 5 minutes of kneading. through the dedicated viewing window. A smooth loaf should be formed. If not. it may be necessary to review the ingredients. If it is necessary to open the cover (D). do it during the kneading or the resting time. In all other moments you may compromise the successful outcome of the bread.
If the dough seems sticky or sticks to the sides of the pan. sprinkle over a teaspoon of flour at a time.
If it is too dry. pour a teaspoon of hot water at a time. It is possible to gently remove the ingredients remained stuck to the sides of the machine using a wooden or plastic spatula.
WARNING: Do not leave the cover (D) open longer than necessary. Wait until the flour/water is completely absorbed in the dough before adding more.
Close the cover (D) before the end of the last kneading. otherwise the bread will not rise properly.
STORING BAKED BREAD
The bread you find on the market usually contains additives (chlorine. limestone. mineral tar dye. sorbitol. soybean. etc). Your bread does not contain any of them. so it will not last long as the bread sold on the market and will look different. Also. it will not have the flavor of the bread on the market due to the missing additives/preservatives. It is preferable to serve immediately. but it can be stored for two days at room temperature. ina plastic bag from which you have removed excess air. To freeze homemade bread. let it cool. place ina plastic bag. remove excess air. then seal and freeze.
- USE ONLY THE MEASURING CUP AND THE MEASURING SPOONS PROVIDED.
- Oil can be replaced with melted butter.
- Follow the order of the table for each Menu Program for the addition of ingredients.
- In each recipe you can replace the high-gluten flour with gluten-free flour.

 Please download pdf file to read more...
CLEANING AND MAINTENANCE
CAUTION: Do not place the bread machine into a dishwasher. Do not use benzene. scrubbing brushes or chemical cleaners as these will damage the machine.
Use only a mild. non-abrasive cleanser to clean the bread maker.
1. General Cleaning
a) Remove all bread crumbs by wiping them away with a slightly damp cloth.
b) DONOT bend the heating element which is located on the inside of the bread maker.
2. Clean the Bread Pan and Kneading Blade
a) Wipe the interior and exterior of the bread pan (F) and kneading blade with a damp cloth and dry completely.
b) DO NOT wash the pan or parts in the dishwasher. This will damage the finish of the pan and the other parts.
3. Caring for your Bread Machine
a) Keep your bread machine clean at all times.
CAUTION: Do not use metal utensils with the bread maker. This will damage the non-stick pan and other parts.
b) It is normal for the color of the bread pan changes over time. The color change is a result of steam and other moisture and does not affect the machine’s performance.
c) If the kneading blade (I) does not come off from the motor shaft easily. fill the pan with warm water and let sit for 30 minutes. The blade must then be cleaned gently with a damp cloth.
d) Wash the measuring cup (G). the measuring spoon (H) in hot soapy water.
e) Clean all other surfaces. internal and external. with a damp cloth. Use a small amount of liquid detergent if necessary. but be sure to rinse completely. otherwise detergent residues could compromise the successful outcome of your next bread.
4. Storing your Bread Machine
a) Make sure the machine is clean and dry before storing.
b) Store the bread machine with the lid closed.
c) Donot place heavy objects on the lid.
d) Remove the kneading blade and place inside the bread pan.
CAUTION: Do not immerse the appliance. the plug or the power cord in water or other liquids. Clean them with a damp cloth.
Even when the appliance is not in use. unplug it from the electrical outlet before inserting or removing individual parts or before cleaning it.
Allow unit to cool before proceeding with cleaning.
Never use metal utensils to remove anything from the pan (L) to avoid scratching the non-stick coating.
TROUBLESHOOTING
NOTE: In the event of malfunctions, switch off the appliance immediately.
The device gives off a burning smell.
Flour or other ingredients may have deposited in the baking compartment.
- Turn off the appliance and let it cool completely. Eliminate excess flour or other ingredients from the baking compartment with a clean cloth.
The ingredients do not mix properly.
The pan or kneading blade have not been assembled correctly.
- Make sure that the pan and kneading blade are installed correctly.
An excessive amount of ingredients has been inserted.
- Measure out the ingredients thoroughly.
The error code "H:HH" is displayed when the power button is pressed.
The temperature inside the appliance is too high.
- Let the appliance cool down between a program and the other.
- Unplug the appliance. open the lid and remove the pan. Allow to cool for 15-30 minutes before starting new programs.
The viewing window is steamed up and covered with condensation.
The viewing window may steam up during the kneading and leavening programs.
- It is a normal phenomenon. Clean the viewing window after use.
The kneading blade remains attached to the bread during removal.
Probably an intense browning option has been selected. which creates a hard crust around the bread.
- It is a normal phenomenon. When bread is cooled. use a spatula to remove the kneading blade.
The dough does not mix properly (for example the flour is gathered at the sides or at the top of the dough).
The pan or kneading blade have not been assembled correctly.
- Make sure that the pan ana kneading blade are installed correctly.
An excessive amount of ingredients has been inserted.
- Measure out the ingredients thoroughly.
A gluten-free flour has been used. which creates a very moist dough.
- If the dough is moist. use a spatula to detach it from the edges of the pan. If the dough is too dry. add a tablespoon at a time of water. until the dough has reached the desired consistency.
The dough is leavened excessively and pushes against the cover.
The ingredients have not been adequately dosed.
- Measure out the ingredients carefully. and pay attention to the right amount of yeast and salt.
No salt has been added.
- Try to decrease the amount of yeast of 1/4 of a teaspoon.
The kneading blade has not been inserted in the pan.
- Check if the kneading blade is installed.
High humidity and hot ambient temperatures can cause bread to over-rise.
- Bake during the coolest part of the day. Try reducing the yeast by % teaspoon or use liquids directly from the fridge. Do not use the timer function.
Hot liquids accelerated the yeast action.
- Use liquids at temperatures between 77°F and 85°F.
The bread will not rise or did not rise enough.
The ingredients have not been adequately dosed.
- Measure out the ingredients thoroughly.
Baking powder or flour have expired.
- Check the expiration date of yeast and flour.
The lid has been opened during a program.
- Make sure that the liquid ingredients are added at room temperature.
Water was too hot and killed the yeast.
- Use liquids that are at temperatures between 77°F and 85°F. Milk. butter. and eggs must not be used directly from the fridge. They should be put outside to obtain the room temperature before added to the pan.
Yeast has been activated before program has started.
- Make sure the yeast does not come in contact with liquid before program has started.
Yeast is not activated due to the cold ingredients.
- Eggs. butter and milk should be left to room temperature after taken out of a fridge. because cold ingredients will deactivate the yea
The bread sinks in the center.
Too much liquid has been added or liquid is too warm.
- Measure ingredients accurately. Use liquids that are at the temperatures between 77°F and 85°F.
Salt was not added. causing bread to over-rise and collapse.
- Measure ingredients accurately. Use only the measuring cup and spoons provided.
Too much yeast was added.
- Measure ingredients accurately. if problem persists. reduce the yeast by %4 teaspoon.
High humidity and hot ambient temperatures can cause the bread to over-rise.
- Bake during the coolest part of the day. Try reducing the yeast by % teaspoon or use liquids directly from the fridge. Do not use the timer function.
High altitudes can cause the bread to over-rise and then collapse during baking.
- Try reducing the yeast by %4 teaspoon.
Lid is open during baking.
- Do not open the lid during baking.
The loaf hasa hole at the top.
The dough leavened too quickly.
- Do not lift the lid during cooking.
Too much yeast or too much water have been added.
- Select a more intense browning option.
An unsuitable program for the recipe has been selected.
- Select a more intense browning option.
The crust color is too dark.
Too much sugar has been added.
- Slightly reduce the amount of sugar. Select a lighter browning option.
The loaf is not Symmetric.
It is normal that some loaves do not have a symmetrical shape. especially those made with wholegrain wheat flour.
- Measure out the ingredients thoroughly.
Too much yeast or too much water have been added.
- Slightly reduce the amount of water or yeast.
The kneading blade has moved the dough sideways before leavening and bakit
- Slightly reduce the amount of water or yeast.
Loaves have different shapes.
It's normal. The shape of the oaves may change depending on the type of bread.
The loaf is hollow or there are holes in the crumb.
The dough Is too moist.
There is too much yeast.
No salt has been added.
Too much hot water has been added.
- Measure out the ingredients thoroughly.
- Slightly reduce the amount of water or yeast. Check that salt has been added.
- Use water at ambient temperature.
The bread is not baked enough or has a chewy texture.
Too much liquid ingredients have been added.
You have not selected the correct progra
- Measure out the ingredients thoroughly.
- Check that the correct program has been selected.
The loaf crumbles when sliced.
The bread is too hot.
- Allow the bread to cool for 15 30 minutes.
The loaf has a heavy and thick consistency.
Too much flour has been added. or the flour has expired.
You have not added enough water.
If the bread is made with wholegrain flour. it is normal to have a denser texture than normal.
- Measure out the ingredients thoroughly.
The base of the pan has taken on a dark or stained color.
It has been washed in the dishwasher.
This is normal. and does not alter the quality of the material.
The bread surface is sticky.
Bread was left in the machine too long and condensation collected on the bread pan.
The wet/dry balance of the ingredients may be incorrect.
- Whenever possible, remove bread from the bread pan and cool on a wire rack before keep warm period ends.
- Measure ingredients accurately.
POWER INTERRUPTION RECOVERY
If the power supply interruption lasts less than 10 minutes. the program will continue as soon as the power supply is restored. If the interruption lasts more than 15 minutes. the program stops and the display returns to its default settings. In this case disconnect the appliance from the electrical outlet. allow to cool. empty the pan. remove the ingredients. clean and start again.
WARNING DISPLAY
If an error occurs. the display may show the following error codes:
“H:HH”: the temperature inside the pan is too high.
1. Press the On/Off button (0) for 3 seconds to stop the program.
2. Unplug.
3. Open the lid and allow the appliance to cool for 10-20 minutes.
4. Restart the program.
“E:EO”: the temperature sensor is disconnected or out of order.
Take the appliance to an authorized service center to check the operation of the sensor.