User Manual VacuumASSEMBLY
Fully assemble product prior to use.
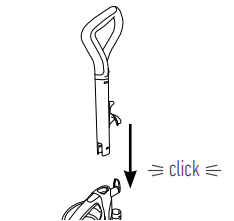
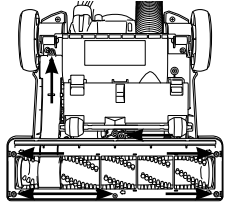
1. Insert handle into body of vacuum until it clicks.
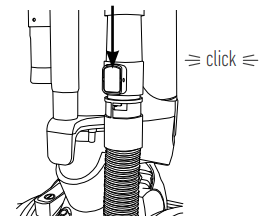
2. Insert hose into hose port. It will click when secured.
OPERATION
CAUTION: Not to be used for grooming a pet.
CAUTION: Use extra care when cleaning on stairs. To avoid personal injury or damage, and to prevent the cleaner from falling, always place cleaner at the bottom of the stairs or on the floor. Do not place cleaner on stairs or furniture, as it may result in injury or damage. When using tools, always ensure handle is in the upright position.
1. Step on the Power Pedal to turn ON/OFF

2. Step on the nozzle and lean the handle back.
USING THE HOSE AND TOOLS
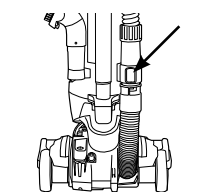
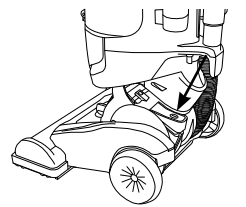
1. Make sure vacuum is upright and press the hose release button.
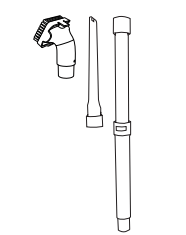
2. Remove hose and attach the desired accessory. The Telescopic Extension Wand can be added for additional reach.
MAINTENANCE
WARNING:To reduce the risk of personal injury, unplug before cleaning or servicing.
This product contains no serviceable parts. If appliance is not working as it should, has been dropped, damaged, left outdoors, or dropped into water, call customer service at 1.800.944.9200 prior to continuing use
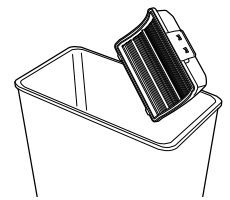
EMPTYING THE DIRT CUP
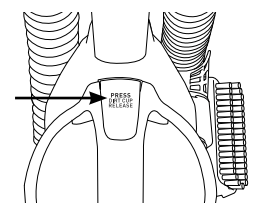
1. Press the dirt cup release button.
2. Empty over a trash can by pressing the trap door release.
CLEANING THE EXHAUST FILTER
PART #440014853
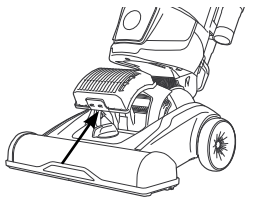
1. Tilt the vacuum back, then release the latch to remove the Exhaust Filter
2. Tap the filter on trash can and wipe away remaining dust with a dry cloth. Place exhaust filter back onto the vacuum.
CLEANING THE RINSABLE FILTER
PART #AH44200
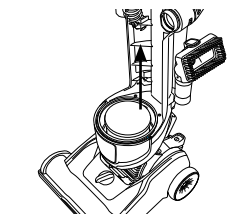
1 Remove the dirt cup, then remove the filter by pulling it up and out.

2. Rinse filter with water only until the filter is clean and the water runs through clear. Gently squeeze the filter to remove excess water.
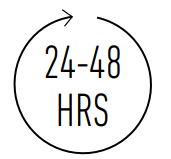
3. Allow the filter to air dry for at least 24 hours.
IMPORTANT: The filter must be completely dry before replacing it. This may take between 24 and 48 hours. Check the inside of filter for dampness before replacing.
LUBRICATION: The motor is equipped with bearings which contain sufficient lubrication for their lifetime. The addition of lubricant could cause damage. Do not add lubricant to motor bearings.
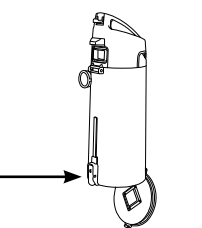
CORD STORAGE: Wrap the power cord around the cord hooks for convenient storage. Attach the plug end to the cord.
CAUTION:To reduce the risk of injury from moving parts, unplug before servicing.
HOW TO REPLACE BELT AND CLEAN BRUSH ROLL
BRUSH ROLL PART #440014833
BELT PART #AH20080
1. Remove the seven screws to remove the nozzle guard.
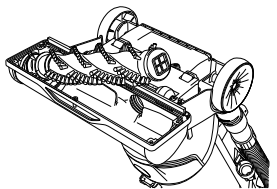
2. Pull the brush roll up and out from the vacuum belt.
3. Cut off tangled hair and wipe away any debris.

4. To replace the brush roll, loop the belt around the brush roll and push the roll back into place. Replace the nozzle guard and seven screws.
TIP: Rotate brush roll manually to ensure the belt is properly installed. Vacuum is equipped with an automatic brush roll shutoff in the event of overload or jam. Check for obstructions in the brush roll area and remove any obstructions. When obstructions are cleared, resume cleaning as normal.
WARNING:To reduce the risk of personal injury, unplug before cleaning or servicing.
REMOVING SYSTEM CLOGS
If you are experiencing a loss of suction, or you notice debris is spitting out of the nozzle, we recommend checking the nozzle, tube, hose and filters for any visible signs of blockage or built up debris. It is also recommended to rinse your Filter if there is visible built up dirt and dust on the filter. This should help improve performance on your vacuum.
THERMAL PROTECTION
A thermal protector has been designed into your cleaner to protect it from overheating. When the thermal protector activates the cleaner will stop running. If this happens proceed as follows:
- Turn cleaner OFF and unplug it.
- Empty the dirt cup
- Inspect the nozzle inlet, hose connector, hose, dirt cup inlet, cyclonic filter rinsable filter and exhaust filter for any obstructions. Clear obstructions if present.
- When cleaner is de-energized and motor cools for 30 minutes, the thermal protector will deactivate and cleaning may continue.
If the thermal protector continues to activate after following the above steps, your cleaner needs servicing.
TROUBLESHOOTING
WARNING:To reduce the risk of personal injury, unplug before cleaning or servicing.
My vacuum will not turn ON
- Always be sure to plug it in firmly.
- The Thermal Protector may have been activated - unplug your vacuum and let cool for 30 minutes. If this does not work, there may be no voltage in the wall plug.
- Check the fuse or breaker in your home. If there is a blown fuse or tripped breaker, replace the fuse in your home or reset the breaker.
My vacuum is hard to push
- Adjust the height of the nozzle with the knob on the foot of your vacuum.
My vacuum is losing suction and/or not picking up
- Be sure to empty the dirt cup if it is full. Check that the dirt cup is properly assembled and installed onto the appliance.
- You may have a clogged filter or a clog in the system. Refer to the Maintenance section in this manual for directions on removing clogs.
- Your filter may be dirty. Pre-motor filters should be rinsed every 2-3 months. Refer to the Maintenance section for directions on how to clean filters.
- Change the nozzle height, adjust setting for appropriate floor/carpet type.
My brush roll is not spinning
- Unplug and remove any hair or other blockages around the brush roll.
- Clean filters. Refer to the Maintenance section for directions on how to clean filters.
- Resume normal operation.
- Replace the belt