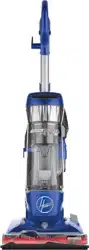
User Manual
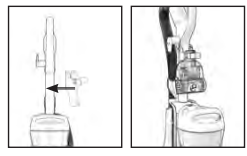
Assembly
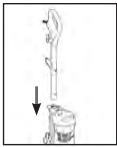
1 Insert wand into the spine until it clicks in place.
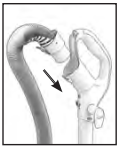
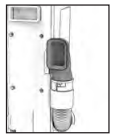
2 Insert hose into canister until it clicks in place.
3 Place tools onboard.
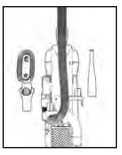
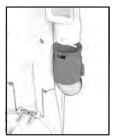
Optional: Attach Turbo Tool clip to wand until you hear a click. Insert Turbo Tool.
Tip: Make sure all pieces click into place.
Tip: Wrap cord around hooks for convenient storage. Attach the plug end to the cord.
Tip: To unwrap cord quickly, rotate cord hook 180 degrees.
User Controls
1 Power the unit ON/OFF.*
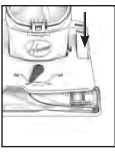
2 Brush Roll ON/OFF.*
- ON: Carpets
- OFF: Hard Floors
To turn the Brush Roll ON/ OFF, step on the pedal
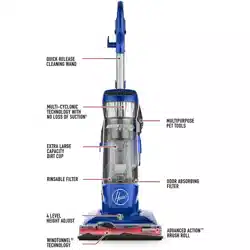
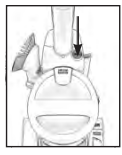
3 Quick Release Cleaning Wand.
* Press the ‘Wand Release’ and pull out of the vacuum for above floor cleaning
4 Level Hight Adjustment Lever*
To adjust the height setting, turn the lever to the desired height setting.
For maximum cleaning performance, the following carpet height settings are recommended:
- Hard floor setting: use for hard floors only -Low and Medium setting: adjust depending on carpet type
- High carpet setting: for use on high pile carpets to ease pushing effort
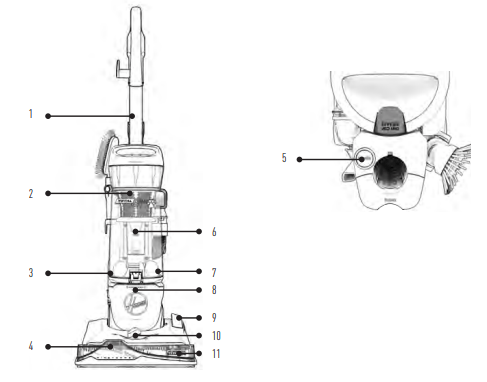
- Quick Release Cleaning Wand
- Dual-Cyclonic Filtration System
- Rinsable Filter
- WindTunnel® Technology
- Power ON/OFF
- Extra Large Capacity Dirt Cup
- Odor Absorbing Filter
- AllergenBlock™ Technology
- Multi-Floor ON/OFF Pedal
- 4 Level Height Adjust
- Advanced Action™ Brush Roll
Upright Mode
1 Step on the ‘Handle Release’ pedal on the foot of the vacuum and pull the handle back.
2 Turn the vacuum ON.
TIP: For optimal cleaning, turn the brush roll ON for carpets and OFF to prevent the scatter of debris on hard floors.
CAUTION: Use extra care when cleaning on stairs. To avoid personal injury or damage, and to prevent the cleaner from falling, always place cleaner at the bottom of the stairs or on the floor. Do not place cleaner on stairs or furniture, as it may result in injury or damage. When using tools, always ensure handle is in the upright position.
Above Floor Mode
1 Make sure the vacuum is in the upright position.

2 Press the wand or handle release and pull the wand or handle out of the vacuum.
OR
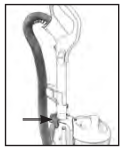
Press the hose tab to remove the hose from 2 the handle
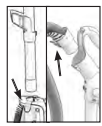
3 Attach the cleaning accessory to the end of the wand or handle.
4 Turn the vacuum ON

Maintenance
Any other servicing should be done by an authorized service representative.
If appliance is not working as it should, has been dropped, damaged, left outdoors, or dropped into water, take it to a service center prior to continuing use.
Hoover® High Performance Swivel vacuums should have regular maintenance checks to maintain optimal performance and suction.

NOTICE: A Thermal Protector has been designed into your cleaner to protect it from overheating.
When the Thermal Protector activates, the cleaner will stop running. If this happens proceed as follows:
- Turn cleaner OFF and unplug it from the electrical outlet.
- Empty the dirt cup.
- Inspect the nozzle inlet, hose connector, hose, dirt cup inlet, cyclonic filter, rinsable filter and HEPA filter for any obstructions. Clear obstructions if present.
- When cleaner is unplugged and motor cools off for 30 minutes, the Thermal Protector will deactivate and cleaning may continue. If the Thermal Protector continues to activate after following the above steps, your cleaner needs servicing. Refer to the Warranty section in the user manual for servicing information.
WARNING Do not use vacuum without dirt cup and dry filters.
WARNING To reduce the risk of personal injury, unplug before cleaning or servicing.
Emptying the Dirt Cup
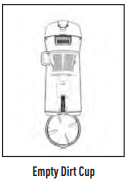
- Remove the dirt cup by pressing the dirt cup release button.
- Hold the dirt cup over your trash can and press the dirt cup trap door release to empty the dirt cup.
TIP: Empty the dirt cup after every use to maintain optimal performance.
Cleaning the Filter
Rinsable Filter
1 Remove the dirt cup by pressing the dirt cup release button.

2 Access the rinsable filter under the filter access door.

3 To remove, pull up on the tab provided.
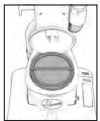
4 Rinse under running water until all dirt is out of the filter.

5 Let your filter dry for 24 hours before replacing into vacuum.

TIP: DO NOT bend filter.

HEPA Filter
1 Locate the HEPA Filter on the back of the vacuum.

2 Push down on the top tab and pull out
3 Tap the HEPA Filter on the side of the trash can to remove excess dirt
TIP: DO NOT RINSE THE HEPA FILTER. Replace filters when heavily discolored.
Do not use your vacuum without all of the filters in place.
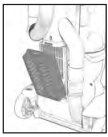
Cleaning & Maintaining the Brush Roll
1 Lower the handle to the reclined position, and flip the unit over. To access the brush roll, unscrew the nozzle guard from the nozzle.

2 Remove the brush roll by pulling it up and out from the vacuum belt.
3 Remove any hair or blockages.

4 Replace brush roll and nozzle guard.
Secure with screws.
TIP: Rotate brush roll manually to ensure the belt is properly installed.
Belt Replacement
WHEN TO REPLACE
Replace the belt if it is damaged, cut or broken. Refer to the directions below.
HOW TO REPLACE
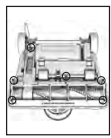
Place the handle in the low position and turn the cleaner over so the bottom side is up.
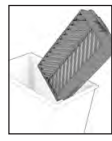
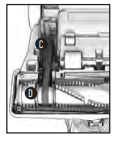
1 Remove the 6 screws as shown with a Phillips screwdriver. Remove the bottom plate.
2 Remove the used belt from the brush roll (A) then from the motor shaft (metal rod) (B) and discard.
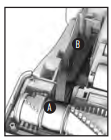
3 Ensure that the letters printed on the belt are facing you, slide the new belt over the motor shaft (metal rod) (C). Then slip it around the area of the brush roll where no bristles are present (D).
4 With the belt in place, pull the belt and slide the brush roll into the nozzle making sure that the brush roll end caps are in the correct orientation. Place the bottom plate aligning the screw holes and re-install the 6 screws.
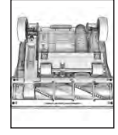
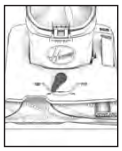
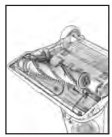
Removing System Clogs
1 Nozzle Inlet
2 Hose Connector
3 Dirt Cup Inlet
4 Cyclonic Separator
5 Rinsable Filter

6 HEPA Filter

7 Hose

8 Wand
Troubleshooting
Any other servicing should be done by an authorized service representative.
If appliance is not working as it should, has been dropped, damaged, left outdoors, or dropped into water, take it to a service center prior to continuing use.
My vacuum will not turn ON
- Always be sure to plug it in firmly.
- The Thermal Protector may have been activated - unplug your vacuum and let cool for 30 minutes. If this does not work, there may be no voltage in the wall plug.
- Check the fuse or breaker in your home. If there is a blown fuse or tripped breaker, replace the fuse in your home or reset the breaker.
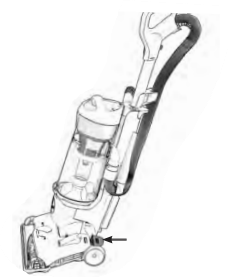
My vacuum is hard to push
- Open the Suction Control Valve near the handle by twisting the valve clockwise.
My vacuum is losing suction
WARNING
To reduce the risk of personal injury, unplug before cleaning or servicing.
- Be sure to empty the dirt cup if it is full.
- You may have a clogged filter. Refer to the Maintenance in the user manual for directions on removing clogs.
- Your filter may be dirty. Your filter should be rinsed every 4-6 uses. Refer to the Maintenance section for directions on how to clean your filters.
- If problem persists, you may have a clog in the system. Refer to the Maintenance section on how to remove a clog in your system.
My brush roll is not spinning
CAUTION
To reduce the risk of injury from moving parts, unplug before cleaning or servicing.
- Unplug and remove any hair or other blockages around the brush roll.
- Clean filters. Refer to the Maintenance section for directions on how to clean filters.
- Check for clogs in the system. Refer to the Maintenance section for directions on how to remove clogs.
- Resume normal operation.
Service & Warranty
SERVICE & WARRANTY FOR HOOVER® HIGH PERFORMANCE SWIVEL PRODUCT SERVICE INFORMATION
REPRESENTATIVE Call 1-800-944-9200 USA & Canada
In the event that further assistance is required, visit and authorized service center. Find one nearest you by visiting our website at www.Hoover.com or Hoover.ca. Costs of any transportation to and from any place of repair are to be paid by the owner. Always identify your product by the model number and manufacturing code when requesting information or ordering replacement parts. (the model number and manufacturing code for the vacuum appears on the back of the spine.)
LIMITED FIVE YEAR WARRANTY (DOMESTIC USE)
WHAT THIS WARRANTY COVERS
When used and maintained in normal household use and in accordance with the Owner’s Manual, your HOOVER® product is warranted against original defects in material and workmanship for a full five years from the date of original purchase from an authorized dealer of Hoover® products (the “Warranty Period”). During the Warranty Period, Hoover will provide labor and parts, at no cost to you, to correct any such defect in products purchased in the United States, U.S. Military Exchanges and Canada. Royal Appliance Mfg. Co. d/b/a TTI Floor Care North America (“Hoover”) provides this five year limited warranty on the terms and conditions contained in this warranty statement for the duration of the Warranty Period.
HOW TO MAKE A WARRANTY CLAIM
If this product is not as warranted, take or send the product to either a Hoover® Sales and Service Center or Hoover® Authorized Warranty Service Dealer along with original proof of purchase from an authorized dealer of Hoover® products. For an automated referral to authorized service outlets in the U.S.A., phone: 1-800-944-9200 OR visit Hoover® online at www.Hoover.com or Hoover.ca. For additional assistance or information concerning this Warranty or the availability of warranty service outlets, phone the Hoover® Consumer Response Center, Phone 1-800-944-9200, Mon-Fri 8am-7pm EST. In Canada, contact Hoover® Canada, Carson Building, 100 Carson St., Etobicoke, Ontario M8W 3R9, Phone: 1-800-944-9200, Mon-Fri 8am-7pm EST.
WHAT THIS WARRANTY DOES NOT COVER
This Warranty does not cover: use of the product in a commercial operation (such as maid, janitorial and equipment rental services), filter, brush roll, belt, improper maintenance of the product, damage due to misuse, acts of God, nature, vandalism or other acts beyond the control of Hoover® owner’s acts or omissions, use outside the country in which the product was initially purchased and resales or transfers of the product by the original owner. This warranty does not cover pick up, delivery, transportation or house calls. However, if you mail your product to a Hoover® Sales and Service Center for warranty service, cost of shipping will be paid one way. This warranty does not apply to products purchased outside the United States, including its territories and possessions, outside a U.S. Military Exchange and outside of Canada. This warranty does not cover products purchased from a party that is not an authorized dealer of Hoover® products, nor does it cover any product that is not accompanied by the original proof of purchase from an authorized dealer of such products.
OTHER IMPORTANT TERMS
This Warranty is not transferable and may not be assigned; therefore, it is only valid for the original purchaser from an authorized dealer of Hoover® products. This Warranty shall be governed and construed under the laws of the state of North Carolina. The Warranty Period will not be extended by any replacement or repair performed under this Warranty. Hoover may, in its sole discretion, repair the product using new or refurbished parts; replace the product presented for repair with a refurbished product of the same or substan tially similar type; or provide a refund. THIS WARRANTY IS THE EXCLUSIVE WARRANTY AND REMEDY PROVIDED BY HOOVER® ALL OTHER WARRANTIES, EXPRESSED OR IMPLIED, INCLUDING WARRANTlES OF MERCHANTABILITY OR FITNESS FOR A PARTIC�ULAR PURPOSE, ARE DISCLAIMED. HOOVER’S LIABILITY FOR DAMAGES TO YOU FOR ANY COSTS WHATSOEVER ARISING OUT OF THIS STATEMENT OF LIMITED WARRANTY SHALL BE LIMITED TO THE AMOUNT PAID FOR THIS PRODUCT AT THE TIME OF ORIGINAL PURPOSE (AS DEMONSTRATED BY THE ORIGINAL PROOF OF PURCHASE), AND HOOVER SHALL NOT BE LIABLE FOR ANY INDIRECT, CONSEQUENTIAL, OR INCIDENTAL DAMAGES ARISING OUT OF THE USE, OR INABILITY TO USE, THIS PRODUCT.
Some states do not allow the exclusion or limitation of incidental or consequential damages; disclaimers of implied warranties; or limitations on how long an implied warranty lasts, so the above exclusions, disclaimers and/or limitations may not apply to you.