Operational Instruction
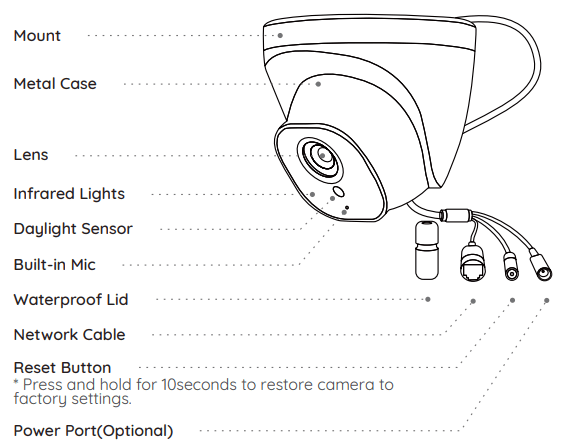
Camera Introduction
Connection Diagram
Before using the camera, please connect your camera as instructed below to finish initial setup.
- Connect the camera to a Reolink NVR (not included) with an Ethernet cable.
- Connect the NVR to your router, and then power on the NVR.
NOTE: The camera should be powered with a 12V DC adapter or a PoE powering device such as PoE injector, PoE switch or Reolink NVR (not included in the package)
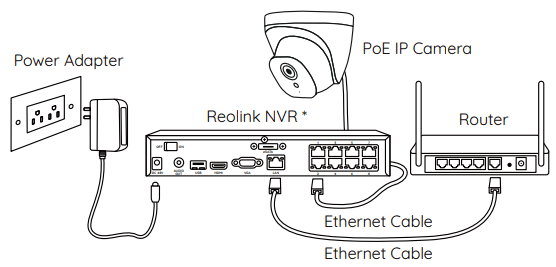
* You may also connect the camera to a PoE switch or PoE injector.
Set up the Camera
Download and launch the Reolink App or Client software, and follow the onscreen instructions to finish initial setup
- On Smartphone: Scan to download the Reolink App

- On PC: Download path of the Reolink Client: Go toreolink.com > Support > App & Client.
NOTE: If you are connecting the camera to a Reolink PoE NVR, please set up the camera via the NVR interface.
Mount the Camera
Installation Tips
- Do not face the camera towards any light sources.
- Do not point the camera towards a glass window. Or, it may result in poor image performance because of the window glare by infrared LEDs, ambient lights or status lights.
- Do not place the camera in a shaded area and point it towards a well-lit area. Or, it may result in poor image performance. For better image quality, please make sure that the lighting condition for both the camera and the capture object is the same.
- For better image quality, it’s recommended to clean the lens with a soft cloth from time to time.
- Make sure the power ports are not exposed to water or moisture or blocked by dirt or other elements.
- The camera comes with waterproof design so it can work properly under conditions like rain and snow. However, it doesn't mean the camera can work underwater.
- Do not install the camera at places where rain and snow may hit the lens directly.
- The camera may work in extreme cold conditions as low as -25°C. Because when it is powered on, the camera will produce heat. You may power on the camera indoors for a few minutes before installing it outdoors.
|
|
|
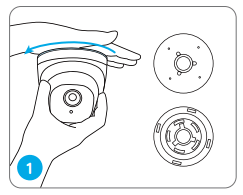
To separate mounting plate from the dome camera, hold and press on the camera top and turn anticlockwise. |
|
|
|
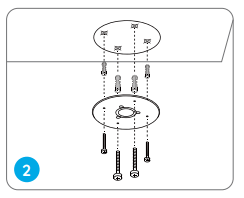
Drill holes according to the mounting hole template and screw the mounting plate to the mounting holes on the ceiling.
NOTE: Use the drywall anchors included in the package if needed.
|
|
|
|
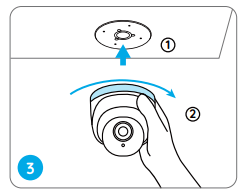
Mount the camera to the mounting plate and turn the camera clockwise to lock it tightly. If the camera is not locked properly, the camera may fall when you turn it anticlockwise to adjust the surveillance angle.
NOTE: Run the cable through the cable notch on the mount base.
|
|
|
|
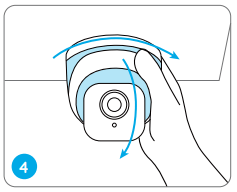
Once the camera is installed, you may rotate the camera body manually to adjust the camera’s surveillance angle. |
Troubleshooting
Camera is not Powering on
If your camera is not powering on, please try the following solutions:
- Make sure your camera is powered on properly. The PoE camera should be powered by a PoE switch/injector, a Reolink NVR or a 12V power adapter.
- If the camera is connected to a PoE device as listed above, connect the camera to another PoE port and see if the camera will power on.
- Try again with another Ethernet cable.
Infrared LEDs Stop Working
If the Infrared LEDs on your camera stop working, please try the following solutions:
- Enable infrared lights on Device Settings page via Reolink App/Client.
- Check if the Day/Night mode is enabled and set up auto infrared lights at night on Live View page via Reolink App/Client.
- Upgrade the firmware of your camera to the latest version.
- Restore the camera to factory settings and check out the infrared light settings again.
Failed to Upgrade Firmware
If you cannot upgrade firmware for the camera, try the following solutions:
- Check out the current camera firmware and see if it is the latest one.
- Make sure that you download the correct firmware from Download Center.
- Make sure that your PC is working on a stable network.
Fail to add PoE camera to NVR
After plugging the new camera into the NVR, the camera's image does not show up on the monitor and it prompts "video loss". The following troubleshooting may be helpful to you.
- No available channels can be distributed to the new camera: remove the cameras which are no longer used and then manually distribute a channel to the new camera.
- The new camera has been distributed with the same IP address as the previously added cameras
- Generally, this situation will cause more than one camera to be offline, or video loss. On the IP channel page, there will be at least two cameras with the same IP address.
- It shows "invalid PWD" on the IP channel page/live view page
- It means that the camera has been set with a password previously, so the NVR couldn't recognize its password. Please input the camera's password to add it.
The micro SD card can not be detected
There are several possible causes for Micro SD Card Not being Detected on Reolink App. You may follow the troubleshooting tips listed below to solve the problem.
- The Micro SD card can not be recognized by Reolink cameras
- Please format the Micro SD card into FAT32 on your computer, and then insert the Micro SD card into the camera to see if it works. Check if the Micro SD card meets the requirements: How to Choose Micro SD Card for Reolink Cameras
- The card had not been properly inserted into the camera
- Take out the Micro SD card and insert it again to see if it works.
- The Micro SD card is defective
- Please test the Micro SD card on your computer and see whether the Micro SD card can be read and written. If it doesn't, please use another Micro SD card to see if it works.