User manual Refrigerator
Introduction
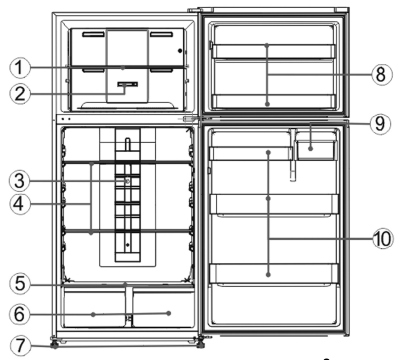
General Description of Refrigerator
| No |
Description |
| 1 |
Freezer Shelf |
| 2 |
Air regulating rod |
| 3 |
Thermostat |
| 4 |
Refrigerator Glass Shelves |
| 5 |
Crisper Cover |
| 6 |
Salad Crisper |
| 7 |
Adjustment feet |
| 8 |
Bottle Racks |
| 9 |
Butter box |
| 10 |
Bottle Racks |
Using Your Refrigerator
The internal temperature of the refrigerator is controlled by a potentiometer installed in the fresh food compartment. Its internal temperature varies with the door opening frequency, ambient temperature, and installation location of the refrigerator.

Refrigerator Temperature Adjustment
The Refrigerator temperature can be adjusted by means of the temperature control knob switch.
1. The temperature gets gradually decreased as you dial the temperature control knob switch from the position “1 ” to “5”.
2. To set the knob switch at the “Optimal” position can meet the daily normal use.
3. When you need to strengthen cooling of the fresh food compartment, dial the temperature control knob switch in the Coldest direction, to extend the compressor running time, with the temperature decreased accordingly.
Note: It is not recommended to set the temperature control knob at the “Coldest” position for a long time.
Freezer Temperature Adjustment
When the temperature control knob switch in the fresh food compartment remains unchanged, the freezer temperature becomes gradually decreased as the slider of FREEZER AIR FLOW is adjusted from “MIN” to “MAX”.
Note: During the actual use, the freezer air regulating lever may be frozen due to high humidity or frequent opening of the door. In such case, do not adjust the regulating lever by force; Instead, you are recommended to use a hot towel to heat it locally, so that the frozen air regulating lever gets thawed before being adjusted to avoid damage.
Recommended optimal temperature modes
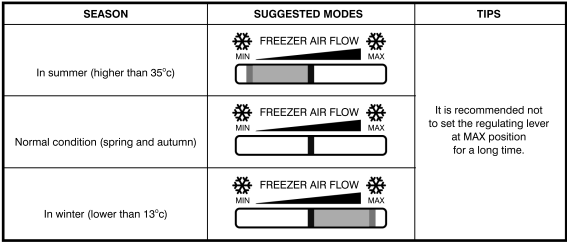
CAUTION: Avoid setting both the refrigerator temperature mode and the freezer temperature mode to be MAX simultaneously, especially in the summer season. This may lead to the fresh food compartment cooling down slowly thus the unpleasant user experience.
In Use
- The appliance might not operate consistently (possibility of defrosting of contents or temperature becoming too warm in the frozen food compartment) when sited for an extended period of time below the cold end of the range of temperatures for which the refrigerating appliance is designed
- The information about the climate range of the appliance is provided on the rated plate.
- The fact that the internal temperatures could be affected by such factors as the location of the refrigerating appliance, ambient temperature and the frequency of door opening, and, if appropriate, a warning that the setting of any temperature control device might have to be varied to allow for these factors
- Effervescent drinks should not be stored in food freezer compartments or cabinets or in low-temperature compartments or cabinets.
- The need to not exceed the storage time(s) recommended by the food manufacturers for any kind of food
Storage of food
- Cook dishes can be put into refrigerator to keep fresh after their temperature decreases to room temperature.
- Food to be stored should be wrapped with clean plastic film.
- Fruits and vegetables should be put into the salad crisper to prevent excessive evaporation of water and freshness.
- Cool hot food down to the room temperature before storing otherwise consumption of electricity will increase and would lead to frost forming inside.
- In the case of refrigerating appliances with chill compartment, some types of fresh vegetables and fruits are sensitive to cold, therefore they are not suitable for storage in this compartment.
- Effervescent drinks should not be stored in food freezer compartments or cabinets or in low-temperature compartments or cabinets.
Tips for keeping food in the Refrigerator
- Cooked meats should always be stored on a shelf above raw meats to avoid bacterial transfer. Keep raw meats on a plate which is large enough to collect juices and cover it with cling film or foil.
- This allows cold air to circulate around the Refrigerator, ensuring all parts of the Refrigerator are kept cool.
- To prevent transfer of flavors and drying out, food should be separately packed or covered. Fruit and vegetables need not be wrapped.
- Allow pre-cooked food to cool down before placing in the Refrigerator. This will help to stop the internal temperature of the Refrigerator from rising.
- To prevent cold air escaping, try to limit the number of times you open the door. When returning from shopping, sort foods to be kept in your Refrigerator before opening the door. Only open the door to put food in or take it out.
Interruption of power supply or failure of the refrigerating system
The care required regarding frozen food in storage in the event of an extended non-running of the refrigerating appliance (interruption of power supply or failure of the refrigerating system)
- Do not open the refrigerator door as much as possible so that even in hot summer food can be safely and freshly kept for hours.
Preparations for freezing
- Leave cooked food to cool completely.
- Chill food in a Refrigerator before freezing if possible.
- Consider how you want to cook the food before freezing it.
- Do not freeze food in metal containers as you may want to microwave it straight from the Freezer.
- Use special Freezer bags available from supermarkets, Freezer film, polythene bags, plastic containers, aluminum foil for acidic foods (such as citrus fruits). Do not use thin cling film or glass. Do not use used food containers (unless cleaned thoroughly first).
- Remove as much air from the container as possible.
- Leave a small amount of “air space” when freezing liquids, to allow for expansion.
Tips for shopping for frozen foods
- When buying frozen food, look at the Storage Guidelines on the packaging. You will be able to store each item of frozen food for the period shown against the star rating. This is usually the period stated as “Best, before”, found on the front of the packaging.
- Check the temperature of the frozen food cabinet in the shop where you buy your frozen foods.
- Make sure the frozen food package is in perfect condition.
- Always buy frozen products last on your shopping trip or visit to the supermarket.
- Try to keep frozen food together while shopping, and on the journey home as this will help to keep the food cooler.
- Do not buy frozen food unless you can freeze it straight away. Special insulated bags can be bought from most supermarkets and hardware shops. These keep frozen food cold for longer.
- For some foods, thawing before cooking is unnecessary. Vegetables and pasta can be added directly to boiling water or steam cooked. Frozen sauces and soups can be put into a saucepan and heated gently until thawed.
- Use quality food and handle it as little as possible. Freeze food in small quantities, it freezes faster, takes less time to thaw and enables you to eat it in the quantity you need.
- First, estimate the amount of food you will be freezing. If you are freezing large amounts of fresh food, remember to turn the control dial to the low temperature range. This will lower the temperature in the Freezer, freezing your food quicker and helping to keep the goodness in. However, you should do this sparingly to conserve energy.
Defrosting
This appliance is designed as automatic defrosting, no need to defrost by hand.
Moving the Refrigerator
Location
Do not place your Refrigerator near a heat source, e.g. Cooker, boiler, or radiator. Also avoid direct sunlight in out-buildings or sun lounges.
Leveling the Refrigerator
Make sure the Refrigerator is level. Use the rotating leveling feet at the front. If the Refrigerator is not level, the doors and magnetic seal alignments will be affected and may cause your Refrigerator to work incorrectly.
After the Refrigerator is in place, it can be used after 4 hours. This allows time for the coolant to settle.
Installation
Do not cover or block the vents or grilles of your appliance.
If you are not at home for a long time
- If the appliance will not be used for several months, turn off the refrigerator first and then unplug the unit from the wall outlet.
- Remove all the food.
- Clean and dry the interior thoroughly. To prevent odor and mold growth, leave the door open slightly: blocking it open if necessary or have the door removed.
- Keep the cleaned Refrigerator in a dry, ventilated place away from the heat source, where the Refrigerator is placed smoothly and do not place heavy objects on top of the Refrigerator.
- Use extreme caution in the case of children. The unit should not be accessible to child’s play.
Save energy
- Install the refrigerator in the coolest part of the room, out of direct sunlight and away from heating ducts or registers. Do not place the refrigerator next to heat-producing appliances such as a range, oven, or dishwasher.
- The refrigerator door should remain open only if necessary; do not place hot food inside the refrigerator.
- Organize the refrigerator to reduce door openings. Remove as many items as needed at one time and close the door as soon as possible.
- The refrigerator door should be properly closed to avoid increased energy consumption, and the formation of excess ice and / or condensation inside.
- Constantly circulating cold air keeps the temperature homogenous inside the refrigerator. For this reason, it is important to properly distribute the food, to facilitate the flow of air.
- Cover foods and wipe containers dry before placing them in the refrigerator. This cuts down on moisture build-up inside the unit.
- Do not overcrowd the refrigerator or block cold air vents. Doing so causes the refrigerator to run longer and use more energy. Shelves should not be lined with aluminum foil, wax paper, or paper toweling. Liners interfere with cold air circulation, making the refrigerator less efficient, which could cause food spoilage.
- The arrangement of food for storage and for freezing, where applicable, particularly including advice that food to be frozen is not to be placed in direct contact with food in storage and, if appropriate, that it could be necessary to reduce the guantity to be frozen if freezing every day is anticipated.
- During prolonged absences (example: vacations), it is advisable to disconnect the refrigerator, remove all the food, and clean it. The door should be left slightly open to avoid mold and unpleasant odors. This will not affect the refrigerator when it is reconnected.
- During short absences (example: holidays), the refrigerator can remain on. However, remember that prolonged power outages may occur while you are gone.
- The door to the evaporator clearance can be used to store food.
- The storage time(s) recommended by the food manufacturers for any kind of food and particularly for commercially quick-frozen food in food-freezer and frozen-food storage compartments or cabinets
- The precautions necessary to prevent an undue rise in the temperature of the frozen food while defrosting the refrigerating appliance, such as wrapping the frozen food in several layers of newspaper.
- A rise in temperature of the frozen food during manual defrosting, maintenance or cleaning could shorten the storage life.
- The care required regarding frozen food in storage in the event of an extended non-running of the refrigerating appliance (interruption of power supply or failure of the refrigerating system).
Maintenance and Cleaning
Internal cleaning
Clean the Refrigerator internally with a weak solution of bicarbonate of soda. Then rinse with warm water using a damp sponge or cloth and wipe dry. Wash the baskets in warm soapy water and ensure they are completely dry before replacing in the Refrigerator.
External cleaning
Use standard non-abrasive detergent diluted in warm water to clean the Refrigerator exterior.
The grille of the condenser at the back of the Refrigerator and the adjacent components can be vacuumed using a soft brush attachment.
Do not use harsh cleaners, scouring pads or solvents to clean any part of the Refrigerator
ELECTRICAL INFORMATION
THIS APPLIANCE MUST BE GROUNDED.
This appliance is fitted with a plug which will be suitable for use in all houses fitted with sockets to current specifications.
If the fitted plug is not suitable for your socket outlets, it should be cut off and carefully disposed of. To avoid a possible shock hazard, do not insert the discarded plug into a socket.
Servicing
TROUBLESHOOTING
Not every failure requires technical service personnel to solve the following simple small problem; you can try to solve the problem.
| CASE |
INSPECTION |
SOLUTIONS |
| Completely non refrigeration |
• Is power plug off?
• Are breakers and fuses a broken?
• No electricity or line trip? |
• Re-plug.
• Opening the door and checking whether the lamp is lit. |
| Abnormal noise |
• Is refrigerator stable?
• Does refrigerator reach the wall? |
• Adjusting refrigerator’s adjustable feet.
• Off the wall. |
| Poor refrigerating efficiency |
• Insert hot food or too much food?
• Is the door opened frequently?
• Is the door fully closed?
• Direct sunlight or near a furnace or stove?
• Is it well-ventilated?
• Temperature setting is too high? |
• Putting food into refrigerator when hot food becomes cool.
• Checking and closing the door.
• Removing the refrigerator from the heat source.
• Emptying the distance to maintain good ventilation.
• Setting to the appropriate temperature. |
| Peculiar smell in refrigerator |
• Any spoiled food?
• Do you need to clean refrigerator?
• Did you pack food with strong odors? |
• Throwing away spoiled food.
• Cleaning refrigerator.
• Packing food of strong flavors. |
Note: If the above cases cannot be corrected, do not disassemble the repair yourself. Repairs carried out by inexperienced persons may cause injury or serious malfunctioning. Contact the local store where your purchase was made. This product should be serviced by an authorized engineer and only genuine spare parts should be used.
When the appliance is not in use for long periods, disconnect from the electricity supply, empty all foods, and clean the appliance, leaving the door ajar to prevent unpleasant smells.
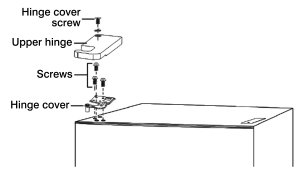
Reversing the Door
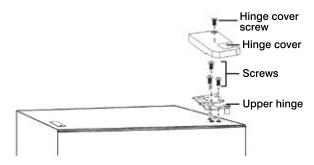
1. Make sure that your refrigerator is unplugged.
2. Remove the hinge cover screw, then pry the hinge cover up and off, remove the three screws that secure the upper hinge to the door, then remove the hinge.
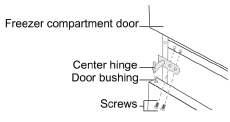
3. Remove the freezer compartment door from the cabinet.
4. Remove the three screws that secure the center hinge.
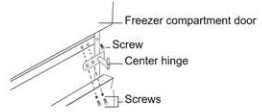
5. Remove the refrigerator compartment door.
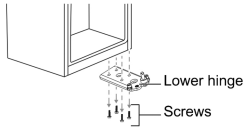
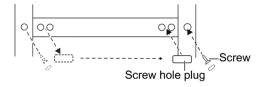
6. Remove the four screws that secure the lower hinge to the right side of the cabinet, then remove the hinge.
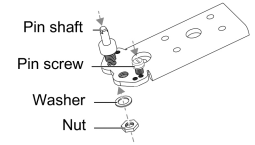
7. Remove the washer and nut that secure the pin shaft to the right hole on the lower hinge, then remove the shaft and pin screw
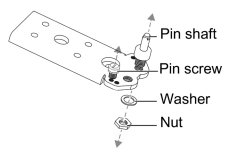
8. Insert the pin screw into the right hole and insert the pin shaft into the left hole on the lower hinge, then secure the shaft with the washer and nut.
9. Install the lower hinge on the left side of the cabinet.
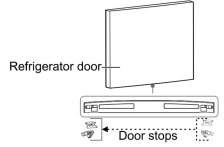
10. Remove the screw that secures the door stops
from the bottom right of the refrigerator compartment door, then remove the door stops and install to the the bottom left side.
11. Install the refrigerator compartment door.
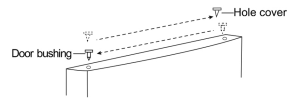
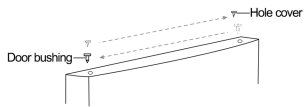
12. Move the door bushing from the top right side of the refrigerator door to the top left side of the door. And move the left hole cover to the right side.
13. Remove screws and the center hinge screw hole plug on the left side of the cabinet, then install in the screw holes on the right side of the cabinet.
14. Install the center hinge to the left side with the two screws you removed previously.
15. Remove the screw that secures the door stops from the bottom right of the freezer compartment door, then remove the door stops and install to the bottom left side.

16. Install the freezer compartment door.
17. Move the door bushing from the top right side of the freezer door to the top left side of the door. And move the left hole cover to the right side.
18. Remove the screw that secures the hinge screw hole cover from the top left side of the cabinet, remove the cover, and secures the cover on the top right side of the cabinet.
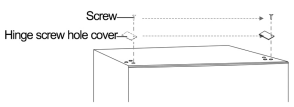
19. Using the left top hinge (from the accessory bag), secure it to the top left side of the cabinet with the three screws you removed previously. Before you tighten the upper hinge screws, make sure that the top of the door is level with the cabinet and that the rubber gasket makes a good seal.
20. Install the left upper hinge cover (from the accessory bag) over the hinge on the top left side of the cabinet with the one screw you removed previously.