User's Manual Electric and Gas Dryer
Features
Package contents
- Electric or Gas Dryer
- Use r Guide
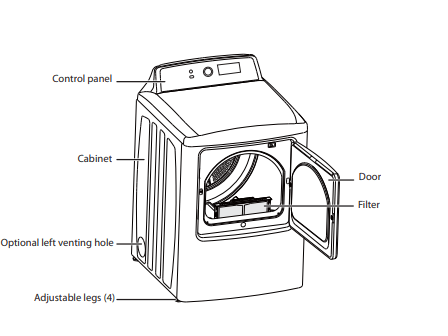
Front components
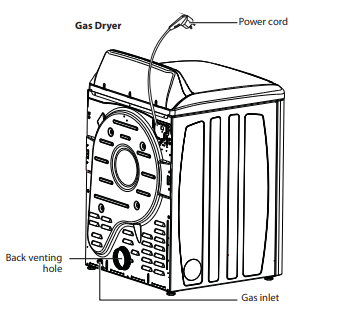
Back components

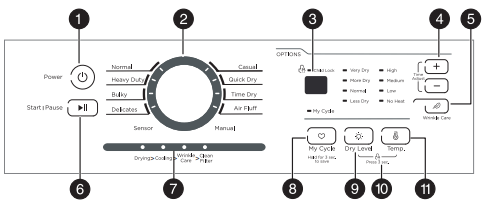
Control panel
Unpacking your dryer
- Unpack your dryer and inspect it for shipping damage. Make sure that you have received all the items shown in the Package contents on page 5.
- To prevent personal injury or strain, wear protective gloves and use a furniture mover whenever lifting or carrying your dryer
Choosing a location
Important to installer
Read the following instructions carefully before installing the dryer.
These instructions should be kept for future reference.
- The dryer is not suitable for installation in a mobile home.
- Remove the door from all discarded appliances to avoid the danger of a child being trapped and suffocating.
- After unplugging a discarded appliance, cut off the power cord.
- Provisions for the introduction of outside air into the dryer room. The free area of any opening for the introduction of outside air shall not be less than twice the area of the dryer exhaust outlet.
You should locate your dryer where there is enough space at the front for loading the dryer and enough space behind for the exhaust system. Your dryer is factory-ready for the rear exhaust option. Make sure that the room you install your dryer in has enough fresh air and that there are no air-flow obstructions.
Do not install or store your dryer in an area where it will be exposed to water or weather. Keep the dryer area clear of combustible materials, gasoline, and other flammable vapors and liquids. Your dryer produces combustible lint. Keep the area around the dryer lint-free.
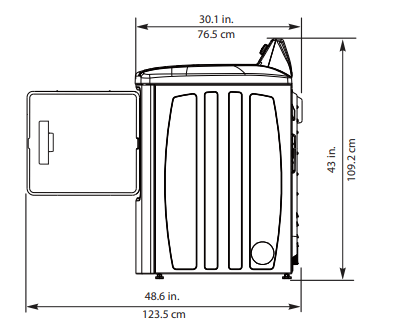
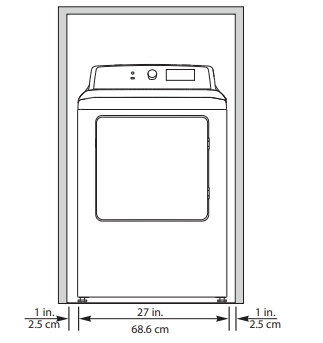
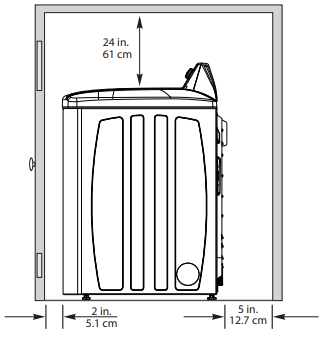
Installing in an alcove, closet, or wall insert/recessed
If you install your dryer in an alcove, closet, or wall insert/recess, the front of the closet must have two unobstructed air openings for a combined minimum total area of 72 sq.in. (465 sq.cm) with a minimum clearance of 3 in. (7.6 cm) at the top and bottom. A slatted door with equivalent space clearance is acceptable. Minimum clearances between your dryer and adjacent walls or other surfaces are:
- Either side: 1 in. (2.5 cm)
- Rear: 5 in. (12.7 cm)
- Top: 24 in. (61 cm)
- Front: 2 in. (5.1 cm)
Exhausting requirements
- Do not assemble the duct with screws or other fasteners that extend into the duct or that catch lint.
- The exhaust duct should be 4 in. (10.2 cm) in diameter.
- The total length of flexible metal duct should not exceed 7.8 ft. (2.4 m).
- Use only those foil-type flexible ducts, if any, speci cally identified for use with your dryer by the manufacturer.
- In the U.S., make sure that the ducts comply with the outline for Clothes Dryer Transition Ducts, Subject 2158A. See Ducting requirements on page 12 for the maximum duct length and number of bends.
Ducting requirements
Measuring and verifying system back pressure
A Dryer
B 10 in. (25.4 cm) minimum of straight pipe-measure back pressure from the center
C To vent system
D Location on back pressure measurement
E Inclined manometer
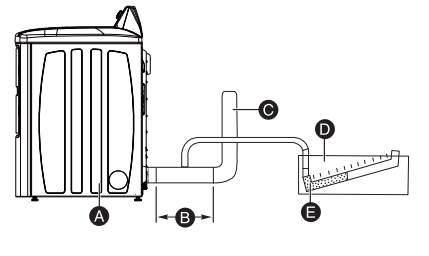
To measure the system back pressure:
- Make sure that your dryer is empty and working.
- Place the manometer at the point where the exhaust duct connects to the dryer.
- Make sure that the lint filter is clean.
- Set your dryer to the no-heat setting, then turn on your dryer.
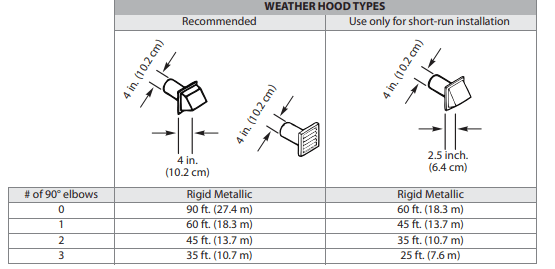
Exhaust hood types
If you install your dryer into an existing exhaust system you must make sure that:
- The exhaust system meets all local, state, and national codes.
- You do not use a flexible plastic duct.
- You inspect and clean all lint buildup from inside the existing duct.
- The duct is not dented or crushed.
- The exhaust hood damper opens and closes freely. For best results, the static pressure in any exhaust system should be between .3 to .8 inches of water column, and it cannot be less than 0 under any circumstances with an installed duct with a four inch diameter.
Electric requirements—Canada only
- You need a 120/240 volt, 60Hz AC approved electrical service fused through a 30-ampere fuse or circuit breaker on both sides of the line.
- All Canadian models are shipped with the power cord attached. The power cord should be plugged into a 30-ampere receptacle.
- In Canada, you may not convert a dryer to 208 volts
Electric requirements—U.S. only
Most dryers require a 120/240 volt, 60Hz AC approved electrical service. Some require 120/208 volt, 60Hz approved electrical service. The electric service requirements can be found on the data label located behind the dryer door. A 30-ampere fuse or circuit breaker on both sides of the line is required:
- If you use a power cord, you should plug the cord into a 30-ampere receptacle.
- A power cord is NOT provided with U.S. electric model dryers.
Power outlet types
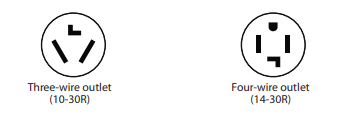
Using a three-wire outlet
If your outlet is a three-wire (three-prong) outlet, choose a three-wire power supply cord with ring or spade terminals and UL listed strain relief. The three-wire power supply cord must:
- Be at least 4 ft. (1.22 m) long
- Have three 10-gauge solid copper wires
- Match a three-wire outlet of NEMA Type 10-30R. See Step-by-Step instructions on page 17 for instructions on how to connect a power cord to your dryer.
Using a four-wire outlet
If your outlet is a four-wire (four-prong) outlet, choose a four-wire power supply cord with ring or spade terminals and UL listed strain relief. The four-wire power supply cord must:
- Be at least 4 ft. (1.22 m) long
- Have four 10-gauge solid copper wires
- Match a four-wire outlet of NEMA Type 14-30R. The ground wire (ground conductor) may be either green or bare. The neutral conductor must be identified by a white color. See Step-by-Step instructions on page 17 for instructions on how to connect a power cord to your dryer.
Grounding requirements
Your dryer must be grounded. If a malfunction or breakdown occurs, the grounding reduces the risk of electrical shock by providing a path of least resistance for the electrical current. This appliance is equipped with a cord having an equipment-grounding conductor and a grounding plug. The plug must be plugged into an appropriate outlet that is properly installed and grounded in accordance with all local codes and ordinances.
Installing your dryer
Tools you will need
Materials you will need
- 3/8’ Gas Dryer Install Kit (Gas model only)
- 3 or 4-prong (dependent on owner's house) Electric Kit. (electric model only)
- Exhaust kit
Step-by-Step instructions
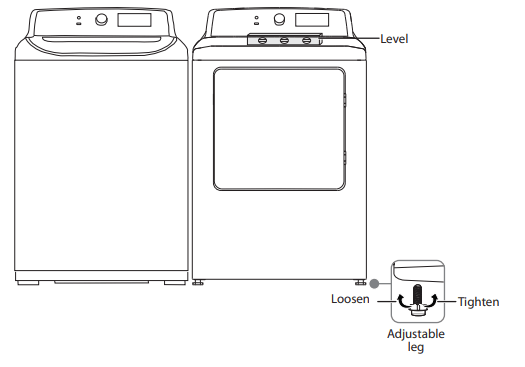
Step 1: Make sure that the floor is a solid, level surface
- Use a level to make sure that the floor where you are installing your dryer is level. This helps minimize vibration, noise, and unwanted movement.if the floor is not level, use the leveling feet of the dryer to make sure the unit is level before use.
Step 2: Move your dryer to the location you selected
- Move your dryer to the location you selected, but do not push your dryer all the way back into the location. You need to connect the power cord and ducting before you move your dryer into its final position.
Step 3: Connect the exhaust ducting

- Make sure that the exhaust hood flapper or louvers move freely. If you do not have an exhaust hood installed, see Exhaust hood types on page 14 for information about recommended hood types. We recommend that you have a professional install the exhaust hood.
- Connect one end of the exhaust ducting to your dryer, then use duct tape to secure the ducting to your dryer. The crimped ends of the duct sections must point away from your dryer. Use a 4 in. (10.2 cm) diameter rigid metal duct.
- Connect the other end of the ducting to the exhaust hood. Tape all joints, including at the dryer.
Step 4: Connect the power cord (U.S. models only)
Three-wire outlet:
A Center terminal block screw
B External ground connector
C Neutral grounding wire (white)
D Neutral wire (white or center wire)
E 3/4" (1.9 cm) UL-listed strain relief
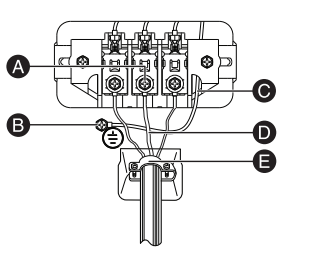
- On your dryer, remove the center terminal block screw (A).
- Connect the neutral wire (white or center wire) of the power cord to the center terminal screw of the terminal block. Be sure to cross the screw through the ring of the power cord terminal and tighten the screw.
- Connect the other wires to the outer terminal block screws. Be sure to cross the screw through the terminal ring and tighten the screw
- Tighten the strain relief screws
- Insert the tab of the terminal block cover into your dryer’s rear panel slot, then secure the cover with a screw.
Four-wire outlet:
A Center terminal block screw
B External ground connector
C Green or bare copper wire of the power cord
D Neutral grounding wire (White)
E Neutral wire (white or center wire)
F 3/4" (1.9 cm) UL-listed strain relief
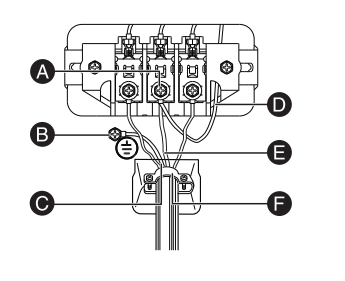
- Remove the center terminal block screw
- Connect the ground wire (green or unwrapped) of the power cord to the external ground conductor screw.
- Connect the neutral wire (white or center wire) of the power cord and the appliance ground wire (white) under the center screw of the terminal block.
- Connect the other wires to the outer terminal block screws. Be sure to cross the screw through the terminal ring and tighten the screw.
- Tighten the strain relief screws
- Insert the tab of the terminal block cover into your dryer’s rear panel slot, then secure the cover with a screw.
Step 5: Level your dryer
- If your dryer is not level, carefully tilt your dryer just enough to adjust the leveling feet on the bottom of your dryer. Extend the feet only as much as is necessary. If the feet are extended too much, your dryer may vibrate.
Step 6: Plug in your dryer
Make sure that all exhaust and electrical connections are complete, then plug your dryer into the electrical outlet.
Step 7: Check the final installation
- Before you use your dryer, make sure that:
- Your dryer is plugged into an electrical outlet and is properly grounded
- You used rigid or stiff-walled flexible metal vent material. You did not use a plastic flexible ducting.
- The exhaust duct work is hooked up and the joints are taped.
- The dryer is level and sits firmly on the floor.
- Start your dryer to confirm that it runs, heats, and shuts off.
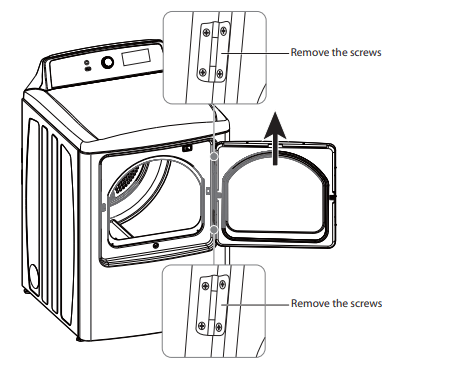
Reversing the dryer door
1. Make sure that the power cord is unplugged
2. While supporting the door, remove the four hinge screws from the door, then lift the door to remove it and set the door aside
3. Remove the screws for the locker cover on the right side of the dryer and the screws for the locker cover on the left side of the dryer.
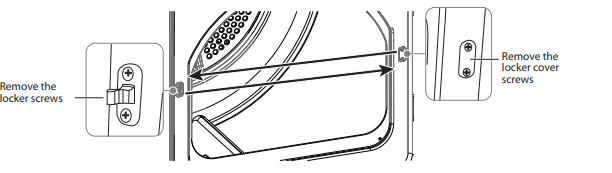
4. Install the locker onto the right side of the dryer with the screws you just removed, then install the locker cover on the left side of the dryer.
5. Remove the screws around the door.
6. Pull the inside door board from the outside door board.
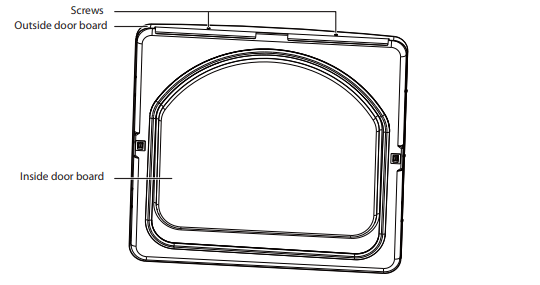
7. Rotate the outside door board 180°, then reassemble it with the inside door board with the screws you removed previously.
8. Install the hinges onto the left side of the dryer
9. Align the hinges on the door with the hinge screw holes on the front of your dryer, then secure the door with the four screws you previously removed.
Using your dryer
Drying a load of clothes
Step 1: Turn on your dryer
- Press the
 /Power button to turn on your dryer.
Step 2: Load your dryer
- Place only one wash load in your dryer at a time.
- Heavy and light weight fabrics take different amounts of time to dry. If you mix heavy and light weight fabrics in a load, lightweight fabrics may be dry at the end of the cycle while heavy fabrics may still be damp.
- If you only need to dry one or two items, you can improve the tumbling action and drying efficiency by adding a couple of similar items to the load.
- Overloading restricts tumbling action which results in uneven drying and excessive wrinkling of some fabrics.
Step 3: Select the dryer cycle and options
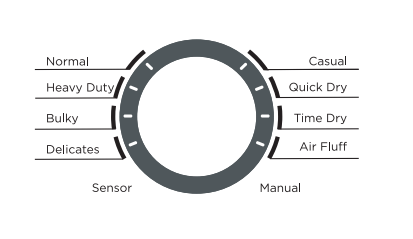
1. Turn the Cycle Selector to select a drying cycle. For more information, see Dryer options and settings on page 29.
2. Optional: Use the control panel buttons (like Wrinkle Care ) to customize the drying cycle. For descriptions of buttons, see Control panel on page 7. For information about which buttons are available for each cycle type, see Dryer options and settings on page 29.
3. Optional: After you select a drying cycle and customize the cycle, press and hold the My Cycle button for three seconds to save your settings. The light next to the knob ashes and your dryer beeps three times to confirm that your settings are saved.
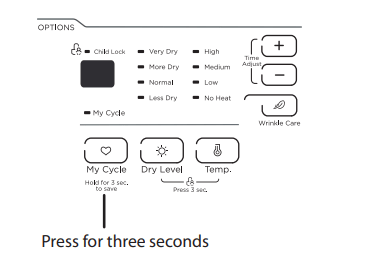
When you want to use your saved cycle and settings again, press the My Cycle button.
Step 4: Start your dryer
1. Press the  button. The Drying indicator lights
2. If you need to pause the cycle (for example to add or remove items or adjust the load), press the  button, then open the door once. your dryer stops tumbling. When you are ready to start drying again, close the door, then press the
  button.
Unloading your dryer
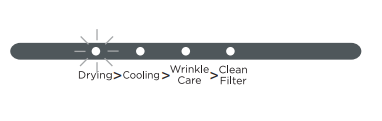
1. When the drying cycle is over, your dryer beeps six times and the Clean Filter indicator lights.

2. Open the door and remove the items
Setting the child lock
Your dryer has a child lock feature to prevent children from playing with your dryer. When you turn on the child lock, the only button that works is  /Power
- You can turn on your dryer, set this function, then turn it off
- When you do so, even if the unit is powered on, you still cannot start it before the Child Lock function is deactivated.
- This function is cancelled automatically if your unit is out of power, such as when you unplug it or the power turns off
1. Press and hold both the Dry Level and Temp buttons for three seconds. The blue child lock light turns on.
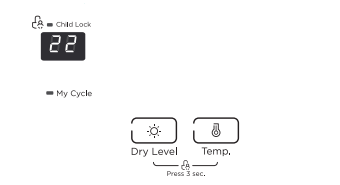
2. To turn off the child lock, press and hold both the Dry Level and Temp buttons for three seconds.
Cleaning the lint filter
- Gently pull the lint filter out of the slot at the bottom of the drum. Remove the accumulated lint, then insert the filter back into the slot.

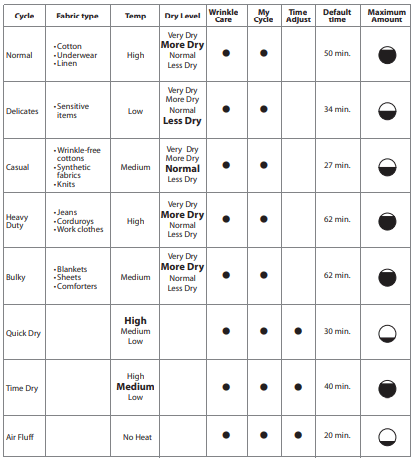
Dryer options and settings
- Settings in bold are initial settings. The • (dot) indicates optional functions you can select.
- For best results, follow the wet load size recommendations noted for each cycle.
 Small load: Fill the dryer drum with three to four items, not more than 1/4 full.
 Medium load: Fill the dryer drum up to about 1/2 full.
 Large load: Fill the dryer drum up to about 3/4 full. Do not overload. Items need to tumble freely.
Special laundry tips

Maintaining your dryer
Cleaning the exterior
- Clean with a soft, damp cloth. Do not use abrasive substances.
- Protect the surface from sharp objects
- Do not place any heavy or sharp objects or a detergent box on the dryer. Keep them in a separate storage area. These items may scratch or damage the top cover of the dryer
- Because the entire dryer has a high-gloss finish, the surface can be scratched or damaged. Avoid scratching or damaging the surface when using the dryer.
Cleaning the drum
- If the dryer drum becomes stained from noncolorfast fabrics, clean the drum with a damp cloth and a mild liquid household cleanser.
- Remove cleanser residue before drying the next load
Cleaning the control panel
- Clean with a soft, damp cloth. Do not use abrasive substances
- Do not spray cleaners directly on the panel. The control panel finish may be damaged by some laundry pre-treatment soil and stain remover products. Apply such products away from your dryer and wipe up any spills or over-spray immediately
Cleaning and inspecting the exhaust system
Inspect and clean the exhaust yearly to maintain optimum performance
- Disconnect the exhaust duct from the dryer and from the exhaust hood (at the exhaust outlet) outside of the building
- Check the interior of the duct and remove any lint accumulation.
- Make sure that lint is removed from the exhaust hood. Lint may collect in the exhaust hood so that the flappers or louvers will not open or close completely.
- After cleaning the exhaust hood, check that the flapper or louvers move freely.
- Reassemble the exhaust duct and hood, making sure that the joints are secure and sealed.
- Operate your dryer and make sure that the exhaust air is not obstructed in the vent and that there are no leaks in the system
Troubleshooting
Dryer does not start.
- Confirm that the Child Lock is off.
- Make sure the dryer door is closed completely.
- If you opened the door during the drying cycle, press the
 button again.
- Make sure that the power cord is plugged into a working electrical outlet.
- Check the circuit breaker and fuses for your dryer’s electrical connection.
Dryer does not heat or does not dry.
- Your dryer may have moved into the cool-down process of the cycle. This is normal.
- Select a cycle other than Air Fluff and a temperature setting that is not “no heat.”
- Do not overload your dryer. Depending on the size of your washer, one wash load should equal one dry load.
- Dry heavy items and lightweight items separately.
- If you are drying large, bulky items, like blankets or comforters, try repositioning the load to ensure even drying.
- The load may be too small to tumble correctly. Add a few towels.
- Clean the lint filter and exhaust duct.
- Check the circuit breaker and fuses for your dryer’s electrical connection.
- Make sure that the outside exhaust hood opens and closes freely.
- Check the exhaust system for lint buildup. Ducting should be inspected and cleaned annually.
- Make sure that your exhaust duct is a 4" rigid metal duct.
Dryer is noisy.
- It is normal for your dryer to hum due to the high velocity of air moving through the dryer drum and exhaust system.
- Check the load for objects, like coins, loose buttons, nails, or broken zippers. Remove these items.
- Make sure that your dryer is level
Clothes are unevenly dried
- Seams, pockets, and other similarly heavy areas may not be completely dry when the rest of the load has reached the selected dryness level. This is normal. Select the More Dry or Very Dry dry level if desired.
- If you dry one heavy item with a lightweight load (such as one towel with sheets), the heavy item may not be completely dry when the rest of the load has reached the selected dryness level. For best drying results, dry heavy items and lightweight items separately
Dryer shuts off before clothes are dried.
- The dryer load is too small. Add more items or a few towels and restart the cycle.
- The dryer load is too large. Remove some items and restart the cycle.
Dryer has an odd odor.
- Your dryer draws air from the surrounding room air. Household odors from paint, varnish, strong cleaners, and so forth, may enter your dryer with the surrounding room air. This is normal. When these odors linger in the air, ventilate the room completely before using your dryer.
Odor remains in clothing even after washing.
- Fabrics containing strong odors should be rewashed utilizing desired wash cycle.
Clothing is still wrinkled after using the Wrinkle Care setting.
- Small loads of one to four items work best.
- If the dryer load is too large, items cannot tumble freely. Try loading fewer items.
- Make sure that the items in the dryer load are similar. The Wrinkle Care setting works best when the items in the dryer load are similar-type items
There is lint on the clothing.
- Check pockets thoroughly before washing and drying clothes. Things like paper or tissue can break up into small pieces that turn into lint.
- Clean the lint filter before every cycle. Some loads that produce high amounts of lint can clog the filter.
- Some fabrics are lint producers (like a fuzzy white cotton towel) and they should be dried separately from clothes that are lint trappers (like a pair of black linen pants).
- Divide larger loads into smaller loads for drying.
Understanding the error codes
Your dryer is equipped with an automatic error-monitoring system to detect and diagnose problems at an early stage.
C9 :
- The PCB failed.
- Contact authorized service personnel for help. DO NOT use your dryer.
E4 :
- The humidity sensor failed.
- Your dryer will complete the current operating cycle but items could be over dried. Your dryer can still operate under the Time cycles. Contact authorized service personnel for help.
E5 :
- The temperature sensor failed.
- Contact authorized service personnel for help. DO NOT use your dryer.
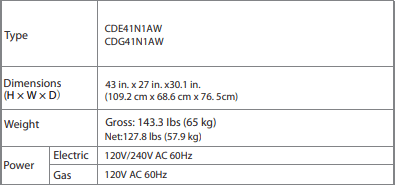
Specifications