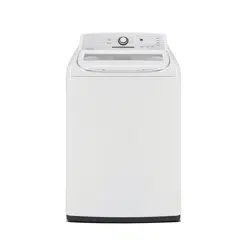
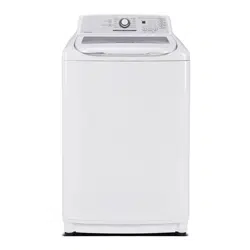
User's Manual Top Load Washer
Features
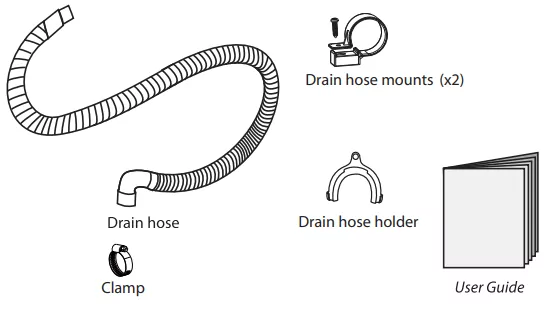
Package contents
Make sure that the following items came with your washer:
Main components


Control Panel
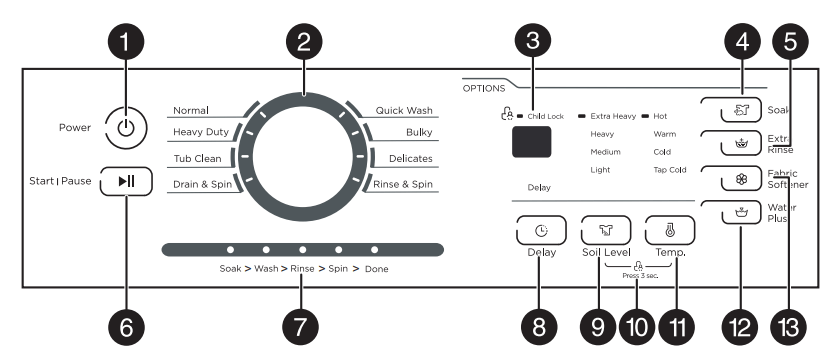
| # |
ITEM |
DESCRIPTION |
| 1 |
Power button |
Press to turn on your washer. Press again to turn off your washer. If you leave your washer on and do not press the  /Start Pause button within 10 minutes, your washer automatically turns off. /Start Pause button within 10 minutes, your washer automatically turns off. |
| 2 |
Cycle selector |
Turn to select a wash cycle. The cycle you select determines the wash pattern for the cycle. For more information, see Washer options and settings. |
| 3 |
Digital display |
- The initial display is the total time for the cycle you select.
- While your washer is running, the display shows the cycle process and time remaining in the cycle. Note: The time shown is an estimate based on normal operating conditions. External factors (such as the load size, room temperature, incoming water temperature, and water pressure) can affect actual time.
- If you set a delay time for the start of the cycle, the display shows the time when the cycle will start.
|
| 4 |
Soak button |
Press to select the Soak option. Press again to cancel. Select this option for heavily soiled items that need to soak to remove stains and heavy dirt.
Soak occurs after the tub fills and detergent is added, but before the wash process. The agitator will rotate several times during the soak process. |
| 5 |
Extra Rinse button |
Press to add an extra rinse to the wash cycle. Press again to cancel. |
| 6 |
/Start Pause button |
Press once to start the wash cycle. Press again to pause the cycle. If you pause the cycle, you can add or remove items, but you cannot change any settings. Press again to restart the cycle. |
| 7 |
Cycle status lights |
Light to indicate what part of the cycle your washer is in. For example, the Soak light turns on when your washer is in the Soak process. |
| 8 |
Delay button |
Press to select a time when you want the cycle to begin. You can set the time up to 24 hours in advance in one-hour increments. The display shows the time when the cycle will start. For more information, see Step 5: (Optional) Set a delayed start time. |
| 9 |
Soil Level button |
Press to select the soil level. Different soil levels result in different washing times and wash cycle settings. For more information, see Washer options and settings. |
| 10 |
Child lock |
Press and hold the Soil Level and Temp buttons at the same time for three seconds to turn on the child lock function. Press and hold these buttons again for three seconds to turn off the function. When the child lock function is turned on, the only button that works is the  /POWER button and the Soil Level and Temp buttons you use to turn off the child lock. /POWER button and the Soil Level and Temp buttons you use to turn off the child lock.
|
| 11 |
Temp button |
Press to select the washing water temperature.
The rinse water temperature is always cold. |
| 12 |
Water Plus button |
Press once to increase one higher water level. Press again to cancel this function. If the water level is already set to the highest, the level will not change. |
| 13 |
Fabric Softener button |
Add liquid fabric softener to the fabric softener compartment, then press this button.
The fabric softener is added to the cycle at the correct time. |
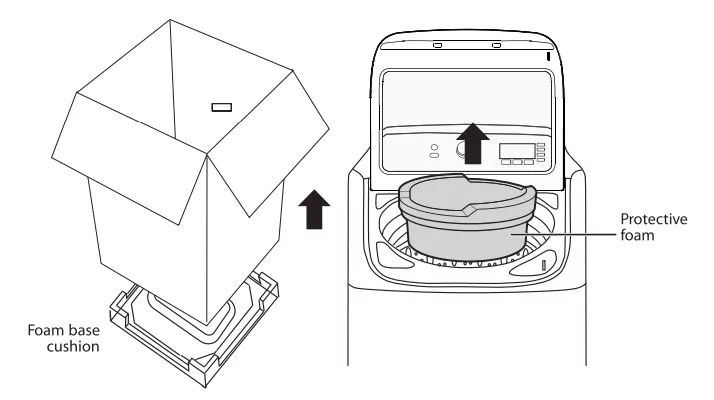
Unpacking your washer
Warning
- Packing materials can be dangerous to children. Keep all packing materials (plastic bags, polystyrene, and so on) well out of the reach of children.
- Do not operate your washer on the foam base cushion. Doing so will result in serious vibration, which could cause equipment damage or result in physical injury.
Remove the packing box and lift the washer up and away from the foam base cushion. Open the lid of the washer to take out all accessories including the protective foam.
Choosing a location
Warning: Do not install your washer in areas where water may freeze, because your washer always retains some water in its water valve, pump, and hose areas. Frozen water can damage the belts, pump, hoses, and other components. Never install on a platform or weakly supported structure.
For best performance, you must install your washer on a solid, level floor. Wooden floors may need to be reinforced to minimize vibration or unbalanced load situations. Carpeting and soft tile surfaces can contribute to excessive vibration, which can cause your washer to move slightly during the spin cycle.
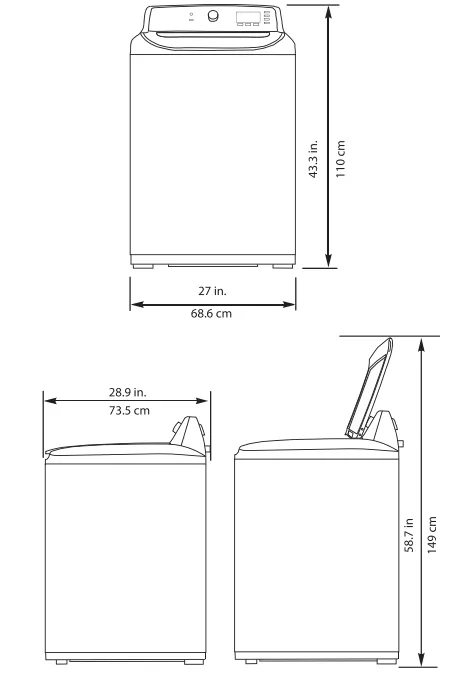
Washer dimensions and installation measurements
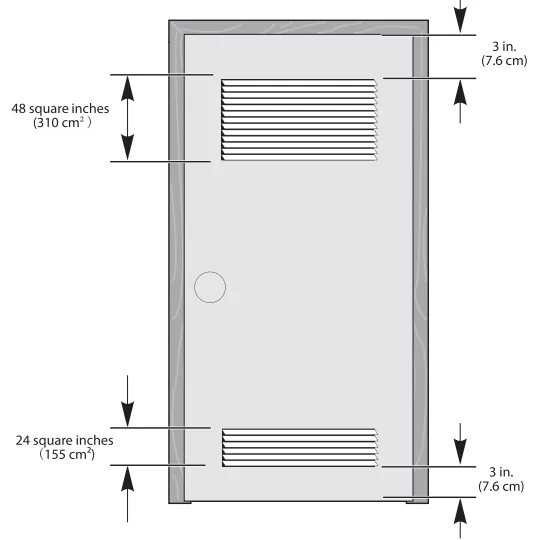
If you install your washer in an alcove or closet, the front of the closet must have two unobstruted air openings for a combined minumum total area of 72 sq.in. (465 sq.cm) with a minimum clearance of 3 in. (7.6 mm) at the top and bottom. A slatted door with equivalent space clearance is acceptable.
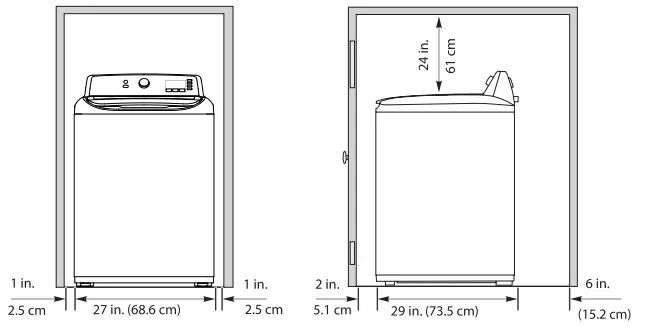
Installing in an alcove or closet
Minimum clearances between your washer and adjacent walls or other surfaces are:
- Either side: 1 in. (2.5 cm)
- Rear: 6 in. (15.2 cm)
- Closet Front: 2 in. (5.1 cm)
- Top: 24 in. (61 cm)
- Gap between the end of water valve and the wall:
- Case 1: If you connect the supply hose after you install your washer: Over 3.9 in. (10 cm)
- Case 2: If you connect the supply hose before you install your washer: Over 2.8 in. (7 cm)
If you install your washer and dryer side- by- side in a closet, the closet front must have an unobstructed air opening of at least 72 square inches (465 square cm).
Electrical requirements
Warning: To reduce the risk of fire, electric shock, or injury to persons, read the IMPORTANT SAFETY INSTRUCTIONS before operating this appliance.
Use a 120 Volt, 60Hz, 15 amp fuse or circuit breaker. We recommend an individual branch circuit that serves only your washer.
Warning: Never use an extension cord.
Electrical grounding is required for your washer.
You must ground your washer. In the event of a malfunction or breakdown, grounding reduces the risk of electric shock by providing a path of least resistance for the electric current.
Your washer is equipped with a power cord with a three- pronged grounding plug for use in a correctly installed and grounded outlet.
Warning
- You are responsible for providing adequate electrical services for your washer.
- An incorrectly connected equipment- grounding conductor can increase the risk of electrical shock. Check with a qualified electrician or serviceman if you are not sure whether your washer is grounded correctly.
- Do not modify the power cord plug that came with your washer. If the plug does not fit the outlet, have the correct type of outlet installed by a qualified electrician.
- To prevent unnecessary risk of fire, electrical shock, or personal injury, all wiring and grounding must be done in accordance with the National Electrical Code ANSI/FNPA, No.70 Latest Revision and local codes and ordinances.
- Never connect the ground wire to plastic plumbing lines, gas lines, or hot water pipes.
Water requirements
To fill your washer in the correct amount of time, the water pressure needs to be between 14 and 116 psi (100 to 800 kPa).
If the water pressure is less than 14 psi (100 kPa):
- The water valve may fail or may not shut off completely.
- The time it takes to fill your washer may be longer than the time your washer controls allow. Your washer will turn off and report an error. A time- limit is built into the controls to prevent flooding in your home if a hose becomes loose.
- Water inlet hoses must be purchased separately. You can buy inlet hoses in various lengths up to 8 ft. (240 cm).
To avoid the possibility of water damage:
- Make sure that the water faucets are easily accessible.
- Turn off the faucets when you are not using your washer.
- Periodically check to make sure that water is not leaking from the water hose fittings.
Drainage requirements
- The recommended height for the drain standpipe is 48 in. (122 cm).
- The drain hose must be routed through the drain hose clip to the standpipe.
- The standpipe must be large enough to accept the outside diameter of the drain hose (1.46 /3.7 cm).
Installing your washer
Tools you will need

Step-by-Step Instructions
Step 1: Select a location
Before you install your washer. make sure that the location:
- Is a hard. level surface without carpeting or soft flooring that can obstruct ventilation.
- Isaway from direct sunlight.
- Has adequate ventilation.
- Is not exposed to freezing temperatures (32° F ot 0°C).
- Is away from heat sources such as oil or gas.
- Has enough space so that the washer does not rest on its power cord.
Step 2: Connect the water hoses
Note: The water supply hoses are not supplied with your washer and must be purchased separately.
Caution:
- Use new water supply hoses. Using old hoses can result in leakage or overflow that can damage your property.
- Donot connect multiple water supply hoses together to increase the length of the hose. Hoses connected this way can leak and cause electrical shock. Ifa hose is too short. replace the hose with a longer. high-pressure hose.
- Make sure that there are rubber washers inside the fittings at both ends of each new water hose. Installing the water supply hoses without rubber washers can cause water leakage.

- Tighten the hose and faucet fittings by hand until they are snug. then tighten them an additional two-thirds of a turn with pliers or a wrench. Pull the water supply hoses downwards to make sure that they are connected securely.

Caution: Do not overtighten the fittings or apply tape or sealant to the faucets or water supply intakes. This can damage the fitting.
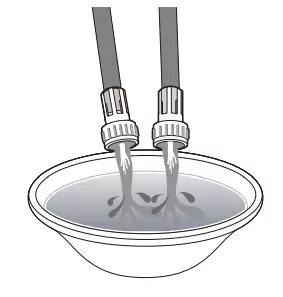
- Place the unconnected ends of the hoses into a bucket and turn on the faucets connected to the water supply hoses for 10 or 15 seconds to remove any foreign substances. Turn off the faucets.
- Connect the ends of the water supply hoses to the water supply intake connections at the top of the washer. Make sure that the rubber washers are in place. The water supply hose connected to the hot faucet must be connected to the hot water supply intake and the water hose connected to the cold faucet must be connected to the cold water supply intake.
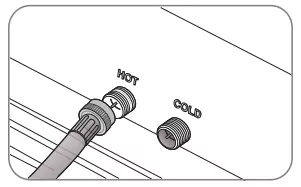
Note: If you do not want to use the hot water supply hose, insert a water intake cap into the hot water supply intake hole. In this case, you must select the Tap Cold option for the water temperature.- No intake cap is provided with your washer. It must be purchased separately.
- Tighten the fittings by hand until they are snug, then tighten them an additional two- thirds of a turn with a wrench.

Caution: Do not overtighten the fittings or apply tape or sealant to the faucets or water supply intakes. This can damage the fittings.- Make sure that the water supply hoses are not twisted or bent. A bent or twisted hose can leak and cause an electric shock due to the water leakage. To ensure the correct water usage, connect both hot and cold water faucets. If either or both are not connected, an error code could occur.
- Turn on the hot and cold water supplies and check all the water supply intake connections and the faucets for water leaks.
Step 3: Connect the drain hose
Caution:
- Failure to slide the drain hose completely over the washer's drain pipe may result in water leakage.
Failure to move the clamp or hoop onto the washer’s drain pipe will result in water leakage.
- Find the end of the drain hose that has the clamp. then slide the clamp away from the end of the hose.
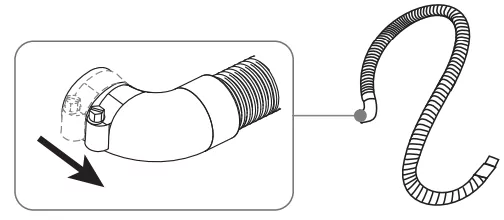
- Insert the drain hose with the clamp onto the washer's drain pipe. Make sure that the drain hose completely covers the end of the drain pipe.
- Move the clamp toward the drain pipe outlet. Tighten the clamp with a flat blade screwdriver.
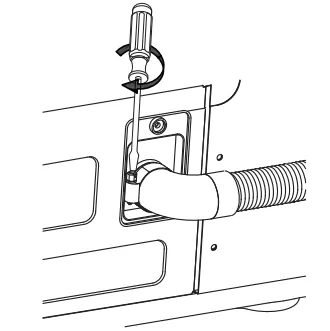
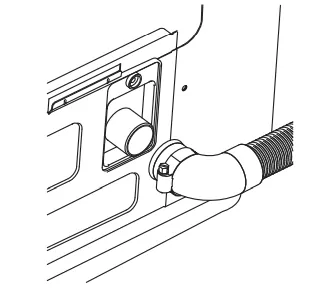
- Fasten the drain hose to the washer frame at the indicated locations with the hose clamps (2) provided, using a Phillips screwdriver.

- Position the other end of the drain hose (the loose end) in one of the following ways:
Caution: Make sure that the connection between the drain hose and the wash basin, standpipe, or laundry tub is not airtight.
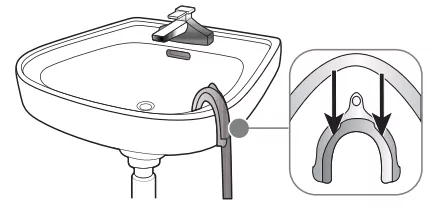
- Over the edge of a wash basin - Secure the guide to the side of the basin wall with a hook, tape it, or tie it with a piece of cord to prevent the drain hose from moving.
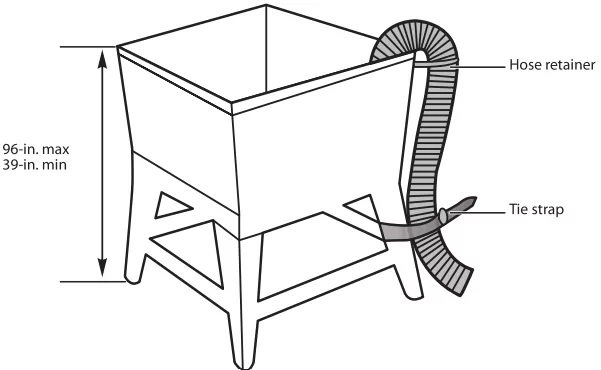
- In a Standpipe - The standpipe must be no shorter than 39-in. (99 cm) and no longer than 96-in. (244 cm).
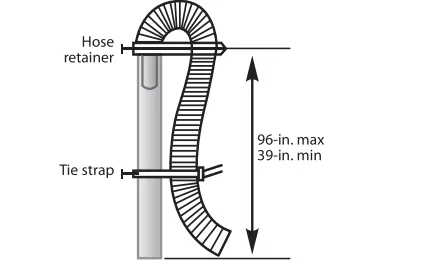
- In a laundry tub - The laundry tub must be no shorter than 39- in. (99 cm) and no higher than 96- in (244 cm) maximum.
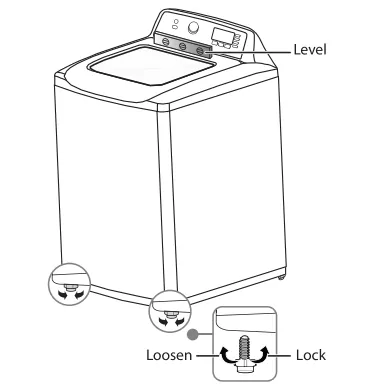
Step 4: Level your washer
Caution: Do not use your washing machine without leveling. If your washer is not level, it may:
- Vibrate excessively which can cause your washer to malfunction
- Make excessive noise.
- Indicate error codes E3, E4 or E5 when the washer is running.
Extend the leveling feet only as much as is necessary. If the feet are extended too much, your washer may vibrate.
Determine if the washer is level by checking the position of the tub or by using a level.
- Slide the washer into position.
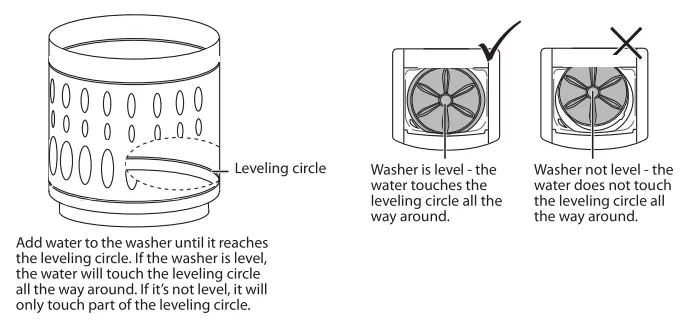
- Open the lid of the washer, then pour water into the tub to the leveling circle. If the washer is level the water will touch the leveling circle all the way around. If the washer is not level, the water will only touch part of the leveling circle.
- If your washer is not level, carefully tilt your washer just enough to adjust the leveling feet on the bottom front of your washer. Extend the feet only as much as is necessary. If the feet are extended too much, your washer may vibrate.
Step 5: Power your washer
Plug the power cord into a well- grounded, 3- prong, 120 Volt 60Hz approved electrical outlet, protected by a 15- amp fuse or comparable circuit breaker. Your washer is grounded through the third prong of the power cord.
Step 6: Run a test cycle
Run a test cycle to make sure that your washer is properly installed.
- Load about 6 pounds (2.7 kg) of laundry into the tub.
- Press the /Power button to turn on your washer.
- Turn the cycle selector to select the Rinse & Spin cycle.
- Press the /Start Pause button to start the test cycle. Your washer should not rock or vibrate excessively when water fills the tub, or when washing or spinning. The washer should drain well during the spin cycle.
Caution:
Using your washer
Washing a load of laundry
WARNING! To reduce the risk of fre. electric shock. or injury to persons. read the IMPORTANT SAFETY INSTRUCTIONS before operating this appliance.
Selecting a detergent - Your washer is designed to use high efficiency (HE) detergents.
- For the best cleaning results. use an HE detergent. We recommend that you do not use a regular detergent. HE detergents contain suppressors that reduce or eliminate suds. When fewer suds are produced, the load tumbles more efficiency and cleaning is maximized.
- Reducing the amount of detergent may reduce the quality of cleaning. Make sure that you:
- Pre-treat stains
- Sort carefully by color and soil level
- Avoid overloading
Step 1:Turn on your washer
Press the Power button to turn on your washer. Your washer's initial setting are:
- Normal on cycle selector with - displayed on the digital display
- Medium for the Soil Level
- Warm for the Wash Temp
Step 2: Load your washer
Caution! Before loading your laundry. make sure that you remove coins. keys. and other hard objects. and close zippers. These items may damage clothes.
- Sort laundry by fabric type. soil level. color. and load size. See Fabric Care Charton page 29
- Fill the tub with dry, unfolded clothes. Load the tub no more than 3/4 full.
Note:
- Overloading may reduce washing efficiency, cause excess wear, and possibly cause creasing or wrinkling of the load.
- Wash delicate items such as bras, hosiery, and other lingerie on the
Delicates cycle with similar lightweight items.
- When washing big, bulky items (such as rugs or pillows) or a few smaller items (such as stuffed toys or one or two sweaters) that do not fill the tub completely, add a few towels to improve spin performance.
- Always use the Bulky cycle for bulky items.
- When washing heavily soiled loads, do not overload your washer to ensure good cleaning results.
Step 3: Add detergent and additives to the tub/compartments.
Loading the liquid or powder detergent
- Pour the recommended amount of laundry detergent directly into the tub before starting your washer.
- If you are using color-safe bleach, add it with the detergent to the tub.
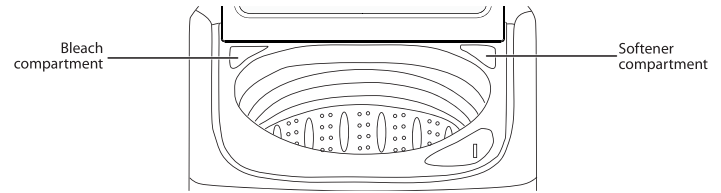
Loading the bleach compartment (liquid bleach only)
- Add chlorine bleach to the bleach compartment. Do not over-fill he compartment.
- There is no water inlet to the bleach dispenser. so the bleach will directly load into the tub when you pour it in.
Caution! Avoid splashing or over-filling the compartment. Never pour undiluted liquid chlorine bleach directly onto the load or into the tub. Doing so can damage fabrics, by weakening of the fibers or stripping the color.
Note! Do not pour color-safe bleach into the bleach compartment.
Loading the fabric softener compartment
- Pour the recommended amount of liquid fabric softener into the softener compartment. The dispenser automatically releases liquid fabric softener at the correct time during the rinse cycle.
Note:
- Use the softener compartment ONLY for liquid fabric softeners.
- Do not use the Downy Ball in the fabric softener compartment.
- Donot use liquid fabric softener that is too sticky as it may not. the water sufficiently.
- Be sure to select the Fabric Softener option when using fabric softener
Step 4: Select the appropriate cycle and options for the load
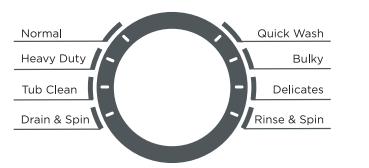
- Tum the cycle selector to select a washing cycle. For information on wash cycles, see Washer options and settings.
- Optional: Use the control panel buttons (like Fabric Softener) to customize the washing cycle. For descriptions of buttons, see Control panel. For information about which buttons are available for each cycle type, see Washer options and settings.
Step 5: (Optional) Set a delayed start time
You can program a wash cycle, then set a time when you want a wash cycle to begin.
- Press the Delay button to turn on the delay start time function.
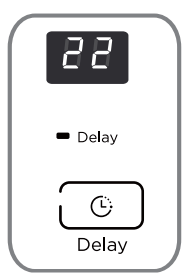
- Press the Delay button repeatedly to select the delay time you want. The delay start time, in hours, will be shown on the display, in sequence, from 0 to 24, then back to 0. You can also press and hold the Delay button to quickly adjust the time until the desired time appears on the display.
- If you want to change the wash cycle settings while you are setting the delay start time, turn the cycle selector. To return to setting the delay start time function, repeat Steps 1 and 2.
- To cancel the delay start time function before you save the setting, press the Delay button until 0 appears on the display, or turn the cycle selector knob.
Step 6: Start your washer
- Press the /Start Pause button.
Note: If you have not set a delayed start time or if the delay time has expired, your washer starts the cycle and the Wash light turns on. As your washer moves from stage to stage in the wash cycle, the related light turns on (such as Rinse or Spin). If you set a delayed start time, the Delay light turns on and your washer starts counting down the start time.

- If you need to pause the cycle (for example to add or remove items or adjust the load), press the /Start Pause button, then open the lid. Your washer stops. When you are ready to resume washing, close the door, then press the /Start Pause button.
Step 7: Unload your laundry
When the wash cycle is complete:
- The Done light turns on
- Your washer beeps six times and flashes 11, 22, 33, 44, 55, 66 after the cycle is done.
- Your washer unlocks the lid

- Open the lid and remove the laundry.
Setting the child lock
Your washer has a child lock function to prevent children from playing with your washer. When you turn on the child lock, the only buttons that work are the /Power button and the Soil Level and Temp buttons you use to turn off the child lock.
- Press and hold both the Soil Level and Temp buttons for three seconds. The child lock light turns on.
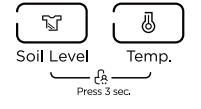
- Totum off the child lock, press and hold both the Soil Level and Temp buttons for three seconds.
- If your washer is not turned on, the child lock can still remain set. Press the /Power button, turn on the child lock function, then press the /Power button to turn off your washer. When you want to use your washer, you need to tum off the lock function.
- If you turn on the child lock function while the washer lid is open, E3 appears on the display. If you do not close the lid within 20 seconds, your washer sounds an alarm, displays CL, and drains all the water in the tub. To clear the alarm, press the /Power button to turn off your washer.
Washer options and settings
- Maximum load weight = 16.60 lbs. (7.53 kg) (Dry clothes)
- Bolded options are initial settings. ● (dots) indicate optional functions you can select.
| Cycle |
Fabric type |
Soil level options |
Temp options |
Delay |
Soak |
Extra rinse |
Fabric softener |
Water Plus |
| Normal |
Cotton, Linen Towels, Shirts Sheets, Jeans Mixed loads |
Extra Heavy Heavy Medium
Light |
Hot
Warm
Cold
Tap Cold |
● |
● |
● |
● |
● |
| Heavy Duty |
Heavily soiled cotton fabrics |
Extra Heavy Heavy Medium |
Hot
Warm
Cold
Tap Cold |
● |
● |
● |
● |
● |
| Tub Clean |
See page 2Z |
Extra Heavy |
Hot |
● |
|
|
|
|
| Drain&Spin |
|
|
|
|
|
|
|
|
| Rinse & Spin |
|
|
Tap Cold |
● |
|
● |
● |
|
| Delicates |
Dress shirts Blouses Nylons Sheer/lacy |
Medium
Light |
Hot
Warm
Cold
Tap Cold |
● |
● |
● |
● |
● |
| Bulky |
Large items like blankets and comforters |
Extra Heavy Heavy Medium
Light |
Hot
Warm
Cold
Tap Cold |
● |
● |
● |
● |
● |
| Quick Wash |
Lightly soiled and small loads |
Medium
Light |
Hot
Warm
Cold
Tap Cold |
● |
● |
● |
● |
|
Maintaining your washer
Caution! Turn off the water faucets after final use. This shuts off the water supply to your washer and prevents the possibility of damage from escaping water.
Cleaning the exterior
- Use a soft cloth to wipe up all detergent, bleach, or other spills as they occur.
Cleaning the interior
- Clean the interior of your washer periodically to remove any dit, soil, odor, mold, mildew, or bacterial residue that may remain in your washer as a result of washing clothes.
Failure to follow these instructions may result in unpleasant conditions. including odors or permanent stains in your washer or on your faundry.
- To remove hard water deposits use a leaner labeled "Washer safe".
Cleaning the control panel
- Clean with a soft, damp cloth. Do not use abrasive powders or cleaning pads.
- Do not spray cleaners directly on the panel. The control panel finish may be damaged by some laundry pre-treatment Soil and stain remover products. Apply such products away from your washer and wipe up any splills or over spray immediately.
Cleaning the bleach or softener compartment
- To remove laundry product residue, wipe with a damp cloth and towel dry.
- You can remove the bleach and softener compartments to clean them.
Cleaning the tub
The Tub Clean cycle is a self-cleaning cycle that removes the causes of odors that may occur inside your washer. We suggest cleaning the tub about your washer.
- With the tub empty, add one cup of chlorine bleach to the bleach dispenser.
- Press the /Power button.
- Turn the cycle selector to Tub Clean. When you select Tub Clean, the only options you can change is the Delay option.
- Press the /Start Pause button.
Storing your washer
You can damage your washer if you do not remove water from, hoses and internal components before storage.
To prepare your washer for storage:
- Select the Quick Wash cycle and add bleach to the washer. Run your washer through the cycle without a load.
- Turn the water faucets off and disconnect the inlet hoses.
- Unplug your washer from the electrical outlet.
Caution: If the washer is stored in an area where freezing can occur or moved in freezing |temperatures, follow these winterizing instructions to prevent damage to the
- Tum off water supply faucets.
- Disconnect hoses from water supply and drain water from hoses.
- Plug electrical cord into a properly grounded electrical outlet Propet
- Add 1 gallon (38 L) nontoxic recreational vehicle (RV) antifreeze to empty wash tub.
Close lid.
- Select the Drain & Spin cycle. Start the cycle and let the washer drain for 1 minute to drain out all the water. Not all of the RV antifreeze will be expelled.
- Stop the cycle, unplug electrical power cord, dry off tub interior and close the lid.
- Store washer in an upright position.
- To remove antifreeze from washer after storage, run empty washer through a complete cycle using detergent. Do not add wash load.
Troubleshooting
Washer does not start
- Make sure that your washer is plugged in.
- Make sure that the lid is closed.
- Make sure that the water source faucets are open.
- Make sure that you press the /Start Pause button to start your washer.
- Before your washer starts to fill, it makes a series of clicking noises to make sure that the lid is locked and to do a quick drain.
- Make sure that the Child Lock is not activated. See Setting the child lock.
- Make sure that the Delay option is not turned on. See Step 5: (Optional) Set a delayed start time.
- Check the fuse or reset the circuit breaker.
No water or not enough water. Detergent or softener is still in its compartment after, the wash cycle is
- Make sure that both faucets are fully turned on.
- Make sure that the water pressure is in the range listed in Water requirements.
- Make sure that the water inlet hoses are not kinked. Straighten if necessary.
- Disconnect the hoses and clean the screens. The hose filter screens may be clogged.
Washer vibrates or is too noisy
- Make sure that your washer is set on a level surface. If the surface is not level, adjust your washer’s feet to level your washer.
- Make sure that your washer is not touching any other object.
- Make sure that the laundry load is balanced.
- During the spin process, if clothes are piled to one side of the tub, your washer may stop because of the imbalance. Your washer tries up to three times to solve the problem automatically the washer cannot solve the problem, try to manually restibute clothes inside the tut
Washer stops
- Make sure that the power outlet is a working outlet.
- Check the fuse or reset the circuit breaker.
- Close the lid, then press the /Start Pause button to start your washer. For your safety, your washer does not spin unless the lid is closed.
- Before your washer starts to fill it makes a series of clicking noises to make sure that the lid is locked and to do a quick drain
- Sometimes your washer may pause between stages in the cycle. Wait to see if your washer starts again.
- Disconnect the inlet hoses and clean the screens periodically. The hose filter screens may be clogged.
Lids locked or will not open.
- Press the /Start Pause button to pause the washer. You cannot open the lid if the washer is running.
- After you pause the washer, it may take a few seconds for the lid lock to release.
- If the lid is locked when your washers not running, press the Power button to turn on your
- If power fails while your washer is running, when power is restored, the lid unlocks. Your washer waits three minutes, then runs the rest ofthe cycle.
Washer does not drain or spin.
- Check the fuse or reset the circuit breaker.
- Close the lid, then press the /Start Pause button to start your washer. For your safety, your washer does not spin unless the lid is closed.
- Make sure that the drain hose is not kinked. Straighten as necessary.
- Make sure that the height of the drain hose is within specified limits. See Drainage requirements.
- The pipes to your sewer system may be clogged. Contact a plumber or qualified repair professional
The water temperature is not correct
- Make sure that you have selected the correct temperature.
- Make sure that the water source faucets are fully opened.
- Make sure that the hoses are connected to the correct faucet and water intake connections on your washer, then flush the lines. See Step 2: Connect the water hoses.
- Disconnect the hoses and clean the screens. The hose filter screens may be clogged.
Load is too wet at the end of the cycle
- Use a high-efficiency detergent to reduce over-sudsing. See Selecting a detergent.
- The load may be too small. Very small loads (one or two items) may become unbalanced and ot spin out completely.
Water leaks
Load has too many suds
- Use a high-efficiency detergent to reduce over-sudsing. See Selecting a detergent.
- If you have “soft” water, reduce the amount of detergent.
- For small or lightly soiled loads, reduce the amount of detergent.
Washer has an odor
- Periodically run a Tub Clean cycle to clean the tub. See Cleaning the tub.
- Use a high-efficiency detergent to reduce over-sudsing. Excessive suds collect in nooks and crannies and cause odor. See Selecting a detergent.
- Dry the interior of your washer after the total cycle has finished.
Error Codes
|
ERROR CODE
|
POSSIBLE CAUSE
|
SOLUTIONS
|
| E1 |
Your washer takes more than 30 minutes to fill with water. After water finishes entering your washer, the water level has not changed in five minutes. |
|
| E2 |
The unit takes more than 10 minutes to drain. |
|
| E3 |
The lid is open. The washer is not level. |
|
| E4 |
Your washer is out of balance more than three times in spin operation. |
|
| E5 |
Your washer is not level.
Impact switch failed. |
- Adjust the washer level refer to installation.
If the situation continues, call Midea service center.
|
| F2 |
The EEPROM failed. |
- Contact Midea service center.
|
| F5 |
Load sensing failed. |
- Contact Midea service center.
|
| F8 |
Water level sensor failed. |
- Contact Midea service center.
|
| Fd |
Lid lock failed. |
- Contact Midea service center.
|
| C9 |
The PCB failed. |
- Contact Midea service center.
|
| CL |
The lid has been open for over 20 seconds with the Child Lock function activated. |
- Press the Power button to turn off your washer.
- Turn off the Child Lock function. See Setting the child lock.
- Contact Midea service center.
|
Specifications
| TYPE |
CTW41N1AW |
| Dimensions (H×W×D) |
43.3 in. x 27 in. x 28.9 in. (110 cm × 68.6 cm × 73.5 cm) |
| Weight |
140 lbs. (63.5 kg) |
| Power |
120V~/60Hz |
| Current draw |
10A |
| Pulsator type |
Impeller |
| Drum grain |
Ellipse |
| Display type |
LED |
| Display color |
White |
| Motor |
Series |
Fabric Care Chart
The following symbols provide garment care direction. The Clothing care labels include symbols for washing, bleaching, drying and ironing, or dry cleaning when necessary. The use of symbols ensures consistency among garment manufacturers of domestic and imported items. Follow care label directions to maximize garment life and reduce laundering problems.
| WASH CYCLE |
SPECIAL INSTRUCTIONS |
WARNING SYMBOLS FOR LAUNDERING |
| Normal |
□Line Dry/Hang to Dry |
□Do Not Wash |
| Permanent Press / Wrinkle Resistant / Wrinkle Control |
□Drip Dry |
□Do Not Wring |
| Gentle/Delicates |
□Dry Flat |
□Do Not Bleach |
| Hand Wash |
|
HEAT SETTING |
| WATER TEMPERATURE** |
|
□High |
□No Steam (added to iron) |
| Hot |
|
□Medium |
□Do Not Iron |
| Warm |
|
□Low |
DRYCLEAN |
| Cold |
|
□Any Heat |
□Dry Clean |
| BLEACH |
|
□No Heat/Air |
□Do Not Dry Clean |
| Any Bleach (when needed) |
|
IRON-DRY OR STEAM TEMPERATURES |
| Only Non-Chlorine (color-safe) Bleach (when needed) |
□Line Dry/Hang to Dry |
□High |
□Drip Dry |
| |
Tumble Dry Cycle |
□Medium |
□Dry Flat |
| |
NORMAL |
|
□Low |
|
| |
Permanent Press / Wrinkle Resistant / Wrinkle Control |
|
For machine-washable wool. Loads should be under 8 pounds. |
| |
Gentle/Delicates |
|
|
|
** The dot symbols represent appropriate wash water temperatures for various items. The temperature range for Hot is 105° - 125°F / 41° - 52°C for Warm 85° - 105°F / 29° - 41°C and for Cold 60° - 85°F / 16° - 29°C. (Wash water temperature must be a minimum of 60°F / 16°C for detergent activation and effective cleaning.) The clothes washer can not ensure these temperatures because the actual temperature of the water entering your washer depends on water heater settings and regional water supply temperatures. For example, cold water entering the home in the northern states during winter may be 40°F / 4°C which is too cold for effective cleaning. In this situation, you will need to adjust the water temperature by selecting a warm setting, adding some hot water to the MAX FILL line, or using your Washer's heating option, if available.
Warranty
1. One year full warranty from original purchase date, includes compressor, parts and labor only.
Midea, through its authorized servicers will:
Pay all costs for repairing or replacing parts of this appliance which prove to be defective in materials or workmanship.
Midea is not responsible for:
Diagnostics, removal, transportation and reinstallation cost required because of service. Costs of service calls that are a result of items listed under NORMAL RESPONSIBILITIES OF THE CONSUMER**
Midea replacement parts shall be used and will be warranted only for the period remaining on the original warranty.
NORMAL RESPONSIBILITIES OF THE CONSUMER**
This warranty applies only to products in ordinary household use, and the consumer is responsible for the items listed below:
1. Proper use of the appliance in accordance with instructions provided with the product.
2. Routine maintenance and cleaning necessary to keep the good working condition.
3. Proper installation by an authorized service professional in accordance with instructions provided with the appliance and in accordance with all local plumbing, electrical and / or gas codes.
4. Proper connection to a grounded power supply of sufficient voltage, replacement of blown fuses, repair of loosened connections or defects in house wiring.
5. Expenses for making the appliance accessible for servicing.
6. Damages to finish after installation.
EXCLUSIONS
This warranty does not cover the following:
1. Failure caused by damage to the unit while in your possession (other than damage caused by defect or malfunction), by its improper installation, or by unreasonable use of the product, including without limitation, failure to provide reasonable and necessary maintenance or to follow the written Installation and Operating Instructions.
2. Products purchased "as-is" or refurbished are not covered by this warranty.
3. Service calls to repair or replace consumables such as handles, knobs and other cosmetic parts.
4. Product that has been transferred from its original owner.
5. Interior or exterior rust on the unit.
6. Damages caused by services performed by persons other than authorized Midea servicers; use of parts other than Midea replacement parts; obtained from persons other than such Midea customer service; or external causes such as abuse, misuse, inadequate power supply or acts of God.
7. Service calls resulting from improper installation of your product.
8. Service calls to instruct you on the use of your product.
9. Surcharges including, but not limited to, any after hour, weekend, or holiday service calls, tolls, ferry trip charges, or mileage expense for service calls to remote areas, including the state of Alaska.
10. If the unit is put to commercial, business, rental, or other use or application other than for consumer use, we make no warranties, express or implied, including but not limited to, any implied warranty of merchantability or fitness for particular use or purpose.
11. Product that has been removed outside the USA or Canada.
12. Products without original serial numbers or products that have serial numbers which have been altered or cannot be readily determined.
Note: Some states do not allow the exclusion or limitation of incidental or consequential damages. So this limitation or exclusion may not apply to you.
IF YOU NEED SERVICE
Keep your bill of sale, delivery slip, and other appropriate payment record. The date on the bill established the warranty period should service be required. If service is performed, it is your best interest to obtain and keep all receipts. This written warranty gives you specific legal rights. You may also have other rights that vary from state to state. Service under this warranty must be obtained by following these steps, in order:
1. Contact Midea Consumer Services or an authorized Midea servicer at 1-866-646-4332 or [email protected]
2. If there is a question as to where to obtain service, contact our consumer relations Department.
1-866-646-4332