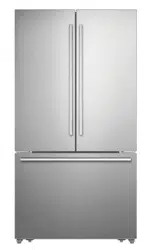
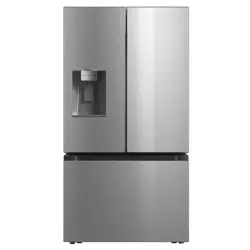
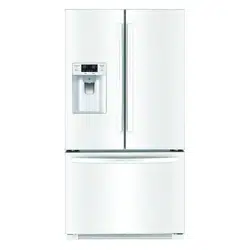
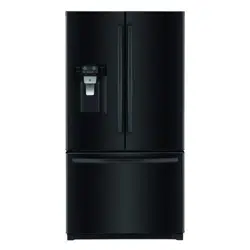
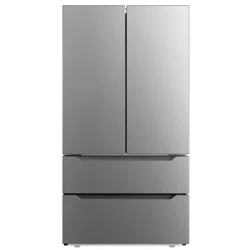
User Manual RefrigeratorInstallation Requirements
Installation Location
Your refrigerator is designed to operate in a temperature range of 55°F (12.8°C) and 109°F (43°C). If you operature your refrigerator outside this range, it may not work correctly.
- Place your refrigerator on a floor that is strong enough to support when fully loaded.
- Do not install your refrigerator on carpeting or a rug.
- If you use your refrigerator in a garage, make sure that the ambient temperature is between 55°F (12.8°C) and 109°F (43°C).
- Position the refrigerator away from direct sunlight and direct sources of heat, such as a stove heater, or radiator. Doing so may increase electrical consumption.
- Avoid locating the refrigerator in moist areas.
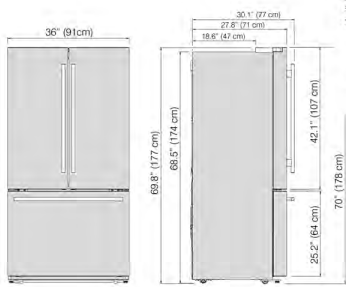
Your refrigerator needs at least 0.5” (1.3cm) between it and the surrounding side walls, at least 2” (5.1cm) between it and the back wall.
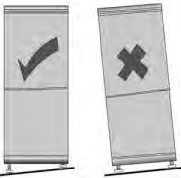
Once the refrigerator is placed in the final location, adjust the feet to level the unit. Not leveling can affect the door seal alignment, causing the refrigerator to work incorrectly.


Door Removal
If your home access door is too narrow for the refrigerator to pass through, remove the refrigerator doors and drawers. See page 22.
If you do not need to remove the appliance doors, proceed to ‘Installing Water Lines’ on page 24. If you need to remove the doors, next page.
Cleaning Before Use
Wipe the inside of the freezer with a solution of mild detergent and water. Then rinse with warm water using a damp sponge or cloth. Wash the baskets and shelves in warm, soapy water and dry completely before replacing in the freezer. The external parts of the freezer can be cleaned with wax polish.
Before Switching On!
LET YOUR REFRIGERATOR STAND UPRGIHT FOR APPROXIMATELY FOUR HOURS BEFORE CONNECTING TO POWER.
The coolant fluid needs time to settle. If the appliance is switched off at any time, wait 30 minutes before switching back on to allow the coolant fluid to settle.
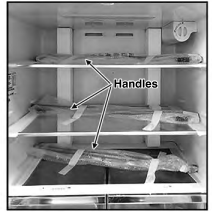
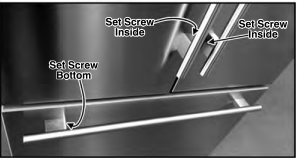
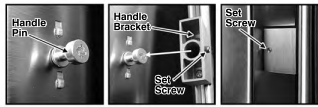
Door/Drawer Handle Installation
LOCATE AND REMOVE THE HANDLES AND PARTS POLYBAG FROM THE INSIDE OF THE REFRIGERATOR.
Loosen the Set Screws in the Brackets on one of the Handles. Place the Handle over the two Pins on the face of a door. Secure in position by tightening the Set Screws in the Brackets with the supplied Allen Wrench.
Repeat the process with the other two Handles.
NOTE: The Handles should be positioned so the Set Screws are located toward the inside of the doors and the bottom of the drawer.
Before Filling Your Freezer
Before storing foods in your freezer, turn the freezer on and wait 24 hours to make sure it is working properly and to allow the freezer to reach the desired temperature
Display Controls
The control panel is located at the top of the inside of the refrigerator. The first time the refrigerator is connected to power, the icons will light up for three seconds and a buzzer will sound. If no buttons are pushed, or the door is closed, the lights will turn off in 60 seconds

Caution!
When you set a temperature, you set an average temperature for the whole refrigerator cabinet. Temperatures inside each compartment may vary from the temperatures displayed on the panel, depending on how much food you store and where you place it. Ambient room temperature may also affect the actual temperature inside the appliance.
Ice Control
 Press the "Ice On/Off" button to turn the ice maker on or off. When the ice maker is turned on, the
  icon will be lit. When the ice maker makes ice, the ice will be stored in the ice storage box inside of the upper freezer drawer.
Fridge Temperature Control
 Press the “Fridge” button to turn on the refrigerator temperature control, then press and hold the “Fridge” button to select a temperature setting.
If you have set the temperature type to Fahrenheit, the temperature settings cycle from 47°F to 35°F in one degree increments.

If you have set the temperature type to Celsius, the temperature settings cycle from 8°C to 2°C in one degree increments.
Note:
If you want to toggle between "°F" to "°C", press and hold the "Super Cool" and "Energy Saving” buttons for 3 seconds.
Super Cool
 Press the “Super Cool” button to quickly reduce the refrigerator temperature to 35°F (2°C). When “Super Cool” mode is turned on, the
  icon will be lit. This function can be useful when adding a large amount of food to the refrigerator compartment.
“Super Cool” mode automatically switches off after 3 hours, and the refrigerator temperature setting will revert back to the previous setting.
To manully turn off “Super Cool” mode, press the “Super Cool” button again.
Freezer Temperature Control
 Press the “Freezer” button to turn on the freezer temperature control, then press and hold the “Freezer” button to select a temperature setting. If you have set the temperature type to Fahrenheit, the temperature settings cycle from 6°F to -12°F in one degree increments.

If you have set the temperature type to Celsius, the temperature settings cycle from -14°C to -24°C in one degree increments.
Super Freeze (Note: Wait 6 hours to use this function after setting freezer temperature.)
 Press the “Super Freeze” button to quickly quickly reduce the freezer temperature to -12°F (-24°C). When “Super Freeze” mode is turned on, the
  icon will be lit. Fast- freezing can help retain more of the vitamins and nutrients in fresh food and keep your food fresh longer. This function is also useful when adding a large amount of food to the freezer compartment.
“Super Freeze” mode automatically switches off after 52 hours, and the freezer temperature setting will revert back to the previous setting.
To manully turn off “Super Freeze” mode, press the “Super Freeze” button again.
Water Filter
 The “Water Filter” icon will blink when you need to change the water filter. This will occur after the refrigerator has dispensed about 300 gallons of water. For the best water quality, it is recommended that you change the filter every six months even if the icon is not blinking.
After you replace the water filter, push and hold the "Ice On/Off" and "Super Freeze" buttons for 3 seconds to reset the icon. When you replace the water filte for 3 seconds to reset the icon. When you replace the water filter, some water may leak from the filter and lines.
Replacement filter: Model #HX2017FR-A
Energy Saving
 Press this button to turn “Energy Saving” mode on and off. When “Energy Saving” mode is turned on, the
  icon will be lit. The temperature of the refrigerator is automatically set to 42°F (6°C) and the freezer to 2°F (-17°C).
Both compartments will revert to the previous settings when the “Energy Saving” button is pressed again and turned off.
Note: You cannot change the refrigerator or freezer temperature while in “Energy Saving” mode. 11
Alarm
- When the refrigerator or freezer door has been opened for over 2 minutes, the door alarm will sound. The alarm will sound 3 times every 1 minute and will stop alarming automatically after 8 minutes. The door alarm can also be cleared by closing the door that is ajar.
- To save energy, please avoid keeping the door open for a long time when using the appliance.
Using your Appliance
1. Using Your Refrigerator Compartment
The refrigerator compartment is suitable for storage of vegetables and fruit. Food inside should be packed to store in order to avoid losing moisture or flavor permeating into other foods.
Caution!
When you set a temperature, you set an average temperature for the whole refrigerator cabinet. Temperatures inside each compartment may vary from the temperatures displayed on the panel, depending on how much food you store and where you place it. High or low room temperature may also affect the actual temperature inside the appliance.
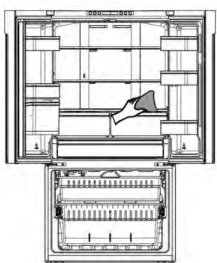
Glass Shelves and Door Racks
The refrigerator compartment has two glass shelves and six door racks, which are designed to store canned liquids, bottled drinks and packed food. They are removable for ease of cleaning and for postion adjustment.

To Relocate a Door Rack:
Remove all items from the rack, lift it, then pull out of the door. Align the rack above the notches in the door, then push the rack down until it stops.
To Remove and Resintall Glass Shelves:
Remove the shelf by gently pulling it forward until it clears the shelf guides. To replace the shelf, make sure that the area where the shelf goes is obstacle-free, then gently push it back into position.
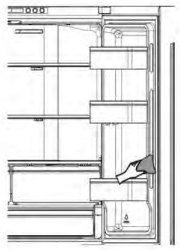
Drawers
The cripser drawers are designed to store fruits and vegetables. Placing these types of foods inside the drawers help avoid moisture loss and prevents flavor from absorbing into other foods .
To Remove a Drawer:
Open the refrigerator door all the way. Pull the drawer completely open and move it slightly toward the compartment wall. Then lift the drawer up and pull it out of the refrigerator.
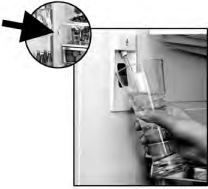
2. Using the Cold Water Dispenser
The water dispenser is located inside the left side of the refrigerator compartment. Position your glass about 1.5” under the dispenser and push the lever with the glass.
Note:
- Wait a few seconds after dispensing water to remove your glass to prevent spills.
- Run water frequently to maintain a cold temperature. When first using this function, the water may not cold enough. Wait for a short time to ensure the appropriate temperature.
- The water flowing through the filter is under increased pressure. When water is dispensed, the pressure descreases, causing bubbles to form. The water may look misty or cloudy temporarily. The bubbles will dissipate and the water will clear after a few seconds.
3. Using the Freezer Compartment
The freezer compartment includes an upper drawer, lower drawer, automatic ice maker, and ice storage box.
Automatic Ice Maker
Note:
- After you turn on the ice maker function, let the ice maker make ice for one to two days. Throw out the first one or two buckets of ice to make sure that all impurities have been removed from the water line.
- If you do not dispense ice for a long periods of time, ice may clump in the ice box. If this occurs, remove and empty out the ice box.
- If you are going on a long trip and therfore not using the water dispenser or ice maker for a period of time, iit is recommended that you turn off the water supply to prevent leaks.
Cleaning and Care
It is recommended that you regulary clean your refrigerator to keep it odor-free and running efficiently.
Caution!
The appliance must not be plugged in during cleaning. Danger of electrical shock! Before cleaning, unplug the refrigerator from the main socket.
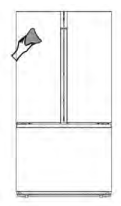
Exterior Cleaning
- Spray water onto the cleaning cloth instead of spraying directly on the surface of the appliance. This helps ensure an even distribution of moisture to the surface.
- Clean the doors, handles and cabinet surfaces with a mild detergent and wipe dry with a soft cloth.
Caution!
- Do not use sharp objects as they are likely to scratch the surface.
- Do not use abrasive cleaners, thinners, gasoline, or benzine for cleaning. They may damage the surface of the appliance.
Interior Cleaning
Wipe the inside of the refrigerator freezer with a weak solution of baking soda and water and then rinse with warm water using a damp sponge or cloth. Wipe completely dry before replacing the shelves and baskets. Thoroughly dry all surfaces and removable parts before putting them back into place.
Although this appliance automatically defrosts, a layer of frost may occur on the freezer compartment’s interior walls if the freezer door is opened frequently or kept open too long. If the frost is too thick, choose a time when the freezer is nearly empty and proceed as follow:
- Remove existing food and accessories baskets, unplug the appliance, and leave the doors open. You may use a plastic or wooden utensil to remove frost, but do not use sharp objects (knives) as they may damage the interio interior.
- When defrosting is completed, clean your freezer as described above.
Warning!
Only after the interior is completely dry should the appliance be switched back on and plugged back into the main socket.
Door Seals
Take care to keep door seals clean so that the doors seal tightly. Wash seal with a mild detergent and warm water. Rinse and dry thoroughly after cleaning.
Caution!
The refrigerator should only be powered on after the seals are completely dry.
Replacing the LED Light
Use the following steps to replace the LED light bulb if necessary:
1. Unplug the refrigerator from the electrical outlet.
2. Locate the LED light on the inside of the refrigerator.
3. Remove the light cover. Insert a tool (tweezers or a screwdriver) along the side opening of the LED light cover. Pop open the side over the cover, grasp the exposed side and gently pull towards you to remove the cover and expose the LED light.
4. Remove LED bulb and insert a new LED bulb.
5. Replace the light cover.
Replacing the Water Filter
To drink the freshest and cleanest water from your refrigerator, change the filter on time.
1. Shut off the water supply.
2. Remove the Water Filter A by twisting it about 1/4 turn counter-clockwise.
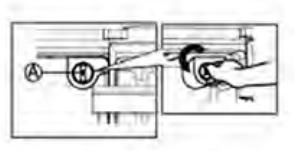
3. Pull the Water Filter A from the Filter Holder B .

4. Empty the Water Filter Tray C and dry around the Filter Case.
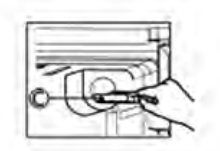
5. Replace with new Water Filter.
Helpful Hints and Tips
Energy Saving Tips
- Try to avoid keeping the door open for long periods in order to conserve energy. Organizing and labelling foods can reduce extended searches.
- Ensure the appliance is away from any sources of heat (direct sunlight, electric oven or cooker, etc.) Place the appliance in a well-ventilated, humidity-free room. Please refer to Installation Location section on Page 7.
- Don‘t set the temperature colder than necessary.
- Don’t store warm food or evaporating liquid in the appliance. Allow foods to come down to room temperature before placing in the refrigerator.
- To prevent frost build-up, wrap foods tightly and wipe dry before placing in the refrigerator.
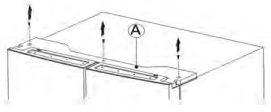
- The diagram on Page 9 shows the most energy efficient layout for the drawers, crisper and shelves. Altering their positions can affect air flow and efficiency of the appliance.
Switching Off Your Appliance
If the appliance needs to be switched off for an extended period, the following steps should be taken prevent mold on the appliance.
- Remove all food.
- Remove the power plug from the main socket.
- Clean and dry the interior thoroughly.
- Ensure that all the doors are wedged open slightly to allow air to circulate
Troubleshooting
If you experience a problem with your appliance or are concerned that the appliance is not functioning correctly, you can carry out some easy checks before calling for service, please see below.
Warning! Don’t try to repair the appliance yourself. If the problem persists after you have made the checks mentioned below, contact a qualified electrician, authorized service engineer or the store where you purchased the product.
Warning! A child entrapment warning statement is included in either the operating instructions or in a use and care manual provided with each refrigerator.
DANGER: Risk of child entrapment. Before you throw away your old refrigerator or freezer:
Take off the doors.
Leave the shelves in place so that children can not easily climb inside.
My refrigerator does not work.
- Make sure that your refrigerator is securely plugged into a working outlet.
- Make sure that your power source has the correct voltage. Your refrigerator’s voltage rating is on a label on the back of your refrigerator.
- Check the house fuse or circuit breaker box and replace the fuse or reset the circuit breaker.
The refrigerator compartment has a bad odo a bad odor.
- Make sure that all food with a strong odor (like onions) is wrapped or stored in airtight packaging.
- Certain containers and wrapping materials (such as paper, foil, or plastic) can cause odors. If you think this might be the case, try using different containers or a different brand of wrapping material.
- Check for spoiled food and remove it.
- Clean the inside of your refrigerator. See Cleaning your refrigerator on page 14.
The refrigerator doors do not close completely.
- Make sure that no food packages are in the way.
- Make sure that the door gaskets (seals) are clean. See Cleaning your refrigerator on page 15.
- If the door gasket does not seal, try heating then cooling the seal. You can use an electric hair dryer to heat the seal.
- Make sure that your refrigerator is level. See Leveling your refrigerator on page 7.
- Make sure that the top of your refrigerator is tilted backward about 0.4" (10 mm) to 0.6" (15 mm). See Leveling your refrigerator on page 7.
The temperature is too hot.
- You may have left the doors open too long or opened them too frequently.
- Make sure that no obstacle is keeping the doors from closing correctly.
- Adjust the refrigerator or freezer compartment temperature. See Setting the refrigerator temperature on page 10 or Setting the freezer temperature on page 11.
- Your refrigerator may not have enough clearance from walls or the ceiling. See Providing correct ventilation on page 7.
The temperature is too cold.
- Adjust the refrigerator or freezer compartment temperature. See Setting the refrigerator temperature on page 10 or Setting the freezer temperature on page 11.
Ice is not dispensing.
- After you install the water supply line, you should wait 12 hours before you try dispensing ice. If the water is not sufficiently cooled, your refrigerator will take longer to make ice.
- Make sure that the water line is connected and the water valve open. See Connecting the water supply on page 24.
- Make sure that the ice dispenser is not in off mode.
- Make sure that no ice is blocking the ice maker bucket or ice chute.
- If the water pressure is less than 30 psi, try installing a booster pump to compensate for the low pressure.
- Make sure that the freezer compartment temperature is not set too warm. Try setting the freezer temperature lower. See Setting the freezer temperature on page 11.
- If you just dispensed a large amount of ice, wait at least 90 minutes before dispensing more ice.
Water is not dispensing.
- Make sure that the water line is connected and the water valve open. See Connecting the water supply on page 24.
- Make sure that the water line is not kinked or bent.
- Make sure that the refrigerator compartment temperature is not set too low. If the temperature is too low, the water in the dispenser tank may freeze. See Setting the refrigerator temperature on page 10.
- Make sure that the water filter is correctly installed. See Replacing the water filter on page 11.
A layer of frost occurs in one of the compartments.
- A layer of frost may occur on the compartment’s interior walls if the freezer is opened frequently or kept open too long.
- Make sure that the air outlets are not blocked by food.
- Make sure that the doors are fully closed.
- To remove the frost, see Defrosting the freezer compartment on page 14.
The refrigerator door is hard to open.
- When you open the refrigerator door, warm air rushes inside. When you close the door, the warm air rushes to the condenser which causes a vacuum. This causes the door to be hard to open for about 10 to 15 seconds after closing.
- If the door is hard to open at other times, try rubbing paraffin wax or petroleum jelly along the edges of the entire gasket. Paraffin wax is used for canning and is safe for use around food.
The compressor runs for a long time or turns on and off frequently.
The compressor runs longer if:
- The room temperature is high.
- You just added a large amount of food. Wait for the food to freeze, then check again.
- You open and close the door frequently.
- The door gasket is dirty. Clean the gasket. See Cleaning your refrigerator on page 15.
- Your refrigerator has been disconnected for a period of time. Wait for your refrigerator to cool (about four hours) before adding food.
- You have the temperature set too low.
The light inside the refrigerator does not turn on.
- Make sure that your refrigerator is plugged into a working outlet.
- If a door stays open too long, your refrigerator automatically turns off the light. Close then open the door again.
- Check to see if the light is damaged. If the light is damaged, have it replaced by a qualified service technician. See Replacing the LED light on page 15..
Hear water bubbling in the refrigerator
- This is normal. The bubbling comes from the refrigerant coolant liquid circulating through the refrigerator
The refrigerator makes unusual noises or vibrations.
The following sounds are normal:
- Compressor running noises.
- Air movement noise from the small fan motor in the freezer compartment or other compartments.
- Gurgling sound similar to water boiling.
- Popping noise during automatic defrosting.
- Clicking noise before the compressor starts.
- Clicking noise when you get the water.
- Motor running noises when you get the ice.
- Other unusual noises or vibrations may occur:
- If you have items on the top of your refrigerator. Remove the items.
- If your refrigerator is not level. See Leveling your refrigerator on page 11.
- If your refrigerator is touching walls. Move it away from the walls.
- If the shelves or drawers are installed incorrectly.
The outside of the refrigerator is hot.
Heat dissipation from the condenser may make the outside feel hot. This is normal and happens if:
- The room temperature is high.
- You have too much food in your refrigerator.
- You open and close the doors excessively.
Water condenses on the outside of the refrigerator.
- Condensation on the exterior surface and door seal is normal when the room humidity is high.
- When you open the door, warm, moist outside air meets the cold dry air inside your refrigerator. This is normal.
Door Removal
Tools you will need (not provided).

Removing the Refrigerator Doors
Make sure that your refrigerator is not plugged in.
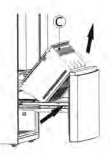
1. With the door closed, remove the 3 screws holding the top cover (A) with Philips (+) screwdriver, and then remove the top cover with the entire-harness attached.
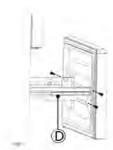
2. Remove the 3 screws (B) fixed on the hinges with a wrench ( 8 mm) and 1 ground screws (C) attached to the hinge with Philips (+) screwdriver. Remove the upper left and right door hinges (D).
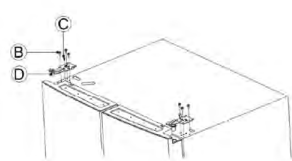
3. Use your both hands to open the door more than 90°.Lift it up and take it off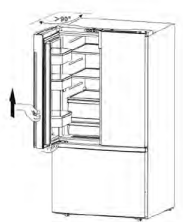
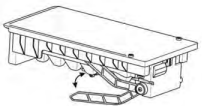
Removing the Freezer Door
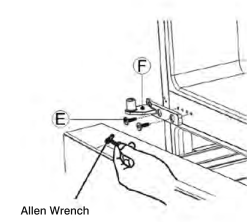
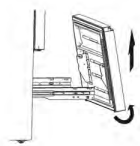
1. Remove the 4 hex head bolts hinges (E) with an Allen wrench (4 mm). Remove the lower left and right door hinges (F).
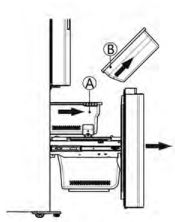
2. Pull out the freezer door and the upper freezer drawer (A) to the final position. Then take out the ice box (B) by lifting it up in the direction of the arrow.
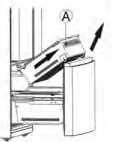
3. Take out the upper freezer drawer (A) by lifting it up from the rail system.
4. Remove the lower freezer drawer (C) by lifting it up.
5. Remove the 4 screws attached to the supporting frame (D).
6. Pull out the freezer door and lift it up in the direction of the arrow.
Installing the Water Line
This refrigerator comes equipped with a water dispenser and an automatic ice maker. To use these features, the refrigerator needs to be connected to a potable water supply. In order for the ice maker to function correctly, the water pressure needs to be between 30 psi and 125 psi.
Warning:
- The water connection must be made by a qualified plumber. Operation outside the water pressure range may cause malfunction, severe and damaging water leaks.
Connecting to the Water Supply
You will need the following tools and parts (not included)
You need to purchase several items to complete this connection. You may find these items sold as a kit at your local hardware store.

Warning:
Make sure that you:
Use the tubing that came with your refrigerator and the water supply installation kit. Do not use old tubing.
Connect to the cold water pipe. If you connect to the hot water pipe, the purifier may malfunction.
Do not contaminate the water pipes during installation.
1. Shut off the main water supply.
2 .Using a 1/4" drill bit, drill a hole into the cold water line, then install the saddle type shutoff valve.
3 . Connect the water line (installation kit not included) to the shutoff valve.
4. Turn the main water supply back on, then turn on the shutoff valve and flush out the tubing until the water runs clear.
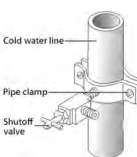
Note: Initial dark discoloration of water is normal.
5. Turn off shutoff valve.

Connecting the Water Supply to Refrigerator
You need to purchase several items to complete this connection.
You may find these items sold as a kit at your local hardware store.
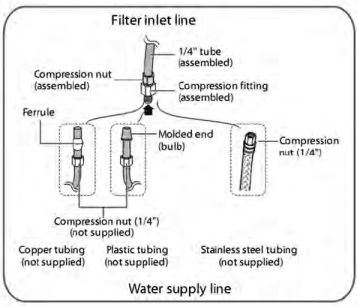
You can use plastic tubing, copper tubing, or stainless steel tubing as the water line installation kit.
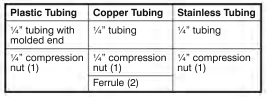
1. Connect the water supply line to the compression fitting (assembled with a 1/4" tube, included in refrigerator).
If you are using copper tubing, slip the compression nut (not supplied) and ferrule (not supplied) on the copper tubing (not supplied).
If you are using plastic tubing, insert the molded end (bulb) of the plastic tubing into the compression fitting.
Important: Do not use without the molded end (bulb) of the plastic tubing.
If you are using stainless steel tubing, slip the compression nut on the copper tubing (not supplied).
2. Tighten the compression nut onto the compression fitting. Do not over-tighten the compression nut.
One Year Limited Warranty
Manufacturer provides a limited warranty for each new refrigerator to be free from defects in material and workmanship for a period of 1 year from the date of purchase. Manufacturer agrees to remedy any such defective inside accessory components such as door panels, door shelves, racks, handles, casters, bins and drawers or to furnish a new unit if the unit proves to have failed, at the company’s option, for one year from your original date of purchase.
In the event the unit requires replacement or refund under the terms of this limited warrant In the event the unit requires replacement or refund under the terms of this limited warranty, the Buyer is responsible for all transportation expenses to return the unit prior to receiving a replacement unit or refund. A copy of the dated sales receipt/invoice is required to receive benefits of this limited warranty.
This limited warranty covers appliances in use within the continental United States, Alaska, and Hawaii, and Puerto Rico.
This limited warranty does not cover the following:
- Products with original serial numbers that have been removed, altered or cannot be readily determined.
- Products that have been transferred from its original owner to another party or removed outside the USA.
- Rust on the interior or exterior of the unit.
- Damages due to shipping damage or improper installation.
- Damages due to misuse or abuse.
- Service calls, repairs, and labor expenses for any purpose.
- Content losses and food spoilage due to failure of the unit.
- Punctures to the evaporation system due to improper defrosting of the unit.
- Replacement or resetting of house fuses or circuit breakers.
- Failure or defects of this product if used for other purposes than its intended purpose or used other than in accordance with the provided instructions.
- Disposal costs for failed unit not returned to Manufacturer.
- Any delivery/installation costs incurred as the result of a unit that fails to perform as specified.
- Expenses for travel and transportation for product if you are exchanging or returning the unit.
- Expenses related to the removal and re-installation of your unit or for making the unit accessible, such as removal of trim, cupboards, shelves, etc. or if not installed in accordance with the provided installation instructions.
- Damages to the finish of the unit or home incurred during installation, including but not limited to floors, cabinets, walls, etc.
- Damages caused by external causes such as abuse, misuse, inadequate power supply, accidents, fires, or acts of God.
- Refunds for returned products are limited to the price paid for the unit per the sales receipt.
Disclaimer of Implied Warranties, Limitation of Remedies and Exclusions:
EXCEPT FOR THE EXPRESS WARRANTIES SET FORTH HEREIN, MANUFACTURER MAKES NO WARRANTY WHATSOEVER (OR THE SHORTEST PERIOD ALLOWED BY LAW) REGARDING THE GOODS, INCLUDING ANY (1) WARRANTY OF MERCHANTABILITY; (2) WARRANTY OF FITNESS FOR A PARTICULAR PURPOSE; (3) WARRANTY OF TITLE; OR (4) WARRANTY AGAINST INFRINGEMENT OF INTELLECTUAL PROPERTY RIGHTS OF A THIRD PARTY; WHETHER ARISING BY LAW, COURSE OF DEALING, COURSE OF PERFORMANCE, USAGE OF TRADE, OR OTHERWISE. BUYER ACKNOWLEDGES THAT IT HAS NOT RELIED ON ANY REPRESEN NOT RELIED ON ANY REPRESENTATION OR WARRANTY MADE BY MANUFACTURER, OR ANY OTHER PERSON ON MANUFACTURER’S BEHALF. REPLACEMENT OF UNIT AND LISTED PARTS IN ACCORDANCE WITH THE TERMS HEREIN, IS YOUR SOLE AND EXCLUSIVE REMEDY UNDER THIS LIMITED WARRANTY. MANUFACTURER IS NOT LIABLE FOR INCIDENTAL OR CONSEQUENTIAL DAMAGES AND NO REPRESENTATIVE OR PERSON IS AUTHORIZED TO ASSUME FOR MANUFACTURER ANY OTHER LIABILITY IN CONNECTION WITH THE SALE OF THIS PRODUCT. UNDER NO CIRCUMSTANCE IS THE CONSUMER PERMITTED TO RETURN THE