Loading ...
Loading ...
Loading ...

12
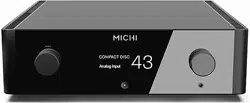
P5 Stereo Control Amplifier
For additional information on the connections, software, and operating codes
for computer control of the P5, contact your authorized Michi dealer.
PC-USB Input
i
See Figure 5
Connect this input using the supplied USB cable to the PC-USB socket of
your computer.
The P5 supports both USB Audio Class 1.0 and USB Audio Class 2.0 modes.
Windows computers do not require installation of a driver for USB Audio Class
1.0 and support playback of audio up to 96k Hz sampling rates. The Factory
Default setting is USB Audio Class 1.0.
To take advantage of USB Audio Class 2.0 audio playback supporting up to
384k Hz sampling rates you will need to install the Windows driver supplied
in the USB Flash Drive included with the P5. You will also need to switch the
P5 to USB Audio Class 2.0 playback mode with the following:
• Press SETUP on the remote control to enter the SETUP Menu and use the
T
/
D
buttons to select the Source menu then press the Enter
K
button. Use
the
T
/
D
arrow buttons and the Enter
K
button on the remote control
to select “PC-USB” as INPUT SOURCE
• Press SETUP on the remote control to enter the SETUP Menu and use the
T
/
D
buttons to select the AUDIO menu then press the Enter
K
button.
Use
T
/
D
arrow buttons and the Enter
K
button on the remote control
to select “USB Audio 2.0” as PC-USB Option.
• Power cycle the P5 and reboot your PC after changing the USB Audio mode
to ensure both units are properly configured.
Many audio playback applications do not support 384k Hz sampling rate.
Please confirm your audio player supports 384k Hz audio and you have 384k
Hz audio files to properly playback this sample rate. Also, you may need to
configure the audio driver in your PC to output 384k Hz or your computer may
“down sample” to a lower audio sample rate. For more information please refer
to your audio player or operating system information.
NOTE: USB Audio Class 2.0 requires installation of the Windows PC driver
on the USB Flash Drive included with the P5.
NOTE: MAC computers do not require a driver to support PC-USB 1.0
or 2.0 audio.
NOTE: Upon successful installation of the driver, you may need to select
the Michi audio driver from the audio/speaker setup of your computer.
NOTE The P5 supports both DSD and DOP audio playback in 1X and
2X formats. Consult your audio player to confirm proper operation for
playback of these audio formats.
Network Connection
u
The P5 can be attached to a network using the rear panel NETWORK socket.
The NETWORK configurations allow both static and DHCP IP addressing. See
the Network Setup section of this manual under Setup Menu for IP address
configuration information.
The NETWORK connections allows software updates to be downloaded from
the Internet. The Network connection also allows IP control for integration
with automation systems.
For additional information on the IP connection please contact your authorized
Michi dealer.
Setup Menu
The Michi P5 features the information display to help operate the system. A
more comprehensive ON-SCREEN DISPLAY (OSD) menu system is available
at any time by pressing the SETUP button on the remote. These OSD menus
guide you through the configuration and setup of the P5. The settings made
in the configuration process are memorized as default settings and need not
be made again for normal operation of the unit.
Front Panel Overview
The following is a brief overview of the controls and features on the front
panel of the unit.
Remote Sensor
4
This remote sensor window receives IR commands from the remote control.
Please do not block this sensor.
Display
2
The front panel display shows the source selected, volume level and tone
settings. The display can be dimmed using the P5 setup menu or the IR remote
controller. See the Display Configuration section of this manual for details.
Overview of Buttons and Controls
This section provides a basic overview of the buttons and controls on the remote
control. Detailed instructions on the use of these buttons are provided in the
more complete operating instructions in the following sections.
Navigating
D
and Enter
K
Buttons
I
: Use the navigation buttons
T
/
D
and the Enter
I
on the remote control to access the various menus
and operate the P5 settings.
Power 5A: The Power button on the front panel and on the remote control
activate or deactivate the unit. There is an LED light in the middle of the
Power button on the remote control, which will be illuminated when you pick
up the remote control. To power on the unit, the rear panel master POWER
switch must be in the ON position for the front panel and the remote standby
function to operate.
Power On - To power on the unit push and release the Power button 5 on
the front panel or the IR remote control.
Power Off/Standby - To power off the unit to standby push and release the
front panel Power button 5 or PUSHHOLD the remote control Power button
A for 1.5 seconds.
Loading ...
Loading ...
Loading ...
