Loading ...
Loading ...
Loading ...
8 www.mastercool.com
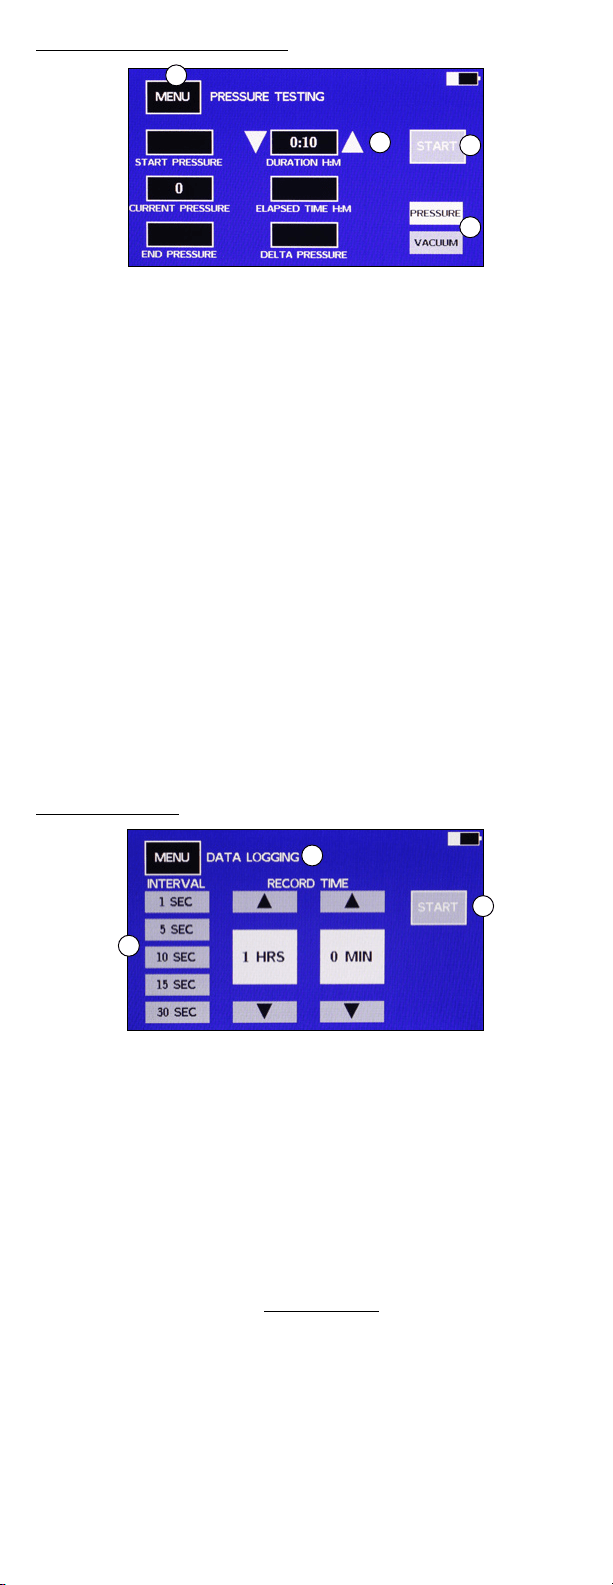
PRESSURE/VACUUM LEAK TEST SCREEN
1
2
3
4
Note: When doing a pressure leak-down test, the manifold uses the high-side pressure
sensor. The manifold’s high-side hose must be hooked up to the system under test for the
test to work.
For vacuum leak-down tests with 4-way manifolds, the vacuum port needs to be
connected to the system and the vacuum valve open.
For vacuum leak tests with 2-way manifolds, if the high or low side hoses are attached
to the system, the valve for the side attached to the system must be open. The center port
can be connected to the system and both valves left closed.
1. Install the manifold to the system undergoing the test.
2. Bring the system to the desired pressure or vacuum for the test.
3. Go to MENU - LEAK TEST to display the pressure test screen.
4. Select if a PRESSURE test or VACUUM test is being done (4).
5. Use the up and down arrows next to the duration time display (2) to set the desired test
duration. The time is in Hours:Minutes.
6. Make sure the test pressure is in the CURRENT PRESSURE window and press START (3).
a. The START button will become a STOP button.
b. The Elapsed time will start. “Test Running” will blink below the STOP button.
c. The CURRENT PRESSURE and START PRESSURE will be displayed.
d. The DELTA PRESSURE will be calculated and displayed during the test.
7. When the test is done, END PRESSURE will be displayed.
8. To reset or restart the pressure test, leave the pressure test screen by pressing the
MENU button, then select LEAK TEST again from the MENU screen.
Note: The CURRENT PRESSURE will continue to be displayed after the test is completed.
Note: The test will continue to run after the display goes to sleep. Touch the screen to turn
the display back on.
Note: The unit will not automatically turn off in the PRESSURE TEST screen.
DATALOGGING SCREEN
1
2
3
1. Press on the interval that the data samples will be recorded to highlight it.
Tip: Keep in mind that a longer interval will give fewer data points to process.
2. Use the up and down arrows to select the recording time.
3. Press START to start the recording data.
4. The unit will return to the DIGITAL screen and a red “R” will be displayed in the upper
right corner.
Note: The manifold will continue to record after the display goes to sleep.
The manifold will not automatically turn off while it is datalogging.
UPDATING THE MANIFOLD FIRMWARE
To add new refrigerants or update the features on the manifold, it is necessary to update
the manifold’s firmware. This requires access to a computer running windows and a USB
cable with a Type C connector. The new firmware and instructions for programming the
manifold can be downloaded from the Mastercool website. If the manifold does not have a
refrigerant you need, or you find a bug in the software, please contact customer service.
MASTERCOOL CONNECT APP
1. Press the ON/OFF key to power on the device
2. Download the Mastercool Connect app to a mobile device from the App Store or Google
Play.
3. Launch the Mastercool Connect app on the mobile device.
4. Touch “SEARCH” on the Mastercool Connect app. From the list of available devices, pick
the digital manifold.
5. Once the connection is made the Bluetooth
®
wireless technology symbol will be
displayed on the upper right side of the digital manifold screen.
Loading ...
Loading ...
Loading ...