
Not for Reproduction
Read all safety rules and instructions carefully before operating this tool.
Owner’s Manual
TOLL-FREE HELPLINE: 1-800-317-7833
www.snapper.com
19" 82V Cordless Mower
80076048

Not
for
Reproduction
............................................................................................. 2
Safety Information ................................................................................................... 3
Symbols .................................................................................................................. 6
Features and Controls ............................................................................................. 7
Assembly ................................................................................................................. 8
Operation .............................................................................................................. 15
Battery & Charger ................................................................................................. 19
Maintenance .......................................................................................................... 21
Environmentally Safe Battery Disposal................................................................... 24
Troubleshooting ..................................................................................................... 25
Warrant
Part List
y................................................................................................................
.................................................................................................................
26
28
PRODUCT SPECIFICATIONS
82 V 19" CORDLESS MOWER
Battery type ....................................................................................................................................82 V Lithium-ion
No-load speed .........................................................................................................................................2800 R MP
Deck size .............................................................................................................................................19” (48.3 cm)
Height adjustments .........................................................................................................1 3/8 - 3 1/2” (3.5 - 9.0 cm)
Torque (for the blade bolt) ......................................................................................................24-27 lb-ft (33-37 Nm)
Functions .................................................................................................. 3-in-1: Mulch, side discharge or rear bag
Weight (without battery) ................................................................................................................ 56.2 lbs (25.5 kg)
CONTENTS
2
Disclaimer: * Maximum initial battery voltage (measured without a workload) is 82 volts. Nominal voltage is 72.

Not
for
Reproduction
SAFETY INFORMATION
1. GENERAL OPERATION
• Avoid Dangerous Environment – Don’t use lawn mowers in damp or wet locations.
• Don’t Use In Rain.
• Keep Children Away – All visitors should be kept a safe distance from work area.
• Dress properly. Do not wear loose clothing or jewelry that can get caught in moving parts. The wearing of protective
gloves and safety footwear is recommended.
• Use Safety Glasses – Always use face or dust mask if operation is dusty.
• Use Right Appliance – Do not use lawn mower for any job except that for which it is intended.
• Don’t Force Lawn Mower – It will do the job better and safer at the rate for which it was designed.
• Don’t Overreach – Keep proper footing and balance at all times.
• Stay Alert – Do not operate the mower when you are tired. Pay attention to what you are doing. Use common sense.
• Store Idle Lawn Mower Indoors – When not in use, lawn mower should be stored in an indoor dry and locked-up place –
out of reach of children.
• Maintain Lawn Mower With Care – Keep cutting edges sharp and clean for best and safest performance.
• Follow instructions for lubricating and changing accessories.
• Inspect lawn mower cord periodically and if damaged, have it repaired by an authorized service facility.
• Keep handles dry, clean, and free from oil and grease.
• Keep safety devices (guards, shields, switches etc.) in place and working.
• Keep blades sharp.
• Keep hands and feet away from cutting area.
• Objects struck by the lawn mower blade can cause severe injuries to persons. The lawn should always be carefully
examined and cleared of all objects prior to each mowing.
• If lawn mower strikes a foreign object, follow these steps:
i) Stop lawn mower. Release the switch.
ii) Remove battery.
iii) Inspect for damage.
iv) Repair any damage before restarting and operating the lawn mower.
• Use identical replacement blades only.
• Do not charge lawn mower in rain, or in wet locations.
• Remove or disconnect battery before servicing, cleaning, or removing material from the lawn mower.
• Use only approved replacement batteries, other batteries may cause injury or damage to the mower. For use only with
Briggs & Stratton batteries BSB2AH82 (2 amp-hour) or BSB4AH82 (4 amp-hour) or BSB5AH82 (5 amp-hour) and Briggs
& Stratton charger BSRC82 or BSSC82.
• Do not dispose of the battery in a re. The cell may explode. Check with local codes for possible special disposal
instructions.
READ ALL INSTRUCTIONS CAREFULLY
W A R N I N G
This mower is capable of amputating hands and feet and throwing objects. Failure to observe the following safety
instructions could result in serious injury or death.
W A R N I N G
When using electric lawn mowers, basic safety precautions should always be followed to reduce the risk of re, electric
shock, and personal injury, including the following:
3

Not
for
Reproduction
4
SAFETY INFORMATION
• Do not open or mutilate the battery. Released electrolyte is corrosive and may cause damage to the eyes or skin. It may
be toxic if swallowed.
• Exercise care in handling batteries in order not to short the battery with conducting materials such as rings, bracelets,
and keys. The battery or conductor may overheat and cause burns.
• Read, understand, and follow all instructions on the machine and in the manual(s) before starting.
• Only allow responsible adults who are familiar with the instructions to operate this machine.
• Clear the area of objects such as rocks, wire, toys, etc., which could be thrown by the blade. Stay behind the handle when
the engine (motor) is running.
• Be sure the area is clear of bystanders before operating. Stop machine if anyone enters the area.
• Do not operate machine barefooted or while wearing sandals. Always wear substantial footwear.
• Do not pull machine backward unless absolutely necessary. Always look down and behind before and while moving
backward.
• Never direct discharged material toward anyone. Avoid discharging material against a wall or obstruction. Material may
ricochet back toward the operator. Stop the blade when crossing gravel surfaces.
• Do not operate machine without the entire grass catcher, discharge guard, rear guard, or other safety protective devices
in place and working.
• Never leave a running machine unattended.
• Stop the motor and wait until the blade comes to a complete stop before removing the grass catcher or unclogging the
chute.
• Operate machine only in daylight or good articial light.
• Do not operate machine while under the inuence of alcohol or drugs.
• Never operate mower in wet grass. Always be sure of your footing; walk, never run.
• Disengage the drive system, if so equipped, before starting the motor.
• If the machine should start to vibrate abnormally, stop the motor and check for the cause immediately. Vibration is
generally a warning of trouble.
• Always wear eye protection when operating machine.
• See manufacturer’s instructions for proper operation and installation of accessories. Only use accessories approved by
the manufacturer.
2. SLOPE OPERATION
• Slopes are a major factor related to slip and fall accidents, which can result in severe injury. Operation on all slopes
requires extra caution. If you feel uneasy on a slope, do not mow it.
• Mow across the face of slopes; never up and down. Exercise extreme caution when changing direction on slopes.
• Watch for holes, ruts, bumps, rocks, or other hidden objects. Uneven terrain could cause a slip and fall accident. Tall
grass can hide obstacles.
• Do not mow on wet grass or excessively steep slopes. Poor footing could cause a slip and fall accident.
3. CHILDREN
Tragic accidents can occur if the operator is not alert to the presence of children. Children are often attracted to the
machine and the mowing activity. Never assume that children will remain where you last saw them.
• Keep children out of the mowing area and under the watchful care of a responsible adult.
• Stay alert, and turn the mower off if a child or any other person enters the mowing area.
• Never allow children to operate the machine.
• Use extreme care when approaching blind corners, doorways, shrubs, trees, or other objects that may obscure your view
of a child who may run into the path of the mower.

Not
for
Reproduction
SAFETY INFORMATION
SAVE THESE INSTRUCTIONS
4. SERVICE
• Keep all nuts, bolts, and screws tight in order to be sure that the equipment is in safe working condition.
• Never remove or tamper with safety devices. Check their proper operation regularly. Never do anything to interfere with
the intended function of a safety device or to reduce the protection provided by a safety device.
• Keep machine free of grass, leaves, or other debris build up. Allow machine to cool before storing.
• After striking a foreign object, stop the motor. Thoroughly inspect the mower for any damage. Repair any damage before
operating the mower.
• Never make any adjustments or repairs with the motor running.
• Always remove battery pack from mowers before adjusting, cleaning, or repairing.
• Check grass catcher components and the discharge guard frequently and replace with manufacturer’s recommended
parts, when necessary.
• Mower blades are sharp, and can cut. Wrap the blades or wear gloves, and use extra caution when servicing.
• Maintain or replace safety and instruction labels, as necessary.
W A R N I N G ( P R O P O S I T I O N 6 5 )
This product contains a chemical known to the state of California to cause cancer, birth defects or other reproductive harm.
Some dust created by power sanding, sawing, grinding, drilling and other construction activities contains chemicals known
to cause cancer, birth defects or other reproductive harm. Some examples of these chemicals are:
• Lead from lead-based paints,
• Crystalline silica from bricks and cement and other masonry products, and
• Arsenic and chromium from chemically-treated lumber.
Your risk of exposure to these chemicals varies depending on how often you do this type of work. To reduce your exposure
to these chemicals, work in a well-ventilated area, and work with approved safety equipment, such as dust masks that are
specially designed to lter out microscopic particles.
5
Not
for
Reproduction
Some of the following symbols may be used on this product. Please study them and learn their meaning. Proper
interpretation of these symbols will allow you to operate the product better and safer.
6
SYMBOLS
SYMBOL NAME DESIGNATION/EXPLANATION
V Volts Voltage
A Amperes Current
Hz Hertz Frequency (cycles per second)
W Watt Power
min Minutes Time
Alternating Current Type of current
Direct Current Type or a characteristic of current
n
o
No Load Speed Rational speed, at no load
Class II Construction Double-insulated construction
/min Per Minute Revolutions, strokes, surface speed, orbits etc., per minute
Wet Conditions Alert Do not expose to rain or use in damp locations.
Read The Operator’s Manual
To reduce the risk of injury
,
user must read and understand operator’s
manual before using this product.
Safety Alert Precautions that involve your safety.
Eye Protection
Always wear eye protection with side shields marked to comply with ANSI
Z87.1 when operating this equipment.
Keep Hands and Feet Away Keep hands and feet away from blade and cutting area.
No Reach Do not reach hands or feet under mower deck.
No Slope
Do not operate on inclines greater than 15º. Mow across the face of slopes,
never up and down.
Keep Bystanders Away Keep all bystanders at least 100 ft. away.
Ricochet
Pay attention that bystanders are not injured through foreign objects
thrown from the mower.
The following signal words and meanings are intended to explain the levels of risk associated with this product.
SYMBOLS SIGNAL MEANING
DANGER
Indicates an imminently hazardous situation, which, if not avoided, will result in death or
serious injury.
WARNING
Indicates a potentially hazardous situation, which, if not avoided, could result in death or
serious injury.
CAUTION
Indicates a potentially hazardous situation, which, if not avoided, may result in minor or
moderate injury.
CAUTION (Without Safety Alert Symbol) Indicates a situation that may result in property damage.
SAVE THESE INSTRUCTIONS
Not
for
Reproduction
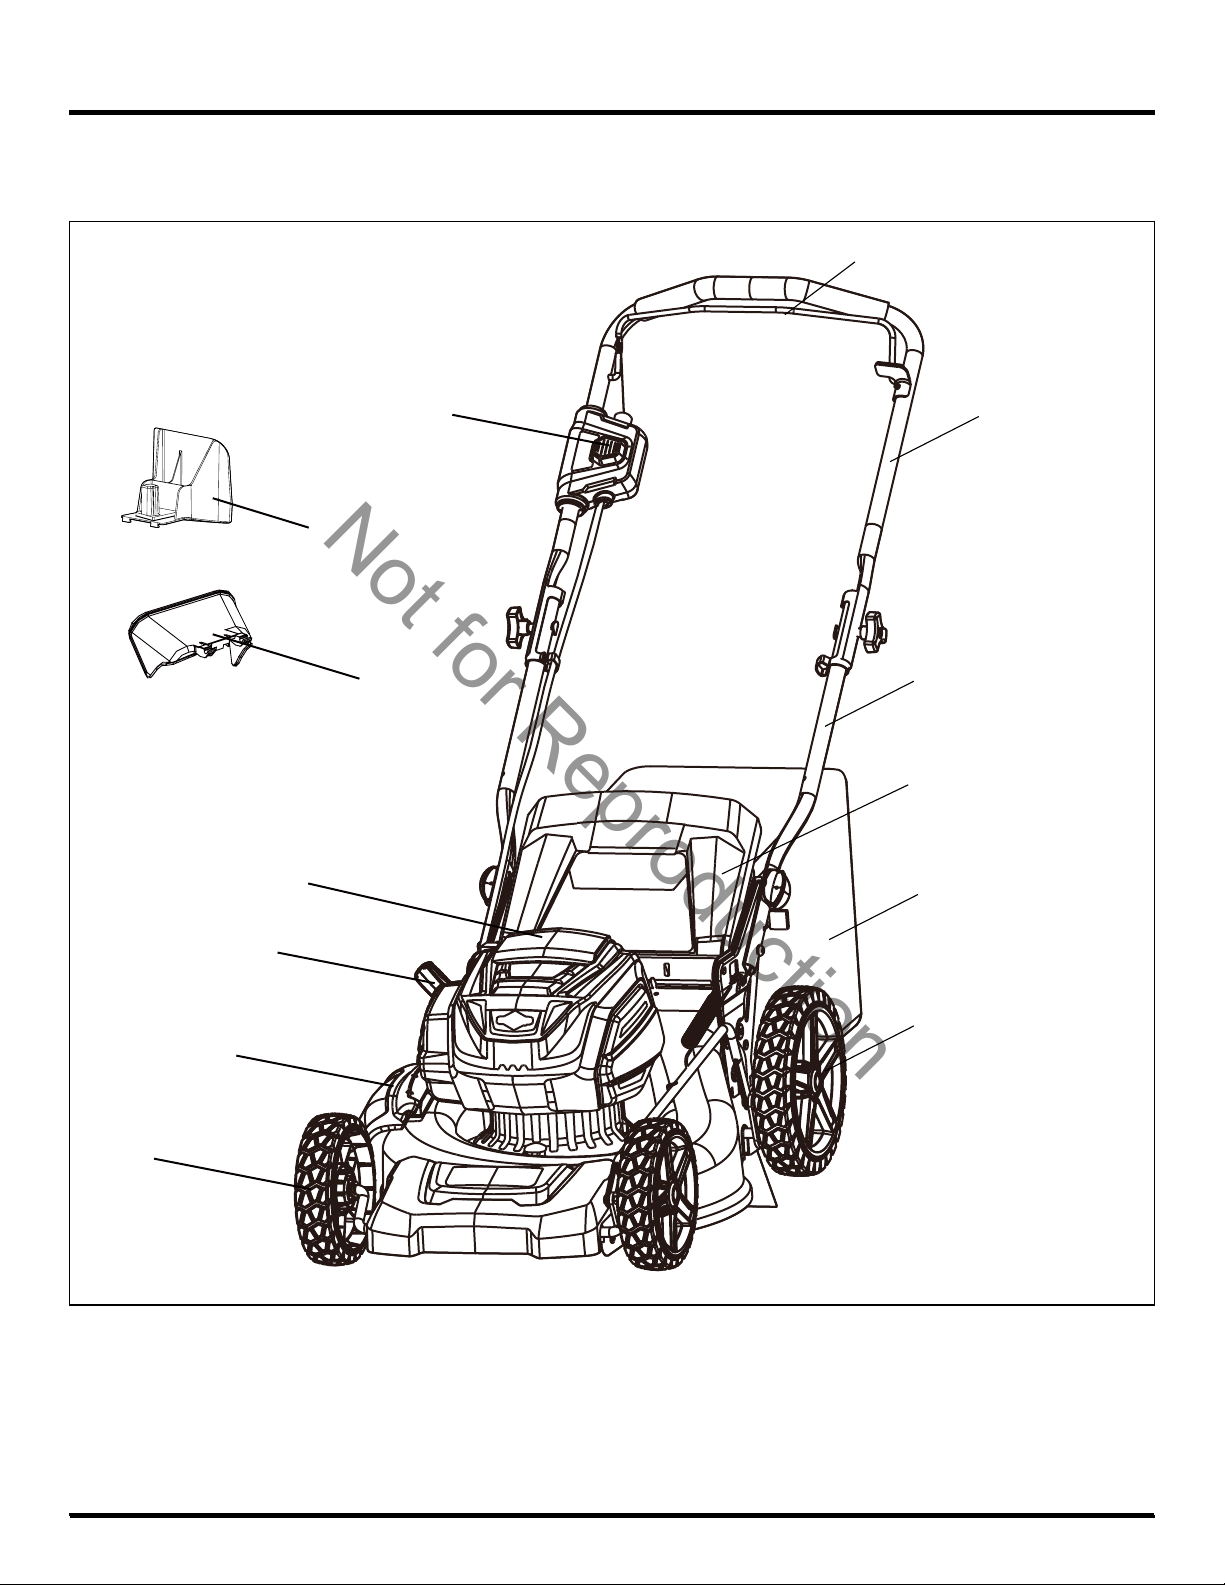
Fig. 1
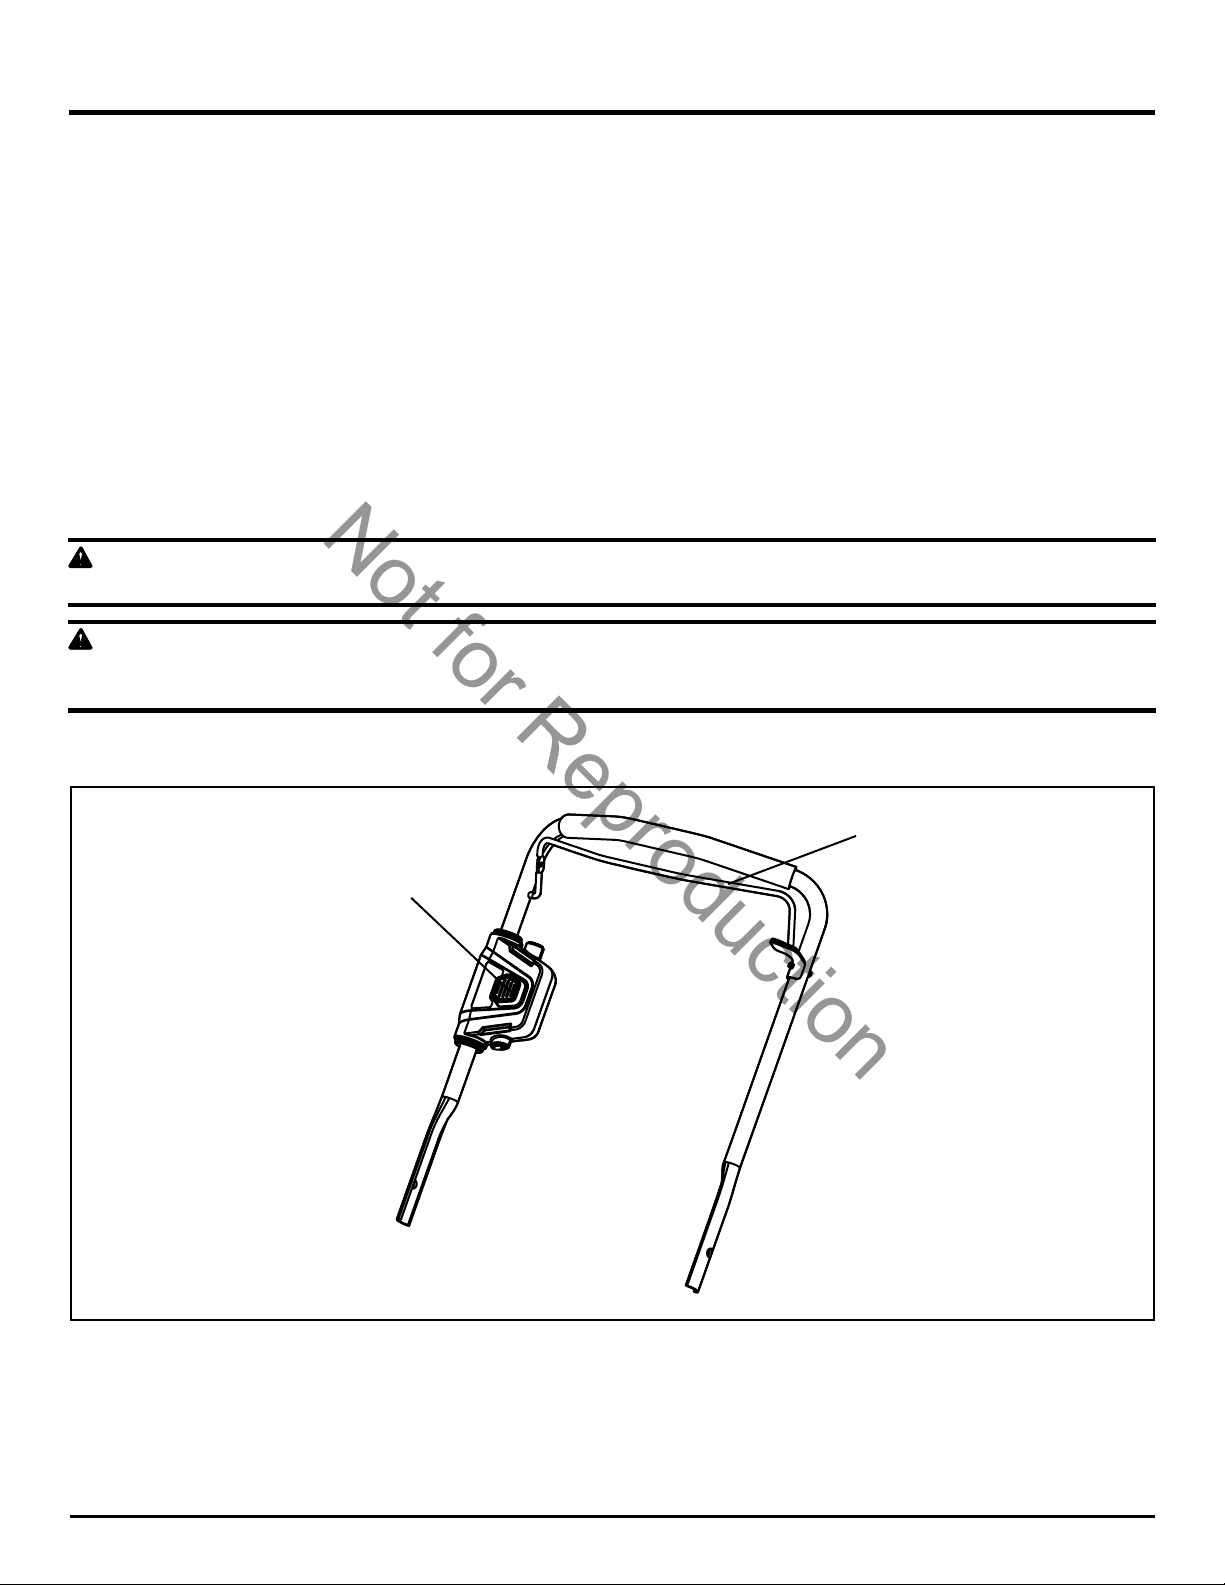
Read this operator's manual and safety rules before operating your mower. Compare the illustration in Figure 1 to your
mower in order to familiarize yourself with the location of various controls and adjustments. Save this manual for future
reference.
FEATURES AND CONTROLS
7
Safety lock-out button
Upper handle
Bail lever
Lower handle
Grass catcher bag
Rear cover
Height adjustment lever
Battery door
Side discharge cover
Rear wheel
Mulching plug
Side discharge chute
Front wheel

Not
for
Reproduction
8
UNPACKING
• Carefully remove the product and any accessories from the box. Make sure that all items listed in the packing list are
included.
• Inspect the product carefully to make sure no breakage or damage occurred during shipping.
• Do not discard the packing material until you have carefully inspected and satisfactorily operated the product.
• If any parts are damaged or missing, please call 1-800-317-7833 for assistance.
PACKING LIST
• Lawn Mower • Handle Knob x 4
• Mulching Plug • Handle Bolt x 4
• Side Discharge Chute • Owner's Manual
• Grass Catcher Bag
Note: The mulching plug is installed in the rear discharge opening when shipped
.
W A R N I N G
If any parts are damaged or missing do not operate this product until the parts are replaced. Using a product with damaged
or missing parts could result in serious personal injury.
W A R N I N G
Do not attempt to modify this product or create accessories not recommended for use with this product. Any such alteration
or modication is misuse and could result in a hazardous condition leading to possible serious personal injury.
W A R N I N G
Do not insert battery until assembly is complete and you are ready to mow. Failure to comply could result in accidental
starting and possible serious personal injury.
W A R N I N G
To prevent accidental starting that could cause serious personal injury, always remove the battery pack from the product
when assembling parts.
W A R N I N G
Never operate the mower without the proper safety devices in place and working. Never operate the mower with damaged
safety devices. Operation of this product with damaged or missing parts could result in serious personal injury.
ASSEMBLY
Not
for
Reproduction
ASSEMBLY
9
UNFOLDING AND ADJUSTING LOWER HANDLE (See Figure 2)
W A R N I N G
Folding or unfolding the handle improperly can damage the cables, causing an unsafe operating condition.
• Do not damage the cables when folding or unfolding the handle.
• If a cable is damaged, contact an Authorized Service Dealer.
• Pull and rotate the handle knobs (1) 90° on both sides to loosen the lower handles (2) on both sides.
• Move the lower handles to the operating position. You may raise or lower the handle to a position comfortable for you.
There are 3 positions (3) for you to choose. Release the handle knobs to lock the lower handle into position.
Note: Ensure both sides are set at the same position for proper assembly.
Fig. 2
(2)
(1)
(3)
Locked position
Unlocked position

Not
for
Reproduction
INSTALLING THE UPPER HANDLE (See Figure 3)
• Align the mounting holes on the upper handle (1) and the lower handle (2). Insert the bolts (3) and use the knobs (4) to
tighten them. Repeat the operation on the other side.
ASSEMBLY
10
Fig. 3
(4)
(4)
(2)
(1)
(3)
Not
for
Reproduction
11
ASSEMBLY
Fig. 4
(3)
(1)
(2)
(5)
(4)
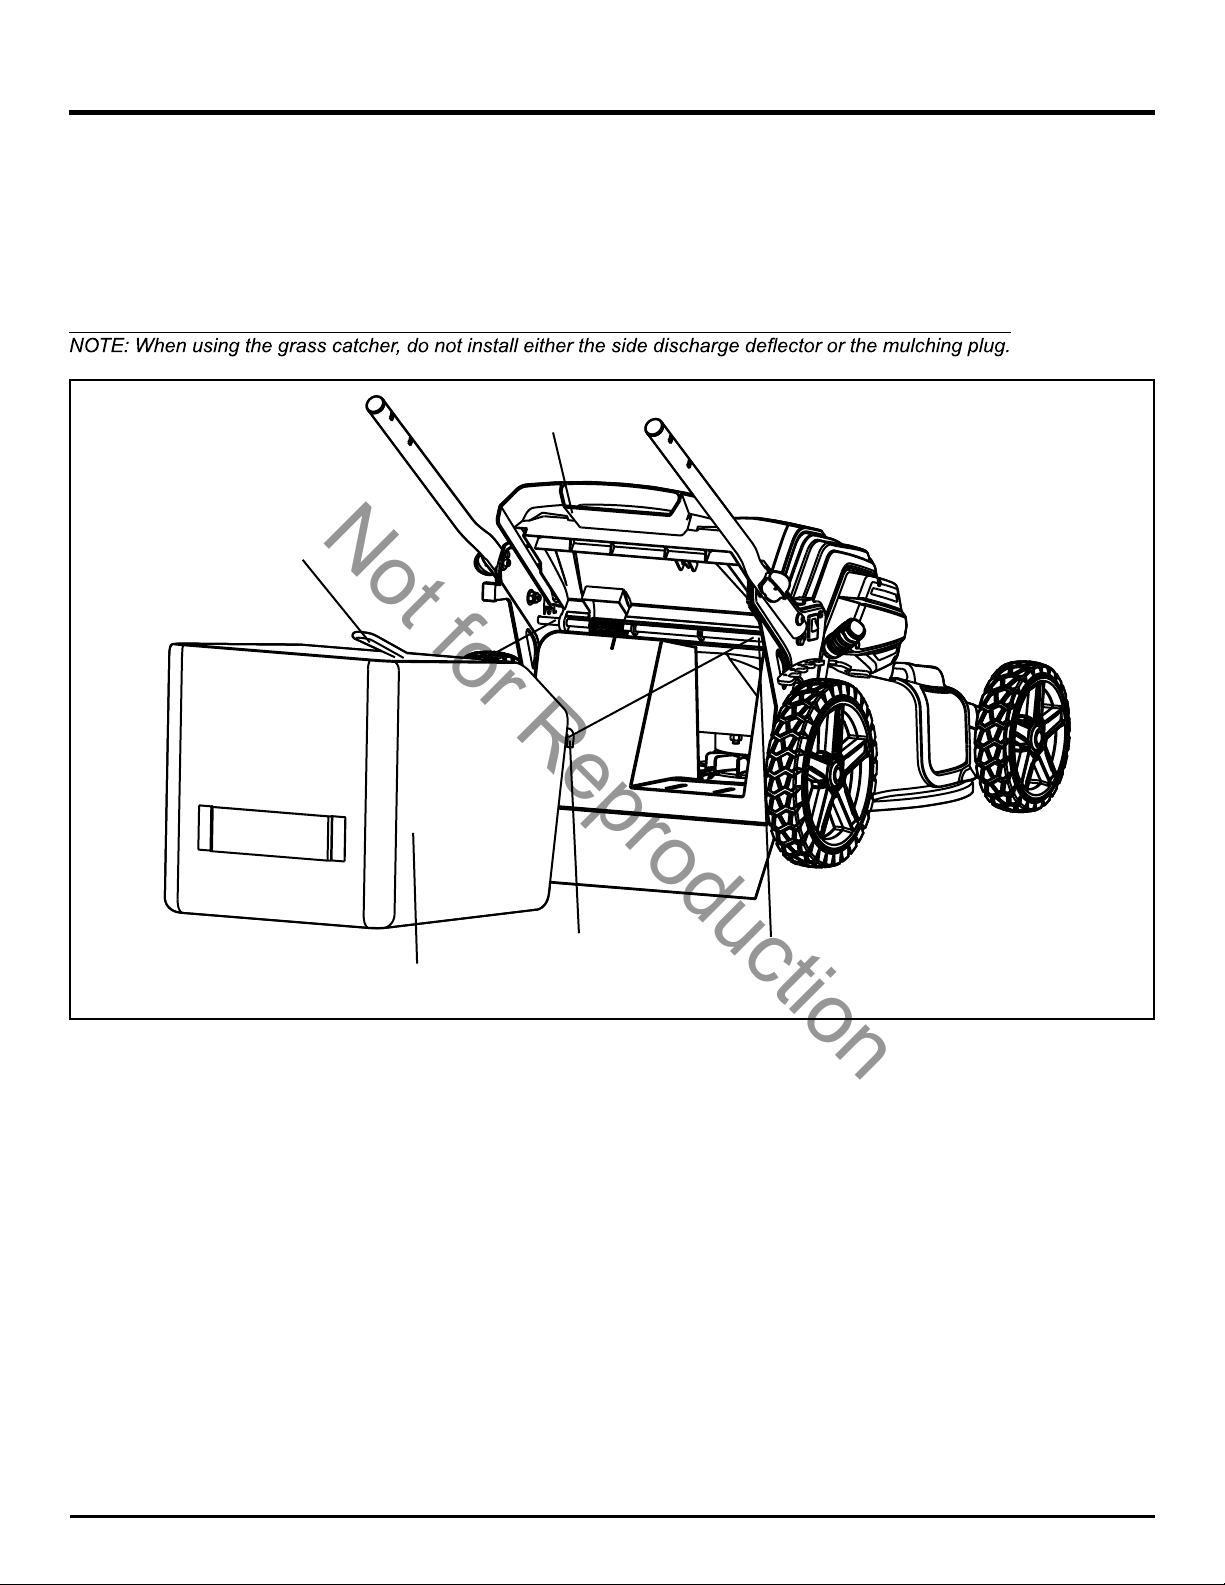
INSTALLING THE GRASS CATCHER BAG (See Figure 4)
• Lift the rear cover (1).
• Lift the grass catcher by its handle (2) and place under the rear cover so that the hooks (3) on the grass catcher (4) are
seated on the door rod (5).
• Release the rear cover. When installed correctly, the hooks on the grass catcher will extend through the openings on the
rear cover.
Not
for
Reproduction
Fig. 5
(2)
ASSEMBLY
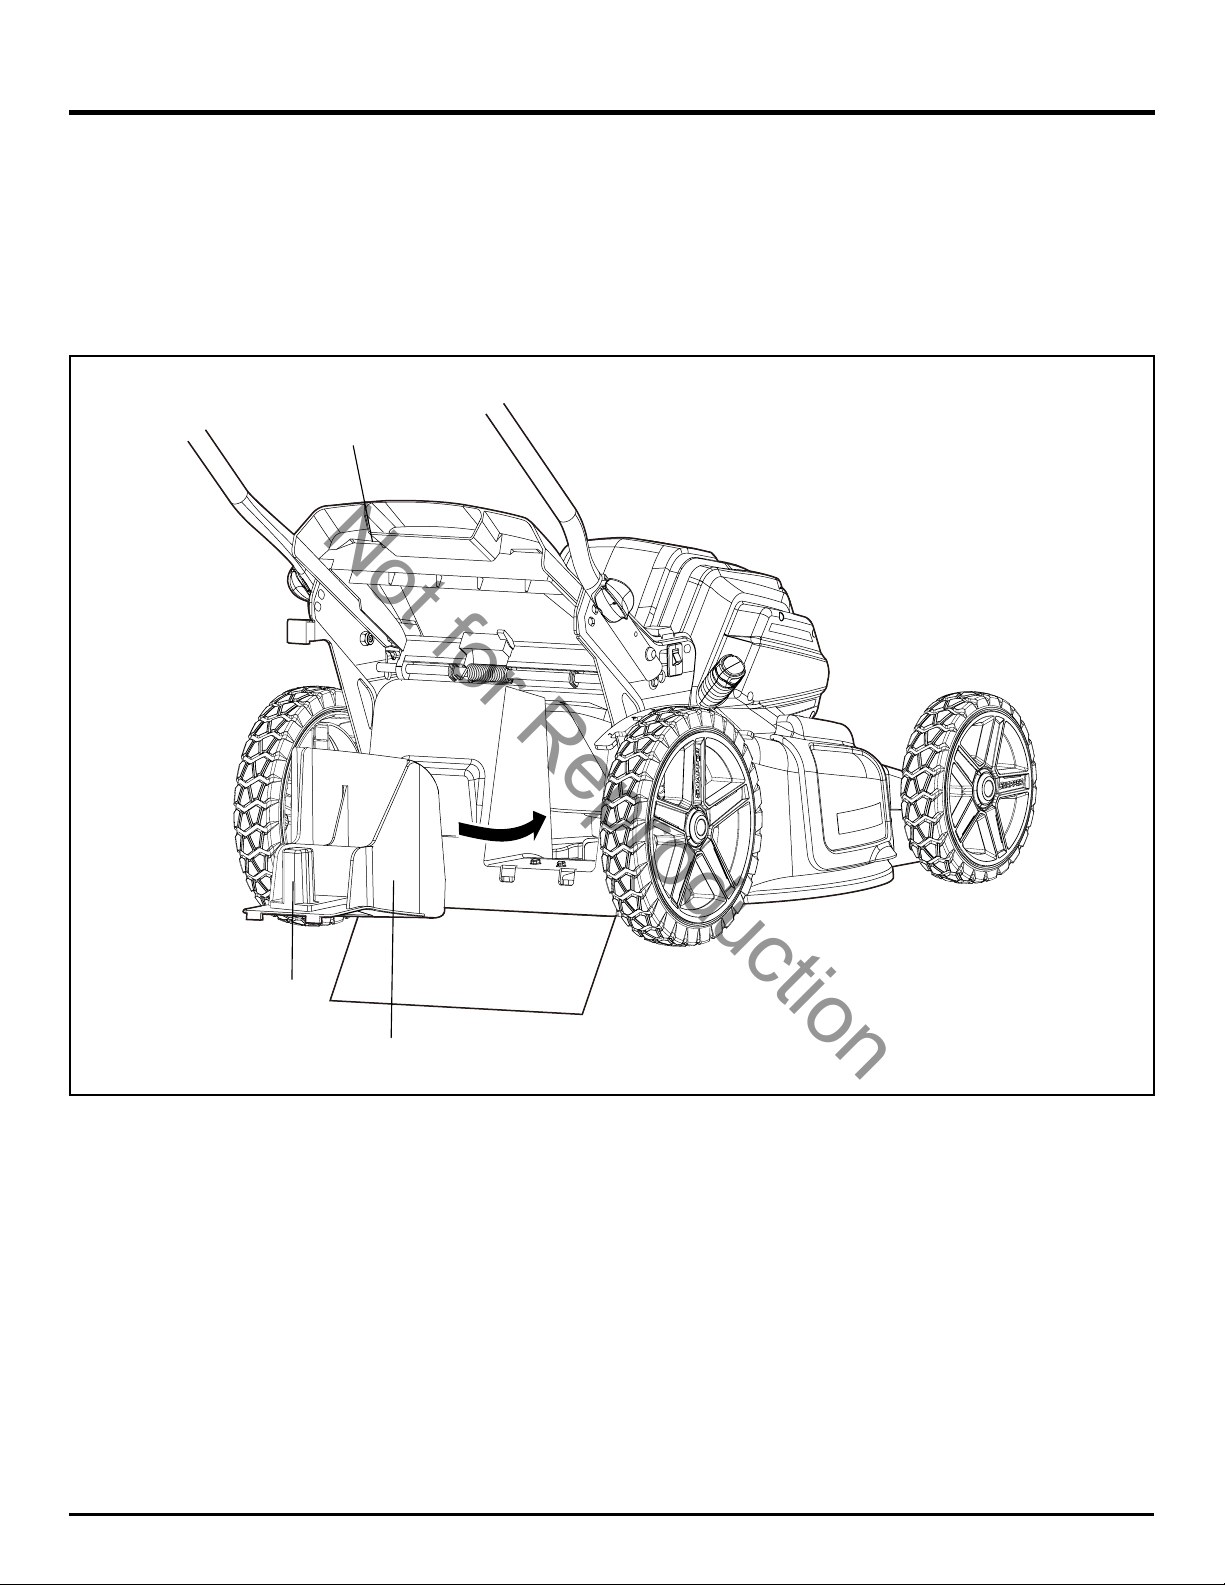
INSTALLING/REMOVING THE MULCHING PLUG (See Figure 5)
• To remove the mulching plug, lift the rear cover (1).
• Grasp the handle (2) of the mulching plug. Lift and pull the mulching plug out using the handle.
• The mulching plug (3) is inserted at an angle, so it requires some force to remove it.
• The mulching plug must be removed in order to install the grass catcher bag.
• The mulching plug must be re-installed when the grass catcher bag is removed.
12
(3)
(1)
Not
for
Reproduction
ASSEMBLY
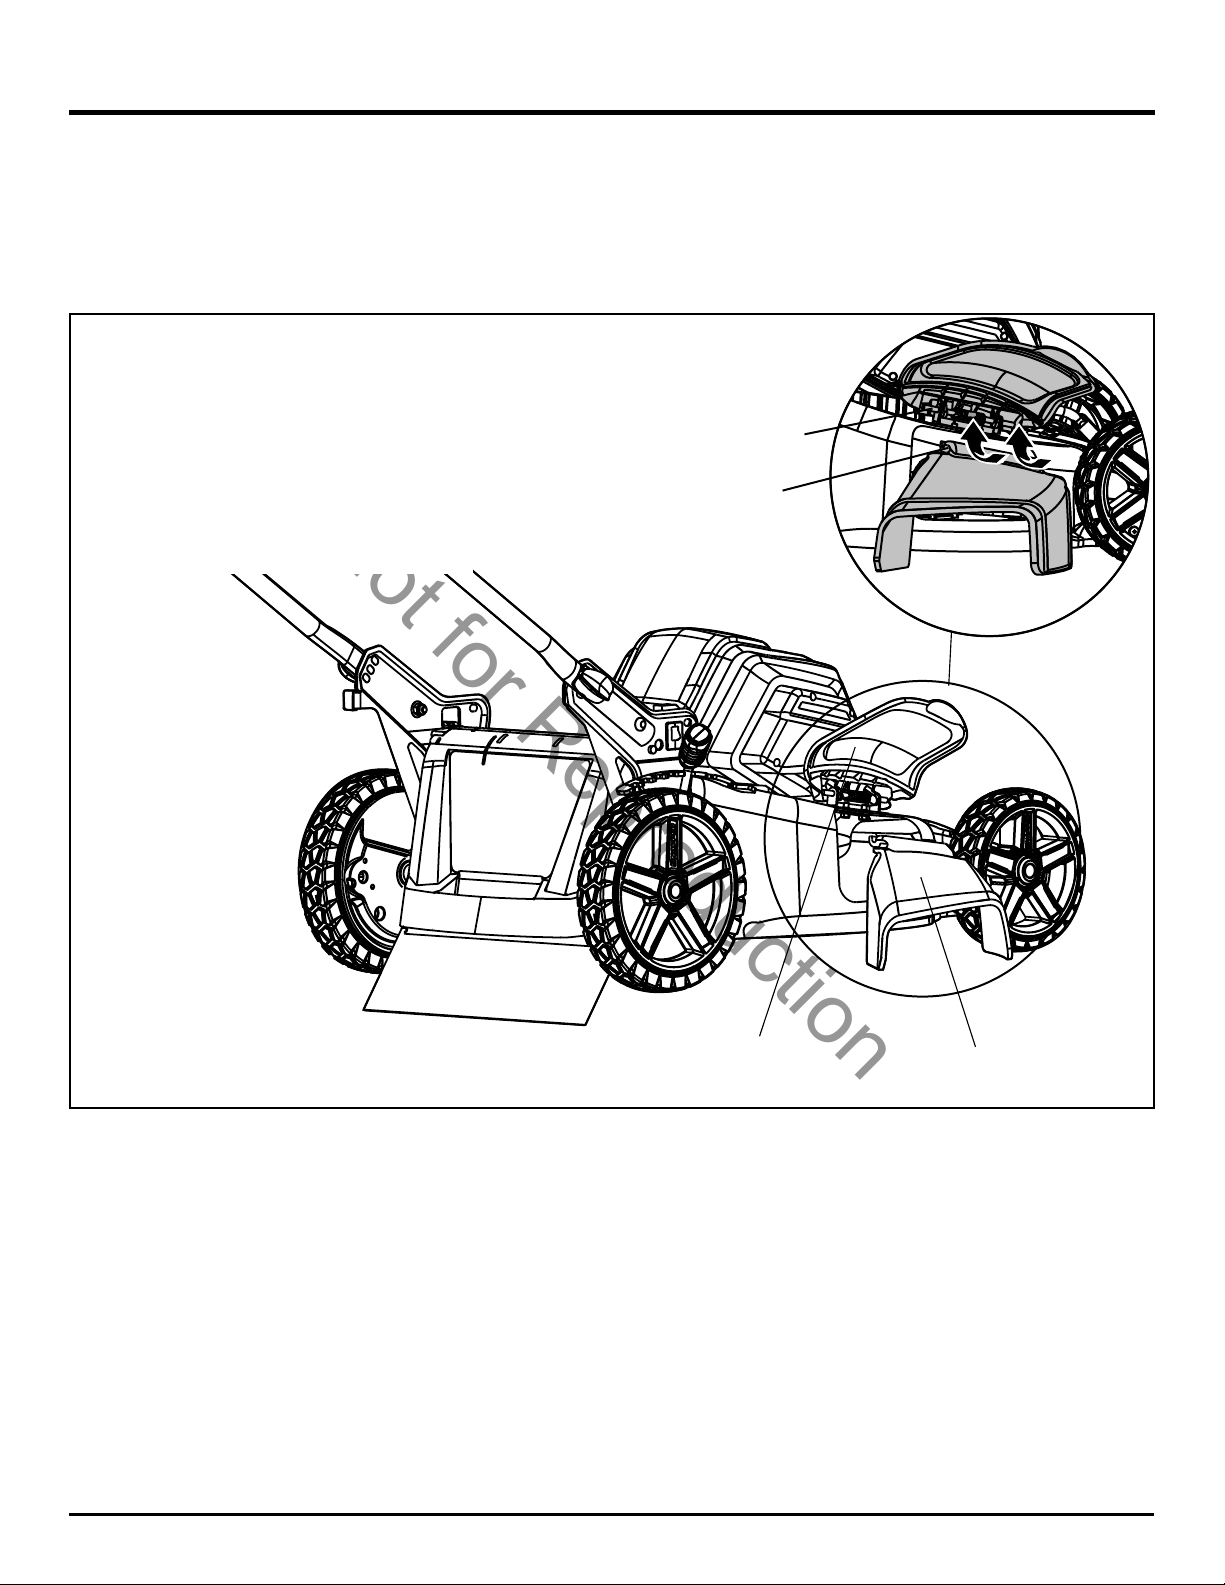
INSTALLING SIDE DISCHARGE CHUTE (See Figure 6)
• Lift the side discharge cover (1).
• Align the grooves (2) on the discharge chute (3) with the pins (4) on the underside of the discharge cover (1).
• Lower the discharge chute until the hooks on the mower deck are secured in the openings in the discharge chute.
• Release the side discharge cover.
13
(2)
(4)
Fig. 6
(1)
(3)
Not
for
Reproduction
Fig. 7
ASSEMBLY
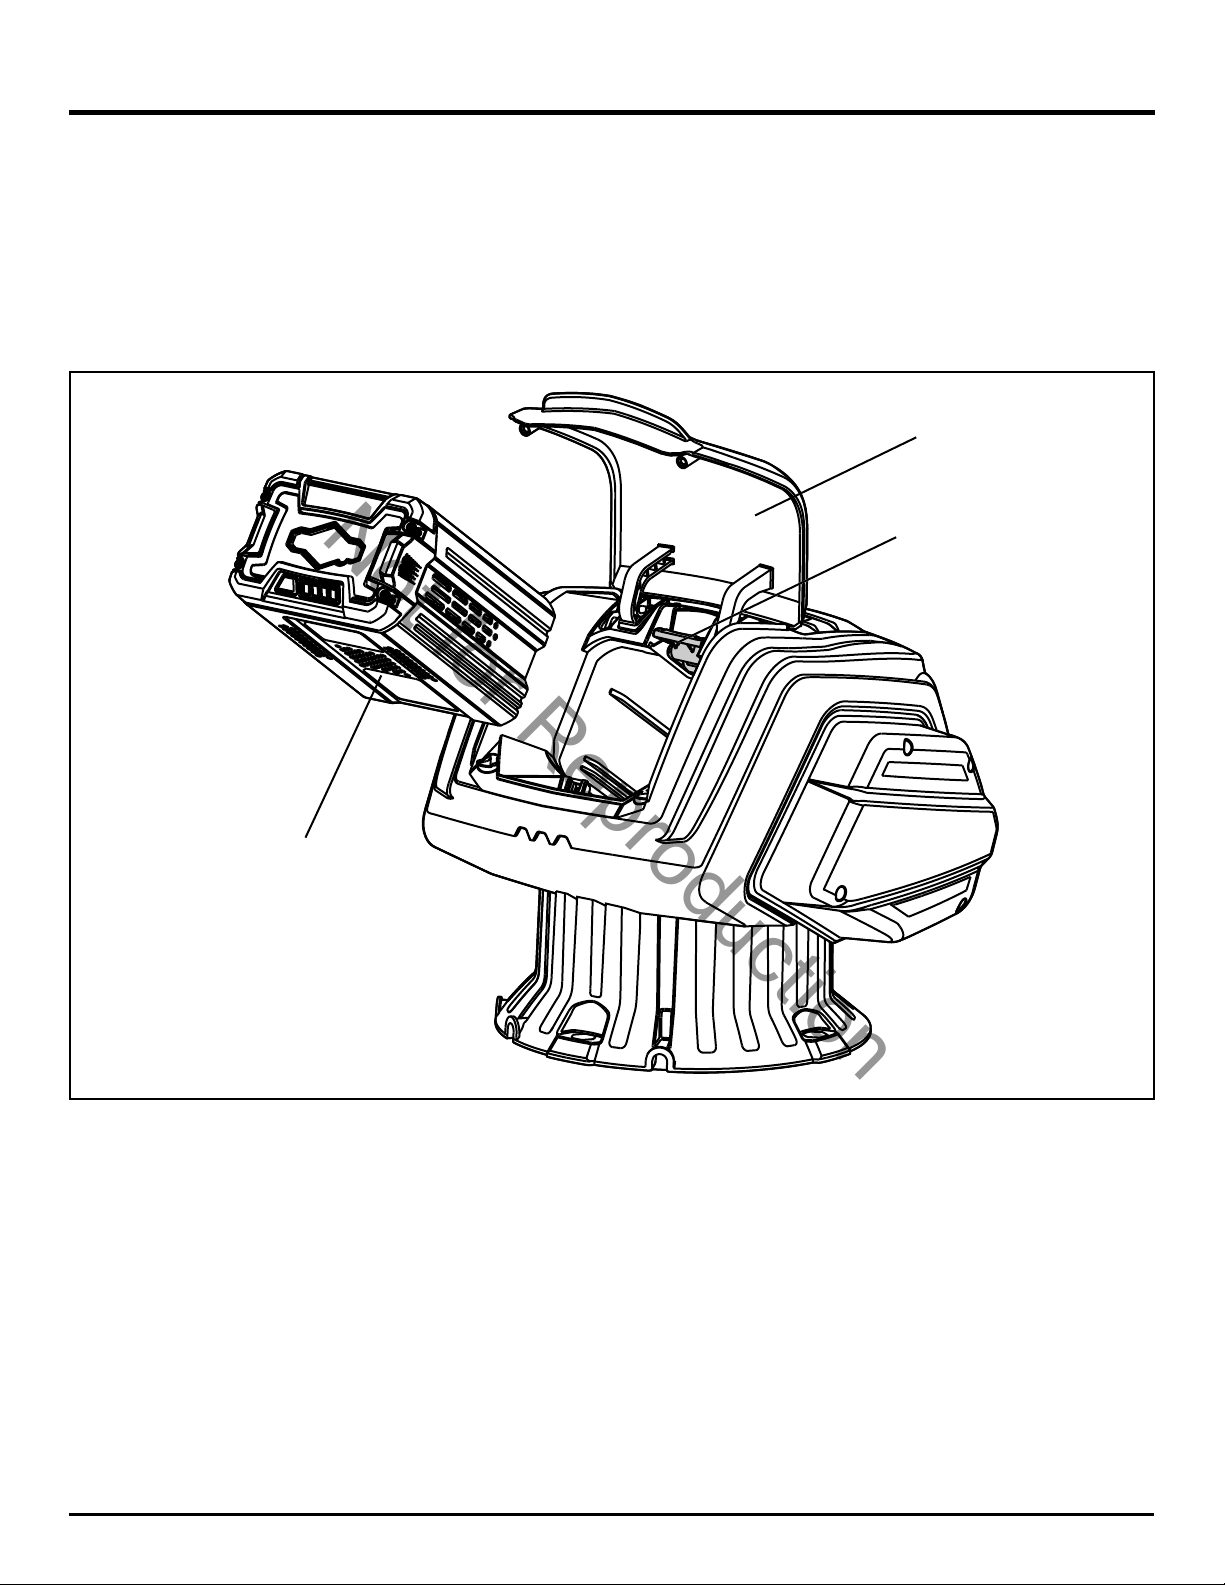
TO INSTALL BATTERY PACK (See Figure 7)
• Lift and hold up the battery door (1).
• Align the battery (2) with the mower’s battery port.
• Make sure the battery release button (3) snaps in place and that battery is fully seated and secure in the mower before
beginning operation.
• If the machine is not going to be used immediately, remove the battery.
• Close the door.
14
TO REMOVE BATTERY PACK (See Figure 7)
• Release the bail lever to stop the mower.
• Open the battery door.
• Press the battery release button (3) on the mower. This will cause the battery to raise out of the tool slightly.
• Remove battery from the mower.
(3)
(1)
(2)
Not
for
Reproduction
OPERATION
STARTING/STOPPING THE MOWER (See Figure 8)
To start the motor:
• Open the battery door.
• Insert the battery.
• Press and hold the safety lock-out button (1).
• Pull the bail lever (2) upward to the handle to start the mower and release the button.
To stop the motor:
• Release the bail lever.
Soft-Start
This LI-ION mower is equipped with a “soft-start” feature. When initially starting up, the mower will take approx. 3 seconds
to get up to full speed. If the mower does not initially start: Remove the battery and check under the mower deck to ensure
there is nothing obstructing the blade and that the blade can spin freely by hand. Even a small amount of grass on start up
will prevent the “softstart” from turning the mower on.
C A U T I O N
Do not attempt to override the operation of the safety lock-out button or bail lever.
W A R N I N G
The operation of any mower can result in foreign objects being thrown into the eyes, which can cause severe eye damage.
Always wear safety glasses while operating the mower and while performing any adjustments or repairs.
INSPECT THE CUTTING AREA. Remove all stones, sticks, wire, bones, and other debris that might be thrown by the
rotating blades.
15
Fig. 8
(1)
(2)
Not
for
Reproduction
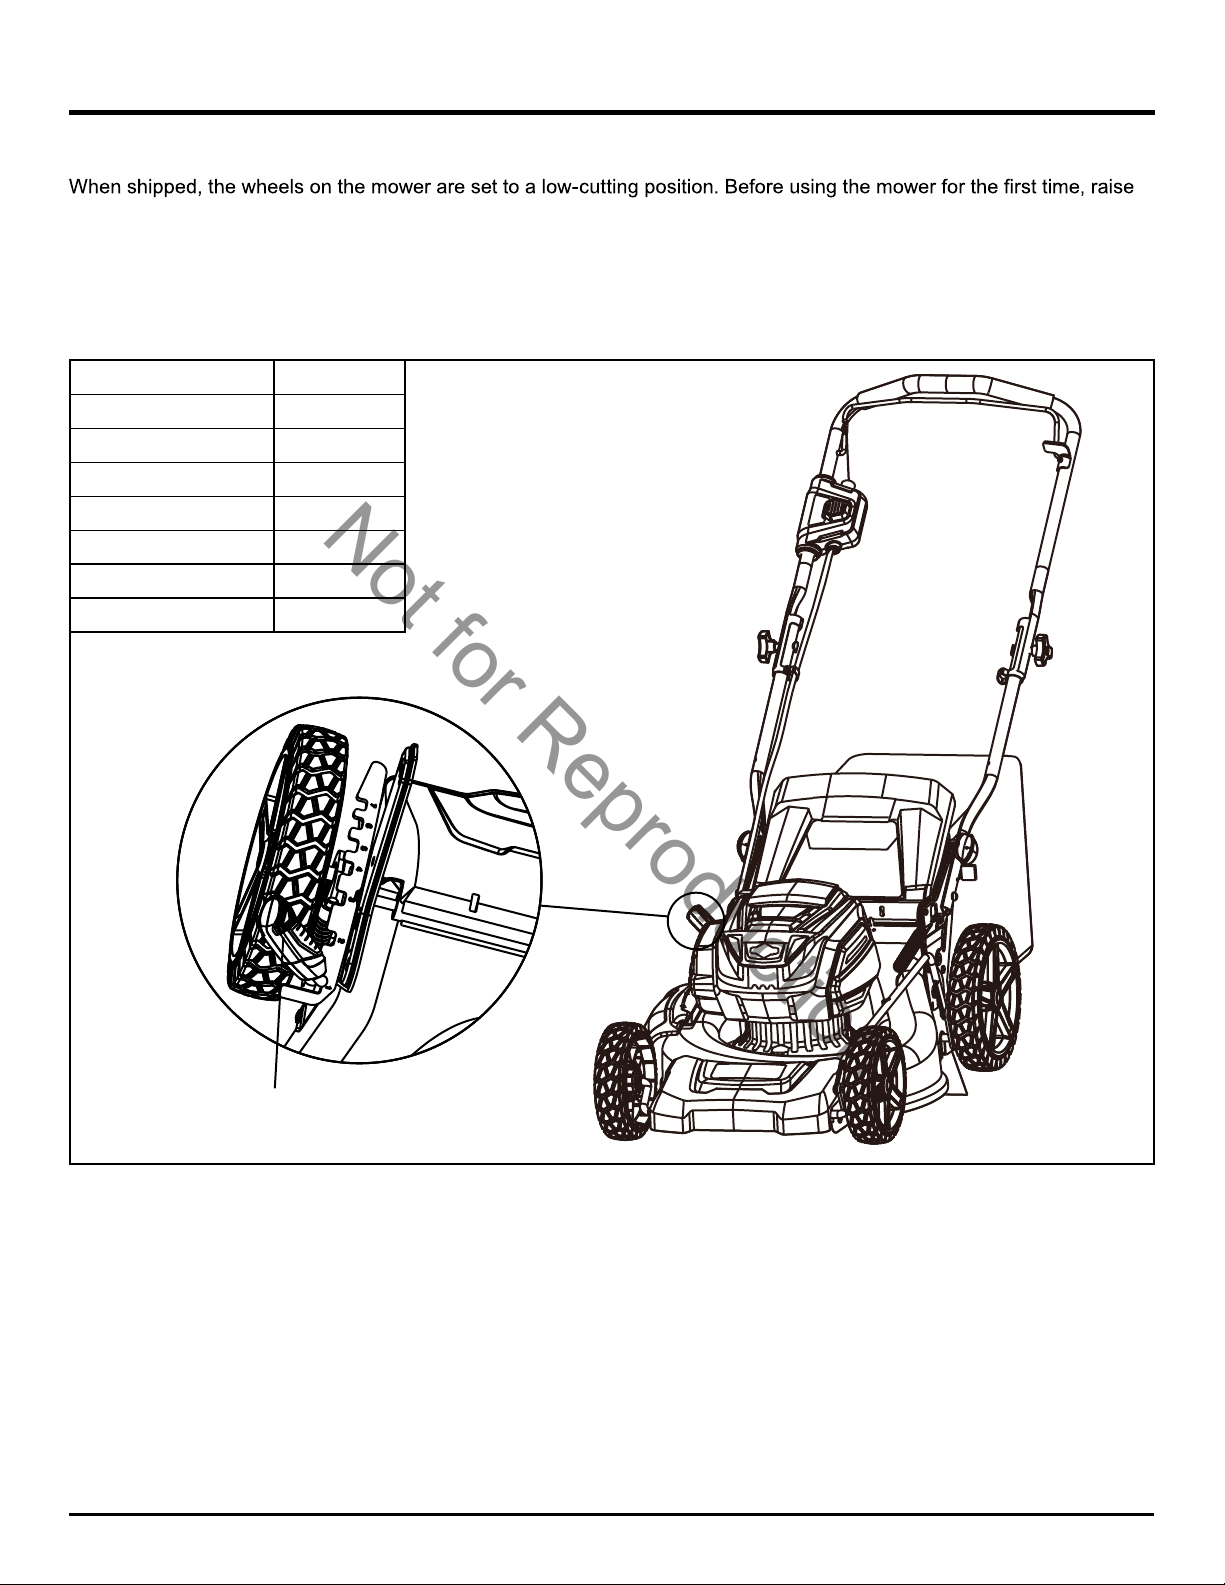
CUTTING HEIGHT ADJUSTMENT (See Figure 9)
the cutting position to the height best suited for your lawn. The average lawn should be between 1 1/2" to 2" (3.8 to 5 cm)
during cool months and between 2" and 3 1/2" (5 cm to 8.3 cm) during hot months
.
To adjust the blade height:
• To raise the blade height, grasp the height adjustment lever (1) and move it toward the back of the mower.
• To lower the blade height, grasp the height adjustment lever (1) and move it toward the front of the mower.
OPERATION
16
Fig. 9
Height Adjustments 1 3/8 - 3 3/4"
1st setting 1 3/8"
2nd setting 1 7/8"
3th setting 2 1/8"
4th setting 2 5/8"
5th setting 3"
6th setting 3 3/8"
7th setting 3 1/2"
(1)
Not
for
Reproduction
OPERATION
17
Fig. 10
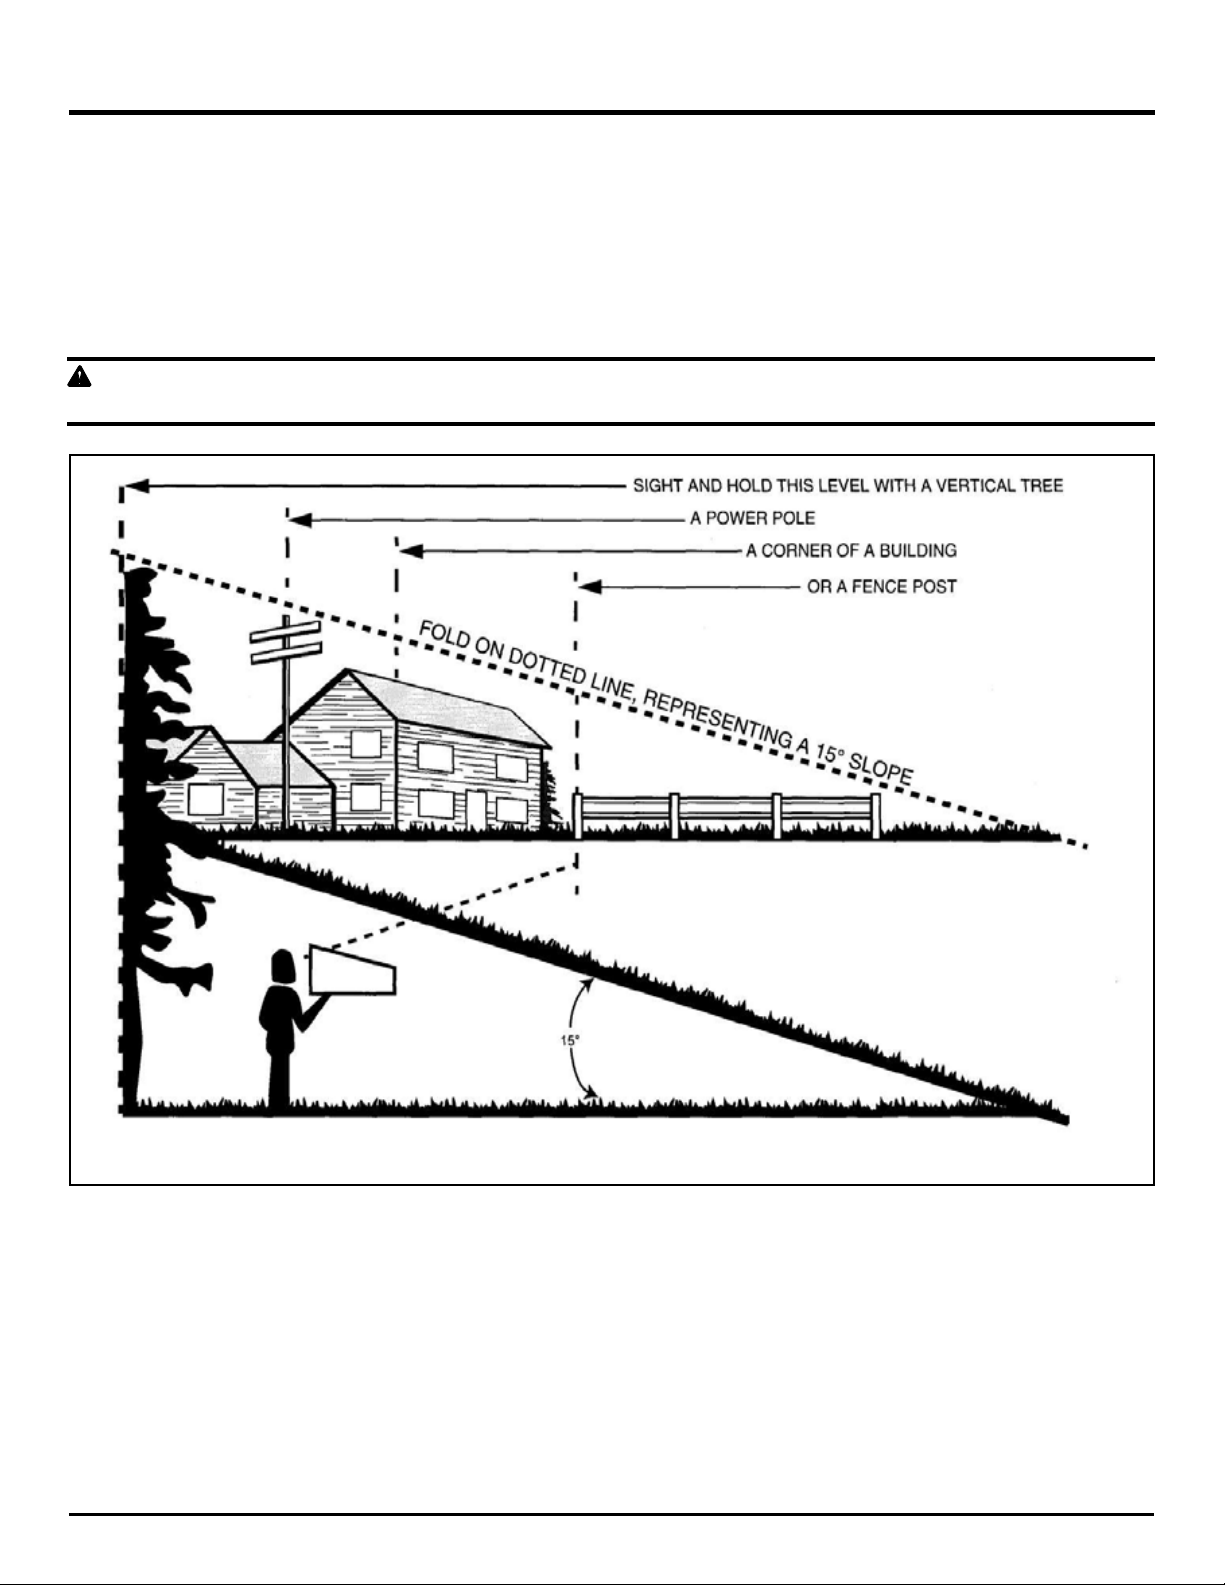
SLOPE GAUGE (See Figure 10)
• For your safety, use the slope gauge that is included as part of this manual to measure slopes before operating this unit
on a sloped or hilly area.
• Always be sure of your footing. If you feel like you are losing your balance, release the blade/ motor control handle
immediately. The blade will stop rotating within 3 seconds.
• Do not mow near drop-offs, ditches, or embankments, because you could lose your footing or balance.
• Do not mow a slope that has an angle of greater than 15°.
W A R N I N G
Do not mow a slope that has an angle of greater than 15° (a rise of approximately 2 1/2 feet [.75 m] every 10 feet [3 m]).
Not
for
Reproduction
MOWING TIPS
NOTE: A sharp blade will greatly enhance the performance of the mower, especially when cutting high grass. Be sure to
check the blade and to sharpen it at least once per year, as described in the Maintenance section.
• Verify that the lawn is free of stones, sticks, wires, and other objects that could damage the blades or the motor. These
objects could be accidentally thrown by the mower in any direction, and could cause serious personal injury to the
operator and to others. In order to prevent electric shock, do not operate the mower in damp or wet conditions.
• Do not mow in circles. Travel back and forth across the lawn.
• When cutting thick grass, reduce walking speed in order to allow for a more effective cut and a proper discharge of the
clippings.
• For a healthy lawn, always cut off one-third or less of the total length of the grass. The average lawn should be
approximately 1 1/2 to 2” (3.8 to 5 cm) long during cool months, and between 2" to 3 1/4" (5 cm to 8.3 cm) long during hot
months. If there is growth, the lawn should be cut in the fall.
MULCHING TIPS
NOTE: INSPECT THE AREA WHERE THE MOWER IS TO BE USED, AND REMOVE ALL STONES, STICKS, WIRE,
BONES, AND OTHER DEBRIS THAT MIGHT BE THROWN BY THE ROTATING BLADE.
• Release the bail lever to turn the mower OFF when crossing any graveled area (stones can be thrown by the blade).
• Set mower to the highest cutting height when mowing on uneven ground or in tall weeds.
• For effective mulching, do not cut wet grass, because it tends to stick to the underside of the deck, preventing proper
mulching of grass clippings. New or thick grass may require a narrower cut. The ground speed should be adjusted to the
condition of the lawn. If mowing has been delayed and the grass has been allowed to grow longer than 4" (10 cm), mow
the lawn twice in order to reduce the grass height to a maximum of 3 1/4” (8.3 cm).
• Walk at a steady pace. Overlap the cutting rows. Do not let the grass get too tall. If the grass gets too long, start at the
highest cutting position and work down to the desired cutting height.
W A R N I N G
If you strike a foreign object, stop the motor and remove the battery. Thoroughly inspect the mower for any damage. Repair
any damage before operating the mower. Excessive vibration of the mower during operation is an indication of damage.
Thoroughly inspect the mower and repair any damage before operating the mower.
OPERATION
18
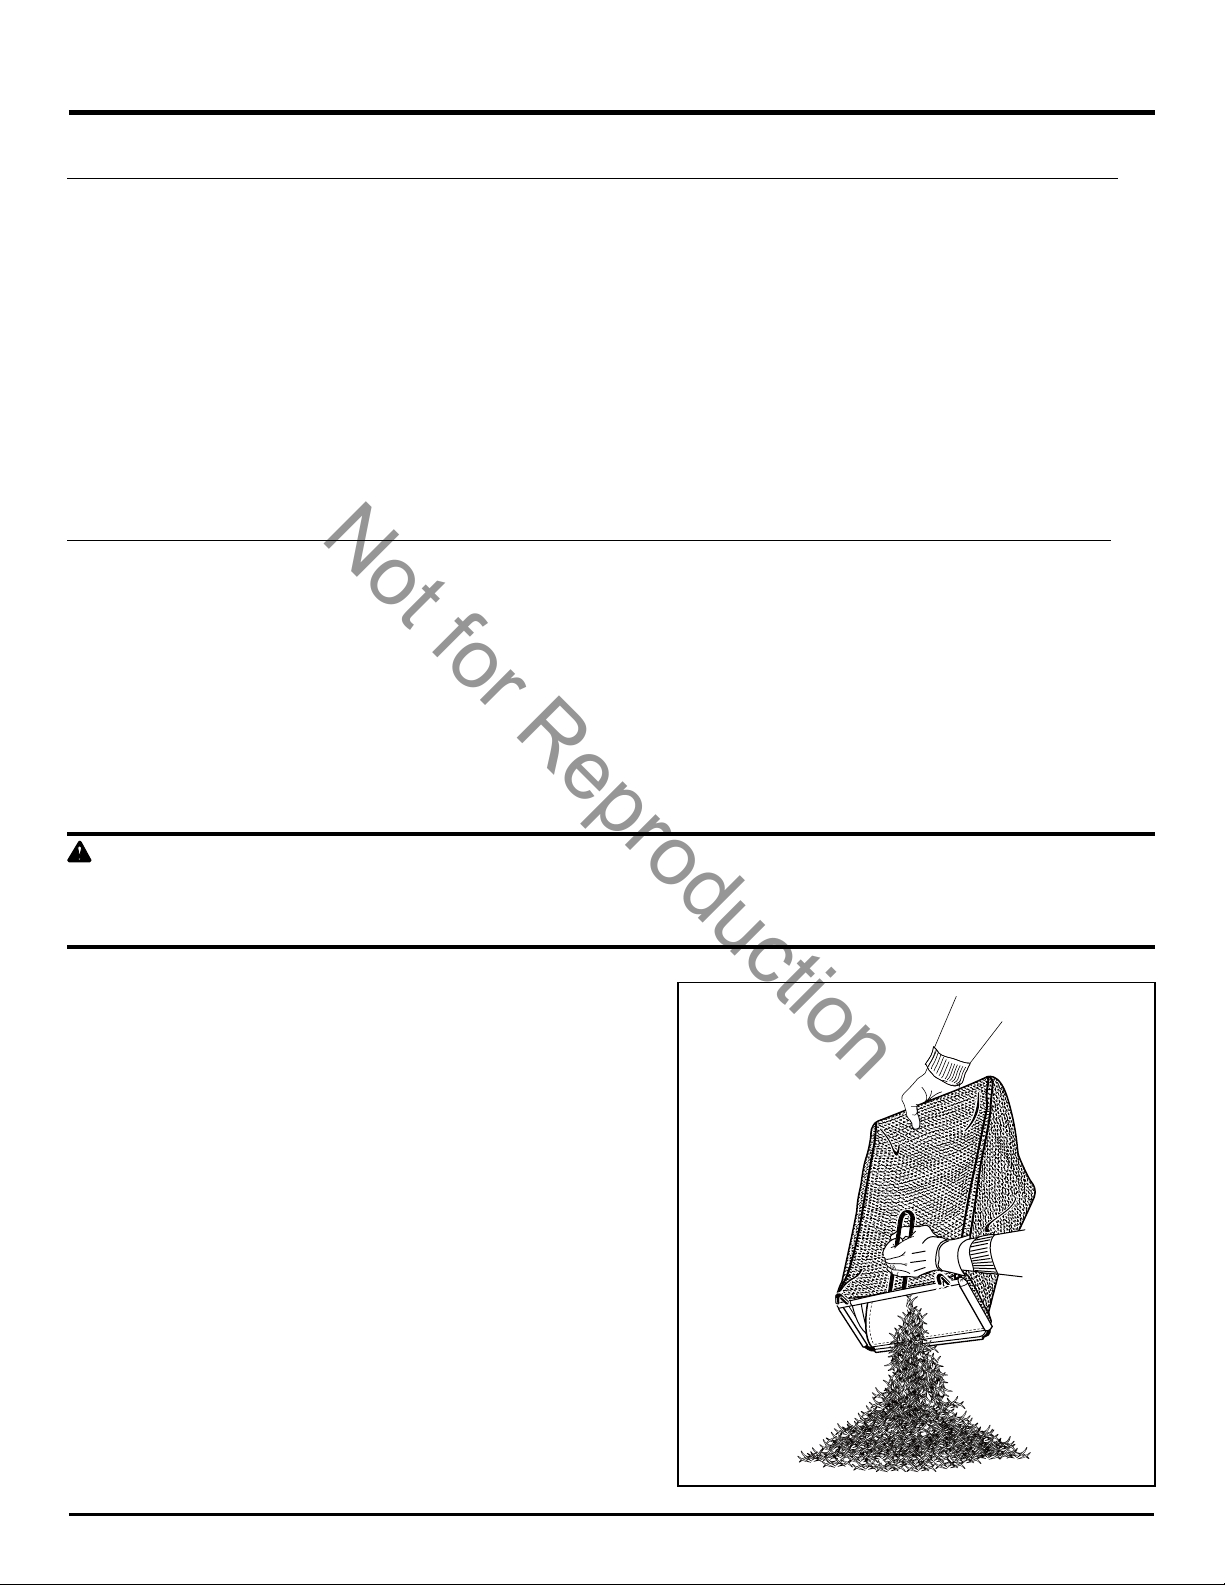
EMPTYING THE GRASS CATCHER BAG
(See Figure 11)
• Stop mower, allow blades to completely stop, and remove
the battery.
• Lift the rear discharge cover.
• Lift the grass catcher bag by its handle to remove from
mower.
• Empty grass clippings.
• Lift the rear discharge cover and reinstall the grass catcher
bag as described earlier in this manual.
Fig. 11
Not
for
Reproduction
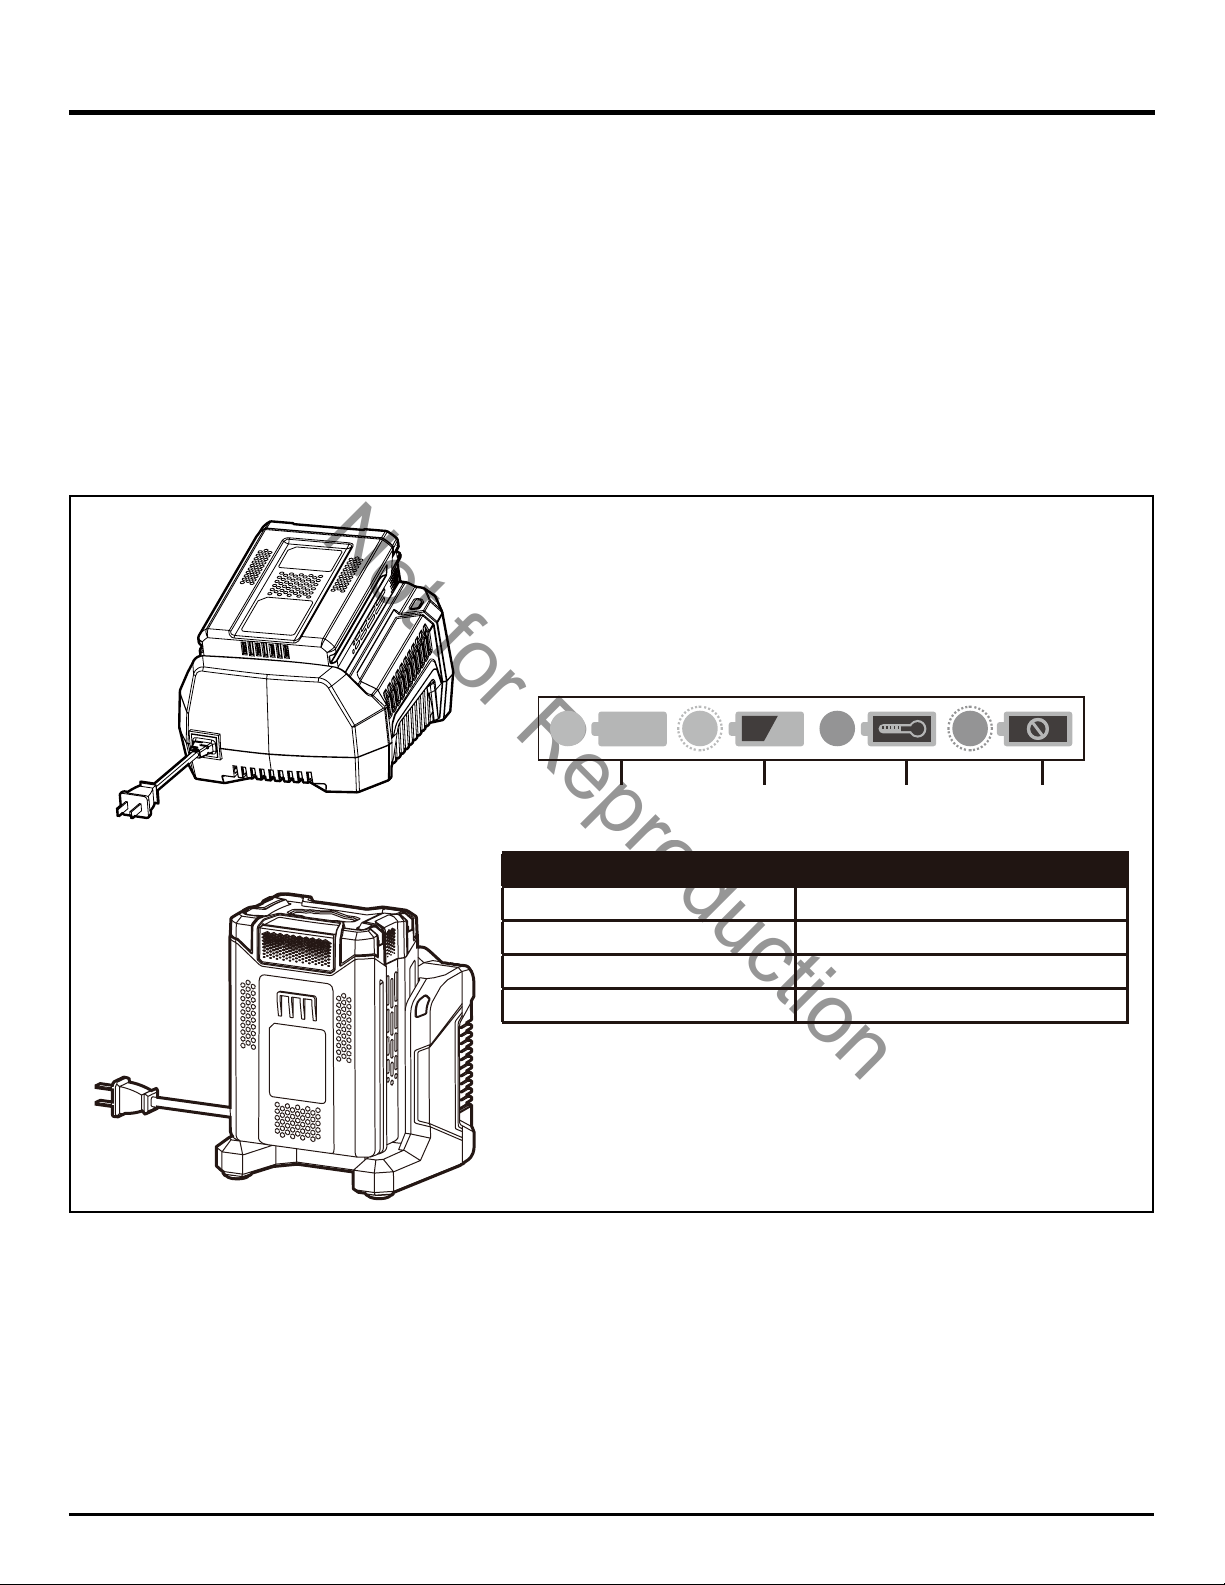
CHARGING PROCEDURE
NOTE: The battery is not shipped fully charged. It is recommended to fully charge before rst use to ensure that maximum
run time can be achieved. This lithium-ion battery will not develop a memory and may be charged at any time.
Low voltage charging:
If the battery has been stored with little to no charge for a long period of time, the charger will go into recovery mode, which
will take 20 hrs to fully charge the battery. This will enhance the life of the battery. Once it is fully charged, the next charge
will return to standard charging.
1. Plug the charger into an AC power outlet.
2. Insert the battery pack into the charger.
This is a diagnostic charger. The Charger LED Lights will illuminate in specic order to communicate the current battery
status. They are as follows:
19
BATTERY & CHARGER
LED STATUS DESCRIPTION
Solid Green Fully Charged
Blinking Green Charging
Solid Red Over Temperature
Blinking Red
Charging Fault
Charging Over
Temperature
Charging
Fault
Fully
Charged
False defect note:
When the battery is inserted into the charger and the status LED blinks RED, remove the battery from the charger for
1 minute, then reinsert. If the status LED blinks GREEN, then the battery is properly charging. If the status LED is still
blinking RED, remove the battery and unplug the charger for 1 minute. After 1 minute, plug in the charger and reinsert the
battery. If the status LED blinks GREEN, then the battery is properly charging. If the status LED is still blinking RED, the
battery is defective and needs to be replaced.
Not
for
Reproduction
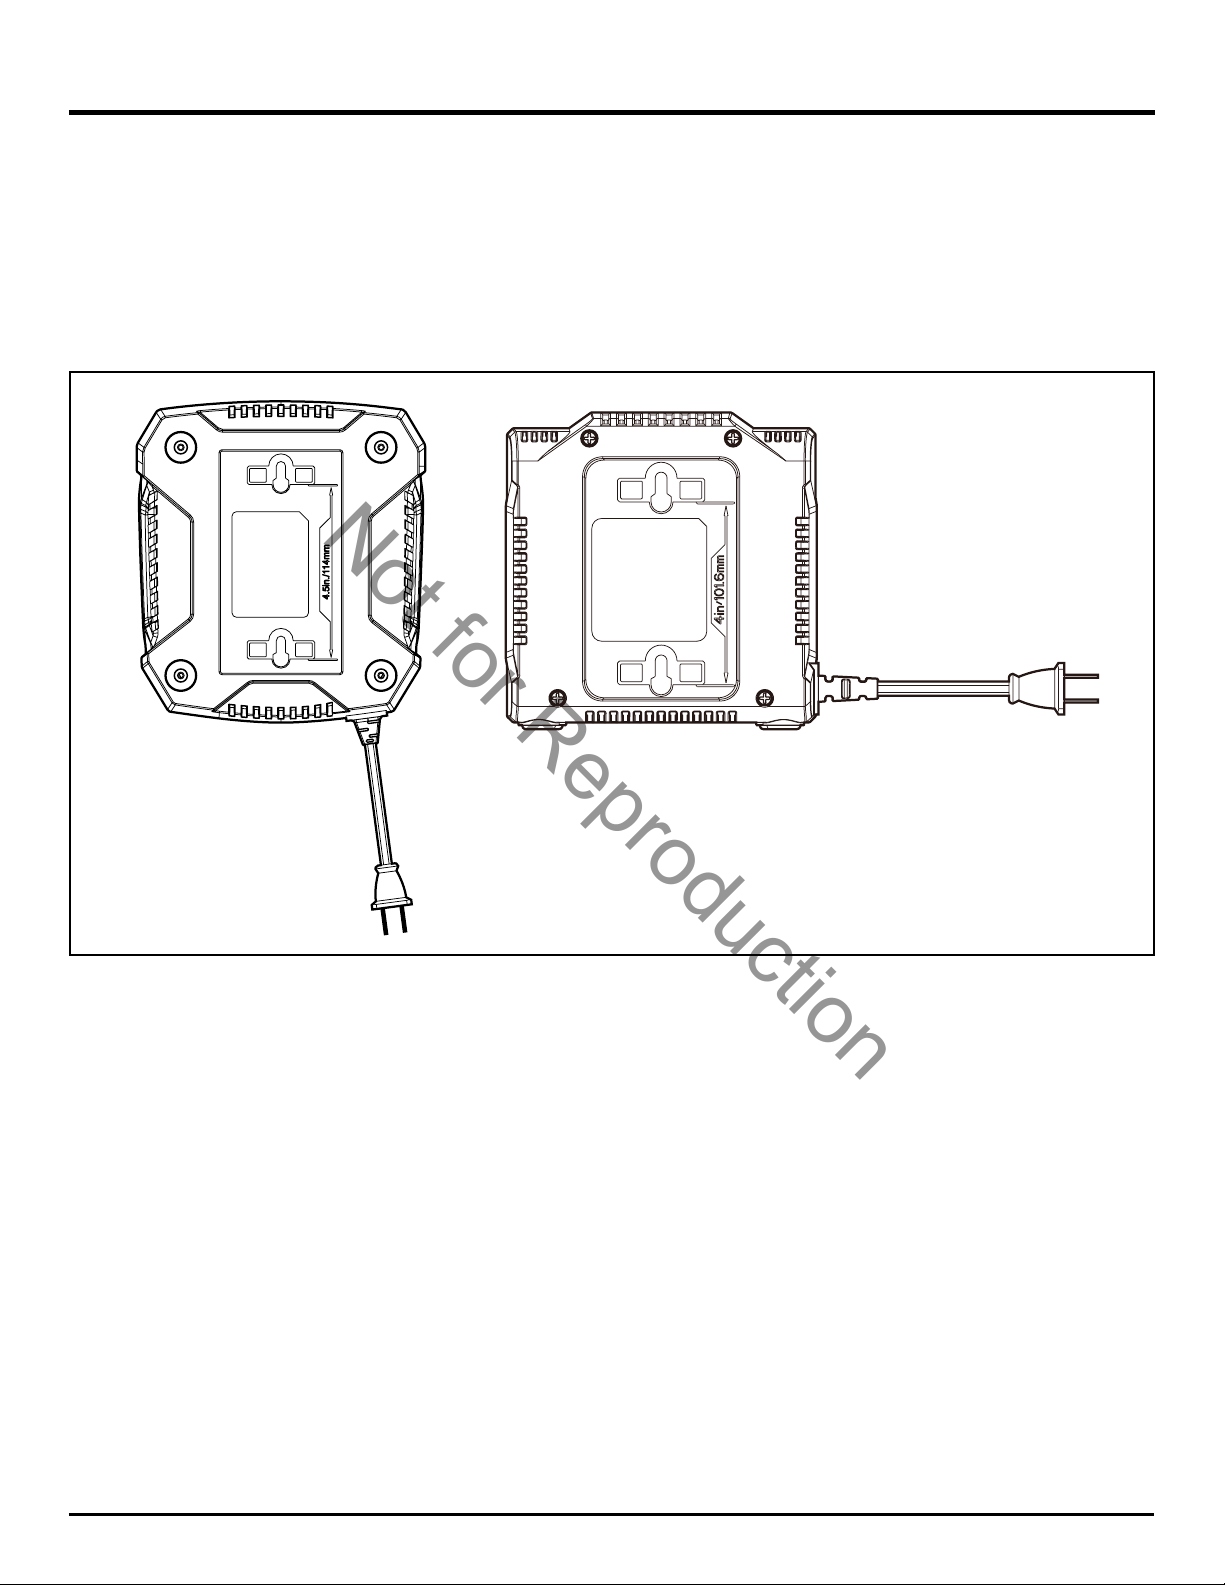
CHARGER MOUNTING
1. This charger can be installed hanging on a wall using two #8 screws (not included).
2. Locate the placement for the charger to be wall mounted.
3. If fastening to wood studs use 2 wood screws (not included).
4. Drill two holes on center 4.5 in. apart ensuring that they are vertically aligned.
5. If fastening to drywall use wall anchors (not included) and screws to secure the charger to the wall.
6. This power unit is intended to be correctly orientated in a vertical or oor mount position.
20
BATTERY & CHARGER
NOTE: If the battery and the charger won’t be used for a long time, remove the battery from the charger and pull out the AC
power plug.
Not
for
Reproduction
MAINTENANCE
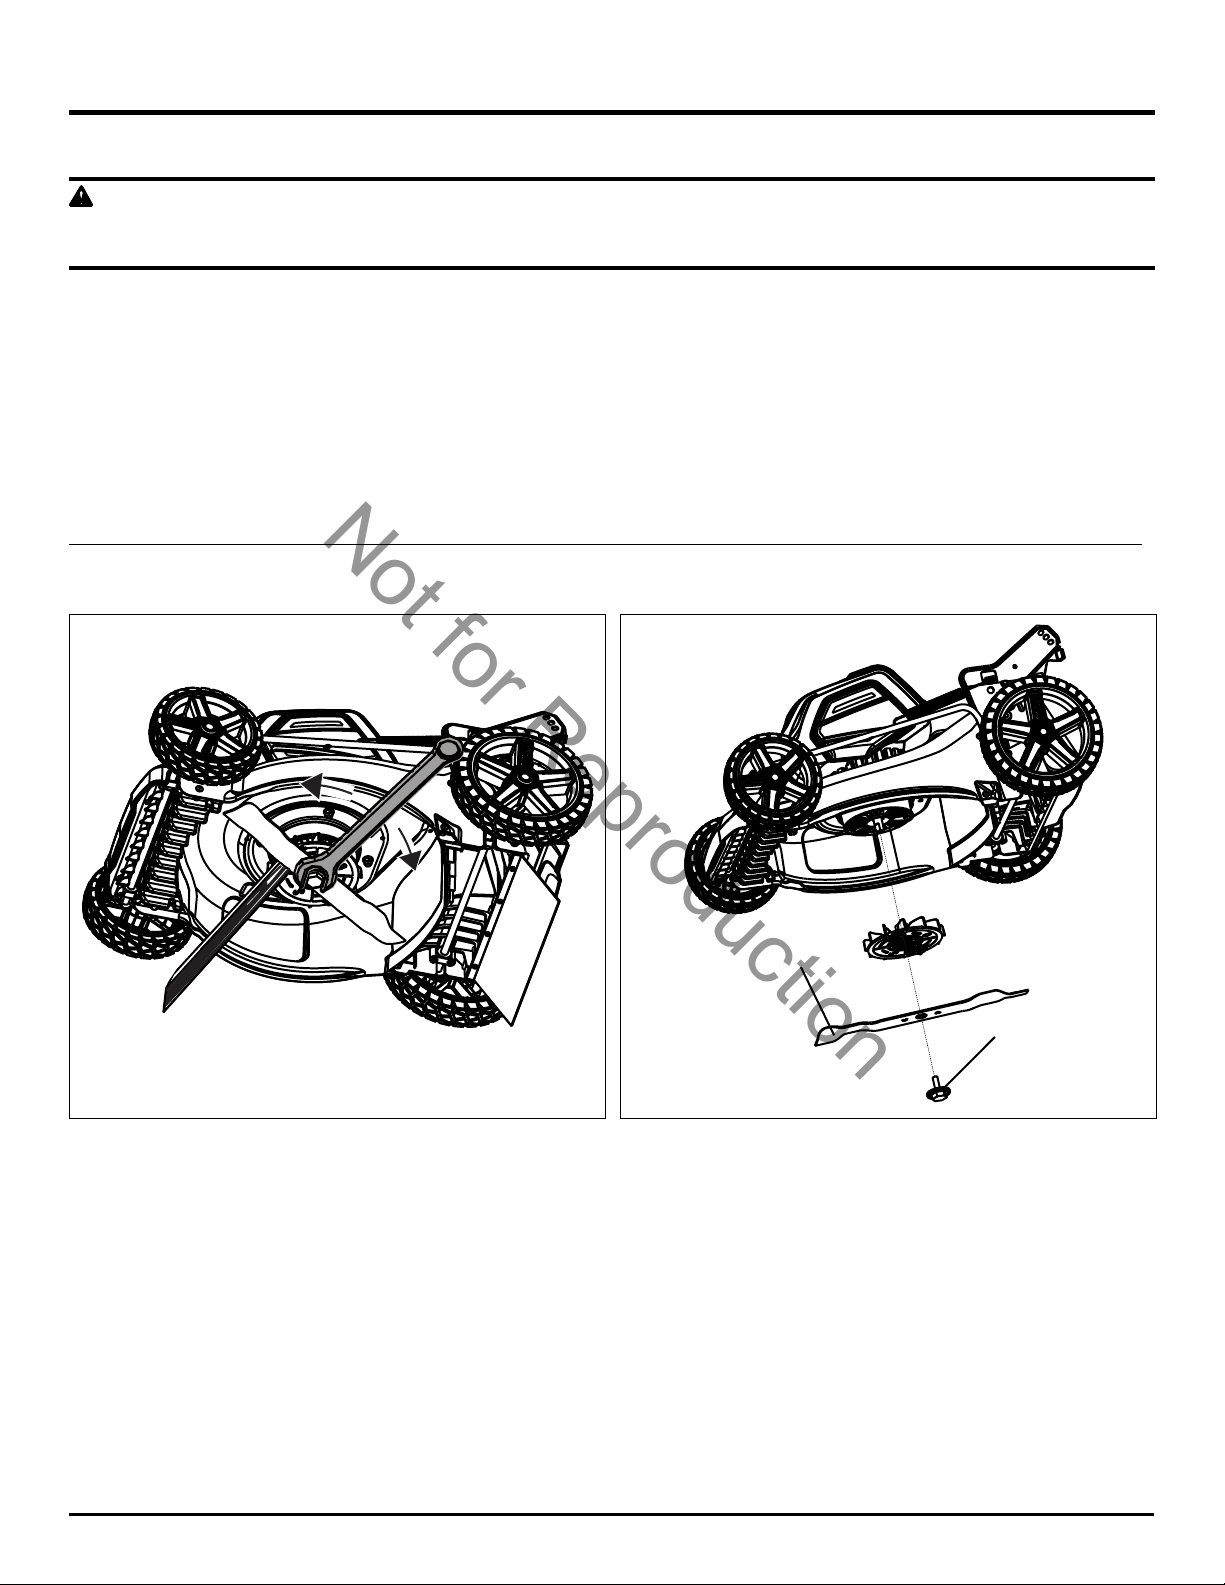
REPLACING THE CUTTING BLADE (See Figures 12-13)
W A R N I N G
Always protect your hands by wearing heavy gloves and/or wrapping the cutting edges with rags or other materials when
performing any maintenance on the blades. ALWAYS remove the battery when servicing or transporting the mower.
• REMOVE BATTERY.
• While wearing leather padded gloves, wedge a block of wood between the blade and the mower deck in order to prevent
the blade from turning when the bolt (1) is being removed.
• Using an adjustable wrench or 27 mm socket, loosen the bolt (1) and remove the blade (2). Turn the bolt
“COUNTERCLOCKWISE” to loosen it and “CLOCKWISE” to tighten it.
• Remove the bolt (1) and the blade (2).
• To re-install the blade, position the blade with the cutting edges toward the ground. Assemble the bolt as shown.
Torque the blade bolt down clockwise using a torque wrench (not provided) to ensure the bolt is properly tightened. The
recommended torque for the blade bolt is 24-27 lb-ft (33-37 Nm).
NOTE: Be sure to replace the parts in the exact order in which they were removed. When installing the cutting blade, verify
that it is installed with the curved ends pointing toward the mower deck, and not toward the ground.
21
Fig. 13Fig. 12
(2)
(1)

Not
for
Reproduction
MAINTENANCE
CLEANING THE MOWER
W A R N I N G
In order to reduce the risk of electric shock, do not expose the mower to water. The underside of the mower deck should be
cleaned after each use, because grass clippings, leaves, dirt, and other debris will accumulate, which will cause rust and
corrosion.
Remove any build-up of grass and leaves on or around the motor cover (do not use water).Occasionally wipe the mower
clean with a dry cloth. If debris builds up on the underside of the mower during use, stop the motor, disconnect it from the
battery, and then tilt the mower on its side, and scrape it clean using an appropriate tool.
STORING THE MOWER
The following steps should be taken in order to prepare the lawn mower for storage.
• Clean the mower as described in the previous section.
• Inspect the blade, and replace it or sharpen it, if required, refer to the Maintenance section.
• Store the mower in a dry, clean location. Do not store it next to corrosive materials, such as fertilizer or rock salt.
• Store the mower indoors, in a cool, dry place, out of the reach of children. Do not cover the lawn mower with a solid
plastic sheet. Plastic coverings trap moisture around the mower, which causes rust and corrosion.
• Remove the battery and store it in a cool dry location, if possible. Charge the battery every two months when not in use
in order to increase its life.
• Remove the battery and store in a secure location out of the reach of children.
W A R N I N G
This battery must be charged every 3 months while in storage to maintain maximum capacity.
• When servicing the mower, use only identical replacement parts that are available from the manufacturer. In order to
obtain replacement parts, call the toll-free helpline, at 1-800-317-7833. The use of parts that do not meet the original
equipment specications may lead to improper performance, and may compromise safety.
• Before cleaning, repairing, or inspecting, verify that the blade and all moving parts have come to a complete stop.
Remove the battery when making any adjustments or when any of the four wheels must be lifted off the ground.
• Follow the instructions for lubricating and changing accessories.
• Keep the handles dry, clean, and free of oil and grease.
• In order to reduce the risk of re, keep the motor free of grass, leaves, and debris build-up.
• Check the blade and motor mounting bolts for proper tightness frequently. Visually inspect blade for damage (e.g., bent,
cracked, or worn).
• For best and safest performance, maintain the mower with care. Keep the mower blade sharp and clean. Mower blades
are sharp, and can cut. Wrap the blades or wear gloves, and use extra caution when servicing.
• Keep all nuts, bolts, and screws tight in order to be sure that the equipment is in safe working condition.
• Never tamper with safety devices. Check them regularly for proper operation.
• After striking a foreign object, stop the motor. Thoroughly inspect the mower for any damage. Repair any damage before
operating the mower.
• The grass catcher components, discharge cover, and trail shield are subject to wear and damage, which could expose
moving parts or allow objects to be thrown. As a safety precaution, check these components frequently, and immediately
replace any parts that show signs of wear, or that are cracked or broken. Use original equipment manufacturer's (OEM)
parts only, as listed in this manual.
• When it is not in use, store the mower indoors in a dry area, and out of the reach of children.
W A R N I N G
Always remove battery when servicing or transporting the mower.
22
Not
for
Reproduction
MAINTENANCE
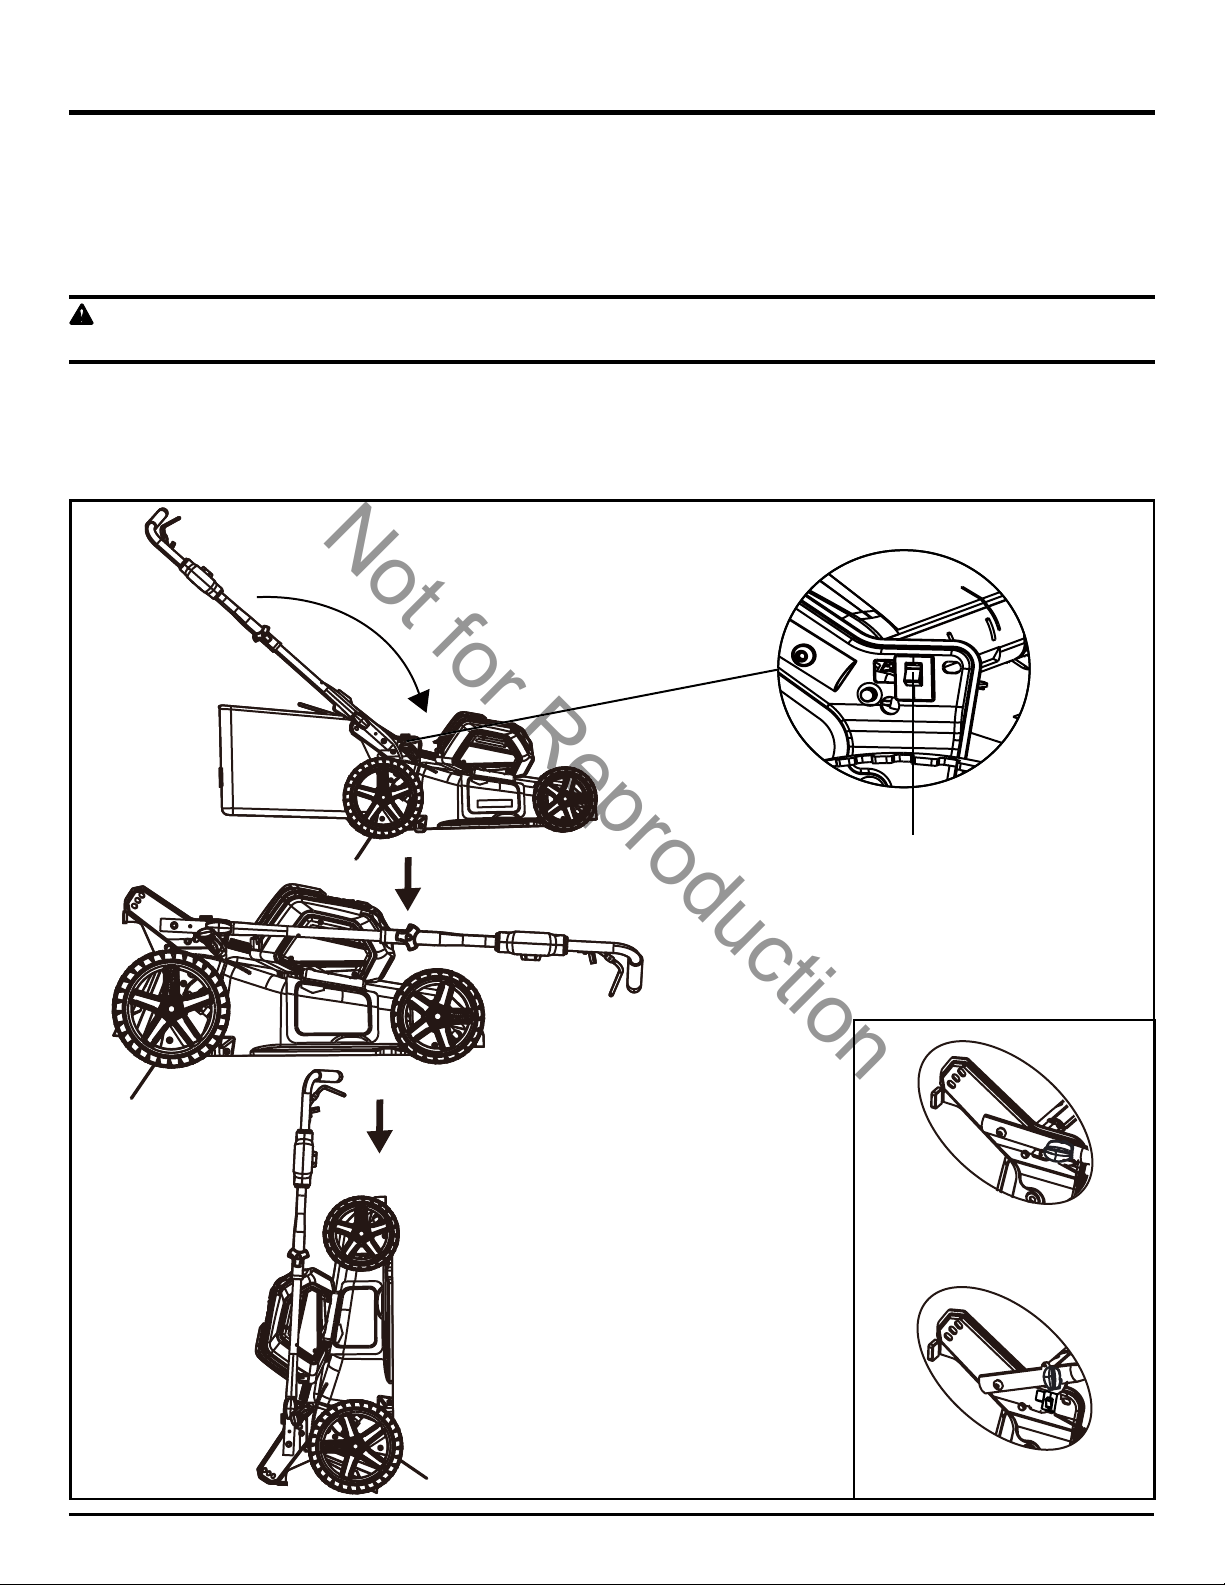
VERTICAL STORAGE FUNCTION (See Figure 14 )
• Remove the battery from the mower. Remove the grass catcher bag.
• Rotate the handle knobs to the unlocked position.
• Lower the handle assembly and rotate the handle knobs to the locked position.
• Lift the mower by the front end to the vertical position.
W A R N I N G
Always remove the battery from the mower before placing the unit in the vertical storage position.
STORAGE SWITCH:
When the handle is rotated into the fully locked storage position, the mower is equipped with a storage switch (1) that will
disable the mower from running in the storage position. The storage switch (1) does not replace the need to remove the
safety key and battery to prevent accidental start-up or unauthorized use.
Locked position
Unlocked position
Fig. 14
(1)
23

Not
for
Reproduction
The following toxic and corrosive materials are in the batteries used in this tool battery pack: Lithium-Ion, a toxic material.
W A R N I N G
Toxic materials must be disposed of in a specified manner in order to prevent contamination of the environment. Before
disposing of damaged or worn out Lithium-Ion battery packs, contact your local waste disposal agency for information and
specic instructions. Take the battery to a local recycling and/or disposal centre that is certied for disposal. If the battery pack
cracks or breaks, whether it leaks or not, do not recharge it and do not use it. Dispose of it and replace it with a new battery
pack. DO NOT ATTEMPT TO REPAIR IT!
Follow these instructions in order to avoid injury and the risk of re, explosion, or electric shock, and to avoid damage to
the environment:
• Cover the battery's terminals with heavy-duty adhesive tape.
• Do not attempt to remove or destroy any of the components of the battery pack.
• Do not attempt to open the battery pack.
• If a leak develops, the electrolytes that are released are corrosive and toxic. Do not get the solution in the eyes or on the
skin, and do not swallow it.
• Do not place batteries in regular household trash.
• DO NOT incinerate batteries.
• DO NOT place batteries where they will become part of any waste landll or municipal solid waste stream.
• Dispose of batteries at a certied recycling or disposal center.
24
ENVIRONMENTALLY SAFE BATTERY DISPOSAL

Not
for
Reproduction
TROUBLESHOOTING
PROBLEM POSSIBLE CAUSE SOLUTION
The mower does not
start.
The battery is not charged. Charge the battery.
The switch is defective. Replace the switch (Contact an authorized service center
)
.
Grass jammed between the
deck and blade.
Remove battery; check under deck for jams.
The battery is not fully inserted
in the mower.
Check the connection between the battery and the mower. Make
sure the battery clicks into place.
Battery may require service or
replacement.
Contact an authorized service center or replace battery.
The mower cuts the
grass unevenly.
The lawn is rough or uneven. Check the mowing area.
The cutting height is not set
properly.
Move the wheels to a higher setting.
The mower does not
mulch properly.
Wet grass clippings are
sticking to the underside of
the deck.
Wait until the grass dries before mowing.
The mulching plug is missing. Install the mulching plug.
The mower is hard to
push.
The grass is too tall, or the
cutting height is too low.
Raise the cutting height.
The rear of the grass catcher
bag is dragging in thick grass.
Empty the grass clippings from the grass catcher bag.
The mower is
excessively noisy and
vibrates.
The motor shaft is bent. Stop the motor, and inspect for damage.
The blade is unbalanced.
Repair before restarting. If vibration persists, contact an authorized
service center.
25

Not
for
Reproduction
LIMITED WARRANTY
Briggs & Stratton warrants that, during the warranty period specied below, it will repair or replace, free of charge, any part
that is defective in material or workmanship or both. Transportation charges on product submitted for repair or replacement
under this warranty must be borne by purchaser. This warranty is effective for and is subject to the time periods and conditions
stated below. For warranty service, nd the nearest Authorized Service Dealer in our dealer locator map at www.SNAPPER.
com. The purchaser must contact the Authorized Service Dealer, and then make the product available to the Authorized
Service Dealer for inspection and testing.
There is no other express warranty. Implied warranties, including those of merchantability and tness for a particular
purpose, are limited to the warranty period listed below, or to the extent permitted by law. Liability for incidental
or consequential damages are excluded to the extent exclusion is permitted by law. Some states or countries do not
allow limitations on how long an implied warranty lasts, and some states or countries do not allow the exclusion or limitation
of incidental or consequential damages, so the above limitation and exclusion may not apply to you. This warranty gives you
specic legal rights and you may also have other rights which vary from state to state or country to country.**
WARRANTY PERIOD
Consumer Use Commercial Use
Equipment 60 months 90 days
Battery and Battery Charger 24 months none
** In Australia - Our goods come with guarantees that cannot be excluded under the Australian Consumer Law. You are
entitled to a replacement or refund for a major failure and for compensation for any other reasonably foreseeable loss or
damage. You are also entitled to have the goods repaired or replaced if the goods fail to be of acceptable quality and the
failure does not amount to a major failure. For warranty service, find the nearest Authorized Service Dealer in our dealer
locator map at BRIGGSandSTRATTON.COM, or by calling 1300 274 447, or by emailing or writing to salesenquires@
briggsandstratton.com.au, Briggs & Stratton Australia Pty Ltd, 1 Moorebank Avenue, NSW, Australia, 2170.
The warranty period begins on the date of purchase by the first retail or commercial consumer. “Consumer use” means
personal residential household use by a retail consumer. “Commercial use” means all other uses, including use for
commercial, income producing or rental purposes. Once a product has experienced commercial use, it shall thereafter be
considered as a commercial use product for purposes of this warranty.
To ensure prompt and complete warranty coverage, register your product at the website shown above or at www.
onlineproductregistration.com.
Save your proof of purchase receipt. If you do not provide proof of the initial purchase date at the time warranty service is
requested, the manufacturing date of the product will be used to determine the warranty period. Product registration is not
required to obtain warranty service on Briggs & Stratton products.
26

Not
for
Reproduction
27
ABOUT YOUR WARRANTY
Warranty service is available only through Snapper Authorized Service Dealers. This warranty covers only defects in materials
or workmanship. It does not cover damage caused by improper use or abuse, improper maintenance or repair, normal wear
and tear, or stale or unapproved fuel.
Improper Use and Abuse - The proper, intended use of this product is described in the Operator’s Manual. Using the product
in a way not described in the Operator’s Manual or using the product after it has been damaged will not be covered under this
warranty. Warranty coverage will also not be provided if the serial number on the product has been removed or the product
corrosion damage.
Improper Maintenance or Repair - This product must be maintained according to the procedures and schedules provided in
the Operator’s Manual, and serviced or repaired using genuine Briggs & Stratton parts or equivalent. Damage caused by lack
of maintenance or use of non-original parts is not covered by warranty.
Normal Wear and Tear - Like most mechanical devices, your unit is subject to wear even when properly maintained. This
warranty does not cover repairs when normal use has exhausted the life of a part or the equipment. Maintenance and wear
wear characteristics alone, unless the cause is due to defects in material or workmanship.
freezing or chemical deterioration. Attachments or accessories that were not originally packaged with the product are also
excluded. There is no warranty coverage on equipment used for primary power in place of utility power or on equipment used
in life support applications. This warranty does not include used, reconditioned, second-hand, or demonstration equipment or
engines. This warranty also excludes failures due to acts of God and other force majeure events beyond the manufacturer’s
control.
LIMITED WARRANTY
Not
for
Reproduction
28
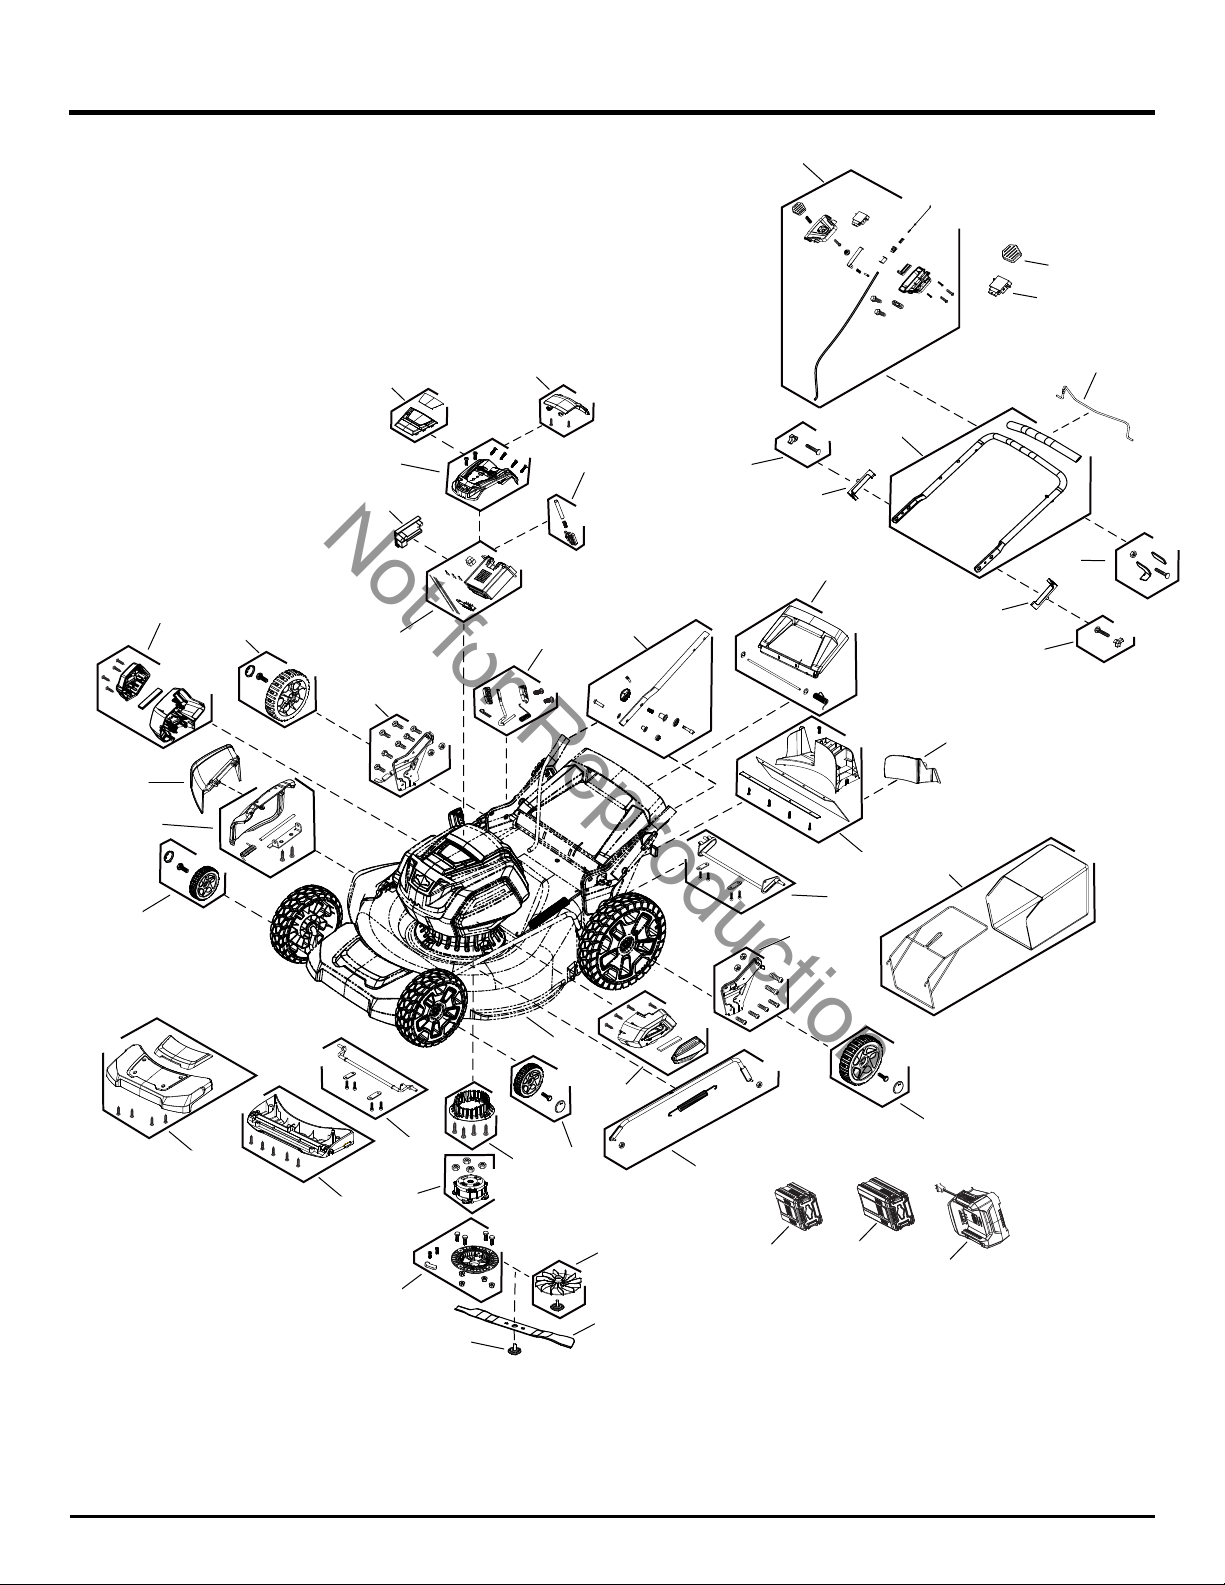
EXPLODED VIEW
1
5
4
5
4
35
6
7
8
9
10
11
12
14
15
16
20
28
30
32
33
31
17
18
19
24
20
19
25
37
34
26
21
23
29
22
27
36
38
39
40
32-2
3
2-15
2-20
2
13

Not
for
Reproduction
PARTS
LIST
29
ITEM NO. PART NO. DESCRIPTION CONTEXT NOTE QTY
1 771419 KIT, UPPER HANDLE 1
2 771420 KIT, SWITCH BOX COMPONENT 1
2-15 84003403 BUTTON, START/STOP 1
2-20 84003405 SWITCH 1
3 771458 KIT, LOWER HANDLE 1
4 771422 KIT, HARDWARE 1
5 771423 KIT, SLEEVE 1
6 771458 KIT, RIGHT BRACKET 1
7 771425 KIT, LEFT BRACKET 1
8 771426 KIT, GRASS BAGGER 1
9 771427 KIT, REAR COVER ASSEMBLY 1
10 771428 MOWER DECK 1
11 771429 KIT, REAR BAFFLE 1
12 771430 KIT, FRONT BULKHEAD 1
13 771431 MULCH PLUG 1
14 771432 KIT, HEIGHT ADJUST HANDLE 1
15 771433 KIT, REAR AXLE 1
16 771434 KIT, FRONT AXLE 1
17 771435 KIT, HEIGHT ADJUST ROD 1
18 771466 KIT, FRONT PANEL 1
19 770187 KIT, 10" WHEEL 2
20 770188 KIT, 8" WHEEL 2
21 771439 KIT, BATTERY COVER 1
22 771440 KIT, TOP COVER 1
23 771468 KIT, DECORATIVE COVER 1
24 771442 KIT, RIGHT COVER 1
25 771443 KIT, LEFT COVER 1
26 771444 KIT, RELEASE BUTTON 1
27 771445 KIT, BATTERY COMPARTMENT 1
28 771446 KIT, BASE 1
29 771447 KIT, PCB 1
30 771448 KIT, MOTOR 1
31
771449 KIT, MOTOR BASE 1
32 771450 KIT, BOLT & FAN 1
32-2 84003533 KIT, BOLT 1
33 771451 KIT, BLADE 1
34 771452 KIT, COVER 1
35 771453 KIT, STOP 1
36 771454 KIT, LEVER 1
37 771455 KIT, DEFLECTOR 1
38 1760266 * BATTERY, 2.0, 82V NA (Option) 1
39 1760265 * BATTERY, 4.0, 82V NA (Option) 1
40 1760263 CHARGER, Battery (Option) 1
-- 770294 REMOTE BELT FOR BATTERY (Not Shown) 1
