User manual Air Fryer
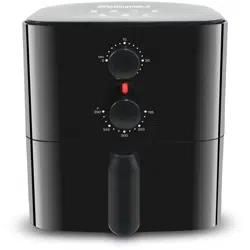
PARTS IDENTIFICATION
-200527.png)
A. Timer Knob
B. Power Indicator
C. Temperature Knob
D. Handle
E. Power Cord (not shown)
F. Pull-Out Drawer Pan
G. Frying Rack
CONTROL PANEL
TIMER CONTROL KNOB
Use this knob to set the desired time setting between 1-minute and 30-minutes. The timer knob MUST be set in order for the appliance to begin heating.
-194503.png)
TEMPERATURE CONTROL KNOB
Use this knob to set the temperature between 195°F up to 390°F.
-30397.png)
BEFORE FIRST USE
- Before using your Air Fryer for the first time, carefully remove all packaging material and recycle appropriately.
- Remove the parts from the box and wash the Drawer Pan and Frying Rack with warm, soapy water and a non-abrasive sponge.
- IMPORTANT: DO NOT IMMERSE THE MAIN HOUSING IN WATER. Wipe the interior and exterior of appliance clean with a damp cloth.
- IMPORTANT: THIS IS NOT A DEEP FRYER. DO NOT FILL THE APPLIANCE OR ITS DRAWER WITH OIL OR FRYING FAT.
- Place the appliance on a flat, horizontal and stable surface (make sure surface is heat-resistant). Place away from walls and other appliances. Leave approximately 4 inches of space from nearby objects
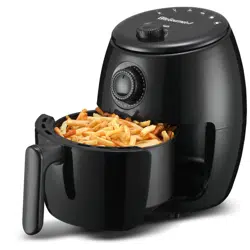
HOW TO USE
- Carefully pull out the Drawer Pan from the Main Fryer Body by pulling forward on the Handle.
- TIP: Never place food directly into the Drawer Pan without the Frying Rack inside. In place of using the Frying Rack, an oven-safe plate or bowl (not included) can be placed onto a wire rack (not included) into the Drawer Pan.
- Place the Frying Rack into the Drawer Pan (Figure 1).
- Place ingredients onto Frying Rack.
- TIP: Do not fill the Drawer Pan over the MAX fill position. If cooking food that expands, make sure the cooked capacity will not exceed the MAX fill position.
- Slide Drawer Pan back into the Main Body.
-962414.png)
HOW TO PROGRAM FRYING TIME AND TEMPERATURE:
- Plug Power Cord into an electrical outlet.
- Turn the Temperature Control Knob to the desired temperature and then turn the Timer Control Knob to the desired time setting (the Timer must be set in order for the unit to begin heating).
- TIP: It is recommended to preheat the air fryer on empty for 3 minutes if the appliance is cold or you can add 3 minutes to your desired time setting in order to pre-heat. The initial 15 minutes of use may result in minimal smell and smoke. This is normal and harmless and comes from the protective substance applied to the heating elements during manufacturing.
- The Power Indicator will illuminate.
DURING THE COOKING/FRYING PROCESS:
Some recipes require stirring/mixing the contents mid-way through cooking (see Cooking Time Chart on page 9). You can do this in the middle of the cooking process by pulling the Drawer Pan out from the Main Fryer Body. Shake or stir the contents on the rack using a non-metallic utensil and then slide Drawer Pan back into the Main Fryer Body.
TIP: If you set the timer to half the required cook time, you will hear the timer indicator when you have to stir the ingredients. However, this means that you will need to set the timer again to the remaining cook time after stirring.
WHEN FRYING IS COMPLETE:
- When the timer completes its countdown, the timer bell will ring and the air fryer will stop heating - this signals it is time to remove your food.
- Carefully pull out the Drawer Pan from the Main Fryer Body by pulling forward on the Drawer Pan Handle and place on a flat, heat resistant surface.
- Check that your foods are ready. If not, then place the Drawer Pan back into the Main Fryer Body and set the timer for a few more minutes.
- Empty the contents of the Drawer Pan into a bowl or onto a plate using non-metallic tongs or a scoop.
- TIP: Do not turn the Drawer Pan and Frying Rack upside down together, as any excess oil that has collected in the bottom of the Drawer Pan will be poured onto the foods.
- When the next batch of ingredients is ready, the air fryer is instantly ready to use again.
- When cooking is complete, remove the Power Cord from the electrical outlet.
CLEANING & MAINTENANCE
The Air Fryer should be cleaned thoroughly after every use.
- Make sure the Power Cord is disconnected from the electrical outlet and that the appliance has cooled down before attempting to clean.
- The Drawer Pan, Frying Rack and the inside of the appliance have a nonstick coating. Do not use metal utensils or abrasive cleaning materials on them, as this can damage the non-stick coating.
- Wipe the outside of the appliance with a damp cloth.
- Lift the Frying Rack upwards out of the Drawer Pan (Figure 2) and clean both with hot water, dishwashing soap and a non-abrasive sponge.
- You can use a degreaser to remove any stuck-on residue.
- TIP: If food residue is stuck to the Frying Rack or the bottom of the Drawer Pan, place the Frying Rack into the Drawer Pan and fill with dishwashing soap and water and let soak for 10 minutes.
- Clean the inside of the appliance with hot water and a non-abrasive sponge.
- Never immerse the power cord, plug or the appliance body in water or any other liquids.
- Dry all parts after each use, re-assemble and store in a cool, dry location
-326423.png)
COOKING TIME CHART
-213871.png)
STIR means the recipe requires mixing the contents mid-way through cooking. You can do this by carefully pulling out the Drawer Pan using the Handle, stir the contents using a non-metallic utensil. Then slide the Drawer Pan back into the Main Fryer Body.
-759399.png)
-793794.png)
HINTS & TIPS
- Smaller cuts of food usually require a slightly shorter cooking time than larger foods.
- A larger amount of food only requires a slightly longer cooking time and a smaller amount of food only requires a slightly shorter cooking time.
- Stirring or shaking smaller foods mid-way through the cooking process will improve the end result and can help cook more evenly.
- Adding a small amount of oil to fresh potatoes can result in a crispier result. Cook your ingredients in the air fryer within a few minutes after adding the oil.
- Do not air fry extremely greasy foods such as sausages in the air fryer.
- Snacks that can be prepared in an oven can also be prepared in the air fryer.
- The air fryer can also reheat foods. To reheat foods, set the temperature to 300°F for up to 10 minutes.
- To cook frozen foods, add an additional 3-5 minutes to your cook time.
BAKING/STEAMING FOODS:
- Place a wire rack (not included) onto the bottom of the Drawer Pan and place an oven-safe dish onto the wire rack if you want to bake a cake/quiche, steam foods or if you want to air fry delicate foods or foods with fillings.
- Use pre-made dough to prepare foods with fillings quickly and easily. Pre-made dough also requires a shorter cooking time than home-made dough.
- For steaming foods, generally, 1-2 cups of water provides approximately 5-10 minutes of steam time. Add water to the Drawer Pan. Place wire rack (not included) into the Drawer Pan. Place food into an oven-safe dish (not included) and place dish onto the wire rack.
HOMEMADE FRENCH FRIES:
When making your own French fries, follow these steps:
- Peel potatoes and slice them into strips.
- Wash and dry them thoroughly.
- Mix potato strips in a bowl with ½ tablespoon of olive oil, make sure they are evenly coated.
- Using your hands or tongs, place the potato strips onto the frying rack.
RETURN INSTRUCTIONS
RETURNS:
A. Any return of defective merchandise to the manufacturer must be processed accordingly by first contacting customer service (info@ maxi-matic.com) to obtain an RA # (Return Authorization Number). We will not accept any returns of merchandise without an applicable RA #.
B. IMPORTANT RETURN INSTRUCTIONS. Your Warranty depends on your following these instructions if you are returning the unit to Maxi-Matic, USA:
- Carefully pack the item in its original carton or other suitable box with sufficient cushioning to avoid damage in shipping.
- Before packing your unit for return, be sure to enclose:
- Your name, full address with zip code, daytime tele phone number, and RA#,
- A dated sales receipt or PROOF OF PURCHASE,
- The model number of the unit and the problem you are having (Enclose in an envelope and tape directly to the unit before the box is sealed,) and d) Any parts or accessories related to the problem.
- Maxi-Matic, USA recommends that you ship the package via UPS ground service for tracking purposes. We cannot assume responsibility for lost or damaged products returned to us during incoming shipment. For your protection, always carefully package the product for shipment and insure it with the carrier. C.O.D shipments cannot be accepted.
- All return shipping charges must be prepaid by you.
- Once your return has been received by our warehouse, Maxi-Matic, USA will repair or replace the product if it is defective in material or workmanship, subject to the conditions in paragraph B.
- Maxi-Matic will pay the shipping charges to ship the repaired or replacement product back to you.