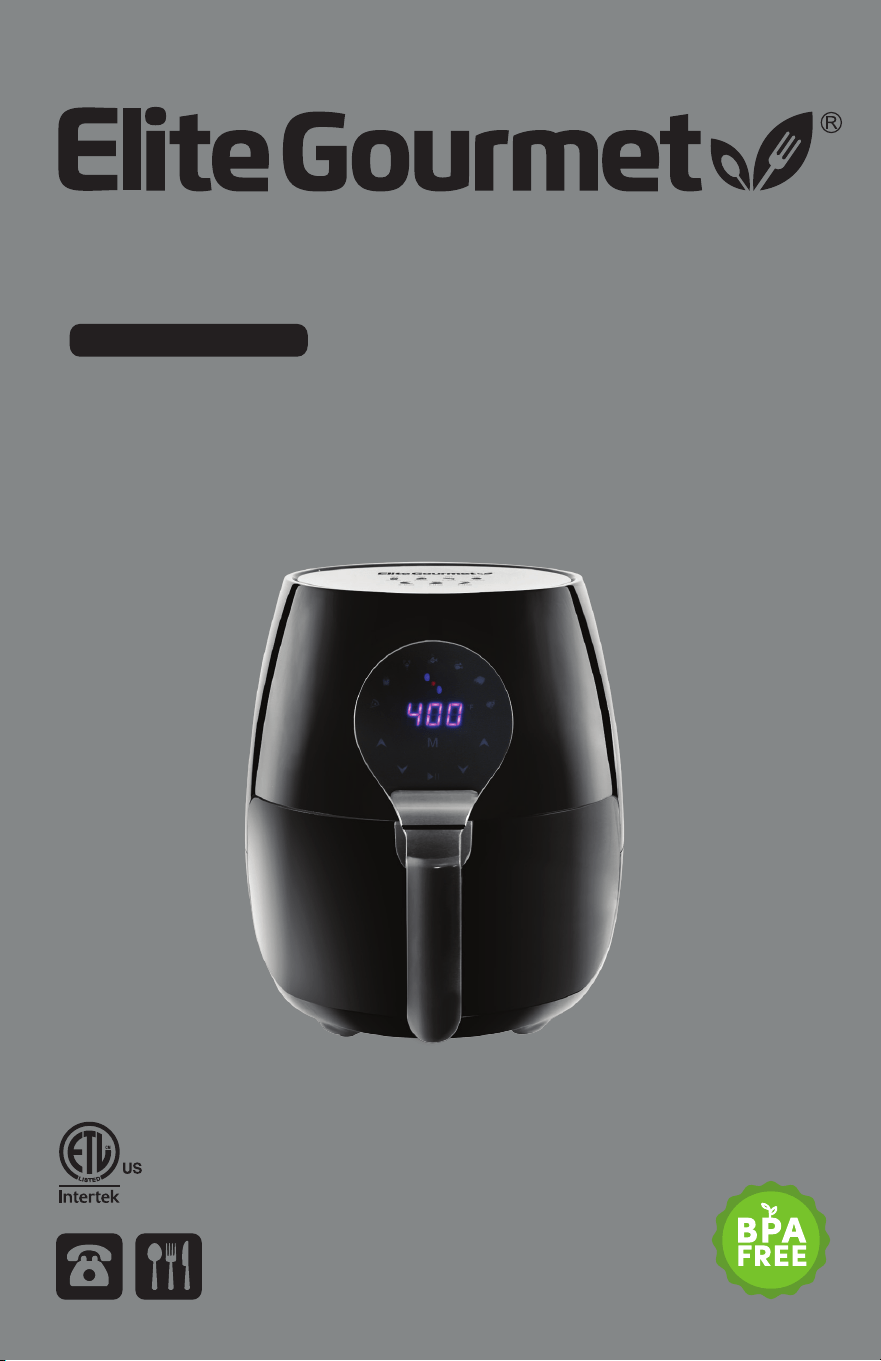
5.3QT. DIGITAL AIR FRYER
INSTRUCTION MANUAL
Before operating your new appliance, please read all instructions carefully and keep for
future reference.
Questions? Elite's customer service team is ready to help.
For more Elite products, visit us at shopelitegourmet.com.
Recipes are included in this manual.
MODEL: EAF5317D


TABLE OF CONTENTS
IMPORTANT SAFEGUARDS
SHORT CORD PURPOSE
POLARIZED PLUG
INTRODUCTION
PARTS IDENTIFICATION
CONTROL PANEL
BEFORE FIRST USE
HOW TO USE
CLEANING AND MAINTENANCE
COOKING TIME CHART
HINTS AND TIPS
AIR FRYER RECIPES
TROUBLESHOOTING GUIDE
WARRANTY POLICY
RETURN INSTRUCTIONS
2
4
4
4
5
6
7
7
10
11
12
13
19
20
21

2 Questions? We’re here to help!
Visit: shopelitegourmet.com for support on this product.
IMPORTANT SAFEGUARDS
The Elite Brand takes consumer safety very seriously. Products are designed and
manufactured with our valued consumers’ safety in mind. Additionally, we ask that
you exercise a level of caution when using any electrical appliance by following all
instructions and important safeguards.
READ ALL INSTRUCTIONS BEFORE USE AND SAVE FOR FUTURE
REFERENCE
WARNING: When using electrical appliances, basic safety precautions should
always be followed as below:
1. Read all instructions before using
your Elite Gourmet Air Fryer.
2. Never immerse the power cord, plug
or housing in water or under the tap.
3. Make sure no liquid enters the
appliance to prevent electric shock
or short-circuit.
4. Do not cover the air inlet and outlet
of the appliance during operation.
5. Always place foods to be cooked on
the rack, foods should never come
into direct contact with the heating
elements.
6. Never ll the pan with oil as this may
cause a re hazard and
damage to the appliance.
7. Never touch the inside of the
appliance during operation.
8. Make sure that your output
voltage corresponds to the voltage
stated on the rating label of the
appliance.
9. It is recommended to regularly
inspect the appliance to avoid a
hazard. Do not operate any
appliance with a damaged cord or
plug or after the appliance
malfunctions or has been damaged
in any manner. Return appliance
to the nearest authorized service
facility for examination, repair, or
adjustment.
10. If the supply cord is damaged, it
must be replaced by a special cord or
assembly available from the
manufacture or its service agent.
11. Never attempt to repair the
appliance yourself, otherwise the
warranty becomes invalid.
12. This appliance is not intended for
use by persons (including children)
with reduced physical, sensory
or mental capabilities, or lack of
experience and knowledge, unless
they have been given supervision
or instruction concerning use of the
appliance by a person responsible
for their safety.
13. Close supervision is necessary when
appliance is used near children.
14. NEVER ALLOW A CHILD TO USE THIS
PRODUCT.
15. DO NOT let the power cord hang
over the edge of the table or
work-top, and keep it away from any
hot surfaces.
16. Do not plug in the appliance or
operate the control panel with wet
hands.
17. Do not place or use the appliance on
or near combustible materials, such
as a tablecloth, curtains or
wallpaper.
18. Only connect the appliance to a
grounded wall socket. Always make
sure that the plug is inserted into the
wall socket properly.
19. Never connect this appliance to an
external timer switch in order to
avoid a hazardous situation.
20. Never leave appliance unattended.
21. Appliance surfaces may become hot
during use.

3 Questions? We’re here to help!
Visit: shopelitegourmet.com for support on this product.
22. The appliance should be placed on a
horizontal and stable surface when
using. Do not place on plastics,
board or any other easy-wear
surface.
23. Do not place the appliance against
wall or other appliances, leave
around 4 inches of space from
nearby objects. Do not place
anything on the top of appliance.
24. Do not use the appliance beyond the
specication of this manual.
25. During operation, hot steam will
exhaust through the hind side air
outlet. Keep your hands and face at a
safe distance from the steam and the
air outlet openings. Also be careful of
hot steam and air when you remove
the pan from the appliance.
26. If food burns and dark smoke
releases from the air outlet, unplug
immediately and wait for smoke
release to stop, then clean the food
and oil from the pan and rack.
27. After use, turn off power to the
appliance then unplug from the wall
outlet.
28. Do not use any accessories that have
not been provided with the
appliance.
29. Unplug the appliance from outlet
when it is not in use or before
cleaning. Allow it to cool down rst
before cleaning.
30. This appliance is intended to be
used indoors. Do not use outdoors.
31. Clean and wipe and dry the pan
and the rack before placing food
inside.
32. Always unplug the appliance when
not in use.
33. If the appliance is of the
grounded type, the extension cord
should be a grounded cord.
34. To ensure continued protection
against risk of electric shock,
connect to properly grounded
outlets only.
35. Some countertop and table
surfaces, such as Corian®, wood
and / or laminates, are not
designed to withstand prolonged
heat generated by certain
appliances. It is recommended by
countertop manufacturers and
Maxi-Matic that a hot pad or trivet
be placed under your appliance to
prevent possible damage to the
surface.
IMPORTANT SAFEGUARDS (cont.)
SAVE THESE INSTRUCTIONS.
THIS PRODUCT IS FOR
HOUSEHOLD USE ONLY.

4 Questions? We’re here to help!
Visit: shopelitegourmet.com for support on this product.
SHORT CORD PURPOSE
Longer power-supply cords or extension cords may be used
if care is exercised in their use.
If an extension cord is used: (1) the marked electrical rating of
the extension cord should be at least as great as the electrical
rating of the product; (2) the extension cord should be
arranged so that it will not drape over the countertop or
tabletop where it can unintentionally be pulled on or tripped
over by children or pets.
POLARIZED PLUG
If this appliance is equipped with a polarized plug (one blade is
wider than the other), please follow the below instructions:
To reduce the risk of electrical shock, this plug is intended to t
into a polarized outlet only one way. If you are unable to t the
plug into the electrical outlet, try reversing the plug. If the plug
still does not t, contact a qualied electrician. Never use the
plug with an extension cord unless the plug can be fully
inserted into the extension cord. Do not alter the plug of the
product or any extension cord being used with this product.
Do not attempt to defeat the safety purpose of the polarized
plug.
INTRODUCTION
Thank you for purchasing the Elite Gourmet Air Fryer. Your
new Air Fryer has a variety of functions to handle a wide array
of cooking tasks. With its easy to use temperature and timer
knobs, you can fry, cook, or even bake your favorite meals
and snacks with ease! Best of all you will be cooking healthier
without the addition of oil. Not only can you cook foods
without the mess of oil but you can cook faster which saves you
time and energy. Unlike most conventional deep fryers, the Air
Fryer's unique vapor system combined with circulating hot air
will automatically make foods crispier and of course healthier
without oil. We hope you enjoy your new Elite Gourmet Air
Fryer and start cooking healthier today!
NOTE:
A short power cord
is provided to reduce
the risk of personal
injury resulting from
becoming entangled
in or tripping over a
long cord.
5 Questions? We’re here to help!
Visit: shopelitegourmet.com for support on this product.
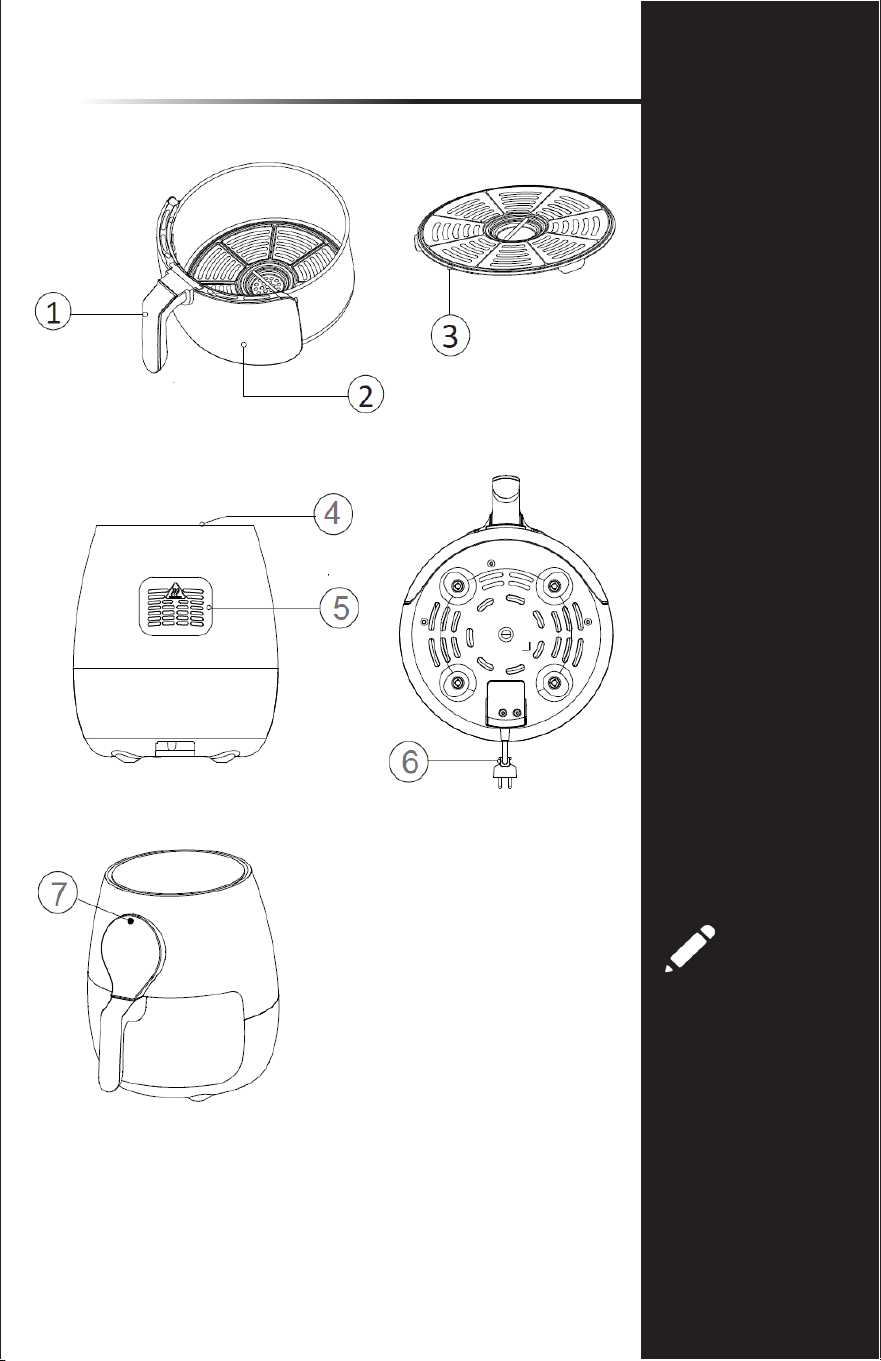
PARTS IDENTIFICATION
NOTE:
The Frying Rack
consists of a non-stick
surface. To avoid
scratching the non-
stick surface, please
use wooden or heat-
proof silicone utensils.
5
1. Handle
2. Pull-Out Drawer Pan
3. Frying Rack
4. Air Inlet
5. Air Outlet
6. Power Cord
7. Digital Control Panel
6 Questions? We’re here to help!
Visit: shopelitegourmet.com for support on this product.
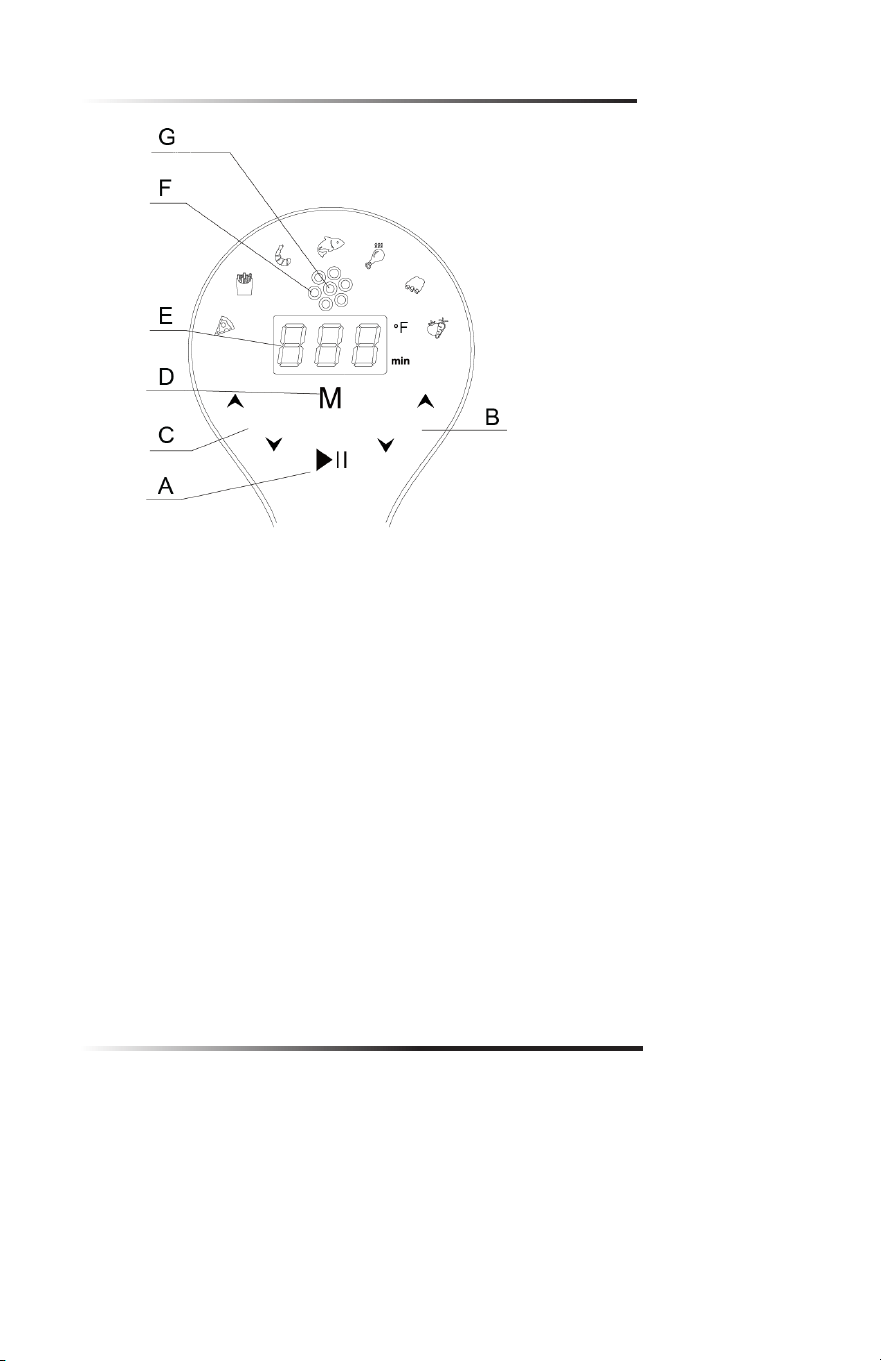
CONTROL PANEL
A. START/STOP BUTTON:
Tap once to power on unit. Tap once to Start or Stop cooking.
B. TIMER BUTTON:
Press up or down to increase or decrease cooking time by one
minute.
C. TEMPERATURE BUTTON:
Press up or down to increase or decrease the temperature setting
by 5-degree increments.
D. MENU BUTTON:
Use this button to toggle through the different menu functions.
E. TEMPERATURE/TIME DISPLAY
F. MOTOR INDICATOR (6PCS):
Indicates that the motor is operating. When the drawer is pulled
out, the fan will pause.
G. HEATING INDICATOR (1PCS):
Indicates that the heating element is in operation. When the
drawer is pulled out, heating will pause.
PFOA-FREE NONSTICK COATING
The cooking surface is coated with a PFOA-Free nonstick nish. This minimizes the
need for oil, prevents food from sticking, and makes cleaning easier.
Do not use metal cooking utensils or abrasive cleaning tools on nonstick surfaces
as they will damage the coating. Use only warm soapy water and remove stubborn
residue with a non-abrasive plastic scouring pad or nylon brush.
NOTE: Do not use nonstick cooking spray as they can impact the performance of
the nonstick surface.
7 Questions? We’re here to help!
Visit: shopelitegourmet.com for support on this product.
CAUTION:
Never place anything
on top of the Main
Body, for this will block
the air ow and reduce
the effect of hot air
heating.
CAUTION:
Do not touch the
Drawer Pan during and
immediately after use,
as it gets very hot. Only
hold the Drawer Pan by
the Handle.
NOTE:
Any excess oil from
food will collect at the
bottom of the Drawer
Pan.
HOW TO USE
1. Carefully pull out the Drawer Pan from the Main Fryer
Body by pulling forward on the Handle.
TIP: Never place food directly into the Drawer Pan without
the Frying Rack inside. In place of using the Frying Rack, an
oven-safe plate or bowl (not included) can be placed onto
a wire rack (not included) into the Drawer Pan.
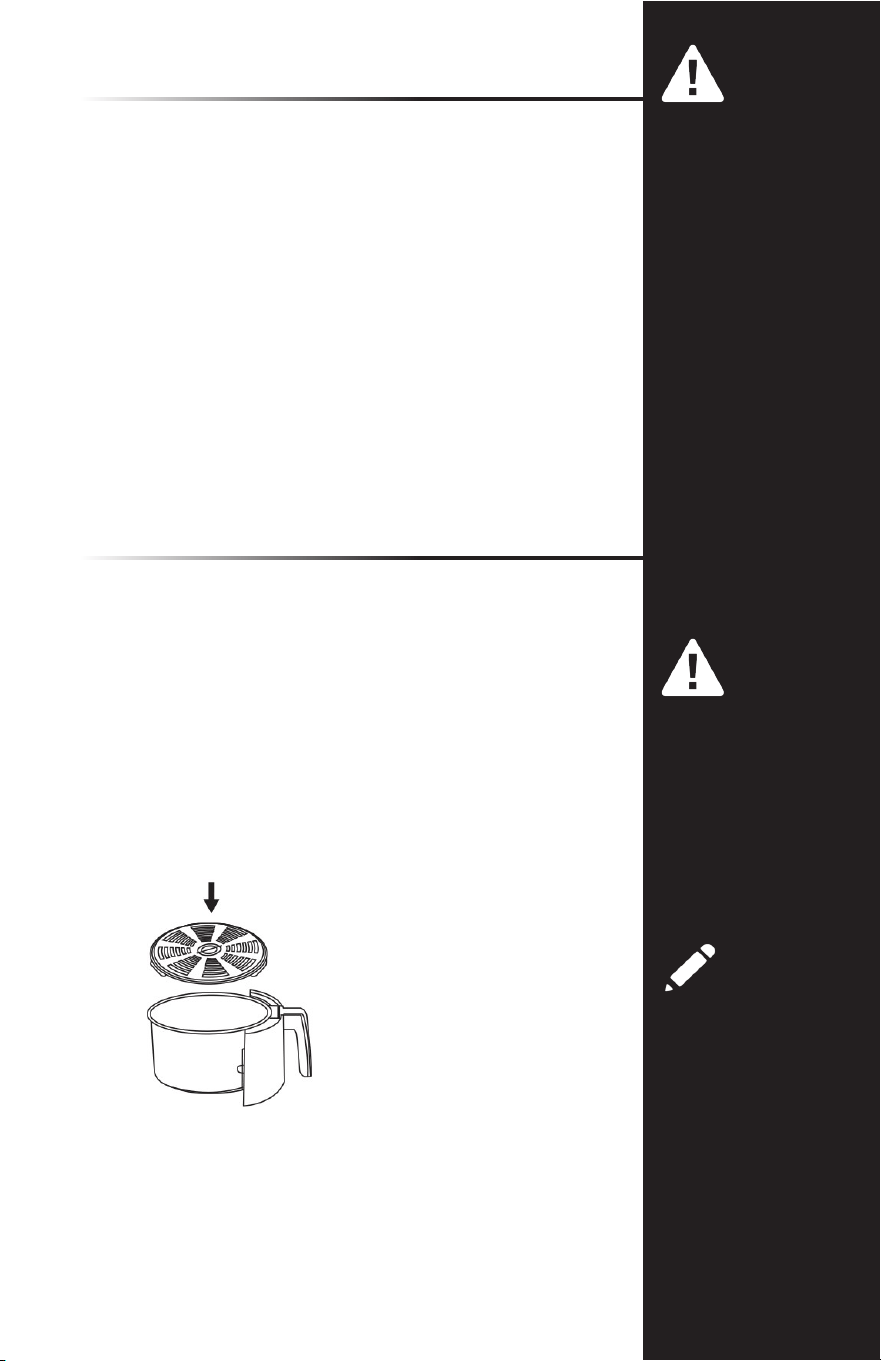
2. Place the Frying Rack into the Drawer Pan (Figure 1).
3. Place ingredients onto Frying Rack.
TIP: Do not ll the Drawer Pan over the MAX ll position.
If cooking food that expands, make sure the cooked
capacity will not exceed the MAX ll position.
4. Slide Drawer Pan back into the Main Body.
7
BEFORE FIRST USE
1. Before using your Air Fryer for the rst time, carefully
remove all packaging material and recycle appropriately.
2. Remove the parts from the box and wash the Drawer
Pan and Frying Rack with warm, soapy water and a non-
abrasive sponge.
IMPORTANT: DO NOT IMMERSE THE MAIN HOUSING IN
WATER. Wipe the interior and exterior of appliance clean
with a damp cloth.
IMPORTANT: THIS IS NOT A DEEP FRYER. DO NOT FILL
THE APPLIANCE OR ITS DRAWER WITH OIL OR FRYING
FAT.
3. Place the appliance on a at, horizontal and stable surface
(make sure surface is heat-resistant). Place away from walls
and other appliances. Leave
approximately 4 inches of space from nearby objects.
FIGURE 1
8 Questions? We’re here to help!
Visit: shopelitegourmet.com for support on this product.
HOW TO USE (cont.)
MANUALLY PROGRAM TIME AND TEMPERATURE:
1. Plug Power Cord into an electrical outlet. You will hear a
beep and the Digital Display will show the Pizza setting at
400°F and 18-minutes.
2. Press the up/down button for the Temperature setting
to adjust to the desired temperature. Temperature will
increase or decrease in 10-degree increments.
3. Press the up/down button for the Timer setting to
adjust to the desired cooking time. Timer will increase or
decrease in 1-minute increments up to 60-minute.
4. Tap the START Button once to begin cooking.
SELECT A QUICK MENU FUNCTION:
MENU TEMPERATURE COOK TIME
PIZZA 400°F 18 min
FRIES 400°F 22 min
SHRIMP 360°F 15 min
FISH 360°F 14 min
CHICKEN 360°F 25 min
MEAT 360°F 20 min
VEGETABLES 360°F 20 min
1. At any time during
cooking, the tempera-
ture and time can both
be adjusted using the
appropriate buttons.
There is no need to tap
the START button after
adjusting the time and/
or temp.
NOTE:
It is recommended to
preheat the air fryer
on empty at 365°F for
3 min. if the appliance
is cold.
The initial 15 minutes
of use may result in
smell and smoke.
This is normal and
harmless and comes
from the protective
substance applied to
the heating elements
during manufacturing.
At any time during
cooking, the time and
temperature can both
be adjusted using the
appropriate buttons.
There is no need to
tap the START button
after adjusting the
time and/or temp.
-
-
-
1. Plug Power Cord into an electrical outlet. You will hear a
beep and the Digital Display will show the Pizza setting at
400°F and 18-minutes.
2. Press the MENU button to cycle through the different
MENU functions. The highlighted MENU function will
illuminate and the default MENU Temperatures/Cooking
Time will appear.
3. To select desired Menu function, tap the START Button
once to begin cooking.
4. Use the up/down buttons to adjust MENU function
temperatures or times if you wish to change the
programmed settings.
CANCELING A SELECTION:
To cancel any programmed selection, simply tap the Start/Stop
Button during the cooking process to cancel the selection.
CAUTION:
Do not touch the
Drawer Pan during and
immediately after use,
as it gets very hot. Only
hold the Drawer Pan by
the Handle.
NOTE:
Any excess oil from
food will collect at the
bottom of the Drawer
Pan.

9 Questions? We’re here to help!
Visit: shopelitegourmet.com for support on this product.
HOW TO USE (cont.)
DURING THE COOKING/FRYING PROCESS:
1. Once you tap the START Button, the Timer will begin
counting down and begin the cooking process.
2. Some recipes require stirring/mixing/ipping the contents
mid-way through cooking (see Cooking Time Chart). You
can do this in the middle of the cooking process by simply
pulling out the Drawer Pan by grasping the Handle and
pulling forward the entire Drawer Pan. The built-in auto
sensors will automatically pause the heating system to
allow you to attend to the food.
3. Shake, stir or ip the contents of the Drawer Pan using a
non-metallic utensil and then slide Drawer Pan back into
the Main Fryer Base.
NOTE:
Any excess oil from
food will collect at the
bottom of the Pan.
CAUTION:
During cooking, the
Drawer Pan and Frying
Rack will be very hot,
only use the cool-touch
handles or oven mitts.
NOTE:
Switch off the
appliance manually
by pressing POWER at
any time.
The FAN motor will
continue to operate
in order to cool down
the Drawer Pan and
the Frying Rack,
this will stop within
approximately 60
seconds.
WHEN FRYING IS COMPLETE:
1. When the timer completes its countdown, the air fryer will
beep and stop heating - this signals it is time to remove
your food.
2. Carefully pull the Drawer Pan out from the Main Fryer Base
by pulling forward on the Drawer Handle and place on a
at, heat resistant surface.
3. Check that your foods are ready. If not, then slide the
Drawer Pan back into the Main Fryer Base and set the
timer for a few more minutes.
4. Empty the contents of the Drawer Pan into a bowl or onto
a plate using non-metallic tongs or a scoop.
TIP: Do not turn the Drawer Pan and Frying Rack upside
down together, as any excess oil that has collected in the
bottom of the Drawer Pan will be poured onto the foods.
TIP: If food contents within Drawer Pan are too heavy to lift
using the Drawer Handle, use oven mitts to carefully pull out
the whole Drawer Pan and Frying Rack together. Place on a
at, heat-resistant surface and use Tongs to remove contents
from the Frying Rack.
5. When the next batch of ingredients is ready, the air fryer is
instantly ready to use again.
6. Remove the Power Cord from the electrical outlet.
CAUTION:
When sliding out the
Drawer Pan, be
careful of steam. Keep
hands and face away
from the opening.
After cooking, the
Drawer Pan and Frying
Rack will be extremely
hot to the touch. Do
not touch surfaces
of the Drawer Pan or
Frying Rack directly.
-
-
-
-
9

10 Questions? We’re here to help!
Visit: shopelitegourmet.com for support on this product.
CLEANING & MAINTENANCE
The air fryer should be cleaned thoroughly after every use.
1. Make sure the Power cord is disconnected from the
electrical outlet and that the appliance has cooled down
before attempting to clean.
2. The Drawer Pan, Frying Rack and the inside of the
appliance have a nonstick coating. Do not use metal
utensils or abrasive cleaning materials on them, as this can
damage the nonstick coating.
3. Wipe the outside of the appliance with a damp cloth.
4. Lift the Frying Rack upwards out of the Drawer
Pan and clean both with hot water, dishwashing soap and
a non-abrasive sponge.
5. You can use a degreaser to remove any stuck-on residue.
6. Clean the inside of the appliance with hot water and a
non-abrasive sponge.
7. Never immerse the power cord, plug or the appliance
body in water or any other liquids.
8. Dry all parts after each use, re-assemble and store in a
cool, dry location.
NOTE:
The Drawer Pan and
Frying Rack are dish-
washer-safe (top rack
only).
If food residue is stuck
to the Frying Rack
or the bottom of the
Drawer Pan, place
the Frying Rack into
the Drawer Pan and
ll with dishwash-
ing soap and water
and let soak for 10
minutes.
-
-
Figure 5

11 Questions? We’re here to help!
Visit: shopelitegourmet.com for support on this product.
COOKING TIME CHART
INGREDIENTS
AMOUNT
(ounces)
TIME
(minutes)
TEMP.
(°F)
STIR NOTES
POTATOES
Thin frozen
fries
15 ~ 25 11-16 390 STIR
Thick frozen
fries
15 ~ 25 13-20 400 STIR
Homemade
fries (0.3”x0.3”)
15 ~ 30 15-20 400 STIR
add 1/2
tbsp of oil
Homemade
potato wedges
15 ~ 30 20-22 360 STIR
add 1/2
tbsp of oil
Homemade
potato cubes
15 ~ 25 14-18 360 STIR
add 1/2
tbsp of oil
Homemade
potato chips
10 9-10 320
MEAT
Steaks 6 ~ 18 10-12 360
Porkchops 6 ~ 18 12-14 360
Hamburgers 6 ~ 18 8-14 360
Drumsticks 6 ~ 18 20-22 350
Chicken wings 15 ~ 20 16-18 400
Chicken strips 6 ~ 18 12-16 360
SNACKS
Egg rolls 6 ~ 18 9-10 400 STIR
Use
oven-ready
Frozen chicken
nuggets
6 ~ 18 7-10 400 STIR
Use
oven-ready
Frozen sh
sticks
6 ~ 14 7-10 400
Use
oven-ready
Fish llet in
batter
6 ~ 18 8-14 360 STIR
Battered
shrimp
6 ~ 18 8-13 360 STIR
Frozen cheese
sticks
6 ~ 14 9-10 360
Use
oven-ready
Stuffed veggies 6 ~ 14 10 320
Mushrooms 6 ~ 14 10 320
Onion rings 6 ~ 18 8-13 360
BAKING
Brownies 10.5 ~ 21 16-20 320
Use oven-
safe baking
dishCake 10.5 ~ 21 20 320
Biscuits 8 biscuits 10-14 320
Cookies 6 ~ 8 cookies 8-10 320
NOTE:
STIR means the recipe
requires mixing the
contents mid-way
through cooking.
You can do this by
carefully pulling out
the Drawer Pan using
the Drawer Handle,
which will auto-
matically pause the
cooking process. Stir
the contents using a
non-metallic utensil.
Cooking will resume
after you close the lid.
You can also stop the
cooking process by
pushing the POWER/
START button. Push
again to resume
cooking.
All information is
for reference only
and can be adjusted
according to the user’s
preference. They are
approximations as
foods differ in size and
density. Cooking
temperatures and
times cannot be
guaranteed.
-
-
11

12 Questions? We’re here to help!
Visit: shopelitegourmet.com for support on this product.
HINTS & TIPS
• Smaller cuts of food usually require a slightly shorter
cooking time than larger foods.
• A larger amount of food only requires a slightly longer
cooking time and a smaller amount of food only requires a
slightly shorter cooking time.
• Stirring or shaking smaller foods mid-way through the
cooking process will improve the end result and can help
cook more evenly.
• Adding a small amount of oil to fresh potatoes can result
in a crispier result. Cook your ingredients in the air fryer
within a few minutes after adding the oil.
• Do not air fry extremely greasy foods such as sausages in
the air fryer.
• Snacks that can be prepared in an oven can also be
prepared in the air fryer.
• The air fryer can also reheat foods. To reheat foods, set the
temperature to 300°F for up to 10 minutes.
• To cook frozen foods, add an additional 3-5 minutes to
your cook time.
BAKING/STEAMING FOODS:
• Place a wire rack (not included) onto the bottom of the
Drawer Pan and place an oven-safe dish onto the wire rack
if you want to bake a cake/quiche, steam foods or if you
want to air fry delicate foods or foods with llings.
• Use pre-made dough to prepare foods with llings quickly
and easily. Pre-made dough also requires a shorter
cooking time than home-made dough.
• For steaming foods, generally, 1-2 cups of water provides
approximately 5-10 minutes of steam time. Add water to
the Drawer Pan. Place wire rack (not included) into the
Drawer Pan. Place food into an oven-safe dish (not
included) and place dish onto the wire rack.
HOMEMADE FRENCH FRIES:
• The optimum amount for air frying crispy fries is 17.5oz. or
a little over 1 lb.
• When making your own French fries, follow these steps:
1. Peel potatoes and slice them into strips.
2. Wash and dry them thoroughly.
3. Mix potato strips in a bowl with ½ tablespoon of olive
oil, make sure they are evenly coated.
4. Using your hands or tongs, place the potato strips onto
the frying rack.
When cooking/baking
foods that rise, the
Drawer Pan should
not be lled more
than halfway.
Do not pour the
potato sticks from the
bowl onto the Frying
Rack to avoid
transferring any
excess oil into the
Drawer Pan.
Do not cook frozen,
raw foods in the air
fryer.
-
-
-
NOTE:
Add 3 minutes to the
cooking time if you
begin cooking while
the air fryer is still
cold.
-

13 Questions? We’re here to help!
Visit: shopelitegourmet.com for support on this product.
AIR FRYER RECIPES
GOLDEN FRIED ONION RINGS
1. Slice onion 1/4 inch thick and separate into rings.
2. Preheat air fryer to 395°F for 3 minutes.
3. Combine remaining ingredients in a bowl and stir just until dry ingredients are
moistened.
4. Dip onion rings into our mixture.
5. Place into air fryer and program to cook at 395°F for 21-24 minutes.
6. Repeat process until all onion rings are cooked.
POTATO CROQUETTES
1. Add milk, salt, pepper, chopped green onion, oil, beaten egg yolks and our to mashed
potatoes.
2. Preheat air fryer at 395°F for 3 minutes.
3. Chill and shape using an ice cream scoop. Dip in the beaten egg, then roll through bread
crumbs. Place into air fryer and program to cook at 395°F for 12-14 minutes or until
golden brown.
4. Note: Cook in small batches, giving each croquette at least 2 inches of space around it to
not overcrowd the rack. Repeat process until all croquettes have been cooked.
BUFFALO WINGS
1. Sprinkle wings with salt and pepper, to taste.
2. Preheat air fryer to 395°F for 3 minutes.
3. Place wings into air fryer and program to cook at 395°F for 23-29 minutes.
4. When wings are golden brown and crisp, remove from air fryer. Add rest of wings; repeat
process.
5. Meanwhile, melt butter in saucepan; add hot sauce, to taste and vinegar. Pour sauce over
wings and mix well to cover.
6. Serve with Blue Cheese Dressing and celery sticks.
APPETIZERS
6 med. mild white onions
1 1/8 cup sifted our
1/2 tsp. salt
2 tbsp. milk
salt
1/2 tsp. pepper
1/2 tsp. chopped green onion
2 egg yolks, beaten
24 wings (4lbs.)
Salt & pepper (optional)
2 tbsp. vegetable oil
1/4 cup olive oil
1 cup milk
1 egg, slightly beaten
3 tbsp. our
4 c. mashed potatoes
1 egg, beaten
Sifted dried bread crumbs
2 tbsp. peanut oil
1/4 cup butter
2 to 5 tsp. hot sauce
1 tsp. white vinegar

14 Questions? We’re here to help!
Visit: shopelitegourmet.com for support on this product.
HOMEMADE BLACK PEPPER POTATO CHIPS
1. Preheat air fryer to 395°F.
2. Wash and clean the potatoes in cold running water. Using a mandoline, or vegetable
peeler, nely slice the potatoes into chips. Drop the chips into a bowl of ice water as you
work to prevent them from going brown. This will also remove any excess starch. Soak in
water for 30 minutes and change the water at least 4 times.
3. Toss the chips in the canola or vegetable oil.
4. Place chips into air fryer and program to cook at 395°F for 23 minutes. Stir the potatoes.
Then cook for another 23 minutes.
5. When nished cooking, immediately sprinkle on salt and a lot of black pepper. Repeat
with the rest of the potatoes. Serve very soon after frying.
FRIED GREEN TOMATOES
1. Cut tomatoes into almost 1/2 inch thick slices.
2. Mix our, salt, pepper and seasoning salt in one bowl.
3. Preheat air fryer to 395°F for 3 minutes.
4. Mix eggs, oil and milk in another bowl. Dip each tomato slice into the milk mixture, then
into the our, back to the milk and then to the our again, coating well.
5. Place tomato slices into air fryer and program to cook at 395°F for 19-22 minutes. Repeat
process until all tomatoes are fried.
APPETIZERS
6 Yukon gold potatoes, unpeeled
2 tbsp. canola or vegetable oil
Kosher salt and black pepper
3 to 4 large green tomatoes
2 cup our
1 tbsp. salt
1 tbsp. pepper
1 tbsp. seasoning salt
2 eggs
2 cup milk
1/4 cup olive oil

15 Questions? We’re here to help!
Visit: shopelitegourmet.com for support on this product.
CORN DOGS
1. Combine the cornmeal, our, sugar, mustard, baking powder and salt, mixing well. Add
the milk, egg, oil and shortening, mixing until very smooth.
Preheat air fryer to 395°F for 3 minutes.
Pour the mixture into a tall glass. Put the frankfurters on sticks.
Dip them into the cornmeal batter to coat them evenly.
2. Place into air fryer and program to cook at 395°F for 15-21 minutes or until evenly
cooked. Repeat process until all hot dogs are cooked.
MAPLE SALMON
1. In a small bowl, mix the maple syrup, soy sauce, garlic, garlic salt, and pepper.
2. Place salmon in a shallow glass baking dish, and coat with the maple syrup mixture.
Cover the dish, and marinate salmon in the refrigerator 30 minutes, turning once.
3. Preheat air fryer to 395°F. Place salmon onto frying rack. Program to cook at 395°F for
14-18 minutes or until easily aked with a fork.
4. Serve on bed of greens.
BEER BATTERED FISH FILETS
1. In a large bowl, mix together our, salt, baking powder, and dill. Add beer, milk, oil, and
eggs; mix well.
2. Place sh llets in batter mixture, coat well, and let stand for 15 minutes.
3. Preheat air fryer to 395°F for 3 minutes. Place sh into air fryer and program to cook at
395°F for 15-21 minutes. Repeat process until all sh is cooked.
4. For sauce, puree everything up in a food processor and sprinkle with paprika (optional).
MAIN COURSES
1/2 c. yellow cornmeal
1/2 c. our
1/4 tsp. dry mustard
1/2 tsp. salt
1 egg, lightly beaten
6-8 hot dogs / frankfurter
1/4 cup maple syrup
2 tbsp. soy sauce
1 clove minced garlic
1 cup our
1 tsp. salt
1 tsp. baking powder
1/2 tsp. dried dill weed
3/4 cup beer
6 skewers or sticks
1 tbsp. sugar
1 tsp. baking powder
1/2 c. milk
1 tbsp. melted shortening
2 tbsp. vegetable oil
1/4 tsp. garlic salt
1/8 tsp. ground black pepper
1 pound salmon
1/2 cup milk
2 eggs
2 pounds cod llets
2 tbsp. vegetable oil
SAUCE
1 cup Pea Shoots
1 cup baby lettuce leaves
1/3 cup lowfat mayonnaise
1/3 cup lowfat plain yogurt

16 Questions? We’re here to help!
Visit: shopelitegourmet.com for support on this product.
MAIN COURSES
FISH STICKS WITH YOGURT DIP
1. Preheat air fryer to 395°F. Rinse salmon llet and pat dry with paper towels. Slice sh so
all the pieces are equally about 1/2 by 1/2 by 4 1/2-inches in size.
2. Place our, salt, and pepper in a medium bowl. Place egg whites in another bowl and
beat until frothy, about 30 seconds. Combine grated parmesan and bread crumbs in a
third bowl.
3. Coat salmon pieces in the our and pat to remove any excess our. Dip oured sh sticks
in egg whites and then into the parmesan mixture.
4. Place the breaded sh sticks into air fryer and lightly drizzle with olive oil. Program to
cook at 395°F for 16-21 minutes or until golden brown. Repeat process until all sh sticks
are cooked.
5. For dipping sauce: mix mayo, yogurt, dijon, and parsley (or chives) in a small dipping
bowl.
CHICKEN TENDERS WITH HONEY MUSTARD SAUCE
1. Preheat air fryer to 330°F. Cut the chicken breasts into long strips and set aside.
2. Beat the 3 eggs in a separate bowl and place the our into another separate dish. Pour
the panko into a pie plate or shallow bowl and season with garlic powder, lemon pepper,
cayenne, salt and pepper.
3. Dip the chicken strips into the our, then beaten egg and the dredge them into the
seasoned panko. Place chicken tenders into air fryer and program at 330°F for 15-20
minutes. Mid-way through cooking, toss/stir the chicken tenders. Repeat process until all
chicken is cooked. Serve with honey mustard sauce.
4. Honey mustard: mix all the ingredients in a small bowl and season with salt and pepper.
process until all tomatoes are fried.
8 oz. center-cut salmon llet, skinned
1/2 cup our
1/2 tsp. ne sea salt
1/4 tsp. freshly ground black pepper
3 egg whites
1 cup grated parmesan
2 pounds boneless, skinless
chicken breasts
3 eggs
1 cup our
2 cups panko bread crumbs
1 tsp. garlic powder
1 tsp. lemon pepper
1/2 tsp. cayenne
1/2 tsp. salt
1/2 tsp. pepper
1 cup seasoned bread crumbs
olive oil, for drizzling
1/3 cup lowfat mayonnaise
1/3 cup lowfat plain yogurt
1 tbsp. dijon mustard
1 tbsp. chopped fresh parsley or chives
HONEY MUSTARD:
1/2 cup dijon mustard
1/2 cup honey
2 tbsp. mayonnaise
1 tbsp. lemon juice
Salt and pepper

17 Questions? We’re here to help!
Visit: shopelitegourmet.com for support on this product.
MAIN COURSES
SWEET & SOUR CHICKEN
1. Combine marinade ingredients in a small bowl. Add chicken, mix well. Let stand 30 min.
2. Combine batter ingredients in a medium bowl until just mixed. Do not stir to blend.
3. Combine sweet & sour sauce, chicken broth, water and cornstarch in a small bowl, set
aside.
4. Preheat air fryer to 395°F for 3 minutes.
5. Coat each piece of chicken with batter and place into air fryer. Program to cook at 395°F
for 18-30 minutes, checking for doneness. Repeat until all chicken is cooked.
6. Using a fry pan, place oil, heat to medium. Stir-fry green peppers, carrots and water
chestnuts for 2 minutes. Add sweet & sour sauce mixture. Stir in pineapple. Stir-fry until
sauce has thickened. Remove from heat. Stir in chicken and serve immediately. Makes 4
servings.
SKIRT STEAK WITH CILANTRO GARLIC SAUCE
1. For the sauce: mince garlic and mash to a paste with salt. Transfer to a blender and add
remaining sauce ingredients, then blend until smooth.
2. Preheat air fryer to 395°F. Stir together cumin, salt, and pepper in a small bowl. Pat steak
dry, then rub both sides of steaks with cumin mixture.
3. Place into air fryer and program to 395°F for 15-18 minutes (medium rare).
Repeat process for 2nd steak. Serve steak drizzled with sauce.
4 cornish game hens
salt and pepper to taste
1 lemon, quartered
4 sprigs fresh rosemary
3 tbsp. olive oil
SAUCE:
1 medium garlic clove
1/2 tsp. salt
1 cup coarsely chopped fresh cilantro
1/4 cup olive oil
2 tbsp. fresh lemon juice
1/8 tsp. cayenne
24 cloves garlic
1/3 cup white wine
1/3 cup low-sodium chicken broth
4 sprigs fresh rosemary for garnish
STEAK:
1 tsp. ground cumin
1/2 tsp. salt
1/2 tsp. black pepper
Two 16oz skirt steaks

18 Questions? We’re here to help!
Visit: shopelitegourmet.com for support on this product.
CHURROS
1. Preheat air fryer to 355°F for 3 minutes.
2. To make churro dough, heat water, margarine and salt to a rolling boil in sauce-pan; stir
in our. Stir vigorously over low heat until mixture forms a ball, about 1 minute; remove
from heat.
3. Beat eggs all at once; continue beating until smooth and then add to saucepan while
stirring mixture. Spoon mixture into cake decorator’s tube with large star tip (like the
kind use to decorate cakes).
4. Squeeze 6-inch loops of dough into drawer pan. Do not overlap. Program to cook at
355°F for 23-30 minutes. Repeat process until all churros are cooked.
5. Mix sugar and the optional cinnamon; roll churros in sugar mixture.
APRICOT POCKET PIES
1. Preheat air fryer to 345°F. Halve the 4 apricots and remove pits.
2. Place 1/2 tsp. butter, 1 tsp. brown sugar, and a pinch of cinnamon inside each of the 2
halves, then put the halves back together.
3. Roll out a 14 oz (9-inch) store-bought pie crust dough and cut four 6-inch circles. Wrap
each whole apricot in a circle of dough and pinch the edges to enclose fully. Sprinkle the
tops of the pies with the sanding sugar.
4. Place pocket pies pinch side down into air fryer. Program to 345°F for 30 minutes or until
golden
MINI CHEESECAKES
1. Preheat air fryer to 330°F for 3 minutes. Grease 12 mini mufn cups.
2. In a medium bowl, mix together the graham cracker crumbs, sugar, and margarine with
a fork until combined. Measure a rounded tablespoon of the mixture into the bottom of
each mufn cup, pressing rmly.
3. Place mufn cups into air fryer. Program at 330°F for 9 minutes, then remove to cool. Beat
together the cream cheese, sugar, lemon juice, lemon zest and vanilla until uffy. Mix in
the egg. Pour the cream cheese mixture into the mufn cups, lling each until 3/4 full.
4. Program at 330°F for 19-22 minutes. Repeat process until all cheesecakes are cooked.
DESSERTS
1 cup water
1/2 cup margarine or butter
1/4 tsp. salt
4 apricots
4 tsp. butter
8 tsp. brown sugar
FILLING:
1 (8oz) package cream
cheese, softened
1/4 cup white sugar
1 1/2 tsp. lemon juice
1 cup our
3 eggs
1/4 cup sugar
1/4 tsp. ground cinnamon
cinnamon, for sprinkling
14 oz. store bought pie dough
CRUST:
1/3 cup graham cracker
crumbs 1 tbsp. white sugar
1 tbsp. margarine, melted
1/2 tsp. grated lemon zest
1/4 tsp. vanilla extract
1 egg

19 Questions? We’re here to help!
Visit: shopelitegourmet.com for support on this product.
TROUBLESHOOTING GUIDE
PROBLEM POSSIBLE CAUSE SOLUTION
The air fryer does not
work.
The appliance is not
plugged in.
Plug the Power Cord into an electrical
outlet.
You have failed to set the
timer.
Turn the timer knob to set the right time needed
for cooking.
The appliance is
defective.
Contact customer service at
shopelitegourmet.com
Food is not completely
cooked/fried.
There is too much food in
the Drawer Pan.
Use smaller batches of food in the Drawer Pan.
Small batches of food will cook more evenly.
The cooking temperature
is set too low.
Increase the temperature setting. Check
“Cooking Time Chart” found in this manual.
The cooking time is too
short.
Increase the time setting. Check “Cooking Time
Chart” found in this manual.
Food is raw and frozen
solid.
Raw frozen foods should be thawed before
cooking in the air fryer. Exceptions to this are
pre-cooked frozen foods.
Food is unevenly
cooked.
Certain foods need to be
stirred mid-way through
the cooking process.
Foods that overlap inside the Drawer Pan need
to be stirred mid-way through cooking.
Fried snacks are not
crispy.
You used a type of snack
meant to be prepared in a
traditional deep fryer.
Use oven snacks or lightly brush some oil onto
the snacks for a crispier result.
I cannot close the
Drawer Pan properly.
The Drawer Pan is too full. Do not overll the Drawer Pan.
The Drawer Pan is not
properly placed inside.
Make sure there is no obstruction for the Drawer
Pan to close properly.
White smoke is emitting
out of the appliance
during use.
You are preparing food
with a high oil content.
When cooking with oily foods, oil will drain into
the Drawer Pan. When the air fryer heats up, the
pan heats up the oil and produces white smoke.
This does not adversely affect the air fryer or
your cooking process.
The pan has built-up
oil residue from previous
uses.
White smoke is caused by oil leftover in the
Drawer Pan. Make sure to thoroughly clean the
Drawer Pan after every use.
Home-made French
fries are coming out
unevenly cooked.
Your potatoes are not
fresh or are frozen.
Make sure to use fresh and rm potatoes, not
frozen potatoes, for home-made French fries.
Potato strips were not
well rinsed prior to frying.
Thoroughly rinse sliced potato to remove all
starch prior to frying.
Home-made French
fries are not crispy after
air frying.
Crispy results are directly
linked to the amount of
oil used and water
content of the potato.
Potato strips need to be thoroughly dried before
adding oil.
Slice potato strips thinner if you want them
crispier.
Use a bit more oil on the potato strips prior to
frying if you want crispier results.

20 Questions? We’re here to help!
Visit: shopelitegourmet.com for support on this product.
LIMITED WARRANTY* ONE (1) YEAR
WARRANTY IS VALID WITH A DATED PROOF OF PURCHASE FROM AN
AUTHORIZED RETAILER
1. Your small kitchen appliance is warranted to the original purchaser to be free from any
manufacturing defects under normal use and conditions for one (1) year, cord excluded.
This Warranty applies only to the original purchaser of this product.
2. Retail stores/merchants selling this product do not have the right to alter, modify, or in any
way revise the terms and conditions of the warranty.
3. If you use your appliance for household use and according to instructions, it should give
you years of satisfactory service.
4. At its sole discretion, Maxi-Matic USA will either repair or replace the product found to be
defective during the warranty period.
5. The repaired or replacement product will be in warranty for the remaining balance of the
one-year warranty period and an additional one-month period.
6. Consumer’s remorse is not an acceptable reason to return a product to our Service Center.
7. This limited warranty covers appliances purchased and used within the 50 U.S. states plus
the District of Columbia and does NOT cover normal wear of parts or:
- Damages caused by unreasonable use, neglect, normal wear and tear, commercial
use, improper assembly or installation of product.
- Damages caused in shipping.
- Damages caused by replacement or resetting of house fuses or circuit breakers.
- Defects other than manufacturing defects.
- Breakage caused by misuse, abuse, accident, alteration, lack of proper care
and maintenance, or incorrect current or voltage.
- Lost or missing parts of the product. Parts will need to be purchased separately.
- Damages of parts that are not electrical; i.e. cracked or broken plastic/glass,
scratched/dented inner pots.
- Damage from service or repair by unauthorized personnel.
- Extended warranties purchased via a separate company or reseller.
- Acts of nature such as re, oods, hurricanes, tornadoes, etc.
8. This warranty does not apply to re-manufactured merchandise.
Maxi-Matic, USA shall not be liable for any incidental or consequential damages caused by the
breach of any express or implied warranty. Apart from the extent prohibited by applicable law,
any implied warranty of merchantability or tness for a particular purpose is limited in time to
the duration of the warranty.
*One Year Limited Warranty valid only in the 50 U.S. states plus the District of Columbia,
excluding Puerto Rico and the Virgin Islands.
This warranty is effective only if the product is purchased and operated in the USA; product us-
age which is in violation of the written instructions provided with the unit will void this warranty.
For international warranty, please contact the local distributor.
This warranty gives you special legal rights and you may also have other rights to which you are
entitled which may vary by state, province, and/or jurisdiction.
**Any instruction or policy included in this manual may be subject to change at any time.
MAXI-MATIC, USA
18401 E. Arenth Ave. City of Industry, CA 91748
Visit: shopelitegourmet.com for Live Chat Support and Contact Us Form

21 Questions? We’re here to help!
Visit: shopelitegourmet.com for support on this product.
RETURN INSTRUCTIONS
RETURNS:
A. Any return of defective merchandise to the manufacturer must be
processed accordingly by rst contacting customer service to obtain an
RA # (Return Authorization Number). We will not accept any returns of
merchandise without an applicable RA #.
B. IMPORTANT RETURN INSTRUCTIONS. Your Warranty depends on your
following these instructions if you are returning the unit to Maxi-Matic,
USA:
1. Carefully pack the item in its original carton or other suitable
box with sufcient cushioning to avoid damage in shipping.
2. Before packing your unit for return, be sure to enclose:
a) Your name, full address with zip code, daytime tele
phone number, and RA#,
b) A dated sales receipt or PROOF OF PURCHASE,
c) The model number of the unit and the problem you
are having (Enclose in an envelope and tape directly to
the unit before the box is sealed,) and
d) Any parts or accessories related to the problem.
3. Maxi-Matic, USA recommends that you ship the package via UPS
ground service for tracking purposes. We cannot assume
responsibility for lost or damaged products returned to us
during incoming shipment. For your protection, always carefully
package the product for shipment and insure it with the carrier.
C.O.D shipments cannot be accepted.
4. All return shipping charges must be prepaid by you.
5. Once your return has been received by our warehouse, Maxi-Matic,
USA will repair or replace the product if it is defective in material or
workmanship, subject to the conditions in paragraph B.
6. Maxi-Matic will pay the shipping charges to ship the repaired or
replacement product back to you.

MODEL: EAF5317D
Elite Customer Service Center
Elite is a registered trademark of Maxi-Matic, USA.
Copyright Elite by Maxi-Matic.
Actual product may vary from the images/illustrations in this manual due to continual product improvement.
Mail:
Website:
Maxi-Matic, USA
18401 E. Arenth Ave
City of Industry, CA
91748-1227
shopelitegourmet.com
Visit our website for Live Chat Support
& Contact Us Form
Register your product online
elitebymaximatic @elite_by_maximatic
To better serve our customers, we’ve included this QR code to scan with
your mobile device and easily download helpful product tools. The link
will direct you to the item page on the Elite Gourmet website so you can
download the Instruction Manual, view product videos, tasty recipes,
and other great Elite Gourmet products.
It’s simple, just access your camera, point at the QR code & your mobile
device will do the rest.