
EC685 EC695 EC785
COFFEE MAKER
2
3
A1
A2
A3
A5
A6
A4
C1
C5
C6
A11
C7
A15
A13
A14
A12
C3
C2
C4
C10
A7
A8
A9
A10
B2
B1
B4 B6
B3 B5 B7
C8
C9
De’Longhi Appliances s.r.l.
Via L. Seitz, 47 31100 Treviso - ITALY
Tel. +39 0422 4131
5413218631/04.15
Decalcificante per macchine da
caffè
Descaler for coffee machines
Détartrant pour machines à café
Entkalker für Kaffeemaschinen
4
1
4 5 6
7 8 9
12
10 11
2 3
2
1
12
5
13
17 18
2120
15
16
5°C
max 1/3
14
19
HOT MILK
22 24
23
6
Before using the appliance, always read the safety warnings.
1. DESCRIPTION
1.1 Description of appliance - A
A1. Water tank lid
A2. Water tank extraction handle
A3. Water tank
A4. Cup warmer
A5. Coee spouts
A6. Main switch (ON/OFF)
A7. Cup grille
A8. Water level indicator in drip tray
A9. Drip tray
A10. Mug or glass tray (Only in certain models)
A11. Steam dial
A12. Hot water/steam dispenser
A13. Hot water/steam nozzle
A14. Frother dial
A15. Hot water/steam wand
1.2 Description of control panel - B
B1. 1 cup button
B2. “ON” light (white) in the button
B3. 2 cup button
B4. “ON” light (white) in the button
B5. Steam button
B6. “ON” light (white) in the button
B7. “Descale light” (orange)
1.3 Description of accessories - C
C1. Filter holder
C2. 1-cup lter ( symbol under lter
C3. 2-cup lter ( symbol under lter)
C4. Pod lter ( symbol under lter) (Only in certain
models)
C5. Scoop/Tamper (Only in certain models)
C6. Tamper (Only in certain models)
C7. Water softener lter (not included, available for purchase
at authorised service centres)
C8. Water hardness test
C9. Descaler (Only in certain models)
C10. Milk jug (Only in certain models)
Please note: to identify your model, see the nameplate
located on the bottom of the appliance.
1.4 Optional cleaning accessories recommended
by the manufacturer
For more information, visit www.delonghi.com.
Water softener lter
EAN: 8004399327252
2. PREPARING THE APPLIANCE
Wash all accessories with warm water and washing-up liquid,
then proceed as follows:
1. Extract the water tank (A3) (g. 1) and ll it with fresh
clean water, taking care not to exceed the MAX level (g. 2).
2. Reinsert the tank, pressing lightly to open the valves locat-
ed on the bottom of the tank itself.
Important: Never operate the appliance without water in the tank or without the
tank.
Please note: You should customise water hardness as soon as possible following the
instructions in section “9. Settings menu”.
3. SETTING UP THE APPLIANCE
When used for the rst time, the internal circuits of the appli-
ance must be rinsed as follows:
1. Plug into the mains socket. Press the main switch (A6) (g.
3).
2. The appliance runs a self-diagnosis cycle, indicated by the
sequential ashing of the three keys
3. The lights and ash, indicating that the ap-
pliance is heating up: when the lights are steadily lit, the
appliance is ready to perform a rinse cycle.
4. Attach the lter holder to the appliance; align the lter
holder handle with “INSERT”, then rotate to the right until
the handle is aligned with “CLOSE”
(g. 9).
5. Place a container with a capacity of at least 0.5 litres under
the coee spout (A5) and the hot water/steam dispenser
(g. 4).
6. Press the button . Repeat this procedure 5 times.
7. Turn the steam dial (A11) to position (g. 5) and
dispense hot water: the appliance automatically stops dis-
pensing and the lights and ash. Turn the
knob back to position ○. The purpose of this procedure is
to purge any water from the circuit before using steam to
prepare a beverage.
The appliance is ready for use.
Please note: It is normal for there to be water in
the space under the tank. This should therefore be dried regularly
with a clean sponge.
4. MAKING COFFEE
1. Place the ground coee lter (C2) or (C3) in the lter holder
(C1) (g. 6).
2. Fill the lter with ground coee (g. 7). Make sure to use
nely ground coee specically for espresso.
3. Distribute the ground coee evenly and press down gently
with the tamper (C5) or (C6) (g. 8). Make sure the coee is
at the right level after tamping. You may need to add more
coee.
7
4. Remove any excess coee from the rim of the lter holder
and attach it to the appliance (g. 9).
5. Place the cup or cups under the lter holder spouts
6. Make sure the lights corresponding to the coee buttons
are on, then press the coee button (B1) or
(B3).
7. The appliance proceeds to make the coee and delivery
stops automatically.
8. To remove the lter holder, turn the handle from right to
left.
Please note:
• For correct operation, before lling with ground coee,
check that the lter has no coee powder residue from the
previous brew.
• While the appliance is making coee, delivery can be in-
terrupted at any moment by pressing the coee button
pressed previously.
• At the end of delivery (within 3 seconds), to increase the
amount of coee in the cup, press and hold the coee but-
ton pressed previously. Delivery stops automatically after
a few seconds.
• To avoid splashes, never remove the lter holder while the
appliance is delivering coee. Always wait for a few sec-
onds after delivery.
4.1 Pressing the coee:
Correct pressing of the ground coee is essential to obtain a
good espresso.
• If you press too rmly, the coee will be delivered slowly
and will be strong.
• If you press too lightly, the coee will be delivered quickly
and will be weak.
4.2 Tips for a hotter coee
• Before making the coee, warm the cups by rinsing them
with a little hot water.
• Attach the lter holder (C1) with the lter (C2) or (C3) to the
appliance, but without adding coee. Using the same
cup as will later be used to make the coee, press the 1 cup
button and deliver hot water into the cup to heat it.
• Increase the coee temperature in the settings menu (see
“9. Settings menu”).
• Stand the cups you will be using on the cup warmer (A4)
which becomes hot during operation.
5. HOW TO MAKE ESPRESSO COFFEE USING PODS
1. Insert the coee pod lter (C4) in the lter holder (C1).
2. Insert the pod, centring it as much as possible on the lter
(g. 11). Always follow the instructions on the pod pack to
position the pod on the lter correctly.
3. Attach the lter holder to the appliance
(g. 9).
4. Place the cup under the lter holder spouts.
5. Make sure the lights corresponding to the coee buttons
are on, then press the coee button (B1).
6. The appliance proceeds to make the coee and delivery
stops automatically.
7. To remove the lter holder, turn the handle from right to
left.
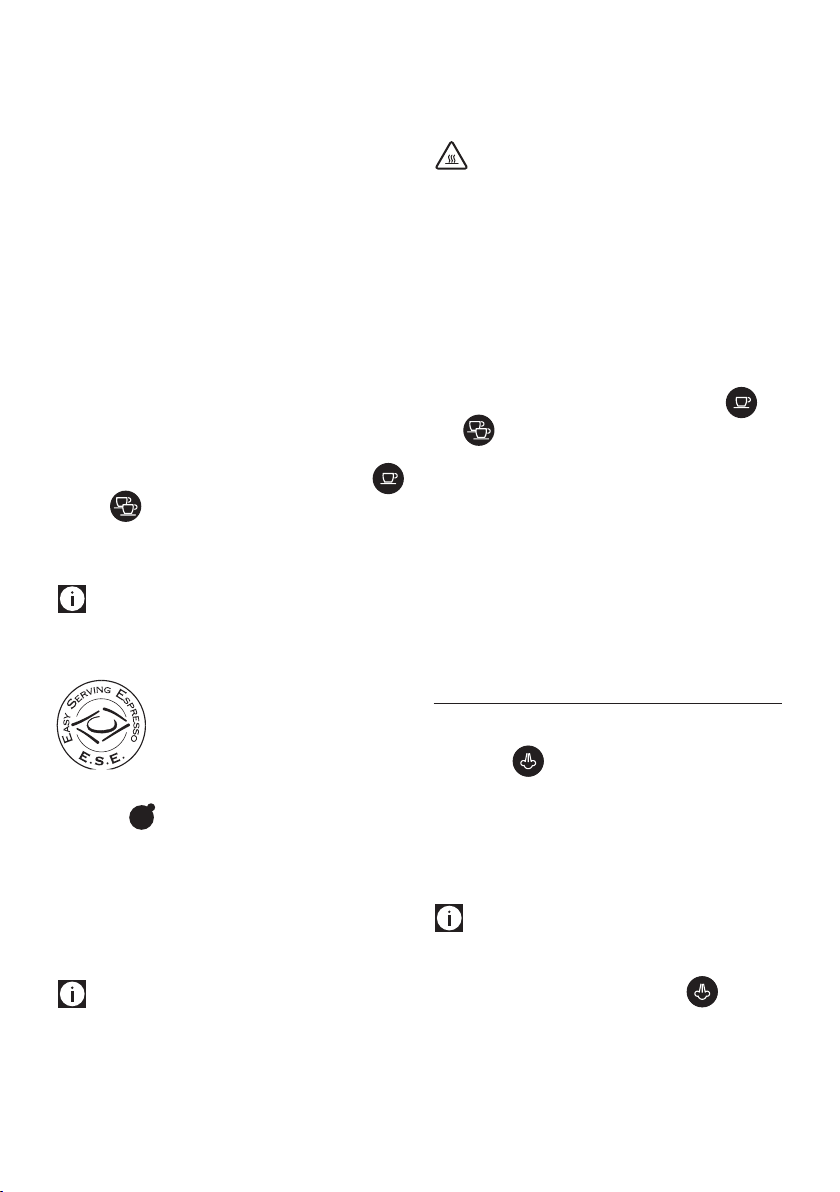
5.1 Choosing the pod
use pods conforming to the ESE standard, indicated on the pack
by the symbol.
The ESE standard is a system accepted by leading pod producers
and enables espresso coee to be prepared simply and cleanly.
Please note:
• When using pods, you can only make one coee at
a time.
• While the appliance is making coee, delivery can be in-
terrupted at any moment by pressing the coee button
pressed previously.
• At the end of delivery (within 3 seconds), to increase the
amount of coee in the cup, press and hold the coee but-
ton pressed previously. Delivery stops automatically after
a few seconds.
• To avoid splashes, never remove the lter holder while the
appliance is delivering coee. Always wait for a few sec-
onds after delivery.
• See section “4.2 Tips for a hotter coee”.
6. PROGRAMMING THE QUANTITIES OF COFFEE
IN THE CUP
The appliance is set by default to automatically deliver standard
quantities. To change these quantities, proceed as follows:
1. Place one or two cups under the lter holder spouts (C1).
2. Press and hold the button you want to programme
( or ) .
3. The coee maker starts delivering coee and the other
coee button ashes to indicate that the appliance is in
programming mode.
4. Once the required quantity of coee has been delivered
into the cup, release the button. Delivery stops and the
light ashes to indicate that the quantity has been saved
correctly.
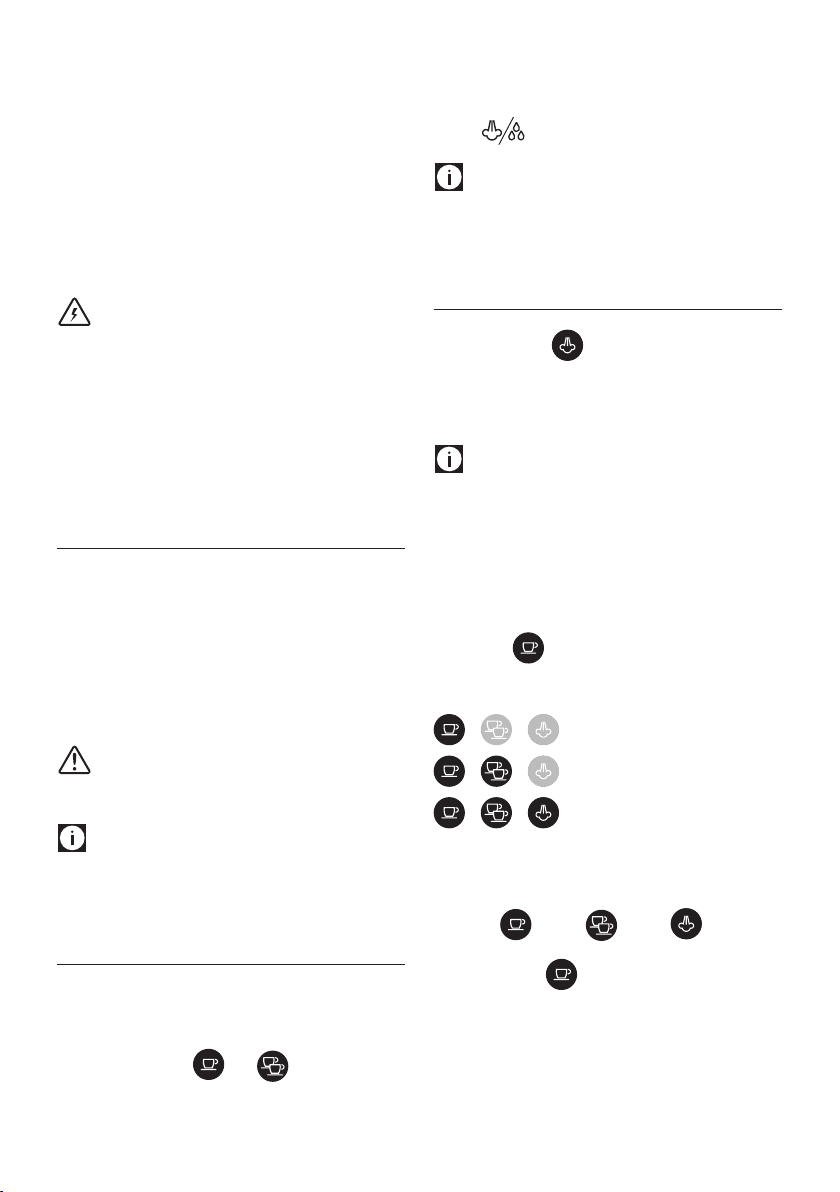
Default
quantity
Programmable quantity
35 ml
from ≃15 to ≃90 ml
70 ml
from ≃30 to ≃180 ml

8
7. HOW TO MAKE CAPPUCCINO COFFEE
1. Prepare the espresso coee as described above, using suf-
ciently large cups. To use tall glasses, remove the drip tray
and stand the glasses on the mug and glass tray (A10);
2. Press (g. 12): the light ashes;
3. In the meantime, ll a container with about 100 grams of
milk for each cappuccino that will be prepared. For dense
and consistent froth, skim or semi-skimmed refrigerated
milk (about 5° C) should be used. When choosing the size of
the container, consider that the milk will increase in volume
two- or three-fold (g. 13).
4. Check that the frother dial (A14) is set to “CAPPUCCINO”
(g. 14);
5. Wait for the key to light up steadily, indicating that
the boiler has reached the ideal temperature to produce
steam.
6. Place an empty container under the frother and open the
dial for a few seconds to purge any water in the circuit.
Close the dial again.
7. Place the container with the milk under the frother.
8. Immerse the frother in the milk container, taking care never
to immerse the black-coloured ring (g. 15). Turn the dial
to position . The frother dispenses steam that gives
the milk a creamy appearance and increases its volume (g.
16) . For creamier steam, immerse the frother into the milk
and move the container slowly in circular motions, from the
bottom up.
9. When the temperature (ideally 60°C) and desired cream
density have been reached, stop the steam supply by turn-
ing the steam dial to position ○.
10. Pour the frothed milk into the cups containing the espresso
coee prepared previously. The cappuccino is ready: add
sugar to taste and, if desired, sprinkle some cocoa powder
over the froth.
Please note:
• to prepare more than one cappuccino, make all the coees
rst, then prepare the frothed milk for all the cappuccinos
at the end;
• To exit the steam function, press any of the keys. The
and lights ash to indicate that the steam dial must
be closed again (○ symbol). If the and
lights ash simultaneously to indicate that the tempera-
ture is too high to dispense coee, see section ‘7.3 Cooling
cycle’.
You should not deliver steam for more than
60 seconds.
7.1 Preparing hot milk
To prepare hot, unfrothed milk, follow the instructions above,
making sure the frother dial (A14) is positioned upwards, set to
“HOT MILK”.
7.2 Cleaning the frother after each use
Important:
For hygiene reasons, the frother should be cleaned after each
use.
Proceed as follows:
1. Release any trapped steam for a few seconds (points 2, 5
and 6 above), rotating the steam dial. This procedure will
drain any milk trapped inside the frother. Turn o the appli-
ance from the ON/OFF button.
2. Wait a few minutes for the frother to cool: with one hand,
hold the frother wand still and with the other, release the
frother itself by twisting it counter-clockwise, then pull it
downards (g. 17).
3. Remove the rubber steam nozzle from the wand, pulling it
downwards (g. 18).
4. Push the ring upwards and check that the holes indicated
by the arrow in g. 19 are not blocked. If necessary, clean
with the help of a pin;
5. Re-t the nozzle, moving the ring downwards, then rein-
sert the frother on the nozzle, turning and pushing it up-
wards until it clicks in.
7.3 Cooling cycle
If after using the steam function, the two and
lights ash simultaneously, indicating that the boiler needs to
cool down to reach the correct espresso temperature, proceed
as follows:
• place a container under the cappuccino maker;
• open the steam dial to dispense steam and hot water: the
light ashes;
• when the lights ( and ) ash, the boiler has
cooled: close the steam dial (when the boiler has cooled,
dispensing stops). The appliance is now ready for use.
8. HEATING WATER
1. Place a container under the hot water/steam dispenser.
2. Wait for the coee dispensing lights and to
turn on.
3. Turn the steam (A11) dial to . Hot water will come
out of the hot water/steam dispenser.
4. To stop the ow of hot water, turn the dial to ○.
You should not deliver hot water for more
than 60 seconds.
9
9. SETTINGS MENU
1. Access the menu:
Press and hold the
button for 10 seconds
until the three buttons
ash in sequence:
10
seconds
2. Select the setting to be adjusted
Correspond-
ing setting
Press to select the
setting
Press to
change the
setting
Brewing
temperature
This is the temperature
of the water in the ther-
moblock. It is therefore
not the temperature
of the beverage in the
cup or the temperature
of the beverage at the
moment of release from
the outlets of the lter
holder.
Press
to select Low
temperature
Press
to select
Medium
temperature
Press
to select High
temperature
Water
hardness
Press
to select Low
hardness
Press to
select Medi-
um hardness
Press to
select High
hardness
→
Auto-o
Press
to select 9
minutes
(* 5 min)
Press
to select 30
minutes
(* 90 min)
Press
to select 3
hours
3. Exit the menu
After 15 seconds of inactivity, the machine automatically
exits the settings menu.
(*) Only for models EC685 EX4, EC685 EX4, EC785 EX4
Please note:
• The light corresponding to the changed setting ashes
quickly to conrm the change.
• After 15 seconds of inactivity, the machine automatically
exits the settings menu and is ready for use.
10. DEFAULT VALUES (RESET)
This resets the machine to the default values.
Proceed as follows:
1. Position the hot water/steam dispenser on the drip tray
(A9);
2. Access the settings menu.
3. Turn the steam dial (A11) to ;
4. Press the button . The three lights ash simulta-
neously to conrm that the original settings have been
restored.
5. The and lights ash to indicate that the
steam dial must be closed again (○ symbol).
When the steam dial has been closed, the appliance is ready for
use.
11. CLEANING THE MACHINE
The following parts of the machine must be cleaned regularly:
• drip tray (A9)
• coee lters (C2), (C3) and (C4);
• coee spout (A5);
• water tank (A3);
• the hot water/steam dispenser as indicated in chapter “7.2
Cleaning the frother after each use”;
10
Important!
• None of the components or accessories is dishwasher safe.
• Do not use solvents, abrasive detergents or alcohol to clean
the coee machine.
• Do not use metal objects to remove encrustations or coee
deposits as they could scratch metal or plastic surfaces.
• If the appliance is not used for more than a week, before
using it again, we recommend performing a rinse cycle as
described in chapter
“3. Setting up the appliance”.
Danger!
• Never immerse the coee maker in water when cleaning: it
is an electrical appliance.
• Before commencing any cleaning operation on the outside
of the machine, turn it o, unplug it from the mains socket
and wait for it to cool down.
11.1 Cleaning the drip tray
Important!
The drip tray is tted with a level indicator (red) showing the
level of water it contains. Before the indicator starts to pro-
trude from the cup tray (g. 20), the tray must be emptied and
cleaned, otherwise the water may spill over the edge and dam-
age the appliance, the support surface or the surrounding area.
1. Remove the tray (A9) (g. 21).
2. Remove the cup grille (A7), eliminate the water and clean
the tray with a cloth, then reassemble the drip tray. Extract
the mug or glass tray (A10), clean with water, dry and put
back in the machine;
3. Put the drip tray back in place.
11.2 Cleaning the coee lters
The coee lters are designed to achieve the best possible coee
froth. To keep them ecient, they must always be kept clean and
free of any coee residue.
• After each use, rinse the lter under plenty of running
water (g. 23), then press on the perforated lter to check
that it is properly seated.
• Check that the hole on the back of the lter (see g. 24) is
free of any residue.
If the lter is still dirty, or in any case at least once a month, clean
the coee lters as follows:
1. Extract the perforated lter by pulling the tab (g. 22).
2. Rinse the lters under running water (g. 23).
3. Make sure the holes are not blocked. If necessary, clean
with a pin (g. 24).
4. Wipe dry with a cloth.
5. Reinsert the perforated lter in its seat and press it down
all the way.
Pod lter
Rinse with running water. Make sure the holes are not blocked. If
necessary, clean with a pin (g. 23-24).
11.3 Cleaning the coee spouts
After every 200 coees, rinse by delivering about 0.5 litres of
water from the spouts (press the coee button without using
ground coee).
11.4 Other cleaning operations
1. Do not use solvents or abrasive detergents to clean the coee
maker. Use a soft damp cloth only.
2. Clean the lter holder cup.
11.5 Cleaning the water tank
1.
Clean the water tank regularly (about once a month) and
whenever you replace the water softener lter (if present)
with a damp cloth and a little mild washing up liquid;
2. Remove the lter (if present) and rinse with running water;
3. Put the lter (if present) back in the appliance, ll the tank
with fresh water and put back in the machine;
4. Deliver 100ml of water (models with water softener lter
only).
12. DESCALING
When the orange key light ashes, run a descaling cycle.
Important!
• Before using the descaler (C9), read the instructions and the
labelling on the pack.
• Use De’Longhi descaler only. Using unsuitable descaler
and/or performing descaling incorrectly may result in
faults not covered by the manufacturer’s guarantee.
• Descaler can cause damage to delicate surfaces. If the prod-
uct is accidentally spilt, dry immediately.
To descale
Descaler De’Longhi descaler
Container Capacity 1 L
Time ~25min
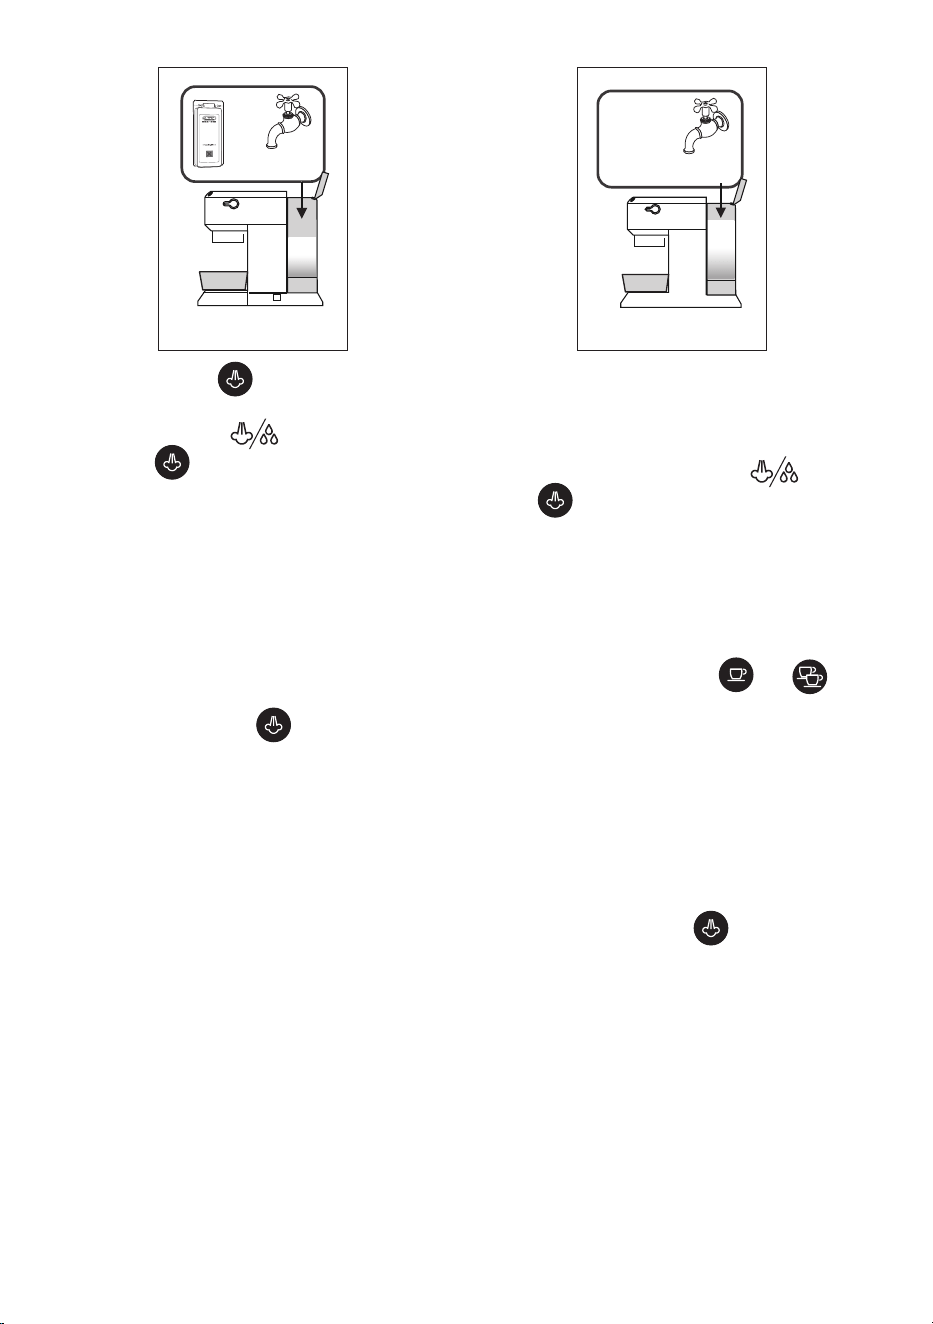
1. Check that the lter holder is not attached and place a con-
tainer under the hot water dispenser and under the boiler
outlet.
2. Pour the descaler solution into the tank, diluting the sup-
plied descaler with water (ll the tank up to the MAX level)
(g. 25)
11
+
up to
MAX level
25
.
3. Press and hold the button for 10 seconds until the
three buttons ash in sequence.
4. Turn the steam dial to .
5. Press the button to start descaling.
6. The descaling programme starts and the descaler solution
comes out from the hot water/steam dispenser. The descaling
programme automatically runs a series of rinse cycles at set in-
tervals, removing any limescale deposits from inside the coee
machine until the tank is emptied.
Please note:
During descaling, close the steam dial from time to time to
deliver small quantities of descaler from the coee spouts to
clean the coee circuit.
Delivery stops and the orange light continues to ash to
indicate the descaling cycle is still underway.
You now need to rinse the appliance.
7. Empty the container used to collect the descaler solution
and reposition it under the spouts.
26
MAX
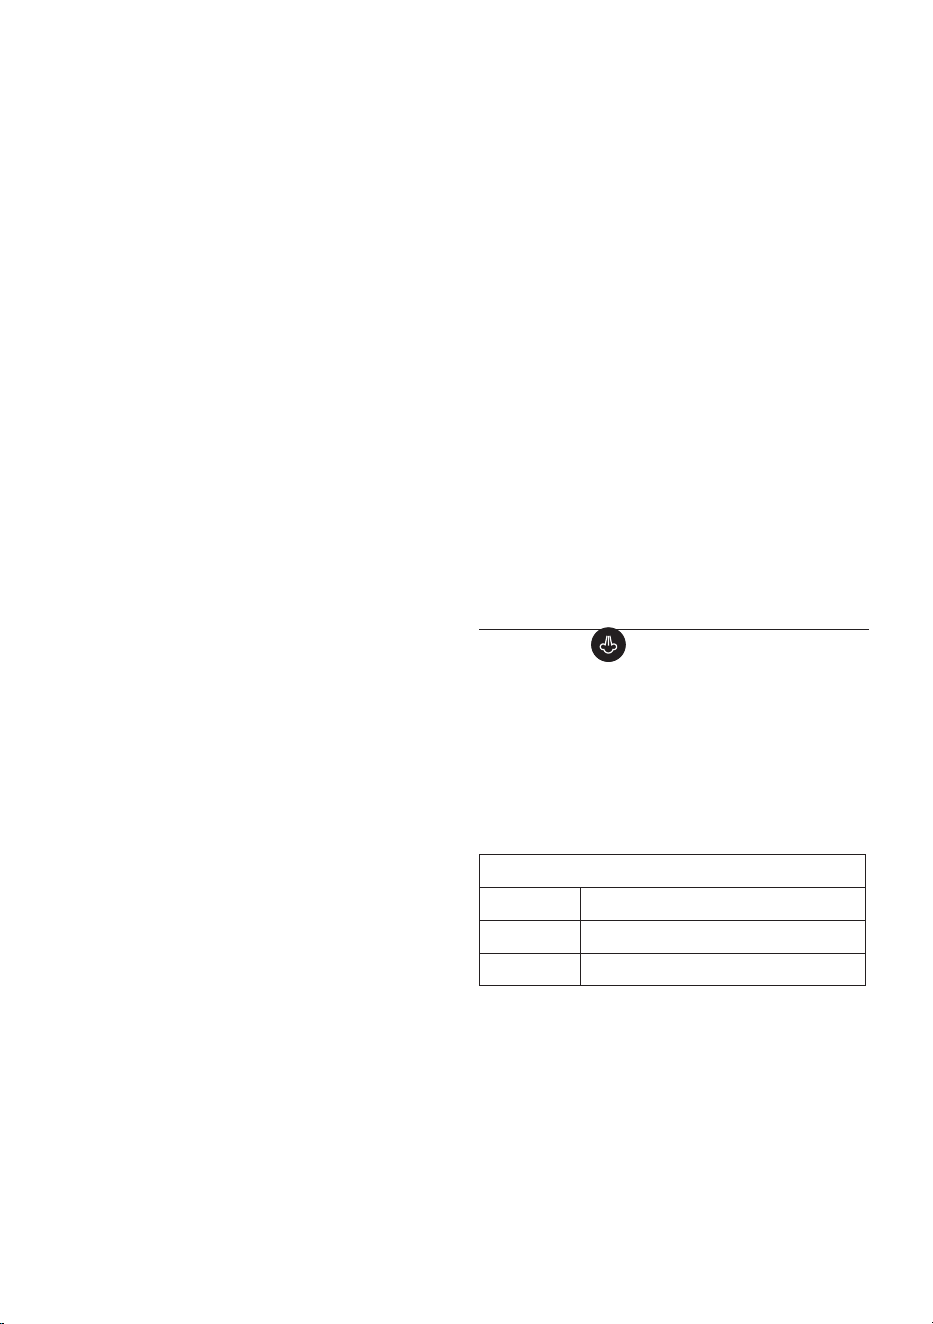
8. The machine is ready for rinsing with fresh, clean water.
Extract the water tank, empty and rinse it under running
water, ll it with fresh water (g. 26) and put it back in the
appliance.
9. Make sure the steam dial is in position , then press
the button to start rinsing. During descaling, close
the steam dial from time to time to deliver small quan-
tities of water from the coee spouts to clean the coee
circuit.
10. Perform a second rinse cycle from points 7 to 9 with the
lter inserted (if present previously).
11. When the water tank is empty, the orange light goes o
and descaling is complete. The and lights
ash.
12. Close the steam dial, setting it to ○.
13. Fill the tank with fresh water.
The machine is now ready for use.
Please note:
• If the descaling cycle is not correctly completed (e.g. elec-
trical power failure), it is recommended to repeat the cycle.
Only for models EC685 EX4, EC685 EX4, EC785 EX4:
If the descaling function is accidentally activated, it can
be stopped by pressing the button for at least 10
seconds.
If the descaling cycle is not completed due to a power fail-
ure, when the power is restored, the appliance will still be
in descaling mode; therefore, wait for the descaling cycle to
end and then the machine will be “ready for use”.
12
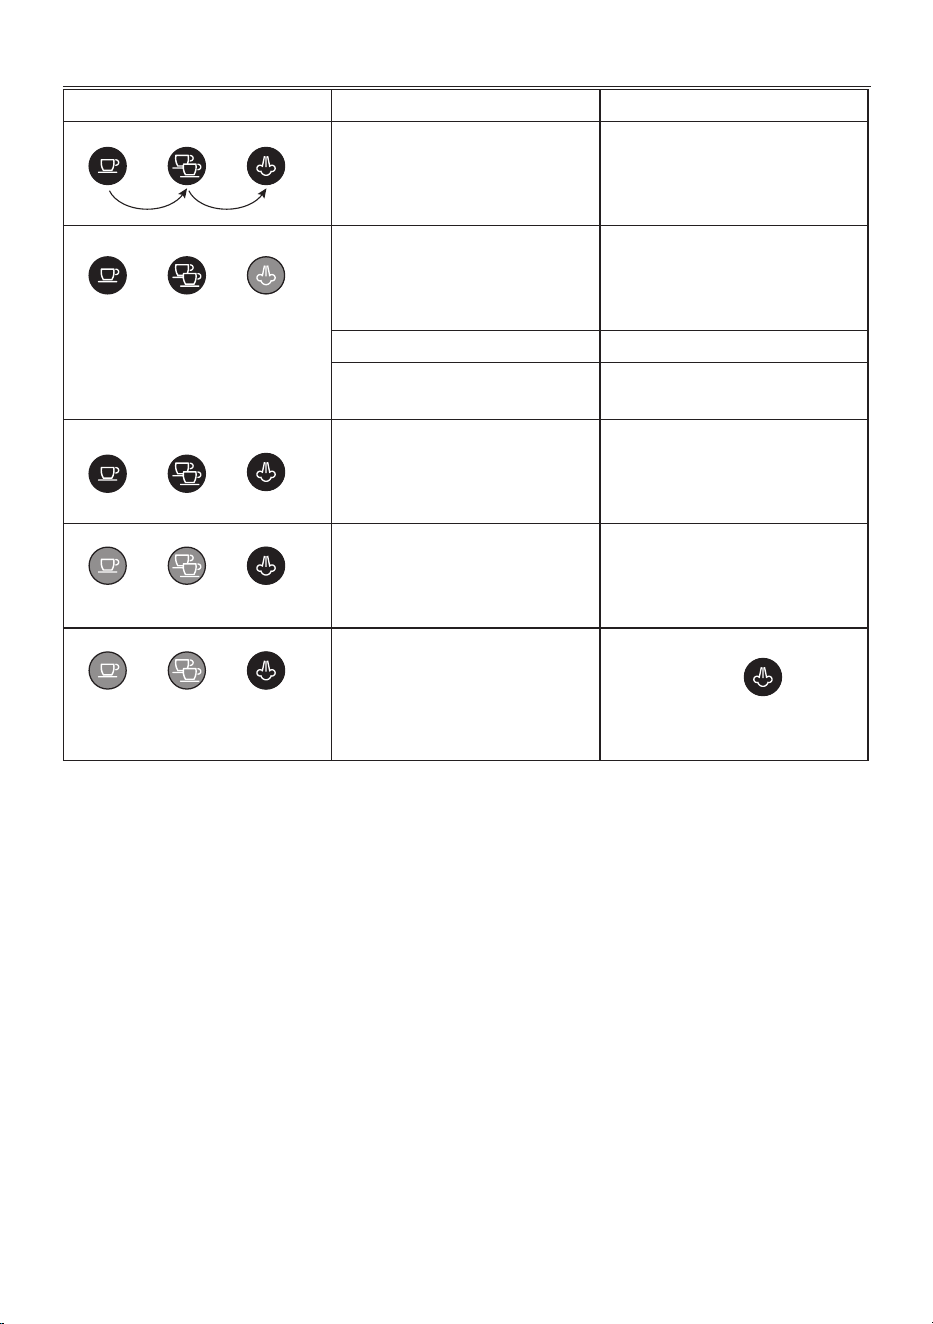
13. EXPLANATION OF INDICATOR LIGHTS
Lights Operation Meaning
The ON/OFF button is turned on The appliance performs a self-diagnosis
cycle, indicated by sequential ashing of
the lights
When the appliance is turned on Flashing lights: the appliance is heating
up to make coee
Lights on steadily:
the appliance is ready to
make coee
Steam dial open Lights ashing: close the steam dial
Cooling cycle required Proceed as described in sect. “7.3 Cooling
cycle”.
The water tank is empty or the machine
does not make coee
The lights ash rapidly. See section “3.
Setting up the appliance”
The steam function is required Flashing light: the appliance is heating
up to deliver steam
Light on steadily: the appliance is ready
to deliver steam
orange
ashing
The appliance needs descaling Descale the appliance, the operation is
complete when the light goes
o.
13
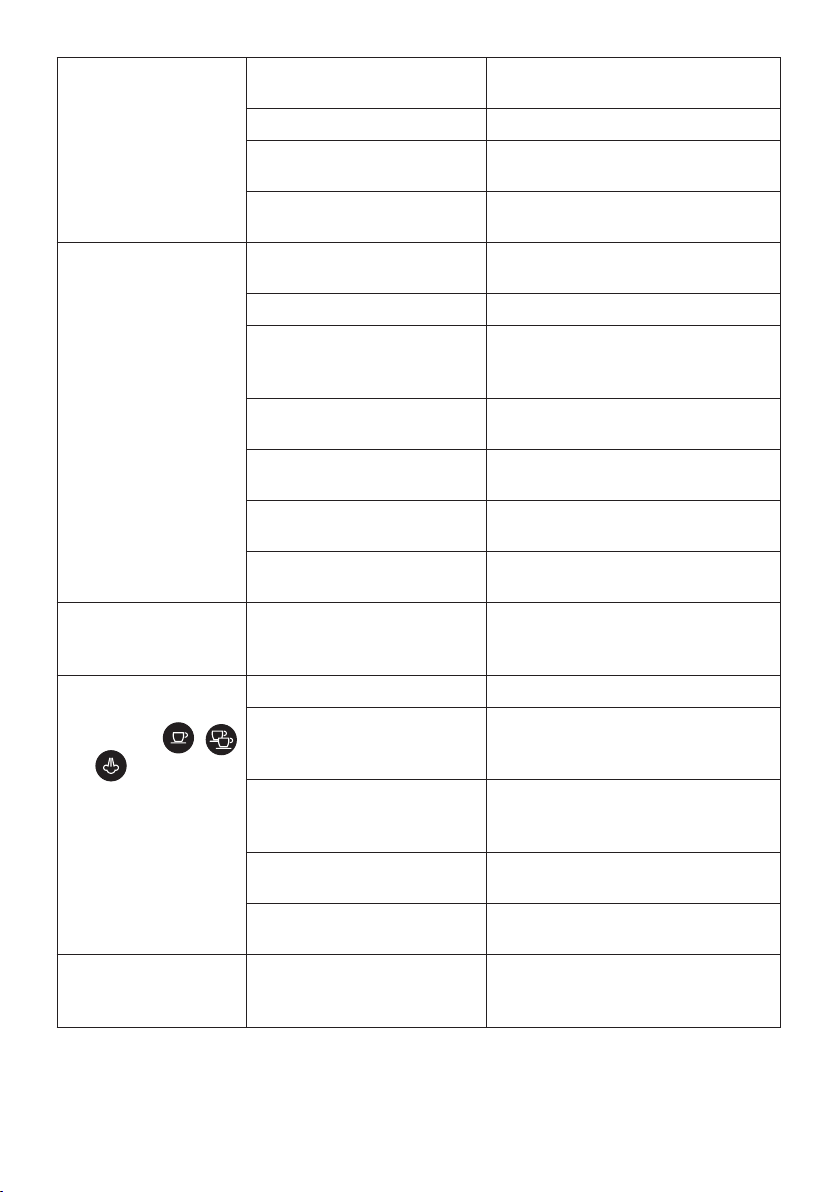
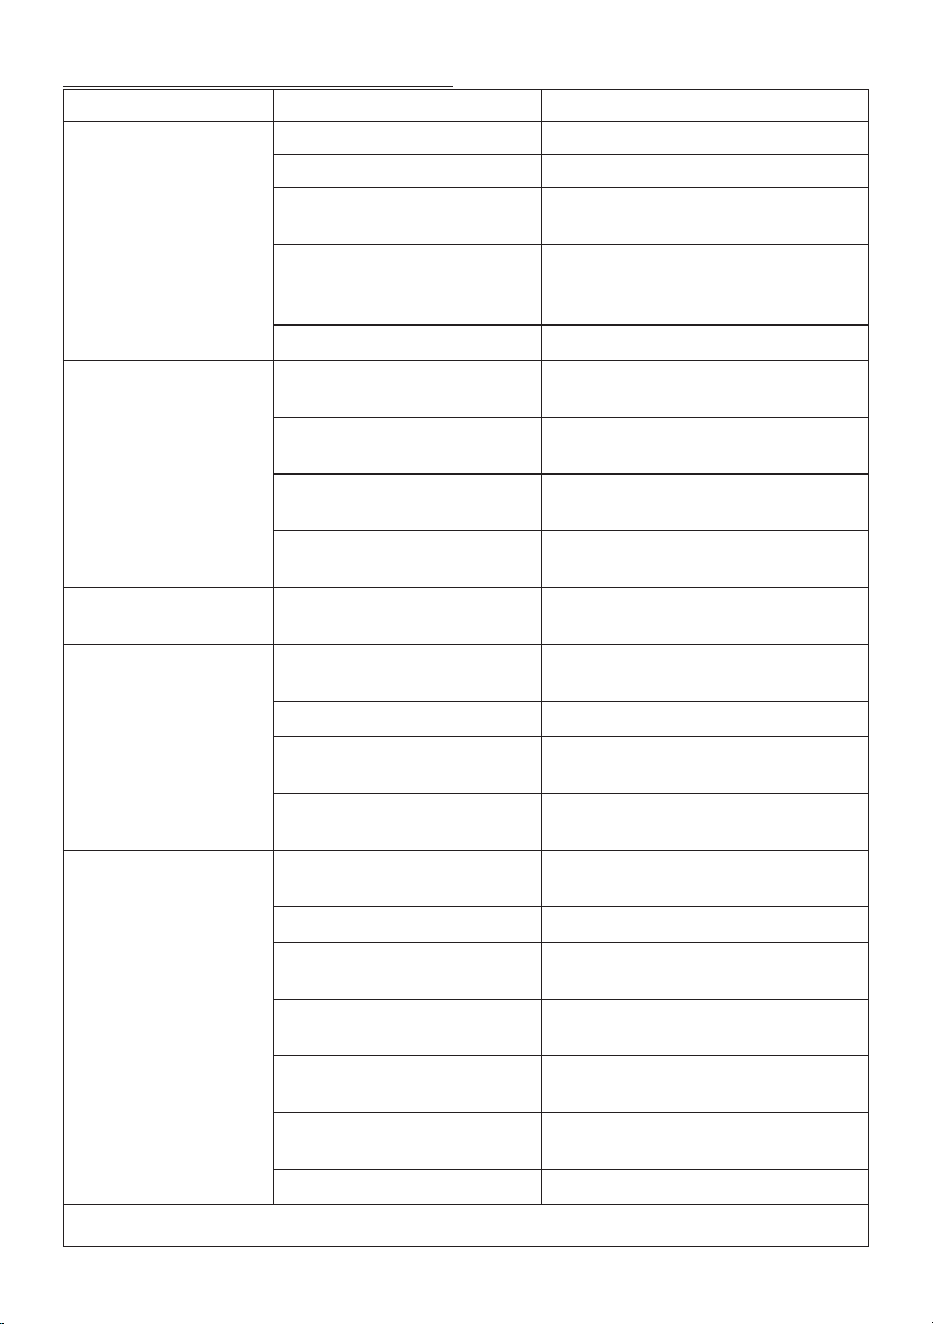
14. TROUBLESHOOTING
Problem Cause Solution
Espresso coee is not delivered
any more
No water in the tank Fill the tank
The holes in the lter holder are blocked Clean the lter holder spout holes
The lter is blocked, or the perforated
lter is missing
Clean as described in section “11.2 Cleaning the
coee lters”
The tank has been inserted incorrectly
and the valves on the bottom are not
open
Press the tank down lightly to open the valves on
the bottom
Limescale in the water circuit Descale as described in section “12. Descaling”
The espresso coee drips from
the edges of the lter holder
rather than the holes
The lter holder has been inserted incor-
rectly or is dirty
Attach the lter holder correctly and rotate rmly
as far as it will go
The espresso boiler gasket has lost elas-
ticity or is dirty
Have the espresso boiler gasket replaced by Cus-
tomer Services
The holes in the lter holder spouts are
blocked
Clean the lter holder spout holes
The lter is blocked, or the perforated
lter is missing
Clean as described in section “11.2 Cleaning the
coee lters”
The lter holder cannot be at-
tached to the appliance
Too much coee has been placed in the
lter
Use the measure supplied and make sure you are
using the correct lter for the type of preparation
The espresso froth is too light
(delivered from the spout too
fast)
The pre-ground coee is not pressed
down rmly enough
Press the pre-ground coee more rmly
There is not enough pre-ground coee Increase the quantity of pre-ground coee
The pre-ground coee is too coarse Use only pre-ground coee for espresso coee
makers
The wrong type of pre-ground coee is
being used
Change the type of pre-ground coee
The espresso froth is too dark
(delivered from the spout too
slowly)
The pre-ground coee is pressed down
too rmly
Press the coee down less rmly
The quantity of ground coee is too high Reduce the quantity of ground coee
The espresso boiler outlet is blocked Clean as described in section “11.3 Cleaning the
coee spouts”
The lter is blocked Clean as described in section “11.2 Cleaning the
coee lters”
The pre-ground coee is too ne Use only pre-ground coee for espresso coee
makers
The ground coee is too ne or damp Use pre-ground coee for espresso coee makers
only and make sure it is not too damp
Limescale in the water circuit Descale as described in section “12. Descaling”
→
14
Problem Cause Solution
After delivering coee, the lter
remains attached to the boiler
outlet
Insert the lter holder again, deliver coee, then
remove the lter holder
The appliance does not make
any beverage and the lights
ash for a few seconds
No water in the tank Fill the tank with water
The tank has been inserted incorrectly
and the valves on the bottom are not
open
Press the tank down lightly to open the valves on
the bottom
The espresso boiler outlet is blocked Clean as described in section “11.3 Cleaning the
coee spouts”
The lter is blocked Clean as described in section “11.2 Cleaning the
coee lters”
Limescale in the water circuit Descale as described in section “12. Descaling”
The appliance does not func-
tion and all the lights ash
Disconnect the appliance immediately and contact
authorised Customer Services.
No milk froth is formed when
making cappuccino
The dial is set to “HOT MILK” Move the dial to “CAPPUCCINO”
Milk not cold enough Always use milk at refrigerator temperature
Cappuccino maker dirty Clean the cappuccino maker as described in section
“7.2 Cleaning the frother after each use”
Limescale in the water circuit Descale as described in section “12. Descaling”

De’Longhi Appliances via Seitz, 47 31100 Treviso Italy delonghi.com
57132C8997_00_0424 web
